

7
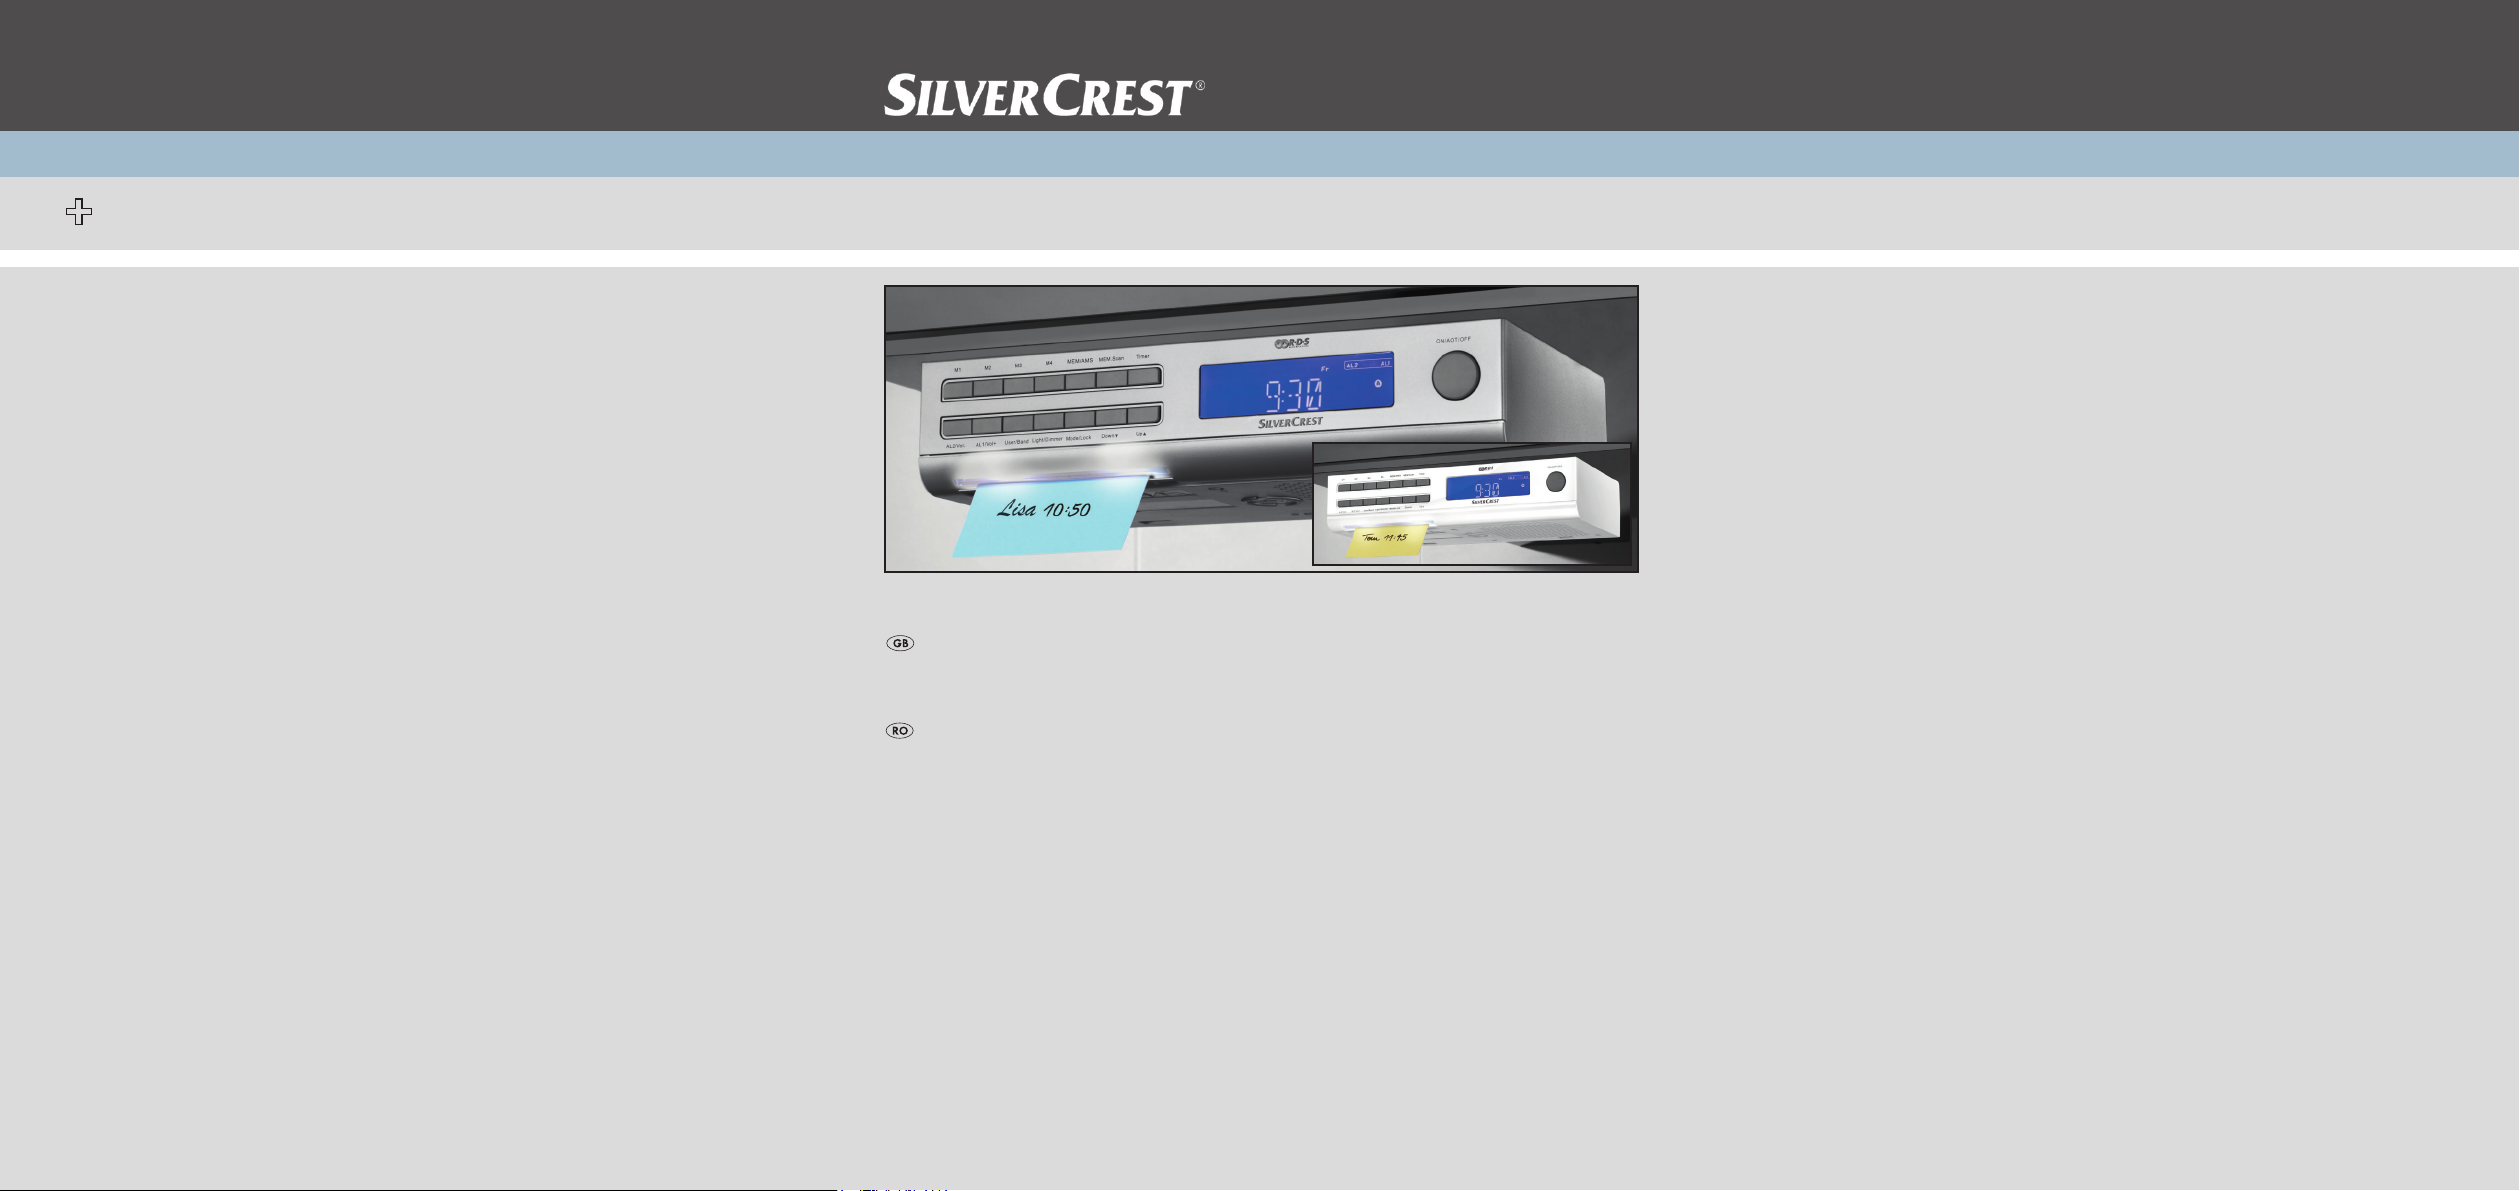
Undercupboard Radio SKRP 1000 A1
Undercupboard Radio
Operating manual
Radio pentru bucătărie
Instructiuni de utilizare
KOMPERNASS GMBH
BURGSTRASSE 21 ⋅ D-44867 BOCHUM
www.kompernass.com
ID-Nr.: SKRP 1000 A1-10/10-V6
SKRP 1000 A1

INDEX PAGE
Intended Use 2
Items supplied 2
Technical data 2
Safety instructions 2
The appliance components 4
Setting up the appliance 4
Fixing the kitchen radio beneath a wall cabinet 5
Setting up the kitchen radio 5
The Settings menu 5
Further setting possibilities 7
Radio operation 8
Cleaning 10
Disposal 11
CE Conformity 11
Importer 11
Warranty and Service 11
Read the operating instructions carefully before using the appliance for the rst time and preserve this booklet for later reference. Pass this booklet on to whoever might acquire the appli-
ance at a future date.
- 1 -
Intended Use
This Kitchen Radio is intended for use either
free-standing or for assembly beneath a wall
cabinet. The intended uses for this Kitchen Ra-
dio are the reception of FM radio transmissions
and as an alarm/timer, using either signal
tones or the radio itself.
This Kitchen Radio is not intended for utilisation
in commercial or industrial applications. The
warranty does not provide compensation
for damage caused by improper use of the
appliance!
Items supplied
1 Kitchen radio SKRP 1000 A1
1 Mounting plate
4 Screws
1 Battery 3 V Type CR2032
1 Operating manual
Technical data
Power supply: 220-240 V~, 50 Hz
Power consumption:
Operation: 5 W
Standby: approx. 1.8 W
Output level: 1 W at 10% THD
Frequency range UKW (FM)
87.5 – 108 MHz
MW (AM)
526,5–1606,5 kHz
Operating temperature: +5 ~ +35°C
Humidity: 5 ~ 90 % (no
condensation)
Dimensions (W x H x D): 27,5 x 15,7 x 6,4 cm
Weight: 1.070 g
Protection class: II /
Backup battery 1 x 3 V Type
CR2032 (supplied)
The technical features of this appliance enable an adjustable reception capability that
exceeds the permitted frequency range of
87,5–108 MHz and 526,5–1606,5 kHz.
In some countries, dierent national regula-
tions may apply to the assigned radio frequency
ranges. Please note that information received
outside of the assigned radio frequency
ranges may not be utilised, passed on to third
parties or otherwise misused.
Safety instructions
• This appliance is not intended for use
by individuals (including children) with
restricted physical, physiological or intellectual abilities or deciencies in experience and/or knowledge unless they are
supervised by a person responsible for
their safety or receive from this person
instruction in how the appliance is to be
used. Children should be supervised to
ensure that they do not play with the appliance.
• Always remove the power plug before
cleaning the appliance.
• Check the appliance and all parts for
visible damages. The safety concept can
work only if the appliance is in a faultless condition.
• The power plug must always be easily
accessible, so that in the event of an
emergency the appliance can
be quickly disconnected from the mains
power supply.
Risk of electrical shocks.
• Connect the appliance only to correctly
installed and earthed mains power sock-
ets. Ensure that the rating of the local
power supply tallies completely with the
details given on the rating plate of the
appliance.
• Arrange for Customer Services to
repair or replace connecting cables
and/or appliances that are not
functioning properly or have been dam-
aged.
• NEVER submerse the appliance in water.
Wipe it only with a slightly damp cloth.
• Do not expose the appliance to rain and
never use it in a humid or wet environment.
- 2 -
• Always take hold of the power cable by
the plug. Do not pull on the cable itself
and never touch the power cable with wet
hands, this could result in either a short circuit or you receiving an electric shock.
• Do not place the appliance, furniture or
anything else on the power cable and en-
sure that it does not become clamped.
• NEVER make a knot in the power cable
and do NOT bind it together with other
cables. The power cable should be positioned so that no one can step on or trip
over it.
• Ensure that the power cable does not
become wet during operation.
• You are not permitted to open the appli-
ance housing or repair the appliance. If
the housing is opened, you run the risk
of receiving a potentially fatal electric
shock and the warranty lapses.
• Protect the appliance against drip and
spray water. Do not place any waterlled vessels (e.g. ower vases) on or
near the appliance.
Riskofre!
• Do not use the appliance near hot surfaces.
• Do not place the appliance in locations
that are subject to direct sunlight. Other-
wise, it may overheat and become irreparably damaged.
• Do not locate the kitchen radio directly
above hotplates. The kitchen radio may
be damaged. There is a danger of re!
• Never leave the appliance unattended
while it is being used.
• Never cover the ventilation slots of the
appliance while it is on.
• Do not place open re sources, such as
candles, on or near the appliance.
Riskofpersonalinjury!
• Keep the power cable and appliance
away from children. Children frequently
underestimate the dangers of electrical
appliances.
• Provide a stable location for the appliance.
• Do not operate the appliance if it has
sustained a fall or is damaged.
• Arrange for the appliance to be checked
and/or repaired by qualied technicians.
• Keep batteries well away from children.
Children can put batteries into their
mouths and swallow them.
• If a battery is swallowed medical assistance must be sought immediately.
Note:
• Some aggressive furniture nishes can
have a destructive inuence on the appliance's rubber pads. If necessary, place
the appliance on a nonslip pad.
Thunderstorms!
• Equipment connected to a power supply
can be damaged during a thunderstorm. You should therefore always
remove the plug from the power socket
when there is a storm.
Notice regarding separation from
mains-power
The ON/AOT/OFF switch does not
completely disconnect the appliance
from the power network. Additionally,
the appliance consumes power when in
standby-mode.
To completely separate the appliance
from mains power, the power plug MUST
be removed from the mains power socket.
Notice regarding electrical power
surges (EFT / electrical fast
transient) and electrostatic
discharges:
In a case of malfunction due to an electrical fast transient (power surge) and/or
electrostatic discharge, the appliance must
be returned to default settings in order to
re-establish normal operation. Possibly
the power supply must be separated
and then reconnected. The batteries (if
- 3 -
present) must be removed and then reinserted.
Information regarding the
handling of batteries
The appliance uses a battery for memory conservation. For the handling of batteries please observe the following:
Riskofexplosion!
• Never subject batteries to excessive heat,
such as direct sunlight, re, etc. Do not
recharge the batteries.
• Never open batteries, never solder or
weld batteries. The risk of explosions
and injuries exists!
• Non-observance of the correct polarities
when inserting the battery may cause
an explosion. The battery may only be
replaced by one of the same or an
equivalent type.
• Regularly check the condition of the bat-
teries. Leaking batteries can cause dam-
age to the appliance.
• If you do not intend to use the appliance
for an extended period, remove the bat-
teries.
• Should the batteries leak, put on a pair
of protective gloves and clean the battery
compartment and terminals with a dry
cloth.
Important!
No liability/warranty will be considered for damage to the Kitchen Radio
caused by the eects of moisture, water
penetration or overheating!
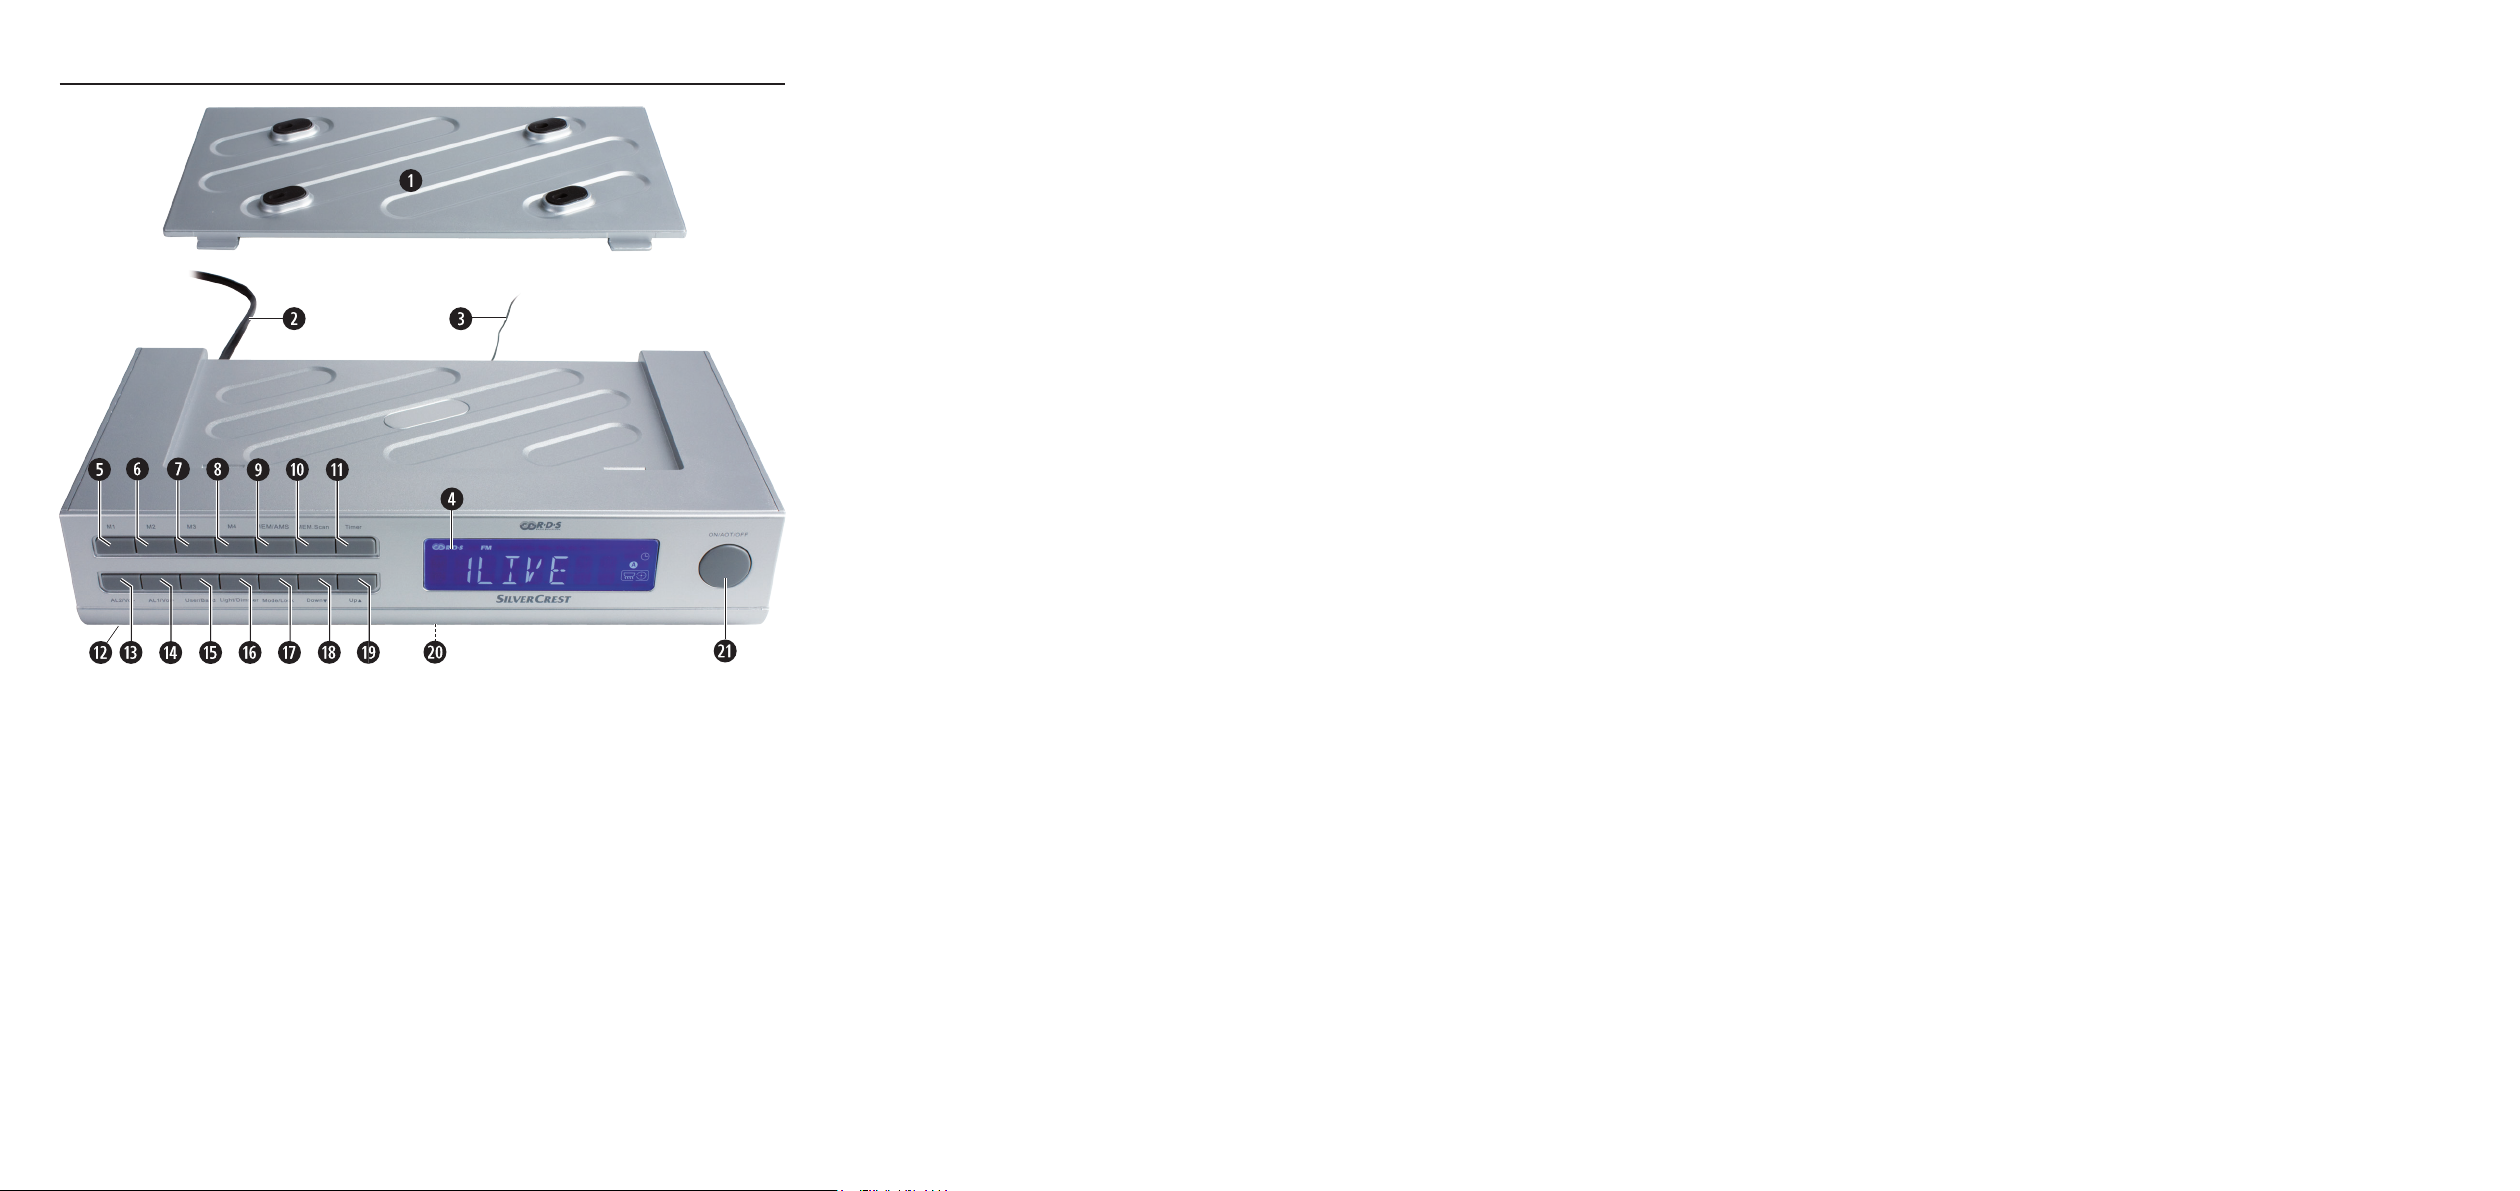
The appliance components
q Mounting plate/Baseplate
w Power cable
e Wire aerial
r Display
t–i M1–M4 - Memory buttons M1–M4
o MEM/AMS - to save and automatically
search for and save radio
stations
a MEM.SCAN - automatic recall of saved
radio stations
s TIMER - controls the timer
programming
d Illuminated clamp strip
f AL2/VOL — - controls the alarm function 2
- Volume reduction
g AL1/VOL + - controls the alarm function 1
- Volume increase
h USER/BAND - User switching,
Radio waveband switching
j LIGHT/ - controls the display and
DIMMER clamp strip illumination
k MODE/ - recalls the settings,
LOCK Button lock
l DOWN - Selection button down
1( UP - Selection button up
2) Battery compartment
2! ON/AOT/ - Switch the radio on/o
OFF controls the switch o timer
Setting up the appliance
First take all appliance components from the
packaging and remove all packing foil and
tape.
Inserting the battery
By inserting the batteries you will avoid the
loss of programmed times and alarm timings
in the event of a possible power outage.
The batteries ensures that the internal clock
continues to run even during a power failure.
When power is restored the correct time appears automatically in the display r.
Note:
The appliance can also be operated
without a battery.
1. Open the cover of the battery compartment 2) on the underside of the appliance
by turning the cover with a coin to the left
and the limit stop and then lifting it.
2. Now place the battery of the type
CR2032 (supplied) in the battery compartment 2). The side with the marking +
should face upwards.
- 4 -

3. Close the battery compartment 2) by
replacing the cover and then turning the
cover with a coin to the right.
Fixing the kitchen radio beneath a
wall cabinet
With the supplied mounting plate q you can
x the kitchen radio below, for example, a
kitchen wall cabinet:
1. Determine a suitable location for the
kitchen radio.
2. Press the two retaining levers on the back
of the appliance down. Push the mounting
plate q back and remove it.
3. Hold the mounting plate q under the in-
stallation location. Thereby, the front edge
of the mounting plate q should be ap-
prox. 3.5 cm behind the front of the kitchen
cabinet.
4. Mark the four points for the drillholes with
a pencil.
5. Using a spike, make a small depression at the marking points. Firmly secure
the mounting plate q with the supplied
screws.
6. Hold the kitchen radio slanted, with the
two recesses in the retaining lugs on the
mounting plate q. Press the kitchen radio
upwards until it audibly engages.
Disassembly
• To disassemble the kitchen radio, press
the two retaining levers at the rear of the
appliance downwards. Then pull the ra-
dio out to the front and remove it.
• Unscrew the screws and remove the assembly plate q.
Setting up the kitchen radio
Do not set the kitchen radio up without the
mounting plate q. Otherwise the speakers are
covered and the sound is scarcely audible.
To t the kitchen radio with the supplied
mounting plate q:
1. Simultaneously press the two retaining
levers on the back of the appliance down.
Push the mounting plate q back and re-
move it.
2. Push the two retainer lugs on the mount-
ing plate q into the recesses on the lower
rear side of the kitchen radio.
3. Press the mounting plate q rmly in the
direction of the appliance rear until it audibly engages.
Disassembly
• Rotate the appliance with the mounting
plate to the top. Hold it in the free space
between the appliance and the mount-
ing plate.
• Lightly pull the mounting plate towards
yourself and upwards in its front area, so
as to free the plate from the front recesses. Remove plate from the appliance.
Providing mains power
• When you have completed installation of
the appliance, insert the plug into a mains
power socket. The display r is illuminat-
ed and the appliance tries to receive an
RDS signal to automatically adjust the
time and date.
• For as long as the appliance waits for
the RDS signal, the display r shows
"Please wait for setting thanks". This
can take several minutes.
The Settings menu
Setting the time
Should this not succeed, you must set the
clock manually. For this, the radio cannot be
switched on (= automatic mode).
1. In automatic mode press the button
MODE/LOCK k once. The time display
blinks.
2.Press the buttons UP/DOWN 1(/l
to set the time in minute intervals. Pressing
and holding the button changes the time
at ten-minute intervals.
- 5 -

3. Press the button MODE/LOCK k once
again to save the time and switch to the
date setting.
If you do not press a button for 15 seconds
when making the settings, the appliance
saves the current setting and returns to auto-
matic mode.
Setting the date
1. In automatic mode press the button
MODE/LOCK k twice. In the display
r appears "01.01.2011", the date display
ashes.
2. Press the buttons UP/DOWN 1(/l
to set the date at day intervals. Pressing
and holding the buttons changes the date
at intervals of 10 days.
3. Press the button MODE/LOCK k once
again to save the date and to switch to
setting the memory function.
If you later press the DOWN button l in
automatic mode, the display r briey shows
"DAY". Subsequently, the time and date display alternate themselves. To switch back to
an exclusive time display, press the button
DOWN l once again.
Setting the memory functions
You can programme in up to 6 dates, which
the appliance will remind you of when they
are reached.
1. In automatic mode press the button
MODE/LOCK k three times. The display
r shows alternatively a date and the
SDA 1 indicator for reminder date 1.
2.Press the buttons UP/DOWN 1(/l
to set the rst desired reminder date.
Pressing and holding the buttons changes
the date at intervals of 10 days.
3. Press the button MEM./AMS o and then
use the buttons UP /DOWN 1(/l
to set the hour at which the alarm of the
reminder function should sound.
4. When you press the button TIMER s, the
year number is deactivated and thus you
are reminded on this date every year.
5. Should you wish to programme in further
dates, press the button MEM.SCAN a to
select the desired memory positions 2-6.
6. Follow the same steps with the other
dates.
7. To deactivate the memory function, programme in a date that lies in the past.
8. Press the button MODE/LOCK k once
again to save the settings of the memory
function and to switch to setting the update function.
Setting the update function
Using this function, the appliance can automatically update the settings for the clock
based on the RDS data. When the radio is
not switched on, this update takes place daily
at 3:00 and 5:00.
1. In automatic mode press the button
MODE/LOCK k four times. The display
r shows "UP DATE".
2.Press the button DOWN l, to deacti-
vate the Actual-isation function. The blinking clock symbol in the display r then
disappears.
3.Press the button UP 1( to reactivate the
update function. The hour symbol appears.
4. Press the button MODE/LOCK k once
again to save the settings of the update
function and to switch to setting the 12 or
24 hour mode.
Selecting 12 or 24 hour time display
1. In automatic mode press the button
MODE/LOCK k ve times. In the display
r appears "24 HOUR" for the 24 hour
modus.
2. Press the button DOWN l to select the
12 hour modus. In the display r appears
"12 HOUR". Press the button UP 1( to return to the 24 hour modus.
In the 12 hour mode "AM" appears between
0:00 and 11:59 (ante meridiem = mornings) behind the time display, from 12:00 to
23:59 "PM" (post meridiem = afternoons) is
shown in the display r.
- 6 -

Press the button MODE/LOCK k to save the
menu settings and to close it down.
Further setting possibilities
Setting the display brightness
Press the button LIGHT/DIMMER j repeat-
edly to set the brightness level at which the
display should be illuminated. The brightness
can be set at 3 levels.
Illuminated clamp strip
Documents, for example recipes, with a width
of up to 10 cm can be inserted and automatically held in the clamp strip d. If you press
and hold the button LIGHT/DIMMER j for
two seconds, the downward facing lamp is
switched on, which then illuminates the recipe.
Press and hold the button j once again for
two seconds to switch the lamp o.
Kitchen timer
1. Press the button TIMER s.
2. Using the buttons UP/DOWN 1(/l,
set the desired time interval (a time span
between 1 minute and 23:59 h is possible). Pressing and holding one of the
buttons changes the display in ten-minute
intervals. Or press one of the buttons
M1–M4 t–i to recall a saved preset
time for the kitchen timer. The following
times are factory pre-programmed:
Button M1 t = 5 min. (Indicator = T1)
Button M2 y = 10 min. (Indicator = T2)
Button M3 u = 15 min. (Indicator = T3)
Button M4 i = 20 min. (Indicator = T4)
3. Press the button TIMER s once again to
start the kitchen timer. In the display r a
clock icon running in reverse and a cook-
ing pot symbol appears.
4. From 30 seconds before expiry of the time
span an acoustic signal sounds, repeating
at shorter intervals the closer the set time
approaches. When the time has expired,
the alarm sounds continuously and with
increasing volume.
5. Press any button to stop the alarm, even if
the button lock is switched on .
Interrupting the kitchen timer.
• To interrupt the kitchen timer, switch to the
kitchen timer mode by pressing the button
TIMER s.
• Then briey press the button TIMER s to
interrupt the kitchen timer.
The time is halted, the indicator blinks for
10 seconds. After this period the appliance
returns to automatic modus. To restart the
kitchen timer, briey press the button TIMER
s again to switch back into the kitchen timer
mode.
• Press the button TIMER s once again. The
time then continues to run.
• To completely switch the kitchen timer o,
press and hold the button TIMER s for 3
seconds The clock and cooking pot symbol disappear.
Programming the kitchen timer
You can programme frequently used times for
the kitchen timer into the appliance, so that
you do not need to enter them in repeatedly.
As the appliance can be used by several
people, it has user switching, A/B. Both users
can save 4 dierent timer periods each.
1. First, select the desired user. To switch
between users, press and hold the button
USER/BAND h for two seconds.
2. Then press the button TIMER s.
3.Using the buttons UP/DOWN 1(/l
enter in the desired time.
4. Press the button MEM/AMS o. On the
right and next to the time indicator, "T"
lights up.
5. Press one of the pre-set buttons M1–M4
t–i, under which the kitchen timer period should be saved. Its number is now
shown to the right of the "T".
6. Press the button MEM/AMS o once
again to conclude the saving.
Setting alarm times (Alarms 1 and 2)
You can programme two alarm times into
your kitchen radio.
- 7 -

Alarm function
Acoustic signal
Symbol in the display r
7. After 10 seconds the blinking in the
display stops and your input is saved.
The appliance then returns to automatic
modus.
Radio
Switched o no symbol
1. In automatic mode press the button AL1/
VOL. + g (or AL2/VOL. – f). In the
display r the last set alarm time and the
symbol for the type of alarm blink for 10
seconds.
2. Press the buttons UP/DOWN 1(/l
to set the desired alarm time.
3. Press the button AL1/VOL. + g (or AL2/
VOL. – f) repeatedly until the desired
alarm function (see the table above) is
indicated in the display r.
4. Repeatedly press the button TIMER s to
set the weekdays on which you require the
alarm function: You can select between
"workdays" (Mo, Tu, We, Th, Fr), "weekends" (Su, Sa) and "every day" (Su, Mo,
Tu, We, Th, Fr, Sa). Thereby, orientate
yourself on the weekday indicator in the
display r:
Mo = Monday
Tu = Tuesday
We = Wednesday
Th = Thursday
Fr = Friday
Sa = Saturday
Su = Sunday.
5. If you hold the button TIMER s pressed
down for 2 seconds, you can also,
through repeated brief pressing of the
TIMER s button, select a specic week-
day (e.g. only "We"). The selected setting
is indicated in the display r.
6. To return to the selection of workdays,
weekends or whole weeks, once again
hold the button TIMER s pressed down
for 2 seconds.
When the alarm signal sounds...
• and the alarm function "Radio" has been
selected, the radio plays for one hour
at a pre-dened alarm volume. To nish
press any button , even if the button lock is
switched on.
• and the alarm function "Signaltones" has
been selected, the signal tone sounds for
10 minutes, with an increasing volume. To
nish press any button , even if the button
lock is switched on.
The Reminder function
The appliance can remind you of a date that
you have set with the reminder function. In
this case, the acoustic reminder alarm will
sound for 10 minutes at the set hour. In addition, the SDA indicator ashes in the display r.
Press any button to stop the reminder alarm,
even if the button lock is switched on.
Radio operation
For radio reception, completely unwind the
wire aerial e and, with the radio switched
on, determine the most favourable position-
ing for it. The appliance has a built-in ferrite
aerial for the reception of MW transmitters.
Should the MW reception be insucient,
please turn the appliance towards a more
favourable direction.
Switching the radio on and off
1. To switch the radio function on, press the
button ON/AOT/OFF 2!. In the display
r the currently selected frequency is
shown.
2. Press the button ON/AOT/OFF 2! once
again to switch the radio o and return
the appliance to the automatic modus.
- 8 -

Note:
By pressing and holding the button
ON/AOT/OFF 2! you switch to the func-
tion switch-o time (see S. 10 chapter
AOT Switch-o timer).
Manual station selection
1. Using the button USER/BAND h, select
the required radio frequency: MW (AM)
or VHF (FM).
2.Briey press the button UP 1( repeat-
edly to search for stations with a higher
frequency than the one shown in the display r.
3. Briey press the button DOWN l
repeatedly to search for stations with a
lower frequency than the one shown in
the display r.
4. Should the currently selected radio station
transmit RDS data, the -indicator
lights-up in the display r. Then the display r shows the name of the radio sta-
tion, and the time is updated (if activated
in the settings, see section "Setting Update
function").
Automatic station search
You can have the kitchen radio search for
stations. The kitchen radio searches the fre-
quency range until it nds a station.
1. Press and hold the button UP 1( for two
seconds: the kitchen radio searches for
the station with the next highest frequency.
2. Press and hold the button DOWN l
for two seconds: the kitchen radio searches for the station with the next lowest fre-
quency.
Repeat these steps until you have found a
radio station to your liking.
Save and recall a radio station manually
As the appliance can be used by numerous
people, it is tted with user switching, A/B.
Both users can save dierent radio stations.
To switch between users, press and hold the
button USER/BAND h for three seconds.
The selected user "A" or "B" is indicated in
the display.
Each user can save 36 radio stations in the
appliance. 32 x VHF stations and 4 x MW
stations. For saving UKW stations, User "A"
has available:
Preset button M1 t for the save positions
A1 – A8,
Preset button M2 y for the save positions
B1 – B8,
Preset button M3 u for the save positions C1
– C8, and
Preset button M4 i for the save positions
D1 – D8.
Available for User "B" are:
Preset button M1 t for the save positions
11 – 18,
Preset button M2 y for the save positions
21 – 28,
Preset button M3 u for the save positions 31
– 38, and
Preset button M4 i for the save positions
41 – 48.
Press the corresponding preset button once to
address the save position "1", press twice for
"2", etc.
With MW radio stations, each preset button
is for one of the 4 save positions.
1. Setting the user, the desired radio wavelength and the desired radio station.
2. Press the button MEM/AMS o. In the
display r the save position indicator and
"MEM" blink.
3. Press one of preset buttons M1–M4
t–i, if necessary repeatedly, to save
the radio station to the desired save position. In the display r, the indicator for the
save position selected by you and "MEM"
blink.
4. Press the button MEM/AMS o once
again. "MEM" and the memory space will
be briey displayed, the station is now
saved.
- 9 -

5. Repeat the steps 1 to 4 (for both users)
until all of the desired radio stations are
saved.
6. To recall the saved radio stations, press
the corresponding preset buttons (M1–
M4 t–i) in radio mode, several times
if need be, until the number of the saved
position appears in the display r.
Automatically save and recall a radio
station
With the AMS function (Automatic Memory
System), the radio automatically searches
for radio stations and then saves them to the
available save positions in the radio waveband. Previously saved radio stations are
thereby erased.
1. Press and hold the button MEM/AMS o
for two seconds. The kitchen radio auto-
matically searches for suciently powerful radio stations and saves them in the
memory.
2. The station search can be stopped by press-
ing on the button MEM/AMS o. The most
recently found radio station plays.
3. When you press the button MEM.SCAN
a, the saved radio stations are recalled in
their sequence and each is played for 10
seconds.
4. To quickly move on to another radio sta-
tion, press the button MEM.SCAN a.
5. To quit the automatic recall, press the button MODE/LOCK k. The display r will
then show the time for 10 seconds.
Adjusting the volume.
• To reduce the sound volume, in radio op-
eration repeatedly press the button AL2/
VOL — f, or hold the button down.
• To increase the sound volume, in radio op-
eration repeatedly press the button AL1/
VOL. + g, or hold the button down.
Lock function
You can lock the kitchen radio so that settings
cannot be altered by unauthorised people or
children.
• Press and hold the button MODE/LOCK
k for 3 seconds. A key symbol appears in
the display r.
• When a key is pressed and the lock is activated, the key symbol blinks but no other
functions are carried out.
• To disable the lock function, press and
hold the button MODE/LOCK k until the
key symbol extinguishes.
A.O.T. - Switch-off timer
This appliance is tted with a switch-o
timer for up to 90 minutes.
1. With the radio switched on, press the
button ON/AOT/OFF 2! down for 2 sec-
onds to recall the function.
2. Repeatedly press the button ON/AOT/
OFF 2! to programme in the number of
minutes, in increments of 5 minutes, for
which the appliance is to remain switched
on. After a few seconds the display again
shows the radio station currently being
played.
3. On expiry of the time period the appli-
ance switches itself o.
4. To switch the appliance o prematurely,
repeatedly press the ON/AOT/OFF
button 2! until "AOT OFF" is indicated in
the display.
Cleaning
Warning!
Always remove the plug before cleaning the appliance!
Moisture penetrating into the appliance
creates the risk of electric shock! Additionally, the kitchen radio could become
irreparably damaged!
Clean the housing of the kitchen radio with
a slightly moist cloth and a mild detergent
only. Ensure that moisture cannot permeate
into the appliance during cleaning!
- 10 -

Disposal
Importer
Do not dispose of the appliance
in your normal domestic waste.
This product is subject to the
provisions of European Directive
2002/96/EC.
Disposing of the appliance
• Arrange for the product, or parts of it, to be
disposed of by a professional disposal company or by your communal waste facility.
• Observe the currently applicable regula-
tions. In case of doubt, please contact
your waste disposal centre.
Disposal of batteries/accumulators
• Used batteries/rechargeable batteries
may not be disposed of in household
waste.
• Batteries/rechargeable batteries can
contain toxic substances which may
damage the environment. Therefore,
dispose of the batteries/rechargeable
batteries in accordance with statutory
regulations.
• Every consumer is statutorily obliged to
dispose of batteries/rechargeable batteries to a community collection centre in
their district or to a dealer. The purpose of
this obligation is to ensure that batteries
are disposed of in a non-polluting manner.
• Only dispose of batteries when they are
fully discharged.
Disposal of packaging
Dispose of all packaging materials in
an environmentally friendly manner.
CE Conformity
This device complies, regarding conformity,
to the basic requirements and other relevent provisions of the Low Voltage Directive
2004/108/EC, the Directive for Low Voltage Appliances 2006/95/EC and the Eco
Design Directive 2009/125/EC (Ordinance
1275/2008 Appendix II, Number 1).
KOMPERNASS GMBH
BURGSTRASSE 21
44867 BOCHUM, GERMANY
www.kompernass.com
Warranty and Service
The warranty for this appliance is for 3 years
from the date of purchase. The appliance
has been manufactured with care and meticulously examined before delivery. Please
retain your receipt as proof of purchase. In
the event of a warranty claim, please make
contact by telephone with our Service Department. Only in this way can a post-free
despatch for your goods be assured.
The warranty covers only claims for material
and maufacturing defects, but not for transport damage, for wearing parts or for damage to fragile components, e.g. buttons or
batteries. This product is for private use only
and is not intended for commercial use.
The warranty is void in the case of abusive
and improper handling, use of force and
internal tampering not carried out by our
authorized service branch. Your statutory
rights are not restricted in any way by this
warranty.
The warranty period will not be extended by
repairs made unter warranty. This applies alsoto replaced and repaired parts. Any damage and defects extant on purchase must be
reported immediately after unpacking the
appliance, at the latest, two days after the
purchase date. Repairs made after the expi-
ration of the warranty period are subject to
payment.
DES Ltd
Tel.: 0871 5000 700 (£ 0.10 / minute)
E-Mail: support.uk@kompernass.com
- 11 -

- 12 -

CUPRINS PAGINA
Utilizarea conform destinaţiei 14
Furnitura 14
Date tehnice 14
Indicaţii de siguranţă 14
Componentele aparatului 16
Punerea în funcţiune a aparatului 17
Montarea radioului de bucătărie sub un dulap suspendat 17
Amplasarea radioului de bucătărie 17
Meniul de setări 18
Alte modalităţi de setare 19
Operarea radioului 21
Curăţarea 23
Eliminarea aparatelor uzate 23
Indicaţii privind conformitatea 23
Importator 23
Garanţia şi service-ul 23
Citiţi cu atenţie instrucţiunile de utilizare înainte de prima utilizare şi păstraţi-le pentru o consultare ulterioară. Dacă înmânaţi aparatul unor terţi, ataşaţi şi instrucţiunile de utilizare.
- 13 -

Utilizarea conform destinaţiei
Radioul de bucătărie poate fi amplasat sau
montat sub un dulap suspendat. Aparatul este
destinat exclusiv recepţionării posturilor de
radio, precum şi utilizării ca ceas deşteptător
prin tonuri sonore sau radio.
Acest aparat nu este prevăzut pentru utilizare
profesională sau industrială. Nu se acordă
garanţie pentru pagubele rezultate în urma
utilizării neconforme sau a modificărilor constructive realizate pe cont propriu!
Furnitura
1 radiou de bucătărie SKRP 1000 A1
1 placă de montaj
4 şuruburi
1 baterie 3 V, tip CR2032
1 exemplar al instrucţiunilor de utilizare
Date tehnice
Conexiunea la reţea: 220 - 240 V~, 50 Hz
Consum
Operare: 5 W
Standby: cca 1,8 W
Putere la ieşire: 1 W la 10% THD
Frecvenţe UKW (FM)
87,5 - 108 MHz
MW (AM)
526,5 - 1606,5 kHz
Temperatura de
operare: +5 ~ +35°C
Umiditate: 5 ~ 90 %
(fără condens)
Dimensiuni (l x A x Î): 27,5 x 15,7 x 6,4 cm
Greutate: 1.070 g
Clasa de protecţie: II /
Baterie de rezervă: 1 x 3 V, tip CR2032
(livrată)
Caracteristicile tehnice ale aparatului oferă
posibilitatea de reglare a unor domenii de
frecvenţă, altele decât cele permise de 87,5–
108 MHz şi 526,5–1606,5 kHz. În anumite
ţări, pot exista reguli naţionale care se abat
de la domeniile de unde radio alocate.
Reţineţi că este interzisă valorificarea, transmiterea către terţi sau utilizarea abuzivă a
informaţiilor recepţionate pe frecvenţele radio
nealocate.
Indicaţii de siguranţă
• Acest aparat nu este destinat utilizării de
către persoane (inclusiv copii) cu capacităţi fizice, senzoriale sau mentale limitate
sau cu o experienţă limitată şi/sau cunoştinţe limitate, cu excepţia cazului în care
sunt supravegheate de către o persoană
responsabilă cu siguranţa lor sau au primit
instrucţiuni de la aceasta privind modul de
utilizare a produsului. Copiii trebuie supravegheaţi pentru a vă asigura că nu se vor
juca cu acest produs.
• Înaintea fiecărei curăţări, scoateţi ştecherul.
• Verificaţi aparatul şi componentele în
privinţa deteriorărilor vizibile. Conceptul
de siguranţă al aparatului funcţionează
numai în stare ireproşabilă.
• Ştecărul trebuie să fie totdeauna uşor
accesibil pentru ca în caz de urgenţă să
poată fi repede deconectat de la reţeaua
de curent.
Pericol de electrocutare!
• Conectaţi aparatul numai la o priză instalată regulamentar şi pământată. Tensiunea de reţea trebuie să corespundă
cu datele de pe plăcuţa de caracteristici.
• Cablurile de reţea, resp. aparatele care
nu mai funcţionează ireproşabil trebuie
reparate sau înlocuite în atelierul de
service.
• Nu introduceţi niciodată aparatul în
apă. Ştergeţi-l numai cu un material
umed.
• Nu expuneţi aparatul ploii şi nu-l utilizaţi
în medii umede sau ude.
• Prindeţi cablul de reţea întotdeauna de
ştecăr. Nu trageţi de cablu şi nu puneţi
mâinile umede pe cablul de reţea deoa-
- 14 -

rece s-ar putea produce un scurt circuit
sau electrocutări.
• Nu aşezaţi aparatul sau corpuri de mobilier etc. pe cablul de reţea şi asiguraţivă că nu este strangulat.
• Nu faceţi noduri pe cablu şi nu-l legaţi
niciodată de alte cabluri. Cablul de reţea şi antena trebuie amplasate de aşa
natură încât nimeni să nu calce pe ele
sau să se împiedice.
• Asiguraţi-vă că în timpul funcţionării cablul de reţea nu se udă sau se umezeşte.
• Este interzisă deschiderea carcasei aparatului sau repararea acestuia. În cazul
deschiderii carcasei există pericol de
moarte prin electrocutare, de asemenea,
se pierde garanţia.
• Protejaţi aparatul împotriva picăturilor de
apă şi a apei pulverizate. De aceea, nu
amplasaţi pe aparat sau lângă acesta
obiecte umplute cu lichide (de exemplu,
vaze de flori).
Pericol de incendiu!
• Nu utilizaţi aparatul în apropierea suprafeţelor fierbinţi.
• Nu aşezaţi aparatul în locurile expuse
radiaţiei solare directe. Altfel, acesta se
poate supraîncălzi şi deteriora ireparabil.
• Nu suspendaţi radioul deasupra plitelor
sau cuptoarelor. Aparatul se poate deteriora. Pericol de incendiu!
• Nu lăsaţi aparatul să funcţioneze nesupravegheat.
• Nu acoperiţi orificiile de aerisire ale
aparatului atunci când acesta se află
în funcţiune.
• Nu aşezaţi surse deschise de foc, de
exemplu, lumânări, pe aparat sau lângă
acesta.
Pericol de rănire!
• Nu lăsaţi aparatul şi cablul de reţea la
îndemâna copiilor. Adesea, copiii subestimează pericolele generate de aparatele electronice.
• Asiguraţi stabilitatea aparatului.
• Este interzisă punerea în funcţiune, dacă
aparatul a căzut jos sau dacă este defect.
• În aceste cazuri aparatul trebuie verificat,
resp. reparat de către un specialist.
• Nu lăsaţi bateriile la îndemâna copiilor.
S-ar putea ca aceştia să pună bateriile
în gură şi să le înghită.
• Dacă s-a înghiţit o baterie, consultaţi
imediat un medic.
Indicaţie
• Lacurile de mobilier agresive pot ataca
picioruşele de cauciuc ale aparatului.
De aceea, aşezaţi un suport pe mobilă
înainte de a amplasa aparatul.
Intemperii!
• În timpul intemperiilor, aparatele conectate la reţeaua de curent pot fi deteriorate. De aceea, în timpul intemperiilor,
scoateţi totdeauna ştecărul din priză.
Indicaţie pentru deconectarea de
la reţea
Butonul ON/AOT/OFF al acestui aparat
nu deconectează aparatul în totalitate
de la reţeaua de curent. În plus, dacă
se află în standby aparatul mai absoarbe
încă curent. Pentru a deconecta complet
aparatul de la reţea, ştecărul trebuie
scos din priză.
Indicaţie pentru tensiunile de
şoc (EFT/ proces electric rapid de
trecere) şi pentru descărcările
electrostatice:
În cazul unei funcţionării eronate din
cauza tensiunilor de şoc, resp. a descărcărilor electrostatice, aparatul trebuie
resetat, pentru a restabili operarea
normală. Este posibil să fie necesară
deconectarea alimentării cu tensiune şi
reconectarea acesteia. Bateriile (dacă
există) trebuie scoase şi reintroduse.
- 15 -

Indicaţie pentru manipularea
bateriilor
Pentru asigurarea memorării datelor,
aparatul utilizează baterii. Pentru manipularea bateriilor respectaţi următoarele:
Pericol de explozie!
• Nu expuneţi niciodată bateriile temperaturilor ridicate, radiaţiei solare directe,
focului etc. Nu reîncărcaţi bateriile.
• Nu deschideţi niciodată bateriile, nu
lipiţi cu ciocanul de lipit şi nu sudaţi bateriile. Pericol de explozie şi de rănire!
• În cazul nerespectării polarităţii în momentul introducerii bateriilor există pericol de explozie. Bateria trebuie înlocuită
numai cu o baterie identică sau cu una
de acelaşi tip.
• Verificaţi regulat bateriile. Bateriile care
se scurg pot provoca defecţiuni ale aparatului.
• Dacă nu utilizaţi aparatul un timp mai
îndelungat, scoateţi bateriile.
• În cazul în care bateriile s-au scurs, puneţi-vă mănuşile de protecţie şi curăţaţi
compartimentul bateriilor şi contactele
cu un material uscat.
Atenţie!
Nu se acordă garanţie pentru cazurile
de defecţiune rezultate în urma acţiunii
umidităţii infiltrare în aparat sau a acţiunii
temperaturilor ridicate (supraîncălzirii)!
Componentele aparatului
q Placă de montaj/stativ
w Cablu de reţea
e Antenă
r Afişaj
t–i M1–M4 - taste pentru locurile
de memorare M1–
M4
o MEM/AMS - pentru memorarea şi
căutarea automată
a posturilor de radio
a MEM.SCAN - pentru apelarea
automată a posturilor
de radio memorate
s TIMER - comandă programa-
rea temporizatorului
d bornă luminată
f AL2/VOL — - comandă funcţia de
alarmă 2
- reducerea intensităţii
sonore
g AL1/VOL + - comandă funcţia de
alarmă 1
- creşterea intensităţii
sonore
h USER/BAND - comutare utilizator,
comutare frecvenţă
radio
j LIGHT/DIMMER - comandă luminarea
afişajului şi bornei
k MODE/LOCK - apelează setările,
blocarea tastelor
l DOWN - tastă de selectare
în jos
1( UP - tastă de selectare
în sus
2) Compartimentul bateriilor
2! ON/AOT/OFF - pornirea/oprirea
radioului, comandă
temporizatorul de
oprire
- 16 -

Punerea în funcţiune a aparatului
Mai întâi, scoateţi toate componentele aparatului din ambalaj şi îndepărtaţi toate materialele de ambalare.
Introducerea bateriilor
Prin introducerea bateriilor evitaţi ca în caz
de căderi de curent să pierdeţi setările pentru
ora programată şi ora de alarmă setată.
Bateria are rolul de a menţine setarea orei
interne chiar şi în caz de cădere de curent.
La recuplarea curentului de reţea, pe afişaj r
apare din nou automat ora corectă.
Indicaţie
Aparatul poate fi operat şi fără baterii.
1. Deschideţi capacul compartimentului bateriilor 2) de sub aparat, prin rotirea cu ajuto-
rul unei monede a capacului spre stânga şi
ridicarea acestuia.
2. Introduceţi bateria de tip CR2032 (inclusă
în furnitură) în compartimentul bateriilor 2).
Partea cu marcajul + este orientată în sus.
3. Închideţi compartimentul bateriilor 2), prin
aşezarea capacului şi rotirea acestuia
cu ajutorul unei monede spre dreapta.
Montarea radioului de bucătărie
sub un dulap suspendat
Aveţi posibilitatea de a suspenda radioul cu
ajutorul plăcii de montaj q livrate, de exemplu sub un dulap de bucătărie suspendat.
1. Căutaţi un loc adecvat de montaj pentru
radioul de bucătărie.
2. Apăsaţi în jos cele două elemente de
blocare de sub aparat. Împingeţi spre
spate placa de montaj q şi scoateţi-o.
3. Ţineţi placa de montaj q sub locul de
montaj. Partea din faţă a plăcii de montaj
q trebuie să se găsească cu cca 3,5 cm
în spatele măştii dulapului de bucătărie.
Astfel, radioul poate fi închis mai târziu
la acelaşi nivel.
4. Marcaţi cele patru puncte pentru găurire
cu un creion.
5. Realizaţi cu un dorn o mică adâncitură în
marcajele făcute cu creionul. Înşurubaţi
placa de montaj q cu şuruburile livrate.
6. Aşezaţi oblic radioul cu cele două decupaje în indentaţiile din placa de montaj q.
Apăsaţi în sus radioul până se fixează
audibil.
Demontarea
• Pentru a demonta radioul, apăsaţi în jos
cele două elemente de blocare de pe
partea din spate a aparatului. Scoateţi
apoi radioul prin faţă şi îndepărtaţi-l.
• Deşurubaţi şuruburile şi îndepărtaţi placa
de montaj q.
Amplasarea radioului de bucătărie
Nu amplasaţi aparatul fără placa de montaj
q. Altfel, difuzorul este acoperit, iar muzica
greu audibilă.
Astfel amplasaţi radioul împreună cu placa
de montaj q livrată:
1. Apăsaţi simultan în jos cele două elemente
de blocare de sub aparat. Trageţi spre
spate placa de montaj q şi scoateţi-o.
2. Împingeţi cele patru indentaţii de susţinere
din placa de montaj q în adânciturile din
partea din spate a radioului.
3. Apăsaţi bine placa de montaj q spre
partea din spate a aparatului până când
se fixează audibil. Acum puteţi amplasa
radioul de bucătărie.
Demontarea
• Rotiţi în sus aparatul împreună cu placa
de montaj. Introduceţi mâna în spaţiul
liber dintre aparat şi placa de montaj.
• Trageţi încet placa de montaj în partea
din faţă, spre dumneavoastră, pentru
a desprinde placa din adânciturile din
faţă. Îndepărtaţi placa de la aparat.
- 17 -

Conectarea alimentării cu curent
• După montarea sau amplasarea aparatului, introduceţi ştecărul într-o priză.
Afişajul r se aprinde, iar aparatul încearcă să recepţioneze un semnal RDS
pentru a putea seta automat ora şi data.
• Atât timp cât aparatul aşteaptă recepţionarea semnalului RDS, pe afişaj apare r
„Please wait for setting thanks“ (aştep-
taţi setarea; mulţumim). Această operaţiune poate dura câteva minute.
Meniul de setări
Setarea orei
Dacă ora nu este setată automat, setarea
trebuie realizată manual. Pentru aceasta,
aparatul nu trebuie pornit (= regim automat).
1. În regimul automat apăsaţi o dată tasta
MODE/LOCK k. Clipeşte afişajul orei.
2. Apăsaţi tastele UP/DOWN 1(/l,
pentru setarea orei în intervale de minute.
Apăsarea şi menţinerea apăsată a tastelor
modifică ora în intervale de câte 10 minute.
3. Apăsaţi din nou tasta MODE/LOCK k
pentru a memora ora şi pentru a comuta
aparatul pentru setarea datei.
Dacă în timpul setărilor, nu apăsaţi nicio tastă
timp de 15 secunde, aparatul salvează setarea şi revine în regimul automat.
Setarea datei
1. În regimul automat apăsaţi de două ori
tasta MODE/LOCK k. Pe afişaj r apare
„01.01.2011“, afişajul datei clipeşte.
2. Apăsaţi tastele UP/DOWN 1(/l,
pentru setarea datei în intervale de zile.
Apăsarea şi menţinerea apăsată a tastelor
modifică data în intervale de 10 zile.
3. Apăsaţi din nou tasta MODE/LOCK k
pentru a salva data şi pentru a comuta
aparatul pentru setarea funcţiei memento.
Dacă mai târziu, în regimul automat, apăsaţi
tasta DOWN l pe afişaj r apare scurt
„DAY“. Apoi, alternează afişajul orei şi datei.
Pentru a comuta din nou în modul de afişare
exclusivă a orei, apăsaţi din nou tasta
DOWN l.
Setarea funcţie memento
Pot fi programate până la 6 date în aparat
pentru ca acesta să vă atragă atenţia în
momentul scadenţei.
1. În regimul automat apăsaţi de trei ori tasta
MODE/LOCK k. Afişajul r indică alternativ o dată şi mesajul SDA 1 pentru data
memorată 1.
2. Apăsaţi tastele UP/DOWN 1(/l,
pentru a seta prima dată memento.
Apăsarea şi menţinerea apăsată a tastelor
modifică data în intervale de 10 zile.
3. Apăsaţi tasta MEM./AMS o, pentru ca
apoi cu tastele UP/DOWN 1(/l să
setaţi ora la care alarma să se declanşeze
în ziua memorată.
4. Dacă apăsaţi tasta TIMER s, cifra pentru
an este dezactivată şi astfel aparatul vă
va aminti această dată în fiecare an.
5. Dacă doriţi să programaţi şi alte date,
apăsaţi tasta MEM.SCAN a, pentru a
alege un loc de memorare de la 2 la 6.
6. Procedaţi la fel şi cu celelalte date.
7. Pentru a dezactiva funcţia memento,
programaţi o dată din trecut.
8. Apăsaţi din nou tasta MODE/LOCK k
pentru a memora setările funcţie memento
şi pentru a comuta aparatul pentru setarea
funcţiei de actualizare.
Setarea funcţie de actualizare
Cu ajutorul acestei funcţii, aparatul poate
actualiza automat setările pentru oră prin
datele RDS. Dacă aparatul nu este pornit,
această actualizare are loc zilnic la orele
3:00 şi 5:00.
1. În regimul automat apăsaţi de patru ori
tasta MODE/LOCK k. Afişajul r indică
„UP DATE“.
2. Apăsaţi tasta DOWN l, pentru a dezactiva funcţia de actualizare. Apoi dispare
de pe afişaj r simbolul intermitent al
orei.
- 18 -

3. Apăsaţi tasta UP 1(, pentru a reactiva
funcţia de actualizare. Apare simbolul
orei .
4. Apăsaţi din nou tasta MODE/LOCK k
pentru a memora setările funcţiei de actualizare şi pentru a comuta pentru afişarea
formatului de 12 sau 24 de ore.
Setarea formatului orar de 12 sau 24
de ore
1. În regimul automat apăsaţi de cinci ori
tasta MODE/LOCK k. Pe afişaj r apare
„24 HOUR“ pentru formatul de 24 de ore.
2. Apăsaţi tasta DOWN l, pentru a seta
formatul de 12 ore. Pe afişaj r apare „12
HOUR“. Apăsaţi tasta UP 1(, pentru a
comuta din nou în formatul de 24 de ore.
În formatul de 12 ore, apare între 0:00 şi
11:59 „AM“ (ante meridiem = dimineaţa) în
spatele afişajului timpului, de la 12:00 până la
23:59 „PM“ (post meridiem = după-amiază)
pe afişaj r.
Apăsaţi tasta MODE/LOCK k, pentru a memora setările din meniu şi pentru a-l închide.
Alte modalităţi de setare
Setarea luminozităţii afişajului
Apăsaţi în mod repetat tasta LIGHT/DIMMER j pentru setarea luminozităţii afişajului.
Luminozitatea poate fi setată în 3 trepte.
Ţineţi apăsată tasta LIGHT/DIMMER pentru
a opri iluminarea afişajului. Apăsaţi din nou
tasta LIGHT/DIMMER pentru a reactiva iluminarea afişajului.
Bornă iluminată
În bornă d pot fi introduse bucăţi de text,
de exemplu, reţete, cu o lăţime de până la
cca 10 cm, care sunt reţinute automat de
către aparat. Dacă ţineţi apăsată două secunde tasta LIGHT/DIMMER j este cuplată
iluminarea orientată în jos, care luminează
apoi reţeta etc. Ţineţi din nou apăsată tasta
j timp de două secunde pentru a stinge
lumina.
Temporizator de bucătărie
1. Apăsaţi tasta TIMER s.
2. Cu ajutorul tastelor UP/DOWN
1(/l setaţi timpul dorit (între 1 min. şi
23:59 de ore). Ţinerea apăsată a uneia
dintre aceste taste modifică afişajul în paşi
de 10 min. Sau apăsaţi una dintre tastele
M1–M4 t–i, pentru a apela o valoare
presetată memorată pentru temporizatorul
de bucătărie. Din fabricaţie, sunt pre-pro-
gramate următoarele valori:
Tasta M1 t = 5 min. (afişaj = T1)
Tasta M2 y = 10 min. (afişaj = T2)
Tasta M3 u = 15 min. ( afişaj = T3)
Tasta M4 i = 20 min. (afişaj = T4)
3. Apăsaţi din nou tasta TIMER s pentru a
porni temporizatorul. Pe afişaj r apare
simbolul orei care se derulează invers,
precum şi simbolul unei oale.
4. Cu 30 de secunde înainte de expirarea
timpului se aude un semnal sonor care,
pe măsură ce se scurge timpul, se aude
la intervale de timp tot mai scurte. După
scurgerea timpului, semnalul sonor este
emis continuu cu intensitate crescândă.
5. Apăsaţi o tastă oarecare, pentru a opri
alarma, chiar dacă blocarea tastelor este
activată.
Întreruperea temporizatorului
• Pentru a întrerupe temporizatorul, comutaţi
în regimul temporizator prin apăsarea tastei
TIMER s.
• Apoi apăsaţi scurt tasta TIMER s, pentru
a întrerupe temporizatorul.
Timpul este oprit, afişajul clipeşte timp de
10 secunde. Apoi, aparatul revine în regimul
automat. Pentru a reporni temporizatorul,
apăsaţi scurt tasta TIMER s, pentru a comuta
din nou în regimul temporizator.
• Apăsaţi din nou tasta TIMER s. Timpul
continuă să se deruleze.
• Pentru a opri complet temporizatorul,
ţineţi apăsată timp de 3 secunde tasta
TIMER s. Dispar simbolurile pentru ceas
şi oală.
- 19 -

Programarea temporizatorului
În aparat pot fi programaţi timpii cei mai des
folosiţi, pentru a nu trebui să-i introduceţi de
fiecare dată. Deoarece aparatul poate fi utilizat de mai multe persoane, acesta dispune
de o comutare a utilizatorilor, A/B. Ambii
utilizatori pot salva patru timpi diferiţi pentru
temporizator.
1. Mai întâi, selectaţi utilizatorul dorit. Pentru
a schimba utilizatorul, ţineţi apăsată timp
de două secunde tasta USER/BAND h.
2. Apăsaţi apoi tasta TIMER s.
3. Cu ajutorul tastelor UP/DOWN 1(/l
setaţi timpul dorit.
4. Apăsaţi tasta MEM/AMS o. În partea
dreaptă, lângă afişajul orei, se aprinde „T“.
5. Apăsaţi una dintre tastele Preset M1–M4
t–i, la care doriţi memorarea timpului
pentru temporizator. Numărul acestuia
va fi acum afişat în partea dreaptă a „T“.
6. Apăsaţi din nou tasta MEM/AMS o,
pentru a închide memorarea.
Funcţia deşteptător (alarmă 1 şi alarmă 2)
La aparatul dumneavoastră pot fi programaţi
doi timpi de deşteptare.
Funcţia
Simbolul pe afişaj r
deşteptător
Semnale sonore
Radio
Oprită Niciun simbol
1. În regimul automat apăsaţi tasta AL1/
VOL. + g (sau AL2/VOL. – f). Pe afişaj
r clipesc pentru 10 secunde ultimul timp
de deşteptare setat şi simbolul pentru tipul
alarmei.
2. Apăsaţi tastele UP/DOWN 1(/l,
pentru a seta timpul de deşteptare dorit.
3. Apăsaţi tasta AL1/VOL. + g (sau AL2/
VOL. – f) până când este afişată funcţia
de deşteptare (a se vedea tabelul de mai
sus) pe afişaj r.
4. Apăsaţi din nou tasta TIMER s, pentru a
seta zilele săptămânii în care doriţi să fiţi
treziţi: puteţi selecta între „zile lucrătoare“
(Mo, Tu, We, Th, Fr), „weekend“ (Su, Sa)
şi „în fiecare zi“ (Su, Mo, Tu, We, Th, Fr,
Sa). Pentru aceasta, orientaţi-vă după
afişarea zilelor săptămânii de pe afişaj r:
Mo = Luni
Tu = Marţi
We = Miercuri
Th = Joi
Fr = Vineri
Sa = Sâmbătă
Su = Duminică
5. Dacă ţineţi apăsată timp de 2 secunde
tasta TIMER s, apoi, prin apăsarea
scurtă a tastei TIMER s puteţi selecta o
anumită zi din săptămână (de exemplu,
numai „We“ pentru miercuri). Setarea
selectată este afişată pe afişaj r.
6. Dacă doriţi să reveniţi la selectarea zilelor
lucrătoare, a zilelor de weekend sau a
întregii săptămâni, ţineţi apăsată timp de
2 secunde tasta TIMER s.
7. După 10 secunde, afişajul nu mai clipeşte, iar datele introduse sunt memorate.
Apoi, aparatul revine în regimul automat.
Dacă se aude semnalul sonor...
• şi este selectată funcţia de deşteptare
„Radio“, radioul funcţionează timp de o
oră la intensitatea sonoră setată în prealabil. Pentru oprire, apăsaţi o tastă oarecare, chiar dacă blocarea tastelor este
activată.
• şi este selectată funcţia de deşteptare
„Semnale sonore“, semnalele sonore sunt
emise 10 minute la o intensitate sonoră
iniţială în creştere. Pentru oprire, apăsaţi
o tastă oarecare, chiar dacă blocarea
tastelor este activată.
- 20 -

Funcţia memento
Aparatul vă aduce aminte de o anumită dată
pe care aţi setat-o cu funcţia memento. În
acest caz, la ora setată este emis semnalul
acustic setat timp de 10 minute. Pe afişaj r
apare SDA. Apăsaţi o tastă oarecare, pentru
a opri mementoul, chiar dacă blocarea tastelor
este activată.
Operarea radioului
4. Dacă emiţătorul setat acum transmite date
RDS, se aprinde pe afişaj r.
Apoi, pe afişaj r apare numele emiţătorului, iar ora este actualizată (dacă a fost
activată la setări, a se vedea secţiunea
„Setarea funcţie de actualizare“).
Căutarea automată a posturilor
Puteţi lăsa aparatul să caute automat posturile
de radio. Radioul caută domeniul de recepţie,
până la găsirea unui post.
Pentru recepţia frecvenţei radio UKW, desfăşuraţi complet antena e şi în timp ce aparatul funcţionează căutaţi o poziţie favorabilă.
Pentru recepţia MW, aparatul dispune de o
antenă Ferrit încorporată. Dacă există deranjamente la recepţia MW orientaţi aparatul
într-o poziţie favorabilă.
Pornirea/oprirea radioului
1. Pentru a porni funcţia radio, apăsaţi tasta
ON/AOT/OFF 2!. Pe afişaj r apare frecvenţa actuală recepţionată.
2. Apăsaţi tasta ON/AOT/OFF 2!, pentru
a opri funcţia radio şi pentru a comuta
aparatul în regim automat.
Indicaţie
Prin apăsarea şi menţinerea apăsată a
tastei ON/AOT/OFF 2! comutaţi aparatul în funcţia temporizator de oprire (a
se vedea p. 22, capitolul Temporizator
de oprire AOT).
Setarea manuală a posturilor
1. Cu ajutorul tastei USER/BAND 1% selectaţi
banda radio dorită:
MW (AM) sau UKW (FM).
2. Apăsaţi din nou, scurt, tasta UP 1(,
pentru a căuta emiţători cu o frecvenţă
mai mare decât cea arătată pe afişaj r.
3. Apăsaţi din nou, scurt, tasta DOWN l,
pentru a căuta emiţători cu o frecvenţă
mai mică decât cea arătată pe afişaj r.
1. Ţineţi apăsată două secunde tasta UP 1(:
aparatul caută postul radio cu următoarea
frecvenţă cea mai mare.
2. Ţineţi apăsată două secunde tasta
DOWN l: aparatul caută postul radio
cu următoarea frecvenţă cea mai mică.
Repetaţi aceşti paşi, până când aţi găsit
postul dorit.
Memorarea şi apelarea manuală a
posturilor
Deoarece aparatul poate fi utilizat de mai
multe persoane, acesta dispune de o comutare a utilizatorilor, A/B. Ambii utilizatori pot
salva posturi de radio diferite. Pentru a schimba
utilizatorul, ţineţi apăsată timp de trei secunde
tasta USER/BAND h. Utilizatorul selectat,
„A“ sau „B“, este indicat pe afişaj.
Pentru fiecare utilizator, în aparat pot fi salvate
câte 36 de posturi de radio. 32 de posturi
UKW, 4 posturi MW. Pentru salvarea posturilor
UKW, utilizatorul „A“ are la dispoziţie:
Tasta Preset M1 t pentru locurile de salvare
A1 – A8,
Tasta Preset M2 y pentru locurile de salvare
B1 – B8,
Tasta Preset M3 u pentru locurile de salvare
C1 – C8,
Tasta Preset M4 i pentru locurile de salvare
D1 – D8.
- 21 -

Utilizatorul „B“ are la dispoziţie:
Tasta Preset M1 t pentru locurile de salvare
11 – 18,
Tasta Preset M2 y pentru locurile de salvare
21 – 28,
Tasta Preset M3 u pentru locurile de salvare
31 – 38,
Tasta Preset M4 i pentru locurile de salvare
41 – 48.
Apăsaţi o dată respectiva tastă Preset pentru
a apela locul de salvare „1”, apăsaţi tasta
de două ori pentru „2“ ş.a.m.d.
Pentru posturile MW, fiecare tastă Preset reprezintă unul dintre cele 4 locuri de salvare.
1. Setaţi utilizatorul, banda dorită şi postul
dorit.
2. Apăsaţi tasta MEM/AMS o. Pe afişaj r
clipesc afişajul pentru locul de salvare şi
„MEM“.
3. Eventual, apăsaţi din nou una dintre
tastele Preset M1–M4 t–i, pentru a
memora postul în locul dorit. Pe afişaj r
clipesc afişajul locului de salvare selectat
de dumneavoastră şi „MEM“.
4. Apăsaţi din nou tasta MEM/AMS o.
Sunt afişat scurt „MEM“ şi locul de salvare,
postul este salvat.
5. Repetaţi paşii 1 - 4 (pentru ambii utilizatori),
până la salvarea tuturor posturilor dorite.
6. Pentru apelarea posturilor salvate, apăsaţi
în regimul radio, dacă este cazul, de mai
multe ori, tasta Preset corespunzătoare
(M1–M4 t–i), până când pe afişaj r
apare numărul locului de salvare dorit.
Memorarea şi apelarea manuală a
posturilor
Cu ajutorul funcţiei AMS (Automatic Memory
System), radioul caută automat posturile şi
le salvează în locurile de salvare disponibile
pentru respectiva bandă radio. Posturile
salvate anterior sunt şterse.
1. Ţineţi apăsată timp de două secunde tasta
MEM/AMS o. Radioul caută automat
după posturile cu emisie suficient de
puternică şi le salvează.
2. Căutarea poate fi întreruptă prin apăsarea
tastei MEM/AMS o. Este redat ultimul
post găsit.
3. Dacă apăsaţi tasta MEM.SCAN a,
posturile salvate sunt apelate pe rând şi
redate fiecare câte 10 secunde.
4. Pentru a trece mai repede la următorul
post, apăsaţi tasta MEM.SCAN a.
5. Pentru a opri apelarea automată, apăsaţi
tasta MODE/LOCK k. Apoi, pe ecran r
apare ora pentru 10 secunde.
Setarea intensităţii sonore
• În regimul radio, apăsaţi repetat tasta AL2/
VOL — f sau ţineţi tasta apăsată pentru
a reduce intensitatea sonoră.
• Apăsaţi repetat tasta AL1/VOL. + g
sau ţineţi tasta apăsată pentru a creşte
intensitatea sonoră.
Blocarea
Aparatul radio poate fi blocat pentru a evita
modificarea setărilor de către copii sau alte
persoane neautorizate.
• Ţineţi apăsată tasta MODE/LOCK k timp
de 3 secunde. Pe afişaj r apare simbolul
unei chei.
• Dacă în timpul blocării activate apăsaţi
tastele, simbolul cheii clipeşte, dar nu se
execută nicio funcţie.
• Pentru a debloca radioul, ţineţi din nou
apăsată tasta MODE/LOCK k până la
dispariţia simbolului cheii.
Temporizatorul de oprire AOT
Aparatul dispune de un temporizator de oprire
setabil până la 90 de minute.
1. În timp ce radioul este pornit, ţineţi apăsată
tasta ON/AOT/OFF 2! timp de 2 secunde
pentru a apela această funcţie.
2. Apăsaţi repetat tasta ON/AOT/OFF 2!,
pentru a introduce minutele în paşi de
câte 5, timp în care aparatul trebuie să
- 22 -

fie încă pornit. După câteva minute este
afişat din nou postul setat.
3. După expirarea timpului setat, aparatul
se opreşte.
4. Pentru oprirea aparatului înainte de trecerea timpului setat, apăsaţi tasta ON/AOT/
OFF 2!, până când pe afişaj apare‚ AOT
OFF‘.
Curăţarea
• Fiecare consumator are obligaţia legală
de a preda bateriile / acumulatorii la un
centru de colectare local. Această obligaţie are scopul de a asigura eliminarea
ecologică a bateriilor / acumulatorilor.
• Predaţi bateriile / acumulatorii numai
dacă sunt descărcaţi.
Eliminarea ambalajului
Eliminaţi toate materialele de ambalare
într-un mod ecologic.
Avertizare!
Înaintea fiecărei curăţări, scoateţi ştecărul
din priză!
Dacă în aparat se infiltrează umezeală,
există pericol de electrocutare! În plus,
aparatul poate fi deteriorat iremediabil!
Curăţaţi carcasa aparatului numai cu un
material uşor umed şi puţin detergent. Atenţie
ca la curăţare în aparat să nu se infiltreze
umezeală!
Eliminarea aparatelor uzate
Nu aruncaţi aparatul sub nicio
formă în gunoiul menajer obişnuit.
Acest produs cade sub incidenţa
directivei europene 2002/96/EC.
Eliminarea aparatului
• Eliminaţi acest produs prin intermediul unei
firme autorizate sau la instalaţia de eliminare
a deşeurilor din regiunea dumneavoastră.
• Respectaţi reglementările actuale în vigoare.
Dacă aveţi nelămuriri, contactaţi serviciul
dumneavoastră local de eliminare a deşeurilor.
Eliminarea bateriilor / acumulatorilor
• Bateriile / acumulatori nu se elimină
împreună cu resturile menajere.
• Bateriile/acumulatorii pot conţine substanţe nocive dăunătoare mediului. De
aceea, eliminaţi neapărat bateriile/
acumulatorii corespunzător dispoziţiilor
legale în vigoare.
Indicaţii privind conformitatea
Aparatul corespunde cerinţelor fundamentale
şi celorlalte prevederi relevante ale Directivei
CEM 2004/108/CE, ale Directivei privind
aparatele de joasă tensiune 2006/95/CE
precum şi Directivei privind designul ecologic
2009/125/CE (Ordonanţa 1275/2008,
anexa II, nr.1).
Importator
KOMPERNASS GMBH
BURGSTRASSE 21
44867 BOCHUM, GERMANIA
www.kompernass.com
Garanţia şi service-ul
Pentru acest aparat, se acordă o garanţie de
3 ani începând cu data cumpărării. Aparatul
a fost produs cu grijă şi verificat cu scrupulozitate înaintea livrării. Păstraţi bonul de casă
pentru a dovedi cumpărarea. Dacă aveţi
solicitări privind garanţia, contactaţi telefonic
centrul dumneavoastră de service. Numai
astfel poate fi asigurată o expediere gratuită
a produsului dumneavoastră.
Garanţia acoperă numai defectele de material sau de fabricaţie, nu şi deteriorările rezultate în urma transportului, piesele de uzură
sau deteriorările apărute la componentele
fragile, de ex. comutatoare sau acumulatoare.
Aparatul este destinat numai pentru uz privat
şi nu pentru o utilizare profesională. În cazul
- 23 -

manevrării abuzive sau necorespunzătoare,
uzului de forţă şi intervenţiilor care nu au fost
realizate de către filiala noastră autorizată
de service, garanţia îşi pierde valabilitatea.
Drepturile dumneavoastră legale nu sunt limitate prin această garanţie.
Perioada de garanţie nu este prelungită după
realizarea reparaţiilor realizate în perioada
garanţie. Acest lucru este valabil şi pentru
piesele înlocuite şi reparate. Deteriorările şi
deficienţele prezente deja la cumpărare trebuie semnalate imediat după despachetare,
însă cel târziu la două zile după data cumpărării. Reparaţiile necesare după expirarea
perioadei de garanţie se efectuează contra
cost.
R
Kompernass Service Romania
Tel.: 031/82 70 1 70
e-mail: support.ro@kompernass.com
- 24 -
 Loading...