


KOMPERNASS GMBH
BURGSTRASSE 21 · D-44867 BOCHUM
www.kompernass.com
ID-Nr.: SAS7.2A1-09/10-V1
IAN: 58810
Handheld Vacuum Cleaner SAS 7.2 A1
7
Handheld Vacuum
Cleaner
Operating instructions
Aspirator de mână
Instrucţiunile
Akku-Handstaubsauger
Bedienungsanleitung
Punjivi ručni usisavač
Upute za upotrebu
Акумулаторна ръчна
прахосмукачка
Ръководство за експлоатация
ΕΕππααννααφφοορρττιιζζόόμμεεννοο ηηλλεεκκττρριικκόό
σσκκοουυππάάκκιι χχεειιρρόόςς
Οδηγίες χρήσης
R
CV_58810_SAS72A1_LB7.qxd 28.10.2010 16:52 Uhr Seite 1
SAS 7.2 A1
1
2
3
4
5
6
7
8
9
0
CV_58810_SAS72A1_LB7.qxd 28.10.2010 16:52 Uhr Seite 4

- 1 -
Content Page
Intended Usage 2
Important safety instructions 2
Items supplied 3
Appliance description 3
Technical data 4
Information about the batteries 4
Installation of the wall holder 4
Charging 5
Operation 5
Cleaning 6
Disposal 6
Warranty and Service 7
Importer 7
Read the operating instructions carefully before using the device for the first time and preserve this booklet
for later reference. Pass this manual on to whoever might acquire the device at a future date.

- 2 -
Handheld Vacuum
Cleaner
Intended Usage
This cordless hand-held vacuum cleaner may only
be used to vacuum dry or wet surfaces resp. dry or
wet materials and fluids. People or animals may not
be vacuumed with this appliance. Any other usage
of, or modification to, the appliance is deemed to
be improper usage and carries the risk of serious
personal injury. The manufacturer accepts no liability for damages that result from improper use of the
appliance or are caused by the incorrect operation
of it. The appliance is not intended for commercial
use.
Important safety instructions
To avoid potentially fatal electric
shocks:
• Do not charge or use the appliance outdoors.
• Never use the hand vacuum cleaner if the cable,
plug or casing are damaged.
• To avoid risks, arrange for damaged power cables
and/or plugs to be replaced as soon as possible
by a qualified specialist or by our Customer
Services.
• Arrange for repairs to be carried out only by
specialist workshops. Under no circumstances
should you open the appliance yourself. Interferences that are not carried out by a specialist
workshop could lead to physical injuries.
• Before switching the hand vacuum cleaner on,
ensure that the mains voltage corresponds to
the voltage indicated in the technical data for
the appliance.
• Never touch the power supply or the appliance
with wet or damp hands.
• Do not use the power adapter with an extension
cable; connect the power adapter directly to
a power socket.
To avoid the risk of injury:
• Do not change any accessories while the appliance is switched on.
• Do not use the hand vacuum for vacuuming
up sharp objects or glass shards.
• Never vacuum up burning matches, glowing
ashes or cigarette butts.
• Do not use the hand vacuum for vacuuming up
chemical products, stone dust, gypsum, cement
or similar particles.
• This appliance is not suitable for use with inflammable and explosive substances or chemical
and aggressive liquids.
• Always store the appliance indoors. To prevent
accidents, keep the appliance in a dry location
when not in use.
• Under extreme conditions, leaks in the battery cells
may occur. In the event that battery fluid comes
into contact with skin or eyes, the affected area
must be rinsed off with water immediately.
Contact a physician.
Tips for safety:
• This appliance is not intended for use by individuals
(including children) with restricted physical, physiological or intellectual abilities or deficiences in
experience and/or knowledge unless they are
supervised by a person responsible for their safety
or receive from this person instruction in how the
appliance is to be used. Children should be supervised to ensure that they do not play with the
appliance.
- 3 -
• Use only accessory parts recommended by the
manufacturer.
• The power adapter may not be used for other
purposes. Never carry the wall holder or the
power adapter by the cable. Do not pull on the
cable when you want to move the appliance.
• Always grip the power plug to disconnect the
appliance from the power supply.
• Always be sure to keep the hand vacuum away
from heating elements, ovens or other heated
appliances and surfaces.
• Always make certain that the ventilation slits are
open. A blocked ventilation circuit can result in
overheating and damage to the appliance.
• This product contains rechargeable NiMH batteries.
Do not thow the batteries into a fire and do not
subject them to high temperatures.
There is the risk of an explosion!
• Take special care when using the hand vacuum
on stairs.
• Do not use the hand vacuum without the dust
filter inserted.
• Do not use the power adapter for a different product and do not attempt to charge this appliance
with a different charging station. Use only the
charging station supplied with this appliance.
Items supplied
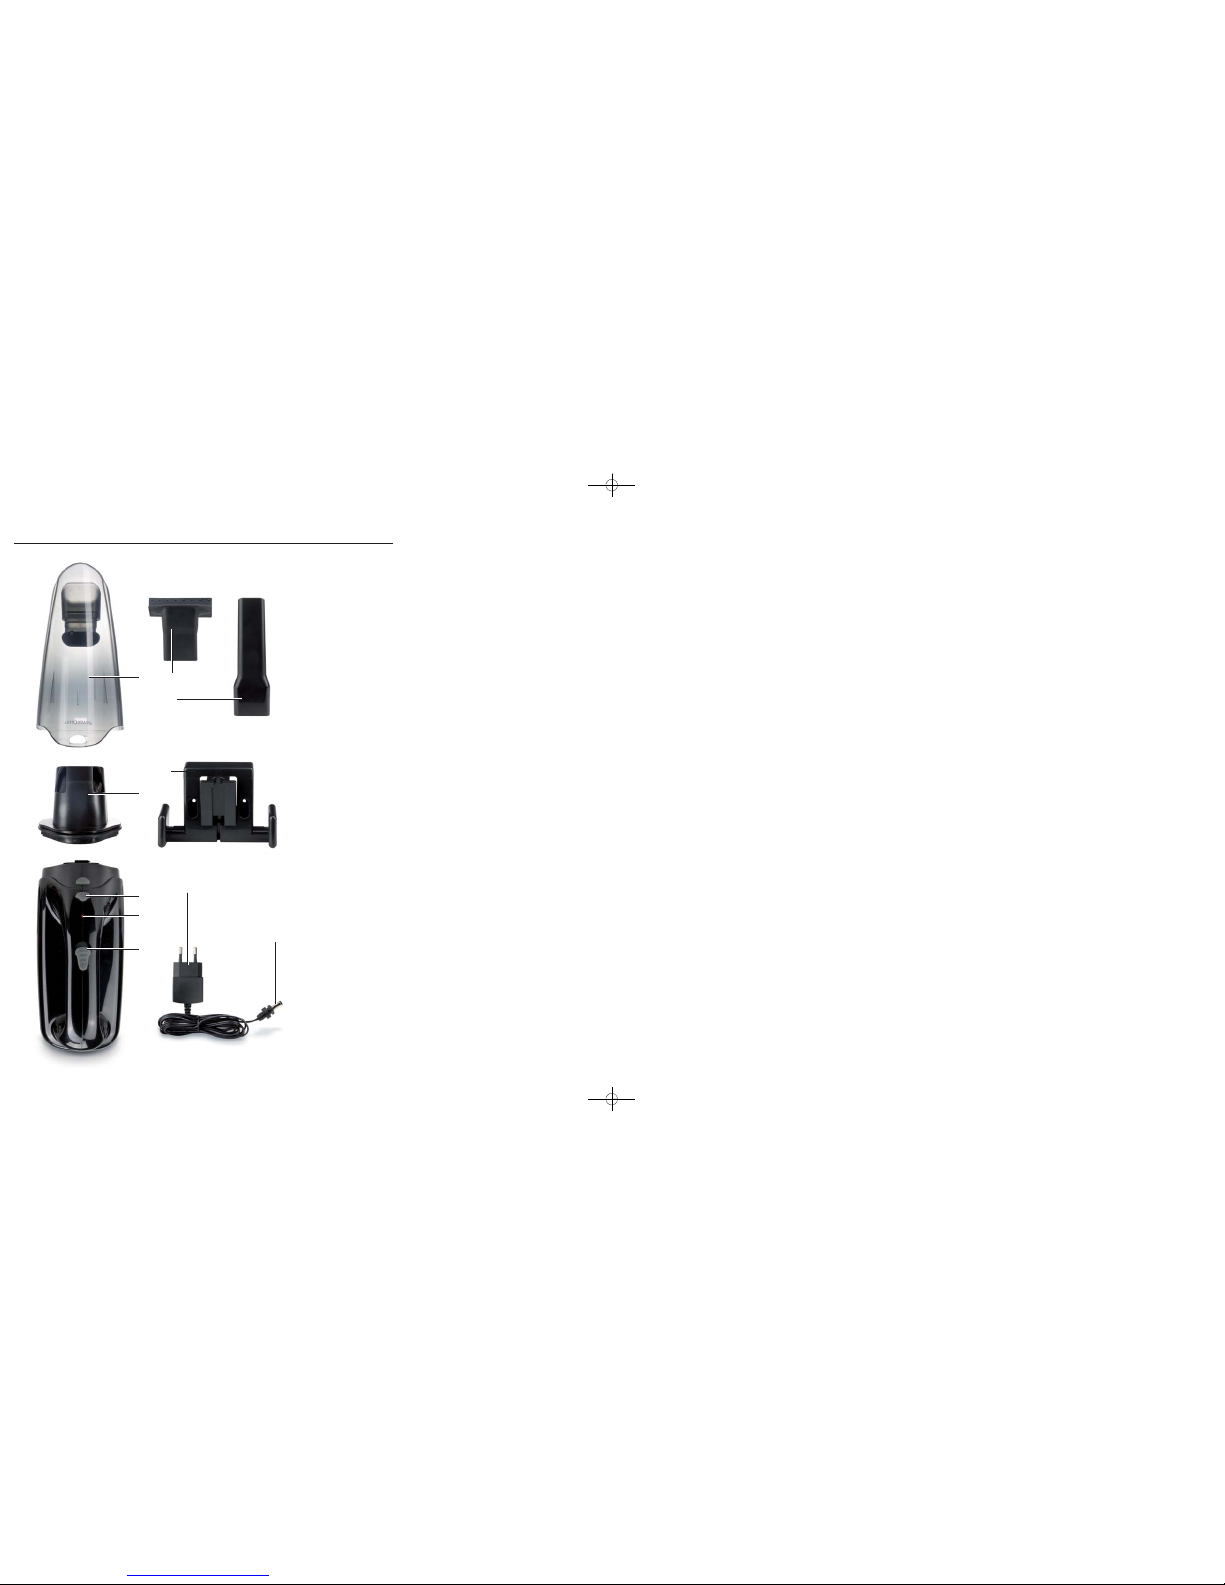
Hand-Held Vacuum Cleaner
Crevice tool
Wet suction nozzle
Wall holder
Assembly material
Power transformer
Operating instructions
Check the items supplied directly after unpacking
for completeness. Remove all packaging materials
from the appliance, especially the protective cap
over the on/off switch.
Appliance description
1 Wet suction nozzle
2 Crevice nozzle
3 Wall holder
4 Power adapter
5 Barrel plug
6 On/Off switch
7 Charge indicator lamp
8 Unlocking button
9 Dust Filter with separate dust-bag
0 Dirt container
Note:
This appliance is supplied with non-charged batteries.
The batteries must be charged for 24 hours before
the first use.

- 4 -
Technical data
Power adapter 4
Input voltage: 100 - 240 V
~
50/60 Hz
200 mA
Output voltage : 10 V
200 mA
Protection class: II
Type designation: HK-S-100A020-EU
aapppplliiaannccee
Input voltage: 10 V
200 mA
Battery: 7,2 V
BBaatttteerriieess
Capacity: 1300 mAh
Batteries: 6 x 1.2 V Sub-C
Ni-MH
HR14/HRM 26/50
Information about the batteries
1. This hand vacuum cleaner is operated by recharge-
able Ni-MH batteries.
Before using the cableless hand vacuum cleaner
for the first time, the batteries must be charged
for at least 24 hours.
2. The batteries reach their full capacity after a
charging period of 24 hours. For care of the batteries we recommend the following: after the batteries are charged, remove the power adapter
4 from the mains power socket. Reconnect the
power adapter 4 again with the mains power
socket when the suction power of the appliance
is noticeably weaker.
Installation of the wall holder
Mortal danger!
Ensure that there are no power cables or other conduits or pipes in the wall at the location where you
intend to bore the holes for the wall holder 3.
It would be a potentially fatal risk to bore into a
current carrying electric cable!
1. Place the barrel plug 5 of the power adapter 4
into the wall holder 3 as shown in the diagramme.
Secure the barrel plug 5 by turning it.
2. Select a suitable installation location for the wall
holder 3: It should present no problem with
taking the hand vacuum cleaner out of it and a
mains power socket for the power adapter 4
must be accessible.
3. Bore two holes with a spacing of approx. 58mm.
Use the wall holder 3 to mark the boreholes:
this will ensure the spacing is correct. The boreholes must be suitable for 5 mm wallplugs.
4. Insert the wallplugs into the boreholes and, using the
screws, firmly screw the wall holder 3 to the wall.
5. You can place the nozzles on the lateral accessories holder.
6. Connect the power adapter 4 to a mains power
socket.
- 5 -
Charging
Note:
Check to ensure that the on/off switch 6 has been
slid back (to the position "0") before starting the
charging process.
• Place the hand vacuum cleaner from above into
the wall holder 3 so that the barrel plug 5 slips
into the socket on the hand vacuum cleaner.
The charge indicator lamp 7 glows red and the
charging process begins.
IMPORTANT:
• When the charging process is complete, which
may take 12 to 15 hours for completely discharged batteries, the device switches over to a
trickle charge (maintenance function) automatically. Nevertheless, in order to avoid possible
damage to the batteries, do not leave the appliance permanently connected to the power
adapter 4.
• Reconnect the appliance with the power adapter 4 when the suction power has become
noticeably weaker.
Note:
The hand vacuum cleaner can also be charged
directly via the power adapter 4. For this, remove
the barrel plug 5 with a slight twist from the wall
holder 3 and insert it into the socket on the hand
vacuum cleaner.
Operation
Warning:
The suction opening must always be open and
unblocked. Blockages lead to overheating and damage to the motor.
Tips:
• Make certain that the dust filter 9 is always
inserted before using the appliance.
• As the maximum, suck up only as much liquid as
will fill the dirt container 0 to the MAX mark.
1. Take the hand vacuum cleaner from the wall holder 3 or, if you do not use the wall holder 3,
remove the barrel plug 5 from the socket.
2. If required, place the appropriate nozzle into the
suction opening:
• the crevice nozzle 2, to clean narrow and
difficult to reach locations.
• the wet suction nozzle 1 to vacuum liquids up.
Note:
After you have vacuumed up liquids, immediately
clean the dirt container 0. Otherwise bacteria and
microbes could form in it! Ensure that the dust filter
9/der dust filter bag is completely dry before
using the appliance again.
3. To switch the appliance on, slide the on/off
switch 6 forwards.
4. When you have finished using it, slide the on/
off switch 6 to the rear.
Place the hand vacuum in the wall holder 3
and start the charging process when the vacuum
power has become noticeably weaker.
- 6 -
Cleaning
To achieve the best results, empty the dirt container 0
and clean the dust filter 9 after every use.
IMPORTANT:
Do not use aggressive, chemical or abrasive cleaning
agents. These could damage the surfaces of the appliance.
1. To open the dirt container 0, press the unlocking
button 8 and remove the dirt container 0.
2. Remove the dust filter 9 from the dirt container 0.
3. Empty the dirt container 0.
4. Pull the dust filter bag with its mounting out of the
dust filter 9.
5. Rinse the dust filter bag in cold water and then
wait until it is completely dry again before you
place it back into the dust filter 9. Do not dry it
with hot air.
6. Place the dust filter 9 back into the dirt container 0. Ensure that the dust filter 9 is seated
squarely and that the rubber lip seals the dirt
container 0.
7. Replace the dirt container 0 back onto the
motor block:
• Push the plastic nose on the underside of the
hand vacuum cleaner into the recess on the
dirt container 0.
• Press the unlocking button 8 and, at the same
time, slide the dirt container 0 onto the motor
block.
• Release the unlocking button 8 so that the
restraint grips into the recess. The dirt container 0 now sits firmly on the motor block.
8. Clean the housing and both nozzles with a lightly
moistened cloth. For stubborn soiling use a mild
detergent on the cloth.
9. Dry all parts thoroughly before reusing the appliance or putting it into storage.
Disposal
Do not dispose of this appliance in your
normal domestic waste. This product is
subject to the provisions of European
Directive 2002/96/EC.
Dispose of the appliance through an approved disposal centre or at your community waste facility.
Observe the currently applicable regulations.
In a case of doubt, please contact your waste disposal centre.
Disposal of batteries/cells
Used batteries/cells may not be disposed of in household waste. Every consumer is statutorily obliged to
dispose of batteries at a collection site of his community/city district or at a retail store.
The purpose of this obligation is to ensure that batteries
are disposed of in a non-polluting manner. Only dispose of batteries/cells when they are fully discharged.
Dispose of all packaging materials in an
environmentally friendly manner.
- 7 -
Warranty and Service
The warranty for this appliance is for 3 years from
the date of purchase. The appliance has been manufactured with care and meticulously examined before delivery. Please retain your receipt as proof of
purchase. In the event of a warranty claim, please
make contact by telephone with our Service Department. Only in this way can a post-free despatch for
your goods be assured.
The warranty covers only claims for material and
maufacturing defects, but not for transport damage,
for wearing parts or for damage to fragile components, e.g. buttons or batteries. This product is for
private use only and is not intended for commercial
use. The warranty is void in the case of abusive and
improper handling, use of force and internal tampering not carried out by our authorized service
branch. Your statutory rights are not restricted in
any way by this warranty.
The warranty period will not be extended by repairs
made under warranty. This applies also to replaced
and repaired parts. Any damage and defects extant
on purchase must be reported immediately after unpacking the appliance, at the latest, two days after
the purchase date. Repairs made after the expiration of the warranty period are subject to payment.
DES UK LTD
Tel.: 0871 5000 700
(£ 0.10 / minute)
e-mail: support.uk@kompernass.com
Kompernass Service Ireland
Tel.: 1850 930 412 (0,082 EUR/Min.)
Standard call rates apply. Mobile operators may vary.
e-mail: support.ie@kompernass.com
Kompernass Service Cyprus
Tel.: 800 9 44 01
e-mail: support.cy@kompernass.com
Importer
KOMPERNASS GMBH
BURGSTRASSE 21
44867 BOCHUM, GERMANY
www.kompernass.com
CY

- 8 -
- 9 -
Sadrˇzaj Strana
Upotreba u skladu sa namjenom 10
Važne sigurnosne napomene 10
Obim isporuke 11
Opis uređaja 11
Tehnički podaci 12
Informacije u vezi sa baterijama 12
Montaža zidnog držača 12
Punjenje 13
Rukovanje 13
Čišćenje 14
Zbrinjavanje 14
Jamstvo i servis 15
Uvoznik 15
Upute za rukovanje prije prve upotrebe pažljivo pročitajte i sačuvajte ih za kasnije korištenje. Ukoliko uređaj
dajete trećim osobama, priložite i ove upute.
- 10 -
Punjivi ručni usisavač
Upotreba u skladu sa
namjenom
Punjivi ručni usisavač smije biti korišten isključivo za
usisavanje suhih i mokrih površina, odnosno za usisavanje suhe i mokre nečistoće ili tekućina. Ljudi ili životinje ne smiju biti čišćeni pomoću ovog uređaja.
Svaki drugi način uporabe i svaka promjena uređaja
smatra se nenamjenskom i krije znatnu opasnost od
nastanka nezgode. Proizvođač ne odgovara za štete nastale uslijed nenamjenske uporabe uređaja ili
uslijed pogrešnog načina rukovanja.
Uređaj nije namijenjen za komercijalnu uporabu.
Važne sigurnosne napomene
Da biste izbjegli opasnost po život
uslijed strujnog udara:
• Ne punite ili koristite ovaj uređaj izvan prostorija.
• Ručni usisavač nikada ne koristite, kada su ošte-
ćeni kabel, utikač ili kućište.
• Oštećeni mrežni kabel ili mrežni utikač na zamje-
nu dajte autoriziranom stručnom osoblju, kako bi
bile izbjegnute moguće opasnosti.
• Popravke dajte izvoditi isključivo u stručnoj radio-
nici. Niukom slučaju ne otvarajte uređaj na vlastitu
ruku. Zahvati, koje nije izvršila autorizirana radionica, mogu dovesti do ozljeda.
• Prije uključivanja uređaja provjerite, da napon
naveden u tehničkim podacima uređaja odgovara
mrežnom naponu.
• Mrežni dio ili uređaj nikada ne dirajte mokrim ili
vlažnim rukama.
• Mrežni dio ne koristite zajedno sa produžnim
kabelom, nego ga neposredno priključite na
utičnicu.
Da biste izbjegli opasnost od
ozljeđivanja:
• Ne vršite zamjenu dijelova opreme, dok je
uređaj u pogonu.
• Ručni usisavač ne koristite za usisavanje šiljatih
predmeta ili krhotina stakla.
• Nikada ne usisavajte goruće šibice, žareći pepeo
ili goruće opuške.
• Ručni usisavač nikada ne koristite za usisavanje
kemijskih proizvoda, kamene prašine, gipsa,
cementa ili sličnih tvari.
• Uređaj nije prikladan za zapaljive i eksplozivne
tvari, niti za kemijske ili agresivne tekućine.
• Uređaj uvijek skladištite u zatvorenim prostorijama.
Da biste spriječili nezgode, uređaj nakon uporabe
uvijek čuvajte na suhome mjestu.
• Pod ekstremnim uvjetima na stanicama baterije
može doći do lekaže. U slučaju kontakta tekućine
sa kožom ili očima dotično mjesto odmah mora
biti isprano sa čistom vodom. Potražite liječničku
pomoć.
Ovako ćete sigurno postupati:
• Ovaj uređaj nije namijenjen da bude korišten od
strane osoba (uključujući djecu) sa ograničenim
fizičkim, senzoričnim i mentalnim osobinama
i nedostatkom iskustva ili znanja, osim ako ove
osobe stoje pod nadzorom druge osobe zadužene za njihovu sigurnost, ili ako su od nje primili upute za ispravno korištenje uređaja. Djeca bi
trebala biti pod nadzorom, čime treba biti osigurano da se ne mogu igrati ovim uređajem.

- 11 -
• Koristite isključivo dijelove opreme preporučene
od strane proizvođača.
• Mrežni dio ne smije biti korišten za druge svrhe.
Zidni držač i mrežni dio nikada ne nosite tako, da
visi na kabelu. Ne povlačite kabel, kada želite
premjestiti uređaj.
• Uvijek uhvatite mrežni utikač, kada uređaj želite
odvojiti od dovoda struje.
• Obavezno obratite pažnju na to, da ručni usisavač
ne odlažete pokraj grijaćih tijela, pećnica ili drugih
zagrijanih uređaja ili površina.
• Uvijek obratite pažnju na to, da otvori za ventilaciju ostanu slobodni. Blokirana cirkulacija zraka
može dovesti do pregrijavanja i oštećenja
uređaja.
• Ovaj proizvod sadrži Ni-MH-baterije, koje se
ponovo mogu napuniti. Baterije ne bacajte u
vatru, niti ih izložite visokim temperaturama.
Postoji opasnost od eksplozije!
• Budite posebno pažljivi, kada ručni usisavač
koristite na stubištima.
• Ručni usisavač ne koristite bez umetnutog filtra
za prašinu.
• Mrežni dio ne koristite za druge proizvode i ne
pokušajte uređaj puniti pomoću druge stanice za
punjenej. Koristite isključivo mrežni dio isporučen
zajedno sa ovim uređajem.
Obim isporuke
Punjivi ručni usisavač
Sapnica za fuge.
Sapnica za mokro usisavanje
Zidni držač
Materijal za montažu
Mrežni dio
Upute za uporabu
Neposredno nakon raspakiranja kontrolirajte cjelovitost obima isporuke. Odstranite sve materijale pakiranja od uređaja, posebno zaštitnu kapu iznad
prekidača Uklj/Isklj.
Opis uređaja
1 Sapnica za mokro usisavanje
2 Sapnica za fuge
3 Zidni držač
4 Mrežni dio
5 Šuplji utikač
6 Prekidač Uklj/Isklj
7 Signalna lampica za kontrolu punjenja
8 Tipka za deblokadu
9 Filtar za prašinu sa odvojenom vrećicom za
prašinu
0 Spremnik za nečistoću
Napomena:
Uređaj se isporučuje sa nenapunjenim baterijama.
Prije prve uporabe uređaja baterije moraju biti
punjene 24 sata.

- 12 -
Tehnički podaci
MMrreežžnnii ddiioo 44
Ulazni napon: 100 - 240 V
~
50/60 Hz
200 mA
Izlazni napon: 10 V
200 mA
Zaštitna klasa: II
Naziv tipa: HK-S-100A020-EU
UUrreeđđaajj
Ulazni napon: 10 V
200 mA
Baterija: 7,2 V
BBaatteerriijjee
Kapacitet: 1300 mAh
Akumulator: 6 x 1,2 V Sub-C
Ni-MH
HR14/HRM 26/50
Izjava o sukladnosti za ovaj proizvod dostupna je
na internet stranici www.lidl.hr.
Informacije u vezi sa baterijama
1. Ručni usisavač radi sa Ni-MH-baterijama, koje
mogu ponovo biti napunjene.
Prije prve uporabe ručnog usisavača baterije
moraju biti punjene u trajanju od najmanje 24 sata.
2. Baterije svoj puni kapacitet dostižu nakon vreme-
na punjenja u trajanju od 24 sata. Za održavanje baterija preporučujemo slijedeće: Izvucite nakon završenog punjenja baterija mrežni element
4 iz mrežne utičnice. Mrežni element 4 tek
onda ponovo povežite sa mrežnom utičnicom,
kada snaga usisavanja uređaja osjetno oslabi.
Montaža zidnog držača
Opasnost po život!
Osigurajte, da se ne nalaze električni kablovi ili drugi
vodovi, na primjer vodovodne cijevi u zidu, u kojem
otvore za zidne držače 3 želite izbušiti. Postoji
opasnost po život, ukoliko svrdlom izbušite električni
vod pod naponom!
1. Umetnite šuplji utikač 5 mrežnog elementa 4 na
način prikazan na slijedećoj slici u zidni držač 3.
Fiksirajte šuplji utikač 5 okretanjem.
2. Potražite prikladno mjesto za montažu zidnog
držača 3: Ručni usisavač morate moći bez
problema iz njega izvući, a mrežna utičnica za
mrežni element 4 mora biti na dohvatu.
3. U razmaku od ca. 58 mm izbušite dva otvora.
Koristite zidni držač 3 za označavanje otvora:
Na taj način odstojanje će ispravno biti izmjereno.
Otvori za bušenje moraju odgovarati tiplama
veličine 5 mm.
4. Umetnite tiple u otvore i okretanjem zavrnite
zidni držač 3 uz pomoć vijaka.
5. Sapnice možete nataknuti na bočne držače
pribora.
6. Utaknite mrežni element 4 u mrežnu utičnicu.
- 13 -
Punjenje
Napomena:
Osigurajte, da prekidač Uklj/Isklj 6 bude gurnut
prema nazad (pozicija „0”), prije nego što započnete
sa punjenjem.
• Umetnite ručni usisavač sa gornje strane u zidni
držač 3, tako da šuplji utikač 5 uklizne u utikač
na uređaju. Lampica za kontrolu punjenja 7
svijetli u crvenoj boji i postupak punjenja započinje.
Važno:
• Nakon dovršetka postupka punjenja, što kod
potpuno ispražnjenih baterija može trajati 12 –
15 sati, uređaj automatski prebacuje na održavanje punjenja (funkcija održavanja). Uređaj
ipak ne ostavite permanentno priključenog na
mrežni element 4, kako biste izbjegli eventualna oštećenja baterija.
• Uređaj povežite sa mrežnim elementom 4 tek
onda, kada snaga usisavanja osjetno oslabi.
Napomena:
Ručni usisavač možete i neposredno preko mrežnog
elementa 4 puniti. U tu svrhu izvadite šuplji utikač 5
blagim okretanjem iz zidnog držača 3 i umetnite
ga u utičnicu na ručnom usisavaču.
Rukovanje
Pažnja:
Usisni otvor u svakom trenutku mora biti prohodan
i ne smije biti začepljen. Začepljenja dovode do
pregrijavanja i oštećenja motora.
Napomena:
• Obratite pažnju na to, da filter za prašinu 9
uvijek bude umetnut, kada uređaj koristite.
• Usisajte maksimalno toliko tekućine, dok spremnik za nečistoću 0 ne bude napunjen do oznake MAX.
1. Skinite ručni usisavač sa zidnog držača 3 ili
ukoliko zidni držač 3 ne koristite, izvucite šuplji
utikač 5 iz utičnice.
2. U usisni otvor umetnite odgovarajuću sapnicu
po želji:
• sapnicu za fuge 2, kada želite dospjeti do
uskih i teško dostupnih mjesta.
• sapnicu za mokro usisavanje 1, ako želite
usisati tekućine.
Napomena:
Nakon što ste usisali tekućine, odmah očistite posudu
za nečistoću 0. U protivnom dolazi do stvaranja
klica i bakterija! Obratite pažnju na to, da filtar za
prašinu 9/ili vrećica filtra za prašinu budu potpu-
no osušeni, prije nego što ponovo koristite uređaj.
3. Za uključivanje uređaja prekidač Uklj/Isklj 6
gurnite prema naprijed.
4. Nakon uporabe gurnite prekidač Uklj/Isklj 6
prema nazad.
Umetnite ručni usisavač u zidni držač 3 i za-
počnite sa postupkom punjenja, kada snaga
usisavanja osjetno oslabi.
 Loading...