

4K ACTION CAMERA SAK 4000 A1
4K ACTION CAMERA
Operation and safety notes
IAN 313595
ACTION CAM 4K
Bedienungs- und Sicherheitshinweise
Before reading, unfold both pages containing illustrations and familiarise yourself
with all functions of the device.
Klappen Sie vor dem Lesen die beiden Seiten mit den Abbildungen aus und machen
Sie sich anschließend mit allen Funktionen des Gerätes vertraut.
GB / IE / NI Operation and safety notes Page 5
DE / AT / CH Bedienungs- und Sicherheitshinweise Seite 93
A
1 2 3
13 411
12
11
56 7
10
9
8
B
27 28 29 30
26
25
24
39 40 43
41 42 44
38
37
45 46 47 48 49
00:16:40
15
20 19 18 17 16
22 2123
3607
32
33
35 3436
14
Video mode
Photo
31
Photo mode
Photo
Playback mode

Warning notices and symbols used ..................... Page 8
List of pictograms used .................................................... Page 8
Introduction ............................................................................... Page 10
Intended use .................................................................................... Page 10
Privacy, copyright and data protection .......................................... Page 10
Parts description............................................................................... Page 11
Delivery contents ............................................................................. Page 13
Technical data ................................................................................. Page 13
General safety notes ......................................................... Page 16
Safety instructions for rechargeable batteries ............................... Page 18
Before use ................................................................................... Page 19
Initial use ...................................................................................... Page 20
Charging the rechargeable battery................................................Page 20
Replacing the rechargeable battery ................... Page 21
Inserting / removing the memory card ............................................Page 22
Explanation of button functions ...................................................... Page 24
Switching the product on and off ................................................... Page 24
Changing modes ............................................................................. Page 25
Recording video...............................................................................Page 25
Taking photos .................................................................................. Page 26
Viewing videos and photos.............................................................Page 26
Deleting videos and photos ............................................................ Page 29
5 GB/IE/NI

Configuring the product ................................................. Page 31
Adjust video settings ........................................................................ Page 31
Adjust photo settings ....................................................................... Page 45
Setting effects ................................................................................... Page 58
General settings .................................................................... Page 67
Inserting the product into the
waterproof case .................................................................... Page 80
Fitting the helmet mount ................................................ Page 81
Memory and viewing options .................................. Page 82
Connecting the product to a TV ...................................................... Page 82
Connecting the product to a computer .......................................... Page 82
Saving videos and photos to your computer ................................. Page 83
Cleaning and care ................................................................ Page 83
Cleaning and caring for the waterproof case
... Page 84
Storage during non-use .................................................. Page 84
Troubleshooting.....................................................................Page 85
Disposal ......................................................................................... Page 86
6 GB/IE/NI

Warranty ..................................................................................... Page 87
Conditions of warranty .................................................................... Page 87
Warranty period and legal claims for defects...............................Page 88
Scope of warranty ........................................................................... Page 88
Processing of warranty claims ........................................................ Page 89
Service ............................................................................................ Page 90
Supplier / Producer / Importer ......................................................... Page 91
EU Compliance information ......................................... Page 91
7 GB/IE/NI
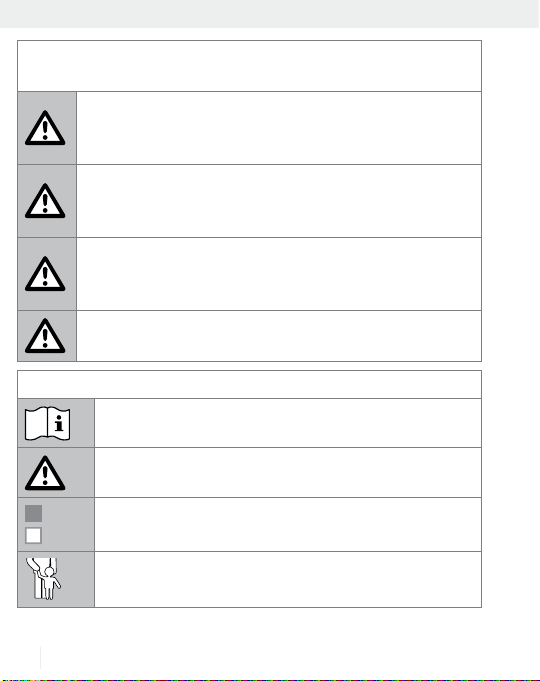
Warning notices and symbols used
These instructions for use contain the following warnings:
DANGER! This symbol, along with the signal word
“DANGER“, indicates a life-threatening situation which
could cause fatal injuries unless avoided.
WARNING! This symbol, along with the signal word
“WARNING“, indicates a dangerous situation which
could cause serious injuries unless avoided.
CAUTION! This symbol, along with the signal word
“CAUTION“, indicates a low-risk danger which could
cause minor to moderate injuries unless avoided.
ATTENTION! This symbol, along with the signal word
“
ATTENTION“, indicates that property damage is possibl
List of pictograms used
Refer to instructions for use!
Observe the warnings and safety notes!
Warnings
Instructions
Never leave children unattended with the packaging
material or the product.
e.
8 GB/IE/NI
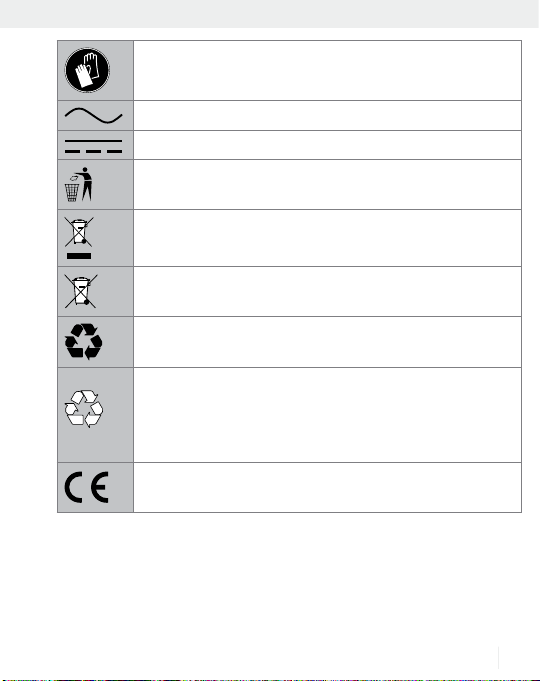
Li-Ion
Wear safety gloves!
Alternating voltage
Direct current
Products and packaging should be disposed of in an
environmentally-friendly manner.
Symbol identifying electrical and electronic devices
Environmental damage through incorrect disposal of
the rechargeable battery!
The packaging is made from 100 % recycled paper.
Like all batteries, lithium batteries should be disposed
of in commercial battery collection boxes and never in
the household waste. Consumers are legally obliged
to do this.
This product complies with the applicable productspecific European directives.
9 GB/IE/NI
4K Action camera SAK 4000 A1
Introduction
We congratulate you on the purchase of your new product.
You have chosen a high quality product. The instructions
for use are part of the product. They contain important information concerning safety, use and disposal. Before using the
product, please familiarise yourself with all of the safety information
and instructions for use. Only use the product as described and for
the specified applications. If you pass the product on to anyone else,
please ensure that you also pass on all the documentation with it.
Intended use
This information electronics product is intended for the creation of
personal films and photographs both indoors and outdoors, e.g.
when climbing, cycling or diving.
Any use other than described above or any modification of the p
is prohibited and will result in damage. The manufacturer does not assume any liability for damage arising from improper use. This product
is not intended for commercial use.
roduct
Privacy, copyright and data protection
The videos and photographs made with this product are to be produced for private use. Refrain from creating unauthorized videos and
photographs that breach copyright. Also note that the creation of
videos and photographs at events, performances, exhibitions or
10 GB/IE/NI
recordings in commercial environments goes against copyright law
and other legal rights, even if these images are created for private use.
Please observe and protect the personal rights of others–this also and
specifically applies to country-specific particularities. Ensure that the
created video and photograph files cannot be used by unauthorized
persons (e.g. put on the internet).
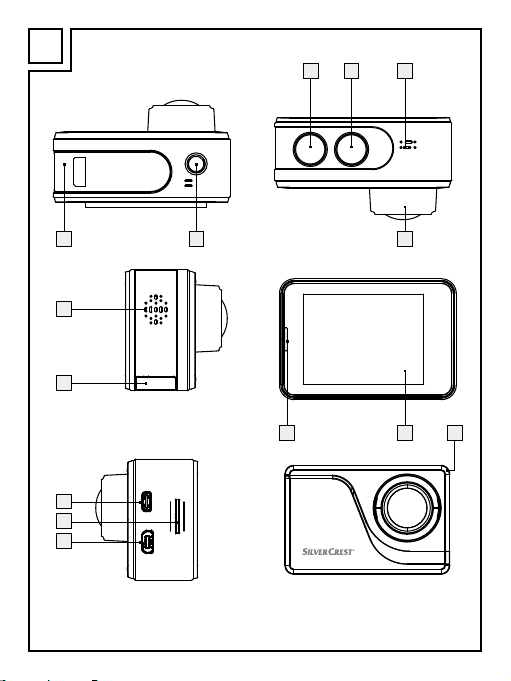
Parts description
Camera (Fig. A):
1
On / off / mode button
2
Shutter release / select button
3
Internal microphone
4
Lens
5
LCD touch display
6
Status LED
7
LED charge display
8
Mini USB port
9
Micro SD card slot
10
Micro HDMI port
11
Battery compartment cover
12
Speaker
13
Tripod socket opening
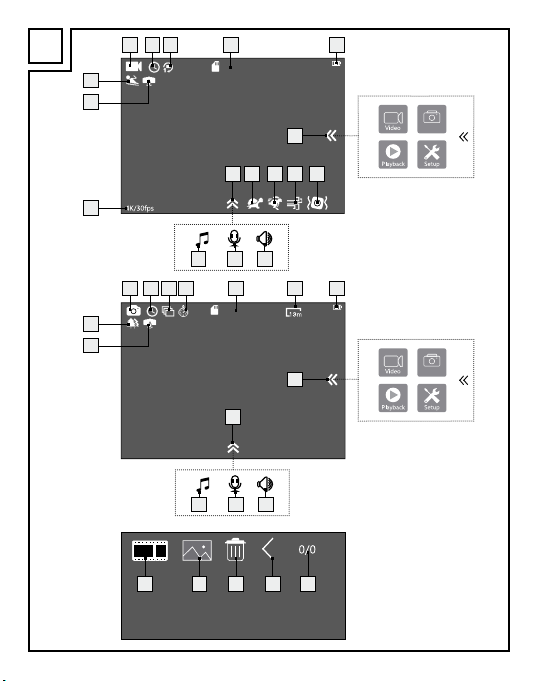
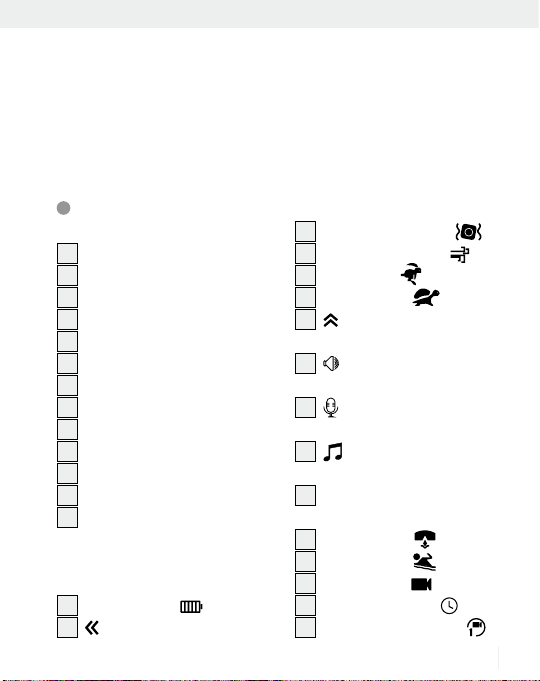
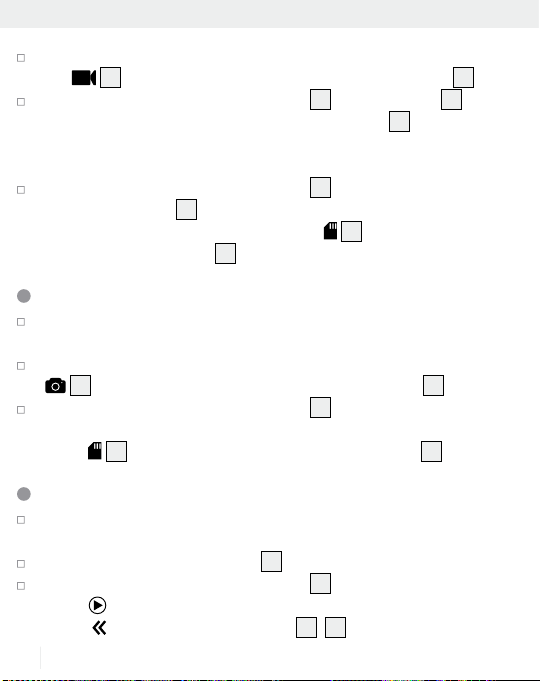
Display screen (Fig. B):
Video Mode:
14
Battery status
15
-touch button (mode menu)
16
Image stabilisation
17
Wind suppression
18
Time lapse
19
Slow motion
20
-touch button settings
(audio / mic / speaker)
21
-touch button
(speaker on / off)
22
-touch button
(microphone on / off)
23
-touch button
(sound on / off)
24
Display “Video resolution“
4K/30 fps**
25
Diving mode
26
Scene mode *
27
Video mode
28
Interval shooting
29
Continuous shooting
11 GB/IE/NI
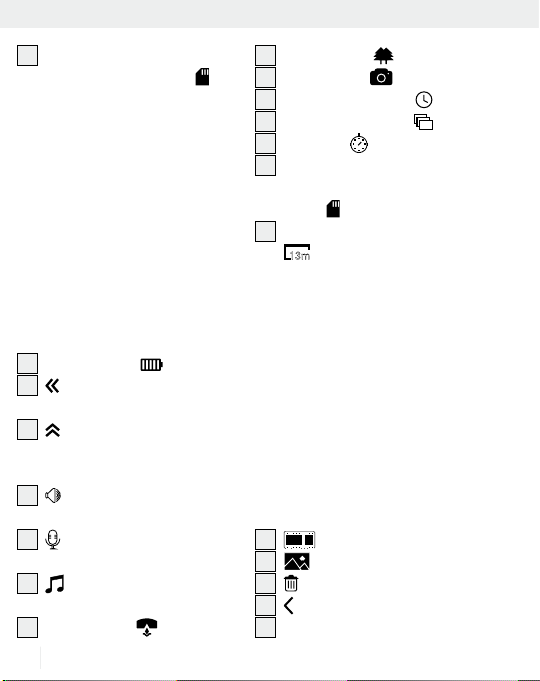
30
Display “Video time remain-
ing on memory card“
* The symbol shown varies ac-
cording to the mode you have
selected (see chapter “Adjust
video settings“).
* The video resolution shown
varies according to the video
resolution you have selected
(see chapter “Adjust video
settings“).
Photo mode:
31
Battery status
32
-touch button (mode
menu)
33
-touch button
(audio / mic /
speaker settings)
34
-touch button
(speaker on / off)
35
-touch button
(microphone on / off)
36
-touch button
(sound on / off)
37
Diving mode
12 GB/IE/NI
38
Scene mode ***
39
Photo mode
40
Time lapse interval
41
Continuous shutter
42
Self-timer
43
Display “Remaining image
storage space on memory
card“
44
Display “Photo resolution“
13m
****
*** The symbol shown varies
according to which mode y
ou
have selected (see chapter
“Adjust photo settings“).
**** The photo resolution varies
according to which photo
resolution you have sele
cted
(see chapter “Adjust photo
settings“).
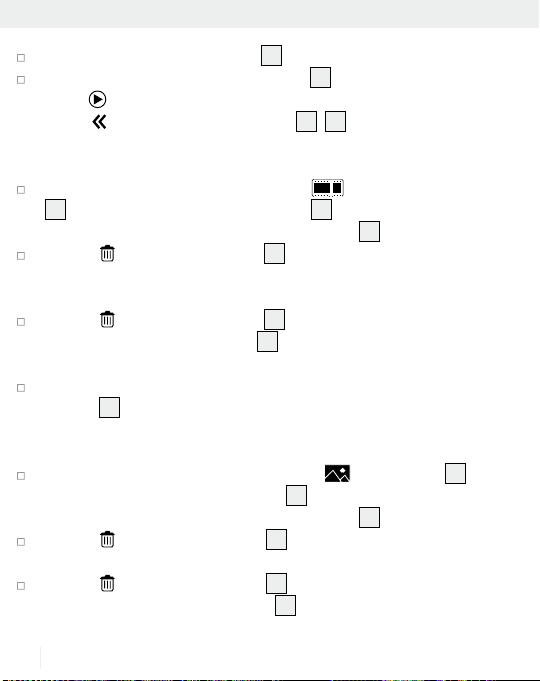
Playback mode:
45
-touch button (video)
46
-touch button (photo)
47
-touch button (delete)
48
-touch button (back)
49
Display “Disk space“ 0/0

Accessories (Fig. C):
50
Frame mount
51
Helmet mount (flat)
52
Helmet mount (curved)
53
3M adhesive labels for
mounting
54
Quick-release mount
Delivery contents
55
Universal adaptor
56
USB cable
57
Screw
58
Locking clip (waterproof
59
Waterproof case
60
Screwdriver
case)
Remove all packaging materials and check that all parts are complete and undamaged. If the delivery is incomplete or damaged,
please contact the manufacturer.
1 4K Action camera
1 Waterproof case
1 USB cable
1 Li-ion rechargeable battery
B028115350001
1 Universal adapter
2 Helmet mounts
1 Quick-release mount
2
3M adhesive labels for mounting
2 Screws
1 Screwdriver
1 Set of operating instructions
1 Frame mount
Technical data
Camera:
Model no.: SAK 4000 A1
Sensor: 13 MP CMOS sensor
LCD touch display: 5.1 cm / 2
13 GB/IE/NI

Dimensions (without
waterproof case): approx. 60 x 41 x 32.5 mm
Weight: approx. 77 g (incl. rechargeable battery)
Operating temperature: 0 °C to 35 °C
Storage temperature: -10 °C to +60 °C
Humidity: 0 % to 75 %
IP protection class: Only when used with waterproof case:
IP68 / 30 m deep / 30 minutes
Memory (external): Micro SD / SDHC memory cards up to
64 GB / at least class 10 required
Lens:
Wide-angle lens: 160 °
Aperture: F2.8
Focal length: 2.27
Focus area: 20 mm - ∞
Focus mode: fixed focus
Video:
Maximum resolution: 3840 x 2160P30
2720 x 1530P30
1920 x 1080P60
1280 x 720P120
Compression format: H.264
File format: MOV
Image stabiliser: digital image stabilisation
14 GB/IE/NI

Photos:
Maximum resolution: 5120 x 3840 pixel
4640 x 3480 pixel
4320 x 3240 pixel
4208 x 3156 pixel (native)
4320 x 2430 pixel
3840 x 2160 pixel
2592 x 1944 pixel
1920 x 1080 pixel
Compression format: JPEG
File format: JPG
Connections:
USB: mini USB port
HDMI: Micro HDMI
Tripod socket: ¼
Power supply:
Rechargeable battery: Lithium-ion, 3.8 V / 1100 mAh / 4.18 Wh
(replaceable)
Model no.: B028115350001
Manufacturer: Shenzhen TAT Electronics Co., Ltd
USB type: mini USB
USB DC-IN: 5 V
, 900 mA
15 GB/IE/NI
General safety notes
BEFORE USING THIS PRODUCT, PLEASE FAMILIARISE YOURSELF
WITH ALL OF THE SAFETY NOTES AND INSTRUCTIONS FOR
USE! PLEASE ALSO INCLUDE ALL DOCUMENTATION WHEN
PASSING THIS PRODUCT ON TO OTHERS!
DANGER! DANGER TO LIFE AND RISK OF
ACCIDENTS FOR INFANTS AND CHILDREN!
Never leave children unsupervised with the packaging material. The packaging material poses a suffocation hazard.
Children frequently underestimate the dangers. The packaging
material is not a toy.
This product may be used by children aged 8 years and up,
as well as by persons with reduced physical, sensory or mental
capacities, or those lacking experience and / or knowledge, as
long as they are supervised or instructed in the safe use of the
product and they understand the associated risks. Do not allow
children to play with the product. Never allow children to clean
or maintain this product unsupervised. This product is not a toy.
CAUTION! RISK OF INJURY!
Before using the product, make sure that it is not damaged! Never
use a damaged product!
16 GB/IE/NI

If you notice anything unusual during use (e.g. unusual noise,
strange odour or smoke), switch off the product immediately. If
this happens, remove the battery from the product and remove
any connected cables. Do not use the product until it has been
examined by a qualified person.
Product repairs must be performed by an authorised speciality
company or customer service. Improper repairs may place the
user in considerable danger. This will also void the warranty.
Keep the product away from water and other liquids, as well as
from dripping water and spray water (unless using with the waterproof case 59). Not doing so can cause the product to malfu
nction.
Never open the housing of the product. It has no internal parts
requiring maintenance.
Do not place burning candles or open fire on or next to the
product.
Do not throw the product into fire or expose it to temperatures
higher than 60 °C.
Only recharge the product using the included USB cable 56.
Never use the product while it is charging.
ATTENTION! RISK OF PROPERTY DAMAGE!
Do not drop the product.
Do not place heavy objects on the product.
Do not place heavy objects, e.g. furniture, on the USB cable
56
.
17 GB/IE/NI

Do not use the product near heat sources or other appliances
emitting heat!
The product‘s rechargeable battery can only be connected with
a USB 3.0 connection or higher. Due to high power consumption
while charging, the camera‘s rechargeable battery can only be
charged using a USB 3.0 connection or higher. Using a USB 2.0
connection or smaller is not permitted. Failure to observe this can
cause damage to the USB host.
Safety instructions for
rechargeable batteries
DANGER TO LIFE! Keep the rechargeable batteries out of the
r
each of children. Seek immediate medical attention if swallow
EXPLOSION HAZARD! Never short-circuit and / or open
rechargeable batteries. This could cause batteries to overheat,
catch fire or explode.
Never throw batteries into fire or water.
Do not exert mechanical strain on batteries.
Ensure that the product is not covered, e.g. by other objects,
while the battery is charging.
Risk of rechargeable battery leakage
Avoid extreme environmental conditions and temperatures
which could affect batteries, e.g. radiators / direct sunlight.
If rechargeable batteries have leaked, avoid contact between
skin, eyes and mucous membranes and the chemicals! Flush out
18 GB/IE/NI
ed!

the affected areas with clean water and seek immediate medical
attention!
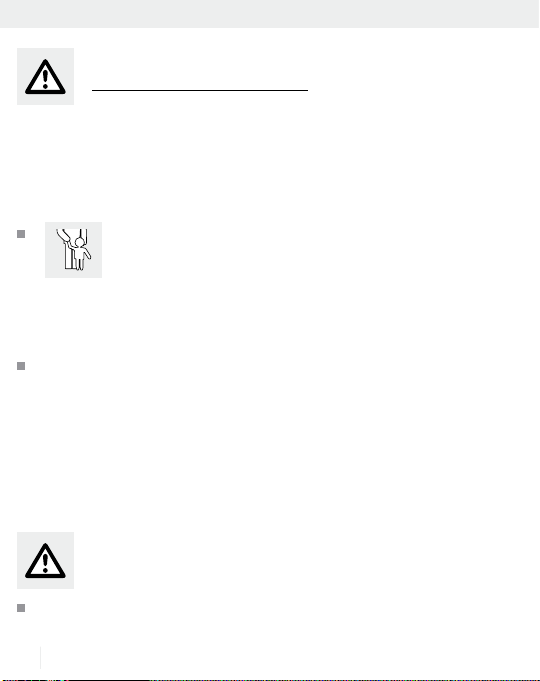
WEAR SAFETY GLOVES! Leaking or damaged
rechargeable batteries can cause caustic burns upon
contact with the skin. Therefore wear suitable protec-
tive gloves in this case.
In the event of a battery leak, remove the rechargeable battery
from the product immediately to prevent damage.
Remove the rechargeable battery if the product will not be used
for an extended period.
Risk of product damage
Only use the battery type specified!
Insert the rechargeable battery according to the polarity marking
(+) and (-) on the battery and the product (see chapter “Replacing the rechargeable battery“).
Clean the contacts on the rechargeable battery and inside the
battery compartment before inserting!
Immediately remove drained rechargeable batteries from the
product.
Before use
Note: Remove all packaging materials from the product.
The action cam does not have its own storage device. It is only possible to take photo / video footage when you have inserted a memory
card (not included).
19 GB/IE/NI
Before use, you must therefore insert a memory card (see chap-
ter “Inserting memory card“). Information about memory card
type can be found in the chapter “Technical data“.
Open the battery compartment cover 11 by pushing it to the
side and lifting it up.
Insert the rechargeable battery and close the battery compartment
11
cover
again, so that it clicks into place.
When inserting the battery, pay attention to the polarity .
Ensure that the battery contacts are pointing towards the lens
4
(also see chapter “Replacing the rechargeable battery“).
Fully charge the battery before first use of the product (see chapter
“Charging the rechargeable battery“). The charging time for the
initial charge is approx. 3 hours.
Initial use
Charging the rechargeable battery
The product can only be connected with suitable USB interfaces
(USB 3.0 and higher) (see chapter “Connecting the product to a computer“). Due to high power consumption while charging, the camera‘s
rechargeable battery can only be charged using a USB 3.0 connection or higher. Using unsuitable USB interfaces can cause damage to
the USB host.
If you are not sure whether your USB interface is suitable, we recommend removing the micro SD card and using a card reader to transfer
photo and video files.
20 GB/IE/NI
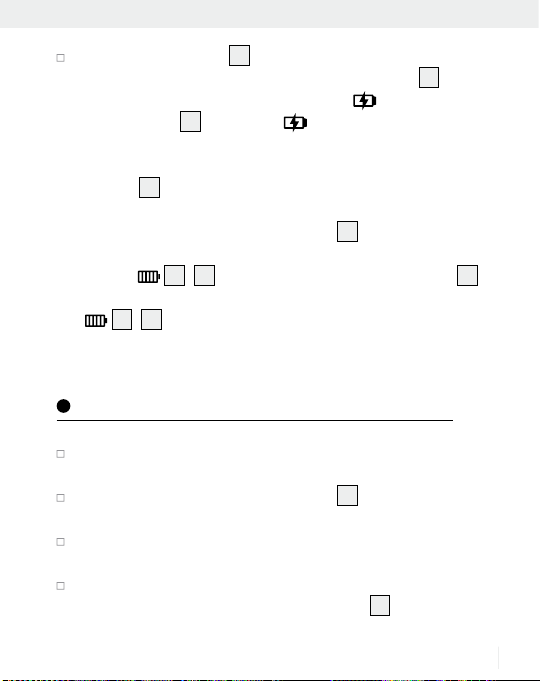
Using the USB cable 56, connect the product to a USB charging
device or a USB device. The LED charge display
up red during charging, and the notice
touch display
5
. The notice will only appear if the product
7
will light
will show in the LCD
is switched on during the charging process. If the product is
switched off during the charging process, only the LED charge
display
7
will continuously light up red.
A fully drained rechargeable battery requires approx. 3 hours
to recharge. The LED charge display
7
turns off automatically
as soon as the charging process is complete. The battery status
symbol
14, 31 is shown on the LCD touch display 5.
Note: Prior to every use, check the display for the battery status
14, 31 and charge the battery if necessary.
If the battery drains fully while the camera is in use, the product
saves the current photo / video and then turns itself off.
Replacing the rechargeable battery
Switch the product off as described in the chapter “Switching the
product on and off“.
Open the battery compartment cover 11 by pushing it to the side
and lifting it up.
Remove the defective rechargeable battery / the battery you wish
to replace by carefully pulling the plastic strip.
Insert the new rechargeable battery (see chapter “Technical data“)
and close the battery compartment cover
clicks into place.
11
again, so that it
21 GB/IE/NI
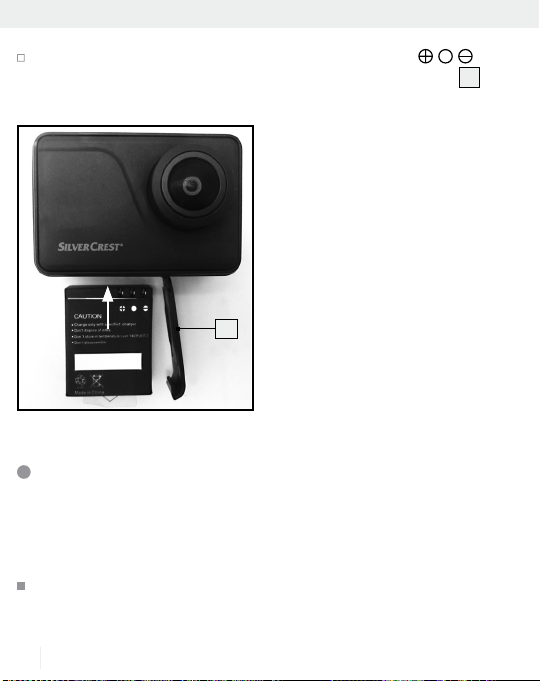
When inserting the battery, pay attention to the polarity .
Ensure that the battery contacts are pointing towards the lens
4
(see figure).
11
The product is ready to use.
Inserting / removing the memory card
Use a micro SD card of the speed class 10 or higher for your videos /
photographs. Memory cards of a lower speed class can cause problems during shooting, such as e.g. blurry videos or omitted frames.
To prevent damage to the product and the micro SD card, never
use force to insert the micro SD card.
22 GB/IE/NI
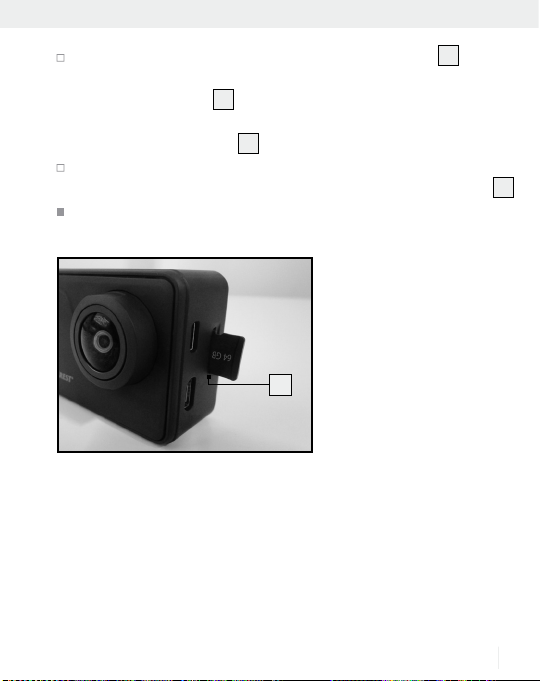
Slide the Micro SD card into the micro SD card slot 9 until it
locks into place. The micro SD card can only be inserted into the
micro SD card slot
9
in one direction. When inserting the micro
SD card, ensure that its contacts are pointing in the direction of
the LCD touch display
5
(see figure).
Carefully press against the micro SD card, e.g. with your finger-
nail or a pen, to remove it again from the micro SD card slot
9
Format new micro SD cards before use (see chapter “General
settings“).
9
.
23 GB/IE/NI
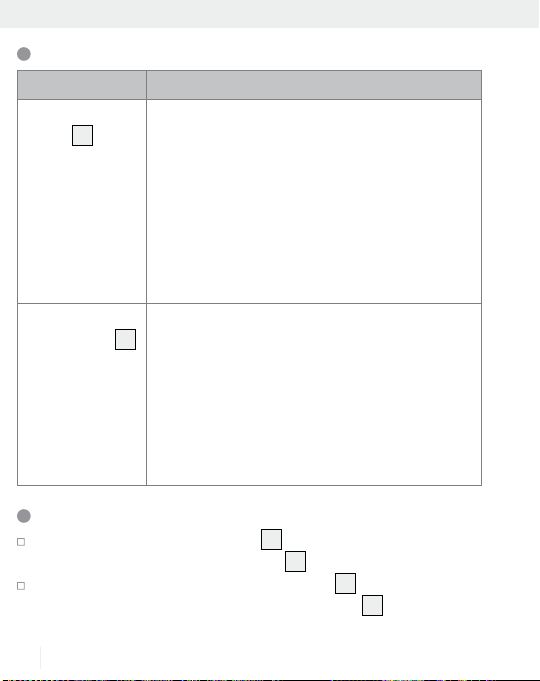
Explanation of button functions
Designation Function
On / off / mode
1
button
- Press and hold for approx. 3 seconds to switch
the product on and off.
-
W
ithin a turned-on mode, press quickly to swi
between the different modes (see chapter
“Changing modes“).
- In the settings menu, press to scroll through the
different menu options (see chapter “Configuring the product“).
- In screensaver mode, press to end the function.
Shutter release /
select button
- In video mode, press to start and press again
2
to stop recording video.
- In photo mode, press to take a single picture.
- In the settings menu, press to confirm a setting /
selection.
- In the menu, hold down to jump back a level
in the menu.
- In screensaver mode, press to end the function.
Switching the product on and off
Hold the on / off / mode button 1 for approx. 3 seconds to
turn the product on. The status LED
Also hold down the on / off / mode button 1 for approx. 3
seconds to turn the product off. The status LED
then turn off.
24 GB/IE/NI
6
will light up blue.
6
will flash and
tch
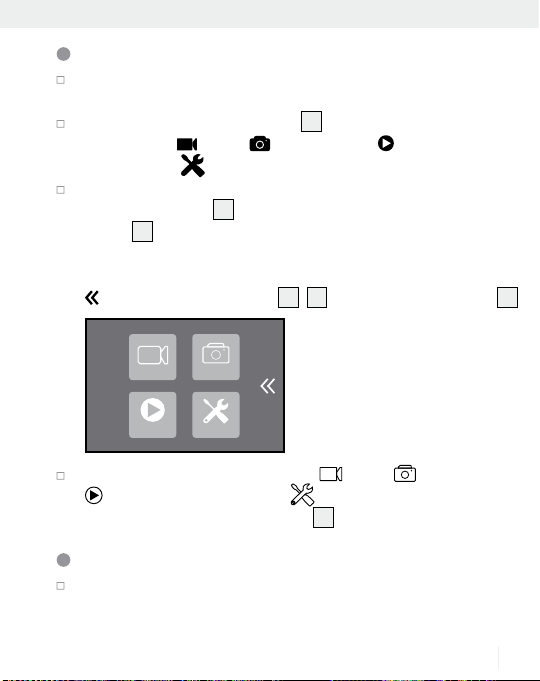
Changing modes
Switch the product on (see chapter “Switching the product on
and off“).
Press the on / off / mode button 1 to change between the
modes video
settings menu
, photo , and playback , or to open the
.
Confirm your selection by tapping the appropriate symbol on the
LCD touch display
2
button
to confirm, the function will be executed immediately
5
. If you press the shutter release / select
and a photograph will be taken.
Note: You can access the menu at any time by tapping on the
-touch button (mode menu) 15, 32 on the LCD touch display 5.
Mode
PhotoVideo
Playback Setup
Choose between the modes video , photo , and playback
, or open the settings menu by tapping the appropriate
symbol on the LCD touch display
Recording video
5
.
Switch the product on (see chapter “Switching the product on
and off“).
25 GB/IE/NI
Make sure that the product is in video mode. The video mode sym-
bol
27 is shown in the top left of the LCD touch display 5.
Press the shutter release / select button 2. The status LED 6
will flash blue. At the top of the LCD touch display
5
, a red
dot will appear with a notice of the current length of the video
to the right.
Press the shutter release / select button 2 again to stop record-
ing. The status LED
“Video time remaining on memory card“
in the LCD touch display
Taking photos
6
will light up continuously blue. The notice
30 will be displayed
5
.
Switch the product on (see chapter “Switching the product on
and off“).
Make sure that the product is in photo mode. The photo symbol
39 is shown in the top left of the LCD touch display 5.
Press the shutter release / select button 2 once to take a single
picture. The notice “Remaining image storage space on memory
card“
43 will be displayed in the LCD touch display 5.
Viewing videos and photos
Switch the product on (see chapter “Switching the product on
and off“).
Press the on / off / mode button 1 to navigate the menu.
Press the shutter release / select button 2 to open playback
mode
on the
26 GB/IE/NI
. Alternatively, you can also open the menu by tapping
-touch button (mode menu) 15, 32.
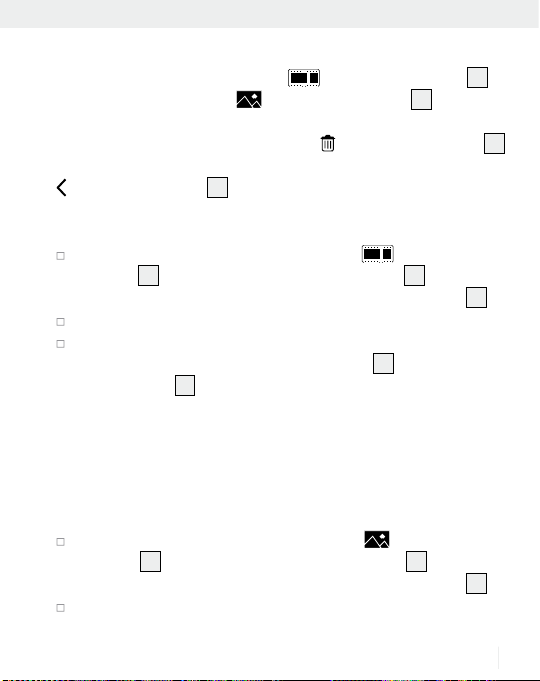
Note: In playback mode, you have the following options: you can
retrieve the video memory via the
the photo memory via the
-touch button (video) 45, or
-touch button (photo) 46, to look at
the photos / videos you have taken.
You can delete photos / videos via the
-touch button (delete) 47.
You can jump back a level in the menu (see figure B) by tapping the
-touch button (back) 48.
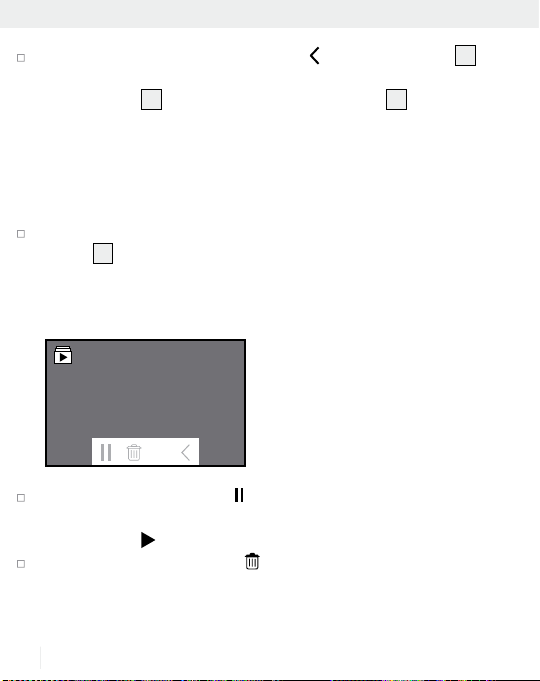
Viewing video files:
Select the video memory by tapping the -touch button
45
(video)
you have taken will be shown on the LCD touch display
at the top of the LCD touch display 5. The videos
5
.
Now tap on a video recording to play the video immediately.
After the video recording has been played, the video file will be
highlighted in red on the LCD touch display 5. Press the on / of
mode button
1
to switch between the different video files in the
f /
video memory.
Note: One file must be highlighted in red for you to be able to
switch between the video files.
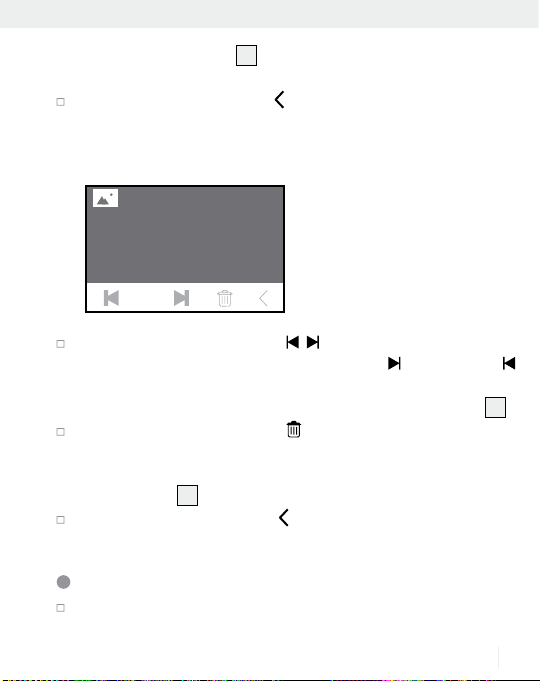
Viewing photo files:
Select the photo memory by tapping the -touch button
46
(photo)
you have taken will be shown on the LCD touch display
at the top of the LCD touch display 5. The photos
5
.
Now tap on a photo to look at it.
27 GB/IE/NI
Close the photo view by tapping on the -touch button (back) 48.
The photo file you viewed will be highlighted in red on the LCD
touch display
5
. Press the on / off / mode button 1 to switch
between the different photo files in the photo memory.
Note: One file must be highlighted in red for you to be able to
switch between the photo files.
In the video or photo archive, press the shutter release / select
2
button
to open a menu list with further operating functions
in the lower edge of the screen.
Video memory:
In the video memory, tap the -touch button (pause) in the bar
further operating functions to pause the playback of the relevant
video. Tap the -touch button (play) to continue playing the vid
In the video memory, tap the -touch button (delete) in the bar
with further operating functions to delete the video you are currently viewing. Confirm the deletion process by tapping “Yes“ in
with
eo.
28 GB/IE/NI
the LCD touch display 5 or cancel the deletion process by tapping “No“.
In the video memory, tap the -touch button (back) in the menu bar
with further operating functions to jump back a level in the menu.
Photo memory:
1/6
In the photo memory, tap the -touch button in the bar with
further operating functions to jump forwards
or backwards
one photo. The number of the photo and the total number of
photos are shown in the top right of the LCD touch display
5
In the photo memory, tap the -touch button (delete) in the bar
with further operating functions to delete the photo you are curr
ently
viewing. Confirm the deletion process by tapping “Yes“ in the LCD
t
ouch display 5 or cancel the deletion process by tapping “N
In the photo memory, tap the -touch button (back) in the bar with
further operating functions to jump back a level in the menu.
Deleting videos and photos
Switch the product on (see chapter “Switching the product on
and off“).
.
o“.
29 GB/IE/NI
Press the on / off / mode button 1 to navigate the menu.
Press the shutter release / select button 2 to open playback
mode
on the
. Alternatively, you can also open the menu by tapping
-touch button (mode menu) 15, 32.
Deleting video files:
Select the video memory by tapping the -touch button (video)
45
at the top of the LCD touch display 5. The videos you have
taken will be shown on the LCD touch display
5
.
Tap the -touch button (delete) 47 and then tap the video file
you wish to delete. The selected file will be marked in red. It is
also possible to select multiple files.
Tap the -touch button (delete) 47 again. A query box will ap-
pear on the LCD touch display
5
, asking whether you want to
delete the selected file.
Confirm the deletion process by tapping “Yes“ in the LCD touch
display
5
or cancel the deletion process by tapping “No“.
Deleting photo files:
Select the photo memory by tapping the -touch button 46
at the top of the LCD touch display
taken will be shown on the LCD touch display
5
. The photos you have
5
.
Tap the -touch button (delete) 47 and then tap the photo file
you wish to delete. The selected file will be marked in red.
Tap the -touch button (delete) 47 again. A query box will
appear on the LCD touch display
5
, asking whether you want
to delete the selected file.
30 GB/IE/NI
 Loading...