

Page 1
118
7
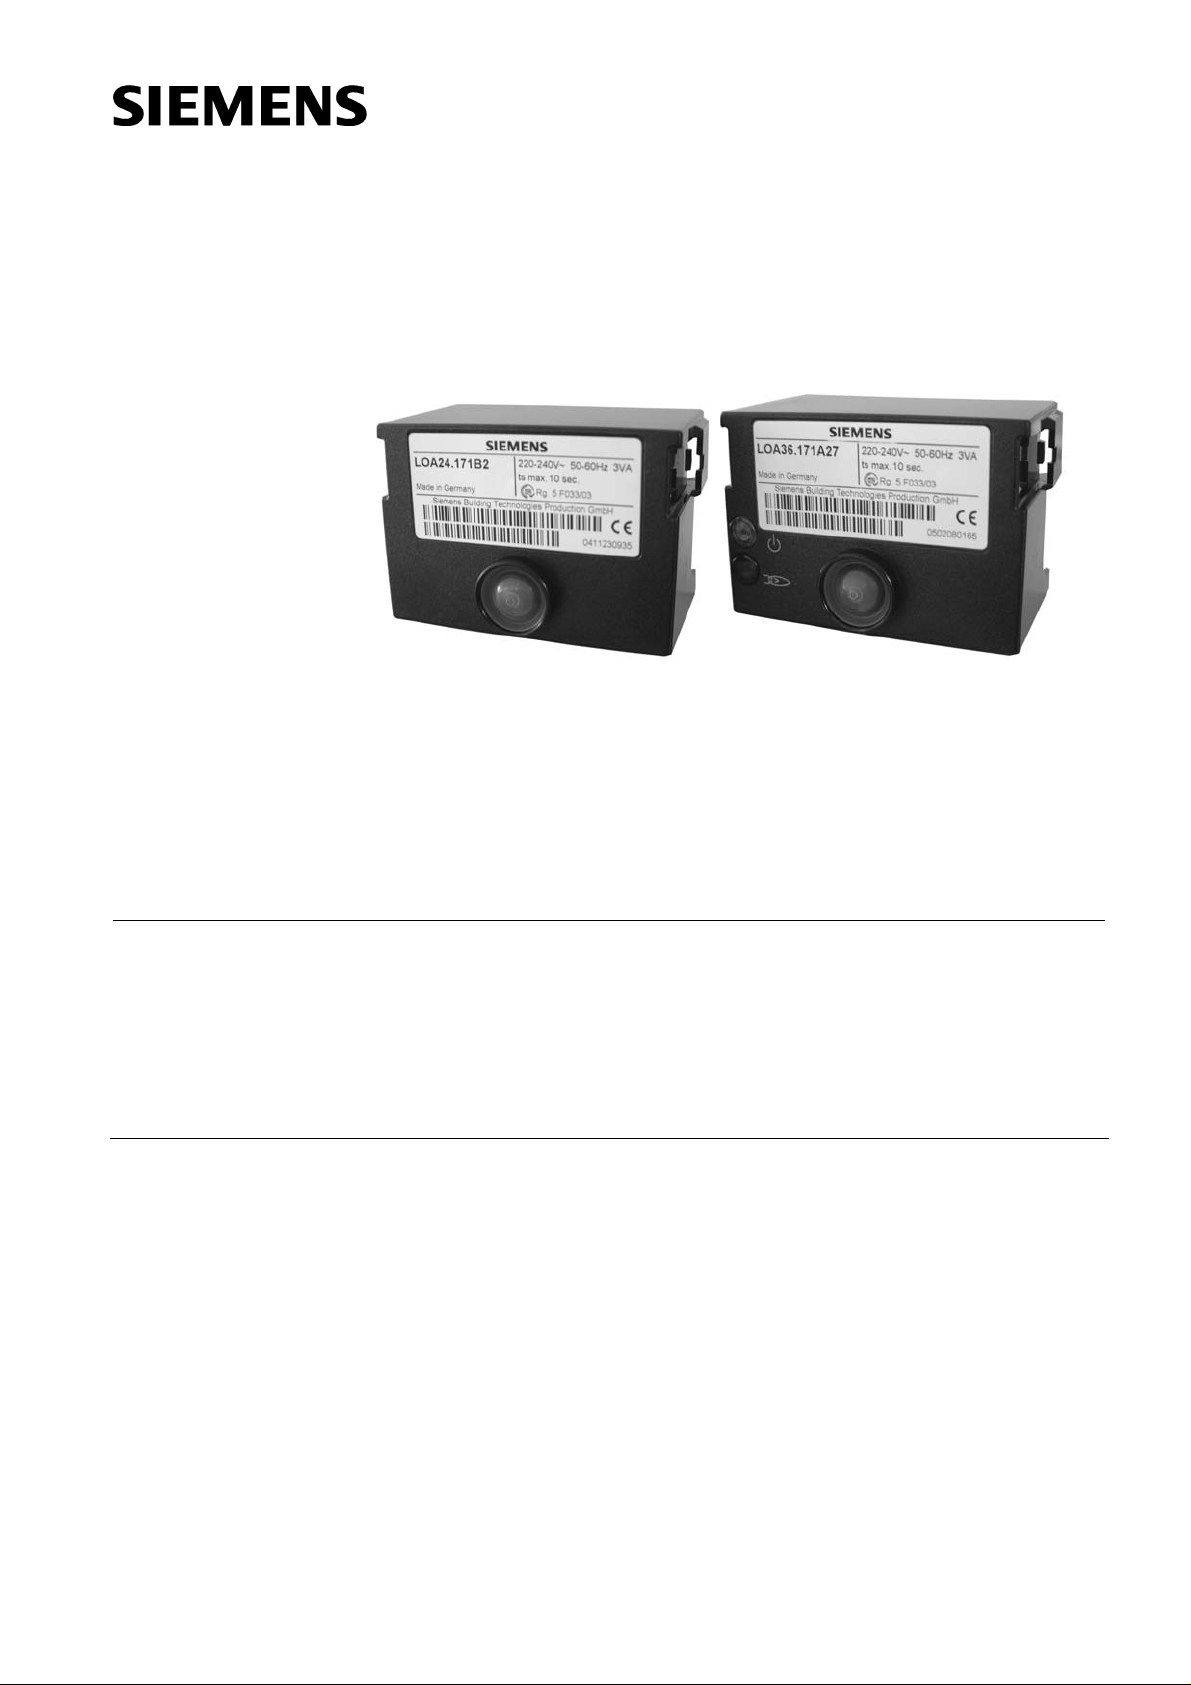
LOA2... LOA3...
Oil Burner Controls LOA2...
LOA3...
Oil burner controls for the supervision, startup and control of 1- or 2-stage forced
draft oil burners in intermittent operation.
Oil throughput up to 30 kg/h.
The LOA2... / LOA3... and this Data Sheet are intended for use by OEMs which
integrate the oil burner controls in their products.
Use, features
Use
General features
Specific features
The LOA... are used for the startup, supervision and control of 1- or 2-stage forced draft
oil burners in intermittent operation.
Yellow-burning flames are supervised with photoresistive detectors QRB..., blueburning flames with blue-flame detectors QRC...
- Forced draft oil burners conforming to EN 267
- Oil atomization burners in monoblock design conforming to EN 230
- Undervoltage detection
- Bridging contact for oil preheater (not with LOA28.173A27)
- Special versions including models for incinerator plant and flash-steam generators
- LOA36... with color LED for indicating flame strength and operation
CC1N7118en
16.12.2005
Building Technologies
HVAC Products
Page 2
Warning notes
Mounting notes
Installation notes
To avoid injury to persons, damage to property or the environment, the following
warning notes should be observed!
Do not open, interfere with or modify the unit!
• All activities (mounting, installation and service work, etc.) must be performed by
qualified staff
• Before making any wiring changes in the connection area of the LOA..., completely
isolate the unit from the mains supply (all-polar disconnection)
• Ensure protection against electric shock hazard by providing adequate protection
for the burner control’s connection terminals
• Each time work has been carried out (mounting, installation, service work, etc.),
check to ensure that wiring is in an orderly state and make the safety checks as indicated in «Commissioning notes» above
• Press the lockout reset button / operating button only manually (applying a force of
no more than 60 N), without using any tools or pointed objects
• Fall or shock can adversely affect the safety functions. Such units must not be put
into operation, even if they do not exhibit any damage
• Ensure that the relevant national safety regulations are complied with
• Do not mix up live and neutral conductors
• Always run high-voltage ignition cables separately while observing the greatest
possible distance to the unit and to other cables
• Install switches, fuses, earthing, etc., in compliance with local regulations
• Ensure that the maximum permissible amperages will not be exceeded (refer to
«Technical data»)
Electrical connection of flame detectors
It is important to achieve practically disturbance- and loss-free signal transmission:
• Never run the detector cable together with other cables
– Line capacitance reduces the magnitude of the flame signal
– Use a separate cable
• Observe the permissible lengths of the flame detector cables (refer to Data Sheets
N7714 (QRB...) and N7716 (QRC...))
Commissioning notes
• When commissioning the plant, when carrying out maintenance work, or after
longer off periods, make the following safety checks:
Safety check Anticipated response
a) Burner startup with flame detector
darkened
b) Burner startup with flame detector
exposed to extraneous light
c) Simulation of flame failure during
operation. For that purpose, darken
the flame detector during operation
and maintain this state
Lockout at the end of «TSA»
Lockout after approx. 40 seconds
Repetition followed by lockout at the
end of «TSA»
2/11
Building Technologies CC1N7118en
HVAC Products 16.12.2005
Page 3
Standards and certificates
Service notes
Conformity to EEC directives
- Electromagnetic compatibility EMC (immunity)
- Low-voltage directive
ISO 9001: 2000
Cert. 00739
ISO 14001: 2004
Cert. 38233
Type reference
LOA24.171B17 x
LOA24.171B27 x
LOA24.173A27 x
LOA24.571C27 x
LOA25.173C17 --LOA25.173C27 --LOA26.171B27 x
LOA28.173A27 x
LOA36.171A27 x
• Use the KF... test adapters for short periods of time only
89 / 336 / EEC
73 / 23 / EEC
Disposal notes
Mechanical design
The unit contains electrical and electronic components and must not be disposed of
together with domestic waste.
Local and currently valid legislation must be observed.
The housing is made of impact-proof, heat-resistant and flame-retarding plastic.
The oil burner control is of plug-in design and engages audibly in its base.
The housing accommodates the
- thermal-electric sequence switch
- flame signal amplifier with the flame relay
- lockout reset button with its integrated fault indication lamp
3/11
Building Technologies CC1N7118en
HVAC Products 16.12.2005
Page 4

Type summary
The type references given below apply to burner controls without base and without flame detector.
Version Type reference Voltage Under-
voltage
detection
Standard version
For flash-steam generators LOA24.571C27 AC 220 V X X 5 s 6 10 s 20 s --- 20 s
For incinerator plant
LOA24.171B27 ²) AC 220 V X X 13 s 13 s 10 s 20 s --- 20 s
LOA24.171B17 ²) AC 110 V X X 13 s 13 s 10 s 20 s --- 20 s
LOA24.173A27 AC 220 V X X 13 s 13 s 10 s 20 s 2 s 20 s
LOA26.171B27 ²) AC 220 V X X 13 s 13 s 10 s 20 s --- 20 s With remote reset facility
LOA36.171A27 AC 220 V X X 13 s 13 s 10 s 20 s --- 20 s
LOA25.173C27 ¹) AC 220 V X --- 13 s 13 s 10 s --- 2 s 20 s
LOA25.173C17 ¹) AC 110 V X --- 18 s 13 s 10 s --- 2 s 20 s
LOA28.173A27 ¹) AC 220 V X --- 13 s 13 s 10 s --- 2 s 20 s
CE t1 t3 TSAmax. t3n t3n´ t4
Legend
¹)
²)
t1 Prepurge time
t3 Preignition time
t3n Long postignition time
t3n´ Short postignition time
t4
TSAmax. Ignition safety time
LOA25... and LOA28... are designed for use on incinerator plant where lockout by extraneous light is not desired.
These types of oil burner controls are not covered by EN 230
IRD1010 infrared flicker detectors can also be used
Interval from establishment of flame to the release of «BV2»
4/11
Building Technologies CC1N7118en
HVAC Products 16.12.2005
Page 5

Ordering
Oil burner control without plug-in base refer to «Type summary»
Electrical connections refer to Data Sheet N7201
- Plug-in base AGK11...
- Cable holders AGK65..., AGK66, AGK67...
- Cable strain relief elements for AGK67...
Electrical connections refer to Data Sheet N7203
- Plug-in base AGK13
- Plug-in housing AGK56
- Cover AGK68
Flame detectors
- Photoresistive detectors QRB1... refer to Data Sheet N7714
- Blue-flame detectors QRC1... refer to Data Sheet N7716
Pedestal (empty housing) AGK21
- To increase the overall height of the LOA...to that of the LAI... / LAB...
Remote reset module ARK21A27
- For use with the LOA26... / LOA36... printed circuit board versions
Adapter KF8819
- For replacing LAB1... / LAI... by LOA...
- No rewiring of plug-in base required
Test adapter KF8833
- For checking the functions of burner controls on the burner
- With signal lamps for program indication
- With one pair of jacks for measuring the flame detector current
Test adapter KF8840
- For checking the functions of burner controls on the burner
- With signal lamps for program indication
- With on / off switch for simulating the flame signal
- With holes for checking the contro l vol tag es at the t abs o f the bu rner contro l
- With one pair of jacks for measuring the flame detector’s resistance
Test adapter KF8885
- For checking the functions of burner controls on the burner
- With switch for manual startup of burner
- With switch for simulating the oil preheater’s release contact
- With 2 pairs of jacks for measuring the flame detector current
- Refer to Mounting Instructions B7986
Demo case KF8891
- For showing the functioning of burner controls
- Refer to Operating Instructions B7989
5/11
Building Technologies CC1N7118en
HVAC Products 16.12.2005
Page 6

Technical data
General unit data
Environmental
conditions
Mains voltage AC 220 V –15 %...AC 240 V +10 %
AC 100 V –15 %...AC 110 V +10 %
Mains frequency 50...60 Hz ±6 %
External primary fuse (Si) 10 A (fast)
Power consumption approx. 3 VA
Perm. mounting position optional
Weight approx. 180 g
Degree of protection IP 40, must be ensured through mounting
Safety class
Perm. cable lengths
- Detector cable laid separately
- Remote reset laid separately
Input current to
- Terminal 1
- Terminal 3
I
max. 3 m with 100 pF/m line capacitance
max. 20 m
max. 20 m
5 A (short-time 15 A for max. 0.5 s)
5 A (excl. current draw of burner motor and
oil preheater)
Perm. current
at cos ϕ ≥ 0.6
LOA24.171B27
LOA24.171B17
LOA24.571C27
LOA25.173C27
LOA25.173C17
LOA28.173A27
LOA24.173A27 Max. 1 A Max. 1 A Max. 2 A Max. 1.5 A Max. 5 A Max. 1 A
LOA26.171B27 Max. 2 A Max. 0.1 A Max. 5 A Max. 1 A
LOA36.171A27
Terminal4 Terminal5 Terminal6 Terminal 7 Terminal 8 Terminal
10
Max. 1 A
Max. 1 A Max. 1 A
Max. 1 A
Max. 2 A
Max. 2 A
Max. 5 A
Max. 1 A
Storage
DIN EN 60 721-3-1
Climatic conditions class 1K3
Mechanical conditions class 1M2
Temperature range -20...+60 °C
Humidity < 95 % r.h.
Transport
DIN EN 60 721-3-2
Climatic conditions class 2K2
Mechanical conditions class 2M2
Temperature range -50...+60 °C
Humidity < 95 % r.h.
Operation
DIN EN 60 721-3-3
Climatic conditions class 3K5
Mechanical conditions class 3M2
Temperature range -20...+60 °C
Humidity < 95 % r.h.
Condensation, formation of ice and ingress of water are not permitted!
6/11
Building Technologies CC1N7118en
HVAC Products 16.12.2005
Page 7

Technical data (cont´d)
Flame supervision with
QRB... or QRC...
QRB...
QRC1...
Measuring circuit for
detector current
For measuring circuits and detector cable lengths, refer to Data Sheets N7714 (QRB...)
and N7716 (QRC...).
QRB... (typically) Type of burner control
Detector current
required (with flame)
LOA24.171B27 / LOA24.171B17
LOA24.571C27
LOA25.173C27 / LOA25.173C17
LOA26.171B27
LOA28.173A27
LOA24.173A27 Min. 45 µA Max. 5.5 µA Max. 45 µA
LOA36.171A27 Min. 70 µA Max. 5.5 µA Max. 900 µA
Min. 70 µA
Perm. detector current
(without flame)
Max. 5.5 µA
Detector current
possible (with flame)
Max. 210 µA
QRC... (typically) Type of burner control
Detector current
required (with flame)
LOA24.171B27
LOA24.571C27
LOA26.171B27
LOA24.171B17 Min. 70 µA Max. 5.5 µA Max. 90 µA
LOA25.173C27 ¹)
LOA25.173C17 ¹)
LOA28.173A27 ¹)
LOA24.173A27 Min. 45 µA Max. 5.5 µA Max. 45 µA
LOA36.171A27 Min. 70 µA Max. 5.5 µA Max. 110 µA
Min .70 µA
--- --- ---
Perm. detector current
(without flame)
Max. 5.5 µA
Detector current
possible (with flame)
Max. 110 µA
¹) These types of LOA... must not be used in connection with QRC...blue-flame detec-
tors
Data given in the above table only apply under the following conditions:
- Mains voltage AC 230 V
- Ambient temperature 23 °C
QRB... QRC...
12
+
µA DC
LOA...
7118v01/0102
bl
11
bl
sw
QR B ...
11
12
sw
+
µA DC
QRC1...
br
LOA...
1
7118v02/0102
Legend
µA DC DC microammeter
with an internal
resistance of
Ri = max. 5 kΩ
bl Blue
sw Black
br Brown
Only with LOA36...
Indication of flame
strength
Building Technologies CC1N7118en
HVAC Products 16.12.2005
Detector current LED on
- With QRB...
- With QRC...
min. 60 µA ±15 %
min. 40 µA ±15 %
7/11
Page 8

Function
Preconditions for
startup
Undervoltage detection
Control sequence in the
event of fault
Reset
• Burner control is reset
• Contacts in the line are closed
• No undervoltage
• Flame detector is darkened, no extraneous light
An additional electronic circuit ensures that if mains voltage drops below approximately
AC 165 V, burner startup will be prevented, or – without release of oil – lockout will be
triggered.
Whenever lockout occurs, the outputs for the fuel valves, the burner motor, oil preheater and ignition equipment will immediately be deactivated (< 1 second).
The lockout indication lamp changes to red and terminal 10 («AL») for remote lockout
indication receives voltage.
This state is also maintained in the event of mains voltage failure.
Cause Response
Mains voltage failure New start
Extraneous light on burner startup Lockout;
with LOA25... / LOA28...:
Prevention of start
No flame at the end of «TSA» Lockout
Loss of flame during operation Repetition
After lockout, the burner control can be reset after 60...90 seconds (also refer to
«Warning notes»).
Indications
Lockout position
Flame strength
Operation
The lockout position is indicated with the lamp integrated in the lockout reset button.
Only with LOA36...
Indication of the flame strength (green LED) is used for checking the flame signal.
To ensure reliable burner operation, this LED must be lit.
If the green LED flickers or extinguishes during burner operation, the light conditions at
the burner are poor, caused by dirt for instance.
Only with LOA36...
When the contacts of the control thermostat are closed, the orange LED is lit, indicating
the start of the oil preheater’s heating up phase (if present).
8/11
Building Technologies CC1N7118en
HVAC Products 16.12.2005
Page 9

.
2
LOA24.171B27
LOA24.171B17
LOA24.571C27
LOA24.173A27
Connection diagram and internal diagram Control sequence
EK1
SB
R
L
N
W
Si
L1
12
tz2
y
x
83
10
AL
N
fr
z
a
b
TZ
d
c
76
tz1
g
f
e
FR
K
4
V
5
11
9
7118a06/1004
12
OH
OW
A´
R
SB
W
M
Z
OW
OH
Z
BV1
M
BV2
QRB
QRC
bl
1
sw
br
BV1
BV2
FS
AB C
tw
t1
t3
7118d04/0402
TSA
EK1
SB
R
L
N
W
Si
L1
12
tz2
fr
x
z
y
a
b
TZ
8
10
AL
376
OW
OH
N
M
tz1
g
c
d
f
e
FR
K
4
Z
BV1
5
BV2
V
11
9
QRC
bl
1
br
7118a07/1004
12
QRB
sw
OH
OW
BV1
BV2
A´
R
SB
W
M
Z
FS
AB C
t3n´
tw
t1
t3
7118d01/0402
TSA
t3n
t3n
D
1
8
3
3
6
7
4
t4
5
11
12
D
1
8
3
3
7
6
4
t4
5
11
12
LOA25.173C27
LOA25.173C17
LOA28.173A27
EK1
1
SB
W
R
Si
L
N
L1
210
AL
tz2
x
y
z
8
OW
OH
N
fr**
b
a
TZ
3
tz1
f
c
d
e
g
FR
K
76
4
V
5
11 12
9
7118a10/1004
OH
OW
OW
A´
R
SB
W
M
Z
Z
BV1
M
BV2
QRB.
BV1
BV2
FS
AB C
tw
t1
t3
7118d02/0402
fr** Not provided with the LOA28.173A27 1) LOA25.173C27 / LOA25.173C17
2) LOA28.173A27
t3n´
TSA
D
1
8
1
3
3
3
6
7
4
t4
5
11
12
9/11
Building Technologies CC1N7118en
HVAC Products 16.12.2005
Page 10

LOA26.171B27
With ARK21
remote lockout
reset module
LOA36.171A27
With ARK21
remote lockout
reset module
Legend
Connection diagram and internal diagram Control sequence
EK1
L1
1210
SB
W
R
Si
L
N
tz2
fr
yz fg
x
8
OW
AL
N
c
ba
TZ
3764
OH
SA
N
M
9
ARK21A27
tz1
d
e
FR
K
V
7118a08/1004
OH
A´
R
SB
W
OW
5 9 11 12
M
Z
Z
BV1
10
210
13
14
EK2
BV2
QRB
QRC
bl
1
sw
br
SA
BV1
BV2
FS
AB C
t3n
tw
t1
t3
TSA
t4
7118d05/0402
D
1
8
3
3
6
7
4
5
11
12
EK1
L1
1210
SB
W
R
Si
L
N
tz2
fr
ba
L2
8
3764
OW
OH
AL
N
tz1
gxyz
c
f
d
e
FR
K
TZ
Z
SA
N
M
210
9
ARK21A27
5 9 11 12
BV1
BV2
10
13
EK2
14
LED1
7118a09/1004
V
QRB
QRC
bl
1
sw
br
OH
OW
BV1
BV2
A´
R
SB
W
M
Z
SA
FS
AB C
t3n
tw
t1
t3
TSA
t4
7118d05/0402
D
1
8
3
3
6
7
4
5
11
12
AL Alarm device OW Release contact of oil preheater
BV... Fuel valve OH Oil preheater
EK1 Lockout reset button QRB… Photoresistive detector
EK2 Remote lockout reset button QRC… Blue-flame detector
FR Flame relay with contacts «fr» bl = blue, br = brown, sw = black
fr Bridging contact for rele ase contact of «OH» R Control thermostat or pressurestat
FS Flame signal SA Actuator with automatic setback
K Catch of flame relay for locking contact «tz1» SB Safety limit thermostat
in the event of premature flame signals or for locking Si External primary fuse
the contact when the flame signal is correct TZ Thermal-electric sequence switch
L1 Indication of faults (red) tz... Contacts of «TZ»
L2 Indication of operation (orange) W Limit thermostat or pressure switch
LED1 Indication of flame strength (green) V Flame signal amplifier
M Burner motor Z Ignition transformer
TSA Ignition safety time A´ Beginning of the startup sequence with burners using an «OH»
tw Waiting time A Beginning of the startup sequence with burners using no «OH»
t1 Prepurge time B Time of flame establishment
t3 Preignition time C Running position
t3n Long postignition time D Controlled shutdown by «R»
t3n´ Short postignition time
t4 Interval between flame signal and release of «BV2»
Control signals delivered by the LOA...
Required input signals
Permissible input signals
10/11
Building Technologies CC1N7118en
HVAC Products 16.12.2005
Page 11

Dimensions
LOA...
Dimensions in mm
22
5,5
62,5
Plug-in base
AGK11... / AGK13...
Remote lockout reset
module ARK21A27
9
88
91
47
62,5
41,5
22
36,5
7118m06/0205
7118m07/1004
47
62,5
Status indication (orange)
Indication of flame st rength (green)
12
23
ØØ
83,5
Ø
67,5
66
50
Ø
+
7118m04/0300
+
Remote lockout reset module for use with the LOA26... / LOA36...
Printed circuit board with no housing.
Degree of protection IP 00, which means that protection against electric shock hazard,
must be ensured through mounting.
Do not place any metal objects in the hatched area.
The module must be fitted with the help of spacers made of plastic.
Do not use spacers made of metal.
© 2005 Siemens Building Technologies HVAC Producs GmbH
Subject to change!
Building Technologies CC1N7118en
HVAC Products 16.12.2005
11/11
 Loading...