

Page 1

RD-5405
AUDIO/VIDEO RECEIVER
OPERATING INSTRUCTIONS
INSTRUCCIONES DE FUNCIONAMIENTO
RECEPTOR DE AUDIO/VIDEO
RECEPTEUR AUDIO/VIDEO
MODE D'EMPLOI
АУДИО/ВИДЕО ПРИЕМНИК
ИНСТРУКЦИЯ ПО ЭКСПЛУАТАЦИИ
AUDIO/VIDEO RECEIVER
BEDIENUNGSANLEITUNG
5404 cover_G_cover.qxp 2010-04-20 오후 7:53 페이지 1
Page 2
RD-5405(G)100316_RD-5503(g) 2010-04-20 오후 7:57 페이지 2
Introduction
READ THIS BEFORE OPERATING YOUR UNIT
CAUTION
: TO REDUCE THE RISK OF ELECTRIC SHOCK, DO
NOT REMOVE COVER (OR BACK).
NO USER-SERVICEABLE PARTS INSIDE. REFER
SERVICING TO QUALIFIED SERVICE PERSONNEL.
This symbol is intended to alert the user to the
presence of uninsulated "dangerous voltage" within the
product's enclosure that may be of sufficient magnitude
to constitute a risk of electric shock to persons.
This symbol is intended to alert the user to the
presence of important operating and maintenance
(servicing) instructions in the literature accompanying
the appliance.
ENGLISH
WARNING
: TO REDUCE THE RISK OF FIRE OR ELECTRIC SHOCK, DO NOT EXPOSE THIS APPLIANCE TO RAIN OR MOISTURE.
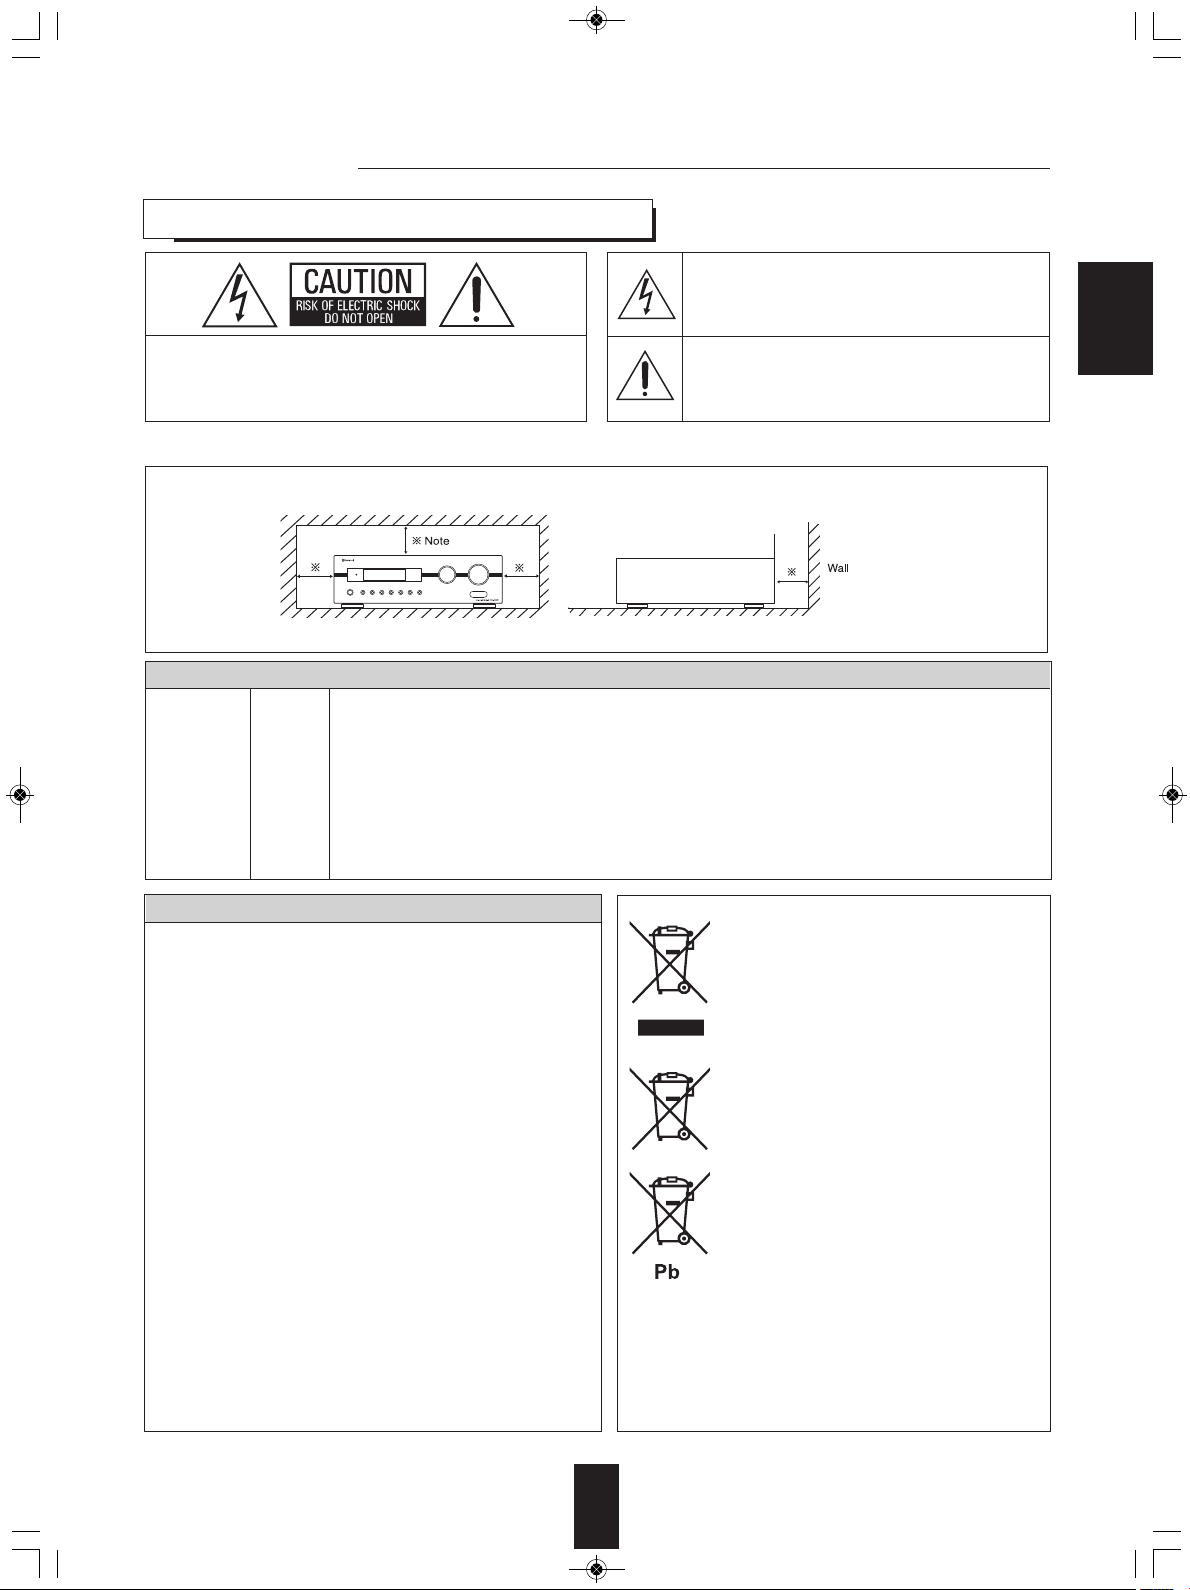
Caution regarding installation
Note : For heat dispersal, do not install this unit in a confined space such as a bookcase or similar enclosure.
Do not block ventilation openings or stack other equipment on the top.
FOR YOUR SAFETY
Units shipped to Australia are designed for operation on 24 0 V AC only.
To ensure safe operation, the three-pin plug supplied must be inserted only into a standard three-pin power point
EUROPE
AUSTRALIA
220 V
240 V
CAUTION
Leave a space around the unit for sufficient ventilation.
•
Avoid installation in extremely hot or cold locations, or in an area
•
that is exposed to direct sunlight or heating equipment.
Keep the unit free from moisture, water, and dust.
•
Do not let foreign objects in the unit.
•
The ventilation should not be impeded by covering the ventilation
•
openings with items, such as newspapers, table-cloths, curtains,
etc.
No naked flame sources, such as lighted candles, should be
•
placed on the unit.
Please be care the environmental aspects of battery disposal.
•
The unit shall not be exposed to dripping or splashing for use.
•
No objects filled with liquids, such as vases, shall be placed on
•
the unit.
• Do not let insecticides, benzene, and thinner come in contact
with the set
Never disassemble or modify the unit in any way.
•
.
■Notes on the AC power cord and the wall outlet.
The unit is not disconnected from the AC power source(mains)
•
as long as it is connected to the wall outlet, even if the unit has
been turned off.
To completely disconnect this product from the mains,
•
disconnect the plug from the wall socket outlet.
When setting up this product, make sure that the AC outlet you
•
are using is easily accessible.
Disconnect the plug from the wall outlet when not using the unit
•
for long periods of time.
which is effectively earthed through the normal household wiring. Extension cords used with the equipment must
be three-core and be correctly wired to provide connection to earth.
-
Improper extension cords are a major cause of fatalities. The fact that the equipment operates satisfactorily
does not imply that the power point is earthed and that the installation is completely safe. For your safety, if
in any doubt about the effective earthing of the power point, consult a qualified electrician.
PAN-EUROPEAN UNIFIED VOLTAGE
All units are suitable for use on supplies 220-240 V AC.
Information for Users on Collection and Disposal of
Old Equipment and used Batteries
These symbols on the products, packaging, and/or
accompanying documents mean that used electrical
and electronic products and batteries should not be
mixed with general household waste. For proper
treatment, recovery and recycling of old products and
used batteries, please take them to applicable
collection points, in accordance with your national
legislation.
By disposing of these products and batteries correctly,
you will help to save valuable resources and prevent
any potential negative effects on human health and the
environment which could otherwise arise from
inappropriate waste handling.
For more information about collection and recycling of
old products and batteries, please contact your local
municipality, your waste diposal service or the point of
sale where you purchased the items.
[Information on Disposal in other Countries outside the
European Union]
These symbols are only valid in the European Union. If
you wish to discard these items, please contact your
local authorities or dealer and ask for the correct
method of diposal.
Note for the battery symbol (bottom two symbol examples):
The sign Pb below the symbol for batteries indicates
that this batteries contains lead.
2
Page 3

RD-5405(G)100316_RD-5503(g) 2010-04-20 오후 7:57 페이지 3
CONTENTS
Introduction
• READ THIS BEFORE OPERATING YOUR UNIT | 2
System Connections | 4
ENGLISH
Front Panel Controls | 8
Remote Controls | 9
• REMOTE CONTROL OPERATION RANGE | 10
• LOADING BATTERIES | 10
Operations
• LISTENING TO A PROGRAM SOURCE | 11
• SURROUND SOUND | 14
• ENJOYING SURROUND SOUND | 15
• LISTENING TO RADIO BROADCASTS | 20
• LISTENING TO RDS BROADCASTS(FM ONLY) | 22
(RDS Tuner(Regional Option for some countries in Europe, etc.))
• RECORDING | 24
• OTHER FUNCTIONS | 25
• USING DIFFERENT FUNCTIONS ON THE FRONT PANEL | 26
System Setup | 27
• SETTING THE SYSTEM | 29
• SETTING THE INPUT | 31
• SETTING THE SPEAKER SETUP | 32
• SETTING THE CH LEVEL | 36
• SETTING THE PARAMETER | 38
Troubleshooting Guide | 40
Specifications | 41
3
Page 4
RD-5405(G)100316_RD-5503(g) 2010-04-28 오전 9:52 페이지 4
System Connections
• Please be certain that this unit is unplugged from the AC outlet before making any connections.
• Be sure to observe the color coding when connecting audio, video and speaker cords.
• Make connections firmly and correctly. If not, it can cause loss of sound, noise or damage to the receiver.
ENGLISH
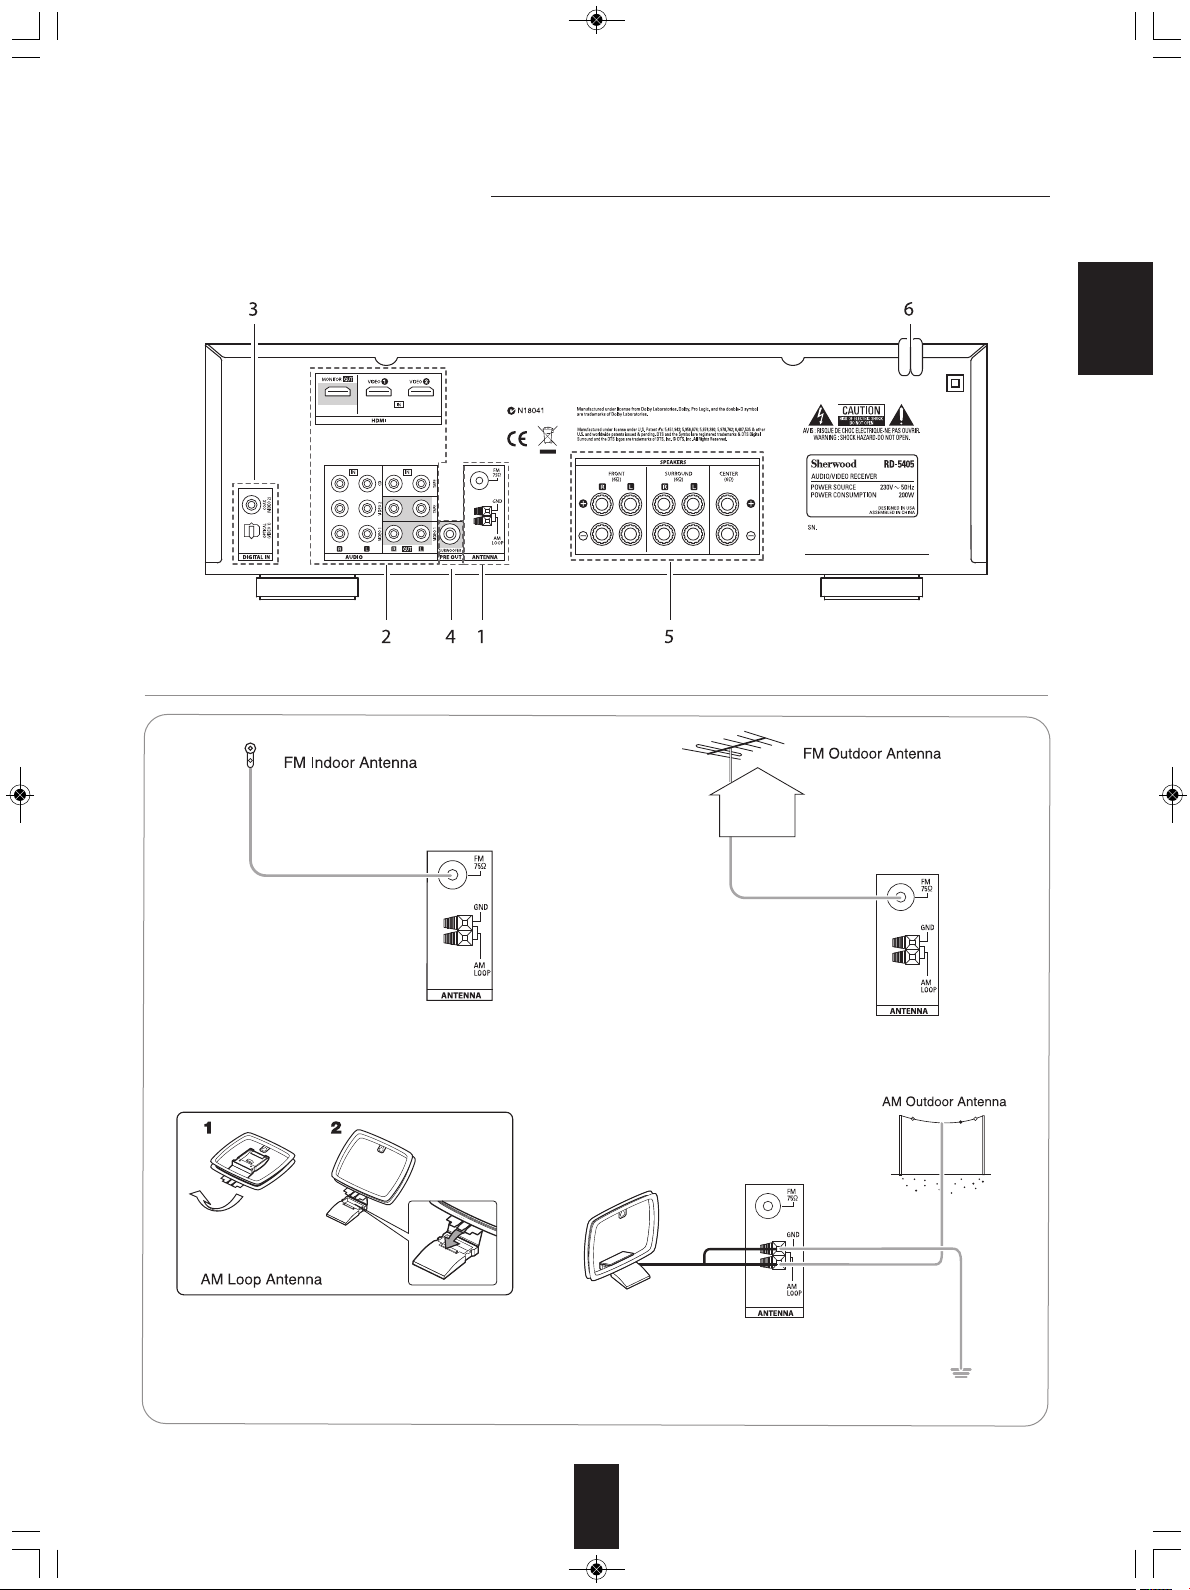
1. CONNECTING ANTENNAS
• Change the position of the FM indoor antenna until you
get the best reception of your favorite FM stations.
• A 75Ω outdoor FM antenna may be used to further
improve the reception. Disconnect the indoor
antenna before replacing it with the outdoor one.
• Place the AM loop antenna as far as possible from the receiver, TV set, speaker cords and the AC
input cord and set it to a direction for the best reception.
• If the reception is poor with the AM loop antenna, an AM outdoor antenna can be used in place of
the AM loop antenna.
4
Page 5
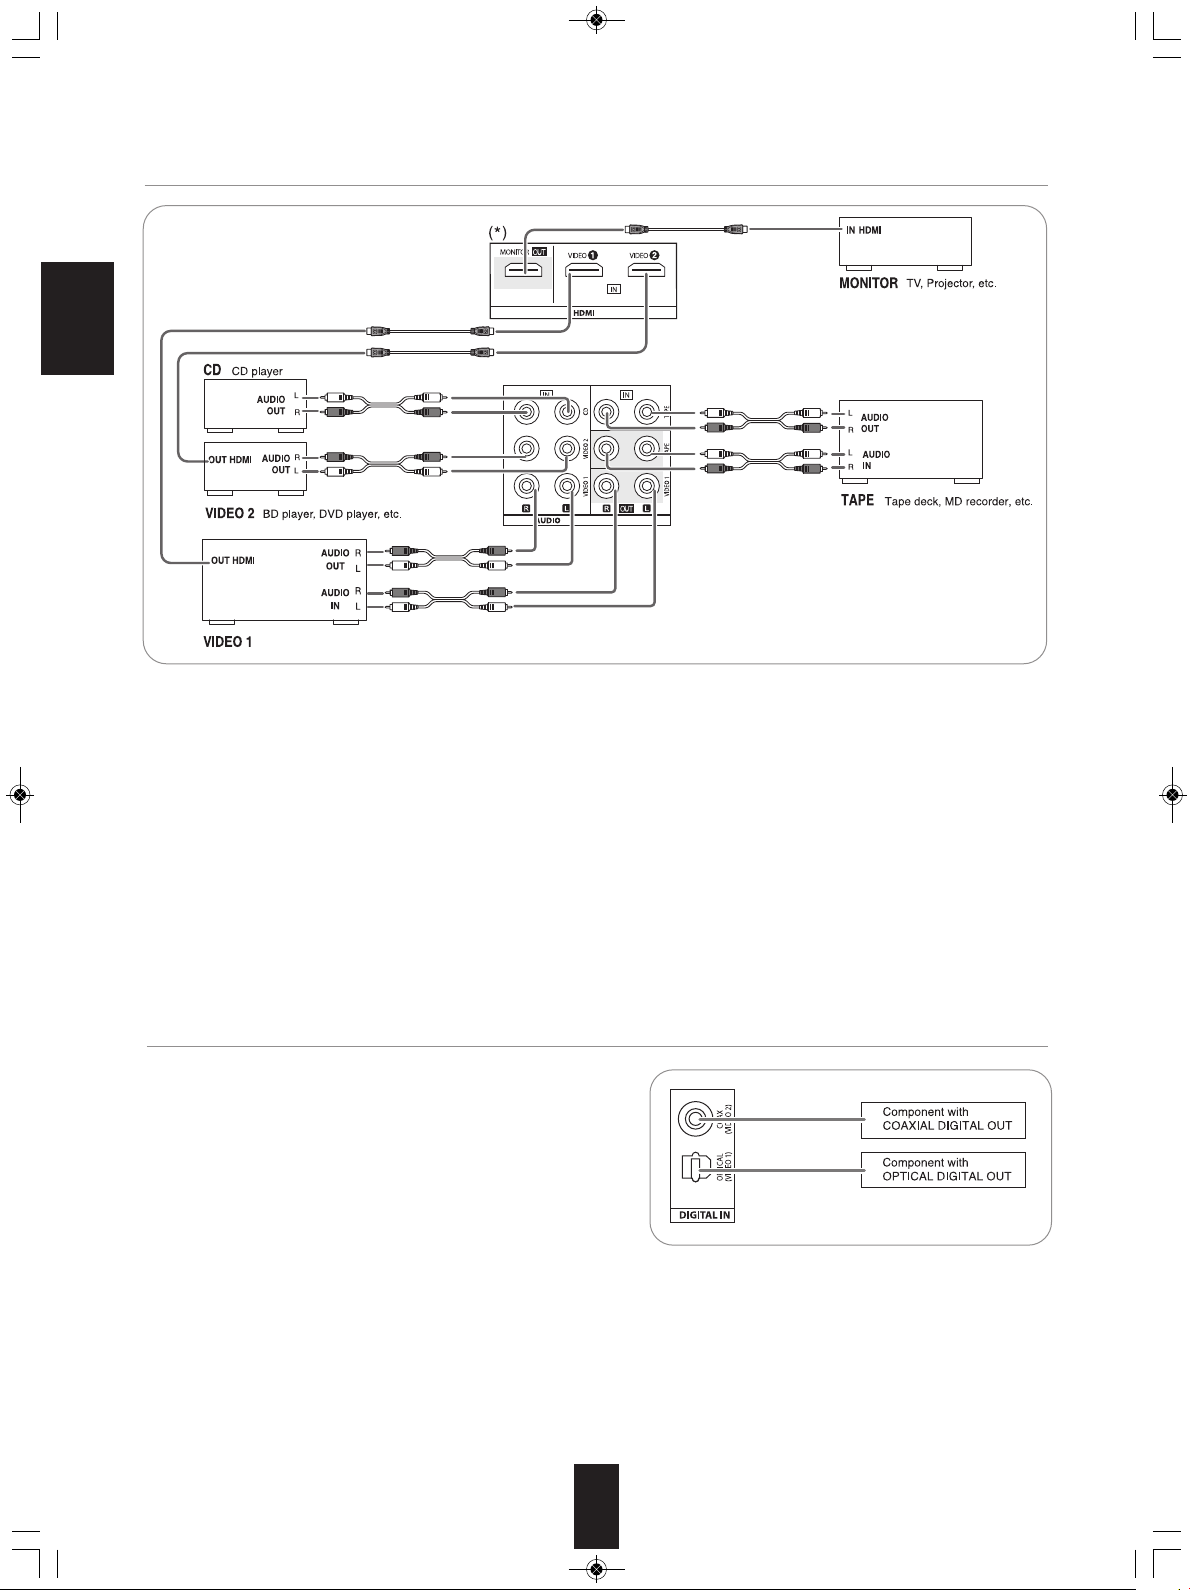
BD player, DVD player, tape deck, MD recorder, etc.
RD-5405(G)100316_RD-5503(g) 2010-04-20 오후 7:57 페이지 5
2. CONNECTING AUDIO/VIDEO COMPONENTS
ENGLISH
• The VIDEO 1/VIDEO 2 jacks may be connected to AUDIO jacks of video components such as BD player, DVD player, TV, etc..
• The TAPE IN/OUT jacks and the VIDEO 1 IN/OUT jacks can be connected to audio recording equipment such as a tape deck,
an MD recorder, etc..
■HDMI (High Definition Multimedia Interface) connection : (*)
• You can connect the source component (BD player, etc.) to the display component (TV, projector, etc.) through this receiver
with using a commercially available HDMI cord.
• The HDMI connection can carry uncompressed digital video signals and digital audio signals.
• This receiver can output digital video and digital audio signals from the HDMI MONIOTR OUT of this receiver without passing
through any circuits as they were input into the HDMI IN(, meaning the audio signals which are input into the HDMI IN cannot
be reproduced on this receiver).
• HDMI, the HDMI logo and High-Definition Multimedia Interface are trademarks or registered trademarks of HDMI licensing LLC.
■Notes :
• Depending on the connected component, unreliable signals transfer may happen.(For details, refer to the operating instruction
of your component)
• For stable signal transfer, we recommend using HDMI cords that are a maximum of 5 meters in length.
3. CONNECTING DIGITAL INs
• The OPTICAL and the COAXIAL DIGITAL OUTs of the
components that are connected to CD and VIDEO 1 of this unit
can be connected to these DIGITAL INs.
• A digital input should be connected to the components such as a
CD player, DVD player, etc. capable of outputting Dolby Digital or
PCM format digital signals, etc.
• For details, refer to the operating instructions of the component
connected.
• When making the COAXIAL DIGITAL connection, be sure to use
a 75Ω COAXIAL cord, not a conventional AUDIO cord.
• All of the commercially available optical fiber cords cannot be used for the equipment. If there is an optical fiber cord which
cannot be connected to your equipment, consult your dealer or nearest service organization.
■Note : Be sure to make either a OPTICAL or a COAXIAL DIGITAL connection on each component. (You don’t need to do both.)
■Digital input default settings
• If you connect the DIGITAL INs to your components, it is easier to do so following the default settings.
• If your DIGITAL connections are different from default settings, you should assign the DIGITAL INs you used with the “When
selecting the DIGITAL IN” procedure on page 31.
• The default settings are as follows : OPTICAL : VIDEO 1, COAX : VIDEO 2
5
Page 6
RD-5405(G)100316_RD-5503(g) 2010-04-28 오전 9:52 페이지 6
4. CONNECTING SUBWOOFER PRE OUT
• To emphasize the deep bass sounds, connect a powered
subwoofer.
5. CONNECTING SPEAKERS
• Be sure to connect speakers firmly and correctly according to
the channel(left and right) and the polarity(+ and -). If the
connections are faulty, no sound will be heard from the
speakers, and if the polarity of the speaker connection is
incorrect, the sound will be unnatural and lack bass.
• For installing the speakers, refer to "Speaker placement" on
page 7.
• After installing the speakers, first adjust the speaker settings
according to your environment and speaker layout.
(For details, refer to "SETTING THE SPEAKER SETUP" on
page 32.)
ENGLISH
Caution :
• Be sure to use the speakers with the impedance of 6 ohms or
above.
• Do not let the bare speaker wires touch each other or any
metal part of this unit. This could damage this unit and/or the
speakers.
• Never touch the speaker terminals while the AC input
cord is connected to the wall AC outlet. Doing so could
result in electric shocks.
■Connecting speaker wire
1. Strip away approx. 10 mm
(3/8 inch) of wire insulation,
then twist the wire ends
tight.
2. Lossen by turning the
speaker terminal counterclockwise.
3. Insert the bare part of the
wire.
4. Tighten by turning it
clockwise.
6. AC INPUT CORD
• Plug the cord into a wall AC outlet.
6
Page 7
RD-5405(G)100316_RD-5503(g) 2010-04-20 오후 7:57 페이지 7
Speaker placement
Ideal speaker placement varies depending on the size of your
room and the wall coverings, etc. The typical example of
speaker placement and recommendations are as follows :
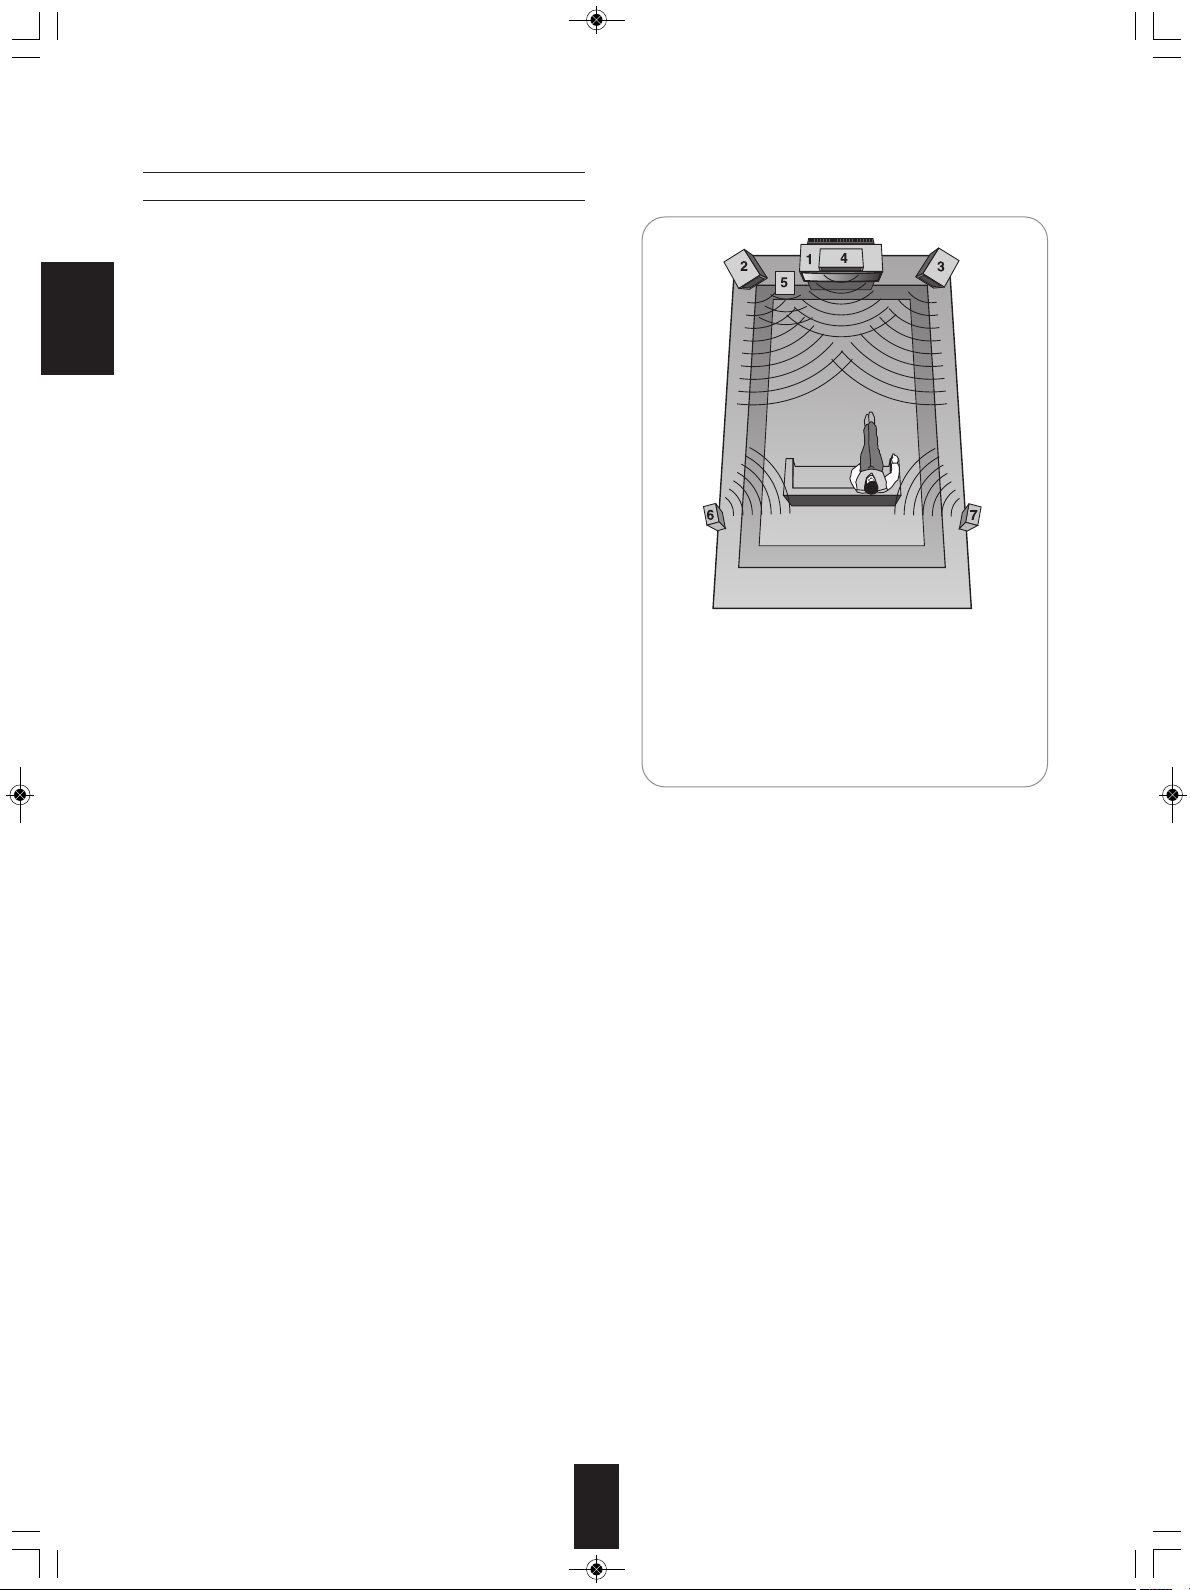
■Front left and right speakers and center speaker
• Place the front speakers with their front surfaces as flush with
ENGLISH
TV or monitor screen as possible.
• Place the center speaker between the front left and right
speakers and no further from the listening position than the
front speakers.
• Place each speaker so that sound is aimed at the location of
the listener’s ears when at the main listening position.
■Surround left and right speakers
• Place the surround speakers approximately 1 meter (40
inches) above the ear level of a seated listener on the direct
left and right of them or slightly behind.
■Subwoofer
• The subwoofer reproduces powerful deep bass sounds.
Place a subwoofer anywhere in the front as
desired.
■Notes :
• When using a conventional TV, to avoid interference with the
TV picture, use only magnetically shielded front left and right
and center speakers.
• To obtain the best surround effects, the speakers except the
subwoofer should be full range speakers.
1. TV or screen
2. Front left speaker
3. Front right speaker
4. Center speaker
5. Subwoofer
6. Surround left speaker
7. Surround right speaker
7
Page 8
RD-5405(G)100316_RD-5503(g) 2010-04-20 오후 7:57 페이지 8
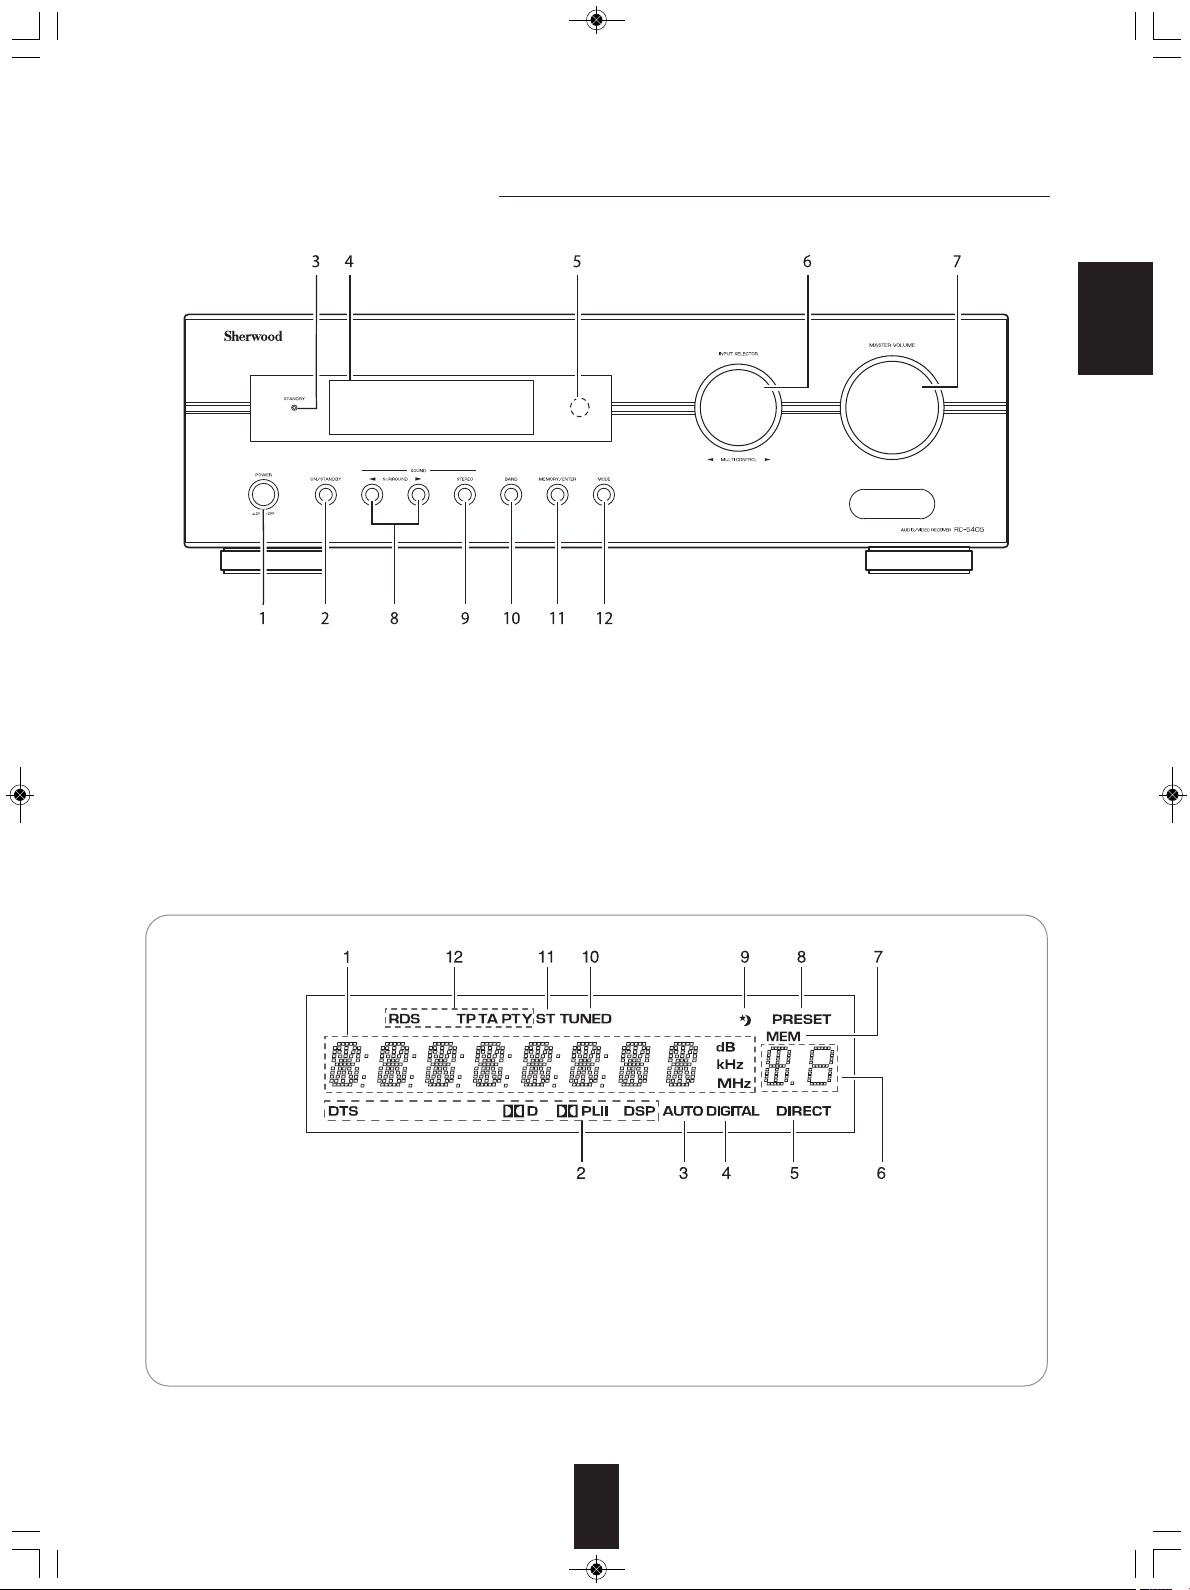
Front Panel Controls
ENGLISH
1. POWER switch
2. POWER ON/STANDBY button
3. STANDBY indicator
4. FLUORESCENT DISPLAY
For details, see below.
5. REMOTE SENSOR
6. INPUT SELECTOR/MULTI CONTROL knob
■FLUORESCENT DISPLAY
1. Input, frequency, volume level,
operating information, etc.
2. Surround mode indicators
3. AUTO indicator
4. DIGITAL INPUT indicator
5. DIRECT indicator
6. Preset number, sleep time display
7. MASTER VOLUME CONTROL knob
8. SURROUND MODE UP/DOWN (▶/◀) buttons
9. STEREO button
10. BAND button
11. MEMORY/ENTER button
12. MODE button
7. MEMORY indicator
8. PRESET indicator
9. SLEEP indicator
10. TUNED indicator
11. STEREO indicator
12. RDS indicators
(Regional option for Europe, etc.)
8
Page 9
CURSOR CONTROL( , , , ), ENTER
</SEARCH MODE, SELECT / > buttons
The functions in “< >” are regional option
for Europe, etc.
RD-5405(G)100316_RD-5503(g) 2010-04-20 오후 7:57 페이지 9
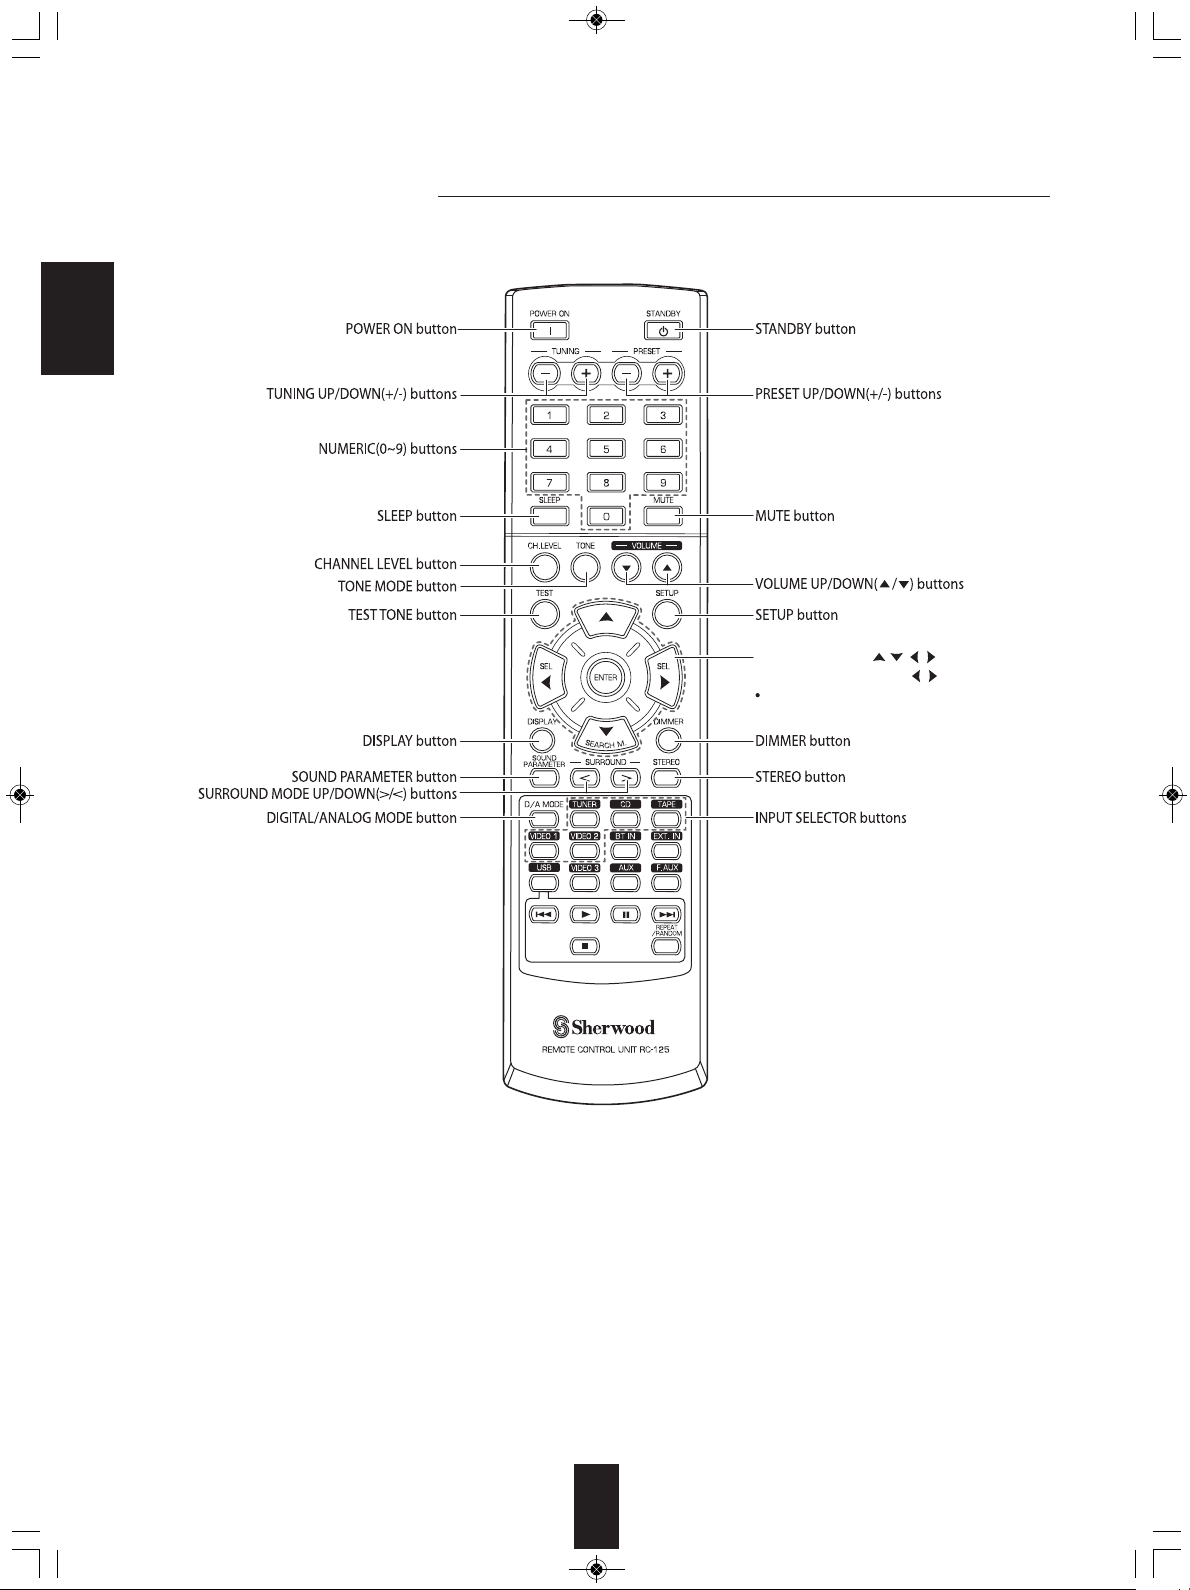
Remote Controls
ENGLISH
■Note:
• Some input selector buttons(BT IN, EXT. IN, USB, VIDEO 3, AUX, F.AUX) and USB transport buttons(
REPEAT/RANDOM) are not available for this unit.
9
■
◀◀, ▶,
■■
,▶▶■, ■,
Page 10
RD-5405(G)100316_RD-5503(g) 2010-04-20 오후 7:57 페이지 10
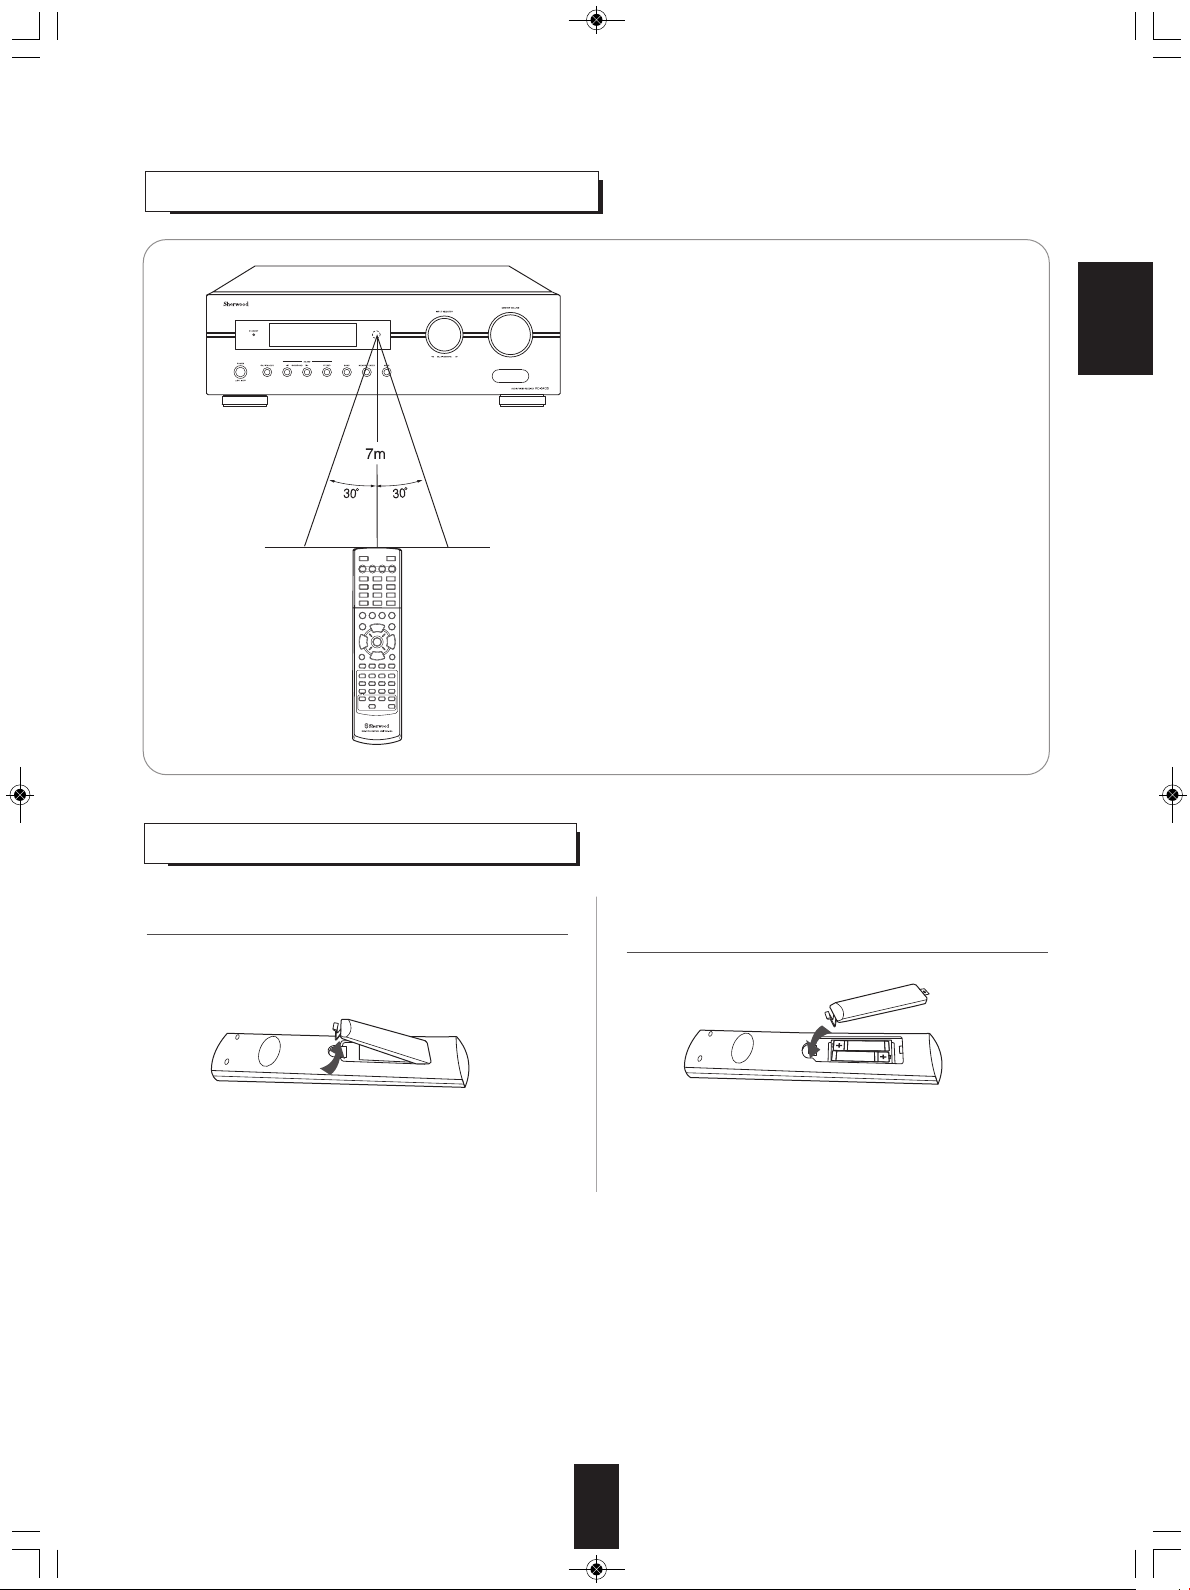
REMOTE CONTROL OPERATION RANGE
ENGLISH
• Use the remote control unit within a range of about 7 meters (23
feet) and angles of up to 30 degrees aiming at the remote sensor.
LOADING BATTERIES
1. Remove the cover. 2. Load two batteries ("AAA" size, 1.5 V) matching the
polarity.
• Remove the batteries when they are not used for a
long time.
• Do not use the rechargeable batteries (Ni-Cd type).
10
Page 11
RD-5405(G)100316_RD-5503(g) 2010-04-20 오후 7:57 페이지 11
Operations
■Note : Before operating this receiver, first set this unit as desired for optimum performance, doing the system setup procedures.
(For details, refer to "System Setup" on page 27.)
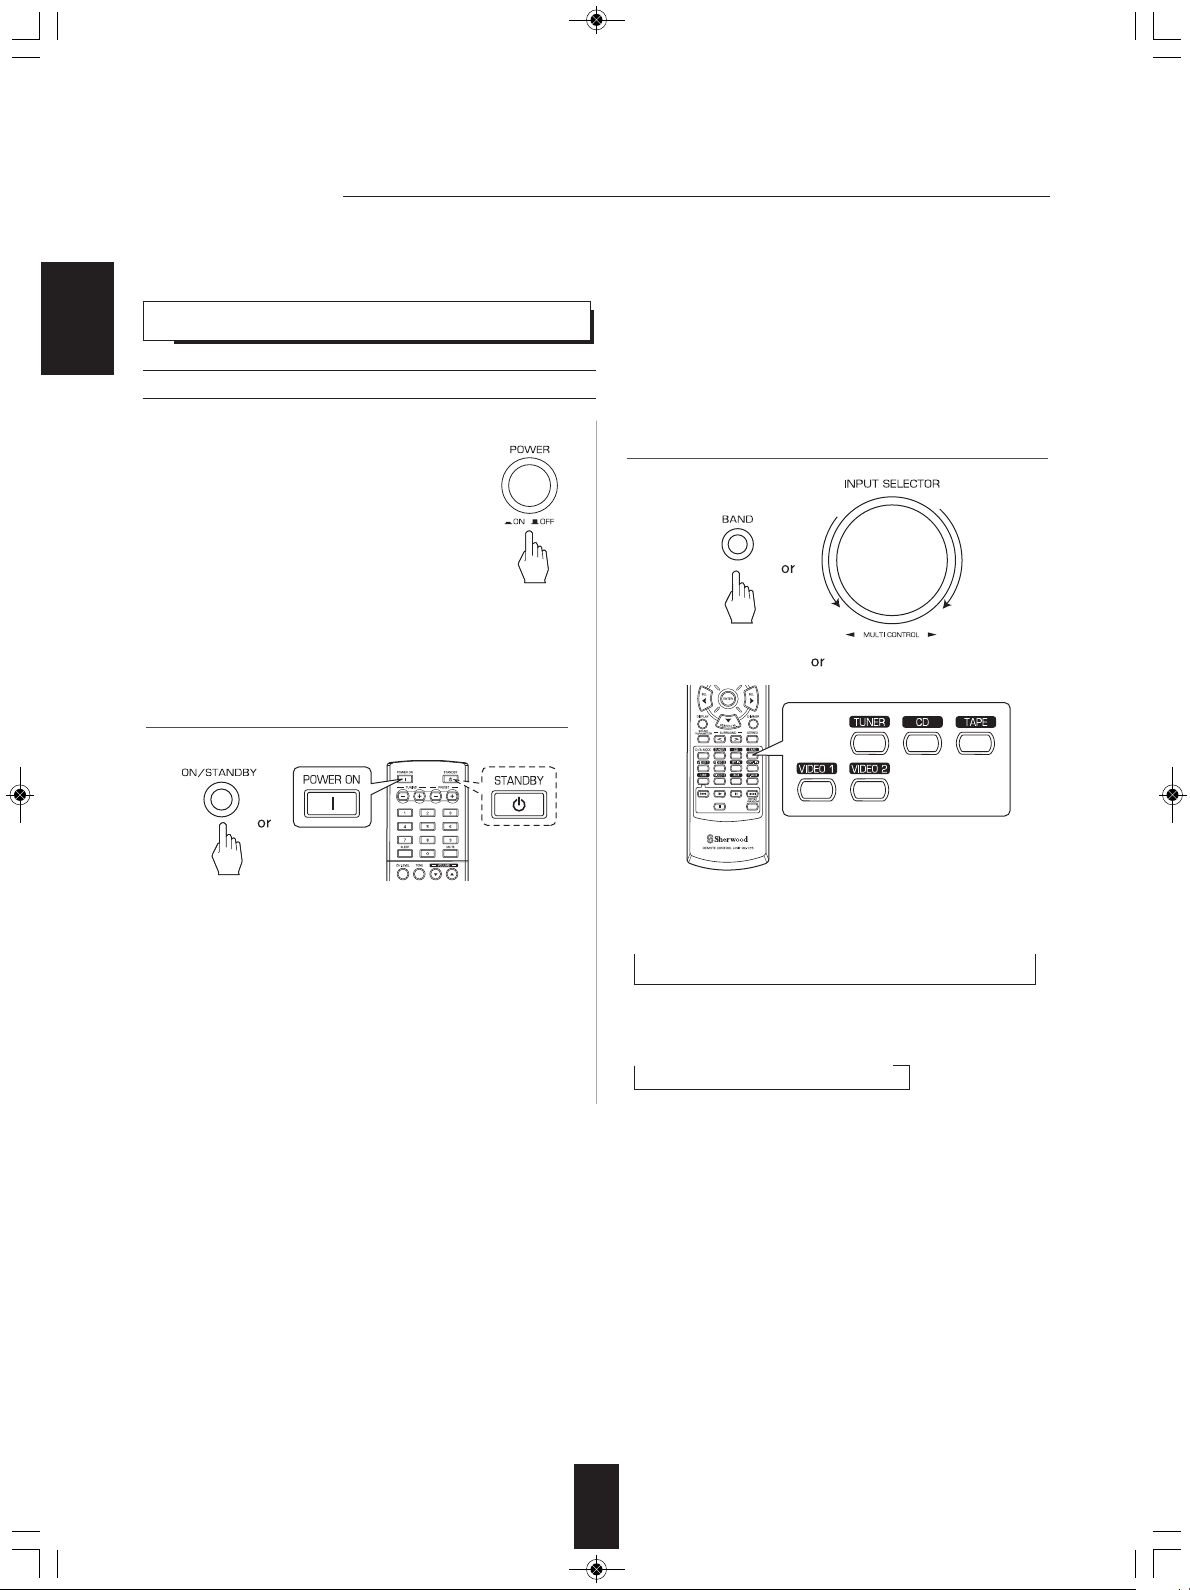
LISTENING TO A PROGRAM SOURCE
ENGLISH
Before operation
• Enter the standby mode.
• The STANDBY indicator lights up.
This means that the receiver is not
disconnected from the AC mains and a
small amount of current is retained to
support the operation readiness.
• To switch the power off, push the POWER
switch again.
• Then the power is cut off and the STANDBY
indicator goes off.
2. Select the desired input source.
1. In the standby mode, turn the power on.
• Each time the POWER ON/STANDBY button on the front
panel is pressed, the receiver is turned on to enter the
operating mode or off to enter the standby mode.
• On the remote control, press the POWER ON button to
enter the operating mode or press the STANDBY button to
enter the standby mode.
• In the standby mode, if the INPUT SELECTOR button is
pressed or the INPUT SELECTOR/MULTI CONTROL
knob is rotated, the receiver is turned on automatically and
the desired input is selected.
• Each time the INPUT SELECTOR/MULTI CONTROL knob
is rotated , the input source changes as follows:
→ TUNER ↔ CD ↔ TAPE ↔ VIDEO 1 ↔ VIDEO 2 ←
(Frequency display)
• Each time the BAND button on the front panel or the
TUNER button on the remote control is pressed, the band
changes as follows:
→ FM ST → FM MONO → AM
11
Page 12
RD-5405(G)100316_RD-5503(g) 2010-04-20 오후 7:57 페이지 12
When VIDEO 1, VIDEO 2 is selected as an input source
3. Select the digital or the analog input connected as
desired.
• Each time this button is pressed, the corresponding input
is selected as follows:
→ o(ptical) → c(oaxial) → A(nalog)
■Notes :
• When TUNER, TAPE or CD is selected as an input source,
the digital input cannot be selected.
• When the selected digital input is not connected, the
"DIGITAL" indicator flickers and the analog input is
automatically selected.
• The selected digital or analog input is automatically
assigned to the corresponding input source on the INPUT
setup menu. (For details, refer to "SETTING THE INPUT "
on page 31.)
• The sound from the component connected to the selected
digital input can be heard regardless of the selected input
source.
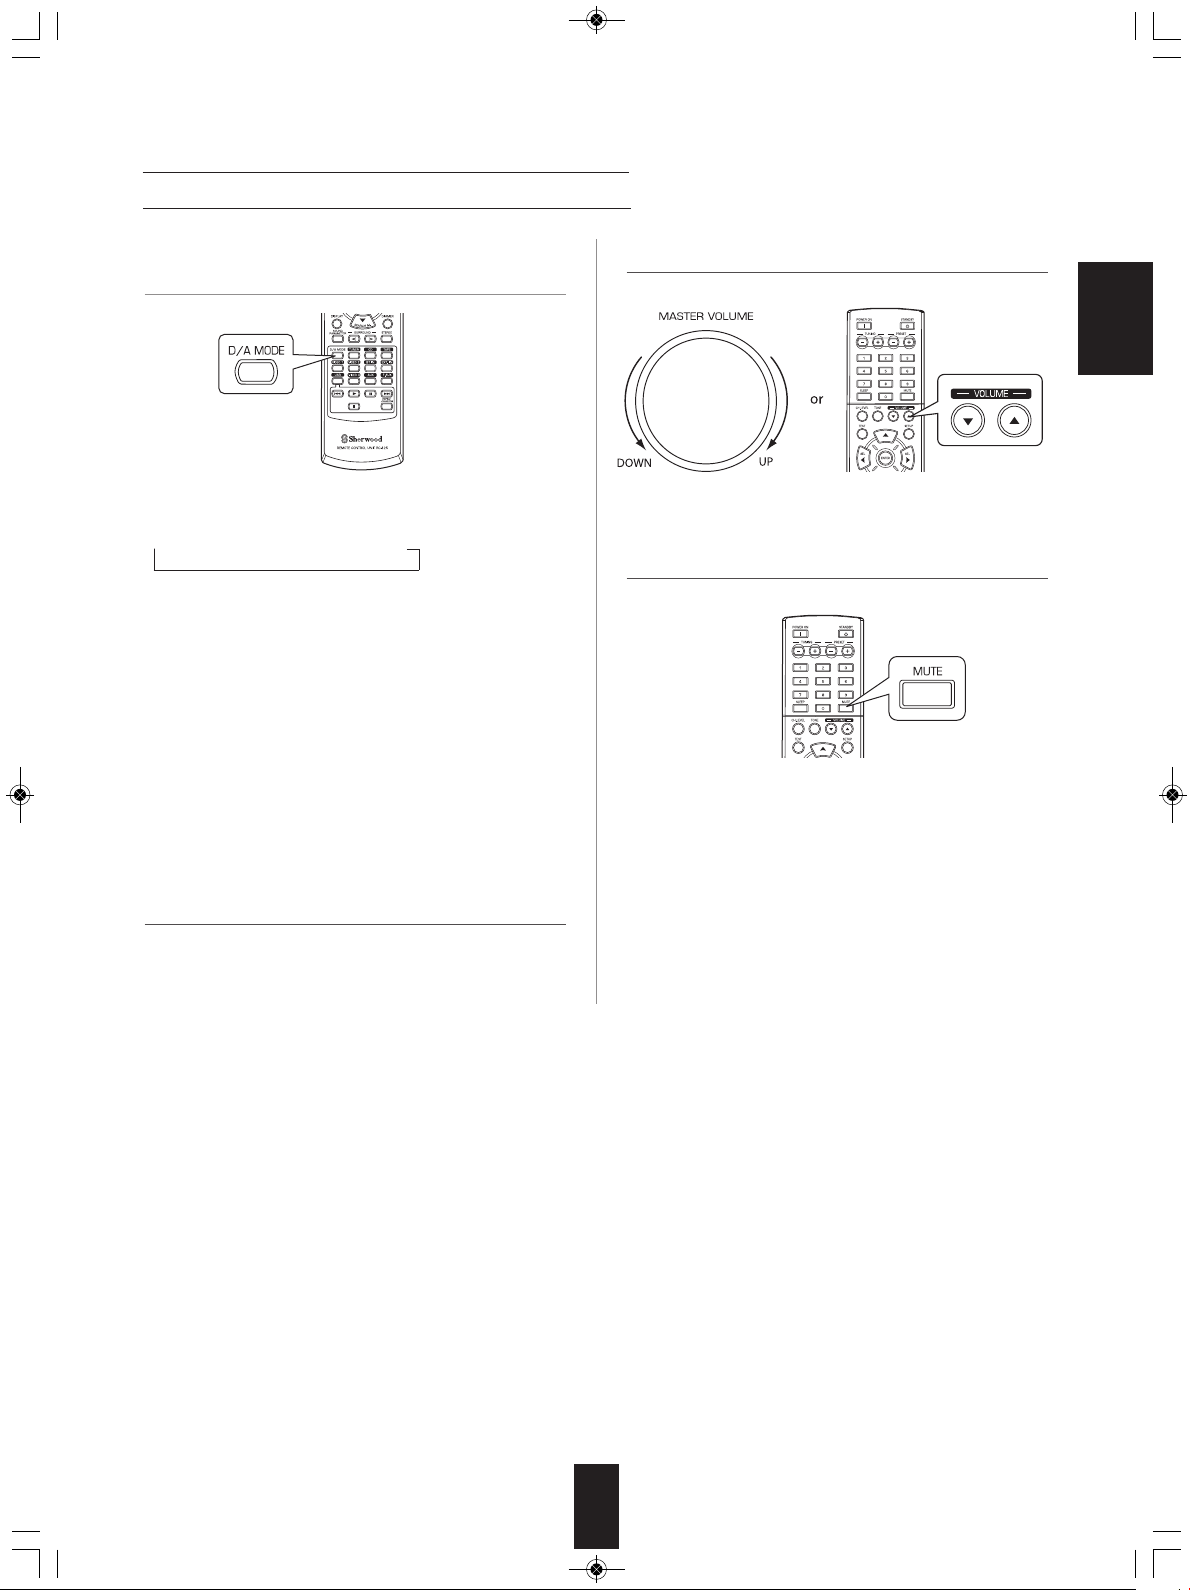
5. Adjust the (overall) volume.
ENGLISH
6. To mute the sound.
• “MUTE” will flicker.
• To resume the previous sound level, press it again.
4. Operate the selected component for playback.
• When playing back the program sources with surround
sound, refer to “ENJOYING SURROUND SOUND” on
page 15.
12
Page 13
RD-5405(G)100316_RD-5503(g) 2010-04-20 오후 7:57 페이지 13
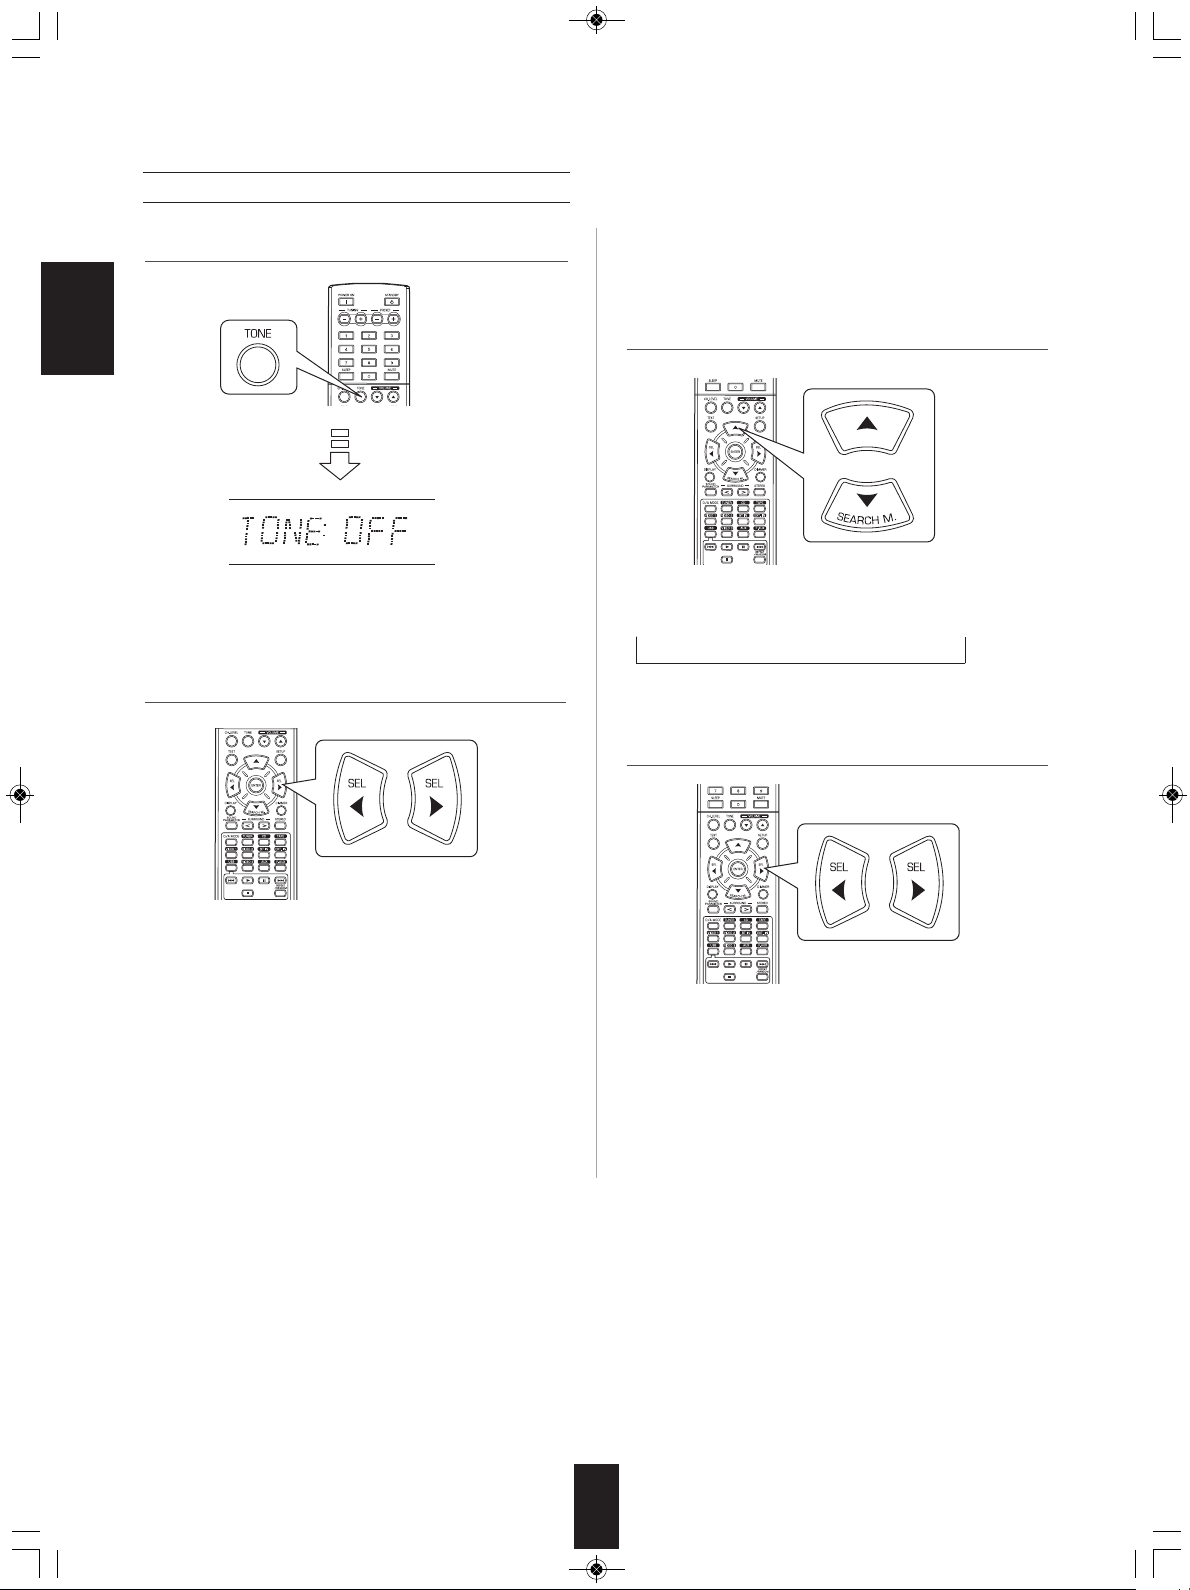
Adjusting the tone (bass and treble)
7. Enter the tone mode.
ENGLISH
• The tone mode is displayed for several seconds.
8. Press the CURSOR LEFT(◀)/RIGHT(▶) buttons to
select the desired tone mode.
■When the TONE is set to ON to adjust the tone
(bass and treble).
9. Press the CURSOR UP(▲)/DOWN(▼) buttons to
select the desired tone.
• Each time these buttons are pressed, the tone is selected
as follows :
→ BASS ↔ TRBL (treble) ↔ TONE: ON ←
10. Press the CURSOR LEFT(◀)/RIGHT(▶) buttons to
adjust the selected tone as desired.
• Each time these buttons are pressed, the tone mode is
selected as follows :
OFF : To listen to a program source without the tone effect.
↕ ("DIRECT" indicator lights up.)
ON : To adjust the tone for your taste.
("DIRECT" indicator goes off.)
• The tone level can be adjusted within the range of -10 ~
+10 dB.
• In general, we recommend the bass and treble to be
adjusted to 0 dB (flat level).
• Extreme settings at high volume may damage your
speakers.
• To complete tone adjustment, repeat the above steps 9
and 10.
• If the tone display disappears, start from the step 7 again.
13
Page 14

RD-5405(G)100316_RD-5503(g) 2010-04-20 오후 7:57 페이지 14
SURROUND SOUND
• This receiver incorporates a sophisticated Digital Signal Processor that allows you to create optimum sound quality and sound
atmosphere in your personal Home Theater.
Surround modes
■DTS Digital Surround
DTS Digital Surround(also called simply DTS) is a multichannel digital signal format which can handle higher data
rates. Discs bearing the DTS logo include the recording of
up to 5.1 channels of digital signals, which can be generally
thought to provide better sound quality due to the lower
audio compression required.
If also provides wide dynamic range and separation,
resulting in magnificent sound.
Manufactured under license under U.S. Patent #'s:
5,451,942; 5,956,674; 5,974,380; 5,978,762; 6,487,535 &
other U.S. and worldwide patents issued & pending.
DTS and DTS Digital Surround are registered trademarks
and the DTS logos and Symbol are trademarks of DTS, Inc.
ⓒ 1996-2008 DTS, Inc. All Rights Reserved.
■Dolby Digital
Dolby Digital is the multi-channel digital signal format
developed by Dolby Laboratories. Discs bearing the Dolby
Digital logo includes the recording of up to 5.1 channels of
digital signals, which can reproduce much better sound
quality, spatial expansion and dynamic range
characteristics than the previous Dolby Surround effect.
■Dolby Pro Logic II surround
This mode applies conventional 2- channel signals such as
digital PCM or analog stereo signals as well as Dolby
Surround signals, etc. to surround processing to offer
improvements over conventional Dolby Pro Logic circuits.
Dolby Pro Logic ll surround includes 2 modes as follows:
• The following modes apply conventional 2-channel
signals such as digital PCM or analog stereo signals to
high performance Digital Signal Processor to recreate
sound fields artificially.
■Matrix
This mode reproduces a delayed signals from the surround
channels to emphasize the sense of expansion for music
sources.
■Church
This mode provides the ambience of a church for baroque,
string orchestral or choral group music.
■Theater
This mode provides the effect of being in a movie theater
when watching a movie source.
■Hall
This mode provides the ambience of a concert hall for
classical music sources such as orchestral, chamber
music, or an instrumental solo.
■Stadium
This mode provides the expansive sound field to achieve
the true stadium effect when watching baseball or soccer
games.
ENGLISH
• Dolby Pro Logic ll Movie
When enjoying movies, this mode allows you to further
enhance the cinematic quality by adding processing that
emphasizes the sounds of the action special effects.
• Dolby Pro Logic ll Music
When listening to music, this mode allows you to further
enhance the sound quality by adding processing that
emphasizes the musical effects.
■Dolby Pro Logic
This mode expands any 2-channel sources(, including
Dolby Surround sources) for 4 channel(front left, center,
front right and surround) playback.
The surround channel is monaural, but is played through
two surround speakers.
Manufactured under license from Dolby Laboratories.
Dolby, Pro Logic, and the double-D symbol are registered
trademarks of Dolby Laboratories.
14
Page 15
RD-5405(G)100316_RD-5503(g) 2010-04-20 오후 7:57 페이지 15
ENJOYING SURROUND SOUND
■Notes:
• Before surround playback, first perform the speaker setup procedure, etc. on the SETUP menu for optimum performance.
(For details, refer to "SETTING THE SPEAKER SETUP" on page 32.)
• Even when the auto surround mode is selected and the same type of digital signal format is being input, the optimum
surround mode may vary depending on whether the speaker type is set to "N (None)" or not.
• When 96 kHz PCM digital signal is being input, only the stereo mode will be selected .
ENGLISH
■Select the desired surround mode
• Each time the SURROUND MODE UP/DOWN (▶, > /
◀, <) buttons are pressed, the surround mode changes
as follows :
Manual surround mode : You can select the desired of
(“AUTO” indicator goes off.)
different surround modes
selectable for the signal being
input.
Auto surround mode : The optimum surround mode will
(“AUTO” indicator lights up.)
be automatically selected
depending on the signal format
being input.
Signal format being input Selectable surround mode
Dolby Digital 5.1 channel sources
Dolby Digital 2 channel sources
DTS sources
PCM (2channel) sources,
Analog stereo sources
[DOLBY DIGITAL, AUTO SURROUND] or <DOLBY DIGITAL>
[DOLBY PLII MOVIE, DOLBY PLII MUSIC, DOLBY PRO LOGIC, AUTO SURROUND] or
<DOLBY DIGITAL>
[DTS, AUTO SURROUND] or <DTS>
[DOLBY PLII MOVIE, DOLBY PLII MUSIC, DOLBY PRO LOGIC, MATRIX, CHURCH, THEATER,
HALL, STADIUM, AUTO SURROUND] or <STEREO>
• Depending on speaker setting, some surround modes can be selected or not as follows :
[ ] : Possible only when "CENTER" or/and "SURR (Surround)" is/are not set to "N (None)".
< > : Possible only when "CENTER" and "SURR (Surround)" are set to "N (None)".
■To cancel the surround mode for stereo operation
• Depending on the signal format which is being input, either
the stereo mode or the 2CH downmix mode is selected.
• To cancel either the stereo mode or the 2CH downmix
mode, select the surround mode with using the
SURROUND MODE UP/DOWN (▶, > / ◀, <) buttons.
■2CH downmix mode
• This mode allows the multi-channel signals encoded in Dolby Digital or DTS format to be mixed down into 2 front
channels and to be reproduced through only two front speakers.
15
Page 16
RD-5405(G)100316_RD-5503(g) 2010-04-20 오후 7:57 페이지 16
When adjusting the sound parameters
• While playing digital signals from Dolby Digital or DTS program source or listening in Dolby Pro Logic II Music mode, you
can adjust their parameters for optimum surround effect.
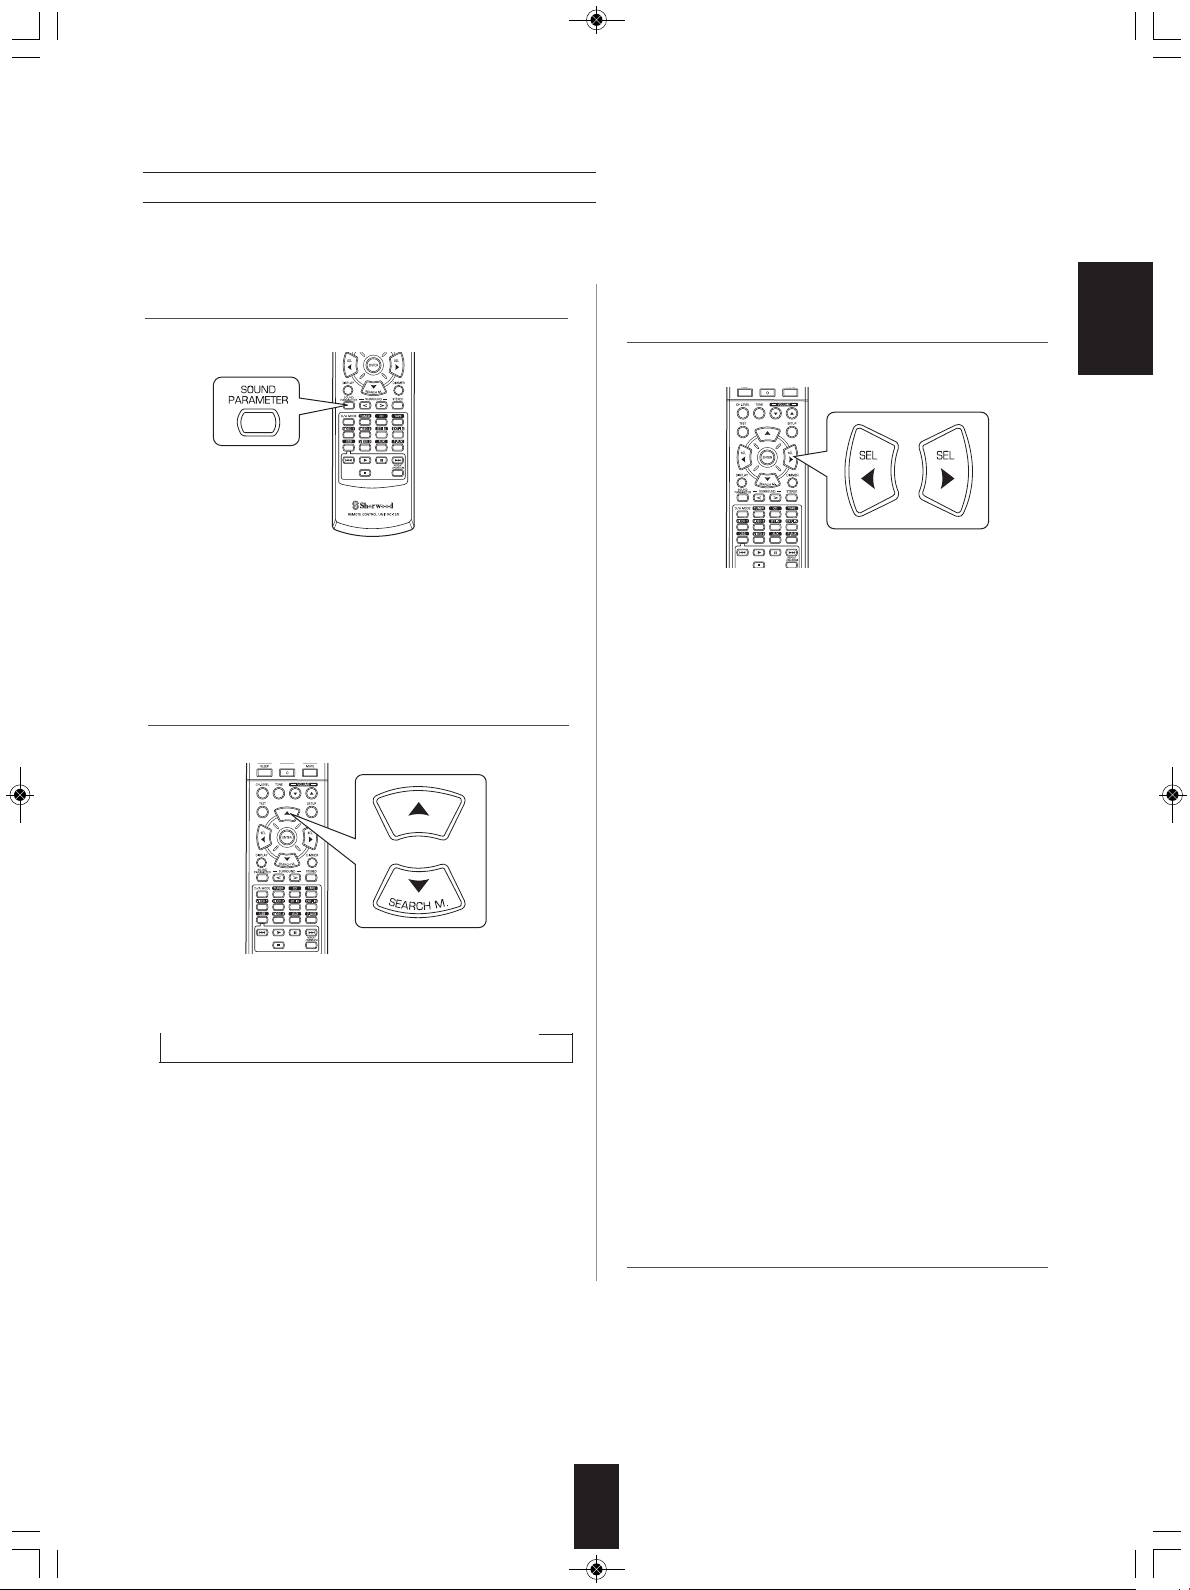
1. Press the SOUND PARAMETER button.
• Then "NIGHT : ~ " (or "PANO : ~ ") is displayed for several
seconds.
• If the parameter mode disappears, press this button again.
2. Press the CURSOR UP(▲)/DOWN(▼) buttons to
select the desired parameter.
• Each time these buttons are pressed, the parameter mode
changes as follows:
→ "NIGHT" ↔ "PANO" ↔ "C.WIDTH" ↔ "DIMEN" ←
(Night mode) (Panorama mode) (Center width control) (Dimension control)
• "NIGHT" can be selected only while playing digital signals
from Dolby Digital or DTS source.
• "PANO", "C.WIDTH" and "DIMEN" can be selected only
while listening in Dolby Pro Logic II Music mode.
3. Press the CURSOR LEFT(◀)/ RIGHT(▶) buttons to
adjust the selected parameter as desired.
■When selecting the "NIGHT (Night mode)"
This function compresses the dynamic range of previously
specified parts of Dolby Digital or DTS sound track (with
extremely high volume) to minimize the difference in
volume between the specified and non-specified parts. This
makes it easy to hear all of the sound track when watching
movies at night at low levels. The night mode can be set in
11 steps from 0.0 to 1.0 (default value : 0.0).
■Note : In some Dolby Digital or DTS softwares, the night
mode may not be valid.
■When selecting the "PANO (Panorama)" mode
This mode extends the front stereo image to include the
surround speakers for an exciting "wraparound" effect with
side wall imaging.
Select "OFF" or "ON"(default value: OFF).
■When selecting the "C. WIDTH (Center width)"
control
This adjusts the center image so it may be heard only from
the center speaker, only from the left/right speakers as a
phantom image, or from all three front speakers to varying
degrees.
The control can be set in 8 steps from 0 to 7(default value :
3).
■When selecting the "DIMEN (Dimension)" control
This gradually adjusts the soundfield either towards the
front or towards the rear. The control can be set in 7 steps
from -3 to +3 (default value : 0).
ENGLISH
4. Repeat the above steps 2 and 3 to adjust other
parameters.
16
Page 17
RD-5405(G)100316_RD-5503(g) 2010-04-20 오후 7:57 페이지 17
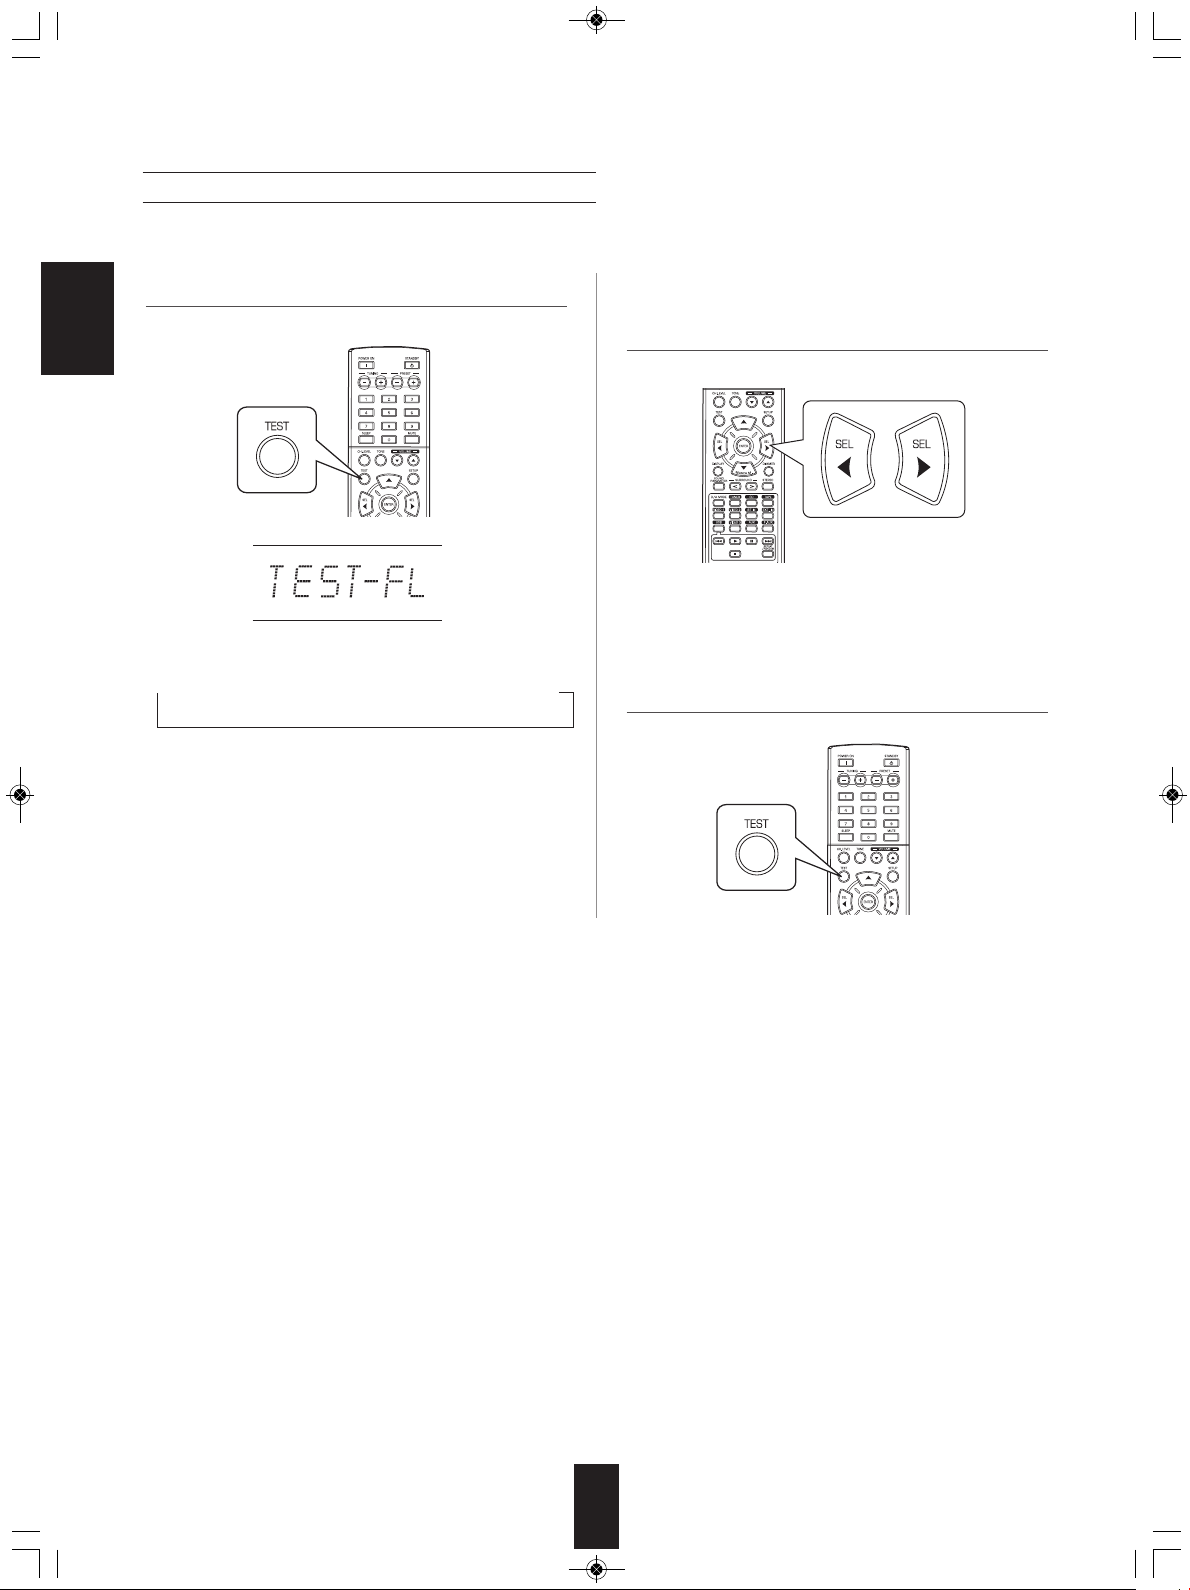
Adjusting each channel level with test tone
• The volume level of each channel can be adjusted easily with the test tone function.
1. Enter the test tone mode. 2. At each channel, adjust the level as desired until the
ENGLISH
sound level of each speaker is heard to be equally
loud.
• The test tone mode is displayed and will be heard from the
speaker of each channel for 2 seconds as follows:
→ FL → C → FR → SR → SL → SW
Front Left Center Front Right Surround Right Surround Left Subwoofer
• When the speaker setting is "N (None or No)", the test
tone of the corresponding channel is not available.
• You can select the desired channel with the CURSOR
UP(▲)/DOWN(▼) buttons.
3. Cancel the test tone function.
17
Page 18
RD-5405(G)100316_RD-5503(g) 2010-04-20 오후 7:57 페이지 18
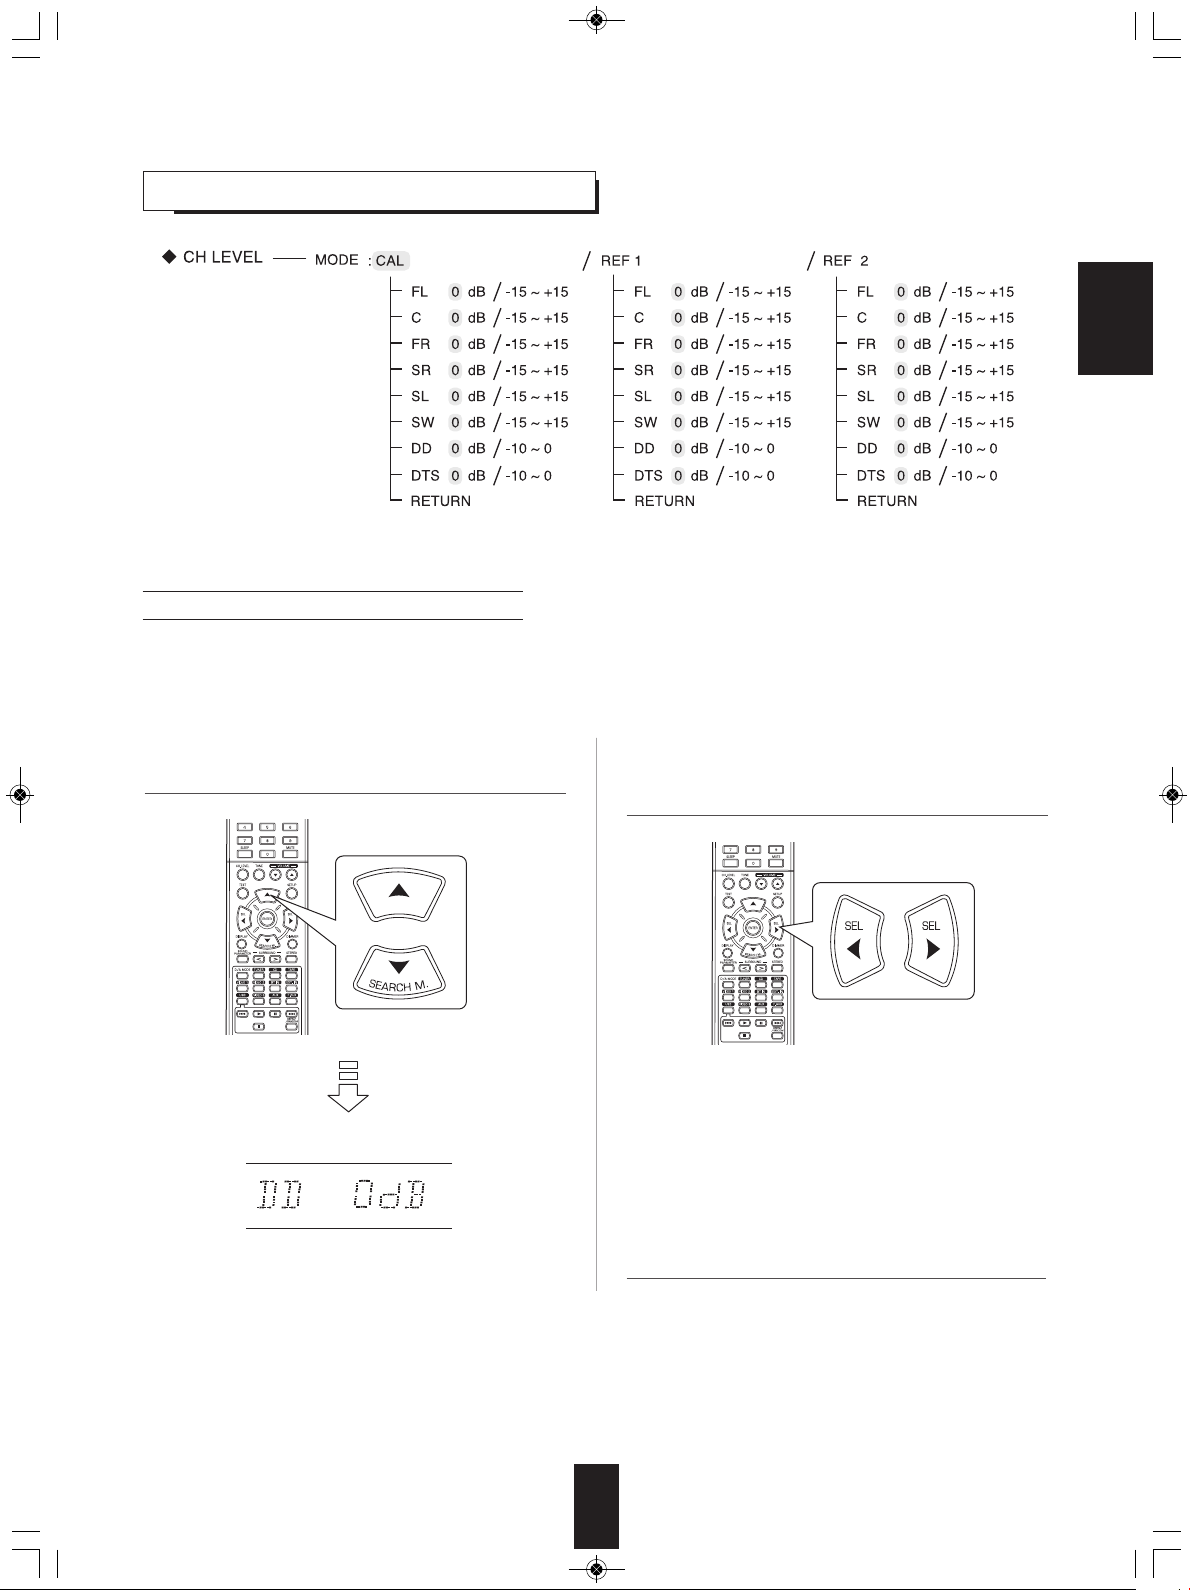
Adjusting the current channel level
• After adjusting each channel level with test tone, adjust the channel levels either according to the program sources or to suit
your tastes.
• You can adjust the current channel levels as desired. These adjusted levels are just memorized into user’s memory ("CAL"),
not into preset memory("REF 1", "REF 2").
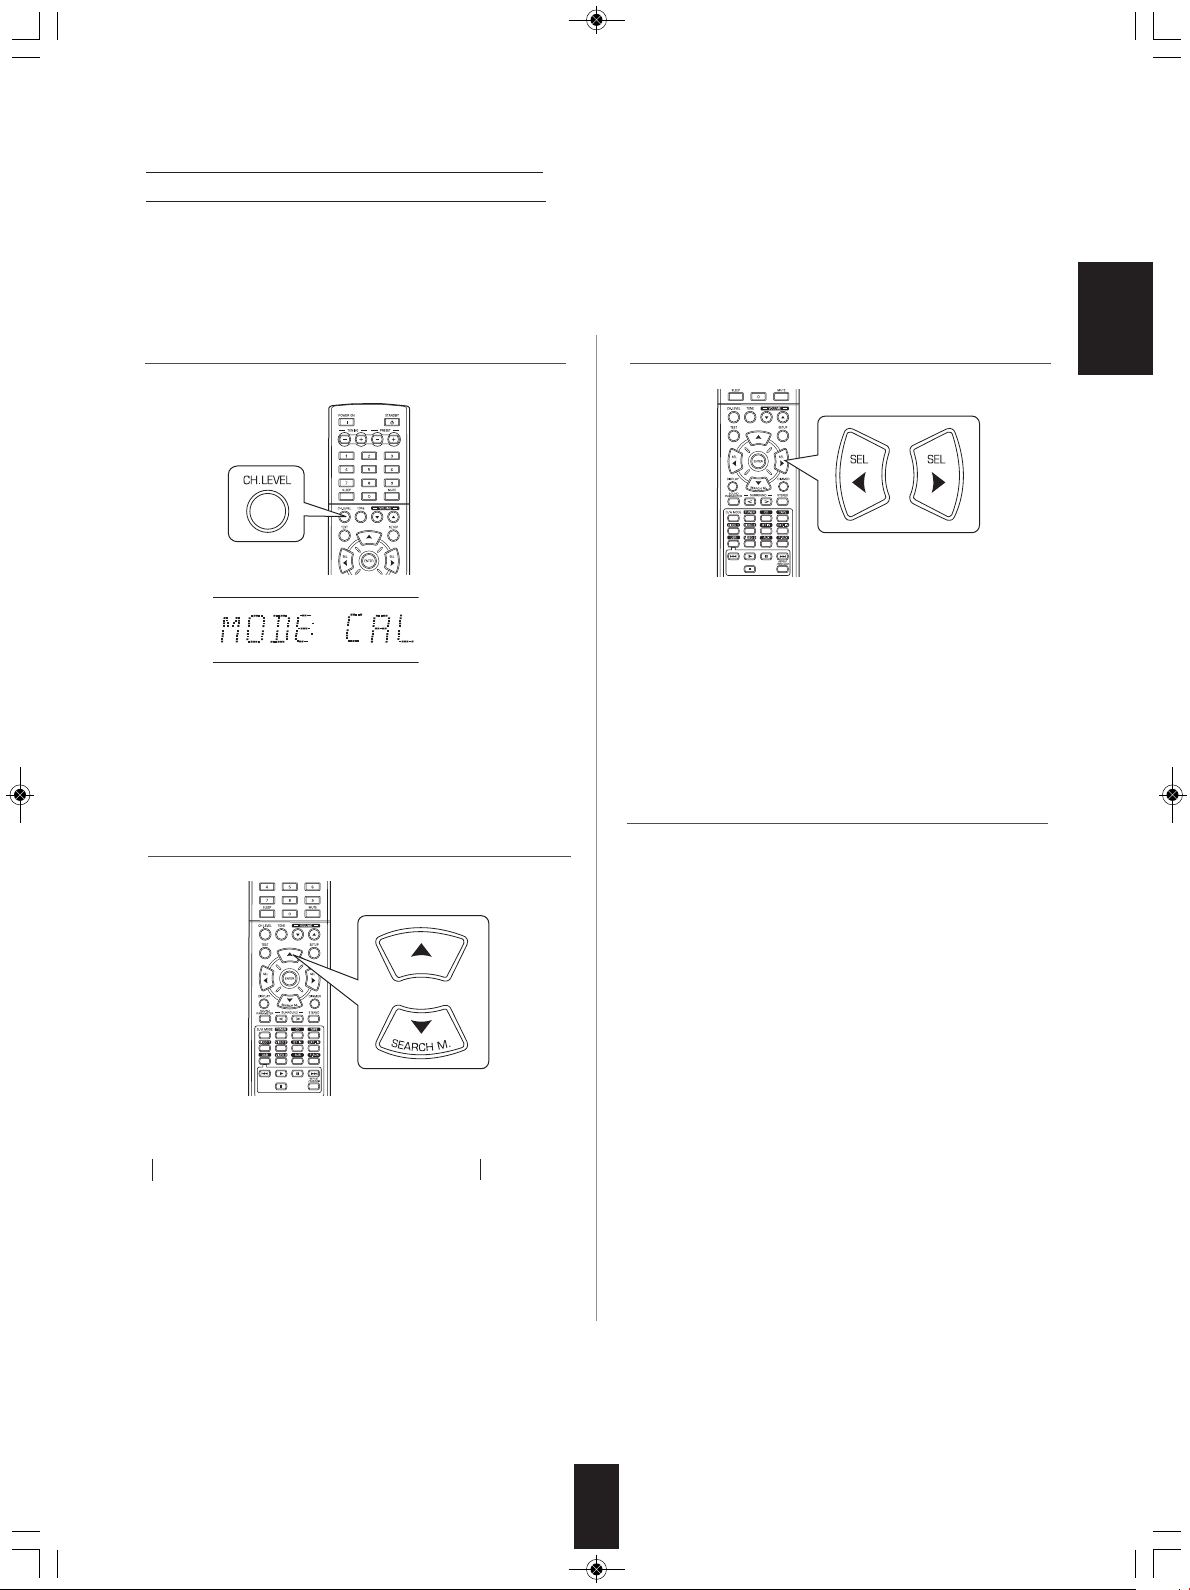
1. Press the CHANNEL LEVEL button.
• Then the memory mode ("CAL", etc.) is displayed for
several seconds.
• When the memory mode or channel level disappears,
press this button again.
2. Select the desired channel.
3. Adjust the level of the selected channel as desired.
• The LFE level can be adjusted within the range of -10~0
dB and other channel levels within the range of -15 ~ +15
dB.
• In general, we recommend the LFE level to be adjusted
to 0 dB.(However, the recommended LFE level for some
early DTS software is -10 dB.) If the recommended levels
seem too high, lower the setting as necessary.
4. Repeat the above steps 2 and 3 to adjust each
channel level.
ENGLISH
• Each time these buttons are pressed, the corresponding
channel is selected as follows:
→ REF 1, 2 (or CAL) ↔ FL ↔ C ↔ FR ←
→ <DD or DTS> ↔ SW ↔ SL ↔ SR ←
LFE level
< >: Only when the digital signals from Dolby Digital or DTS
program sources that include LFE signal are input, LFE level
can be displayed.
• Depending on the speaker settings ("N (None or No)") and
surround mode, etc., some channels cannot be selected.
18
Page 19
RD-5405(G)100316_RD-5503(g) 2010-04-20 오후 7:57 페이지 19
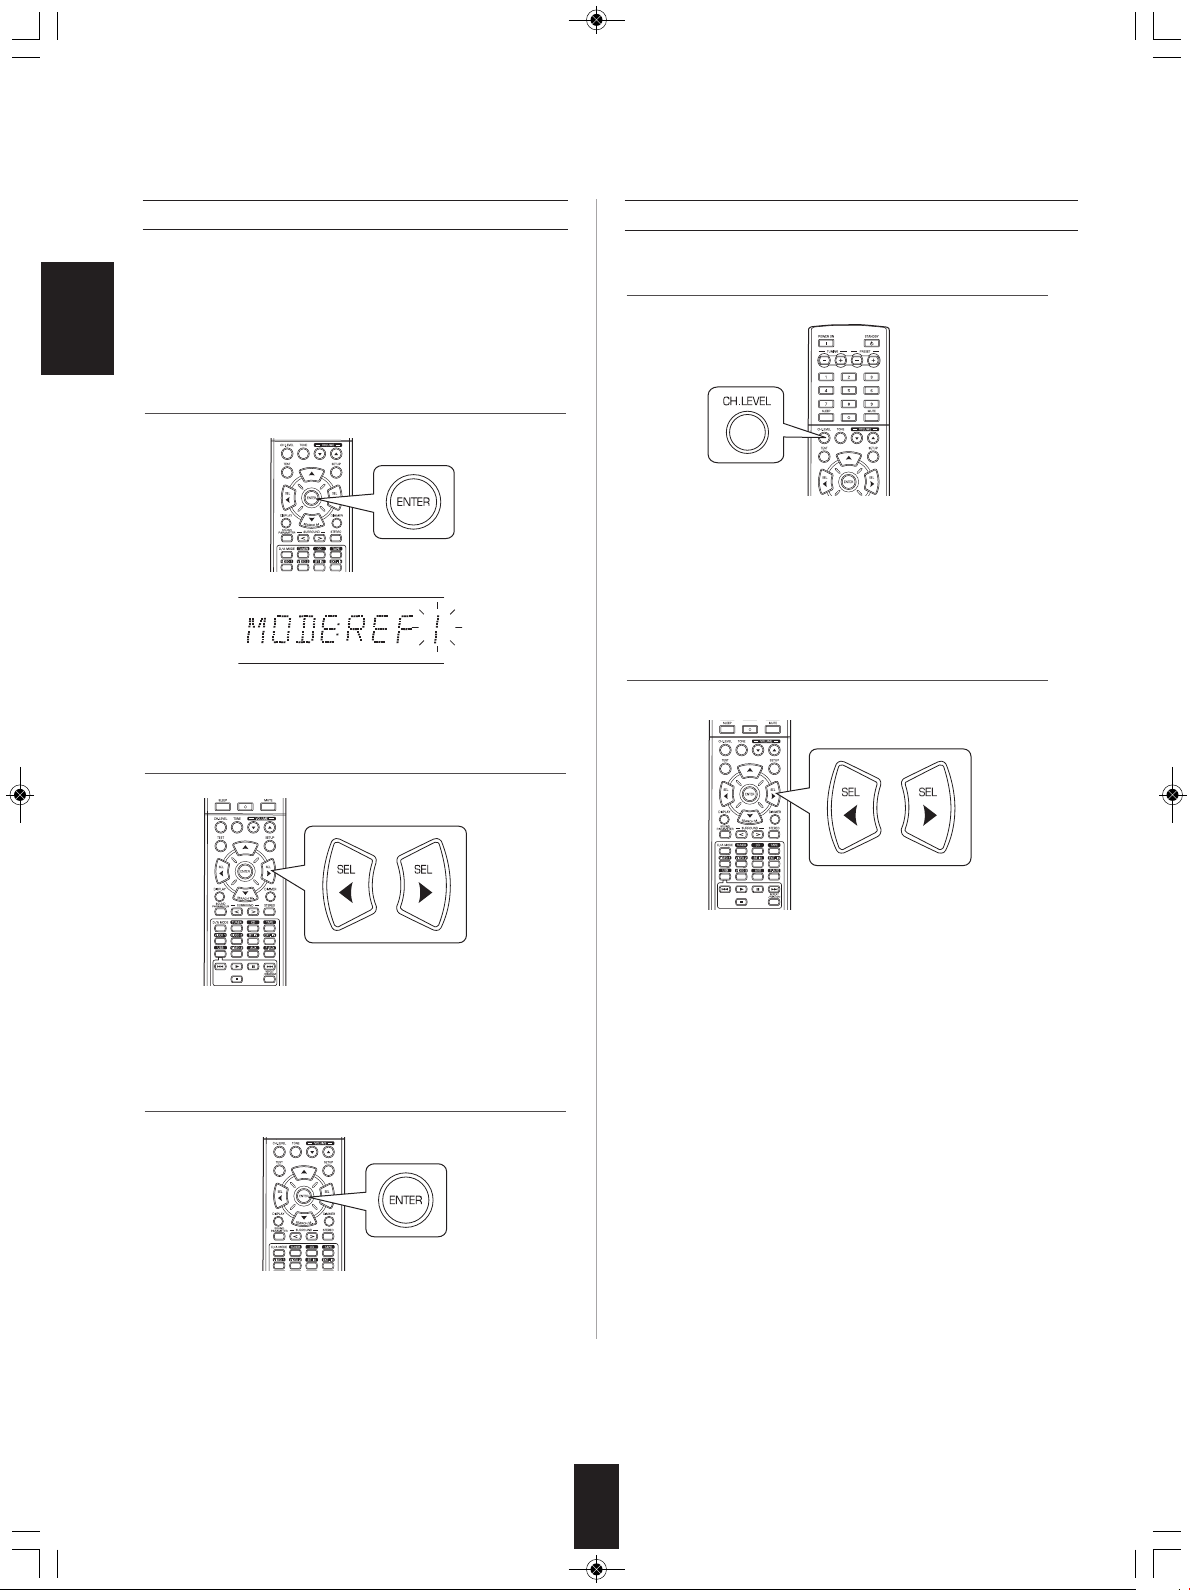
Memorizing the adjusted channel levels
• You can memorize the adjusted channel levels into preset
memory("REF 1", "REF 2") and recall the memorized
whenever you want.
ENGLISH
1. After performing the steps 1 ~ 4 in "Adjusting the
current channel level" procedure on page 18, press the
ENTER button.
• Then "1" of "REF 1" indication flickers for several seconds.
2. Select the desired one of REF 1 and REF 2.
Recalling the memorized channel levels
1. Press the CHANNEL LEVEL button.
• "CAL " (or "REF 1", etc.) is displayed for several
seconds.
• If the channel level mode display disappears, press this
button again.
2. Select the desired one of REF 1 and REF 2.
• If the preset memory disappears, perform the above step
1 again.
3. Confirm your selection.
• The adjusted channel levels have now been memorized
into the selected memory.
• Then the channel levels memorized into the selected
preset memory are recalled.
19
Page 20

RD-5405(G)100316_RD-5503(g) 2010-04-20 오후 7:57 페이지 20
LISTENING TO RADIO BROADCASTS
Auto tuning
1. Select the desired band.
• Each time this button is pressed, the band changes as
follows ;
→ FM ST → FM MONO → AM
("ST" lights up) ("ST" goes off)
• When FM stereo broadcasts are poor because of weak
broadcast signals, select the FM mono mode to reduce
the noise, then FM broadcasts are reproduced in
monaural sound.
Manual tuning
• Manual tuning is useful when you already know the
frequency of the desired station.
• After selecting the desired band, press the TUNING UP(+)
/ DOWN(-) buttons repeatedly until the right frequency has
been reached.
Auto presetting
• Auto presetting function automatically searches for FM
stations only and store them in the memory.
• While listening to radio broadcasts, press and hold down
the (MEMORY/) ENTER button for more than 2 seconds.
ENGLISH
2. Press the TUNING UP(+)/DOWN(-) buttons for more
than 0.5 second.
• The tuner will now search until a station of sufficient
strength has been found. The display shows the tuned
frequency and "TUNED".
• If the station found is not the desired one, simply repeat
this operation.
• Weak stations are skipped during auto tuning.
• Then "AUTO MEM" flickers and this receiver starts auto
presetting.
• Up to 30 FM stations can be stored.
■Notes:
• FM stations of weak strength cannot be memorized.
• To memorize AM stations or weak stations, preform
"Manual presetting" procedure with using "Manual tuning"
operation.
20
Page 21
RD-5405(G)100316_RD-5503(g) 2010-04-20 오후 7:57 페이지 21
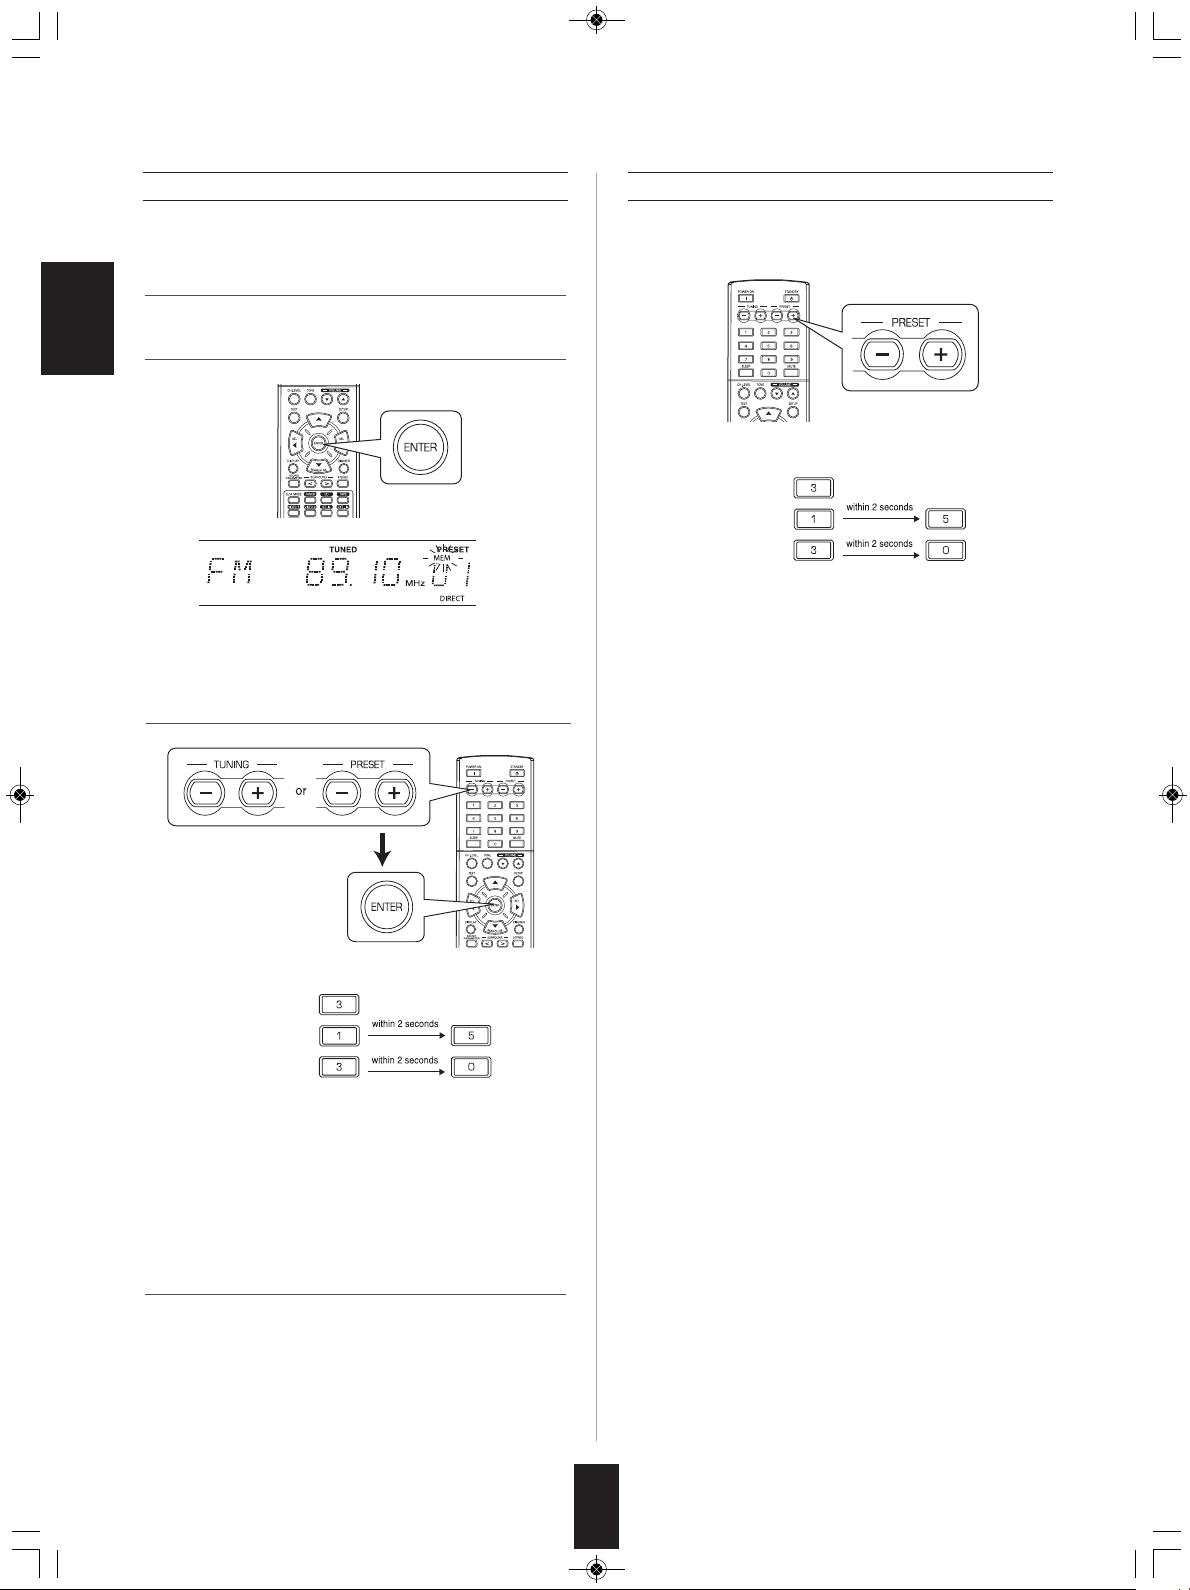
Manual presetting
• You can store up to 30 preferred stations in the memory.
1. Tune in the desired station with auto or manual tuning.
2. Press the ENTER button.
ENGLISH
• "MEM" is flickering for several seconds.
3. Select the desired preset number (1~30) and press the
ENTER button.
Tuning to preset stations
• After selecting the tuner as an input source, select the
desired preset number.
• When using the NUMERIC buttons on the remote control.
Examples) For “3” :
For “15” :
For “30” :
• When using the NUMERIC buttons on the remote control.
Examples) For “3” :
For “15” :
For “30” :
• The station has now been stored in the memory.
• When using the NUMERIC buttons, the station is stored
automatically without pressing the ENTER button.
• A stored frequency is erased from the memory by storing
another frequency in its place.
• If “MEM” goes off, start again from the above step 2.
4. Repeat the above steps1 to 3 to memorize other
stations.
■MEMORY BACKUP FUNCTION
The following items, set before the receiver is turned off,
are memorized.
• INPUT SELECTOR settings
• Surround mode settings
• Preset stations,etc.
21
Page 22
RD-5405(G)100316_RD-5503(g) 2010-04-20 오후 7:57 페이지 22
RDS Tuner (Regional Option for some countries in Europe, etc.)
LISTENING TO RDS BROADCASTS(FM ONLY)
RDS(Radio Data System) is a method for sending information signals together with the transmitter signals. Your tuner is
capable of translating these signals and putting the information on the display. These codes contain the following
informations. Program Service name (PS), A list of Program Types (PTY), Traffic Announcement (TA), Clock Time (CT),
Radio Text (RT).
■Note :
• In the other countries, RDS tuner function cannot be available.
ENGLISH22ENGLISH
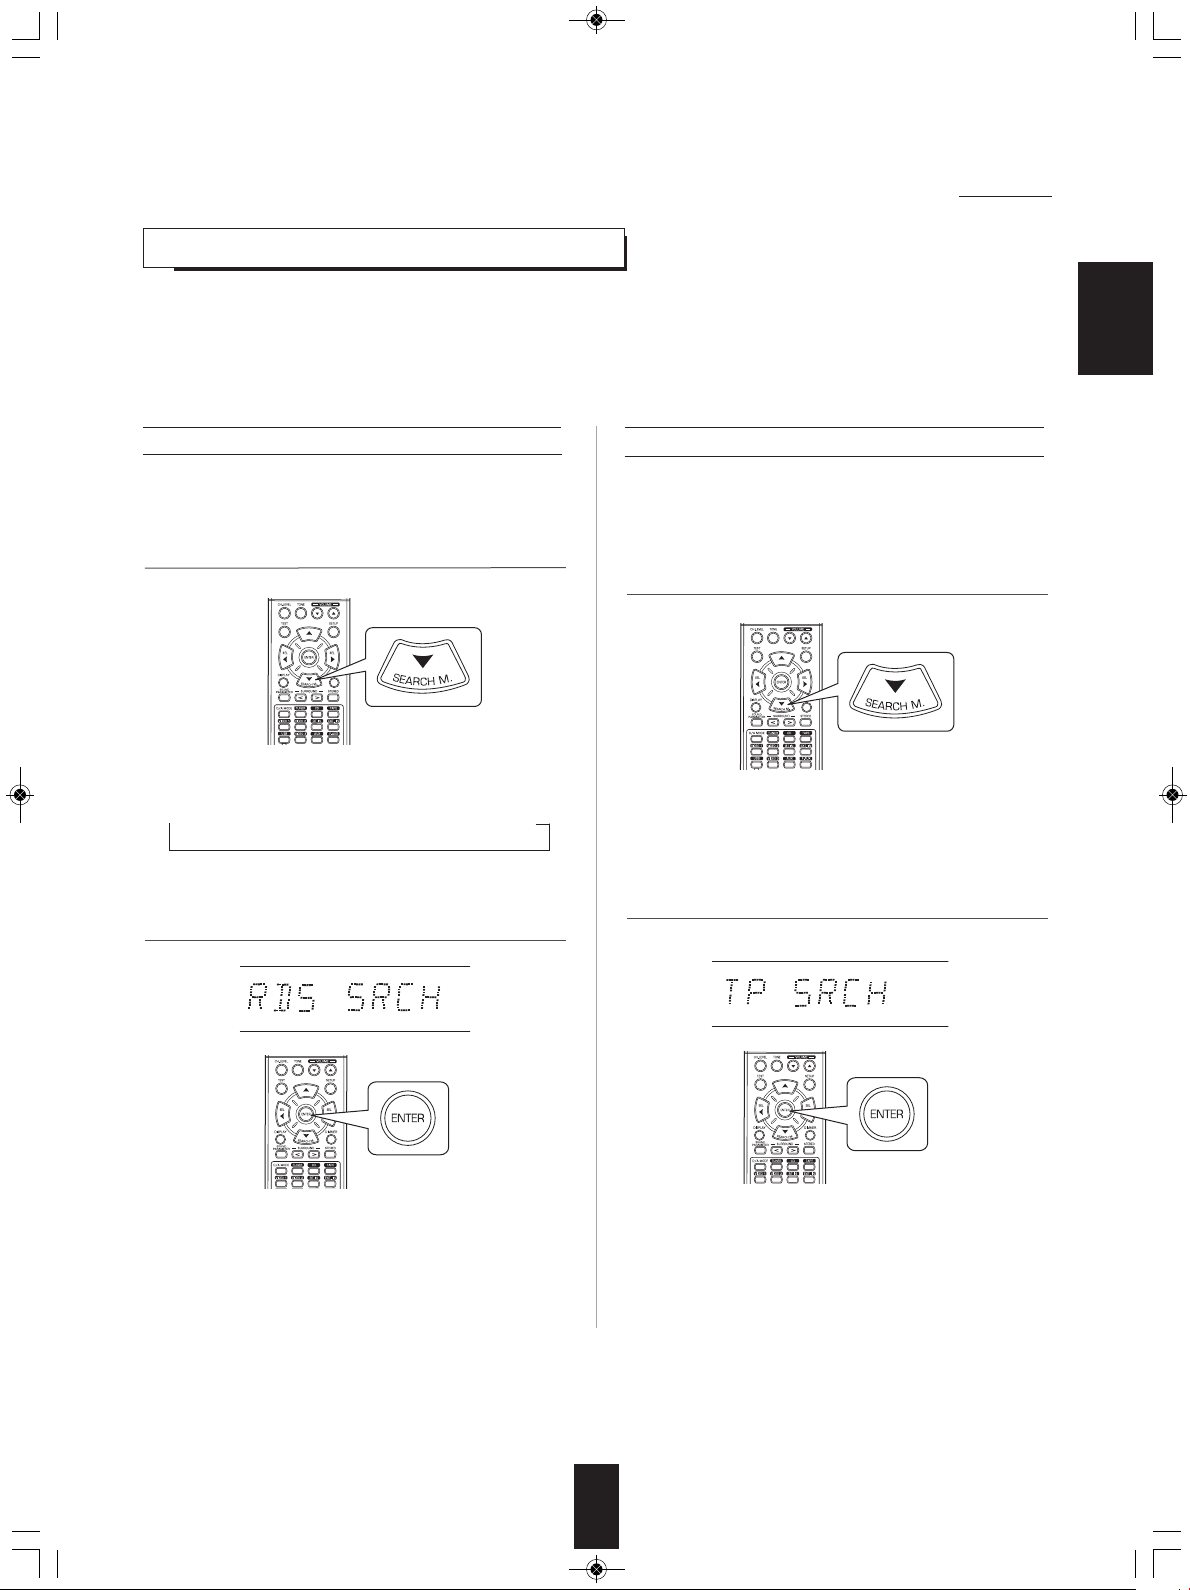
RDS search
• Use this function to automatically search and receive
the stations offering RDS services.
In the FM mode, select the RDS search mode.
1.
• Each time this button is pressed, the search mode
changes as follows;
→ RDS SRCH → TP SRCH → PTY SRCH → OFF
button.
TP search
• Use this function to automatically search and receive
the stations broadcasting the traffic program.
1. In the FM mode, press the SEARCH MODE button
twice.
• "TP SRCH" is displayed.
2. When "TP SRCH" is displayed, press the ENTER button.2. When "RDS SRCH" is displayed, press the ENTER
• The tuner automatically searches stations offering RDS
services and the station name is displayed.
• If no RDS station is found, "NO RDS" is displayed.
• When "RDS SRCH" is not displayed, repeat again from
the above step 1.
• The tuner automatically searches for stations
broadcasting the traffic program.
• "NO TRAFF" is displayed if the signal is too weak or there
are no stations broadcasting the traffic program.
• When "TP SRCH" is not displayed, repeat again from
the above step 1.
Page 23
RD-5405(G)100316_RD-5503(g) 2010-04-20 오후 7:57 페이지 23
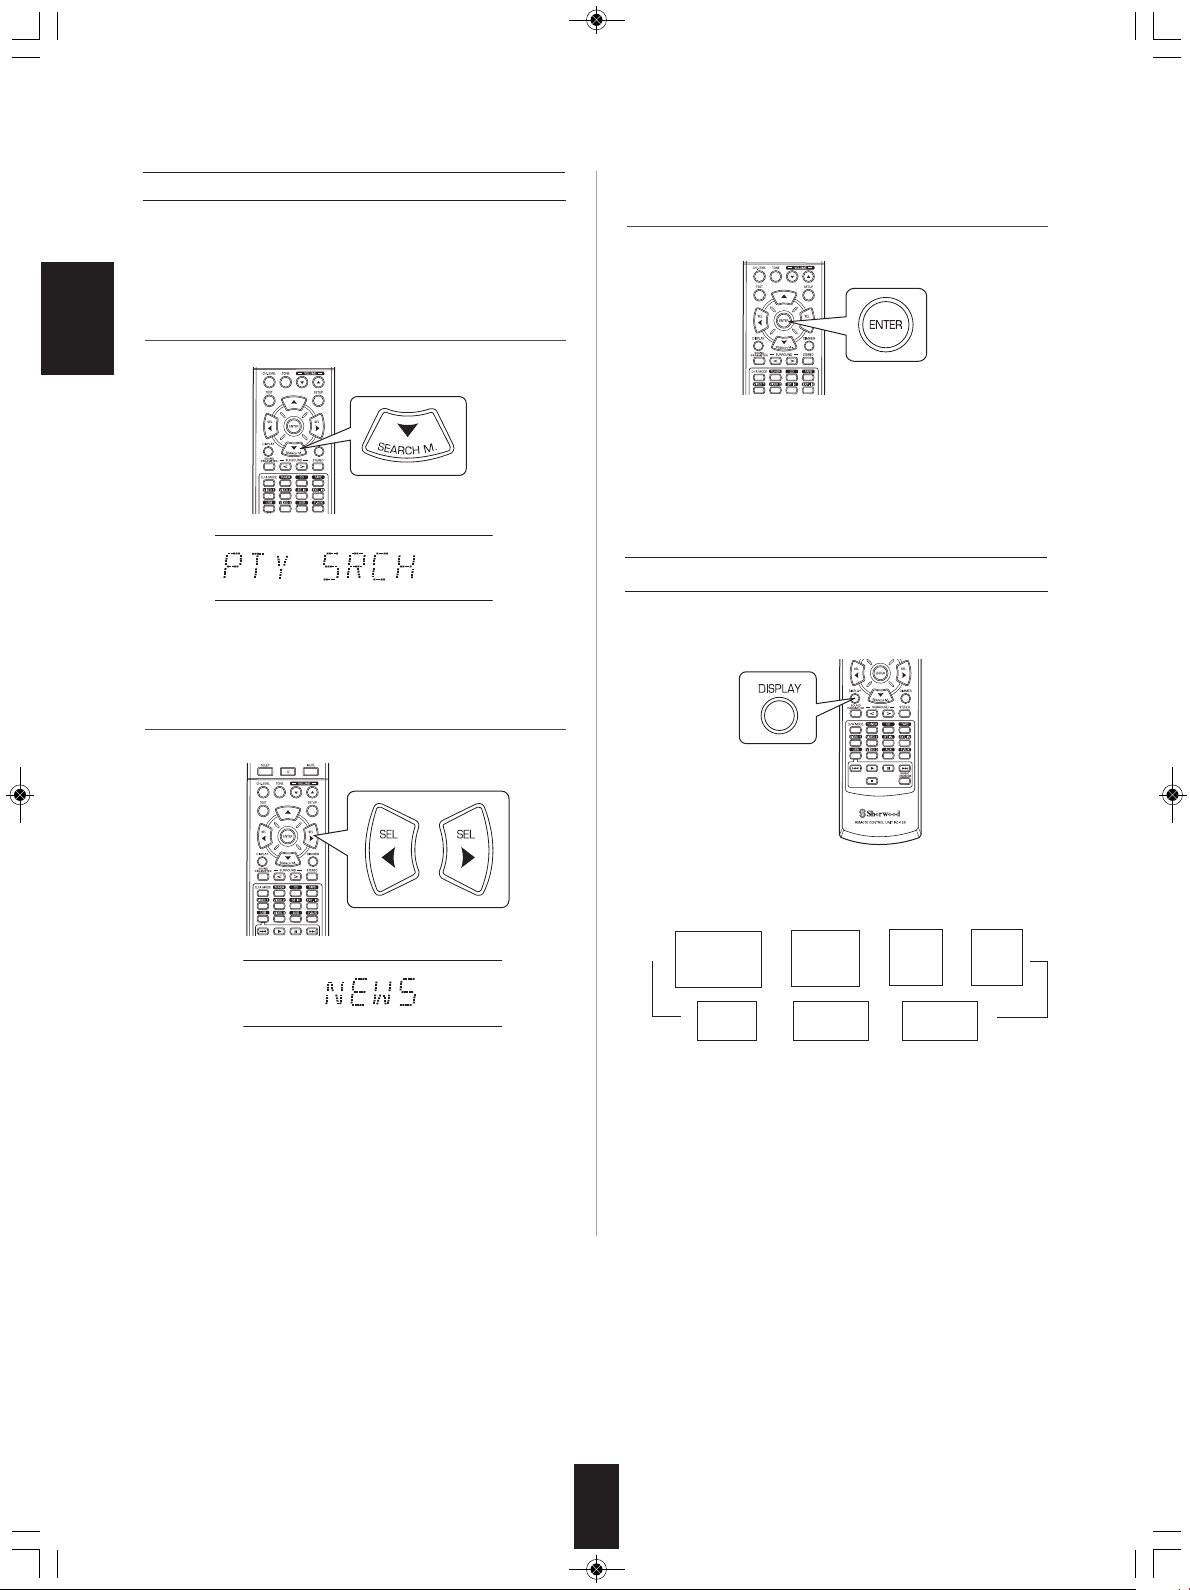
PTY search
• Use this function to automatically search and receive
the stations broadcasting the desired program type.
1. In the FM mode, press the SEARCH MODE button
three times.
ENGLISH
• "PTY SRCH" is displayed.
2. When "PTY SRCH" is displayed, select the desired
program type.
3. When the desired program is displayed, press the
ENTER button.
• The tuner automatically searches a station offering PTY
services.
• If no station is found, "NO PROG" is displayed.
DISPLAY
In the FM mode,
• Each time these buttons are pressed, one of 32 different
types of programs is selected.
(NEWS, AFFAIRS, INFO, SPORT, EDUCATE, DRAMA,
CULTURE, SCIENCE, VARIED, POP M, ROCK M,
EASY M, LIGHT M, CLASSICS, OTHER M, WEATHER,
FINANCE, CHILDREN, SOCIAL, RELIGION, PHONE
IN, TRAVEL, LEISURE, JAZZ, COUNTRY, NATION M,
OLDIES, FOLK M, DOCUMENT, TEST, ALARM, NONE)
• When "PTY SRCH" is not displayed, repeat again from
the above step 1.
• Each time this button is pressed, the display mode
changes as follows:
Program
Service name
→→→→
(PS)
Volume
• If the signals are too weak or no RDS service is
available, "NO NAME", "NO PTY", "NO TIME" or "NO
TEXT" will be displayed.
Program
Type
(PTY)
Surround
←← ←
mode
Clock
Time
(CT)
Frequency
Radio
Text
(RT)
23
Page 24
RD-5405(G)100316_RD-5503(g) 2010-04-20 오후 7:57 페이지 24
RECORDING
• When recording the analog signals from VIDEO 1 or VIDEO 2, be sure to select the analog input.
(For details, refer to "When VIDEO 1, VIDEO 2 is selected as an input source" on page 12.)
• The volume and tone (bass, treble) settings have no effect on the recording signals.
• When you select tuner, CD or VIDEO 2 as a recording source, recording may be made on TAPE, VIDEO 1 or both simultaneously.
Recording with TAPE
1. Select the desired input as a recording source except for TAPE.
2. Start recording on the TAPE.
Recording with VIDEO 1
• When the audio recording equipment is connected to the VIDEO 1 jacks, you can record the audio signals.
3. Start play on the desired input.
ENGLISH
1. Select the desired input as a recording source except for VIDEO 1.
2. Start recording on the VIDEO 1.
3. Start play on the desired input.
24
Page 25

RD-5405(G)100316_RD-5503(g) 2010-04-20 오후 7:57 페이지 25
OTHER FUNCTIONS
Operating the sleep timer
• The sleep timer allows the system to continue to operate for a specified period of time before automatically shutting off.
• To set the receiver to automatically turn off after the specified period of time.
ENGLISH
Adjusting the brightness of the fluorescent display
Displaying the operation status
• Each time this button is pressed, the sleep time changes
as follows:
→ 10 → 20 → 30 → --- → 90 → OFF
Unit : minutes
• While operating the sleep timer, " " lights up.
• When the sleep time is selected, the fluorescent display
is dimly lit.
• Each time this button is pressed, the brightness of
the fluorescent display changes as follows:
→ ON → dimmer → OFF
• In the display OFF mode, pressing any button will
restore the display ON mode.
During playback,
• Each time this button is pressed, the display mode
changes as follows:
Surround
→→→
mode
• When RDS tuner function is available in your country, for
details on the FM mode information, see “DISPLAY” on
page 23.
Volume
Input
source
25
Page 26

RD-5405(G)100316_RD-5503(g) 2010-04-20 오후 7:57 페이지 26
USING DIFFERENT FUNCTIONS ON THE FRONT PANEL
• You can use the different functions easily with the specific buttons on the front panel.
1. Select the desired setting mode.
• Depending on the selected input source, each time this
button is pressed, the mode changes as follows and is
displayed for several seconds:
→[PRESET → TUNE → ] CH LEVEL
(Current input display)
[ ] : Selectable only when the tuner is selected.
< >: Selectable only when the VIDEO 1, VIDEO 2 is selected.
OFF ← TONE < ← D/A SET> ←
3. Set the selected mode as desired.
■
When selecting “PRESET” (Preset tuning mode)
• Each time this knob is rotated, the preset station will be
tuned to.(For details, refer to “Tuning to preset stations” on
page 21.)
When selecting “TUNE” (Auto/manual tuning mode)
■
• Depending on whether this knob is rotated over several
steps once or one by one slowly, Auto tuning or manual
tuning will function. (For details, refer to “Auto tuning” and
“Manual tuning” on page 20.)
When selecting “CH LEVEL” (Channel level adjustment mode)
■
• You can adjust the current channel levels as desired.
(For details, refer to “Adjusting the current channel level” on
page 18.)
① Press the MODE button to select the desired channel.
② Rotate this knob to adjust the level of the selected channel
as desired.
③ Repeat the above steps ① and ② to adjust each channel
level.
2. Enter the selected mode.
• The setting mode will be cancelled in several seconds.
Should this happened, perform the above step 1 again.
■
When selecting “D/A SET” (Digital/Analog input mode)
• Each time this knob is rotated, the digital(optical or coaxial)
or the analog input will be selected.(For details, refer to
“When VIDEO 1, VIDEO 2 is selected as an input source” on
page 12.)
When selecting “TONE” (Tone adjustment mode)
■
• Each time this knob is rotated, the tone mode is selected as
follows:
OFF : To listen to a program source without the tone effect.
↕ (“DIRECT” indicator lights up.)
ON : To adjust the tone for your taste.
(“DIRECT” indicator goes off.)
When the TONE is set to ON to adjust the tone
◆
(bass and treble)
① Press the MODE button to select the desired tone.
② Rotate this knob to adjust the selected tone as desired.
③ To complete tone adjustment, repeat the above steps ①
and ②.
ENGLISH
4. Exit the setting mode.
26
Page 27
RD-5405(G)100316_RD-5503(g) 2010-04-20 오후 7:57 페이지 27
System Setup
• The setup menu is displayed on the fluorescent display and allows you to perform the setup procedures easily. In most
situations, you will only need to set this once during the installation and layout of your home theater, and it rarely needs to be
changed later.
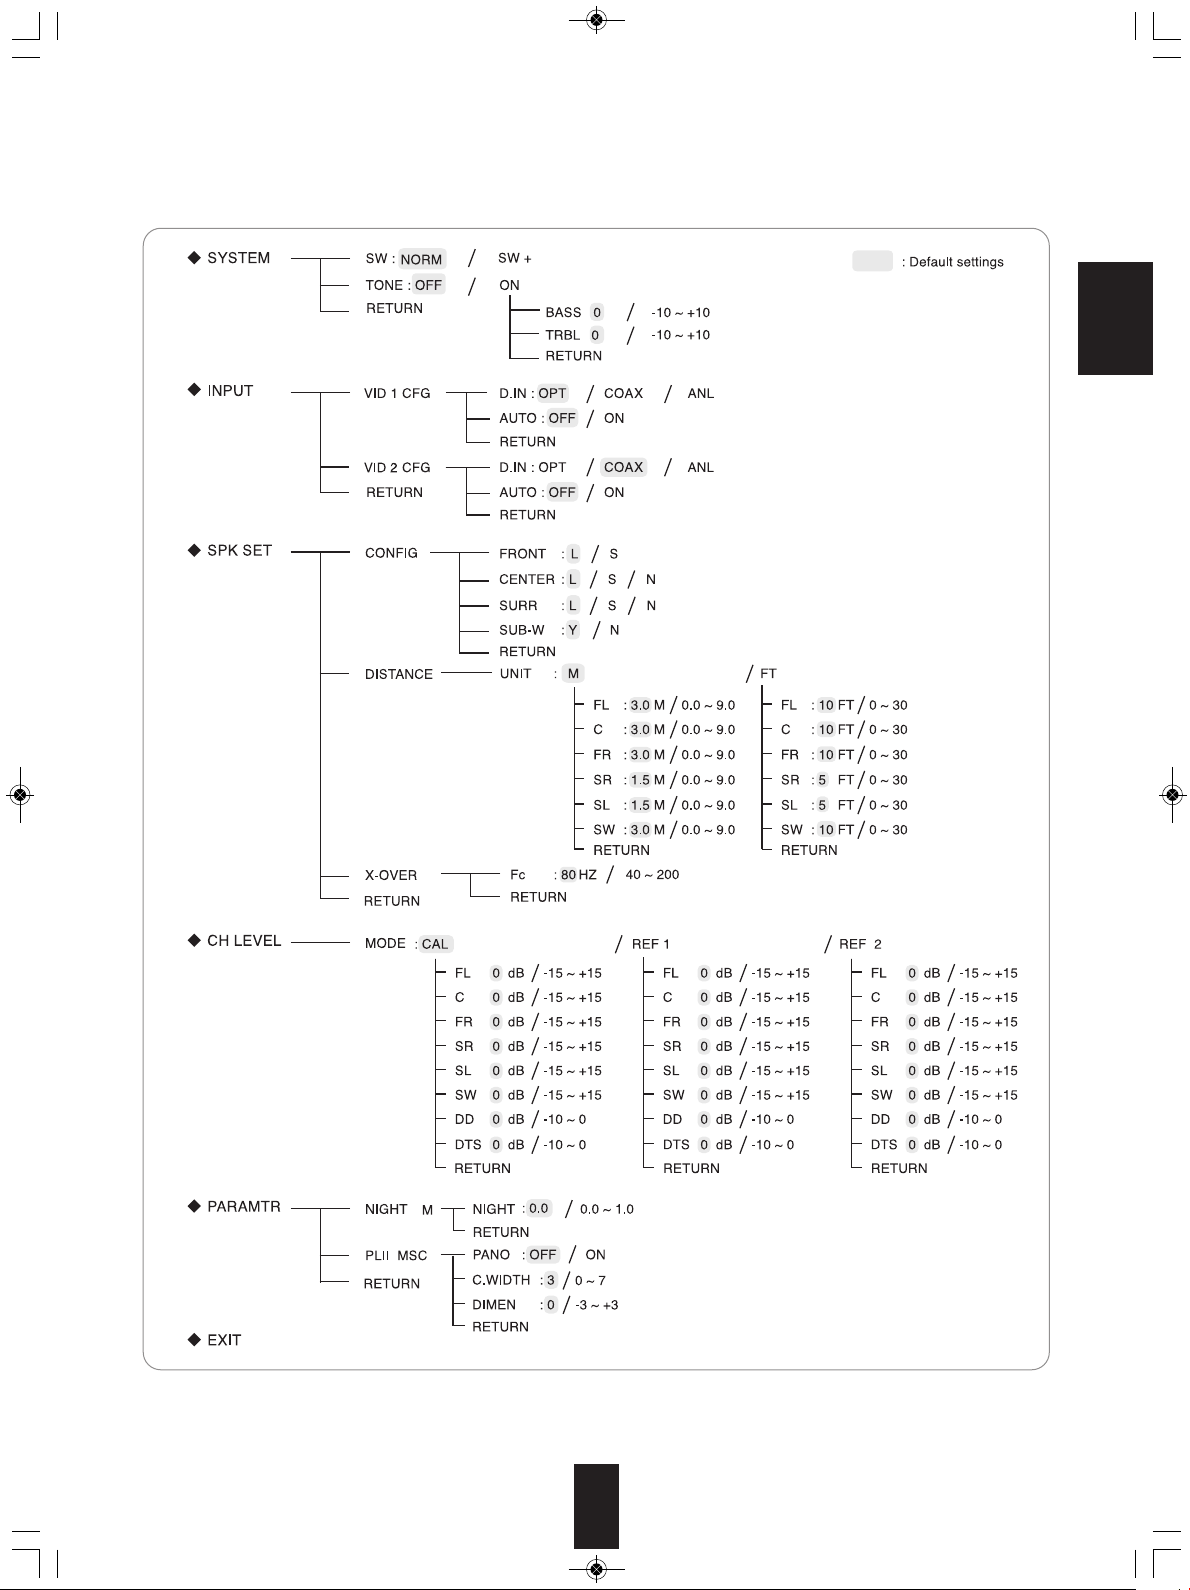
The setup menu consists of 5 main menus ; system, input, speaker setup, CH level and parameter. These menus
are then divided up into various sub-menus.
ENGLISH
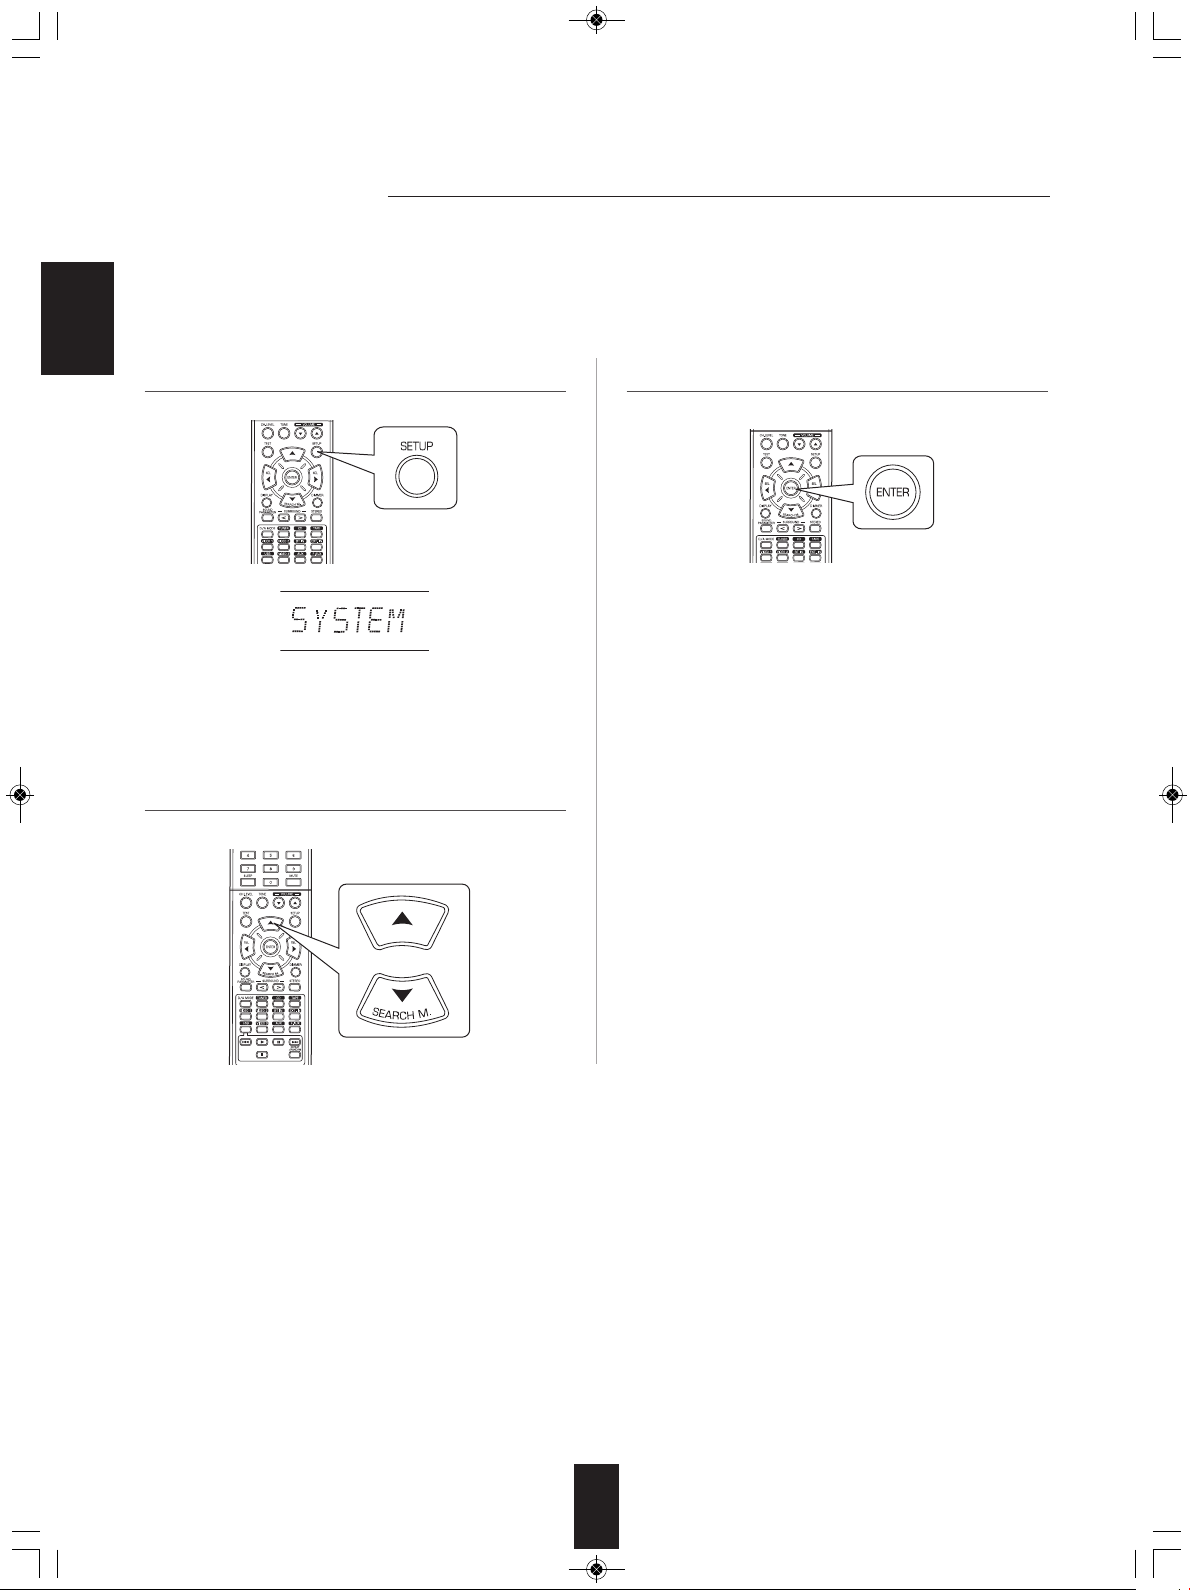
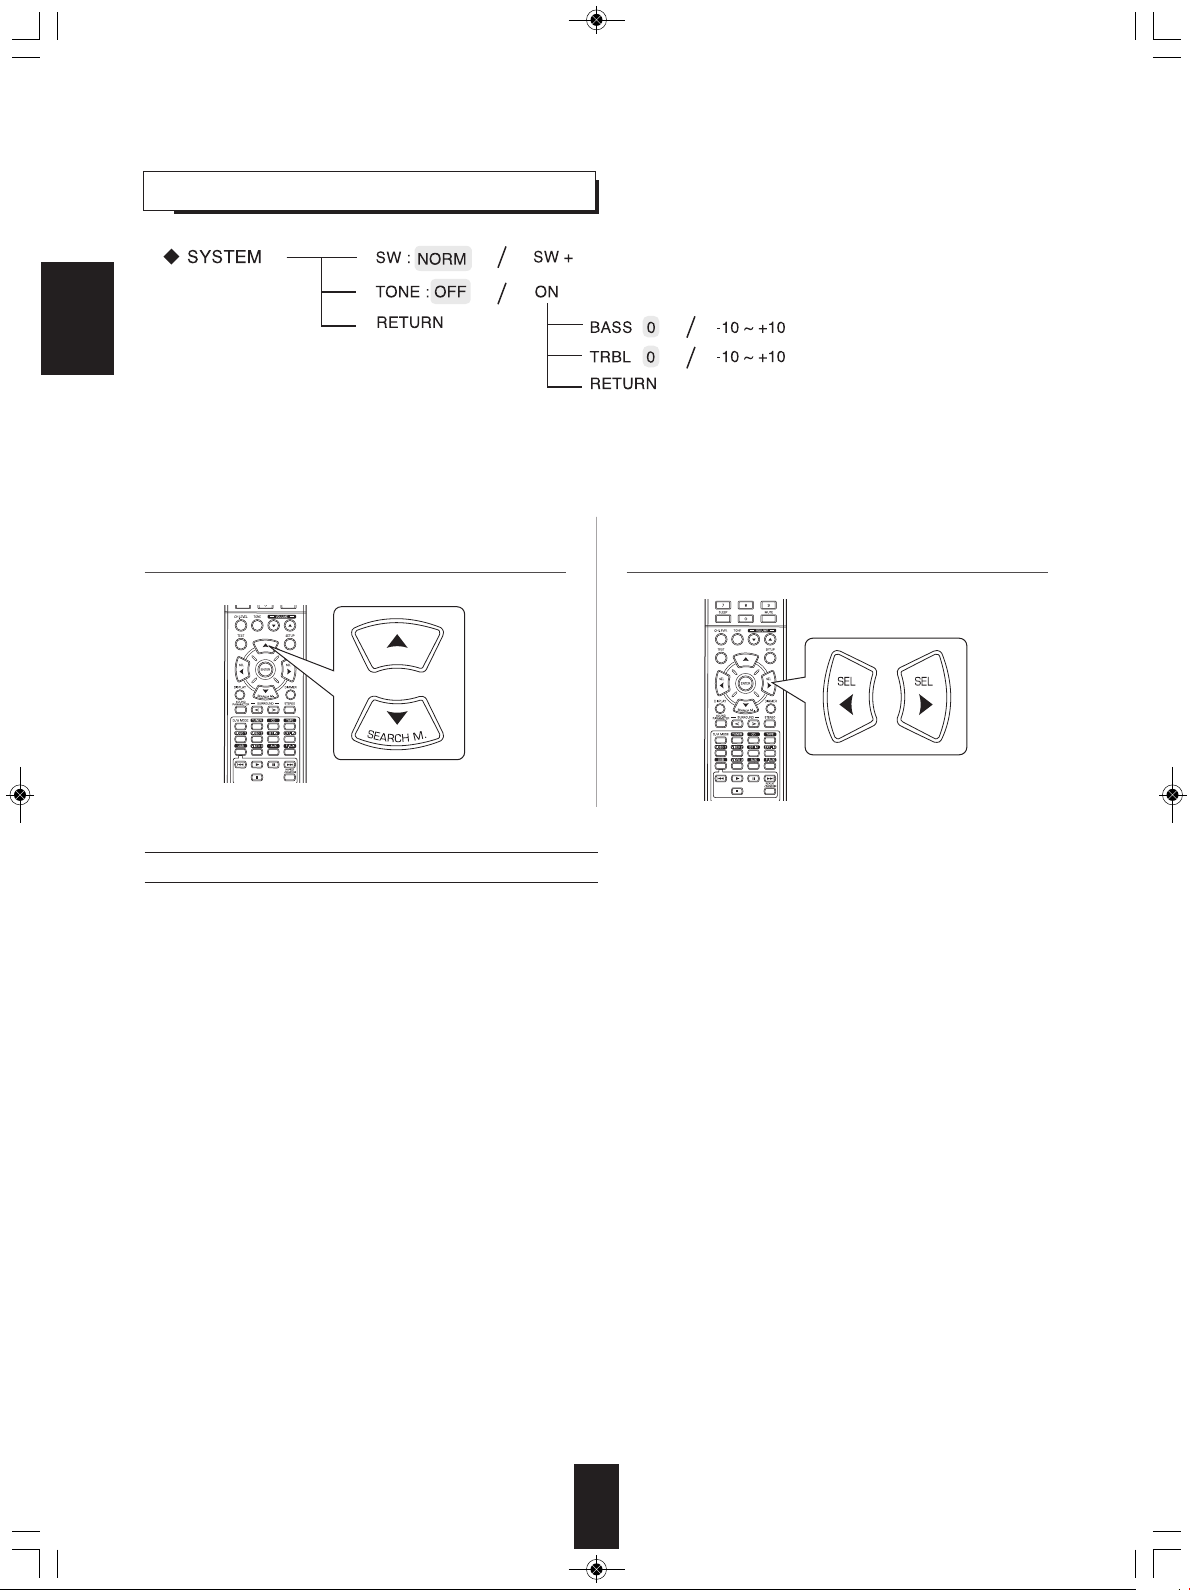
1. Turn the setup menu on. 3. Confirm your selection.
• The setup menu will be shown.
• To turn the menu off, press this button again.
2. Select the desired menu using the CURSOR UP(▲)/
DOWN(▼) buttons.
• When selecting "SYSTEM", see "SETTING THE
SYSTEM" on page 29.
• When selecting "INPUT", see "SETTING THE INPUT" on
page 31.
• When selecting "SPK SET", see "SETTING THE
SPEAKER SETUP" on page 32.
• When selecting "CH LEVEL", see "SETTING THE CH
LEVEL" on page 36.
• When selecting "PARAMTR", see "SETTING THE
PARAMETER" on page 38.
• When selecting "EXIT", the setup menu will be turned off.
27
Page 28
RD-5405(G)100316_RD-5503(g) 2010-04-20 오후 7:57 페이지 28
■Setup menu flow
• The setup menu flow is as follows :
ENGLISH
• When "RETURN" is selected on a sub-menu, it will returns to the previous menu.
■Note : During setup menu operation, only the (POWER ON/) STANDBY button and the buttons required for system setup
will function.
28
Page 29
RD-5405(G)100316_RD-5503(g) 2010-04-20 오후 7:57 페이지 29
SETTING THE SYSTEM
ENGLISH
• SW (SUBWOOFER) : To select the desired subwoofer mode.
• TONE : To adjust the tone (bass and treble) as desired.
• RETURN : To return to the previous menu.
1. Press CURSOR UP(▲)/DOWN(▼) buttons to select
the desired item.
When selecting the SUBWOOFER mode
• "SW +" mode is effective only when "FRONT" and "CENTER" are set to "L" and "SUB- W" is set to "Y" on the SPK SET
menu. (For details, refer to "SETTING THE SPEAKER SETUP" on page 32.)
• While playing the 2 channel source in MATRIX, CHURCH, THEATER, HALL or STADIUM mode, the low frequency signals
can be reproduced from subwoofer regardless of the subwoofer mode setting.
NORM : When the low frequency signals of channels set to "L" are reproduced from those channels only.
SW +: When the low frequency signals of channels set to "L" are reproduced simultaneously from those channels and the
In this mode, the low frequency signals that are reproduced from the subwoofer channel is only the low frequency
signals of LFE (from the multi-channel sources that contains LFE (Low Frequency Effects) channel, also called the ".1"
↕
channel) and the channels set to "S".
subwoofer channel.
In this mode, the low frequency range expands more uniformly through the room, but depending on the size and shape
of the room, interference may result in a decrease of the actual volume of the low frequency range.
2. Press the CURSOR LEFT(◀)/RIGHT(▶) buttons to
set the selected item as desired
29
Page 30
RD-5405(G)100316_RD-5503(g) 2010-04-20 오후 7:57 페이지 30
When selecting the TONE
OFF : To listen to a program source without the tone effect. ("DIRECT" indicator lights up.)
↕
ON : To adjust the tone for your taste. ("DIRECT" indicator goes off.)
■When the TONE is set to ON to adjust the tone (bass and treble)
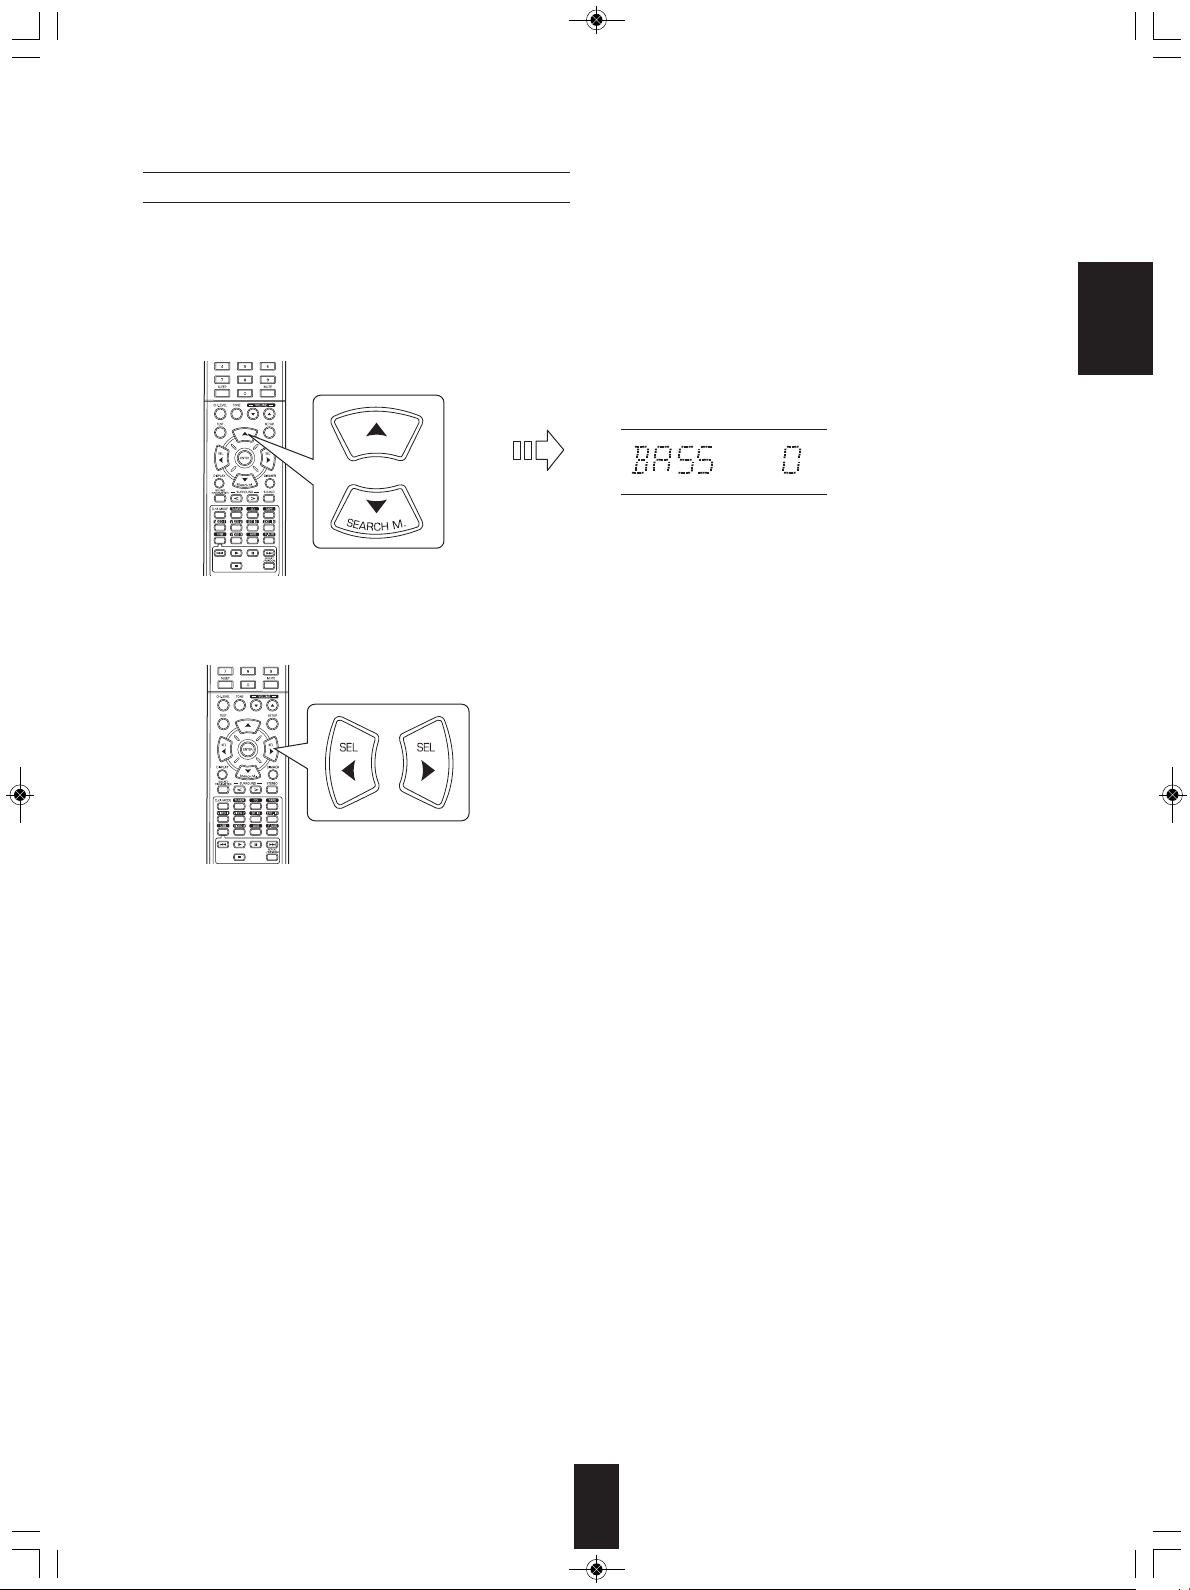
① Press the CURSOR UP(▲)/DOWN(▼) buttons to select the desired tone.
ENGLISH
When selecting the BASS
② Press the CURSOR LEFT(◀)/RIGHT(▶) buttons to adjust the selected tone as desired.
• The tone level can be adjusted within the range of -10 ~
+10 dB.
• In general, we recommend the bass and treble to be
adjusted to 0 dB (flat level).
• Extreme settings at high volume may damage your
speakers.
• To complete tone adjustment, repeat the above steps ①
and ②.
30
Page 31

RD-5405(G)100316_RD-5503(g) 2010-04-20 오후 7:57 페이지 31
SETTING THE INPUT
ENGLISH
• D.IN (DIGITAL IN) : To assign the connected DIGITAL INs to the desired input.
• AUTO (AUTO SURROUND) : To select the auto surround mode or the manual surround mode.
• RETURN : To return to the previous menu.
1. Press the CURSOR UP(▲)/DOWN(▼) buttons to
select the desired input source, then press the ENTER
button.
2. Press the CURSOR UP(▲)/DOWN(▼) buttons to
select the desired item.
3. Press the CURSOR LEFT(◀)/RIGHT(▶) buttons to
set the selected item as desired.
Example) When selecting the VIDEO 2
When selecting the DIGITAL IN
• You should assign the connected DIGITAL INs to the desired of VIDEO 1 and VIDEO 2.
(For details, refer to "CONNECTING DIGITAL INs" on page 5.)
• You can select the desired of OPT (optical), COAX(coaxial) and ANL (analog).
■Notes :
• In such a case that a DIGITAL IN is assigned to two input sources or more, when these input sources are selected, the digital audio signals
can be heard from the same DIGITAL IN.
• When TUNER, TAPE or CD is selected as an input source, the digital input(“OPT”, “COAX”) cannot be selected.
When selecting the AUTO SURROUND
• Depending on how to select a surround mode, you can select the auto surround mode or the manual surround mode.
OFF(Manual surround mode) : You can select the desired of different surround modes selectable for the signal being input with
↕
ON
(Auto surround mode) : The optimum surround mode will be automatically selected depending on the signal format being input.
■Notes :
• Even when the auto surround mode is selected and the same type of digital signal format is being input, the optimum surround
mode may vary depending on whether the speaker type is set to "N (None)" or not.
• When 96 kHz PCM digital signal is being input, only the stereo mode will be selected.
using the SURROUND MODE UP/DOWN (▶, > /◀, <) buttons. (For details, refer to "ENJOYING
SURROUND SOUND" on page 15.)
31
Page 32

RD-5405(G)100316_RD-5503(g) 2010-04-20 오후 7:57 페이지 32
SETTING THE SPEAKER SETUP
• After you have installed this receiver and connected all the components, you should adjust the speaker settings for the
optimum sound acoustics according to your environment and speaker layout.
• Even when you change speakers, speaker positions, or the layout of your listening environment, you should adjust the
speaker settings, too.
ENGLISH
• CONFIG (CONFIGURATION) : To select the sizes of the speakers that are connected.
• DISTANCE: To enter the distance between the listening position and each speaker to set the delay time automatically for
optimum surround playback.
• X-OVER (CROSSOVER) : To select the desired crossover frequency.
• RETURN : To return to the previous menu.
32
Page 33

RD-5405(G)100316_RD-5503(g) 2010-04-20 오후 7:57 페이지 33
When selecting the CONFIGURATION
1. Press the CURSOR UP(▲)/DOWN(▼) buttons to
select the "CONFIG", then press the ENTER button.
ENGLISH
2. Press the CURSOR UP(▲)/DOWN(▼) buttons to
select the desired speaker.
3. Press the CURSOR LEFT(◀)/ RIGHT(▶) buttons to
set the selected speaker as desired.
• Depending on your speaker type, you can select one of
these following speaker types.
L(Large): Select this when connecting speakers that can
fully reproduce sounds below crossover frequency.
S(Small) : Select this when connecting speakers that can
not fully reproduce sounds below crossover
frequency. When this is selected, sounds below
crossover frequency are sent to the subwoofer
or speakers which are set to "L (Large)" (when
not using a subwoofer)
N(None): Select this when no speakers are connected.
When this is selected, sounds are sent to the
speakers which are not set to "N (None)".
Y(Yes)/N(No): Select the desired depending on whether a
subwoofer is connected or not.
■Notes :
• When speakers are set to "S (Small)", you should set
their crossover frequency correctly according to their
frequency characteristics. (For details, refer to "When
selecting the CROSSOVER" on page 35.)
• When "SUB-W" is set to "N (No)", "FRONT" is
automatically set to "L (Large)".
• When the "FRONT" is set to "S (Small)", "CENTER" and
"SURR" cannot be set to "L (Large)".
4. Repeat the above steps 2 and 3 until the speakers are
all set to the desired mode.
■About the speaker size
• Select "L (Large)" or "S (Small)" not according to the
actual size of the speaker but according to the speaker's
capacity for playing low frequency (bass sound below
frequency set on the "X-OVER" menu) signals.
• If you do not know, try comparing the sound at both
settings (setting the volume to a level low enough so as
not to damage the speakers) to determine the proper
setting.
33
Page 34

RD-5405(G)100316_RD-5503(g) 2010-04-20 오후 7:57 페이지 34
When selecting the DISTANCE
1. Press the CURSOR UP(▲)/DOWN(▼) buttons to
select the DISTANCE, then press the ENTER button.
2. Press the CURSOR UP(▲)/DOWN(▼) buttons to
select the desired item.
3. Press the CURSOR LEFT(◀)/RIGHT(▶) buttons to
set the selected item as desired.
ENGLISH
■When selecting the desired unit
• You can select either "M (Meter)" or "FT (Feet)".
• Once a unit is selected, the distances are automatically
changed in the selected unit.
■When setting the distance
• You can set the distance within the range of 0.0 ~ 9.0
meters in 0.3 meter intervals(or 0 ~ 30 feet in 1 feet
intervals).
4. Repeat the above steps 2 and 3 until the distances are
all set as desired.
■Note :
• You cannot select the speakers set to "N (None or No)".
■About the speaker distance
When enjoying multi-channel surround playback with Dolby
Digital sources, etc., it is ideal that the center, surround and
subwoofer speakers should be the same distance from the
main listening position as the front speakers. By entering
the distance between the listening position and each
speaker, the delay times of center, surround and subwoofer
speakers are automatically adjusted to create an ideal
listening environment virtually as if the center, surround and
subwoofer speakers were at their ideal locations
respectively.
34
Page 35

RD-5405(G)100316_RD-5503(g) 2010-04-20 오후 7:57 페이지 35
When selecting the CROSSOVER
• When speakers are set to "S (Small)", be sure to set their crossover frequency correctly according to their frequency
characteristics.
1. Press the CURSOR UP(▲)/DOWN(▼) buttons to
select the "X-OVER", then press the ENTER button.
ENGLISH
2. Press the CURSOR LEFT(◀)/RIGHT(▶) buttons to
set the crossover frequency as desired.
• You can adjust the crossover frequency within the range
of 40 ~ 200 Hz in 10 Hz intervals.
■About the crossover frequency
• When speakers are set to "S (Small)", low frequencies in
those channels that are below the crossover frequency
are to output from subwoofer or front speakers which are
set to "L (Large)" (when not using a subwoofer).
• Refer to the operating instructions of the speakers to be
connected. If the frequency range of your speaker is 100
Hz~20 kHz, the crossover frequency should be set to 100
Hz(or slightly higher).
35
Page 36
RD-5405(G)100316_RD-5503(g) 2010-04-20 오후 7:57 페이지 36
SETTING THE CH LEVEL
■Note : Depending on the speaker settings ("N (None or No)"), some channels cannot be selected.
ENGLISH
Adjusting the current channel level
• You can adjust the current channel levels as desired. These adjusted levels are just memorized into user’s memory("CAL"),
not into preset memory ("REF 1", "REF 2")
• After adjusting each channel level with test tone, adjust the channel levels either according to the program sources or to suit
your tastes. (For details, refer to "Adjusting each channel level with test tone" on page 17.)
1. Press the CURSOR UP(▲)/DOWN(▼) buttons to
select the desired channel.
Example) When selecting Dolby Digital source's LFE
2. Press the CURSOR LEFT(◀)/RIGHT(▶) buttons to
adjust the level of the selected channel or program
source's LFE as desired.
• The LFE level can be adjusted within the range of -10 ~ 0
dB and other channel levels within the range of -15 ~ +15 dB
• In general, we recommend the LFE level to be adjusted to
0 dB.(However, the recommended LFE level for some
early DTS software is -10 dB.) If the recommended levels
seem too high, lower setting as necessary.
3. Repeat the above steps 1 and 2 to adjust each
channel level.
36
Page 37

RD-5405(G)100316_RD-5503(g) 2010-04-20 오후 7:57 페이지 37
Memorizing the adjusted channel levels
• You can memorize the adjusted channel levels into preset
memory("REF 1", "REF 2") and recall the memorized
whenever you want.
ENGLISH
1. After performing the steps 1 ~ 3 in "Adjusting the
current channel level" procedure on page 36, press the
ENTER button.
• Then "1" of "REF 1" indication flickers.
Recalling the memorized channel levels
1. Press the CURSOR UP(▲)/DOWN(▼) buttons to
select the "MODE ~ ".
• "CAL" may be displayed instead of "REF 1" or "REF 2".
2. Press the CURSOR LEFT(◀)/RIGHT(▶) buttons to
select the desired preset memory, then press the
ENTER button.
• Each time the CURSOR LEFT(◀) or RIGHT(▶) button is
pressed, "REF 1" or "REF 2" is selected.
• The adjusted channel levels have now been memorized
into the selected memory.
2. Press the CURSOR LEFT(◀)/RIGHT(▶) buttons to
select the desired one of REF 1 and REF 2.
• Then the channel levels memorized into the selected
preset memory are recalled.
37
Page 38

RD-5405(G)100316_RD-5503(g) 2010-04-20 오후 7:57 페이지 38
SETTING THE PARAMETER
• NIGHT M (NIGHT MODE) : To adjust the dynamic range compression that makes faint sound easier to hear at low volume
levels.
• PLII MSC (DOLBY PLII MUSIC) : To adjust the various surround parameters for optimum surround effect.
• RETURN : To return to the previous menu.
When selecting the NIGHT MODE
ENGLISH
• This function compresses the dynamic range of previously specified parts of Dolby Digital or DTS sound track (with
extremely high volume) to minimize the difference in volume between the specified and non-specified parts.
This makes it easy to hear all of the sound track when watching movies at night at low levels.
■Notes:
• The night mode setting is valid only when the digital signals from Dolby Digital or DTS program source are being input.
• In some Dolby Digital or DTS softwares, the night mode setting may not be valid.
1. Press the CURSOR UP(▲)/DOWN(▼) buttons to
select the "NIGHT M", then press the ENTER button.
2. Press the CURSOR LEFT(◀)/ RIGHT(▶) buttons to
adjust the dynamic range compression as desired.
0.0 ↔ 0.1 ↔ 0.2 ........ 0.9 ↔ 1.0
Lower compression Higher compression
38
Page 39

RD-5405(G)100316_RD-5503(g) 2010-04-20 오후 7:57 페이지 39
When selecting the DOLBY PLII MUSIC
• You can adjust the various surround parameters for optimum surround effect.
■Note: The parameter settings are valid only when listening in Dolby Pro Logic II Music mode.
1. Press the CURSOR UP(▲)/DOWN(▼) buttons to
select the "PLII MSC", then press the ENTER button.
ENGLISH
2. Press the CURSOR UP(▲)/DOWN(▼) buttons to
select the desired parameter.
3. Press the CURSOR LEFT(◀)/ RIGHT(▶) buttons to
adjust the selected parameter as desired.
■When selecting the "PANO (Panorama)" mode
This mode extends the front stereo image to include the
surround speakers for an exciting "wraparound" effect with
side wall imaging. Select "OFF" or "ON"(default
value:OFF).
■When selecting the "C. WIDTH (Center width)"
control
This adjusts the center image so it may be heard only from
the center speaker, only from the left/right speakers as a
phantom image, or from all three front speakers to varying
degrees. The control can be set in 8 steps from 0 to 7
(default value : 3).
■When selecting the "DIMEN (Dimension)"
control
This gradually adjusts the soundfield either towards the
front or towards the rear. The control can be set in 7 steps
from -3 to +3 (default value : 0).
4. Repeat the above steps 2 and 3 to adjust other
parameters.
39
Page 40

RD-5405(G)100316_RD-5503(g) 2010-04-20 오후 7:57 페이지 40
Troubleshooting Guide
If a fault occurs, run through the table below before taking your receiver for repair.
If the fault persists, attempt to solve it by switching the receiver off and on again. If this fails to resolve the situation, consult your
dealer. Under no circumstances should you attempt to repair the receiver yourself. This could void the warranty.
PROBLEM POSSIBLE CAUSE REMEDY
No power
• The AC input cord is disconnected.
• Poor connection at AC wall outlet or the
outlet is inactive.
• Connect the cord securely.
• Check the outlet using a lamp or another
appliance.
ENGLISH
No sound
No sound from the surround
speakers
No sound from the center
speaker
Stations cannot be received
Preset stations cannot be
received
• The speaker cords are disconnected.
• The master volume is adjusted too low.
• The MUTE button on the remote control is
pressed to ON.
• Incorrect selection of the input source.
• Incorrect connections between the
components.
• Surround mode is switched off(stereo mode).
• Master volume and surround level are too
low.
• A monaural source is used.
• Surround speaker setting is “N”.
• Surround mode is switched off(stereo mode).
• Center speaker setting is “N”.
• Master volume and center level are too low.
• No antenna is connected.
• The desired station frequency is not tuned
in.
• The antenna is in wrong position.
• An incorrect station frequency has been
memorized.
• The memorized stations are cleared.
• Check the speaker connections.
• Adjust the master volume.
• Press the MUTE button to cancel the
muting effect.
• Select the desired input source correctly.
• Make connections correctly.
• Select a surround mode.
• Adjust master volume and surround level.
• Select a stereo or surround source.
• Select the desired surround speaker setting.
• Select the desired surround.
• Select the desired center speaker setting.
• Adjust master volume and center level.
• Connect an antenna.
• Tune in the desired station frequency.
• Move the antenna and retry tuning.
• Memorize the correct station frequency.
• Memorize the stations again.
Poor FM reception
Continuous hissing noise
during FM reception,
especially when a stereo
broadcast is received.
Continuous or intermittent
hissing noise during AM
reception, especially at night.
Remote control unit does not
operate.
• No antenna is connected.
• The antenna is not positioned for the best
reception.
• Weak signals.
• Noise is caused by motors, fluorescent
lamps or lightning, etc.
• Batteries are not loaded or exhausted.
• The remote sensor is obstructed.
40
• Connect an antenna.
• Change the position of the antenna.
Change the position of the antenna.
•
Install an outdoor FM antenna.
•
• Keep the receiver away from noise sources.
• Install an outdoor AM antenna.
• Replace the batteries.
• Remove the obstacle.
Page 41

RD-5405(G)100316_RD-5503(g) 2010-04-20 오후 7:57 페이지 41
Specifications
■ AMPLIFIER SECTION
• Power output, stereo mode, 6 Ω, THD 0.7%, 40 Hz~20 kHz | 2× 50 W
• Total harmonic distortion, 6 Ω, 50 W, 1 kHz | 0.09 %
• Intermodulation distortion
60 Hz : 7 kHz= 4 : 1 SMPTE, 6 Ω, 50 W | 0.1 %
ENGLISH
• Input sensitivity, 47 kΩ
Line (CD, TAPE, VIDEO) | 280 mV
• Signal to noise ratio, IHF “A” weighted
Line (CD, TAPE, VIDEO) | 92 dB
• Frequency response
Line (CD, TAPE, VIDEO), 20 Hz~50 kHz | +0 dB, -3 dB
• Output level
TAPE/VIDEO 1 REC, 2.2 kΩ | 280 mV
• Bass/Treble control, 100 Hz/10 kHz | ±10 dB
• Surround mode, only channel driven
Front power output, 6 Ω, 1 kHz, THD 0.7 % | 70 W / 70 W
Center power output, 6 Ω, 1 kHz, THD 0.7 % | 70 W
Surround power output, 6 Ω, 1 kHz, THD 0.7 % | 70 W / 70 W
■ DIGITAL AUDIO SECTION
• Sampling frequency | 32, 44.1, 48, 96 kHz
• Digital input level
Coaxial, 75 Ω | 0.5 Vp-p
Optical, 660 nm | -15~-21 dBm
■ FM TUNER SECTION
• Tuning frequency range | 87.5~108 MHz
• Usable sensitivity, THD 3%, S/N 26 dB | 12.8 dBf
• 46 dB quieting sensitivity, mono/stereo | 20.2 / 45.3 dBf
• Signal to noise ratio, 65 dBf, mono/stereo | 55 / 50 dB
• Total harmonic distortion, 65 dBf,1 kHz, mono/stereo | 0.5 / 1.0 %
• Frequency response, 30 Hz~12 kHz | ±3.0 dB
• Stereo separation, 1 kHz | 30 dB
• Capture ratio | 4 dB
• IF rejection ratio | 80 dB
■ AM TUNER SECTION
• Tuning frequency range | 522~1611 kHz
• Usable sensitivity | 500 µV/m
• Signal to noise ratio | 40 dB
• Selectivity | 25 dB
■ GENERAL
• Power supply | 230 V ~ 50 Hz
• Power consumption | 200 W
• Dimensions (W× H× D, including protruding parts) | 440× 141× 358.5 mm (17-3/8× 5-1/2× 14-1/8 inches)
• Weight (Net) | 9.5 kg (20.9 lbs)
Note: Design and specifications are subject to change without notice for improvements.
41
Page 42

RD-5405(G) de100415_RD-5503(g) 2010-04-20 오후 6:48 페이지 2
Einleitung
BITTE LESEN SIE DIESE HINWEISE VOR INBETRIEBNAHME DES GERÄTS
:
VORSICHT
VORSICHT ZUR VERMEIDUNG VON STROMSCHLAG
GERÄTEGEHÄUSE NICHT ÖFFNEN. ES BEFINDEN SICH
KEINE VOM VERBRAUCHER WARTBAREN TEILE IM INNERN
DES GERÄTS. REPARATUR UND WARTUNG NUR DURCH
FACHPERSONAL.
ieses Symbol weist auf gefährliche Hochspannung im
D
Gerät hin, die zu Stromschlag führen kann.
ieses Symbol weist auf wichtige Bedienungs- und
D
Wartungsanleitungen hin.
WARNHINWEIS :
ZUR VERMEIDUNG VON FEUER UND STROMSCHLAG GERÄT WEDER REGEN NOCH FEUCHTIGKEIT AUSSETZEN.
InstallationsBitte beachten Sie:
Bauen Sie dieses Gerät nicht umschlossen ein, beispielsweise in einem Bücherschrank oder in einem ähnlichen Gehäuse.
itte beachten Sie
B
:
Blockieren Sie nicht die Lüftungsschlitze und stellen Sie keine anderen Geräte oben auf dem Gerät ab.
SICHERHEITSBITTE BEACHTEN SIE
Geräte für den australischen Markt sind für eine Netzspannung von 240V~ konzipiert.
Für einen sicheren Betrieb darf der dreistiftige Netzstecker nur an einer ordnungsgemäß
geerdeten Standard Haushaltssteckdose angeschlossen werden. Sollten Sie für das Gerät ein
EUROPA
AUSTRALIEN
220 V
-
240 V
VORSICHT
Lassen Sie rings um das Gerät genügend Raum für
•
ausreichende Lüftung.
Installieren Sie das Gerät nicht in besonders heißen oder kalten
•
Umgebungen, in direkter Sonneneinstrahlung oder in
unmittelbarer Nähe von Heizgeräten.
Schützen Sie das Gerät vor Feuchtigkeit, Wasser und Staub.
•
Führen Sie keine Fremdkörper in das Gerät ein.
•
Blockieren Sie keinesfalls die Lüftungsschlitze mit Zeitungen,
•
Tischtüchern, Gardinen oder ähnlichem.
Stellen Sie keine offenen Flammen (wie brennende Kerzen) auf
•
dem Gerät ab.
Bitte entsorgen Sie Batterien umweltgerecht.
•
Setzen Sie das Gerät weder Tropfwasser noch Spritzwasser aus.
•
Stellen Sie keine wassergefüllten Gegenstände (wie Vasen) auf
•
dem Gerät ab.
• Lassen Sie das Gerät nicht mit Insektenvernichtungsmitteln,
Waschbenzin oder Verdünner in Berührung kommen
Demontieren oder modifizieren Sie das Gerät nicht.
•
■Bitte beachten Sie: zum Netzkabel und zur Steckdose.
Dieses Gerät ist nicht vom Stromnetz getrennt, solange der
•
Netzstecker in der Steckdose steckt, selbst wenn das Gerät
ausgeschaltet ist.
Beim Ziehen des Netzsteckers fassen Sie bitte stets am Stecker
•
an, nicht am Kabel ziehen.
Bei längerer Nichtbenutzung ziehen Sie bitte den Netzstecker.
•
Die Steckdose sollte sich in unmittelbarer Nähe des Geräts
•
befinden und muss jederzeit frei zugänglich sein.
Verlängerungskabel benutzen, so muss dieses dreiadrig verkabelt und geerdet sein.
Nicht ordnungsgemäße Verlängerungskabel stellen eine große Gefahrenquelle dar. Allein die
Tatsache, dass dieses Gerät einwandfrei funktioniert, weist nicht darauf hin, dass die Steckdose
geerdet ist und dass die Elektroinstallation sicher ist. Zu Ihrer eigenen Sicherheit wenden Sie sich
im Zweifelsfall in Bezug auf die korrekte Erdung der Steckdose bitte an einen Elektrofachmann.
VEREINHEITLICHTE EUROPÄISCHE NETZSPANNUNG.
Alle Geräte sind für eine Netzspannung von 220-240V~ geeignet.
Verbraucherinformationen zur Sammlung und
Entsorgung von Altgeräten und erschöpften Batterien
Diese Symbole auf Produkt, Verpackung und/oder
beigefügten Dokumenten bedeuten, dass gebrauchte
elektrische und elektronische Geräte sowie Batterien nicht mit
dem Hausmüll entsorgt werden dürfen. Für ordnungsgemäße
Behandlung, Wiedergewinnung und Recycling von Altgeräten
und erschöpften Batterien geben Sie diese bitte bei einer
entsprechenden Sammelstelle gemäß örtlicher Richtlinien ab.
Durch die ordnungsgemäße Entsorgung dieser Geräte und
Batterien helfen Sie bei der Einsparung wertvoller
Ressourcen mit und vermeiden Sie mögliche negative Folgen
für Umwelt und Gesundheit, welche anderenfalls aufgrund
unsachgemäßer Abfallentsorgung entstehen könnten.
Für weitere Informationen zu Sammelstellen und zum
Recycling von Altgeräten und Batterien setzen Sie sich bitte
.
mit Ihrer Kommunalverwaltung, dem
Entsorgungsunternehmen oder mit der Verkaufsstelle, in
welcher Sie die Produkte gekauft haben, in Verbindung.
[Informationen zur Entsorgung in Ländern außerhalb der
Europäischen Union]
Diese Symbole gelten nur innerhalb der Europäischen Union.
Zur Entsorgung dieser Produkte setzen Sie sich bitte mit den
örtlichen Behörden oder Ihrem Fachhändler in Verbindung.
Bitte beachten Sie: für das Batteriesymbol (untere beide
Symbolbeispiele):
Die Bezeichnung Pb unterhalb des Batteriesymbols bedeutet,
dass diese Batterie Blei enthält.
DEUTSCH
2
Page 43

RD-5405(G) de100415_RD-5503(g) 2010-04-20 오후 6:48 페이지 3
INHALT
Einleitung
• BITTE LESEN SIE DIESE HINWEISE VOR INBETRIEBNAHME DES GERÄTS | 2
Systemanschlüsse | 4
Bedienelemente Frontblende | 8
Fernbedienung | 9
• REICHWEITE DER FERNBEDIENUNG | 10
DEUTSCH
• BATTERIEN EINSETZEN | 10
Bedienungshinweise
• WIEDERGABE EINER PROGRAMMQUELLE | 11
• SURROUND SOUND | 14
• SURROUND SOUND | 15
• RADIO HÖREN | 20
• UKW-RADIO MIT RDS HÖREN | 22
( RDS Tuner (Regionale Option für einige europäische Länder))
• AUFNAHME | 24
• SONSTIGE FUNKTIONEN | 25
• FUNKTIONEN AUF DER GERÄTEFRONT | 26
Systemeinstellungen | 27
• SYSTEMEINSTELLUNGEN | 29
• EINGANGSEINSTELLUNGEN | 31
• LAUTSPRECHEREINSTELLUNGEN | 32
• KANALPEGELEINSTELLUNGEN | 36
• PARAMETEREINSTELLUNGEN | 38
Störungserkennung | 40
Spezifikationen | 41
3
Page 44

RD-5405(G) de100415_RD-5503(g) 2010-04-28 오전 9:57 페이지 4
Systemanschlüsse
• Nehmen Sie den Netzanschluss erst vor, nachdem alle Anschlüsse des Systems vorgenommen wurden.
• Bitte beachten Sie beim Anschluss der Audio-, Video- und Lautsprecherkabel die Farbcodierung.
• Schließen Sie die Stecker fest und korrekt an, anderenfalls kann es zu Tonausfällen, Störungen oder Schäden am Receiver
kommen.
DEUTSCH
1. ANTENNENANSCHLUSS
• Richten Sie die UKW-Wurfantenne aus, um den besten
Empfang Ihrer Lieblingssender zu gewährleisten.
• Mit einer 75Ω UKW-Hausantenne verbessern Sie
den Empfang. Ziehen Sie die Wurfantenne vor
dem Anschluss der Hausantenne ab.
• Stellen Sie die MW-Zimmerantenne so weit wie möglich von Receiver, Fernseher, Lautsprecherund Netzkabeln entfernt auf und richten Sie die Antenne für besten Empfang aus.
• Ist das Empfangssignal mit der MW-Zimmerantenne nicht ausreichend, so können Sie alternativ
eine MW-Hausantenne benutzen.
4
Page 45

BD-Player, DVD-Player, Fernseher usw.
Fernseher,
P
rojektor usw.
Kassettendeck,
MD-Rekorder usw.
BD-Player, DVD-Player, Kassettendeck, MD-Rekorder usw.
RD-5405(G) de100415_RD-5503(g) 2010-04-20 오후 6:48 페이지 5
2. ANSCHLUSS AUDIO-/VIDEOKOMPONENTEN
DEUTSCH
• An die VIDEO 1/VIDEO 2 Buchsen können die entsprechenden Komponenten, wie BD-Player, DVD-Player, Fernseher usw.
angeschlossen werden.
• An die TAPE IN/OUT und VIDEO 1 IN/OUT Buchsen können Audioaufzeichnungsgeräte, wie Kassettendeck, MD-Rekorder usw.
angeschlossen werden.
■HDMI (High Definition Multimedia Interface) Anschluss: (*)
• Schließen Sie die Quellenkomponente (BD-Player usw.) am Anzeigegerät (Fernseher, Projektor usw.) über diesen Receiver über
HDMI-Kabel an (im Fachhandel erhältlich).
• Der HDMI-Anschluss überträgt unkomprimierte digitale Video- und Audiosignale.
• Dieser Receiver gibt digitale Video- und Audiosignale über HDMI MONIOTR OUT aus, ohne sie durch andere Schaltkreise zu
schleifen, sofern sie an HDMI IN angeschlossen sind (was bedeutet, das über HDMI IN eingehende Signale auf diesem Receiver nicht
reproduziert werden können).
• HDMI, das HDMI-Logo und High-Definition Multimedia Interface sind Marken oder eingetragene Marken von HDMI Licensing LLC.
¢Bitte beachten Sie
• Abhängig von der angeschlossenen Komponente kann es zu unzuverlässiger Signalübertragung kommen (Einzelheiten siehe
Bedienungsanleitung Ihrer Komponente).
• Für stabile Signalübertragung empfehlen wir die Benutzung von HDMI-Kabeln mit einer Länge von nicht mehr als 5 m.
3. ANSCHLUSS DIGITALER EINGÄNGE
• Die OPTISCHEN und KOAXIAL-DIGITALAUSGÄNGE der Komponenten,
welche an CD und VIDEO 1dieses Geräts angeschlossen sind, können an
diesen DIGITALEINGÄNGEN angeschlossen werden.
• An einem Digitaleingang sollten Geräte wie beispielsweise ein CD-Player, LDPlayer, DVD-Player usw. mit DTS Digital Surround, Dolby Digital oder mit
PCM-formatigen Digitalsignalen usw. angeschlossen werden.
• Einzelheiten entnehmen Sie bitte der Bedienungsanleitung
des anzuschließenden Geräts.
• Bei KOAXIAL-DIGITALANSCHLUSS benutzen Sie bitte ein
75 Ω KOAXIALKABEL, kein gewöhnliches AUDIOKABEL.
• Einige der optischen Glasfaserkabel können für dieses Gerät nicht benutzt werden. Können optische Glasfaserkabel nicht an Ihren Geräten
angeschlossen werden, so setzen Sie sich bitte mit Ihrem Fachhändler oder dem autorisierten Kundendienst in Verbindung.
¢Bitte beachten Sie: Bitte nehmen Sie entweder einen OPTISCHEN oder einen KOAXIAL-DIGITALEN ANSCHLUSS der
Komponenten vor (nicht beide).
■Digitaleingang Standardeinstellungen
• Bei Anschluss der Eingänge DIGITAL IN an Ihren Komponenten folgen Sie bitte den Standardeinstellungen.
• Weichen Ihre DIGITAL-Anschlüsse von Standardeinstellungen ab, so ordnen Sie die benutzten Anschlüsse DIGITAL IN entsprechend
der Anleitungen in „Auswahl des DIGITALEINGANGS (DIGITAL IN)“ auf Seite 31 zu.
• Die Standardeinstellungen sind wie folgt: OPTICAL: VIDEO 1, COAX: VIDEO 2
5
Page 46

RD-5405(G) de100415_RD-5503(g) 2010-04-28 오전 9:57 페이지 6
4. ANSCHLUSS SUBWOOFER PRE OUT
• Zur Verstärkung der Bässe schließen Sie einen aktiven
Subwoofer an.
5. ANSCHLUSS LAUTSPRECHER
• Schließen Sie die Lautsprecher fest und korrekt am
entsprechenden Kanal (links und rechts) und mit der
korrekten Polarität (+ und -) an. Bei nicht ordnungsgemäß
ausgeführten Anschlüssen haben Sie keinen Ton von den
Lautsprechern und bei vertauschter Polarität klingt der Sound
unnatürlich und die Bässe fehlen.
• Zur Installation der Lautsprecher siehe Abschnitt „Aufstellen
der Lautsprecher” auf Seite 7.
• Nach der Installation der Lautsprecher gleichen Sie bitte
zunächst die Lautsprechereinstellungen entsprechend Ihrer
häuslichen Umgebung und dem Lautsprecherlayout ab.
(Einzelheiten finden Sie im Abschnitt
„LAUTSPRECHEREINSTELLUNGEN” auf Seite 32.)
Achtung :
• Bitte benutzen Sie ausschließlich Lautsprecher mit einer
Impedanz von 6 Ohm oder höher.
• Achten Sie darauf, dass die blanken Lautsprecherkabel
weder miteinander noch mit Metallteilen dieses Geräts in
Berührung kommen, das kann zu Schäden am Gerät
und/oder an den Lautsprechern führen.
• Berühren Sie keinesfalls die Lautsprecheranschlüsse,
während das Gerät am Netz angeschlossen ist, das kann zu
Stromschlag führen.
■Anschluss der Lautsprecherkabel
DEUTSCH
1. Isolieren Sie die Kabel etwa
10 mm ab und verzwirbeln
Sie die Kabelenden.
2. Mit Linksdrehung öffnen
Sie den
Lautsprecheranschluss.
6. NETZKABEL
• Stecken Sie den Netzstecker in die Steckdose.
3. Setzen Sie das abisolierte
Kabel ein.
6
4. Mit Rechtsdrehung
schließen Sie den
Lautsprecheranschluss.
Page 47

RD-5405(G) de100415_RD-5503(g) 2010-04-20 오후 6:48 페이지 7
Aufstellen der Lautsprecher
Die Idealposition der Lautsprecher hängt unter anderem von
Ihrer Raumgröße sowie der Wandverkleidung ab. Ein typisches
Beispiel für die Aufstellung der Lautsprecher finden Sie
nachstehend:
¢
Lautsprecher vorn links und rechts sowie mittlerer
Lautsprecher
• Stellen Sie die vorderen Lautsprecher mit deren Vorderseite
möglichst auf gleicher Höhe wie Fernseher oder Bildschirm
auf.
• Stellen Sie den mittleren Lautsprecher zwischen dem linken
und rechten vorderen Lautsprecher und nicht weiter entfernt
von der Sitzposition auf, als die vorderen Lautsprecher.
• Richten Sie die Lautsprecher auf die Kopfhöhe der
DEUTSCH
hauptsächlichen Sitzposition aus.
¢
Linker und rechter Surround-Lautsprecher
• Stellen Sie die Surround-Lautsprecher etwa 1 Meter über
Kopfhöhe der Sitzposition direkt links und rechts oder etwas
nach hinten versetzt auf.
¢
Subwoofer
• Der Subwoofer erzeugt kräftige Bässe. Stellen Sie den
Subwoofer vorn an beliebiger Stelle auf.
¢
Bitte beachten Sie:
• Haben Sie einen herkömmlichen Fernseher, so benutzen Sie
bitte ausschließlich magnetisch abgeschirmte Lautsprecher
vorn links und rechts sowie in der Mitte, um Bildstörungen zu
vermeiden.
• Für beste Surround-Effekte sollten alle Lautsprecher, außer
dem Subwoofer, Full-Range-Lautsprecher sein.
1. Fernseher oder Leinwand
. Lautsprecher vorn links
2
3. Lautsprecher vorn rechts
4. Mittlerer Lautsprecher
5. Subwoofer
6. Surround-Lautsprecher links
7. Surround-Lautsprecher rechts
7
Page 48

RD-5405(G) de100415_RD-5503(g) 2010-04-20 오후 6:48 페이지 8
Bedienelemente Frontblende
DEUTSCH
1. POWER: Hauptschalter
2. ON/STANDBY: Ein/Aus-Schalter
3. STANDBY Statusanzeige
4. FLUORESZENZANZEIGE
Einzelheiten nachstehend.
5. SENSOR FERNBEDIENUNG
6. AUSWAHL EINGANGSQUELLE/
MULTI-CONTROL Drehregler
■ FLUORESZENZANZEIGE
1. Eingang, Frequenz, Lautstärkepegel,
Betriebsinformationen usw.
2. Surroundmodus Statusanzeigen
3. AUTO Statusanzeige
4. DIGITALEINGANG Statusanzeige
5. DIREKT Statusanzeige
6. Senderspeicher, Anzeige automatische Abschaltung
7. MASTER-LAUTSTÄRKE
8. SURROUNDMODUS AUFWÄRTS/ABWÄRTS
(u/t)
9. STEREO Umschalter
10. BANDWAHL Umschalter
11. MEMORY/ENTER Taste
12. MODUS
7. MEMORY Statusanzeige
8. SENDERSPEICHER Statusanzeige
9. SLEEPTIMER Statusanzeige
10. SENDER Statusanzeige
11. STEREO Statusanzeige
12. RDS Statusanzeige
(Regionale Option für Europa usw.)
8
Page 49

RD-5405(G) de100415_RD-5503(g) 2010-04-20 오후 6:48 페이지 9
Fernbedienung
DEUTSCH
¢
Bitte beachten Sie: Einige Auswahltasten für Eingangsquellen (BT IN, EXT. IN, USB, VIDEO 3, AUX, F.AUX) sowie
USB-Funktionstasten(
Verfügung.
■
◀◀, ▶,
■■
,▶▶■, ■,REPEAT/RANDOM) stehen für dieses Gerät nicht zur
9
Page 50

RD-5405(G) de100415_RD-5503(g) 2010-04-20 오후 6:48 페이지 10
REICHWEITE DER FERNBEDIENUNG
DEUTSCH
• Die Fernbedienung hat eine Reichweite von etwa 7 Metern bei
einem Winkel von jeweils 30 Grad. Richten Sie die Fernbedienung
auf den Sensor im Receiver aus.
BATTERIEN EINSETZEN
1. Öffnen Sie das Batteriefach. 2. Setzen Sie zwei Batterien (AAA, 1,5 V) mit der
korrekten Polarität ein.
• Bei längerer Nichtbenutzung nehmen Sie bitte die
Batterien aus der Fernbedienung.
• Benutzen Sie bitte keine Akkus (Ni-Cd).
10
Page 51

RD-5405(G) de100415_RD-5503(g) 2010-04-20 오후 6:48 페이지 11
Bedienungshinweise
¢
Bitte beachten Sie : Vor der Benutzung des Receivers nehmen Sie bitte zunächst die Einstellungen für beste Leistung vor
WIEDERGABE EINER PROGRAMMQUELLE
Erste Schritte
(Einzelheiten finden Sie im Abschnitt „Systemeinstellungen” auf Seite 27).
• Schalten Sie den Receiver in Stand-by Modus.
• Die STANDBY Anzeige leuchtet auf.
DEUTSCH
Der Receiver ist nicht vom Netz getrennt und
hat eine geringe Leistungsaufnahme zur
Unterstützung der Betriebsbereitschaft.
• Zum Ausschalten drücken Sie erneut den
Hauptschalter POWER.
• Die Spannungsversorgung wird unterbrochen
und die STANDBY Anzeige erlischt.
1. Schalten Sie den Receiver im Stand-by Modus ein.
oder
• Mit jedem Tastendruck auf ON/STANDBY auf der
Frontblende wird der Receiver entweder in den
Betriebsmodus eingeschaltet oder in Stand-by Modus
ausgeschaltet.
• Drücken Sie POWER ON auf der Fernbedienung zum
Aufrufen des Betriebsmodus oder drücken Sie STANDBY
zum Aufrufen des Stand-by Modus.
• Im Stand-by-Modus schaltet sich der Receiver
automatisch ein und wählt die gewünschte
Eingangsquelle, sofern die AUSWAHLTASTE FÜR DIE
EINGANGSQUELLE gedrückt oder der
MULTI-CONTROL Drehregler gedreht wird.
2. Wählen Sie die gewünschte Eingangsquelle.
oder
oder
• Mit jedem Tastendruck/jeder Drehung AUSWAHL
EINGANGSQUELLE/MULTI-CONTROL wird die
Eingangsquelle wie folgt umgeschaltet:
" TUNER " CD " TAPE " VIDEO 1 " VIDEO 2
(Frequenzanzeige)
• Mit jedem Tastendruck auf BAND auf der Gerätefront oder
TUNER auf der Fernbedienung wird das Frequenzband
wie folgt umgeschaltet:
" FM ST " FM MONO " AM
11
Page 52

RD-5405(G) de100415_RD-5503(g) 2010-04-20 오후 6:48 페이지 12
Auswahl von VIDEO 1, VIDEO 2 als Eingangsquelle
3. Wählen Sie den gewünschten Digital- oder
Analogeingang.
• Mit jedem Tastendruck wird der entsprechende Eingang
wie folgt gewählt:
" o(ptical) " c(oaxial) " A(nalog)
¢
Bitte beachten Sie:
• Bei Auswahl von TUNER, TAPE oder CD als
Eingangsquelle kann der Digitaleingang nicht gewählt
werden.
• Ist der gewählte Digitaleingang nicht angeschlossen, so
blinkt die „DIGITAL” Statusanzeige und der Analogeingang
wird automatisch gewählt.
• Der gewählte Digital- oder Analogeingang wird der
entsprechenden Eingangsquelle im EINGANGSMENÜ
automatisch zugeordnet (Einzelheiten finden Sie im
Abschnitt „EINGANGSEINSTELLUNGEN” auf Seite 31.)
• Der Ton von dem am ausgewählten Digitaleingang
angeschlossenen Gerät kann unabhängig von der
gewählten Eingangsquelle gehört werden.
5. Stellen Sie die (Master-) Lautstärke ein.
oder
DEUTSCH
6. Stummschaltung.
• „MUTE” blinkt.
• Mit erneutem Tastendruck heben Sie die Stummschaltung
wieder auf.
4. Wiedergabe von der gewählten Komponente.
• Bei Wiedergabe der Programmquellen mit Surround
Sound siehe „SURROUND SOUND” auf Seite 15.
12
Page 53

RD-5405(G) de100415_RD-5503(g) 2010-04-20 오후 6:48 페이지 13
Klangeinstellung (Bässe und Höhen)
7. Rufen Sie den Klangmodus auf.
DEUTSCH
¢
Sind die Klangeinstellungen mit TONE aktiviert,
dann stellen Sie den Klang (Bässe und Höhen)
ein.
9. Mit den NAVIGATIONSTASTEN AUFWÄRTS
(p)/ABWÄRTS (q) wählen Sie den
gewünschten Klang.
• Der Klangmodus wird für einige Sekunden angezeigt.
8. Mit den NAVIGATIONSTASTEN LINKS (t)/
RECHTS (u) wählen Sie den gewünschten
Klangmodus.
• Mit jedem Tastendruck schalten Sie den Klangmodus
wie folgt um:
OFF: Wiedergabe einer Programmquelle ohne den
Klangeffekt
2
(die „DIRECT” Statusanzeige leuchtet auf)
ON: Einstellen der Klangeffekte nach persönlichem
Geschmack
(die „DIRECT” Statusanzeige erlischt)
• Mit jedem Tastendruck schalten Sie den Klang wie folgt
um :
" BASS 1 TRBL (Höhen) 1 TONE : ON !
10. Mit den NAVIGATIONSTASTEN
LINKS (t)/RECHTS (u) stellen Sie den
gewählten Klang wunschgemäß ein.
• Der Klangpegel kann im Bereich zwischen -10 ~ +10 dB
eingestellt werden.
• Allgemein empfehlen wir, Bässe und Höhen auf 0 dB
(Flat Level) einzustellen.
• Extreme Einstellungen können Ihre Lautsprecher bei
hohen Lautstärken beschädigen.
• Zur Vervollständigung der Klangeinstellungen
wiederholen Sie obige Schritte 9 und 10.
• Erlischt das Klangdisplay, so beginnen Sie erneut mit
Schritt 7.
13
Page 54

RD-5405(G) de100415_RD-5503(g) 2010-04-20 오후 6:48 페이지 14
SURROUND SOUND
• Dieser Receiver ist mit einem hoch entwickelten digitalen Signalprozessor ausgestattet, welcher Ihnen eine optimale
Soundqualität und Soundatmosphäre in Ihrem eigenen Heimkino liefert.
Surround-Modi
¢ DTS Digital Surround
DTS Digital Surround (oder einfach DTS) ist ein
Mehrkanal-Digitalsignalformat zur Verarbeitung höherer
Datenübertragungsraten. Discs mit dem DTS-Logo
enthalten Aufzeichnungen von bis zu 5.1-Kanal
Digitalsignalen, die allgemein aufgrund der geringeren
Audiokompression eine bessere Klangqualität liefern.
Es liefert ebenfalls einen breiteren Dynamikbereich und
Trennung und damit einen hervorragenden Klang.
Hergestellt unter Lizenz nach US-Patenten Nr.: 5, 451,942;
5, 956,674; 5, 974,380; 5, 978,762; 6,487,535 sowie
anderen US-amerikanischen und weltweiten Patenten und
angemeldeten Patenten. DTS und DTS Digital Surround
sind eingetragene Marken und die DTS-Logos und das
Symbol sind Marken von DTS, Inc. ©1996-2008 DTS, Inc.
Alle Rechte vorbehalten.
¢ Dolby Digital
Dolby Digital ist das Mehrkanal-Digitalsignalformat der Dolby
Laboratories. Discs mit dem Dolby Digital Logo enthalten
Aufzeichnungen von bis zu 5.1-Kanal Digitalsignalen zur
Reproduktion einer viel höheren Klangqualität, räumlichen
Ausdehnung und Dynamikbereichcharakteristik als der
frühere Dolby Surround Effekt.
¢ Dolby Pro Logic II Surround
Dieser Modus wendet auf konventionelle 2-Kanalsignale,
wie digitale PCM oder analoge Stereosignale wie auch
Dolby Surroundsignale und dergleichen,
Surroundverarbeitung zur Verbesserung gegenüber
konventionellen Dolby Pro Logic Schaltungen an. Dolby
Pro Logic ll Surround umfasst die nachstehenden 2 Modi:
• Nachstehende Modi wenden auf konventionelle 2-KanalSignale, wie digitale PCM oder analoge Stereosignale
einen Hochleistungs-Digitalsignalprozessor zur
künstlichen Nachstellung von Klangfeldern an.
¢ Matrix
Dieser Modus reproduziert ein verzögertes Signal von den
Surroundkanälen zur Unterstreichung des Weitegefühls für
Musikquellen.
¢ Church
Dieser Modus liefert die Atmosphäre einer Kirche für
Barock-, Streichorchester- oder Chormusik.
¢
Theater
Dieser Modus liefert Effekte wie im Kino.
¢
Hall
Dieser Modus bietet eine Umgebung wie im Konzertsaal
für klassische Musik, wie Orchester, Kammermusik oder
Instrumentalsolos.
¢ Stadium
Dieser Modus liefert das ausgedehnte Klangfeld zur
Erreichung eines wahrhaften Stadioneffekts, wenn Sie sich
Baseball- oder Fußballspiele ansehen.
DEUTSCH
• Dolby Pro Logic ll Movie
Beim Betrachten von Filmen erlaubt Ihnen dieser Modus
durch zusätzliches Processing eine weitere Verbesserung
der Filmqualität, wodurch der Sound der Action Special
Effects betont wird.
• Dolby Pro Logic ll Music
Beim Hören von Musik erlaubt Ihnen dieser Modus durch
zusätzliches Processing eine weitere Verbesserung der
Klangqualität, wodurch die musikalischen Effekte betont
werden.
¢
Dolby Pro Logic
Dieser Modus erweitert jegliche 2-Kanalquellen
(einschließlich Dolby Surround Signalquellen) auf 4 Kanäle
(vorn links, Mitte, vorn rechts und Surround) zur
Wiedergabe.
Der Surroundkanal ist in Mono, wird jedoch über zwei
Surround-Lautsprecher wiedergegeben.
Hergestellt unter Lizenz von Dolby Laboratories.
Dolby, Pro Logic und das Doppel-D-Symbol sind
eingetragene Marken der Dolby Laboratories.
14
Page 55

RD-5405(G) de100415_RD-5503(g) 2010-04-20 오후 7:40 페이지 15
SURROUND SOUND
¢
Bitte beachten Sie:
• Vor der Surround-Wiedergabe nehmen Sie bitte zunächst die Einstellung der Lautsprecher im SETUP-Menü für optimale
Leistung vor (Einzelheiten finden Sie im Abschnitt „LAUTSPRECHEREINSTELLUNGEN” auf Seite 32).
• Selbst bei Auswahl des Auto-Surroundmodus und gleichem digitalen Signalformat als Eingang kann der optimale
Surroundmodus abhängig von der Einstellung des Lautsprechertyps auf „N (None)” abweichen.
• Bei Eingang von 96 kHz PCM Digitalsignal wird nur der Stereomodus gewählt.
¢
Surroundmodus wählen
DEUTSCH
oder
• Mit jedem Tastendruck auf SURROUNDMODUS
AUFWÄRTS/ABWÄRTS (u, > / t , <) wird der
Surroundmodus wie folgt umgeschaltet:
Manueller Surroundmodus : Sie wählen den gewünschten
(„AUTO” Statusanzeige erlischt.)
Surroundmodus für das
Eingangs-Signalformat mit den
SURROUND (>/<) Tasten.
Automatischer Surroundmodus : Der optimale
(„AUTO” Statusanzeige leuchtet auf.)
Surroundmodus wird
automatisch gewählt,
abhängig vom EingangsSignalformat.
Eingangssignalformat Wählbarer Surroundmodus
Dolby Digital 5.1-Kanal-Quellen
Dolby Digital 2-Kanal-Quellen
Quellen DTS
PCM (2-Kanal) Quellen
Analog-Stereo-Quellen
[DOLBY DIGITAL, AUTO SURROUND] oder <DOLBY DIGITAL>
[DOLBY PLII MOVIE, DOLBY PLII MUSIC, DOLBY PRO LOGIC, AUTO SURROUND] oder
<DOLBY DIGITAL>
[DTS, AUTO SURROUND] oder <DTS>
[DOLBY PLII MOVIE, DOLBY PLII MUSIC, DOLBY PRO LOGIC, MATRIX, CHURCH, THEATER,
HALL, STADIUM, AUTO SURROUND] oder <STEREO>
• Abhängig von der Lautsprechereinstellung können die Surroundmodi wie folgt gewählt werden:
[ ]: Nur möglich, wenn „CENTER” und/oder „SURR (Surround)” nicht auf „N (None)” eingestellt ist/sind.
< >: Nur möglich, wenn „CENTER” und „SURR (Surround)” auf „N (None)” eingestellt sind.
¢
Beenden des Surroundmodus zur Stereowiedergabe
• Abhängig vom Eingangssignalformat wird entweder der
Stereomodus oder der 2-Kanal-Downmixmodus gewählt.
• Zur Deaktivierung entweder des Stereomodus oder des
2CH-Downmixmodus wählen Sie den Surroundmodus mit
oder
SURROUNDMODUS AUFWÄRTS/ABWÄRTS
(u, > / t , <).
¢
2-Kanal-Downmixmodus
• Dieser Modus erlaubt das Heruntermischen der Mehrkanalsignale im Dolby Digital oder DTS Format in 2 Frontkanäle und die
Wiedergabe über nur die beiden vorderen Lautsprecher oder über Kopfhörer.
15
Page 56

RD-5405(G) de100415_RD-5503(g) 2010-04-20 오후 6:48 페이지 16
Einstellen der Soundparameter
• Bei der Wiedergabe von Digitalsignalen von Dolby Digital oder DTS Programmquellen oder beim Hören in Dolby Pro
Logic II Musikmodus können Sie deren Parameter für optimalen Surroundeffekt einstellen.
1. Drücken Sie die SOUND PARAMETER Taste.
• Für einige Sekunden wird „NIGHT: ~” (oder „PANO: ~”)
angezeigt.
• Erlischt der Parametermodus, so drücken Sie diese Taste
bitte erneut.
2. Mit den NAVIGATIONSTASTEN AUFWÄRTS (p)
/ABWÄRTS (q) wählen Sie den gewünschten
Parameter.
3. Mit den NAVIGATIONSTASTEN LINKS (t)
/RECHTS (u) stellen Sie den gewählten
Parameter wunschgemäß ein.
¢
„NIGHT (Nachtmodus)” wählen
Diese Funktion komprimiert die Dynamik zuvor festgelegter
Bereiche des Dolby Digital oder DTS Soundtracks (mit
extrem hoher Lautstärke), um die Lautstärkedifferenz
zwischen spezifizierten und nicht spezifizierten Bereichen
zu minimieren. Hierdurch wird das Hören des gesamten
Soundtracks beim Betrachten von Filmen des Nachts mit
verringerter Lautstärke verbessert. Der Nachtmodus kann
in 11 Schritten von 0.0 bis 1.0 (Standardeinstellung: 0.0)
eingestellt werden.
¢
Bitte beachten Sie: Bei bestimmter Dolby Digital oder
DTS Software ist der Nachtmodus
nicht gültig.
DEUTSCH
• Mit jedem Tastendruck ändert sich der Parametermodus
wie folgt:
" "NIGHT" 1 "PANO" 1 "C.WIDTH" 1 "DIMEN" !
(Nachtmodus)
• „NIGHT” kann nur bei der Wiedergabe von Digitalsignalen
von einer Dolby Digital oder DTS Quelle gewählt werden.
• „PANO”, „C.WIDTH” und „DIMEN” kann nur bei der
Wiedergabe in Dolby Pro Logic II Musikmodus gewählt
werden.
(Panoramamodus) (Mittlere Breitenregelung) (Größenregelung)
¢
Auswahl des „PANO (Panorama)” Modus
Dieser Modus erweitert das vordere Stereo-Klangbild zum
Einschluss der Surround-Lautsprecher für einen
aufregenden „Wraparound” Effekt mit
Seitenwandabbildung.
Wählen Sie „OFF” oder „ON” (Standardeinstellung: OFF).
¢
Auswahl der „C. WIDTH (Mittlere Breiten)” Regelung
Hier stellen Sie das mittlere Klangbild ein, sodass es nur
über den mittleren Lautsprecher, nur von den
linken/rechten Lautsprechern als Phantom-Klangbild oder
von allen drei vorderen Lautsprechern in unterschiedlichen
Maßen gehört wird.
Die Einstellung erfolgt in 8 Stufen zwischen 0 und 7
(Standardeinstellung: 3).
¢
Auswahl der „DIMEN (Größen)” Regelung
Hier wird das Klangfeld schrittweise mehr nach vorn oder
nach hinten eingestellt. Die Einstellung erfolgt in 7 Stufen
zwischen -3 und +3 (Standardeinstellung: 0).
4. Wiederholen Sie obige Schritte 2 und 3 zur
Einstellung der anderen Parameter.
16
Page 57

RD-5405(G) de100415_RD-5503(g) 2010-04-20 오후 6:48 페이지 17
Einstellen der einzelnen Kanäle mit dem Testton
• Der Lautstärkepegel jedes Kanals kann mit der Testtonfunktion leicht eingestellt werden.
1. Rufen Sie den Testtonmodus auf. 2. Stellen Sie den Pegel für jeden Kanal ein, bis
DEUTSCH
der Klangpegel aller Lautsprecher gleich laut ist.
• Wählen Sie den gewünschten Kanal mit den
NAVIGATIONSTASTEN
p/q.
• Der Testtonmodus wird angezeigt und wird nacheinander
wie folgt vom Lautsprecher des entsprechenden Kanals
für 2 Sekunden übertragen:
" FL " C " FR " SR " SL " SW
Vorn links Mitte Vorn rechts Surround
• Ist die Lautsprechereinstellung „N (None/No oder Keiner)”,
so ist der Testton des entsprechenden Kanals nicht
verfügbar.
rechts
Surround
links
Subwoofer
3. Beenden Sie die Testtonfunktion.
17
Page 58

RD-5405(G) de100415_RD-5503(g) 2010-04-20 오후 6:48 페이지 18
Einstellen des Kanalpegels
• Nach dem Einstellen der Kanalpegel mit dem Testton stellen Sie die Kanalpegel entweder entsprechend der Programmquelle
oder nach Ihrem persönlichen Geschmack ein.
• Der Kanalpegel kann beliebig eingestellt werden. Diese eingestellten Pegel werden nur im Nutzerspeicher („CAL”) abgelegt,
nicht im Speicher für die Voreinstellungen („REF 1”, „REF 2”).
1. Drücken Sie die KANALPEGEL Taste.
• Der Speichermodus („CAL” usw.) wird für einige
Sekunden angezeigt.
• Erlischt der Speichermodus oder der Kanalpegel, so
drücken Sie diese Taste erneut.
2. Wählen Sie den gewünschten Kanal.
3. Stellen Sie den Pegel des gewählten Kanals
wunschgemäß ein.
DEUTSCH
• Der LFE-Pegel kann im Bereich -10~0 dB eingestellt
werden, die anderen Kanalpegel im Bereich von
-15 ~ +15 dB.
• Allgemein empfehlen wir, den LFE-Pegel auf 0 dB
einzustellen (der empfohlene LFE-Pegel für einige frühe
DTS Software ist jedoch -10 dB). Erscheinen die
empfohlenen Pegel zu hoch, so stellen Sie diese
niedriger ein, falls nötig.
4. Wiederholen Sie obige Schritte 2 und 3 zur
Einstellung aller Kanalpegel.
• Mit jedem Tastendruck wird der entsprechende Kanal wie
folgt gewählt:
" REF 1, 2 (oder CAL) 1 FL 1 C 1 FR !
" <DD oder DTS> 1 SW 1 SL 1 SR !
< >: Nur bei Digitalsignaleingang von Dolby Digital oder DTS
Programmquellen mit LFE-Signal kann der LFE-Pegel
angezeigt werden.
• Abhängig von den Lautsprechereinstellungen
(„N (None/No oder Keiner)”) und dem Surroundmodus
können einige Kanäle nicht gewählt werden.
18
Page 59

RD-5405(G) de100415_RD-5503(g) 2010-04-20 오후 6:48 페이지 19
Speichern der eingestellten Kanalpegel
• Sie können die eingestellten Kanalpegel in den
Voreinstellungen speichern („REF 1”, „REF 2”) und
jederzeit aufrufen.
1. Nach den Schritten 1 ~ 4 in „Einstellen des
Kanalpegels” auf Seite 18 drücken Sie die
ENTER Taste.
DEUTSCH
• Die „1” in „REF 1” blinkt für einige Sekunden.
2. Wählen Sie zwischen REF 1 und REF 2.
Aufrufen der gespeicherten Kanalpegel
1. Drücken Sie die KANALPEGEL Taste.
• „CAL” (oder „REF 1” usw.) wird für einige Sekunden
angezeigt.
• Erlischt die Anzeige des Kanalpegelmodus, so drücken
Sie diese Taste bitte erneut.
2. Wählen Sie zwischen REF 1 und REF 2.
• Erlischt die Voreinstellung, so wiederholen Sie bitte
Schritt 1.
3. Bestätigen Sie Ihre Auswahl.
• Die eingestellten Kanalpegel sind nun im gewählten
Speicher abgelegt.
• Hiermit werden die in den Voreinstellungen gespeicherten
Kanalpegel aufgerufen.
19
Page 60

RD-5405(G) de100415_RD-5503(g) 2010-04-20 오후 6:48 페이지 20
RADIO HÖREN
Automatische Sendersuche
1. Wählen Sie das gewünschte Frequenzband.
oder
• Mit jedem Tastendruck wird das Frequenzband wie folgt
umgeschaltet:
" FM ST " FM MONO " AM
(„ST” leuchtet) („ST” erlischt)
• Bei schlechtem UKW Stereoempfang aufgrund
schwacher Signale wählen Sie bitte FM Mono zur
Störunterdrückung. Hiermit haben Sie den UKWEmpfang in Mono.
Manuelle Sendersuche
• Die manuelle Sendersuche ist hilfreich, wenn Sie
bereits die Frequenz des gewünschten Senders
kennen.
• Nach der Auswahl des gewünschten Frequenzbandes
drücken Sie mehrfach SENDERWAHL (+) / (-), bis die
gewünschte Frequenz angezeigt wird.
DEUTSCH
Automatische Sendersuche und Speicherung
• Die automatische Sendersuche und Speicherung sucht
automatisch nur nach UKW-Sendern und speichert diese
im Senderspeicher.
• Halten Sie (MEMORY/) ENTER für mehr als 2 Sekunden
gedrückt, während Sie einen UKW-Sender eingestellt
haben.
2. Halten Sie die SENDERWAHL (+)/(-) Tasten für
länger als 0,5 Sekunden gedrückt.
• Der Tuner sucht nun, bis ein Sender mit ausreichender
Signalstärke aufgefunden wurde. Im Display werden die
Frequenz und „TUNED” angezeigt.
• Handelt es sich bei dem aufgefundenen Sender nicht
um den gesuchten Sender, so wiederholen Sie die
Suche einfach.
• Schwache Sender werden bei der automatischen
Sendersuche übersprungen.
oder
• „AUTO MEM” blinkt und der Receiver beginnt mit der
automatischen Sendersuche und Speicherung.
• Bis zu 30 UKW-Sender können gespeichert werden.
¢ Bitte beachten Sie:
• UKW-Sender mit schwachem Signal können nicht
gespeichert werden.
• Zur Speicherung von Mittelwelle-Sendern oder
schwachen Sendern führen Sie bitte die „manuelle
Speicherung” und die „manuelle Sendersuche” durch.
20
Page 61

RD-5405(G) de100415_RD-5503(g) 2010-04-20 오후 6:48 페이지 21
Manuelle Speicherung
• Sie können bis zu 30 Sender in den Senderspeicher
aufnehmen.
1. Stellen Sie den gewünschten Sender manuell
oder automatisch ein.
2. Drücken Sie ENTER.
DEUTSCH
• „MEM” blinkt für einige Sekunden.
4. Wiederholen Sie obige Schritte 1 bis 3 zur
Speicherung weiterer Sender.
¢ BACKUP-SPEICHERFUNKTION
Nachstehende Einstellungen werden gespeichert, bevor
der Receiver ausgeschaltet wird.
• Auswahleinstellung für EINGANG
• Surroundmodus
• Senderspeicher usw.
Aufrufen der Senderspeicher
• Nach Auswahl des Tuners als Eingangsquelle wählen
Sie den gewünschten Senderspeicher.
3. Wählen Sie den gewünschten Senderspeicher
(1~30) und drücken Sie ENTER.
oder
• Benutzung der ZIFFERNTASTEN auf der Fernbedienung.
Beispiele) Für „3” :
Für „15”:
Für „30”:
• Der Sender ist nun im Senderspeicher gespeichert.
• Bei der Benutzung der ZIFFERNTASTEN wird der Sender
automatisch gespeichert, ohne dass Sie ENTER drücken
müssen.
• Eine gespeicherte Frequenz wird durch das
Überschreiben mit einer neuen Frequenz gelöscht.
• Erlischt „MEM”, so beginnen Sie erneut ab Schritt 2.
• Benutzung der ZIFFERNTASTEN auf der Fernbedienung.
Beispiele) Für „3”:
Für „15”:
Für „30”:
21
Page 62

RD-5405(G) de100415_RD-5503(g) 2010-04-20 오후 6:48 페이지 22
RDS Tuner(Regionale Option für einige europäische Länder)
UKW-RADIO MIT RDS HÖREN
RDS (Radio Data System) ist ein System zur Übertragung von zusätzlichen Informationen gemeinsam mit den Programmen.
Ihr Tuner kann diese Signale in Display-Informationen umsetzen. Diese Codes enthalten die nachstehenden Informationen:
Sendername (PS), Programmtyp (PTY), Verkehrsdurchsagen (TA), Uhrzeit (CT) und Radiotext (RT).
¢ Bitte beachten Sie : In den anderen Ländern steht die RDS-Tuner-Funktion nicht zur Verfügung.
RDS-Suche
• Mit dieser Funktion suchen und empfangen Sie
automatisch Sender mit RDS-Diensten.
1. Wählen Sie im UKW-Modus den RDS-Suchmodus.
• Mit jedem Tastendruck schalten Sie den Suchmodus
wie folgt um:
" RDS SRCH " TP SRCH " PTY SRCH " OFF
2. Drücken Sie ENTER, sobald „RDS SRCH”
angezeigt wird.
TP-Suche
• Mit dieser Funktion suchen und empfangen Sie
automatisch Sender, welche Verkehrsmeldungen
übertragen.
1. Drücken Sie im UKW-Modus zweimal die
SUCHMODUS-Taste.
• „TP SRCH” wird angezeigt.
2. Drücken Sie ENTER, sobald „TP SRCH” angezeigt
wird.
DEUTSCH
• Der Tuner sucht automatisch nach Sendern mit RDSDiensten, der jeweilige Sendername wird angezeigt.
• Wird kein RDS-Sender gefunden, dann wird „NO RDS”
angezeigt.
• Wird „RDS SRCH” nicht angezeigt, so wiederholen Sie
bitte Schritt 1.
• Der Tuner sucht automatisch nach Sendern mit
Verkehrsmeldungen.
• „NO TRAFF” wird angezeigt, sofern das Signal zu
schwach ist oder kein Verkehrssender gefunden werden
kann.
• Wird „TP SRCH” nicht angezeigt, so wiederholen Sie bitte
Schritt 1.
22
Page 63

RD-5405(G) de100415_RD-5503(g) 2010-04-20 오후 6:48 페이지 23
PTY-Suche
•
Mit
d
ie
s
e
r
Fu
n
k
t
io
n
s
u
c
h
e
n
u
n
d
e
mp
f
a
u
t
o
ma
t
is
c
h
Se
n
d
e
r
mit
d
e
m
a
g
e
w
ü
n
s
c
1. Drücken Sie im UKW-Modus dreimal die
SUCHMODUS-Taste.
DEUTSCH
• „PTY SRCH” wird angezeigt.
2. Wählen Sie den gewünschten Programmtyp,
sobald „PTY SRCH” angezeigt wird.
3. Drücken Sie ENTER, sobald der gewünschte
n
g
e
n
Sie
h
t
e
n
Pr
o
g
r
a
mmt
y
p
.
Programmtyp angezeigt wird.
• Der Tuner sucht automatisch nach Sendern mit PTYDiensten.
• Wird kein entsprechender Sender gefunden, so wird „NO
PROG” angezeigt.
DISPLAY
Im UKW-Modus:
• Mit jedem Tastendruck wird zwischen den 32 verschiedenen
Programmtypen umgeschaltet.
(NEWS, AFFAIRS, INFO, SPORT, EDUCATE, DRAMA,
CULTURE, SCIENCE, VARIED, POP M, ROCK M, EASY
M, LIGHT M, CLASSICS, OTHER M, WEATHER,
FINANCE, CHILDREN, SOCIAL, RELIGION, PHONE IN,
TRAVEL, LEISURE, JAZZ, COUNTRY, NATION M,
OLDIES, FOLK M, DOCUMENT, TEST, ALARM, NONE)
• Wird „PTY SRCH” nicht angezeigt, so wiederholen Sie bitte
Schritt 1.
• Mit jedem Tastendruck wird der Displaymodus wie folgt
umgeschaltet:
Sendername
"" ""
(PS)
• Sind die Signale zu schwach oder es steht kein RDSDienst zur Verfügung, so wird „NO NAME”, „NO PTY”,
„NO TIME” oder „NO TEXT” angezeigt.
Programmtyp
(PTY)
!!!
Uhrzeit
(CT)
FrequenzSurroundmodusLautstärke
23
Radiotext
(RT)
Page 64

RD-5405(G) de100415_RD-5503(g) 2010-04-20 오후 6:48 페이지 24
AUFNAHME
• Bei der Aufnahme von Analogsignalen von VIDEO 1 oder VIDEO 2 wählen Sie bitte den Analogeingang.
(Einzelheiten finden Sie im Abschnitt „Auswahl von VIDEO 1, VIDEO 2 als Eingangsquelle” auf Seite 12.)
• Lautstärke- und Klangeinstellungen (Bässe, Höhen) haben keinen Einfluss auf die Aufnahmesignale.
• Bei Auswahl von TUNER, CD oder VIDEO 2 als Aufnahmequelle können Sie über TAPE, VIDEO 1 oder beide gleichzeitig
aufnehmen.
Aufnahme mit TAPE
1. Wählen Sie den gewünschten Eingang als Aufnahmequelle, außer TAPE.
oder
DEUTSCH
2. Starten Sie die Aufnahme mit TAPE.
Aufnahme über VIDEO 1
• Bei Anschluss des Audioaufnahmegeräts an VIDEO 1 können Sie die Audiosignale aufnehmen.
3. Starten Sie die Wiedergabe der gewünschten
Eingangsquelle.
1. Wählen Sie den gewünschten Eingang als Aufnahmequelle, außer VIDEO 1.
oder
2. Starten Sie die Aufnahme mit VIDEO 1. 3. Starten Sie die Wiedergabe des gewünschten Eingangs.
24
Page 65

RD-5405(G) de100415_RD-5503(g) 2010-04-20 오후 6:48 페이지 25
SONSTIGE FUNKTIONEN
Sleeptimer
• Mit dem Sleeptimer können Sie das System sich automatisch nach einer gewissen Zeit ausschalten lassen.
• Einstellen des Receivers auf automatische Ausschaltung nach einem voreingestellten Zeitraum.
• Mit jedem Tastendruck durchlaufen Sie die
Voreinstellungen des Sleeptimers wie folgt:
" 10 " 20 " 30 " --- " 90 " OFF
Einheit: Minuten
DEUTSCH
Einstellen der Helligkeit des Fluoreszenzdisplays
Anzeige des Betriebsstatus
Während der Wiedergabe:
• Bei aktiviertem Sleeptimer leuchtet „ ” im Display.
• Bei eingestellter Ausschaltzeit ist das Display nur
schwach beleuchtet.
• Mit jedem Tastendruck schalten Sie die Helligkeit
des Fluoreszenzdisplays wie folgt um:
" ON " Dimmer " OFF
• Ist das Display deaktiviert (OFF), so aktivieren Sie es
mit Tastendruck auf eine beliebige Taste.
• Mit jedem Tastendruck schalten Sie den Anzeigemodus
wie folgt um:
Surroundmodus Lautstärke Eingangsquelle
"""
• Stehen in Ihrem Land die Funktionen des RDS Tuners
zur Verfügung, so entnehmen Sie Einzelheiten zu den
UKW-Modus-Informationen bitte dem Abschnitt
„DISPLAY” auf Seite 23.
25
Page 66

RD-5405(G) de100415_RD-5503(g) 2010-04-20 오후 6:48 페이지 26
FUNKTIONEN AUF DER GERÄTEFRONT
• Sie können die unterschiedlichen Funktionen einfach mit den entsprechenden Tasten auf der Gerätefront aufrufen.
1. Wählen Sie den gewünschten Einstellmodus.
• Abhängig von der gewählten Eingangsquelle wird der
Modus mit jedem Tastendruck wie folgt umgeschaltet und
für einige Sekunden angezeigt:
" [PRESET " TUNE " ] CH LEVEL
OFF ! TONE < ! D/A SET> !
Aktuelle Eingangsquelle)
(
]: Nur wählbar, wenn der Tuner gewählt ist.
[
< >: Nur wählbar, wenn VIDEO 1, VIDEO 2 gewählt ist.
2. Geben Sie den gewählten Modus ein.
¢
„CH LEVEL” (Kanalpegeleinstellmodus) wählen
• Sie können die Kanalpegel wunschgemäß einstellen
(Einzelheiten siehe Abschnitt „Einstellen des Kanalpegels”
auf Seite 18).
① Mit MODE wählen Sie den gewünschten Kanal.
② Mit dem Drehknopf stellen Sie den Pegel des gewählten
Kanals wunschgemäß ein.
③ Wiederholen Sie die obigen Schritte ① und ② zur
Einstellung der anderen Kanalpegel.
¢
„D/A SET” (Digital-/Analogeingangsmodus) wählen
• Mit jeder Drehung des Drehknopfes schalten Sie zwischen
dem Digital- (optisch oder koaxial) und dem
Analogeingang um (Einzelheiten siehe Abschnitt „Auswahl
von VIDEO 1, VIDEO 2 als Eingangsquelle” auf Seite 12).
¢
„TONE” (Toneinstellmodus) wählen
• Mit jeder Drehung des Drehknopfes schalten Sie den Ton
wie folgt um:
OFF: Hören einer Programmquelle ohne den Toneffekt
↕ („DIRECT” leuchtet im Display).
ON: Manuelle Einstellung des Tons
(„DIRECT” erlischt im Display).
DEUTSCH
• Der Einstellmodus wird nach einigen Sekunden deaktiviert.
In diesem Fall wiederholen Sie bitte Schritt 1.
3. Stellen Sie den gewählten Modus wunschgemäß ein.
¢
„PRESET” (Senderspeichermodus) wählen
• Mit jeder Drehung des Drehknopfes wird ein neuer
Senderspeicher aufgerufen (Einzelheiten siehe Abschnitt
„Aufrufen der Senderspeicher” auf Seite 21).
¢
„TUNE” (automatische/manuelle Sendersuche) wählen
• Abhängig davon, ob der Drehknopf über mehrere Stufen
oder langsam einzeln gedreht wird, haben Sie die
automatische oder die manuelle Sendersuche
(Einzelheiten siehe Abschnitte „Automatische
Sendersuche” und „Manuelle Sendersuche” auf Seite 20).
Ton bei Einstellung von TONE auf ON (Bässe und Höhen)
¿
einstellen
① Mit MODE wählen Sie den gewünschten Ton.
② Mit dem Drehknopf stellen Sie den gewählten Ton
wunschgemäß ein.
③ Wiederholen Sie die obigen Schritte ① und ② zur
Einstellung der anderen Toneinstellungen.
4. Einstellmodus verlassen.
26
Page 67

RD-5405(G) de100415_RD-5503(g) 2010-04-20 오후 6:48 페이지 27
Systemeinstellungen
• Das Einstellungsmenü wird im Fluoreszenzdisplay angezeigt und vereinfacht die Einstellungen. In den meisten Situationen müssen
Sie diese Einstellung während der Installation und des Layouts Ihres Heimkinos nur einmal durchführen und eine spätere
Umstellung ist nur in Ausnahmefällen nötig.
Das Einstellungsmenü besteht aus 5 Hauptmenüs: System, Eingang, Lautsprechereinstellung, Kanal-Pegel und Parameter. Diese
Menüs sind in verschiedene Untermenüs unterteilt.
1. Rufen Sie das Einstellungsmenü auf. 3. Bestätigen Sie Ihre Auswahl.
DEUTSCH
• Das Einstellungsmenü wird angezeigt.
• Mit erneutem Tastendruck verlassen Sie das
Menü wieder.
2. Wählen Sie das gewünschte Menü mit den
NAVIGATIONSTASTEN AUFWÄRTS (p)/
ABWÄRTS (q) .
• Bei Auswahl von „SYSTEM” siehe
„SYSTEMEINSTELLUNGEN” auf Seite 29.
• Bei Auswahl von „INPUT” siehe
„EINGANGSEINSTELLUNGEN” auf Seite 31.
• Bei Auswahl von „SPK SET” siehe
„LAUTSPRECHEREINSTELLUNGEN” auf Seite
32.
• Bei Auswahl von „CH LEVEL” siehe
„KANALPEGELEINSTELLUNGEN” auf Seite 36.
• Bei Auswahl von „PARAMTR” siehe
„PARAMETEREINSTELLUNGEN” auf Seite 38.
• Bei Auswahl von „EXIT” verlassen Sie das
Einstellungsmenü.
27
Page 68

RD-5405(G) de100415_RD-5503(g) 2010-04-20 오후 6:48 페이지 28
¢ Systemeinstellungen Ablaufdiagramm
• Der Ablauf der Systemeinstellungen ist wie folgt :
DEUTSCH
• Bei Auswahl von „RETURN” im Untermenü kehren Sie in das vorherige Menü zurück.
¢ Bitte beachten Sie: Während der Systemeinstellungen sind nur die (POWER ON/) STANDBY Taste sowie die für die
Systemeinstellungen notwendigen Tasten belegt.
28
Page 69

RD-5405(G) de100415_RD-5503(g) 2010-04-20 오후 6:48 페이지 29
SYSTEMEINSTELLUNGEN
• SW (SUBWOOFER): Auswahl des gewünschten Subwoofermodus.
• TONE: Klangeinstellungen (Bässe und Höhen).
DEUTSCH
• RETURN: Rückkehr in das vorherige Menü.
1. Mit den NAVIGATIONSTASTEN AUFWÄRTS (p)
/ABWÄRTS (q) wählen Sie das gewünschte
Menüelement.
2. Mit den NAVIGATIONSTASTEN LINKS (t)/
RECHTS (u) stellen Sie das gewählte
Menüelement ein.
Auswahl des SUBWOOFER-Modus
• Der „SW +” Modus ist nur wirksam, wenn im SPK SET Menü „FRONT” auf „L” und „SUB- W” auf „Y” eingestellt ist
• Bei Wiedergabe einer 2-Kanalquelle in MATRIX, CHURCH, THEATER, HALL oder STADIUM Modus werden die
Niederfrequenzen über den Subwoofer ausgegeben, unabhängig von der Moduseinstellung des Subwoofers.
NORM : Sind die Niederfrequenzsignale von Kanälen auf „L” eingestellt, so werden sie nur von diesen Kanälen reproduziert.
↕
(Einzelheiten entnehmen Sie bitte dem Abschnitt „LAUTSPRECHEREINSTELLUNGEN” auf Seite 32).
In diesem Modus sind die Niederfrequenzsignale, welche vom Subwoofer reproduziert werden, nur die
Niederfrequenzsignale von LFE (von den Mehrkanalquellen, welche LFE-Kanäle (Low Frequency Effects), auch „.1”
Kanal genannt) enthalten und die Kanäle müssen auf „S” eingestellt sein.
SW +: Es werden die auf „L” eingestellten Niederfrequenzsignale von Kanälen gleichzeitig von jenen Kanälen und dem
Subwooferkanal reproduziert.
In diesem Modus verläuft der Niederfrequenzbereich einheitlicher durch den Raum, jedoch kann es in Abhängigkeit
von Raumgröße und Grundriss zu Störungen mit verringerter tatsächlicher Lautstärke im Niederfrequenzbereich
kommen.
29
Page 70

RD-5405(G) de100415_RD-5503(g) 2010-04-20 오후 6:48 페이지 30
Auswahl des KLANGES (TONE)
OFF: Wiedergabe einer Programmquelle ohne Klangeffekte („DIRECT” Statusanzeige leuchtet auf.)
2
ON: Klangeinstellung nach Ihrem persönlichen Geschmack („DIRECT” Statusanzeige erlischt.)
¢ Bei Aktivierung von TONE stellen Sie den Klang ein (Bässe und Höhen)
①
Mit den NAVIGATIONSTASTEN AUFWÄRTS (p)/ABWÄRTS (q) wählen Sie den gewünschten Klang.
Bei Auswahl der BASS
②
Mit den NAVIGATIONSTASTEN LINKS (t)/RECHTS (u) stellen Sie den gewählten Klang wunschgemäß ein.
• Der Klangpegel kann im Bereich -10 ~ +10 dB eingestellt werden.
• Allgemein empfehlen wir, Bässe und Höhen auf 0 dB (Flat Level)
einzustellen.
• Extreme Einstellungen mit hoher Lautstärke können zur
Beschädigung Ihrer Lautsprecher führen.
①
• Wiederholen Sie die vorstehenden Schritte
Fertigstellung der Einstellungen.
und ②zur
DEUTSCH
30
Page 71

RD-5405(G) de100415_RD-5503(g) 2010-04-20 오후 6:48 페이지 31
EINGANGSEINSTELLUNGEN
• D.IN (DIGITAL IN): Zuordnung der angeschlossenen DIGITALEINGÄNGE zu dem gewünschten Eingang.
• AUTO (AUTO SURROUND): Auswahl des automatischen Surroundmodus oder des manuellen Surroundmodus.
• RETURN: Rückkehr in das vorherige Menü.
DEUTSCH
1. Mit den NAVIGATIONSTASTEN AUFWÄRTS(p)/
ABWÄRTS (q) wählen Sie die gewünschte
Eingangsquelle, danach drücken Sie ENTER.
2. Mit den NAVIGATIONSTASTEN AUFWÄRTS (p)/
ABWÄRTS (q) wählen Sie das gewünschte
Menüelement.
3. Mit den NAVIGATIONSTASTEN LINKS (t)/RECHTS (u)
stellen Sie das gewählte Menüelement wunschgemäß
Beispiel) Bei Auswahl der VIDEO 2
Auswahl des DIGITALEINGANGS (DIGITAL IN)
• Sie müssen die angeschlossenen DIGITALEINGÄNGE den gewünschten VIDEO 1 und VIDEO 2 zuordnen (Einzelheiten
finden Sie im Abschnitt „ANSCHLUSS DIGITALER EINGÄNGE” auf Seite 5).
• Wählen Sie zwischen OPT (optisch), COAX (koaxial) und ANL (analog).
¢ Bitte beachten Sie :
• Für den Fall, dass ein DIGITALEINGANG zwei oder mehr Eingangsquellen zugeordnet ist, können die digitalen Audiosignale
vom gleichen DIGITALEINGANG gehört werden, wenn diese Eingangsquellen gewählt sind.
• Bei Auswahl von TUNER, TAPE oder CD als Eingangsquelle kann der Digitaleingang („OPT”, „COAX”) nicht gewählt werden.
ein.
Auswahl von AUTO SURROUND
• Sie können entweder den automatischen oder den manuellen Surroundmodus wählen.
OFF(Manueller Surroundmodus) : Wählen Sie den gewünschten Surroundmodus für das Eingangssignal mit dem mit den
2
(Automatischer Surroundmodus) : Der optimale Surroundmodus wird automatisch abhängig vom Eingangssignalformat gewählt.
ON
¢ Bitte beachten Sie :
• Selbst bei Auswahl des Auto-Surroundmodus und gleichem digitalen Signalformat als Eingang kann der optimale
Surroundmodus abhängig von der Einstellung des Lautsprechertyps auf „N (None)” abweichen.
• Bei Eingang von 96 kHz PCM Digitalsignal wird nur der Stereomodus gewählt.
SURROUND (▶, >/◀, < ) Tasten.(Einzelheiten finden Sie im Abschnitt „SURROUND SOUND”
auf Seite 15.)
31
Page 72

RD-5405(G) de100415_RD-5503(g) 2010-04-20 오후 6:48 페이지 32
LAUTSPRECHEREINSTELLUNGEN
• Nach der Installation des Receivers und dem Anschluss aller Komponenten nehmen Sie die Lautsprechereinstellungen für
optimalen Klang entsprechend Ihrer Umgebung und des Lautsprecher-Layouts vor.
• Auch beim Austausch von Lautsprechern oder ihrer Umsetzung, der Veränderung der Sitzposition oder des Layouts Ihrer
Umgebung sollten Sie eine neue Einstellung der Lautsprecher vornehmen.
DEUTSCH
• CONFIG (KONFIGURATION): Auswahl der Größe der angeschlossenen Lautsprecher.
• DISTANCE: Eingabe des Abstands zwischen der Sitzposition und jedem Lautsprecher zur Einstellung der automatischen
Verzögerungszeiten für optimale Surroundwiedergabe.
• X-OVER (CROSSOVER): Auswahl der gewünschten Überschneidungsfrequenz.
• RETURN: Rückkehr in das vorherige Menü.
32
Page 73

RD-5405(G) de100415_RD-5503(g) 2010-04-20 오후 6:48 페이지 33
Auswahl der KONFIGURATION
1. Mit den NAVIGATIONSTASTEN AUFWÄRTS (p)/ABWÄRTS (q) wählen Sie „CONFIG”, danach drücken Sie ENTER.
DEUTSCH
2. Mit den NAVIGATIONSTASTEN AUFWÄRTS (p)/ABWÄRTS (q) wählen Sie den gewünschten Lautsprecher.
3. Mit den NAVIGATIONSTASTEN LINKS (t)/RECHTS (u) stellen Sie den gewählten Lautsprecher wunschgemäß ein.
• Abhängig von der Bauart Ihrer Lautsprecher wählen Sie eine der
nachstehenden Lautsprechertypen.
L (groß): Wählen Sie diese Einstellung beim Anschluss von Lautsprechern,
S (klein): Wählen Sie diese Einstellung beim Anschluss von
N (keiner): Wählen Sie diese Einstellung, wenn kein Lautsprecher
Y (Ja)/N (Nein): Wählen Sie die entsprechende Einstellung abhängig
¢ Bitte beachten Sie :
• Bei der Einstellung von Lautsprechern auf „S (klein)” müssen Sie deren Überschneidungsfrequenz korrekt entsprechend
derer Frequenzeigenschaften einstellen (Einzelheiten finden Sie im Abschnitt „Auswahl der
ÜBERSCHNEIDUNGSFREQUENZ (CROSSOVER)” auf Seite 35).
• Ist „SUB-W” auf „N (Nein)” eingestellt, so ist „FRONT” automatisch auf „L (groß)” eingestellt.
• Ist „FRONT” auf „S (klein)” eingestellt, so können „CENTER” und „SURR” nicht auf „L (groß)” eingestellt werden.
welche den Sound unterhalb der Überschneidungsfrequenz voll
reproduzieren können.
Lautsprechern, welche den Sound unterhalb der
Überschneidungsfrequenz nicht voll reproduzieren können. Bei
entsprechender Auswahl wird der Sound unterhalb der
Überschneidungsfrequenz an den Subwoofer oder Lautsprecher
mit Einstellung „L (groß)” übertragen (sofern kein Subwoofer
benutzt wird).
angeschlossen ist. Bei entsprechender Auswahl wird der Sound
an Lautsprecher übertragen, die nicht auf „N (keiner)” eingestellt
sind.
davon, ob ein Subwoofer angeschlossen ist oder nicht.
4. Wiederholen Sie die vorstehenden Schritte 2 und 3, bis alle Lautsprecher auf den gewünschten Modus eingestellt sind.
Informationen zur Größe der Lautsprecher
¢
• Wählen Sie „L (groß)” oder „S (klein)” nicht entsprechend der körperlichen Größe der Lautsprecher, sondern entsprechend
der Kapazität zur Wiedergabe von Niederfrequenzsignalen (Bässe unterhalb der Frequenz, welche im „X-OVER” Menü
eingestellt ist).
• Sind Sie sich nicht sicher, so versuchen Sie den Sound in beiden Einstellungen (stellen Sie die Lautstärke gering genug
ein, um die Lautsprecher nicht zu beschädigen), um die korrekte Einstellung zu bestimmen.
33
Page 74

RD-5405(G) de100415_RD-5503(g) 2010-04-20 오후 6:48 페이지 34
Auswahl der ENTFERNUNG (DISTANCE)
1. Mit den NAVIGATIONSTASTEN AUFWÄRTS
(p)/ABWÄRTS (q) wählen Sie DISTANCE,
danach drücken Sie ENTER.
2. Mit den NAVIGATIONSTASTEN AUFWÄRTS (p)
/ABWÄRTS (q) wählen Sie den gewünschten
Lautsprecher.
3. Mit den NAVIGATIONSTASTEN LINKS (t)/
RECHTS (u) stellen Sie die gewählten
Lautsprecher wunschgemäß ein.
¢ Auswahl der gewünschten Einheit
• Wählen Sie zwischen „M (Meter)” und „FT (Fuß)”.
• Nach der Auswahl der Einheit werden die Abstände
automatisch in die gewählte Einheit umgerechnet.
¢
Einstellen der Entfernung
• Sie können die Entfernung zwischen 0,0 und 9,0 m in 0,3
Meter Intervallen einstellen (oder 0 ~ 30 Fuß in
1-Fuß-Schritten).
4. Wiederholen Sie die vorstehenden Schritte 2
und 3, bis alle Entfernungen wunschgemäß
eingestellt sind.
DEUTSCH
■ Bitte beachten Sie :
• Sie können die Lautsprecher nicht auf „N(None
oder No)” einstellen.
¢
Hinweise zum Abstand der Lautsprecher
Bei Mehrkanal-Surroundwiedergabe von Dolby Digital
Quellen sollten sich mittlerer, Surround- und SubwooferLautsprecher idealerweise im gleichen Abstand von der
Sitzposition befinden, wie die vorderen Lautsprecher. Durch
die Eingabe des Abstands zwischen der Sitzposition und
jedem Lautsprecher werden die Verzögerungszeiten für
mittleren, Surround und Subwoofer-Lautsprecher
automatisch eingestellt, um eine ideale Hörumgebung zu
schaffen, als befänden sich mittlerer, Surround- und
Subwoofer-Lautsprecher in idealer Position.
34
Page 75

RD-5405(G) de100415_RD-5503(g) 2010-04-20 오후 6:48 페이지 35
Auswahl der ÜBERSCHNEIDUNGSFREQUENZ (CROSSOVER)
• Bei Einstellung der Lautsprecher auf „S (klein)” achten Sie bitte darauf, die Überschneidungsfrequenz korrekt entsprechend
ihrer Frequenzeigenschaften einzustellen.
1. Mit den NAVIGATIONSTASTEN AUFWÄRTS (p)
/ABWÄRTS (q) wählen Sie „X-OVER”, danach
drücken Sie ENTER.
DEUTSCH
2. Mit den NAVIGATIONSTASTEN LINKS (t)/
RECHTS (u) stellen Sie die gewünschte
Überschneidungsfrequenz wunschgemäß ein.
• Sie können die Überscheidungsfrequenz im Bereich
zwischen 40 und 200 Hz in 10 Hz Intervallen einstellen.
¢
Informationen zur Überschneidungsfrequenz
• Bei Lautsprechereinstellung auf „S (klein)” werden die
Niederfrequenzen auf diesen Kanälen, welche unterhalb
der Überschneidungsfrequenz liegen, vom Subwoofer
oder den vorderen Lautsprechern, die auf „L (groß)”
eingestellt sind, übertragen (sofern kein Subwoofer
benutzt wird).
• Entnehmen Sie Einzelheiten bitte den
Bedienungsanleitungen der anzuschließenden
Lautsprecher. Ist der Frequenzbereich Ihrer Lautsprecher
100 Hz~20 kHz, so muss die Überschneidungsfrequenz
auf 100 Hz (oder etwas höher) eingestellt
werden.
35
Page 76

RD-5405(G) de100415_RD-5503(g) 2010-04-20 오후 6:48 페이지 36
KANALPEGELEINSTELLUNGEN
DEUTSCH
¢ Bitte beachten Sie : Abhängig von den Lautsprechereinstellungen („N (None/No oder Keiner)”) können einige Kanäle nicht
Einstellen des aktuellen Kanalpegels
• Sie können die aktuellen Kanalpegel wunschgemäß einstellen. Diese eingestellten Pegel werden nur im Benutzerspeicher
(„CAL”) abgelegt, nicht im Voreinstellungsspeicher („REF 1”, „REF 2”).
• Nach der Einstellung der Kanalpegel mit dem Testton stellen Sie die Kanalpegel entweder entsprechend der
Programmquellen oder nach eigenem Geschmack ein (Einzelheiten finden Sie im Abschnitt „Einstellen der einzelnen Kanäle
mit dem Testton” auf Seite 17).
1. Mit den NAVIGATIONSTASTEN AUFWÄRTS (p)
/ABWÄRTS (q) wählen Sie den gewünschten
Kanal.
gewählt werden.
2. Mit den NAVIGATIONSTASTEN LINKS (t)/
RECHTS (u) stellen Sie den Pegel des
gewählten Kanals oder LFE der Programmquelle
wunschgemäß ein.
Beispiel) Auswahl LFE für Dolby Digital Quelle
• Der LFE-Pegel kann im Bereich zwischen -10 und 0 dB,
andere Kanalpegel können im Bereich zwischen -15 und
+15 dB eingestellt werden.
• Allgemein empfehlen wir, den LFE-Pegel auf 0 dB
einzustellen (der empfohlene LFE-Pegel für einige frühe
DTS Software ist jedoch -10 dB). Erscheinen die
empfohlenen Pegel zu hoch, so stellen Sie diese
niedriger ein, falls nötig.
3. Wiederholen Sie die obigen Schritte 1 und 2 zur
Einstellung aller Kanalpegel.
36
Page 77

RD-5405(G) de100415_RD-5503(g) 2010-04-20 오후 6:48 페이지 37
Speicherung der eingestellten Kanalpegel
• Sie können die eingestellten Kanalpegel in den
Voreinstellungen („REF 1”, „REF 2”) speichern und
jederzeit aufrufen.
1. Nach den Schritten 1 ~ 3 in „Einstellen des
aktuellen Kanalpegels” auf Seite 36 drücken Sie
ENTER.
DEUTSCH
• Danach blinkt die „1” der „REF 1” Anzeige.
Aufrufen der gespeicherten Kanalpegel
1. Mit den NAVIGATIONSTASTEN AUFWÄRTS
(p)/ABWÄRTS (q) wählen Sie „MODE ~”.
• Möglicherweise wird „CAL” anstatt „REF 1” oder „REF 2”
angezeigt.
2. Mit den NAVIGATIONSTASTEN LINKS (t)/
RECHTS (u) wählen Sie die gewünschte
Voreinstellung, danach drücken Sie ENTER.
• Mit jedem Tastendruck auf die NAVIGATIONSTASTEN
LINKS (t) oder RECHTS ( u) wird zwischen „REF 1”
und „REF 2” umgeschaltet.
• Die eingestellten Kanalpegel wurden nun in den
gewählten Speicher übernommen.
2. Mit den NAVIGATIONSTASTEN LINKS (t)/
RECHTS (u) wählen Sie zwischen REF 1 und
REF 2.
• Hiermit werden die im gewählten
Voreinstellungsspeicher abgelegten Kanalpegel
angezeigt.
37
Page 78

RD-5405(G) de100415_RD-5503(g) 2010-04-20 오후 6:48 페이지 38
PARAMETEREINSTELLUNGEN
• NIGHT M (NACHTMODUS): Einstellen der Kompression des Dynamikbereichs zur besseren Hörbarkeit schwacher
Geräusche bei niedrigem Lautstärkepegel.
• PLII MSC (DOLBY PLII MUSIC): Einstellen der unterschiedlichen Surroundparameter für optimale Surroundeffekte.
• RETURN: Rückkehr in das vorherige Menü.
Auswahl des NACHTMODUS
DEUTSCH
• Diese Funktion komprimiert den Dynamikbereich zuvor spezifizierter Teile des Dolby Digital oder DTS Soundtracks (mit extrem
hoher Lautstärke) zur Minimierung der Lautstärkedifferenz zwischen den spezifizierten und nicht spezifizierten Teilen.
Dies vereinfacht das Hören des Soundtracks des Nachts mit heruntergeregelter Lautstärke.
¢ Bitte beachten Sie :
• Die Nachtmoduseinstellung ist nur gültig, wenn die Digitalsignale von Dolby Digital oder DTS Programmquellen stammen.
• Bei einiger Dolby Digital oder DTS Software ist die Nachtmoduseinstellung möglicherweise nicht verfügbar.
1. Mit den NAVIGATIONSTASTEN AUFWÄRTS (p)
/ABWÄRTS (q) wählen Sie „NIGHT M”, danach
drücken Sie ENTER.
2. Mit den NAVIGATIONSTASTEN LINKS (t)/
RECHTS (u) stellen Sie den Dynamikbereich
der Kompression ein.
0.0 ↔ 0.1 ↔ 0.2 ........ 0.9 ↔ 1.0
Geringere Kompression Höhere Kompression
38
Page 79

RD-5405(G) de100415_RD-5503(g) 2010-04-20 오후 6:48 페이지 39
Auswahl von DOLBY PLII MUSIC
• Sie können die unterschiedlichen Surroundparameter für optimale Surroundeffekte einstellen.
¢ Bitte beachten Sie: Die Parametereinstellungen sind nur im Dolby Pro Logic II Musikmodus gültig.
1. Mit den NAVIGATIONSTASTEN AUFWÄRTS (p)
/ABWÄRTS (q) wählen Sie „PLII MSC”, danach
drücken Sie ENTER.
DEUTSCH
2. Mit den NAVIGATIONSTASTEN AUFWÄRTS (p)
/ABWÄRTS (q) wählen Sie den gewünschten
Parameter.
3. Mit den NAVIGATIONSTASTEN LINKS (t)/
RECHTS (u) stellen Sie den gewählten
Parameter wunschgemäß ein.
¢ Auswahl des „PANO (Panorama)” Modus
Dieser Modus erweitert das vordere Stereo-Klangbild zum
Einschluss der Surround-Lautsprecher für einen
aufregenden „Wraparound” Effekt mit
Seitenwandabbildung. Wählen Sie „OFF” oder „ON”
(Standardeinstellung: OFF).
¢ Auswahl der „C. WIDTH (Mittlere Breiten)” Regelung
Hier stellen Sie das mittlere Klangbild ein, sodass es nur
über den mittleren Lautsprecher, nur von den
linken/rechten Lautsprechern als Phantom-Klangbild oder
von allen drei vorderen Lautsprechern in unterschiedlichen
Maßen gehört wird. Die Einstellung erfolgt in 8 Stufen
zwischen 0 und 7 (Standardeinstellung: 3).
¢ Auswahl der „DIMEN (Größen)” Regelung
Hier wird das Klangfeld schrittweise mehr nach vorn oder
nach hinten eingestellt. Die Einstellung erfolgt in 7 Stufen
zwischen
-3 und +3 (Standardeinstellung: 0).
4. Wiederholen Sie die vorstehenden Schritte 2
und 3 zur Einstellung weiterer Parameter.
39
Page 80

RD-5405(G) de100415_RD-5503(g) 2010-04-20 오후 6:48 페이지 40
Störungserkennung
Kommt es zu einer Fehlfunktion, so sehen Sie sich bitte zunächst die nachstehende Tabelle an, bevor Sie sich an
den Kundendienst wenden.
Können Sie die Fehlfunktion nicht abstellen, so schalten Sie den Receiver aus und danach wieder ein. Kommen
Sie auch hiermit nicht weiter, so wenden Sie sich bitte an Ihren Fachhändler. Unter keinen Umständen versuchen
Sie selbst, die Reparatur durchzuführen, hiermit verlieren Sie Ihre Garantieansprüche.
PROBLEM MÖGLICHE URSACHE LÖSUNGSVORSCHLAG
Keine
Spannungsversorgung.
Kein Ton.
Kein Ton von den SurroundLautsprechern.
Kein Ton vom mittleren
Lautsprecher.
Kein Empfang von
Radiosendern.
• Das Netzkabel ist nicht angeschlossen.
• Schlechter Anschluss des Netzkabels oder
Steckdose defekt.
• Die Lautsprecherkabel sind nicht
angeschlossen.
• Die Master-Lautstärke ist zu niedrig
eingestellt.
• MUTE auf der Fernbedienung wurde
gedrückt.
• Falsche Auswahl der Eingangsquelle.
• Falscher Anschluss der Komponenten.
• Surroundmodus ist deaktiviert
(Stereomodus).
• Master-Lautstärke und Surroundpegel sind
zu niedrig eingestellt.
• Es wird eine Monoquelle benutzt.
• Surround-Lautsprecher sind auf „N”
eingestellt.
• Surroundmodus ist deaktiviert
(Stereomodus).
• Mittlerer Lautsprecher ist auf „N”
eingestellt.
• Master-Lautstärke und mittlerer Pegel sind
zu niedrig eingestellt.
• Es ist keine Antenne angeschlossen.
• Die gewünschte Senderfrequenz ist nicht
eingestellt.
• Die Antenne ist falsch ausgerichtet.
• Schließen Sie das Netzkabel korrekt an.
• Überprüfen Sie die Steckdose.
• Überprüfen Sie die
Lautsprecheranschlüsse.
• Stellen Sie die Master-Lautstärke ein.
• Drücken Sie MUTE zur Aufhebung der
Stummschaltung.
• Wählen Sie die gewünschte
Eingangsquelle korrekt.
• Nehmen Sie die Anschlüsse korrekt vor.
• Wählen Sie einen Surroundmodus.
• Stellen Sie Master-Lautstärke und
Surroundpegel ein.
• Wählen Sie eine Stereo- oder
Surroundquelle.
• Wählen Sie die gewünschte SurroundLautsprechereinstellung.
• Wählen Sie den gewünschten
Surroundmodus.
• Wählen Sie die gewünschte Einstellung
des mittleren Lautsprechers.
• Stellen Sie Master-Lautstärke und
mittleren Pegel ein.
• Schließen Sie eine Antenne an.
• Stellen Sie die gewünschte
Senderfrequenz ein.
• Richten Sie die Antenne neu aus.
DEUTSCH
Senderspeicher können
nicht empfangen werden.
Schlechter UKW Empfang.
Ständige Zischgeräusche
bei UKW-Empfang,
insbesondere bei
Stereosendern.
Ständige oder zeitweise
Zischgeräusche bei MWEmpfang, insbesondere
nachts.
Fernbedienung funktioniert
nicht.
• Es wurde eine falsche Senderfrequenz
gespeichert.
• Die Senderspeicher wurden gelöscht.
• Es ist keine Antenne angeschlossen.
• Die Antenne ist falsch ausgerichtet.
• Schwache Signale.
• Störungen werden durch Motoren,
Neonlampen oder Gewitter usw.
verursacht.
• Die Batterien sind erschöpft.
• Der Sensor wird behindert.
40
• Speichern Sie die korrekte
Senderfrequenz.
• Speichern Sie die Sender erneut.
• Schließen Sie eine Antenne an.
• Richten Sie die Antenne neu aus.
• Richten Sie die Antenne neu aus.
• Montieren Sie eine UKW-Hausantenne.
• Halten Sie den Receiver von Störquellen
fern.
• Montieren Sie eine MW-Hausantenne.
• Tauschen Sie die Batterien aus.
• Entfernen Sie Hindernisse.
Page 81

RD-5405(G) de100415_RD-5503(g) 2010-04-20 오후 6:48 페이지 41
Spezifikationen
¢ VERSTÄRKER
• Ausgangsleistung, Stereomodus, 6 Ω, THD 0,7%, 40 Hz~20 kHz | 2×50W
• Gesamtklirrfaktor, 6 Ω, 50 W, 1 kHz | 0,09 %
• Intermodulationsverzerrung
60 Hz: 7 kHz = 4 : 1 SMPTE, 6 Ω, 50 W | 0,1 %
• Eingangsempfindlichkeit, 47 kΩ
Line (CD, TAPE, VIDEO) | 280 mV
• Rauschabstand, IHF „A”-bewertet
Line (CD, TAPE, VIDEO) | 92 dB
• Frequenzgang
DEUTSCH
Line (CD, TAPE, VIDEO), 20 Hz~50 kHz | +0 dB, -3 dB
• Ausgangspegel
TAPE/VIDEO 1 REC, 2,2 kΩ | 280 mV
• Bässe-/Höhensteuerung, 100 Hz/10 kHz | ±10 dB
• Surroundmodus, nur kanalgetrieben
Front Ausgangsleistung, 6 Ω, 1 kHz, THD 0,7 % | 70 W / 70 W
Mitte Ausgangsleistung, 6 Ω, 1 kHz, THD 0,7 % | 70 W
Surround Ausgangsleistung, 6 Ω, 1 kHz, THD 0,7 % | 70 W / 70 W
¢ DIGITALAUDIO
• Abtastfrequenz | 32, 44,1, 48, 96 kHz
• Digitaler Eingangspegel
Koaxial, 75 Ω | 0,5 Vp-p
Optisch, 660 nm | -15 ~ -21 dBm
¢ UKW TUNER
• Frequenzbereich | 87,5 ~ 108 MHz
• Nutzbare Empfindlichkeit, THD 3%, Rauschabstand 26 dB | 12,8 dBf
• 46 dB Dämmungsempfindlichkeit, Mono/Stereo | 20,2 / 45,3 dBf
• Rauschabstand, 65 dBf, Mono/Stereo | 55 / 50 dB
• Gesamtklirrfaktor, 65 dBf, 1 kHz, Mono/Stereo | 0,5 / 1,0 %
• Frequenzgang, 30 Hz~12 kHz | ±3,0 dB
• Stereotrennung, 1 kHz | 30 dB
• Erfassungsverhältnis | 4 dB
• ZF Gleichtaktunterdrückungsverhältnis | 80 dB
¢ MW TUNER
• Frequenzbereich | 522 ~ 1611 kHz
• Nutzbare Empfindlichkeit | 500 µV/m
• Rauschabstand | 40 dB
• Trennschärfe | 25 dB
¢ ALLGEMEIN
• Spannungsversorgung | 230 V ~ 50 Hz
• Leistungsaufnahme | 200 W
• Abmessungen (B×H×T, einschließlich überstehender Teile) | 440×141×358,5 mm
• Gewicht (netto) | 9,5 kg
Bitte beachten Sie: Änderung von Design und Spezifikationen, auch ohne Vorankündigung, vorbehalten .
41
Page 82

RD-5405(G) fr100413_RD-5503(g) 2010-04-20 오후 6:46 페이지 2
Introduction
A LIRE AVANT D'UTILISER L'APPAREIL
ATTENTION:
AVERTISSEMENT
Avertissements concernant l'installation
Remarque : Pour la dissipation de la chaleur, ne pas placer cet appareil dans un espace fermé, tel qu'une
AFIN DE REDUIRE LES RISQUE DE CHOC ELECTRIQUE,
N'ENLEVEZ PAS LE COUVERCLE
OU LE PANNEAU ARRIERE). AUCUNE PIÈCE À
(
L'INTÉRIEUR NE PEUT ÊTRE RÉPARÉE PAR
L'UTILISATEUR. EN CAS DE PROBLÈME,
S'ADRESSER À DU PERSONNEL TECHNIQUE QUALIFIÉ.
: POUR REDUIRE TOUT RISQUE D'INCENDIE OU DE CHOC ÉLECTRIQUE, NE PAS EXPOSER CET APPAREIL À LA PLUIE OU À L'HUMIDITÉ.
bibliothèque ou meuble similaire.
C
e symbole sert à avertir l'utilisateur de la
p
résence dans le boîtier de l'appareil de
tensions dangereuses non isolées posant
des risques d'électrocution.
C
e symbole sert à avertir l'utilisateur que la
documentation fournie avec le matériel
c
ontient des instructions importantes
concernant l'exploitation et la maintenance
(
réparation).
FRANÇAIS
Ne pas couvrir les ouvertures de ventilation et ne pas placer d'autres équipements au dessus de l'appareil.
POUR VOTRE SECURITE
Les appareils expédiés vers l'Australie sont conçus pour fonctionner uniquement à 240 V CA.
Pour des raisons de sécurité, la fiche 3 broches doit être branchée uniquement dans une prise
d'alimentation tripolaire standard connectée directement au circuit de mise à la terre de la maison. Les
EUROPE
AUSTRALIE
220 V
-
240 V
ATTENTION
• Laisser de l'espace autour de l'appareil pour assurer une ventilation
suffisante.
• Eviter d'installer dans des endroits trop chauds ou trop froids, ou dans une
zone exposée directement au soleil ou à équipement de chauffage.
• Protéger l'appareil contre I'humidité, I'eau et la poussière.
• Eviter que des objets étrangers pénètrent dans l'appareil.
• Pour ne pas gêner la ventilation, les fentes de ventilation, ne doivent pas être
couvertes par des objets tels que des journaux, nappes de table, rideaux etc.
• Ne placer sur l'appareil aucune source de flamme nue, telle que des
chandelles allumées.
• Il faut tenir compte de la protection de l'environnement lors de la mise au
rebut des piles.
• L'appareil ne doit pas être exposé au ruissellement ni à la projection d'eau.
• Aucun objet rempli de liquide, un vase par exemple, ne doit être placé sur
l'appareil.
• Ne pas mettre en contact des insecticides, du benzène ou un diluent avec
l'appareil.
• Ne jamais démonter ou modifier l'appareil d'une manière ou d'une autre.
■Remarques concernant le cordon CA et la prise secteur
• L'appareil reste sous tension tant qu'il est branché à une prise secteur, même
s'il est éteint.
• Pour déconnecter complètement cet appareil du secteur, il faut le débrancher
de la prise secteur.
• Lors de l'installation de cet appareil, il faut s'assurer que la prise secteur
utilisée est facilement accessible.
• Débrancher l'appareil du secteur s'il ne va pas être utilisé pendant une longue
période.
rallonges à utiliser avec cet équipement doivent être trifilaires et branchées correctement pour assurer
une connexion à la terre. Les rallonges électriques inappropriées sont la cause de tous les accidents
mortels. Le fait que l'appareil fonctionne de façon satisfaisante ne veut pas dire que la source
d'alimentation est mise à la terre ou que l'installation est totalement sans risque. Pour votre sécurité, si
vous avez un quelconque doute concernant la mise à la terre de la source d'alimentation, consultez un
électricien qualifié.
VOLTAGE PANEUROPEEN UNIFIE
Tous les appareils peuvent être utilisées sur des sources d'alimentation 220-240 V CA.
Avis aux utilisateurs concernant la collecte et l’élimination des
piles et des appareils usagés
Apposé sur le produit lui-même, sur son emballage, ou figurant dans
la documentation qui l’accompagne, ce pictogramme indique que les
piles et appareils électriques et électroniques usagés doivent être
séparés des ordures ménagères. Afin de permettre le traitement, la
valorisation et le recyclage adéquats des piles et des appareils
usagés, veuillez les porter à l’un des points de collecte prévus,
conformément à la législation nationale en vigueur.
En éliminant piles et appareils usagés conformément à la
réglementation en vigueur, vous contribuez à prévenir le gaspillage
de ressources précieuses ainsi qu’à protéger la santé humaine et
l’environnement contre les effets potentiellement nocifs d’une
manipulation inappropriée des déchets.
Pour de plus amples renseignements sur la collecte et le recyclage
des piles et appareils usagés, veuillez vous renseigner auprès de
votre mairie, du service municipal d’enlèvement des déchets ou du
point de vente où vous avez acheté les articles concernés.
[Information relative à l’élimination des déchets dans les pays
extérieurs à l’Union européenne]
Ce pictogramme n’est valide qu’à l’intérieur de l’Union européenne.
Pour éliminer ces articles, contactez les autorités locales ou votre
revendeur afin de connaître la procédure d’élimination à suivre.
Note relative au pictogramme sur les piles (voir les deux exemples
ci-contre) :
Le symbole Pb ci-contre pour les piles indique que cette pile
contient du plomb.
2
Page 83

RD-5405(G) fr100413_RD-5503(g) 2010-04-20 오후 6:46 페이지 3
CONTENTS
Introduction
• A LIRE AVANT D'UTILISER L'APPAREIL | 2
Raccordements du système | 4
Commandes du panneau frontal | 8
Télécommande | 9
• PORTEE DE LA TELECOMMANDE | 10
• MISE EN PLACE DES PILES | 10
Fonctionnement
• ECOUTER UNE SOURCE DE PROGRAMMES | 11
FRANÇAIS
• SONS SURROUND | 14
• ECOUTER DES SONS SURROUND | 15
• ECOUTER DES EMISSIONS RADIO | 20
• ECOUTER DES EMISSIONS RDS (FM SEULEMENT) | 22
(Syntoniseur RDS (Option régionale dans certains pays Européens, etc.))
• ENREGISTREMENT | 24
• AUTRES FONCTIONS | 25
• UTILISATION DES DIFFERENTES FONTIONS DU PANNEAU AVANT | 26
Configuration du système | 27
• CONFIGURATION DU SYSTEME | 29
• CONFIGURATION DES ENTREES | 31
• CONFIGURATION DES ENCEINTES | 32
• CONFIGURATION DU NIVEAU DES CANAUX | 36
• CONFIGURATION DES PARAMETRES | 38
Guide de dépannage | 40
Spécifications | 41
3
Page 84

RD-5405(G) fr100413_RD-5503(g) 2010-04-28 오전 9:59 페이지 4
Raccordements du système
• Ne pas brancher le cordon CA dans une prise secteur jusqu'à ce que toutes les connexions soient achevées.
• Assurez-vous que le codage couleur est respecté lors de raccordements des câbles audio, vidéo et des enceintes.
• Vérifiez que tous les raccordements sont correctement faits et bien serrés. Dans le cas contraire, il risque d'y avoir perte de
son, augmentation de bruit ou endommagement du récepteur.
FRANÇAIS
1. RACCORDEMENT DES ANTENNES
• Changez la position de l'antenne FM intérieure jusqu'à ce
que vous obteniez la meilleure réception des vos stations
FM favorites.
• Une antenne FM extérieure 75 Ω peut être utilisée pour
améliorer la réception. Débranchez l'antenne intérieure
avant de la remplacer par l'antenne extérieure.
• Placez l'antenne AM en boucle le plus loin possible du récepteur, poste télé, câbles d'enceintes et
d'alimentation et réglez-la dans une direction de bonne réception.
• Si la réception est mauvaise avec l'antenne AM en boucle, une antenne AM extérieure peut être
utilisée à sa place.
4
Page 85

TAPE Magnétophone, enregistreur de
Minidisques (MD), etc.
MONITOR TV, Projecteur, etc.
CD Lecteur CD
VIDEO 1 Lecteur BD, lecteur DVD, Magnétophone,
enregistreur de Minidisques (MD), etc.
VIDEO 2 Lecteur BD, lecteur DVD, etc.
RD-5405(G) fr100413_RD-5503(g) 2010-04-20 오후 6:46 페이지 5
2. CONNEXION DE COMPOSANTS AUDIO/VIDEO
FRANÇAIS
• Les prises VIDEO 1/VIDEO 2 peuvent être connectées aux prises AUDIO des composants vidéo tels que lecteur BD, lecteur DVD, TV, etc.
• Les prises d'entrée/sortie TAPE IN/OUT et VIDEO 1 peuvent être connectées à des équipements d'enregistrement audio tels que
magnétophone, enregistreur de Minidisques (MD), etc.
■
Raccordement HDMI (Interface Multimédia Haute définition) : (*)
• Vous pouvez connecter le composant source (lecteur BD, etc.) au composant de visualisation (TV, projecteur, etc.) via ce récepteur à
l'aide d'un câble HDMI disponible dans le commerce.
• Une connexion HDMI peut accepter des signaux vidéo numériqu es non compressés et des signaux audio numériques.
• Ce récepteur peut transférer les signaux vidéo et audio numériques provenant des entrées HDMI IN vers la sortie HDMI MONITOR
OUT et sans passer par les circuits internes de l’amplificateur. Les signaux audio injectés par les entrées HDMI IN ne peuvent donc
pas être reproduits par l’amplificateur.
• HDMI, le logo HDMI et l’Interface Multimédia Haute Définition sont des marques déposées ou commerciales de HDMI Licensing LLC.
■
Remarques :
• En fonction des composants connectés, le transfert de signal peut être instable.
(Pour plus de détails, reportez-vous au manuel de l'utilisateur du composant à connecter.)
• Pour que le transfert de signal soit stable, nous recommandons l'utilisation de câbles HDMI de longueur inférieure à 5 mètres.
3. RACCORDEMENT D'ENTREES NUMERIQUES (DIGITAL IN)
• Les sorties NUMERIQUE OPTIQUE et NUMERIQUE COAXIALE des
composants qui sont connectés à CD et VIDEO 1 de cet appareil
peuvent être connectées aux entrées numériques DIGITAL IN.
• Une entrée numérique doit être connectée à des composants tels qu'un
lecteur CD, lecteur LD, lecteur DVD, etc. capables de produire des
signaux numériques Surround de format DTS, Dolby Digital ou PCM etc.
• Pour plus de détails, reportez-vous au manuel de l'utilisateur du
composant à connecter.
• Lorsque vous faites une connexion NUMERIQUE COAXIALE, un câble
COAXIAL 75 Ω doit être utilisé et non un câble AUDIO classique.
• Quelques câbles de fibre optique disponibles dans le commerce ne peuvent être utilisés avec cet équipement. Si un câble de fibre optique
ne peut pas être connecté à votre équipement, consultez votre revendeur ou un service spécialisé qui vous est proche.
¢ Remarque : Sur un composant, il faut ou faire une connexion NUMERIQUE OPTIQUE ou une connexion NUMERIQUE COAXIALE.
■Réglages par défaut des entrées numériques
• Si vous connectez les entrées DIGITAL IN à vos composants, il vous sera plus facile d’effectuer les réglages par défaut suivants.
• Si vos connexions numériques sont différentes des réglages par défaut, vous devez attribuer les entrées DIGITAL utilisées
selon la procédure "Sélection de DIGITAL IN" de la page 31.
• Les réglages par défaut sont : OPTICAL : VIDEO 1, COAX : VIDEO 2
(On n'a pas besoin des deux à la fois.)
5
Page 86

RD-5405(G) fr100413_RD-5503(g) 2010-04-28 오전 9:59 페이지 6
4. RACCORDEMENT DE LA SORTIE SUBWOOFER PRE OUT
• Pour améliorer les basses fréquences (son riche en graves),
connectez un subwoofer amplifié..
5. RACCORDEMENT DES ENCEINTES
• Vérifiez que les connexions des enceintes sont bien serrées
et correctes (canal gauche et canal droit et les signes + et -).
Si les connexions sont erronées, les enceintes seront
muettes, et si la polarité d'une enceinte est inversée, le son
manquera de naturel et de graves.
• Pour l'installation des enceintes, voir "Emplacement des
enceintes" à la page 7.
• Après l'installation des enceintes, réglez d'abord leurs
paramètres en fonction de votre environnement et de leur
disposition.
(Pour plus de détails, voir "CONFIGURATION DES
ENCEINTES" à la page 32.)
FRANÇAIS
Attention :
• Assurez-vous d'utiliser des enceintes avec une impédance de
6 ohms ou plus.
• Ne laissez aucun fil dénudé des enceintes se toucher ou
toucher une partie métallique de cet appareil. Cela pourrait
endommager les enceintes et/ou l'appareil.
• Ne touchez jamais les bornes des enceintes lorsque le
cordon d’alimentation CA est connecté à une prise secteur.
Vous risquez d'être électrocuté.
■Raccordez des fils des haut-parleurs
1. Dénudez environ. 10 mm
(3/8 pouce) des fils, puis
torsadez les extrémités
fermement.
2. Desserrez en tournant la
borne de l’enceinte à
gauche
3. Insérez la partie dénudée
du fil.
4. Serrez en tournant la
borne à droite.
6. ENTRÉE DU CORDON CA
• Branchez le cordon d'alimentation dans une prise secteur.
6
Page 87

RD-5405(G) fr100413_RD-5503(g) 2010-04-20 오후 6:46 페이지 7
Emplacement des enceintes
L'emplacement idéal des enceintes varie en fonction de la taille
de votre pièce, du revêtement des murs, etc. Voici un exemple
typique d'emplacement de enceintes :
¢
Enceintes avant gauche et droite et enceinte
centrale
• Placez si possible, les enceintes avant de manière que leurs
surfaces frontales soient alignées avec la télé ou l'écran.
• Placez l'enceinte centrale entre les enceintes avant gauche et
droite non loin de la position d'écoute de ces derniers.
• Placez chaque enceinte de manière que le son soit orienté
vers les oreilles de l'auditeur qui est dans la position d'écoute
principale.
¢
Enceintes surround gauche et droite
• Placez les enceintes surround à environ 1 mètre (40 pouces)
au dessus des oreilles de l'auditeur assis, direct à sa gauche
et à sa droite ou légèrement derrière.
¢
FRANÇAIS
Subwoofer (Enceinte d'extrêmes graves)
• Le subwoofer reproduit les basses fréquences (son riche en
graves). Placez un subwoofer n'importe où en face.
¢
Remarques :
• Pour éviter les interférences avec l'image d'une télé
classique, utilisez uniquement des enceintes avant gauche et
droite et enceinte centrale dotées d'un blindage magnétique.
• Pour obtenir les meilleurs effets surround, les enceintes à
l'exception du subwoofer devraient êtres des enceintes à
gamme étendue.
1. Télé ou écran
. Enceinte avant gauche
2
3. Enceinte avant droite
4. Enceinte centrale
5. Subwoofer (Enceinte d'extrêmes graves)
6. Enceinte surround gauche
7. Enceinte surround droite
7
Page 88

RD-5405(G) fr100413_RD-5503(g) 2010-04-20 오후 6:46 페이지 8
Commandes du panneau frontal
FRANÇAIS
1. Interrupteur marche/arrêt
2. Touche Marche/Veille
3. Témoin Veille
4. Afficheur fluorescent
Pour plus de détails, voir ci-dessous.
5. Capteur de la télécommande
6. Bouton Sélecteur de source d'entrée/multicommande
¢
AFFICHEUR FLUORESCENT
1. Source, fréquence, niveau de volume, informations de
fonctionnement, etc.
2. Indicateurs mode Surround
3. Indicateur AUTO
4. Indicateur entrée numérique
5. Indicateur DIRECT
6. Numéro préréglé, temps Sommeil
7. Bouton de réglage de volume global
8. Touches Mode surround et déplacement vers le
Haut/Bas (u/t)
9. Touche Steréo
10. Bouton Bande
11. Touche Mémoire/Enter
12. Touche Mode
7. Indicateur Mémoire
8. Indicateur Préréglage
9. Indicateur Sommeil
10. Indicateur Syntonisé
11. Indicateur Stéréo
12. Indicateur RDS
(option régionale pour l'Europe, etc.)
8
Page 89

Touche Marche
Touches numériques (0 à 9)
Touche Sommeil
Touche Stéréo
Touche mode Numérique/Analogique
Touche Paramètres audio
Touches Mode Surround Haut/Bas (>/<)
T
ouche S
électeur
S
o
ur
ce
Touche Atténuer l'affichage
Touche Affichage
T
ouche Configuration
Touche Mode tonalité
Touche tonalités de test
Touches Volume Haut/Bas ( / )
T
ouche Niveau de canal
Touche Muet
T
ouches Préréglé Haut/Bas (+/-)Touches Rechercher Haut/Bas (+/-)
Touche Veille
Touches de déplacement ( , , , ),
Entrer</Mode Recherche, Sélectionner / >
Les fonctions entre "<" et ">" sont des options
régionales pour l'Europe, etc.
RD-5405(G) fr100413_RD-5503(g) 2010-04-20 오후 6:46 페이지 9
Télécommande
FRANÇAIS
¢
Remarque : certaines touches Sélecteur de source d'entrée (BT IN, EXT. IN, USB, VIDEO 3, AUX, F.AUX) et touches de
navigation USB((
■
◀◀, ▶,
■■
, ▶▶■, ■, Répéter/Aléatoire) ne sont pas disponibles sur cet appareil.
9
Page 90

RD-5405(G) fr100413_RD-5503(g) 2010-04-20 오후 6:46 페이지 10
PORTEE DE LA TELECOMMANDE
FRANÇAIS
• Orientez la télécommande vers le capteur à une distance d'environ
7 mètres (23 pieds) et des angles de 30 degrés.
MISE EN PLACE DES PILES
1. Retirez le couvercle. 2. Mettez en place deux piles ("AAA" size, 1,5 V) en
respectant les polarités.
• Retirez les piles si vous n'allez pas utiliser l'appareil
pendant une longue durée.
• N'utilisez pas des piles rechargeables (de type Ni-Cd ).
10
Page 91

RD-5405(G) fr100413_RD-5503(g) 2010-04-20 오후 6:46 페이지 11
Fonctionnement
¢
Remarque : Avant d'utiliser ce récepteur, il faut effectuer les procédures de configuration système pour obtenir des
ECOUTER UNE SOURCE DE PROGRAMMES
Avant l'utilisation
performances optimales. (Pour plus de détails, voir "Configuration du système" à la page 27.)
• Passez en mode Veille.
• Le témoin Veille (STANDBY) s'allume.
Cela signifie que le récepteur n'est pas
déconnecté du secteur et qu'une quantité
de courant est mise à la disposition de la
mise en marche.
• Pour éteindre, appuyez de nouveau sur la
FRANÇAIS
touche Marche (POWER).
• Le courant sera coupé et le témoin Veille
(STANDBY) s'éteint.
1. En mode veille, allumez le récepteur.
ou
• Chaque fois que la touche Marche-arrêt/Veille du
panneau frontal est appuyée, le récepteur s'allume pour
passer en mode marche ou s'éteint pour passer en mode
veille.
• Appuyez sur la touche Marche (POWER) de la
télécommande pour passer en mode marche ou appuyez
sur la touche Veille (STANDBY) pour passer en mode
veille.
• En mode veille, si le bouton Sélecteur de source d'entrée
(Sélecteur de source d'entrée/multicommande) est
tournée ou appuyée, le récepteur s'allume
automatiquement et la source souhaitée est sélectionnée.
2. Sélectionnez la source d'entrée souhaitée.
ou
ou
• Chaque fois que le bouton Sélecteur de source
d'entrée est tournée, la source d'entrée change dans
cet ordre :
→ TUNER ↔ CD ↔ TAPE ↔ VIDEO 1 ↔ VIDEO 2 ←
(Affichage des fréquences)
• Chaque fois que la touche BAND du panneau avant ou
la touche TUNER de la télécommande, est appuyée, la
bande change dans cet ordre :
" FM ST " FM MONO " AM
11
Page 92

RD-5405(G) fr100413_RD-5503(g) 2010-04-20 오후 6:46 페이지 12
La source d'entrée est VIDEO 1, VIDEO 2
3. Sélectionnez le composant d'entrée numérique
ou analogique.
• Chaque fois la touche est appuyée, l'entrée
correspondante est sélectionnée dans cet ordre :
" o(ptical) " c(oaxial) " A(nalog)
¢
Remarques :
• Lorsque TUNER, TAPE ou CD est sélectionné comme
source d’entrée, l’entrée numérique ne peut être
sélectionnée.
• Lorsque l'entrée numérique sélectionnée n'est pas
connectée, l'indicateur "DIGITAL" clignote et les entrées
analogiques sont sélectionnées automatiquement.
• L'entrée numérique ou analogique sélectionnée est
automatiquement attribuée à la source d'entrée
correspondante dans la menu Configuration de l'Entrée.
(Pour plus de détails, voir "CONFIGURATION DES
ENTREES" à la page 31.)
• Le son issu du composant connecté à l'entrée numérique
sélectionnée est entendu indépendamment de la source
d'entrée sélectionnée.
5. Régler le volume général.
ou
6. Pour couper le son.
FRANÇAIS
• "MUTE" va clignoter.
• Appuyez de nouveau pour restaurer le niveau de son
antérieur.
4. Lecture depuis le composant sélectionné.
• Pour lire de sources de programmes avec son surround,
voir "ECOUTER DES SONS SURROUND" à la page 15.
12
Page 93

RD-5405(G) fr100413_RD-5503(g) 2010-04-20 오후 6:46 페이지 13
Réglage de la tonalité (graves et aigues)
7. Passez en mode tonalité.
¢
Vous pouvez régler la tonalité lorsque TONE est
réglé sur ON (activé).
9. Utilisez les touches Haut(p)/Bas (q) pour
sélectionner la tonalité souhaitée.
FRANÇAIS
• Le mode tonalité est affiché pendant quelques secondes.
8. Utilisez les touches Gauche (t)/Droite (u) pour
sélectionner le mode tonalité souhaité.
• Chaque fois ces touches sont appuyées, le mode tonalité
change dans cet ordre :
OFF (désactivée) : Pour écouter de sources de
2
ON (activée) : Pour régler la tonalité à votre goût.
programme sans effet de tonalité.
(l'indicateur "DIRECT" s'allume.)
(l'indicateur "DIRECT" s'éteint.)
• Chaque fois ces touches sont appuyées, la tonalité
change dans cet ordre :
" BASS 1 TRBL (aigues) 1 TONE : ON !
10. Utilisez les touches Gauche (t)/Droite (u)
pour régler la tonalité souhaitée.
• Le niveau de tonalité peut être choisi dans l'intervalle
-10 à +10 dB.
• En général, nous recommandons de régler les graves
et aigues sur 0 dB (niveau plat).
• Les réglages à des niveaux de volume extrêmes
peuvent endommager vos enceintes.
• Pour compléter le réglage de tonalité, répétez les
étapes 9 et 10.
• Si l'affichage de tonalité disparaît, recommencez à
partir de l'étape 7.
13
Page 94

RD-5405(G) fr100413_RD-5503(g) 2010-04-20 오후 6:46 페이지 14
SONS SURROUND
• Ce récepteur intègre un processeur de signal numérique (Digital Signal Processor ) sophistiqué, permettant de créer
n'importe quelle son d'ambiance dans votre cinédom, avec une qualité sonore optimale.
Modes Surround
¢
DTS Digital Surround
DTS Digital Surround (aussi appelé DTS) est un format de
signal numérique multivoies qui peut traiter des hauts
débits de données. Les disques portant le logo DTS
comprennent des signaux numériques 5.1 canaux, qui sont
généralement sensés fournir une meilleure qualité de son
grâce à la faible compression audio.
Il fournit également une large gamme dynamique et une
séparation donnant lieu à un son magnifique.
Fabriqué sous licence sous les numéros de brevets
américains suivants : 5,451,942; 5,956,674; 5,974,380;
5,978,762; 6,487,535 et d'autres brevets américains et
étrangers émis et en cours. DTS et DTS Digital Surround
sont des marques déposées et les logos et les Symboles
DTS sont des marques de DTS, Inc.
© 1996-2008 DTS, Inc. Tous droits réservés
¢
Dolby Digital
Dolby Digital est un format de signal numérique multivoies
développé par Dolby Laboratories. Les disques portant le
logo Dolby Digital comprennent des signaux numériques
5.1 canaux, qui reproduisent qualité de son, expansion
spatiale et gamme dynamique de caractéristiques
meilleures que dans l'effet Dolby surround antérieur.
¢
Dolby Pro Logic II surround
Ce mode applique des signaux conventionnels 2 canaux
tels que les signaux numériques PCM, analogiques stéréo
ou Dolby Surround etc., sur un processeur surround pour
offrir beaucoup plus qu'un signal conventionnel Dolby Pro
Logic. Le Dolby Pro Logic surround comprend 2 modes :
• Les modes suivants appliquent des signaux
conventionnels 2 canaux tels que les signaux numériques
PCM ou analogiques stéréo sur un processeur Digital
Signal haute qualité pour recréer artificiellement des
champs sonores.
¢
Matrix
Ce mode reproduit un retard audio à partir des canaux
surround pour accentuez la sensation d'expansion des
sources de musique.
¢
Church (église)
Ce mode fournit l'ambiance d'une église avec une musique
baroque, un orchestre à cordes ou un choral.
¢
Theater
Ce mode donne la sensation d'être dans une salle de
cinéma regardant un film.
¢
Hall
Ce mode fournit l'ambiance d'une salle de concert avec des
sources de musique classique telle que orchestrale ou de
chambre ou solo pour instrumentiste.
¢
Stadium (stade)
Ce mode fournit l'effet d'un champ sonore étendu pour
atteindre l'ambiance d'un vrai stade lors de matchs de baseball ou de foot.
FRANÇAIS
• Dolby Pro Logic ll Movie
Lorsque vous regardez un film, ce mode permet
d'accentuer l'effet cinéma grâce au traitement
supplémentaire qui renforce les sons des effets spéciaux
des actions.
• Dolby Pro Logic ll Music
Lorsque vous écoutez de la musique, ce mode permet
d'accentuer la qualité sonore grâce au traitement
supplémentaire qui renforce les effets musicaux.
¢
Dolby Pro Logic
Ce mode étend toute lecture de source 2 canaux (y
compris les sources Dolby Surround) à 4 canaux (frontal
gauche, centre, frontal droite et surround)
Le canal surround est monaural, mais reproduit via deux
enceintes surround
Fabriqué sous licence de Dolby Laboratories.
Dolby, Pro Logic et le symbole du double D sont des
marques déposées de Dolby Laboratories
14
Page 95

RD-5405(G) fr100413_RD-5503(g) 2010-04-20 오후 6:46 페이지 15
ECOUTER DES SONS SURROUND
¢
Remarques :
• Pour obtenir des performances optimales, avant toute lecture surround, effectuez d'abord la procédure de configuration des
enceintes, etc. dans le menu Configuration. (Pour plus de détails, voir "CONFIGURATION DES ENCEINTES" à la page 32.)
• Même lorsque le mode surround auto est sélectionné et le même type de format de signal numérique est reçu, le mode
surround optimum peut varier en fonction du type d’enceinte s’il est réglé sur NO ou pas.
• Si un signal numérique PCM 96 kHz est entrée, seul le mode stéréo sera sélectionné.
é
it
a
h
u
o
s
d
n
¢
e
n
n
io
t
c
le
é
S
z le
mo
d
FRANÇAIS
e
ou
u
rro
u
s
•
c
s
n
a
d
e
g
n
a
h
c
d
n
u
o
r
r
u
s
e
d
o
m
e
l
,
e
é
y
u
p
p
a
t
s
e
v
u
o
p
s
u
o
V
:
l
e
u
n
a
m
d
n
u
rro
u
s
e
d
o
M
TO"
U
A
"
n
i
o
m
é
t
e
l
(
u
rro
u
s
e
d
o
M
t
le
(
TO"
U
"A
in
mo
é
)
.
t
n
i
e
t
é
'
s
m
m
e
:
to
u
a
d
n
)
.
me
llu
a
'
s
rro
u
s
e
d
o
s
i
d
s
e
d
o
.
e
tré
n
e
n
s
e
d
o
m
e
L
a
fo
e
q
ti
a
m
to
u
n
u
d
n
o
i
t
c
n
.
e
tré
ti
c
e
l
é
s
z
e
ffé
i
d
d
n
u
p
s
e
l
b
i
n
o
p
o
d
n
u
o
rr
u
u
é
s
t
n
e
m
e
t d
a
rm
fo
:
e
r
d
r
o
t
e
n
r u
e
n
n
o
t p
n
re
r l
u
o
m
ti
p
ti
c
e
l
g
i
s
u
s
e
l
i
rm
a
l
a
n
g
i
s
e
ra
e
s
l
a
n
e
é
n
n
o
n
e
l
a
n
,
)
<
t ,
/
>
,
u
(
s
a
B
/
t
u
Ha
d
n
u
o
r
r
u
S
e
h
c
u
o
t
a
l
e
u
q
s
i
o
f
e
u
q
a
Ch
ormat du signal en entrée Mode surround disponible
F
Sources Dolby Digital 5.1 canaux
Sources Dolby Digital 2 canaux
Sources DTS
Sources PCM (2 canaux),
Sources analogiques stéréo
• En fonctions des réglages de l’enceinte, certains modes surround peuvent être sélectionnés ou pas comme suit :
[ ] : Possible uniquement si "CENTER" ou/et "SURR (Surround)" ne sont pas réglées sur "N (Aucun)".
< > : Possible uniquement si "CENTER" et "SURR (Surround)" sont réglées sur "N (Aucun)".
[DOLBY DIGITAL, AUTO SURROUND] ou <DOLBY DIGITAL>
[DOLBY PLII MOVIE, DOLBY PLII MUSIC, DOLBY PRO LOGIC, AUTO SURROUND] ou
<DOLBY DIGITAL>
[DTS, AUTO SURROUND] ou <DTS>
[DOLBY PLII MOVIE, DOLBY PLII MUSIC, DOLBY PRO LOGIC, MATRIX, CHURCH, THEATER,
HALL, STADIUM, AUTO SURROUND] ou <STEREO>
■Pour annuler le mode surround pour une lecture stéréo
• En fonction du format du signal en entrée, l'un des modes
stéréo ou downmix 2 canaux est sélectionné.
• Pour annuler le mode stéréo ou downmix 2 canaux,
ou
sélectionnez le mode surround à l'aide de la touche
Surround Haut/Bas (u, > / t , <).
■Mode downmix 2 canaux
• Ce mode permet aux signaux multivoies encodés en format Dolby Digital ou DTS d'être démultiplexés en 2 canaux
frontaux et d'être reproduits via deux enceintes frontales seulement ou via un casque.
15
Page 96

RD-5405(G) fr100413_RD-5503(g) 2010-04-20 오후 7:02 페이지 16
Lors du réglage des paramètres audio
• Lors de lecture de signaux numérique depuis des sources de programme Dolby Digital ou DTS, ou lors d'écoute de
musique en mode Dolby Pro Logic II, vous pouvez ajuster leurs paramètres pour obtenir un effet surround optimum.
1. Appuyez sur la touche Paramètres audio
(SOUND PARAMETER).
• Alors "NIGHT : ~ " (ou "PANO : ~ ") sera affichée pendant
quelques secondes.
• Si le mode paramètres disparaît, appuyez de nouveau sur
cette touche.
2. Utilisez les touches Haut (p)/Bas (q) pour
sélectionner le paramètre souhaité.
3. Utilisez les touches de déplacement Gauche(t)/
Droite (u) pour régler le paramètre souhaité.
¢
Sélection du mode "NIGHT (mode nuit)"
Cette fonction compresse la gamme dynamique des
parties précédemment spécifiées de piste sonore Dolby
Digital ou DTS(à un volume extrêmement élevé) pour
minimiser les différences en volume entre les parties
spécifiées et non spécifiées. Ceci permet d'entendre
facilement, la nuit, toute la bande sonore d'un film à bas
volume. La plage de réglage va de 0,0 à 1,0 (par défaut
0,0)
¢
Remarque :sur certains logiciels Dolby Digital ou DTS,
¢
Sélection du mode "PANO (Panoramique)"
Ce mode transpose la stéréo frontale vers les deux
enceintes surround, vous enveloppant ainsi avec le son
des enceintes latérales pour créer une perspective sonore
extraordinaire.
Sélectionnez "OFF" ou "ON"(par défaut : OFF).
le mode nuit peut ne pas être applicable.
FRANÇAIS
• Chaque fois ces touches sont appuyées, le mode paramètre
change dans cet ordre :
" "NIGHT" 1 "PANO" 1 "C.WIDTH" 1 "DIMEN" !
(Mode Nuit)
• "NIGHT" ne peut être sélectionné en cours de lecture de
signaux numériques depuis une source Dolby Digital ou
DTS.
• "PANO", "C.WIDTH" et "DIMEN" peuvent être sélectionnés
en cours de lecture de musique en mode Dolby Pro Logic II.
(Mode Panoramique) (Contrôle de dimension)
(contrôle de la
largeur centrale)
¢
Sélection de "C. WIDTH (Center width)" (contrôle de
la largeur centrale)
Cette commande permet de régler l’image sonore centrale
de sorte qu’elle ne peut être écoutée que sur l’enceinte
centrale, sur les enceintes gauche/droite comme image
virtuelle ou sur les trois enceintes avant à différents degrés.
La plage de réglage va de 0 à 7 (par défaut : 3).
¢
Sélection de "DIMEN (Dimension)" (contrôle de
dimension)
Cette commande permet de régler le champ sonore vers
l’avant ou vers l’arrière. La plage de réglage va de -3 à +3
(par défaut : 0).
4. Répétez les étapes 2 et 3 ci-dessus pour régler
d'autres paramètres.
16
Page 97

RD-5405(G) fr100413_RD-5503(g) 2010-04-20 오후 6:46 페이지 17
Réglage du niveau de chaque canal à l'aide de TEST TONE (tonalités de test)
• Le niveau de volume de chaque canal peut être réglé à l'aide de la fonction TEST TONE (tonalités de test).
1. Passez en mode tonalités de test. 2. Réglez le niveau de volume de chaque canal
FRANÇAIS
• Le mode tonalités de test s'affiche et un son sera émis
pendant 2 secondes par chaque canal de chaque enceinte
dans l'ordre suivant :
" FL " C " FR " SR " SL " SW
Avant droite
Centre
Avant
gauche
Surround
droite
Surround
gauche
Subwoofer (Enceinte
d'extrêmes graves)
comme vous le souhaitez de manière que toutes
les enceintes seront entendues comme ayant le
même niveau.
• Vous pouvez sélectionner le canal souhaité à l'aide des
touches de déplacement Haut (p)/Bas (q).
3. Annulez la fonction tonalités de test.
• Si le paramètre d'une enceinte est "N (Aucun ou Non)", le
tonalités de test du canal correspondant ne se fait pas.
17
Page 98

RD-5405(G) fr100413_RD-5503(g) 2010-04-20 오후 6:46 페이지 18
Régler le niveau du canal courant
• Après avoir réglé le niveau de chaque canal à l'aide des tonalités de test, réglez les niveaux en fonction des sources des
programmes ou selon vos goûts.
• Vous pouvez régler le niveau du canal courant comme vous le souhaitez. Les niveaux réglés sont simplement mémorisés
dans la mémoire utilisateur ("CAL"), et non dans la mémoire de préréglages ("REF 1", "REF 2").
1. Appuyez sur la touche Niveau de canal (CH.
LEVEL).
• Alors le mode mémoire ("CAL", etc.) sera affichée pendant
quelques secondes.
• Lorsque le mode mémoire ou niveau de canal disparaît,
appuyez de nouveau sur cette touche.
2. Sélectionnez le canal souhaité.
3. Réglez le niveau du canal sélectionné comme
vous le souhaitez.
FRANÇAIS
• La plage de réglage du niveau LFE (Effets basse
fréquence) va de -10 à 0 dB et les niveaux des autres
canaux va de -15 à +15 dB.
• En général, nous recommandons de régler le niveau
LFE sur 0 dB. (Bien que, le niveau LFE recommandé sur
quelques logiciels DTS plus récents est de -10 dB.)
Diminuez les valeurs si les niveaux recommandés
semblent trop élevés.
4. Répétez les étapes 2 et 3 ci-dessus pour régler
chaque niveau de canal.
• Chaque fois ces touches sont appuyées, le canal
correspondant change dans cet ordre :
" REF 1, 2 (ou CAL) 1 FL 1 C 1 FR !
" < DD ou DTS> 1 SW 1 SL 1 SR !
Niveau LFE
< >: Seulement lorsque des signaux de sources de programmes
Dolby Digital ou DTS qui incluent un signal LFE (Effets
basse fréquence) sont entrées, que le niveau LFE est
affiché.
• En fonction des paramètres des enceintes "N (Aucun ou Non)" et
du mode surround, etc., certains canaux ne peuvent pas être
sélectionnés.
18
Page 99

RD-5405(G) fr100413_RD-5503(g) 2010-04-20 오후 6:46 페이지 19
Mémorisation des niveaux de canaux réglés
• Vous pouvez mémoriser les niveaux de canaux réglés
dans la mémoire de préréglages ("REF 1", "REF 2") et
les rappeler quand vous voulez.
1. Après avoir effectué les étapes 1 à 4 dans la
procédure "Régler le niveau de canal courant" à
la page 18, appuyez sur la touche ENTER.
FRANÇAIS
• Alors le "1" de l'indication "REF 1" se met à clignoter
pendant quelques secondes.
2. Sélectionnez REF 1 ou REF 2.
Rappeler les niveaux de canaux mémorisés
1. Appuyez sur la touche Niveau de canal (CH.
LEVEL).
• "CAL " (ou "REF 1", etc.) sera affichée pendant
quelques secondes.
• Si le mode Niveau de canal disparaît, appuyez de
nouveau sur cette touche.
2. Sélectionnez REF 1 ou REF 2.
• Si la mémoire préréglée disparaît, refaites l'étape 1 cidessus.
3. Confirmez votre sélection.
• Les niveaux de canaux réglés sont à présent mémorisés
dans la mémoire sélectionnée.
• Les niveaux de canaux mémorisés dans la mémoire de
préréglages sélectionnée sont rappelés.
19
Page 100

RD-5405(G) fr100413_RD-5503(g) 2010-04-20 오후 6:46 페이지 20
ECOUTER DES EMISSIONS RADIO
Recherche automatique
1. Sélectionnez la bande souhaitée.
ou
• Chaque fois cette touche est appuyée, la bande
change dans cet ordre :
" FM ST " FM MONO " AM
("ST" s'allume) ("ST" s'éteint)
• Si les émissions FM stéréo sont mauvaises à cause
des faibles signaux de transmission, sélectionnez le
mode FM mono pour réduire le bruit, dans ce cas les
émissions FM seront écoutés en monaural.
Recherche manuelle
• La recherche manuelle est pratique lorsque vous
connaissez déjà la fréquence de station.
• Après la sélection de la bande souhaitée, appuyez
plusieurs fois sur les touches TUNING Haut (+) / Bas (-)
jusqu'à ce que la fréquence souhaitée soit atteinte.
FRANÇAIS
Balayage automatique des stations préréglées
• La fonction balayage automatique des stations
préréglées cherche automatiquement les stations FM
seulement et les mémorise.
• Pendant l'écoute d'émission radio FM, maintenez
enfoncée la touche (MEMORY/) ENTER pendant plus
de 2 secondes.
2. Appuyez sur les touches TUNING Haut (+)/Bas
(-) pendant plus de 0,5 seconde.
• Le syntoniseur se met à la recherche et s'arrête dès
qu'il trouve une station de signal suffisamment
puissant. La fréquence trouvée ainsi que l'indication
"TUNED" seront affichées.
• Si la station trouvée n'est pas celle que vous souhaitez,
il suffit simplement de répéter cette opération.
• Les stations de faibles signaux sont ignorées durant la
recherche automatique.
ou
• L'indication "AUTO MEM" se met à clignoter et le
récepteur démarre le préréglage.
• On peut mémoriser jusqu'à 30 stations FM.
¢ Remarques :
• Les stations FM à faible signal ne peuvent pas être
mémorisées.
• Pour mémoriser les stations AM ou des stations faibles,
effectuez la procédure "Préréglage Manuel" à l'aide de
"Recherche manuelle".
20
 Loading...