

Sharp XE-A407, XE-A43S Owner's Manual
XE-A407
XE-A43S
Customer Support Tool
User’s Manual
Thank you for downloading this PDF file.
Before reading this file, please read Instruction Manual of XE-A407 and XE-A43S.
Save or print this file so that you can read when necessary.

Table of Contents
Introduction...............................................................................................................................................................1
What is the Customer Support Tool? ......................................................................................................................1
Note on using Customer Support Tool ....................................................................................................................1
Trademarks .............................................................................................................................................................1
About this manual ...................................................................................................................................................2
System requirements ..............................................................................................................................................2
System Configuration..............................................................................................................................................3
To start Customer Support Tool..............................................................................................................................4
How to install the Customer Support Tool...............................................................................................................4
● To start Customer Support Tool......................................................................................................................4
To Start and Exit the Customer Support Tool ..........................................................................................................4
● To start the Customer Support Tool................................................................................................................4
● To exit the Customer Support Tool.................................................................................................................4
Using SD Memory Card............................................................................................................................................5
Before Using SD Memory Card...............................................................................................................................5
● An SD memory card you can use ..................................................................................................................5
● Inserting and Removing an SD Memory Card...............................................................................................6
● Formatting an SD Memory Card....................................................................................................................6
Reading Data from SD Memory Card .....................................................................................................................7
Writing Data to SD Memory Card............................................................................................................................8
Main Window of the Customer Support Tool.......................................................................................................10
Appearance and details of the main window ........................................................................................................10
To open data..........................................................................................................................................................11
Settings of a data folder ........................................................................................................................................12
To Edit and Import/Export Data .............................................................................................................................13
DEPT (Department Screen) ..................................................................................................................................13
● Appearance and details of the department Screen......................................................................................13
● To create a new department data.................................................................................................................15
● To delete department data ...........................................................................................................................16
PLU/UPC (Price Look-Up or Universal Product Code).........................................................................................17
● Appearance and details of the PLU/UPC screen.........................................................................................17
● To create PLU/UPC data..............................................................................................................................18
● To delete PLU/UPC data ..............................................................................................................................19
CLERK ..................................................................................................................................................................20
● Appearance and details of the clerk screen.................................................................................................20
● To create clerk data......................................................................................................................................21
● To delete clerk data ......................................................................................................................................22

LOGO TEXT..........................................................................................................................................................23
● Appearance and details of the logo text window..........................................................................................23
LOGO ....................................................................................................................................................................24
● Appearance and details of the logo screen..................................................................................................24
TAX........................................................................................................................................................................26
● Appearance and details of the tax screen....................................................................................................26
● To set taxes with the tax table ......................................................................................................................28
QuickBooks® ........................................................................................................................................................29
● Appearance and details of the QuickBooks® screen ..................................................................................29
● To send sales data from an SD memory card to QuickBooks® Pro .............................................................30
Sample Operations .................................................................................................................................................32
Exchanging and Editing Data................................................................................................................................32
Creating Logo Data ...............................................................................................................................................35
Before Calling for Service......................................................................................................................................39
Trouble Shooting...................................................................................................................................................39
Error Message List ................................................................................................................................................40

Introduction
With the Customer Support Tool on your personal computer, you can easily make the best use of functions of the
electronic cash register by exchanging data between the cash register and your computer. This manual fully
explains functions and operations of the Customer Support Tool.
What is the Customer Support Tool?
The Customer Support Tool is software to read various setting data from the cash register via an SD memory card
and change it on your computer. You can use the following functions of this tool.
• Setting data
You can edit and save various settings such as department, PLU or clerk data on your computer.
• SD memory card
You can exchange settings with the cash register via an SD memory card.
• Logo data
You can set logo data to print on the receipt to the cash register via an SD memory card.
• Connection with QuickBooks
You can import sales data from the cash register and export it via SD memory card to QuickBooks
®
Pro
®
Pro on your
computer.
Note on using Customer Support Tool
• Sharp Corporation bears no responsibility for errors made during use by the customer or a third party, nor for any
other malfunctions or damage to this product arising during use, except where indemnity liability is required by
law.
• Your right to copy this manual and the Customer Support Tool is limited by copyright law. Unauthorized copies,
adaptations or compilations of this manual or program may be liable for copyright infringement.
• The Customer Support Tool and this manual may be changed without notice.
Trademarks
• Microsoft, Windows and Windows Vista are trademarks or registered trademarks of Microsoft Corporations in the
USA and other countries.
• QuickBooks
and Other countries.
• All other brand and product names are trademarks or registered trademarks of their respective holders.
®
and QuickBooks Pro® are registered trademarks and service mark of Intuit Inc. in the United States
1

About this manual
Notice
Indicates what you have to be careful about or limitations.
Note
Indicates important information that helps you make better use of your device.
• Menus, commands, buttons or tabs displayed on the screen are in brackets, [ ].
• Names of functions, checkboxes, radio buttons displayed on the screen are in double quotations, “ ”.
• Software names and manual names are written in italics.
• What you see on the screen may be different if you are using an operating system other than Windows 7 or if you
have customized the screen settings.
• This manual does not explain basic operation of Microsoft Windows.
System requirements
To use Customer Support Tool you need the environment below.
• Operating system
Windows XP SP3 (32-bit edition)
Windows Vista SP2 (32-bit edition / 64-bit edition)
Windows 7 (32-bit edition / 64-bit edition)
• Hardware requirements
• SD memory card interface
• Display resolution: 800 x 600 (SVGA) or higher
• Color: 16-bit High Color or higher
• Runtime environment
.NET Framework 3.5 or higher
If .NET Framework is not installed on your computer, you will need to install it from the Microsoft website.
• QuickBooks
Customer Support Tool can export the sales data of a cash register to QuickBooks
®
®
Pro, the following versions
have been tested by Sharp Corporation
QuickBooks
®
Pro 2010 and QuickBooks® Pro 2011
2
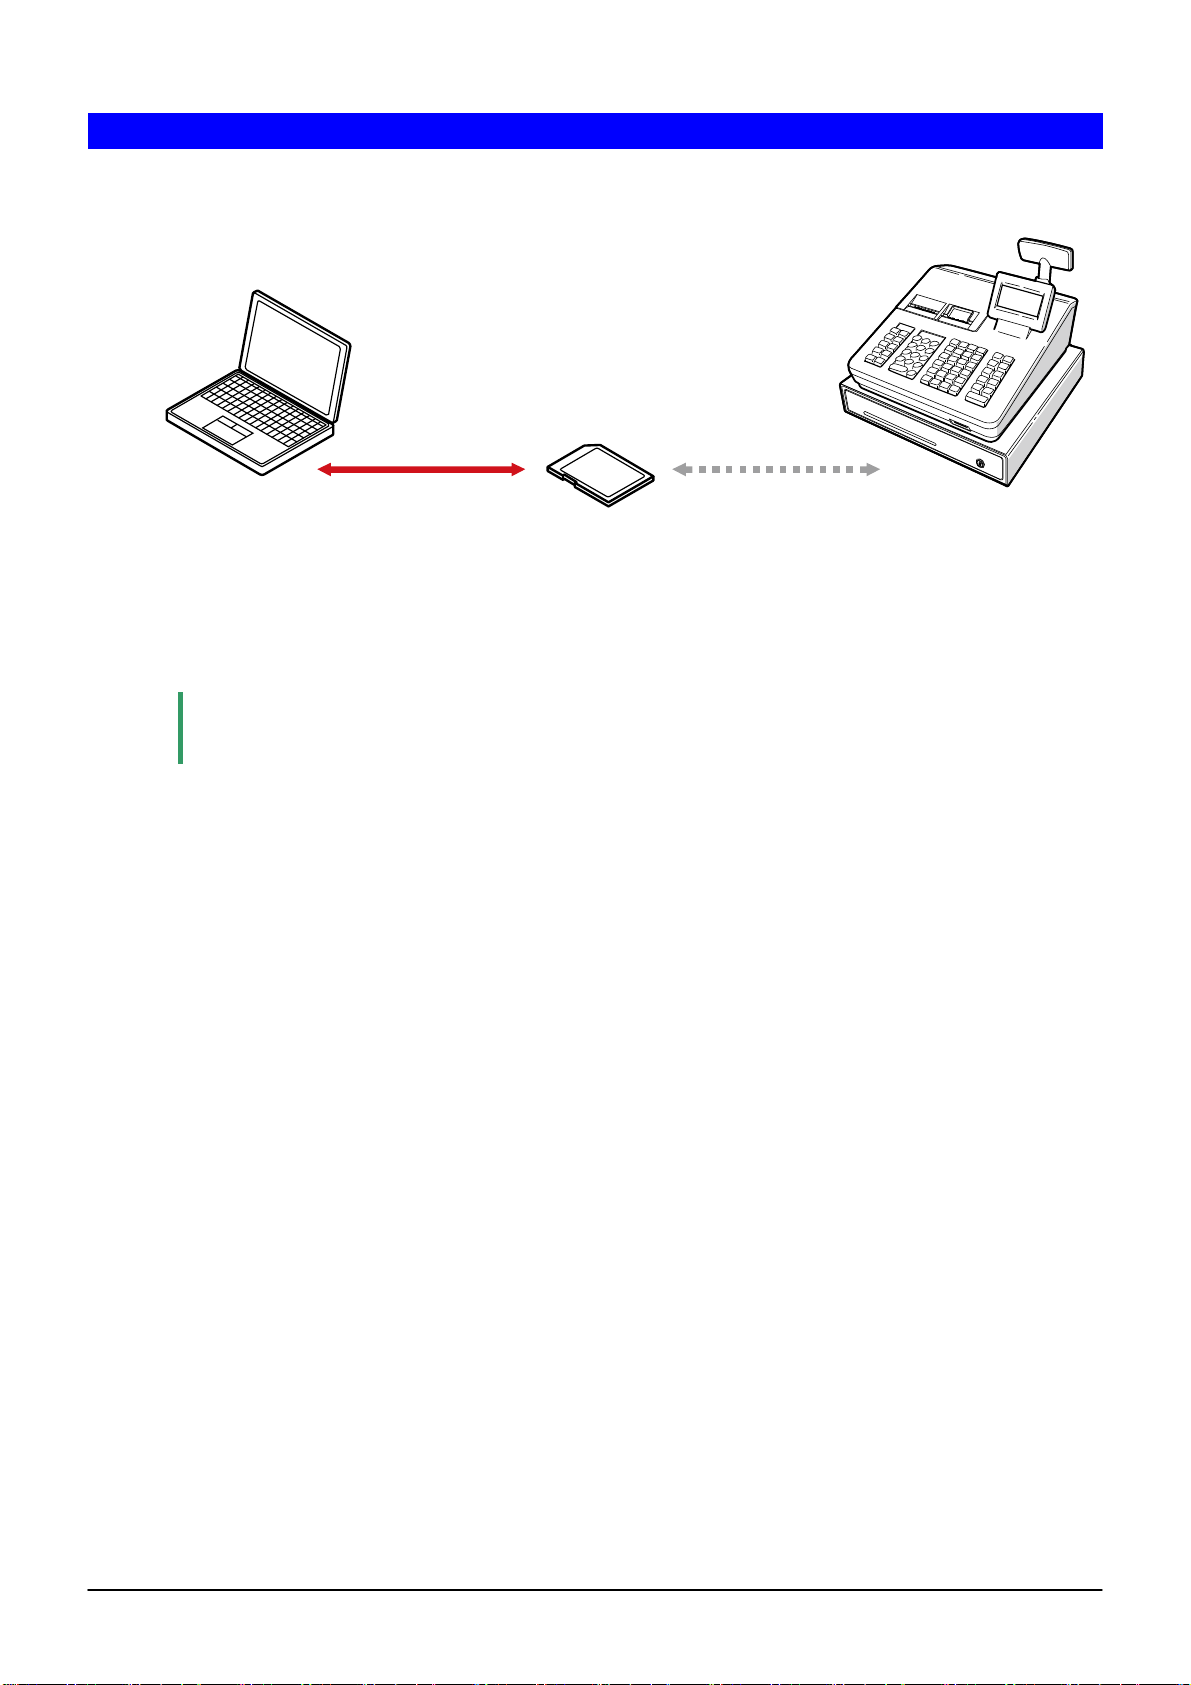
System Configuration
The Customer Support Tool operates under the following system configuration. You can exchange data between
the cash register and your computer via a commercial SD memory card.
Computer
(Customer Support Tool )
• To use an SD memory card with the cash register, refer to “SD CARD Mode” on page 99 in the Instruction
Manual of XE-A407 and XE-A43S and “Using SD Memory Card” on page 5 in this manual.
Note
You can use either an SD memory card or an SDHC memory card with the cash register. In this
manual, we call both of them “SD memory card.”
SD memory card
Cash register
3
To start Customer Support Tool
How to install the Customer Support Tool
● To start Customer Support Tool
1. Download the Customer Support Tool from the website www.sharpusa.com/registersoftware.
2. Unzip (extract / decompress) the contents of the .ZIP file to a directory where you will use the program.
Note
・ The Customer Support Tool software is provided in a .ZIP format and you may need a separate
program to extract (unzip) the file.
To Start and Exit the Customer Support Tool
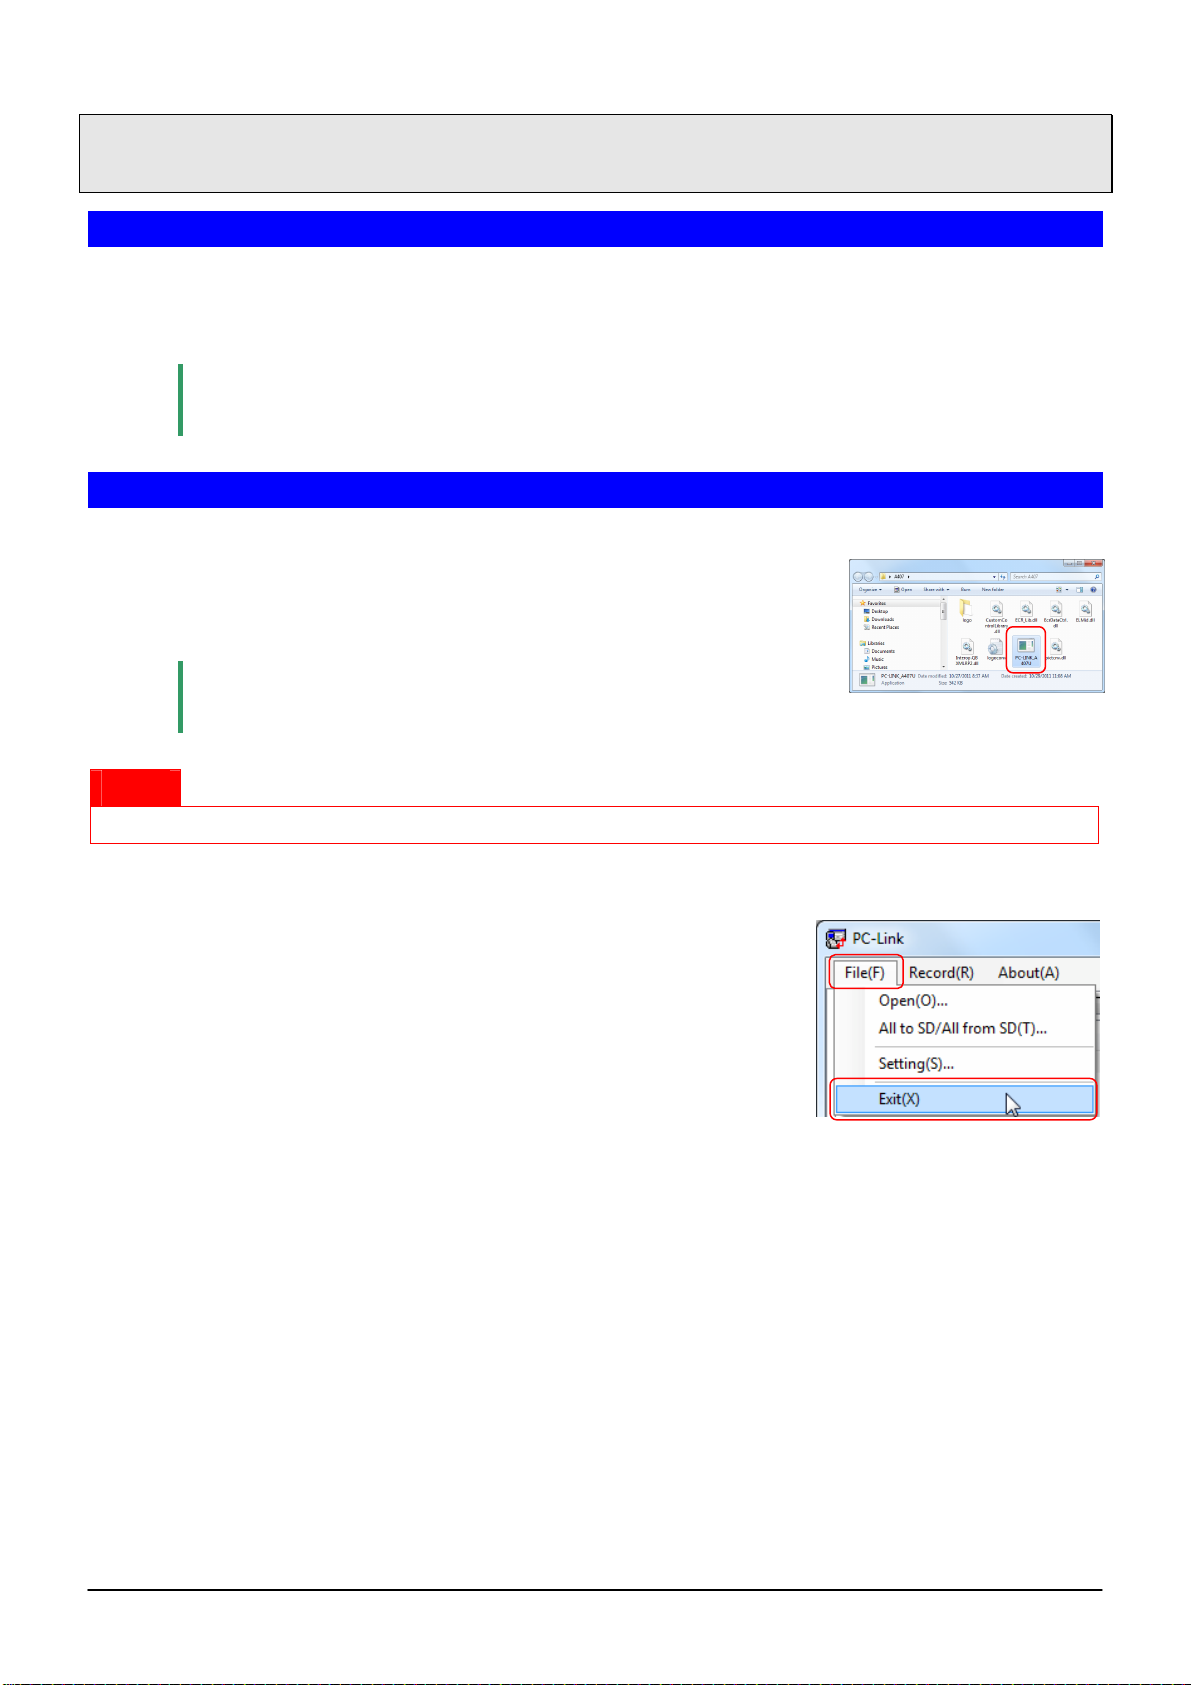
● To start the Customer Support Tool
1. Double-click “PC-LINK_A407U(.exe)” in the A407 folder, which has been
created after unzip (extract / decompression).
The main window of the Customer Support Tool appears.
Note
Notice
You cannot start the Customer Support Tool if it is already running.
● To exit the Customer Support Tool
1. Click [File], and then [Exit].
・ The [DEPT] tab is selected immediately after starting Customer
Support Tool.
1
Data you have edited is saved in the data folder, and the main window is
closed.
You can also finish by clicking [X] at the upper right corner of the main
window.
1
4
Using SD Memory Card
You can use either an SD memory card or an SDHC memory card with the cash register. In this manual, we call
both of them “SD memory card.”
Before Using SD Memory Card
● An SD memory card you can use
To use an SD memory card, your computer has to have an SD memory card slot or a card reader supporting an SD
memory card.
• Use a commercial SD memory card up to 32GB.
• Format an SD memory card on your caash register before using it.
• You cannot use a mini or micro SD memory card.
Notice
• For handling an SD memory card, refer to the manual attached to the SD memory card.
• What you have saved on an SD memory card may be erased or destroyed in an accident or
malfunction. Sharp Corporation does not take responsibility for damage to data on the SD card for any
reason.
• Do not touch or remove an SD memory card while your computer or cash register is accessing the
card. It may cause damage of data.
5
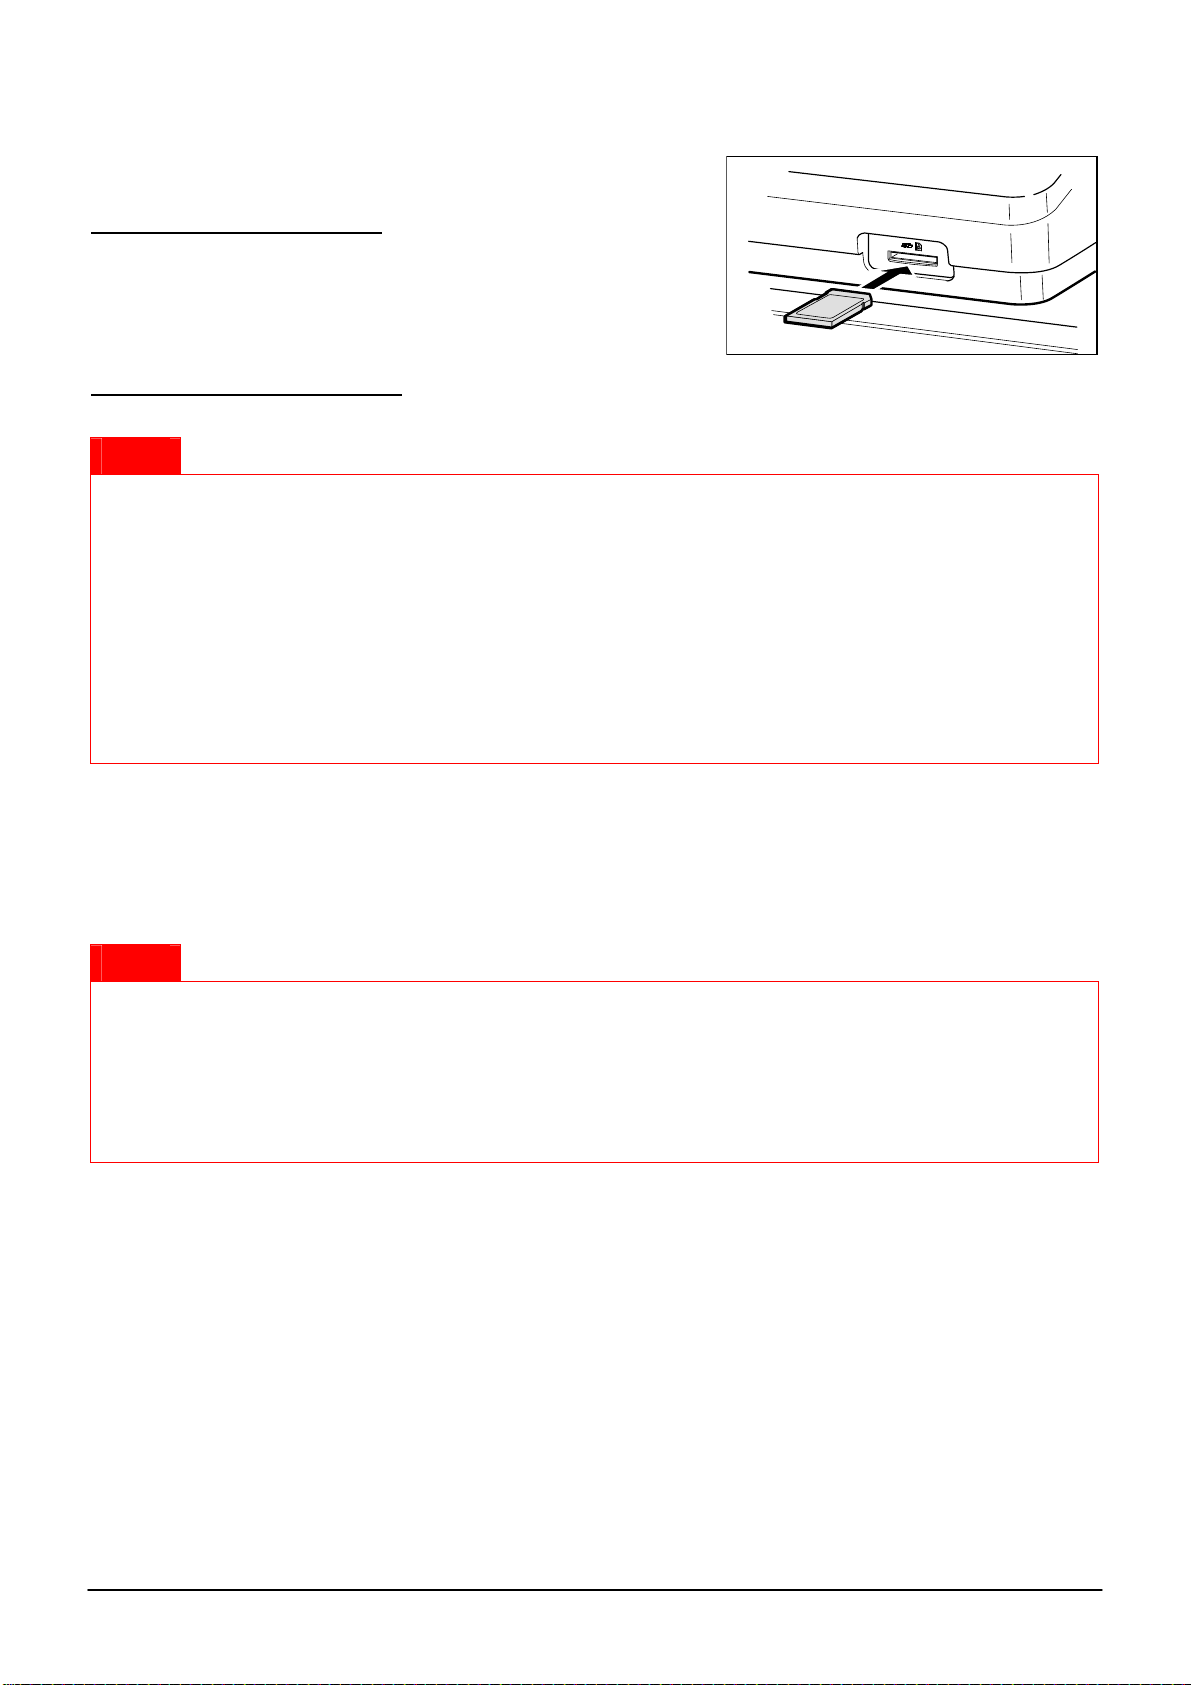
● Inserting and Removing an SD Memory Card
The SD card slot is located on the front side of your register.
Inserting an SD memory card
Insert an SD memory card into the SD card slot with the printed SD
logo facing upwards. Push the card in steady with a finger until it
clicks and release it slowly.
Removing the SD memory card
Push the card in gently with a finger and release it. The card will come out.
Notice
• This model supports SD cards only. Use of any other types of SD cards such as mini SD, micro SD, etc.
with an adapter is not supported.
• When inserting or removing the SD memory card, be sure to release it slowly. Otherwise, the card may
pop out and injure your finger.
• Never touch or remove the SD memory card while it is accessed, otherwise the data stored in it may be
damaged.
• Formatting the SD memory card erases all the data in it.
CAUTION: Never turn the power off, while the SD memory card is accessed.
● Formatting an SD Memory Card
When you use an SD memory card with the cash register for the first time, be sure to format it on your cash register
before writing programming data to it. Also refer to “SD CARD Mode” on page 98 in the Instruction Manual of
XE-A407 and XE-A43S.
Notice
• Once you format an SD memory card, you do not have to repeat formatting.
• Never format any SD memory card that contains data, otherwise all of the data stored on the card will
be erased
• If you use a formatted SD memory card with another cash register, you do not have to repeat
formatting.
1. Insert an SD memory card into the SD card slot of the cash register.
2. Select the “7 SD CARD mode” in the mode selection window.
3. Select “4 FORMATTING” in the SD CARD mode, the confirmation window is displayed.
4. To perform the format operation, select OK and press the [CA/AT/NS] key.
To cancel the operation, select CANCEL and press the [CA/AT/NS] key.
6
7
Reading Data from SD Memory Card
This section explains the procedure for reading data from an SD memory card into your computer.
Note
For details of writing data to an SD memory card with the cash register, refer to “Data saving” on
page 99 in the Instruction Manual of XE-A407 and XE-A43S.
Notice
Appearance of the screen is different depending on data to be read. For details, refer to the section of
each data.
1. Prepare an SD memory card on which data imported from the cash register is written.
2. Insert the SD memory card into an SD memory card slot of your computer or a card reader connected to your
computer.
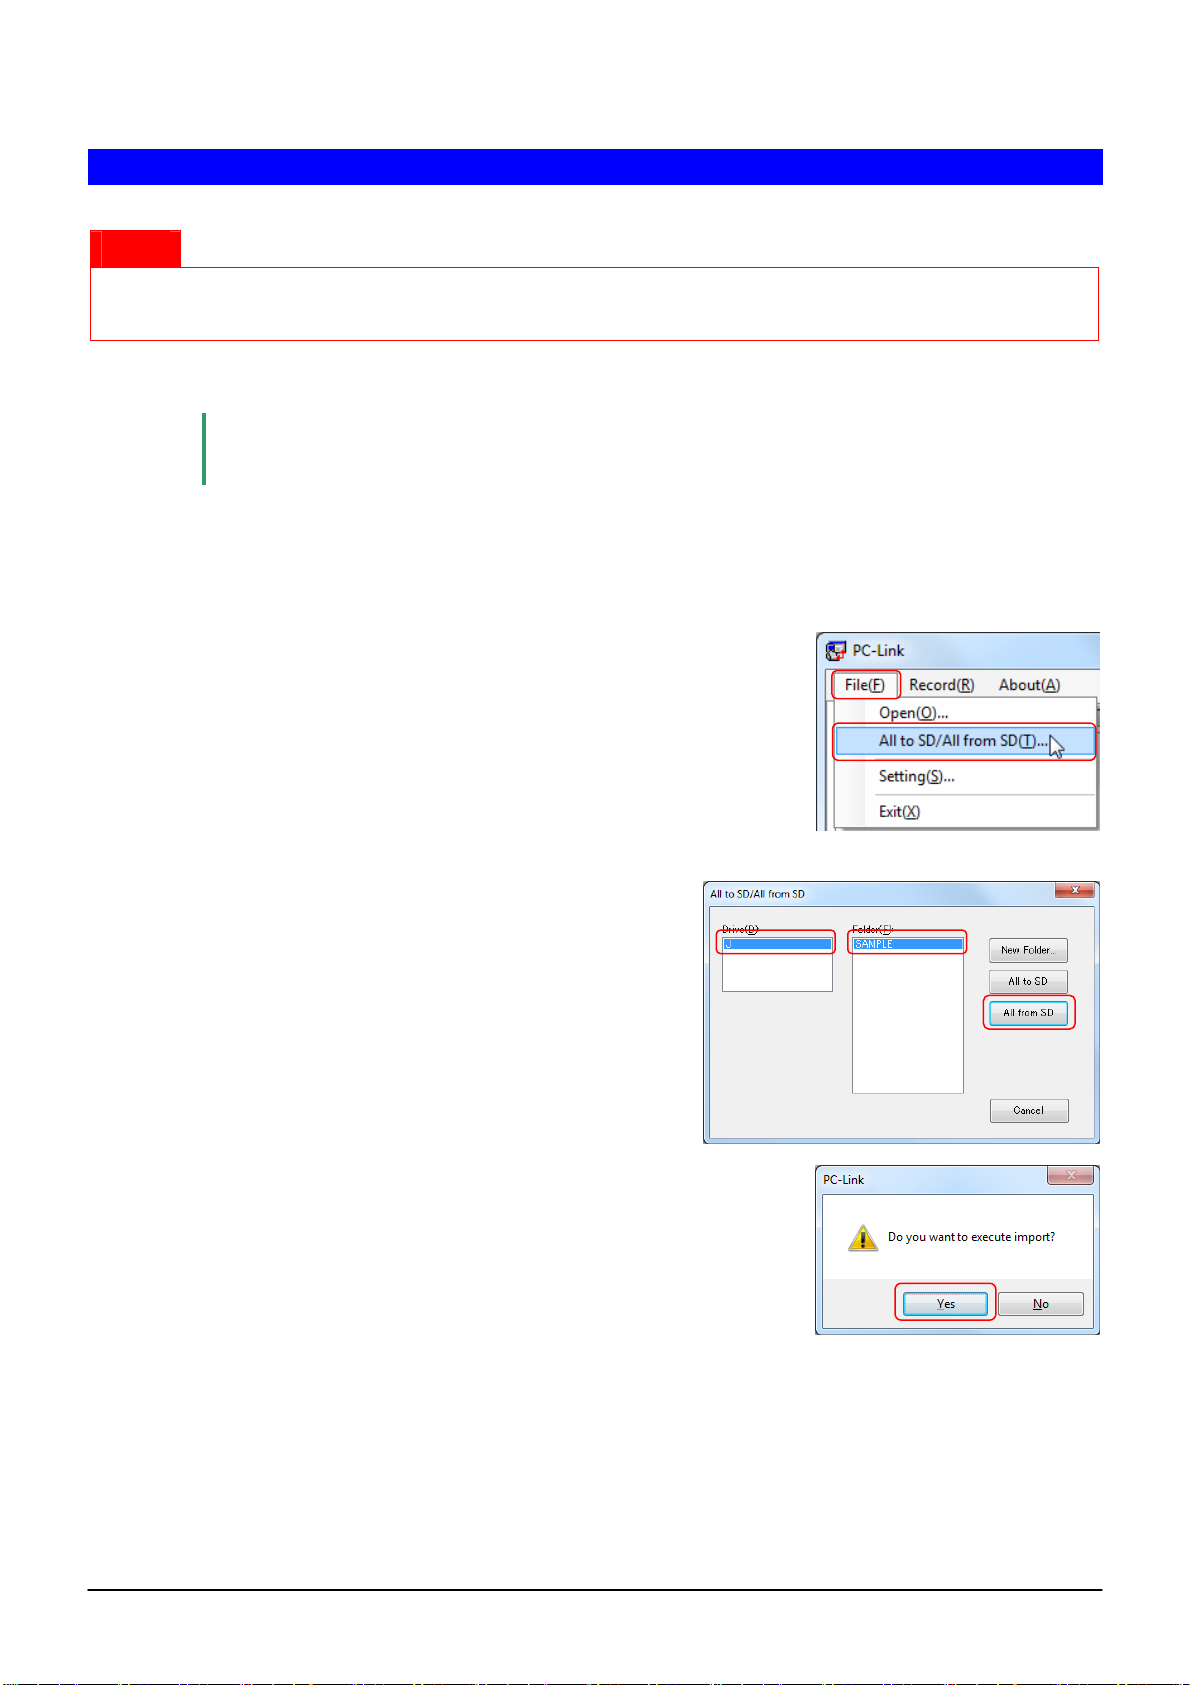
3. Click [File], and then [All to SD/All from SD].
3
The All to SD/All from SD dialog appears.
4. Select a drive.
5. Select a folder.
6. Click [All from SD].
The confirmation dialog appears.
7. Click [Yes].
Data on an SD memory card is read into your computer.
4
5
6
7
Writing Data to SD Memory Card
This section explains the procedure for writing data to an SD memory card from your computer.
Notice
Appearance of the screen is different depending on data to be written. For details, refer to the section of
each data.
1. Insert an SD memory card into an SD memory card slot of your computer or a card reader connected to your
computer.
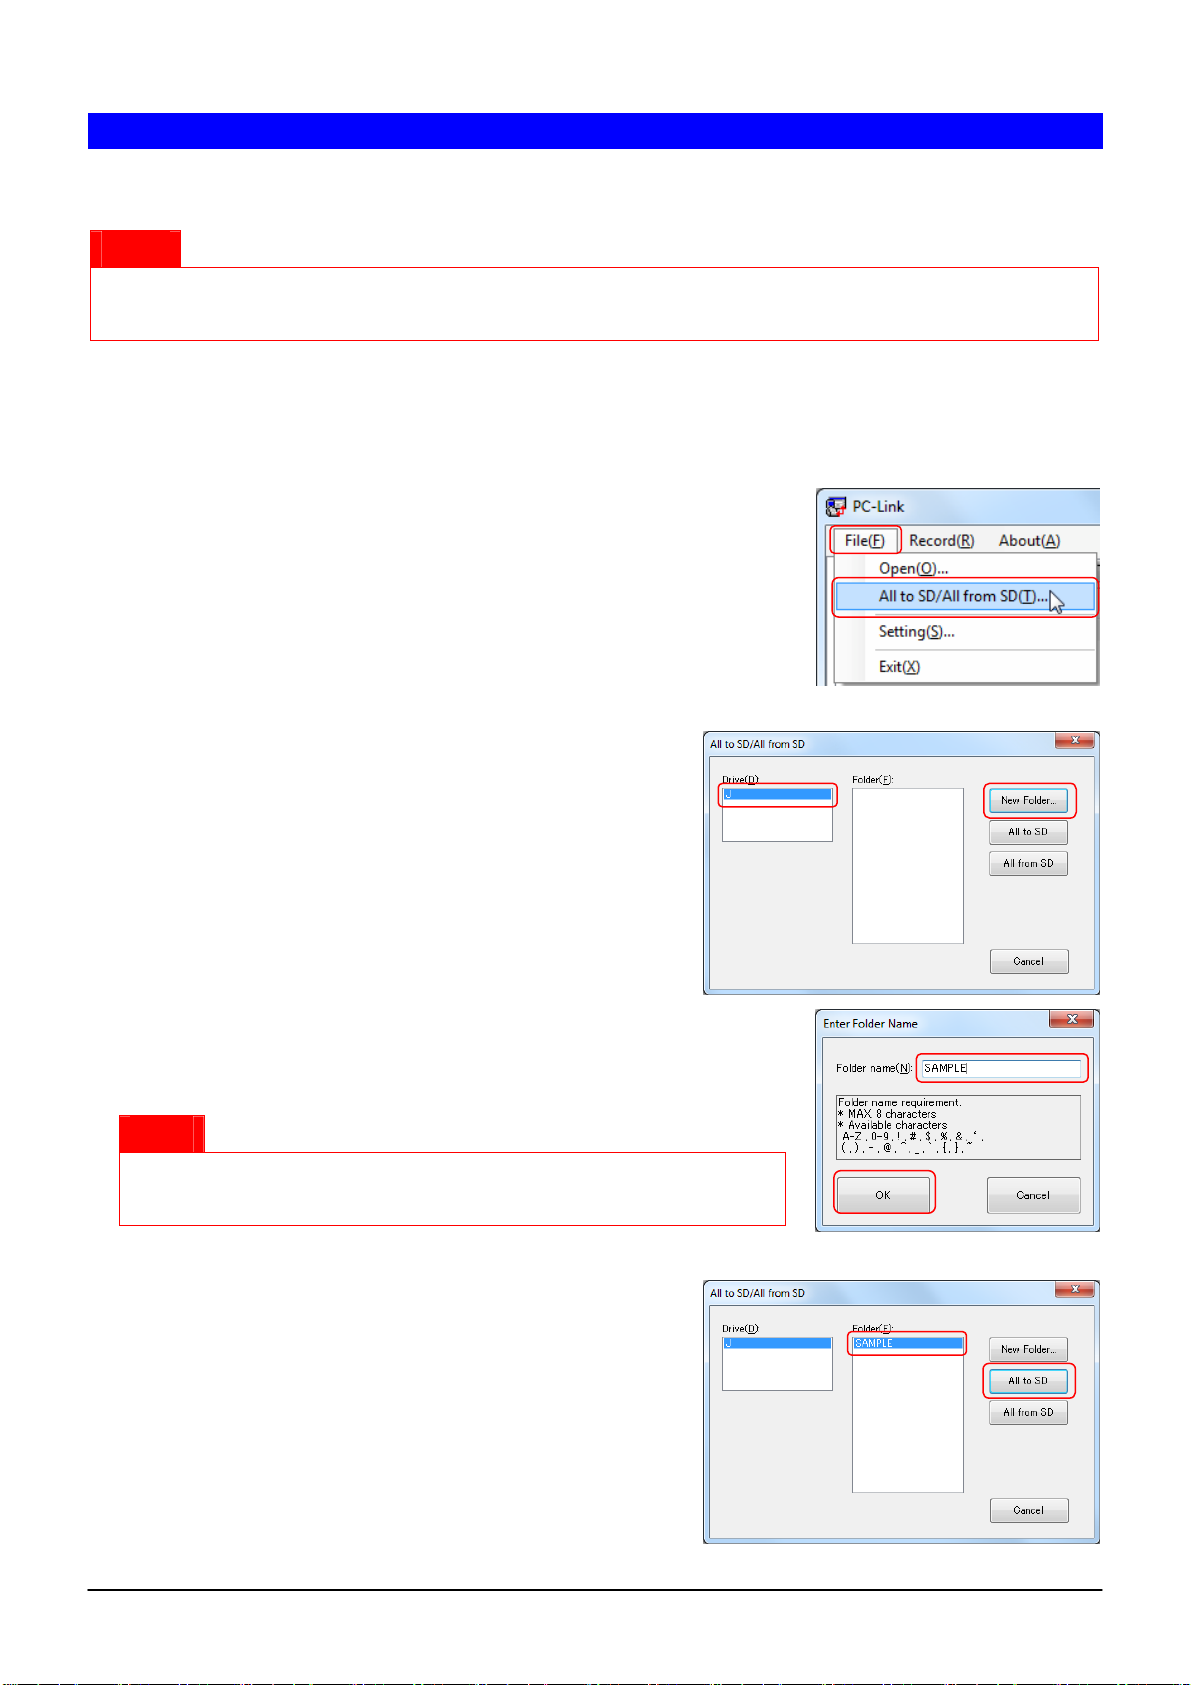
2. Click [File], and then [All to SD/All from SD].
The All to SD/All from SD dialog appears.
3. Select a drive.
4. When you use a newly formatted SD memory card or when you
2
3
4
want to write data into a new folder, click [New Folder]. When
you do not create a new folder, skip to Step 7.
The new folder creation dialog appears.
5. Type a folder name in the textbox.
6. Click [OK].
Notice
Read requirements of a folder name on the screen, and type a name
satisfying the requirements.
7. Select a folder.
8. Click [All to SD].
5
6
7
8
8
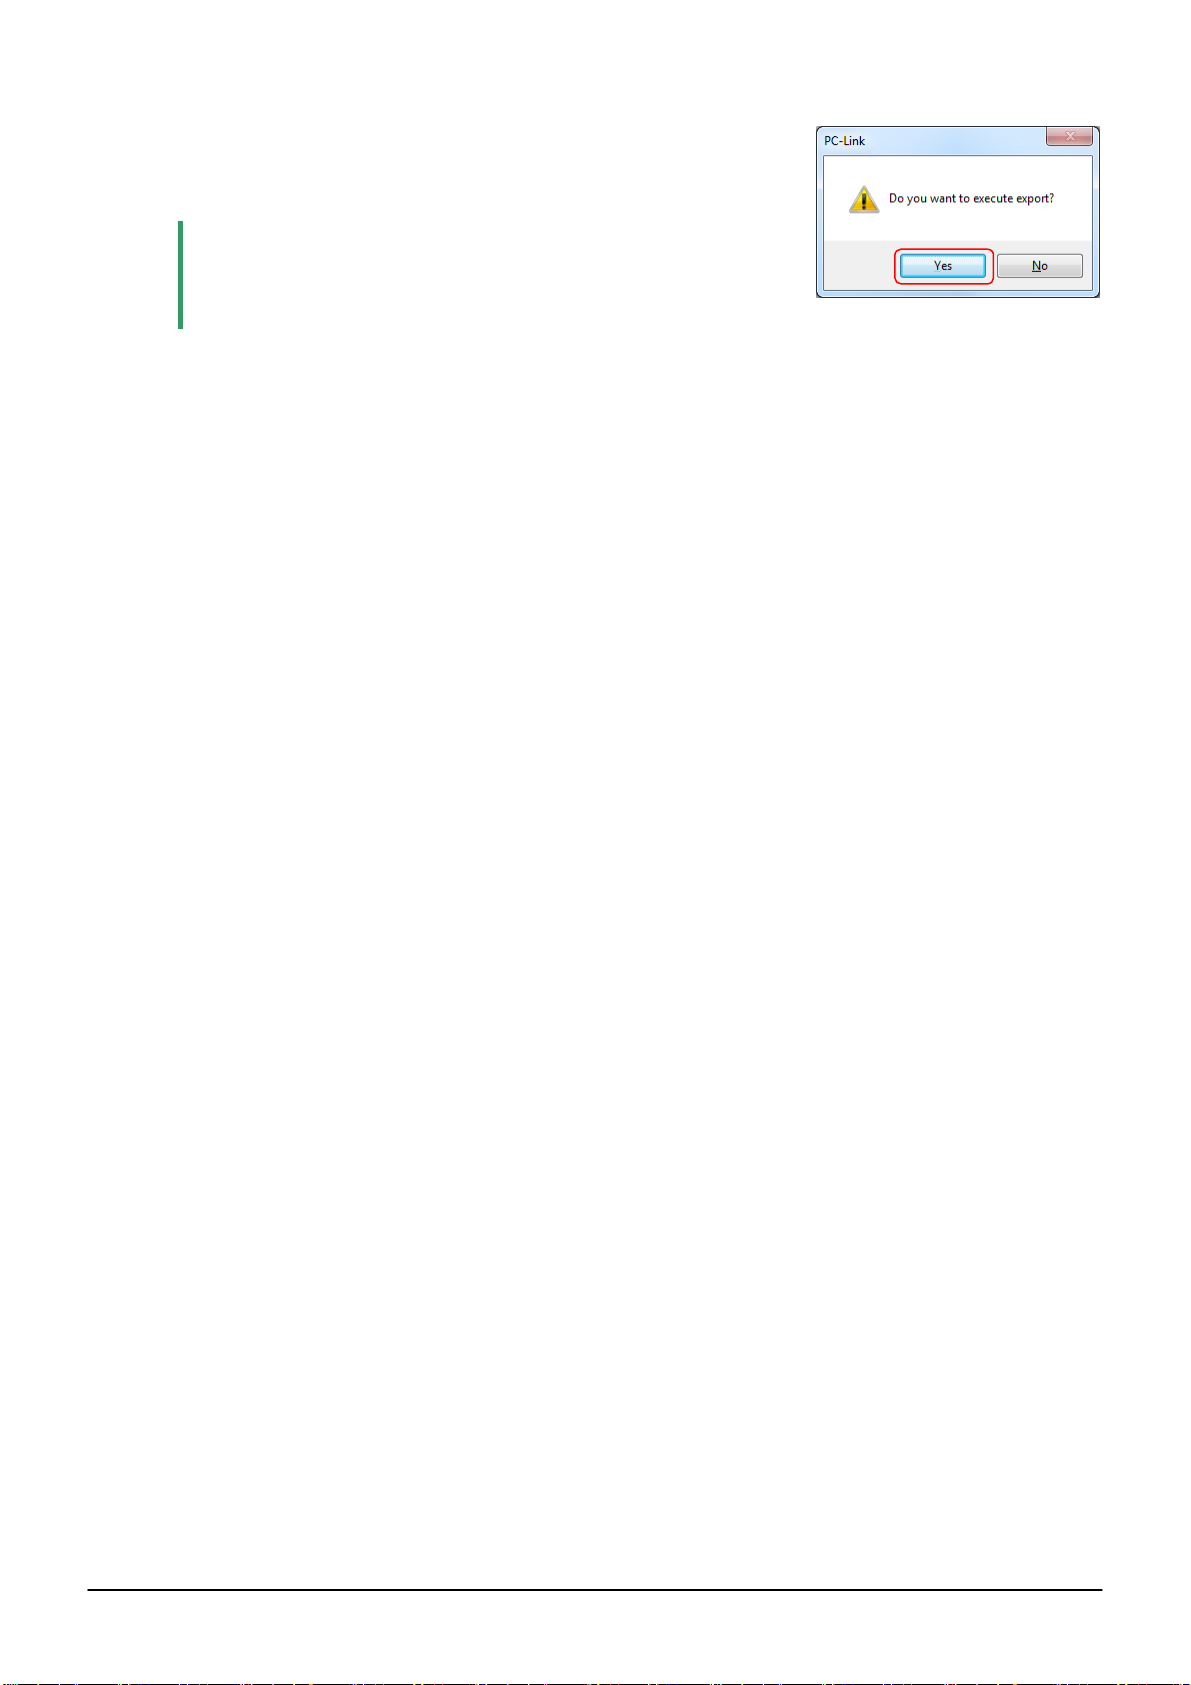
The confirmation dialog appears.
9. Click [Yes].
Data in your computer is written into an SD memory card.
Note
For details of reading data from an SD memory card into the cash
register, refer to “Data loading” on page 100 in the Instruction
Manual of XE-A407 and XE-A43S.
9
9
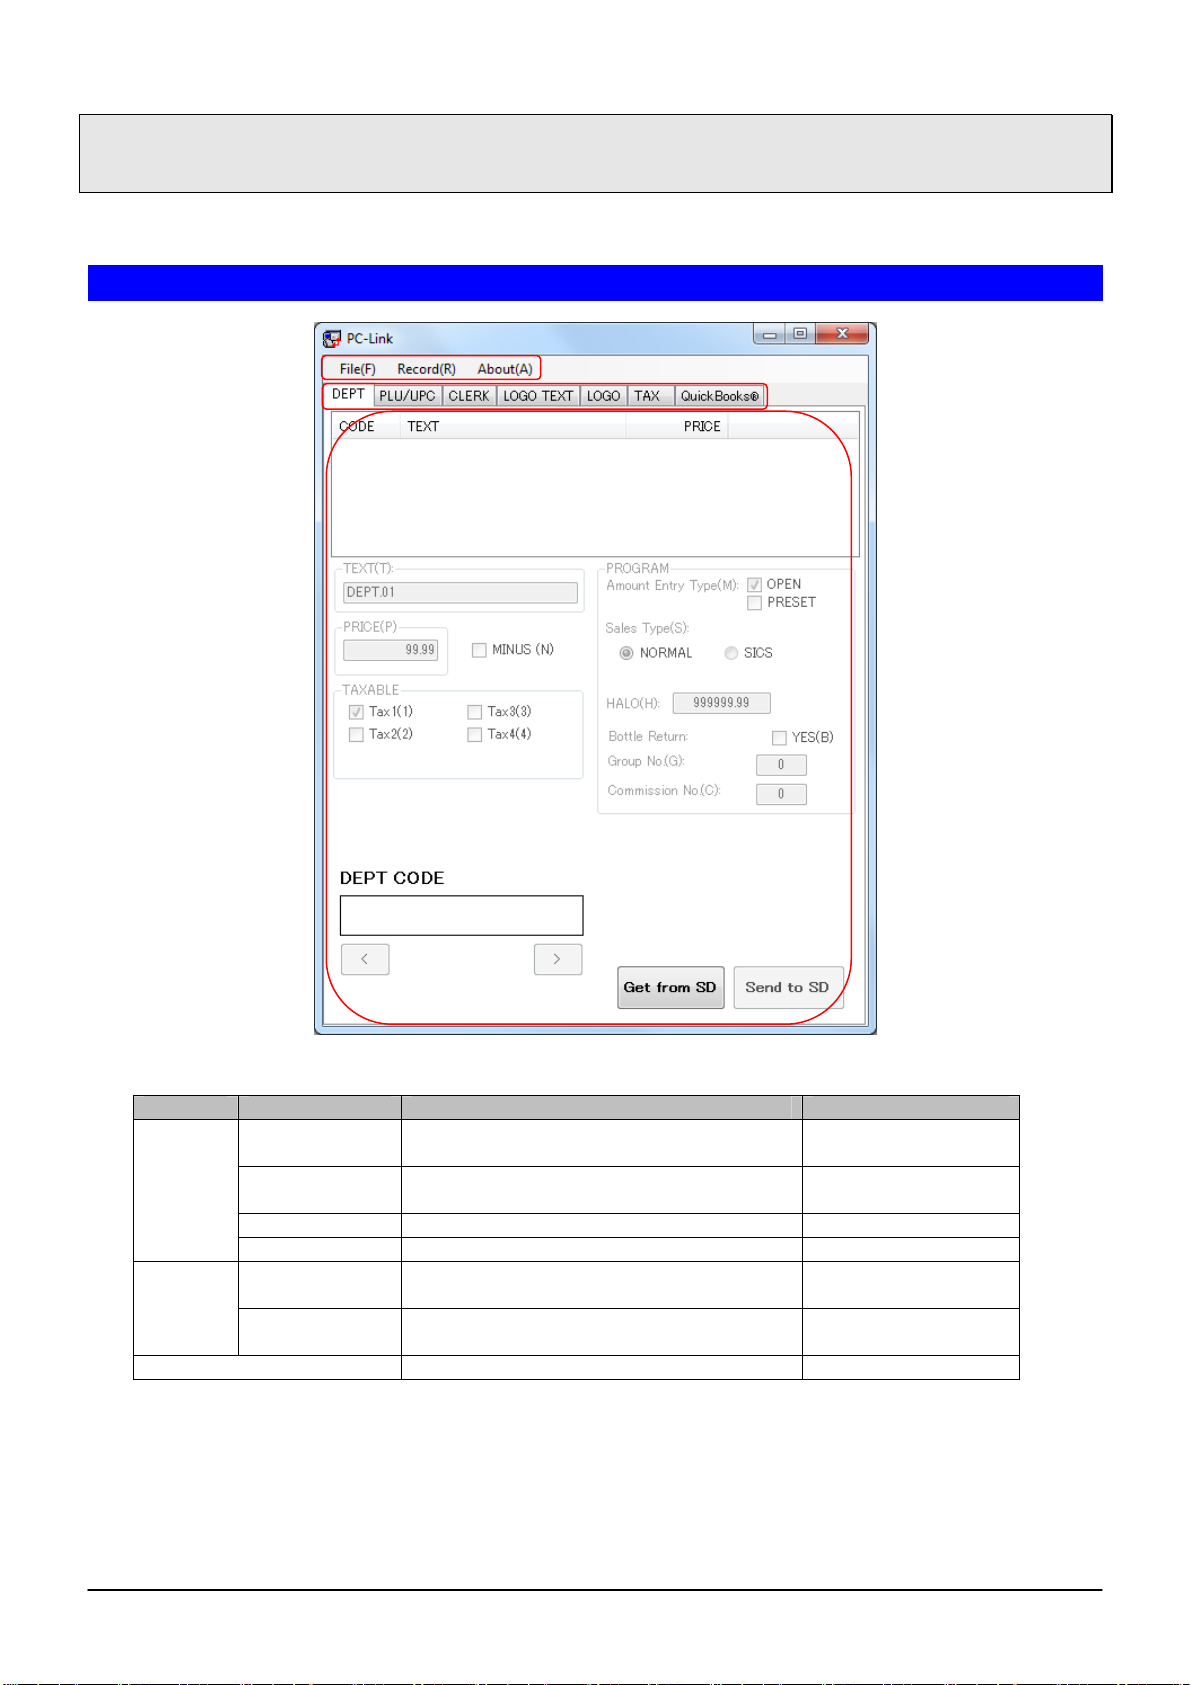
Main Window of the Customer Support Tool
This page describes the appearance of the main window and details of each function.
Appearance and details of the main window
(1)
(2)
(1) Menu
You can select one of three menus: [File], [Record] or [About].
(3)
Menu Command Description Page in this manual
File
About Shows version information. -
(2) Tab
You can select one of seven tabs: [DEPT], [PLU/UPC], [CLERK], [LOGO TEXT], [LOGO], [TAX] or
[QuickBooks®]. Click a tab, and the setting screen corresponding to each tab appears.
(3) Setting screen
The setting screen corresponding to the tab you have clicked appears. For details, refer to the explanation of
each setting screen.
Open Opens the Customer Support Tool data in
your computer.
All to SD/
All from SD
Setting Defines a data folder. 12
Exit Exits the Customer Support Tool. 4
New Creates new department, PLU/UPC or
Delete Deletes one department, PLU/UPC or
Write/read cash register data to/from an
SD memory card.
clerk data.
clerk data.
10
11
7, 8
15, 18, 21 Record
16, 19, 22
To open data
You can open the Customer Support Tool data saved in your computer and edit it.
Note
1. Click [File], and then [Open].
The data folder selection dialog appears.
2. Click a data folder.
The data folder is set by default during installation.
• Windows Vista or Windows 7
C:\Users\(Username)\Documents\SHARP_ECR\A407U\SHOP_NAME1
• Windows XP
C:\Documents and Settings\(Username)\My Documents\SHARP_ECR\A407U\SHOP_NAME1
* The actual Windows account user name is represented by (Username) above.
* You do not need to open the data folder or change the settings when using the default folder.
1
3. Click [OK].
The confirmation dialog appears.
Note
4. Click [Yes].
Data saved in the data folder is read into the Customer Support Tool.
If you re-select a data folder that is already open, the confirmation dialog does not appear.
2
3
4
11
 Loading...