


BG-X005SGA
MANUAL
Forward
First, we would like to thank you for purchasing the Sonic
4-Player Air Hockey Table. The product can be a 2 or 4 player game for the whole family to enjoy.
For your own safety, please carefully read through the instruction that indicates precautions to be taken prior to the assembly of the product. We hope that you can quickly be accustomed to it and comfortably play the product.
Note before assembling
1.Ensure there is sufficient space assembling the Air Hockey Table.
2.Need at least 4 people to do the assembly, please ensure safety when moving the components.
3.Please ensure all parts are accessible before assembling.
Tools required for assembling
Screw Driver
Scissors (Pliers)
Electronic Screw Driver
Air Hockey Access Key (game key)
* Note: Self preparation on the tools indicated above
Be careful not to damage the product when using the tools to assemble.
1.
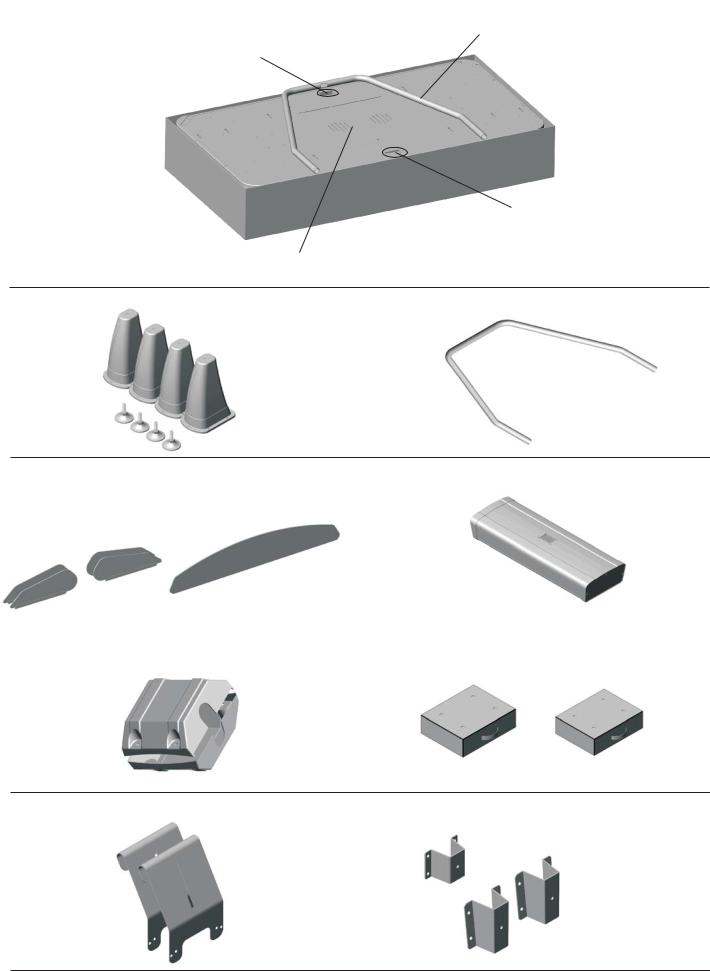
List of Parts
Main Body
Overhead Bar
Power Switch
Key and Screws Storage Box
Blower Access Door
Legs & Leg Levelers Overhead Bar
4 Sets
X1
|
Center Guard |
Scoreboard |
Side Guards |
|
|
|
|
|
|
SEGA |
|
X4 |
X1 |
X1 |
|
|
|
|
|
|
Plastic Bar Bracket Cover (black) |
Puck and Mallet Box |
|
X2
X2
Center Guard Bracket
Scoreboard Brackets (1 set)
Overhead Bar Bracket (2 sides)
X2
2.
List of Parts
Plastic Sonic Sign |
Power Cable |
Mallets x8 |
Spray Wax for Tabletop |
Pucks x20 |
|
X2
List of Screws
Big Flathead Screw (4mm x 12mm) |
Big Flathead Screw (5mm x 35mm) |
|
|
Scoreboard x 12 |
Plastic Bar Bracket Cover(black) |
|
Aluminum Side Guard Brackets |
x 8 |
|
x 12 |
|
|
<X24> |
<X8> |
|
|
|
|
Roundhead Screw (8mm x 25mm) |
Flat Washer (8mm x 16mm) |
|
|
|
|
Legs x 16 |
Legs x 16 |
|
|
|
|
<X16> |
<X16> |
|
|
|
|
Big Flathead Screw (5mm x 15mm) |
Big Flathead Screw (4mm x 8mm) |
|
Sonic Sign Fastener x 3 |
|
|
Overhead Bar Bracket x 12 |
Side Guards x 8 |
|
Center Guard x 4 |
|
|
|
|
|
<X19> |
<X8> |
3.

Assembly Instruction
Step 1:Remove the 4 legs from the box; screw the leg levelers onto it. Attach onto the bottom of the table. Align the holes of legs to the holes on the bottom of the table, and then secure it with big flathead
and flat
leg levelers x 4
Step 2:Once the legs are tightly screwed on to the table base, flip and position the table by 90 degree angle; this action would require at least 3~4 people, then flip it again in same manner to conclude with the upright position as shown on the diagram:
roundhead screw (8mm x 25mm) flat washer (8mm x 16mm)
FINISHED PICTURE
4.
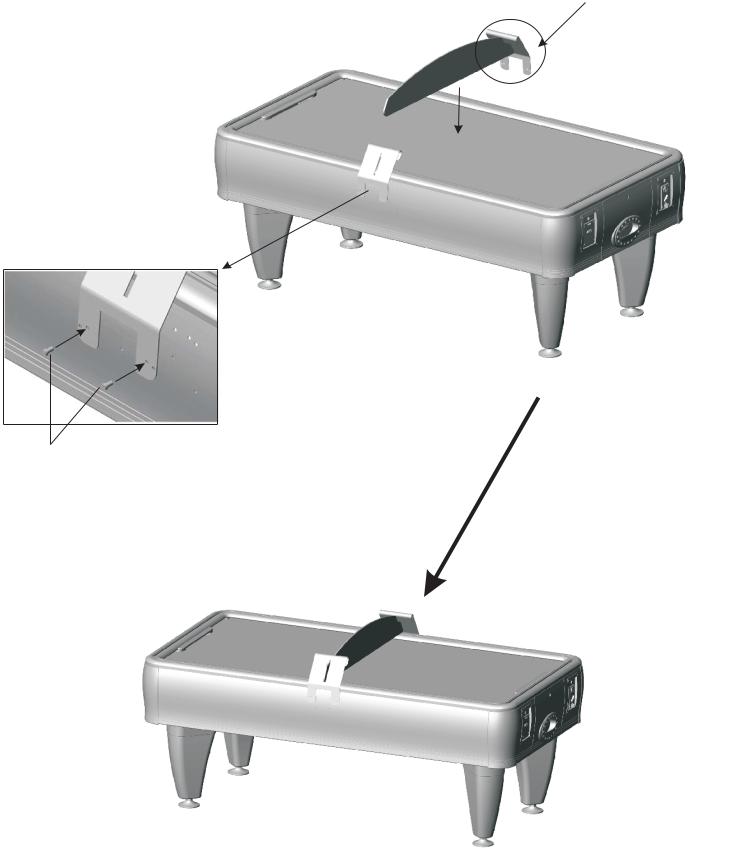
Assembling Instruction
Step 3:Attach the center guard on one side with big flathead screw (5mm x 15mm). As to the other side, insert the center guard into the iron plate first before screw it tightly.
Insert the center guard into the other side first, and then screw to the iron plate.
Screw the iron plate on one side with big flathead screw (5mm x 15mm)
(Finished as shown)
FINISHED PICTURE
5.
 Loading...