


420-0003-01UK
1ST PRINTING
SEGA AMUSEMENTS EUROPE LTD.
42 Barwell Business Park, Leatherhead Road, Chessington, SURREY. United Kingdom KT9 2NY
SERVICE MANUAL
IMPORTANT
•Before using this product, read this manual carefully to understand the contents herein stated.
•After reading this manual, be sure to keep it near the product or in a convenient place for easy reference when necessary.

TABLEOFCONTENTS |
|
|
BEFORE USING THIS PRODUCT, BE SURE TO READ THE FOLLOWING: |
|
|
TABLE OF CONTENTS.............................................................................................. |
i |
|
INTRODUCTION..................................................................................................... |
iv |
|
1 |
HANDLINGANDPRECAUTIONS.................................................................... |
1 |
2 |
PRECAUTIONSREGARDINGINSTALLATIONLOCATION.............................. |
4 |
3 |
PRECAUTIONSREGARDINGPRODUCTOPERATION.................................... |
6 |
4 |
PARTDESCRIPTIONS..................................................................................... |
9 |
5 |
ACCESSORIES............................................................................................... |
10 |
6 |
ASSEMBLYANDINSTALLATION................................................................. |
11 |
|
6-1 Securing the cabinet in to location .................................................................................. |
13 |
|
6-2 Conneection of Power and Ground.................................................................................. |
14 |
|
6-3 Check area for Game Interference Requirements.......................................................... |
16 |
|
6-4 Prize Unit (Installation of prizes)........................................................................................ |
17 |
7 |
PRECAUTIONSWHENMOVINGTHEMACHINE.......................................... |
19 |
8 |
GAMEDESCRIPTION.................................................................................... |
20 |
|
8-1 HOW TO PLAY........................................................................................................................ |
20 |
|
8-2 IMDIVIDUAL GAME SCREENS.............................................................................................. |
23 |
|
8-3 RESULT / ACCURACY SCREEN............................................................................................. |
25 |
CONTENTS OF TABLE
E0-0704 |
420-6992UK |
|
|
|

CONTENTS OF TABLE
9 EXPLANATIONOFTESTANDDATADISPLAY............................................. |
26 |
|
|
9-1 GAME TEST MODE................................................................................................................. |
27 |
|
9-1-1 TEST MENU ............................................................................................................... |
28 |
|
9-1-2 GAME TEST MODE................................................................................................... |
29 |
|
9-1-3 INPUT TEST................................................................................................................ |
30 |
|
9-1-4 OUTPUT TEST............................................................................................................ |
31 |
|
9-1-5 VENT TEST................................................................................................................. |
32 |
|
9-1-6 COIN TEST.................................................................................................................. |
33 |
|
9-1-7 SOUND TEST............................................................................................................. |
34 |
|
9-1-8 SCREEN TEST............................................................................................................. |
35 |
|
9-1-9 GUN CALIBRATION TEST........................................................................................ |
36 |
|
9-1-10 BOOK-KEEPPING...................................................................................................... |
38 |
|
9-1-11 GAME SETTINGS....................................................................................................... |
42 |
|
9-1-12 CLOCK SETTINGS..................................................................................................... |
43 |
10 |
CONTROLLER(GUNUNIT).......................................................................... |
44 |
|
10-1 MICROSWITCH REPLACEMENT......................................................................................... |
45 |
|
10-2 SENSOR UNIT RELPACEMENT........................................................................................... |
46 |
|
10-3 SOLINOID REPLACEMENT (if fitted)................................................................................. |
47 |
11 |
GRAPHICSDISPLAY..................................................................................... |
49 |
|
11-1 SAFETY PRECAUTIONS WHEN HANDLING THE DISPLAY............................................ |
49 |
|
11-2 CLEANING THE SCREEN SURFACE.................................................................................... |
50 |
|
11-3 ADJUSTMENT METHOD..................................................................................................... |
51 |
12 |
COINSELECORANDCREDITSETTINGS...................................................... |
53 |
|
12-1 CLEANING THE COIN SELECTOR....................................................................................... |
53 |
|
12-2 CREDIT SETTINGS UK/EURO.............................................................................................. |
55 |
|
12-3 STERLING / EURO SELECTION........................................................................................... |
58 |
|
12-4 SR3 TEACH AND RUN INFORMATION.............................................................................. |
59 |
13 |
REPLACINGTHEFLUORESCENTLAMPS..................................................... |
62 |
14 |
PERIODICINSPECTION................................................................................ |
65 |
15 |
TROUBLESHOOTING................................................................................... |
67 |
16 |
GAMEBOARD.............................................................................................. |
68 |
17 |
DESIGNRELATEDPARTS............................................................................. |
70 |
18 |
PARTSLIST................................................................................................... |
71 |
19 |
WIRECOLOURCODETABLE........................................................................ |
85 |
20 |
WIRINGDIAGRAMS..................................................................................... |
86 |
ii

INTRODUCTION
This manual is intended to provide detailed descriptions together with all the necessary information covering the general operation of electronic assemblies, electro-mechanicals, servicing control, spare parts, etc. for the product, “MANIC PANIC GHOSTS.”
This manual is intended for the owners, personnel and managers in charge of operation of the product. Operate the product after carefully reading and sufficiently understanding the instructions.
In the unlikely event that the product does not function correctly, DO NOT allow anyone other than a technician to touch the internal system. Turn off the power to the machine, making sure to unplug the electrical cord from the outlet, and contact the office listed below or the point of purchase for this product.
Use of this product is unlikely to cause physical injuries or damage to property. However, points that require special attention are indicated by bold text, the word “IMPORTANT” and the symbol below.
Indicates important information that, if ignored, may result in the mishandling of the product and cause faulty operation or damage to the product.
SEGA AMUSEMENTS EUROPE, LTD.
Block C, 42 Barwell Business Park, Chessington, Surrey. KT9 2NY United Kingdom.
Telephone: +44 (0) 208 391 8090 Facsimile: +44 (0) 208 391 8099 e-mail: mailbox@sega.co.uk http://www.sega-amusements.co.uk
|
SPECIFICATIONS |
Installation Space |
1,693 mm H × 983 mm W |
Height |
2,205 mm |
Weight |
220 kg |
Power, Current |
420 W 2 A AC 230 V 50/60 Hz |
Monitor Type |
50 Type Projector |
NOTE: The contents herein described are subject to change without notice.
●The typefaces included herein are solely developed by DynaComware.
●This software uses specially-designed fonts created under license from Fontworks Japan, Inc. Fontworks Japan, Fontworks, and font names are trademarks or registered trademarks of Fontworks Japan, Inc.
INTRODUCTION
iii

INTRODUCTION
 Definition of 'Site Maintenence Personnel or Other Qualified Individuals'
Procedures not described in this manual or marked as ‘to be carried out by site maintenance personnel or other qualified professionals’ should not be carried out by personnel without the necessary skill or technology. Work carried out by unqualified persons may cause serious accidents, including electrocution.
Parts replacement, maintenance inspections and troubleshooting should be carried out by site maintenance personnel or other qualified professionals. This manual includes directions for potentially dangerous procedures which should only be carried out by professionals with the appropriate specialized knowledge.
The site maintenance personnel or other qualified professionals mentioned in this manual are defined as follows:
Sitemaintenancepersonnel:
Individuals with experience in maintaining amusement equipment, vending machines, etc., working under the supervision of the owner/operator of this product to maintain machines within amusement facilities or similar premises by carrying out everyday procedures such as assembly, maintenance inspections, and replacement of units/expendable parts.
Activitiestobecarriedoutbysitemaintenancepersonnel:
Amusement equipment/vending machine assembly, maintenance inspection and replacement of units/ expendable parts.
Otherqualifiedprofessionals:
Persons employed by amusement equipment manufacturers, or involved in design, production, testing or maintenance of amusement equipment. The individual should have either graduated from technical school or hold similar qualifications in electrical/electronics/mechanical engineering.
Activitiestobecarriedoutbyotherqualifiedprofessionals:
Amusement equipment/vending machine assembly, repair/adjustment of electrical/electronic/ mechanical parts.
iv
1 HANDLINGPRECAUTIONS
When installing or inspecting the machine, be very careful of the following points and pay attention to ensure that the player can enjoy the game safely.
Non-compliance with the following points or inappropriate handling running counter to the cautionary matters herein stated can cause personal injury or damage to the machine.
•Before performing work, be sure to turn the power off. Performing the work without turning the power off can cause an electric shock or short circuit. In the case work should be performed in the status of power on, this manual always states to that effect.
•To avoid an electric shock or short circuit, do not plug in or unplug quickly.
•To avoid an electric shock, do not plug in or unplug with a wet hand.
•Do not expose power cords or earth wires on the surface, (floor, passage, etc.). If exposed, the power cords and earth wires are susceptible to damage. Damaged cords and wires can cause an electric shock or short circuit.
•To avoid causing a fire or an electric shock, do not put things on or damage the power cords.
•When or after installing the product, do not unnecessarily pull the power cord. If damaged, the power cord can cause a fire or an electric shock.
•In case the power cord is damaged, ask for a replacement through where the product was purchased from or the office herein stated. Using the cord as is damaged can cause fire, an electric shock or leakage.
•Be sure to perform grounding appropriately. Inappropriate grounding can cause an electric shock.
•Be sure to use fuses meeting the specified rating. Using fuses exceeding the specified rating can cause a fire or an electric shock.
•Be sure that connections such as IC BD are made properly. Insufficient insertion can cause an electric shock.
•Specification changes, removal of equipment, conversion and/or addition, not designated by SEGA are not permitted.
-Failuretoobservethismaycauseafireoranelectricshock.Non-compliancewiththisinstruction can have a bad influence upon physical conditions of the players or the onlookers, or result in injury during play.
- SEGA shall not be held responsible for damage, compensation for damage to a third party, caused by specification changes not designated by SEGA.
• If work or parts replacement not indicated in this manual is carried out, an accident may occur. If it is necessary to carry out work not indicated in this manual, be sure to have it done by the office indicated in this manual or by the point of purchase. Also, please inquire regarding details of the work involved.
• Be sure to perform periodic maintenance inspections herein stated.
1 HANDLINGPRECAUTIONS
1 HANDLINGPRECAUTIONS
•For the IC board circuit inspections, only the logic tester is allowed. The use of a multiple-purpose tester is not permitted, so be careful in this regard.
•Static electricity from your body may damage some electronics devices on the IC board. Before handling the IC board, touch a grounded metallic surface so that the static electricity can be discharged.
•Do not turn the power on and off continuously. Repeatedly turning the power on and off may cause product malfunction or parts damage.
•Some parts are not designed and manufactured specifically for this game machine. The manufacturers may discontinue, or change the specifications of such general-purpose parts. If this is the case, SEGA cannot repair or replace a failed game machine whether or not a warranty period has expired.
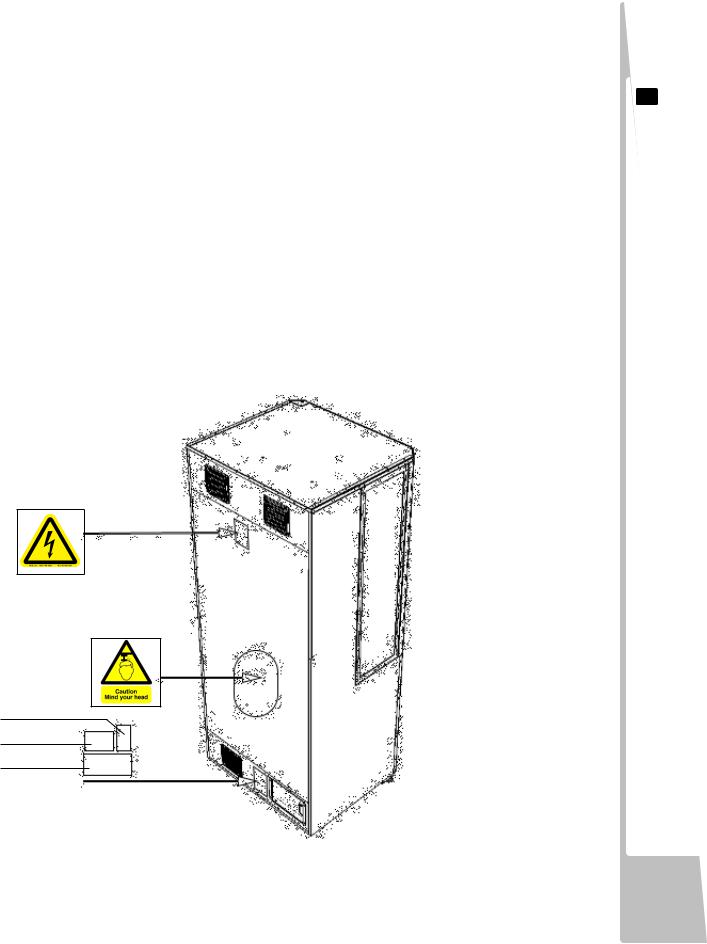
CONCERNING THE STICKER DISPLAY |
CONCERNING WARNING DISPLYS |
|
|
|
|
|
|
This SEGA product has stickers attached describing |
This SEGA product has warning displays on stickers, |
|
|
the product manufacture No. (Serial No.) and Electrical |
labels and/or printed instructions adhered/attached |
|
|
Specifications. It also has a Sticker describing where to |
to or incorporated in the places where a potentially |
|
|
contact for repair and for purchasing parts. |
hazardous situation could arise. The warning displays are |
1 |
|
When inquiring about or asking for repairs, mention |
intended for accident prevention for customers and for |
HANDLING |
|
the Serial No. and Name of Machine indicated on |
avoiding hazardous situations relating to maintenance |
||
|
|||
the Sticker. The Serial Number indicates the product |
and servicing work. Some portions of the cabinet contain |
|
|
register. Identical machines could have different |
high voltage and may cause accidents if touched. |
|
|
parts depending on the date of production. Also, |
When performing maintenance, be very careful of the |
PRECAUTIONS |
|
improvements and modifications might have been |
warning displays. It is especially important that any |
||
|
|||
made after the publication of this manual. In order to |
complex repair and replacement work not mentioned |
|
|
ensure you order the correct parts, mention the Serial |
herein should be performed by those technical |
|
|
No. when contacting the applicable places. |
personnel who have knowledge of electricity and |
|
|
|
technical expertise. In order to prevent accidents, |
|
|
|
caution any customer ignoring the warnings to cease |
|
|
|
and desist immediately. |
|
|
|
|
|
(Inside)
Do Not Dispose
Serial No: & CE
P.A.T Label
1 fig01
2
REGARDING PRECAUTIONS LOCATION INSTALLATION
2 PRECAUTIONSREGARDINGINSTALLATIONLOCATION
This product is an indoor game machine. Do not install it outside. Even indoors, avoid installing in places mentioned below so as not to cause a fire, electric shock, injury and/or malfunction.
-Places subject to rain or water leakage, or places subject to high humidity in the proximity of an indoor swimming pool and/or shower, etc.
-Places subject to direct sunlight, or places subject to high temperatures in the proximity of heating units, etc.
-Places filledwith inflammable gas orvicinity of highly inflammable/volatile chemicals or hazardous matter.
-Dusty places.
-Sloped surfaces.
-Places subject to any type of violent impact.
-Vicinity of anti-disaster facilities such as fire exits and fire extinguishers.
-Areas where the temperature exceeds the applicable temperature (ambient temperature) range of 5 to 30 degrees centigrade.
LIMITATIONS OF USE
Be sure to check the Electrical Specifications. Ensure that this product is compatible with the location’ s power supply, voltage, and frequency requirements. A plate describing Electrical Specifications is attached to the product. Non-compliance with the Electrical Specifications can cause a fire and electric shock.
This product requires a breaker and earth mechanism as part of the location facilities. Using the product without these can cause a fire and electric shock.
Ensure that the indoor wiring for the power supply is rated at 15 A or higher (AC single phase 100 V ~ 120 V area), and 7 A or higher (AC 220 V ~ 240 V area). Non-compliance with the Electrical Specifications can cause a fire and electric shock.
Be sure to use an independent power supply equipped with an earth leakage breaker. Using a power supply without an earth leakage breaker can cause an outbreak of fire if a power surge occurs.
Putting many loads on one electrical outlet can cause generation of heat and a fire resulting from overload.
When using an extension cord, ensure that the cord is rated at 15 A or higher (AC 100 V ~ 120 V area) and 7A or higher (AC 220 V ~ 240 V area). Using a cord rated lower than the specified rating can cause a fire and electric shock.
ELECTRICITYCONSUMPTION
MAX 2A
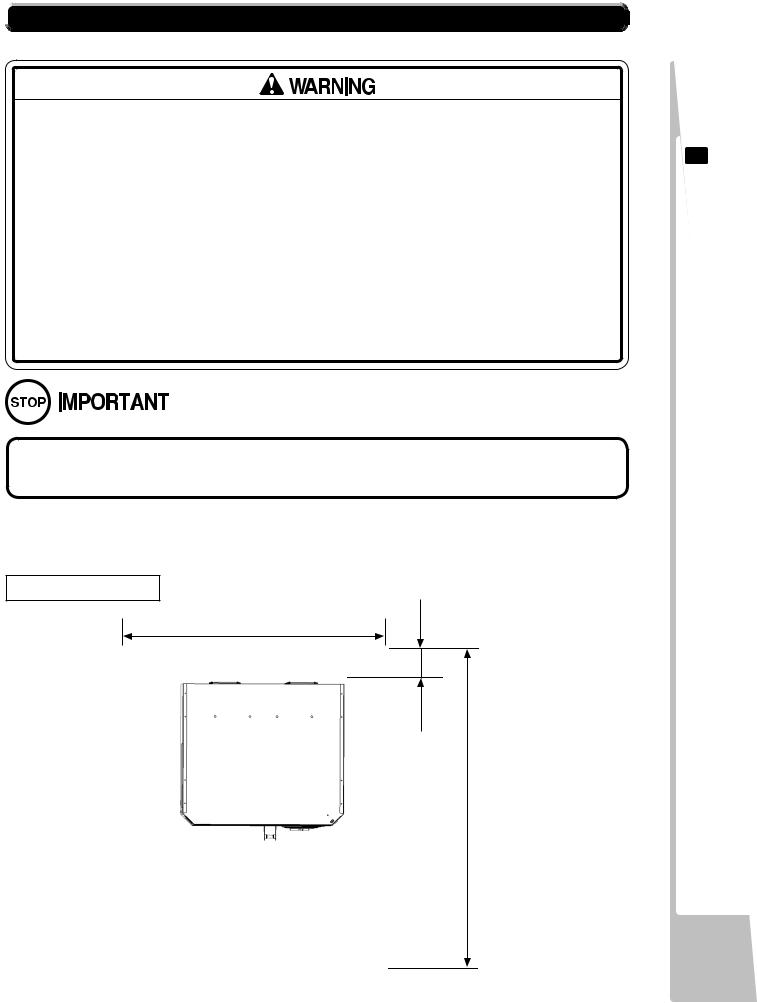
 2-1 OPERATION AREA
●For safe operation and management of this product, allow at least 70 cm of space between cabinets when allocating floor space and space for people to move through.
●Be sure to provide sufficient space specified in this manual. Do not allow objects to blocktheventilationports.Itcancausegenerationofheatandafire.
●SEGAshallnotbeheldresponsiblefordamage,compensationfordamagetoathird party,resultingfromthefailuretoobservethisinstruction.
●If the machine does not fit through the entryway to the installation location, do not disassemble it without first consulting the instructions. If the machine still does not fit through the entryway after following the procedures in this manual, contact yourretailerortheofficelistedinthismanual.
Fortransportingthemachineintothelocation'sbuilding,theminimumnecessary dimensionsoftheopening(ofdoors,etc.)are0.85m(W)and1.98(H).
Note: The product has been designed to pass through a standard doorway when either pushed from the front or rear of the cabinet. The machine will not pass through a doorway if pushed from the side asthecontroller/holderwillpreventaccess.
SampleLayout
1100
200
2100
2-1 FIG. 01
(Unit: mm)
2
REGARDING PRECAUTIONS LOCATION INSTALLATION
PRODUCTERATION
REGARDING 3
PRECAUTIONS
3 PRECAUTIONSREGARDINGPRODUCTOPERATION
To avoid injury and trouble, be sure to pay attention to the behavior of visitors and players.
 3-1BEFOREOPERATION
In order to avoid accidents, check the following before starting the operation:
•To ensure maximum safety for the players and the customers, ensure that where the product is operated has sufficient lighting to allow any warnings to be read. Operation under insufficient lighting can cause bodily contact with each other, hitting accident, and/or trouble between customers.
•Be sure to perform appropriate adjustment of the visual display unit.
For operation of this machine, do not leave display's flickering or deviation as is. Failure to observe this can have a bad influence upon the players' or the customers' physical conditions.
•It is suggested to ensure a space allowing the players who feel sick while playing the game to take a rest.
•Do not put any heavy item on this product. Placing any heavy item on the product can cause a falling down accident or parts damage.
•Do not climb on the product. Climbing on the product can cause falling down accidents. To check the top portion of the product, use a step ladder.
•To avoid electric shock, check to see if door & cover parts are damaged or omitted.
•To avoid electric shock, short circuit and/or parts damage, do not put the following items on or in the periphery of the product.
Flower vases, flowerpots, cups, water tanks, cosmetics, and receptacles/containers/ vessels containing chemicals and water.
•To avoid injury, be sure to provide sufficient space by considering the potentially crowded situation at the installation location. Insufficient installation space can cause contact, collisions, and/or trouble between customers.
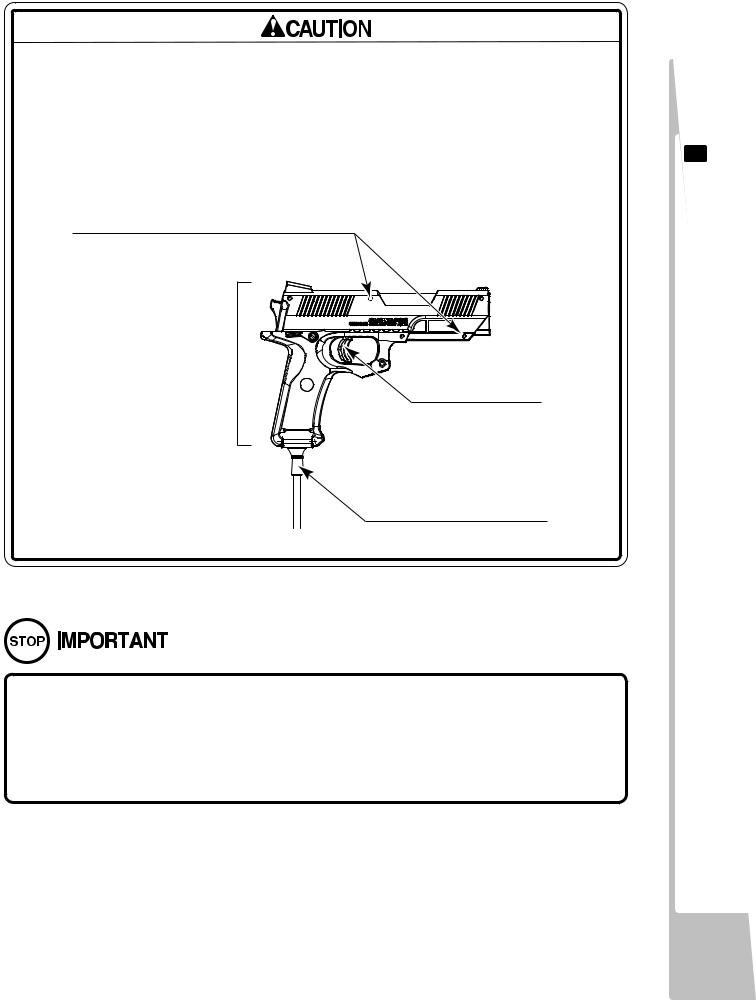
•Every day when cleaning the gun, inspect the gun and make sure that there are no
scratches or cracks in the surface, and that the fastening screws are not loose. If the game is played with scratches, cracks or loose screws, it can cause injuries to the player or to people nearby.
Ensure that the screws are not loose and are all present.
Ensure that the casing is free of scratches and cracks.
Ensure that the trigger is functioning properly.
Ensure that all connecting wires are not damaged.
03-1 fig. 01
•Players directly hold the controller with their bare hands so it is recommended that wet towels (paper towels) be provided.
•Placing the LCD monitor near halogen lamps or other types of light fixtures which emit strong light may cause a malfunction. Make sure to install the monitor at a reasonable distance from such sources of light.
PRODUCTERATION
REGARDING 3
PRECAUTIONS

PRODUCTERATION
REGARDING 3
PRECAUTIONS
 3-2DURINGOPERATION(PAYINGATTENTIONTOCUSTOMERS)
To avoid injury and trouble, be sure to pay attention to the behavior of visitors and players.
•For safety reasons, do not allow any of the following people to play the game.
-Those who need assistance such as the use of apparatus when walking.
-Those who have high blood pressure or a heart problem.
-Those who have experienced muscle convulsion or loss of consciousness when playing video games, etc.
-Those who have neck or spinal cord problems.
-Those who are intoxicated or under the influence of drugs.
-Pregnant women.
-Those who are not in good health.
-Those who do not follow the attendant’ s instructions.
-Those who cannot grasp the Control Unit securely because of immobility in fingers, hands or arms.
-Persons who disregard the product's warning displays.
•Even players who have never been adversely affected by light stimulus might experience dizziness or headache depending on their physical condition when playing the game. Small children are especially likely to experience these symptoms. Caution guardians of small children to keep watch on their children during play.
•Instruct those who feel sick during play to have a medical examination.
•To avoid injury from falls and electric shocks due to spilled drinks, instruct the player not to place heavy items or drinks on the product.
•To avoid electric shocks and short circuits, do not allow customers to put hands and fingers or extraneous matter in the openings of the product or small openings in or around the doors.
•To avoid falls and resulting injury, immediately stop the customer from leaning against or climbing on the product, etc.
•To avoid electric shock and short circuit, do not allow customers to unplug the power plug without a justifiable reason.
•Immediately stop such violent acts as hitting and kicking the product. Such violent acts can cause parts damage or cause the cabinet to fall over, resulting in injury.
•Instruct players to hold the gun securely while playing. If the gun is dropped, it could cause injury to the player.
•Items such as large finger rings can cause injury to the fingers while playing. Instruct players to remove all accessories that could cause an accident before playing.
•Instruct players that a single gun is never to be held by two or more people during play. Otherwise there could be dangerous contact or a collision.
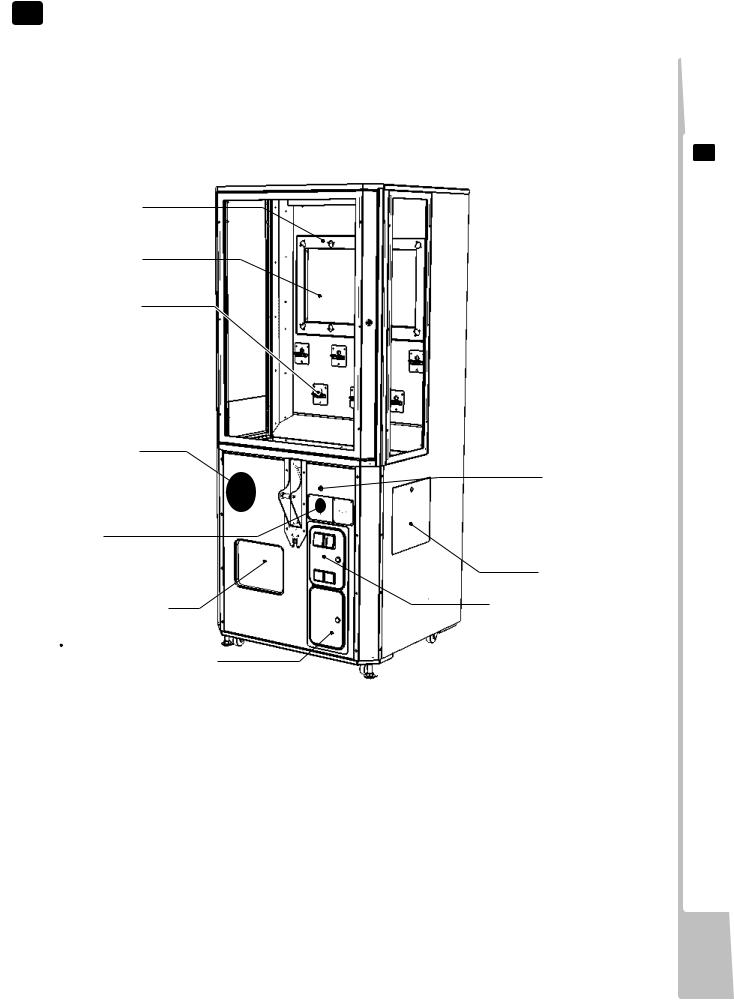
4 PARTDESCRIPTION
SHOOT THIS WIN THIS
Mask
Display
Prize arm
Speaker |
Key switch |
|
Start switch
Side door
Prize door |
Coin door |
|
Cash door
Pleasenote:
The controller is not shown in the figure above.
4 PARTDESCRIPTIONS
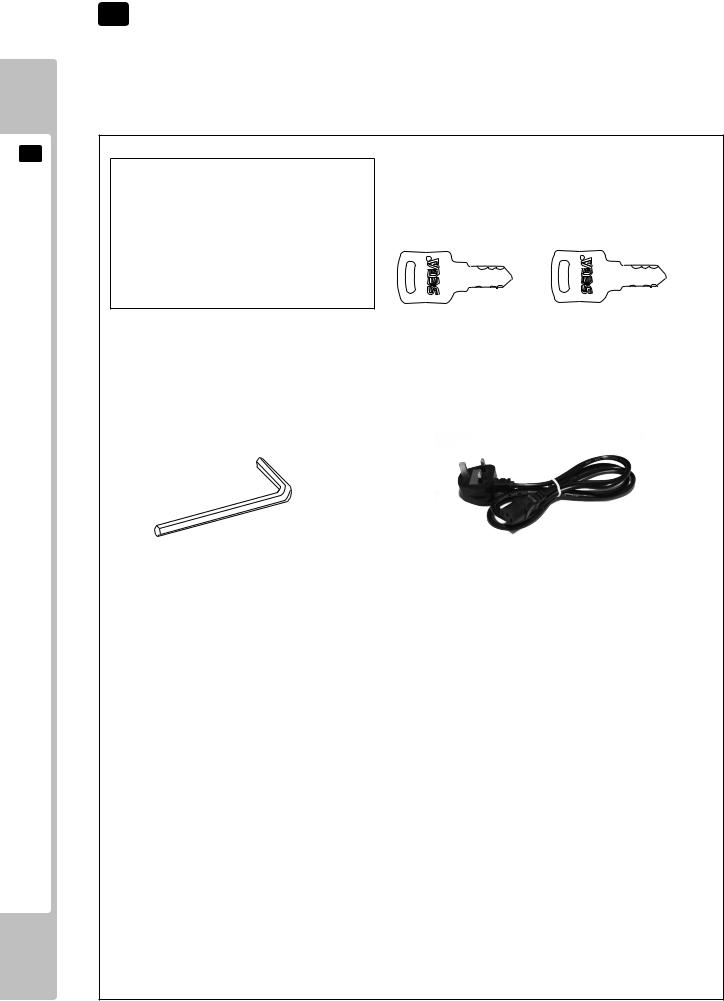
5 ACCESSORIES
5 ACCESSORIES
Confirm that the accessories listed in the table below are present when setting up the product.
Accessories marked "Spare" in the note column are consumable items but included as spares.
DESCRIPTION:
Part No. (Qty.): Note:
Figures:
Parts not labeled with part numbers are as yet unregistered or cannot be registered. Be sure to handle all parts with care, as some parts are not available for purchase separately.
KEY MASTER |
KEY SWITCH |
||
220-5775UK (2) |
|
|
|
(J9117) |
For operating the key |
||
For opening/closing |
switch |
||
the doors |
|
|
|
|
|
|
|
|
|
|
|
TAMPERPROOF SCREW WRENCH (for M4) |
POWER CABLE |
540-0006-01 (1) |
LM1227 <UK> |
TAMPERPROOF SCREW WRENCH (for M8) |
LM1246 <EURO> |
|
|
540-0009-01 (1) |
|
10
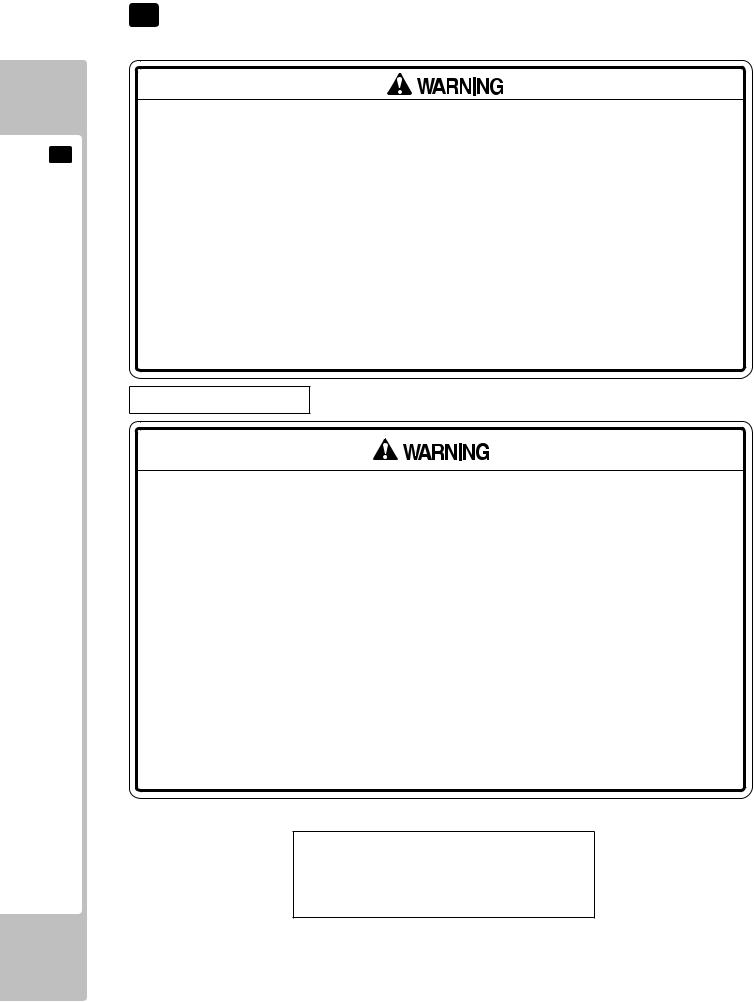
6ASSEMBLY&INSTALLTION
•This work should be carried out by site maintenance personnel or other qualified
professionals. Work performed by non-technical personnel can cause a severe accident such as electric shock. Failing to comply with this instruction can cause a severe accident such as electric shock to the player during operation.
•Perform assembly work by following the procedure herein stated. Failure to comply with the instructions can cause electric shock.
•Perform assembling as per this manual. Since this is a complex machine, incorrect assembling can cause an electric shock, machine damage and/or improper functioning as per specified performance.
•Whenassembling,morethanonepersonisrequired.Dependingontheassemblywork, there are some cases in which working by one person alone can cause personal injury or parts damage.
•Ensure that connectors are properly connected. Improper connections can cause electric shock.
•Be careful not to damage the wires. Damaged wires may cause electric shock or short circuit or present a risk of fire.
•Do not carelessly push on the monitor. This could cause it to fall over.
•Provide sufficient space so that assembling can be performed. Performing work in places with narrow space or low ceiling may cause an accident and assembly work to be difficult.
•To perform work safely and avoid serious accident such as the cabinet falling down, do not perform work in places where step-like grade differences, a ditch, or slope exist.
•Do not use connectors other than those connected to and used by the game board at the time of shipment. Do not connect wires to unused connectors. This could cause the generation of heat or smoke, or a burnout.
•Wear appropriate work clothing so that work can be performed safely. Use gloves and safety shoes to prevent accidents or injuries.
•When installing a wire protection cover over a floor, use a material shaped so that no one passing by will stumble over it. Using a material that could be stumbled over might lead to an accidental fall.
•Be careful in handling plastic parts. Be sure not to tighten screws or nuts too tightly. If such parts are exposed to excessive loads or impact, they might become damaged, resulting in fragments or cracks that could cause accidental injury.
6 ASSEMBLY& INSTALLATION
11

6 ASSEMBLY& INSTALLATION
The Installation and assembly of this product should take place in the following sequence.
 6-1 SecuringofCabinetintoLocation
 6-2 ConnectionofPowerandGround
 6-3 CheckingAreaforGameInterferenceHarnessRequirements
 6-4 PrizeUnit
An M4 Nut Driver or Spanner |
A 3mm Allen Key or Hex Key |
|
A Box or Ladders to stand on |
Sega Service key (J9117) |
An Adjustable Wrench
6 fig01
12
 6-1 SecuringofCabinetintoLocation
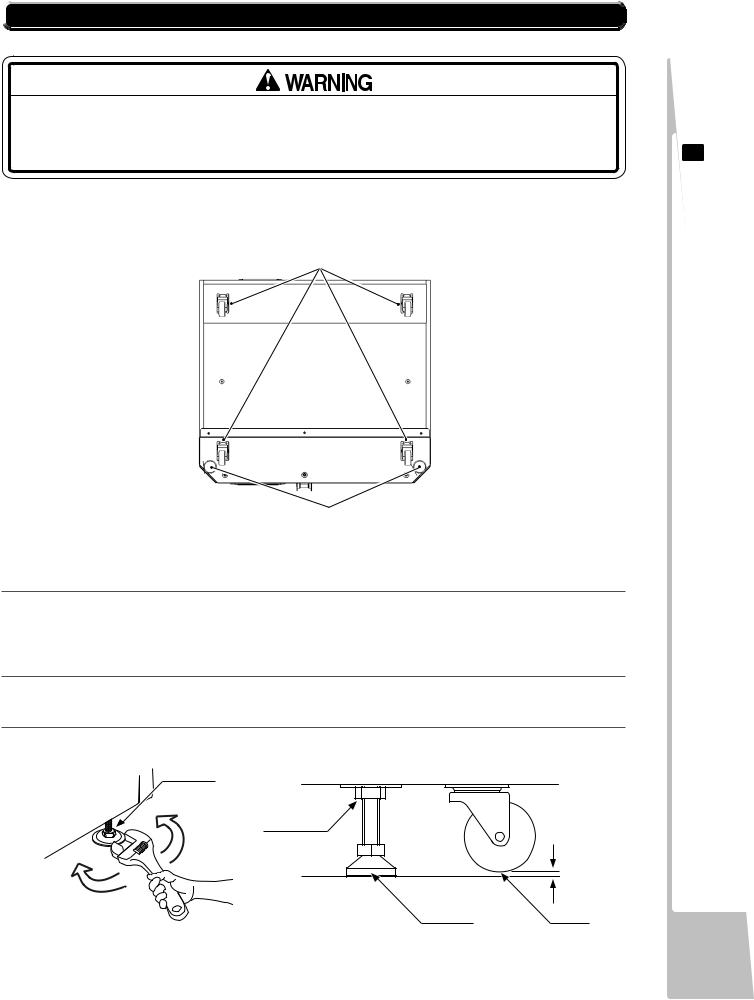
Be sure to ground the adjusters, and secure the product firmly to the installation location. If the cabinet moves either during assembly work or during operation after the completion of assembly, a serious accident may occur.
This product has 4 casters and 2 adjusters.
CASTER (4)
|
ADJUSTER (2) |
|
6-1 fig. 01 |
1 |
Move the product to the installation site. See Chapter 2 for examples of installation. |
Ensure that you leave enough aisle space for the player to operate the controller at arms length. |
|
|
Additionally, leave at least 200 mm of space on the side of the cabinet with the exhaust vent (the |
|
rear surface of the cabinet) for ventilation. |
2 |
Use a wrench to set adjuster heights so that the unit will stay level. |
3 |
After setting, turn adjuster nuts upwards to tighten them and secure adjuster heights. |
|
ADJUSTER |
|
Tighten nut |
|
upwards. |
About 5 mm
ADJUSTER |
CASTER |
6-1 fig. 02
6 ASSEMBLY& INSTALLATION
13
6 ASSEMBLY& INSTALLATION
 6.2 ConnectionofPowerandGround
•Use the power supply equipped with an earth leakage breaker. Use of power supply without such a breaker could result in fire if there is a current leakage.
•This product MUST be EARTHED. Using this product without a suitable earth will cause electric shock and possibly cause a fire hazzard.
•Do not expose the power cords. If these are exposed, customers could stumble over them,forinstance,andeasilydamagethem.Additionally,iftheselinesaredamaged, there could be a risk of electrical shock or short circuit. Set these lines at locations where they will not interfere with customer traffic, or attach covers to them.
•After laying out the power cord on the floor, be sure to always protect it. If the power cord is left exposed, it can easily be damaged, resulting in electrical shock.
•This product comes complete with POWER CORDS for the UK and EUROPEAN destinations. Be sure to use the power cords supplied. If a power cord is to be replaced, be sure to replace it with the same specification as the one provided.
If grounding has been established with the ground wire inside the power cord, do not perform grounding with the AC unit ground terminal. Conversely, if the AC unit ground terminal has been used for grounding, do not establish ground with the ground wire in the power cord. Otherwise there could be faulty or erroneous operations.
The accessory power cord has a ground wire inside it. Connect the power cord to the AC unit then insert the power cord plug into a “power outlet with ground terminal.” If there is no “power outlet with ground terminal,” be sure to establish ground by some other means; for example, by connecting the AC unit ground terminal to a ground wire with a ground mechanism prepared separately.
If you use a conversion adapter sold on the market to supply power, connect the ground wire terminal of the adapter to a “securely grounded ground terminal.” <For Taiwan>
Always connect the ground wire.
POWER PLUG
GROUND WIRE
CONVERSION ADAPTER
6-2 fig 01
14
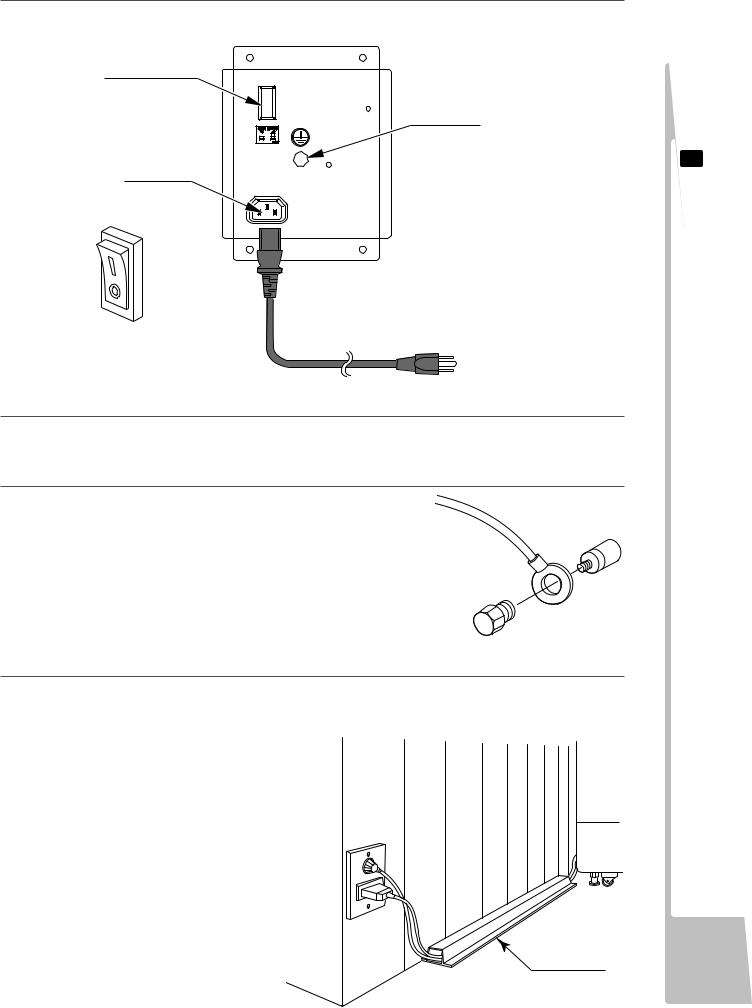
1Confirm that the MAINS SWITCH is set to OFF.
ON/OFF SWITCH
IEC INLET
INTRGRAL |
EARTH POINT |
“0” = OFF |
AC MAINS LEAD |
|
MAINS PLUG |
6-2 fig 02 |
|
2Fully insert the AC MAINS LEAD connector on the side opposite the power plug into the AC unit inlet. Then fully insert the AC MAINS LEAD PLUG into the power outlet.
3When using a ground wire made available separately, connect one end of the wire to the AC unit ground terminal and the opposite end to an indoor ground terminal. The AC unit
ground terminal is a bolt-and-nut combination. Remove the nut and pass the bolt through the ground terminal, then se cure the nut to the bolt. <For Taiwan>
6-3 fig03
4
The power cord is laid out indoors. protect the power cord by attaching wire cover to it. If ground will be established with a ground wire
made available separately, lay out the ground wire indoors and have it protected. <For Taiwan>
6-2 fig 03 |
WIRE COVER |
6 ASSEMBLY& INSTALLATION
15
6 ASSEMBLY& INSTALLATION
 6-3 CheckingAreaforGameInterferenceHarnessRequirements
1 Makesurethatthemachineisisolatedfromthemainssupplybeforeattemptingthisoperation.
2 Becarefulnottodamagewiring.
3 TheGameBoardareashouldbeaccessedifnecessary.
OnlyQUALIFIEDSERVICEPERSONNEL
shouldcarryoutthisoperation
16
 6-4 PrizeUnit
To prevent improper dispensing of gifts/prizes please follow the instructions below on how to correcty install prizes on to the prize arms.
●Do not allow more than 3 major prizes for each of the “High Value” Prize Arms.
●Do not allow large prizes to obstruct the adjacent prize arm. This may cause prizes to jam or become tangled.
●Do not attach prizes in the excess of 1kg to any of the Prize Arms. Prizes which exceed 1kg may cause premature damage to the motor or prize arm.
●Always use the hangers provided to hang the prizes on to the prize arms.
●Do not prevent the motor from turning when activated. Trying to stop the motor prematurely may cause the motor to overheat and become inoperative.
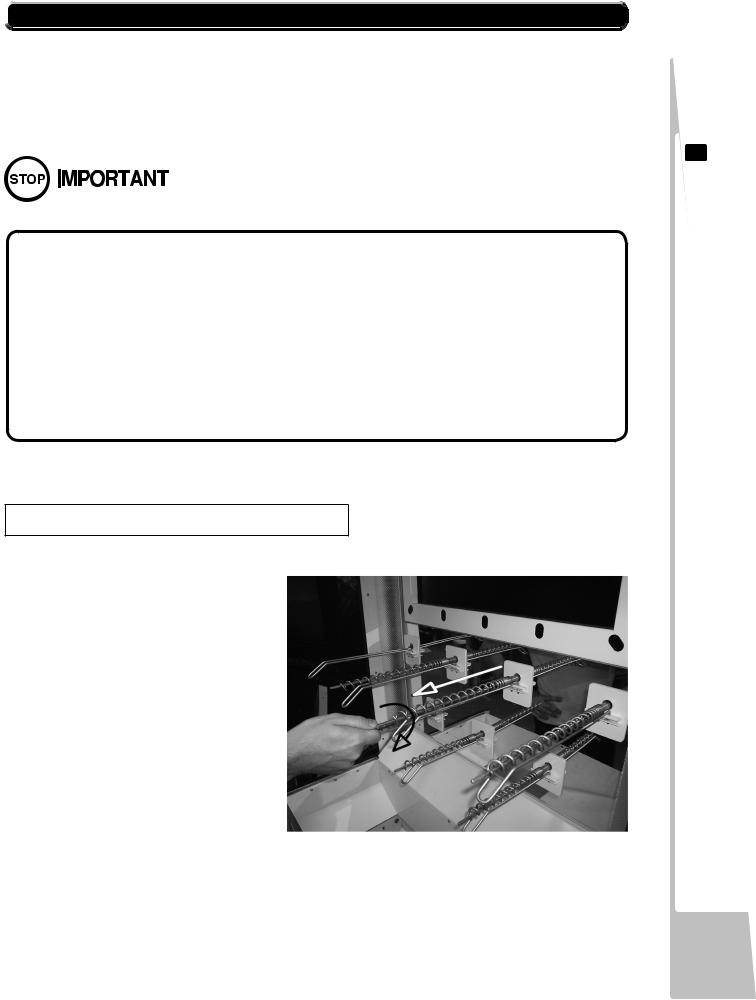
Fitting Prizes to the Prize Arms
STEP1
First remove the central prize bar. Unscrew the prize bar in a clockwise direction to remove.
6-4 fig 01
6 ASSEMBLY& INSTALLATION
17
6 ASSEMBLY& INSTALLATION
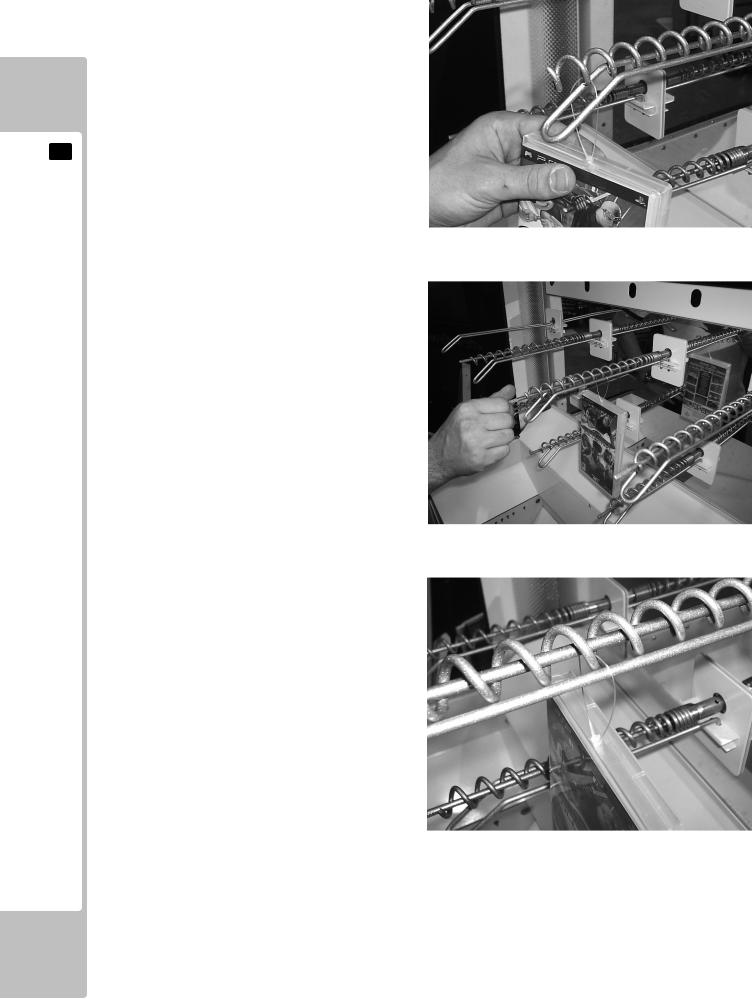
STEP2
Once the prize bar has been removed, attach the prize (along with the hanger) on to the prize arm as shown.
6-4 fig 02
STEP3
When the prize has been correctly fitted to the arm, re-fit the prize bar by turning it in an counter-clockwise direction.
6-4 fig 03
IMPORTANT!
Ensure that the hanger encompasses the the spiral arm and the guide arm. Make sure that the Prize bar is above the hanger and not positioned through it.
6-4 fig 04
18

7PRECAUTIONSWHENMOVINGTHEMACHINE
●Always disconnect the power cable before moving the product. If it is moved with the power cable connected, the cable could be damaged, causing fire or electric shock.
●To move the unit over the floor, pull in the adjustors and have the casters contact the floor. While moving the unit, be careful that the casters do not roll over the power cord or the ground wire. If cord or wire is damaged, there could be electrical shocks and/or short circuits.
●When crossing a sloped or stepped area, remove all prizes from the prize area to minimize on weight and to prevent heavy prizes swinging in to the glass. Failure to remove prizes from the prize area may cause injury to personnel and damage to machine.
●When lifting the cabinet up steps, you must hold it by the designated handles or by the bottom surface. Lifting it by any other area may lead to damage or disfiguration to that part or surrounding parts due to the weight of the cabinet and could also lead to injury of personnel.
●When tilting the cabinet to move it across a sloped or stepped area, always use at least two people. Attempting such an operation alone can lead to accident or injury.
●When moving the cabinet, do not hold, push or pull the Control Units. This may disfigure or damage them.
●When moving the cabinet through a doorway, push the cabinet either front or rear first. Do not push the cabinet sideways through a door as damage to the controller or controller holder or both may occur.
●Do not use the Controller Holders to move the cabinet, in doing so may damage or disfigure them.
7 PRECAUTIONSWHEN
THE MOVING MACHINE
19

DESCRIPTION8 GAME
8 GAMEDESCRIPTION
8.1 HOW TO PLAY:
Insertcoin/s. (TheexcactamountofcoinsisdependantontheProgramsettings).
PresstheStartbuttontostartthegame.
Usingtheguntopositionthesightonthescreen,
selectoneofthesixgamesavailabletoplaybypressing
thetriggeronthegun. |
|
SIGHT |
Games Available to Play |
|
|
ROCKIN RAPIDS |
CREEPY CABIN |
WACKY TRACK |
WRECKIN REEF |
LOONY MOON |
CRAZY CANYON |
GAMESELECTIONSCREEN
Eachofthegameswithhavearangeofmovingtargets toshootat,andisplayedagainsttheclock.
Eachhit/shotontargetwilllightabulbattheedgeofthe TARGET screenclimbingtowards 'PrizeWin'positions.
Therewillalsobe'DecoyTargets'shown,donotshootat these,theywillnotcountasahitandwillwastevaluable
timeandbullets. DECOYTARGET
20
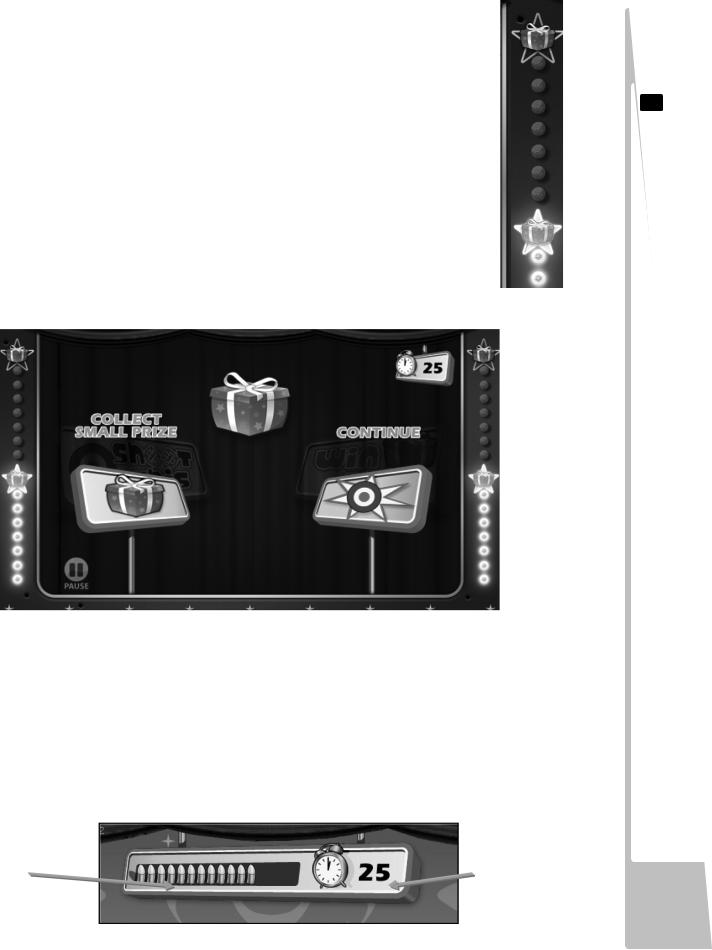
WINNING A PRIZE :
AprizeisofferedbyLightingallbulbsinthe
trailandreachingeithertheSmall orBig Prizelevel.
When playersachievethe'Small Prize'level,the displaychangestoshowthe'PrizeOptionScreen'. Theythenchoosetoeithercollectaprizefromanyof thethreelowervendarmslocatedbelowthedisplay, ortocontinuetoplaythegameattheriskthelosing thesmall prizeinanattempttoclimbuptothe
'Big Prize'level.
Prize Option Screen
Big
Prize
Small
Prize
DESCRIPTION8 GAME
Toselectthe'SmallPrize',theplayermustshoottheCollectSmallPrize'Parcel', endingthegameandenteringthePrizeSelectionscreen.
TocontinuetheGametheplayermustshoottheContinue'Target', rejectingtheSmall Prize intheattempttogaintheBig Prize. Game endsiftheplayerrunsoutoftime,ortheyselectaSmall Prize.
When all bullets are used, they will reload using up valuable time.
BULLETS |
TIMER |
21
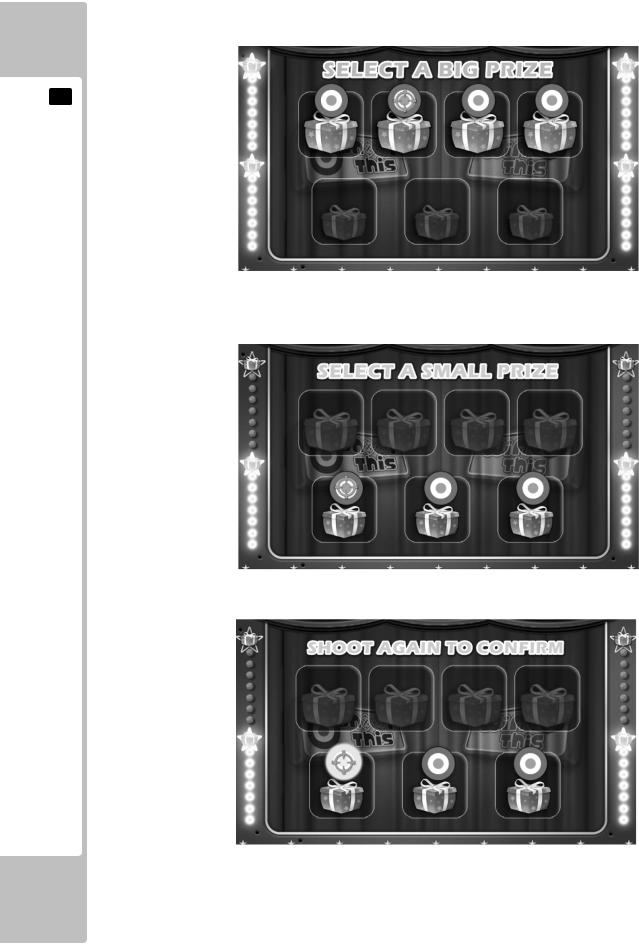
PRIZE SELECTION :
Onceyouhavewonaprize,usetheguntoselectaprizearm
whichisrepresentedonscreen.
DESCRIPTION8
GAME
IfyouwonaBig Prize,youcanonlyselectfromtheBigPrizearms.
IfyouwonaSmallPrize,youcanonllyselectfromtheSmallPrizearms.
Youwillbeakedtoshootagaintoconfirmyourprize.
Yourprizewillvendandcanthenbecollectedfrombehindthe
Prize Out dooronthefrontofthemachine.
22
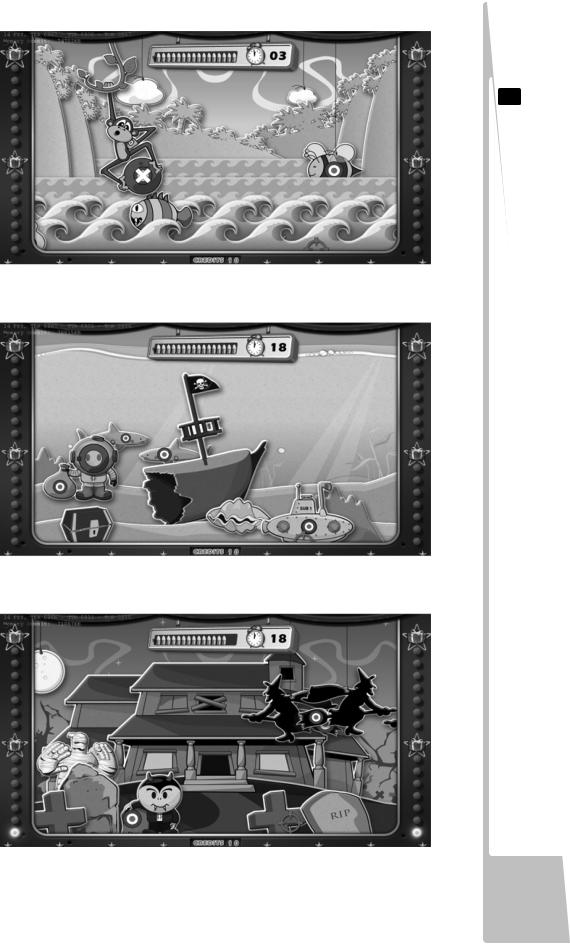
8.2 INDIVIDUAL GAMES SCREENS ROCKIN RAPIDS
DESCRIPTION8
GAME
WRECKIN REEF
CHEEPY CABIN
23
 Loading...