


. . . . . . . . . . . . . . . . . . . . . . . . . . . . . . . . . . . . . .
Medalist 4340 (ST34340A)
. . . . . . . . . . . . . . . . . . . . . . . . . . . . . . . . . . . . . .
Medalist 3230 (ST33230A)
. . . . . . . . . . . . . . . . . . . . . . . . . . . . . . . . . . . . . .
Medalist 2120 (ST32120A)
. . . . . . . . . . . . . . . . . . . . . . . . . . . . . . . . . . . . . .
for ATA (IDE)-Compatible PCs
. . . . . . . . . . . . . . . . . . . . . . . . . . . . . . . . . . . . . .
Installation Guide
. . . . . . . . . . . . . . . . . . . . . . . . . . . . . . . . . . . . . .
-2 |
Medalist 4340, 3230 and 2120, Rev. B |
|
|
© 1997, 1999 Seagate Technology, Inc. All rights reserved.
Publication Number: 21200079-001, Rev. B, May 1999
Seagate, Seagate Technology and the Seagate logo are registered trademarks of Seagate Technology, Inc. Medalist, DiscWizard, SeaFAX, SeaFONE, SeaBOARD and SeaTDD are either trademarks or registered trademarks of Seagate Technology, Inc. or one of its subsidiaries. All other trademarks or registered trademarks are the property of their respective owners.

Medalist 4340, 3230 and 2120, Rev. B |
-1 |
|
iii |
Contents |
|
The easiest way to install your drive .................................... |
1 |
What you need ........................................................................ |
2 |
Before you begin .................................................................... |
2 |
Handling precautions............................................................. |
3 |
Master/slave jumpers ............................................................. |
4 |
Attaching cables and mounting the drive ............................ |
6 |
Configuring your computer ................................................... |
9 |
Addressing drive capacity limitations................................ |
11 |
Partitioning and formatting your drive ............................... |
13 |
Installation using Disk Manager........................................ |
14 |
Windows 95 or Windows 98 installation ........................... |
15 |
Standard DOS installation ................................................ |
16 |
Additional installation options ............................................ |
18 |
Non-ATA compatible slave jumper...................................... |
18 |
Cable select jumper ............................................................. |
19 |
Advanced Disk Manager options ........................................ |
20 |
Troubleshooting ................................................................... |
23 |
Alternate capacity jumper ................................................. |
25 |
Seagate Technology support services ............................... |
31 |
Storing and shipping your drive ......................................... |
37 |
0 |
Medalist 4340, 3230 and 2120, Rev. B |
iv |
|

Medalist 4340, 3230 and 2120, Rev. B |
1 |
The easiest way to install your drive
DiscWizardä is Seagate’s exclusive Windows program, provided on a diskette, that makes it easy to install your Medalistâ drive.
DiscWizard helps you configure your new drive and your computer. It analyzes your
system, lets you select various installation
options and creates customized step-by-step instructions. It also allows older computers to access the full capacity of large hard drives.
You can run DiscWizard to install your new hard drive if:
•You already have an existing, bootable hard drive in your computer with at least 3 Mbytes of available disc space, and
•You are running Windows 95 or Windows 98.
If you can run DiscWizard, follow the instructions on the DiscWizard diskette to install your drive. If you need additional information, refer to this installation guide.
If you cannot run DiscWizard, follow the instructions in this installation guide to install and configure your new drive.
2 |
Medalist 4340, 3230 and 2120, Rev. B |
What you need
•Straight-edge and Phillips screwdrivers
•Four 6-32 UNC drive mounting screws
•An ATA host adapter and interface cable (max length: 18 inches) with enough connectors for all your drives
•An unused drive power cable for your new drive
•A bootable DOS system diskette (Seagate recommends using DOS Version 5.0 or later).
•If you are mounting this 3.5-inch drive in a 5.25-inch drive bay, you need a mounting adapter or frame kit. Also, you may need drive mounting rails if your drive bay is not designed for direct mounting.
Before you begin
•Make sure your computer is turned off before you open the case.
•Read the handling precautions following and inspect the drive to make sure that it is not damaged.
•Save your foam-lined Seagateâ disc drive box. This box has been approved by Seagate for shipping a Seagate disc drive. Using any other container or packing material voids your drive warranty.

Medalist 4340, 3230 and 2120, Rev. B |
3 |
Handling precautions
Disc drives are extremely fragile. Do not drop or jar your drive.
Keep the drive in its antistatic bag until you are ready to install it.
Protect your drive from static discharge by making sure you are well grounded before touching the drive. We recommend wearing a grounded wrist strap throughout the installation process. Do not touch the connectors or any part of the printed circuit board.
Always handle the drive by its edges or frame.
Do not apply pressure or attach labels to the circuit board or the top of the drive.
4 |
Medalist 4340, 3230 and 2120, Rev. B |
Master/slave jumpers
If your new Seagate drive will be the only drive in your computer, you do not have to change any jumper settings. In this case, skip ahead to “Attaching cables and mounting the drive,” on page 6.
If you already have one hard drive in your computer and you are installing a second drive, you must configure one drive as a master and the other as a slave.
To configure the drive as a master or one drive only:
•Place a jumper on pins 5 and 6 (see Figure 1 on page 5). The master drive usually defaults to being the “boot” drive
(drive C), from which the computer loads system software when it first starts up.
To configure the drive as a slave:
•Remove all the jumpers.
•If you need to change the jumpers on your existing hard drive, see the Disk Manager online manual, look on the drive label, or contact the drive manufacturer.

Medalist 4340, 3230 and 2120, Rev. B |
5 |
pin 1
2 4 6
4-pin power 

 connector 1 3 5
Slave
Master or single drive
ATA interface connector
Figure 1. Master and slave jumper settings

6 |
Medalist 4340, 3230 and 2120, Rev. B |
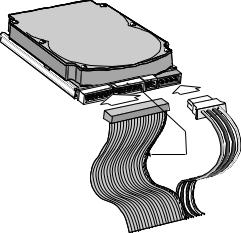
Attaching cables and mounting the drive
1.If you are attaching a new ATA interface cable to a single drive, attach one end of the cable to the interface connector on your host adapter or motherboard. Motherboard connectors can be identified by the IDE or HDD 40-pin connector. The ATA cable must be no more than 18 inches (457 mm) long.
2.Thread the interface cable through the drive bay and attach the connector at the end of the interface cable to your new drive.
Note. If you have two drives, attach the second drive to the second connector.
Pin 1 |
Figure 2. Attaching the cables
!make sure to align pin 1 on the host adapter or motherboard with pin 1 on your drive or drives. Pin 1 on the
interface cable is usually indicated by a stripe along the edge of the cable.Caution. To avoid possible damage to your system,
Medalist 4340, 3230 and 2120, Rev. B |
7 |
Figure 3. Mounting screws
3.You can mount the drive in any orientation. Usually it is mounted with the circuit board down.
4.Slide the drive carefully into the drive bay. Secure the drive with four 6-32 UNC mounting screws in either the sidemounting holes or the bottom-mounting holes. Insert the screws no more than 0.22 inch (5.58 mm) into the bottommounting holes and no more than 0.20 inch (5.0 mm) into the side-mounting holes.
! |
Caution. To avoid possible damage to the drive, do not |
overtighten the screws or use metric screws. |
8 |
Medalist 4340, 3230 and 2120, Rev. B |
Power connector
Interface connector
Pin 1
Figure 4. Cable connectors
Note. If you are mounting the drive in a 5.25-inch drive bay, you need a mounting adapter or frame kit. Contact your computer dealer. Some computers also require drive mounting rails, which can be obtained from your distributor or computer manufacturer.
5.Attach a power cable to each drive. If your computer does not have an unused power connector, you can purchase a Y- shaped power cable from your computer dealer.
6.Check all cable connections and then replace your computer cover. Continue to “Configuring your computer.”
Medalist 4340, 3230 and 2120, Rev. B |
9 |
Configuring your computer
Before you format or partition your new drive, you must configure your computer’s BIOS so that the computer can recognize your new drive.
1.Turn your computer on. As your computer starts up, watch the screen for a message that describes how to run the system setup program (also called BIOS or CMOS setup). This is usually done by pressing a special key, such as DELETE, ESC or F1, during startup. See your computer manual for details. Press the appropriate key to run the System Setup program.
2.Enable LBA mode if it is available. Many BIOS use the logical block addressing (LBA) mode to access drives with capacities greater than 528 Mbytes.
3.If your BIOS provides automatic drive detection (an “Auto” drive type), select this option. This allows your computer to configure itself automatically for your new drive.
If your BIOS does not provide automatic drive detection, select “User-defined” drive settings. If your computer supports LBA addressing, enter the LBA cylinder, head and sector values for your drive from the table at the top of the next column. If your computer does not support LBA addressing, enter the CHS values from the table.
4.Save the settings and exit the System Setup program (your computer will automatically reboot).
10 |
Medalist 4340, 3230 and 2120, Rev. B |
|||
|
|
|
|
|
BIOS Settings |
|
|
||
|
|
|
|
|
Drive |
|
Cylinders |
Heads |
Sectors |
|
|
|
|
|
ST34340A |
|
|
|
|
CHS addressing |
|
8,894 |
15 |
63 |
Addressable sectors |
|
8,404,830 |
— |
— |
|
|
|
|
|
ST33230A |
|
|
|
|
CHS addressing |
|
6,253 |
16 |
63 |
Addressable sectors |
|
6,303,024 |
|
|
|
|
|
|
|
ST32120A |
|
|
|
|
CHS addressing |
|
4,092 |
16 |
63 |
Addressable sectors |
|
4,124,736 |
|
|
|
|
|
|
|
Note. This drive does not use the write precomp or landing zone parameters. Set these parameters to zero.
Recommendation
After you configure your computer, we recommend that you use Disk Manager to partition and format your drive. If your computer was built before mid-1994, you probably will not be able to access the full capacity of your new drive unless you use Disk Manager. See page 14 for information on “Installation using Disk Manager.”
If you do not want to use Disk Manager, you can use the standard DOS commands to partition and format your drive, as described on page 16.
 Loading...