


SyncMaster B2230HD
Samsung SyncMaster B2230HD, SyncMaster B2330HD, SyncMaster B2430HD, SyncMaster B2230, LS-23PTNSF/ZA User Manual

SyncMaster B2230HD B2330HD B2430HD
LCD TV Monitor
User Manual
The color and the appearance may differ depending on the
product, and the specifications are subject to change
without prior notice to improve the performance.

Table Of Contents
MAJOR SAFETY PRECAUTIONS
Before You Start . . . . . . . . . . . . . . . . . . . . . . . . . . . . . . . . . . . . . . . . . . . 1-1
Care and Maintenance . . . . . . . . . . . . . . . . . . . . . . . . . . . . . . . . . . . . . 1-2
Safety Precautions . . . . . . . . . . . . . . . . . . . . . . . . . . . . . . . . . . . . . . . . . 1-3
INSTALLING THE PRODUCT
Package Contents . . . . . . . . . . . . . . . . . . . . . . . . . . . . . . . . . . . . . . . . . 2-1
Installing the Stand . . . . . . . . . . . . . . . . . . . . . . . . . . . . . . . . . . . . . . . . 2-2
Removing the Stand . . . . . . . . . . . . . . . . . . . . . . . . . . . . . . . . . . . . . . . . 2-3
Attaching a Wall Mount/Desktop Stand . . . . . . . . . . . . . . . . . . . . . . . . 2-4
Connecting to a Computer . . . . . . . . . . . . . . . . . . . . . . . . . . . . . . . . . . 2-5
Using it as a TV . . . . . . . . . . . . . . . . . . . . . . . . . . . . . . . . . . . . . . . . . . . . 2-6
Connecting an HDMI cable . . . . . . . . . . . . . . . . . . . . . . . . . . . . . . . . . . 2-7
Connecting Using a DVI to HDMI Cable . . . . . . . . . . . . . . . . . . . . . . . 2-8
Connecting a Component cable . . . . . . . . . . . . . . . . . . . . . . . . . . . . . . 2-9
Connecting AV Devices . . . . . . . . . . . . . . . . . . . . . . . . . . . . . . . . . . . . 2-10
Connecting to an Amplifier . . . . . . . . . . . . . . . . . . . . . . . . . . . . . . . . . 2-11
Connecting Headphones . . . . . . . . . . . . . . . . . . . . . . . . . . . . . . . . . . . 2-12
Kensington Lock . . . . . . . . . . . . . . . . . . . . . . . . . . . . . . . . . . . . . . . . . 2-13
USING THE PRODUCT
Plug & Play Feature . . . . . . . . . . . . . . . . . . . . . . . . . . . . . . . . . . . . . . . . 3-1
Viewing the Control panel . . . . . . . . . . . . . . . . . . . . . . . . . . . . . . . . . . . 3-2
Remote Control . . . . . . . . . . . . . . . . . . . . . . . . . . . . . . . . . . . . . . . . . . . . 3-3
Using the Screen Adjustment Menu (OSD: On Screen Display) . . . . 3-4
Media Play . . . . . . . . . . . . . . . . . . . . . . . . . . . . . . . . . . . . . . . . . . . . . . . . 3-5
Anynet+ (HDMI-CEC) . . . . . . . . . . . . . . . . . . . . . . . . . . . . . . . . . . . . . . . . 3-6
Installing the Device Driver . . . . . . . . . . . . . . . . . . . . . . . . . . . . . . . . . . 3-7
Standard Signal Mode Table . . . . . . . . . . . . . . . . . . . . . . . . . . . . . . . . . 3-8
INSTALLING THE SOFTWARE
Natural Color . . . . . . . . . . . . . . . . . . . . . . . . . . . . . . . . . . . . . . . . . . . . . . 4-1
MultiScreen . . . . . . . . . . . . . . . . . . . . . . . . . . . . . . . . . . . . . . . . . . . . . . . 4-2
TROUBLESHOOTING
Monitor Self-Diagnosis . . . . . . . . . . . . . . . . . . . . . . . . . . . . . . . . . . . . . 5-1
Before Requesting Service . . . . . . . . . . . . . . . . . . . . . . . . . . . . . . . . . . 5-2
FAQ . . . . . . . . . . . . . . . . . . . . . . . . . . . . . . . . . . . . . . . . . . . . . . . . . . . . . 5-3
MORE INFORMATION
Specifications . . . . . . . . . . . . . . . . . . . . . . . . . . . . . . . . . . . . . . . . . . . . . 6-1
Power Saving Function . . . . . . . . . . . . . . . . . . . . . . . . . . . . . . . . . . . . . 6-2
Contact SAMSUNG WORLDWIDE . . . . . . . . . . . . . . . . . . . . . . . . . . . . . 6-3
Major Safety Precautions 1-1
1 Major Safety Precautions
1-1 Before You Start
Icons used in this manual
Using this Manual
• Make yourself fully aware of the safety precautions before using this product.
• If a problem occurs, refer to the 'Troubleshooting' section.
• The contents of this manual are subject to change without prior notice for performance improvement.
License
Open source license notice
In the case of using open source software, Open Source License are available on the product menu.
Open Source license Notice is written only English.
ICON NAME MEANING
Caution Indicates cases where the function may not work or the setting may be canceled.
Note Indicates a hint or tip to operate a function.
Manufactured under license from Dolby Laboratories.
Dolby and the double-D symbol are trademarks of Dolby Laboratories.
DivX Certified to play DivX video up to HD 1080p, including premium content.
ABOUT DIVX VIDEO: DivX® is a digital video format created by DivX,Inc.
This is an official DivX Certified device that plays DivX video.
Visit www.divx.com for more information and software tools to convert your files into DivX video.
ABOUT DIVX VIDEO-ON-DEMAND: This DivX Certified® device must be registered in order to
play DivX Video-on-Demand (VOD) content.
To generate the registration code, locate the DivX VOD section in the device setup menu.
Go to vod.divx.com with this code to complete the registration process and learn more about
DivX VOD.
Pat. 7,295,673; 7,460,688; 7,519,274
Manufactured under license under U.S. Patent #’s: 5,451,942; 5,956,674; 5,974,380;
5,978,762; 6,487,535 & other U.S. and worldwide patents issued & pending.
DTS and the Symbol are registered trademarks, & DTS 2.0+ Digital Out and the DTS logos are
trademarks of DTS, Inc. Product includes software. ©DTS, Inc. All Rights Reserved.
TheaterSound, SRS and the symbol are trademarks of SRS Labs, Inc.
TheaterSound technology is incorporated under license from SRS Labs, Inc.

1-1 Major Safety Precautions
Copyright Notice
Copyright © 2010 Samsung Electronics Co., Ltd. All Rights Reserved.
The copyright of this manual is reserved by Samsung Electronics, Co., Ltd.
The contents of this manual may not be partially or in whole reproduced, distributed or used in any form without the written
permission of Samsung Electronics, Co., Ltd.
The SAMSUNG logo and SyncMaster are the registered trademarks of Samsung Electronics, Co., Ltd.
Microsoft, Windows and Windows NT are the registered trademarks of Microsoft Corporation.
VESA, DPM and DDC are the registered trademarks of the Video Electronics Standard Association.
All other trademarks mentioned herein belong to their respective companies.
Major Safety Precautions 1-2
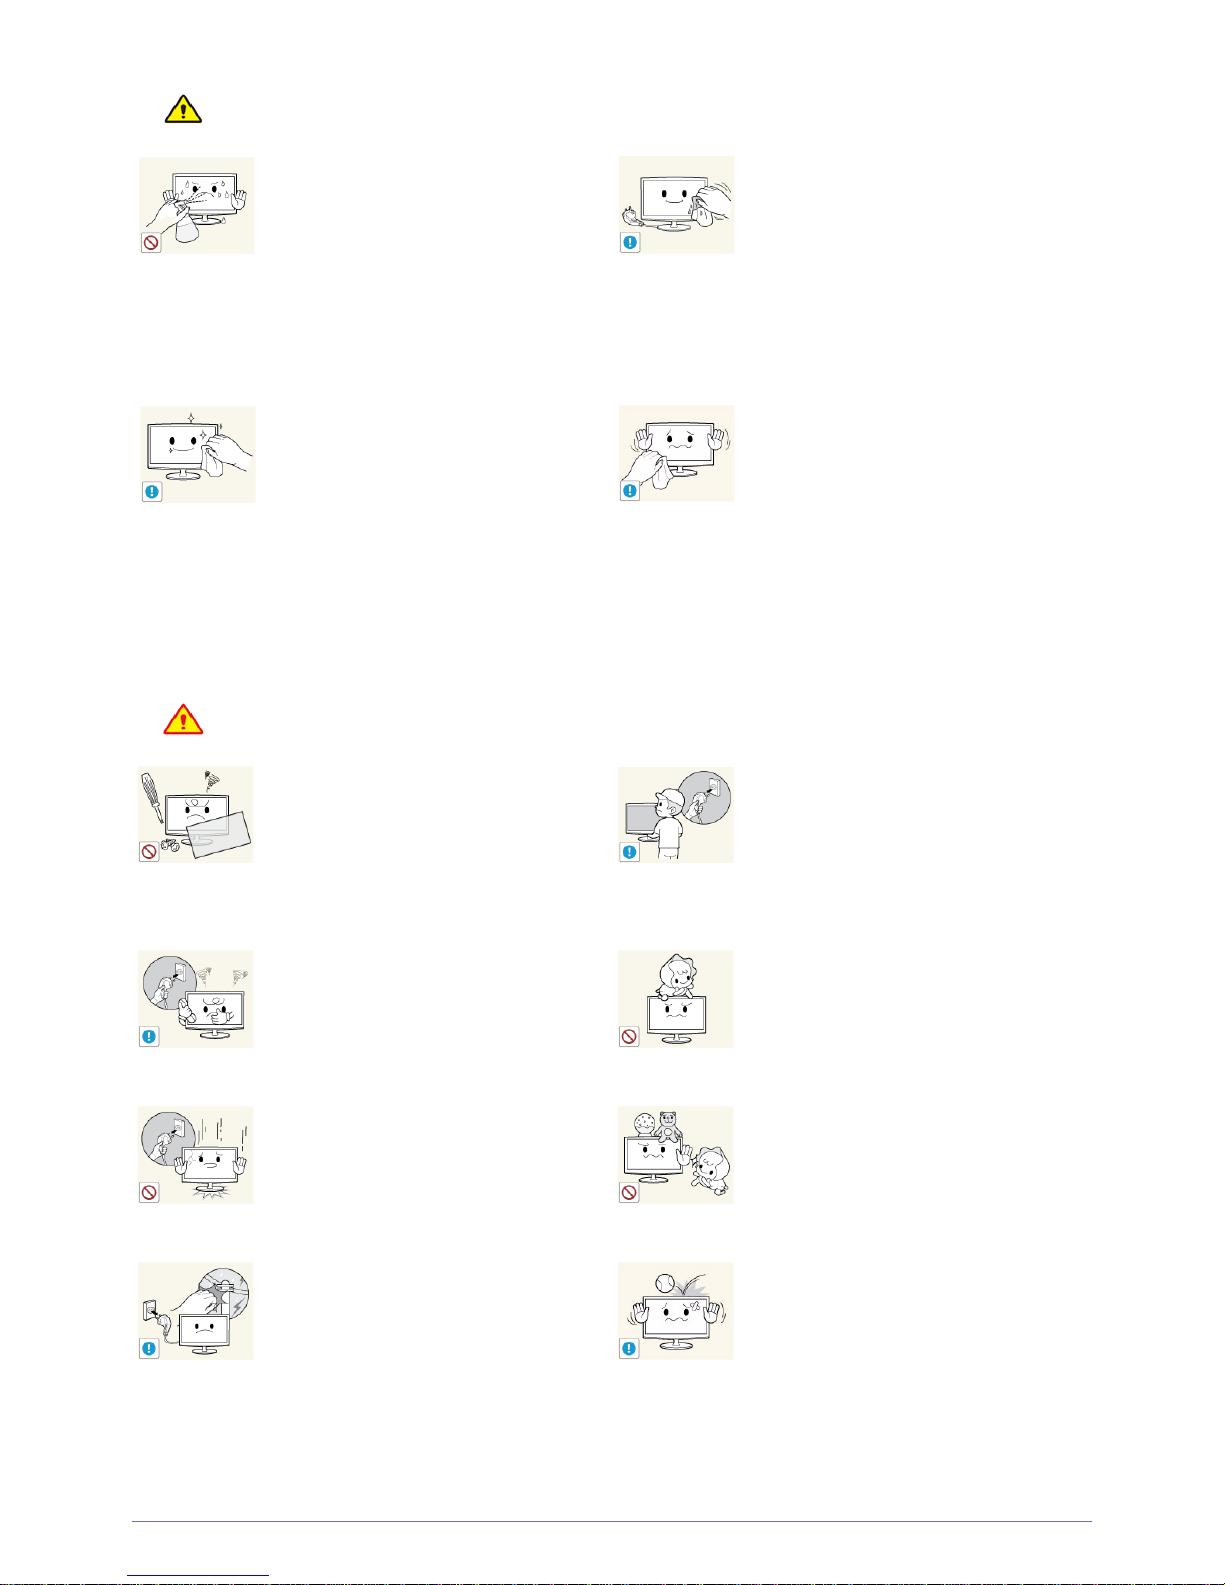
1-2 Care and Maintenance
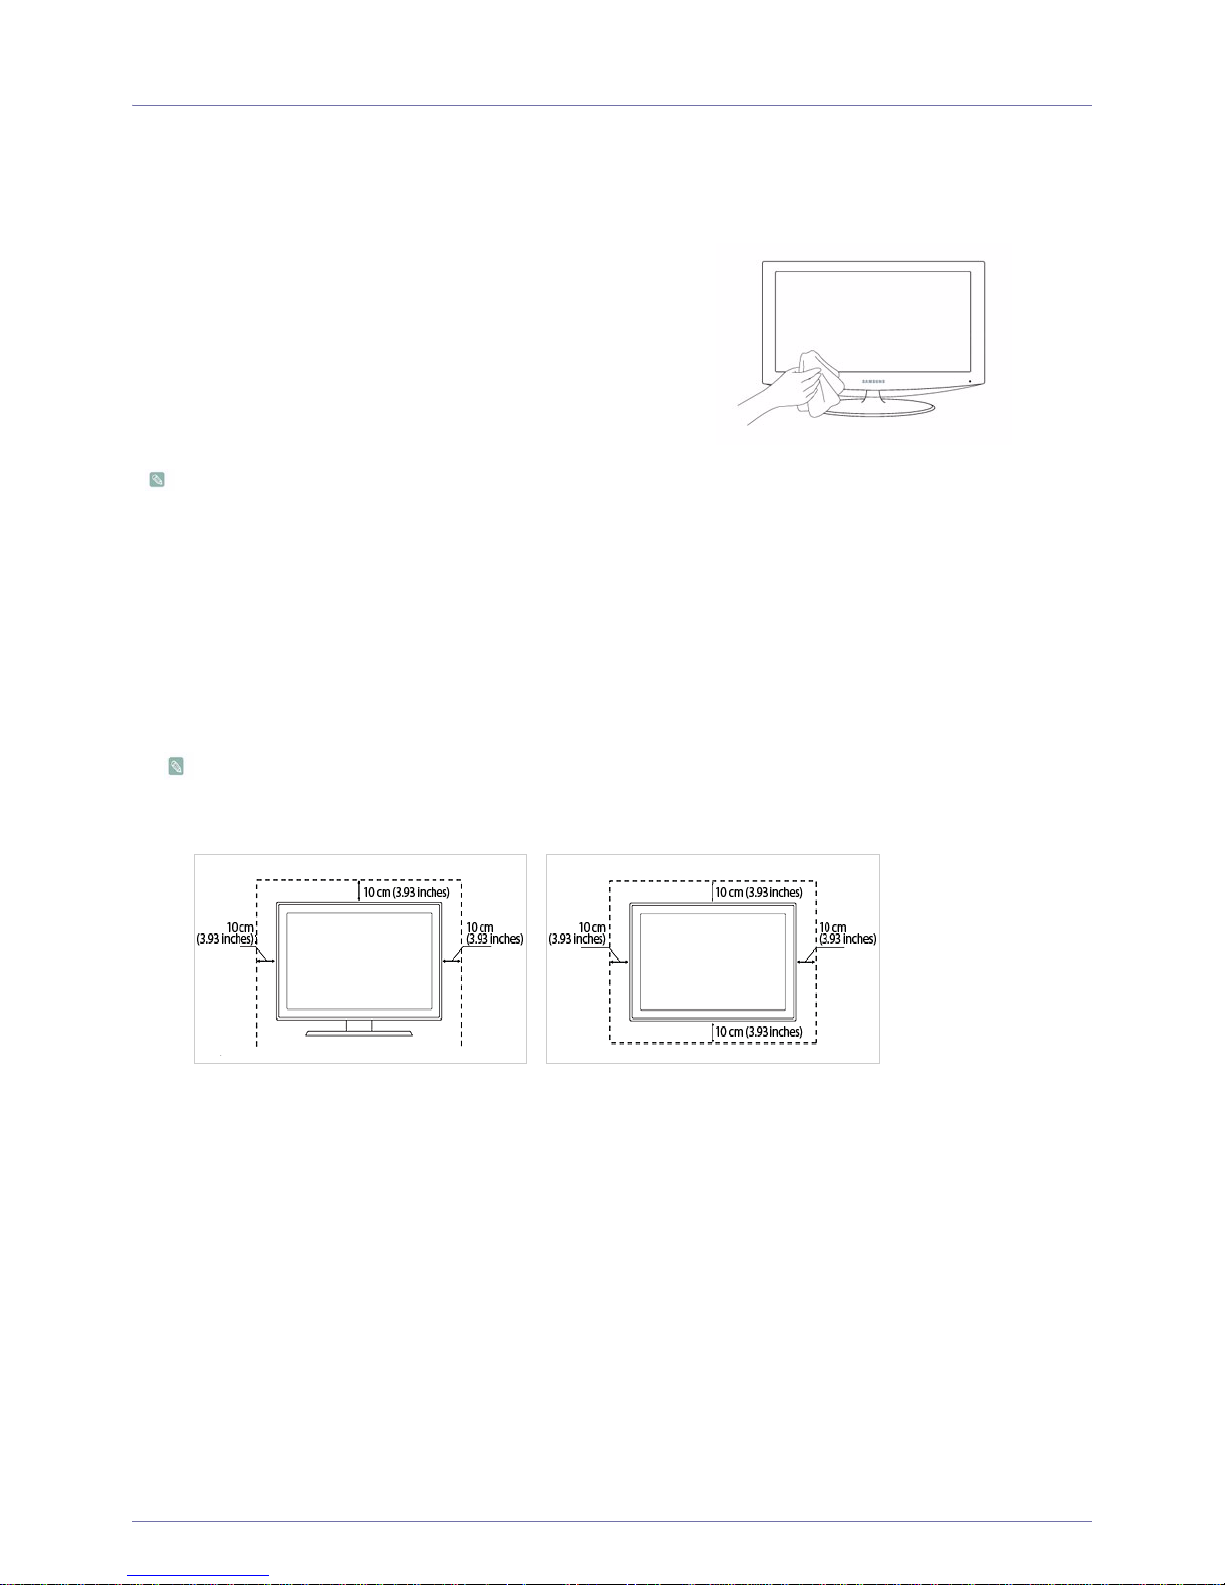
External Surface and Screen Maintenance
Securing the Installation Space
• Keep the required distances between the product and other objects (e.g. walls) to ensure proper ventilation.
Failing to do so may result in fire or a problem with the product due to an increase in the internal temperature.
Install the product so the required distances shown in the figure are kept.
The appearance may differ depending on the product.
About persistent images
• Displaying a still image for a long time may create a persistent image or stain on the screen.
If you do not use the product for a long time, set the power-saving mode or screen saver.
• Due to technological constraints of the LCD Panel manufacturer, the images generated by this product may appear either
brighter or darker than normal by appr. 1ppm (parts per million) pixel.
The number of sub-pixels of an LCD panel by size: The number of Sub-Pixels = Max. Horizontal Resolution x Max. Vertical
Resolution x 3
Example) If the maximum resolution is 1920 x 1080, the number of sub-pixels is 1920 x 1080 x 3 = 6,220,800.
Clean the product with a soft dry cloth.
• Avoid cleaning the product with an inflammable substance such
as benzene or thinner or with a wet cloth. This may result in a
problem with the product.
• Avoid scratching the screen with your fingernails or a sharp
object.
• Avoid cleaning the product by spraying water onto it. If water
enters the product, it may result in fire, electric shock or a
problem with the product.
A white stain may be generated on the surface of the model if a
supersonic humidifier is used near it.
The appearance and the color may differ depending on models.
When installing the product with a stand When installing the product with a wall-mount
1-3 Major Safety Precautions
1-3 Safety Precautions
Icons used for safety precautions
Meaning of Signs
Power Related
The following images are for your reference and may differ depending on models and countries.
Warning
ICON NAME MEANING
Warning Failing to follow the precautions marked with this sign may result in a serious injury or even a
fatality.
Caution
Failing to follow the precautions marked with this sign may result in a personal injury or property
damage.
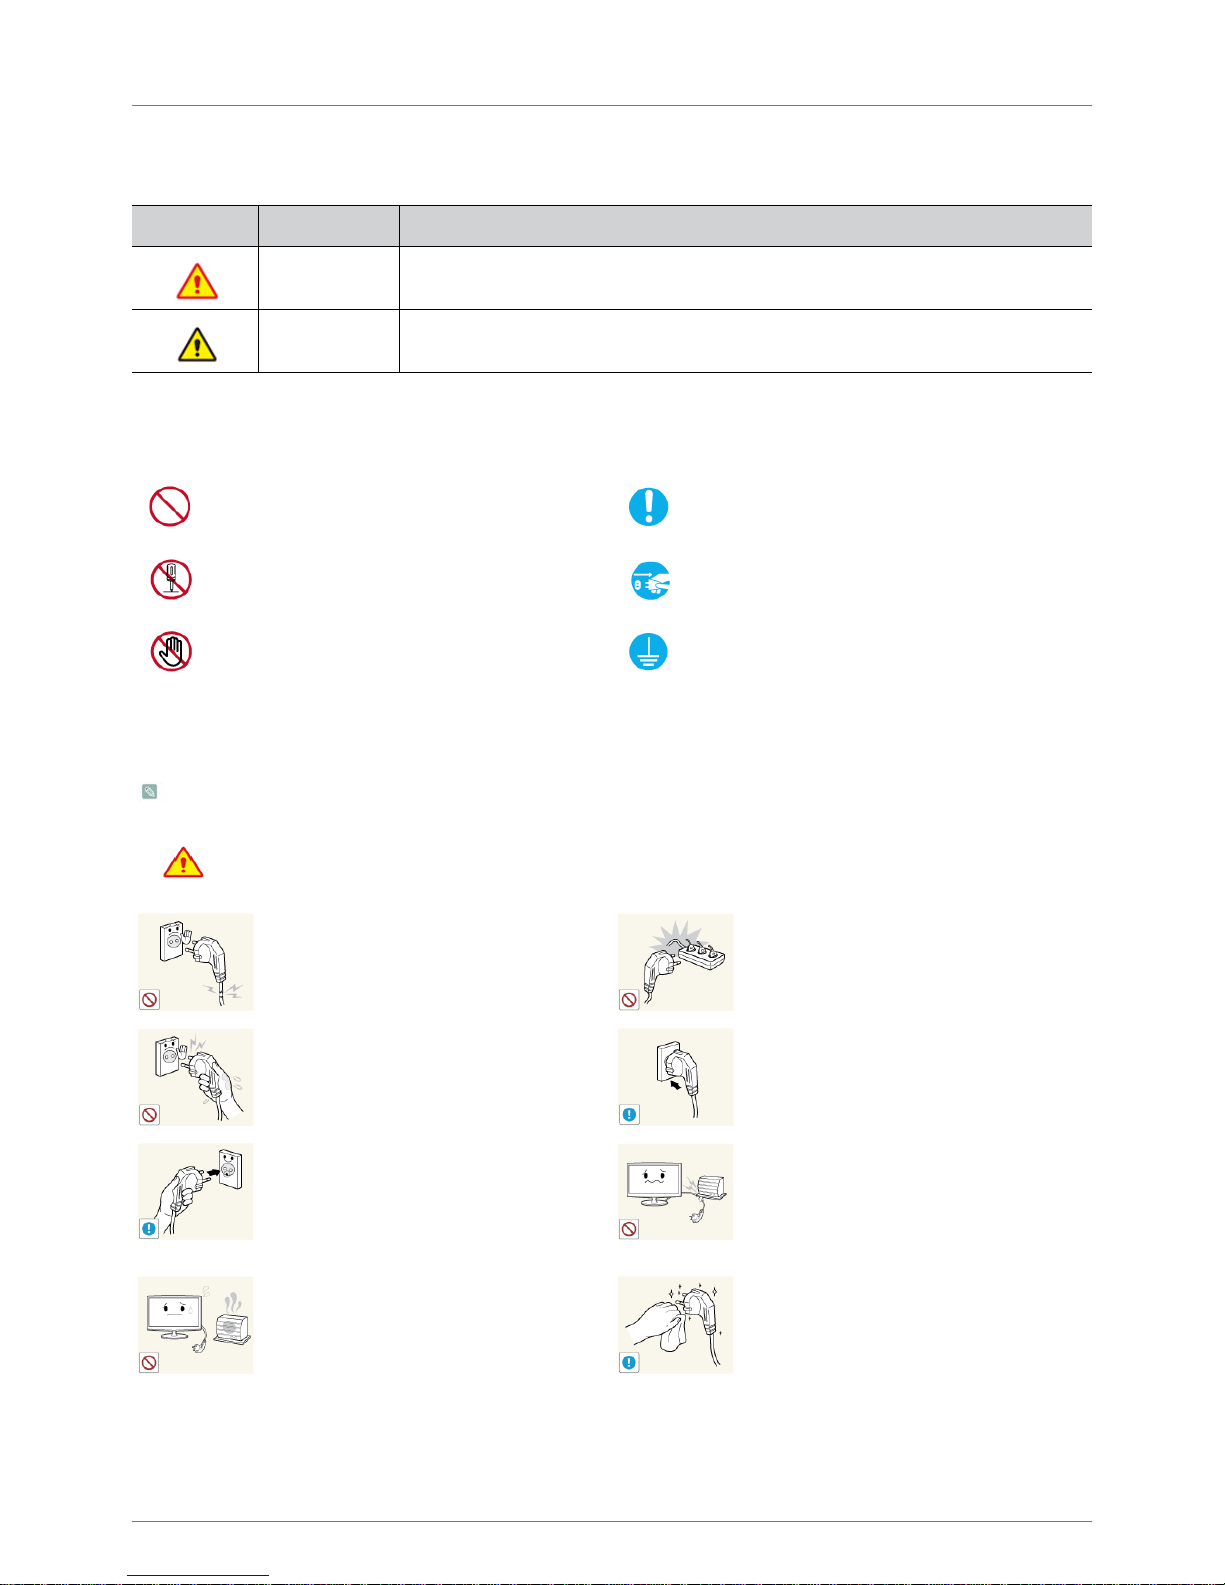
Do not perform. Must be followed.
Do not disassemble.
The power plug must be unplugged from the
wall outlet.
Do not touch. Must be grounded to prevent electric shock.
Avoid using a damaged power cord or plug
or a loose power outlet.
• Otherwise, it may result in electric shock
or fire.
Avoid connecting multiple electric appliances to a single wall outlet.
• Otherwise, it may result in fire due to
overheating of the wall outlet.
Avoid plugging in or unplugging the power
supply with wet hands.
• Otherwise, it may result in electric
shock.
Plug the power plug in firmly.
• Otherwise, it may result in fire.
Make sure to connect the power cord to a
grounded wall outlet (for insulation class 1
equipment only).
• Otherwise, it may result in electric shock
or injury.
Avoid bending or twisting the power cord
excessively and avoid placing heavy objects
on the cord.
• Otherwise, it may result in electric shock
or fire due to a damaged power cord.
Keep the power cord and the product away
from a heater.
• Otherwise, it may result in electric shock
or fire.
If the pins of the power plug or the wall outlet are covered in dust, clean it using a dry
cloth.
• Otherwise, it may result in fire.
Major Safety Precautions 1-3
Caution
Installation Related
Warning
Avoid unplugging the power plug while the
product is operating.
• Otherwise, it may damage the product
due to electric shock.
Make sure to use only the power cord supplied by our company. In addition, do not
use the power cord of another electric appliance.
• Otherwise, it may result in electric shock
or fire.
When unplugging the power plug from the
wall outlet, make sure to hold it by the plug
and not by the cord.
• Otherwise, it may result in electric shock
or fire.
Connect the power plug to a wall outlet that
can be easily reached.
• When a problem occurs with the
product, you must unplug the power
plug to cut the power off completely. You
cannot cut the power off completely
using only the power button on the
product.
Avoid placing burning candles, mosquitorepellent or cigarettes on the product.
• Otherwise, it may result in fire.
Ask an installation engineer or relevant
company to install the product onto the wall.
• Otherwise, it may result in injury.
• Make sure to use the specified wall
mount.
Avoid installing the product in a badly-ventilated location such as inside a bookshelf or
closet.
• Otherwise, it may result in fire due to
internal over-heating.
Keep a distance of at least 10 cm(3.93
inches) from the wall when installing the
product for ventilation.
• Otherwise, it may result in fire due to
internal over-heating.
Keep the plastic bags used to pack the
product away from children.
• If children place the plastic bags over
their heads, they may suffocate.
Avoid installing the product in a location that
is unstable or exposed to excessive vibrations such as on an unstable or slanted
shelf.
• The product may fall and this may result
in damage to the product or injury.
• If you use the product in a location
exposed to excessive vibration, it may
result in a problem with the product or
fire.
Avoid installing the product in a location
exposed to dust, moisture (sauna), oil,
smoke or water (rain drops) and installing it
within a vehicle.
• This may result in electric shock or fire.
Avoid installing the product in a location
exposed to direct sunlight or near a heat
source such as a fireplace or heater.
• This may shorten the product life cycle
or cause fire.

1-3 Major Safety Precautions
Caution
Cleaning Related
Warning
Avoid installing the product where children
may reach it.
• If a child touches the product, the
product may fall and this may result in
injury.
• Since the front part is heavier, install the
product on a flat and stable surface.
Bend the outdoor antenna cable downwards
at the location where it comes in the house
so that rainwater does not flow in.
• If rainwater enters the product, it may
result in electric shock or fire.
Install the antenna far away from any high
voltage cables.
• If the antenna touches or falls onto a
high voltage cable, it may result in
electric shock or fire.
Do not let the product drop while moving it.
• This may result in a problem with the
product or injury.
Do not place the product face down on the
floor.
• This may damage the panel of the
product.
When installing the product on a console or
shelf, make sure that the front of the product
does not protrude out of the console or
shelf.
• Otherwise, this may cause the product
to fall off and result in a malfunction or
injury.
• Make sure to use a cabinet or shelf
suitable to the size of the product.
When putting the product down, handle it
gently.
• Otherwise, it may result in a problem
with the product or injury.
If the product is installed in a location where
the operating conditions vary considerably,
a serious quality problem may occur due to
the surrounding environment. In this case,
install the product only after consulting one
of our service engineers about the matter.
• Places exposed to microscopic dust,
chemicals, too high or low temperature,
high humidity, airports or stations where
the product is continuously used.
Before cleaning the product, unplug the
power cord.
• Otherwise, it may result in electric shock
or fire.
When cleaning the product, do not spray
water directly over the product parts.
• Make sure that water does not enter the
product.
• Otherwise, it may result in fire, electric
shock or a problem with the product.
Major Safety Precautions 1-3
Caution
Usage Related
Warning
Avoid spraying cleansing agent directly onto
the product.
• This may result in discoloration or
cracking of the exterior of the product or
the panel coming off.
When cleaning the product, disconnect the
power cord and clean the product with the
supplied cleaning cloth.
• Avoid using chemicals such as wax,
benzene, alcohol, thinner, mosquitorepellent, fragrance, lubrication or
cleansing agent when cleaning the
product.
This may result in the exterior being
deformed or the print being removed.
If you can't get the product clean with just
the supplied cloth, use a soft, damp cloth
with a "monitor-exclusive cleansing agent"
and wipe the product with it.
• If no monitor-exclusive cleansing agent
is available, dilute a cleansing agent
with water at a ratio of 1:10 before
cleaning the product.
Since the exterior of the product is easily
scratched, be sure to use the supplied
cleansing cloth.
Since a high voltage runs through the product, never disassemble, repair or modify the
product yourself.
• Otherwise, it may result in fire or electric
shock.
• If the product needs to be fixed, contact
a service center.
To move the product, turn the power off and
unplug the power cord, the antenna cable
and any other wires connected to the product.
• Otherwise, it may result in electric shock
or fire due to the damaged power cord.
If the product generates a strange noise, a
burning smell, or smoke, unplug the power
plug immediately and contact a service center.
• Otherwise, it may result in electric shock
or fire.
Avoid letting children hang or climb onto the
product.
• Otherwise, it may result in the product
falling and this may result in injury or
death.
If you drop the product or the case is damaged, turn the power off and unplug the
power cord. Contact a Service Center.
• Otherwise, it may result in fire or electric
shock.
Avoid placing objects such as toys and
cookies on top of the product.
• If a child hangs over the product to grab
an object, the object or the product may
fall and this may result in injury or even
death.
When thunder or lighting occurs, unplug the
power cord and under no circumstance
touch the antenna cable as this is dangerous.
• Otherwise, it may result in electric shock
or fire.
Avoid dropping an object over the product
or cause impact to the product.
• Otherwise, it may result in electric shock
or fire.
1-3 Major Safety Precautions
Caution
Avoid moving the product by pulling the
power cord or antenna cable.
• Otherwise, it may result in electric
shock, fire or a problem with the product
due to damage to the cable.
When a gas leak occurs, do not touch the
product or the power plug and ventilate
immediately.
• A spark may result in an explosion or
fire.
• During a thunder or lighting storm, do
not touch the power cord or antenna
cable.
Avoid lifting up or moving the product by
holding only the power cord or signal cable.
• Otherwise, it may result in electric
shock, fire or a problem with the product
due to damage to the cable.
Avoid using or placing inflammable spray or
objects near the product.
• This may result in an explosion or fire.
Take care not to block the vent by a table
cloth or curtain.
• Otherwise, it may result in fire due to
internal overheating.
Avoid inserting metal objects such as a
chopsticks, coins or hairpins, or inflammable objects into the product (the vents,
ports, etc).
• If water or substances enter the product,
turn the power off, unplug the power
cord and contact a service center.
• Otherwise, it may result in a problem
with the product, electric shock or fire.
Avoid placing a liquid container such as a
vase, flowerpot, beverage, cosmetics or
drugs, or a metal object over the product.
• If water or substances enter the product,
turn the power off, unplug the power
cord and contact a service center.
• Otherwise, it may result in a problem
with the product, electric shock or fire.
Displaying a still image for a long time may
create a persistent image or stain on the
screen.
• If you do not use the product for a long
time, use the power-saving mode or set
the screensaver to the moving picture
mode.
When not using the product for a long time
such as leaving your home, unplug the
power cord from the wall outlet.
• Otherwise, it may cause dust
accumulation and result in fire caused
by overheating or short circuit or result in
an electric shock.
Set the appropriate resolution and frequency for the product.
• Otherwise, it may result in eye strain.
Avoid turning the product upside down or
move the product holding only the stand.
• This may cause the product to fall,
resulting in damage to the product or
injury.
Watching the product from too close a distance continuously may damage your eyesight.
Avoid using a humidifier or cooker near the
product.
• Otherwise, it may result in electric shock
or fire.
It is important to give your eyes some rest (5
minutes every hour) when viewing the product screen for long periods of time.
• This will alleviate any eye strain.
Since the display panel is hot after using it
for a long time, do not touch the product.
Major Safety Precautions 1-3
Maintaining the Correct Posture when Using this Product
Keep the small accessories in a location out
of the reach of children.
Take care when adjusting the angle of the
product or the height of the stand.
• If your hand or finger is caught, you may
be injured.
• If the product is tilted excessively, the
product may fall and this may result in
injury.
Avoid placing a heavy object over the product.
• Otherwise, it may result in a problem
with the product or injury.
When using headphones or earphones, do
not turn the volume too high.
• Having the sound too loud may damage
your hearing.
Be careful that children do not place the batteries in their mouths when removed from
the remote control. Place the battery in a
location that children or infants cannot
reach.
• If children have had the battery in their
mouths, consult your doctor
immediately.
When replacing the batteries, insert them
with right polarity (+, -).
• Otherwise, the battery may become
damaged or it may cause fire, personal
injury or damage due to leakage of the
internal liquid.
Use only specified standard batteries. Do
not use new and used batteries together.
• This may cause a battery to break or
leak and may cause fire, injury, or
contamination (damage).
The batteries (and rechargeable batteries)
are not ordinary refuse and must be
returned for recycling purposes. The customer is responsible for returning the used
or rechargeable batteries for recycling.
• The customer can return used or
rechargeable batteries to a nearby
public recycling center or to a store
selling the same type of the battery or
rechargeable battery.
Maintain the correct posture when using this product.
• Straighten your back.
• Keep a distance of 45~50 cm (18~19 inches) from your eyes to the screen. Look down at
the screen and face the screen forwards.
• Adjust the angle of the product so that light is not reflected onto the screen.
• Keep your elbow at a right angle and keep your arm level with the back of your hand.
• Keep your elbow at a right angle.
• Place your heels flat on the ground while keeping your knees at an angle of 90 degrees or
higher and maintain the position of your arm so that your arm is below your heart.
2-1 Installing the Product
2 Installing the Product
2-1 Package Contents
• Unpack the product and check if all of the following contents have been included.
• Store the packaging box in case you need to move the product at a later stage.
The cleaning cloth is supplied with black high-glossy models only.
CONTENTS
Quick Setup Guide
Product Warranty
(Not available in all locations)
User Manual Power Cord
Cable Holder Batteries (AAA X 2)
(Not available in all locations)
Stand Base Stand Connector
Cleaning Cloth Stereo Cable D-Sub Cable Remote Control
SOLD SEPARATELY
HDMI Cable HDMI to DVI cable
Installing the Product 2-2
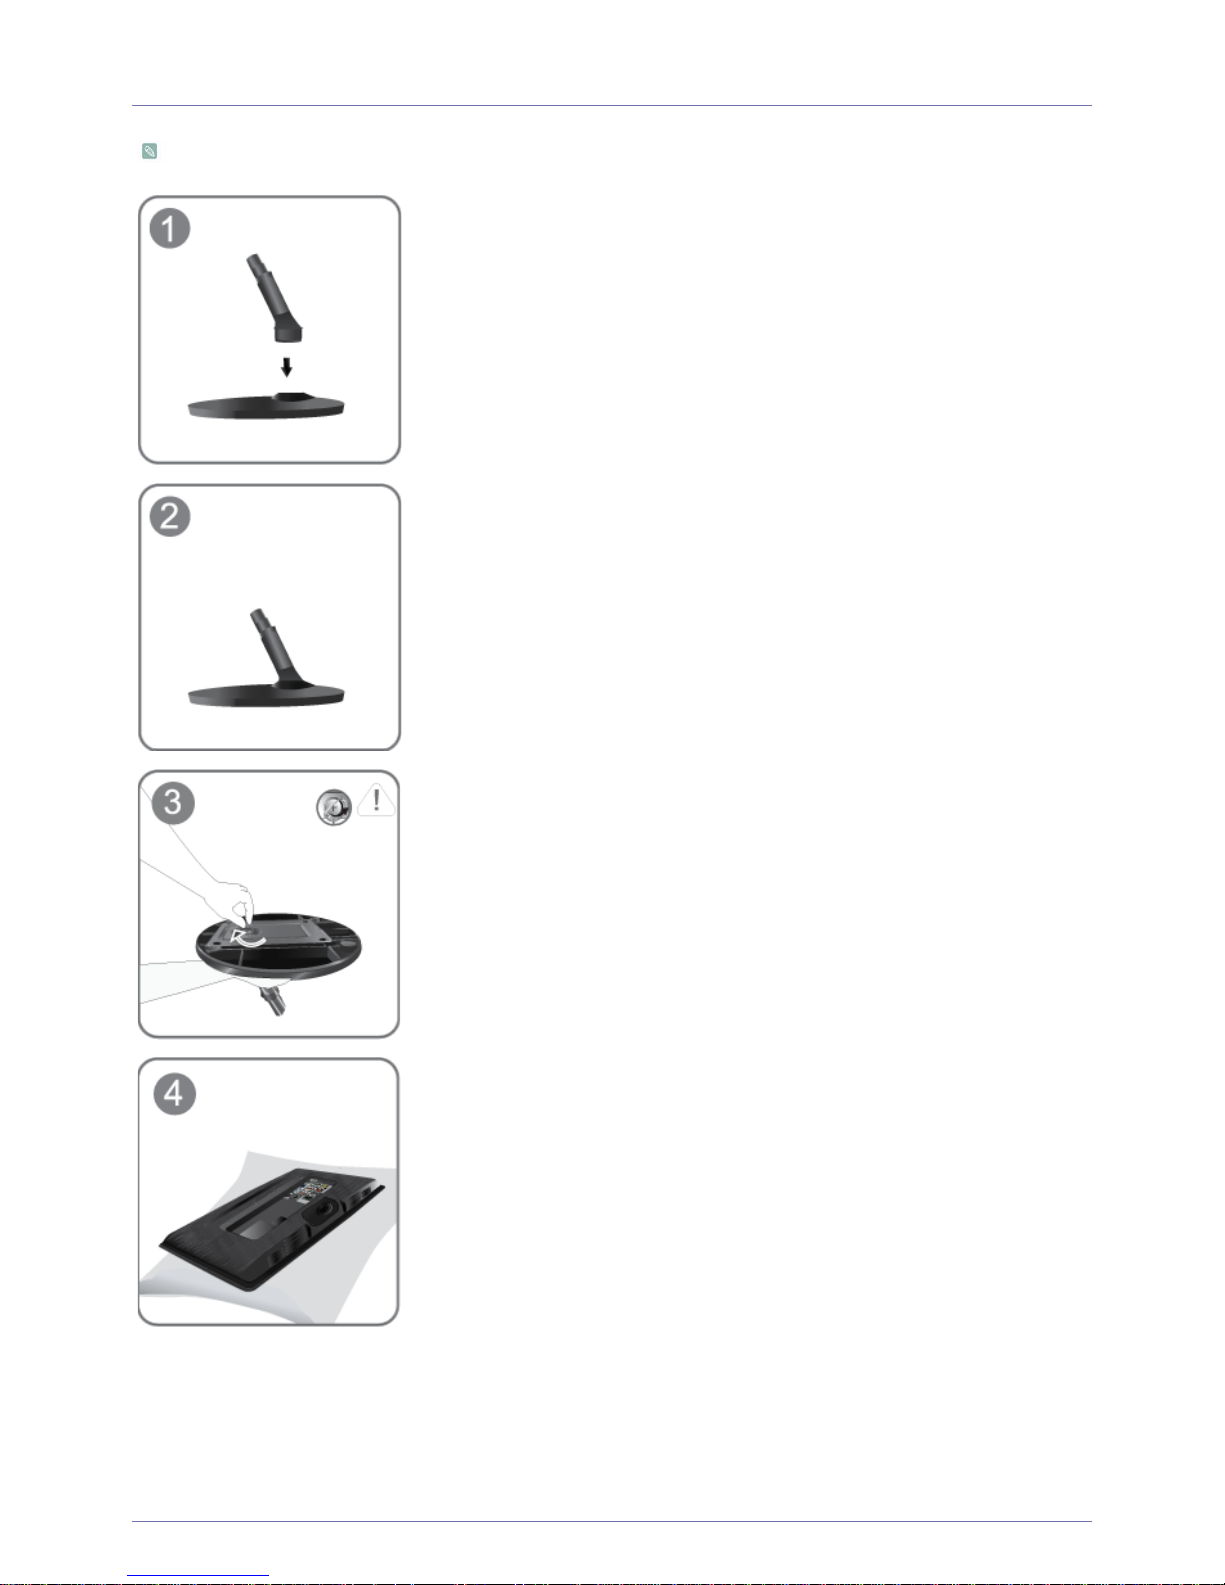
2-2 Installing the Stand
Before assembling the product, place the product down on a flat and stable surface so that the screen is facing downwards.
Insert the Stand Connector into the Stand Base in the direction shown by the figure.
Check if the Stand Connector is firmly connected.
Turn the connecting screw at the bottom of the Stand base fully so that it is completely
fixed.
Place a soft cloth over the table to protect the product and place the product onto the
cloth face down.
2-2 Installing the Product
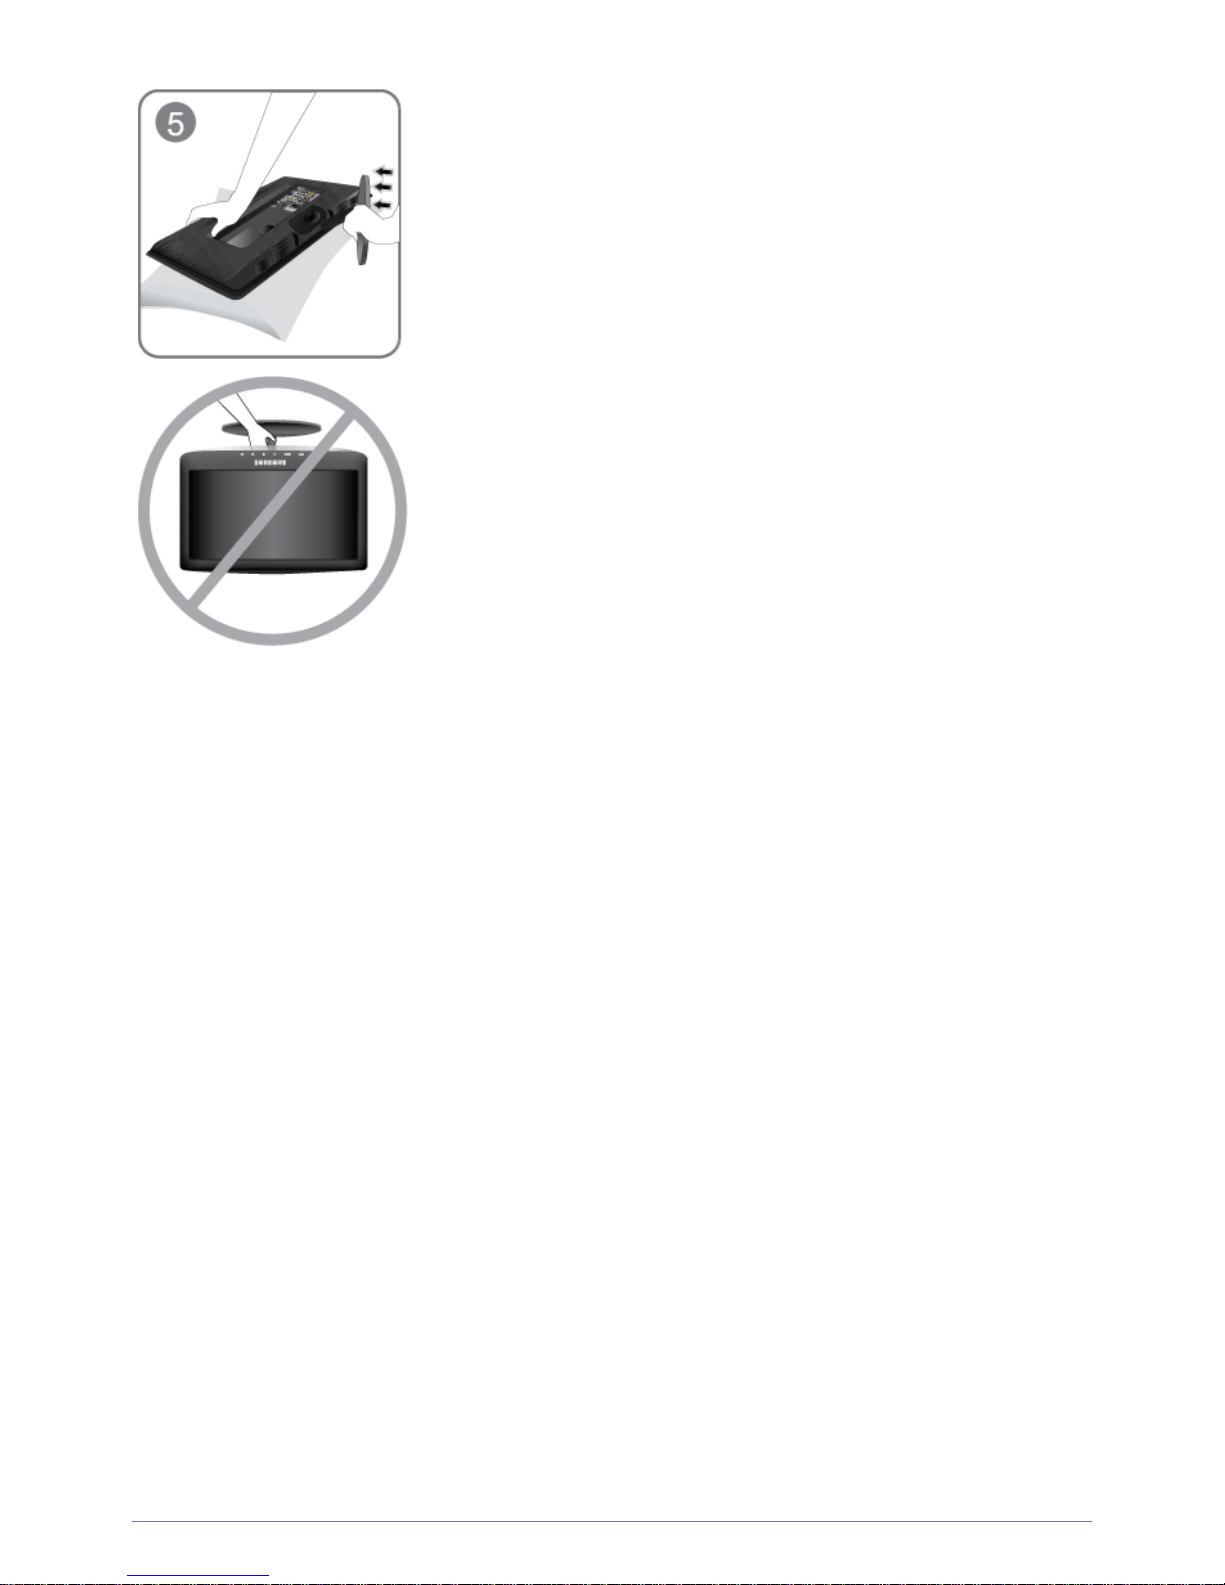
Hold the main body of the product with your hand as shown by the figure.
Push the assembled stand into the main body in the direction of the arrow as shown in
the figure.
- Caution
Do not lift the product holding only the stand.
Installing the Product 2-3
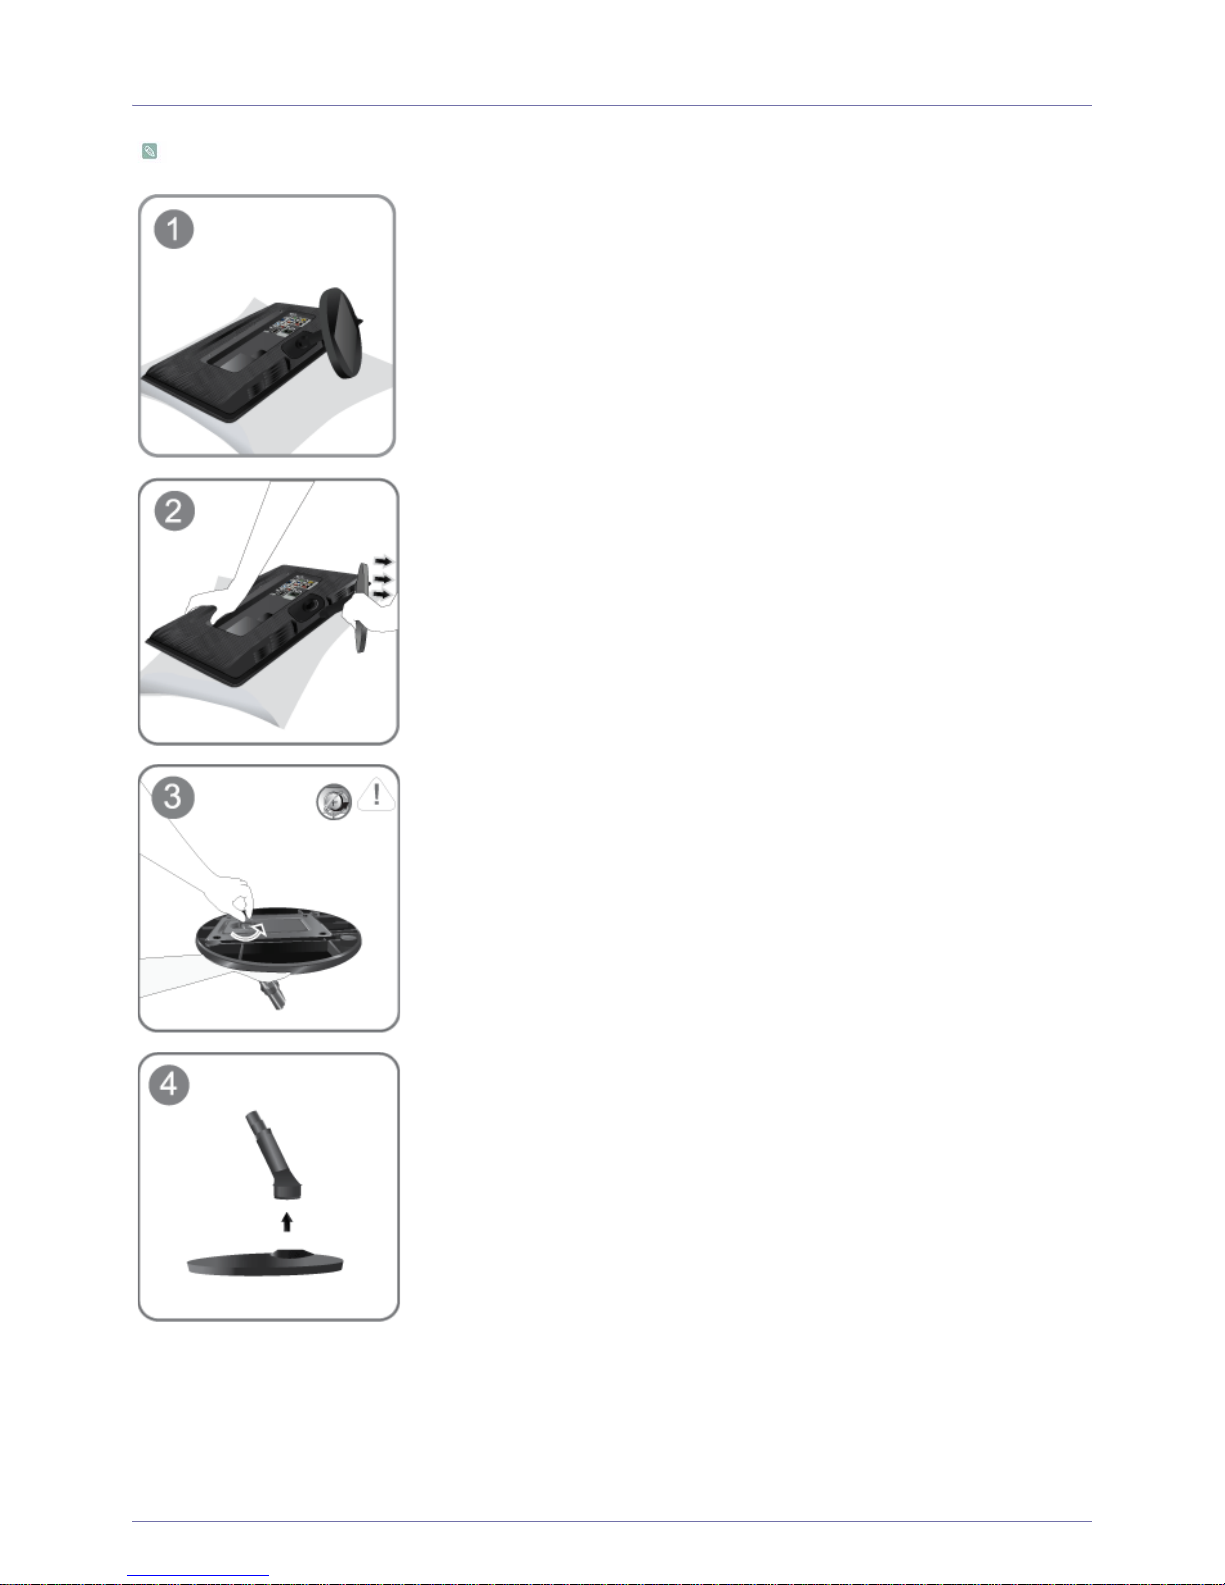
2-3 Removing the Stand
Before removing the stand, place the product down on a flat and stable surface so that the screen faces downwards.
Place a soft cloth over the table to protect the product and place the product face down.
Hold the main body of the product with your hand as shown by the figure.
Pull the stand in the direction of the arrow as shown in the figure to separate it.
Turn the connecting screw at the bottom of the Stand base to separate it from the Stand
connector.
Take the Stand Connector out of the Stand base by pulling it in the direction of the arrow
as shown in the figure.
2-4 Installing the Product
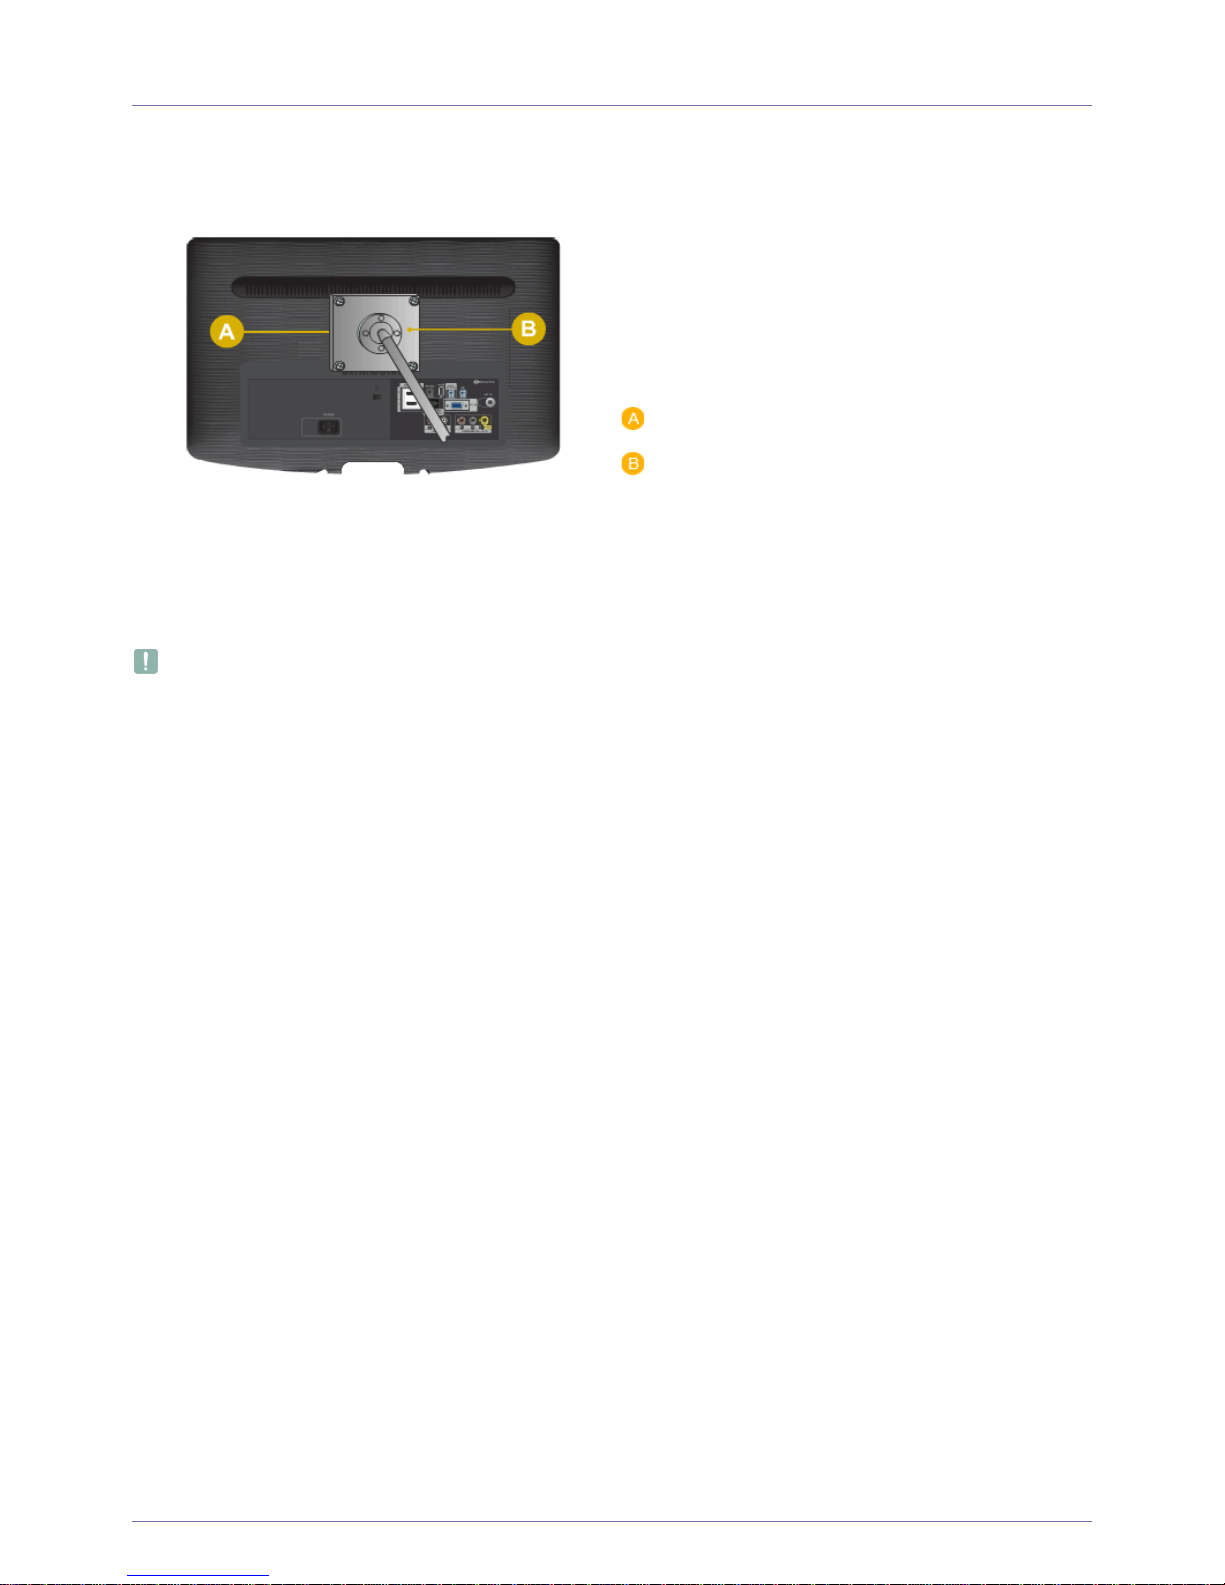
2-4 Attaching a Wall Mount/Desktop Stand
Attaching a Wall Mount/Desktop Stand(not supplied)
This product complies with 75 mm x 75 mm (2.95 x 2.95 inches) VESA specifications.
1. Turn the product off and unplug the power cord from the wall outlet.
2. Place a soft cloth or cushion on a flat surface to protect the panel and place the product face down.
3. Align wall mount/desktop stand to the Monitor/TV and firmly fix the wall mount/desktop stand by fastening the screw.
4. Align the groove of the part of the product that is to be connected to the stand with the groove in the stand (desk-top stand,
wall mount stand or another stand) and firmly fix the stand by fastening the screw.
• If you use screws that are longer than the standard specifications, the inside of the product may be damaged.
• For wall mounts that are not compatible with the standard VESA specifications, the length of the screw may differ
depending on the corresponding specifications.
• Avoid using screws that are incompatible with the standard VESA specifications and avoid assembling them using
excessive force.
• This may result in damage to the product or injury due to the product falling. Samsung shall not be held liable for any
damage or injury.
• Samsung shall not be held liable for any damage to the product or injury caused by using a wall mount/desktop stand
that is not compatible with the specifications or due to an installation not performed by an authorized installation
engineer.
• When installing the product using a wall mount, purchase a wall mount that provides at least 10 cm (3.93 inches) of
space from the wall.
• Use the wall mount according to the international specifications.
. Wall/Desktop Stand Mount
. Wall mount kit/desktop stand (not supplied)
Installing the Product 2-5
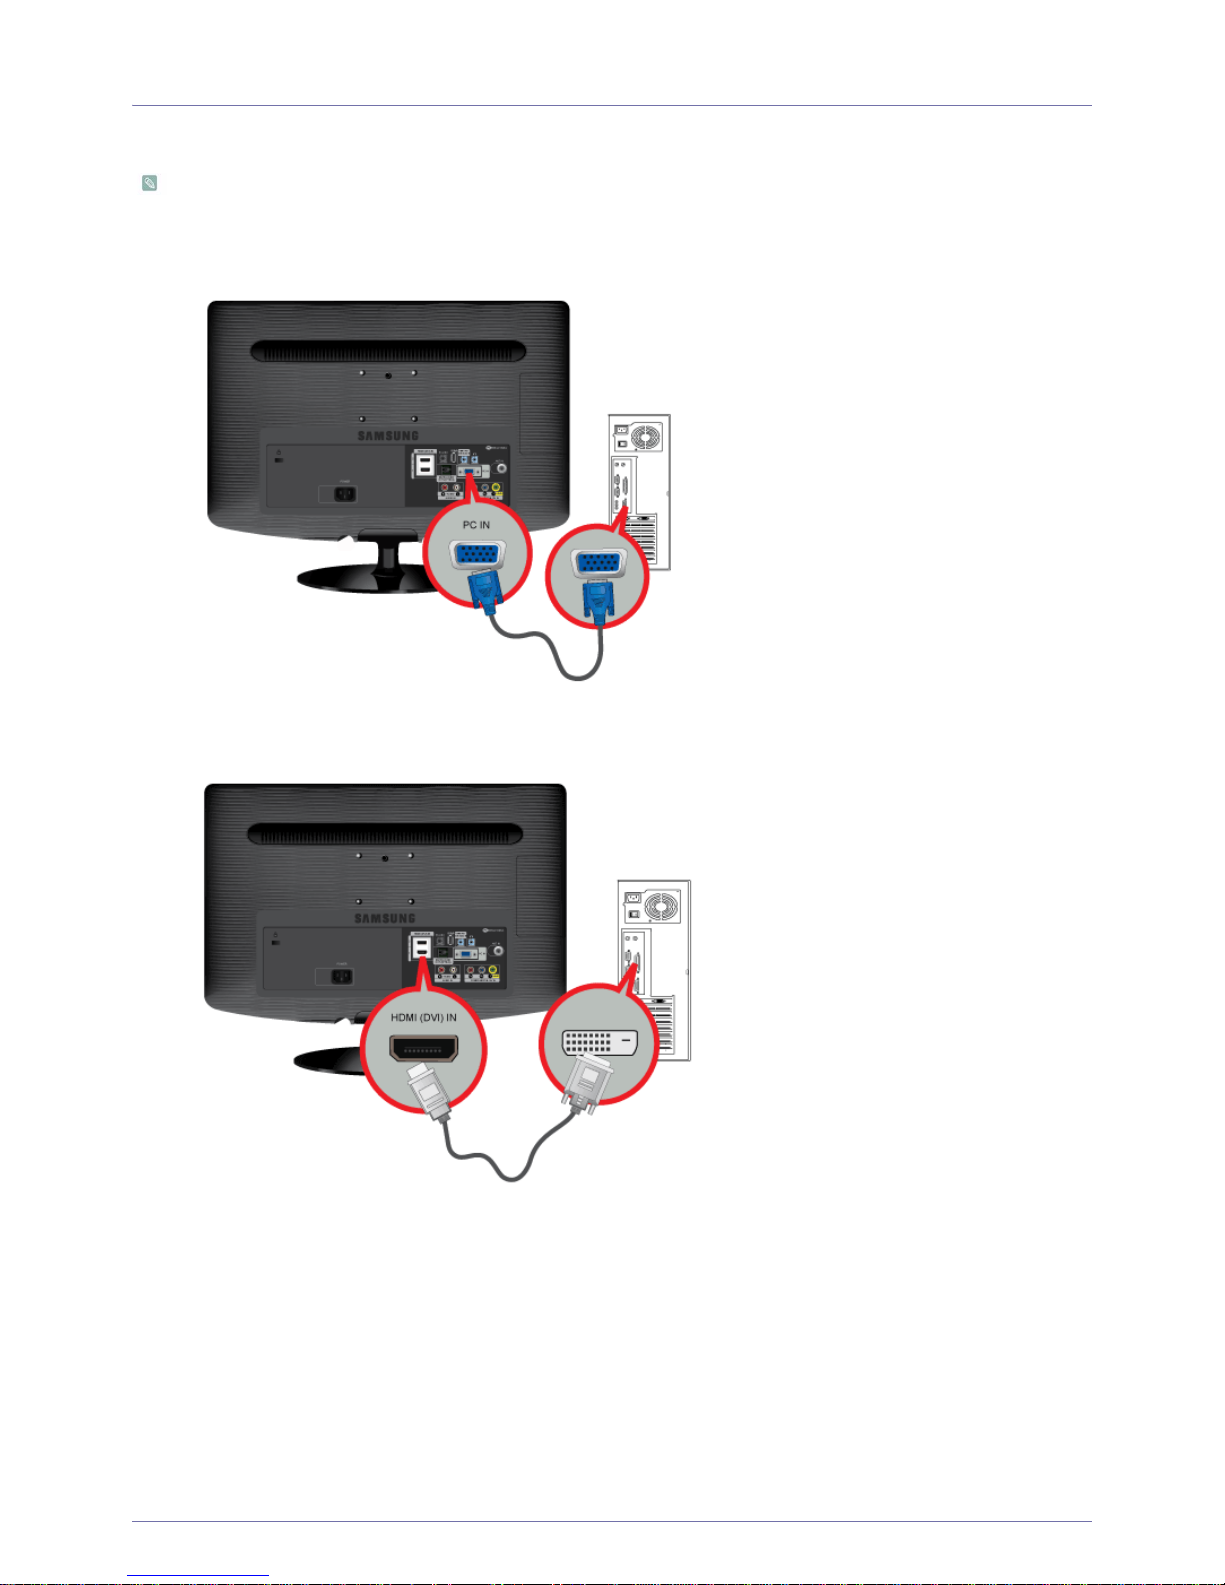
2-5 Connecting to a Computer
1. Connect the product to a PC depending on the video output supported by the PC.
The connecting part may differ depending on the product model.
When the graphics card provides a D-Sub (analog) output
• Connect the [PC IN] port of the product to the D-Sub port of the PC with the D-Sub cable.
When the graphics card provides a DVI (digital) output
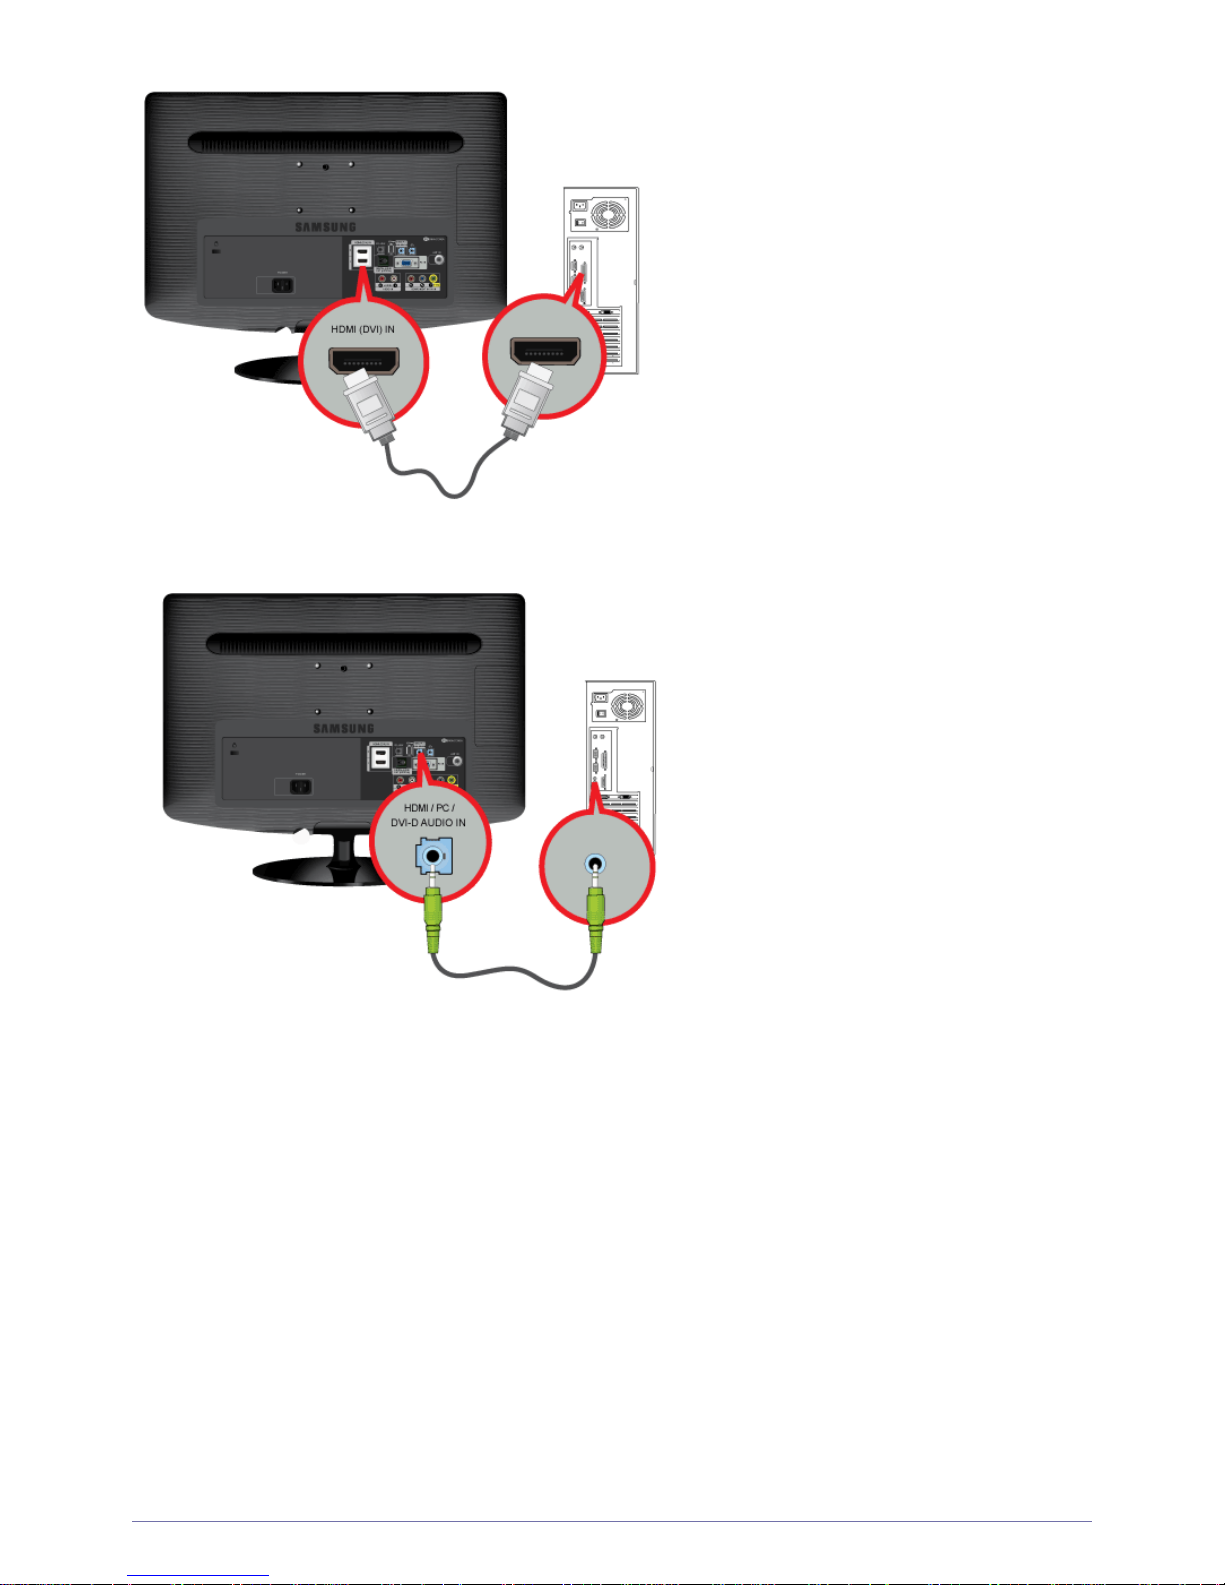
• Connect the [HDMI (DVI) IN] port of the product to the DVI port of the PC with the HDMI to DVI cable.
When the graphics card provides a HDMI output
• Connect the [HDMI (DVI) IN] port of the product to the HDMI port of the PC with the HDMI cable.
2-5 Installing the Product
2. Connect the [HDMI/PC/DVI-D AUDIO IN] port on the rear side of the monitor to the sound card of the PC.
3. To use the monitor, connect the power cable to a power outlet and the [POWER] port on the monitor.
(The input voltage is switched automatically.)

Installing the Product 2-5
• You may enjoy clear and quality sound from the computer sound card using the monitor's speakers. (You don't need to
install separate speakers for your computer.)
• You may get a blank screen depending on the type of video card you are using if you connect the D-sub cables
simultaneously to one computer.
2-6 Installing the Product
2-6 Using it as a TV
You may view television programs on the monitor if it is connected to an antenna or cable system without installing any
separate TV reception hardware or software on your computer.
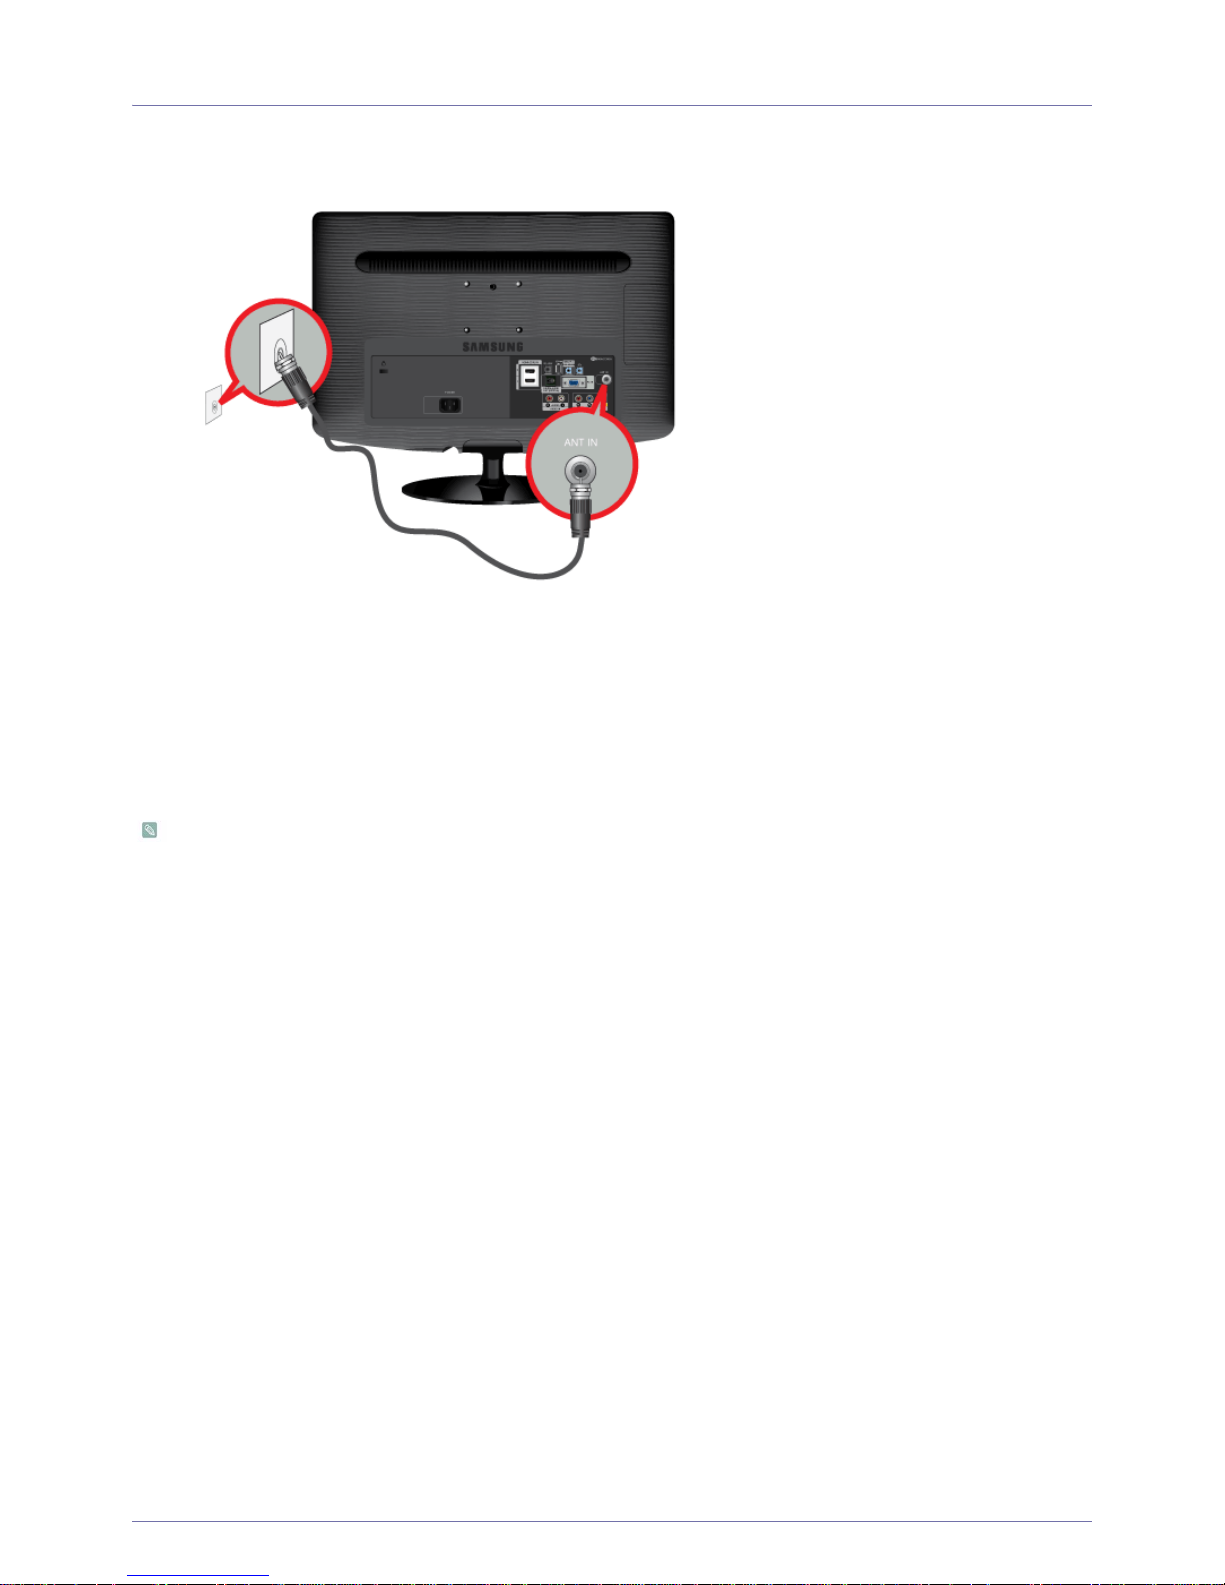
1. Connect the cable or TV antenna cable to the [ANT IN] port on the rear side of the monitor.
• When using an indoor antenna/cable terminal:
Check the antenna terminal on the wall and then connect the antenna/cable
TV
cable.
• When using an outdoor antenna:
When using an outdoor antenna, we strongly suggest using a qualified technician to install it.
2. When the connections are completed, connect the TV power.
3. When the product is turned on for the first time after it was purchased, the initial setup operations (<Plug&Play>) begin.
Be careful that the coaxial cable is not bent when connecting it to the antenna input terminal [ANT IN].

Installing the Product 2-7
2-7 Connecting an HDMI cable
Connect the HDMI OUT port of the AV device (Blu-Ray/DVD/Cable/Satellite box) to the [HDMI (DVI) IN] terminal of the monitor
using the HDMI cable.
Press the [SOURCE] button at the front of the monitor or on the remote control to select <HDMI> mode.
You do not need to make a separate audio connection when connecting via HDMI.
2-8 Installing the Product
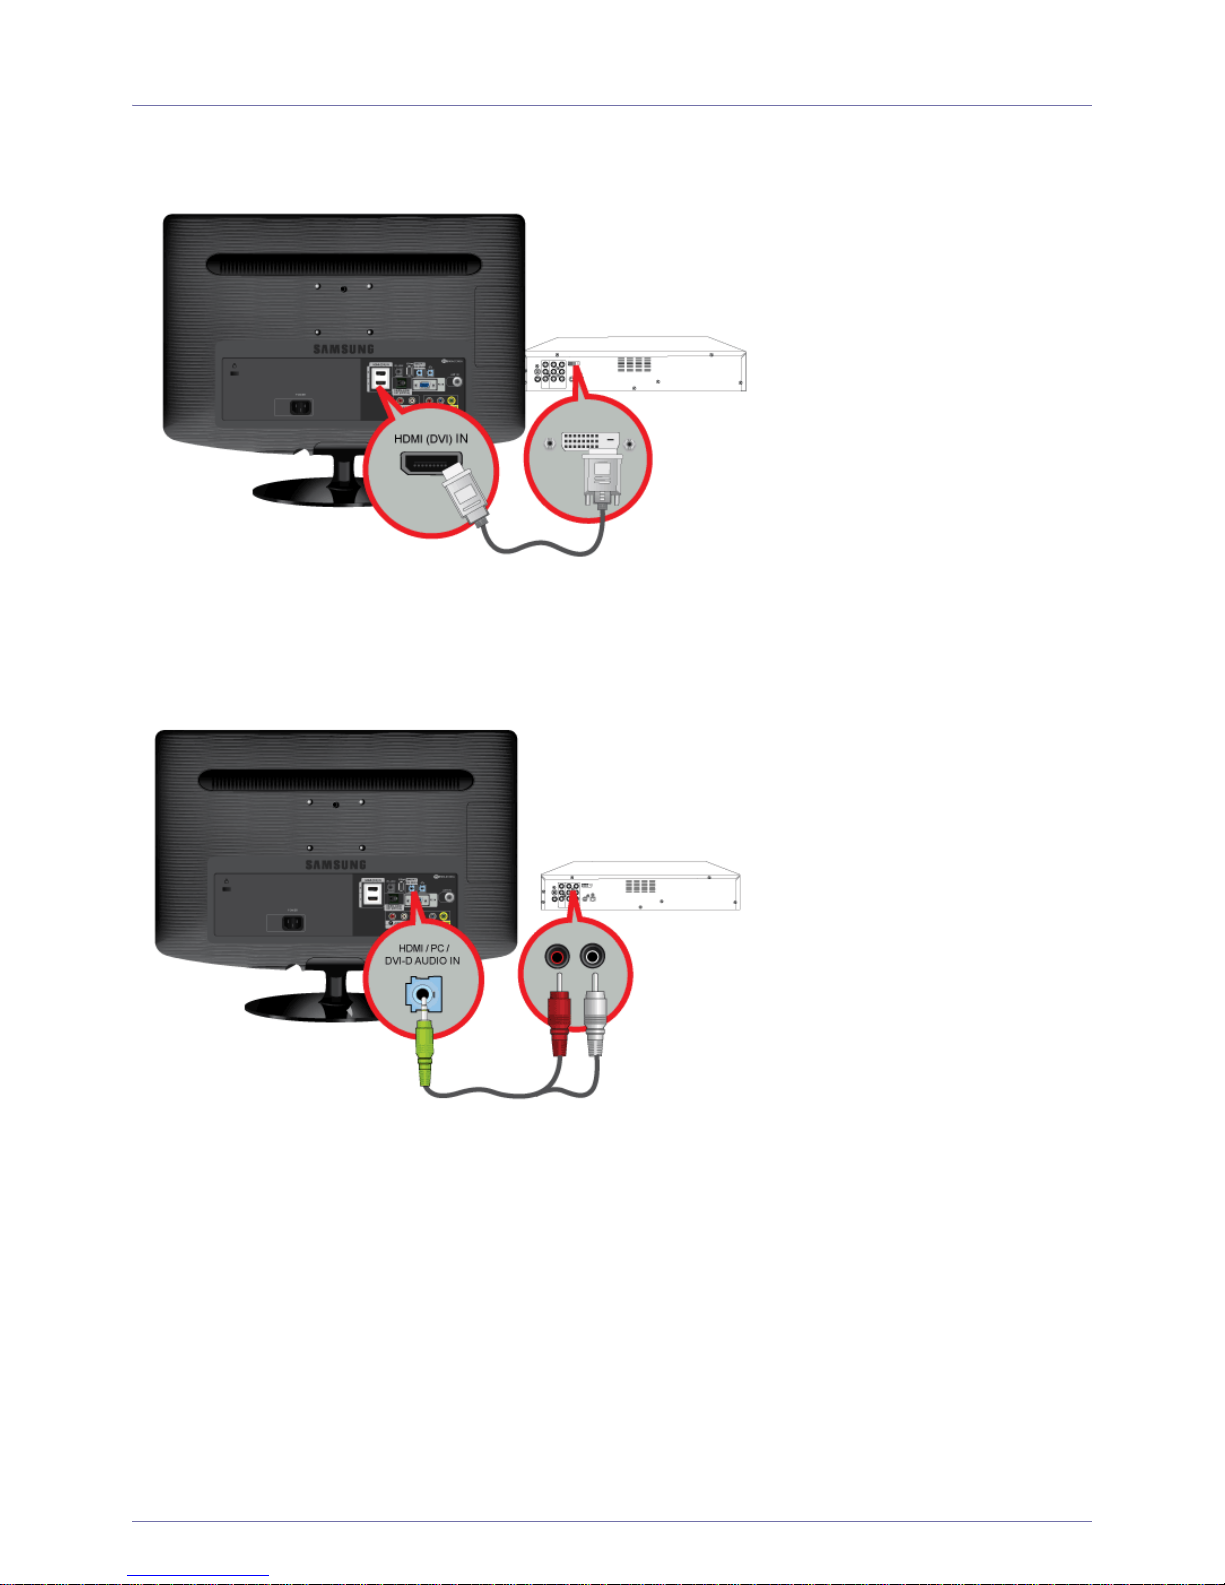
2-8 Connecting Using a DVI to HDMI Cable
1. Connect the DVI output terminal of an external device to the [HDMI (DVI) IN] terminal of the monitor using a DVI to HDMI
cable.
2. Connect the red and white plugs of an RCA to stereo (for PC) cable to the same colored audio output terminals of the digital
output device, and connect the opposite plug to the [HDMI/PC/DVI-D AUDIO IN] terminal of the product.
Press the [SOURCE] button at the front of the monitor or on the remote control to select <HDMI> mode.
Installing the Product 2-9
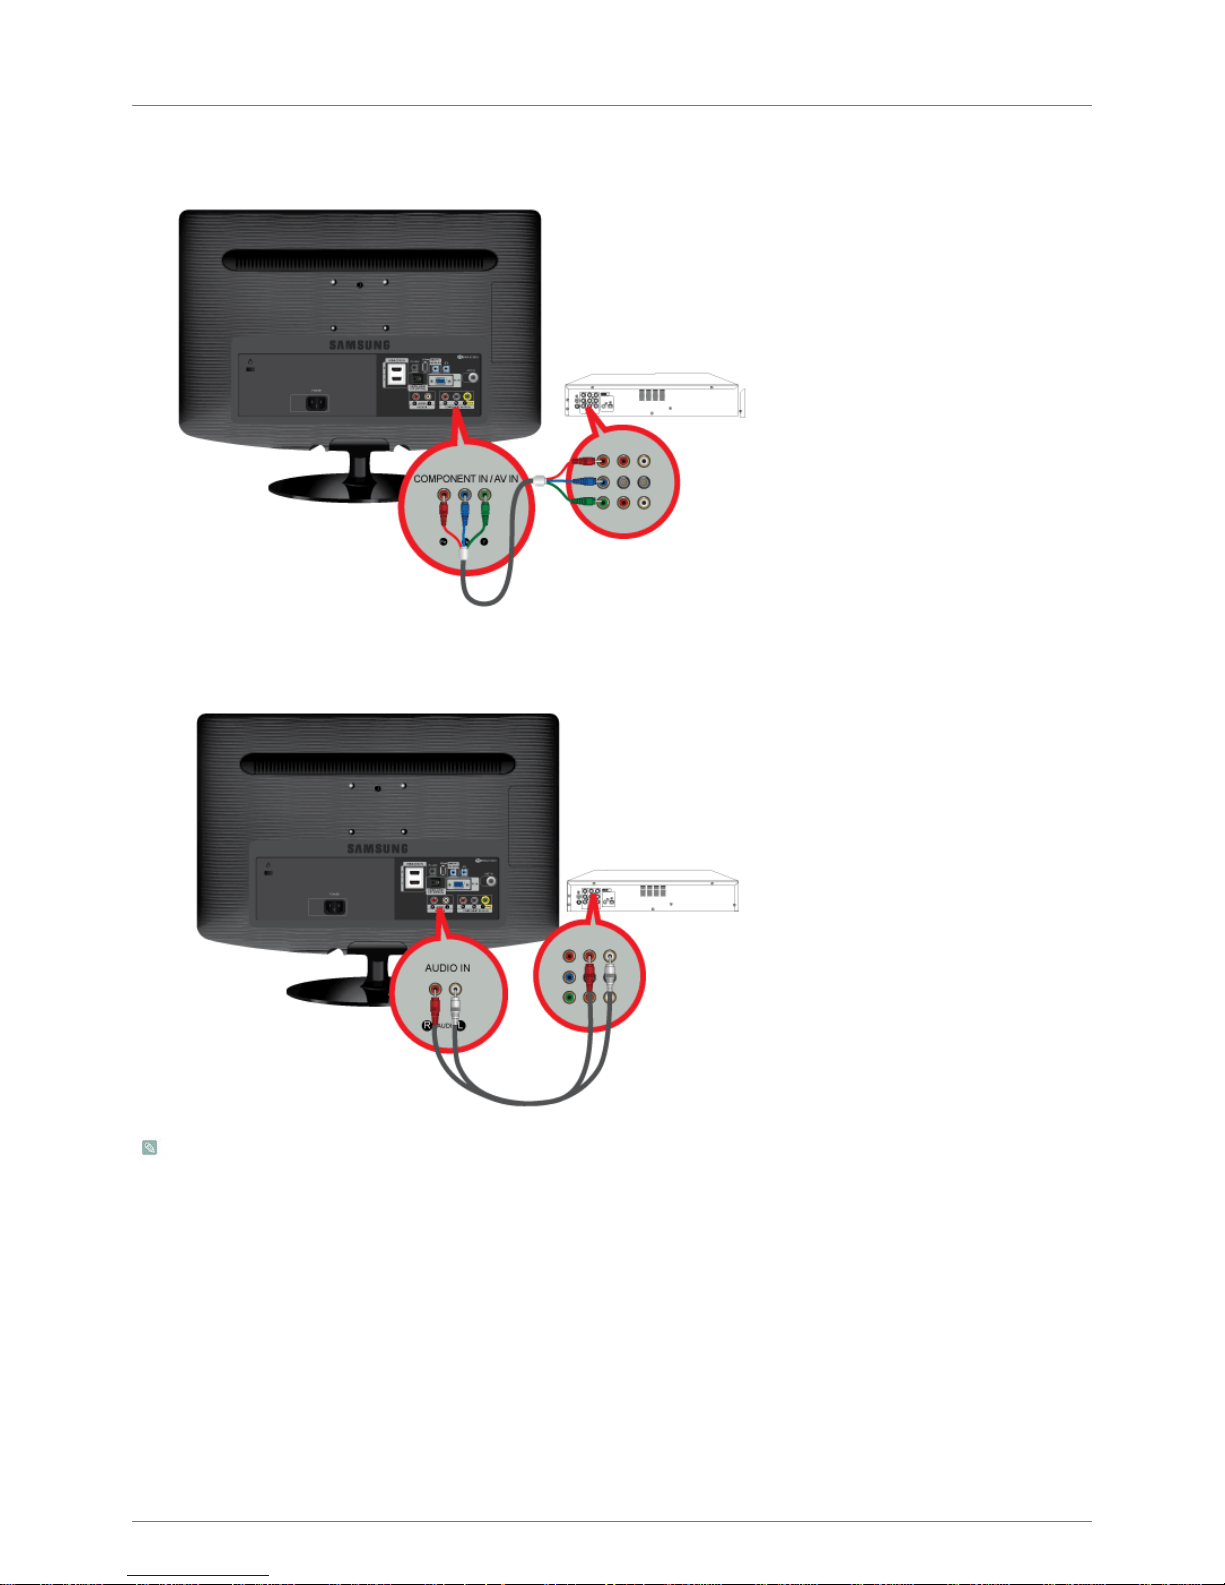
2-9 Connecting a Component cable
1. Connect the VIDEO OUT port of the AV device (DVD/VCR/Cable/Satellite box) to the [COMPONENT IN / AV IN (PR, PB, Y)]
input ports using a component video cable [P
R
, PB,Y].
2. Connect the audio port of the AV device (DVD/VCR/Cable/Satellite box) to the [AUDIO IN (R-AUDIO-L)] port of the monitor.
Press the [SOURCE] button at the front of the monitor or on the remote control to select the <Component> mode.
For an explanation of Component video, consult your DVD/VCR/Cable/Satellite box manual.
 Loading...