

Page 1

1732E EtherNet/IP ArmorBlock
Supporting Sequence of Events
Catalog Number 1732E-IB16M12SOEDR
User Manual
Page 2
Important User Information
Solid state equipment has operational characteristics differing from those of electromechanical equipment. Safety Guidelines for the Application,
Installation and Maintenance of Solid State Controls (publication SGI-1.1 available from your local Rockwell Automation sales office or online at
http://literature.rockwellautomation.com
devices. Because of this difference, and also because of the wide variety of uses for solid state equipment, all persons responsible for applying this
equipment must satisfy themselves that each intended application of this equipment is acceptable.
In no event will Rockwell Automation, Inc. be responsible or liable for indirect or consequential damages resulting from the use or application of this
equipment.
The examples and diagrams in this manual are included solely for illustrative purposes. Because of the many variables and requirements associated
with any particular installation, Rockwell Automation, Inc. cannot assume responsibility or liability for actual use based on the examples and
diagrams.
No patent liability is assumed by Rockwell Automation, Inc. with respect to use of information, circuits, equipment, or software described in this
manual.
Reproduction of the contents of this manual, in whole or in part, without written permission of Rockwell Automation, Inc., is prohibited.
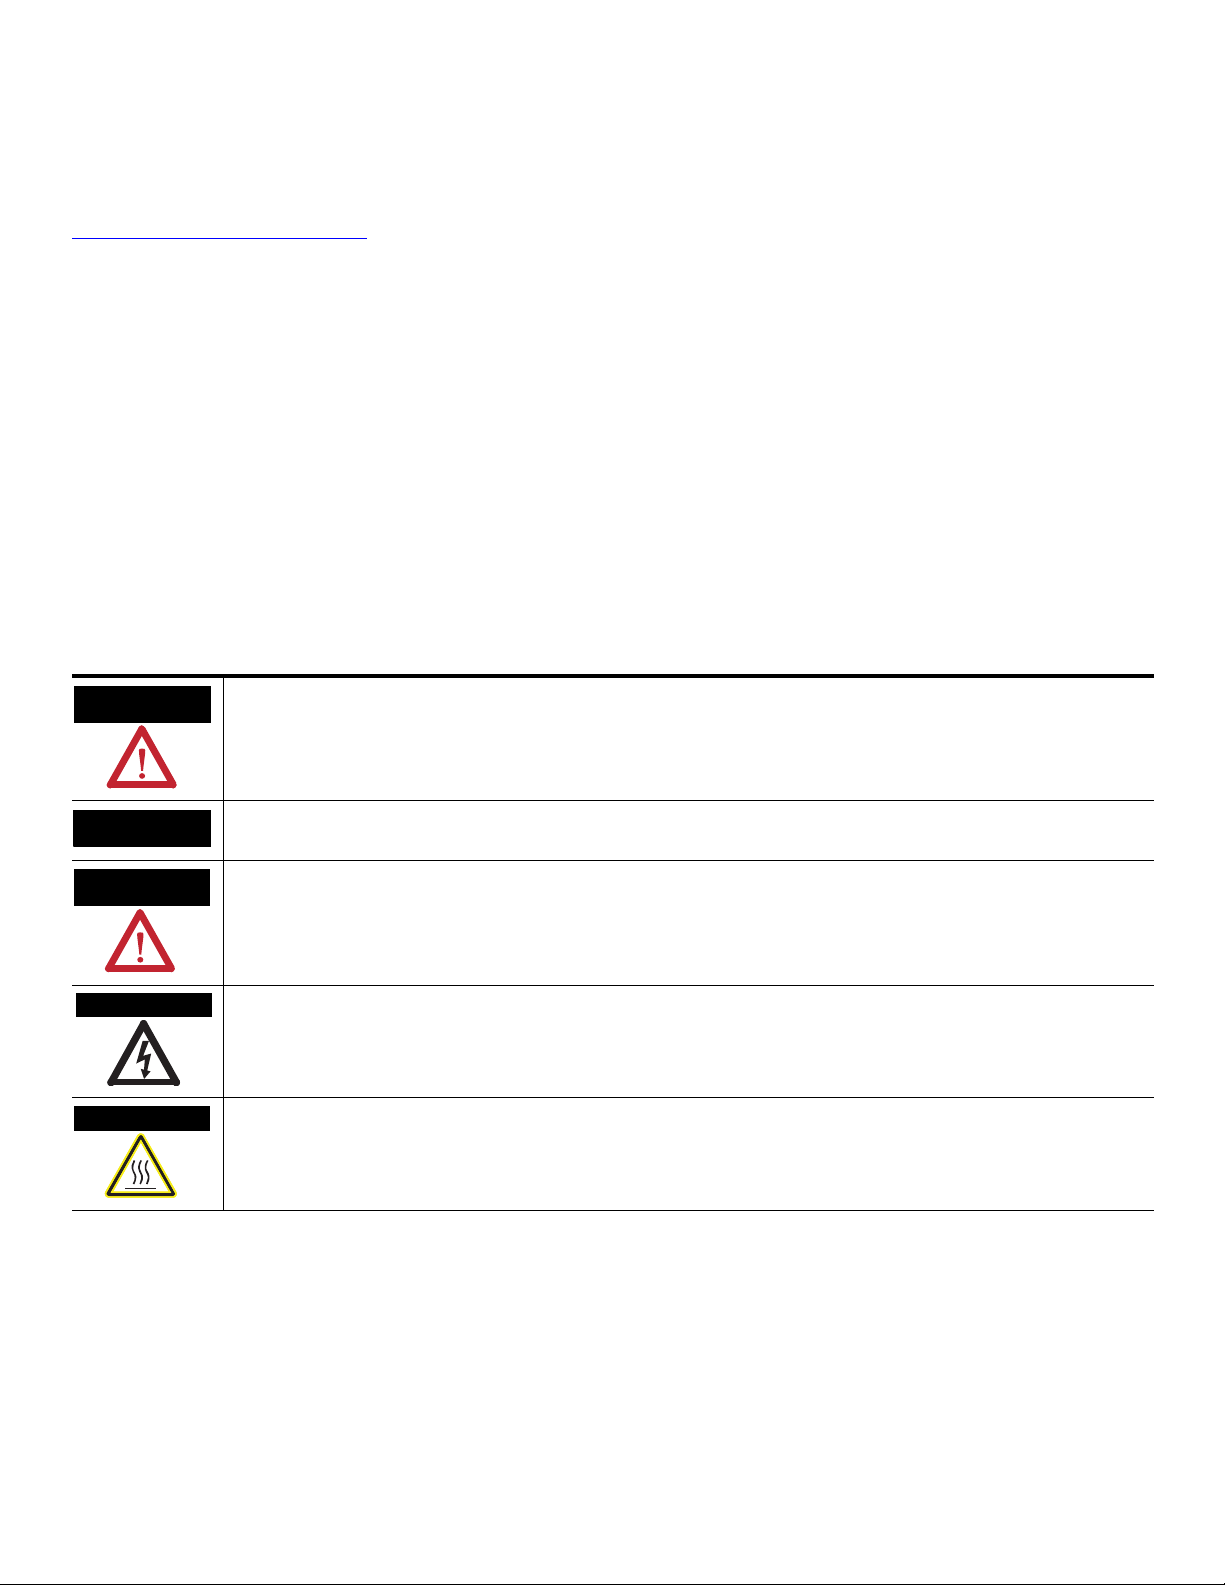
Throughout this manual, when necessary, we use notes to make you aware of safety considerations.
WARNING
Identifies information about practices or circumstances that can cause an explosion in a hazardous environment, which may
lead to personal injury or death, property damage, or economic loss.
) describes some important differences between solid state equipment and hard-wired electromechanical
IMPORTANT
ATTENTION
Identifies information that is critical for successful application and understanding of the product.
Identifies information about practices or circumstances that can lead to: personal injury or death, property damage, or
economic loss. Attentions help you identify a hazard, avoid a hazard, and recognize the consequence.
SHOCK HAZARD
Labels may be on or inside the equipment, such as a drive or motor, to alert people that dangerous voltage may be present.
BURN HAZARD
Labels may be on or inside the equipment, such as a drive or motor, to alert people that surfaces may reach dangerous
temperatures.
Rockwell Automation, Allen-Bradley, RSLogix, RSLinx, RSLogix 5000 and TechConnect are trademarks of Rockwell Automation, Inc.
Trademarks not belonging to Rockwell Automation are property of their respective companies.
Page 3

About 1732E ArmorBlock Modules
Module Overview
Table of Contents
Preface
Who Should Use this Manual . . . . . . . . . . . . . . . . . . . . . . . . . . . . . . . . . v
Purpose of this Manual . . . . . . . . . . . . . . . . . . . . . . . . . . . . . . . . . . . . . . v
Common Techniques Used in this Manual. . . . . . . . . . . . . . . . . . . . . . vi
Chapter 1
Overview. . . . . . . . . . . . . . . . . . . . . . . . . . . . . . . . . . . . . . . . . . . . . . . . . . 1
Module Features. . . . . . . . . . . . . . . . . . . . . . . . . . . . . . . . . . . . . . . . . . . . 1
Hardware/Software Compatibility . . . . . . . . . . . . . . . . . . . . . . . . . . . . . 1
Use of the Common Industrial Protocol (CIP) . . . . . . . . . . . . . . . . . . . 2
Understand the Producer/Consumer Model . . . . . . . . . . . . . . . . . . . . . 2
Specify the Requested Packet Interval (RPI) . . . . . . . . . . . . . . . . . . . . . 3
Chapter Summary and What’s Next . . . . . . . . . . . . . . . . . . . . . . . . . . . . 3
Chapter 2
Overview. . . . . . . . . . . . . . . . . . . . . . . . . . . . . . . . . . . . . . . . . . . . . . . . . . 5
EtherNet/IP Network Overview . . . . . . . . . . . . . . . . . . . . . . . . . . . . . . 5
Introduction to CIP Sync. . . . . . . . . . . . . . . . . . . . . . . . . . . . . . . . . . . . . 6
What is IEEE 1588 PTP (Precision Time Protocol)? . . . . . . . . . . . 6
CIP Sync Support . . . . . . . . . . . . . . . . . . . . . . . . . . . . . . . . . . . . . . . 7
What is CIP Sync? . . . . . . . . . . . . . . . . . . . . . . . . . . . . . . . . . . . . . . . 7
What is Time Stamping? . . . . . . . . . . . . . . . . . . . . . . . . . . . . . . . . . . 7
Introduction to Sequence of Events modules . . . . . . . . . . . . . . . . . . . . 8
High Performance Sequence of Events Applications in the Logix
Architecture . . . . . . . . . . . . . . . . . . . . . . . . . . . . . . . . . . . . . . . . . . . . 9
First Fault Detection . . . . . . . . . . . . . . . . . . . . . . . . . . . . . . . . . . . . . 9
High Speed Applications . . . . . . . . . . . . . . . . . . . . . . . . . . . . . . . . . 10
Motion Control . . . . . . . . . . . . . . . . . . . . . . . . . . . . . . . . . . . . . . . . 10
Global Position Registration . . . . . . . . . . . . . . . . . . . . . . . . . . . . . . 10
Chapter Summary and What’s Next . . . . . . . . . . . . . . . . . . . . . . . . . . . 10
Chapter 3
Use the Module in an ArmorBlock
System
Introduction . . . . . . . . . . . . . . . . . . . . . . . . . . . . . . . . . . . . . . . . . . . . . . 11
Differences Between Module and Standard I/O . . . . . . . . . . . . . . . . . 11
Similar Functionality to Standard ArmorBlock. . . . . . . . . . . . . . . . . . . 11
Chapter Summary and What’s Next . . . . . . . . . . . . . . . . . . . . . . . . . . . 12
Chapter 4
Install Your Module
i Publication 1732E-UM002A-EN-P - March 2010
Overview. . . . . . . . . . . . . . . . . . . . . . . . . . . . . . . . . . . . . . . . . . . . . . . . . 13
Mount the Module . . . . . . . . . . . . . . . . . . . . . . . . . . . . . . . . . . . . . . . . . 13
Wire the Module. . . . . . . . . . . . . . . . . . . . . . . . . . . . . . . . . . . . . . . . . . . 14
Auxiliary Power Cable . . . . . . . . . . . . . . . . . . . . . . . . . . . . . . . . . . . 15
Chapter Summary and What’s Next . . . . . . . . . . . . . . . . . . . . . . . . . . . 15
Page 4

Table of Contents ii
Configure the Module for Your
EtherNet/IP Network
Configure the Module Using
RSLogix 5000
Chapter 5
Introduction . . . . . . . . . . . . . . . . . . . . . . . . . . . . . . . . . . . . . . . . . . . . . . 17
Configuration Requirements . . . . . . . . . . . . . . . . . . . . . . . . . . . . . . . . . 17
IP Address . . . . . . . . . . . . . . . . . . . . . . . . . . . . . . . . . . . . . . . . . . . . 18
Gateway Address . . . . . . . . . . . . . . . . . . . . . . . . . . . . . . . . . . . . . . . 19
Subnet Mask. . . . . . . . . . . . . . . . . . . . . . . . . . . . . . . . . . . . . . . . . . . 20
Set the Network Address. . . . . . . . . . . . . . . . . . . . . . . . . . . . . . . . . . . . 21
Use the Rockwell BootP/DHCP Utility . . . . . . . . . . . . . . . . . . . . . . . . 21
Save the Relation List . . . . . . . . . . . . . . . . . . . . . . . . . . . . . . . . . . . 24
Use DHCP Software to Configure Your Module . . . . . . . . . . . . . . . . 24
Chapter Summary and What’s Next . . . . . . . . . . . . . . . . . . . . . . . . . . . 25
Chapter 6
Introduction . . . . . . . . . . . . . . . . . . . . . . . . . . . . . . . . . . . . . . . . . . . . . . 27
Set Up the Hardware . . . . . . . . . . . . . . . . . . . . . . . . . . . . . . . . . . . . . . . 28
Create the Example Application . . . . . . . . . . . . . . . . . . . . . . . . . . . . . . 29
Configure Your I/O Module. . . . . . . . . . . . . . . . . . . . . . . . . . . . . . . . . 30
RSLogix 5000 Configuration Software . . . . . . . . . . . . . . . . . . . . . . 30
Overview of the Configuration Process . . . . . . . . . . . . . . . . . . . . . . . . 30
Add a New Bridge and Module to Your RSLogix 5000 Project . . . . . 30
Add the Local EtherNet/IP Bridge to the I/O Configuration. . . 31
Add the 1732E-IB16M12SOEDR as a child of the
1756-EN2T module. . . . . . . . . . . . . . . . . . . . . . . . . . . . . . . . . . . . . 33
Use the Default Configuration . . . . . . . . . . . . . . . . . . . . . . . . . . . . . . . 34
Change the Default Configuration . . . . . . . . . . . . . . . . . . . . . . . . . . . . 34
Download Your Configuration . . . . . . . . . . . . . . . . . . . . . . . . . . . . . . 37
Edit Your Configuration . . . . . . . . . . . . . . . . . . . . . . . . . . . . . . . . . . . . 37
Access Module Data in RSLogix 5000 . . . . . . . . . . . . . . . . . . . . . . . . . 38
Configure RSLogix 5000 and the 1756-EN2T Communication
Module for CIP Sync . . . . . . . . . . . . . . . . . . . . . . . . . . . . . . . . . . . . . . . 39
Chapter Summary and What’s Next . . . . . . . . . . . . . . . . . . . . . . . . . . . 39
Module Features
Chapter 7
Introduction . . . . . . . . . . . . . . . . . . . . . . . . . . . . . . . . . . . . . . . . . . . . . . 41
Determine Module Compatibility . . . . . . . . . . . . . . . . . . . . . . . . . . . . . 42
Module Features That Can Be Configured . . . . . . . . . . . . . . . . . . . . . . 42
Timestamp Capture . . . . . . . . . . . . . . . . . . . . . . . . . . . . . . . . . . . . . 43
Timestamp Latching . . . . . . . . . . . . . . . . . . . . . . . . . . . . . . . . . . . . 44
Input Diagnostics. . . . . . . . . . . . . . . . . . . . . . . . . . . . . . . . . . . . . . . 45
Software Configurable Input Filters . . . . . . . . . . . . . . . . . . . . . . . . 46
Communications Format. . . . . . . . . . . . . . . . . . . . . . . . . . . . . . . . . 49
Electronic Keying . . . . . . . . . . . . . . . . . . . . . . . . . . . . . . . . . . . . . . 49
Module Inhibiting . . . . . . . . . . . . . . . . . . . . . . . . . . . . . . . . . . . . . . 51
Module Fault Reporting . . . . . . . . . . . . . . . . . . . . . . . . . . . . . . . . . 52
Fully Software Configurable . . . . . . . . . . . . . . . . . . . . . . . . . . . . . . 52
Page 5

Using the Module
Table of Contents iii
Producer/Consumer Model . . . . . . . . . . . . . . . . . . . . . . . . . . . . . . 53
Status Indicator Information. . . . . . . . . . . . . . . . . . . . . . . . . . . . . . 53
Agency Certifications. . . . . . . . . . . . . . . . . . . . . . . . . . . . . . . . . . . . 53
Chapter Summary and What’s Next . . . . . . . . . . . . . . . . . . . . . . . . . . . 53
Chapter 8
Introduction . . . . . . . . . . . . . . . . . . . . . . . . . . . . . . . . . . . . . . . . . . . . . . 55
Overview. . . . . . . . . . . . . . . . . . . . . . . . . . . . . . . . . . . . . . . . . . . . . . . . . 55
How Does the Module Store Timestamp Data? . . . . . . . . . . . . . . . . . 56
Using Timestamp Latching . . . . . . . . . . . . . . . . . . . . . . . . . . . . . . . 57
Using Timestamp Capture. . . . . . . . . . . . . . . . . . . . . . . . . . . . . . . . 58
Manage the Data . . . . . . . . . . . . . . . . . . . . . . . . . . . . . . . . . . . . . . . . . . 60
Module Sends Data to the Controller. . . . . . . . . . . . . . . . . . . . . . . 60
Copy Relevant Input Data to a Separate Data Structure . . . . . . . . 63
Acknowledge Timestamp Latching Timestamp Data . . . . . . . . . . 64
Sort the Data . . . . . . . . . . . . . . . . . . . . . . . . . . . . . . . . . . . . . . . . . . . . . 66
Clear All Data From the Module’s Buffer At Once . . . . . . . . . . . . . . . 67
Propagate a Signal From Input Pin to EtherNet . . . . . . . . . . . . . . . . . 67
Chapter Summary and What’s Next . . . . . . . . . . . . . . . . . . . . . . . . . . . 68
Interpret Status Indicators
Troubleshoot the Module
ArmorBlock 2 Port Ethernet
Module Specifications
Module Tags
1732E EtherNet/IP ArmorBlock
Supporting Sequence of Events
Data Tables
Connect to Networks via Ethernet
Interface
Chapter 9
Introduction . . . . . . . . . . . . . . . . . . . . . . . . . . . . . . . . . . . . . . . . . . . . . . 69
Chapter Summary and What’s Next . . . . . . . . . . . . . . . . . . . . . . . . . . . 70
Chapter 10
Introduction . . . . . . . . . . . . . . . . . . . . . . . . . . . . . . . . . . . . . . . . . . . . . . 71
Troubleshoot the Module . . . . . . . . . . . . . . . . . . . . . . . . . . . . . . . . . . . 71
Determining Fault Type . . . . . . . . . . . . . . . . . . . . . . . . . . . . . . . . . 72
Appendix A
Specifications . . . . . . . . . . . . . . . . . . . . . . . . . . . . . . . . . . . . . . . . . . . 73
Appendix B
Fault and Status Reporting Between the Module and Controllers . . . 77
Module Tag Names and Definitions . . . . . . . . . . . . . . . . . . . . . . . . . . . 77
Appendix C
Communicate with Your Module . . . . . . . . . . . . . . . . . . . . . . . . . . . . . 83
Appendix D
ArmorBlock Module and Ethernet Communication . . . . . . . . . . . . . . 89
ArmorBlock module and PC Connections to the
Ethernet Network . . . . . . . . . . . . . . . . . . . . . . . . . . . . . . . . . . . . . . . . . 89
Ethernet Network Topology. . . . . . . . . . . . . . . . . . . . . . . . . . . . . . 90
Publication 1732E-UM002A-EN-P - March 2010
Page 6

Table of Contents iv
1732E ArmorBlock I/O Embedded
Web Server
Index
Connecting to an Ethernet Network . . . . . . . . . . . . . . . . . . . . . . . 90
Cables . . . . . . . . . . . . . . . . . . . . . . . . . . . . . . . . . . . . . . . . . . . . . . . . 90
Ethernet Connections . . . . . . . . . . . . . . . . . . . . . . . . . . . . . . . . . . . . . . 91
Duplicate IP address Detection. . . . . . . . . . . . . . . . . . . . . . . . . . . . . . . 91
Configure Ethernet Communications on the ArmorBlock module . . 91
Configure Using RSLogix 5000 Software . . . . . . . . . . . . . . . . . . . . . . . 92
Configure Using Web Server . . . . . . . . . . . . . . . . . . . . . . . . . . . . . . . . 93
Appendix E
Introduction . . . . . . . . . . . . . . . . . . . . . . . . . . . . . . . . . . . . . . . . . . . . . . 95
Typical Applications. . . . . . . . . . . . . . . . . . . . . . . . . . . . . . . . . . . . . . . . 95
Browser Requirements. . . . . . . . . . . . . . . . . . . . . . . . . . . . . . . . . . . . . . 95
Access the Home Page of the Web Server . . . . . . . . . . . . . . . . . . . . . . 96
Log Into the Web Server . . . . . . . . . . . . . . . . . . . . . . . . . . . . . . . . . . . . 96
Navigate the 1732E ArmorBlock I/O . . . . . . . . . . . . . . . . . . . . . . . . . 97
Access Diagnostic Information . . . . . . . . . . . . . . . . . . . . . . . . . . . . . . . 97
Glossary
Publication 1732E-UM002A-EN-P - March 2010
Page 7

Preface
Read this preface to familiarize yourself with the rest of the manual. It provides
information concerning:
• who should use this manual
• the purpose of this manual
• related documentation
• conventions used in this manual
Who Should Use this Manual
Purpose of this Manual
Use this manual if you are responsible for designing, installing, programming,
or troubleshooting control systems that use 1732 ArmorBlock EtherNet/IP
with Diagnostics and CIPSync modules.
You should have a basic understanding of electrical circuitry and familiarity
with relay logic. If you do not, obtain the proper training before using this
product.
This manual is a reference guide for the 1732E-IB16M12SOEDR module. It
describes the procedures you use to install, wire, and troubleshoot your
module. This manual:
• explains how to install and wire your module
• gives you an overview of the ArmorBlock EtherNet/IP system
v Publication 1732E-UM002A-EN-P - March 2010
Page 8

vi Preface
Related Documentation
The following documents contain additional information concerning Rockwell
Automation products. To obtain a copy, contact your local
Rockwell Automation office or distributor.
Resource Description
1732 Ethernet/IP 16 Point ArmorBlock I/O Wiring
Diagram, publication 1732E-WD001
1732E ArmorBlock 2 Port Ethernet Module Installation
Instructions, publication 1732E-IN004
1732E ArmorBlock 2 Port Ethernet Module Release
Notes, publication 1732E-RN001
ControlLogix Sequence of Events Module User Manual,
publication 1756-UM528
EtherNet/IP Embedded Switch Technology Application
Guide, publication ENET-AP005
EtherNet/IP Modules in Logix5000 Control Systems User
Manual, publication ENET-UM001
Integrated Architecture and CIP Sync Configuration
Application Techniques, publication IA-AT003
Getting Results with RSLogix 5000, publication
9399-RLD300GR
M116 On-Machine Connectivity Catalog, M116-CA001A
Allen-Bradley Industrial Automation Glossary, AG-7.1
Information on wiring the ArmorBlock EtherNet/IP module.
Information on installing the ArmorBlock EtherNet/IP module.
Release notes to supplement the existing documentation supplied with the
ArmorBlock EtherNet/IP module.
A manual on how to install, configure and troubleshoot the ControlLogix
Sequence of Events module in your ControlLogix application.
A manual on how to install, configure and maintain linear and Device-level
Ring (DLR) networks using Rockwell Automation EtherNet/IP devices with
embedded switch technology.
A manual on how to use EtherNet/IP modules with Logix5000 controllers and
communicate with various devices on the Ethernet network.
A manual on how to configure CIP Sync with Intergrated Architecture products.
and applications.
Information on how to install and navigate RSLogix 5000. The guide includes
troubleshooting information and tips on how to use RSLogix 5000 effectively.
An article on wire sizes and types for grounding electrical equipment.
A glossary of industrial automation terms and abbreviations.
Common Techniques Used in this Manual
Publication 1732E-UM002A-EN-P - March 2010
The following conventions are used throughout this manual:
• Bulleted lists such as this one provide information, not procedural steps.
• Numbered lists provide sequential steps or hierarchical information.
Italic
•
type is used for emphasis.
Page 9

About 1732E ArmorBlock Modules
Chapter
1
Overview
Module Features
This chapter is an overview of the 1732E ArmorBlock family of modules. You
will need to understand the concepts discussed in this chapter to configure
your module and use it in an EtherNet/IP control system. The following table
lists where to find specific information in this chapter.
Topic Page
Module Features 1
Hardware/Software Compatibility 1
Use of the Common Industrial Protocol (CIP) 2
Understand the Producer/Consumer Model 2
Specify the Requested Packet Interval (RPI) 3
The module features include:
• use of EtherNet/IP messages encapsulated within standard
TCP/UDP/IP protocol
• common application layer with ControlNet and DeviceNet
• interfacing via Category 5 rated twisted pair cable
• half/full duplex 10 Mbit or 100 Mbit operation
• mounting on a wall or panel
• communication supported by RSLinx software
• IP address assigned via standard DHCP tools
• I/O configuration via RSLogix 5000 software
• no network scheduling required
• no routing tables required
• supports connections from multiple controllers simultaneously
Hardware/Software
The module and the applications described in this manual are compatible with
the following firmware versions and software releases.
Compatibility
1 Publication 1732E-UM002A-EN-P - March 2010
Page 10

2 About 1732E ArmorBlock Modules
Contact Rockwell Automation if you need software or firmware upgrades to
use this equipment.
Product Firmware Version / Software Release
1732E-IB16M12SOEDR Firmware rev. 1.6 or later
1756-EN2T or 1756-EN2TR module 2.3 (or later version of major revision 2) when
using RSLogix 5000 v17
3.x version when using RSLogix 5000 v18 or later
RSLogix 5000 software 17 or later
RSLinx software 2.56 or later
Use of the Common Industrial Protocol (CIP)
For a complete ControlLogix compatibility matrix, see publication IA-AT003
The 1732E-IB16M12SOEDR uses the Common Industrial Protocol (CIP).
CIP is the application layer protocol specified for EtherNet/IP, the Ethernet
Industrial Protocol, as well as for ControlNet and DeviceNet. It is a
message-based protocol that implements a relative path to send a message
from the “producing” device in a system to the “consuming” devices.
The producing device contains the path information that steers the message
along the proper route to reach its consumers. Because the producing device
holds this information, other devices along the path simply pass this
information; they do not need to store it.
This has two significant benefits:
• You do not need to configure routing tables in the bridging modules,
which greatly simplifies maintenance and module replacement.
• You maintain full control over the route taken by each message, which
enables you to select alternative paths for the same end device.
.
Understand the Producer/Consumer Model
Publication 1732E-UM002A-EN-P - March 2010
The CIP “producer/consumer” networking model replaces the old
source/destination (“master/slave”) model. The producer/consumer model
reduces network traffic and increases speed of transmission. In traditional I/O
systems, controllers poll input modules to obtain their input status. In the CIP
system, input modules are not polled by a controller. Instead, they produce
their data either upon a change of state (COS) or periodically. The frequency
of update depends upon the options chosen during configuration and where
on the network the input module resides. The input module, therefore, is a
producer of input data and the controller is a consumer of the data.
The controller can also produce data for other controllers to consume. The
produced and consumed data is accessible by multiple controllers and other
devices over the EtherNet/IP network. This data exchange conforms to the
producer/consumer model.
Page 11

About 1732E ArmorBlock Modules 3
Specify the Requested Packet Interval (RPI)
Chapter Summary and What’s Next
The Requested Packet Interval (RPI) is the update rate specified for a
particular piece of data on the network. This value specifies how often to
produce the data for that device. For example, if you specify an RPI of 50 ms,
it means that every 50 ms the device sends its data to the controller or the
controller sends its data to the device.
RPIs are only used for devices that exchange data. For example, a
ControlLogix EtherNet/IP bridge module in the same chassis as the controller
does not require an RPI because it is not a data-producing member of the
system; it is used only as a bridge to remote modules.
In this chapter you were given an overview of the 1732E ArmorBlock family
of modules. The next chapter is an overview of the 1732E EtherNet/IP
ArmorBlock Supporting Sequence of Events module.
Publication 1732E-UM002A-EN-P - March 2010
Page 12

4 About 1732E ArmorBlock Modules
Notes:
Publication 1732E-UM002A-EN-P - March 2010
Page 13
Module Overview
2
Overview
EtherNet/IP Network Overview
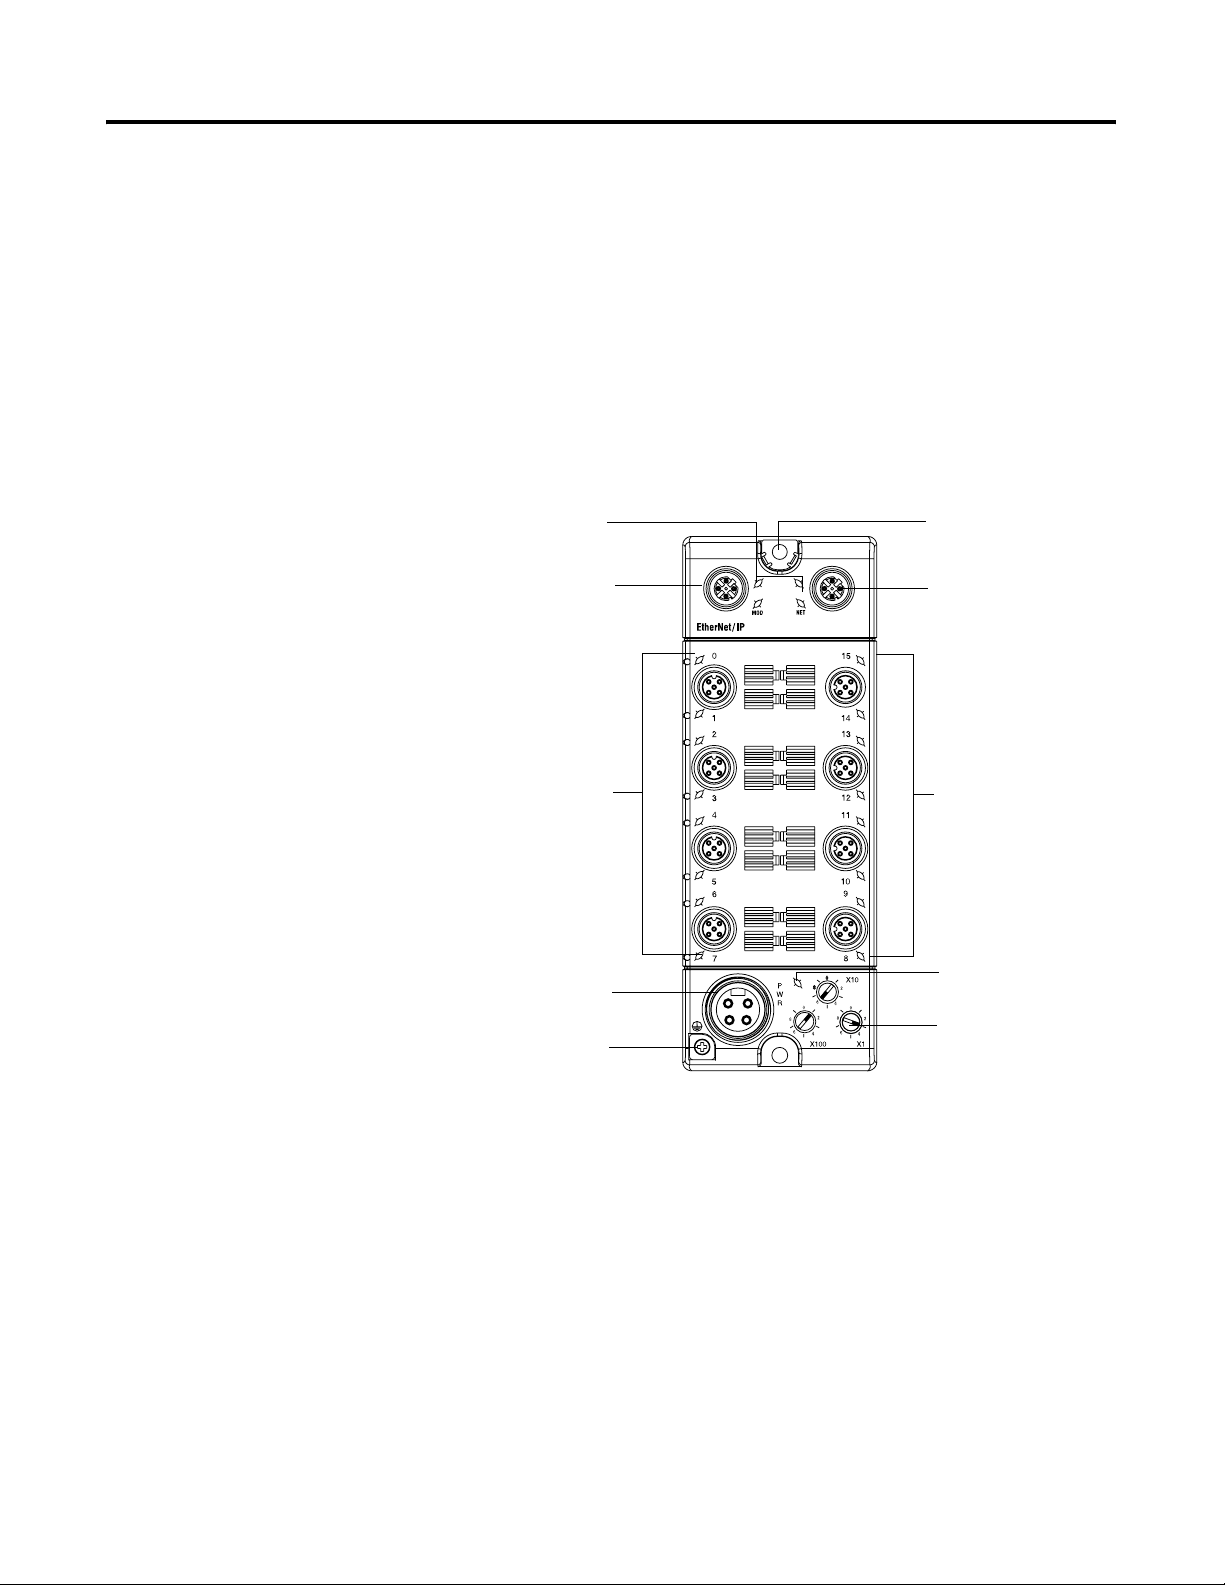
This chapter provides an overview of the 1732E EtherNet/IP ArmorBlock
Supporting Sequence of Events module. The module uses CIP Sync
functionality to provide time stamping when an input event occurs.
Status Indicators Functional Earth
EtherNet/IP D-Code
M12 connector
M12 I/O connectors/
Status indicators
LINK 1 LINK 2
EtherNet/IP D-Code
M12 connector
M12 I/O connectors/
Status indicators
Auxiliary power
Protective Earth
Auxiliary power
status indicator
Node address switches
44945
The module incorporates embedded switch technology. The module supports
Star, Tree, Daisy Chain or Linear, and Ring network topologies.
• Star or Tree topologies can connect to either Port 1 or Port 2.
• Daisy Chain/Linear topologies will pass communications from Port 1 to
2, or Port 2 to 1.
• Ring topology will pass communications from Port 1 to 2, or Port 2
to 1.
The 1732E-IB16M12SOEDR supports the management of network traffic to
ensure timely delivery of critical data, Quality of Service (QoS) and Internet
Group Management Protocol (IGMP) protocols are supported.
5 Publication 1732E-UM002A-EN-P - March 2010
Page 14

6 Module Overview
Introduction to CIP Sync
If the ring topology is used, the
ArmorBlock Supporting Sequence of Events) must be designated in the
system, and it will determine the beacon rate and the timeout period. For more
information on topologies, refer to publication ENET-AP005
1732E-IB16M12SOEDR module is a CIP Sync slave only device. There must
be another module on the network that will function as a master clock.
Each input connector's Sensor Source Voltage (SSV) is protected from short
circuits to ground as well as open wire conditions due to missing sensor or
cable disconnection. These conditions are indicated in the modules input tags
and by its input LEDs flashing red for open wire or being solid red for short
circuit.
CIP is the Common Industrial Protocol that we use to let all Rockwell
products communicate with each other whether it be on a DeviceNet,
ControlNet, and/or an EtherNet network. Since it is an ODVA standard,
other industrial product manufactures develop products to communicate via
the CIP protocol.
CIP Sync is a CIP implementation of the IEEE 1588 PTP (Precision Time
Protocol) in which devices can bridge the PTP time across backplanes and on
to other networks via EtherNet/IP ports.
Ring Master
(not the 1732E EtherNet/IP
. The
What is IEEE 1588 PTP (Precision Time Protocol)?
The IEEE 1588 standard specifies a protocol to synchronize independent
clocks running on separate nodes of a distributed measurement and control
system to a high degree of accuracy and precision. The clocks communicate
with each other over a communication network. In its basic form, the protocol
is intended to be administration free. The protocol generates a master slave
relationship among the clocks in the system. Within a given subnet of a
network there will be a single master clock. All clocks ultimately derive their
time from a clock known as the grandmaster clock. This is called Precision
Time Protocol (PTP).
The PTP is a time-transfer protocol defined in the IEEE 1588-2008 standard
that allows precise synchronization of networks, for example, Ethernet.
Accuracy within the nanosecond range can be achieved with this protocol
when using hardware generated synchronization.
IEEE 1588 is designed for local systems requiring very high accuracies beyond
those attainable using Network Time Protocol (NTP). NTP is used to
synchronize the time of a computer client or server to another server or
reference time source, such as a GPS.
Publication 1732E-UM002A-EN-P - March 2010
Page 15

Module Overview 7
CIP Sync Support
CIP Sync supports the IEEE 1588-2008 synchronization standard. In this
architecture, a grandmaster clock provides a master time reference for the
system time. The 1732E-IB16M12SOEDR module is a CIP Sync slave only
device. There must be another module on the network that will function as a
master clock. The grandmaster could be:
• a 1756 ControlLogix L6 or L7controller when using RSLogix 5000
software V18 or later.
• an Ethernet switch that supports IEEE 1588 V2, or
• a Symmetricom Grand Master GPS or equivalent.
What is CIP Sync?
CIP Sync is a CIP implementation of the IEE 1588 PTP (Precision Time
Protocol). CIP Sync provides accurate real-time (Real-World Time) or
Universal Coordinated Time (UTC) synchronization of controllers and devices
connected over CIP networks. This technology supports highly distributed
applications that require time stamping, sequence of events recording,
distributed motion control, and increased control coordination.
What is Time Stamping?
Each input has its own individual timestamp recorded for both ON and OFF
transitions. The offset from the timestamp to the local clock is also recorded
so that steps in time can be detected and resolved. Diagnostic events such as
short circuit, open wire and open load are not time stamped.
Time stamping uses the 64-bit System Time whose time base is determined by
the modules master clock resolved in microseconds. Each timestamp is
updated as soon as an input transition is detected, before input filtering occurs.
When filtering is enabled, the transition is only recorded if the transition passes
the filter.
The module starts time stamping as soon as it powers up, even if it is not
synchronized to a master clock. If it is synchronized to a master clock and then
becomes unsynchronized it will continue to time stamp. All time stamps and
offsets have a value of zero at power-up.
For more information on how to use CIP Sync technology, see the Integrated
Architecture and CIP Sync Configuration Application Technique publication
I
A-AT003.
Publication 1732E-UM002A-EN-P - March 2010
Page 16

8 Module Overview
Introduction to Sequence of Events modules
The 1732E-IB16M12SOEDR is an input module that offers sub-millisecond
timestamping on a per point basis in addition to providing the basic ON/OFF
detection.
All input point event times are recorded and returned in a single buffer. The
module returns two 64-bit timestamps for each input point, thus allowing:
Filtering allows all inputs on the module to be filtered for both ON to OFF
and OFF to ON transitions. The timestamp for a filtered input will be the time
of the initial transition to the new state and not the time that the filter validates
the event as real.
Selective Event Capturing allows particular events to be disabled per input and
per transition, ON to OFF or OFF to ON.
• ON and OFF events for each point to be displayed simultaneously in
the input data.
• ladder logic not being explicitly required to see events, although needed
to archive events.
• events to be kept in the controller memory during remote power loss
thus eliminating data loss.
Event latching ensures that events are not overwritten. A single transition in
each direction is recorded per point. Any new event, which occurs after the
point has captured a time stamp, is dropped until the stored events have been
acknowledged.
If latching is not enabled, new events overwrite old events immediately. Thus,
if inputs are changing rapidly it may be possible that events will be lost either in
the module or the controller prior to an event being operated on by ladder
logic.
When events are lost, either old ones being overwritten or new ones being
ignored due to latching, an EventOverflow bit will be set for each point that
loses an event. The EventOverflow bit will clear when the blocking events for
that point are acknowledged.
Timestamping is a feature that registers a time reference to a change in input
data. For the 1732E-IB16M12SOEDR, the time mechanism used for
timestamping is (PTP) system time. The 1732E-IB16M12SOEDR module is a
PTP slave only device. There must be another module module on the network
that will function as a master clock.
Publication 1732E-UM002A-EN-P - March 2010
Page 17

Module Overview 9
High Performance Sequence of Events Applications in the Logix Architecture
Sequence of Events (SOE) applications span a wide range of industry
applications. Typically any event that needs to be compared against a second
event can be classified as SOE.
• Used on discrete machines to identify failure points
• Used in Power Substations or power plants to indicate first fault
conditions
• Used in SCADA applications to indicate pump failures or other discrete
events
• Used in motion control applications to increase control coordination.
• Used in high speed applications
• Used in Global Position Registration
In today's environment, specifications for SOE applications typically require
1 ms or better resolution on time stamps. There are two types of SOE
applications.
First Fault
First Fault measures the time between events with no correlation to events
outside of that system.
Real Time
Real Time captures the time of an event occurrence as it relates to some
master clock. Typically this is a GPS, NTP server or some other very accurate
clock source. This method allows distributed systems to capture events and
build a history of these events. These events are almost always digital, however
some are analog for which lower performance requirements can be configured.
First Fault Detection
An example of first fault detection would be intermittent failure from a sensor
on a safety system faults a machine and halts production cascading a flood of
other interrelated machine faults. Traditional fault detection or alarms may not
appear in the correct timed order of actual failure making root cause of the
down time difficult or impossible.
Time Stamped I/O
High precision time stamps on I/O allows very accurate first fault detection
making it easy to identify the initial fault that caused machine down time.
Publication 1732E-UM002A-EN-P - March 2010
Page 18

10 Module Overview
Common Time base for Alarming System logs user interaction as well as alarm
events using common time reference.
The power industry requires sub 1 ms accuracy on first fault across
geographically dispersed architecture.
High Speed Applications
Packaging machines or sorters that have fast part cycles are often bottlenecked
by controller scan times. By switching to a time based solution, you can
remove many scan time critical components of the system. This programming
technique allows you to do predictive events and schedule outputs to run
things like diverters without having a scan time to match the part cycle time.
Motion Control
CIP Sync also provides a common time reference for distributed VFD drives,
servo’s, and controllers throughout the system. This allows controllers to
request axes reach a pre-defined position at a known time reference or run at a
set speed using the same reference. Since all drives and controllers in the
system have the same reference to time, the controller can issue simple
requests for axes to reach target positions in a synchronized fashion.
Global Position Registration
Registration refers to a function usually performed by the drive where a
physical input is triggered causing the drive to precisely capture the actual axis
position when the input event occurred. Rather than wiring inputs to the
registration input on all of the drives, this time based system lets you wire an
input to only one time based SOE input module. The time stamp returned for
that input, can be used by the motion planner to calculate the actual axis
position at the time the input triggered. This simplifies system installation,
reduces wiring costs, and provides a global machine registration for all the axes
in the system thru one SOE input.
Chapter Summary and What’s Next
Publication 1732E-UM002A-EN-P - March 2010
In this chapter, you were given an overview of the 1732E EtherNet/IP
ArmorBlock Supporting Sequence of Events module. The next chapter
describes how the 1732E EtherNet/IP ArmorBlock Supporting Sequence of
Events module operates in an ArmorBlock system.
Page 19

Use the Module in an ArmorBlock System
3
Introduction
Differences Between Module and Standard I/O
Difference Description
Additional data produced for controller The module produces significantly more data for its owner-controller than standard
CIP Sync This module has an internal clock that is synchronized with a master clock using CIP Sync.
Only one owner-controller per module While multiple controllers can simultaneously own other digital input modules, the module
This chapter describes how the 1732E EtherNet/IP ArmorBlock Supporting
Sequence of Events module operates in an ArmorBlock system.
Topic Page
Differences Between Module and Standard I/O 11
Similar Functionality to Standard ArmorBlock 11
In many aspects, the module behaves the same as other ArmorBlock digital
input modules. However, the module offers several significant differences
from other EtherNet/IP ArmorBlock digital input modules, including those
described in the following table.
ArmorBlock digital input modules. While other input modules only produce ON/OFF and
fault status, the module produces data such as ON/OFF and fault status, timestamp data,
indication of whether new data was produced for specific input points or if transitions were
not timestamped.
This clock is used for time stamping inputs.
only supports a single owner-controller.
No listen-only connections Controllers cannot make listen-only connections to the module. All connections between
the module and its owner-controller are direct connections.
Similar Functionality to Standard ArmorBlock
11 Publication 1732E-UM002A-EN-P - March 2010
With respect to general module operation in an ArmorBlock I/O system, the
module operates similarly to other ArmorBlock, single and dual port
EtherNet/IP I/O modules in many ways. This chapter focuses on how the
module’s behavior differs from that of other ArmorBlock I/O modules.
However, you should be aware of aspects in which the module is similar to
Page 20

12 Use the Module in an ArmorBlock System
standard EtherNet/IP ArmorBlock I/O modules. In addition to the common
features described in Chapter 1
Concept Description
Ownership Every module in the ArmorBlock system must be owned by a Logix5000 controller. This
owner-controller:
, the following table describes the similarities.
• stores configuration data for every module that it owns.
• sends the module configuration data to define the module’s behavior and
begin operation with the control system.
This module does not support multiple owner-controllers.
Using RSLogix 5000 software The I/O configuration portion of RSLogix 5000 software, v17 or greater, generates the
configuration data for each module.
Configuration data is transferred to the controller during the program download and
subsequently transferred to the appropriate modules.
Modules are ready to run as soon as the configuration data has been downloaded.
Chapter Summary and What’s Next
Configure all modules for a given controller using RSLogix 5000 software and download that
information to the controller.
In this chapter, you learned about the differences between this module and
other EtherNet/IP ArmorBlock modules. The next chapter describes how to
install and wire your module.
Publication 1732E-UM002A-EN-P - March 2010
Page 21
Install Your Module
Chapter
4
Overview
Mount the Module
This chapter shows you how to install and wire the 1732E EtherNet/IP
ArmorBlock Supporting Sequence of Events. The only tools you require are a
flat or Phillips head screwdriver and drill.
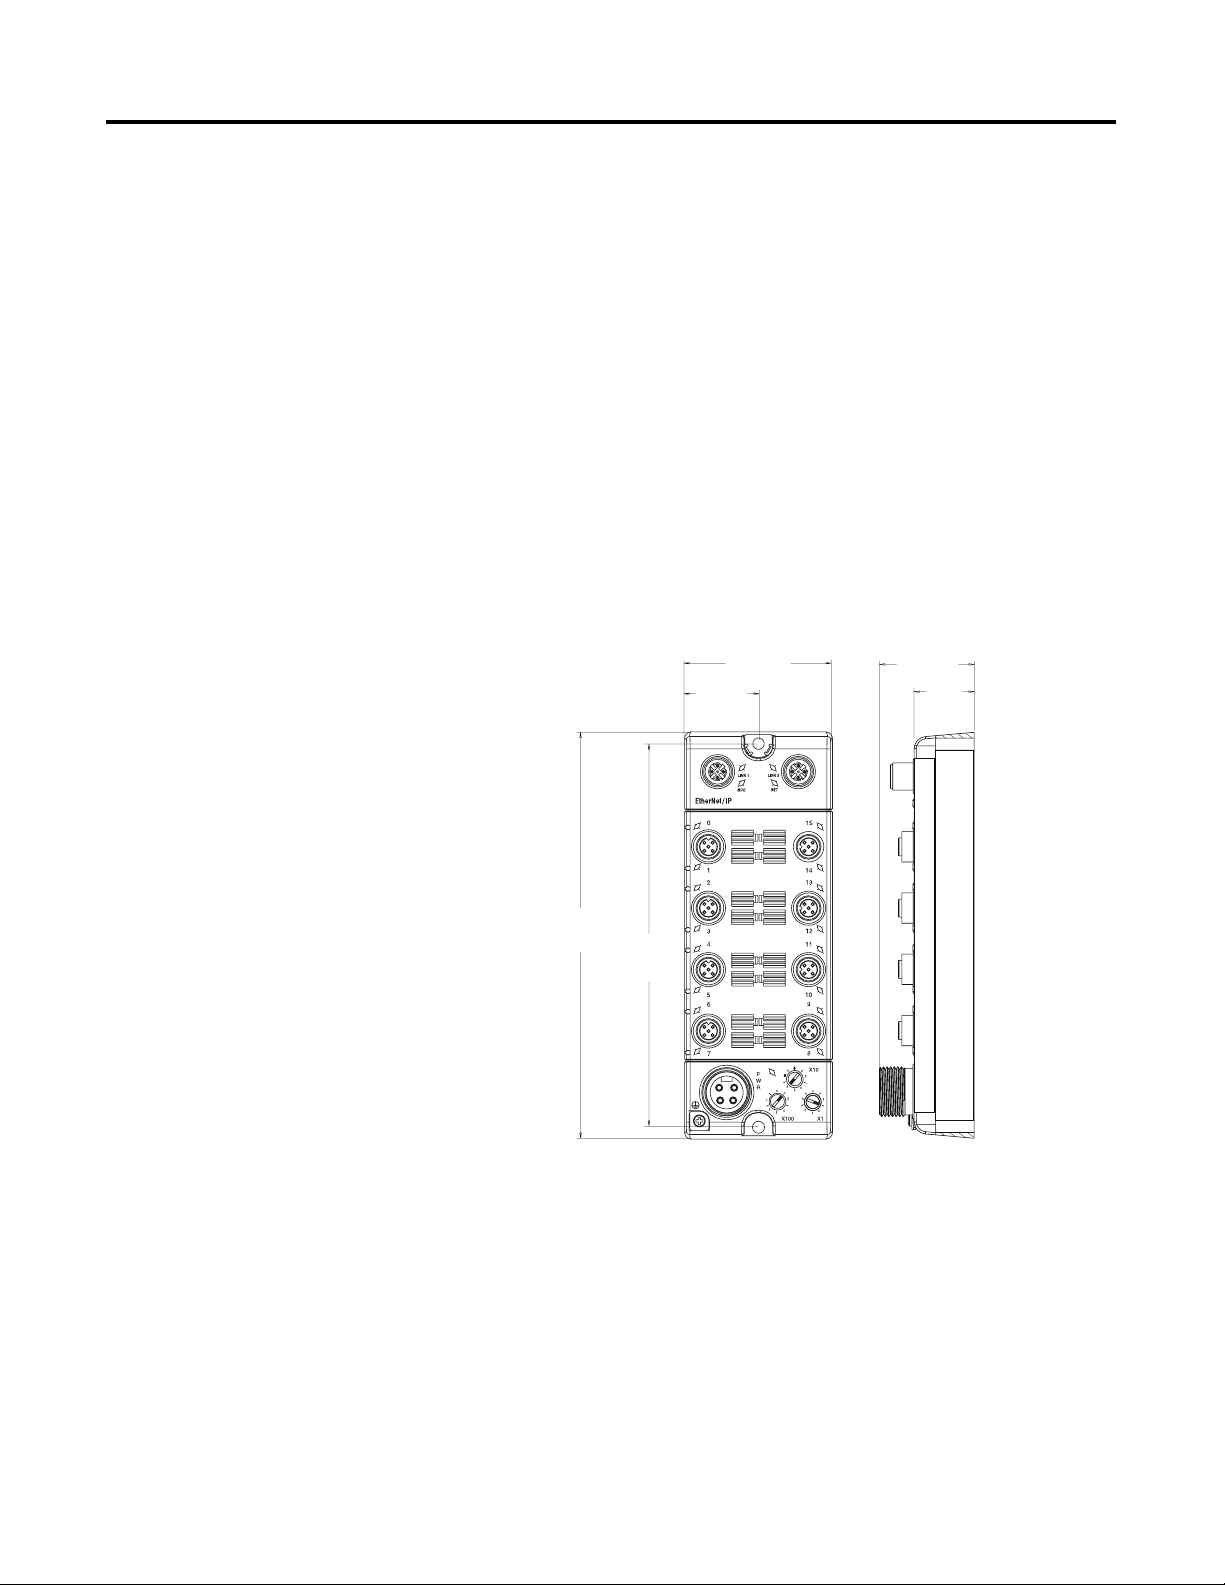
To mount the module on a wall or panel, use the screw holes provided in the
module.
Refer to the drilling dimensions illustration to guide you in mounting the
module.
43.25 mm
(1.70 in.)
26.5 mm
(1.04 in.)
179 mm
(7.05 in.)
65 mm
(2.56 in.)
32.5 mm
(1.28 in.)
169 mm
(6.64 in.)
44946
Front view
Install the mounting base as follows:
1. Lay out the required points as shown above in the drilling dimension
drawing.
2. Drill the necessary holes for #8 (M4) pan head screws.
3. Mount the module using #8 (M4) screws.
13 Publication 1732E-UM002A-EN-P - March 2010
Side view
Page 22
14 Install Your Module
Wire the Module
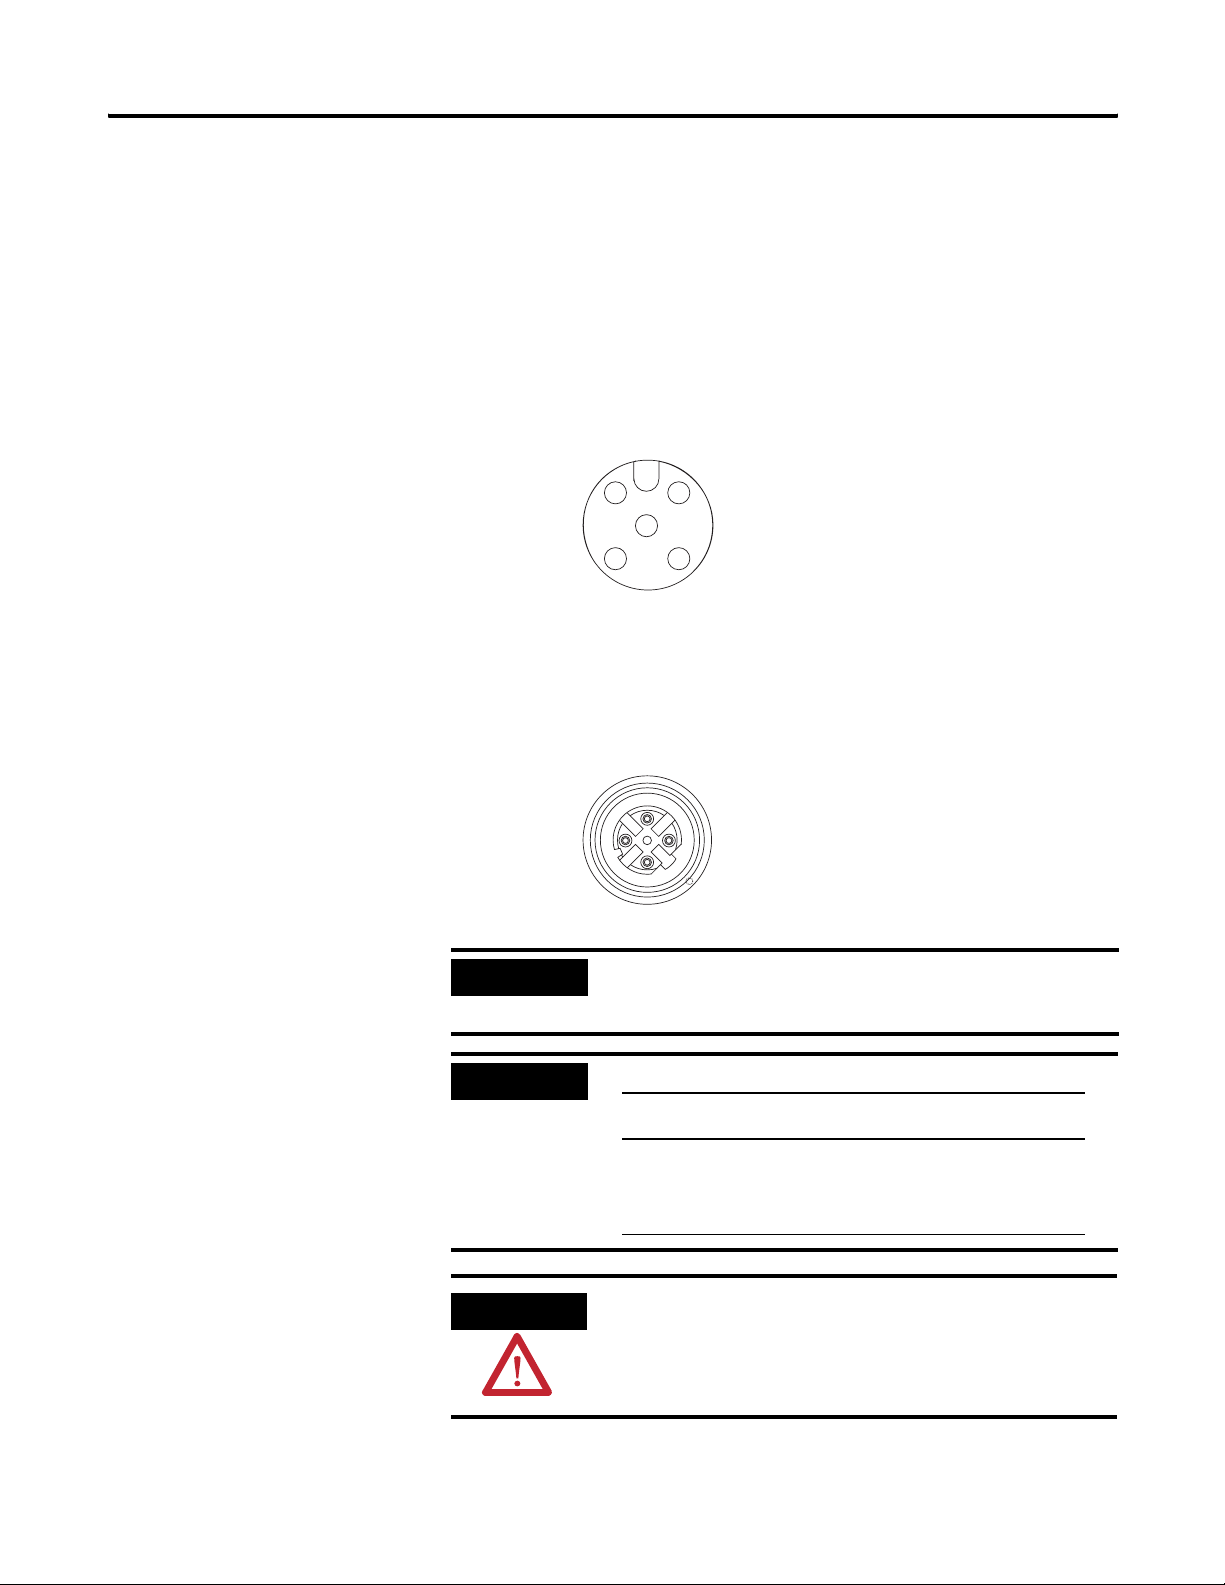
The ArmorBlock EtherNet/IP family has 5-pin micro-style I/O connectors.
We provide caps to cover the unused connectors on your module. Connect the
quick-disconnect cord sets you selected for your module to the appropriate
ports.
I/O Connectors
Refer to the pinout diagrams for the I/O connectors.
Micro-style
1 2
5
4
5-Pin Input Female
(View into connector)
Pin 1 Sensor Source Voltage
Pin 2 Input B
Pin 3 Return
44807
Pin 4 Input A
Pin 5 PE
3
Connector
Ethernet/IP Connectors
Refer to the pinout diagrams for the network connectors.
D-Code M12 Network Female Connector
4
31
2
(View into connector)
Pin 1 M12_Tx+
Pin 2 M12_Rx+
Pin 3 M12_TxPin 4 M12_Rx-
5
Pin 5 Connector shell shield FE
44808
.
Publication 1732E-UM002A-EN-P - March 2010
IMPORTANT
IMPORTANT
ATTENTION
Use the 1585D–M4DC–H: Polyamide small body unshielded or the
1585D–M4DC–SH: Zinc die-cast large body shielded mating
connectors for the D-Code M12 female network connector.
Use two twisted pair CAT5E UTP or STP cable.
D-Code
M12 Pin
1 White-Orange TX+ 1
2 White-Green RX+ 3
3 Orange TX- 2
4 Green RX- 6
Wire Color Signal 8-way Modular
RJ45 Pin
Make sure all connectors and caps are securely tightened to
properly seal the connections against leaks and maintain IP
enclosure type requirements.
Page 23
Install Your Module 15
Auxiliary Power Cable
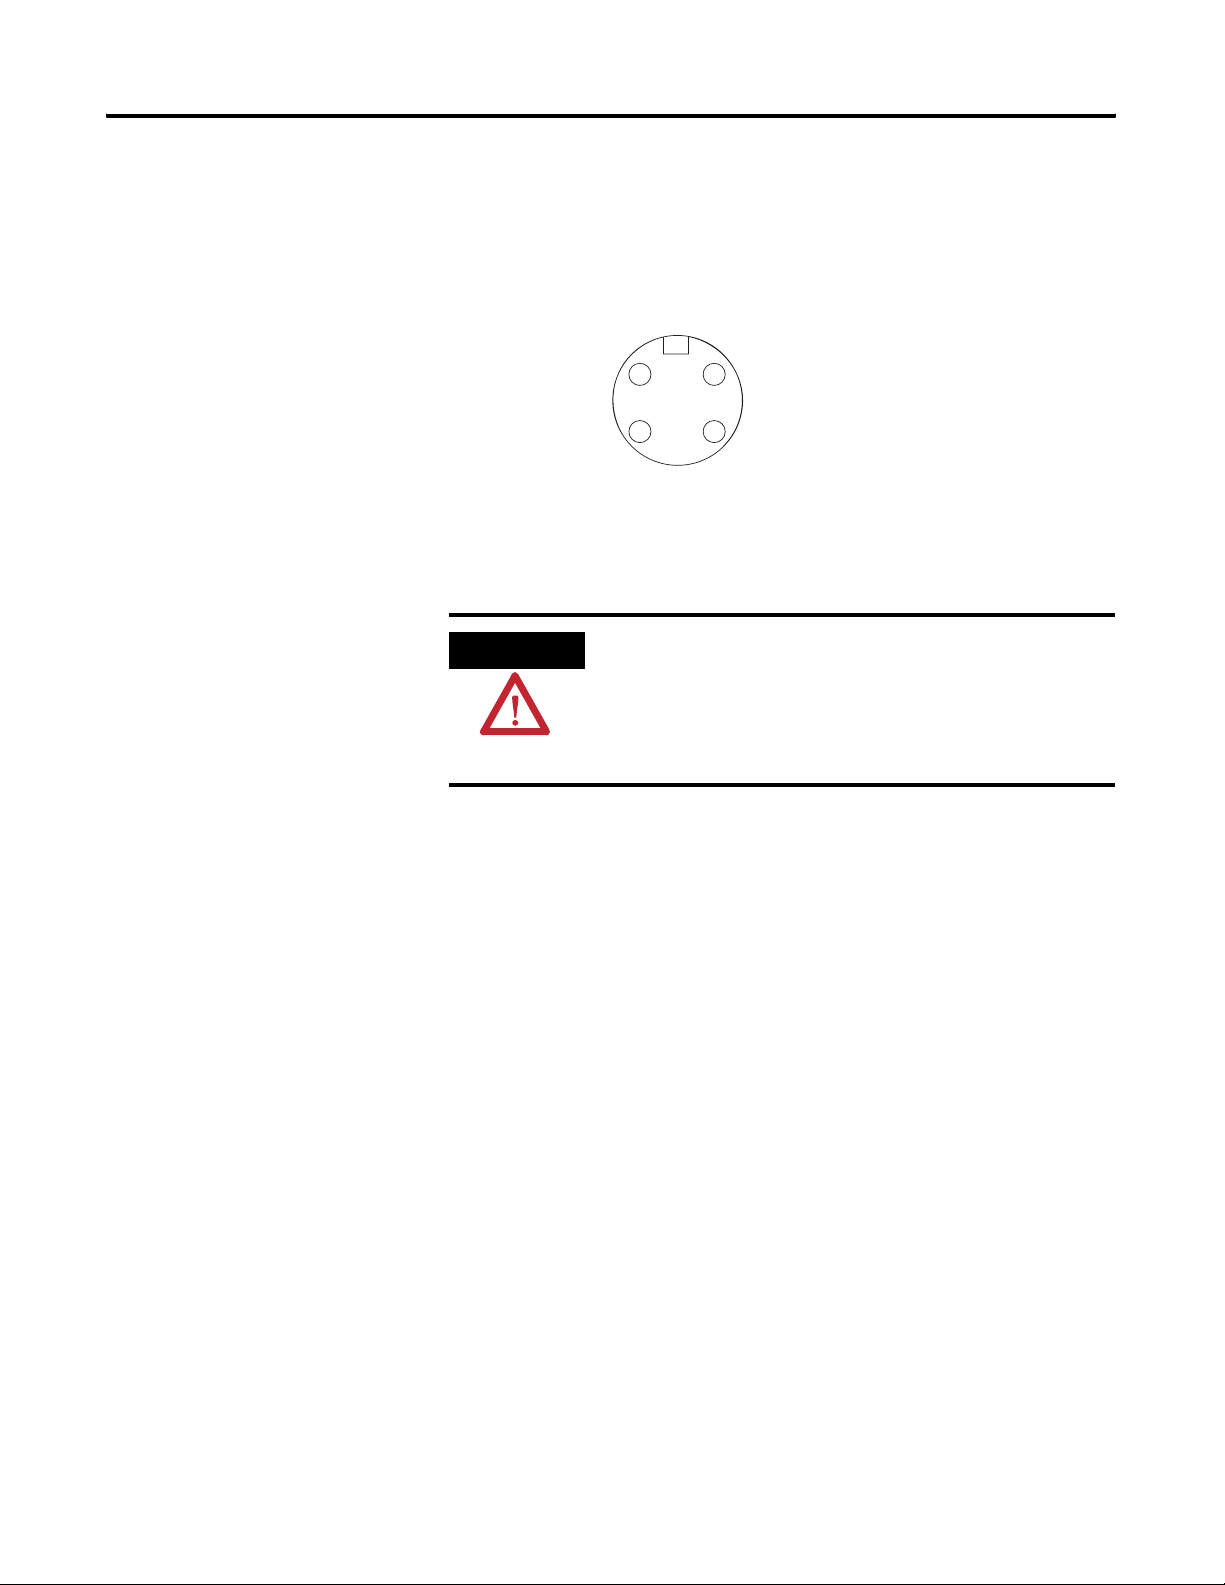
Attach the mini-style 4-pin connector to the mini-style 4-pin receptacle as
shown below.
Mini-style 4-Pin Male Receptacle
(View into receptacle)
4 2
3 1
Auxiliary Power is based on a 4-pin connector system and is used to provide
24V DC power to I/O modules and other devices. Pins 3 and 4 are connected
inside the module.
Pin 1 NC
Pin 2 Sensor/MDL power+
Pin 3 Sensor/MDL powerPin 4 NC
44809
Chapter Summary and What’s Next
ATTENTION
To comply with the CE Low Voltage Directive (LVD), this
equipment and all connected I/O must be powered from a
source compliant with the following:
Safety Extra Low Voltage (SELV) or Protected Extra Low Voltage
(PELV).
In this chapter, you learned how to install and wire your module. The
following chapter describes how to configure your module to communicate on
the EtherNet/IP network by providing an IP address, gateway address, and
Subnet mask.
Publication 1732E-UM002A-EN-P - March 2010
Page 24

16 Install Your Module
Notes:
Publication 1732E-UM002A-EN-P - March 2010
Page 25

5
Configure the Module for Your EtherNet/IP
Network
Introduction
Before using the 1732E EtherNet/IP ArmorBlock Supporting Sequence of
Events in an EtherNet/IP network, configure it with an IP address, subnet
mask, and optional Gateway address. This chapter describes these
configuration requirements and the procedures for providing them. Here are
the ways you can do this:
• Use the Rockwell BootP/DHCP utility, version 2.3 or greater, that ships
with RSLogix 5000 or RSLinx software. You can also use this utility to
reconfigure a device whose IP address must be changed.
• Use a third party DHCP (Dynamic Host Configuration Protocol) server.
• Use the Network Address switches.
• Have your network administrator configure the module via the network
server.
See the table for a list of where to find specific information in this chapter.
Topic Page
Configuration Requirements 17
IP Address 18
Gateway Address 19
Subnet Mask 20
Use the Rockwell BootP/DHCP Utility 21
Save the Relation List 24
Use DHCP Software to Configure Your Module 24
Configuration Requirements
17 Publication 1732E-UM002A-EN-P - March 2010
Before you can use your module, you must configure its IP address, its subnet
mask, and optionally, gateway address. You have the option to use the
Rockwell BootP/DHCP utility, version 2.3 or greater, to perform the
configuration. You also have the option to use a DHCP server or the network
address switches to configure these parameters.
Page 26

18 Configure the Module for Your EtherNet/IP Network
If the module needs to be reset to factory defaults, set the switches on the
module to the value 888 and then cycle power to the module.
IMPORTANT
If using the BootP/DHCP utility, you will need to know the
Ethernet hardware address of your module. Rockwell assigns
each module a unique 48-bit hardware address at the factory.
The address is printed on a label on the side of your module. It
consists of six hexadecimal digits separated by colons. This
address is fixed by the hardware and cannot be changed.
If you change or replace the module, you must enter the new
Ethernet hardware address of the module when you configure
the new module.
IP Address
The IP address identifies each node on the IP network (or system of
connected networks). Each TCP/IP node on a network (including your
module) must have a unique IP address.
The IP address is 32 bits long and has a net ID part and a Host ID part.
Networks are classified A, B, C, (or other). The class of the network
determines how an IP address is formatted.
Class A
Class B
Class C
Net ID
78
Net ID
Host ID
15 16
Host ID
233124
Host ID
0
0
0
1 0
0
1 1 0
Net ID
You can distinguish the class of the IP address from the first integer in its
dotted-decimal IP address as follows:
Classes of IP Addresses
Range of first integer Class Range of first integer Class
0…127 A 192…223 C
128...191 B 224…255 other
Each node on the same logical network must have an IP address of the same
class and must have the same net ID. Each node on the same network must
have a different Host ID thus giving it a unique IP address.
31
31
Publication 1732E-UM002A-EN-P - March 2010
Page 27
Configure the Module for Your EtherNet/IP Network 19
IP addresses are written as four decimal integers (0...255) separated by periods
where each integer gives the value of one byte of the IP address.
EXAMPLE
For example, the 32-bit IP address:
10000000 00000001 00000000 00000001 is written as
128.1.0.1.
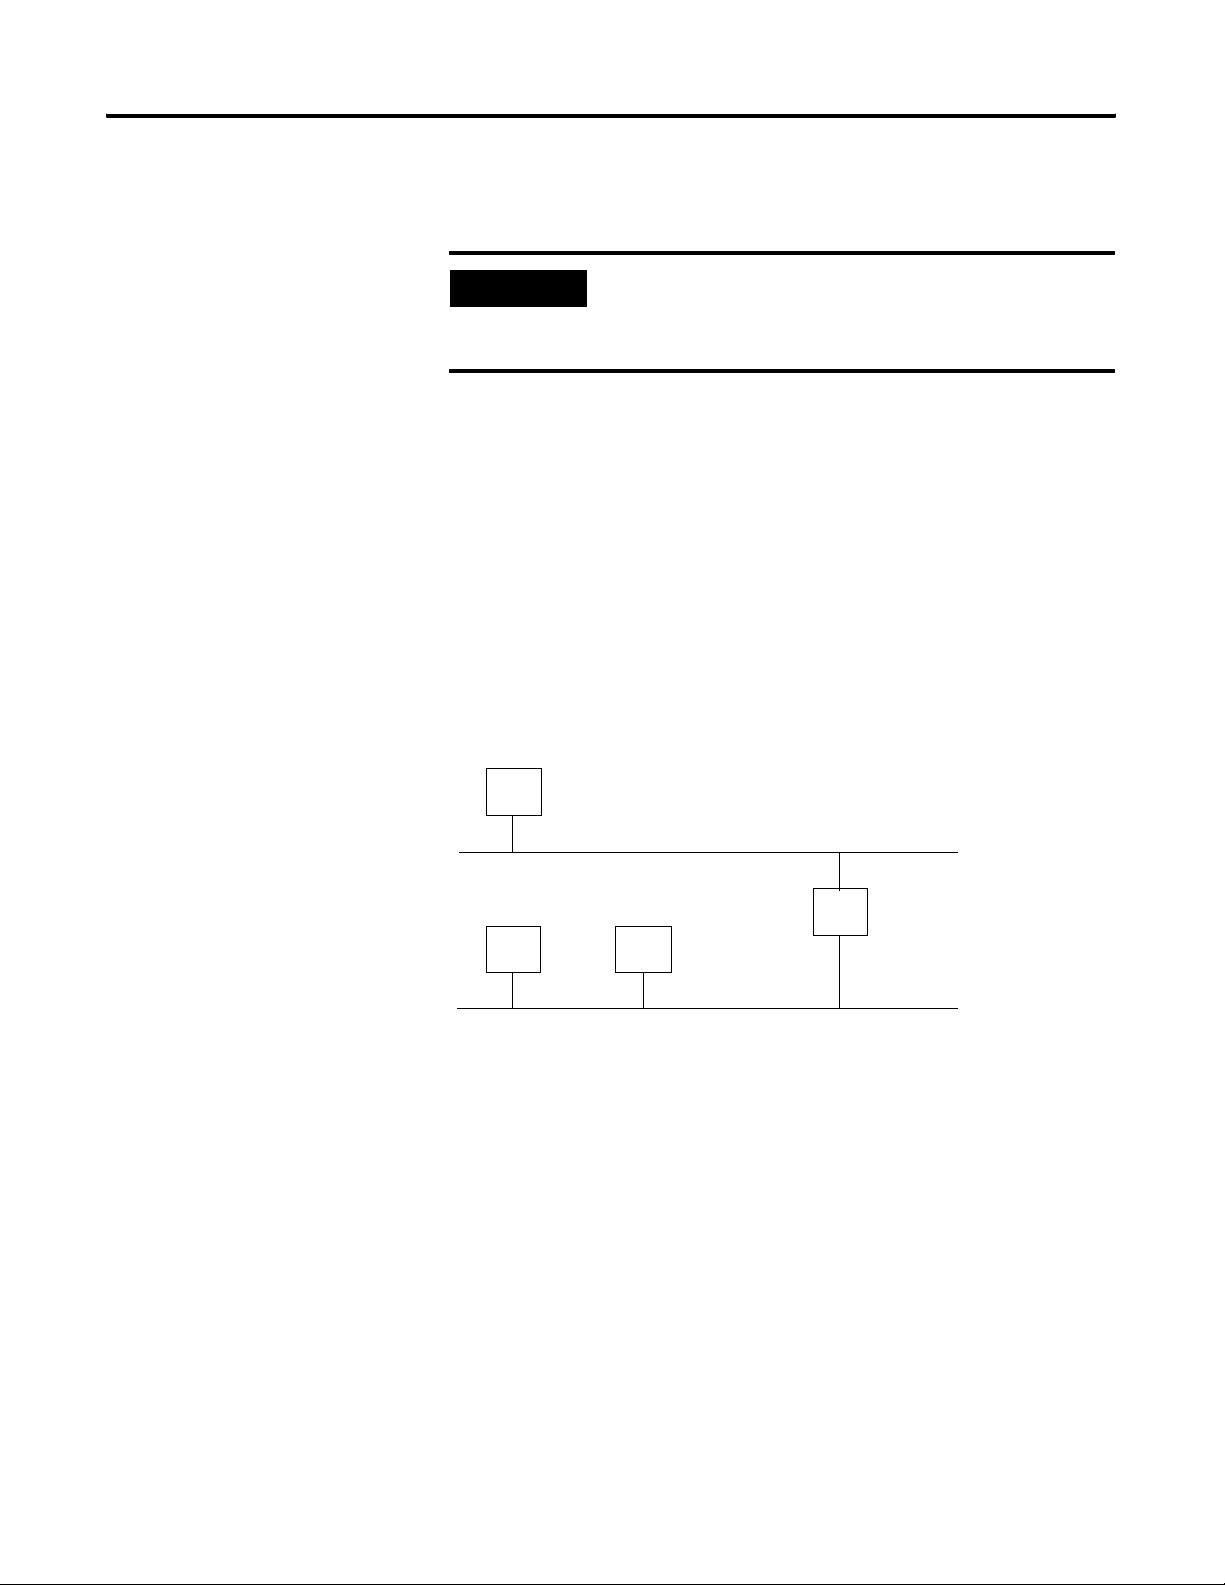
Gateway Address
This section applies to multi-network systems. If you have a single network
system, skip to the next section.
The gateway address is the default address of a network. It provides a single
domain name and point of entry to the site. Gateways connect individual
networks into a system of networks. When a node needs to communicate with
a node on another network, a gateway transfers the data between the two
networks. The following figure shows gateway G connecting Network 1 with
Network 2.
A
128.1.0.1
B
128.2.0.1
Network 1
C
128.2.0.2
Network 2
128.1.0.2
G
128.2.0.3
When host B with IP address 128.2.0.1 communicates with host C, it knows
from C’s IP address that C is on the same network. In an Ethernet
environment, B then resolves C’s IP address into a hardware address (MAC
address) and communicates with C directly.
When host B communicates with host A, it knows from A’s IP address that A
is on another network (the net IDs are different). In order to send data to A, B
must have the IP address of the gateway connecting the two networks. In this
example, the gateway’s IP address on Network 2 is 128.2.0.3.
The gateway has two IP addresses (128.1.0.2 and 128.2.0.3). The first must be
used by hosts on Network 1 and the second must be used by hosts on
Network 2. To be usable, a host’s gateway must be addressed using a net ID
matching its own.
Publication 1732E-UM002A-EN-P - March 2010
Page 28
20 Configure the Module for Your EtherNet/IP Network
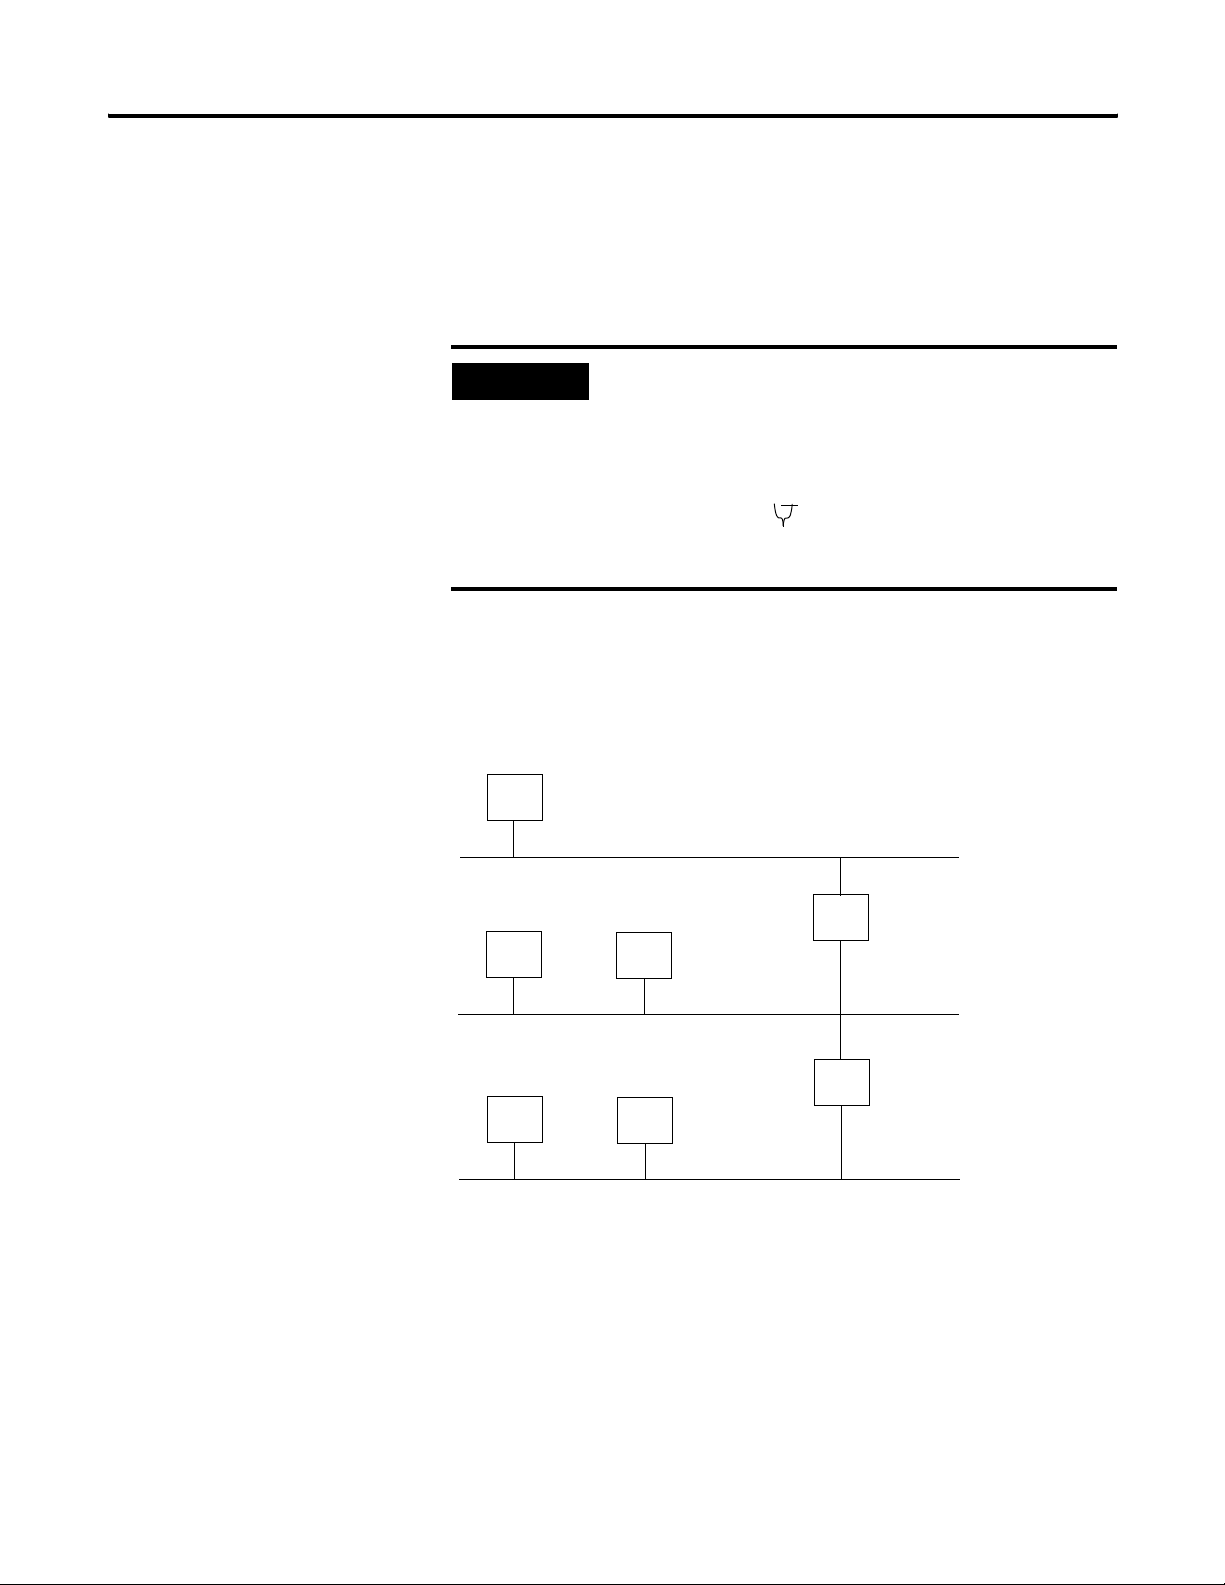
Subnet Mask
The subnet mask is used for splitting IP networks into a series of subgroups,
or subnets. The mask is a binary pattern that is matched up with the IP address
to turn part of the Host ID address field into a field for subnets.
EXAMPLE
Take Network 2 (a Class B network) in the previous
example and add another network. Selecting the following
subnet mask would add two additional net ID bits, allowing
for four logical networks:
11111111 11111111 11000000 00000001 = 255.255.192.0
These two bits of the host ID used to
extend the net ID
Two bits of the Class B host ID have been used to extend the net ID. Each
unique combination of bits in the part of the Host ID where subnet mask bits
are 1 specifies a different logical network.
The new configuration is:
A
128.1.0.1
Network 1
128.1.0.2
G
Publication 1732E-UM002A-EN-P - March 2010
B
128.2.64.1
D
128.2.128.1
C
Network 2.1
E
128.2.128.2
Network 2.2
128.2.64.3
G2
128.2.128.3
A second network with Hosts D and E was added. Gateway G2 connects
Network 2.1 with Network 2.2.
Hosts D and E use Gateway G2 to communicate with hosts not on
Network 2.2.
Hosts B and C use Gateway G to communicate with hosts not on
Network 2.1.
When B is communicating with D, G (the configured gateway for B) routes the
data from B to D through G2.
Page 29

Configure the Module for Your EtherNet/IP Network 21
Set the Network Address
The I/O block ships with the rotary switches set to 999 and DHCP enabled.
To change the network address, you can do one of the following:
1. Adjust the switches on the front of the module.
2. Use a Dynamic Host Configuration Protocol (DHCP) server, such as
Rockwell Automation BootP/DHCP.
3. Retrieve the IP address from nonvolatile memory.
The I/O block reads the switches first to determine if the switches are set to a
valid number. Set the network address by adjusting the 3 switches on the front
of the module. Use a small blade screwdriver to rotate the switches. Line up
the small notch on the switch with the number setting you wish to use. Valid
settings range from 001…254.
Network Address Example
This example
shows the network
address set at 163
Use the Rockwell BootP/DHCP Utility
44233
When the switches are set to a valid number, the I/O block’s IP address is
192.168.1.xxx (where xxx represents the number set on the switches). The I/O
block’s subnet mask is 255.255.255.0 and the gateway address is set to 0.0.0.0.
When the I/O block uses the network address set on the switches, the I/O
block does not have a host name assigned to it or use any Domain Name
Server.
If the switches are set to an invalid number (for example, 000 or a value greater
than 254, excluding 888), the I/O block checks to see if DHCP is enabled. If
DHCP is enabled, the I/O block asks for an address from a DHCP server.
The DHCP server also assigns other Transport Control Protocol (TCP)
parameters.
If DHCP is not enabled, and the switches are set to an invalid number, the
I/O block uses the IP address (along with other TCP configurable parameters)
stored in nonvolatile memory.
The Rockwell BootP/DHCP utility is a stand alone program that incorporates
the functionality of standard BootP/DHCP software with a user-friendly
graphical interface. It is located in the Utils directory on the RSLogix 5000
Publication 1732E-UM002A-EN-P - March 2010
Page 30
22 Configure the Module for Your EtherNet/IP Network
installation CD. The module must have DHCP enabled (factory default and
the network address switches set to an illegal value) to use the utility.
To configure your module using the BootP/DHCP utility, perform the
following steps:
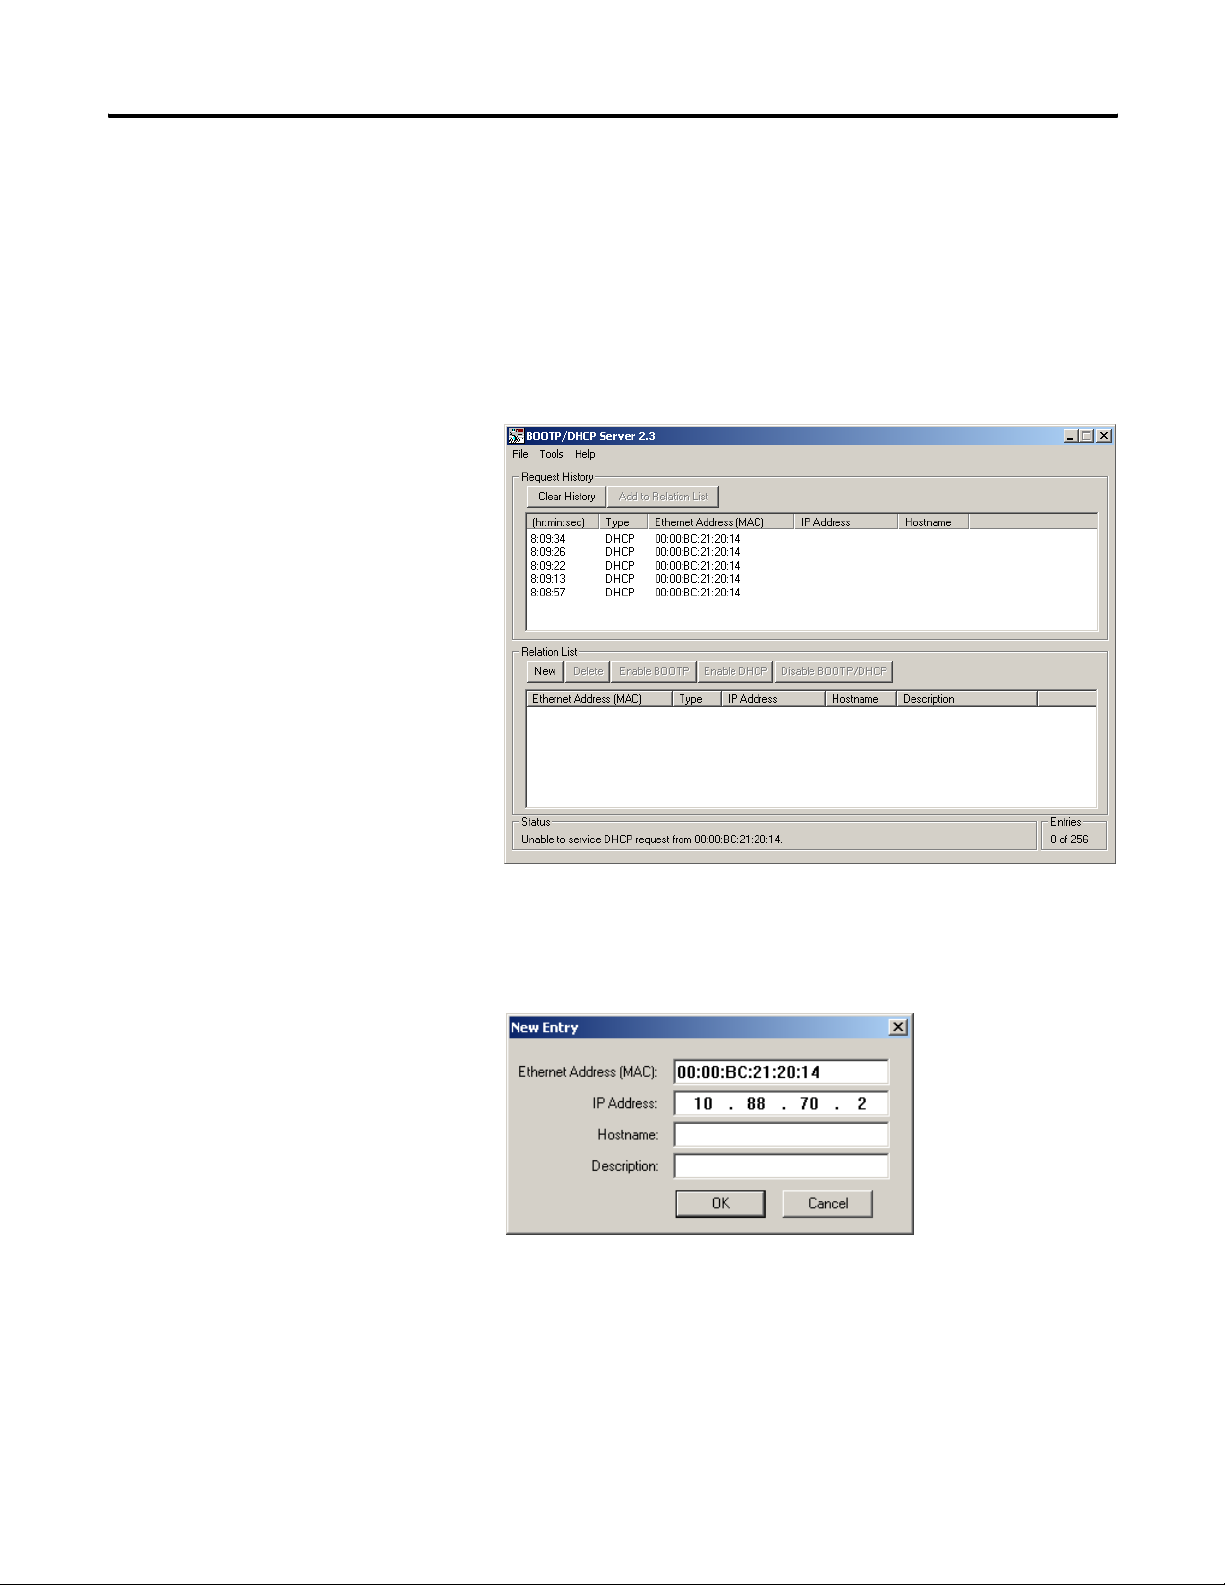
1. Run the BootP/DHCP software.
The BOOTP/DHCP Request History dialog appears showing the
hardware addresses of devices issuing BootP/DHCP requests.
2. Double-click the hardware address of the device you want to configure.
The New Entry dialog appears showing the device’s Ethernet
Address (MAC).
3. Enter the IP Address you want to assign to the device and click OK.
Publication 1732E-UM002A-EN-P - March 2010
Page 31

Configure the Module for Your EtherNet/IP Network 23
The device is added to the Relation List, displaying the Ethernet
Address (MAC) and corresponding IP Address, Hostname and
Description (if applicable).
When the IP address assignment is made, the address displays in the IP
Address column in the Request History section.
4. To assign this configuration to the device, highlight the device in the
Relation List panel and click Disable BOOTP/DHCP. When power is
cycled to the device, it uses the configuration you assigned and not does
not issue a DHCP request.
TIP
To enable DHCP for a device that has had DHCP disabled,
highlight the device in the Relation List and click Enable DHCP.
You must have an entry for the device in the Relation List panel
to re-enable DHCP.
Publication 1732E-UM002A-EN-P - March 2010
Page 32

24 Configure the Module for Your EtherNet/IP Network
Save the Relation List
You can save the Relation List to use later. To save the Relation List do the
following:
1. Select Save As... from the File menu.
Use DHCP Software to Configure Your Module
The Save As dialog box appears.
2. Select the folder you want to save the list to.
3. Enter a file name for the Relation List (for example, control system
configuration) and click Save.
If you want to see your saved file names in the Open dialog box, save
your files using the default file type (*.bpc).
Dynamic Host Configuration Protocol (DHCP) software automatically assigns
IP addresses to client stations logging onto a TCP/IP network. DHCP is
based on BootP and maintains some backward compatibility. The main
difference is that BootP was designed for manual configuration, while DHCP
Publication 1732E-UM002A-EN-P - March 2010
Page 33

Configure the Module for Your EtherNet/IP Network 25
allows for dynamic allocation of network addresses and configurations to
newly attached devices.
Be aware that a DHCP server typically assigns a finite lease time to the offered
IP address. When 50 percent of the leased time has expired, the module will
attempt to renew its IP address with the DHCP server. The module could be
assigned a different IP address, which would cause communicating with the
ControlLogix controller to cease.
Chapter Summary and What’s Next
ATTENTION
In this chapter, you learned how to configure the module to communicate on
your EtherNet/IP network by providing an IP address, gateway address, and
Subnet mask. The next chapter describes an example application in which you
configure discrete I/O.
To avoid unintentional control, the module must be assigned
a fixed IP address. The IP address of this module should not
be dynamically provided. If a DHCP server is used, it must be
configured to assign a fixed IP address for your module.
Failure to observe this precaution may result in unintended
machine motion or loss of process control.
Publication 1732E-UM002A-EN-P - March 2010
Page 34

26 Configure the Module for Your EtherNet/IP Network
Notes:
Publication 1732E-UM002A-EN-P - March 2010
Page 35

Chapter
Configure the Module Using RSLogix 5000
6
Introduction
This chapter guides you through the steps required to configure your 1732E
EtherNet/IP ArmorBlock Supporting Sequence of Events using
RSLogix 5000 software. Note that the modules presented in this chapter are
configured using RSLogix 5000 software, version 17 or later. The chapter
contains the following main sections:
Topic Page
Set Up the Hardware 28
Create the Example Application 29
Configure Your I/O Module 30
Overview of the Configuration Process 30
Add a New Bridge and Module to Your RSLogix 5000 Project 30
Use the Default Configuration 34
Change the Default Configuration 34
Download Your Configuration 37
Edit Your Configuration 37
Access Module Data in RSLogix 5000 38
27 Publication 1732E-UM002A-EN-P - March 2010
Page 36

28 Configure the Module Using RSLogix 5000
Set Up the Hardware
In this example, a ControlLogix chassis contains the Logix 5565 processor in
slot 1 and a 1756-EN2T bridge module in slot 3. The 1732E ArmorBlock
module is mounted remotely.
LINK 1 LINK 2
1732E
ArmorBlock
Programming
Terminal
44971
Local
Chassis
0
Logix5565
Logix5565
Logix5565
Controller (slot 1)
32Slot 1
EtherNet/IP
1756-EN2T
1756-EN2T
192.168.1.1 (slot 3)
192.168.1.100
1732E ArmorBlock
Ethernet Module
192.168.1.20
Data
Switch
To work along with this example set up your system as shown.
• Note that in the example application, the Logix5565 controller and
1756-EN2T module (firmware version 2.3 or higher) are assumed to be
in the slots shown.
• Verify the IP addresses for your programming terminal, 1756-EN2T
module and 1732E ArmorBlock Ethernet module.
• Verify that you connected all wiring and cabling properly.
• Be sure you configured your communication driver (for example,
AB_ETH-1 or AB-ETHIP-1) in RSLinx software.
Publication 1732E-UM002A-EN-P - March 2010
Page 37

Configure the Module Using RSLogix 5000 29
Create the Example Application
Perform the following steps to create the example application:
1. Perform the following steps to create the example application:
2. From the File menu, select New.
The New Controller dialog opens.
3. Enter an appropriate name for the Controller, for example,
ArmorBlock_IO_Controller.
4. Select the correct version, chassis type, and slot number of the
Logix5565 controller, and the folder where you want to save the
RSLogix 5000 software file (Create In). The Description is optional.
To use redundancy in your system, select the Redundancy Enabled
checkbox.
5. Click OK.
Publication 1732E-UM002A-EN-P - March 2010
Page 38

30 Configure the Module Using RSLogix 5000
Configure Your I/O Module
Overview of the Configuration Process
You must configure your module upon installation. The module will not work
until it has been configured with at least the default configuration.
RSLogix 5000 Configuration Software
You must use RSLogix 5000, version 17 or later to set configuration for your
module. You have the option of accepting default configuration for your
module or writing point level configuration specific to your application.
Both options are explained in detail, including views of software screens, in
this chapter.
When you use the RSLogix 5000 software to configure a module, you must
perform the following steps:
1. Add the Local EtherNet/IP Bridge (1756-EN2T or 1756-EN2TR) to
your project’s I/O Configuration.
2. Add the 1732E-IB16M12SOEDR as a child of the 1756-EN2T module.
Add a New Bridge and Module to Your RSLogix 5000 Project
3. Accept the default configuration or change it to specific configuration
for the module.
4. Edit configuration for a module when changes are needed.
After you have started RSLogix 5000 and created a controller, you must add a
new bridge and a new module to your project. The bridge allows your module
to communicate with the controller.
The wizard allows you to create a new module and write configuration. You
can use default configuration or write specific configuration for your
application.
IMPORTANT
Click Help on the configuration dialogs shown in this section if
you need assistance in selecting and setting the parameters.
Publication 1732E-UM002A-EN-P - March 2010
Page 39

If you are not offline, use this
pull-down menu to go offline
Configure the Module Using RSLogix 5000 31
Add the Local EtherNet/IP Bridge to the I/O Configuration
1. If necessary, go offline.
2. Add the EtherNet/IP Bridge to your RSLogix 5000 project.
A. Right-click on I/O
Configuration.
B. Select New Module
Publication 1732E-UM002A-EN-P - March 2010
Page 40

32 Configure the Module Using RSLogix 5000
A. Select the 1756-EN2T
EtherNet/IP Bridge.
B. Click OK.
3. When the Select Module dialog appears, expand Communications and
select the new module. Select the 1756-EN2T EtherNet/IP Bridge.
4. The Select Major Revision dialog opens.
Select Major Revision 2 or later.
A. Select the number of
major revision.
B. Click OK.
A. Name the bridge.
B. Enter the IP address.
C. Select slot 3 for the EtherNet/IP bridge.
D. Make sure the Minor Revision number
matches your module’s revision.
E. Choose an Electronic Keying method.
For more information, see page 49
F. Click OK.
.
5. Configure the bridge. The first screen of the configuration wizard
opens.
The local 1756-EN2T communication module will communicate with the
1732E ArmorBlock module on EtherNet. Before you can communicate with
slave
your module, you need to add it as a
of the 1756-EN2T communication
module. For more information about using 1756 controller and EtherNet/IP
products, see publication ENET-UM001
.
Publication 1732E-UM002A-EN-P - March 2010
Page 41

A. Select the
1732E-IB16M12SOEDR
module.
B. Click OK.
Configure the Module Using RSLogix 5000 33
Add the 1732E-IB16M12SOEDR as a child of the 1756-EN2T module
1. Right click the Ethernet folder that appears below the 1756-EN2T
bridge you added to the I/O Configuration tree and select New Module.
2. When the Select Module dialog appears expand Digital. Select the
1732E-IB16M12SOEDR module.
TIP
If the 1732E-IB16M12SOEDR module is not listed in the digital
section of the Select Module dialog you may need to download
the Add-On Profile (AOP) for the 1732E- ArmorBlock R 2-Port
and install it as an add-on to RSLogix 5000. The AOP file can be
downloaded from:
support.rockwellautomation.com/controlflash/LogixProfiler.asp
3. The Create Module wizard appears.
Fill in the Module Properties information as shown, and then click OK.
Module Definition Dialog Values
Field Name Value
Name My2PortIB16SOEDR_20
IP address 192.168.1.20
Electronic keying Compatible Module
Connection Data
Revision 1.1
Publication 1732E-UM002A-EN-P - March 2010
Page 42

34 Configure the Module Using RSLogix 5000
A. Name the module.
B. Enter the module’s IP address as shown.
C. Make sure the Module Definition
information matches this example.
D. Click Change... to edit the Module
Definition for your module before
downloading the program to the controller.
E. Click OK to accept the default
configuration.
You can either accept or change the default configuration as shown...
Use the Default Configuration
Change the Default Configuration
If you use the default configuration and click on OK, you are done.
You can skip to Download Your Configuration on page 37
for instructions on
downloading your default configuration to the controller.
If you click Change... in step D on page 34, you can change the Module
Definition information. Select tabs on the Module Properties dialog to edit
specific configuration for your module in RSLogix 5000, for example the
Configuration tab.
Some of the screens that appear during this initial module configuration
process are blank and are not shown here. However, those screens can be
important during online monitoring. To see these screens in use, see Chapter
10, Troubleshoot the Module on page 71
.
Publication 1732E-UM002A-EN-P - March 2010
Page 43

On this dialog, you can:
A. Select the module series.
B. Make sure the Major and Minor
Revision numbers match your
module’s revision.
C. Choose and Electronic Keying
method. For more information, see
.
page 49
D. Select the Connection type.
E. Select the Data Format.
F. Click OK to return to theGeneral tab
of the Module Properties dialog.
From the Connection tab, you can:
Configure the Module Using RSLogix 5000 35
A. Change the RPI. For more information
on the RPI, see page 3
B. Inhibit the module. For more
information on Module Inhibiting,
see page 51
C. Make sure a Major Fault occurs on
the module’s owner-controller if there
is a connection failure between the
module and the controller.
D. Click the Port Configuration tab to see
the next screen.
E. Click OK to close the Module
Properties dialog and download your
configuration.
.
.
Publication 1732E-UM002A-EN-P - March 2010
Page 44

36 Configure the Module Using RSLogix 5000
This screen is grayed out unless you are
online with the controller and module. On this
screen, you can:
A. Enable or disable external ports.
B. Select Auto-negotiate on enabled
ports. If Auto-negotiate is disabled
then select the correct speed and
duplex.
C. Click Port Diagnostics to display the
Port Diagnostics dialog.
D. If you make changes in Step A or
Step B then click Set. Changes will
not take effect until you reset the
module or cycle the power to the
module.
E. Click the Configuration tab to see the
next screen.
F. Click OK to close the Module
Properties dialog and download your
configuration.
On this screen, you can:
A. Set the Input Filter Times. For more
information on Input Filters, see page
46
B. Enable Timestamp Capture for all
input points or for specific points. For
more information on Timestamp
Capture, see page 43
C. Enable Open Wire Detection for all
points or for specific points. For more
information on Open Wire Detection,
see page 45
D. Click on the box to enable Timestamp
Latching. For more information on
Timestamp Latching, see page 44
E. Click Refresh communication to
update the content.
.
.
.
F. Click OK to close the Module
Properties dialog and download your
configuration.
G. Click Help to access the RSLogix 5000
Add-On Profile help for descriptions of
tabs that are not required for setting
up your module.
Publication 1732E-UM002A-EN-P - March 2010
Page 45

Configure the Module Using RSLogix 5000 37
Download Your Configuration
A. Click here to see the
pull-down menu.
B. Click download.
After you write configuration for your module, the module does not use this
configuration until you download it to the owner-controller. The download
transfers the entire program to the controller, overwriting any existing
program.
Download module configuration as shown below.:
Depending on your application, a variety of RSLogix 5000 software screens
may appear to choose a path to your ControlLogix controller and to verify the
download. Navigate those screens as best fits your application.
This completes the download process.
Edit Your Configuration
A. Right-click on the module.
B. Select Properties
After you have set configuration for a module, you can review and change your
choices. You can change configuration data and download it to the controller
while online. This is called dynamic reconfiguration.
Your freedom to change some configurable features, though, depends on
whether the controller is in Remote Run Mode or Program Mode.
IMPORTANT
The editing process begins on the main page of RSLogix 5000
Although you can change configuration while online, you must
go offline to add or delete modules from the project.
Publication 1732E-UM002A-EN-P - March 2010
Page 46

38 Configure the Module Using RSLogix 5000
A. Click the tab where you need to
reconfigure the module.
In this example, Timestamp Capture
was disabled for several input
points.
B. When the module is
reconfigured, click OK.
The General tab of the Module Properties dialog appears.
Click on the tab of the page that you want to view or reconfigure and make any
appropriate changes, as shown in the example.
Access Module Data in RSLogix 5000
Use the following information to use the 1732E-IB16M12SOEDR data in the
ladder logic program.
Use the controller tags in your ladder program to read input data or write
output data.
Publication 1732E-UM002A-EN-P - March 2010
• For RSLogix 5000 programming instructions, refer to RSLogix 5000
Getting Results, publication no. 9399-RLD300GR
.
• For ControlLogix controller information, refer to ControlLogix System
User Manual, publication no. 1756-UM001
.
Page 47

Configure the Module Using RSLogix 5000 39
Configure RSLogix 5000 and the 1756-EN2T Communication Module for CIP Sync
If you are using RSLogix 5000 version 17, follow these steps to configure the
1756-EN2T communication module to be the PTP (CIP Sync) master clock.
1. In your web browser, go to the Rockwell Automation Sample Code
Library at
http://samplecode.rockwellautomation.com/idc/groups/public/docu
ments/webassets/sc_home_page.hcst.
The Search Our Sample Code Library page appears.
2. In the Filename/ID field enter MMS_048132.
3. Click Search.
The 1732E EtherNet/IP ArmorBlock Supporting Sequence of Events
module synchronizes to the grandmaster clock as a slave module as
described in the document.
If you are using RSLogix 5000 version 18 or greater, refer to publication
IA-AT003
module and the ContolLogix processor so that the processor can function as
the PTP (CIP Sync) master clock.
for instructions on configuring the 1756-EN2T communication
Chapter Summary and What’s Next
In this chapter, you read about configuring your module in RSLogix 5000. The
next chapter describes the module Features.
Publication 1732E-UM002A-EN-P - March 2010
Page 48

40 Configure the Module Using RSLogix 5000
Notes:
Publication 1732E-UM002A-EN-P - March 2010
Page 49

Module Features
Chapter
7
Introduction
This chapter describes the features available on 1732E EtherNet/IP
ArmorBlock Supporting Sequence of Events. The chapter contains the
following main sections:.
Topic Page
Determine Module Compatibility 42
Module Features That Can Be Configured 42
Operational Mode 43
Timestamp Capture 43
Timestamp Latching 44
Input Diagnostics 45
Software Configurable Input Filters 46
Communications Format 49
Electronic Keying 49
Module Inhibiting 51
Module Fault Reporting 52
Fully Software Configurable 52
Producer/Consumer Model 53
Status Indicator Information 53
Agency Certifications 53
41 Publication 1732E-UM002A-EN-P - March 2010
Page 50

42 Module Features
Determine Module Compatibility
Primarily, this module is used to interface to sensing devices and detect
whether they are ON or OFF and to timestamp ON and OFF transitions. The
module converts ON/OFF signals from user devices to appropriate logic level
for use in the processor. Typical input devices include:
• auxiliary contacts
• limit switches
When designing a system using these modules, you must consider:
• the voltage necessary for your application
• whether you need a solid state device
• current leakage
• if your application should use sinking or sourcing wiring.
For more information on compatibility of other Rockwell Automation
products to modules, see the I/O Systems Overview, publication CIG-SO001
There are two types of features available on the module:
• Module Features That Can Be Configured - Features that can be
adjusted to make sure the module operates as efficiently as possible in
your application (for example., input filter times)
• Other Inherent Module Features - Features that cannot be changed but
are still crucial to module functionality (for example,
producer/consumer model).
.
Module Features That Can Be Configured
Publication 1732E-UM002A-EN-P - March 2010
The following features on the module can be configured
This feature is described on
Timestamp Capture 43
Timestamp Latching 44
Input Diagnostics 45
Software Configurable Input Filters 46
Page 51

Module Features 43
Operational Mode
The module operates only in Per Point Mode:
Per Point Mode
The module produces timestamps for up to 2 input transitions per input, one
for OFF to ON transitions and another for ON to OFF transitions; these
timestamps can occur simultaneously on separate inputs.
Timestamp Capture
Timestamp Capture instructs the module to timestamp specific input point
transitions. You can use this feature to instruct the module to capture the
timestamp when the inputs transition from:
• OFF to ON only
• ON to OFF only or
• both OFF to ON and ON to OFF
When Timestamp Capture is enabled for specific points and transitions occur
for those points, the module not only captures the timestamp at the transition
occurrence but also sends input data to the controller.
IMPORTANT
All points on the module have Enable Timestamp Capture
enabled by default for both ON to OFF and OFF to ON
transitions.
Additionally, you must specify an RPI regardless of whether you
use Timestamp Capture on any input points. If a change does
not occur within the RPI timeframes, the module will still
produce data at the rate specified by the RPI.
Publication 1732E-UM002A-EN-P - March 2010
Page 52

44 Module Features
Click the Configuration tab.
• Click on the individual boxes for
each input point to Timestamp
Capture for that point.
• Clear the individual boxes for
each input point to disable
Timestamp Capture for that
point.
You can also use these boxes to enable
or disable all points simultaneously.
Use the Configuration tab in RSLogix 5000 to set Timestamp Capture, as
shown in the example.
Timestamp Latching
Timestamp Latching can be used to prevent the module from overwriting
input data once it is timestamped.
• If Timestamp Latching is enabled, the module timestamps an input in a
given direction and ignores future input transitions in that direction until
the controller acknowledges the timestamp data already received.
• If Timestamp Latching is disabled, the module timestamps every input
transition and may overwrite previously recorded timestamp data if the
controller does not acknowledge the data quickly enough.
This feature is set on a modulewide basis and is enabled by default.
Use the Configuration tab in RSLogix 5000 to enable Timestamp Latching, as
shown in the example.
Select this box to enable the
Timestamp Latching feature.
Unselect the box to disable
the feature.
Publication 1732E-UM002A-EN-P - March 2010
Page 53

Module Features 45
Input Diagnostics
As with other modules with diagnostics, the input connector’s Sensor Source
Voltage (SSV), on Pin 1 of the input connectors, is protected from short
circuits to ground as well as open wire conditions due to a missing sensor or to
a cable disconnection.
Short Circuit Protection
Each connector with inputs is protected against short circuits to ground. The
circuit automatically resets each connector individually and the SSV energizes
once the short circuit is removed.
When a short circuit condition is detected, the module issues a diagnostic for a
short circuit in the module’s input tag and solid red input LEDs are illuminated
for the inputs associated with that connector. For more information on
interpreting Status Indicators, see page 69
.
Short circuit detection cannot be disabled.
Open Wire Detection
Open Wire Detection can be used to monitor each input connector for cable
disconnection conditions.
• If Open Wire Detection is enabled, the module monitors the enabled
input connectors for cable disconnections. If an open wire condition is
detected, the module issues a diagnostic for an open wire in the
module’s input tag and blinks the red diagnostic LEDs for the inputs
associated with that connector. For more information on interpreting
Status Indicators indicators, see page 69
• If Open Wire Detection is disabled, the module will not signal a fault for
the disabled input connectors.
Disabling Open Wire Detection on unused inputs prevents the module from
signaling a fault even though nothing is connected to it. This feature is set on
an input connector basis and is disabled for all inputs by default.
.
Publication 1732E-UM002A-EN-P - March 2010
Page 54

46 Module Features
• Click on the individual boxes for
each input point to enable Open
Wire Detection for that point.
• Clear the individual boxes for
each input point to disable Open
Wire Detection for that point.
You can also select this box to enable or
disable all points simultaneously.
Use the Configuration tab in RSLogix 5000 to enable Open Wire Detection, as
shown in the example.
Software Configurable Input Filters
To account for hard contact “bounce”, you can configure ON to OFF and
OFF to ON input filter times in RSLogix 5000 for your module. These filters
define how long an input transition must remain in the new state before the
module considers the transition valid.
IMPORTANT
Input filters are applied to all inputs on the module. You cannot
apply input filters to individual inputs on the module.
When an input transition occurs, the module timestamps the transition on the
initial edge of the transition and stores data for the transition on-board; the
module then scans the input where the transition occurred every millisecond
for the length of the filter time setting to verify that the input remains in the
new state (remained OFF or ON).
• If the input remains in the new state for a time period equal to the filter
time setting, the module sends data for the transition to the controller.
When an input transition is detected the module counts the number of
1 ms intervals the input is in the new state until the count reaches the
filter value.
• If the input changes state again (returns to the original state) before the
length of time of the filter setting has elapsed, the module starts
decrementing the number of 1 ms intervals counted until it reaches zero.
At this point the module stops filtering the input and discards the
timestamp. During this continued scan period, one of the following
events occurs:
Publication 1732E-UM002A-EN-P - March 2010
Page 55

Module Features 47
– At some point while still filtering the input, the input returns to the
transitioned state and remains there until the module counts the
number of 1 ms intervals equal to the filter setting. In this case, the
module sends data from the transition to the controller.
– The input does not remain in the transitioned state for a time period
equal to the filter setting and the 1 ms counter decrements to zero. In
this case, the module does not consider the original transition valid
and drops the timestamp.
The following example illustrates how the module’s input filters operate.
In the example, a module:
• is Timestamp Capture-enabled for all of its points
• uses a 2 ms input filter setting for OFF to ON transitions
Three possible scenarios can result after an input transitioning from OFF to
ON in the given circumstances.
Input turns ON;
timestamp recorded
• Scenario #1 (no bounce) – The input turns ON and remains for the full
2 ms. In this case, the module considers the transition valid and sends
the data recorded at the transition to the controller.
Note the input was sampled as being on three different times: 0 ms,
1ms and 2ms.
Input remains ON for at least 2 ms; transition is considered
valid and the timestamp is sent to the controller
012345678
Time in milliseconds
43671
Publication 1732E-UM002A-EN-P - March 2010
Page 56

48 Module Features
• Scenario #2 – The input turns ON but turns OFF before 2 ms (length
of the input filter setting) elapses. In this case, the module continues to
scan the input every millisecond. At some point, less than 2 ms later, the
input turns ON again and remains for 1 to 2 ms, the third ON sampled
1 ms interval (in this case at 6 ms). In this case, the module considers
the transition valid and sends the data timestamped at the original
transition to the controller.
Input turns ON;
timestamp recorded
Input turns OFF before 2 ms have elapsed.
012345678
• Scenario #3 – The input turns ON but turns OFF before 2 ms (length
of the input filter setting) elapses. In this case, the module continues to
scan the input every millisecond until the 1 ms counter decrements to
zero. The input never remains ON for at least 2 consecutive ms
intervals, the third ON sampled 1 ms interval. In this case, the module
considers the transition invalid and drops the data timestamped at the
original transition.
Input turns OFF before
2 ms have elapsed.
Time in milliseconds
In none of these time periods is the input
ON for at least 2 consecutive ms intervals.
Input turns ON and remains ON for
1…2 ms.
The module sends the timestamp recorded
at the original transition point to the
controller.
43672
Input turns ON;
timestamp #1 recorded
012345678
43671
Publication 1732E-UM002A-EN-P - March 2010
Time in milliseconds
After 7 ms, the module drops the data
recorded at the original transition. If an RPI
occurs during this 7 ms, the module sends
the controller its current valid input data; the
data that’s sent does not include data from
the transition describes in this graphic
because the timestamp has not been
validated.
The next time the input turns ON, the
module records the transition as
timestamp #1, with the timestamp of the
new input transition.
Page 57

Type the filter times or use the
drop down menu to select the
Input Filter Time.
The Input Filter Time range is 0,
1, 2, 4, 8 or 16 ms.
Module Features 49
Use the Configuration tab in RSLogix 5000 software to configure Input Filters,
as shown in the example below.
Communications Format
The communications format determines what operational mode your module
uses and, consequently, what tags RSLogix 5000 generates when configuration
is complete. Once a module is created, you cannot change the communications
format unless you delete and recreate the module.
The 1732E-IB16M12SOEDR module can only use Per Point mode as the
communication format.
Electronic Keying
Electronic keying allows the ControlLogix system to control what modules
belong in the configured system.
During module configuration, you must choose one of the following keying
options for your module:
• Exact Match
• Compatible Module
• Disable Keying
Publication 1732E-UM002A-EN-P - March 2010
Page 58

50 Module Features
When the controller attempts to connect to and configure a module (for
example, after program download), the module compares the following
parameters before allowing the connection and configuration to be accepted:
• Vendo r
• Product Type
• Product Code
• Major Revision - Change that affects the module’s function or
RSLogix 5000 interface
• Minor Revision - Change that does not affect the module’s intended
function or RSLogix 5000 interface
The comparison is made between the keying information present in the
module and the keying information in the controller’s program, preventing the
inadvertent operation of a system with the wrong module. For example, if you
select Exact Match and a module with revision 1.2 is placed in a location
configured for a module with revision 1.4, the controller does not make a
connection to the new module because of the mismatched revisions.
The following table describes the keying options available with your module.
Keying option: Definition:
Exact Match All of the parameters listed above must match or the inserted module will reject a connection to the controller.
Compatible Module The Compatible Module mode allows the module to determine whether it can emulate the module defined in
the configuration sent from the controller. Some modules can emulate older revisions. The module will accept
the configuration if the configuration’s major.minor revision is less than or equal to the physical module’s
revision.
For example, if the configuration contains a major.minor revision of 1.7, the module must have a firmware
revision of 1.7 or higher for a connection to be made. When a module is inserted with a major.minor revision
that is less than the revision configured (that is., the module has a revision of 1.6 and the slot is configured for
a module with revision 1.8), no connection is made between the controller and the I/O module.
TIP
We recommend using Compatible Module whenever possible. Remember, though,
with major revision changes, the module only works to the level of the configuration.
At the time of this printing, the module uses a major.minor revision of 1.6
if a new major revision for the module is released, consider this example. If a module
is configured for major.minor revision of 1.7 and you insert a module with a
major.minor revision of 2.3, the module works at the 1.7 level, with respect to
module functions that are related to RSLogix 5000 software such as interface
changes. Anomaly updates that are affected by the module’s firmware, though,
would work at the 2.3 revision level.
(1)
However,
Publication 1732E-UM002A-EN-P - March 2010
If possible, we recommend that you make sure configuration is updated to match the
revision levels of all I/O modules, including your module. Failure to do so may not
prevent the application from working but may defeat the purpose of upgrading your
modules’ revision levels.
Page 59

Keying option: Definition:
Disable Keying The inserted module attempts to accept a connection to the controller regardless of its type.
ATTENTION
If keying is disabled, a controller makes a connection with most modules of the same type as that used in the
configuration.
A controller will NOT establish a connection if any of the following conditions exist, even if keying is disabled:
•The module is configured for one module type (for example, input module) and a module of another type (for
example, output module) is used.
•The module cannot accept some portion of the configuration. For example, if a non-diagnostic input module
is configured for a diagnostic input module, the controller cannot make a connection because the module will
not accept/process the diagnostic configuration.
(1)
Minor revisions are incremented by single counts such that minor level 10 (major.minor revision level = 1.10) follows minor revision level 9 (1.9).
Be extremely cautious when using the disable keying option; if used incorrectly, this
option can lead to personal injury or death, property damage or economic loss.
Module Features 51
Module Inhibiting
With module inhibiting, you can indefinitely suspend a connection between an
owner-controller and a module. This process can occur in the following way:
• You write configuration for a module but inhibit the module to prevent
it from communicating with the owner-controller. In this case, the
owner-controller does not establish a connection and configuration is
not sent to the module until the connection is uninhibited.
The following examples are instances where you may need to use module
inhibiting:
• You want to FLASH upgrade your module. We recommend you:
a. Inhibit the module.
b. Perfor m the upgrade.
c. Uninhibit the module.
• You are using a program that includes a module that you do not
physically possess yet, but you do not want the controller to continually
look for a module that does not exist yet. In this case, you can inhibit the
module in your program until it physically resides on the network.
Publication 1732E-UM002A-EN-P - March 2010
Page 60

52 Module Features
Click on this box to inhibit
or uninhibit the module
You can inhibit your module on the Connection tab in RSLogix 5000, as
shown in the example.
The following table lists features on the module that cannot be configured.
This feature: is described on:
Module Fault Reporting 52
Fully Software Configurable 52
Producer/Consumer Model 53
Status Indicator Information 53
Module Fault Reporting
Your module provides both a hardware and software indication when a
module fault occurs. The module’s status indicators and RSLogix 5000 display
each fault and include a fault message describing the nature of the fault.
This feature allows you to determine how the fault affects your module and
what action you should take to resume normal operation. For more
information on how to use hardware and software indicators when a module
fault occurs, see Interpret Status Indicators on page 69
Module on page 69.
and Troubleshoot the
Publication 1732E-UM002A-EN-P - March 2010
Fully Software Configurable
RSLogix 5000 uses a custom, easily understood interface to write
configuration. All module features are enabled or disabled through the I/O
configuration portion of the software.
Page 61

Module Features 53
You can also use the software to interrogate your module to retrieve:
• serial number
• revision information
• product code
• vendor identification
• error/fault information
• diagnostic counters.
By eliminating such tasks as setting hardware switches and jumpers, the
software makes module configuration easier and more reliable.
Producer/Consumer Model
By using the Producer/Consumer model, modules can produce data without
having been polled by a controller first. The module produces the data and the
owner-controller device consumes it.
Chapter Summary and What’s Next
Status Indicator Information
Each module has Status Indicators on the front of the module that allows you
to check the module health and operational status.
For more information on how to use the module’s status indicators, and
RSLogix 5000, when troubleshooting your application, see Interpret Status
Indicators on page 69
and Troubleshoot the Module on page 71.
Agency Certifications
The module is marked for any agency certifications (for example, c-UL-us, CE,
C-Tick and EtherNet/IP) it has obtained. See the module’s label for all agency
certifications. For more information on full certification specifications, see
Appendix A on page 73
In this chapter, you read about the module’s features. The next chapter
describes using the module.
.
Publication 1732E-UM002A-EN-P - March 2010
Page 62

54 Module Features
Notes:
Publication 1732E-UM002A-EN-P - March 2010
Page 63

Using the Module
Chapter
8
Introduction
Overview
This chapter describes how to use the 1732E EtherNet/IP ArmorBlock
Supporting Sequence of Events module. The chapter contains the following
main sections:.
Topic Page
Overview 53
Manage the Data 58
Module Sends Data to the Controller 58
Copy Relevant Input Data to a Separate Data Structure 61
Acknowledge Timestamp Latching Timestamp Data 62
Sort the Data 64
Clear All Data From the Module’s Buffer At Once 65
The module can be configured to timestamp two transitions per input, one in
each direction (OFF to ON and ON to OFF).
When specific points that are Timestamp Capture-enabled transition (for
example., input 1 is configured so that Timestamp Capture is enabled for OFF
to ON transitions and the input turns ON), the module timestamps the
transition with the current system time value on the network. The module
produces data for the owner-controller the RPI after the input filter criteria
have been met and at subsequent RPIs.
55 Publication 1732E-UM002A-EN-P - March 2010
Page 64

56 Using the Module
How Does the Module Store Timestamp Data?
The module is installed, wired to input
devices and ready to begin operation. All
inputs are configured to timestamp any
transition that occurs.
At this point, timestamp data for each
input is 0 because no input transitions
have occurred.
Note that only 8 bits of the 64-bit
timestamp are shown.
Input 1 transitions from OFF to ON.
The module timestamps the transition;
the module sends the data to the
owner-controller (not shown) and also
stores it locally.
With each timestamped transition, the module stores data for that point. An
overview of how the module stores timestamp data is shown in the following
figure.
0 0 0 0 0
Input 0
Input 1
Input 2
Input 15
Input 0
Input 1
Input 2
0 0 0 0 0
0 0 0 0 0
OFF/ON timestamp data
ON/OFF timestamp data
0 0 0 0 0
OFF/ON timestamp data
0 0 0 0 0
ON/OFF timestamp data
0 0 0 0 0
OFF/ON timestamp data
0 0 0 0 0
ON/OFF timestamp data
0 0 0 0 0
OFF/ON timestamp data
0 0 0 0 0
ON/OFF timestamp data
0 0 0 0 0
OFF/ON timestamp data
ON/OFF timestamp data
OFF/ON timestamp data
0 1 0 1 1
ON/OFF timestamp data
0 0 0 0 0
OFF/ON timestamp data
0 0 0 0 0
ON/OFF timestamp data
0 0 0 0 0
Input 2 transitions from ON to OFF.
The module timestamps the transition;
the module sends the data to the
owner-controller (not shown) and also
stores it locally.
Note that the module continues to store
the timestamp for the OFF to ON
transition on input 1.
Generally the following occurs:
1. The module timestamps each transition for inputs that are Timestamp
Capture-enabled. The module can timestamp each transition with a
unique system time.
2. The module sends all of its input data, including the new data from the
most recent transition, to the controller the RPI after timestamping the
transition and passing the input filter to make sure the transition was
valid.
Input 15
Input 0
Input 1
Input 2
Input 15
0 0 0 0 0
0 0 0 0 0
0 0 0 0 0
0 0 0 0 0
0 1 0 1 1
0 0 0 0 0
0 0 0 0 0
1 1 0 0 1
0 0 0 0 0
0 0 0 0 0
OFF/ON timestamp data
ON/OFF timestamp data
OFF/ON timestamp data
ON/OFF timestamp data
OFF/ON timestamp data
ON/OFF timestamp data
OFF/ON timestamp data
ON/OFF timestamp data
OFF/ON timestamp data
ON/OFF timestamp data
Publication 1732E-UM002A-EN-P - March 2010
Page 65

Using the Module 57
3. You copy new data from the controller tags to a separate data structure
for later sorting.
4. Acknowledge the timestamp, using output tags, so that the module can
capture another timestamp on that input without losing any data.
5. Once the data is copied to a separate data structure, you may sort the
data in the controller to determine the order of events.
Some of these typical events are described in greater detail in the rest of this
chapter. For typical applications for Sequence of Events modules, refer to
High Performance Sequence of Events Applications in the Logix Architecture
on page 9
.
Using Timestamp Latching
When enabled, Timestamp Latching prevents the module from overwriting
recorded timestamp data once a transition occurs. This feature is set on a
modulewide basis and is enabled by default. The following table describes how
Timestamp Latching affects the module.
If Timestamp
Latching is:
Enabled The module timestamps two transitions for each input–one for OFF to ON
Disabled The module timestamps each transition for each input as it occurs. In this
(1)
This table assumes the transition occurs on inputs that have Timestamp Capture enabled. If Timestamp Capture
is disabled, the module does not timestamp transitions on that input and, therefore, Timestamp Latching does
not affect module behavior.
the following occurs
and one for ON to OFF. If similar transitions occur on inputs where a
transition has already been timestamped and the data was not yet
acknowledged (for more information on Acknowledge Timestamp
Latching Timestamp Data, see page 64
the new transition.
When transitions occur that the module does not timestamp, the module
sets the I.EventOverflow tag for that point to inform the controller that an
input transitioned but a timestamp was not produced for the transition.
By default, Timestamp Latching is enabled.
case, when multiple transitions occur in the same direction on the same
input, the module records the new timestamp data, overwriting any
previously-recorded data which had yet to be acknowledged (for more
information on Acknowledge Timestamp Latching Timestamp Data, see
page 64
).
When the module overwrites data, it sets the I.EventOverflow tag for that
point to inform the controller that events have been overwritten.
(1)
), the module does not timestamp
Publication 1732E-UM002A-EN-P - March 2010
Page 66

58 Using the Module
Select this box to enable the
Timestamp Latching feature.
Deselect the box to disable
the feature.
IMPORTANT
We suggest you monitor the I.EventOverflow bits to make sure
you are aware of when transitions were either not timestamped
or when timestamp data was overwritten.
Use the Configuration tab in RSLogix 5000 to enable Timestamp Latching, as
shown in the example.
Using Timestamp Capture
Timestamp Capture causes the module to timestamp specific input transitions
(Off to On and On to Off). However, keep the following in mind when using
this feature:
Typically, Timestamp Latching is enabled. The configuration of this feature
(described on page 57
first transition on an input until the timestamp is acknowledged, or every
transition on an input while overwriting timestamps that have not yet been
acknowledged.
If Timestamp Capture is enabled, the module timestamps only the enabled
transitions (OFF to ON and ON to OFF) for each input.
Whenever an input transition is timestamped as a valid transition, the module
sends updated input data for all inputs to the controller at the next RPI and at
every subsequent RPI.
Use the Configuration tab in RSLogix 5000 to set Timestamp Capture, as
shown in the example below.
) determines whether the module timestamps only the
Publication 1732E-UM002A-EN-P - March 2010
Page 67

Click the Configuration tab.
• Select the individual boxes for
each input point to enable
Timestamp Capture for that
point.
• Unselect the individual boxes
for each input point to disable
Timestamp Capture for that
point.
You can also use these boxes to enable
or disable all points simultaneously.
Using the Module 59
Publication 1732E-UM002A-EN-P - March 2010
Page 68

60 Using the Module
Manage the Data
The module sends all of its input data to the controller the next RPI after an
input transition has been timestamped and at each subsequent RPI. You must
manage the data coming from the module.
The following occurs in the process of the managing data coming from the
module:
1. The module sends data to the controller.
2. The controller copies the relevant portions of the input data to separate
array.
3. At the user’s discretion, the controller clears latched timestamp data
from the module via the O.EventAck and O.NewData tags, preparing
the module to timestamp the next transition.
This process is described in the rest of this section.
Module Sends Data to the Controller
The following figure shows an example of the module sending data to the
controller. In the example, the following occurs:
1. Input 1 transitions
from OFF to ON.
1. Input 1 transitions from OFF to ON. (The input has Timestamp
Capture enabled).
2. The module timestamps the transition.
3. The module sends its input data, including the transition timestamp
from input 1, to the controller.
1732E-IB16M12SOEDR ControlLogix controller
3. Module sends input
2. Module timestamps
the transition.
0 0 0 0 0 0 0
0 0 0 0 0 0 0
0 1 0 1 1 0 0
0 0 0 0 0 0 0
0 0 0 0 0 0 0
0 0 0 0 0 0 0
0 0 0 0 0 0 0
0 0 0 0 0 0 0
data to the controller.
I.Fault
I.Data
I.OpenWire
I.ShortCircuit
I.NewData
I.EventOverflow
I.EventNumber
I.LocalClockOffset
I.OffsetTimeStamp
I.GrandMasterClockID
I.Timestamp[16].OffOn[2]
I.Timestamp[16].OnOff[2]
I.SyncedToMaster
Publication 1732E-UM002A-EN-P - March 2010
Page 69

Using the Module 61
The following table describes the data that is sent for each input. These tags
are sent to the controller the next RPI after the module timestamps a
transition on any input as well as all other RPIs. For detailed descriptions of
the tags, refer to Appendix B
.
Tag Name Set on a Per Point or
Modulewide Basis
I.Fault Modulewide Indicates if a communication fault has occurred.
I.Data Per point Status of the input point. This data is filtered if the Input Filter feature is used on the
I.OpenWire Per input connector 0 = no fault
I.ShortCircuit Per input connector 0 = no fault
I.NewData Per point Flag indicating if new timestamp data was detected on the input.
Description
0 = no fault
1 = fault – Communication fault - The controller sets this tag to 1 for all 32 bits if a
communication fault occurs on the module.
This tag clears when the fault that causes the condition no longer exists.
module. Thus, an input change must pass through the filter before it is seen in this
tag.
0 = input is OFF
1 = input is ON
For example, if input 3 is ON, I.Data.3 = 1.
1 = Open Wire
For more information on Open Wire Detection, see page 45
1 = Short Circuit
For more information on Short Circuit Protection, see page 45
.
.
0 = no new timestamp data on the input
1 = new timestamp data on the input (since last acknowledged)
Because input data for all inputs is sent the RPI after each timestamped transition
and at each subsequent RPI, this tag is useful to quickly determine on which input the
transition occurred. For example, if the module sends new input data to the
owner-controller and I.NewData.5 = 1, you know that at least one of the timestamps
for input 5 (I.Timestamp[5].OffOn or I.Timestamp[5].OnOff) has new data.
This tag only clears when the controller acknowledges the new data or all events on
the module are reset. For more information on clearing timestamp data, see page 67
Publication 1732E-UM002A-EN-P - March 2010
.
Page 70

62 Using the Module
Tag Name Set on a Per Point or
Description
Modulewide Basis
I.EventOverflow Per point Set for an input when the module either:
• Does not timestamp a transition on the input – The module has Timestamp
Latching enabled and a similar transition has already been timestamped on
this input but has not been cleared via the O.EventAck and O.NewDataAck
output tags (see page 82
).
or
• Overwrites previously-recorded timestamp data for the input – The module
has Timestamp Latching disabled and multiple transitions occur on the input.
In this case, timestamp data from new transitions are recorded before
previously-recorded transitions were cleared from the input via the
O.EventAck and O.NewDataAck output tags (see page 82
).
This tag only clears when the controller acknowledges the new data or all events on
the module are reset. For more information on clearing timestamp data, see page 64
I.EventNumber.x Modulewide Running count of the timestamped transitions; this tag increments by one with each
new transition that the module timestamps.
This value is cleared if the power is cycled and rolls over 1 instead of 0.
I.LocalClockOffset Modulewide The offset from the local clock to the system time. This value is useful for detecting
steps in time.
.
This value updates when a PTP update is received.
I.OffsetTimeStamp Modulewide The time when the PTP message was received to cause the Local Clock Offset to
update.
This value is initially zero. The first timestamp occurs when the module synchronizes
with the Grandmaster clock.
I.GrandMasterClockID Modulewide The I.D. number of the Grandmaster clock that the module is synchronized to.
I.Timestamp[16].OffOn[2] Per point Timestamp value for an input’s OFF to ON transition. This tag is a 16 x 2 32-bit array.
There is a 64-bit timestamp per point.
This value is cleared after the data has been acknowledged via the O.EventAck and
O.NewData tags. For more information on clearing timestamp data, see page 64
.
I.Timestamp[16].OnOff[2] Per point Timestamp value for an input’s ON to OFF transition. This tag is a 16 x 2 32-bit array.
There is a 64-bit timestamp per point.
This value is cleared after the data has been acknowledged via the O.EventAck and
O.NewData tags. For more information on clearing timestamp data, see page 64
.
I.SyncedToMaster Modulewide Indicates if the module is synchronized with a master clock.
1 = Synchronized
0 = Not synchronized
Publication 1732E-UM002A-EN-P - March 2010
Page 71

Using the Module 63
Copy Relevant Input Data to a Separate Data Structure
When the module sends input data to the controller, the data is stored in the
controller tags. We recommend you use a COP or CPS instruction to
programmatically copy new timestamp data from the controller tags to a
separate array in the controller’s memory. Later, you can combine timestamp
data from multiple modules and use a Sort routine to determine the order of
events, with relative time reference, that occurred in a specific time period.
1. Input 1 transitions
from OFF to ON.
IMPORTANT
When you copy relevant timestamp data from the controller
tags to a separate data structure, make sure you copy enough
information for each timestamp that you can differentiate
between timestamps for different inputs.
The following figure shows when to use the COP instruction. In this example,
the module timestamped a transition on input 1 and is sending input data to
the controller at each RPI. The controller copies input data from the controller
tags to a separate data structure.
1732E-IB16M12SOEDR ControlLogix controller
2. Module timestamps
the transition.
3. Module sends input
data to the controller.
I.Fault
I.Data
I.OpenWire
I.ShortCircuit
I.NewData
I.EventOverflow
I.EventNumber
I.LocalClockOffset
I.OffsetTimeStamp
I.GrandMasterClockID
I.Timestamp[16].OffOn[2]
I.Timestamp[16].OnOff[2]
I.SyncedToMaster
4. Controller
copies
relevant
data from
controller
tags to a
separate
array.
Controller tags
I.Fault
I.Data
I.OpenWire
I.ShortCircuit
I.NewData
I.EventOverlow
I.EventNumber
I.LocalClockOffset
I.OffsetTimeStamp
I.GrandMasterClockID
I.Timestamp[16].OffOn[2]
I.Timestamp[16].OnOff[2]
I.SyncedToMaster
Separate array
Your application determines what input data should be copied from the
controller tags to a separate data structure. Although you can copy all the input
data to another array, typically, only the data from specific tags is copied.
The following figure shows an example of ladder logic in which the controller
only moves OFF to ON timestamp data for inputs 0…3 from the controller
tags to a separate data structure named myarray. The data in the myarray
Publication 1732E-UM002A-EN-P - March 2010
Page 72

64 Using the Module
structure is then moved to another array used to sort the data. In this example,
32 bits of each 64-bit timestamp are moved to the new array.
Acknowledge Timestamp Latching Timestamp Data
In most cases, Timestamp Latching is enabled. This means that once the
module timestamps an input transition, the module will not timestamp another
transition in the same direction on the same input until you acknowledge the
data from the first timestamped transition; when you acknowledge data, you
clear it from the module.
To clear data from the module, you must acknowledge them via the module’s
output tags. You can clear data in the following ways:
• Clear latched timestamp data for specific inputs – As data is
acknowledged, it is cleared from the module, and the module will once
again timestamp the first new transition for the input in the cleared
direction(s).
To clear timestamp data for specific inputs, you must complete the
following steps:
a. Write to the EventAck output tag (
which edge you will clear (acknowledge).
• 0 = clear only the falling edge timestamp (I.Timestamp[x].OnOff)
• 1 = clear only the rising edge timestamp (I.Timestamp[x].OffOn)
• 2 = clear both the falling and rising edge timestamps
O.Even tAck
). This tag determines
Publication 1732E-UM002A-EN-P - March 2010
Page 73

Using the Module 65
b. Change the NewDataAck output tag (
O.NewDataAck.x
) to a rising
edge (set the tag =1). This tag determines which inputs will be
cleared (acknowledged). There are 16 bits (x = 0…15) that can be
transitioned; each corresponding to an input. More than one bit can
be transitioned at the same time.
• If the bit = 0, change the bit to 1.
• If the bit = 1, change the bit to 0, wait for at least one RPI, and
change the bit to 1.
The corresponding I.EventOverflow and I.NewData tags are also
cleared.
• Clear all latched data for the module – This transition erases all
timestamp data from the module, clearing data from all inputs
simultaneously. Once the data is cleared, the module timestamps the
first transition in each direction for each input and sends the data to the
controller (assuming those inputs are configured with Timestamp
Capture enabled in each direction).
To clear all data for the module, transition the O.ResetEvents tag to 1.
– If the bit = 0, change the bit to 1.
– If the bit = 1, change the bit to 0, wait for at least one RPI, and
change the bit to 1.
The following figure shows when to clear data from the module. In this
example, the module sent input data to the controller, and the controller
copied the relevant input data to a separate structure. Now, the controller must
clear the data from the module.
In this example, to clear data from the module, the controller writes the
following to the Sequence of Events output word:
• O.EventAck = 1
Publication 1732E-UM002A-EN-P - March 2010
Page 74

66 Using the Module
• O.NewDataAck.2 = 1
1732E-IB16M12SOEDR ControlLogix controller
1. Input 2 transitions
from OFF to ON.
3. Module sends input
2. Module timestamps
the transition.
data to the controller.
I.Fault
I.Data
I.OpenWire
I.ShortCircuit
I.NewData
I.EventOverflow
I.EventNumber
I.LocalClockOffset
4. Controller
copies
relevant
data from
controller
tags to a
separate
array.
Controller tags
I.Fault
I.Data
I.OpenWire
I.ShortCircuit
I.NewData
I.EventOverlow
I.EventNumber
I.LocalClockOffset
I.OffsetTimeStamp
I.GrandMasterClockID
I.Timestamp[16].OffOn[2]
I.Timestamp[16].OnOff[2]
I.SyncedToMaster
Separate array
I.OffsetTimeStamp
I.GrandMasterClockID
I.Timestamp[16].OffOn[2]
I.Timestamp[16].OnOff[2]
I.SyncedToMaster
5. Controller clears data from input 2 on the module.
O.EventAck = 1
O.NewDataAck.2 = 1
If Timestamp Latch is disabled, the module sends new data, from
subsequent transitions, to the controller as soon as they occur. The controller
overwrites timestamp data from the last transition, regardless of whether it
saved the data or not.
Sort the Data
Publication 1732E-UM002A-EN-P - March 2010
If the controller does not acknowledge the timestamp data then the NewData
bits in the input tags remains set and the EventOverflow bit is set as well.
If you need to determine the order of events that occurred in a cascade, you
must use a Sort routine to determine the order of events. Rockwell
Automation offers a sample sort routine that you can use to determine the
order of events in an event cascade.
Visit the Rockwell Automation Sample Code Library at
http://samplecode.rockwellautomation.com/idc/groups/public/documents/
webassets/sc_home_page.hcst.
Page 75

Using the Module 67
Clear All Data From the Module’s Buffer At Once
Propagate a Signal From Input Pin to EtherNet
If necessary, you can reset the events in the module, in effect clearing all data
from previously timestamped transitions. In other words, when all data is
cleared from the module’s buffers, all of the module’s input tags return to 0.
To reset events in the module’s buffer, transition the O.ResetEvents tag to 1 as
described below:
• If the bit = 0, change the bit to 1.
• If the bit = 1, change the bit to 0, wait for at least one RPI, and change
the bit to 1.
Once the data is cleared, the module begins timestamping input transitions
again and storing them in its on-board buffer.
The module receives a signal at its input pin and processes it internally before
sending the input and time stamp data to the controller at the Requested
Packet Interval (RPI) via EtherNet.
When you operate the module, you must account for signal propagation delays
that exist during internal processing. Some of these delays are inherent to the
module and others are controlled by temperature and input voltage.
During processing, the following delays exist:
• hardware delay – The time it takes an input signal to propagate from the
module’s input pin to its microprocessor. This time varies according to
input transition type (OFF to ON/ON to OFF), input voltage and
temperature.
• firmware delay time – The time is takes the module to acquire a time
stamp once its microprocessor receives the input signal.
• input filter delay – user-configurable number from 0…16 ms. The input
filter does not affect when the timestamp is acquired. It is acquired the
"firmware delay time" after the input changes state at the module's
microprocessor. The input filter simply delay's the amount of time the
input must be in a certain state before input is considered valid and the
timestamp data will be sent to the controller.
• RPI – Once the timestamp is acquired by the microprocessor and the
input is filtered, the input and timestamp data is sent to the controller at
the next RPI.
Publication 1732E-UM002A-EN-P - March 2010
Page 76

68 Using the Module
Timestamp Accuracy = +/- 40 µs.
Module Input Pin OFF->ON to Timestamp (Hardware + Firmware) Delay (µs)
Ambient Temp ºC -20 25 60
Voltage
10V DC 23 24 25
24V DC 18 19 19
30V DC 18 19 19
Module Input Pin ON->OFF to Timestamp (Hardware + Firmware) Delay (µs)
Ambient Temp ºC -20 25 60
Voltage
10V DC 59 75 84
24V DC 70 84 93
30V DC 71 85 94
(1)
Maximum input frequency (for each input) = 250 Hz 50% duty cycle. The
module can provide unique timestamps for input transitions on separate
inputs as long as they occur 25 µs apart. An input that changes state less than
25 µs after another input may receive the timestamp of the first input.
Chapter Summary and What’s Next
EXAMPLE
For example, if you are turning ON a
1732E-IB16M12SOEDR module’s input at 24V DC in
25 ºC conditions, the signal propagation delay is 19 µs. If
you want to calculate the actual time the signal reaches the
module’s input pin, subtract 19 µs from the timestamp.
If you are turning OFF an input at 30V DC in 60 ºC
conditions, the signal propagation delay is 94 µs. If you
want to calculate the actual time the signal reaches the
module’s input pin, subtract 94 µs from the timestamp.
The timestamps acquired are accurate to +/- 40 µs as noted
earlier.
The Timestamp data being produced on EtherNet is also
delayed by the input filter setting and the RPI setting.
In this chapter, you learned how to use the module. The next chapter describes
interpreting the Status Indicators.
Publication 1732E-UM002A-EN-P - March 2010
(1)
The timestamp accuracy of +/- 40 µs does not included errors introduced by the module’s clock being tuned
using CIP Sync. This error can be less than one microsecond on a properly configured network.
Page 77

Interpret Status Indicators
Chapter
9
Introduction
This chapter contains information about status indicators.
This module has the following indicators:
• Network, Module, and Link status indicators for EtherNet/IP
• Auxiliary Power indicator
• Individual I/O status indicators for inputs
Link
status
indicator
Module
status
indicator
Input
status
indicators
LINK 1 LINK 2
.
Link
status
indicator
Network
status
indicator
Input status
indicators
Auxiliary power
status indicator
44945
Indicator Status for Module
Status Description
Module status Off No power applied to device.
Flashing red/green Device is in self-test.
Flashing green Device not synchronized to master clock.
Green Device operating normally.
Flashing red Recoverable fault.
Red Unrecoverable fault – may require device
replacement.
69 Publication 1732E-UM002A-EN-P - March 2010
Page 78

70 Interpret Status Indicators
Indicator Status for Module
Status Description
Network status Off The device is not initialized or the module does not
have an IP address.
Flashing green The device has an IP address, but no CIP
connections are established.
Green The device is online, has an IP address, and CIP
connections are established.
Flashing red One or more connections have timed out.
Red The module has detected that its IP address is
already in use.
Network link
status
Auxiliary status Off No power to device or input not valid.
Off No link established.
Green Link established on indicated port at 100 Mbps.
Flashing green Link activity present on indicated port at 100 Mbps.
Yellow Link established on indicated port at 10 Mbps.
Flashing yellow Link activity present on indicated port at 10 Mbps.
Green Power applied to device.
Chapter Summary and What’s Next
Digital input
status
IMPORTANT
Off No valid input.
Yellow Valid input.
Red Sensor source voltage shorted.
Flashing red Sensor source open wire.
The Module Status Indicator will flash red and green for a
maximum of 30 seconds while the module completes its POST
(Power-On Self Test).
In this chapter, you read how to interpret the Status Indicators on the module.
The next chapter describes how to troubleshoot the module using
RSLogix 5000.
Publication 1732E-UM002A-EN-P - March 2010
Page 79

Troubleshoot the Module
Chapter
10
Introduction
Troubleshoot the Module
Warning icon appears when a
communications fault occurs or
if the module is inhibited
This chapter describes how to troubleshoot the 1732E EtherNet/IP
ArmorBlock Supporting Sequence of Events using RSLogix 5000.
In addition to the Status Indicators on the module, RSLogix 5000 alerts you to
fault and other conditions in one of three ways:
• Warning signal on the main screen next to the module – This occurs
when the connection to the module is broken.
Warning signal - The module has a communications fault
• Message in a screen’s status line.
Status line provides information
on the module’s fault and on the
connection to the module
71 Publication 1732E-UM002A-EN-P - March 2010
Page 80

72 Troubleshoot the Module
RSLogix 5000 software generates 1s in
response to a module communication
fault.
In this example, a communication fault
occurred between the controller and the
module, so the controller automatically
writes 1s for all bits in the word.
• Notification in the Tag Monitor - General module faults are also
reported in the Tag Monitor. Communication faults are reported in the
input tags. OpenWire, ShortCircuit and EventOverflow faults are also
reported in the input tag.
The fault type is listed here
Click Help for a detailed
listing of the possible faults,
their causes and suggested
solutions.
Determining Fault Type
When you are monitoring a module’s configuration properties in
RSLogix 5000 and receive a Communications fault message, the Connection
page lists the type of fault.
For a detailed listing of the possible faults, their causes and suggested
solutions, see Module Faults in the RSLogix 5000 online help.
Refer to the RSLogix 5000 AOP help to troubleshoot using the Module Info
tab, Internet Protocol tab, Port Diagnostics dialog, Time Sync tab, or Network
tab. Access the AOP help by clicking Help on any of these tabs.
Publication 1732E-UM002A-EN-P - March 2010
Page 81

Specifications
Appendix
A
ArmorBlock 2 Port Ethernet
Module Specifications
ArmorBlock 2 Port Ethernet Module Input Specifications – 1732E-IB16M12SOEDR
Attributes Value
Number of inputs 16
Input type Sink, 24V DC
Voltage, off-state input, max 5V DC
Voltage, on-state input, max 30V DC
Voltage, on-state input, nom 24V DC
Voltage, on-state input, min 11V DC
Current, off-state input, max 1.5 mA @ 5V DC
Current, on-state input, max 5 mA @ 30V DC
Voltage, sensor source, max 30V DC
Voltage, sensor source, min 10V DC
Input delay time
ON to OFF
OFF to ON
Isolation voltage 50V (continuous), Basic Insulation Type, Inputs and Sensor
Voltage, auxiliary power, max 30V DC
Voltage, auxiliary power, min 12V DC
Current, Ethernet system
power, max
(pins 2, 3 sensor
source/module power)
Current, sensor source, per
input, max
Current, sensor source, per
connector, max
Timestamp accuracy 100 μs
Communication rate EtherNet/IP
0…16000 μs
Power to Network
No isolation between individual Inputs or between
Network channels Type tested at 707V DC for 60s
1.2 A
50 mA
100 mA
Refer to the module input delay tables on page 68
10/100 Mbps
Full or half-duplex
100 meter per segment
.
73 Publication 1732E-UM002A-EN-P - March 2010
Page 82

74 ArmorBlock 2 Port Ethernet Module Specifications
ArmorBlock 2 Port Ethernet Module Input Specifications – 1732E-IB16M12SOEDR
Attributes Value
CIP Sync (PTP) clock Transparent clock, and slave only ordinary clock
Status indicators Module Status - red/green
Dimensions (HxWxD), approx. 179 x 65 x 43.25 mm (7.05 x 2.56 x 1.70 in.)
Weight, approx. 0.34 kg (0.75 lb)
Enclosure type rating Meets IP65/66/67/69K (when marked)
Wiring category
(1)
Environmental Specifications
Network Status - red/green
Link Status - green/yellow
Auxiliary Power - green
I/O Status - yellow/red
(1)
1 - on signal ports
1 - on power ports
1 - on communications ports
Use this Conductor Category information for planning conductor routing. Refer to publication 1770-4.1,
Industrial Automation Wiring and Grounding Guidelines.
Attribute Value
Temperature, operating IEC 60068-2-1 (Test Ad, Operating Cold),
IEC 60068-2-2 (Test Bd, Operating Dry Heat),
IEC 60068-2-14 (Test Nb, Operating Thermal Shock):
-20…60 °C (-4…140 °F)
Temperature, storage IEC 60068-2-1 (Test Ab, Unpackaged Non-operating Cold),
IEC 60068-2-2 (Test Bb, Unpackaged Non-operating Dry Heat),
IEC 60068-2-14 (Test Na, Unpackaged Non-operating
Thermal Shock):
-40…85 °C (-40…185 °F)
Relative humidity IEC 60068-2-30 (Test Db, Unpackaged Damp Heat):
5…95% non-condensing
Vibration IEC60068-2-6 (Test Fc, Operating):
5 g @ 10…500 Hz
Shock, operating IEC60068-2-27 (Test Ea, Unpackaged Shock):
30 g
Shock, non-operating IEC60068-2-27 (Test Ea, Unpackaged Shock):
50 g
Emissions CISPR 11:
Group 1, Class A
ESD immunity IEC 61000-4-2:
6 kV contact discharges
8 kV air discharges
Radiated RF immunity IEC 61000-4-3:
10V/m with 1 kHz sine-wave 80% AM from 80…2000 MHz
10V/m with 200 Hz 50% Pulse 100% AM @ 900 Mhz
10V/m with 200 Hz 50% Pulse 100% AM @ 1890 Mhz
3V/m with 1 kHz sine-wave 80% AM from 2000…2700 MHz
Publication 1732E-UM002A-EN-P - March 2010
Page 83

Environmental Specifications
Attribute Value
EFT/B immunity IEC 61000-4-4:
±4 kV @ 5 kHz on power ports
±3 kV @ 5 kHz on signal ports
±3 kV @ 5 kHz on communications ports
ArmorBlock 2 Port Ethernet Module Specifications 75
Surge transient
immunity
IEC 61000-4-5:
±1 kV line-line(DM) and ±2 kV line-earth(CM) on power ports
±1 kV line-line(DM) and ±2 kV line-earth(CM) on signal ports
±2 kV line-earth(CM) on communications ports
Conducted RF
immunity
IEC 61000-4-6:
10V rms with 1 kHz sine-wave 80% AM from 150 kHz…80 MHz
Certifications
Certification (when
product is marked)
Value
(1)
c-UL-us UL Listed Industrial Control Equipment, certified for US and
Canada. See UL File E322657.
CE European Union 2004/108/EC EMC Directive, compliant with:
EN 61326-1; Meas./Control/Lab., Industrial Requirements
EN 61000-6-2; Industrial Immunity
EN 61000-6-4; Industrial Emissions
EN 61131-2; Programmable Controllers (Clause 8, Zone A & B)
C-Tick Australian Radiocommunications Act, compliant with:
AS/NZS CISPR 11; Industrial Emissions
EtherNet/IP ODVA conformance tested to Ethernet/IP specifications.
(1)
See the Product Certification link at http://www.ab.com for Declarations of Conformity, Certificates, and other
certification details.
Publication 1732E-UM002A-EN-P - March 2010
Page 84

76 ArmorBlock 2 Port Ethernet Module Specifications
Notes:
Publication 1732E-UM002A-EN-P - March 2010
Page 85

Module Tags
Appendix
B
Fault and Status Reporting Between the Module and Controllers
Module Fault Word
Module Tag Names and
The 1732E-IB16M12SOEDR sends fault/status data to the owner-controller.
The module maintains a Module Fault Word, the highest level of fault
reporting.
The following table describes the tag that can be examined in ladder logic to
indicate when a fault has occurred for your module:
Tag Description
Module Fault Word This word provides fault summary reporting. It’s tag name is Fault.
• If a communication fault occurs on the module, all 32 bits in the Module
Fault Word are set to 1.
Bit 31 Bit 0
A communications fault sets all bits in the Module Fault Word.
42676
The 1732E-IB16M12SOEDR has three sets of tags:
Definitions
77 Publication 1732E-UM002A-EN-P - March 2010
• Configuration
• Input
• Output
Page 86

78 Module Tags
Tags Used
Configuration Tags
The following table describes the configuration tags generated in
RSLogix 5000 when you use your module.
Configuration Tags
Tag Name Type Description
C.FilterOffOn INT Sets the OFF to ON filter time for all 16 inputs. Times are set in μs increments of 0,
1000 (default), 2000, 4000, 8000 and 16000 μs.
0 = no filtering
For more information on Software Configurable Input Filters, see page 46
C.FilterOnOff INT Sets the ON to OFF filter time for all 16 inputs. Times are set in μs increments of 0, 1000
(default), 2000, 4000, 8000 and 16000 μs.
0 = no filtering
For more information on Software Configurable Input Filters, see page 46
C.PointXX_YYOpenWireEn BOOL XX = even numbered input 0…14
YY = odd numbered input 1…15
OpenWire is enabled or disabled per I/O connector. For example, 00_01 or 14_15
0 = Off (default)
1 = Enable Open Wire
C.LatchEvents BOOL Latches events so that an event will not be overwritten until acknowledged.
0 = SOE not latched
1 = SOE latched (default)
Latched means that a sequence of events of LO to HI and HI to LO then LO to HI will cause
the first LO to HI transition to be recorded and the final LO to HI to be ignored. All
subsequent transitions on that point will be ignored until acknowledged/reset. If the bit is
not set, the new LO to HI will overwrite the first LO to HI event immediately, even if the
controller has yet to extract that data.
C.MasterSyncEn BOOL PTP enabled bit indicates if the module is expected to sync to a master clock.
.
.
Publication 1732E-UM002A-EN-P - March 2010
0 = Synchronization indication disabled (default)
1 = Synchronization indication enabled
If not enabled (0) then the Module Status Indicators will not flash green if we are not
sync'd to a master clock. Disabling the bit does not prevent the module from
synchronizing to a master clock.
Page 87

Module Tags 79
Configuration Tags
Tag Name Type Description
C.CaptureOffOn.x INT Enables capturing OFF to ON events on a per point basis. If disabled (0), that point will not
record timestamp data for OFF to ON input transitions.
0 = Capture disabled for OFF to ON input transitions
1 = Capture enabled (default) for OFF to ON input transitions
This option is useful if you want to avoid reporting data on the module for events in which
you have no interest.
C.CaptureOnOff.x INT Enables capturing ON to OFF events on a per point basis. If disabled (0), that point will not
record timestamp data for ON to OFF input transitions.
0 = Capture disabled for ON to OFF input transitions
1 = Capture enabled (default) for ON to OFF input transitions
This option is useful if you want to avoid reporting data on the module for events in which
you have no interest.
Input Tags
The following table describes the input tags generated in RSLogix 5000.
Input Tags
Tag Name Type Set on Per
Point or
Modulewide
basis
I.Fault DINT Modulewide Communication fault - The controller sets this tag to 1 for all 32 bits if a
I.Data INT Per point Status of the input point. This data is filtered if the Input Filter feature is used
I.PtXX_YYOpenWire BOOL Per point XX = even numbered input 0…14
Description
communication fault occurs on the module otherwise all bits are zero.
on the module. Thus, an input change must pass through the filter before it is
seen in this tag.
0 = input is OFF
1 = input is ON
For example, if input 3 is ON, I.Data.3 = 1.
YY = odd numbered input 1…15
An OpenWire condition exists per I/O connector. For example, 00_01 or 14_15
0 = no fault
1 = Open Wire
For more information on Open Wire Detection, see page 45
Publication 1732E-UM002A-EN-P - March 2010
.
Page 88

80 Module Tags
Input Tags
Tag Name Type Set on Per
Description
Point or
Modulewide
basis
I.PtXX_YYShortCircuit BOOL Per point XX = even numbered input 0…14
YY = odd numbered input 1…15
A Short Circuit condition exists per I/O connector. For example, 00_01 or 14_15
0 = no fault
1 = short circuit
For more information on Short Circuit Protection, see page 45
I.NewData INT
Per point
(1)
Flag indicating if new timestamp data was detected on the input.
0 = no new timestamp data on the input
1 = new timestamp data on the input (since last acknowledged)
Because input data for all inputs is sent the next RPI after each timestamped
transition, this tag is useful to quickly determine on which input the transition
occurred. For example, if the module sends new input data to the
owner-controller and I.NewData.5 = 1, you know that at least one of the
timestamps for input 5 (I.Timestamp[5].OffOn or I.Timestamp[5].OnOff) has new
data.
This tag only clears when the controller acknowledges the new data or all
events on the module are reset. For more information, see page 64
I.EventOverflow INT Per point Set for an input when the module either:
.
.
• Does not timestamp a transition on the input – The module has
Timestamp Latch enabled and a similar transition has already been
timestamped on this input but has not been cleared via the O.EventAck
and O.NewDataAck output tags (see page 64).
or
• Overwrites previously-recorded timestamp data for the input – The
module has Timestamp Latch disabled and multiple transitions occur on
the input. In this case, timestamp data from new transitions are
recorded before previously-recorded transitions were cleared from the
input via the O.EventAck and O.NewDataAck output tags (see page 64
This value is cleared if the module is reset.
I.EventNumber.x DINT Modulewide Running count of the timestamped transitions; this tag increments by one with
each new transition that the module timestamps and rolls over to 1, not 0.
This value is cleared if the module is reset.
I.LocalClockOffset DINT[2] Modulewide The offset from the local clock to the system time. This value is useful for
detecting steps in time.
This value updates when a PTP update is received.
).
Publication 1732E-UM002A-EN-P - March 2010
Page 89

Input Tags
Module Tags 81
Tag Name Type Set on Per
Description
Point or
Modulewide
basis
I.OffsetTimeStamp DINT[2] Modulewide The time when the PTP message was received to cause the Local Clock Offset
to update.
This value is initially zero. The first timestamp occurs when the module
synchronizes with the Grandmaster clock.
I.GrandMasterClockID DINT[2] Modulewide The I.D. number of the Grandmaster clock that the module is synchronized to.
I.Timestamp[16].OffOn[2] DINT[2] Per point Timestamp value with an input’s OFF to ON transition. This tag is a 16 x 2 32-bit
array.
This value is cleared after the data has been acknowledged via the O.EventAck
and O.NewData tags. For more information on clearing timestamp data, see
see page 64
.
I.Timestamp[16].OnOff[2] DINT[2] Per point Timestamp value with an input’s ON to OFF transition. This tag is a 16 x 2 32-bit
array.
This value is cleared after the data has been acknowledged via the O.EventAck
and O.NewData tags. For more information on clearing timestamp data, see
page 64
.
I.SyncedToMaster BOOL Modulewide Indicates if the module is synchronized with a master clock.
1 = Synchronized
0 = Not synchronized
(1)
With the Per point tags, there is one bit per input. For example, bit 0 represents input 0, bit 7 represents input 7 and so on.
Publication 1732E-UM002A-EN-P - March 2010
Page 90

82 Module Tags
Output Tags
The following table describes the output tags generated in RSLogix 5000.
Output Tags
Tag Name Type Description
O.EventAck DINT For the bits selected in the O.NewDataAck tag, this tag selects which edge to acknowledge,
On to Off, Off to On or both.
0 = acknowledging an ON to OFF event
1 = acknowledging an OFF to ON event
2 = acknowledging both ON to OFF and OFF to ON events
The O.NewDataAck tag must also be used to acknowledge the event(s).
O.NewDataAck.x INT Allows I.NewData bits and I.Timestamp data updates in the Input tag to function as
intended. I.NewData bits are set and I.Timestamp data updates when a transition occurs
and clear only after they are acknowledged via the O.NewDataAck bit. Typically, the
following events occur:
• An event occurs on an input.
• The module sets the I.NewData bit and I.Timestamp data for the input where the
event occurred.
• The controller records the new data.
• The controller acknowledges the new data by causing a 0 to 1 transition on the
corresponding O.NewDataAck bit.
• The I.NewData bit and I.Timestamp data clears.
• When another event occurs on the input, the sequence begins at the top bullet in
this list.
The controller must cause a 0 to 1 transition in this bit to acknowledge new data for an
input; in other words, if the NewDataAck bit is 0 when new data is received, the controller
must change this bit to 1 to acknowledge the data. If NewDataAck bit is 1 when new data
is received, the controller must change this bit to 0 and then at least one RPI later to 1 to
acknowledge the new data.
O.PointToRetrieve SINT Not used in this mode.
O.ResetEvents BOOL Erases all recorded events when transitioned from 0 to 1.
O.RetrieveByPoint BOOL Not used in this mode.
Publication 1732E-UM002A-EN-P - March 2010
Page 91

Appendix
C
1732E EtherNet/IP ArmorBlock Supporting
Sequence of Events Data Tables
Communicate with Your
Read this section for information about how to communicate with your
module.
Module
I/O messages are sent to (consumed) and received from (produced) the
ArmorBlock I/O modules. These messages are mapped into the processor’s or
scanner’s memory. The following table lists the assembly instances and
connection points for the 1732E EtherNet/IP ArmorBlock Supporting
Sequence of Events.
Produced Assembly Instance 118
16 Point Input / Status / CIP Sync
Produced
Byte
0 Reserved (Must be 0)
1 Reserved (Must be 0)
2 Reserved (Must be 0)
3 Reserved (Must be 0)
4 IN 7IN 6IN 5IN 4IN 3IN 2IN 1IN 0
5 IN 15 IN 14 IN 13 IN 12 IN 11 IN 10 IN 9 IN 8
6 INOW 7 INOW 6 INOW 5 INOW 4 INOW 3 INOW 2 INOW 1 INOW 0
7 INSC 7 INSC 6 INSC 5 INSC 4 INSC 3 INSC 2 INSC 1 INSC 0
8 NewData 7 NewData 6 NewData 5 NewData 4 NewData 3 NewData 2 NewData 1 NewData 0
9 NewData 15 NewData 14 NewData 13 NewData 12 NewData 11 NewData 10 NewData 9 NewData 8
10 EventOV 7 EventOV 6 EventOV 5 EventOV 4 EventOV 3 EventOV 2 EventOV 1 EventOV 0
11 EventOV 15 EventOV 14 EventOV 13 EventOV 12 EventOV 11 EventOV 10 EventOV 9 EventOV 8
12-15 Event Number (32 bit)
16-23 Local clock Offset (64 bit)
24-31 Offset Time Stamp (64 bit)
32-39 Grandmaster Clock ID (64 bit) 8 byte SINT array
40-47 IN 0 Off-On Time Stamp (64 bit)
48-55 IN 0 On-Off Time Stamp (64 bit)
56-63 IN 1 Off-On Time Stamp (64 bit)
64-71 IN 1 On-Off Time Stamp (64 bit)
72-79 IN 2 Off-On Time Stamp (64 bit)
80-87 IN 2 On-Off Time Stamp (64 bit)
Bit 7 Bit 6 Bit 5 Bit 4 Bit 3 Bit 2 Bit 1 Bit 0
83 Publication 1732E-UM002A-EN-P - March 2010
Page 92

84 1732E EtherNet/IP ArmorBlock Supporting Sequence of Events Data Tables
Produced Assembly Instance 118
88-95 IN 3 Off-On Time Stamp (64 bit)
96-103 IN 3 On-Off Time Stamp (64 bit)
104-111 IN 4 Off-On Time Stamp (64 bit)
112-119 IN 4 On-Off Time Stamp (64 bit)
120-127 IN 5 Off-On Time Stamp (64 bit)
128-135 IN 5 On-Off Time Stamp (64 bit)
136-143 IN 6 Off-On Time Stamp (64 bit)
144-151 IN 6 On-Off Time Stamp (64 bit)
152-159 IN 7 Off-On Time Stamp (64 bit)
160-167 IN 7 On-Off Time Stamp (64 bit)
168-175 IN 8 Off-On Time Stamp (64 bit)
176-183 IN 8 On-Off Time Stamp (64 bit)
184-191 IN 9 Off-On Time Stamp (64 bit)
192-199 IN 9 On-Off Time Stamp (64 bit)
200-207 IN 10 Off-On Time Stamp (64 bit)
208-215 IN 10 On-Off Time Stamp (64 bit)
216-223 IN 11 Off-On Time Stamp (64 bit)
224-231 IN 11 On-Off Time Stamp (64 bit)
232-239 IN 12 Off-On Time Stamp (64 bit)
240-247 IN 12 On-Off Time Stamp (64 bit)
248-255 IN 13 Off-On Time Stamp (64 bit)
256-263 IN 13 On-Off Time Stamp (64 bit)
264-271 IN 14 Off-On Time Stamp (64 bit)
Publication 1732E-UM002A-EN-P - March 2010
Page 93

1732E EtherNet/IP ArmorBlock Supporting Sequence of Events Data Tables 85
Produced Assembly Instance 118
272-279 IN 14 On-Off Time Stamp (64 bit)
280-287 IN 15 Off-On Time Stamp (64 bit)
288-295 IN 15 On-Off Time Stamp (64 bit)
296 Reserved Synced to
Master
Where: INOW = Input Open Wire
INSC = Input Short Circuit
NewData = New data, has been detected upon that input and an unread event is queued for that point.
EventOV = Set whenever the module begins to lose events for that input pint. Events may be lost when new events are either ignored or
overwriting existing events which have yet to be acknowledged.
EventNumber = Running count of events which increments by one each new event. Allows the controller to check for a new event easily by
comparing this number to the last retrieved event. If the EventNumber reaches its maximum value and rolls over it rolls over to 1, not 0.
Inx Off-On Time Stamp = Timestamp corresponding to when an event was recorded at one of the module’s inputs when the input
transitioned from Off to On.
Inx On-Off Time Stamp = Timestamp corresponding to when an event was recorded at one of the module’s inputs when the input
transitioned from On to Off.
Local Clock Offset = The offset from the local clock to the system time. This value is useful for detecting steps in time. This value will
update when a PTP update is received.
Offset Time Stamp = The time when the PTP message was received that caused the Local Clock Offset to update. This value is initially zero
and the first timestamp occurs when the module synchronizes with the master clock.
Grandmaster Clock ID = The I. D. number of the Grandmaster clock the module is synchronized to.
Synced to Master = 1 indicates the module is synchronized with a master clock. 0 indicates it is not.
In order to acknowledge receipt of an event the user must transition the
corresponding NewDataAck bit from 0 to 1 and set the EventAck to indicate
whether to acknowledge the Off-On or On-Off transition for the input. the
NewDataAck bits and EventAck are in consumed assembly 139.
Timestamps are zero at power-up and after a timestamp is acknowledged. The
time base and epoch of the timestamps are determined by the grandmaster
clock of the system.
Publication 1732E-UM002A-EN-P - March 2010
Page 94

86 1732E EtherNet/IP ArmorBlock Supporting Sequence of Events Data Tables
All data listed in this assembly is in Little Endian format, LSB first, in
increasing byte order to MSByte last.
Consumed Assembly Instance 139
CIP Sync
Consumed
Byte
0-3 Event Ack (32 bit)
4NewData
5NewData
6 Point To Retrieve
7 Reserved Retrieve
Where: EventAck
Bit 7 Bit 6 Bit 5 Bit 4 Bit 3 Bit 2 Bit 1 Bit 0
Ack 7
Ack 15
NewData
Ack 6
NewData
Ack 14
NewData
Ack 5
NewData
Ack 13
NewData
Ack 4
NewData
Ack 12
NewData
Ack 3
NewData
Ack 11
• Is a 0 or 1 to indicate acknowledging an OnOff or OffOn event respectively, or a 2 to acknowledge both.
NewData
Ack 2
NewData
Ack 10
NewData
Ack 1
NewData
Ack 9
By Point
NewData
Ack 0
NewData
Ack 8
Reset
Events
NewDataAck
• When transitioned from 0 to 1, acknowledges the corresponding input’s timestamp and clears its NewData and
EventOV bits in produced instance 118. EventAck determines which OffOn and/or OnOff timestamps are
acknowledged by the NewDataAck bits.
PointToRetrieve: Not used
RetrieveByPoint: Not used
Reset Events: When transitioned from 0 to 1, erases all recorded time stamped events.
Publication 1732E-UM002A-EN-P - March 2010
Page 95

1732E EtherNet/IP ArmorBlock Supporting Sequence of Events Data Tables 87
Configuration Assembly Instance 110
16 Input / Status / CIP Sync
Byte Bit 7 Bit 6 Bit 5 Bit 4 Bit 3 Bit 2 Bit 1 Bit 0
0 Reserved CRN
1 Reserved
2 Reserved
3 Reserved
4 Group 0 Input OFF_ON Delay Filter (Low Byte)
5 Group 0 Input OFF_ON Delay Filter (High Byte)
6 Group 0 Input ON_OFF Delay Filter (Low Byte)
7 Group 0 Input ON_OFF Delay Filter (High Byte)
8 Enable IN
OW 7
9 Master Sync
10 Capture
OffOn 7
11 Capture
OffOn 15
12 Capture
OnOff 7
13 Capture
OnOff 15
Enable IN
OW 6
Capture
OffOn 6
Capture
OffOn 14
Capture
OnOff 6
Capture
OnOff 14
Enable IN
OW 5
Capture
OffOn 5
Capture
OffOn 13
Capture
OnOff 5
Capture
OnOff 13
Enable IN
OW 4
Capture
OffOn 4
Capture
OffOn 12
Capture
OnOff 4
Capture
OnOff 12
Enable IN
OW 3
Capture
OffOn 3
Capture
OffOn 11
Capture
OnOff 3
Capture
OnOff 11
Enable IN
OW 2
Capture
OffOn 2
Capture
OffOn 10
Capture
OnOff 2
Capture
OnOff 10
Enable IN
OW 1
Enable
Capture
OffOn 1
Capture
OffOn 9
Capture
OnOff 1
Capture
OnOff 9
Enable IN
OW 0
Latch
Events
Capture
OffOn 0
Capture
OffOn 8
Capture
OnOff 0
Capture
OnOff 8
Where CRN = Configuration Revision Number, Value is 0 after power-on reset and after completely closing the connection. Value is
1 when the module is configured. Once a module is configured, the only way to change its configuration is to close the
connections to it or use the override value of 0.
Enable IN OW x = Enable Input Open Wire x
1 = Enable; 0 = Off
LatchEvents: When set, latches events which means that an event will not be overwritten until acknowledged. For example,
this means that an input’s sequence of events of Off, On, Off, On will cause the first Off to On transition to be recorded, and
the final Off to On transition to be ignored. All subsequent transitions on that point will be ignored until
acknowledged/reset. If the bit is not set, the new Off to On transition will overwrite the first Off to On transition event
immediately, even if the controller has yet to extract that data.
MasterSyncEnable: This is a PTP enable bit which will indicate if the module is expected to sync to a master clock. If not
enabled (0), then the module Status Indicator does not flash green if it is not synchronized to a master clock. Disabling the
bit does not prevent the module from synchronizing to a master clock.
CaptureOffOn: Enables capturing Off to On events on a per point basis. If cleared, that point will not record Off to On events.
This is useful for not reporting events that are not necessary.
CaptureOnOff: Enables capturing On to Off events on a per point basis. If cleared, that point will not record On to Off events.
This is useful for not reporting events that are not necessary.
Input Filter values = 0, 1000, 2000, 4000, 8000 or 16000 µs.
Publication 1732E-UM002A-EN-P - March 2010
Page 96

88 1732E EtherNet/IP ArmorBlock Supporting Sequence of Events Data Tables
Notes:
Publication 1732E-UM002A-EN-P - March 2010
Page 97

Appendix
D
Connect to Networks via Ethernet Interface
This appendix:
• describes ArmorBlock module and Ethernet communication.
• describes Ethernet network connections and media.
• explains how to establish connections with the ArmorBlock module.
• lists Ethernet configuration parameters and procedures.
• describes configuration for subnet masks and gateways.
ArmorBlock Module and Ethernet Communication
ArmorBlock module and PC Connections to the Ethernet Network
Ethernet is a local area network that provides communication between various
devices at 10 or 100 Mbps. The physical communication media options for the
ArmorBlock module are:
See the following page for more information on Ethernet physical media.
The ArmorBlock module utilizes 10 Base-T or 100 Base-TX media.
Connections are made directly from the ArmorBlock module to an Ethernet
hub or switch. Since the ArmorBlock module incorporates embedded switch
technology, it can also be connected to other modules in a Star, Tree, Daisy
Chain or Linear, and Ring network topologies. The network setup is simple
and cost effective. Typical network topology is pictured below.
• built-in
– twisted-pair (10/100Base-T)
• with media converters or hubs
– fiber optic
– broadband
– thick-wire coaxial cable (10Base-5)
– thin-wire coaxial cable (10Base-2)
89 Publication 1732E-UM002A-EN-P - March 2010
Page 98

90 Connect to Networks via Ethernet Interface
Ethernet Network Topology
Ethernet Hub or
Switch
to PC Ethernet Card to ArmorBlock module
IMPORTANT
The ArmorBlock module contains two 10/100Base-T,
RJ45 cable with D-coded
M12 connector
M12-D (4-pin) Ethernet connectors which connect to standard
Ethernet hubs or switches via RJ-45 (8-pin) twisted-pair
straight-through cable. It can also connect to another
ArmorBlock module via a four wire twisted pair straight-through
or cross-over cable. To access other Ethernet mediums, use
10/100Base-T media converters or Ethernet hubs or switches
that can be connected together via fiber, thin-wire, or thick-wire
coaxial cables, or any other physical media commercially
available with Ethernet hubs or switches.
Connecting to an Ethernet Network
The ArmorBlock module supports the following Ethernet settings:
• 10 Mbps half duplex or full duplex
• 100 Mbps half duplex or full duplex
Mode selection can be automatic, based on the IEEE 802.3 auto negotiation
protocol. In most cases, using the auto negotiation function results in proper
operation between a switch port and the ArmorBlock module.
With RSLogix5000 programming software version 17 or later, you can
manually set the communication rate and duplex mode of an Ethernet port
you have connected to the switch port. The settings of the Ethernet port and
the switch port must match.
Cables
Shielded and non-shielded twisted-pair 10/100Base-T cables with D-coded
M12 connectors are supported. The maximum cable length (without repeaters
or fiber) is 100 m (323 ft). However, in an industrial application, cable length
should be kept to a minimum.
Publication 1732E-UM002A-EN-P - March 2010
Page 99

Connect to Networks via Ethernet Interface 91
Ethernet Connections
Duplicate IP address Detection
TCP/IP is the mechanism used to transport Ethernet messages. On top of
TCP, the Ethernet/IP protocol is required to establish sessions and to send
MSG commands. Connections can be initiated by either a client program
(RSLinx application) or a processor.
The client program or processor must first establish a connection to the
ArmorBlock module to enable the ArmorBlock module to receive solicited
messages from a client program or processor.
In order to exchange I/O data with another device on Ethernet, that device
must first originate a connection with the ArmorBlock via TCP/IP. Once an
IO connection is established via TCP/IP the IO data is exchanged via
UDP/IP.
The ArmorBlock module firmware supports duplicate IP address detection.
When you change the IP address or connect one of the modules to an
EtherNet/IP network, the module checks to make sure that the IP address
assigned to this device does not match the address of any other network
device. The module will periodically check for a duplicate IP address on the
network. If the module determines that there is a conflict (another device on
the network with a matching IP address), the Network Status Indicator
becomes solid red.
Configure Ethernet Communications on the ArmorBlock module
To correct this conflict, the IP address of one of the modules will need to
changed. If you decide to change the IP address of the ArmorBlock then,
assign a unique IP address to the module then cycle power to the module.
If you decide to change the IP address of the other module, remove the device
with the incorrect IP address or correct its conflict. To get the ArmorBlock
out of conflict mode, cycle power to the module or disconnect its Ethernet
cables and reconnect the cables. If you choose to disconnect the Ethernet
cables to correct this conflict you will need to disconnect both Ethernet cables
from two port Ethernet modules at the same time.
There are five ways to configure ArmorBlock module Ethernet
communications.
• via a DHCP request at module powerup
• manually setting the configuration parameters using RSLogix 5000
software
• manually setting the configuration parameters using RSLinx software
• manually configuring the network settings using the embedded web
server
Publication 1732E-UM002A-EN-P - March 2010
Page 100

92 Connect to Networks via Ethernet Interface
• set the IP address of the module using the modules network address
switches. See Connecting to an Ethernet Network on page 90
.
The configuration parameters are shown in the Configuration Parameters
table, and the configuration procedures follow.
Configuration Parameters
Parameter Description Default Status
Hardware
Address
IP Address The ArmorBlock module internet address (in network byte order). The internet address
Subnet Mask The ArmorBlock module subnet mask (in network byte order). The Subnet Mask is used to
Gateway
Address
Host name The Host Name is a unique name that identifies a device on a network. It must start with
Default
Domain Name
Primary Name
Server
Secondary
Name Server
The ArmorBlock module Ethernet hardware address. Ethernet
hardware
address
0 (undefined) read/write
must be specified to connect to the TCP/IP network.
0 (undefined) read/write
interpret IP addresses when the internet is divided into subnets. A Subnet Mask of all
zeros indicates that no subnet mask has been configured.
In this case, the controller assumes a Subnet Mask of 255.255.255.0.
The address of a gateway (in network byte order) that provides connection to another IP
network. A Gateway Address of all zeros indicates that no gateway has been configured.
a letter, end with a letter or digit, and have as interior characters only letters, digits or
hyphens. Maximum length is 64 characters. It must have an even number of characters.
The default domain name can have the following formats:
’a.b.c’, ’a.b’ or ’a’, where a, b, c must start with a letter, end with a letter or digit, and
have as interior characters only letters, digits or hyphens. Maximum length is 48
characters.
This is the IP address of the computer acting as the local Ethernet network Primary
Domain Name System (DNS) server.
This is the IP address of the computer acting as the local Ethernet network Secondary
Domain Name System (DNS) server.
0 (undefined) read/write
NULL
(undefined)
NULL
(undefined)
0 (undefined) read/write
0 (undefined) read/write
read only
read/write
read/write
DHCP Enable When DHCP is enabled, a DHCP server automatically assigns network related parameters
to the ArmorBlock module when it logs into a TCP/IP network. There must be a DHCP
server on the network capable of allocating network addresses and configuring
parameters to newly attached device. When DHCP is disabled, the ArmorBlock module
uses the locally configured network related parameters (IP Address, Subnet Mask,
Gateway Address, etc.).
Auto Negotiate
and Port
Setting
Configure Using
When Auto Negotiate is disabled (unchecked), the Ethernet speed/duplex is forced to
either 10 Mbps/Half-duplex, 10 Mbps/Full-duplex, 100 Mbps/Half-duplex, or 100
Mbps/Full-duplex, as selected in the Port Setting field.
When Auto Negotiate is enabled (checked), the ArmorBlock module will automatically
negotiate the link speed and duplex with the module it is connected to.
Refer to the online documentation provided with your programming software
or see Configure the Module for Your EtherNet/IP Network on page 17
RSLogix 5000 Software
Publication 1732E-UM002A-EN-P - March 2010
Configure the Module Using RSLogix 5000 on page 27
1 (enabled) read/write
Auto
Negotiate
enabled
read/write
and
.
 Loading...