

Page 1
Wireless Gas Leak Detector
Introduction
RISCO Group's Wireless Gas Leak Detector detects mixtures of
air and combustible gases (Natural Gas, Methane, Propane and
Butane).
Upon detecting the presence of gas, the unit emits an alarm and
notifies the control panel.
The main features of your Wireless Gas Leak Detector include the
following:
Integrated transmitter designed for use RISCO Group's
wireless alarm systems
Easy to install
Monitoring for Natural Gas, Methane, Propane and Butane in
a continuous manner
Loud alarm (85 dB) when detecting a buildup of Gas
Test button
Self-test
Selecting the installation location
The Wireless Gas Leak Detector will function effectively if installed
in the correct location. Consider the following before mounting the
gas alarm:
Methane (Natural) Gas: Methane is lighter than air, therefore
the greatest concentration of gas is found right below the
ceiling, and therefore the Wireless Gas Leak Detector should
be installed on the wall, approximately 30 cm (12”) below the
ceiling.
Butane Gas: Propane and Butane are heavier than air,
therefore the greatest concentration of gas is found right
above the floor level. The Wireless Gas Leak Detector should
therefore be installed about 30cm (12”) above the floor. Do
not mount in a location where the gas alarm could be
damaged by dirt, liquids, etc.
Note:
Do not install the detector on the ceiling or on the floor.
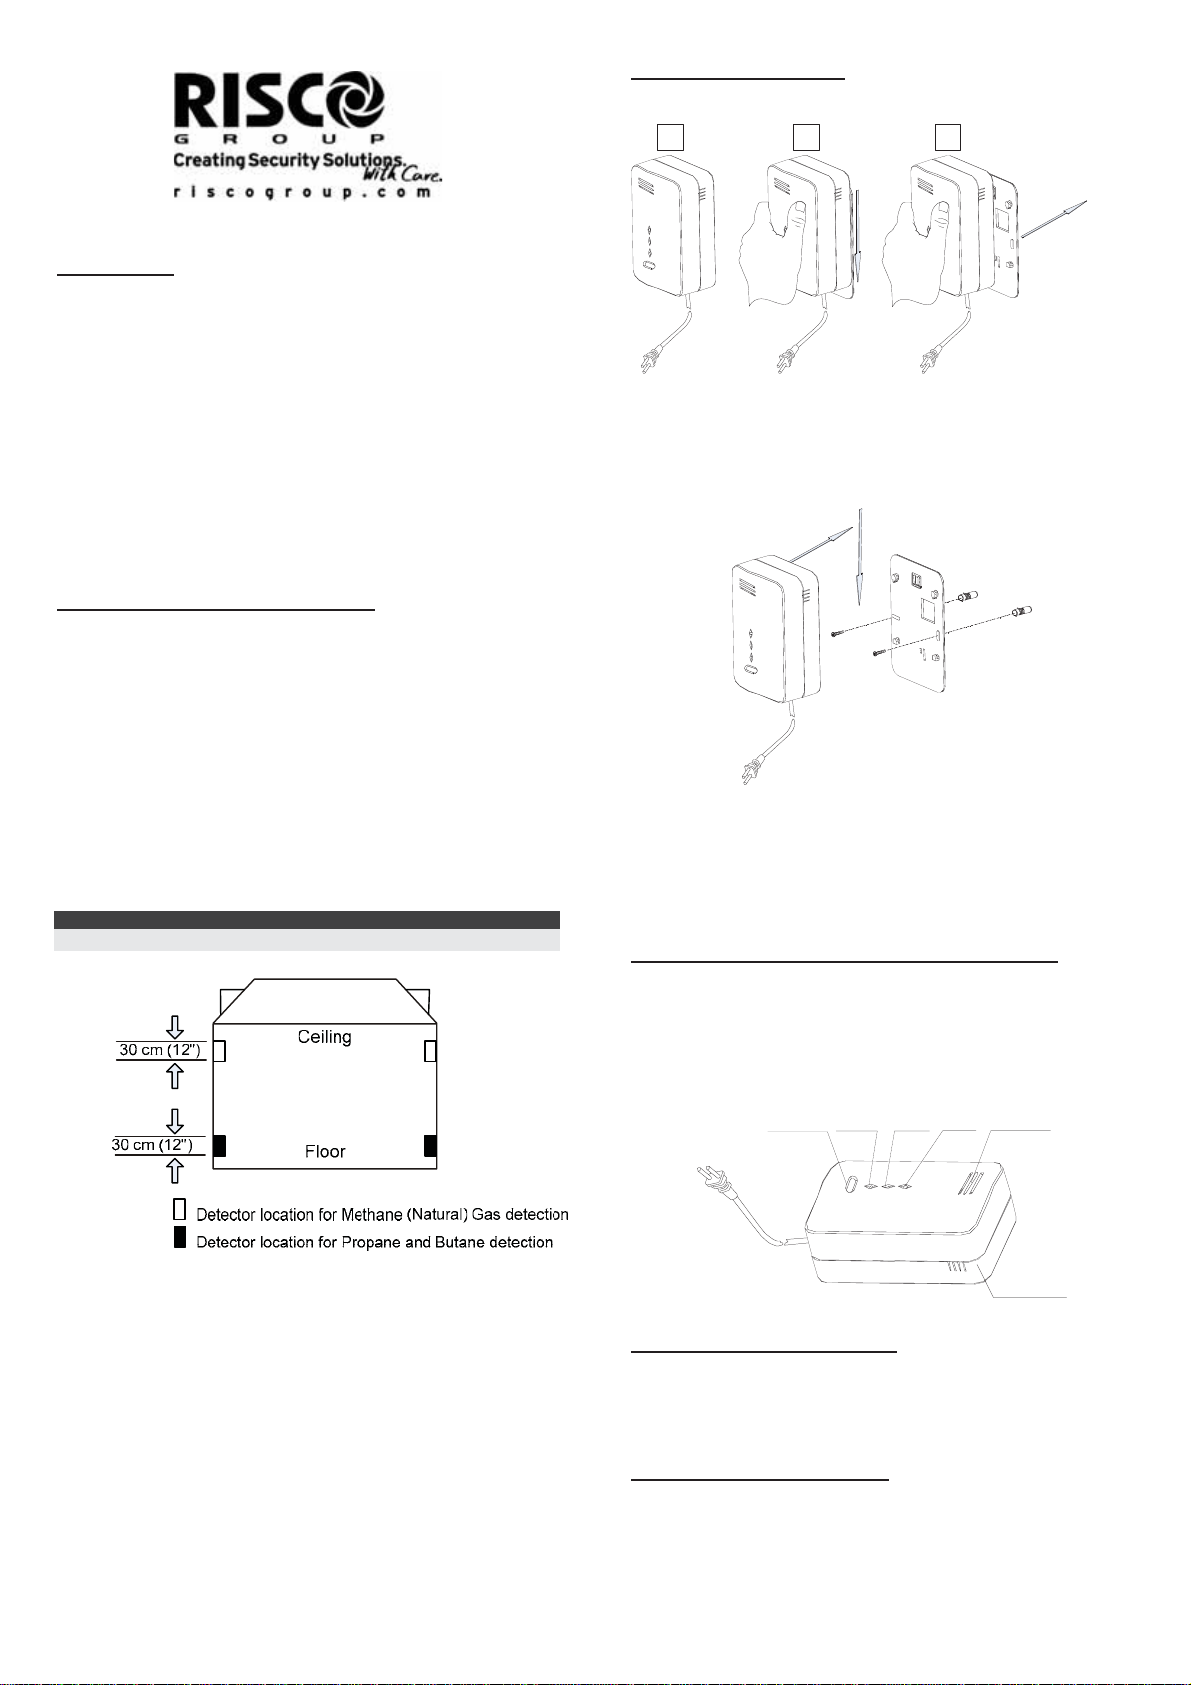
To install the detector:
1. Remove the mounting bracket from your unit according
to Fig. 1.
1 2 3
2. Hold the Mounting bracket against the wall as a template and
mark the locations for the 2 mounting holes.
3. Using a 3/16-inch (5 mm) drill bit, drill two holes at the marks
and insert wall plugs (Fig. 2).
4. Secure the mounting bracket to the wall.
5. Line up the side slot of the bracket and the detector. Push the
detector onto the mounting bracket and fix it (see arrow
direction, Fig. 2). Pull the detector outwards to make sure that it
is securely attached to the mounting bracket.
6. Connect the detector power cable to the wall power outlet.
Fig. 1
Fig. 2
Transmitter/Receiver Communication Setup
1. Set the receiver to Learn mode.
2. A Write message is sent shortly after connecting the detector
to power supply (after 10 seconds).
- and -
When test button is pressed for at least 3 seconds (have to be
pressed during the first 10 minutes after powering the
detector).
3. Verify that the detector has been identified by the receiver.
TEST/HUSH POWER SERVICE A LA RM ALARM VENT
Install the detectorin close proximity to every gas-operated
appliance.
Do not:
x Install the gas detector directly on any gas appliance.
x Install the gas detector in sealed or closed compartments
or in an area where a wall or a closed door can obstructs
the flow of gas to the gas alarm.
x Install the gas detector in locations where fans, open
doors, open windows etc. may prevent gas from reaching
the sensor.
x Install the gas detector in any room where aerosols or
ammonia are used (e.g. bathrooms).
Page 1
Fig. 3
SENSOR VENT
TESTING YOUR DETECTOR
To test the detector (do not test when detector is at warm up
mode), press the Test Button.
x The red and orange LED's will flash and a sound will be
heard
MUTING YOUR DETECTOR
You can partially mute the detector in an event of alarm by
pressing the Test Button. The Red LED will continue to flash and a
short beep will be heard every 16 seconds.
Page 2

DETECTOR MALFUNCTIONING
A malfunctioning unit is indicated by beep-sounding on and off
sequentially, i.e., beeping for 3 seconds with 3 seconds delay
between two beeps. If this occurs, unplug the detector from the
power source for 10 seconds and then plug the unit again. Should
the unit beep intermittently, DO NOT use this detector. Send the
malfunctioning unit for servicing.
TAKING CARE OF YOUR DETECTOR
You have to maintain the detector frequently to ensure it working
properly. Few tips are provided for you to take care of your
detector:
1. Use a vacuum cleaner to clean the air vents occasionally to
keep them free of dust.
2. Push the Test button on your detector to test its operating
function once every week.
LED & BUZZER Indication
The LED light and buzzer turn on and/or off to indicate various
situations. There are four different light and buzzer operations:
Led
Status Meaning
Color
Green
(Power)
Flashing (for 4
minutes)
Warm up (the status between
Power -Up and Normal operation)
On Normal Condition (Power On)
RED
(Alarm)
Flashing +
Sequential Alarm
Alarm
Sound
Orange
On Malfunction/ sensor interruption
(service)
ACTIONS TO TAKE WHEN ALARM SOUNDING
In case of harmful levels of gas being detected, your detector will
go into a continuous full alarm. Try to take the following necessary
actions immediately or evacuate the building:
(a) Widely open doors and windows
(b) Disconnect electrical appliances
(b) Avoid open fire
(c) Repair the gas leak by a professional gas repairer
ACTIONS TO TAKE AFTER THE PROBLEM IS
CORRECTED
Once the problem about the gas presence in the premises has
been corrected, the alarm of the detector should be off. After
waiting for 10 minutes, push the Test button to test the detector so
that you can make sure that the detector is working properly again.
SPECIFICATIONS
ELECTRICAL
Power supply: AC120V - For RWT6GS41100A model
AC230V - For RWT6GS40000A,
RWT6GS80000A models
Frequency: ~50/60Hz
Radio Frequency 868.65 MHz / 433.92 MHz
Supervision
Transmission:
15 min. - For RWT6GS80000A model
65 min. - For RWT6GS40000A model
Response Wave: Less than 20% in the lower explosion limit
Signal Volume: Approximately 85 dB at a distance of 3
meters
Sensor Type Hotwire
PHYSICAL
Size (L X W X H): 140 X 80 X 49 mm
ENVIRONMENTAL
Operating Temperature: 0qC to 40qC (32qF to 122qF)
Storage Temperature: -20qC to 60qC (-4qF to 140qF)
Specifications are subject to change without prior notice. Should any
questions arise please contact your supplier.
Page 2
ORDERING INFORMATION
P/N Description
RWT6GS80000A Wireless Gas Leak Detector 868.65 MHz
RWT6GS40000A Wireless Gas Leak Detector 433.92 MHz
RWT6GS41100A Wireless Gas Leak Detector 433.92 MHz, 110V
RTTE Compliance Statement
Hereby, RISCO Group declares that this equipment is in compliance
with the essential requirements and other relevant provisions of
Directive 1999/5/EC For the CE Declaration of Conformity please refer
to our website: www.riscogroup.com.
RISCO Group Limited Warranty
RISCO Group and its subsidiaries and affiliates ("Seller") warrants its
products to be free from defects in materials and workmanship under
normal use for 24 months from the date of production. Because Seller
does not install or connect the product and because the product may
be used in conjunction with products not manufactured by the Seller,
Seller can not guarantee the performance of the security system which
uses this product. Sellers' obligation and liability under this warranty is
expressly limited to repairing and replacing, at Sellers option, within a
reasonable time after the date of delivery, any product not meeting the
specifications. Seller makes no other warranty, expressed or implied,
and makes no warranty of merchantability or of fitness for any
particular purpose. In no case shall seller be liable for any
consequential or incidental damages for breach of this or any other
warranty, expressed or implied, or upon any other basis of liability
whatsoever. Sellers obligation under this warranty shall not include any
transportation charges or costs of installation or any liability for direct,
indirect, or not be compromised or circumvented; that the product will
prevent any persona; injury or property loss by intruder, robbery, fire or
otherwise; or that the product will in all cases provide adequate
warning or protection. Buyer understands that a properly installed and
maintained alarm may only reduce the risk of intruder, robbery or fire
without warning, but is not insurance or a guaranty that such will not
occur or that there will be no personal injury or property loss as a result.
Consequently seller shall have no liability for any personal injury,
property damage or loss based on a claim that the product fails to give
warning. However, if seller is held liable, whether directly or indirectly,
for any loss or damage arising from under this limited warranty or
otherwise, regardless of cause or origin, sellers maximum liability shall
not exceed the purchase price of the product, which shall be complete
and exclusive remedy against seller. No employee or representative of
Seller is authorized to change this warranty in any way or grant any
other warranty.
WARNING: This product should be tested at least once a week.
Contacting RISCO Group
RISCO Group is committed to customer service and product
support. You can contact us through our website
(www.riscogroup.com) or at the following telephone and fax
numbers:
United Kingdom
Tel: +44-161-655-5500
technical@riscogroup.co.uk
Italy
Tel: +39-02-66590054
support@riscogroup.it
Spain
Tel: +34-91-490-2133
support-es@riscogroup.com
France
Tel: +33-164-73-28-50
support-fr@riscogroup.com
Belgium
Tel: +32-2522-7622
support-be@riscogroup.com
All rights reserved.
No part of this document may be reproduced in any form without prior
written permission from the publisher.
(CE is for RWT6GS80000A only)
USA
Tel: +305-592-3820
support@riscogroupusa.com
Brazil
Tel: +55-11-3661-8767
support-br@riscogroup.com
China
Tel: +86-21-52-39-0066
support-cn@riscogroup.com
Poland
Tel: +48-22-500-28-40
support-pl@riscogroup.com
Israel
Tel: +972-3-963-7777
support@riscogroup.com
© RISCO Group 09/08 5INT6GS B
 Loading...