

Page 1
Voice Module
Programming and
Operations Manual
For use with ProSYS 16,
ProSYS 40 and ProSYS 128
Page 2
Important Notice
This manual is delivered subject to the following conditions and
restrictions:
This manual contains proprietary information belonging to RISCO
Group. Such information is supplied solely for the purpose of
assisting explicitly and properly authorized users of the ProSYS™
system.
No part of its contents may be used for any other purpose,
disclosed to any person or firm or reproduced by any means,
electronic or mechanical, without the express prior written
permission of RISCO Group.
The text and graphics are for the purpose of illustration and
reference only. The specifications on which they are based are
subject to change without notice.
Information in this document is subject to change without notice.
Corporate and individual names and data used in examples
herein are fictitious unless otherwise noted.
Copyright © 2009 RISCO Group. All rights reserved.
2
Voice Module Programming and Operations Manual
Page 3
Customer Information
RTTE COMPLIANCE STATEMENT
Hereby, RISCO Group, declares that this equipment is in compliance
with the essential requirements and other relevant provisions of
Directive 1999/5/EC.
RADIO FREQUENCY INTERFERENCE
(Ref.: FCC Part 15, Para. 15.105)
This equipment has been tested and found to comply with the limits
for a Class B digital device pursuant to Part 15 of the FCC Rules.
These limits are designed to provide reasonable protection against
harmful interference in a residential installation. This equipment
generates, uses, and can radiate radio frequency energy and, if not
installed and used in accordance with the instructions, may cause
harmful interference to radio communications. However, there is no
guarantee that interference will not occur in a particular installation.
If this equipment does cause harmful interference to radio or
television reception, which can be determined by turning the
equipment off and on, the user is encouraged to try to correct the
interference by one or more of the following measures:
1. Reorient or relocate the receiving antenna.
2. Increase the separation between the equipment and the
receiver.
3. Connect the equipment into an outlet on a circuit different from
that to which the receiver is connected.
4. Consult the dealer or an experienced Radio/TV technician for
help.
CHANGES OR MODIFICATIONS (Ref.: FCC Part 15, Para. 15.21 and
15.27)
Changes or modifications to this unit not expressly approved by
RISCO Group, could void the user's authority to operate the
equipment.
Voice Module Programming and Operations Manual
3
Page 4
Table of Contents
Chapter 1: Introducing the Voice Module................................7
Voice Module Spoken Messag es...........................................8
Chapter 2: Prog ramming the Voice Module ............................9
Defining the Event A n nounceme nt Message........................10
Selecting a Message Structure .............. ........................ ........11
Recording and Playing M e ssages..........................................12
Recording the Common Messag e ....................................12
Recording a Zone or P a rtition Message.............................12
Playing Messages ...... ............................................. ..............14
Recording Utility Output (UO ) Message s...............................14
Verifying Communica tion.......................................................16
Verifying Remote Communication.....................................16
Verifying Loca l Co mmunic at io n.........................................17
Enabling and Disabling Announcement Messages .............18
Chapter 3: Re motely Op er ating the System.............................19
Voice Module Talking Menus.................................................19
Quick Key Combinations........................................................20
Remotely Ac c essing the System............................................21
Status Messages ...................................................................22
Operations Menu .................................................................23
Arming the System................................................................23
Disarming the System......... ... ........................ ..........................26
Changing Z one Bypass Status ..............................................28
Operating Utility Outputs (UOs) ..............................................30
Changing Follow Me (FM) Numbers ............ ... .......................31
Special Func tio ns..................................................................33
Listening and Ta lking...............................................................34
Using the Message Box...........................................................35
Playing a Message......... .... ............................................. .....35
4
Voice Module Programming and Operations Manual
Page 5

Recording a Message..........................................................36
Exiting the System....................................................................37
Chapter 4: Re ceiving Ca lls from the System...........................37
Receiving an Event Call..........................................................38
Event Announcement................. ... ......................................38
Acknowledge Menu............................. ... ................................39
Acknowledging an Event........................................................40
Acknowled ging and Stopping All Dialing .............................40
Accessing the Operati ons Menu............................................41
Chapter 5: On Pre mises Operation of the MBU .......................42
Voice Module Programming and Operations Manual
5
Page 6

6
Voice Module Programming and Operations Manual
Page 7
Chapter 1: Introducing the Voice
Module
The Voice module provides audible information about the status of
your ProSYS system, and enables any remote, touch-tone (DTMF)
telephone to act as a keypad for the system.
Upon event occurrence, such as alarm activation, the Voice
module informs you of a security situation, for example intrusion or
fire, by calling you and playing a pre-recorded Event
announcement message. You can then acknowledge the event
and remotely operate the system, as described on page 37.
Remote operation of the system includes a Listen and Talk option
that enables you to listen in to your property and talk back, if
necessary, as described on page 34.
The Voice module also enables you to remotely activate or
deactivate up to 8 home appliances such as heating, lighting,
sprinkler systems and garage doors, as described on page 30.
NOTE:
=
In order to carry out the procedures described in this manual, ensure that the Voice
module is connected to the ProSYS Main Panel, as described in the
Installation Guide
.
Voice Module
Voice Module Programming and Operations Manual
7
Page 8
Voice M o dule Spoken Messages
Three types of spoken messages are heard when using the Voice
module:
Event announcement message:
Voice module initiates a call to a remote Follow Me (FM)
number, informing you of a security situation by playing a
pre-recorded Event announcement message, as described on
page 10.
Status message:
Upon remote access of the system by initiating
a call from a remote telephone or receiving a call from the
system, the Voice module announces the current system status
by playing a pre-recorded Status message, as described on
page 22.
Announcement message:
module can announce the security situation to occupants by
sounding a local Announcement message from all Message Box
Units (MBUs) on the premises, as described on page 17.
NOTE:
=
The Message Box Unit (MBU) is an external unit connected to the voice module and is
used for playing and recording voice messages and for performing Listening-in and
Talking operations with the voice module
Upon event occurrence, the
Upon event occurrence, the Voice
.
8
Voice Module Programming and Operations Manual
Page 9
*
*
Chapter 2: Programming the Voice
Module
This chapter describes how to customize the spoken messages that
the Voice module announces when you access the system from a
remote telephone or you hear on the premises MBUs, enabling these
messages to be immediately and easily understood.
In addition, this chapter describes how to verify the communication
between the Voice module and the ProSYS, and how to enable
Announcement messages to be sounded from MBUs at the
premises.
All procedures in this chapter are performed from the
Message
described in the
of User Functions
NOTE:
Only installers and users with the Grand Master authority level can program the Voice
module.
This chapter includes the following sections:
Messages
menu, which is accessed from the ProSYS keypad, as
ProSYS User's Manual, Chapter 12: Complete Menu
.
9
9
9
9
*
CODE
CODE
CODE
CODE
, page 18
#
4
1
#
#
#
Selecting a Message Structure
4
2
Recording and Playing Messages
3
4
Verifying Communication
4
4
Enabling and Disabling Announcement
Voice
, page 11
, page 12
, page 16
Voice Module Programming and Operations Manual
9
Page 10
Definin g the Event Announcement
Message
Upon event occurrence, such as alarm activation, the Voice
module informs you of a security situation, such as intrusion or fire, by
calling you and playing a pre-recorded Event announcement
message.
The Event announcement message consists of the following 4
messages, each of which is defined individually:
Common message:
for example, the address and/or telephone number of the
premises. This message is up to 10 seconds long. The default
Common message is
system calling
Event message:
situation that has occurred, for example, Intruder alarm. Ask
your installer for a list of possible Event messages.
Partition message:
the event occurred, for example, First floor. The default system
description is
Partition message can be up to 2 seconds long, and is only
announced when the Event announcement message concerns
a partition.
Zone message:
event occurred, for example, Kitchen. The default system
description is
message can be up to 2 seconds long, and is only announced
when the Event announcement message concerns a zone.
The following are 2 examples of an Event announcement message:
Common Event Partition Zone
24 Oaklands. Intruder alarm. Ground floor. Kitchen.
24 Oaklands. Low battery trouble.
NOTE:
Event Restore announcements include the word
Defining the Event announcement message consists of specifying
the order in which these messages are announced, as described
below, and recording your own Common, Partition and Zone
messages, as described on page 12.
User-defined identification of the premises,
Hello, this is your RISCO Group security
.
System-defined description of the security
User-defined name for the partition in which
Partition x
Zone x
where x is the partition number. The
User-defined name for the zone in which the
where x is the zone number. The Zone
Restore
after the Event message.
10
Voice Module Programming and Operations Manual
Page 11
Selecting a Message Structure
9
*
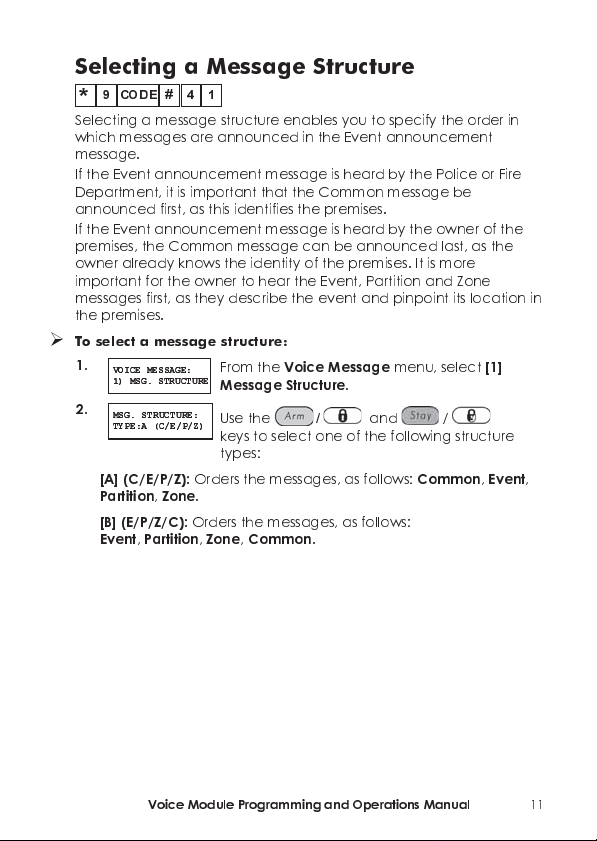
Selecting a message structure enables you to specify the order in
which messages are announced in the Event announcem ent
message.
If the Event announcement message is heard by the Police or Fire
Department, it is important that the Common message be
announced first, as this identifi es the premises.
If the Event announcement message is heard by the owner of the
premises, the Common message can be announced last, as the
owner already knows the identit y of the premises. It is more
important for the owner to hear the Event, Partition and Zone
messages first, as they describe the event and pinpoint its location in
the premises.
To select a message structure:
1.
2.
[A] (C/E/P/Z):
Partition, Zone
[B] (E/P/Z/C):
Event, Partition, Zone, Common
#
CODE
VOICE MESSAGE:
VOICE MESSAGE:
1) MSG. STRUCTURE
1) MSG. STRUCTURE
MSG. STRUCTURE:
MSG. STRUCTURE:
TYPE:A (C/E/P/Z)
TYPE:A (C/E/P/Z)
4 1
Orders the messages, as follo ws:
Orders the messages, as follo ws:
From the
Message Str u cture
Use the
keys to select one of the following structure
types:
.
Voice Message
.
/
and / =
.
menu, select
Common, Event
[1]
,
Voice Module Programming and Operations Manual
11
Page 12
Recording and Playing Messages
9
*
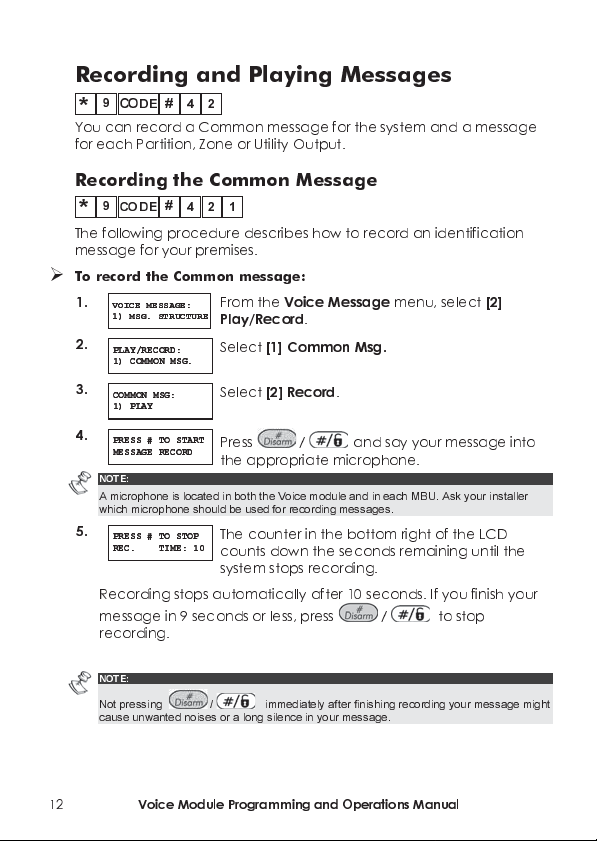
You can record a Common message for the system and a message
for each Partition, Zone or Utility Output.
Recording the Common Message
9
*
The following procedure describes how to record an identification
message for your premises.
To record th e C omm on mes sa ge :
1.
2.
3.
4.
NOTE:
=
A microphone is located in both the Voice module and in each MBU. Ask your installer
which microphone should be used for recording messages.
5.
Recording stops automatically after 10 seconds. If you finish your
message in 9 seconds or less, press
recording.
NOTE:
=
Not pressing /
cause unwanted noises or a long silence in your message.
#
CODE
CODE#421
VOICE MESSAGE:
VOICE MESSAGE:
1) MSG. STRUCTURE
1) MSG. STRUCTURE
PLAY/RECORD:
PLAY/RECORD:
1) COMMON MSG.
1) COMMON MSG.
COMMON MSG:
COMMON MSG:
1) PLAY
1) PLAY
PRESS # TO START
PRESS # TO START
MESSAGE RECORD
MESSAGE RECORD
PRESS # TO STOP
PRESS # TO STOP
REC. TIME: 10
REC. TIME: 10
4
2
From the
Play/Record
Select
Voice Message
.
[1] Common Msg.
menu, select
Select
[2] Record
.
/
Press
the appropriate microphone.
and say your message into
==
The counter in the bottom right of the LCD
counts down the seconds remaining until the
system stops recording.
/
immediately after finishing recording your message might
==
to stop
==
[2]
12
Voice Module Programming and Operations Manual
Page 13
Recording a Zone or Partition Message
9
9
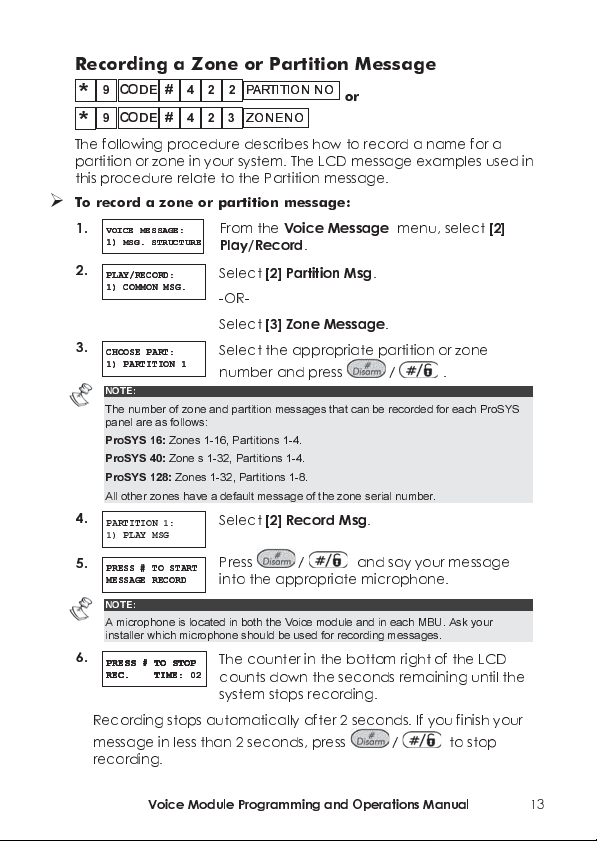
The following procedure describes how to record a name for a
partition or zone in your system. The LCD message examples used in
this procedure relate to the Partition message.
To record a zone or partit i on me ssage:
1.
2.
3.
=
4.
5.
=
6.
Recording stops automatically after 2 seconds. If you finish your
message in less than 2 seconds, press
recording.
#
422
4
2
From the
Play/Record
Select
-OR-
Select
P ARTIT ION NOP ARTIT ION NO
3
ZONE NOZONE NO
[2] Partition Msg
[3] Zone Message
or
Voice Message
.
.
menu, select
.
Select the appropriate partition or zone
number and press
Select
[2] Record Msg
/
.
==
.
/
Press
into the appropriate microphone.
and say your message
==
The counter in the bottom right of the LCD
counts down the seconds remaining until the
system stops recor ding.
/
==
to stop
CODE
#
CODE
VOICE MESSAGE:
VOICE MESSAGE:
1) MSG. STRUCTURE
1) MSG. STRUCTURE
PLAY/RECORD:
PLAY/RECORD:
1) COMMON MSG.
1) COMMON MSG.
CHOOSE PART:
CHOOSE PART:
1) PARTITION 1
1) PARTITION 1
NOTE:
The number of zone and partition messages that can be recorded for each ProSYS
panel are as follows:
ProSYS 16:
Zones 1-16, Partitions 1-4.
ProSYS 40:
Zone s 1-32, Partitions 1-4.
ProSYS 128:
All other zones have a default message of the zone serial number.
PARTITION 1:
1) PLAY MSG
PRESS # TO START
PRESS # TO START
MESSAGE RECORD
MESSAGE RECORD
NOTE:
A microphone is located in both the Voice module and in each MBU. Ask your
installer which microphone should be used for recording messages.
PRESS # TO STOP
PRESS # TO STOP
PRESS # TO STOP
PRESS # TO STOP
REC. TIME: 02
REC. TIME:
REC. TIME: 02
REC. TIME:
Zones 1-32, Partitions 1-8.
[2]
Voice Module Programming and Operations Manual
13
Page 14

Playing Messages
After recording, you can verify messages by following the
procedures in this section and selecting
the
[1] Play
option before recording your own messages, you hear
[1] Play
in step 4. If you use
the system-defined description for the premises, partition or zone, as
described on page 22.
NOTE:
If the Voice module is not connected to the ProSYS Main Panel, the LCD displays the
following message in step 4 of both procedures in this section:
READY
.
VOICE MODULE NOT
Recording Utility Output (UO) Messages
9
*
Utility Outputs enable you to operate and control home appliances,
such as heating, lighting, sprinkler systems and garage doors, via
your ProSYS security system.
Recording voice messages for Utility Outputs simplifies the process of
remotely operating them, as described on page 30, by enabling the
user to hear a meaningful name, such as
Output.
This procedure involves:
Selecting a Utility Output voice message.
Assigning an appliance to that message.
Recording a name for the selected appliance.
NOTE:
Up to 8 appliances can be assigned to voice messages. Appliances must be defined as
Follow Code
defining appliances in this way.
#
CODE
424
Heating
, for each Utility
in order for you to assign them to voice messages. Ask your installer about
14
Voice Module Programming and Operations Manual
Page 15

To record a UO messag e:
1.
VOICE MESSAGE:
VOICE MESSAGE:
1) MSG. STRUCTURE
1) MSG. STRUCTURE
2.
PLAY/RECORD:
PLAY/RECORD:
1) COMMON MSG.
1) COMMON MSG.
3.
UO MESSAGE:
UO MESSAGE:
1) UO MESSAGE 1
1) UO MESSAGE 1
Select the number representing the message to which you want
From the
Play/Record
Select
Each option in the
represents a message for a utility output.
Voice Message menu
.
[4] UO Message
.
UO Message
, select
menu
to assign an appliance.
4.
CHOOSE UO:
CHOOSE UO:
02) OUTPUT 03
02) OUTPUT 03
The options in the
your
Follow Code
installer about defining appliances as
Code
.
Choose UO
menu represent
home appliances. Ask your
Follow
Select the number representing the appropriate appliance for the
message selected in step 3.
-OR-
Select 00 for no appliance to be assigned to a message.
NOTE:
All 8 appliances are assigned to
=
using the
Operations
00
is assigned to them in this step.
5.
OUTPUT 03
OUTPUT 03
01) PLAY MESSAGE
01) PLAY MESSAGE
6.
PRESS # TO START
PRESS # TO START
MESSAGE RECORD
MESSAGE RECORD
NOTE:
A microphone is located in both the Voice Module and in each MBU. Ask your installer
=
which microphone should be used for recording messages.
7.
PRESS # TO STOP
PRESS # TO STOP
PRESS # TO STOP
PRESS # TO STOP
REC. TIME: 02
REC. TIME:
REC. TIME: 02
REC. TIME:
Recording stops automatically after 2 seconds. If you finish your
message in less than 2 seconds, press
TIP:
After recording, you can verify that you have assigned the correct appliance to the
=
selected recording by repeating this procedure and selecting
you use the
default system message for the appliance, such as
[1] Play Msg.
00
menu, appliances are not announced unless an option other than
Select
by default. When remotely operating appliances
[02] Record Msg
.
/
Press
the appropriate microphone.
and say your message into
==
The counter in the bottom right of the LCD
counts down the seconds remaining until the
system stops recording.
to stop recording.
option before recording your own message, you hear the
[1] Play Msg.
utility output 1
in step 5. If
.
[2]
Voice Module Programming and Operations Manual
15
Page 16

Verifying Communication
9
CODE
You can verify the communication between the Voice module and
a remote FM telephone, and between the Voice module and a
local Message Box Unit (MBU). The options in this section are used
mainly by your installer.
Verifying Remote Communication
9
CODE#431
*
Remote communication is verified by sending a Test event message
from the ProSYS to a selected FM number. In order to achieve this, a
phone number must first be assigned to the relevant FM number by
entering
[][2][CODE][#][7], as described in the
Manual, Chapter 6: Setting Follow Me Numbers.
To verify remote communication:
1.
VOICE MESSAGE:
VOICE MESSAGE:
1) MSG. STRUCTURE
1) MSG. STRUCTURE
2.
TEST MESSAGE:
TEST MESSAGE:
01) SEND MESSAGE
01) SEND MESSAGE
3.
SEND MESSAGE:
SEND MESSAGE:
01) FM NUM 1
01) FM NUM 1
4.
VOICE FM TEST
VOICE FM TEST
ACTIVATED
ACTIVATED
The Acknowledge menu is then announced, as described on
page 39.
3
#
4
ProSYS User's
From the
Test Message
Select
Voice Message
.
[01] Send Message
menu, select
.
Select the FM number to which you want a
test message to be sent.
The system calls the selected FM number and
announces the following message:
Test message.
[3]
16
Voice Module Programming and Operations Manual
Page 17

Verifying Local Communication
9
*
Local communication can be verified by sending an
Announcement message to all MBUs that are connected to the
Audio and Listen-In channels.
To verify local communication:
1.
VOICE MESSAGE:
VOICE MESSAGE:
1) MSG. STRUCTURE
1) MSG. STRUCTURE
2.
TEST MESSAGE:
TEST MESSAGE:
01) SEND MESSAGE
01) SEND MESSAGE
3.
PRESS ANY KEY
PRESS ANY KEY
TO STOP VM TEST
TO STOP VM TEST
=
432
CODE
NOTE:
This option can also be used by the installer to test and adjust the volume of each
one of the MBU. For this purpose, the tamper alarm is disengaged when the
installer code is entered, enabling the MBU to be opened and its volume adjusted.
From the
Test Message
Select
Voice Message
.
[02] Local Play
menu, select
.
The following announcement message is
repeated continuously from all MBUs in the
system:
Test message.
Press any key to stop the announcement.
NOTE:
If required, the installer can adjust the volume in the MBU(s), as described in the
MBU Operating Instructions on Chapter 5
.
[3]
Voice Module Programming and Operations Manual
17
Page 18

9
*
CODE
#
4
4
Upon event occurrence, the Voice module can announce the
security situation to occupants of the premises by sounding a local
Announcement message from all MBUs on the premises. This
Announcement message can be enabled or disabled, per event.
By default, all Announcement messages are disabled.
To enable and disa ble Ann ounc emen t messag es:
1.
VOICE MESSAGE:
VOICE MESSAGE:
1) MSG. STRUCTURE
1) MSG. STRUCTURE
2.
ANNOUNCE MESSAGE:
ANNOUNCE MESSAGE:
1) INTRUDER N
1) INTRUDER N
Select the event for which you want to enable or disable an
Announcement message from the following options:
[1] Intruder
From the
Announce Message
The
events.
Voice Msg.
menu, select
.
Announce Message
[4]
menu lists system
[2] Fire
[3] Emergency
[4] Panic
[5] Auto Arm
[6] Arm Process
[7] Arm
[8] Stay
3.
Use the
/ = keys to select one of the following
options:
[N]:
To disable the Announcement message for the selected
event. This is the default.
[Y]:
To enable the Announcement message for the selected
event.
18
Voice Module Programming and Operations Manual
Page 19

Chapter 3: Remotely Operating the
System
Using the Voice module to remotely operate the ProSYS enables
your telephone to act as a keypad for the system. This consists of
initiating a telephone call to or from the system, and interacting with
talking menus that guide you through your required remote
operation.
Voice Module Talking Menus
The first of these talking menus is the
on page 23. Each option in the
voice prompt menu that announces further options and instructions,
as described in subsequent sections of this chapter.
It is not necessary to wait for the end of a message or menu to enter
a reply. If you remember the options listed, you can press the
appropriate key at any time. For a list of shortcuts that enable you to
bypass menus and go directly to your required operation, see the list
of quick key combinations on page 20.
When you have carried out your required operation, simply hang up
the phone. The communication disconnects automatically.
When using the Voice module, you can press the following keys at
any time:
Star:
To return to the previous menu.
*
#
Pound: To repeat the options in the current menu.
Operations
Operations
menu, as described
menu leads to a distinct
Voice Module Programming and Operations Manual
19
Page 20

Quick Key Combinations
Quick key combinations are shortcuts that enable you to bypass
menus and go directly to your required remote operation.
Access the system, as described on page 21, before entering the
required combination from the table below.
Operation Quick Key Combination Page
Arming All
1 1
Partitions
9
1
Arming by Partition
Disarming A ll
2 2
P ARTITION NOP ARTITION NO
Partitions
9
2
Disarming by
P ARTITION NOP ARTITION NO
Partition
Changing Zone
ZONE NOZONE NO
#
9
3
Bypass Status
UO NOUO NO
Operating Uos
Changing FM
4
5
FM N OFM N O
#
2
Numbers
Listening In
Talking
Playing a Message
6 1
6 2
7
1
from the Message
Box
Recording a
Message for the
Message Box
Exiting the System
7
2
0
For a detailed description of how to carry out your required
operation, turn to its corresponding page number in the table
above.
24
25
26
27
28
30
31
34
34
35
36
37
2
0
Voice Module Programming and Operations Manual
Page 21

Remotely Accessing the System
Remotely accessing the system involves initiating a call to the
system, and entering your remote access code and the user code
you usually enter in the system keypad.
All procedures in this chapter are performed by first initiating a call in
this way, and then selecting your required option from the
Operations
To remotely access the system:
1. From a remote, touch-tone telephone, dial the number
If an answering machine is in use at the premises:
If an answering machine is not in use at the premises:
2. Enter your 2-digit remote access code.
menu, as described on page 23.
of the premises where ProSYS is installed, and proceed as
follows:
ring once, then hang up and call again.
NOTE:
=
Ask your installer to define the Answering Machine Override feature.
In some telephone systems, you may need to wait at least 10 seconds before
calling the system again.
the system picks up.
The system picks up after a predefined number of rings, and no
sound is heard.
NOTE:
=
When the system picks up, all phones on the same line are effectively
disconnected, and cannot be used.
NOTES:
This code is defined by your installer.
You have 10 seconds in which to enter this code. After this time the system
automatically switches to MODEM mode. The sound of the connected modem is
heard, and the call must be made again, as described in step 1.
The following message is announced:
Let the line
Wait until
Hello, please enter your user code, followed by pound.
Voice Module Programming and Operations Manual
21
Page 22

3. Enter the 4- or 6-digit user code you usually enter in the system
#
keypad, followed by
NOTE:
If an invalid user code is entered, the following message is announced:
If a valid user code is not entered within 10 seconds, the system hangs up, and the call
must be made again, as described in step 1.
If 3 invalid user codes are entered within 10 minutes, the system hangs up and is then
locked for fifteen minutes. During this time, any calls initiated to the system are not
picked up. However, it is still possible to receive event calls from the system.
The Status message is announced, followed by the
.
Wrong code.
Operations
menu, as described on page 23.
You can now perform the required remote operations, as described
in the subsequent sections of this manual.
TIPS:
#
To repeat the Status message, press
To bypass further menus and go directly to your required operation, use the list of quick
key combinations on page 20.
.
Status Messages
When a valid user code is entered, the Status message is
announced, declaring the current status of the system.
The following is a list of possible Status messages:
All partitions are armed.
All partitions are ready to arm.
Intruder alarm in [partition x] / all partitions.
Fire alarm in [partition x] / all partitions.
Emergency alarm in [partition x] / all partitions.
Panic alarm in [partition x] / all partitions.
[Partition x] is armed.
[Partition x] is ready to arm.
[Partition x] is not ready to arm.
The Status message declares the status of the partitions to which you
have access. If partition status varies, the Statu s message includes a
separate message for each partition.
The default message for a partition is
partition number. See page 12 for details about recording a name,
such as
Living Room
22
Voice Module Programming and Operations Manual
for each partition.
partition x where x is the
Page 23

Operations Menu
After the Status message, the following list of remote operations is
announced:
Option Page
To arm, press 1.
To disarm, press 2.
To bypass a zone, press 3.
To operate a Utility Output, press 4.
To change a Follow Me number, press 5.
To Listen and Talk, press 6.
To enter the message box, press 7.
To exit, press 0.
For a detailed description of how to carry out your required
operation, turn to its corresponding page number in the list above.
These options in the
status and your access rights. For example, the To
option is not announced if all partitions in your system are already
armed, and the
appliances) is not announced if the UOs in your system are not
defined as
Follow Code
Operations
Activate UOs
option (for activating home
, as described on page 30.
23
26
28
30
31
34
35
37
menu vary according to system
arm the system
Arming the System 1
Arming your system enables its detectors to detect activity on your
premises.
To arm the system:
1. From the
partition, the following message is announced:
To arm all partitions, press 1.
To arm by partition, press 9.
If you only have permision to arm 1 partition, the partition is
armed and the following message is announced:
[Partition x] armed.
Operations
menu, press 1. If you have more than 1
Voice Module Programming and Operations Manual
23
Page 24

2. To arm all partitions in the system, follow the procedure on page
24. To arm individual partitions within the system, follow the
procedure,
To arm all partitions:
Press
Message Description
All partitions armed.
To force arm, press 2.
To previous menu,
press star.
NOTE:
The option to force arm can be disabled by your installer, and in this case it is not
announced.
WARNING:
Force arming a partition results in leaving that partition unsecured.
The
page 23.
To arm by partition
1 1
1
. One of the following messages is announced:
Operations
menu is then announced again, as described on
, on page 25.
All partitions have been armed
successfully.
1 or more partitions are not ready to
arm.
2
Press
to force arm all partitions that
are not ready to arm. The following
message is announced:
All partitions armed.
-OR-
to return to the previous
Press
*
menu.
2
4
Voice Module Programming and Operations Manual
Page 25
9
1
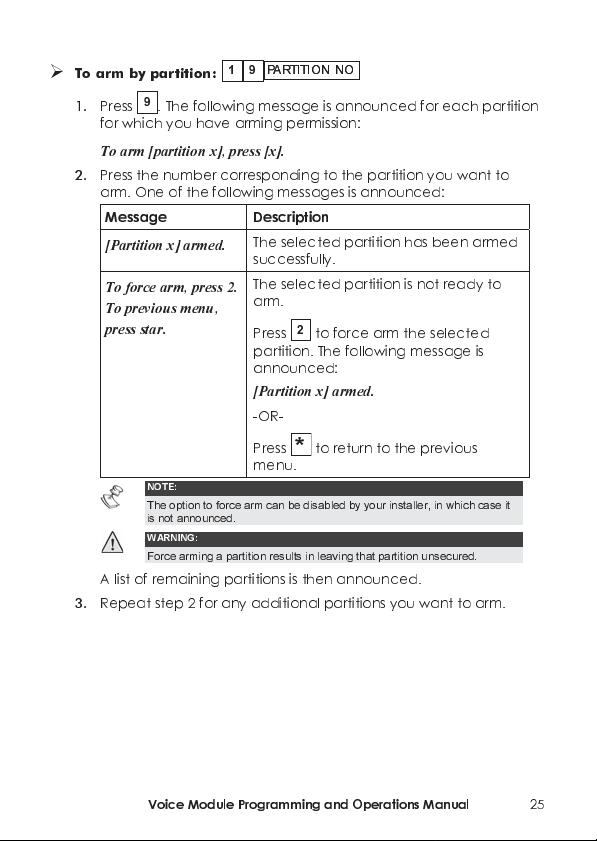
To arm by partition:
1. Press 9. The following message is announced for each partition
for which you have arming permission:
P ARTITION NOP ARTITION NO
To arm [partition x], press [x].
2. Press the number corresponding to the partition you want to
arm. One of the following messages is announced:
Message Description
[Partition x] armed.
To force arm, press 2.
To previous menu,
press star.
NOTE:
The option to force arm can be disabled by your installer, in which case it
is not announced.
WARNING:
Force arming a partition results in leaving that partition unsecured.
A list of remaining partitions is then announced.
3. Repeat step 2 for any additional partitions you want to arm.
The selected partition has been armed
successfully.
The selected partition is not ready to
arm.
2
Press
partition. The following message is
announced:
[Partition x] armed.
-OR-
Press
menu.
to force arm the selected
to return to the previous
*
Voice Module Programming and Operations Manual
2
5
Page 26

Disarming the Syst em
Disarming your system deactivates its detectors.
To disarm the system :
From the
partition, the following message is announced:
To disarm all partitions, press 2.
To disarm by partition, press 9.
If you only have permission to disarm 1 partition, the partition is
disarmed and the following message is announced:
[Partition x] disarmed.
To disarm all partitions:
Press 2. The following message is announced:
All partitions disarmed.
The
-OR-
To disarm individual partitions in your system, follow the
procedure below.
Operations
Operations
menu, press 2. If you have more than 1
2 2
menu is repeated.
2
2
6
Voice Module Programming and Operations Manual
Page 27

To disarm by p art it ion:
1. Press 9. The following message is announced for every partition
in the system:
9
2
P ARTITION NOP ARTITION NO
To disarm [partition x], press [x].
2. Enter the number corresponding to the partition you want to
disarm. One of the following messages is announced:
Message Description
[Partition x]
disarmed.
All partitions ready
to arm.
The selected partition has been disarmed
successfully.
The list of remaining partitions is
announced.
Repeat step 2 for any additional partitions
you want to disarm.
The selected partition was the last partition
to be disarmed.
All partitions are disarmed.
Voice Module Programming and Operations Manual
2
7
Page 28
Changing Zone Bypass Status
3
ZONE NOZONE NO
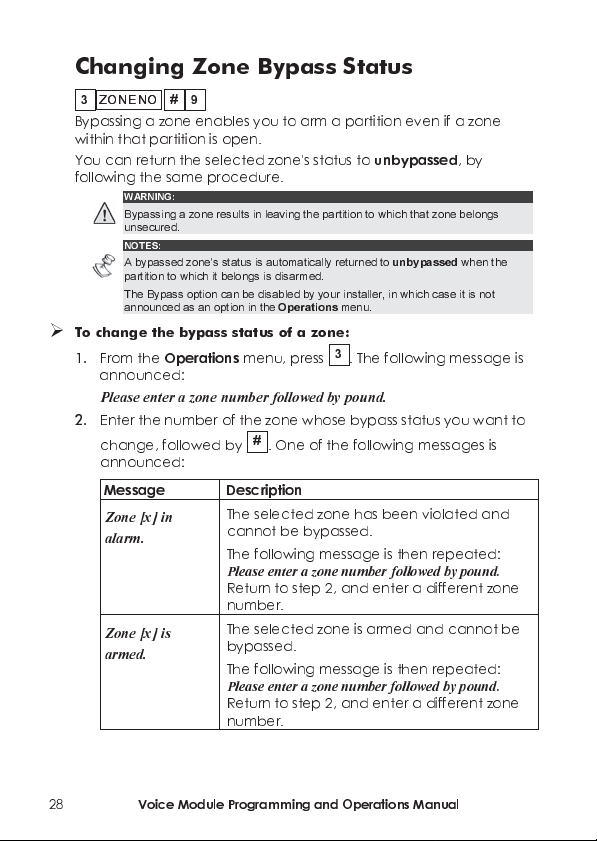
Bypassing a zone enables you to arm a partition even if a zone
within that partition is open.
You can return the selected zone's status to
following the same procedure.
WARNING:
Bypassing a zone results in leaving the partition to which that zone belongs
unsecured.
NOTES:
A bypassed zone's status is automatically returned to
partition to which it belongs is disarmed.
The Bypass option can be disabled by your installer, in which case it is not
announced as an option in the
To change the by pass s tat us of a zo ne:
1. From the
announced:
Please enter a zone number followed by pound.
2.
Enter the number of the zone whose bypass status you want to
change, followed by
announced:
Message Description
Zone [x] in
alarm.
Zone [x] is
armed.
9
#
Operations
unbypassed
unbypassed
Operations
menu.
menu, press 3. The following message is
#
. One of the following messages is
The selected zone has been violated and
cannot be bypassed.
The following message is then repeated:
Please enter a zone number followed by pound.
Return to step 2, and enter a different zone
number.
The selected zone is armed and cannot be
bypassed.
The following message is then repeated:
Please enter a zone number followed by pound.
Return to step 2, and enter a different zone
number.
, by
when the
2
8
Voice Module Programming and Operations Manual
Page 29

Message Description
Zone is not valid.
Zone [x] is open.
To change bypass
status, press 9.
To return, press
star.
Zone [x] is closed.
To change bypass
status, press 9.
To previous
menu, press star.
Zone [x] is
bypassed.
To change bypass
status, press 9.
3. Press 9. One of the following confirmation messages is
announced:
Message Description
Zone [x] is
bypassed.
Zone [x] is
unbypassed.
The following message is then announced:
Please enter a zone number followed by pound.
You do not have access to the selected
zone, or the selected zone does not exist in
the system.
The following message is then repeated:
Please enter a zone number followed by pound.
Return to step 2, and enter a different zone
number.
The selected zone's bypass status can be
changed.
Proceed to step 3 below.
The selected zone's bypass status can be
changed.
Proceed to step 3 below.
The selected zone has already been
bypassed.
To unbypass the selected zone, proceed to
step 3 below.
The selected zone's status has been
changed to
The selected zone's status has been
changed to
bypassed
unbypassed
.
.
Voice Module Programming and Operations Manual
2
9
Page 30

4. Enter the number of the next zone whose bypass status you want
to change.
-OR-
to return to the
Press
Operating Utility Outputs (UOs)
The Utility Output option enables you to remotely operate (activate
or deactivate) up to 8 home appliances such as heating, lighting,
sprinkler systems and garage doors.
There are 2 types of appliances, each of which behaves differently
when activated:
Latched appliance:
Pulsed appliance:
of seconds, after which it is automatically deactivated.
Ask your installer which of your appliances are defined as latched
and which are defined as pulsed.
NOTES:
The Utility Output option applies to Utility Outputs that are defined as
Code
. Ask your installer for details about defining Utility Outputs in this way.
The default system message for a Utility Output is
number. See page 14 for details about defining a name, such as
Utility O utput.
To activate and deac ti vate UOs:
1. From the
messages is announced for every
assigned to a message, as described on page 14:
To activate [output
x], press [x].
To dea ct i v at e [outpu t
x], press [x].
Operations
Message Description
Operations
Remains activated until it is deactivated.
Remains activated for a predefined number
menu, press 4. One of the following
The appliance is defined as
currently deactivated.
-OR-
The appliance is defined as
The appliance is defined as
currently activated.
menu.
output x where x is the output
Follow Code
UO that has been
4
UO NOUO NO
Follow
Heating, for each
latched
pulsed
latched
and
.
and
30
Voice Module Programming and Operations Manual
Page 31

2. Enter the number corresponding to the UO you want to activate
or deactivate. One of the following confirmation messages is
announced, depending on whether you have activated or
deactivated the selected UO:
[Output x] activated.
[Output x] deactivated.
The messages described in step 1 are then repeated for every
UO in the system.
3. Repeat step 2 to activate or deactivate other UOs,
-OR-
Press
to return to the
Operations
menu.
.
Changing Follow Me (FM) Numbers
FM N OFM N O
5
The Voice module enables you to remotely change the phone
numbers of users to whom event calls are sent.
This is useful if you want to receive event calls while on vacation. In
this case, you would temporarily change your regular FM number
from that of your workplace to that of your vacation residence.
To change F M numbers:
1. From the
2. Enter the FM number representing the phone number you want
#
2
NOTES:
Only the Grand Master, Master and Manager authority levels have permission to
change FM numbers.
announced:
Operations
menu, press 5. The following message is
Please enter Follow Me number followed by pound.
to change, followed by
NOTES:
For ProSYS 16 or 40 systems, this number must be from 1 to 8.
For ProSYS 128 systems, this number must be from 1 to 16.
Voice Module Programming and Operations Manual
#
.
31
Page 32

One of the following messages is announced:
Message Description
Current phone
number is [x].
To change phone
number, press 2.
To return to
The number you have entered currently
represents a phone number. This phone
number is announced.
Proceed to step 3 on page 32.
previous menu,
press star.
A phone number is
not defined for this
FM number.
Access is denied to
this Follow Me
number.
3. Press 2 to change the selected phone number. The following
message is announced:
No telephone number is defined for the
FM phone you have entered.
Return to step 2, and enter a different FM
number.
Either you do not have access to the
number you have entered, or the
number does not exist.
The following message is then repeated:
Please enter Follow Me number followed by
pound.
Return to step 2, and enter a different FM
number.
Please enter new phone number. To end, press pound.
4. Enter the new phone number, followed by #. If required,
include special characters, as described on page 33. The menu
described in step 2 on page 31 is repeated.
-OR-
#
Press
to delete the phone number.
The following messages are then announced:
To confirm new phone number, press 1.
To change phone number, press 2.
To return to previous menu, press star.
32
Voice Module Programming and Operations Manual
Page 33

*
*
*
*
*
5. Press 1 to confirm the phone number you entered in step 4.
-OR-
Select an alternative option, as required.
6. Repeat steps 2 - 5 for any additional FM numbers you want to
change.
Special Functions
Including a character in a phone number enables a particular
function to be performed during the process of dialing that phone
number.
To include one of the following functions in a phone number, enter
its corresponding key combination from the list below.
Function
Stop dialing and wait for a new dial tone. A
Wait a fixed period before continuing. B
Switch from Pulse to Tone (or from Tone to
Pulse).
Send the DTMF # character.
*
Send the DTMF
character.
Character
C
#
*
Press
1
2
3
#
Voice Module Programming and Operations Manual
33
Page 34

Listening and Talking
The Listen and Talk option enables you to remotely and silently listen
in to your premises in order to verify the cause of an event
occurrence through the MBU units. It also enables you to remotely
talk into your premises, for example, to guide someone in distress.
NOTE:
When entering the Listen and Talk option you have 2 minutes time out in which to
listen or talk, after each press on [1] or [2] options. After this time, the
Acknowledge
To listen and talk:
From the
following messages are announced:
menu or the
Operations/Acknowledge
Operations
6
menu is repeated.
menu, press 6. The
To listen in, press 1.
To talk, press 2.
To return to the previous menu, press star.
6
To listen:
At any time, you can press 1
bell alarm is silenced. If you talk, your voice cannot be heard in
the premises.
To talk:
At any time, you can press 2 and talk into the telephone. The
bell alarm is silenced, and your voice is heard in the premises.
During this Talking mode you can’t listen-in to the premises.
To stop listening and talking:
Press to stop listening and talking and return to the
Operations
1
to listen in to the premises. The
6
2
NOTE:
When you switch from talk mode to listen mode, the MBUs on the premises sound a
beep and the Led is flashing slowly. This can help you to make a convenient dialog
with a person in the premises
menu.
34
Voice Module Programming and Operations Manual
Page 35

NOTES:
Listening and talking cannot be performed simultaneously. You must press 1
prior to listening and 2 prior to talking in order to be heard in the premises.
The bell alarm resumes sounding 2 minutes after the last key has been pressed,
and the previous menu is announced.
The MBU LED flashes when listening and talking are performed.
7
Using the Message Box
The Message Box enables you to collect voice messages from and
leave voice messages for users of the system through the MBU.
7
Playing a Message
The Message Box enables you to play a message left by users of the
system.
To play a m ess ag e:
1
1. From the
messag es is announced:
You have a new message.
You have no new message.
The following message is then announced:
To play the message, press 1.
To record a message, press 2.
2. To play a message, press
the message in step 1 above.
Operations
Voice Module Programming and Operations Manual
menu, press 7. One of the following
1
. The message is played, followed by
35
Page 36

*
7
Recording a Message
The Message Box enables you to record and store 1 message up to
10 seconds long. When you record a new message, the last
message is deleted.
To record a me ssage:
1. Follow step 1 in the procedure above.
2. Press
2
. The following message is announced:
2
Press pound to start and stop recording.
3. Press # and say your message into the telephone receiver.
4. Press
#
when you have finished your message. The following
message is announced:
You have a new message.
To play the message, press 1.
To record a message, press 2.
5. Press 1 to listen to the message you have just recorded.
-OR-
Press
to return to the
When accessing the Message Box option,
is announced. This changes to
user with a different user code to the user who recorded the
message plays the message.
NOTE:
The MBU LED starts to flash rapidity indicating that new mew message has been
recorded.
Operations
menu.
You have a new message
You have no new message
when a
36
Voice Module Programming and Operations Manual
Page 37

Exiting the System 0
When you have finished performing remote operations, you can exit
the system, as described below.
NOTE:
You can also exit the system by hanging up. The communication is automatically
disconnected.
To exit the system:
1. From the
announced:
Operations
menu, press 0. The following message is
Goodbye.
2. Hang up. All phones on the same line as the system are
effectively reconnected and can be used.
Chapter 4 Receiving Calls from
the System
Upon event occurrence, such as alarm activation, the Voice
module informs you of security situations such as intrusion or fire,
by calling you and announcing a pre-recorded Event
announcement message, as described on page 10, followed by
the
Acknowledge
The system can call up to 16 Follow Me numbers, depending on
your system, enabling you, a relative or neighbor to be informed
of the security situation.
NOTES:
ProSYS 16 and 40 systems can call up to 8 FM numbers.
ProSYS 128 systems can call up to 16 FM numbers.
FM numbers are assigned certain events and partitions for which they receive calls.
The system must be programmed to call an FM number after a specific event
occurs in order for that event to trigger the call. See page 31 for more information
about FM numbers.
You can then take the appropriate action, whether this is to
inform the authorities, or to use the Voice module to
acknowledge the event and remotely operate the system, as
described in this chapter.
menu, as described on page 39.
Voice Module Programming and Operations Manual
37
Page 38

Receiving an Event Call
When you receive an event call from the system, the first thing you
must do is speak into the telephone handset in order to
acknowledge the system that you have received the call, and to
trigger the Event announcement message.
Simply picking up the phone and saying "Hello", or in fact anything, is
enough to do this.
NOTES:
If no voice is detected the event message will start playing 5 seconds after
phone pick up.
Interference noise on the telephone line might be recognized by the voice
module as a phone pick up and by that start playing the event message before
the phone has been picked up by you. Press # to begin playback of the event
message from the beginning.
Event Announcement
After you say "Hello", the Event announcement message is made, as
described on page 10.
TIPS:
To repeat the Event announcement message, press
To bypass the Event announcement message and go directly to the
Acknowledge
menu, press *.
#
.
38
Voice Module Programming and Operations Manual
Page 39
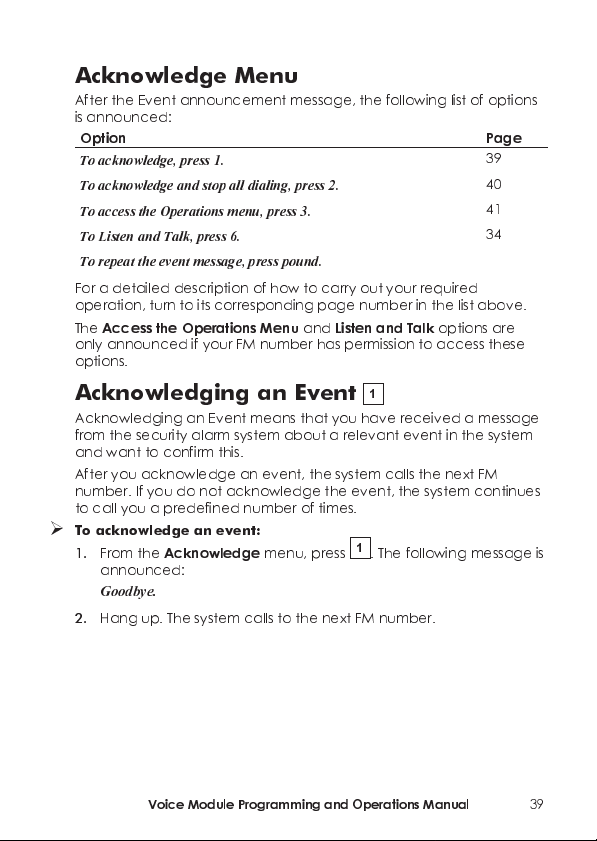
Acknowledge Menu
After the Event announcement message, the following list of options
is announced:
Option Page
To acknowledge, press 1.
To acknowledge and stop all dialing, press 2.
To access the Operations menu, press 3.
To Listen and Talk, press 6.
To repeat the event message, press pound.
For a detailed description of how to carry out your required
operation, turn to its corresponding page number in the list above.
The
Access the Operations Menu
only announced if your FM number has permission to access these
options.
and
Listen and Talk
39
40
41
34
options are
Acknowledging an Event 1
Acknowledging an Event means that you have received a message
from the security alarm system about a relevant event in the system
and want to confirm this.
After you acknowledge an event, the system calls the next FM
number. If you do not acknowledge the event, the system continues
to call you a predefined number of times.
To acknowledge an event:
1. From the
announced:
Goodbye.
2. Hang up. The system calls to the next FM number.
Acknowledge
menu, press 1. The following message is
Voice Module Programming and Operations Manual
39
Page 40

Acknowledging and Stopping All Dialing
2
This option acknowledges the event and prevents the system from
calling to the next FM numbers to report the event.
To acknowledge and stop all dialing:
1. From the
2. Enter your user code followed by #. The system stops all dialing,
3. Hang up.
#
CODE
announced:
Acknowledge
menu, press 2. The following message is
Please enter your user code, followed by pound.
and the following message is announced:
Goodbye.
NOTE:
See the note on page 41 regarding the outcome of entering an invalid user code.
4
0
Voice Module Programming and Operations Manual
Page 41
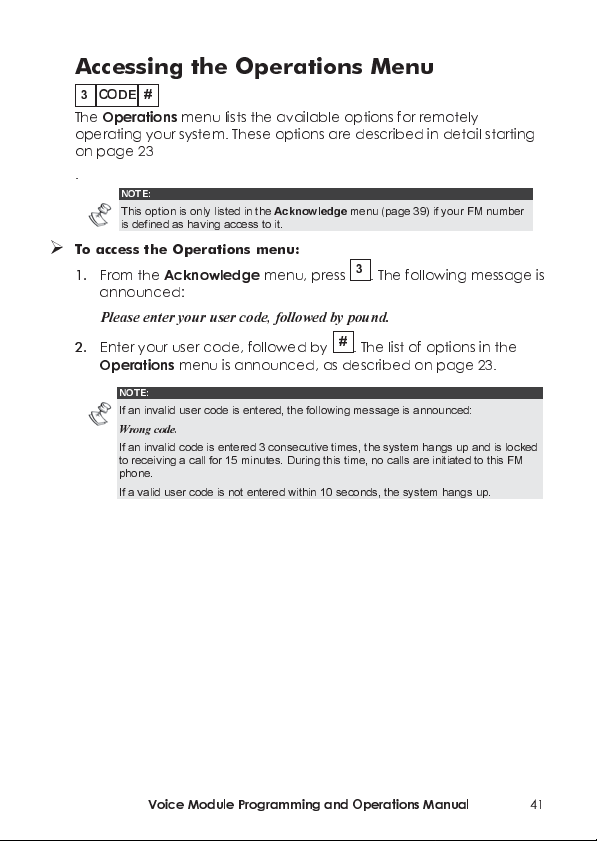
Accessing the Operations Menu
3
The
operating your system. These options are described in detail starting
on page 23
.
To access th e Op erations menu:
1. From the
2. Enter your user code, followed by #. The list of options in the
#
CODE
Operations
menu lists the available options for remotely
NOTE:
This option is only listed in the
is defined as having access to it.
Acknowledge
Acknowledge
menu (page 39) if your FM number
menu, press 3. The following message is
announced:
Please enter your user code, followed by pound.
Operations
menu is announced, as described on page 23.
NOTE:
If an invalid user code is entered, the following message is announced:
Wrong code.
If an invalid code is entered 3 consecutive times, the system hangs up and is locked
to receiving a call for 15 minutes. During this time, no calls are initiated to this FM
phone.
If a valid user code is not entered within 10 seconds, the system hangs up.
Voice Module Programming and Operations Manual
4
1
Page 42

Chapter 5: On Premises Operation of
the MBU
The Message Box Unit enables you to play and record a message on
the premises. The Message is up to 10 seconds long. When you
record a new message, the last message is deleted.
To play a m ess ag e:
Press the Play [] button. The recorded message will begin playing
automatically
To record a message:
1. Press the [] button continuously for 2 seconds. The LED will start
a slow flash.
2. Talk into the MBU from a distance of 3 cm. If you finish your
message before the time limit, press the [] key again.
3.
NOTE:
It is recommended to record the messages from the MBU mounted next to the keypad
When recording any of the zones, partition, UO or common messages you do not need to
press the [] button to start and stop the recording. The control of the message recording is
performed from the keypad.
4
2
Voice Module Programming and Operations Manual
Page 43

RISCO Group Limited Warranty
RISCO Group and its subsidiaries and affiliates ("Seller") warrants its
products to be free from defects in materials and workmanship
under normal use for 24 months from the date of production.
Because Seller does not install or connect the produc t and because
the product may be used in conjunction with products not
manufactured by the Seller, Seller can not guarantee the
performance of the security system which uses this product. Sellers
obligation and liability under this warranty is expressly limited to
repairing and replacing, at Sellers option, within a reasonable time
after the date of delivery, any product not meeting th e
specifications. Seller makes no other warranty, expressed or implied,
and makes no warranty of merchantability or of fitness for any
particular purpose.
In no case shall seller be liable for any consequential or incidental
damages for breach of this or any other warranty, expressed or
implied, or upon any other basis of liability whatsoever.
Sellers obligation under this warranty shall not include any
transportation charges or costs of installation or any liability for direct,
indirect, or consequential damages or delay.
Seller does not represent that its product may not be compromised
or circumvented; that the product will prevent any persona; injury or
property loss by burglary, robbery, fire or otherwise; or that the
product will in all cases provide adequate warning or protection.
Buyer understands that a properly installed and maintained alarm
may only reduce the risk of burglary, robbery or fire without warning,
but is not insurance or a guaranty that such will not occur or that
there will be no personal injury or property loss as a result.
Consequently seller shall have no liability for any personal injury,
property damage or loss based on a claim that the product fails to
give warning. However, if seller is held liable, whether directly or
indirectly, for any loss or damage arising from under this limited
warranty or otherwise, regardless of cause or origin, sellers maximum
liability shall not exceed the purchase price of the product, which
shall be complete and exclusive remedy against seller.
No employee or representative of Seller is authorized to change this
warranty in any way or grant any other warranty.
WARNING: This product should be tested at least once a week.
Voice Module Programming and Operations Manual
4
3
Page 44
Contacting RISCO Group
RISCO Group is committed to customer service and product support.
You can contact us through our website (www.riscogroup.com) or at
the following telephone and fax numbers:
United Kingdom
Tel: +44-161-655-5500
technical@riscogroup.co.uk
Italy
Tel: +39-02-66590054
support@riscogroup.it
Spain
Tel: +34-91-490-2133
support-es@riscogroup.com
France
Tel: +33-164-73-28-50
support-fr@riscogroup.com
Belgium
Tel: +32-2522-7622
support-be@riscogrou p .com
USA
Tel: +305-592-3820
support@riscogroupusa.com
Brazil
Tel: +55-11-3661-8767
support-br@riscog roup.com
China
Tel: +86-21-52-39-0066
support-cn@riscogroup.com
Poland
Tel: +48-22-500-28-40
support-pl@riscogroup.com
Israel
Tel: +972-3-963-7777
support@riscogroup.com
All rights reserved.
No part of this document may be reproduced in any form without prior written permission
from the publisher.
RISCO Group 01/09 5IN128EVUM C
 Loading...