

Page 1

4 Channel H.264 DVR
Model: QSD9004CM
What’s in the box? check that your package includes the following:
PWR HDD
4 Cha n n el D i g it a l Video R e co r d er
4 Channel DVR
CH1 CH2 CH3 CH4 QUAD
REW PAUSE PLAY FWD STOP REC
PTZ
Software CD
Manual
USB Mouse
Digital Peripheral Solutions, Inc.
8015 East Crystal Drive,
Anaheim, CA 92807
www.Q-See.com
Q-See is a registered trademark of Digital Peripheral Solutions, Inc.
Remote Control
Cameras x2 - QSC7614
x2 - QSC7614W
Ethernet Cable
Power Supply and 4 Way
Splitter for Cameras
BNC to RCA Cable
Power Supply for DVR
60 FT. Cables x 4
Hard Drive (Pre-Installed)
Page 2
1
CH1
CH3 CH4 AIN3
AIN1 AIN2
LAN
AIN4
VIDEO
OUTPUT
AUDIO
OUTPUT
CH2
CH1
CH3 CH4
CH2
Connect
4 Channel DVR
1
1
POWER BUTTON
2
POWER/ HARD DRIVE LIGHTS
3
CHANNELS 1-4/ QUAD
4
REWIND
5
PAUSE
PWR HDD
4 Ch a n ne l D i gi t a l Vide o Re c o rd e r
6
7
8
9
10
2 3
CH1 CH2 CH3 CH4 QUAD
REW PAUSE PLAY FWD STOP REC
4 5 6 7 8 9
PLAY
FAST FORWARD
STOP
RECORD
PTZ BUTTON
11
DOWN
12
RIGHT/ SELECT/ EDIT
13
LEFT/ MENU/ ESCAPE
14
UP
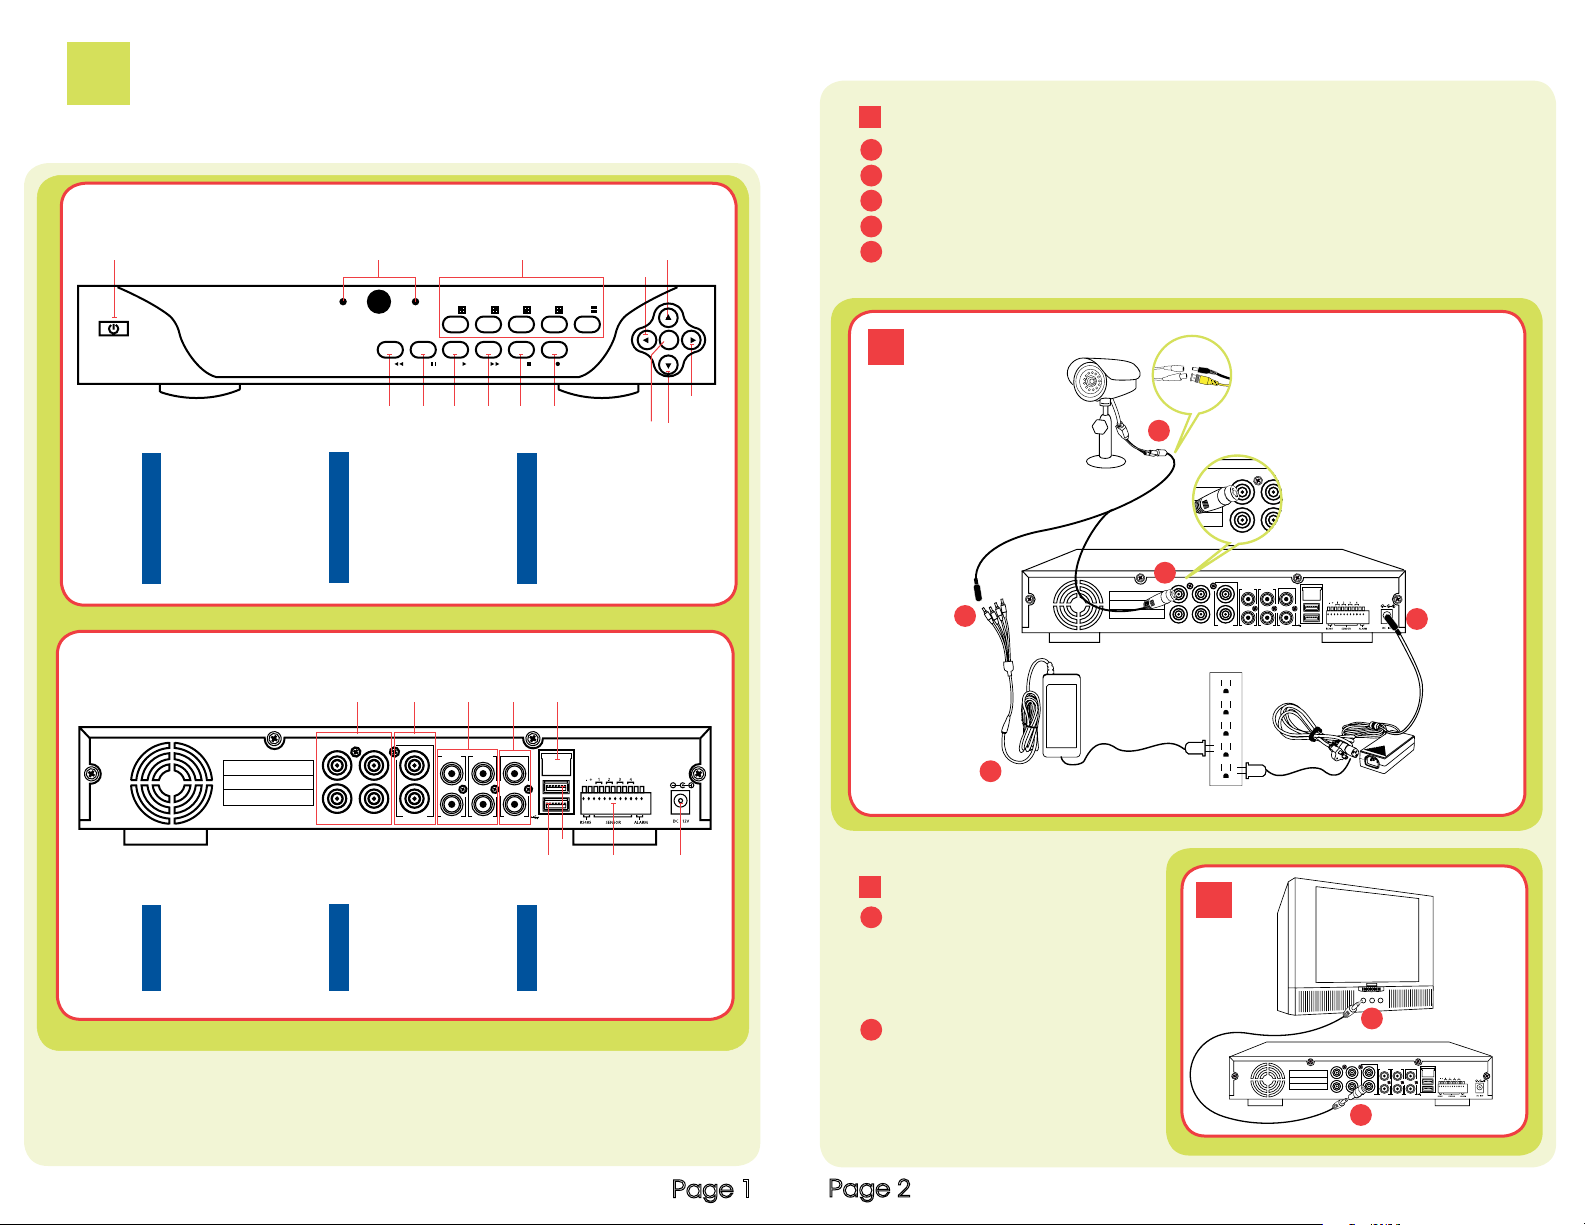
FRONT VIEW
14
13
PTZ
10
11
1 CONNECT
Connect the 60 ft. extension cable to the camera
A
Connect the female power end of the 60 ft. cable to the splitter
B
Connect the 4 way splitter to the AC Adapter
C
Connect the power supply to the DVR
D
E
Connect the video feed on the other end of the cable to the DVR
Repeat the same process for Cameras 2-4
1
12
CAMERA CONNECTIONS
Yellow: Video Out
Black: Power In
A
E
CAUTION:
REAR VIEW
5
LAN
AUDIO
OUTPUT
7
6 8 9
USB PORT (USB MOUSE)
7
RS-485/ SENSOR/ ALARM
8
POWER PORT
9
VIDEO
32 4
AIN1 AIN2
AIN4
1
CH1
CH2
CH3 CH4 AIN3
VIDEO INPUT
1
VIDEO OUTPUT
2
AUDIO INPUT
3
Use only the power adapters supplied with the Q-See unit. We recommend
4
5
6
OUTPUT
AUDIO OUTPUT
ETHERNET PORT
USB PORT (USB DEVICE)
Plugging the DVR and Cameras into a Transient Voltage Surge Protector
(UL-449 Rating)* 330 or lower clamping voltage, Joule rating 400.
Page 1
2 CONNECT TO A TV
Plug the BNC to RCA adapter to
A
the Video Out port on the DVR and
then connect an RCA cable (not
included) to the adapter
Connect the other end of the RCA
B
cable to the Video Input on the TV
Page 2
B
D
C
2
A
CH1
CH2
CH3 CH4 AIN3
B
LAN
AIN1 AIN2
VIDEO
AIN4
AUDIO
OUTPUT
OUTPUT
Page 3

2
A Accessing the DVR menus
B Setup Image View and Record Quality
Setup
To navigate through the DVR menu, three options are available:
1. DVR Front Panel: Use the DIRECTION keys to move the cursor and the
SEL key to select
2. Remote Control
3. USB Mouse (included)
Push MENU from the DVR front panel, or remote.
The Main Menu offers the following Setup Features:
CAMERA: Setup name display, position, image
view, and record quality of each channel (camera).
RECORD: Enable recording & audio, set resolution
& quality, recording mode and file size.
NETWORK: Setup Network access (Remote
Internet Monitoring).
SEARCH: Find files for playback and backup.
DEVICES: Manage & format hard drive and USB
devices. Setup alarms, PTZ cameras, mobile phone
access and motion detection.
SYSTEM: Setup time, date, password and video
mode.
C Setting up the DVR to Record:
This system offers three modes for recording:
1. Manual 2. Time Schedule 3. Motion Detection
C1
From the main menu, select RECORD to enter into the Record Setup menu (C1).
CHANNEL: “ON” enables video to record from the respective camera. If the
channel is set to “OFF”, video from that channel will not record.
RESOLUTION: D1= 704x480, HD1= 704x240, CIF=352x240
QUALITY: Best, Good, Normal
Using higher resolution and quality settings, results in better video quality, but
takes up more space on the hard drive. Choosing lower settings, results in lower
video quality, but takes up less space on the hard drive.
AUDIO: If audio is ENABLED, sound will be recorded with the video from the
channels, and will have audio output on playback mode. If audio is DISABLED,
sound will not record, and will have no audio output on playback mode (Audio
cameras or a microphone is required to record the sound).
REC MODE: Sets DVR to record on Manual, Motion Detection, and Time
Schedule Recording Detailed (instructions below).
PACK TIME: Choose the time length of all recorded files: 15, 30, 45, 60 min
(Max = 60 min).
From the Main Menu, select CAMERA. Here you
can setup the name display (up to 8 characters)
and position of each channel (camera). Select
COLOR SETUP to adjust the image brightness,
saturation, contrast and hue settings of each
channel (camera). You can also choose whether
each channel can be previewed in LIVE MODE
and/or RECORDING MODE.
Page 3
Page 4
Manual Recording:
From the Record Setup screen, set the Rec Mode to “ALWAYS”. Your DVR
will continuously record, and separate files will be created with the Pack Time
Intervals you selected.
Page 4

Time Schedule Recording:
From the Record Setup screen, set the Rec Mode to “TIME SCHEDULE
RECORD” and click “SCHEDULE” in green. This will display the Schedule menu
(C2). Select the channels (cameras) that you wish to record on a schedule. The
options are: All, CH-1, CH-2, CH-3, and CH-4 respectively. The channel you select
will be highlighted in “Blue”, and the unselected channels will be “Gray”. Click on
the green GENERAL option box, and then select the boxes for the days and times
to record using this option on the timeline. You can use the [From – To] pull-down
menus and COPY button to copy settings from one day to another day, or all days.
Your DVR will record on it’s Time Schedule and separate files will be created with
the Pack Time Intervals you selected.
Select APPLY to activate your customized schedule, and then reboot the
DVR.
You can also click on the DEFAULT button to use the system defaults.
The system default settings are:
Hr 01:00 am-07:59 am : No recording
Hr 08:00 am-18:59 pm : General recording (Time Schedule)
Hr 19:00 pm- 00:59 am : Alarm recording (Motion Detection)
C2
Motion Detection Recording:
From the Record Setup screen, set the Rec Mode to “TIME SCHEDULE
RECORD” and click “SCHEDULE” in green. This will display the Schedule menu
(C2). The options are: All, CH-1, CH-2, CH-3, and CH-4 respectively. The channel
you select will be highlighted in “Blue”, and the unselected channels will be Grey.
Click on the red ALARM option box, and then click on the boxes for the days and
times that you want to record using this option on the timeline. You can use the
[From – To] pull-down menus and COPY button to copy settings from one day to
another day, or all days. Your DVR will record on Motion Detection, and separate
files will be created with the Pack Time Intervals you selected.
Select APPLY to activate your customized schedule, and go to the Devices
option (C3), and then select the Motion Option (C4) which will display the Motion
Detect Box.
C3
C4
Grid Explanation:
Red= Alarm (motion detection) recording
Green= General (time schedule)recording
Transparent= No recording
C5
Blue= The channel and date selected.
The Motion detection Menu (C5) has
three sections, including Channel
Status, Sensitivity and Motion area.
CHANNEL STATUS: This option allows
you to enable motion detection on
any channel.
SENSITIVITY: This option allows you
to set the sensitivity level of motion
detection from 1 to 4.
(Level 4 being the highest.)
Page 5
Page 6
Page 5

C6
D Setting up the DVR to Playback
Click on the MD AREA SETUP button, to
display the image shown in (C6). This option
allows you to select the area you want to
be sensitive to motion. The area in red is
sensitive to motion. You can set this area by
using the USB mouse, or pushing the REV,
FWD, and SEL keys on the DVR front panel.
Once you have set the area, right click with
the mouse or push the ESC key to save
the setting. After you have set the motion
sensitivity area for all cameras, click on the
Apply button to save the settings.
D2
E Backup Files
File List:
On the Video Search Menu mode, click
FILE LIST to display the sub-menu (D2).
This option allows you to view all of the
available files by Channel and Type (All,
General, or Alarm).
Select a file from the list. Push the
SELECT button to playback the file.
For more information on the File List
option, refer to section 5.2.4 “Search
Recordings” in the User’s Manual.
From the Main Menu select SEARCH to display the Video Search Menu (D1).
Searched Playback:
D1
If you input a specific date and click
SEARCH, you will find all the recordings
for that day. When you select the day and
time to view, you will see all 4 cameras
play back. (The highlighted dates are the
files available to play.)
You can also click the FILE LIST button
to display the File list interface, and
playback or backup the file you
selected (D2).
When playing back video:
1. Fast Forward at speeds of 2x, 4x, or 8x
2. Play video at Normal pace, or Slow Play at 1/2x, 1/4x, 1/8x
3. Pause and Play frame by frame using the Playback Control Bar
4. Adjust volume by clicking or sliding the Tune Control Bar.
When playback has finished, the previous menu will be displayed.
E1
Insert a USB flash drive or USB hard
drive into the USB port on the back of the
DVR, bottom USB port. Display the File
List menu by clicking FILE LIST from the
Video Search Menu. (See section D).
To backup one recorded event from the
file list, select the file from the list, and
click BACKUP. To backup more than one
E2
file, put a check mark in the BAK box at
the end of each file you choose to backup.
A Progress Bar will display. When the
backup is complete, a dialog box will
appear as “Backup Success!” Click the
[OK] button to save your backup (E2).
Explanation: The Backup file will be in H.264 format. H.264 video can only be
viewed with the Multimedia Player which comes with your DVR, or through the
NetViewer program. In order to have your backup video compatible with all Media
Players, you must convert the video into AVI format using the Multimedia Player or
NetViewer program. See section 5.2.5 in the product manual for more information
on using the Multimedia Player.
Page 7
Page 8
Page 6

3
Enjoy
CONGRATULATIONS
on your purchase!
This Q-See product has undergone extensive quality control. If you have
any issues during the setup process, please contact our support department
before returning the product.
We have your solution!
1) Need assistance setting up the remote monitoring feature with your Q-See
DVR? Visit www.portforward.com/qsee
2) Visit our Q-See Support Section at www. Q-See.com for instant
troubleshooting tips, FAQs, DVR firmware downloads, Live Chat and More.
3) Contact our Support Team:
On the Web: (24/7) Visit the Technical Support Section
www.Q-See.com
By Phone (Monday thru Friday, 9am-5pm (PST)
Tech Support 1 (877) 998 3440, ext 539
Customer Service 1 (877) 998 3440 ext. 538
By Email:
@
ts@dpsi-usa.com
Digital Peripheral Solutions, Inc.
8015 East Crystal Drive,
Anaheim, CA 92807
www.Q-See.com
Q-See is a registered trademark of Digital Peripheral Solutions, Inc.
 Loading...