


WH210
Savi
™
Office WO200 Professional Wireless Headset System
(WO1
™
Base + WH210
™
Headset)
Quick Start Guide
Guide de démarrage rapide
Guía de inicio rápido
Guia de Início Rápido
2-1
2-2
2-3
1
Quick Start
1
Savi WH210 Headset
Savi WO1 Base
1. Listening Volume (also controls
mute and switching functions)
2. Call Control Button
3. Indicator Light
4. Noise-Canceling Boom
5. Ear tips
6. Charge Cradle
6
4
2
3
5
1. Desk Phone Speaking Volume
2. Configuration Switch
3. Desk Phone Listening Volume
4. Subscription Button and Indicator Light
5. Power/Charging Indicator Light
6. Power Jack
7. Handset Lifter Jack
8. Telephone Interface Cable Jack
9. USB Port
10. Desk Phone Talk Button and Indicator Light
11. PC Talk Button and Indicator Light
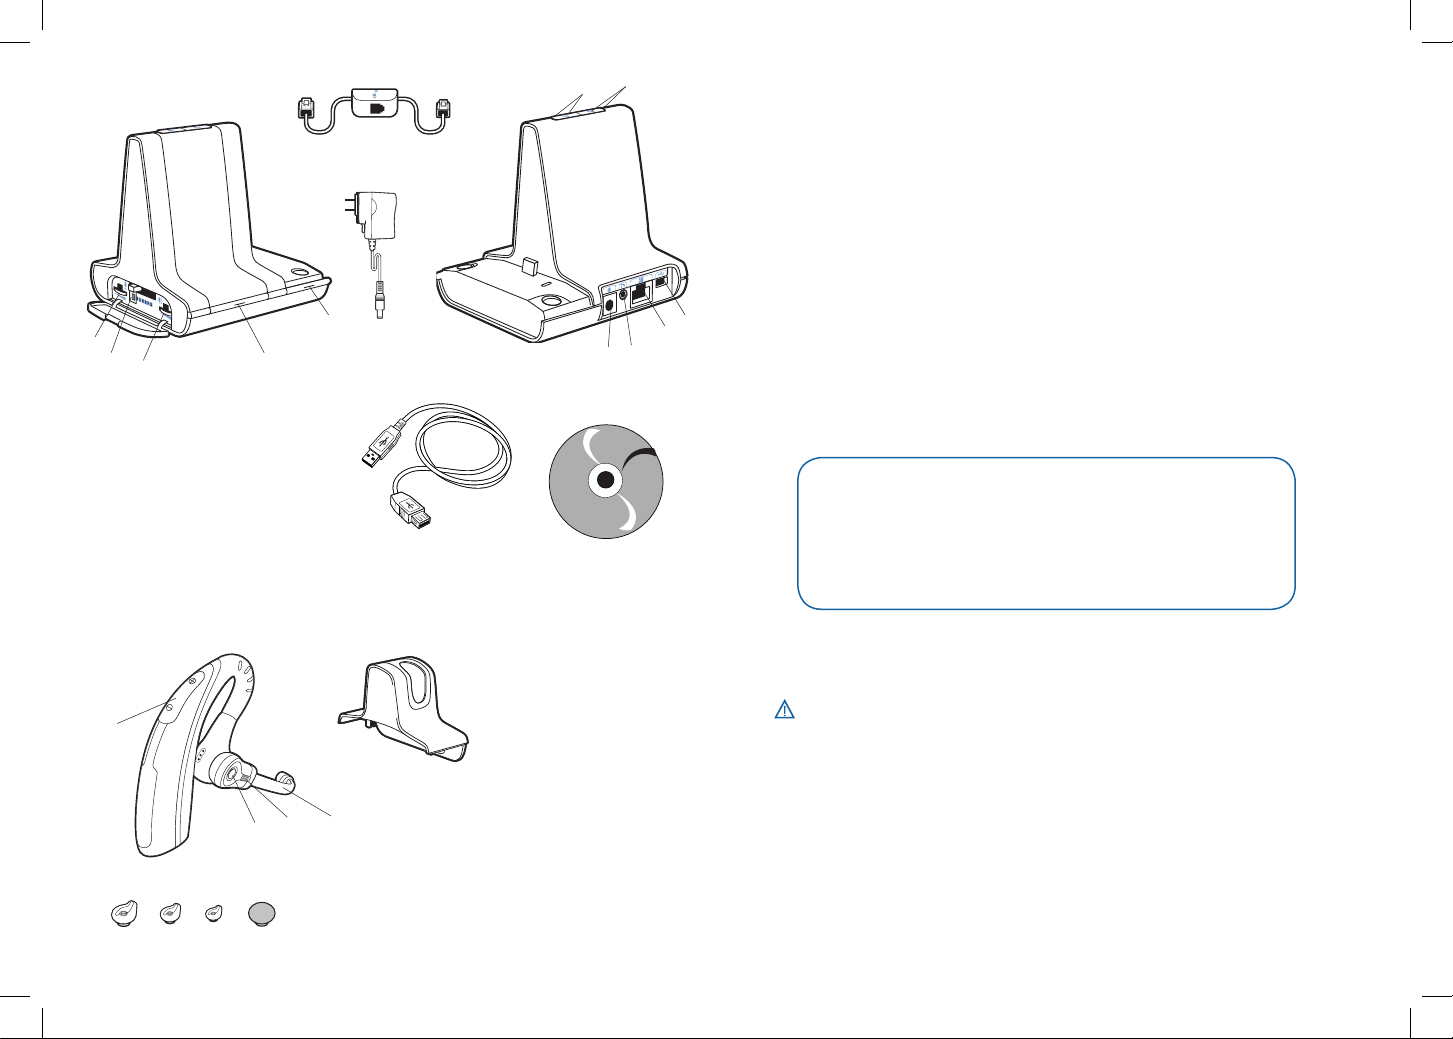
Base Power
Supply
Telephone
Interface Cable
CD includes:
• PerSono
®
Suite Software
• Animated Setup Guide
• Complete User Guide
USB Cable
10
6
7
8
11
9
3-1
3-2
4
7-1
7-2
5-7
5-2
6-6
5-2
6-5
5-2
6-4
5-6
4
2
3
1
5
Welcome
Congratulations on purchasing your new Plantronics product. This Quick Start Guide contains
instructions for setting up the Savi Office WO200 Professional Wireless Headset System. Please
refer to the separate safety instructions for important product safety information prior to installation
or use of the product.
System Requirements
The minimum system requirements for Savi Office are as follows:
• Supported Operating Systems: Windows XP, Windows Vista
• Processor: 400 MHz Pentium processor or equivalent (Minimum); 1GHz Pentium processor or
equivalent (Recommended)
• RAM: 96 MB (Minimum); 256 MB (Recommended)
• Hard Disk: 280 MB (Minimum); 500 MB (Recommended)
• Display: 800 x 600, 256 colours (Minimum); 1024 x 768 high colour, 32-bit (Recommended)
• Internet Explorer V6 or better must be on the user’s system (Required)
Safety Instructions
Do not use headphones / headsets at high volumes for an extended period of time.
Doing so can cause hearing loss. Always listen at moderate levels. See www.plantronics.com/
healthandsafety for more information on headsets and hearing.
We highly recommend that you refer to the CD
for Animated Set Up instructions and the complete
User Guide.

Setting Up the Savi Office WO200 System
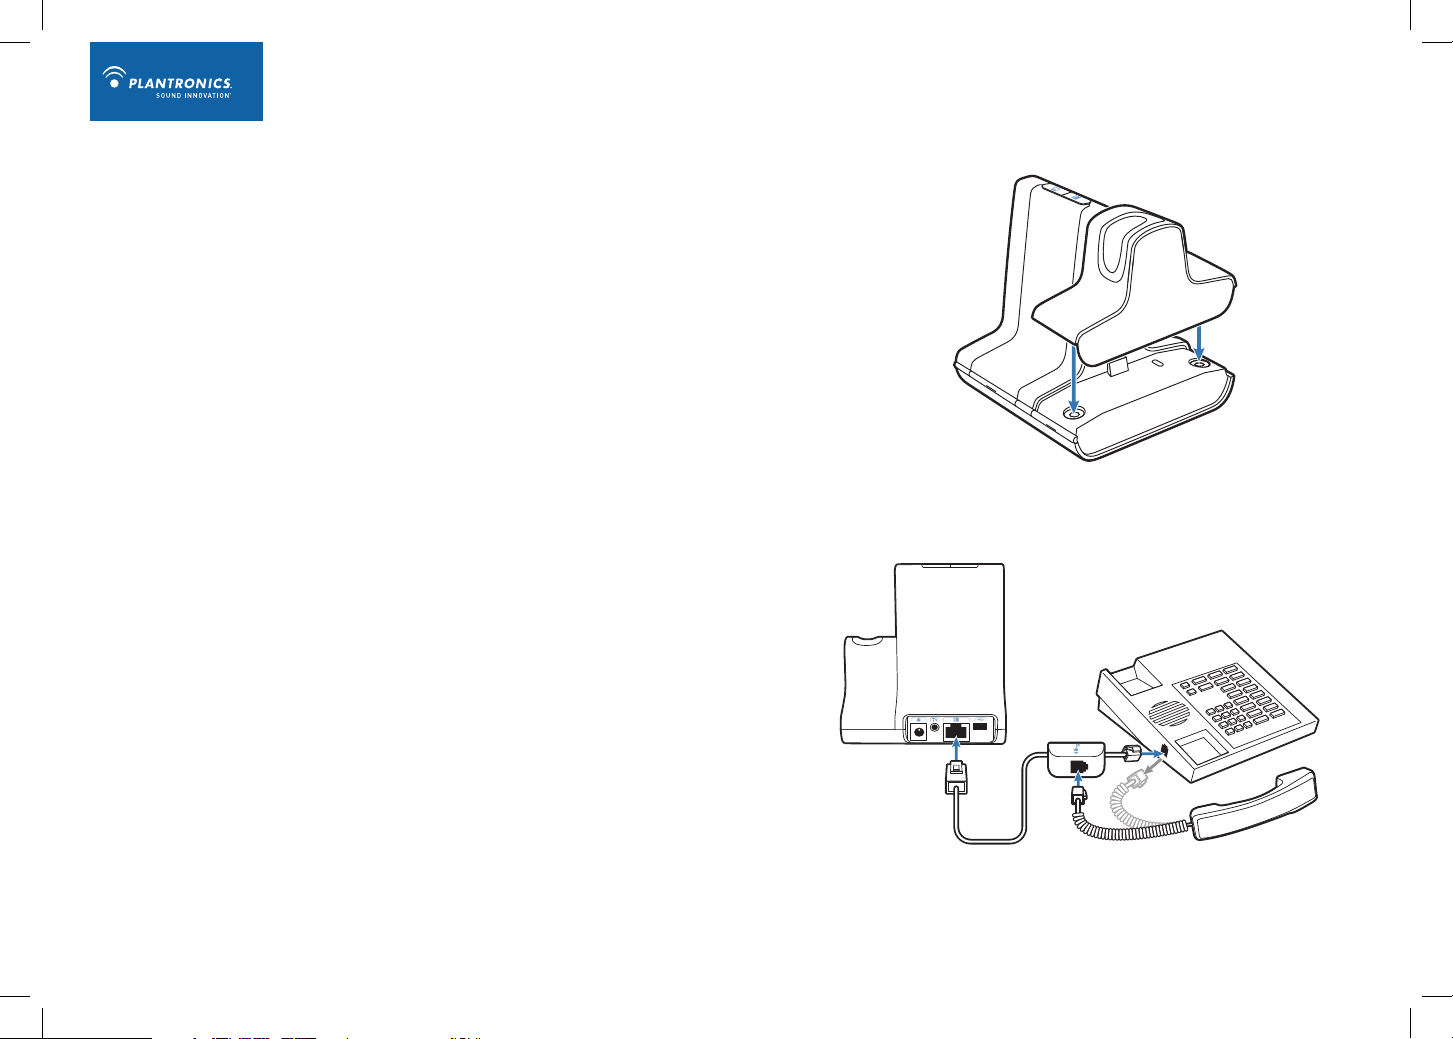
1. Attaching Charge Cradle to Base
Connect the headset charge cradle to the base. Push firmly on the cradle until the cradle snaps
into place.
2. Connecting Base to Desk Phone
2-1. Connect the telephone interface cable to the telephone interface cable jack on the base.
2-2. After disconnecting the handset coil cord from the desk phone, connect the telephone
interface cable to the now open handset port on the desk phone.
2-3. Connect the handset coil cord to the telephone interface cable junction box.
3. Connecting Power Supply to Base
3-1. Connect the base power supply into the power jack on the base.
3-2. Connect the power supply to outlet.
4. Docking and Charging Headset
Gently push the headset into the charge cradle. Charge for at least 20 minutes prior to the rst use.
A full charge takes 3 hours.
5. Checking Configuration
5-1. Set volume on desk phone to mid-range.
5-2. On the base, ensure the conguration switch is set to “A” and the desk phone speaking
volume and desk phone listening volume are both set to 3.
NOTE For most phones, these factory default settings will sound the best.
5-3. With your headset on, press the call control button on headset.
5-4. Remove the handset from desk phone cradle.
5-5. Listen for a dial tone. If the dial tone sounds clear, press the call control button on headset
and continue with Step 6. Making a Test Call with Desk Phone.
5-6. If the dial tone is too loud or too soft, adjust the headset volume level.
5-7. If the dial tone still does not sound clear, adjust the conguration switch until the dial tone
sounds the best.
NOTE Multiple settings might work with your phone; however, only one is the optimal position.
5-8. Press the call control button on the headset and return the handset to the cradle to complete
configuration.
6. Making a Test Call with Desk Phone
6-1. With your headset on, press the call control button on headset.
6-2. Remove the handset from desk phone cradle.
6-3. Dial the number using your desk phone.
6-4. If needed, adjust the listening volume on the headset.
6-5. If the listening volume is still too loud or too soft, adjust the desk phone listening volume
on the base.
6-6. If the speaking volume is too loud or too soft for your listener, adjust the desk phone
speaking volume on the base.
6-7. Press the call control button on the headset and return the handset to the cradle to
complete the test call.
7. Connecting to the PC
7-1. Connect the USB cable to the USB port on the back of the base.
7-2. Connect the other end of the USB cable to the USB port on the PC.
7-3. Insert the CD and install the PerSono Suite software. Follow the installation instructions
shown on your PC.
8. Making a Test Call with PC
8-1. Ensure the PerSono Suite software is running on your PC.
8-2. With your headset on, press the PC talk button on the base.
8-3. Dial the number using your softphone application.
8-4. Adjust listening and speaking volume using your softphone application and/or “sound and
audio devices” in your PC control panel.
8-5. You can fine tune the listening volume on the headset.
8-6. To end the test call, press the call control button on the headset.
Please refer to the complete User Guide located on the CD for further details on how to use your
Savi Office WO200 Professional Wireless Headset System.
CHARGING TIME
20 min .....................
Minimum charge
before first use
3 hours ...................
Full charge
1
Micro-casque Savi WH210
Base Savi WO1
1. Volume (contrôle aussi les fonctions
de sourdine et de commutation)
2. Bouton de contrôle des appels
3. Voyant
4. Microphone éliminateur de bruit
5. Embouts
6. Chargeur
6
4
2
3
5
1. Volume d’émission du téléphone
2. Commutateur de configuration
3. Volume de réception du téléphone
4. Bouton d’association et voyant
5. Voyant d’alimentation/charge
6. Prise d’alimentation
7. Prise du décrocheur de combiné
8. Prise de câble d’interface téléphonique
9. Port USB
10. Bouton de conversation par téléphone et voyant
11. Bouton de conversation par ordinateur et voyant
Bloc d’alimentation
de la base
Câble
d’interface téléphonique
Contenu du CD :
• Logiciel PerSono
®
• Guide de conguration
animé
• Guide de l’utilisateur
complet
Câble USB
10
6
7
8
11
9
Bienvenue
Félicitations pour votre nouveau produit Plantronics. Ce guide explique comment installer le
système de micro-casque sans fil professionnel Savi Office WO200. système de micro-casque sans
l professionnel Savi Ofce WO100. Veuillez lire les consignes de sécurité fournies séparément
avant d’installer ou d’utiliser le produit. Elles contiennent des renseignements importants relatifs à la
sécurité.
Configuration système requise
La configuration système requise pour Savi Office est la suivante :
• Systèmes d’exploitation compatibles : Windows XP et Windows Vista
• Processeur : 400 MHz (minimum); 1 GHz (recommandé)
• Mémoire : 96 Mo (minimum); 256 Mo (recommandé)
• Disque dur : 280 Mo (minimum); 500 Mo (recommandé)
• Afchage : 800 x 600, 256 couleurs (minimum); 1 024 x 768, couleurs 32 bits (recommandé)
• Internet Explorer version 6
Renseignements sur la sécurité
Attention : N’utilisez pas les casques et micro-casques à volume élevé sur de longues
périodes. Cela pourrait provoquer des problèmes d’audition. Conservez toujours un niveau
d’écoute modéré. Consultez le site www.plantronics.com/healthandsafety pour obtenir de plus
amples renseignements sur les micro-casques et l’audition.
Nous vous recommandons fortement de vous
reporter aux instructions du guide de configuration
animé et du guide de l’utilisateur complet sur le CD.
4
2
3
1
5
 Loading...