


4920 - VISTA USER GUIDE |
29/9/00 11:45am Page 1 |
Plantronics Ltd |
Plantronics France |
Plantronics Acoustics Italia SrL |
|
|
|||
Interface Business Park |
424, La Closerie Mont d’Est |
Palazzo G/2, Via Roma 108 |
|
Bincknoll Lane |
93194 Noisy-le-Grand Cedex |
20060 Cassina dé Pecchi MI |
|
Wootton Bassett |
Tel: +33 (0)1 41 67 41 41 |
Tel: +39 02 9511900 |
|
Wiltshire |
Fax:+33 (0)1 41 67 41 40 |
Fax:+39 02 9511903 |
|
SN4 8QQ |
|
|
|
ENGLAND |
Plantronics GmbH |
Plantronics Spain |
|
Tel: + 44 1793 842200 |
Gildenweg 7 |
Europa Empresarial |
|
Fax:+ 44 1793 848853 |
50354 Hürth |
Ctra. de la Coruña Km. 24 |
|
|
Germany |
Edificio Londres Of. 7 |
|
Plantronics Denmark |
Tel: + 49 22 33 3990 |
Las Rozas 28230 Madrid |
|
Andersen Nexø Vej 29 |
Fax:+ 49 22 33 399399 |
Tel: +34 91 640 47 44 |
|
2860 Søborg |
|
Fax:+34 91 640 47 46 |
|
Denmark |
Plantronics Nordic Region |
|
|
Tel: +45 39551051 |
Oskarsvägen 10 |
Plantronics MEEA |
|
Fax:+45 39551052 |
S-702 14 Örebro |
Sales Region |
|
|
Sweden |
262 Regents Park Road |
|
Plantronics B.V. |
Tel: + 46 19 121930 |
Finchley |
|
Antareslaan 9 |
Fax:+ 46 19 121933 |
London N3 3HN |
|
2132 JE Hoofddorp |
|
Tel: +44 208 349 3579 |
|
The Netherlands |
|
Fax:+44 203 346 0038 |
|
Tel: +31 (0)23 5648025 |
|
|
|
Fax:+31 2356 48015 |
|
|
|
Plantronics Ltd, Interface Business Park, Bincknoll Lane, Wootton Bassett,
Wiltshire SN4 8QQ. ENGLAND
www.plantronics.com
Plantronics, the Plantronics name and logo design are Registered Trademarks of Plantronics, Inc. Vista and Quick Disconnect are Trademarks of Plantronics, Inc. © 1999 Plantronics, Ltd. All rights reserved.
Printed in the U.K.
34399-01 Rev. C

4920 - VISTA USER GUIDE |
29/9/00 11:45am Page 2 |
VISTA™
UNIVERSAL MODULAR AMPLIFIER M12
User Guide
Brugsanvisning
Gebruiksaanwijzing
Notice d’utilisation
Benutzerhinweise
Manuale d’istruzioni
Brukerveiledning
Guia do Utilizador
Manual del usuario
Bruksanvisning
4920 - VISTA USER GUIDE |
29/9/00 11:45am Page 3 |
A
2ND
1ST
3RD

4920 - VISTA USER GUIDE |
29/9/00 11:45am Page 4 |
HEADSET ADAPTER
9
10
14
13
12
11
1
8 2
3
4
15 |
5
6 B
7
|
17 |
|
|
18 |
|
16 |
19 |
|
20 |
||
|
4920 - VISTA USER GUIDE 29/9/00 11:45am Page 5
DIAGRAM KEY
1 |
Receiver Volume Control |
6 |
Security Cover |
|
|
|
|
Volumenknap |
|
Omskifterdæksel |
|
|
|
Volumeregeling |
|
Afdekklepje |
|
|
|
Réglage du volume sonore en réception |
|
Couvercle de sécurité |
|
|
|
Hörer-Lautstärkeregelung |
|
Abdeckklappe |
|
|
|
Regolatore del volume di ricezione |
|
Sportello di sicurezza |
|
|
|
Mottaksvolumkontroll |
|
Sikkerhetsdeksel |
|
|
|
Controlo do Volume do Auscultador |
|
Tampa de Segurança |
|
|
|
Regulador del volumen del auricular |
|
Tapadera de seguridad |
|
|
|
Volymkontroll |
|
Skyddslock |
|
|
|
Headset/Handset Selector Switch |
|
Slide Switch |
|
|
|
Hoved/håndsæt omskifter |
|
6-Positionsknap |
|
|
|
Schakelaar headset/telefoonhoorn |
|
Schuifschakelaar |
|
|
|
Inverseur Casque/Combiné |
|
Commutateur 6 positions |
|
|
|
Headset/Handhörer Umschalter |
|
Schiebeschalter |
|
|
|
Interruttore di selezione cuffia/ricevitore |
|
Interruttore a scorrimento |
|
|
|
Hodesett/Håndsett-bryter |
|
Skyvebryter |
|
|
|
Comutador de Selecção do Auscultador |
|
Comutador Deslizante |
|
|
|
de Cabeça/Auscultador Manual |
|
Interruptor deslizable |
|
|
|
Conmutador selector |
|
6-Läges omkopplare |
|
|
|
Auricular/Microteléfono |
|
|
|
|
|
Headset/luromkopplare |
|
Battery Cover |
|
|
|
|
|
Batteridæksel |
|
|
|
Mute |
|
Ruimte voor batterijen |
|
|
|
Muteknap |
|
Couvercle du bac à piles |
|
|
|
‘Mute’ schakelaar |
|
Batterieabdeckung |
|
|
|
Touche secret |
|
Sportello vano batterie |
|
|
|
Mikrofon-Stummschalter |
|
Batterilokk |
|
|
|
Pulsante "mute" |
|
Tampa da Bateria |
|
|
|
Mute-knapp |
|
Tapadera de las pilas |
|
|
|
Mudo (MUTE) |
|
Batterilock |
|
|
|
Enmudecedor |
|
|
|
|
|
Sekretess (Mute) |
|
Handset Port |
|
|
|
|
|
Håndsætindgang |
|
|
|
Headset Port |
|
Poort voor snoer telefoonhoorn |
|
|
|
Hovedsætindgang |
|
Prise combiné |
|
|
|
Headsetpoort |
|
Handhörer-Anschlußbuchse |
|
|
|
Prise casque |
|
Presa per il recevitore |
|
|
|
Headset-Anschlußbuchse |
|
Håndsett inngang |
|
|
|
Presa per la cuffia |
|
Entrada do Auscultador Manual |
|
|
|
Hodesett inngang |
|
Puerto del microteléfono |
|
|
|
Entrada do Auscultador de Cabeça |
|
Luranslutning |
|
|
|
Puerto del auricular |
|
|
|
|
|
Headsetanslutning |
|
Installation |
|
|
|
|
|
Batteriinstallation |
|
|
|
|
|
Wijze van installeren batterijen |
|
|
|
Transmitteringsvolumen |
|
Position des piles |
|
|
|
Microfoonniveauregeling |
|
Batterien |
|
|
|
Réglage du volume sonore en émission |
|
Inserimento batterie |
|
|
|
Mikrofon-Lautstärkeregelung |
|
Batteri installasjon |
|
|
|
Regolatore del volume di trasmissione |
|
Instalação da Bateria |
|
|
|
Mikrofon-volumkontroll |
|
Instalación de las pilas |
|
|
|
Controlo do Volume de Transmissão |
|
Batterier |
|
|
|
Regulador del volumen de transmisión |
|
|
|
|
|
Mikrofonvolym |
|
|
|
|
|
|
|
|
|
|
|
|
|
|
|
4920 - VISTA USER GUIDE 29/9/00 11:45am Page 6
|
|
|
FELSÖKNINGSGUIDE FÖR ADAPTER |
|
|
|
|
|
|
SW |
|
||
|
|
|
PROBLEM |
|
|
|
|
|
|
|
|
|
|
|
|
|
Uppringande personer kan inte höra mig/jag kan inte höra dem |
|
|
|
|
|
|
|
|
|
|
|
|
|
Trolig orsak |
Åtgärd |
|
|
|
|
|
Batteri problem |
Kontrollera att batteriena är korrekt isatta |
|
|
|
|
|
|
och att locket sitter som det skall |
|
|
|
|
|
Fel inställning av |
Se rekommendations tabell alt kontakta |
|
|
|
|
|
6-läges omkopplaren |
leverantören |
|
|
|
|
|
Kontrollera ljudstyrka |
Justera till rekommenderad nivå och ring |
|
|
|
|
|
|
ett testsamtal |
|
|
|
|
|
Låg mottagnings nivå |
Ställ volymkontrollen på 1 och höj nivån |
|
|
|
|
|
|
därefter stegvis till behaglig nivå |
|
|
|
|
|
Fel anslutna kablar |
Kontrollera anslutningskablarna till telefon |
|
|
|
|
|
|
och headset |
|
|
|
|
|
Headset/lur omkopplare |
För att kunna använda headset skall grön |
|
|
|
|
|
|
färgmarkör visas på “Headset” |
|
|
|
|
|
|
omkopplaren |
|
|
|
|
|
Sekretess funktion |
Mikrofonen kopplas bort när grön |
|
|
|
|
|
|
färgmarkör visas på “Mute” omkopplaren |
|
|
|
|
|
|
|
|
|
|
|
|
PROBLEM |
|
|
|
|
|
|
|
|
|
|
|
|
|
Uppringande personer hör mig otydligt |
|
|
|
|
|
|
Trolig orsak |
Åtgärd |
|
|
Din röst låter otydlig för den som ringer upp
Ställ in sändningsnivån på det läge, som krävdes för att din röst skulle höras tydligt. Ställ inte in denna nivå för högt.
41
4920 - VISTA USER GUIDE |
29/9/00 11:45am Page 7 |
SW INSTALLATION AV VISTA ADAPTER
Om telefonluren skall användas, tryck ned “Headset” knappen så att färgmarkören försvinner, lyft upp luren och utför samtalet som vanligt.
Vid uppringning med headset, lyft av telefonluren och invänta kopplings ton. Du kan nu slå önskat nummer och genomföra samtalet.
För att ta emot ett samtal med headset, lyft av telefonluren och genomför samtalet.
INSTÄLLNING AV VOLYMEN
För inställning av volymen till en behaglig ljudnivå, ställ volymkontrollen på nivå 1 och höj därefter volymen genom att vrida på volymkontrollen.
ANVÄNDNING AV “MUTE”
FUNKTIONEN (SEKRETESS)
Mikrofonen kan kopplas bort medan man fortfarande hör motparten genom att trycka ned “Mute” knappen så att färgmarkören visas. För att återgå till normal läge tryck en gång till på “Mute” knappen.
40

4920 - VISTA USER GUIDE |
29/9/00 11:45am Page 8 |
|
|
|
|
|
|
|
|
|
|
|
|
|
|
|
|
11 Push in and Slide down |
16 Adjust Volume Dial |
|
|
|
|
|
Batteridæksel af og på |
Justering af transmitteringsniveau |
|
|
|
|
|
Indrukken en naar beneden schuiven |
Instellen microfoonniveau |
|
|
|
|
|
Poussez et tirez vers le bas |
Réglage du volume d’émission |
|
|
|
|
|
Eindrücken und nach unten schieben |
Mikrofonlautstärke-Anpassung |
|
|
|
|
|
Spingere e tirare verso il basso |
Regolazione del volume di trasmissione |
|
|
|
|
|
Press inn og skyv ned |
Juster mikrofonvolum |
|
|
|
|
|
Dispositivo de Empurrar para dentro e |
Regolar o volume do microfone |
|
|
|
|
|
Deslizar para baixo |
Ajustar el volumen |
|
|
|
|
|
Empujar hacia dentro y deslizar |
Justering av utgående ljud styrka |
|
|
|
|
|
hacia abajo |
|
|
|
|
|
|
Tryck in och drag ned |
On |
|
|
|
|
|
|
Til |
|
|
|
|
|
Battery Compartment |
Aan |
|
|
|
|
|
Batterirum |
Appuyez |
|
|
|
|
|
Batterijklepje |
An |
|
|
|
|
|
Trappes à piles |
Acceso |
|
|
|
|
|
Batteriefach |
På |
|
|
|
|
|
Vano batterie |
Ligado |
|
|
|
|
|
Batteriluke |
Encendido |
|
|
|
|
|
Compartimento da Bateria |
På |
|
|
|
|
|
Compartimiento de las pilas |
|
|
|
|
|
|
Battterifack |
Off Hook |
|
|
|
|
|
|
Afløftet håndsæt |
|
|
|
|
|
Screwdriver |
Hoorn van de haak |
|
|
|
|
|
Skruetrækker |
Décrochez |
|
|
|
|
|
Schroevendraaier |
Von der Gabel nehmen |
|
|
|
|
|
Tournevis |
Ricevitore sganciato |
|
|
|
|
|
Schraubendreher |
Rør av |
|
|
|
|
|
Mini-cacciavite |
Ausc. levantado |
|
|
|
|
|
Skrutrekker av plast |
Descolgado |
|
|
|
|
|
Chave de Parafusos |
Luren av |
|
|
|
|
|
Destornillador |
|
|
|
|
|
|
Skruvmejsel |
Listen to Dial Tone |
|
|
|
|
|
|
Lyt til opkaldstone |
|
|
|
|
|
Telephone Port |
Luister naar de kiestoon |
|
|
|
|
|
Telefonindgang |
Ecoutez la tonalité |
|
|
|
|
|
Aansluitpunt telefoon |
Freizeichen |
|
|
|
|
|
Prise téléphonique |
Attendere il segnale libero |
|
|
|
|
|
Telefon-Anschlußbuchse |
Hør på summetonen |
|
|
|
|
|
Presa per il telefono |
Ouvir o sinal de linha |
|
|
|
|
|
Telefon inngang |
Escuchar tono |
|
|
|
|
|
Entrada do Telefone |
Kopplings ton |
|
|
|
|
|
Puerto del teléfono |
|
|
|
|
|
|
Telefonanslutning |
|
|
|
|
|
|
|
Volumeregeling |
|
|
|
|
|
Isæt Batterierne |
Règlez le volume de réception |
|
|
|
|
|
Batterijen installeren |
Empfangslautstärke |
|
|
|
|
|
Mise en place des piles |
Regolazione del volume di ricezione |
|
|
|
|
|
Batterien Einlegen |
Still inn mottaksvolumet |
|
|
|
|
|
Inserimento batterie |
Regular o volume de recepcão |
|
|
|
|
|
Installer batteries |
Establecer el volumen de recepcion |
|
|
|
|
|
Colocar Baterias |
Inställning av volymen |
|
|
|
|
|
Instalar pilas |
|
|
|
|
|
1 |
|
|
|||
|
|
Insattning av batterier |
|
|
|
|
|
|
|
|
|
|
|
|
|
|
|
|
|
|
4920 - VISTA USER GUIDE |
29/9/00 11:45am Page 9 |
GB INSTRUCTIONS
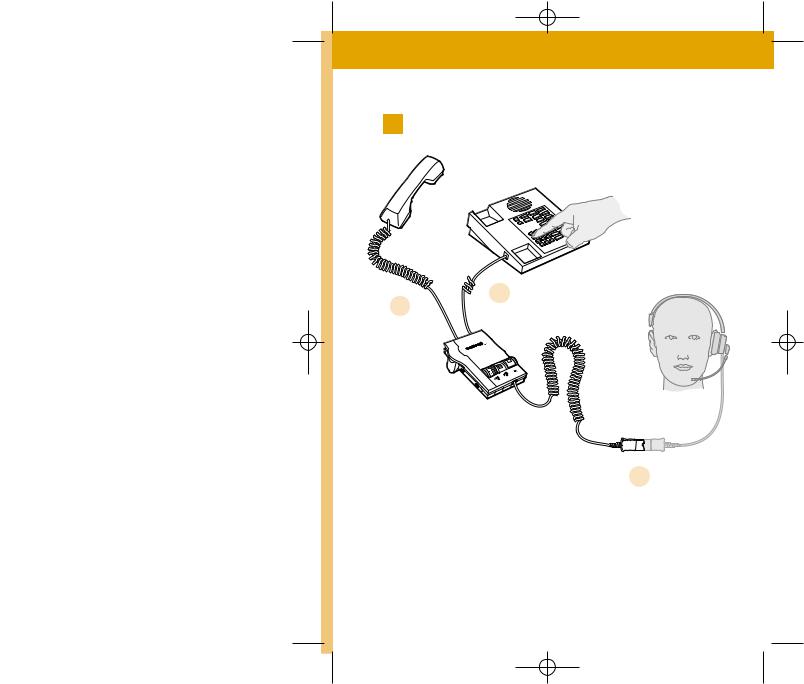
ACONNECTING THE ADAPTER TO YOUR TELEPHONE AND HEADSET
Unplug the handset coiled cable from the telephone base and plug it into the port labelled with the handset symbol on the Adapter.
Insert the coiled cable from the Adapter port labelled with the telephone symbol into the handset cord port on your telephone.
To connect your headset, put the 2 halves of the Quick Disconnect™ (QD) connector together. Your headset and Adapter are both supplied with QD connectors. (See diagram).
Refer to your headset user guide for further information on your headset.
Note: The telephone must be disconnected from the network before installing the Adapter. Your telephone may have a special socket labelled headset; if this is the case do NOT connect the handset to the Adapter. Please check your telephone user guide to find out how to set up headset operation on your telephone.
BADJUSTING THE ADAPTER
The Adapter has been designed to work with most telephones. The following instructions will help you to set up your Adapter with your telephone. Most telephones will work with the switch set in position 5. If this does not work try the other positions.
INSTALLING BATTERIES
The batteries on your Adapter may need to be installed before you can use your headset. You should disconnect your telephone from the network before doing this.
To install the batteries, remove the battery cover on the side of the Adapter by pressing on the grips and pushing down.
Put the batteries into the compartment as shown on the inside of the battery compartment, and replace the cover.
2
4920 - VISTA USER GUIDE 29/9/00 11:45am Page 10
INSTALLATION AV VISTA ADAPTER SW
LOCK FÖR 6-LÄGES OMKOPPLAREN
På adapterns vänstra sida sitter ett lock. För att ta bort det, håll stadigt i adaptern och placera tummarna på locket. Pressa försiktigt och tryck locket nedåt. Under locket finns en 6-läges omkopplare samt en potentiometer för justering av utgående ljudstyrka.
JUSTERING AV UTGÅENDE LJUDSTYRKA
Adaptern levereras med ljudstyrkan inställd i pos 5. Prova med denna inställning och justera om nödvändigt. Ljudstyrkan avgör hur din röst uppfattas av din samtals partner.
Före justering bör du försäkra dig om att ditt headset är korrekt anslutet.
Ring upp någon du känner och justera under samtalet potentiometern tills det att lämplig ljudnivå uppnåtts. Medurs ökar ljudnivån och moturs sänker den. Ingen ytterligare justering är nödvändig förutom vid byte av telefon.
Efter användning fästes skruvmejseln i hållaren under adaptern och locket trycks på plats.
UPPRINGNING OCH MOTTAGNING
AV SAMTAL MED ADAPTERN
Vissa telefoner kan programmeras så att en av telefonens knappar reserveras för använding av headset. Med denna knapp kan du enkelt svara i telefonen. Se telefonens instruktionsbok. För telefoner som inte har denna möjlighet följ anvisningarna nedan.
Adaptern har 2 lägen:
1. Lur |
2. Headset |
Vid användning av headset syns den gröna färgmarkören på “Headset” knappen. Tryck på knappen för att alternera mellan de två lägena.
39
4920 - VISTA USER GUIDE |
29/9/00 11:45am Page 11 |
SW INSTALLATION AV VISTA ADAPTER
AANSLUTNING AV VISTA ADAPTERN TILL TELEFONEN
Koppla ur telefonlurskabeln ur telefonen och anslut den till adapterns ingång märkt med en lursymbol.
Anslut kabeln från adapterns utgång märkt med telefonsymbolen till telefonens luranslutning. För att ansluta headsetet kopplas de två snabbkopplingsdelarna samman (Quick Disconnect).
Obs: Telefonen bör kopplas ur telefonnätet innan adaptern installeras. Om telefonen har ett speciellt headset uttag skall luren inte kopplas till adaptern. Kontrollera i din telefons bruksanvisning hur headset skall anslutas.
BINSTÄLLNING AV ADAPTERN
Adaptern fungerar med de flesta telefoner. Följande anvisningar försäkrar dig om bästa funktion. De flesta telefoner fungerar med 6-läges omkopplaren i läge 3 eller 5. Om detta inte går, pröva de andra lägena.
INSÄTTNING AV BATTERIER
Om batterier är nödvändiga för att din telefon och adaptern skall fungera tillsammans måste dessa sättas in före headsetet kan användas.
Tag bort batteriluckan genom att pressa försiktigt och drag ned locket.
Stoppa in de två pennlight batterierna (LR6, AA) som medföljer adaptern enligt + och - tecknena i batterifacket.
Adaptern varnar då batterierna håller på att ta slut. Om det hörs tre pip från ditt headset vid början av ett samtal bör batterierna bytas.
INSTÄLLNING AV 6-LÄGES OMKOPPLAREN
Använd den lilla plastskruvmejseln som är placerad i botten av adaptern för att ställa 6-läges omkopplaren i rätt läge för din
38 telefon.
4920 - VISTA USER GUIDE |
29/9/00 11:45am Page 12 |
INSTRUCTIONS GB
The Adapter has a low battery indicator which gives 3 beeps when you begin a call. If you hear this then replace the batteries as soon as possible.
SETTING THE 6 POSITION SWITCH
The Vista is supplied pre-set to position 5. Try out the product at this setting and adjust if necessary. Remove the mini-screwdriver from the base of the Adapter by sliding it out of the bracket.
Use the screwdriver to set the switch to the correct position for your telephone.
FITTING AND REMOVING THE SWITCH COVER
On the left of the Adapter is a cover. To remove it, hold the Adapter firmly and put your thumbs on the cover grips. Press and slide the cover downwards. This gives you access to the adjustments for the transmit level and the 6 position switch.
ADJUSTING THE TRANSMIT LEVEL
The transmit level is how loud or quiet your voice is heard by people on the other end of the line.
The Adapter can be adjusted to set the optimum transmit level. However, you need to fully install your headset before you make this adjustment.
When you have completed your headset installation, put on your headset and make a call to a colleague. Use the screwdriver to adjust the dial until the ideal sound and tone levels are reached. Turn the dial clockwise to increase the sound level, anti-clockwise to decrease. The sound level should be the same as when you are using the handset. Once you have set this, the dial only needs adjusting if you change your telephone.
When you have finished making adjustments, replace the security cover and the screwdriver for future use.
3
4920 - VISTA USER GUIDE |
29/9/00 11:45am Page 13 |
GB INSTRUCTIONS
MAKING AND TAKING CALLS WITH THE ADAPTER
Some phones can be programmed to allocate a button on the telephone for headset use. This allows you to take a call by simply pressing this button. Please refer to your phone user guide for further instructions. For other phones, please follow the instructions below.
The Adapter has 2 modes –
1. Handset 2. Headset
To use the headset the green square indicator should be showing on the headset switch. Press the button to switch between the two settings.
To make a short call using the handset, press the headset button on the top of the Adapter so that the green square indicator does not appear. Pick up your handset, dial and make the call as normal.
To make a call while wearing the headset, first lift off the handset from the cradle. You should now hear the dialling tone and you can dial and make the call as normal.
To take a call while wearing the headset, lift the handset off the cradle when the phone rings.
VOLUME CONTROL
The Adapter has a receive volume control, so you can adjust the volume of your callers voice. To change the volume rotate the wheel until the sound is at a comfortable listening level.
MUTE BUTTON
The Adapter has a mute button so that you can still hear the caller, but they cannot hear you, for example, if you need to speak to a colleague during a call. To do this press the mute button so that you can see the green square indicator. Press the button again when you want your caller to hear you.
4
|
|
|
4920 - VISTA USER GUIDE |
29/9/00 11:45am Page 14 |
|
|
|
|
|
|
|
|
|
|
|
||
|
|
|
GUÍA DE LOCALIZACIÓN Y REPARACIÓN DE AVERÍAS DEL ADAPTADOR |
|
|
|
||
|
|
|
E |
|
||||
|
|
|
|
PROBLEMA |
|
|
|
|
|
|
|
|
|
|
|
|
|
|
|
|
|
No oigo a los que llaman/los que llaman no me oyen |
|
|
|
|
|
|
|
|
Posible causa |
Remedio |
|
|
|
|
|
|
|
Problema de pilas |
Comprobar que las pilas están instaladas |
|
|
|
|
|
|
|
|
correctamente y que la tapa está bien |
|
|
|
|
|
|
|
|
colocada |
|
|
|
|
|
|
|
Graduación incorrecta |
Remitirse a la tabla de compatibilidades y |
|
|
|
|
|
|
|
del interruptor de seis |
poner en la posición correcta |
|
|
|
|
|
|
|
posiciones |
|
|
|
|
|
|
|
|
Comprobar el nivel |
Ajustar al nivel recomendado tal y como se |
|
|
|
|
|
|
|
de transmisión |
muestra en la tabla de compatibilidades y |
|
|
|
|
|
|
|
|
efectuar una llamada de prueba |
|
|
|
|
|
|
|
Bajo volumen |
Girar el disco de volumen e en la parte |
|
|
|
|
|
|
|
de recepción |
superior del Vista. Para subir el volumen |
|
|
|
|
|
|
|
|
girar el disco a un número mayor |
|
|
|
Los cables no están bien enchufados
Comprobar las conexiones con su teléfono y auricular. Remitirse al manual del usuario para instrucciones
Selector auricular/ |
Para usar el Vista con su auricular, |
microteléfono mal |
asegurarse de que el indicador de color |
colocado |
verde se vea en el interruptor |
Activada la función del |
Su voz queda enmudecida si se ve el |
enmudecedor |
indicador de color verde en el interruptor |
PROBLEMA
Los que llaman no oyen su voz con claridad
Posible causa |
Remedio |
Sus interlocutores no oyen |
Ajuste el nivel de transmisión solamente al |
clarmente la voz de usted |
nivel neccesario para que su voz se oiga |
|
con claridad. No ajuste este nivel a un |
|
punto demasiado alto. |
|
|
37
 Loading...