


 Loading...
Voyager® PRO UC v2
Bluetooth headset
BT300-M
Bluetooth USB adapter
USER GUIDE
TM

Contents
Welcome |
3 |
Voyager Pro UC next generation technology |
3 |
System Requirements |
3 |
What’s in the Box |
4 |
Adapter and Headset Basics |
5 |
Bluetooth USB Adapter |
5 |
Headset |
5 |
Stowing the headset |
5 |
Headset Controls |
6 |
Charge Your Headset |
7 |
Charge Indicator Lights |
7 |
Low Battery Warnings |
7 |
Fit your Headset |
8 |
Fitting the Headset |
8 |
Quick-turn Adjustment for the left ear |
9 |
Accessories and replacement parts |
9 |
Pairing your Bluetooth USB Adapter |
10 |
Initial Pairing |
10 |
To Re-Pair your Bluetooth USB Adapter |
10 |
Connect PC |
11 |
Bluetooth USB Adapter LED indicators |
12 |
Use Your Headset with Microsoft Office Communicator |
13 |
Powering Headset On/Off |
13 |
Placing, Answering, and Ending Calls |
|
with Microsoft Office Communicator |
13 |
Call Button Behavior with PC and |
|
Mobile Connected (not on a call) |
14 |
Transmission Range |
14 |
Simultaneous Call Handling Behavior (PC & Mobile) |
14 |
Pair Mobile Phone and Call |
15 |
Placing a Call with your Headset and Bluetooth Mobile Phone |
16 |
Answering and Ending Calls with your |
|
Headset and Bluetooth Mobile Phone |
16 |
Advanced Features |
17 |
Smart Sensor Features |
17 |
Listening to Audio via A2DP |
|
(Advanced Audio Distribution Profile for Bluetooth) |
18 |
Headset Controls, Indicators and Voice Prompts |
19 |
Optional Plantronics Software |
20 |
Plantronics Control Panel |
20 |
Plantronics Update Manager |
22 |
Troubleshooting |
23 |
Troubleshooting — Microsoft Office Communicator Usage |
23 |
Troubleshooting — Mobile Phone Usage |
24 |
2

Welcome
Congratulations on purchasing your new Plantronics Voyager PRO UC. This user guide contains instructions for setting up and using your Voyager PRO UC Bluetooth headset and BT300-M Bluetooth USB adapter.
Voyager Pro UC next generation technology.
Featured highlights and Smart Sensor technology:
•Auto answers calls by placing headset on your ear
•Auto transfers calls between mobile phone and headset
•When on a mobile or PC call, softphone presence is automatically updated
•Eliminates accidental dialling by locking call button when headset is not worn
•Features PC wideband audio for best PC audio quality
•Integrated A2DP (Advanced Audio Distribution Profile for Bluetooth) lets you listen to audio
•Automatically pairs headset to PC and mobile phone when headset is within range
•Voice prompts announce power on/off, battery level, connection status
System requirements
Computer
•Supported operating systems: Windows XP®SP3 or later, Windows Vista® SP1 or later,
Windows® 7 SP1 or later recommended
•Processor: 400 MHz Pentium® processor or equivalent (Minimum); 1 GHz Pentium processor or equivalent (Recommended)
•RAM: 96 MB (Minimum); 256 MB (Recommended)
•Hard disk: 280 MB (Minimum); 500 MB (Recommended)
 For your safety, do not use headset at high volumes for extended periods of time. Doing so can cause hearing loss. Always listen at moderate levels. For more information on headsets and hearing, visit: www.plantronics.com/healthandsafety
3

What’s in the box
1
2
3
4 


 6
6
5
1 Voyager PRO UC Headset with pre-installed medium ear tip 2 Bluetooth USB Adapter
3 Soft gel ear tips (small & large) and optional foam tip covers (small & medium) 4 Carry case
5 AC charging cable
6 USB charging cable
4

Adapter and headset basics
Bluetooth USB adapter |
|
|
1 |
||
1 LED indicator light
Headset
1 |
2 |
3 |
4 |
5 |
1 Volume/Mute button
2 Call button
3 Micro USB charging port
4 Power button
5 LED indicator light
Stowing the headset
5
Headset controls

1 |
2 |
3 |
4 |
5 |
1 Volume/Mute button
Increase/decrease volume Mute/unmute mic during a call Pause/play audio
2 Call button
Tap + or – button to adjust listen volume 1-second press of both + and – buttons 1-second press of both + and – buttons
Answer or end a call (PC or mobile) |
1 tap |
Redial |
2 taps |
Initiate mobile phone’s voice-dialling* |
2-second press until tone heard |
Reconnect lost connection |
1 tap |
* Feature not supported by all mobile phones |
|
3Micro USB charging port
4Power button
On or off
Talk time voice alert/sensor checker Activate pairing mode
5LED
Charging Battery status Pairing mode
90 minutes for full charge
2-second press
1 tap
With headset off, press until LED flashes red/blue
Solid red. When fully charged, LED is off. Low = 2 red flashes, Recharge = 3 red flashes Flashes red/blue
6
Charge your headset
Charge your headset before using. Plug in your headset and place on a flat non-metallic surface. The Smart Sensors in your
headset fully calibrate while charging. When fully charged, the LED goes off.
NOTE Always charge at near room temperatures; never charge battery at temperatures below 0ºC (32ºF) or above 40ºC (104ºF).
charging time
30 min ...........................
Minimum charge before first use
1.5 hours .......................
Full charge
Check battery level and Smart Sensor
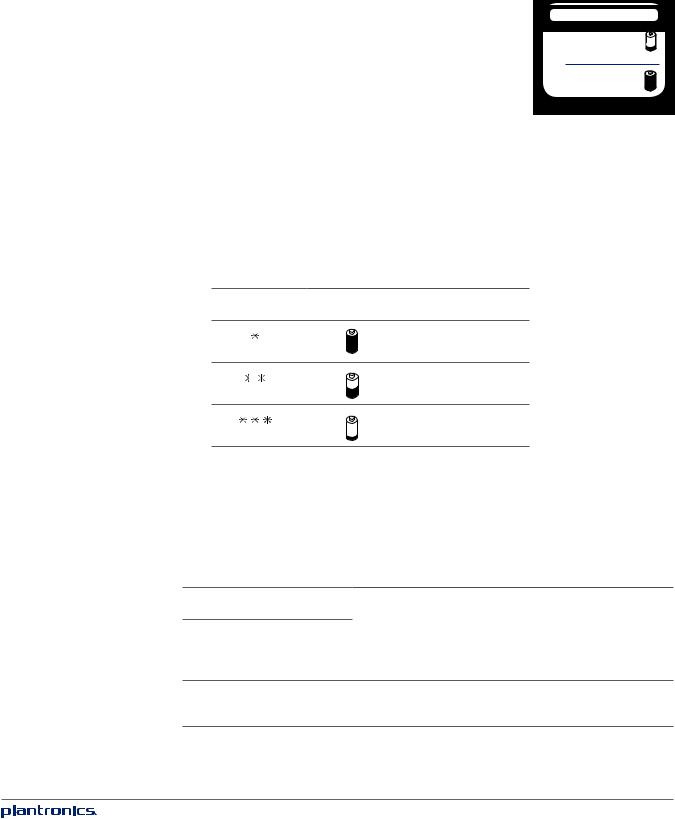
To check the battery status, the headset must be powered on. While wearing the headset short press power button and a voice alert will advise you of the talk time you have remaining on your current charge. If you hear a beep after the remaining talk time your Smart Sensors are not calibrated properly. Remove headset from your ear and place headset flat on a non-metallic surface and connect to the AC charger or the USB cable charger for 10 seconds to recalibrate the Smart Sensors. While not wearing your headset short press the power button and the indicator light flashes red to show the battery charge level as shown below.
Charge indicator lights |
|
|
 |
Red flashes |
Battery level |
|
||
More than 2/3 full
1/3 to 2/3 full
Less than 1/3 full
USB cable
A USB cable is supplied to allow you to charge the headset from a PC’s USB port. The PC must be powered on to charge via USB 2.0 or higher.
When the battery charge is very low, a tone and voice prompt will automatically occur.
Low battery warnings
Battery level
30 minutes of talk time remaining (this alert only occurs during an active call)
Tone |
Voice prompt |
|
|
Double high tone every 15 |
“Battery Low” repeats every |
minutes |
30 minutes |
10 minutes of talk time remaining
Triple high tone every 30 |
“Recharge Battery” repeats every |
seconds |
3 minutes |
7
Fit your headset
Fitting the headset
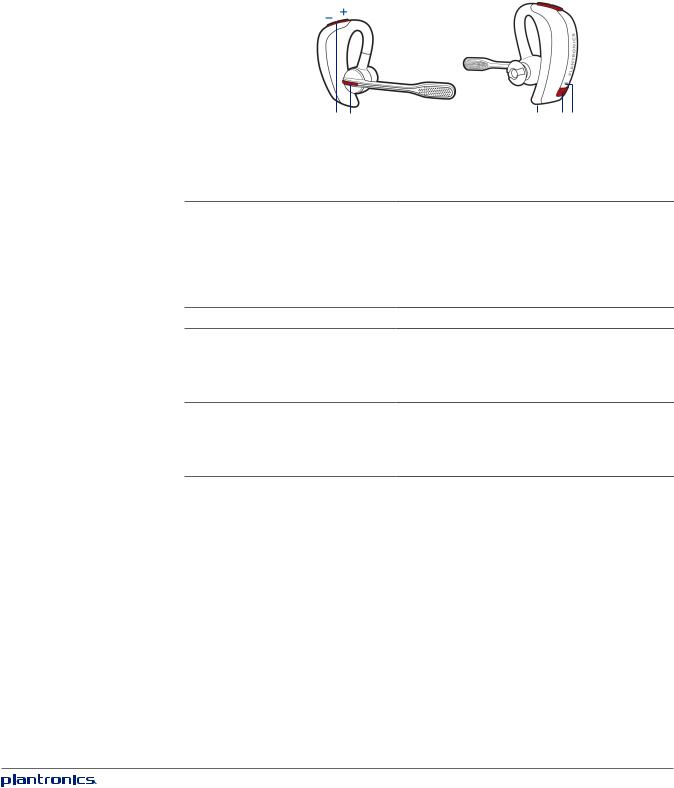
The headset comes configured for the right ear, with the medium ear tip installed, however you can replace it with the small or large ear tip provided or configure the headset to fit on the left ear. For the best sound clarity and comfort, make sure you have a secure fit.
Replace the ear tip for a better fit.
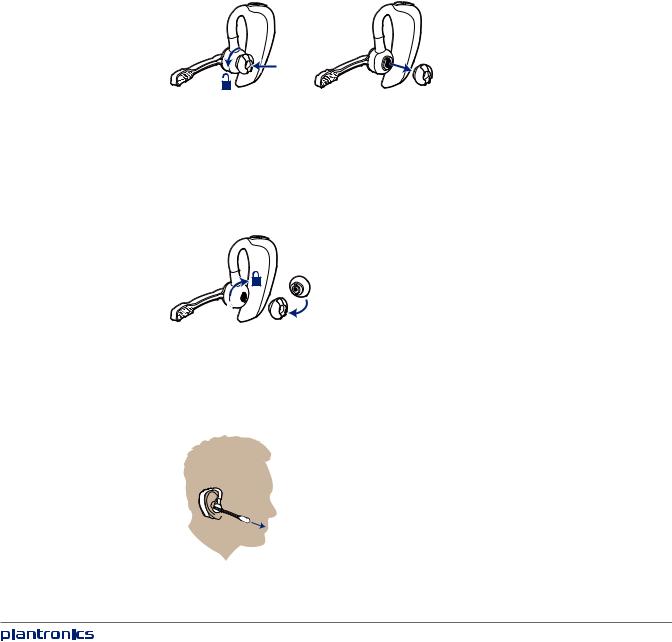
1Grip the ear tip and gently push it into the speaker housing.
2Rotate it a quarter turn to the left to unlock.
3Pull the ear tip away from the headset.
2
1 |
3 |
|
Attach a new ear tip.
4Align the tabs on the ear tip with the slots on the speaker housing.
5Gently push the ear tip into housing while turning it a quarter turn to the right. The ear tip will stop rotating when it is locked.
You may want to add an optional foam ear tip cover for additional comfort. (small & medium)
54 

4
Wearing the headset
1Guide the ear loop behind your ear and position the headset so that the speaker and ear tip rest comfortably in your ear.
2Pivot the boom up to point the microphone toward the corner of your mouth.
1
2
8
Loading...