


FastPac™ Document Inserting System
DI425
Operator Guide
US/Canada English Version
Statement of FCC Compliance
This equipment has been tested and found to comply with the limits for a Class A digital device, pursuant to part 15 of the FCC rules. These limits are designed to provide reasonable protection against interference when the equipment is operated in a commercial environment. This equipment generates, uses, and can radiate radio frequency energy and, if not installed and used in accordance with the instruction manual, may cause interference to radio communications. Operation of this equipment in a residential area is likely to cause interference, in which case the user will be required to correct the interference at his own expense.
CAUTION: Changes or modifications to this equipment not expressly approved by the party responsible for compliance (Pitney Bowes) could void the user’s authority to operate the equipment.
Canada
This class A digital apparatus complies with Canadian ICES-003.
Cet appareil numérique de la classe A est conforme á la norme NMB-003 du Canada.
SV61789 Rev. A ©2006 Pitney Bowes Inc.
All rights reserved. This book may not be reproduced in whole or in part in any fashion or stored in a retrieval system of any type or transmitted by any means, electronically or mechanically, without the express, written permission of Pitney Bowes. We have made every reasonable effort to ensure the accuracy and usefulness of this manual; however, we cannot assume responsibility for errors or omissions or liability for the misuse or misapplication of our products.
Due to our continuing program of product improvement, equipment and material specifications as well as performance features are subject to change without notice. OfficeRight and E-Z Seal are trademarks or registered trademarks of Pitney Bowes.

Table of Contents
If You Need Assistance
Contact Information for the USA and Canada |
.......................iii |
|
Chapter 1 |
Introduction |
|
Safety |
................................................................................. |
1-1 |
To The .................................................................Operator |
1-3 |
|
Machine .....................................................Configurations |
1-3 |
|
Machine ........................................................Identification |
1-5 |
|
Control .....................................................................Panel |
1-8 |
|
Display .................................................................Symbols |
1-9 |
|
Chapter 2 |
Operation |
|
About .............................................................this Chapter |
2-1 |
|
Connecting ..............................................................Power |
2-1 |
|
Select .......................................................................a Job |
2-2 |
|
Run a ................................................................Trial Piece |
2-3 |
|
Start Machine ....................................................Operation |
2-3 |
|
Setting .................................................the Sheet Feeders |
2-4 |
|
Setting ..............................................the Envelope Feeder |
2-6 |
|
Setting ....................................................the Insert Feeder |
2-8 |
|
Filling ..............................................................the Sealer |
2-10 |
|
Adjusting .......................................................the Stacker |
2-10 |
|
Programming ...........................................................Jobs |
2-11 |
|
Creating ..........................................................a New Job |
2-11 |
|
Confirming .................................................the Job Setup |
2-22 |
|
Testing .................................................................the Job |
2-23 |
|
Changing ................................................an Existing Job |
2-24 |
|
Deleting ..................................................................a Job |
2-24 |
|
SV61789 Rev. A |
|

Table of Contents
Chapter 3 Optical Mark Recognition (OMR)
OMR Availability................................................................. |
3-1 |
What is OMR?.................................................................... |
3-1 |
A Brief Overview of OMR on your Machine........................ |
3-1 |
Levels of OMR on the System........................................... |
3-2 |
OMR Mark Positions.......................................................... |
3-2 |
OMR Specifications............................................................ |
3-3 |
OMR Marks Available......................................................... |
3-6 |
OMR Mark Grouping.......................................................... |
3-8 |
Programming an OMR Job.............................................. |
3-10 |
Adjustment of OMR Scanner........................................... |
3-16 |
OMR Troubleshooting...................................................... |
3-18 |
Chapter 4 Reference
Changing the Display Language |
........................................4-1 |
Clearing Material................................................................ |
4-1 |
Changing the Sealer Unit Felts.......................................... |
4-5 |
General Troubleshooting.................................................... |
4-7 |
Error Messages................................................................ |
4-12 |
Material Specifications..................................................... |
4-15 |
Machine Specifications.................................................... |
4-19 |
Jobs
Customer Job Programming Record.................................. |
5-1 |
Appendix A
Glossary of Terms............................................................. |
A-1 |
Index
Index to the Operator Guide........................................Index-1
ii |
SV61789 Rev. A |

Pitney BowesTableContacof tentsList
If You Need Assistance
USA Contacts
▪Product Name - FastPac™ Document Inserting System
▪Model - DI425
▪For frequently asked questions, go to: www.pb.com and click on Customer Support.
▪To place requests for service or training, go to: www.pb.com and click on My Account.
▪To order PB supplies and accessories, go to: www.pb.com and click on Online Store.
▪To view and pay invoices online, go to: www.pb.com and click on My Account.
▪To view inventory, go to: www.pb.com and click on My Account.
▪For direct questions, call: 1.800.522.0020. Customer Service Representatives are available Monday through Friday, 8:00 AM to 8:00 PM ET.
Canada Contacts
▪Product Name - FastPac™ Document Inserting System
▪Model - DI425
▪For frequently asked questions or to order supplies, go to: www.pitneybowes.ca
▪For direct questions, call: 1.800.672.6937. Customer Service Representatives are available Monday through Friday, 8:30 AM to 4:00 PM ET.
SV61789 Rev. A |
iii |

Table of Contents
iv |
SV61789 Rev. A |
|
|

Introduction • 1
Safety Notes
Follow these precautions whenever you use your inserting system:
•Read all instructions before you attempt to operate the system. Keep the Operator Guide accessible for quick reference.
•Use this equipment only for its intended purpose.
•Place the system close to an easily accessible wall outlet.
•Place the system in an accessible location to allow for proper venting of the equipment and to facilitate servicing.
•Use the power cord supplied with the machine and plug it into a properly grounded wall outlet that is located near the machine and easily accessible. Failure to properly ground the machine can result in severe personal injury and/or fire.
•The power cord wall plug is the primary means of disconnecting the
machine from the AC supply.
•DO NOT use a wall outlet controlled by a wall switch or one that is shared with other equipment.
•DO NOT use an adapter plug on the line cord or wall outlet.
•DO NOT remove the ground pin from the line cord.
•Make sure the area in front of the wall outlet into which the machine is plugged is free from obstruction.
•DO NOT route the power cord over sharp edges or trap it between pieces of furniture. Make sure there is no strain on the power cord.
•To reduce the risk of fire or electrical shock, DO NOT attempt to remove covers or disassemble the control panel or its base. The cabinet encloses hazardous parts. If you should damage the unit, contact Your system supplier. Refer to the Contact Information List at the front of this guide for more information.
•If the unit becomes damaged, unplug it from the wall, then contact Your system supplier. Refer to the Contact Information List at the front of this guide for more information.
•Keep fingers, long hair, jewelry and loose clothing away from moving parts at all times.
•Avoid touching moving parts or materials while the machine is in use. Before clearing a jam, be sure machine mechanisms come to a complete stop.
•Remove jammed material gently and carefully.
SV61789 Rev. A |
1-1 |

1 • Introduction
Safety Notes (Continued)
•Do not place lighted candles, cigarettes, cigars, etc., on the system.
•To prevent overheating, do not cover vent openings.
•Use only approved supplies, in particular aerosol duster. Improper storage and use of aerosol dusters or flammable aerosol dusters, can cause an explosive-like condition that could result in a personal injury and/or property damage. Never use aerosol dusters labeled flammable and always read instructions and safety precautions on the duster container label.
•To obtain supplies and/or Material Safety Data Sheets, contact your system supplier. Refer to the Contact Information List at the front of this guide for more information.
•Operation of this equipment without periodic maintenance will inhibit optimum operating performance and could cause the equipment to malfunction. Contact your system supplier for the required service schedule.
•Always follow specific occupational safety and health standards for your workplace.
•To reduce the risk of fire or electrical shock, DO NOT attempt to remove covers or disassemble the control panel or its base. The cabinet encloses hazardous parts. If you should damage the unit, contact your system supplier. Refer to the Contact Information List at the front of this guide for more information.
If your stacker has an AC adapter to power the stacker:
•Use only the AC adapter designed specifically for the stacker. Third-party AC adapters may damage the stacker.
•To protect against electrical shock, plug the AC adapter power cord into a properly grounded wall outlet.
•Do not route the AC adapter cable over sharp edges or trap it between furniture.
1-2 |
SV61789 Rev. A |

Introduction • 1
To the Operator
Your new Folding/Inserting Machine has an easy-to-follow user interface which makes it simple to set up, yet offers the following advanced features:
•Envelope seal/no seal option
•Fully automatic material separation on sheet feeders
•Fully automatic setting of fold plates
•Fully automatic envelope separation
•Fully automatic double document detection (when selected)
•Fold-only option (fold without insertion)
•Manually fed, semi-automatic insertion of single and multiple sheet collations
•Option of single fold, letter (C) fold, accordion (Z) fold or double fold
•Job recall facility.
•Linked feeding (three-station machines only)
•Optical Mark Recognition (OMR) scanning (some models)
Machine Configurations
The following machine configurations are available:
•1 Station – One sheet feeder only
•2 Station – One sheet feeder and an insert feeder
•3 Station – Two sheet feeders and an insert feeder
IMPORTANT: This guide covers all models, features and equipment variations. Some of the features and machine options mentioned in this book may not be available on your machine.
SV61789 Rev. A |
1-3 |
1 • Introduction
Processing speed will vary, depending on machine configuration. See Specifications in Chapter 4 for further details.
Your system may be equipped with OMR (Optical Mark Recognition) scanning, depending on the model you purchased.
An OMR mark is normally a dark solid line on a sheet of light colored paper that is perpendicular to the direction of paper travel. This line must be thick and dense enough to trigger the system’s OMR scanner.
The scanner, together with the system software, checks for one or more different OMR marks on a document as it feeds through the system. Tracking of these marks enhances mail piece integrity by assuring that documents that belong together (a set) stay together throughout the inserting process.
OMR-equipped models have scanning heads located on each of the sheet feeders.
Instructions for using OMR functions appear in Chapter 3 of this guide.
Top Sheet
Feeder Scanner
Bottom Sheet
Feeder Scanner
1-4 |
SV61789 Rev. A |

Introduction • 1
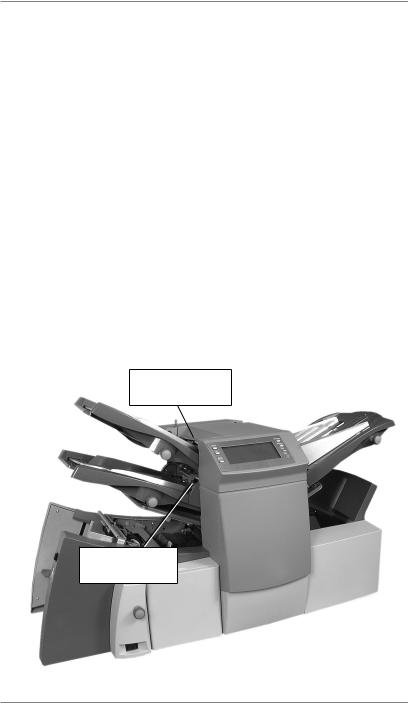
Machine Identification
6 |
3 |
1
2 |
|
5 |
10 |
|
|
9 |
12 |
8 |
|
|
7 |
11
4
1Sheet Feeder 1 — This feeder is intended for feeding material that requires folding.
In addition, you can set sheet feeder 1 to Manual Feed. In this mode, you can run stapled sets of up to five sheets. The machine waits for you to feed each set by hand into sheet feeder 1 before folding and inserting the set automatically. See the Specifications section of this guide for full details of the sets possible.
2Sheet Feeder 2 — For feeding material that requires folding. Its functions are similar to those of sheet feeder 1, but the manual feed option is NOT available from this feeder.
SV61789 Rev. A |
1-5 |

1 • Introduction
Machine Identification (Continued)
6 |
3 |
5 |
10 |
|
|
9 |
12 |
8 |
|
|
7 |
11
4
3Insert Feeder-— Use this feeder to add additional inserts to your envelope. The inserter cannot fold material fed from this feeder. However, this feeder is especially suited to feeding pre-folded or thicker inserts.
4Fold Plates 1 and 2 — These units create the desired fold in
5material fed from the sheet feeder(s). The fold plates are automatically set from the control panel.
6Display/Control Panel — This is where you enter commands and where the machine informs you of its status through symbols and icons. Each button is explained on page 1-8.
1-6 |
SV61789 Rev. A |

Introduction • 1
Machine Identification (Continued)
7Drop Stacker or Output Device (not illustrated)
A fold-down stacker is located at the machine exit to collect finished mail pieces. You can latch this unit against the machine when it is not in use. Alternatively, a range of power stackers are available which offer greater capacity than the standard drop stacker.
A mailing machine interface can be installed in place of a stacker. This option automatically transports mail pieces to a Pitney Bowes mailing machine for postage imprinting.
8Manual Advance Knob — This is located inside an opening cover at the lower center of the machine. Use it to turn the machine by hand to help clear material stoppages.
9Envelope Feeder — This feeder feeds envelopes into the inserting area where they are filled with the material requested from the other feeder(s).
10Sealer Bottle — The sealer bottle is located inside an opening cover at the front right side of the machine. It provides sealing solution to the envelope sealer.
11Measuring Scale The scale is located on the left side of the machine near the sheet feeders. Use it to measure sheets, insert material and envelopes.
12Envelope Inverter This unit causes the envelope to exit into the stacker face up.
SV61789 Rev. A |
1-7 |

1 • Introduction
Control Panel
Control Panel Buttons
Default — Press to return the machine to its default or standard settings. These settings come pre-configured from the factory but a Pitney Bowes Service Representative can change them to suit your needs.
Job — Press to step through the jobs you’ve programmed into the machine’s memory. You can program the machine with up to 20 jobs. See page 2-11 for instructions.
Reset Counter — Press to reset the item or batch counter.
Clear Deck — Press to jog material through and out of the inserter. Also use it to clear the machine and make it ready for automatic operation after a stoppage has occurred.
Trial Piece — Press to run a single test piece to check machine setup. You must run a trial piece before you begin automatic operation using the Start button. If you’re using double detection, the machine sets itself automatically as it runs the trial piece. The trial piece envelope will be unsealed and counted as one item.
Start — Press to start automatic operation.
Stop — Press to stop automatic operation at the end of the next cycle.
Delete — Press while in setup mode to delete a programmed job from memory.
Setup — Press to enter the setup mode. This mode allows you to program jobs into memory for instant recall using the Job button.
Change + – In setup mode, press to select options or set values of machine settings.
Prev. ◄ ► Next — In setup mode, press to step backward or forward through the various job settings.
1-8 |
SV61789 Rev. A |

Introduction • 1
Display Symbols
Used on sheet feeders to signify that the feeder is on without double detection.
|
|
|
|
|
|
|
|
|
Used on sheet feeders to signify that the feeder is on |
|
|
|
|
|
|
|
|
|
|
|
|
|
|
|
|
|
|
|
|
|
|
|
|
|
|
|
|
|
|
|
|
|
|
|
|
|
|
|
with double detection. |
|
|
|
|
|
|
|
|
|
Used on insert feeder to signify that the feeder is on |
|
|
|
|
|
|
|
|
|
|
|
|
|
|
|
|
|
|
|
|
|
|
|
|
|
|
|
|
|
|
|
|
|
|
|
|
|
|
|
without double detection. |
|
|
|
|
|
|
|
|
|
Used on insert feeder to signify that the feeder is on |
|
|
|
|
|
|
|
|
|
|
|
|
|
|
|
|
|
|
|
|
|
|
|
|
|
|
|
|
|
with double detection. |
|
|
|
|
|
|
|
|
|
Used on sheet feeder 1 to signify that the feeder is set |
|
|
|
|
|
|
|
|
|
for manual feed. |
|
|
|
|
|
|
|
|
|
Used on envelope feeder to signify that the feeder is |
|
|
|
|
|
|
|
|
|
|
|
|
|
|
|
|
|
|
|
on. |
|
Indicates the setting (from 1 to 5) of the envelope |
||||||||
|
|
|
|
|
|
|
|
|
stop. |
|
|
|
|
|
|
|
|
|
Indicates that the sealer bottle needs refilling. |
|
|
|
|
|
|
|
|
|
|
|
|
|
|
|
|
|
|
|
Indicates the envelope depth. |
|
|
|
|
|
|
|
|
|
|
|
|
|
|
|
|
|
|
|
|
|
|
|
|
|
|
|
|
|
Indicates that the sealer unit is off (envelopes not |
|
|
|
|
|
|
|
|
|
|
|
|
|
|
|
|
|
|
|
|
|
|
|
|
|
|
|
|
|
sealed). |
SV61789 Rev. A |
1-9 |
1 • Introduction
Display Symbols (Continued)
Indicates that the sealer unit is on (automatic envelope sealing).
!"#
Indicates a C (letter) fold is selected.
Indicates a Z (accordion fold) is selected.
Indicates a double fold is selected.
Indicates a single fold is selected.
Indicates a no-fold insert operation.
Indicates a material stoppage. The position of this symbol in the display indicates where the stoppage has occurred.
Call Pitney Bowes for service.
Indicates the paper size, address orientation and fold(s) set for sheet feeder.
Indicates a material stoppage in a downstream device, such as a power stacker or mailing machine interface.
1-10 |
SV61789 Rev. A |
Operation • 2
About this Chapter
This chapter explains operation of the machine, assuming the job to be run is already programmed into the system.
If you have not programmed the job, see to Programming Jobs on page 2-11.
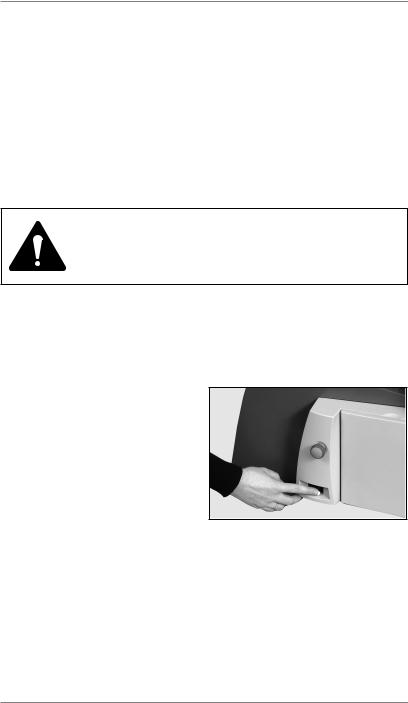
Connecting Power
Read the safety information on page 1-1 before connecting the machine.
Connect the power cord to the socket on the back of the machine.
Plug the power cord into a suitable power outlet. Make sure the power outlet is near the machine and is easily accessible.
Turn the power switch ON as shown at the right.
SV61789 Rev. A |
2-1 |
2 • Operation
Select a Job
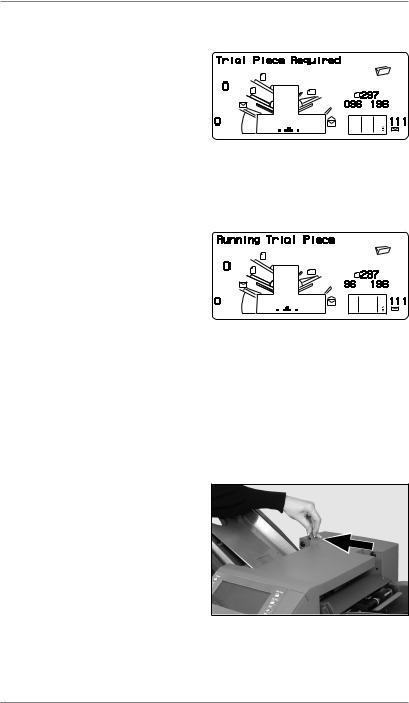
When the machine is turned ON,
the display shows the last job run and Trial Piece Required.
Press the Job button until the job you want displays, or press Default if you want to run the machine with your standard job
settings.
Note: Only a Pitney Bowes Service Representative can modify the default job.
If you have material loaded, press Trial Piece. The machine will set
itself and run a test piece for you to check.
If you don’t have material loaded, do this now, then return to this
section. You’ll find instructions for loading the machine on pages 2-4 to 2-9.
Note:
You may have selected a manual feed job where sheet feeder 1 is set for manual feed of collated sets. If this is the case, DO NOT load the sheet feeder. Instead, you’ll feed collated sets one at a time by hand as required by the machine.
Before you run a manual feed job, pull back the lever as shown at the right. This opens the feed
mechanism for manual feed operation.
Remember to return this lever to its normal position when you use the feeder for automatic operation.
2-2 |
SV61789 Rev. A |

Operation • 2
Run a Trial Piece
Once material is in place, press Trial Piece so that you can check the setup is correct.
You can make minor changes to the job settings at this stage if the trial piece needs fine tuning. Enter setup as described on page 2-11, then use the Prev (◄), Next (►) and Change (+/-) buttons as required to modify job settings. When you’ve made the necessary
changes, press Setup again to return to run mode. Your inserter system will save the job with the new settings.
Notes:
1.When you use linked feeding, load both sheet feeders before you run a trial piece.
2.If you load material during a run which seems to have different characteristics (weight, color shade, etc.), or if you have any problems with double detection, run another trial piece. This causes the machine to recalibrate the double detect function for the new material which may vary slightly from the old.
Start Machine Operation
Press Start to begin automatic operation.
The machine operates until material runs out or you press the Stop button.
Note: If the machine is set for linked feeding, the display shows:
1 > 2 > 1
This confirms that feeding will automatically switch between sheet feeders. See page 2-15 for more information.
SV61789 Rev. A |
2-3 |
2 • Operation
Setting the Sheet Feeders
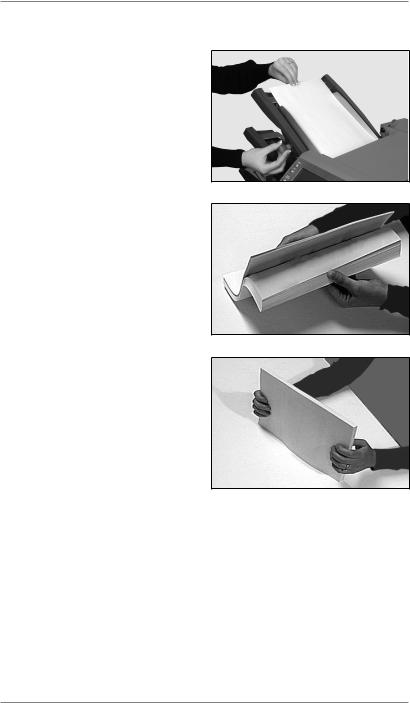
1.Adjust the side guides to the width of the material, then back-off a quarter turn on the side guide control. This sets the correct clearance between the guides and the material.
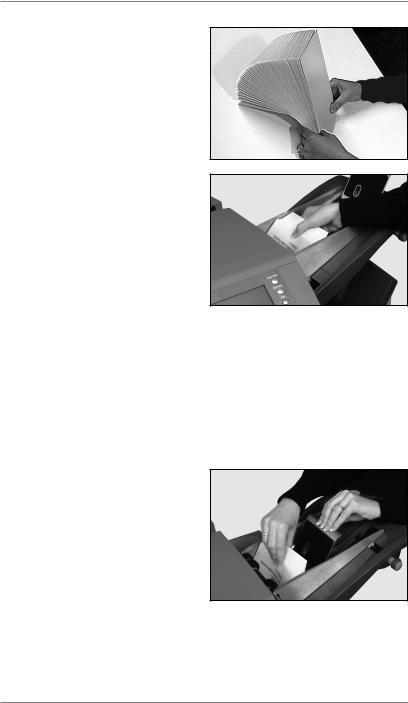
2.Take the stack of paper and aerate (fan) it to ensure that individual sheets are not stuck together.
3.Jog the stack back into alignment. The sheet feeders take the paper stack aligned in a manner similar to that used for a photocopier paper cassette.
4.The display indicates the correct orientation of the paper.
FACE UP |
|
FACE DOWN |
HEAD FIRST |
|
FEET FIRST |
ABC |
|
ABC |
2-4 |
SV61789 Rev. A |
Operation • 2
5.Place the paper stack onto the feed deck. Allow the deck to move down and the top of the paper stack to slide under the feed roller.
Note: When you use both sheet feeders, use the feeder listed below for the prime (address bearing) document:
•C or Double fold: Use sheet feeder 1
•Z or Single fold: Use sheet feeder 2
SV61789 Rev. A |
2-5 |
2 • Operation
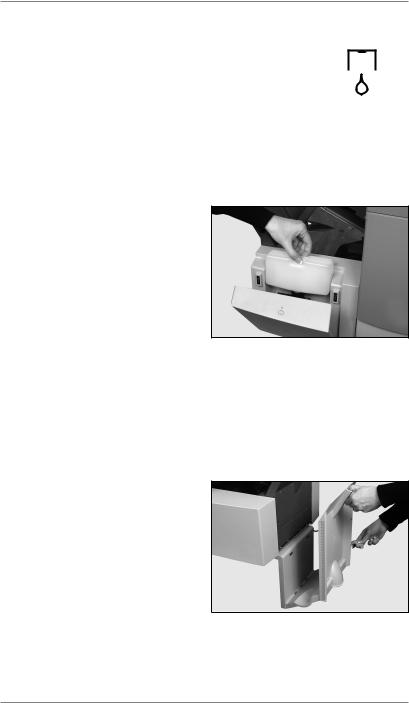
Setting the Envelope Feeder
The envelope feeder feeds the outer envelope for the inserting job being run.
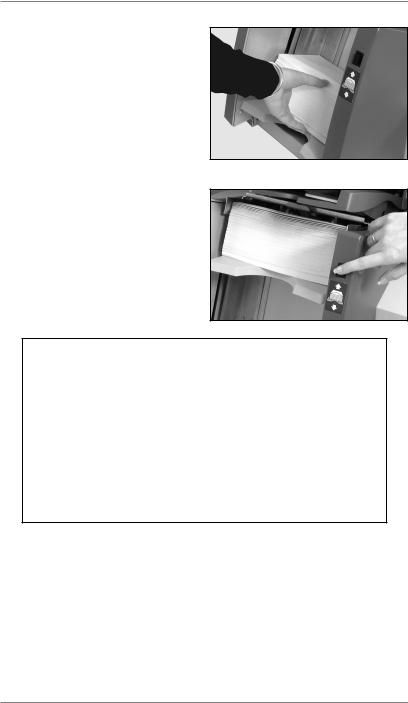
1.Press the envelope feeder loading switch to lower the feeder tray.
2.Adjust the side guides to the width of the envelopes. Use the side guide adjustment knob, then back-off 1/4 turn.
This sets the correct clearance between the guides and envelopes.
3.Take the stack of envelopes and fan it to ensure that individual envelopes are not stuck together.
2-6 |
SV61789 Rev. A |
Operation • 2
4.Place the stack of envelopes into the feeder with the flap side UP and flap LAST.
5.Press the envelope feeder loading switch again to raise the envelope stack to the normal feeding position.
TIP:
To quickly load envelopes during a run, without the need to stop and start the machine...
•Press the envelope feeder loading switch to lower the feeder tray.
•Load envelopes as described above.
•Press the envelope feeder loading switch again. The envelope stack rises to the normal feeding position and processing continues automatically.
SV61789 Rev. A |
2-7 |
2 • Operation
Setting the Insert Feeder
The insert feeder feeds items that do not require folding by the machine. Depending on configuration, your machine may not have an Insert Feeder.
1.Adjust the side guides to the width of the inserts you’re running. Use the side guide adjustment knob as shown, then back off 1/4 turn.
This sets the correct clearance between the guides and inserts.
2.Refer to the labels located on the insert feeder. Match your insert type (slip, reply envelope, pre-folded or booklet) with the relevant icon and color indicator on each label.
If the label indicates a range of settings, follow this general rule: The thicker the insert, the higher the number or letter you should select.
For example: The blue booklet range runs from 6 to 9 and C to D. A setting for a thin booklet might be 6 or 7 and C, whereas a setting for a thick booklet might be 9 and D to run effectively.
3.Set the blue separator gap lever to the number required.
4.Set the blue separator shield lever to the letter required.
2-8 |
SV61789 Rev. A |
Operation • 2
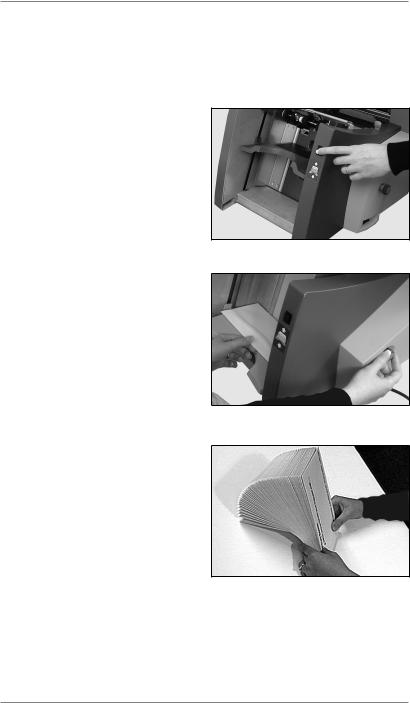
5.Take the stack of inserts and fan it to ensure that individual pieces are not stuck together.
6.Shingle the inserts so that they look like the photograph on the right and place them onto the feed deck.
Loading orientation can vary depending on the actual in-
serts you’re running. However, as a general guideline, load inserts as follows:
Slip |
Face up, bottom edge first |
Reply Envelope |
Face up, top edge first |
Pre-Folded |
Face up, closed edge first |
Booklet |
Face up, bound edge first |
7.Let the wedge (material prop) slide down behind the stack to support the inserts.
SV61789 Rev. A |
2-9 |
2 • Operation
Filling the Sealer
When the sealer unit needs refilling, the Add Sealing Solution symbol flashes in the display. 
Add E-Z Seal® Sealing Solution or water in the following way:
Note: We recommend Pitney Bowes E-Z Seal to minimize growth of algae and scale build-up.
Hinge open the sealer bottle cover located at the rear right hand side of the machine. Remove the bottle.
Fill the bottle up to the level indicated.
Place the sealer bottle in posi-
tion in the machine and close the cover.
Note: If the sealer unit was completely empty, allow time for the fresh solution or water to soak through the sealer before you resume operation. This helps assure a good seal.
Adjusting the Stacker
Adjust the drop stacker to suit the material you’re running.
Lift the lever at the rear of the stacker and adjust the stacker to one of the preset positions. Lower the lever to lock the stacker into position.
When not in use, you can raise
the stacker and latch it vertically against the exit area of the machine.
2-10 |
SV61789 Rev. A |
Operation • 2
Programming Jobs
You can program your machine with jobs that remain in its memory. You can recall these jobs at the touch of a button.
All models have a capacity of 20 operator-programmable jobs plus one default job that’s set by your Pitney Bowes Service Representative.
Creating a New Job
This section takes you step-by-step through the process of setting up a new job and saving it in the memory.
Throughout the programming sequence, an asterisk (*) will flash on the display next to the item being set. Use the Prev (◄) and Next
(►) buttons to step forward or backward through the available settings. Once the item displays, use the Change (+/-) buttons to select the option or value you want.
Note: Your machine may be equipped with OMR (Optical Mark Recognition) scanning, depending on the model you purchased. To program an OMR job, go to page 3-10 of this guide. To program a non-OMR job, continue by entering the Setup Mode…
Entering the Setup Mode
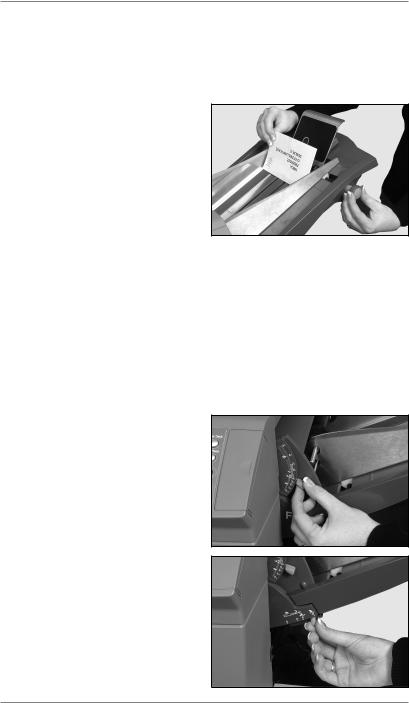
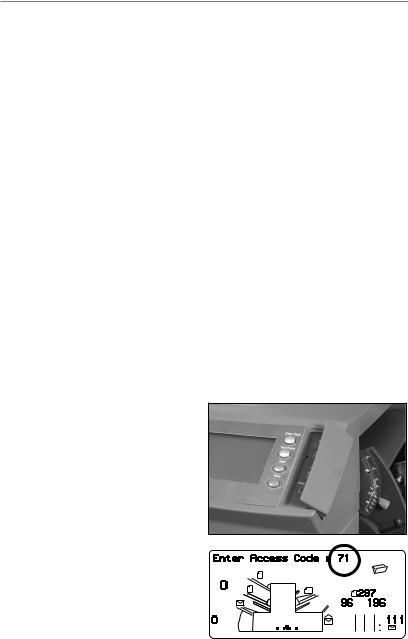
Open the hinged cover to the right of the display. This reveals the setup buttons.
Press Setup. The indicator lights and the machine asks for an access code. (This code prevents unauthorized personnel from changing machine settings).
Use the Change (+/-) buttons to select the access code 71.
Press Next (►) to advance to the next setting…
|
|
|
|
|
|
|
|
|
|
|
|
|
|
|
|
|
|
|
|
|
|
|
|
SV61789 Rev. A |
2-11 |
||||

2 • Operation
Choosing the New Job Number
The machine will ask for the job number you wish the new settings to be stored under. Use the Change (+/-) buttons to display the job number you want.
Notes:
•If you use an existing job number, the old settings will be overwritten by the new settings you are about to make.
•If you want to find a currently unused job number, press Change (+/-) until you see a job where the display shows no symbols alongside the feeders or in the fold setup area. This means the job number is unused and available.
Press Next (►) to advance to the next setting…
OMR
On models equipped with OMR ONLY, you will now be asked to select the OMR mode. For a non-OMR job, use Change (+/-) to select OMR off. If you wish to program an OMR job, see page 3-10.
Press Next (►) to advance to the next setting…
2-12 |
SV61789 Rev. A |

Operation • 2
Fold Type
Select the type of fold.
Press Change (+/-) until you see the option you want:
|
|
|
|
|
|
|
|
|
|
|
|
|
|
|
|
|
|
C - Letter |
Z - Accordion |
Double |
|
Single |
|
Note: For accumulation jobs, DO NOT manually change the automatically set fold length dimensions at the Fold A and Fold B settings on pages 2-19 and 2-20.
When the fold type is selected, the display indicates the correct orientation of the paper for loading into the feeders:
FACE UP |
|
FACE DOWN |
HEAD FIRST |
|
FEET FIRST |
ABC |
|
ABC |
When the fold type is set as required, press Next (►) to go the next setting…
SV61789 Rev. A |
2-13 |

2 • Operation
Setting the Accumulation Function
Accumulation, if selected, allows multiple sheets to be fed from the same feeder into the envelope.
Press Change (+/-) until you see the option you want.
Accumulation: OFF
Accumulation is turned off for this job.
1- and 2-station machines...
Accumulation: ON
Accumulation is turned on for this job.
3-station machines...
Accumulation From Main
Accumulation is turned on with sheets feeding from the main feeder. This feeder normally contains the address sheet.
Accumulation From Suppl
Accumulation is turned on with sheets feeding from the supplementary feeder, that is, one address sheet from the main feeder followed by multiple sheets from the supplementary feeder.
Press Next (►) to advance to the next setting…
Accumulation = (2 to 10)
Select how many pages you want to feed into each envelope using Change (+/-).
Important: The number of sheets that can be accumulated is limited by machine specifications. Exceeding this limit can cause a machine malfunction. See page 4- 16 for details.
2-14 |
SV61789 Rev. A |
 Loading...