


Thank you for buying this Pioneer product.
Please read through these operating instructions so you will know how to operate your model properly. After you have finished reading the instructions, put them away in a safe place for future reference.
CAUTION
The lightning flash with arrowhead, within an equilateral triangle, is intended to alert the user to the presence of uninsulated "dangerous voltage" within the product's enclosure that may be of sufficient magnitude to constitute a risk of electric shock to persons.
RISK OF ELECTRIC SHOCK
DO NOT OPEN
CAUTION:
TO PREVENT THE RISK OF ELECTRIC SHOCK, DO NOT REMOVE COVER (OR BACK). NO USER-SERVICEABLE PARTS INSIDE. REFER SERVICING TO QUALIFIED SERVICE PERSONNEL.
The exclamation point within an equilateral triangle is intended to alert the user to the presence of important operating and maintenance (servicing) instructions in the literature accompanying the appliance.
D1-4-2-3_En
IMPORTANT NOTICE – THE SERIAL NUMBER FOR THIS EQUIPMENT IS LOCATED IN THE REAR.
PLEASE WRITE THIS SERIAL NUMBER ON YOUR ENCLOSED WARRANTY CARD AND KEEP IN A SECURE AREA. THIS IS FOR YOUR SECURITY.
Information to User
Alteration or modifications carried out without appropriate authorization may invalidate the user’s right to operate the equipment.
NOTE: This equipment has been tested and found to comply with the limits for a Class B digital device, pursuant to Part 15 of the FCC Rules. These limits are designed to provide reasonable protection against harmful interference in a residential installation. This equipment generates, uses and can radiate radio frequency energy and, if not installed and used in accordance with the instructions, may cause harmful interference to radio communications. However, there is no guarantee that interference will not occur in a particular installation. If this equipment does cause harmful interference to radio or television reception, which can be determined by turning the equipment off and on, the user is encouraged to try to correct the interference by one or more of the following measures:
–Reorient or relocate the receiving antenna.
–Increase the separation between the equipment and receiver.
–Connect the equipment into an outlet on a circuit different from that to which the receiver is connected.
– Consult the dealer or an experienced radio/TV technician for help.
D8-10-1-2_En
CAUTION : USE OF CONTROLS OR ADJUSTMENTS OR PERFORMANCE OF PROCEDURES OTHER THAN THOSE SPECIFIED HEREIN MAY RESULT IN HAZARDOUS RADIATION EXPOSURE.
CAUTION : THE USE OF OPTICAL INSTRUMENTS WITH THIS PRODUCT WILL INCREASE EYE HAZARD. D6-8-2-1_En
WARNING – TO PREVENT FIRE OR SHOCK
HAZARD, DO NOT EXPOSE THIS
APPLIANCE TO RAIN OR MOISTURE.
D1-4-2-1_En
CAUTION: This product satisfies FCC regulations when shielded cables and connectors are used to connect the unit to other equipment. To prevent electromagnetic interference with electric appliances such as radios and televisions, use shielded cables and connectors for connections.
This Class B digital apparatus complies with Canadian ICES-003.
Cet appareil numérique de la Classe B est conforme à la norme NMB-003 du Canada.
IMPORTANT SAFETY INSTRUCTIONS
READ INSTRUCTIONS — All the safety and operating instructions should be read before the product is operated.
RETAIN INSTRUCTIONS — The safety and operating instructions should be retained for future reference.
HEED WARNINGS — All warnings on the product and in the operating instructions should be adhered to.
FOLLOW INSTRUCTIONS — All operating and use instructions should be followed.
CLEANING — The product should be cleaned only with a polishing cloth or a soft dry cloth. Never clean with furniture wax, benzine, insecticides or other volatile liquids since they may corrode the cabinet.
ATTACHMENTS — Do not use attachments not recommended by the product manufacturer as they may cause hazards.
WATER AND MOISTURE — Do not use this product near water — for example, near a bathtub, wash bowl, kitchen sink, or laundry tub; in a wet basement; or near a swimming pool; and the like.
ACCESSORIES — Do not place this product on an unstable cart, stand, tripod, bracket, or table. The product may fall, causing serious injury to a child or adult, and serious damage to the product. Use only with a cart, stand, tripod, bracket, or table recommended by the manufacturer, or sold with the product. Any mounting of the product should follow the manufacturer’s instructions, and should use a mounting accessory recommended by the manufacturer.
CART — A product and cart combination should be moved with care. Quick stops, excessive force, and uneven surfaces may cause the product and cart combination to overturn.
VENTILATION — Slots and openings in the cabinet are provided for ventilation and to ensure reliable operation of the product and to protect it from overheating, and these openings must not be blocked or covered. The openings should never be blocked by placing the product on a bed, sofa, rug, or other similar surface. This product should not be placed in a built-in installation such as a bookcase or rack unless proper ventilation is provided or the manufacturer’s instructions have been adhered to.
POWER SOURCES — This product should be operated only from the type of power source indicated on the marking label. If you are not sure of the type of power supply to your home, consult your product dealer or local power company.
LOCATION – The appliance should be installed in a stable location.
NONUSE PERIODS – The power cord of the appliance should be unplugged from the outlet when left un-used for a long period of time.
GROUNDING OR POLARIZATION
•If this product is equipped with a polarized alternating current line plug (a plug having one blade wider than the other), it will fit into the outlet only one way. This is a safety feature. If you are unable to insert the plug fully into the outlet, try reversing the plug. If the plug should still fail to fit, contact your electrician to replace your obsolete outlet. Do not defeat the safety purpose of the polarized plug.
•If this product is equipped with a three-wire grounding type plug, a plug having a third (grounding) pin, it will only fit into a grounding type power outlet. This is a safety feature. If you are unable to insert the plug into the outlet, contact your electrician to replace your obsolete outlet. Do not defeat the safety purpose of the
grounding type plug.
POWER-CORD PROTECTION — Power-supply cords should be routed so that they are not likely to be walked on or pinched by items placed upon or against them, paying particular attention to cords at plugs, convenience receptacles, and the point where they exit from the product.
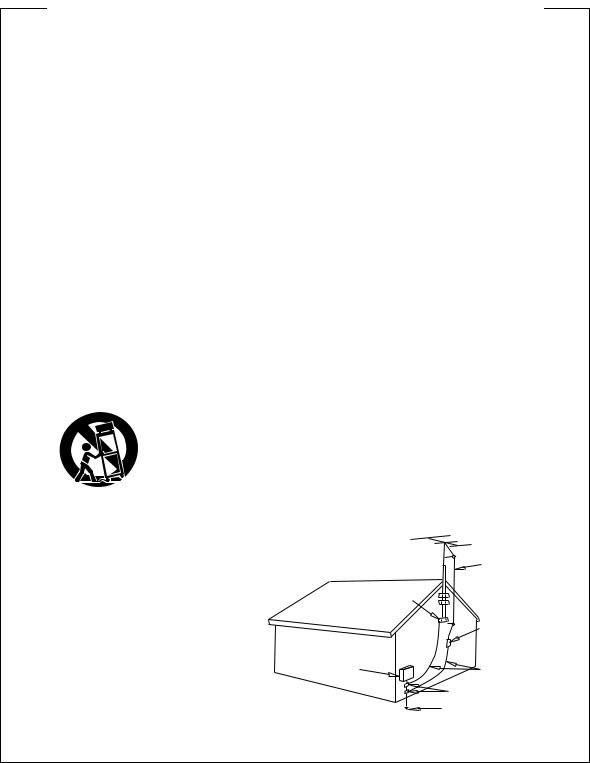
OUTDOOR ANTENNA GROUNDING — If an outside antenna or cable system is connected to the product, be sure the antenna or cable system is grounded so as to provide some protection against voltage surges and built-up static charges. Article 810 of the National Electrical Code, ANSI/NFPA 70, provides information with regard to proper grounding of the mast and supporting structure, grounding of the lead-in wire to an antenna discharge unit, size of grounding conductors, location of antenna-discharge unit, connection to grounding electrodes, and requirements for the grounding electrode. See Figure A.
LIGHTNING — For added protection for this product during a lightning storm, or when it is left unattended and unused for long periods of time, unplug it from the wall outlet and disconnect the antenna or cable system. This will prevent damage to the product due to lightning and power-line surges.
POWER LINES — An outside antenna system should not be located in the vicinity of overhead power lines or other electric light or power circuits, or where it can fall into such power lines or circuits. When installing an outside antenna system, extreme care should be taken to keep from touching such power lines or circuits as contact with them might be fatal.
OVERLOADING — Do not overload wall outlets, extension cords, or integral convenience receptacles as this can result in a risk of fire or electric shock.
OBJECT AND LIQUID ENTRY — Never push objects of any kind into this product through openings as they may touch dangerous voltage points or short-out parts that could result in a fire or electric shock. Never spill liquid of any kind on the product.
SERVICING — Do not attempt to service this product yourself as opening or removing covers may expose you to dangerous voltage or other hazards. Refer all servicing to qualified service personnel.
DAMAGE REQUIRING SERVICE — Unplug this product from the wall outlet and refer servicing to qualified service personnel under the following conditions:
•When the power-supply cord or plug is damaged.
•If liquid has been spilled, or objects have fallen into the product.
•If the product has been exposed to rain or water.
•If the product does not operate normally by following the operating instructions. Adjust only those controls that are covered by the operating instructions as an improper adjustment of other controls may result in damage and will often require extensive work by a qualified technician to restore the product to its normal operation.
•If the product has been dropped or damaged in any way.
•When the product exhibits a distinct change in
performance — this indicates a need for service. REPLACEMENT PARTS — When replacement parts
are required, be sure the service technician has used replacement parts specified by the manufacturer or have the same characteristics as the original part. Unauthorized substitutions may result in fire, electric shock, or other hazards.
SAFETY CHECK — Upon completion of any service or repairs to this product, ask the service technician to perform safety checks to determine that the product is in proper operating condition.
WALL OR CEILING MOUNTING — The product should not be mounted to a wall or ceiling.
HEAT — The product should be situated away from heat sources such as radiators, heat registers, stoves, or other products (including amplifiers) that produce heat.
ANTENNA
LEAD IN
WIRE
|
GROUND |
|
CLAMP |
|
ANTENNA |
|
DISCHARGE UNIT |
|
(NEC SECTION 810-20) |
ELECTRIC |
|
SERVICE |
GROUNDING CONDUCTORS |
EQUIPMENT |
(NEC SECTION 810-21) |
|
GROUND CLAMPS |
POWER SERVICE GROUNDING Fig. A ELECTRODE SYSTEM
(NEC ART 250, PART H)
NEC — NATIONAL ELECTRICAL CODE
D1-4-2-2_En

DANGER
VISIBLE AND INVISIBLE LASER RADIATION WHEN OPEN. AVOID DIRECT EXPOSURE TO BEAM.
This product incorporates copyright protection technology that is protected by method claims of certain U.S. patents and other intellectual property rights owned by Macrovision Corporation and other rights owners. Use of this copyright protection technology must be authorized by Macrovision Corporation, and is intended for home and other limited viewing uses only unless otherwise authorized by Macrovision Corporation. Reverse engineering or disassembly is prohibited.
CAUTION – PREVENT ELECTRIC SHOCK DO NOT USE THIS (POLARIZED) PLUG WITH AN EXTENSION CORD. RECEPTACLE OR OTHER OUTLET UNLESS THE BLADES CAN BE FULLY INSERTED TO PREVENT BLADE EXPOSURE.
ATTENTION – POUR PREVENIR LES CHOCS ELECTRIQUES NE PAS UTILISER CETTE FICHE POLARISEE AVEC UN PROLONGATEUR UNE PRISE DE COURANT OU UNE AUTRE SORTIE DE COURANT, SAUF SI LES LAMES PEUVENT ETRE INSEREES A FOND SANS EN LAISSER AUCUNE PARTIE A DECOUVVERT.
NOTE TO CATV SYSTEM INSTALLER
THIS REMINDER IS PROVIDED TO CALL THE CATV SYSTEM INSTALLER’S ATTENTION TO ARTICLE 82040 OF THE NEC THAT PROVIDES GUIDELINES FOR PROPER GROUNDING AND, IN PARTICULAR, SPECIFIES THAT THE CABLE GROUND SHALL BE CONNECTED TO THE GROUNDING SYSTEM OF THE BUILDING, AS CLOSE TO THE POINT OF CABLE ENTRY AS PRACTICAL.
Recording equipment and copyright: You may use this product only to reproduce or copy materials for which you own the copyright or have obtained permission to copy from the copyright owner or for which you otherwise have a legal right to reproduce or copy. Unless you own the copyright or have obtained permission from the copyright owner or otherwise have a legal right to reproduce or copy, you may be violating the law, including copyright law, and may be subject to payment of damages and other remedies.
POWER-CORD CAUTION
Handle the power cord by the plug. Do not pull out the plug by tugging the cord and never touch the power cord when your hands are wet as this could cause a short circuit or electric shock. Do not place the unit, a piece of furniture, etc., on the power cord, or pinch the cord. Never make a knot in the cord or tie it with other cords. The power cords should be routed such that they are not likely to be stepped on. A damaged power cord can cause a fire or give you an electrical shock. Check the power cord once in a while. When you find it damaged, ask your nearest PIONEER authorized service center or your dealer for a replacement.
This product is for general household purposes. Any failure due to use for other than household purposes (such as long-term use for business purposes in a restaurant or use in a car or ship) and which requires repair will be charged for even during the warranty period.
WARNING: Handling the cord on this product or cords associated with accessories sold with the product will expose you to lead, a chemical known to the State of California and other governmental entities to cause cancer and birth defects or other reproductive harm.
Wash hands after handling |
D36-P4_En |
This product contains mercury. Disposal of this material may be regulated due to environmental considerations. For disposal or recycling information, please contact your local authorities or the Electronics Industries Alliance : www.eiae.org.
MOISTURE CONDENSATION
DO NOT OPERATE THIS DVD/VCR FOR AT LEAST TWO OR THREE HOURS WHEN MOISTURE IN THE AIR CONDENSES ON THE DVD/VCR.
WHAT IS MOISTURE CONDENSATION?
When cold liquid is poured into a glass, for example, water vapour in the air will condense on the surface of the glass. This is called moisture condensation.
MOISTURE WILL CONDENSE ON THE UNIT IN THE FOLLOWING CASES;
•When you move this DVD/VCR from a cold to a warm place.
•After heating a cold room or under extremely humid conditions.
WHEN YOU EXPERIENCE THE ABOVE CONDITIONS;
Plug the power cord into an AC outlet, set the STANDBY/ON switch to ON and leave the unit at room temperature until moisture condensation disappears. Depending on the surrounding conditions, this may take from two or three hours.
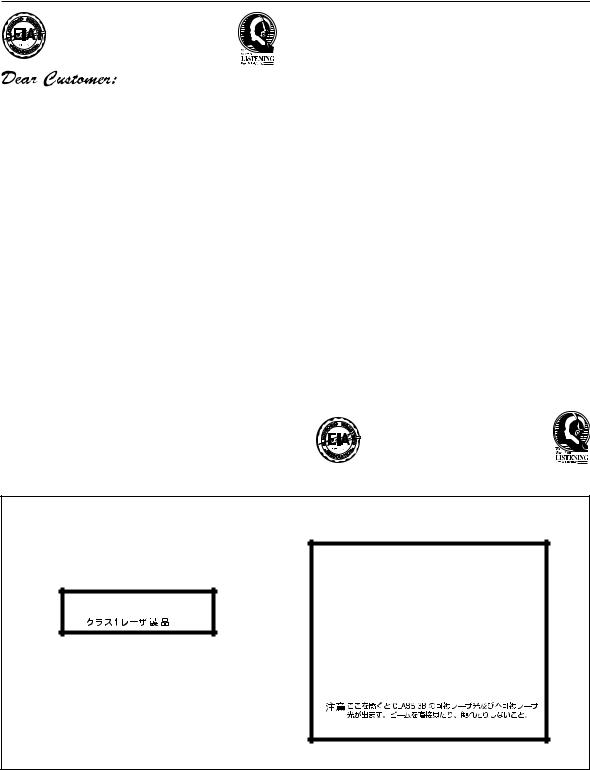
Selecting fine audio equipment such as the unit you’ve just purchased is only the start of your musical enjoyment. Now it’s time to consider how you can maximize the fun and excitement your equipment offers. This manufacturer and the Electronic Industries Association’s Consumer Electronics Group want you to get the most out of your equipment by playing it at a safe level. One that lets the sound come through loud and clear without annoying blaring or distortion and, most importantly, without affecting your sensitive hearing.
Sound can be deceiving. Over time your hearing “comfort level” adapts to higher volumes of sound. So what sounds “normal” can actually be loud and harmful to your hearing. Guard against this by setting your equipment at a safe level BEFORE your hearing adapts.
To establish a safe level:
•Start your volume control at a low setting.
•Slowly increase the sound until you can hear it comfortably and clearly, and without distortion.
Once you have established a comfortable sound level:
• Set the dial and leave it there.
Taking a minute to do this now will help to prevent hearing damage or loss in the future. After all, we want you listening for a lifetime.
We Want You Listening For A Lifetime
Used wisely, your new sound equipment will provide a lifetime of fun and enjoyment. Since hearing damage from loud noise is often undetectable until it is too late, this manufacturer and the Electronic Industries Association’s Consumer Electronics Group recommend you avoid prolonged exposure to excessive noise. This list of sound levels is included for your protection.
Decibel
Level Example
30 Quiet library, soft whispers
40 Living room, refrigerator, bedroom away from traffic
50 Light traffic, normal conversation, quiet office
60 Air conditioner at 20 feet, sewing machine
70 Vacuum cleaner, hair dryer, noisy restaurant
80Average city traffic, garbage disposals, alarm clock at two feet.
THE FOLLOWING NOISES CAN BE DANGEROUS UNDER CONSTANT EXPOSURE
90 Subway, motorcycle, truck traffic, lawn mower
100 Garbage truck, chain saw, pneumatic drill
120Rock band concert in front of speakers, thunderclap
140 Gunshot blast, jet plane
180 Rocket launching pad
Information courtesy of the Deafness Research Foundation.
S001_En
CAUTION:
This product is a class 1 laser product, but this product contains a laser diode higher than Class 1. To ensure continued safety, do not remove any covers or attempt to gain access to the inside of the product. Refer all servicing to qualified personnel.
CLASS 1 LASER PRODUCT
LASER KLASSE 1
The following caution label appears on your unit. Location: inside of the unit
CAUTION CLASS 3B VISIBLE AND INVISIBLE LASER RADIATION WHEN OPEN, AVOID EXPOSURE TO THE BEAM.
ATTENTION RADIATIONS LASER VISIBLES ET INVISIBLES DE CLASSE 3B QUAND OUVERT. ÉVITEZ TOUT EXPOSITION AU FAISCEAU.
ADVARSEL KLASSE 3B SYNLIG OG USYNLIG LASERSTRÅLING VED ÅBNING. UNDGÅ UDSÆTTELSE FOR STRÅLING.
VARNING KLASS 3B SYNLIG OCH OSYNLIG LASERSTRÅLNING NÄR DENNA DEL ÄR ÖPPNAD. UNDVIK ATT UTSÄTTA DIG FÖR STRÅLEN.
VORSICHT BEI GEÖFENETER ABDECKUNG IST SICHTBARE UND UNSICHTBARE LASERSTRAHLUNG DER KLASSE 3B IM GERÄTEINNEREN VORHANDEN. AUGEN NICHT DEM LASERSTRAHLAUSSETZEN!
PRECAUCIAÓN CUANDO SE ABRE HAY RADIACIÓN LÁSER DE CLASE 3B VISIBLE E INVISIBLE. EVITE LA EXPOSICIÓN A LOS RAYOS LÁSER.
VARO! AVATTAESSA OLET ALTTINA NÄKYVÄLLE JA NÄKYMÄTTÖMÄLLE LUOKAN 3B LASERSÄTEILYLLE. ÄLÄ KATSO SÄTEESEEN.
DRW2282-A
D3-4-2-1-8_A_En

Contents |
|
01 Before you start |
|
Features ............................................................................. |
8 |
Discs which can be played back ..................................... |
9 |
Discs on which video can be recorded ........................ |
10 |
Recording format ........................................................... |
10 |
Disc playback in other players ...................................... |
11 |
02 Controls and displays |
|
Front panel ...................................................................... |
12 |
Rear panel ....................................................................... |
12 |
Display window .............................................................. |
13 |
Remote control ............................................................... |
14 |
Putting the batteries in the remote control ................. |
15 |
Remote control basics ................................................... |
15 |
Using the remote control .............................................. |
15 |
Power Source ................................................................. |
15 |
03 Connecting up |
|
Antenna connection ...................................................... |
16 |
Cable TV connections .................................................... |
18 |
Connections with the TV or audio component ............ |
20 |
04 Getting started |
|
Auto clock setting / Setting the video channel ........... |
22 |
SETUP MENU ................................................................. |
23 |
Using the SETUP MENU ............................................... |
23 |
Setting the language ..................................................... |
24 |
OSD LANGUAGE ............................................................ |
24 |
DVD MENU ..................................................................... |
24 |
AUDIO ............................................................................. |
24 |
SUBTITLE ........................................................................ |
24 |
Setting the parental control .......................................... |
25 |
Selecting parental control ............................................. |
25 |
Temporarily cancelling parental control ...................... |
25 |
Setting the clock ............................................................ |
26 |
CLOCK (manually) .......................................................... |
26 |
AUTO CLOCK .................................................................. |
26 |
STANDARD TIME (Time zone) ....................................... |
26 |
DAYLIGHT SAVING TIME ............................................... |
26 |
Setting the disc .............................................................. |
27 |
REFORMAT ..................................................................... |
27 |
NEW DISC FORMAT ...................................................... |
27 |
FINALIZE ......................................................................... |
28 |
PROTECT DISC ............................................................... |
28 |
6
UNDO FINALIZE ............................................................. |
28 |
DIMMER (Brightness of the display window) .............. |
29 |
DISPLAY/CALL (Turning the screen display |
|
“ON” or “OFF”) ............................................................... |
29 |
Setting the screen .......................................................... |
29 |
TV SCREEN ..................................................................... |
29 |
STILL MODE .................................................................... |
29 |
LINE1 INPUT / LINE2 INPUT ......................................... |
30 |
Setting the image quality .............................................. |
30 |
BRIGHTNESS ................................................................. |
30 |
BLACK LEVEL CONTROL (PLAY) .................................. |
30 |
Setting the audio ............................................................ |
30 |
DRC ................................................................................. |
30 |
EXTERNAL AUDIO INPUT ............................................. |
31 |
SAP (Second Audio Program) ...................................... |
31 |
DOLBY DIGITAL OUTPUT ............................................... |
31 |
Setting the recording ..................................................... |
31 |
INITIAL REC TO .............................................................. |
31 |
INITIAL REC MODE ........................................................ |
31 |
AUTO CHAPTER ............................................................. |
31 |
INDEX PICTURE ............................................................. |
31 |
BLACK LEVEL CONTROL (REC) .................................... |
31 |
Setting the channel ....................................................... |
32 |
TV/CABLE SELECT ......................................................... |
32 |
AUTO CH MEMORY ....................................................... |
32 |
ADD/DELETE (channels) ............................................... |
32 |
Setting other items ........................................................ |
32 |
JPEG INTERVAL .............................................................. |
32 |
DIVX® VOD ...................................................................... |
32 |
05 Playback |
|
Playback procedure ....................................................... |
33 |
Playback by selecting a title .......................................... |
34 |
Checking media information ........................................ |
35 |
Special playback ............................................................ |
36 |
Fast forward playback .................................................... |
36 |
Review playback ............................................................. |
36 |
Still playback .................................................................. |
36 |
Frame advance ............................................................... |
36 |
Slow motion playback .................................................... |
36 |
Locating a chapter or track ........................................... |
36 |
Commercial skip / Locating a specific scene .............. |
37 |
Repeat playback ............................................................. |
38 |
One touch repeat ........................................................... |
38 |
A-B repeat playback ....................................................... |
38 |
Title, Chapter repeat playback ...................................... |
38 |
Title selection / DVD menu ............................................ |
39 |
Changing angles / Zooming .......................................... |
40 |
Changing soundtrack language ................................... |
41 |
Changing the subtitle language ................................... |
41 |
The CD Track Info screen ............................................... |
42 |
En

Playing back a selected track ....................................... |
42 |
Random playback .......................................................... |
43 |
Repeat playback of selected track ................................ |
43 |
Repeat playback of all tracks ........................................ |
43 |
Playing back programs .................................................. |
43 |
Playing back track by specifying the time ................... |
43 |
MP3/WMA*/JPEG/DivX®*playback .............................. |
44 |
Using the BROWSER screen ........................................ |
44 |
When the file to be displayed is selected ..................... |
44 |
Playing back MP3/WMA files ........................................ |
45 |
Playing back JPEG files ................................................. |
46 |
Playing back DivX® video files ....................................... |
47 |
Progressive scan ............................................................ |
48 |
Different scanning modes ............................................. |
48 |
Loading and unloading a cassette tape ....................... |
49 |
Loading ........................................................................... |
49 |
Unloading ....................................................................... |
49 |
Cassette tape playback .................................................. |
50 |
Forward/Reverse picture search mode ........................ |
50 |
Special playback ............................................................ |
51 |
Picture search ................................................................ |
51 |
Still picture ..................................................................... |
51 |
Slow motion .................................................................... |
51 |
Frame by frame picture ................................................. |
51 |
Adjusting tracking condition ........................................ |
51 |
Repeat playback ............................................................. |
51 |
Commercial skip ............................................................ |
51 |
To display VCR operation status ................................... |
51 |
ZERO RETURN function / Video index search system ..... |
52 |
06 Recording |
|
Read this before recording on disc .............................. |
53 |
Recording a TV program ............................................... |
55 |
One-touch Timer Recording (OTR) ............................... |
57 |
VCR Plus+® programming system .............................. |
58 |
Timer recording .............................................................. |
60 |
Chase playback .............................................................. |
63 |
Stereo recording and playback ..................................... |
64 |
07 Editing |
|
Editing the disc .............................................................. |
65 |
Editing a playlist ............................................................. |
66 |
Creating a playlist .......................................................... |
66 |
Changing a title name ................................................... |
67 |
Erasing a scene (Edit title) ............................................ |
68 |
Combining the title ........................................................ |
70 |
Erasing a playlist ............................................................ |
71 |
Editing an original title .................................................. |
72 |
Adding a chapter mark .................................................. |
72 |
Combining chapters ...................................................... |
74 |
Changing an original title name ................................... |
74 |
Erasing a scene (Edit title) ............................................ |
75 |
Erasing an original title ................................................. |
76 |
Changing a disc name .................................................. |
77 |
Using the keyboard screen ........................................... |
78 |
08 Dubbing |
|
Dubbing a tape onto a disc ........................................... |
80 |
Dubbing a disc onto a tape ........................................... |
81 |
Dubbing only the specified titles or the playlist .......... |
81 |
Dubbing using other equipment .................................. |
82 |
When a video is recorded using this unit .................... |
82 |
09 Additional information |
|
Language code list ......................................................... |
83 |
Screen sizes and disc formats ...................................... |
83 |
Glossary .......................................................................... |
84 |
Error/Warning message list .......................................... |
86 |
Troubleshooting .............................................................. |
88 |
Handling discs ............................................................... |
90 |
Storing discs ................................................................... |
90 |
Damaged discs .............................................................. |
90 |
Cleaning the pickup lens ............................................... |
90 |
Handling video tapes ..................................................... |
90 |
Storing video tapes ........................................................ |
90 |
Video head cleaning ...................................................... |
91 |
Moving the recorder ...................................................... |
91 |
Resetting the recorder ................................................... |
91 |
Hints on installation ...................................................... |
91 |
Specifications ................................................................. |
92 |
*WMA (Windows MediaTM Audio) compatibility
Microsoft, Windows Media, and the Windows logo are trademarks, or registered trademarks of Microsoft Corporation in the United States and/or other countries.
*DivX, DivX Certified, and associated logos are trademarks of DivX, Inc. and are used under license.
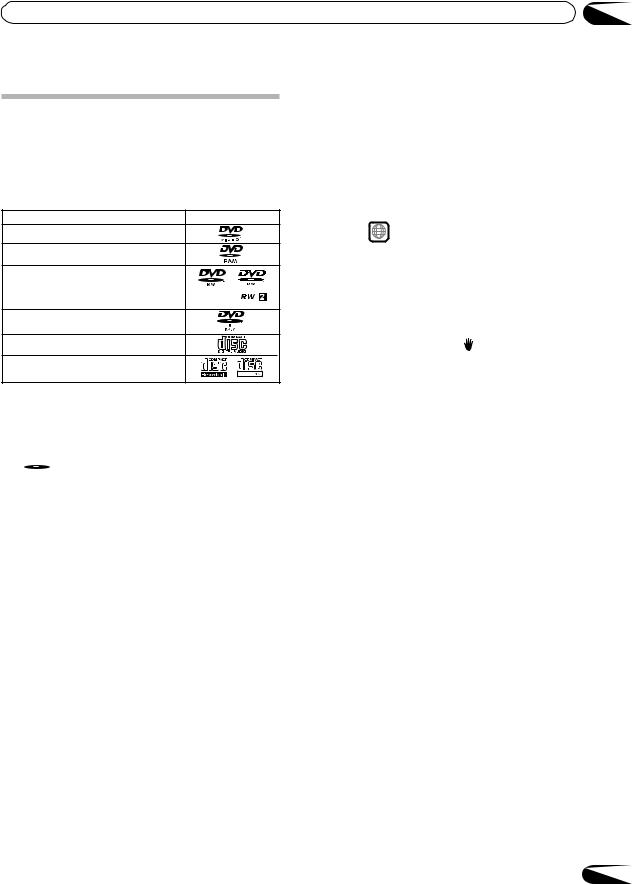
Media mark
Each applicable media are indicated using the symbol shown below.
DVD-Video |
: DVD-Video |
DVD-R |
: DVD-R |
|
|
|
|
|
|
RAM |
: DVD-RAM |
CD |
: Audio CD and CD-R/CD-RW |
|
|
|
|
|
|
VR mode |
: DVD-RW in VR mode |
VCR |
: Video tape |
|
|
|
|
|
|
Video mode |
: DVD-RW in Video mode |
|
7 |
|
|
|
|
|
|
En

01 |
Before you start |
Chapter 1
Before you start
Features
Not only can you playback and record video tapes, but you can also playback DVD discs or make recordings using DVD-RAM, DVD-RW, DVD-R discs with this unit. In addition, you can enjoy editing the programs you record.
Playback function
•A realistic, powerful, Movie Theater sound DVD-Video
When connected to Dolby Digital and DTS compliant devices, you can enjoy realistic, powerful surround sound.
•Playback the scene you want to see immediately
DVD-Video RAM VR mode Video mode DVD-R
As DVD’s do not require rewinding like video tapes, you can get to the scene you wish to watch immediately. A variety of search functions allow you to find the scene you wish to watch.
• Title menu RAM VR mode Video mode DVD-R
As thumbnail images are displayed in the title menu, you can find the title you want to play back quickly.
•The title list appears on finalized DVD-RW disc (recorded in the Video mode) and DVD-R disc.
• MP3/WMA/JPEG/DivX® playback CD
MP3, WMA and DivX® files can be played back. Also, you can display JPEG files on the TV screen and enjoy them as a slide show.
•Progressive scan
RAM DVD-Video VR mode Video mode DVD-R
This unit supports the progressive scanning system. If your TV is equipped with component video input jacks which support the progressive video input, you can enjoy high quality picture. Check your TV/monitor for compatibility with this feature.
• Chase Playback RAM
You can begin playback from the beginning of a program currently being recorded. You will find this function of great advantage on long programs, as you do not have to wait for the end of recording to begin playback.
8
Recording function
•Timer recording
RAM VR mode Video mode DVD-R |
VCR |
You can program the recorder to record up to 12 programs, up to a month in advance, using the
VCR Plus+® system*1 for easy programming if you want. As well as single programs, you can specify daily or weekly recordings, too.
*1 VCR Plus+ and PlusCode are registered trademarks of Gemstar Development Corporation.
The VCR Plus+ system is manufactured under license from Gemstar Development Corporation.
•One-touch Timer Recording (OTR)
RAM VR mode Video mode DVD-R |
VCR |
The One-touch Timer Recording feature provides a simple and convenient way to make a timed recording.
Edit function
•Editing recorded material without changing the
original titles RAM
You can create a playlist based on the original titles. The playlist won’t affect the original titles. If you erase the playlist, the original titles remain. It is recommended to create and edit the playlist to prevent important titles from being erased accidentally.
• Chapter mark RAM VR mode
You can add (or delete) a chapter mark to (from) the original title. This function is useful when searching for the scene you wish to watch that you have marked with the Chapter mark function.
• Erasing scenes RAM
You can erase an unnecessary scene from the created playlist or the original titles.
• Combining titles RAM
You can combine several original titles or playlists to a separate playlist.
Dubbing function
•Dubbing a tape onto a disc or a disc onto a tape
RAM VR mode Video mode DVD-R |
VCR |
With just this one unit, you can dub whatever you like, from video tape to disc, or from disc to video tape.
•Dubbing cannot be carried out when attempting to copy a “copy guarded” video tape or disc.
En
Before you start |
01 |
Discs which can be played back
In this unit, use only discs that meet the standard, such as those bearing the below logo marks on the disc label surface. If you use a non-standard disc, we cannot guarantee playback. Even if such a disc can be played back, we cannot guarantee the image or sound quality. The DVD logo is a registered trademark.
Media type |
Logo mark |
DVD-Video
DVD-RAM*1 Ver.2.0 Ver.2.1
DVD-RW Ver.1.0, Ver.1.1, Ver.1.2
Ver.1.1 CPRM support
Ver.1.2 CPRM support
DVD-R Ver.2.0, Ver.2.1
Audio CD*2
CD-R/CD-RW


 l
l
*1 When using cartridge-type DVD-RAM discs, it will be necessary to remove the disc from the cartridge.
*2 This unit is designed to playback music Compact Discs (CD) that conform to the CD standard. CDs that contain (copy-restriction) signals to protect copyrights cannot be played back.
• is a trademark of DVD Format/Logo Licensing Corporation.
About DualDisc playback
A DualDisc is a new two -sided disc, one side of which contains DVD content -video, audio, etc.- while the other side contains non-DVD content such as digital audio material. The non-DVD, audio side of the disc is not compliant with the CD Audio specification and therefore may not play. It is possible that when loading or ejecting a DualDisc, the opposite side to that being played will be scratched. Scratched discs may not be playable.
The DVD side of a DualDisc plays in this product. DVDAudio content will not play. For more detailed information on the DualDisc specification, please refer to the disc manufacturer or disc retailer.
Older models of DVD recorders and DVD writers may reject DVD-RW Ver. 1.2 / 4x discs. If you want to share DVD-RW discs between this recorder and an older recorder/writer, we recommend using Ver. 1.1 discs.
The following table shows older Pioneer DVD recorder compatibility with DVD-RW Ver. 1.2 / 4x discs.
Model |
Playable |
Recordable |
|
|
|
|
|
DVR-7000 |
Yes1,2,3 |
No |
|
DVR-810H/DVR-57H |
Yes1 |
No |
|
DVR-210/DVR-310/DVR-510H |
|||
|
|
1 Discs should be finalized in this recorder before playing. Unfinalized VR mode and Video mode discs may not play.
2 Cannot read the CPRM information will show in the display when you load a disc. However, this will not affect playback.
3 Copy-once protected disc titles will not play.
Region management information
This unit is designed and manufactured to support the region management information that is recorded on a DVD disc. If the region number written on the DVD disc does not correspond to the region number of this unit, this unit cannot play that disc.
•The region number of this unit is “1”.
•The unit will play DVD-Video discs marked with
labels containing “1” or “ALL”. Example: 1 
Operating DVD-Video
•Some operations of DVD-Video may be prohibited by the manufacturer, or some operation methods or functions of the DVD-Video may be different from the description in this manual.
•If you attempt an operation that is prohibited by either the disc or the unit, a “ ” mark will appear on the TV monitor. For operations prohibited by the disc, see the information that came with the disc.
•When the menu screen or the operation guide appears during disc playback, follow the displayed information.
Discs which cannot be played back
The discs listed below cannot be played back in general. Even if one of these can be played back, it may not be played back correctly. If a disc is played back by mistake, extensively loud sounds may blow the speakers or may damage the hearing of those in hearing range. Do not playback the discs listed below.
CDG, Photo-CD, CD-ROM, CD-TEXT, CD-EXTRA, VCD, SVCD, SACD, PD, CDV, DVD-ROM, DVD+R/ RW, DVD audio, DVD-R DL (dual layer), DVD+R DL (dual layer), DVD-R (VR mode), etc.
The below DVD-Video may not be played back.
•DVD-Video that do not have the region number “1” or “ALL”.
•PAL or SECAM DVD-Video.
•Prohibited or business-use DVD-Video.
CD-R/CD-RWs cannot be played back for the following reasons.
•Compatibility of the disc and this unit.
•Compatibility of the disc and the recorder used.
•Unfinalized discs.
Do not playback the following discs. Playback of these discs may cause a failure.
•Discs on which paper, labels or stickers are affixed.
•Discs that have sticky areas left by adhesive tape.
•Special-shaped discs.
PC-created disc compatibility
Discs recorded using a personal computer may not be |
9 |
playable in this unit due to the setting of the application |
|
software used to create the disc. In these particular |
En |
instances, check with the software publisher for more |
|
detailed information. |
|

01 |
Before you start |
10
En
Discs on which video can be recorded
To record video with this unit, use the discs below:
Media type |
Logo mark |
DVD-RAM Ver.2.0 Ver.2.1 |
|
|
|
DVD-RW Ver.1.0, Ver.1.1, Ver.1.2 |
|
Ver.1.1 CPRM support Ver.1.2 CPRM support (1~6x SPEED)
DVD-R Ver.2.0, Ver.2.1
(1~16x SPEED)
DVD-RAM
•When using cartridge-type DVD-RAM discs, it will be necessary to remove the disc from the cartridge.
•Use only DVD-RAM discs that comply with DVDRAM standard Version 2.0 or 2.1.
The recorder cannot record on a disc formatted in any other standard. When using such a disc, initialize it by using the disc-format function of this recorder.
•The recorder may not record, dub, or edit some DVD-RAM discs, because they are edited/recorded with another manufacture’s equipment or PC, contain a large number of titles, or have little remaining capacity. Also, a DVD-RAM disc may not be edited or recorded if its title contains still pictures.
•When you load a DVD-RAM disc for PC, “INCORRECT DISC” may appear on screen. In this case please format the disc to use with this recorder.
•DVD-RAM discs formatted in UDF2.0 on a PC are not compatible with this recorder. Before using these discs, initialize them on this recorder.
•This recorder complies with current copyright protection technology and can copy a disc only when the disc permits copying once. When there is no indication on the disc, copying will not be allowed.
Such an indication on a disc is required also for the Library Management database.
DVD-RW
•The disc can be erased and used again about 1,000 times.
•Only the VR mode can be used for Ver.1.0 discs.
•With Ver.1.1/1.2 discs, you can record by selecting the VR mode or Video mode.
•When you record in the VR mode, you can repeatedly record and erase. By erasing unnecessary titles, you effectively increase remaining time.
•When you record in the Video mode, you can record until the disc becomes full.
•When you use the Video mode, you can newly record on the disc by formatting the disc. However, if the disc is formatted, all the recorded contents will be erased.
DVD-R
•You can record on the disc only in the Video mode.
•You can record until the disc becomes full.
•Finalizing the discs allows playback on other DVD players. However, the finalized discs can no longer be recorded.
•Discs can be recorded to repeatedly until they are finalized.
 Note
Note
•There are some players that cannot playback discs that were recorded with this unit. We cannot guarantee the playback with other units.
•This unit can record on DVD-RAM/RW/R discs that are 8 cm in diameter.
•This unit cannot record on CD-R or CD-RW.
•This unit may not be able to record to or playback from discs that have been recorded on other units due to the recording conditions, surface dirt or scratches.
•Other units may not be able to record to or playback from discs that have been recorded on the unit due to the recording conditions, surface dirt or scratches.
Recording format
This unit has two modes for formatting discs for recording: VR mode and Video mode.
When a blank, new disc is loaded into this unit, the automatic format function starts to format the disc. (For the disc format setting in this step, see page 27.)
VR mode
•This mode can be used for DVD-RAM/RW.
•In this mode, the discs can be recorded and edited repeatedly.
•The disc recorded in this mode can be played back with other DVD-RW-compatible players.
•When a Ver.1.1 CPRM or Ver. 1.2 disc is used, you can record a “Copy Once” program (see page 54).
Video mode
•This mode can be used for DVD-R and DVD-RW (Ver.1.1/1.2).
•When you finalize the disc after recording, the disc recorded with this unit can be played back with other DVD players.
•Recording, editing or playback of an unfinalized disc can be done only with this unit. However, there is some limitation to editing operations.
•In this mode, you cannot record a “Copy Once” program (see page 54).
•When you record a TV program of a bilingual broadcast, only one of the audio modes can be recorded. You have to select it.
Format modes that can be used each disc
The usable format depends on the media type as shown in the below table.
Media type |
Format |
Available functions |
|
|
|
DVD-RAM |
VR mode |
Playback, recording and |
(Ver.2.0/2.1) |
|
editing (Original/playlist) |
DVD-RW |
VR mode |
Playback, recording and |
(Ver.1.0) |
|
editing (Original/playlist) |
DVD-RW |
VR mode |
Playback, recording and |
(Ver.1.1/1.2) |
|
editing (Original/playlist) |
|
Video mode |
Playback and recording |
|
|
Editing (with limitation) |
DVD-R |
Video mode |
Playback and recording |
(Ver.2.0/2.1) |
|
Editing (with limitation) |
|
|
|
Before you start
Title/Chapter/Track
A DVD-Video has large partitions called “Titles”, and smaller partitions within them called “Chapters”.
A music CD has other partitions called “Tracks”. A number is allotted to each partition and these numbers are called “title numbers”, “chapter numbers” or “track numbers”.
DVD DISC
|
|
|
|
|
TITLE 1 |
TITLE 2 |
||
CHAPTER 1 CHAPTER 2 CHAPTER 1 |
CHAPTER 2 CHAPTER 3 |
|||||||
|
|
|
|
|
|
|
|
|
|
|
|
|
|
|
|
|
|
|
|
|
|
|
|
|
|
|
Audio-CD
TRACK 1 |
|
TRACK 2 |
|
TRACK 3 |
|
TRACK 4 |
|
TRACK 5 |
||||||||||||||
|
|
|
|
|
|
|
|
|
|
|
|
|
|
|
|
|
|
|
|
|
|
|
|
|
|
|
|
|
|
|
|
|
|
|
|
|
|
|
|
|
|
|
|
|
|
|
|
|
|
|
|
|
|
|
|
|
|
|
|
|
|
|
|
|
|
|
|
|
|
|
|
|
|
|
|
|
|
|
|
|
|
|
|
|
|
|
|
|
|
|
|
When recording in the VR mode
One-time recording is set to 1 title (1 chapter). However, if you stop recording temporarily or erase scenes by editing, the chapter will automatically be partitioned. The interval between chapters can be specified. (See page 31.)
When recording in the Video mode
One-time recording is set to 1 title. In recording, chapters are set automatically. The interval between chapters can be specified. (See page 31.)
 Note
Note
•The title, chapter and track are numbered, but some discs may not record the numbers.
•Recording on DVD-R/RW in the Video mode is a new standard approved at the 2000 DVD forum. Conformity to this standard varies with each DVD player manufacturer. Some models of DVD player or DVD-ROM drive, therefore, will not playback recorded videos.
01
Disc playback in other players
A disc recorded in this unit can be finalized. The disc can be played back in other players that can playback DVD-RW and DVD-R.
For more information on finalization, see “FINALIZE” in “Setting the disc” (page 28).
When recording in the VR mode
Even if a disc recorded in the VR mode is finalized, you can record or edit by cancelling the finalization. (See “UNDO FINALIZE” on page 28.)
When you playback the disc with another player, make sure that the DVD player supports DVD-RW and bears the following mark.
When recording in the Video mode
When a disc recorded in the Video mode is finalized, it cannot be recorded onto any more. Therefore, before finalization, be sure to perform all desired recording. After finalization, a title list that can be used by the DVD player is automatically created.
Note
•The finalization process may require from a few minutes up to 1 hour depending on the disc type and the amount of free space on the disc.
•A DVD-RW Ver.1.1/1.2 recorded in the Video mode cannot be recorded or edited after finalization, but if you format the disc by erasing all the content, you can again record on this disc.
•A finalized disc may not play because of the condition of the DVD or the compatibility with the player used for playback.
•Some players may not playback the discs recorded with this unit. We cannot guarantee the playback using other players.
11
En

02 |
Controls and displays |
Chapter 2
Controls and displays
Front panel
|
|
|
|
|
|
PLAY button |
|
|
|
Cassette Loading Slot |
|
STOP button |
|||
|
|
|
REW (Rewind) button |
||||
|
|
|
VCR EJECT button |
|
|||
|
|
|
|||||
STANDBY/ON |
IR Remote senser |
||||||
|
|
|
FF (Fast Forward) button |
||||
button |
|
VCR/DVD button |
|
||||
|
|
Disc tray |
|||||
|
|
|
|
|
|
|
|
|
|
|
|
|
|
|
|
|
|
|
|
|
|
|
|
|
|
|
|
|
|
|
|
REC |
DUBBING |
|
|
|
|
|
|
|
|
|
|
|
|
|
|
|
|
DVD indicator |
|
OPEN/CLOSE button |
||
AUDIO (L/R)/VIDEO |
VCR indicator |
Display window |
||||
CHANNEL –/+ buttons |
||||||
|
|
|
||||
IN (LINE 2) jacks |
|
|
|
|
DUBBING button |
|
DVD S-VIDEO IN (LINE 2) jack |
|
|||||
REC button
Rear panel
|
|
|
|
|
|
|
|
COMPONENT |
|
|
|
RF OUT jack |
||||||
|
|
|
|
|
|
|
|
OUT jacks |
RF IN jack |
|||||||||
|
|
|
|
COAXIAL DIGITAL |
(DVD Priority*) |
|||||||||||||
|
|
|
|
|
|
|
|
|
||||||||||
AC power cord |
|
AUDIO OUT jack |
|
S-VIDEO |
|
|
|
|
|
|||||||||
|
(DVD Priority*) |
|
IN (LINE 1) jack |
|||||||||||||||
|
|
|
|
|
||||||||||||||
|
|
|
|
|
|
|
|
|
|
|
|
|
|
|
|
|
|
|
|
|
|
|
|
|
|
|
|
|
|
|
|
|
|
|
|
|
|
|
|
|
|
|
|
|
|
|
|
|
|
|
|
|
|
|
|
|
|
|
|
|
|
|
|
|
|
|
|
|
|
|
|
|
|
|
|
|
|
|
|
|
|
|
|
|
|
|
|
|
|
|
|
|
|
|
|
|
|
|
|
|
|
|
|
|
|
|
|
|
|
|
|
|
|
|
|
|
|
|
|
|
|
|
|
|
|
|
|
|
|
|
|
|
|
|
|
|
|
|
|
|
|
|
|
|
|
|
|
|
|
|
|
|
|
|
|
|
|
|
|
|
|
|
|
|
|
|
|
|
|
|
|
|
|
|
|
|
|
|
|
|
|
|
|
|
|
|
|
|
|
|
|
|
|
|
|
|
|
|
|
|
|
|
|
|
|
|
|
|
|
|
|
|
|
|
|
|
|
|
|
|
|
|
|
|
|
|
|
|
|
|
|
|
|
|
|
|
|
|
|
|
|
|
|
|
|
|
|
|
|
|
|
|
|
|
|
|
|
|
|
|
|
|
|
|
|
|
|
|
|
|
|
|
|
|
|
|
|
|
|
|
|
|
|
|
FAN
Make sure that when installed the fan is not obstructed.
S-VIDEO |
AUDIO (L/R)/VIDEO |
|
OUT jack |
IN (LINE 1) jacks |
|
(DVD Priority*) |
|
|
DVD AUDIO (L/R) |
DVD/VCR common |
|
OUT jacks |
AUDIO (L/R)/VIDEO OUT jacks |
|
(DVD Priority*) |
|
|
*With these jacks, DVD image output will be prioritized. (See page 19.)
12
En
Controls and displays |
02 |
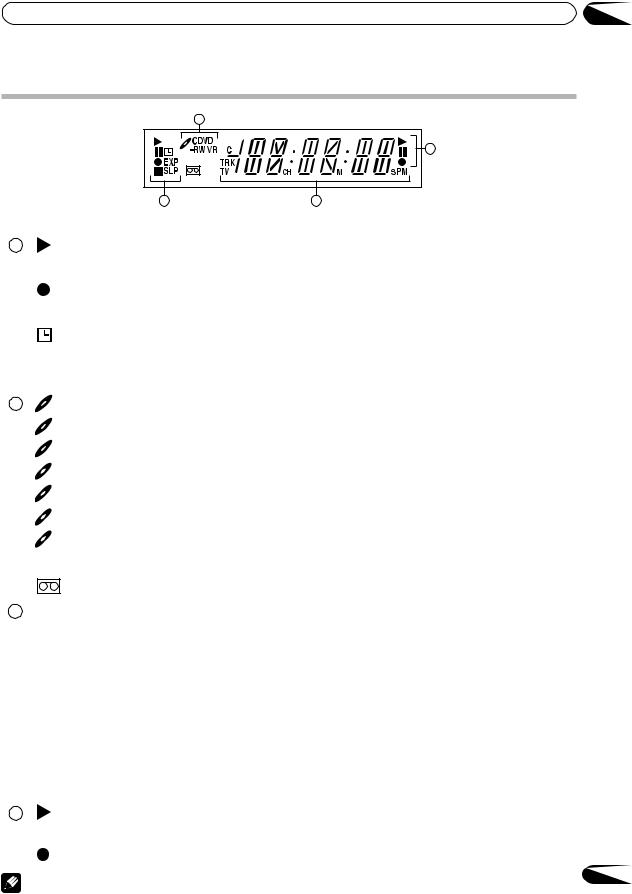
Display window
|
2 |
|
4 |
|
RAM |
P |
|
1 |
3 |
No. |
Display |
Description |
||||||
|
|
|
|
|
|
|
|
|
1 |
|
|
|
|
|
|
Lights during video tape playback. |
|
|
|
|
|
|
|
|
|
|
|
|
|
|
|
|
|
Video tape is temporarily stopped. |
|
|
|
|
|
|
|
|
||
|
|
|
|
|
|
|
|
|
|
|
|
|
|
|
|
Lights during video tape recording. |
|
|
|
|
|
|
|
|
|
|
|
|
|
|
|
|
|
|
|
|
|
P |
Progressive scanning mode. |
|||||
|
|
|
|
|
|
|
|
|
|
|
|
|
|
|
|
Timer recording display. |
|
|
|
|
|
|||||
|
XP/SP/LP/EP |
4 DVD recording modes. XP, SP, LP or EP is selected in turn by pressing the REC MODE/SPEED repeatedly. |
||||||
|
|
|
|
|||||
|
SP/EP |
2 VCR recording modes. SP or EP is selected in turn by pressing the REC MODE/SPEED repeatedly. |
||||||
|
|
|
|
|
|
|
|
|
2 |
|
|
|
|
|
CD |
Appears when a CD is inserted. |
|
|
|
|
|
|
|
|
|
|
|
|
|
|
|
|
CD-R |
Appears when a CD-R is inserted. |
|
|
|
|
|
|
|
|
|
|
|
|
|
|
|
|
CD-RW |
Appears when a CD-RW is inserted. |
|
|
|
|
|
|
|
|
|
|
|
|
|
|
|
|
DVD |
Appears when a DVD-Video is inserted. |
|
|
|
|
|
|
|
|
|
|
|
|
|
|
|
|
DVD-R |
Appears when a DVD-R is inserted. |
|
|
|
|
|
|
|
|
|
|
|
|
|
|
|
|
DVD-RW |
Appears when a DVD-RW is inserted. |
|
|
|
|
|
|
|
|
|
|
|
|
|
|
|
|
RAM |
Appears when a DVD-RAM is inserted. |
|
|
|
|
|
|||||
|
VR |
Appears when a DVD-RW in VR mode is inserted. When the disc is set to video mode, VR does not appear. |
||||||
|
|
|
|
|
|
|
|
|
|
|
|
|
|
|
|
Video tape is in the unit. |
|
|
|
|
|
|||||
3 |
10:00 |
Clock display (Colon [ : ] flashes). |
||||||
|
|
|
|
|||||
|
01H00M00S |
Counter display in hour/minute/second. |
||||||
|
|
|
|
|||||
|
C 36CH |
Cable TV channel display. |
||||||
|
|
|
|
|||||
|
2CH |
TV channel display. |
||||||
|
|
|
|
|||||
|
TRK 002 |
Track number display for CD. |
||||||
|
|
|
|
|||||
|
TV |
Appears when the tuner built into this unit is not selected. When you press TV/VIDEO, TV disappears. |
||||||
|
|
|
||||||
|
PM |
Display for afternoon (out in the morning). |
||||||
|
|
|
|
|||||
|
L1/L2 |
The external input channel (L1 or L2) display. |
||||||
|
|
|
|
|||||
|
Err |
Error display. |
||||||
|
|
|
|
|
|
|
|
|
4 |
|
|
|
|
|
|
Lights during playback of DVD and CD. Flashes in auto resume. |
|
|
|
|
|
|
|
|
|
|
|
|
|
|
|
|
|
DVD or CD is temporarily stopped. |
|
|
|
|
|
|
|
|
||
|
|
|
|
|
|
|
|
|
|
|
|
|
|
|
|
Lights during DVD recording. |
|
|
|
|
|
|
|
|
|
|
Note
13
En
• Some discs may not playback correctly, or chapter number, playback time, etc may not be displayed.
02 |
Controls and displays |
Remote control
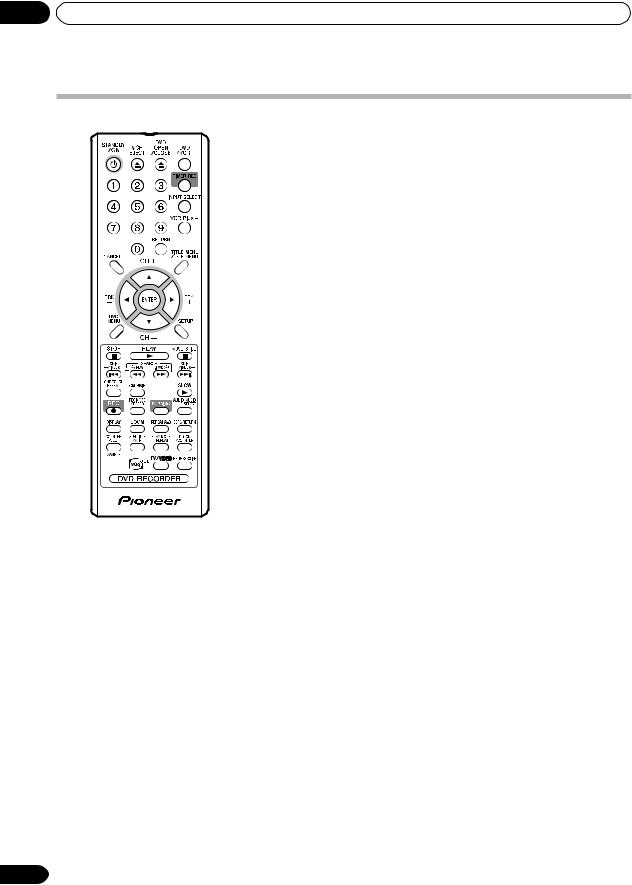
1STANDBY/ON (page 22) Turns power on/off.
2VCR EJECT (page 49) Ejects the cassette tapes.
3DVD OPEN/CLOSE (page 33) Opens or closes the tray.
4DVD/VCR (pages 80, 81) Switches to operation between VCR and DVD.
50-9
Use for direct TV channel selection of TV (page 55); setting the input (pages 37, 78); entering a password (page 25); entering a Pluscode for VCR Plus+ timer programming (page 59).
6 TIMER REC (pages 60, 62)
Sets the unit to start recording at a preset time.
7 INPUT SELECT (page 82) Switches between the external inputs.
8 VCR Plus+ (page 59)
Display the VCR Plus+ program screen.
9RETURN (pages 23, 45) Closes the menu window.
10CANCEL
Cancels input data in the setting mode (page 25); deletes the timer recording program (pages 60, 62).
11TITLE MENU/TOP MENU (pages 34, 39, 42, 66)
Selects titles of a DVD disc.
12CH +/– (page 55)
Use to select TV channels.
/ (pages 23, 33, 37, 61) Up/down cursor buttons
13 TRK +/– (page 51)
Use to adjust the VCR manual playback tracking.
/ (pages 33, 37, 61) Left/right cursor buttons
14ENTER (pages 23, 33, 37, 59, 61) Use to select menu options.
15DVD MENU (page 39)
Displays the menu of the DVD disc.
16SETUP (pages 23, 59, 61) Displays the setup menu.
17STOP (pages 33, 50, 56) Stops playback or recording.
18PLAY (pages 33, 50) Starts playback.
19PAUSE/STILL (pages 36, 51) Pauses recording or playback (press again to restart).
20SKIP / (page 36)
Skips forward or back chapters.
21INDEX – / + (page 52) Searches for INDEX marks on a tape
22REW/SEARCH – (pages 36, 50, 51) Rewind/review playback
23F.FWD/SEARCH + (pages 36, 50, 51) Fast forward/forward search playback
24ONE TOUCH REPEAT (page 38) Repeats playback of the last 10 seconds of video.
25CM SKIP (pages 37, 51)
Skips commercial breaks.
26SLOW (pages 36, 51) Starts slow motion playback.
27REC (pages 55,57,82) Starts recording.
28REC MODE/SPEED (pages 55, 57) Selects the recording mode.
29DUBBING (page 80)
Copies VCR to DVD or DVD to VCR.
30 AUDIO/AUDIO SELECT
Switches sound between mono and stereo (page 64); changes the language of the DVD (page 41).
31DISPLAY (pages 35, 52) Displays VCR or DVD operation status.
32ZOOM (page 40)
33REPEAT A-B (page 38)
Repeats playback between A and B.
34ZERO RETURN (page 52) Stops the tape when the counter reaches 00H00M00S.
35COUNTER RESET (page 52) Resets the counter to 00H00M00S.
36ANGLE (page 40)
Changes the DVD playback angle.
37 SUBTITLE (page 41)
Selects subtitles of the DVD disc.
38 ATR (page 51)
Digital auto tracking for VCR playback.
39PLAY MODE (page 37) Selects the playback mode.
40REPEAT (pages 38, 51)
Selects the repeat playback mode.
41CLOCK/COUNTER (page 52) Changes the front panel display mode.
42TV/VIDEO (pages 22, 56) Switches input between the TV and VIDEO.
43PROGRESSIVE (page 48) Activates the progressive scanning mode.
14
En
Controls and displays
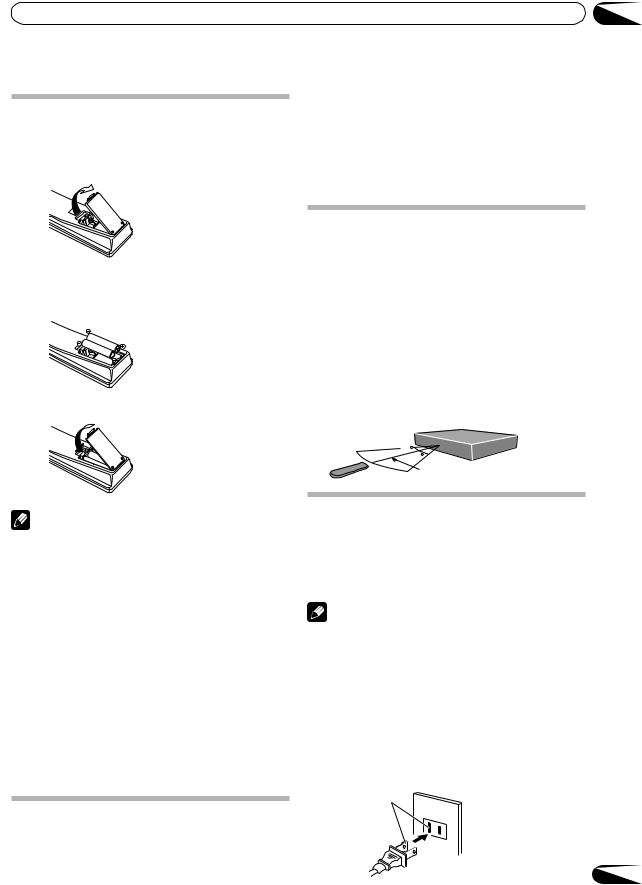
Putting the batteries in the remote control
1 Open the battery compartment cover on the back of the remote control.
02
•The / / / are also used to navigate onscreen menu system.
•You can directly access specific channels using numeric keys.
•Each press of DVD/VCR, switches the screen between the DVD screen (DVD mode) and the VCR screen (VCR mode).
2 Insert two AAA/R03 batteries into the battery compartment following the indications (+,–) inside the compartment.
3 Close the cover.
Using the remote control
Keep in mind the following when using the remote control:
•Make sure that there are no obstacles between the remote and the remote sensor on the unit.
•Remote operation may become unreliable if strong sunlight or fluorescent light is shining on the unit's remote sensor.
•Remote controllers for different devices can interfere with each other. Avoid using remotes for other equipment located close to this unit.
•Replace the batteries when you notice a fall off in the operating range of the remote.
•Use within the operating range and angle, as shown.
30
30
23ft
Note
Incorrect use of batteries can result in hazards such as leakage and bursting. Please observe the following:
•Don't mix new and old batteries together.
•Don't use different kinds of battery togetheralthough they may look similar, different batteries may have different voltages.
•Make sure that the plus and minus ends of each battery match the indications in the battery compartment.
•Remove batteries from equipment that isn't going to be used for a month or more.
•Do not try to recharge batteries not intended to be recharged; they can overheat ant rupture. (Follow battery manufacturer’s directions.)
•When disposing of used batteries, please comply with governmental regulations or environmental public instruction's rules that apply in your country or area.
Remote control basics
•Press STANDBY/ON to turn the DVD/VCR on or off.
•Press CH + or CH – to move through the channels one channel at a time.
Power Source
TO USE AC POWER SOURCE
Use the AC polarized line cord provided for operation on AC. Insert the AC cord plug into a standard 120V 60Hz polarized AC outlet.
Note
•Never connect the AC line cord plug to other than the specified voltage (120V 60Hz). Use the attached power cord only.
•If the polarized AC cord does not fit into a nonpolarized AC outlet, do not attempt to file or cut the blade. It is the user’s responsibility to have an electrician replace the obsolete outlet.
•If you cause a static discharge when touching the unit and the unit fails to function, simply unplug the unit from the AC outlet and plug it back in. The unit should return to normal operation.
Wider Hole |
AC Outlet |
and Blade |
|
Polarized AC Cord Plug |
15 |
(One blade is wider than the other.) |
En
03 |
Connecting up |
Chapter 3
Connecting up
 Important
•Before making or changing any rear panel connections, make sure that all components are switched off and unplugged from the wall outlet.
Antenna connection
If you are using an antenna system, follow these instructions. If you are a Cable TV subscriber, skip ahead to page 18 for the proper connections.
ANTENNA TO DVD/VCR CONNECTION
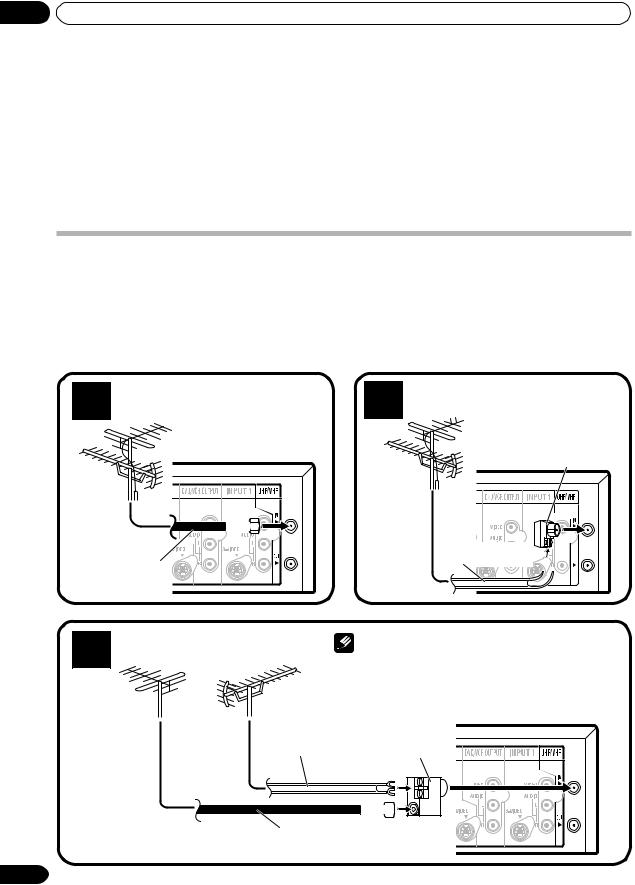
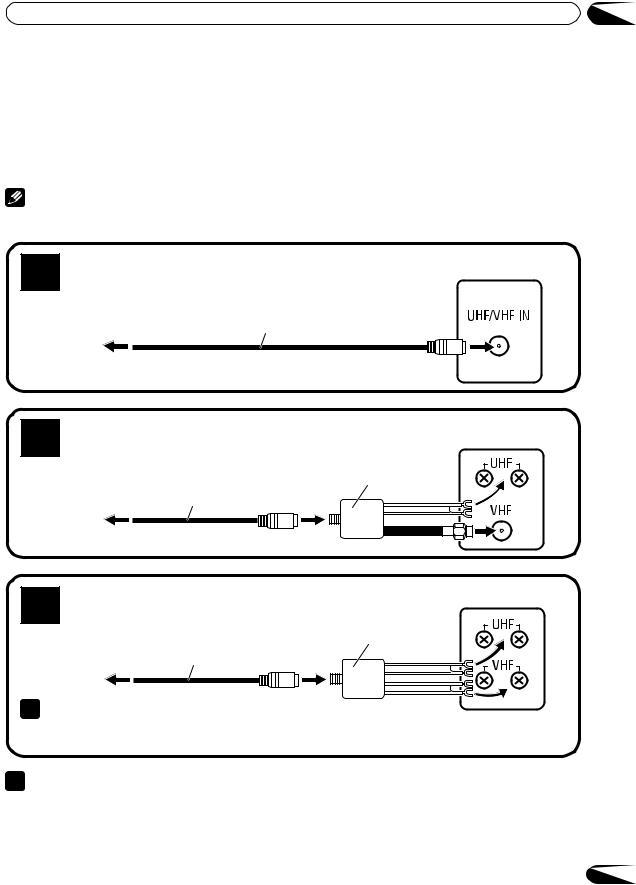
The DVD/VCR must be connected “between” the antenna and the TV. First, disconnect the antenna from the TV and connect it to the DVD/VCR. Then connect the DVD/VCR to the TV. Below are 3 common methods of connecting an antenna system to a DVD/VCR. Find the type of antenna system you are using and follow the connection diagram.
1 |
Combination UHF/VHF antenna with |
2 |
Combination UHF/VHF antenna with |
75 Ω coaxial cable |
300 Ω twin lead (flat) wire |
DVD/VCR
75 Ω coaxial cable
Matching transformer
|
300 Ω input |
|
75 Ω output |
DVD/VCR |
(not supplied) |
300 Ω twin lead (flat) 


 wire
wire 


3 |
Separate UHF and VHF antennas |
Note |
||
• If both UHF and VHF antennas have 300 Ω twin lead |
||||
|
|
|
||
|
|
|
(flat) wires, use a combiner having two 300 Ω inputs |
|
|
|
|
and one 75 Ω output. |
|
|
VHF |
UHF |
Combiner DVD/VCR |
|
|
|
|
||
75/300 Ω input 75 Ω output 300 Ω twin lead (flat) wire (not supplied)
75 Ω coaxial cable
16
En
Connecting up |
03 |
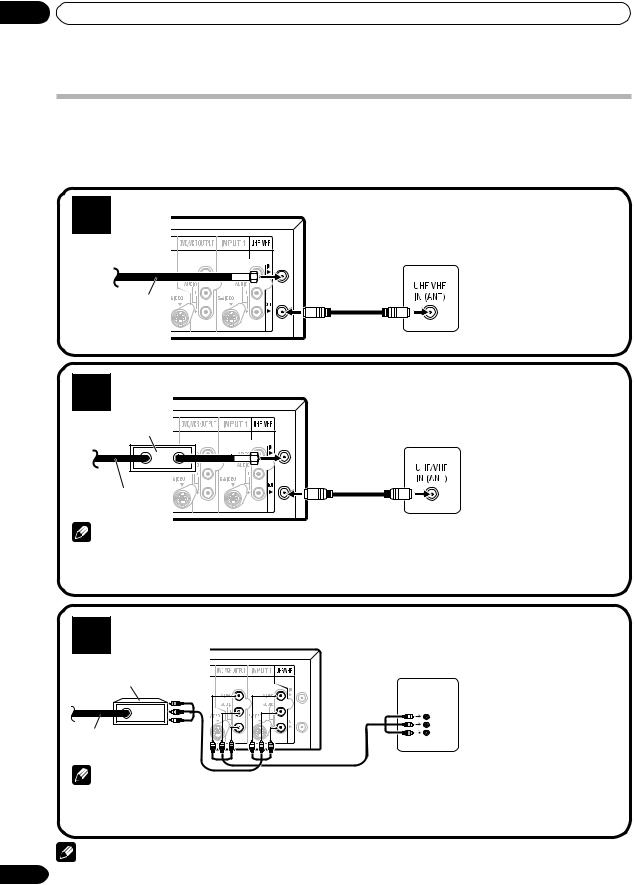
DVD/VCR TO TV CONNECTION
After you have connected the antenna to the DVD/VCR, you must connect the DVD/VCR to the TV.
Below are 3 common methods of connecting your DVD/VCR to a TV. Find the type of TV you are using and follow the connection diagram.
This DVD/VCR has a single 75 Ω output for connection to a TV. If your TV has separate UHF and VHF antenna inputs (numbers 2 and 3 below), use a splitter to connect the DVD/VCR to the TV for UHF and VHF reception.
Note
• If a UHF or VHF antenna is used, set the TV/CABLE menu option to the “TV” mode.
1 TV with single 75 Ω UHF/VHF antenna input |
TV |
RF antenna cable (supplied)
To DVD/VCR
2 TV with 300 Ω UHF and 75 Ω VHF antenna inputs |
Splitter TV |
|
75 Ω input |
|
75/300 Ω outputs |
|
(not supplied) |
RF antenna cable (supplied) |
|
To DVD/VCR |
|
3 TV with 300 Ω UHF and 300 Ω VHF antenna inputs |
Splitter TV |
75 Ω input |
|
|
300 Ω outputs |
|
(not supplied) |
RF antenna cable (supplied) |
|
To DVD/VCR |
|
 Note
Note
•If both UHF and VHF antennas have 300 Ω twin lead (flat) wires, use a combiner having two 300 Ω inputs and one 75 Ω output.
 Note
Note
•A clear picture will not be obtained by the DVD/VCR unless the antenna signal is good. Connect the antenna to the DVD/VCR properly.
•For better quality recording, an indoor antenna or a telescopic antenna is not recommended. The use of an outdoor type antenna is required.
•If you are not sure about the connection, please refer to qualified service personnel.
17
En
03 |
Connecting up |
Cable TV connections
Many cable companies offer services permitting reception of extra channels including pay or subscription channels. This DVD/VCR has an extended tuning range and can be tuned to most cable channels without using a cable company supplied converter box, except for those channels which are intentionally scrambled. If you subscribe to a special channel which is scrambled, you must have a descrambler box for proper reception.
1 DVD/VCR
Incoming cable
Allows
•Recording of nonscrambled channels.
•Use of the programmable
TV |
timer. |
|
|
|
• Recording of one channel |
|
while watching another. |
2 |
|
Allows |
|
DVD/VCR |
• |
Recording of channels |
|
|
through the converter box |
||
|
Converter/ |
|
|
|
|
(scrambled and un- |
|
|
descrambler |
TV |
scrambled). |
|
|
||
|
|
• |
Using the programmable |
|
|
|
timer to record only the |
|
|
|
channel selected at the |
Incoming cable |
|
converter box. |
|
|
|
Prevents |
|
18
En
Note
•To record from converter/descrambler, DVD/VCR tuner must be tuned to the converter output channel, usually channel 3 or 4.
3
DVD/VCR
Converter/ descrambler
Incoming
cable
Note
•If you are playing a tape or using the tuner built into the DVD/VCR, the converter must be set to the video channel output of the DVD/VCR (either 3 or 4).
Note
•Recording one channel while watching another.
•Using the DVD/VCR tuner to select channels.
Allows
|
• |
Recording of channels |
|
|
|
through the converter box |
|
TV |
|
(scrambled and un- |
|
Audio/Video |
|
scrambled). |
|
• |
Using the programmable |
||
IN |
|||
|
|
timer to record only the |
|
|
|
channel selected at the |
|
|
|
converter box. |
Prevents
•Recording one channel while watching another.
•Using the DVD/VCR tuner to select channels.
•Whenever a converter/descrambler box is placed before the DVD/VCR, you must tune the DVD/VCR to the output of the converter/descrambler box, usually channel 3 or 4.
Connecting up |
03 |
 Important
•Make sure the TV/CABLE menu option is set to the “CABLE” mode.
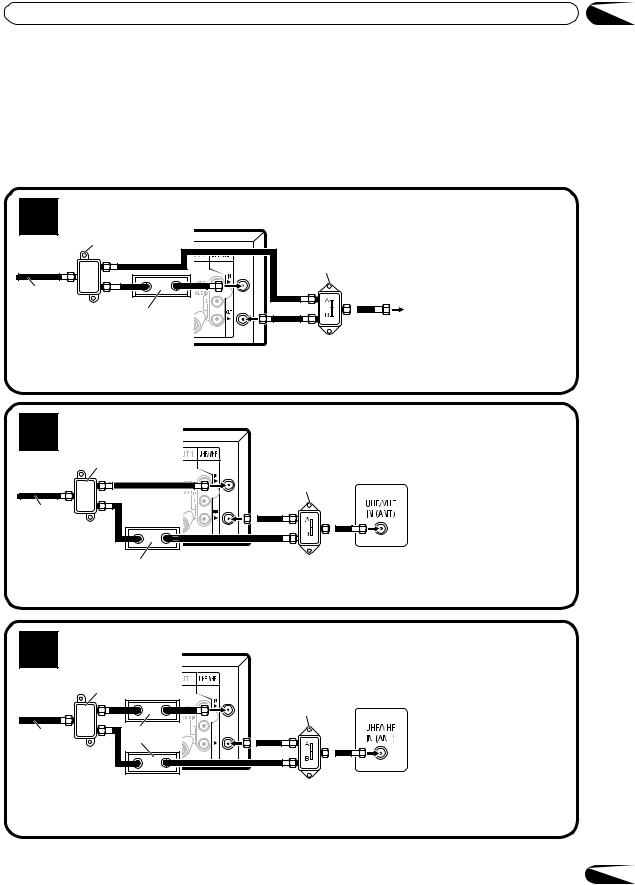
This DVD/VCR cannot receive scrambled programs since it does not contain a descrambler. In order to receive scrambled programs, your existing descrambler must be used. Descrambler boxes are available from cable companies. Consult your local Cable TV company for more information concerning connection to their descrambler equipment. There are many ways to connect your DVD/VCR to a cable system. Below are six common methods of connection.
4 |
Allows |
||
• Recording of one channel |
|||
|
while watching another. |
||
DVD/VCR |
• |
Using the programmable |
|
Splitter |
|||
|
TV |
timer to record only the |
|
A/B switch |
channel selected at the |
||
|
|||
|
|
converter box. |
|
Incoming |
• Recording of all channels |
||
cable |
|
through the converter box. |
|
Converter/ |
Prevents |
||
descrambler |
|||
|
• |
Watching scrambled |
|
|
|
channels while recording |
|
another channel.
• Using the DVD/VCR tuner to select channels.
5 |
DVD/VCR |
|
Splitter
TV
A/B switch
Incoming cable
Converter/descrambler
6 |
DVD/VCR |
Splitter
TV
A/B switch
Incoming |
Converter/ |
|
descrambler |
||
cable |
||
|
Allows
•Recording of nonscrambled channels.
•Recording of one channel while watching another.
•Watching premium channels through the converter while recording nonscrambled channels.
•Using the programmable timer.
Prevents
•Recording scrambled channels.
Allows
•Recording of all channels through the converter box.
•Recording a scrambled or unscrambled channel while watching another (scrambled or unscrambled) channel.
•Using the programmable timer to record only the channel selected at the converter box.
Prevents
•Using the DVD/VCR tuner to select channels.
19
En
03 |
Connecting up |
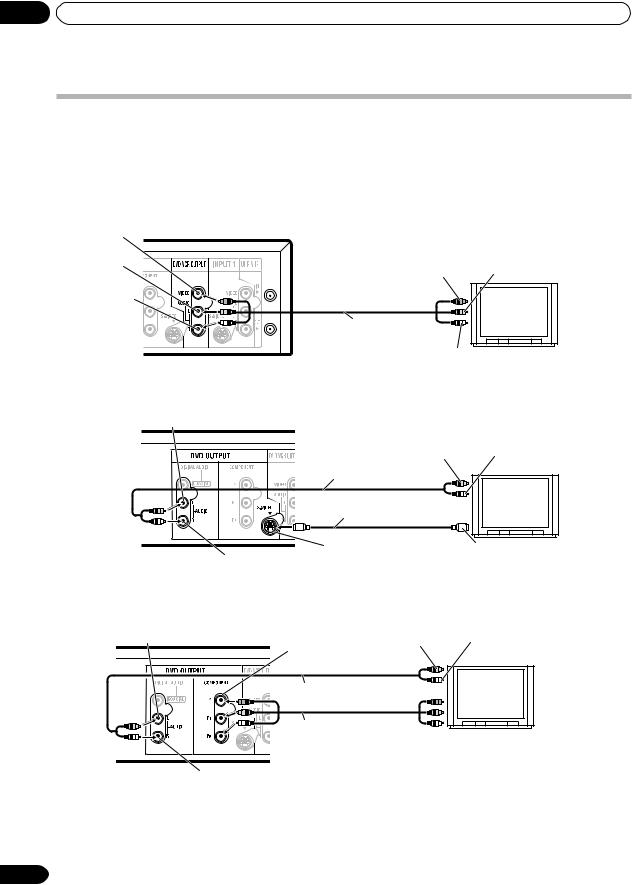
Connections with the TV or audio component
The exact arrangement you use to interconnect various video and audio components to the DVD/VCR is dependent on the model and features of each component. Check the Owner’s Manual provided with each component for the location of video and audio inputs and outputs.
Connect to a TV with Audio/Video output
You can enjoy playback by connecting the unit to a TV.
Connect the unit to a TV equipped with audio input (L/R) and video input jacks using the supplied audio/video cable.
Video output |
DVD/VCR |
|
Audio (L) output |
To Video input |
To Audio (L) input |
|
TV |
|
|
|
|
Audio (R) output |
|
|
|
Audio/video cable |
|
|
(supplied) |
|
|
To Audio (R) input |
|
Connect to a TV with S-Video output
If your TV has an S-Video input, you can get higher quality by connecting it with the S-Video output of the unit using an S-Video cable (not supplied) instead of connecting the video input of the TV to the video output jack of the unit.
DVD audio (L) output |
DVD/VCR |
To Audio (L) input |
To Audio (R) input |
|
TV
Audio cable (not supplied)
S-Video cable (not supplied)
S-Video output |
To S-Video input |
DVD audio (R) output
Connect to a TV with Component video output
You can enjoy the highest quality picture by connecting the unit’s component video out jacks to the component video input jacks of your TV, with component video cables (not supplied).
DVD audio (L) output |
DVD/VCR |
To Audio (L) input To Audio (R) input |
|
|
|
Component |
TV |
|
|
video output |
|
|
|
Audio cable (not supplied) |
|
|
|
Component video cable |
To Component |
|
|
(not supplied) |
|
|
|
|
video input |
|
DVD audio (R) output |
|
|
20
En
Connecting up |
03 |
Connect to a stereo amplifier with audio output
You can enjoy high quality audio by connecting the audio output to your amplifier.
Connect the audio output jacks to any line-level inputs (such as AUX, DVD, CD, etc.) of an audio amplifier.
DVD/VCR
Stereo Amplifier
Audio (L) output
To Audio (L) input 
 To Audio (R) input
Audio cable (not supplied)
Audio (R) output
Connect to an AV Amplifier with built-in digital surround
If you are using an Amplifier with a built-in digital surround as follows, you can enjoy the various audio systems such as Dolby Digital and DTS by using the optical or coaxial digital output.
Use this connection to connect an:
•AV amplifier with built-in *Dolby Digital decoder
•AV amplifier with built-in *DTS decoder
Note
•You may connect to a TV with a component video cable (not supplied) or S-Video cable (not supplied) instead of a video cable (not supplied).
Coaxial digital |
Audio(R) |
Audio(L) |
audio output |
output |
output |
|
Audio/Video cable (supplied) |
DVD/VCR |
To Audio/Video intput |
Video output
Coaxial digital cable (not supplied)
TV
AV Amplifier with built-in various decoder as above
Note
•When you connect the recorder to other equipment, be sure to turn off the power and unplug all of the equipment from the wall outlet before any connections.
•When you connect to a TV with a component cable or S-video cable, on-screen display of VCR will not be displayed. On-screen display will be activated only when you press DISPLAY while VCR is playing.
•If you use a coaxial connection, when you play a DVD-RW (VR mode) which was recorded from a bilingual broadcast, you can only hear the audio mode that was selected when it was recorded. See page 10.
•DTS audio will be output only from the COAXIAL output. To hear DTS audio, DTS-Decoder is necessary.
•When playing DTS-encoded CDs, only noise will be heard from the speakers or analogue stereo outputs.
•Some DTS decoders which do not support DVD-DTS interface may not work properly with the unit.
•The coaxial digital output jack output sounds in the bitstream.
21
En
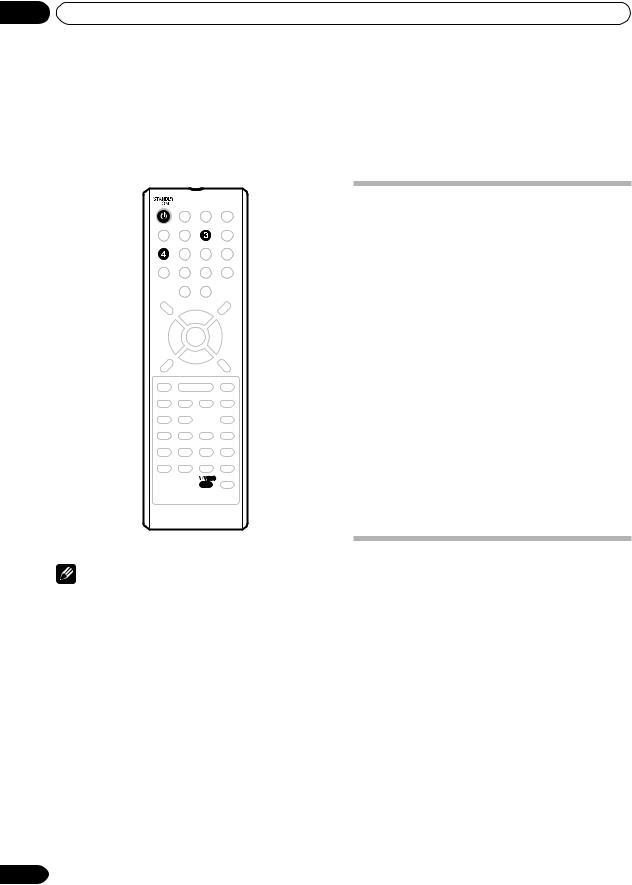
04 |
Getting started |
Chapter 4
Getting started
Note
•If the unit does not operate properly, or there is no key operation from the unit and/or the remote control: Static electricity, etc., may affect the operation. Disconnect the AC power cord once, then connect it again.
22
Auto clock setting
Preparation:
You must connect the antenna or cable before connecting the AC cord to the power source.
After the clock is set automatically, you may have to set the Standard Time (time zone) and Daylight Saving Time. (See page 26.)
Press STANDBY/ON to turn on the DVD/VCR after the auto clock operation completed.
•When shipped from the factory, the “AUTO CLOCK” option is set to “ON” position.
•If you turn the DVD/VCR on during auto clock setting, the clock is not set.
•After a power failure or disconnection of the power plug, the clock setting will be lost. In this case, wait 30 minutes before turning the DVD/VCR on.
•With cable box connection, if the auto clock setting is unsuccessful, select the PBS channel carrying the XDS information, then turn the DVD/VCR off. After 30 minutes, turn the DVD/VCR on.
•If the clock is not set automatically, set the clock manually. (See page 26.)
Setting the video channel
To view playback of a recorded tape or DVD disc, or to watch a program selected by the VCR’s channel selector, the TV must be set to channel 3 or 4 (video channel).
When a TV is connected with the 75 Ω coaxial cable only:
1Press and hold 3 or 4 on the remote control for 3 seconds in the standby mode to select CH 3 or 4. The selected channel number will flash on the display for about 4 seconds.
2Turn ON the TV and set to CH 3 or 4 to correspond with the channel selected in step 1.
3Press STANDBY/ON to turn on the DVD/VCR.
4Press TV/VIDEO to select the VIDEO position.
The TV indicator will appear in the display.
En
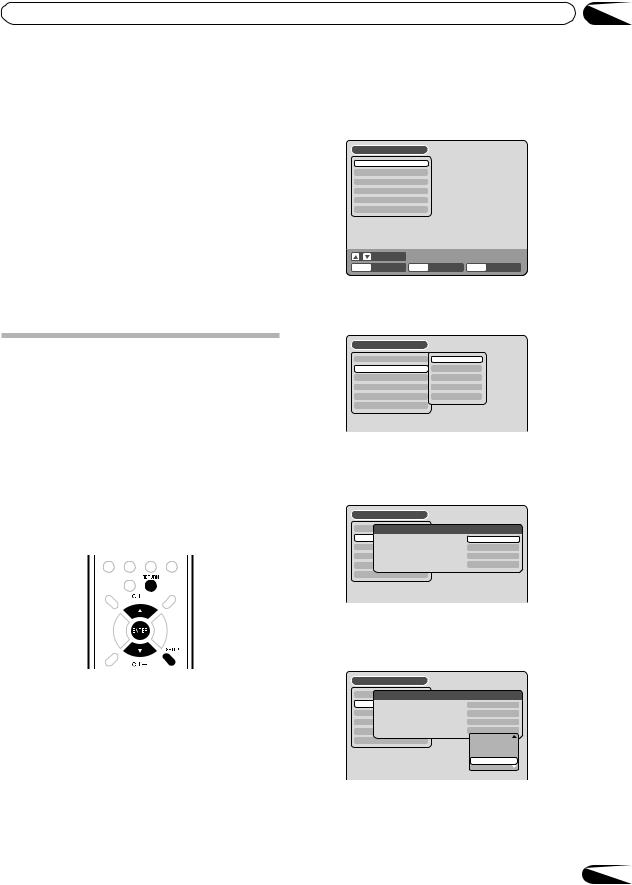
Getting started |
04 |
5 Select any channel to receive a TV station in your area.
The channel number will appear on the screen for about 4 seconds.
For a push-button TV tuner
If CH 3 or 4 corresponding to the video channel cannot be tuned on your TV, proceed as follows: set the VCR 3/4 channel selector and the TV to CH 3 or 4, playback a prerecorded tape and tune the TV to receive a sharp color picture from the video cassette recorder. Refer to your TV owner’s manual for details.
 Note
Note
•When shipped from factory, the video channel is set to CH 3.
SETUP MENU
The SETUP MENU consists of several menus where you can make various settings concerning language, audio functions, and images. In addition, this menu includes a clock, channel and other things that require setting just after purchase.
For details of each menu, see the corresponding section in this chapter.
Using the SETUP MENU
The following example shows the basic setting procedure of the SETUP MENU. The remote control keys that operate the SETUP MENU are displayed at the bottom of the screen.
1 Press SETUP while the DVD and video tape is stopped.
The SETUP MENU screen will appear.
SETUP MENU
TIMER REC SET
SYSTEM SETUP
AV SETUP
REC SETUP
CH SETUP
OTHER
SELECT
ENTER |
ENTER |
RETURN |
BACK |
SETUP |
END |
2 Press or to select the desired menu and press ENTER.
The submenu screen of the selected menu will appear.
SETUP MENU
TIMER REC SET |
LANGUAGE |
SYSTEM SETUP |
PARENTAL |
AV SETUP |
CLOCK |
REC SETUP |
DISC SETUP |
CH SETUP |
OTHER |
OTHER |
|
3 Press or to select the desired submenu and press ENTER.
The screen for the selected submenu will appear.
SETUP MENU
TIMER REC SET |
LANGUAGE |
SYSTEM SETUP |
ENGLISH |
OSD LANGUAGE |
|
AV SETUPDVD MENU |
ENGLISH |
REC SETAUPDIO |
ENGLISH |
CH SETUPSUBTITLE |
AUTOMATIC |
OTHER |
|
4 Press or to select the desired item you want and press ENTER.
Selectable items will be listed.
 Note
Note
•For items that require different operations from the basic setting procedure, the setting procedure is described in each individual section.
•The item which is indicated by green color cannot be selected.
•“TIMER REC SET” cannot be selected when the clock is not set.
SETUP MENU
TIMER REC SET |
LANGUAGE |
|
SYSTEM SETUP |
ENGLISH |
|
OSD LANGUAGE |
||
AV SETUPDVD MENU |
ENGLISH |
|
REC SETAUPDIO |
ENGLISH |
|
CH SETUPSUBTITLE |
AUTOMATIC |
|
OTHER |
ENGLISH |
|
FRANCAIS |
||
|
||
|
ESPANOL |
|
|
OTHER ---- |
|
|
AUTOMATIC |
|
|
OFF |
5 Press or to select the desired item and press
ENTER.
This completes the setting procedure.
•To return to the previous screen, press RETURN.
•To close the SETUP MENU, press SETUP.
23
En
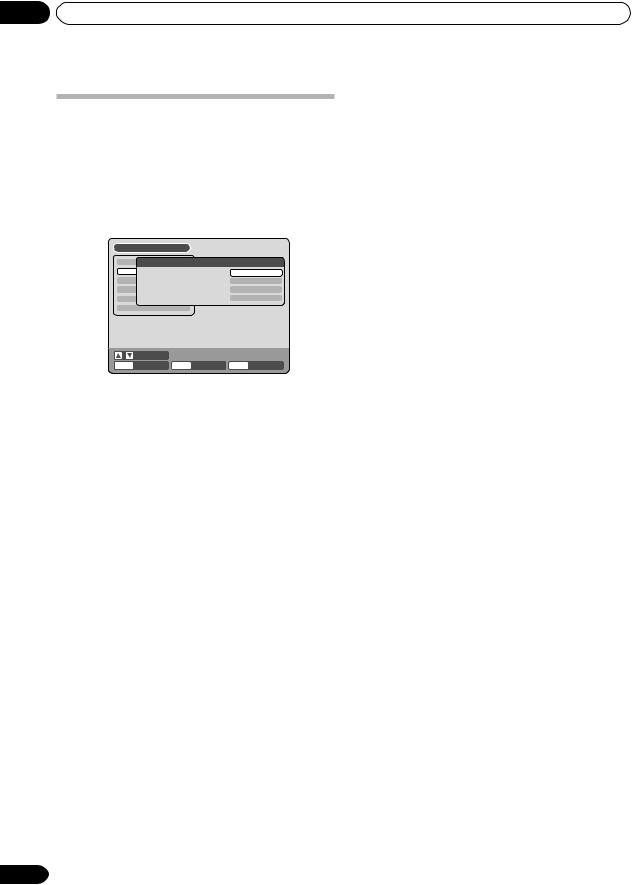
04 |
Getting started |
Setting the language
You can choose the language of the menu screen, DVD menu, DVD audio and subtitles.
Preparation:
•Turn ON the TV and set it to the video input mode.
•Select “LANGUAGE” from “SYSTEM SETUP”. For the procedure, see steps 1 to 3 in “Using the SETUP MENU” on page 23.
SETUP MENU
TIMER REC SET |
|
LANGUAGE |
|
|
|
SYSTEM SETUP |
|
|
ENGLISH |
||
|
OSD LANGUAGE |
|
|||
AV SETUPDVD MENU |
|
|
ENGLISH |
||
REC SETAUPDIO |
|
|
ENGLISH |
||
CH SETUPSUBTITLE |
|
|
AUTOMATIC |
||
OTHER |
|
|
|
|
|
|
SELECT |
|
|
|
|
ENTER |
ENTER |
RETURN |
BACK |
SETUP |
END |
Selectable languages:
ENGLISH, FRANCAIS, ESPANOL
The language you have selected will play if it is recorded on the disc.
ORIGINAL
The unit will select the first priority language of each disc.
OTHER
If you want to select another language, before pressing ENTER, input the language code by using the numeric keys. (See the Language code list on page 83). Then press ENTER.
• If you input a wrong number, press CANCEL.
 Note
Note
•If the selected language is not recorded on the disc, the first priority language is selected.
OSD LANGUAGE
You can set the language for on screen display.
Select “OSD LANGUAGE” and select the language from the list below.
Selectable languages:
ENGLISH, FRANCAIS, ESPANOL
DVD MENU
When several menu languages are recorded on a DVD, you can select the language to be used for the DVD menu.
Select “DVD MENU” and select the language from the list below.
Selectable languages:
ENGLISH, FRANCAIS, ESPANOL
The selected language is the firstpriority menu language.
OTHER
If you want to select another language, before pressing ENTER, input the language code by using the numeric keys. (See the Language code list on page 83). Then press ENTER.
• If you input a wrong number, press CANCEL.
AUDIO
When several audio languages are recorded on a DVD, you can select the audio language to be played back. The selected language remains in effect after the power is turned off or the disc is replaced.
Select “AUDIO” and select the audio language from the list below.
24
SUBTITLE
When several subtitles languages are recorded on DVD, you can select the language to be used for the subtitles. The selected language remains in effect after the power is turned off or the disc is replaced.
Select “SUBTITLE” and select the menu language from the list below.
Selectable languages:
ENGLISH, FRANCAIS, ESPANOL
The subtitle is displayed with the selected language if it is recorded on the disc.
OTHER
If you want to select another language, before pressing ENTER, input the language code by using the numeric keys. (See the Language code list on page 83). Then press ENTER.
•If you input a wrong number, press CANCEL.
AUTOMATIC
•The unit will automatically select the same language in the AUDIO setting.
•When the unit selects the same language as the AUDIO setting, the subtitles will not appear during playback.
•When you do not use the same language as the AUDIO setting, the subtitles will appear during playback.
OFF
Subtitles do not appear.
 Note
Note
•If the selected language is not recorded on the disc, the first priority language is selected.
En
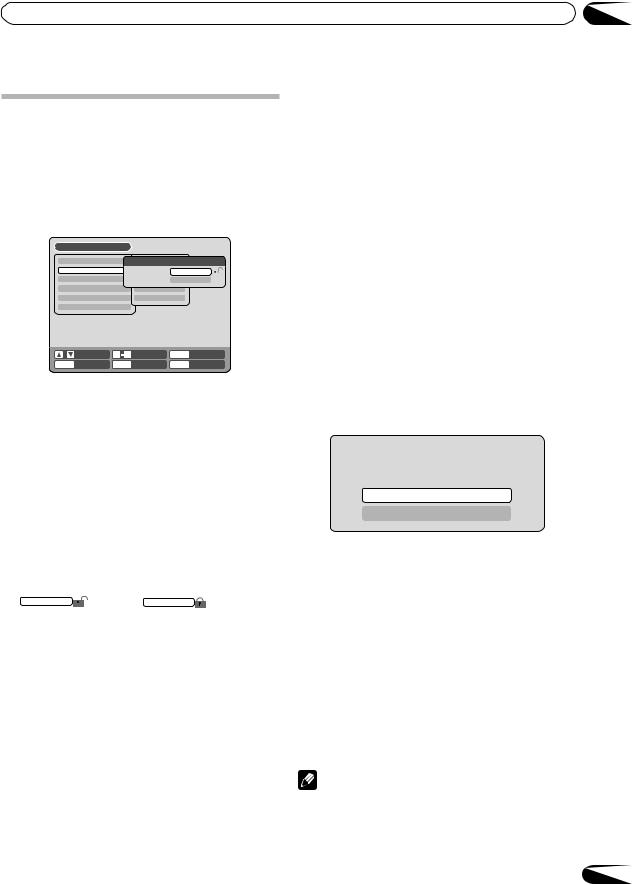
Getting started
Setting the parental control
Some discs are specified as not suitable for children. This unit can prevent playback of such discs.
Preparation:
•Turn ON the TV and set it to the video input mode.
•Select “PARENTAL” from “SYSTEM SETUP”. For the procedure, see steps 1 to 3 in “Using the SETUP MENU” on page 23.
SETUP MENU
TIMER REC SET |
|
LANGUAGEPARENTALP |
|
|
||||
SYSTEM SETUP |
|
PARENTAL |
|
|
|
|
|
|
|
|
PASSWORD |
|
- |
- - |
- |
|
|
AV SETUP |
PARENTALCLOCK |
|
OFF |
|
|
|||
REC SETUP |
|
DISC SETUP |
|
|
|
|
|
|
CH SETUP |
|
OTHER |
|
|
|
|
|
|
OTHER |
|
|
|
|
|
|
|
|
|
SELECT |
0 9 |
INPUT NO. |
CANCEL |
DELETE |
|||
ENTER |
ENTER |
RETURN |
BACK |
SETUP |
END |
|||
Selecting parental control
Select “PARENTAL” and select the parental control level. If the recorder is set to a lower level than the disc, it will require you to enter a password before the disc will play.
To lock the selected parental control level
1To lock the selected parental control level, pressor to select “PASSWORD”.
2Use the numeric keys to input a 4-digit password.
•If you input a wrong number, press CANCEL.
•Be sure to remember this number!
3Press ENTER.
1234 |
change to |
---- |
To cancel the locked parental control level
1Select “PASSWORD” shown in step 1 of the above section and use the numeric keys to input the password.
2Press ENTER.
The locked mark “ ” will change to an unlocked mark “
  ”.
”.
Then, you can change the parental control level, or enter a new password.
04
 Note
Note
•The selected level will apply to operations executed after this.
•The unit cannot restrict playback of some discs.
•Some discs may not be encoded with specific rating level information though its disc jacket says “adult”. Parental control will not work with those discs.
•If you forget the password, you can reset the recorder to its factory settings (see Resetting the recorder on page 91), then set a new password.
Temporarily cancelling parental control
Parental control can temporarily be canceled with some DVDs.
1Playback a DVD. (See page 33.)
2If the DVD disc has been designed to temporarily cancel the rating level, the screen that follows the “READING” screen will change. If you select “YES” with the ENTER, the message “YOUR DISC EXCEEDS THE PARENTAL CONTROL LEVEL 1.” (for example) will then appear.
YOUR DISC EXCEEDS THE PARENTAL
CONTROL LEVEL 1.
PARENTAL CONTROL LEVEL
CANCEL PICTURE
3If you wish to cancel the set rating level temporarily, select “PARENTAL CONTROL LEVEL” with or, then press ENTER. If the password has been selected, the password input screen will appear.
Alternatively, if the password has not been set, playback will commence. If you don’t know (or have forgotten) the password, select “CANCEL PICTURE”.
The setting screen will disappear. Press OPEN/CLOSE to remove the disc.
4Use the numeric keys to input the password.
•To interrupt the input process, press RETURN.
5Press ENTER.
6Playback will commence if the entered password was correct.
Note
•This temporary cancellation of the rating level will remain active until the disc is ejected.
When the disc is ejected, the original rating level will be set again automatically.
25
En

04 |
Getting started |
Setting the clock
The clock is set to the correct time automatically, but it can also be set manually. The clock can be set for daylight saving time and time zone.
Preparation:
•Turn ON the TV and set it to the video input mode.
•Select “CLOCK” from “SYSTEM SETUP”. For the procedure, see steps 1 to 3 in “Using the SETUP MENU” on page 23.
SETUP MENU
TIMER REC SET |
|
CLOCK |
|
|
||
SYSTEM SETUP |
|
|
01/01/06 12:00AM |
|||
|
|
CLOCK (MM/DD/YY) |
||||
AV SETUP |
AUTO CLOCK |
|
|
ON |
||
REC SETUP |
STANDARD TIME |
|
AUTOMATIC |
|||
CH SETUP |
DAYLIGHT SAVING TIME |
AUTOMATIC |
||||
OTHER |
|
|
|
|
|
|
|
SELECT |
|
SELECT |
|
|
|
ENTER |
ENTER |
RETURN |
BACK |
SETUP |
END |
|
CLOCK (manually)
You can manually set the date, year and present time with the remote control.
Ex.: Setting the clock to “10:20AM” October, 30th, 2006.
1Select “CLOCK” and press ENTER.
01/01/06 12:00AM
2Select the desired items using or (month, date, year, hour, minute and AM/PM) then press ENTER.
3Press or to set the value of the selected item.
•For the minutes, press or once to set the time minute by minute, or hold down either of buttons for several seconds to set the time in 10-minute intervals.
10/30/06 10:20AM
4Repeat steps 2 and 3 to set the date, year and present time, and press ENTER. The SETUP MENU will close.
This completes clock time setting.
AUTO CLOCK
You can automatically set the clock by turning “ON” the AUTO CLOCK function.
When you want to set the auto clock function to “OFF”, select “AUTO CLOCK”, press ENTER and select “OFF” from the list.
For more information see page 22.
 Note
Note
•In case of a power failure, the clock will continue to operate for another 30 minutes with quartzcontrolled precision. To indicate that the power failure has lasted for an excessive period of time “0:00” will appear on
26 |
the display. In this case readjust time and date. |
|
STANDARD TIME (Time zone)
In the rare event that you live within the broadcast range of two stations in two different time zones, the DVD/VCR may recognize the wrong station for the auto clock set.
To correct the situation:
Select “STANDARD TIME” and select the time zone from the list below.
Selectable time zones and correction times
ATLANTIC: GMT – 4 hours
(GMT: Greenwich Mean Time)
EASTERN: |
GMT – 5 hours |
CENTRAL: |
GMT – 6 hours |
MOUNTAIN: |
GMT – 7 hours |
PACIFIC: |
GMT – 8 hours |
ALASKA: |
GMT – 9 hours |
HAWAII: |
GMT – 10 hours |
AUTOMATIC: |
AUTO SET |
 Note
Note
•When shipped from the factory, the “STANDARD TIME” is set to “AUTOMATIC”.
•After making the auto clock setting, in some cases the clock may display another time zone. You can correct the clock by selecting your time zone setting above.
•When the clock is not set or you set the clock manually, the time zone setting is not available.
DAYLIGHT SAVING TIME
You can set the clock to daylight saving time automatically or manually.
To select daylight saving time, select “DAYLIGHT SAVING TIME” and select “ON”, while to cancel the daylight saving time, select “OFF”.
ON: For manual setting (forward 1 hour)
OFF: For manual setting (back 1 hour)
AUTOMATIC: For automatic setting (read XDS in the signal)
 Note
Note
•When you want to set daylight saving time, on the first Sunday in April you set it to “ON”, and on the last Sunday in October you set it to “OFF”.
•When shipped from the factory, the “DAYLIGHT SAVING TIME” option is set to “AUTOMATIC”.
•When the clock is not set, the daylight saving time setting is not available.
•When there is no daylight saving time in your area, always select “OFF”.
En
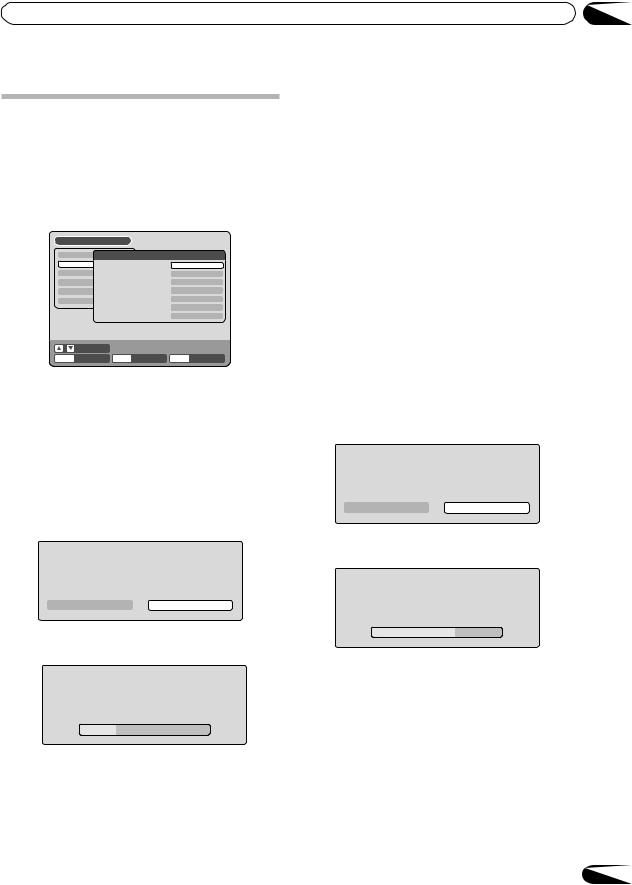
Getting started
Setting the disc
You can format, protect, or finalize a disc.
Preparation:
•Turn ON the TV and set it to the video input mode.
•Select “DISC SETUP” from “SYSTEM SETUP”. For the procedure, see steps 1 to 3 in “Using the SETUP MENU” on page 23.
SETUP MENU
TIMER REC SET |
|
DISC SETUP |
|
|
||
SYSTEM SETUP |
|
|
PROCEED |
|||
|
|
REFORMAT AS DVD VIDEO |
||||
AV SETUP |
REFORMAT AS DVD VR |
PROCEED |
||||
REC SETUP |
NEW DISC FORMAT |
|
VR |
|||
CH SETUP |
FINALIZE |
|
PROCEED |
|||
OTHER |
|
PROTECT DISC |
|
|
OFF |
|
|
|
UNDO FINALIZE |
|
PROCEED |
||
|
|
DVD-RAM Physical Format |
PROCEED |
|||
|
SELECT |
|
|
|
|
|
ENTER |
ENTER |
RETURN |
BACK |
SETUP |
END |
|
REFORMAT
You can format a recorded DVD-RAM/RW.
Check the content of the disc before format. If you format the disc, the recorded content of the disc will be erased.
To format a DVD in the Video mode, select “REFORMAT AS DVD VIDEO”, and to format it in the VR mode, select “REFORMAT AS DVD VR”. You cannot select “REFORMAT AS DVD VIDEO” when DVD-RAM inserted. For more information see page 10.
The screen below will appear.
REFORMAT
START |
CANCEL |
•When you select “START” and press ENTER, format will start. The screen below will appear.
REFORMAT
•When you select “CANCEL” and press ENTER, the DISC SETUP screen will appear.
04
 Note
Note
•When the format finished, “REFORMATTING COMPLETED PRESS ENTER.” will appear. Press ENTER to clear the screen.
•You cannot format Ver. 1.0 DVD-RW and DVD-R.
•You cannot format a disc if the disc protection is “ON”.
In such a case, be sure to cancel the disc protection (see page 28) before format.
•You cannot format a DVD-RAM in the Video mode.
NEW DISC FORMAT
If you insert an unused disc, the disc is automatically formatted.
If you use the DVD-RW (Ver.1.1/1.2), you can select the mode to be used for automatic format.
Select “NEW DISC FORMAT” and select the mode from the list below.
VR: Format the disc in the VR mode.
VIDEO:Format the disc in the Video mode.
When you insert an unused disc, the following message screen will appear.
NEW DISC FORMAT
START |
CANCEL |
•When you select “START” and press ENTER, formatting will start. The screen below will appear.
INITIALIZING DISC
•When you select “CANCEL” and press ENTER, the normal TV screen will appear.
 Note
Note
•When the Initialization finished, “FORMATTING COMPLETED PRESS ENTER” will appear. Press ENTER to clear the screen.
•If a recorded disc has scratches or contamination on it, the “NEW DISC FORMAT” screen may appear. If this happens, select “CANCEL”.
27
En
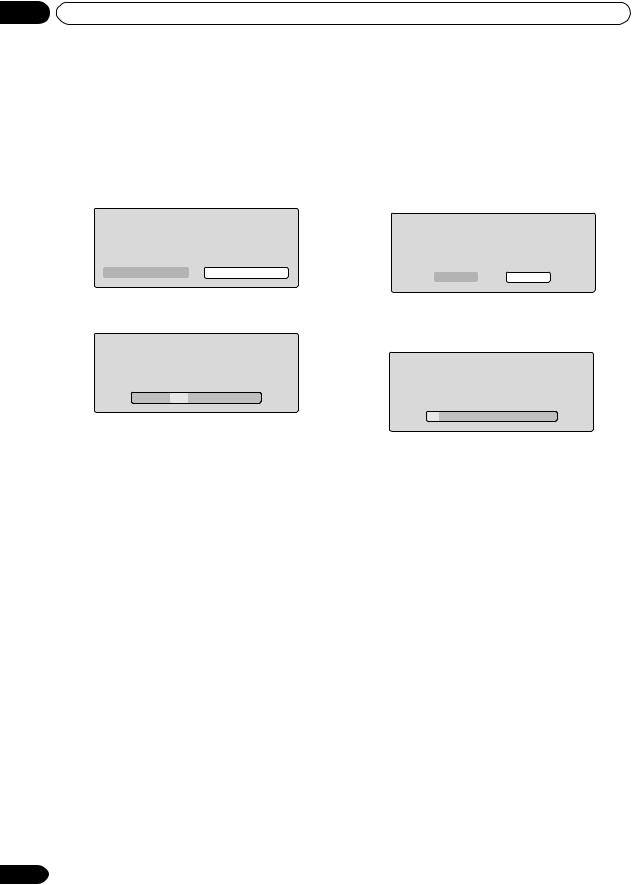
04 |
Getting started |
FINALIZE
To play a DVD(-R/RW) disc recorded on this unit you must finalize the disc to insure compatibility with other DVD players. In addition, if you are using a DVD-RW disc you must record in Video mode.
When “FINALIZE” is selected, the screen below will appear.
FINALIZE
START |
CANCEL |
•When you select “START” and press ENTER, finalization will start. The screen below will appear.
FINALIZING
PLEASE WAIT
UNDO FINALIZE
You can cancel the finalization of a finalized DVD-RW (in VR mode).
You cannot cancel the finalization for discs other than above. You can record or edit on a disc whose finalization has been canceled.
Select “UNDO FINALIZE”, and the screen below will appear.
UNDO FINALIZE
START CANCEL
•When you select “START” and press ENTER, the cancelling finalization will start. The screen below will appear.
UNFINALIZING
PLEASE WAIT
•When you select “CANCEL” and press ENTER, the DISC SETUP screen will appear.
 Note
Note
•During finalizing, the cursor will move repeatedly. When the finalization finished, “FINALISING COMPLETED PRESS ENTER” will appear. Press ENTER to clear the screen.
•The finalization process may require a few minutes to about 1 hour according to disc type or the amount of free space on the disc.
•You can record or edit a finalized DVD-RW (in VR mode) by cancelling the finalizing, but you cannot do these operations with a DVD-RW (Video mode), or with a DVD-R.
•You cannot playback a disc recorded on VR mode on a unit that does not support DVD-RW.
•Even if you finalize a disc in the Video mode, the disc cannot be played back in some DVD players.
•A DVD-R disc cannot be named after it is finalized.
PROTECT DISC
You can protect a disc to prevent the content recorded on it from being erased, edited or re-recorded.
Only DVD-RAM and DVD-RW (in VR mode) can be protected.
Select “PROTECT DISC” and select “ON” to protect the disc.
To cancel the disc protection, select “OFF”.
28
En
•When you select “CANCEL” and press ENTER, the DISC SETUP screen will appear.
 Note
Note
•During unfinalizing, the cursor will move repeatedly. When cancelling finalization is complete, “UNDO FINALISING COMPLETED PRESS ENTER” will appear. Press ENTER to clear the screen.
•The cancelling finalization process may require a few minutes to about 1 hour according to disc type or the amount of free space on the disc.
•When the disc’s finalization cannot be canceled, you cannot select “UNDO FINALIZE”.
DVD-RAM Physical Format
Physically formats a DVD-RAM disc. Whenever you use a new disc for the first time, be sure to format it.
 Note
Note
•The physical format process may require about 1 hour according to disc condition.
•Select Physical Format when the DVD-RAM disc cannot be recognized after reformatting the disc.
•Select Physical Format for DVD-RAM disc that has been used on PC before using.
You can turn the display window and screen display “ON” or “OFF”.
Preparation:
•Turn ON the TV and set it to the video input mode.
•Select “OTHER” from “SYSTEM SETUP”. For the procedure, see steps 1 to 3 in “Using the SETUP MENU” on page 23.
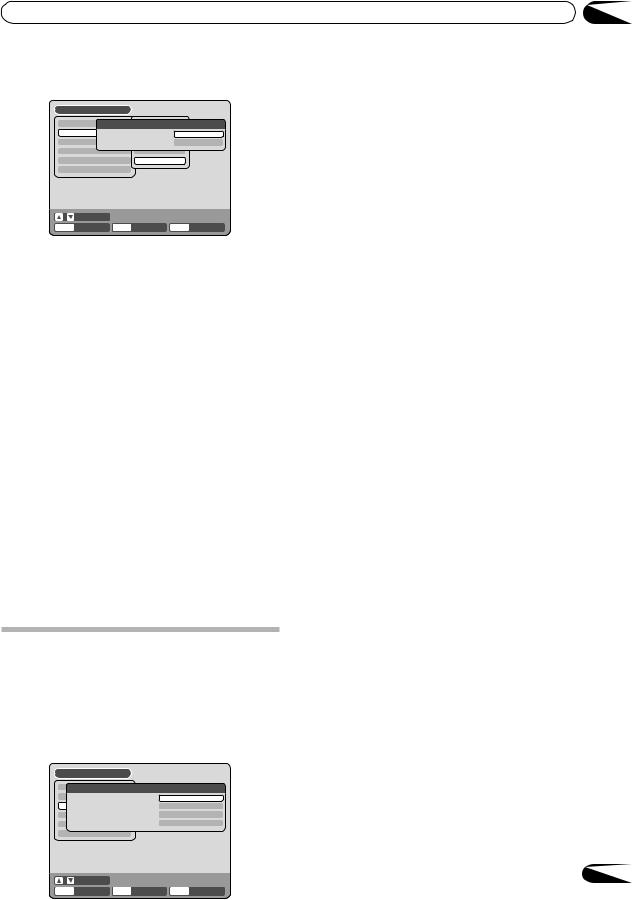
Getting started |
04 |
SETUP MENU
TIMER REC SET |
LANGUAGEOTHER |
|
|
SYSTEM SETUP |
PARENTAL |
AUTOMATIC |
|
|
DIMMER |
|
|
AV SETUP |
DISPLAY/CALLCLOCK |
ON |
|
REC SETUP |
|
DISC SETUP |
|
CH SETUP |
|
OTHER |
|
OTHER |
|
|
|
|
SELECT |
|
|
|
|
ENTER |
ENTER |
RETURN |
BACK |
SETUP |
END |
DIMMER (Brightness of the display window)
You may adjust the brightness or turn off the display on the front panel of the unit.
Select “DIMMER” and select the display window status from the list below.
AUTOMATIC:
When the power is on, the display window appears bright. When the power is off, it appears dark.
DIM:
The window display always appears dark.
OFF:
When the power is on, the display window appears dark. When the power is off, it is turned off.
DISPLAY/CALL (Turning the screen display “ON” or “OFF”)
You can turn off the screen display that is output to the TV screen by this unit. Select “DISPLAY/CALL”, and select “ON” or “OFF”.
ON:
The screen display appears.
OFF:
Nothing but the SETUP MENU and error messages appear.
Setting the screen
This section describes settings about the screen.
Preparation:
•Turn ON the TV and set it to the video input mode.
•Select “AV SETUP 1” from “AV SETUP”. For the procedure, see steps 1 to 3 in “Using the SETUP MENU” on page 23.
SETUP MENU
TIMER REC SET |
AV SETUP 1 |
SYSTEM SETUP |
4:3 Letter box |
TV SCREEN |
|
AV SETUPSTILLMODE |
AUTOMATIC |
RECLINE1SETUPINPUT |
VIDEO |
CH SETUPLINE2 INPUT |
VIDEO |
OTHER |
|
TV SCREEN
You can select the TV screen size to suit the screen image.
Select “TV SCREEN” and select screen size from the list below.
4:3 Pan scan
It displays a wide picture across the whole screen with left and right edges automatically cut off.
4:3 Letter box
Select this mode when connecting to a conventional TV. When playing back a wide screen DVD disc, it displays a wide picture with black bands at the top and bottom of screen.
16:9
Select this mode when connecting to a wide-screen TV. A wide-screen picture is displayed in full size.
 Note
Note
•For the screen sizes and disc formats, see page 83.
•If the DVD disc is not formatted in the pan scan format, it displays a 4:3 aspect ratio.
STILL MODE
You can set the type of image displayed on the TV screen when the playback of the DVD is stilled. Select “STILL MODE” and select the image to be displayed from the list below.
AUTOMATIC
The field still or frame still is automatically selected. (For normal use.)
STILL BY FRAME
The frame still is set.
Note for the field still and frame still:
(with 480i interlaced scanning mode)
•Field* still (240 lines)
Since only one field (half of the video information) is shown on the TV screen, the picture appears rough but does not shake.
•Frame* still (480 lines)
Two fields are alternatively shown on the TV screen. The picture shakes but the resulting picture quality is superior to the field still pictures.
Field*: |
A field refers to the video information in |
|
one-half of a frame. 1 frame (screen) |
|
consists of 2 fields. |
Frame*: |
A frame refers to the total area occupied |
|
by each picture on the TV screen. |
SELECT
ENTER |
ENTER |
RETURN |
BACK |
SETUP |
END |
29
En
 Loading...