

Page 1

Audio Visual Master Unit
Unidad maestra audiovisual
Operation Manual
AVM-P7000R
Manual de Operación
Page 2

Contents
Key Finder...............................................3
• Remote Controller
Before Using This Product
About This Product
About This Manual
To Ensure Safe Driving ............................................5
Resetting the Microprocessor
Precaution...................................................................6
In Case of Trouble
..................................................
...................................................
....................................................
...................
...................................
Using the Remote Controller.................7
• Batteries
Basic Operation
To Listen to Music
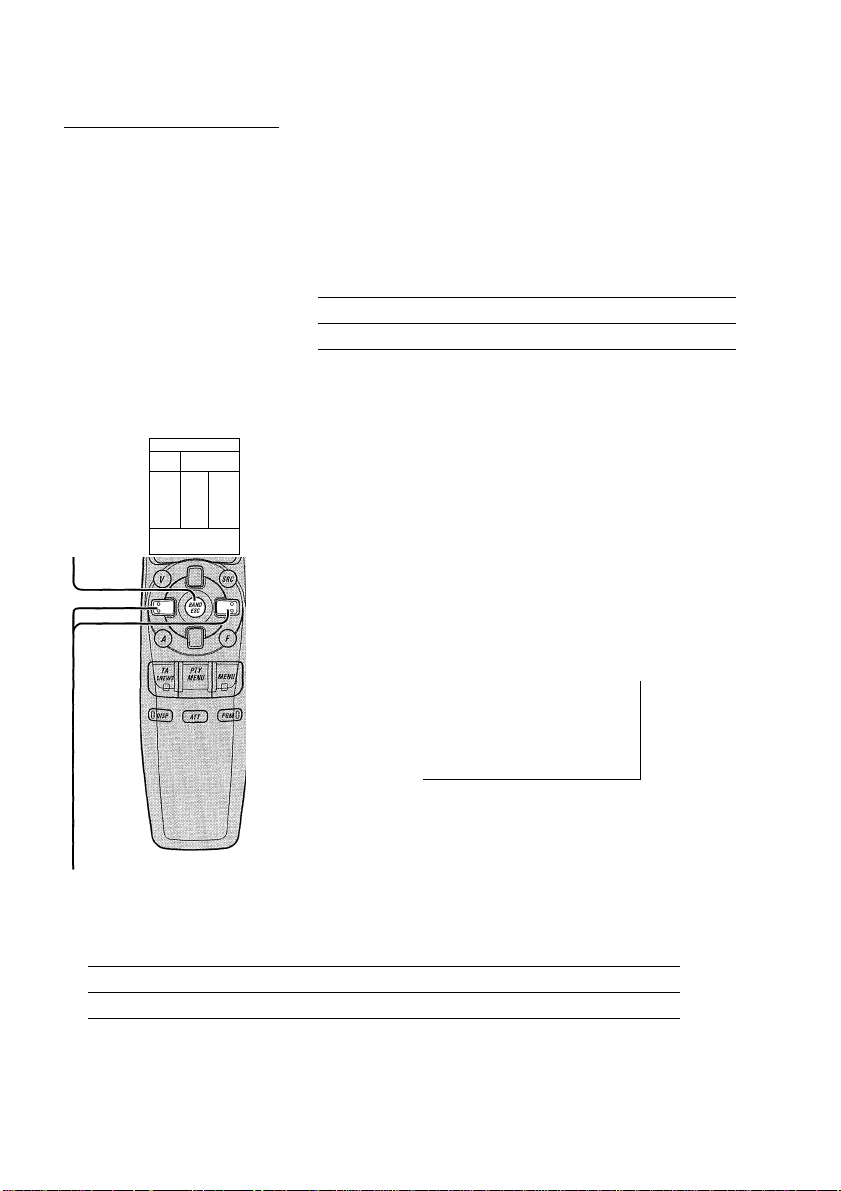
Basic Operation of Tuner........................................10
• Band
• Manual and Seek Tuning
• Preset Tuning
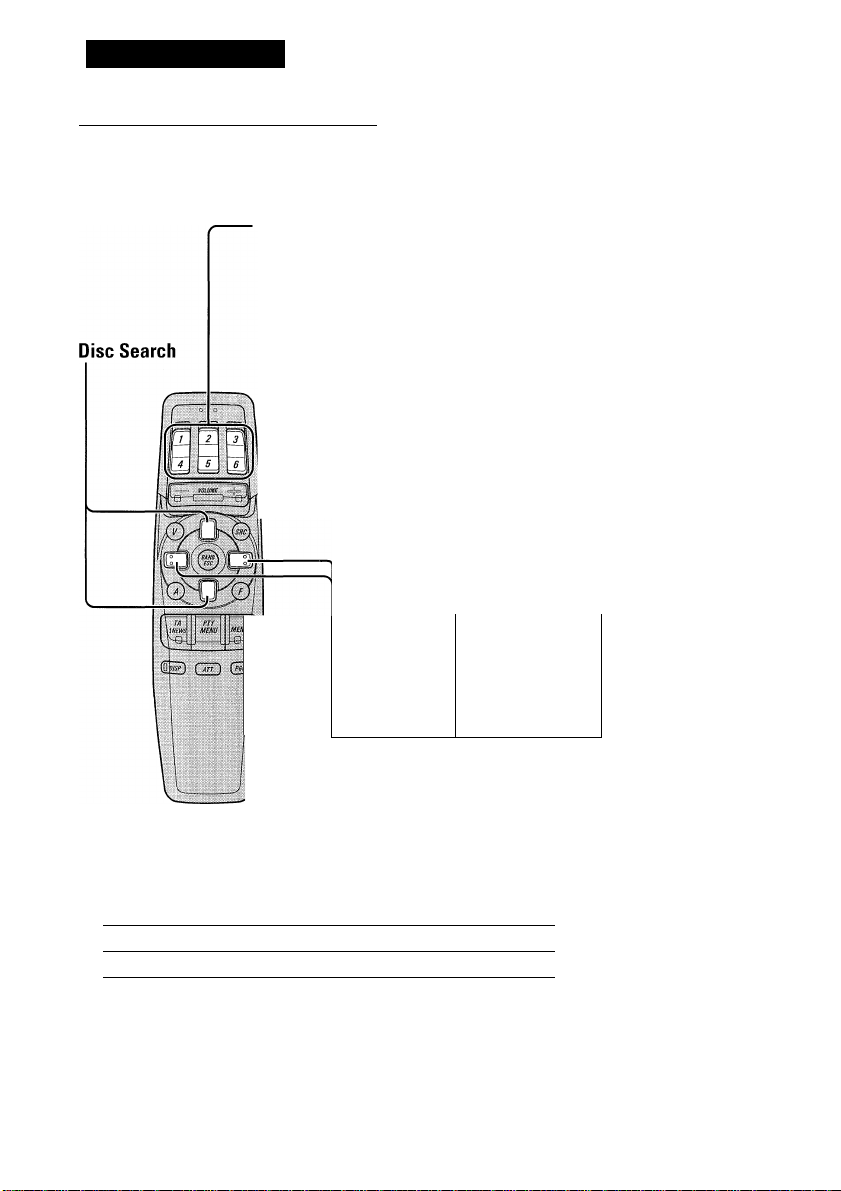
Basic Operation of Multi-CD Player
• Disc Search
• Disc Number Search
(for 6-Disc, 12-Disc types)
• Track Search and Fast Forward/Reverse
Entering the Function Menu
• Function Menu Functions
Entering the Detailed Setting Menu .......................14
• Detailed Setting Menu Functions
....................................
....................................................
.....................
...................................
Tuner Operation ...................................16
Local Seek Tuning (LOCAL)
Best Stations Memory (BSM)
................................
................................
16
17
4
Using the RDS Functions
4
5
6
6
8
8
11
12
WhatisRDS?
Frequency Display ON/OFF ..................................18
• Program Service Name
• PTY Information
AF Function (AF)
• Activating/Deactivating the AF Function
PI Seek Function ................................................... 20
• PI Seek
• Auto PI Seek (for preset station)
Regional Function (REGIONAL)
• Activating the Regional
TA Function (TRAFFIC ANNC.)
• Activating/Deactivating the TA Function
• Canceling Traffic Announcements
• Adjusting the TA Volume
• TP Alarm Function
PTY Function ..........................................................23
• Searching the PTY
• News Program Interruption Setting
• PTY Alarm
• PTY List
(NEWS)
.......
.....................................................18
....................................................
....................
.........................
.........................
18
19
20
21
Page 3

Using Multi-CD Players
Repeat Modes (PLAY MODE) ..............................27
Pause (PAUSE)
Random Play (RANDOM)......................................28
Scan Play (SCAN) ...................................................28
CD Sound Quality Adjustment
(COMP SELECT)
• COMP/DBE ON/OFF Switching
ITS (Instant Track Selection)
• ITS Programming (ITS INPUT)
• ITS Play (ITS PLAY)
• Erase a Track Program
• Erase a Disc Program
Disc Title ..................................................................33
• Disc Title Input (TITLE INPUT)
CD TEXT Function (for CD TEXT
compatible type)
• Title Display Switching
• Title Scroll
Other Functions ......................................................37
• Switching the Multi-CD Player
• Playing Discs on a 50-Disc Type
Multi-CD Player
.......................................................
.......................
..........................................
................................
.............................................
27
Audio Adjustment.................................38
Entering the Audio Menu
Balance Adjustment (FADER/BALANCE) .... 39
Bass/Middle/Treble Adjustment
(BASS/MID/TREBLE) ...................................40
Loudness Adjustment (LOUDNESS)
Using a Subwoofer...................................................41
• Subwoofer Output (SUBW.l)
• Subwoofer Setting Adjustment
(SUBW.2)
Front Image Enhancer Function (FIE)
Source Level Adjustment (SLA)
.......................................
...................
....
............
...........................
Initial Setting Menu ..............................47
Entering the Initial Setting Menu
27
30
30
Changing the EM Tuning Step
(EM TUNING STEP)
Setting the DAB Priority Function
(DAB PRIORITY)
Switching the Auto PI Seek
(AUTO PI SEEK)
Switching the AUX Mode (AUX)
Switching the Speaker Input Mode
(SPEAKER INPUT)
Switching the VIDEO Modes
(VIDEO INPUT A/B)
...........................................
.........................
.....................................
..........................................
..........................
.......................................
.....................................
47
48
48
49
50
50
51
Other Functions....................................52
35
38
41
43
44
Using the PGM Button
(PGM-EUNCTION)
• Setting the PGM Button
• Using the PGM Button
Using the AUX Source.............................................54
• Selecting the AUX Source
• AUX Title Input
Using the Speaker Input Source .......................... 55
Selecting the Picture (Front Display) ....................55
Using the Rear Display ...........................................56
Volume Attenuator
Muting Function
• Mobile Navigation Unit Muting
• Cellular Telephone Muting
When using the DAB (Digital Audio
Broadcasting) Tuner .......................................58
• About this Product’s Indications
• Operation
Specifications
.......................................
..................................................
......................................................
.......................................
52
56
57
60
Picture Adjustment...............................45
Adjusting the Picture
• Color (COLOR)
• Sharpness (SHARP)
.............................................
45
Page 4
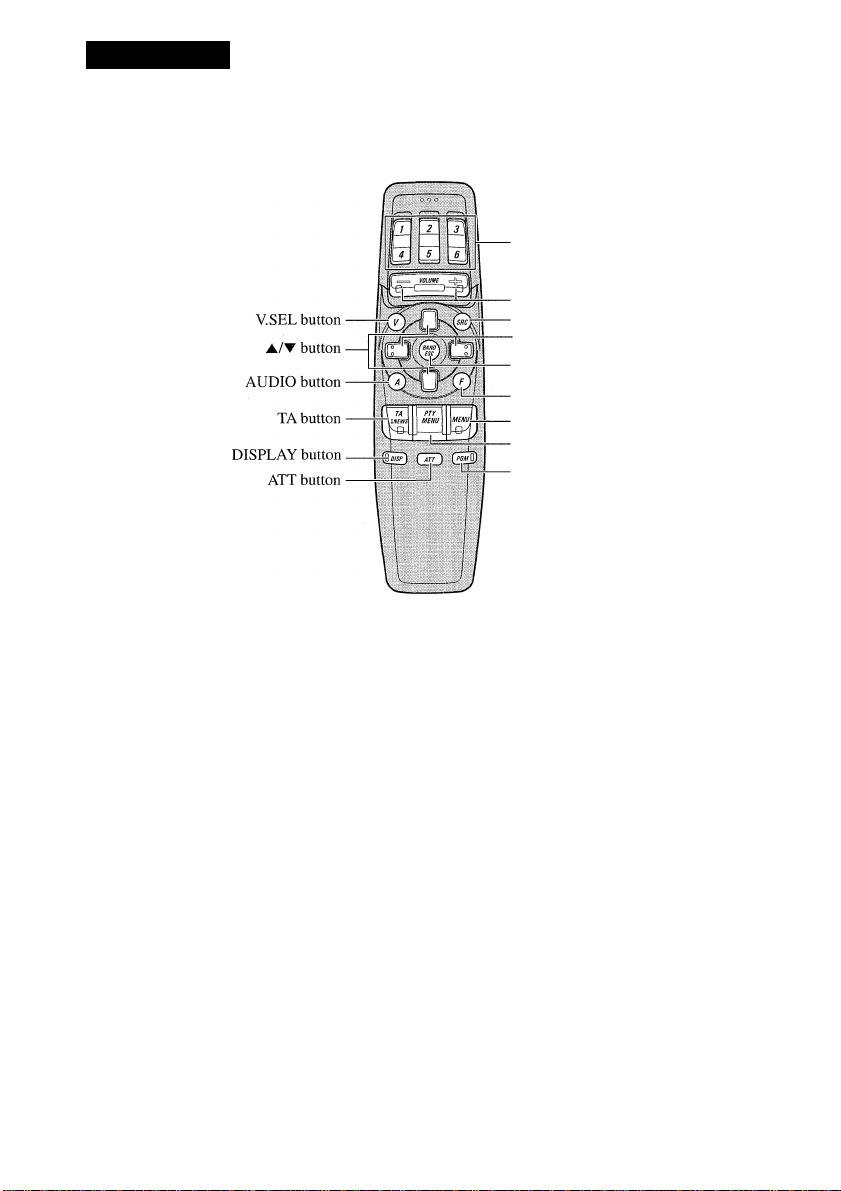
Key Finder
Remote Controller
■ Buttons 1-6
■ +/- button
■ SOURCE button
4/^ button
- BAND button
- FUNCTION button
■ MENU button
- PTY button
- PGM button
Page 5
Before Using This Product
About This Product
This product complies with the EMC Directives (89/336/EEC, 92/31/EEC) and CE Marking
Directive (93/68/EEC).
The tuner frequencies on this product are allocated for use in Western Europe, Asia, the
Middle East, Africa and Oceania. Use in other areas may result in improper reception. The
RDS function operates only in areas with EM stations broadcasting RDS signals.
This product’s display features Key Guidance Indicators. These light to indicate which of
the A/T/^/^, FUNCTION and AUDIO buttons you can use. When you’re in the
Function Menu or Audio Menu, they also make it easy to see which A/T/^/^ buttons
you can use to switch functions ON/OFF, switch repeat selections, and perform other oper
ations.
Key Guidance Indicators
eg: Function Menu
eg: Audio Menu
FUNCTiON
6 n 8 0 02*34"
CORVETTE
® 6 8 ©02*34"
CORVETTE
FADER
FROHT
Note:
• When “ON” and “OFF” are lit, you can switch the currently selected function ON/OFF with the
A/T buttons.
• When “SEE” is lit, you can use the ◄/► buttons or A/T buttons to switch selection options of the
currently selected function.
• When settings such as “ON”, “OFF” etc., are selected, the selected setting will be displayed in
yellow.
• The image sometimes fluctuates. It is not a malfunction.
Page 6

Before Using This Product
About This Manual
This product features a number of sophisticated functions ensuring superior reception and
operation. All are designed for the easiest possible use, but many are not self-explanatory.
This operation manual is intended to help you benefit fully from their potential and to
maximize your listening enjoyment.
We recommend that you familiarize yourself with the functions and their operation by
reading through the manual before you begin using this product. It is especially important
that you read and observe the “Precaution” on the next page and in other sections.
To Ensure Safe Driving
To ensure safe vehicle operation, complicated functions are not operable during driving. If
any of these complicated functions are selected while driving, “YOU CANNOT USE
THIS FUNCTION WHILE DRIVING” is temporarily displayed on the display. To use
these functions, please stop your vehicle and engage the parking brake.
ATTENTION
YO U CA NNOT USE THI S
FU NCTI ON WHIL E DRIV ING
Once you have stopped your vehicle and engaged the parking brake, the system may
ignore this fact and display the “YOU CANNOT USE THIS FUNCTION WHILE
DRIVING” message. This may occur when:
- The ignition is turned ON or OFF.
- The ignition switch is turned to the ACC position, and the engine started in order to
use the system.
- The RESET button is pressed.
In the above cases it can be assumed that the system has not detected that the parking
brake is engaged. In this case, release the parking brake and then re-engage it.
On some vehicles, when the ignition is set to the OFF or ACC position, the condition of
the parking brake cannot be detected. In order to use the system while the ignition
switch is in the ACC position, first turn the ignition switch to the ON position, engage
the parking brake, and then return the ignition switch to the ACC position.
Page 7

Resetting the Microprocessor
The microprocessor must be reset under the following conditions:
When using this product for the first time after installation.
When the machine fails to operate properly.
When strange (incorrect) messages appear on the display.
To reset the microprocessor, press the RESET button on the unit with a pen tip or other pointed instrument.
Precaution
Keep this manual handy as a reference for operating procedures and precautions.
Always keep the volume low enough for outside sounds to be audible.
Protect this product from moisture.
If the battery is disconnected, the preset memory will be erased and must be repro
grammed.
In Case of Trouble
Should this product fail to operate properly, contact your dealer or nearest authorized
PIONEER Service Station.
Page 8
Using the Remote Controller
This product is equipped with a remote controller for convenient operation.
• Point the controller in the direction of the signal reception on the color display (sold sep
arately) to operate.
• When the controller is not in use, attach it firmly to the provided Mounting base.
Precaution:
• Do not store the remote controller in high temperatures or direct sunlight.
• The controller may not function properly in direct sunlight.
• Do not let the remote controller fall onto the floor, where it may become jammed under the brake or
accelerator pedal.
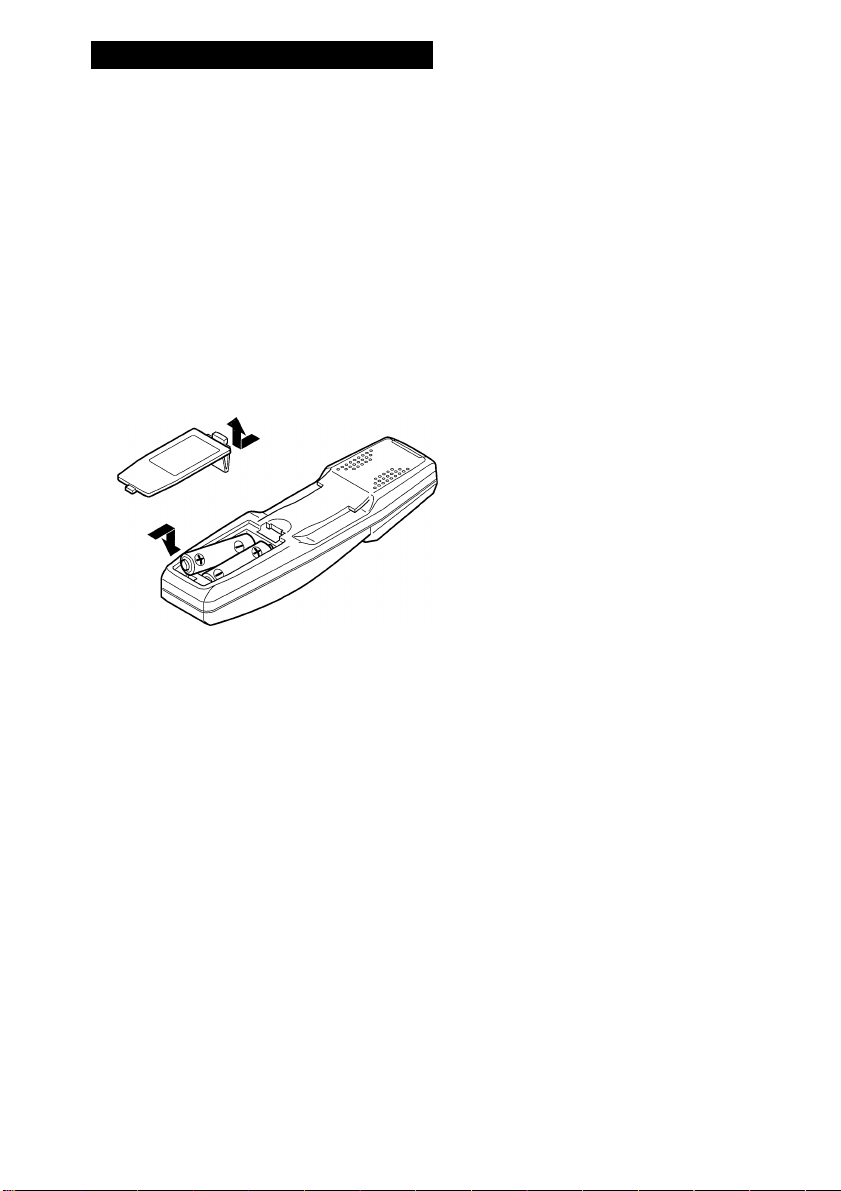
Batteries
• Remove the cover on the back of the remote controller and insert the batter
ies with the (+) and (-) poles pointing in the proper direction.
Precaution:
• Use only AAA or lEC R03 1.5 V batteries.
• Remove the batteries if the remote controller is not used for a month or longer.
• Do not attempt to recharge the supplied batteries.
• Do not mix new and used batteries.
• In the event of battery leakage, wipe the remote controller completely clean and install new
batteries.
Page 9
Basic Operation
To Listen to Music
The following explains the initial operations required before you can listen to music.
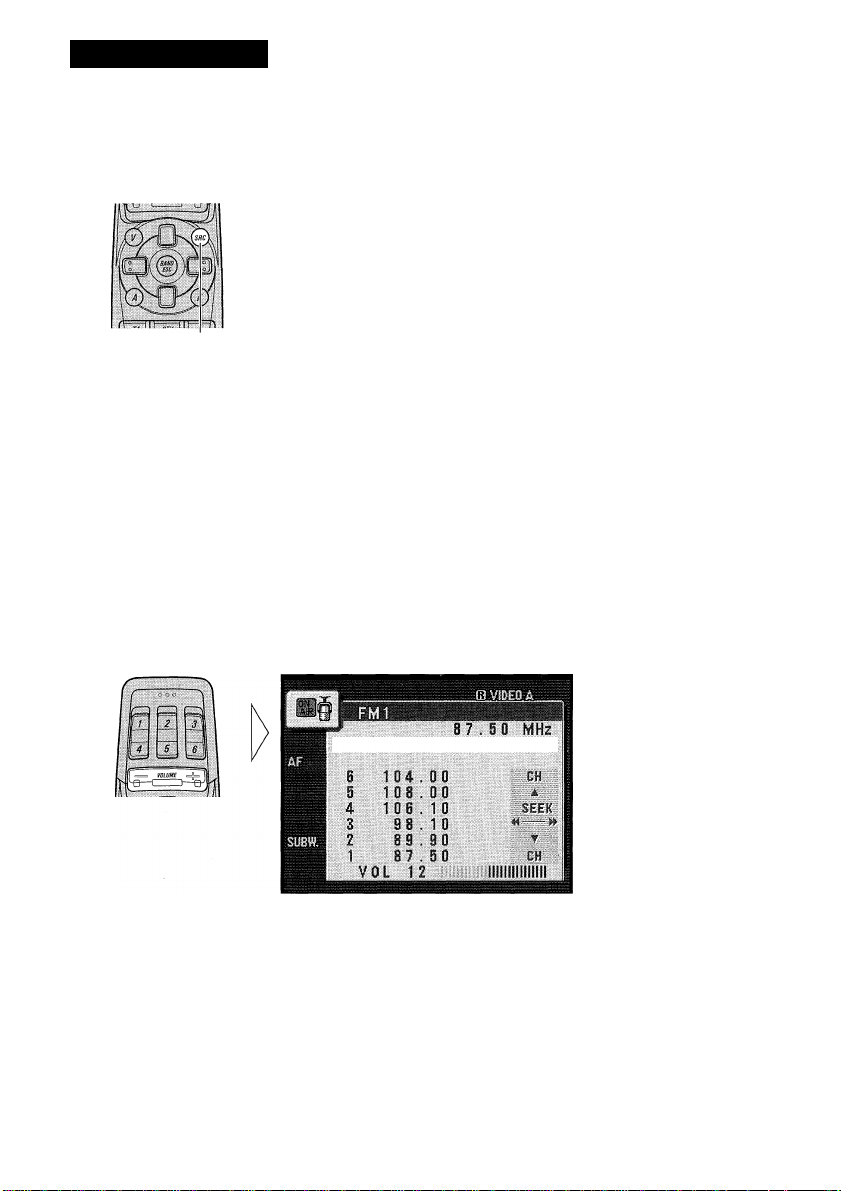
1. Select the desired source in the following order (e.g. tuner):
8 7.5 0 MHz
Cll
iliiljpili
CH
Each press changes
the Souree ...
6 104;, 00
108 00
5
4 106 . 1 B
3
2 89 .. 90
1
98 ,
87
1 0
, 50
CD player (one disc only) —► TV —► VIDEO A “► VIDEO B —► Tuner —► DAB (Digital
Audio Broadcasting) -► Multi-CD player —► AUX -► Speaker Input
Note:
• In the following eases, the sound source will not change:
* When the sound source from another product is not connected to this produet.
* When no magazine is set in the Multi-CD player.
* When no dise is set in the CD player.
* When the AUX (external input), VIDEO A, VIDEO B and Speaker Input are set to OEF.
(Refer to pages 50 and 51.)
2. Raise or lower the volume.
Continued overleaf.
Page 10

Basic Operation
3. Turn the source OFF.
Hold for 1 second
or more
Page 11
Basic Operation of Tuner
This product’s AF function can be switched ON and OFF. AF should be switched OFF for
normal tuning operations. (Refer to page 19.)
Band
FMl -► FM2 -► FM3
-►MW/LW
r_
1
(f . j]
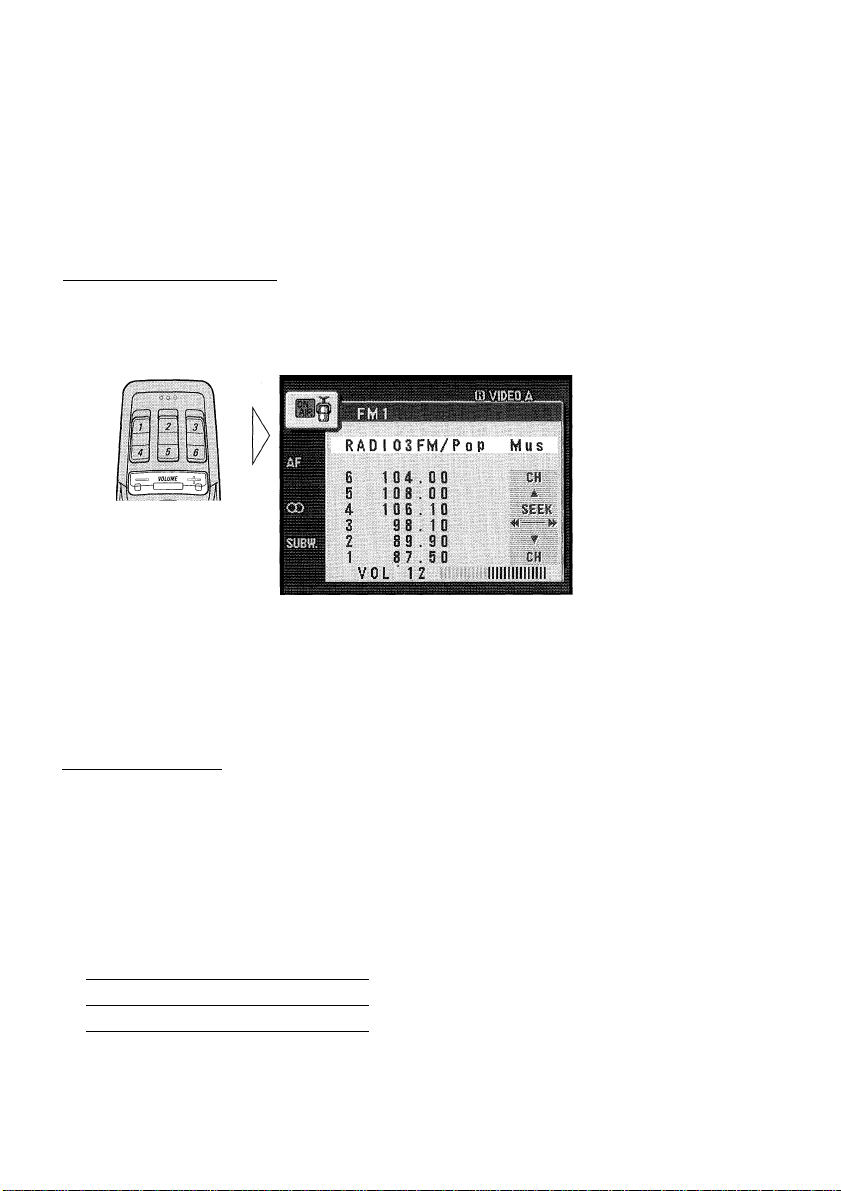
Preset Tuning
• You can memorize broadcast stations in buttons 1 through 6 for easy, one-touch station recall.
Preset station recall
Broadcast station preset memory 2 seconds or more
2 seconds or less
Note:
• Up to 18 FM stations (6 in FMl, FM2 and FM3) and 6 MW/LW
stations can be stored in memory.
• You can also use the A or ▼ buttons to recall broadcast stations
memorized in buttons 1 through 6.
2
Preset Number Indicator
Band Indicator
-CH 1
87.
eg
.50
.00
.90
1
6 104
5 108
4 106.. 10
3 98 . 1 0
2
Frequency Indicator
8 7.5 0 MHz
iiiiiil®»
00
J CH.
SEEK
-----
CH
^
Manual and Seek Tuning
• You can select the tuning method by changing the length of time you press the ◄/► button.
Manual Tuning (step by step) 0.5 seconds or less
Seek Tuning 0.5 seconds or more
Note:
• If you continue pressing the button for longer than 0.5 seconds, you can skip broadcasting stations.
Seek Tuning starts as soon as you stop pressing the button.
• “CD” stereo indicator lights when a stereo station is selected.
Page 12
Basic Operation
Basic Operation of Multi-CD Player
This product can control a multi-CD player. (With certain old type multi-CD players, using
a multiple connection adapter lets you connect multiple units which you can control with
this product.)
Disc Number Search (for 6-Disc, 12-Disc types)
• You can select discs directly with the 1 to 6 buttons. Just press the number corresponding to the disc you want to listen to.
Note:
• When a 12-Disc Multi-CD Player is connected and you want to select disc
7 to 12, press the 1 to 6 buttons for 2 seconds or longer.
Track Number Indicator
Disc Number Indicator
V
w|;
pi
H 1
— 6
Bfffll 3
MM 2
[NO TITLE 11
NO TITLE
5
NO TITLE
4
NO TITLE
NO TITLE
[ NO T!TLE
If a disc title has been input, the title will
be displayed.
Elapsed Play Time Indicator
Track Search and Fast Forward/Reverse
• You can select between Track Search or Fast forward/Reverse by pressing the ◄/► button for a different length of time.
Track Search
Fast forward/Reverse
0.5 seconds or less
Continue pressing
Note:
• The multi-CD player may perform a preparatory operation, such as verifying the presence of a disc
or reading disc information, when the power is turned ON or a new disc is selected for playback.
“READY” is displayed.
• If the multi-CD player cannot operate properly, an error message such as “ERROR-14” is dis
played. Refer to the multi-CD player owner’s manual.
• If there are no discs in the multi-CD player magazine, “NO DISC” is displayed.
Page 13
Entering the Function Menu
The Function Menu lets you operate simple functions for each source.
Note:
• After entering the Function Menu, if you do not perform an operation within about 30 seconds, the
Function Menu is automatically canceled.
1. Select the desired mode in the Function Menu. (Refer to “Function Menu functions”.)
FUNCT1 ON
6
n 8 0 0 2*34'
N0 D Ì SO TITLE
RkUùùm
the Mode ...
2. Operate a mode. (e.g. Random Play)
The button used and the
FUNCTI ON
6 n I © 0 2*34'
N0 DISC TITLE
operation it performs are
indicated by the key guid
ance indicator. Press the A
button to switch the key
guidance indicator ON, and
the ▼ button to switch it
OFF.
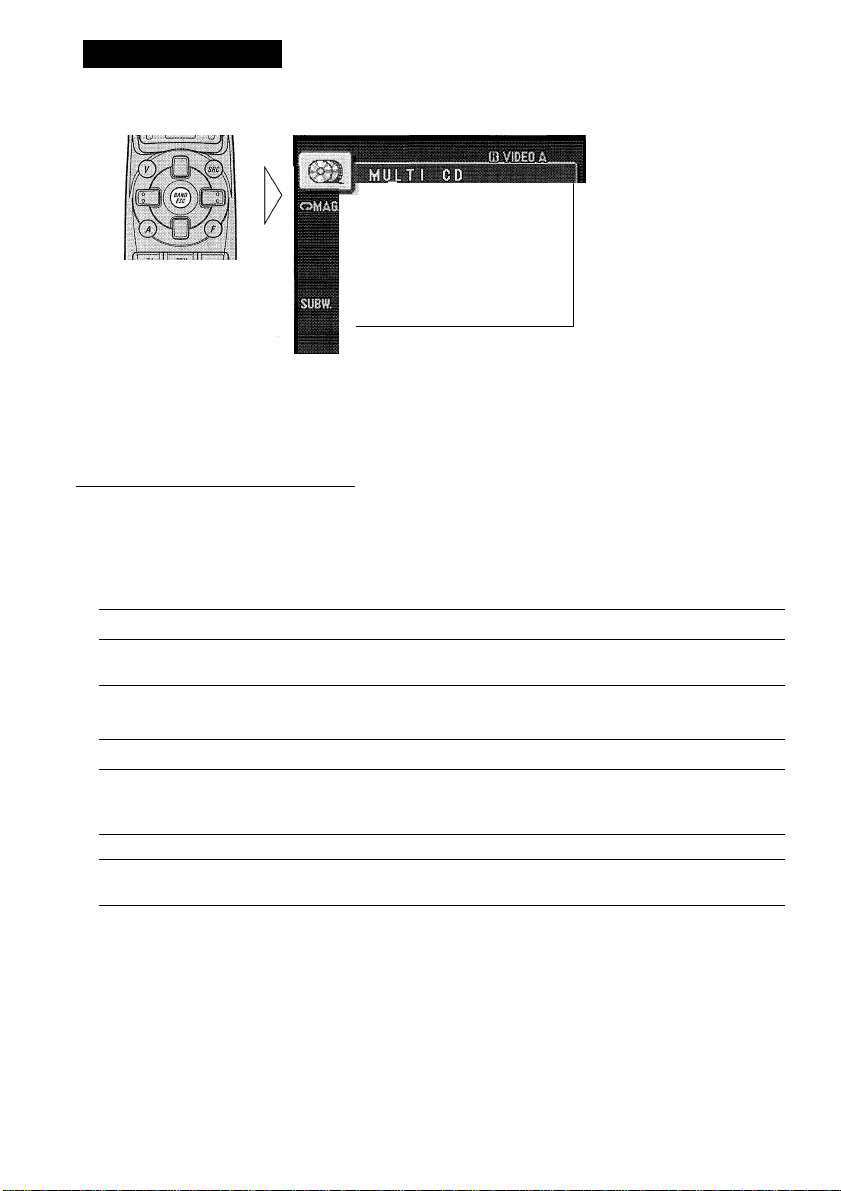
3. Cancel the Function Menu.
MULTI CD
1 n 1 © 0 2' 34"
N0 DISC TITLE
N0 TITLE
1
s N0 T
N0 T 1ITLE
5
4
3 N0 T 1
2 N0 T !ITLE
N0
T iITLE
iTLE
ITLE
iilHi®*
disc:
TRACK
ii
-----
DISC
H'
Page 14

Basic Operation
Function Menu Functions
The following chart shows functions for each source in the Function Menu. The chart also
shows indications for each function, operations and buttons used to perform operations.
For more details, or when you want to know about an operation, refer to the page number
indicated in the chart.
■ Tuner
Function name (Display)
Best Stations Memory (BSM)
AF Function (AF)
Regional (REGIONAL)
Local Seek Tuning (LOCAL)
TA Function (TRAFFIC ANNC.)
News Program Interruption Setting
(NEWS)
■ Multi-CD Player
Function name (Display)
Repeat Modes (PLAY MODE)
Random Play (RANDOM)
Scan Play (SCAN)
ITS Play (ITS PLAY)
Pause (PAUSE)
CD Sound Quality Adjustment
(COMP SELECT)
Button : Operation
A:ON
T:OFF
A:ON
T:OFF
A:ON
T:OFF
1 A:ON
▼:OEE
2 ◄ or ►: Select (Sensitivity)
A:ON
T:OEE
A:ON
▼:OFF
Button : Operation Page
◄ or ►:Select (Play range)
A:ON
TiOEE
A:ON
T:OEF
A:ON
T:OFF
A;ON
T:OEP
A or ▼:Select
(Sound Quality Function)
Page
17
19
20
16
21
25
27
28
28
31
27
30
Page 15

Entering the Detailed Setting Menu
In the Detailed Setting Menu, you can operate convenient, complex functions for each
source.
1. Enter the Detailed Setting Menu.
FUNCTI ON
6 n 8 ©02* 34‘
NO DI SC TITLE
TITLE INPUT
A mixi
lilBliiiHISlillil
mm
2. Select the desired mode. (Refer to ‘‘Detailed Setting Menu functions”.)
Each press changes
the Mode ...
3. Operate a mode. Continued overleaf.
FUNCTI ON
NO DISC TITLE
PfiM-FUNCTI ON
8 0 02' 34":
iiSiM
---
Page 16
Basic Operation
4. Cancel the Detailed Setting Menu.
.
1
Hi)
1 NO
6 NOTlTLE
5
NO
4 NO
NO
3
1 NO
T1 fl.E
TlTLE
TlTLE
T 1
TLE
T 1
TLE
T !TL
n
1002
1 SC
Note:
• You can cancel the Detailed Setting Menu by pressing the FUNCTION button again for 2 seconds
or more.
Detailed Setting Menu Functions
The following chart shows functions for each source in the Detailed Setting Menu. The
chart also shows indications for each function, operations and buttons used to perform
operations. For more details, or when you want to know about an operation, refer to the
page number indicated in the chart.
■ Tuner
Function name (Display)
Program Function (PGM-FUNCTION)
Button : Operation Page
!◄ or ►:Select (Function)
2 A Memory
' 34”
DISC
iii
<5^ -—
E
DISC
52
■ Multi-CD Player
Function name (Display)
Disc Title Input (TITLE INPUT)
ITS Programming (ITS INPUT)
Program Function (PGM-FUNCTION)
Button : Operation
1 A or T:Select (Letter)
2 ◄ or ►: Select (Position)
3 ►Memory
A Memory
1 ◄ or ►:Select (Function)
2 A Memory
Page
33
30
52
Page 17
Tuner Operation
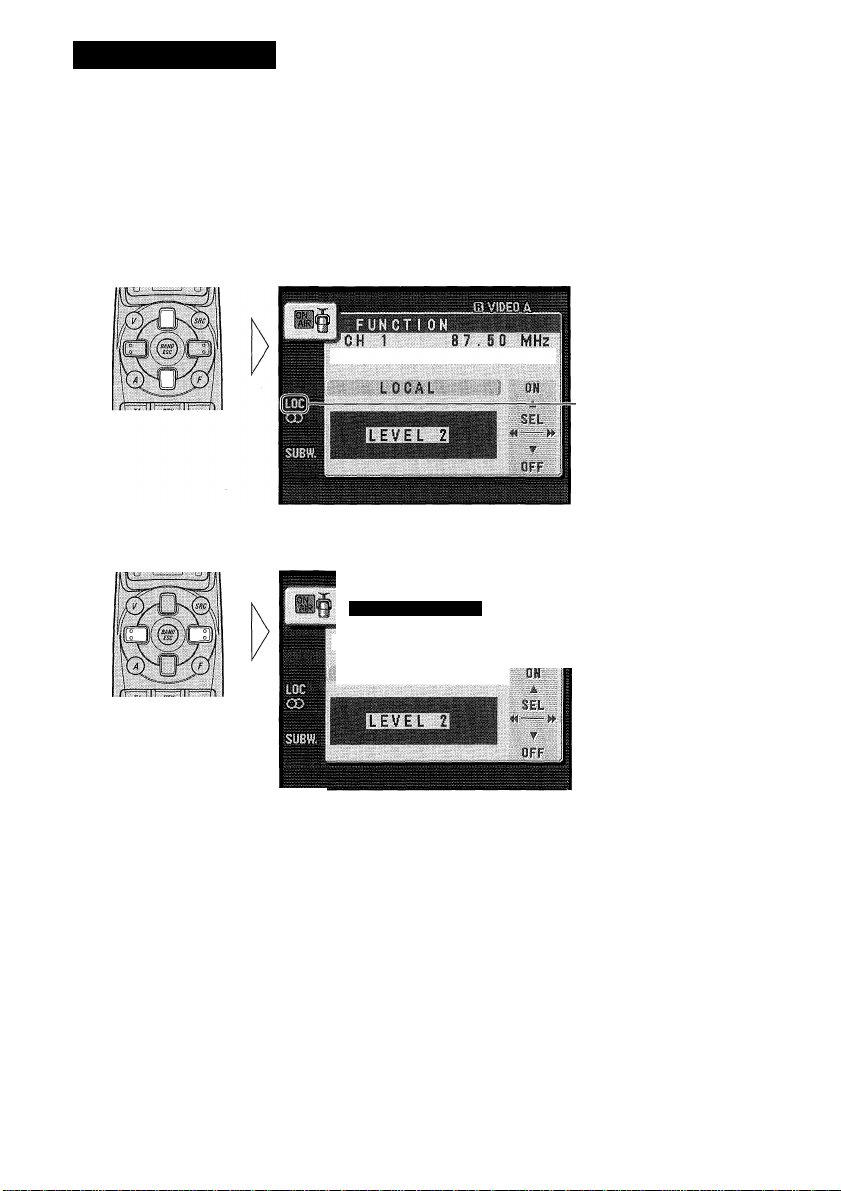
Local Seek Tuning (LOCAL)
This mode selects only stations with especially strong signals.
The sensitivity can be adjusted in 4 steps for FM and 2 steps for MW/LW.
1. Press the FUNCTION button and select the Local mode (LOCAL) in the Function Menu.
2. Switch the Local ON or OFF.
“LOG”
3. Select the desired Local Seek sensitivity.
FUNOT! ON
CH 1 8 7.5 0 MHz
LOCAL )
FM : LOCAL 1 ^ LOCAL 2 ^ LOCAL 3 ^ LOCAL 4
MW/LW: LOCAL 1 ^ LOCAL 2
Note:
• The “LOCAL 4” setting allows reception of only the strongest stations, while lower settings let you
receive progressively weaker stations.
<1
Page 18
Tuner Operation
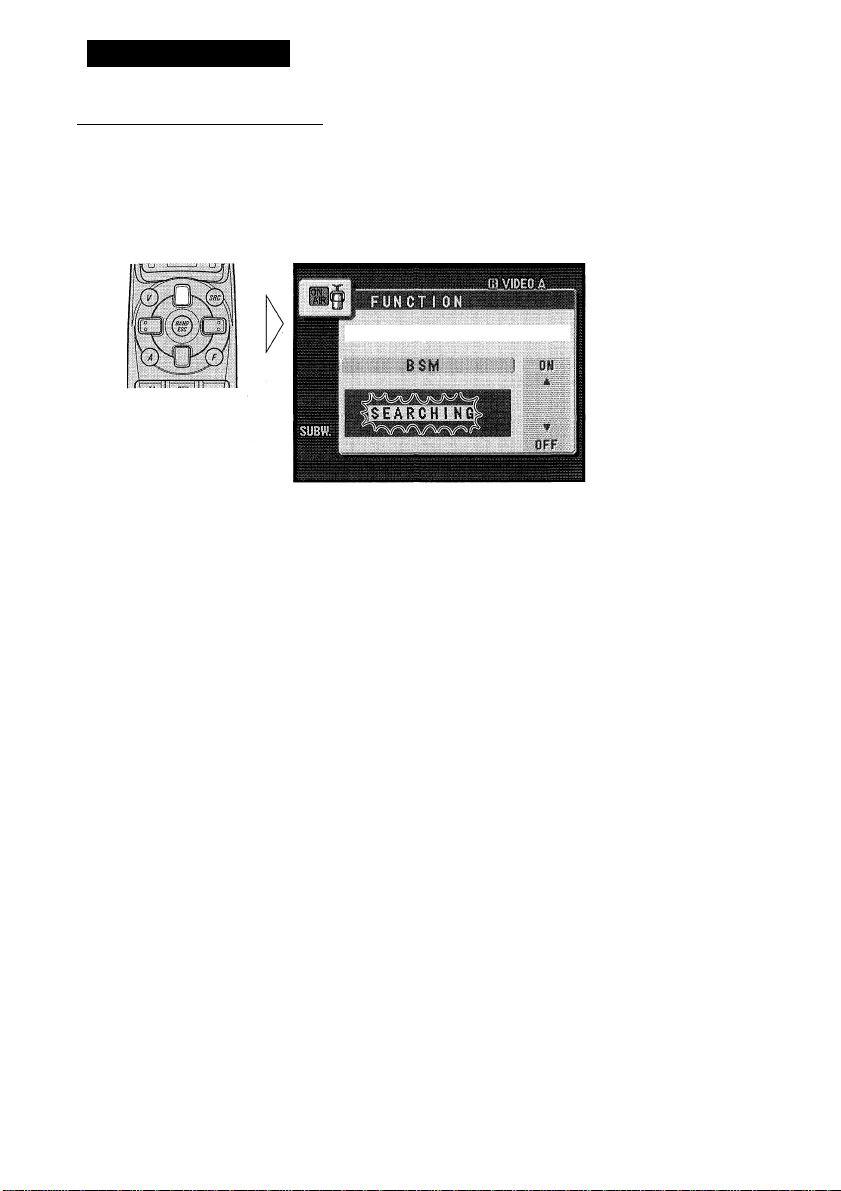
Best Stations Memory (BSM)
The BSM function stores stations in memory automatically.
1. Press the FUNCTION button and select the BSM mode (BSM) in the
Function Menu.
2. Switch the BSM ON.
The stations with the strongest signals will be stored under buttons 1-6 and in order of
their signal strength.
To cancel the process, press the ▼ button in the Function Menu before mem
orization is complete.
Page 19
Using the RDS Functions
What is RDS?
RDS (Radio Data System) is a system for transmitting data along with FM programs. This
data, which is inaudible, provides a variety of features such as: program service name, pro
gram type display, traffic announcement standby, automatic tuning and program type tun
ing, intended to aid radio listeners in tuning to a desired station.
Note:
RDS service may not be provided by all stations.
RDS functions, like AF (Alternative Frequencies search) and TA (Traffic Announcement standby),
are only active when your radio is tuned to RDS stations.
Frequency Display ON/OFF
When you want to know the frequency of the current station, you can switch frequency
display ON.
Switch the frequency display ON.
^ Frequency
P 9 5.00 MHz
RADI03FM/Po^ Mus-
AF
6
4.00
III
n n
lit
5
O)
4
106.10
3
98.10
2 89.90
SUBW.
Repeat the preceding operation to switch the frequency display OFF.
Program Service Name
The Program Service Name is the name of networks/stations providing RDS Service.
PTY Information
PTY (Program Type ID code) information for the currently tuned station appears on the
display. The information is correlated with the list in the section “PTY List” on page 26.
1 87.50
i:h
SEEK
H-^
Cfl
■ PTY information
k
Program Service Name
Page 20
Using the RDS Functions
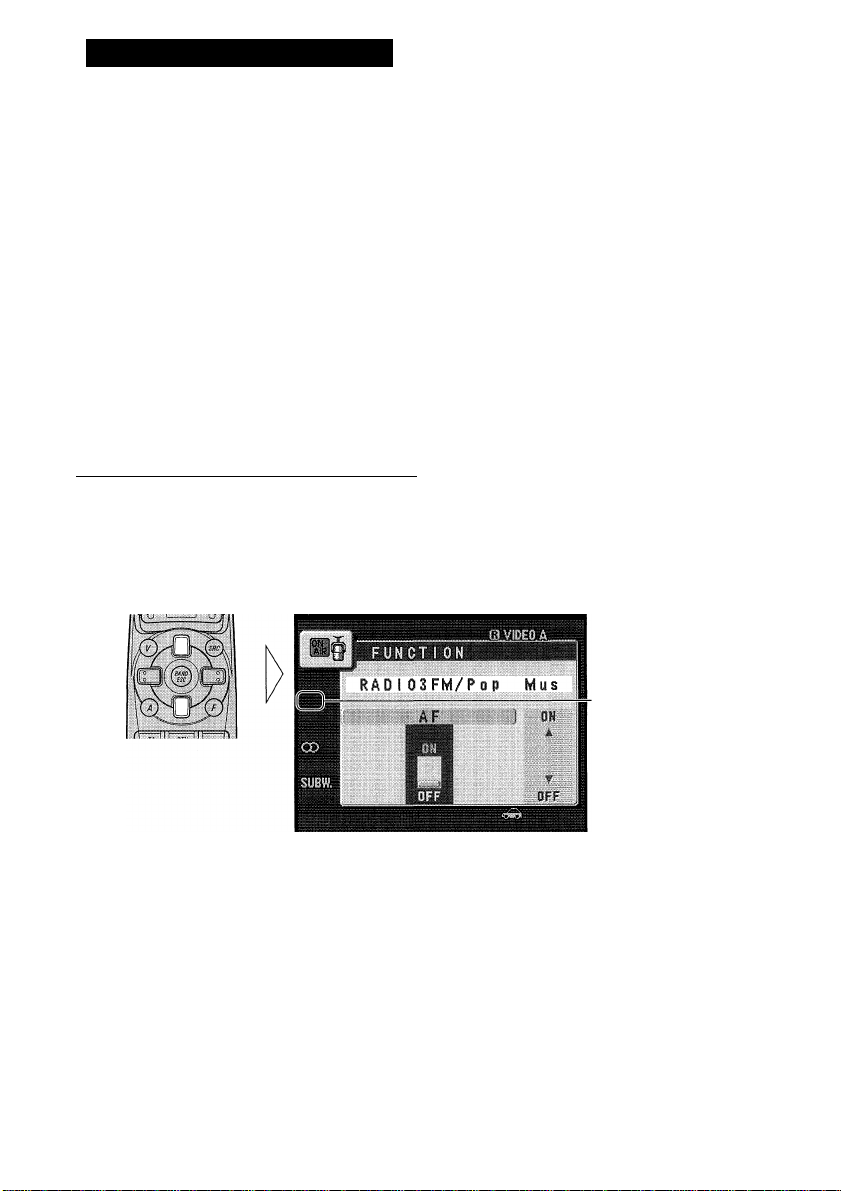
AF Function (AF)
The AF (Alternative Frequencies search) function is used to search for other frequencies in
the same network as the currently tuned station. It automatically retunes the receiver to
another frequency in the network which is broadcasting a stronger signal when there are
problems with reception of the currently tuned station or better reception is possible on a
different frequency.
Note:
• AF tunes the receiver only to RDS stations when you use Seek tuning or BSM Auto Memory with
the “AF” indicator ON.
• When you recall a preset station, the tuner may update the preset station with a new frequency from
the station’s AF list. (This is only available when using presets on the FMl and FM2 bands.) No
preset number appears on the display if the RDS data for the station received differs from that for
the originally stored station.
• Sound may be temporarily interrupted by another program during an AF frequency search.
• When the tuner is tuned to a non-RDS station, the “AF” indicator flashes
• AF can be switched ON or OFF independently for each FM band.
Activating/Deactivating the AF Function
AF is set to ON by default.
1. Press the FUNCTION button and select the AF mode (AF) in the Function Menu.
2. Activate or deactivate AF while in an FM band.
“AF” disappears
Page 21
PI Seek Function
The tuner searches for another frequency broadcasting the same programming. “PI SEEK”
appears on the display and the radio volume is muted during a PI Seek. The muting is dis
continued after completion of the PTSeek, whether or not the PI seek has succeeded. If the
PI Seek is unsuccessful, the tuner returns to the previous frequency.
PI Seek
If the tuner fails to locate a suitable alternative frequency or if the broadcasting signal is
too weak for proper reception, the PI Seek will automatically start.
Auto PI Seek (for preset station)
When preset stations cannot be recalled, as when traveling long distances, this product can
be set to perform PI Seek also during preset recall.
The default setting for Auto PI Seek is OFE.
Note:
• Refer to “Initial Setting Menu” for details on how to switch Auto PI Seek ON/OFF.
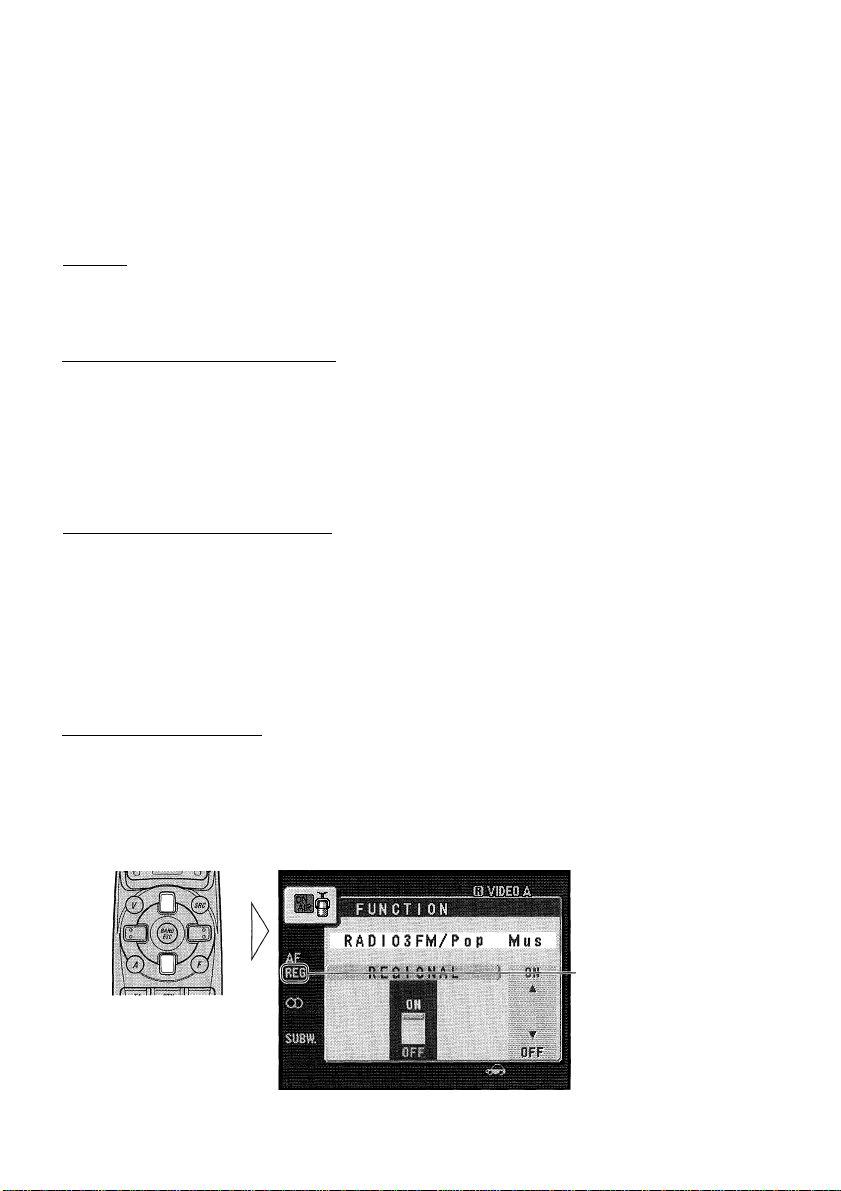
Regional Function (REGIONAL)
When AE is used to retune the tuner automatically. Regional (REGIONAL) limits the
selection to stations broadcasting regional programs.
Note:
• Regional programming and regional networks are organized differently depending on the country
(i.e., they may change according to the hour, state or broadcast area).
• The preset number may disappear on the display if the tuner tunes in a regional station which dif
fers from the originally set station.
Activating the Regional
The Regional function can be turned ON independently for each EM band.
1. Press the FUNCTION button and select the Regional mode (REGIONAL) in the Function Menu.
2. Activate or deactivate Regional while in an FM band.
“REG”
Page 22
Using the RDS Functions
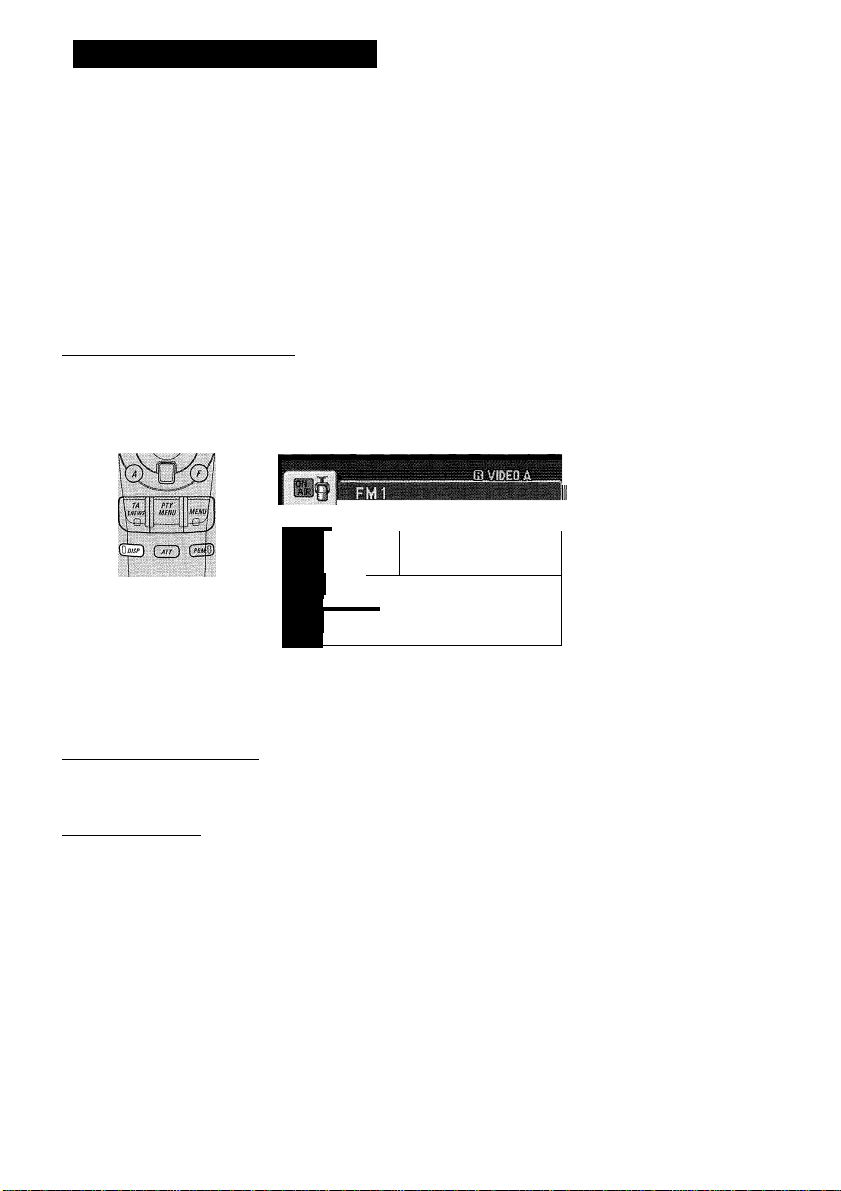
TA Function (TRAFFIC ANNC.)
The TA (Traffic Announcement standby) function lets you receive traffic announcements
automatically, no matter what source you are listening to. The TA function can be activat
ed for either a TP station (a station that broadcasts traffic information) or an EON TP sta
tion (a station carrying information which cross-references TP stations).
Activating/Deactivating the TA Function
1. Tune in a TP or EON TP station.
The Car icon lights when the tuner is tuned to a TP station or an EON TP station.
2. Activate the TA function.
m VIDEO A ^
^ i
a —1
mws MENU
>—1
is
(S o
ÌWÉmi
1 FM1
^
.............
RADI03FM/PO P Mus I
e 10 4.. 0 0 cd 1
i 108.00
4 108.10
3 98.10
2 89.90
1 87.10 1
The “TRFC.” indicator lights, indicating that the tuner is waiting for traffic announce
ments.
Repeat the preceding operation when no traffic announcement is being received to deacti
vate the TA function.
Note:
• You can also switch the TA Function ON/OFF in the Function Menu.
• The system switches back to the original source following traffic announcement reception.
• The TA function can be activated from sources other than tuner if the tuner was last set to the FM
band but not if it was last set to the MW/LW band.
• If the tuner was last set to FM, turning on the TA function lets you operate other tuning functions
while listening to sources other than tuner.
• Only TP or EON TP stations are tuned in during the Seek Tuning mode when the “TRFC.” indica
tor is ON.
• Only TP or EON TP stations are stored by BSM when the “TRFC.” indicator is ON.
9
Page 23
Canceling Traffic Announcements
• Press the TA button while a traffic announcement is being received to cancel the announcement and return to the original source.
The announcement is canceled but the tuner remains in the TA mode until the TA button is
pressed again.
Adjusting the TA Volume
When a traffic announcement begins, the volume adjusts automatically to a preset level to
enable you to hear the announcement clearly.
• Set the volume by adjusting it during reception of a traffic announcement.
The newly set volume is stored in memory and recalled for subsequent traffic announce
ments.
Note:
• Volume Attenuator is canceled if a traffic announcement is received in the Volume Attenuator
mode. (Refer to page 56 for details concerning the Volume Attenuator.)
TP Alarm Function
About 30 seconds after the Car icon is extinguished due to a weak signal, a 5 second beep
sounds to remind you to select another TP or EON TP station.
• If you are listening to the tuner, tune in another TP station or EON TP sta
tion.
In sources other than tuner, the tuner automatically seeks out the TP station with the
strongest signal in the current area 10 (or 30)* seconds after Car icon disappears from the
display.
* Time taken before Seek begins.
TA Function ON 10 seconds
TA, AF Functions ON 30 seconds
Page 24
Using the RDS Functions
PTY Function
With Wide and Narrow classification of program type, the PTY function provides two
ways to select stations by the type of program being broadcast (PTY Search). It also pro
vides automatic tuning to emergency broadcasts (PTY Alarm).
Note:
• There’s no need to perform PTY Search settings again if they have previously been set. After
switching to the PTY Search Setting mode in Step 1, just perform PTY Search in Step 4.
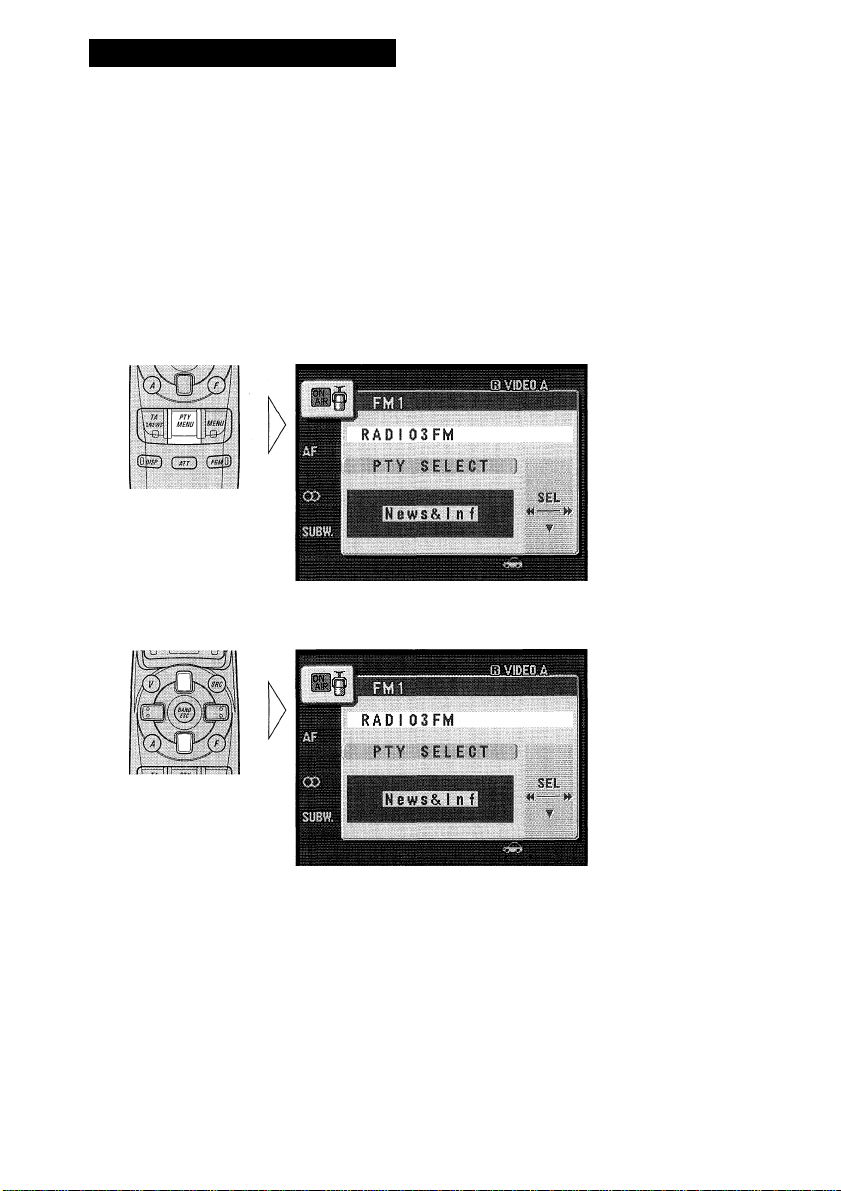
Searching the PTY
1. Select the PTY Search Setting mode (PTY SELECT).
2. Select the PTY Search method (Wide, Narrow).
Page 25
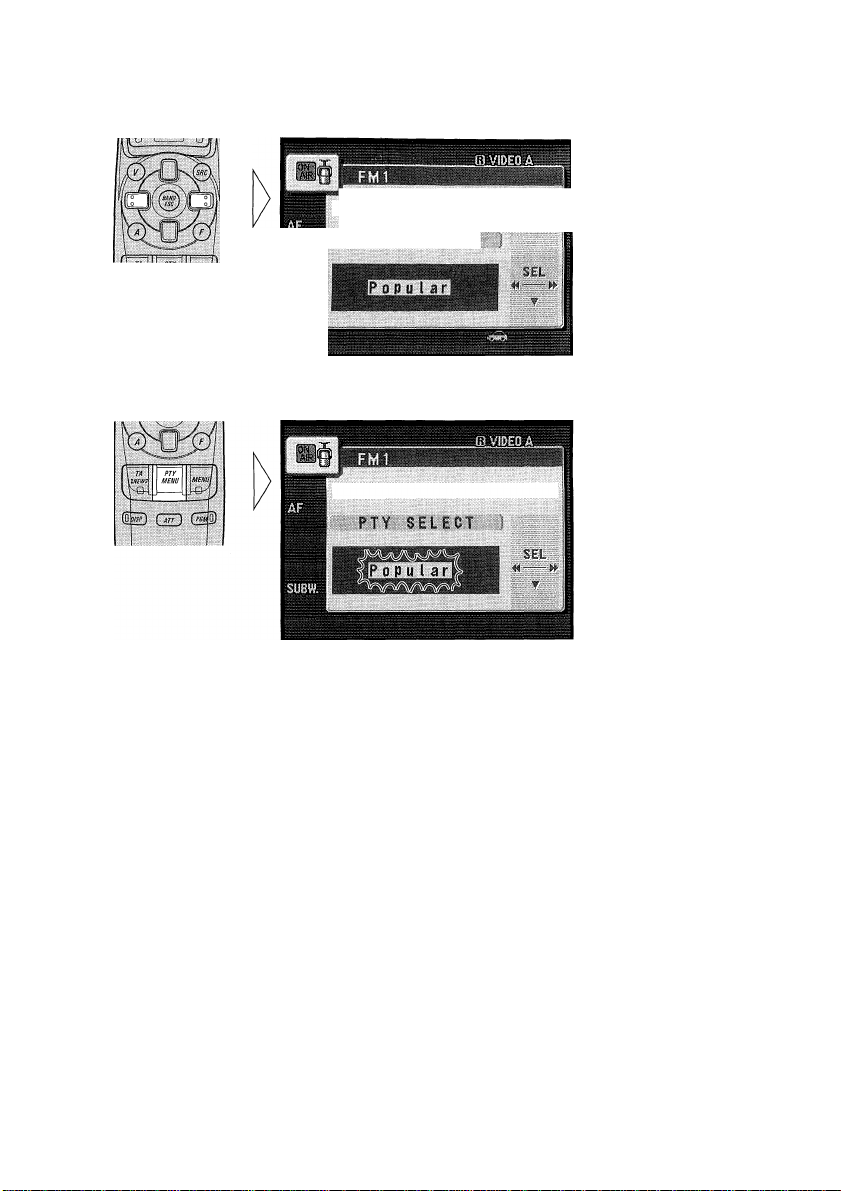
3. Select one from among the PTY.
RADI 03FM
PTY SELECT
4. Start PTY Search.
The tuner searches for a station broadcasting the desired PTY.
To cancel the PTY Search Setting mode, hold down the PTY button for 2 seconds or more.
Note:
• If a PTY code of zero is received from a station, “NONE” will be displayed. This indicates that the
station has not defined its program contents.
• The program of some stations may differ from that indicated by the transmitted PTY.
• If no station broadcasting the selected programming type is found, “NOT FOUND” is displayed for
about 2 seconds, and the tuner returns to the original station.
Page 26

Using the RDS Functions
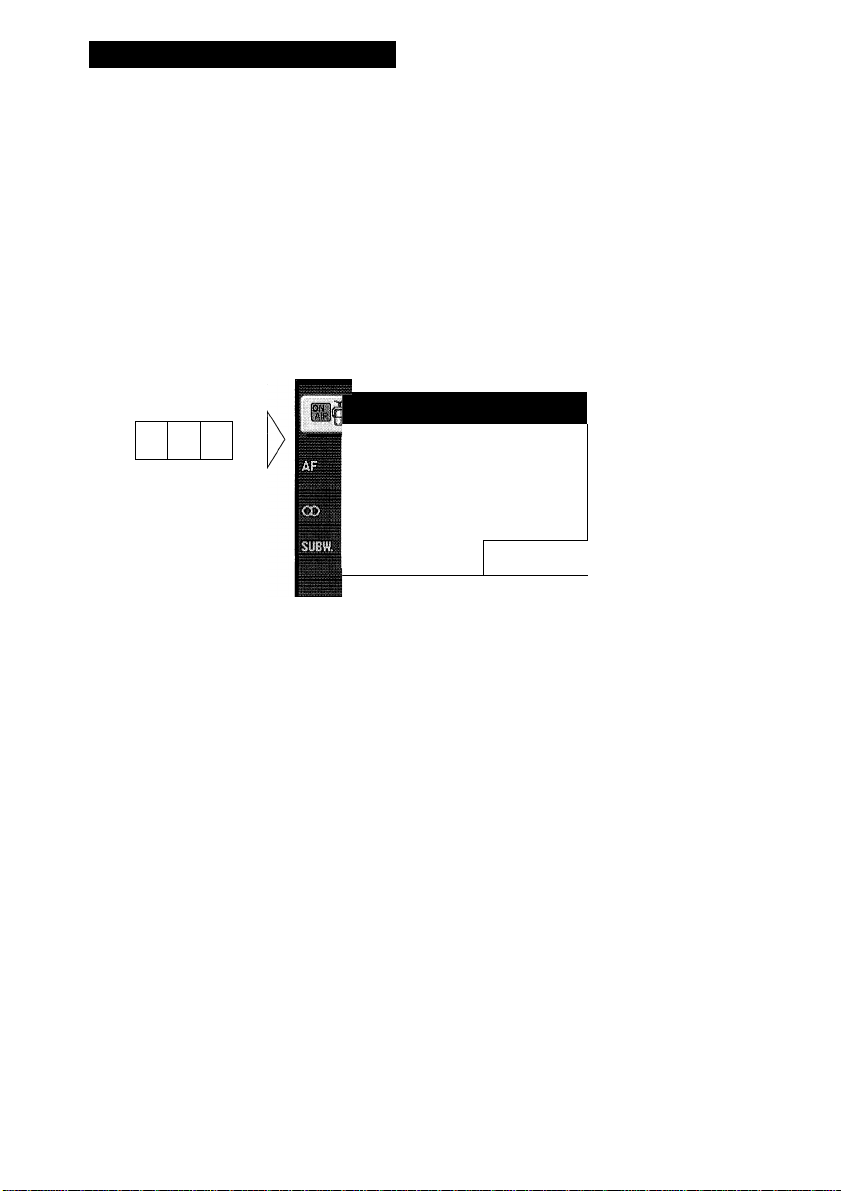
News Program Interruption Setting (NEWS)
You can switch automatic reception of PTY code news programs ON/OFF. When a
received news program ends, reception of the previous program resumes.
• Set interruption to ON or OFF.
\ TA
m
MENU
QiD GE3)
MENUÌ
iSjJ
rRADI03FM/POP
M'
6 104.00
S
4
3
2
1
108.00
loe. 10
8 i . i 0
w
08.10
87.50
Mus
h
4
■NEWS”
INEWS
ÌÈ3
Hold for 2 seconds
Note:
• You can also switch the News Program Interruption Setting ON/OFF in the Function Menu.
PTY Alarm
PTY Alarm is a special PTY code for announcements regarding emergencies such as nat
ural disasters. When the tuner receives the radio alarm code, “ALARM” appears on the
display and the volume adjusts to the TA volume. When the station stops broadcasting the
emergency announcement, the system returns to the previous source.
Note:
• The system switches back to the original source following emergency announcement reception.
■ Canceling Emergency Announcements
• Press the TA button during emergency announcement reception to cancel the announcement and return to the previous source.
Page 27

PTY List
Wide
News&Inf
Popular
Classics
Others
Narrow
News
Affairs Current affairs.
Info
Sport
Weather
Finance
Pop Mus
Rock Mus
Easy Mus
0th Mus
Jazz
Country
Nat Mus
Oldies
Folk Mus
L. Class
Classic
Educate
Drama
Culture
Science
Varied
Children
Soeial
Religion
Phone In
Touring
Leisure
Document
Details
News.
General information and advice.
Sports programs.
Weather reports/Meteorological information.
Stock market reports, commerce, trading etc.
Popular music.
Contemporary modern musie.
Easy listening music.
Other types of music, which can’t be
categorized.
Jazz music based programs.
Country music based programs.
National music based programs.
Oldies musie, ‘Golden age’ based programs.
Folk musie based programs.
Light elassical music.
Serious classieal musie.
Educational programs.
All radio plays and serials.
Programs eoncerned with any aspeet of national
or regional culture.
Programs about nature, science and teehnology.
Light entertainment programs.
Children’s programs.
Social affairs programs.
Religion affairs programs or serviees.
Phone in based programs.
Travel programs, not for announeements about
traffic problem.
Programs about hobbies and recreational
aetivities.
Documentary programs.
Page 28
Using Multi-CD Players
Repeat Modes (PLAY MODE)
There are three repeat modes (play range): One-track Repeat, Disc Repeat and Multi-CD
player Repeat (Default mode is Multi-CD player Repeat.)
1. Press the FUNCTION button and select the Repeat Selecting mode (PLAY MODE) in the Function Menu.
2. Select the desired Repeat mode in the following order:
“TRK”
Multi-CD player Repeat (MAG RPT) —► One-track Repeat (TRACK RPT)
-► Disc Repeat (DISC RPT)
Note:
• If you go beyond the play range of the selected repeat mode by performing Track Search, Fast forward/Reverse or selecting another disc or Multi-CD player, the mode changes to an applicable
Repeat mode.
• When two or more Multi-CD players are connected, after Multi-CD player Repeat, the mode
switches to All Repeat (“All” is displayed). All Repeat is performed on all connected Multi-CD
players.
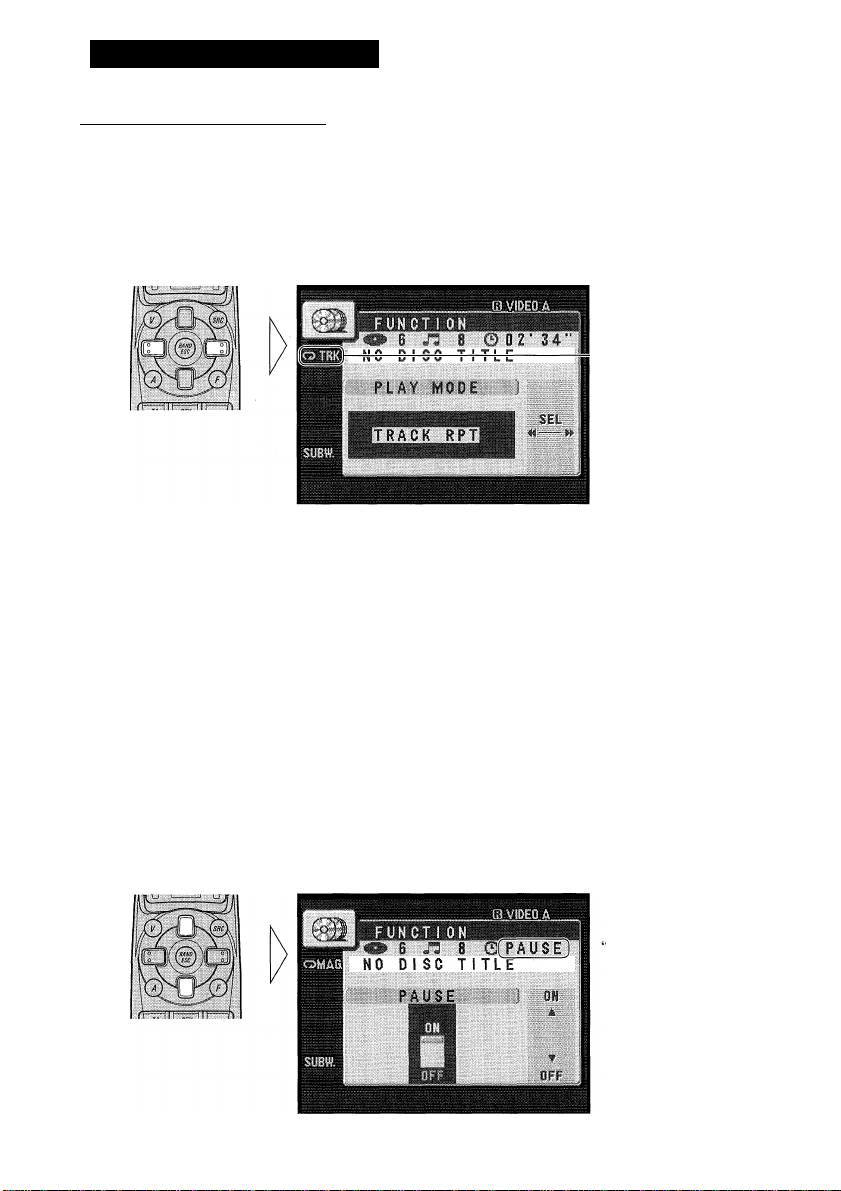
Pause (PAUSE)
Let’s you pause play of the track currently playing.
1. Press the FUNCTION button and select the Pause mode (PAUSE) in the Function Menu.
2. Switch the Pause mode ON/OFF.
PAUSE”
Page 29
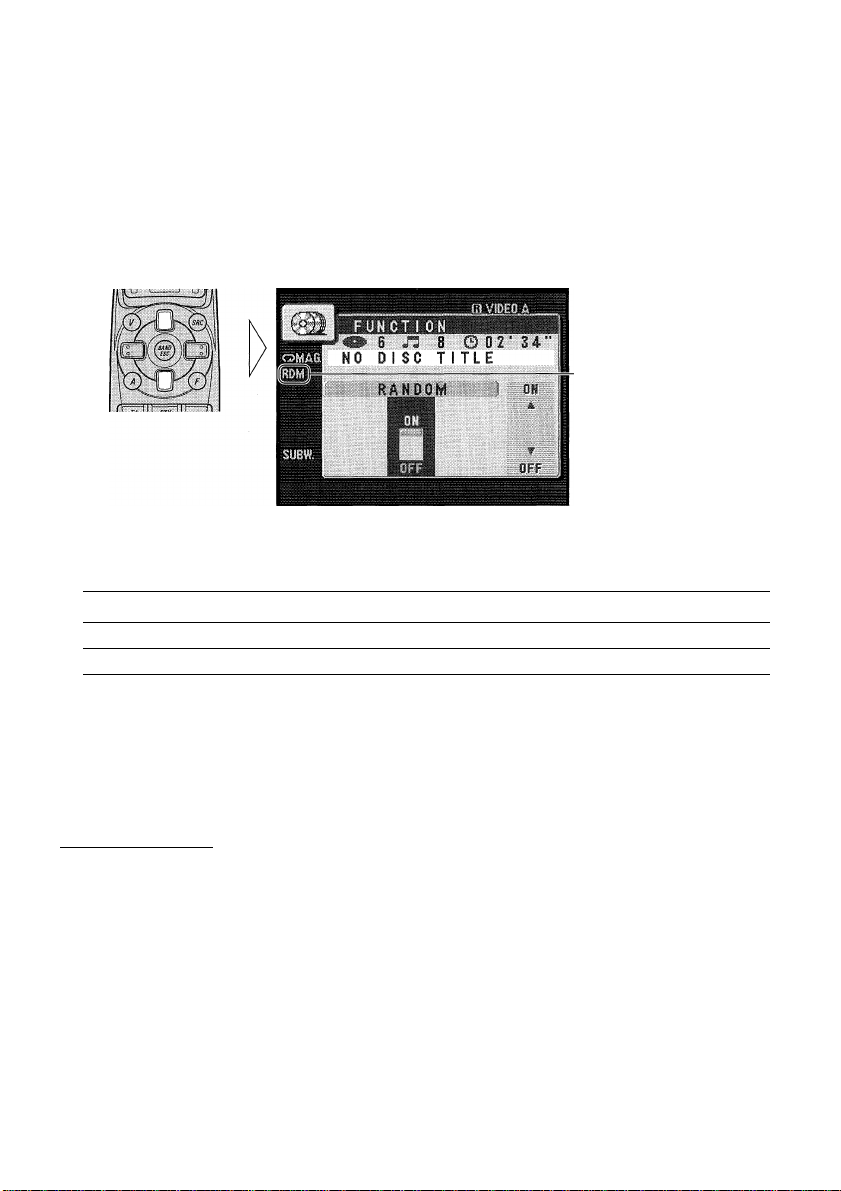
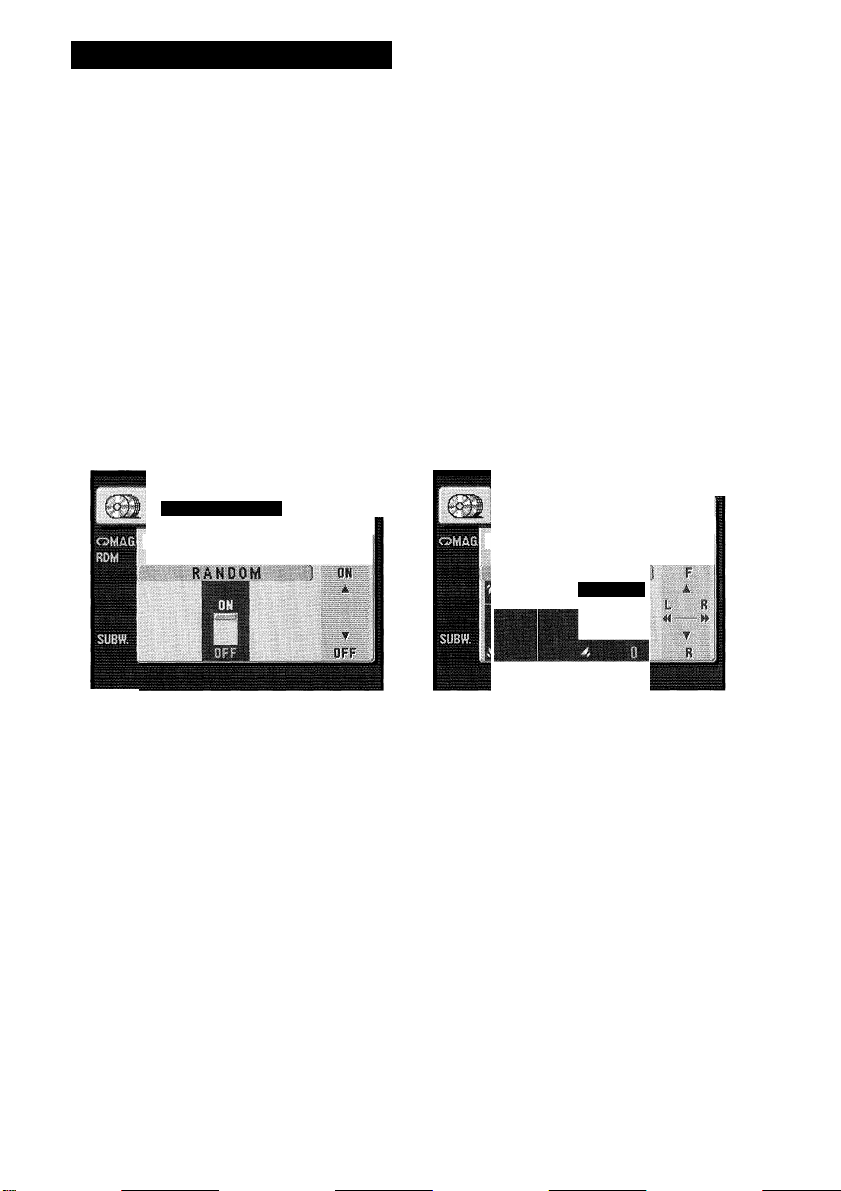
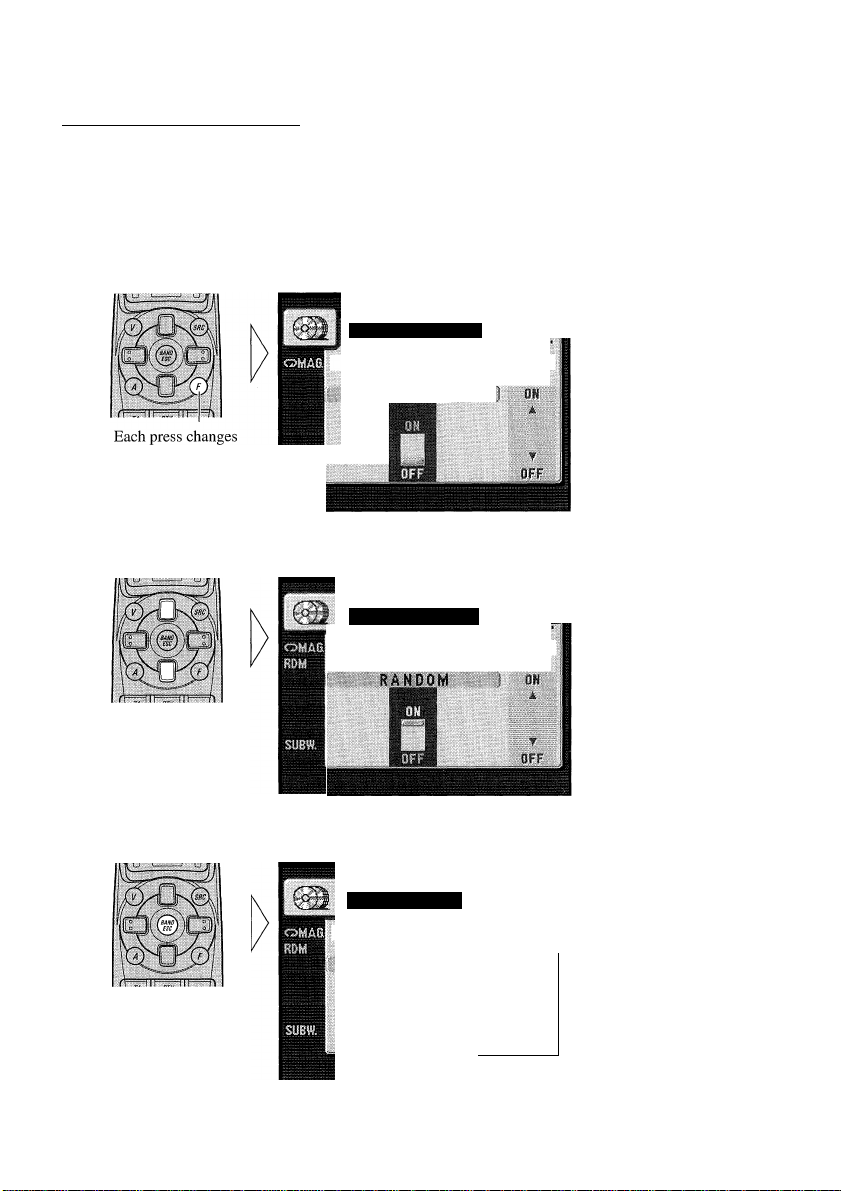
Random Play (RANDOM)
Tracks are played at random within the selected repeat mode play range as explained in
“Repeat Modes” on page 27.
1. Press the FUNCTION button and select the Random mode (RANDOM) in the Function Menu.
2. Switch the Random Play ON/OFF.
“RDM”
After selecting the desired repeat mode play range from those referred to in “Repeat
Modes” on page 27, switch Multi-CD Player Random Play ON.
Display
DISC, RDM
MAG, RDM
Play range
Disc Repeat
Multi-CD player Repeat
Note:
• One-track Repeat mode returns to the Disc Repeat mode when you switch the Random Play ON.
• When two or more Multi-CD players are connected, you can also select the All Repeat mode and
then perform Random Play. If you do this, Random Play of all tracks on all CDs loaded in all the
connected Multi-CD players is performed.
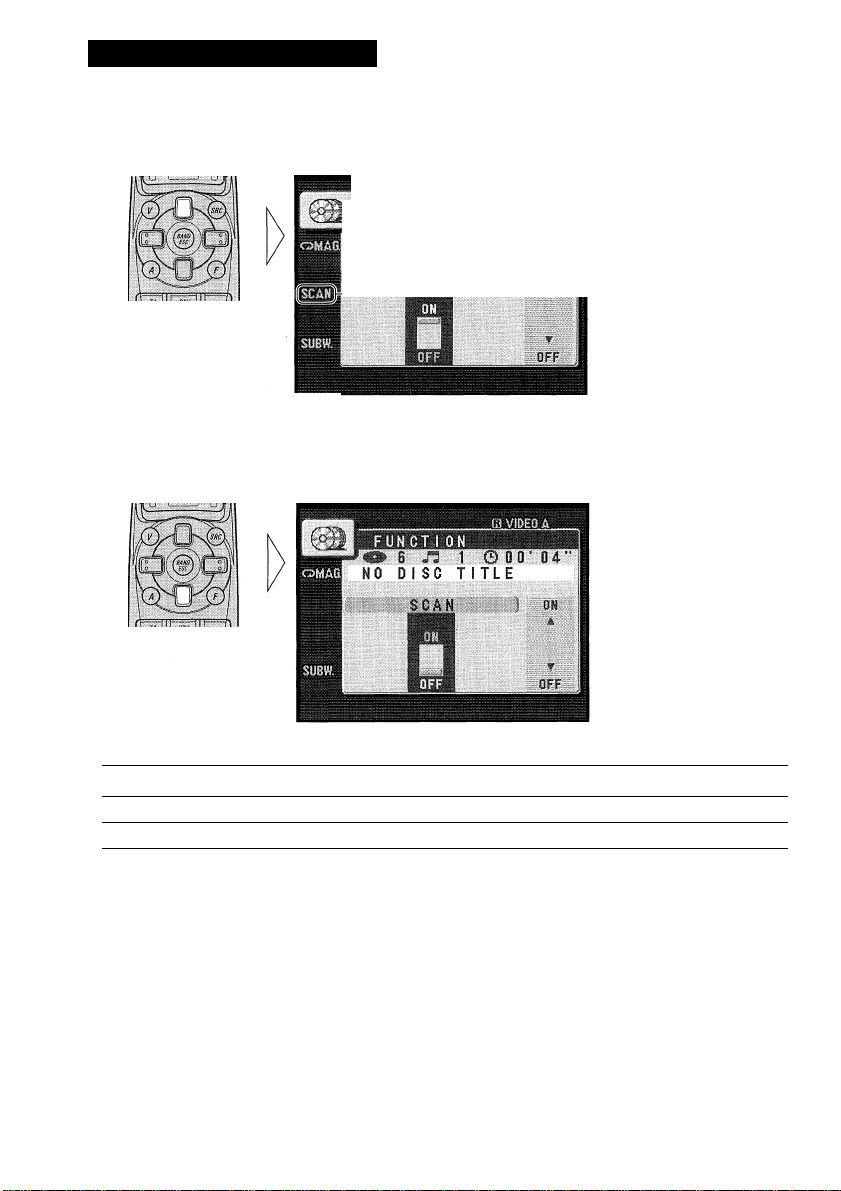
Scan Play (SCAN)
In the Disc Repeat mode, the beginning of all tracks on the selected disc is scanned for
about 10 seconds. In the Multi-CD player Repeat mode, the beginning of the first track on
all discs is scanned for about 10 seconds.
1. Press the Function button and select the Scan mode (SCAN) in the Function Menu.
Continued overleaf.
Page 30
Using Multi-CD Players
2. Switch the Scan Play ON.
After selecting the desired repeat mode play range from those referred to in “Repeat
Modes” on page 27, switch Multi-CD Player Scan Play ON.
1 n 1 ©of.................0 4
NO DI SC TITLE
SCAN
3. When you find the desired track (or disc), cancel the Scan Play.
If the Function Menu has been canceled automatically, select the Scan mode in the
Function Menu again.
nu
“SCAN”
Display
DISC, SCAN
MAG, SCAN
Play range
Disc Repeat
Multi-CD player Repeat
Note:
• Scan Play is canceled automatically after all the tracks or discs have been scanned.
• One-track Repeat mode returns to the Disc Repeat mode when you switch the Scan Play ON.
• When two or more Multi-CD players are connected, you can also select the All Repeat mode and
then perform Scan Play. If you do this, the beginning of the first track only on each disc loaded in
each connected Multi-CD player is played for about 10 seconds.
Page 31

CD Sound Quality Adjustment (COMP SELECT)
Using the COMP (Compression) and DBE (Dynamic Bass Emphasis) functions enables
Multi-CD player sound quality adjustment. Both of the functions enable adjustment on two
levels.
COMP
The COMP (Compression) function eliminates distortions caused by imbalances between
loud and subdued sounds at higher volumes.
■ DBE
DBE (Dynamic Bass Emphasis) boosts bass levels to give a fuller sound.
COMP/DBE ON/OFF Switching
1. Press the FUNCTION button and select the COMP/DBE switching mode (COMP SELECT) in the Eunction Menu.
2. Select the desired mode in the following order:
8 n 8 0 02' 34‘
N0 DISC TITLE
COMP SELECT
ilBli
iigil
COMP OFF -► COMP 1 -► COMP 2 COMP OFF -► DBE 1 -► DBE 2
Note:
• You can use these functions with Multi-CD players that have them. If the player does not feature
the COMP/DBE funetions, “NO COMP” is displayed if you try to use them.
ITS (Instant Track Selection)
The ITS function allows you to search for the track you wish to play when a multi-CD
player is installed. You can use ITS to program automatic playback of up to 24 tracks per
disc from up to 100 discs. (You can store ITS program and Disc Title data for up to 100
discs in memory.)
ITS Programming (ITS INPUT)
ITS programming can be conducted in any multi-CD player playback mode except ITS
Play.
__________________________________________
Page 32

Using Multi-CD Players
1. Play the track you wish to program.
2. Select the ITS Programming mode (ITS INPUT) in the Detailed Setting Menu. (Refer to page 14.)
3. Program the desired track.
» e n I © 0 2*34'
NO DISC TITLE
ITS INPUT
Note:
• After 100 discs have been programmed, data for a new disc will overwrite the data for the disc that
has not been played back for the longest time.
ITS Play (ITS PLAY)
ITS play of tracks is performed within the play range explained in the “Repeat Modes”
section.
1. Press the FUNCTION button and select the ITS Play mode (ITS PLAY) in
the Function Menu.
hm
illlilllli
SR
^■1 -
SIWll
CUi
2. Switch ITS Play ON/OFF.
After selecting the desired repeat mode play range from those referred to in “Repeat
Modes” on page 27, switch ITS Play ON.
FUNCTI ON
6 n 8 002*34'
N0 DISC TITLE
_____
8 A
^ I n
Note:
• If no track in the current range is programmed for ITS Play, “ITS EMPTY” is displayed.
9
“ITS”
Page 33

Erase a Track Program
1. Select the track you wish to erase, during ITS Play.
2. Select the ITS Programming mode (ITS INPUT) in the Detailed Setting
Menu. (Refer to page 14.)
3. Erase the track program.
8 ^ * 8 ' ’
NO DISC TITLE
ITS INPUT
;vji-,hj
IB.
iiliilii
(UK
ITS is canceled and playback of the next ITS-programmed track begins. If there are no
more programmed tracks in the current range, “ITS EMPTY” is displayed and normal play
resumes.
Erase a Disc Program
1. Select the disc you wish to erase, while the disc is playing.
2. Select the ITS Programming mode (ITS INPUT) in the Detailed Setting
Menu. (Refer to page 14.)
3. Erase the disc program.
■" 6 n a 0 0 2*34“
NO DISC TITLE
TS INPUT
ilPillBii
■li - lì':
lllilil
SEL
CUI
Page 34

Using Multi-CD Players
Disc Title
Disc Title Input (TITLE INPUT)
You can input Titles up to 10 letters long for up to 100 discs. Using this function lets you
easily search for and select a desired disc for play. (You can store ITS program and Disc
Title data for up to 100 discs in memory.)
1. Play the disc you wish to input the disc title.
2. Select the Disc Title Input mode (TITLE INPUT) in the Detailed Setting Menu. (Refer to page 14.)
Note:
• You cannot select this mode when playing a CD TEXT disc on a CD TEXT compatible Multi-CD
player.
3. Select the desired Character mode in the following order:
FUNCT i ON
6 n 8 © 02*34*
N0 DISC TITLE
TITLE INPUT
Each press changes
the Mode ...
DOWN
MfXi
Alphabet (Upper case), Numbers and Symbols —► Alphabet (Lower case)
Note:
• You can switch to the Numbers and Symbol mode by pressing the button 2.
Page 35

4. Select a letter, number or symbol.
FUNCTI ON
8 n 8 © 02’
NO DISC TITLE
TITLE INPUT •
& UU'i
0
DOWN
To insert a space, select the
cursor.
5. Reverse or advance box by box.
FUNCT! ON
■»6 n 8 0 02' 34’
NO DISC TITLE
TITLE INPUT
mm h NEXT
^'CO ■
mm
6. When the title is completed, store it in memory to make the cursor fade out.
m 6 n 8 © 02’ 34'
NO DISC TITLE
TTTLE INPUT ):
mm A ' NEXT I
^CORVETTE ^
. T - ; ;
DOWN
Note:
• Titles remain in memory, even after the disc has been removed from the magazine, and are recalled
when the disc is reinserted.
• After the titles for 100 discs have been entered, data for a new disc will overwrite the data for the
disc that has not been played back for the longest time.
Page 36

Using Multi-CD Players
CD TEXT Function (for CD TEXT compatible type)
You can use these functions when playing a CD TEXT disc on a CD TEXT compatible
Multi-CD player.
Title Display Switching
CORVETTE
BLUE FLAME
Each press changes
the Display ...
Disc Title -► Disc Artist Name Track Title -► Track Artist Name
Note:
• If certain text information is not reeorded on a CD TEXT disc, “NO (e.g. “NO TRACK TITLE”)
is displayed.
LADY NAIL
MANTA RAY
STINCRAY
MAKO SHARK
Page 37

Title Scroll
This product displays the first 10 letters only of Dise Title, Artist Name and Traek Title.
With text longer than 10 letters, you ean see the rest of the text by scrolling.
• Scroll the title display.
m ra VIDEO A
Hold for 2 seconds
1 MULTI CD 1
GREATEST C
6 CORVETTE
S BLUE flame:
4 LADY NAIL
3 MANTA RAY
2 STINGRAY
1 MAKO SHARK
6 8 f'T
02'34"
A
...
T
i > m
Page 38

Using Multi-CD Players
Other Functions
Switching the Multi-CD Player
It is possible to connect up to three multi-CD players by means of a multiple installation
adapter. When two or more multi-CD players are installed, their priorities must be speci
fied. Follow the multi-CD player instructions carefully, and set the address switches prop
erly.
• Each press of the BAND button selects the Multi-CD player in the following order:
“MAGAZINE 1” “MAGAZINE 2” -► “MAGAZINE 3”
Playing Discs on a 50-Disc Type Multi-CD Player
When a magazine is loaded into a 50-Disc type Multi-CD Player, information on all the
discs in the magazine is read.
Read out will not function if the data for all discs has not already been read in.
If you start playing a disc on a 50-Disc type Multi-CD Player before reading of informa
tion on all discs has been completed, reading of information stops part way through. This
will prevent you from using the ITS function. (If you try and use this function, “NOT
READY” is displayed.)
If this happens, reading of information begins again when you switch to a component other
than the 50-Disc type Multi-CD Player.
Note:
• You cannot use the “Ejecting a Single Dise”, “Frequeney Play”, “Music Group Play”, or “ABC
Disc Title Search” functions with this product.
■ Disc Number Rough Search (for 50-Disc type only)
This handy function lets you select discs loaded in a 50-Disc Multi-CD Player using the
1-5 buttons. The 50 discs are divided into five blocks, with each of the 1-5 buttons
assigned to a block.
Note:
• Pressing button 5 lets you select the 50th disc only.
• Rough search of discs 1 to 9 is not possible. Use the A/T buttons to select a desired disc.
• “NOW LOADING” will be displayed in the following eases:
* If the disc in the extra tray is selected.
* If the disc is moved from the extra tray to the magazine.
(Refer to the 50-Dise type multi-CD player’s owner’s manual.)
1. Press the appropriate button from 1-5 to select the block containing the desired disc.
2.
Press the
l/T button to select the desired disc, after completing a rough
search.
Page 39

Audio Adjustment
Entering the Audio Menu
With this Menu, you can adjust the sound quality.
Note:
• After entering the Audio Menu, if you do not perform an operation within about 30 seconds, the
Audio Menu is automatically canceled.
• You can select the “SUBW.2” mode only when subwoofer output is switched ON in the “SUBW.l”
mode.
1. Select the desired mode in the Audio Menu.
Each press changes
the Mode...
2. Operate a mode.
3. Cancel the Audio Menu.
CORVETTE
6 CORVETTE OlSC
5 BLUE FLAME a
4 LADY NAIL TRACK
3 MANTA RAY ^^
2 STINCRAY
1 MAKO SHARK DISC
6 n 8 0 02' 34"
Page 40

Audio Adjustment
Balance Adjustment (FADER/BALANCE)
This function allows you to select a Fader/Balance setting that provides ideal listening con
ditions in all occupied seats.
1. Press the AUDIO button and select the Fader/Balance mode (FADER/ BALANCE) in the Audio Menu.
2. Adjust front/rear speaker balance.
“FRONT +15” - “REAR
+15” is displayed as it
moves from front to rear.
3. Adjust left/right speaker balance.
6 n '8 0 02‘ 34"
DORVETTE
Note:
• “FADER 0” is the proper setting when 2 speakers are in use.
“LEFT +9” - “RIGHT +9”
is displayed as it moves
from left to right.
Page 41

Bass/Middle/Treble Adjustment (BASS/MID/TREBLE)
____________________
This product is equipped with three tone adjustment modes, the Bass (BASS), Middle
(MID) and Treble (TREBLE) modes.
1. Press the AUDIO button and select the Bass (BASS)/Middle (MID)/Treble
(TREBLE) mode in the Audio Menu.
2. Select the desired tone for adjustment.
The selected tone is dis
played in yellow.
MULTI
CORVETTE
CD
e n 8 0 OZ’ 34‘
BASSI
1
m VIDEO À
3. Increase or decrease the intensity of the Bass, Middle or Treble, whichever is
selected.
The display shows “+6”
MULT !
W 6 /3 8 0 02* 3 4*’
CORVETTE
BASS
“-6”.
4. Repeat steps 2-3 above for the other Bass, Middle or Treble Adjustment.
Page 42

Audio Adjustment
Loudness Adjustment (LOUDNESS)
The Loudness function compensates for deficiencies in the low and high sound ranges at
low volume. You can select a desired Loudness level.
1. Press the AUDIO button and select the Loudness mode (LOUDNESS) in the Audio Menu.
2. Switch the Loudness function ON/OFF.
MULTI CD
B n 8 0 0 2 ■ 3 4 ■ ■
CORVETTE
LOUDNESS Oil
A
“LOUD”
I I
Using a Subwoofer
Subwoofer Output (SUBW.1)
This product is equipped with a subwoofer output which can be switched ON or OFF.
Initially subwoofer output is ON.
The subwoofer output phase can be switched between normal, or 0° (“N”), and reverse, or
180° (“R”). 0° is the default phase.
1. Press the AUDIO button and select the Subwoofer ON/OFF mode (SUBW.l) in the Audio Menu.
Page 43

2. Switch the subwoofer output ON or OFF.
Note:
• When the subwoofer output is OFF, you cannot change the phase of subwoofer output.
3. Change the phase of subwoofer output.
8 8 e02'34"
CORVETTE
SUBW.1-PHASE
R N
41- ■
SUB.W”
The selected phase is dis
played in yellow.
Note:
• Select the OFF setting when you do not want the subwoofer to operate.
Subwoofer Setting Adjustment (SUBW.2)
When the subwoofer output is ON, you can adjust the cut-off frequency and the output
level of subwoofer.
1. Press the AUDIO button and select the Subwoofer Setting mode (SUBW.2) in the Audio Menu.
Continued overleaf.
€
Page 44

Audio Adjustment
2. Select the frequency to 50 Hz, 80 Hz or 125 Hz.
n 8 © 0 2*34"
CORVETTE
---
SUilR 50 80125 125
--------
3. Increase or decrease the output level.
CORVETTE
.........
sum :. 50 80125 120
-----------
SUB .mi
^ LEVEL
FREQ.
6 /3 e ©02*34“i
SUB .1^2
A\V ^*6
_____
FREO.
level
UP
l^lM
A
FBEQ.
M —w
mm
UP
FREfi.
M
------
DOWN
The selected frequency is
displayed.
The display shows “+6”
“-6”.
Note:
• You can select the subwoofer setting mode only when subwoofer output is switched ON in the
“SUBW.l” mode.
Front Image Enhancer Function (FIE)
The F.I.E. (Front Image Enhancer) function is a simple method of enhancing front imaging
by cutting mid- and high-range frequency output from the rear speakers, limiting their out
put to low-range frequencies. You can select the frequency you want to cut.
Precaution:
• When the F.I.E. function is deactivated, the rear speakers output sound of all frequencies, not
just bass sounds. Reduce the volume before disengaging F.I.E. to prevent a sudden increase in
volume.
1. Press the AUDIO button and select the F.I.E. mode (FIE) in the Audio Menu.
Page 45

2. Switch the F.I.E. function ON/OFF.
• e n 8
( B n r z A’
CORVETTE
Note:
After switching the F.I.E. function ON, select the Fader/Balance mode in the Audio Menu, and
adjust front and rear speaker volume levels until they are balanced.
Switch the F.I.E. function OFF when using a 2-speaker system.
Source Level Adjustment (SLA)
The SLA (Source Level Adjustment) function prevents radical leaps in volume level when
switching between sources. Settings are based on the FM volume level, which remains
unchanged. (Since the FM volume is the control, SLA is not possible in the FM modes.)
You can perform SLA independently for each of the following groups:
• MW/LW
• CD player (one disc only) and Multi-CD player
• TV, VIDEO A and VIDEO B
• DAB
• AUX and Speaker Input
1. Compare the FM volume with the volume of the other source. (e.g. Multi-CD player.)
2. Press the AUDIO button and select the SLA mode (SLA) in the Audio Menu.
3. Increase or decrease the level.
The display shows “+4” “-4”.
Page 46

Picture Adjustment
Adjusting the Picture
You can independently adjust VIDEO A, VIDEO B and TV Tuner Unit picture quality.
You can also make adjustments to the picture quality when viewing something with the car
light ON and with it OEF, and store both settings in memory.
Note:
• After entering the Picture Adjust Menu, if you do not perform an operation within about 30 sec
onds, the Picture Adjust Menu is automatically canceled.
1. Enter the Picture Adjust Menu.
2. Select the desired mode for adjustment.
Page 47

3. Adjust the selected mode.
A
IJ-VHI,
^
-------
^
I I I I I I I I I I I I ^ ^
SEL
4. Repeat steps 2-3 above for the other Color and Sharpness adjustment.
5. Cancel the Picture Adjust Menu.
(BWaniA
^CH 10 P12
Color (COLOR)
You can adjust the color of the picture.
Sharpness (SHARP)
You can adjust the sharpness of the picture.
Page 48

Initial Setting Menu
Entering the Initial Setting Menu
1. Turn the source OFF.
2. Enter the Initial Setting Menu.
3. Select a desired mode.
INITIAL
Each press changes
the Mode ...
4. Operate a mode.
5. Cancel the Initial Setting Menu.
Note:
Holding down the FUNCTION button for 2 seconds also cancels the Initial Setting Menu.
AUTO^
........
PI
1 1
OFF
SEEK
............
on
A
OFF ;
Page 49

Changing the FM Tuning Step (FM TUNING STEP)
Normally set at 50 kHz during Seek tuning in the FM mode, the tuning step changes to
100 kHz when the AF or TA mode is activated.
It may be preferable to set tuning step to 50 kHz in the AF mode.
______________________
1. Press the FUNCTION button and select the FM Tuning Step mode (FM TUNING STEP) in the Initial Setting Menu.
2. Select the desired tuning step.
Note:
• The tuning step remains set at 50 kHz during Manual tuning.
• The tuning step returns to 100 kHz if the battery is temporarily disconnected.
Setting the DAB Priority Function (DAB PRIORITY)
When a Hide-away DAB tuner (e.g. GEX-P900DAB) is connected, you can set the prod
uct in this mode so that the interruption of traffic information from the Hide-away DAB
tuner takes precedence over this product’s RDS Traffic Announcement (TA) function.
■ When it is ON
During DAB reception, when the selected Service Component supports Road Traffic
Flashes and Transport Flashes, reception is not interrupted by this product’s RDS Traffic
Announcement (TA).
■ When it is OFF
Interruption is by the first received news flash from among this product’s RDS and the
hide-away DAB traffic information broadcasts.
_______________________
Page 50

Initial Setting Menu
1. Press the FUNCTION button and select the DAB Priority Setting mode
(DAB PRIORITY) in the Initial Setting Menu.
2. Switch the DAB Priority Setting ON or OFF.
1 IN!
^
T 1 AL
DAB 1PRIORITY
ON
a
llBPUl
________
1
1
1
ON '
OFF
Switching the Auto PI Seek (AUTO PI SEEK)
During Preset Station PI Seek operation, you can switch the Auto PI Seek function
ON/OFF. (Refer to “PI Seek Function” on page 20.)
1. Press the FUNCTION button and select the Auto PI Seek mode (AUTO PI
SEEK) in the Initial Setting Menu.
2. Switch the Auto PI Seek ON/OFF.
AUTOjPI
SEEK Cl» 1
1 I
ON
.......
□
OFF
! , OFF i
i
Page 51

Switching the AUX Mode (AUX)
When connecting auxiliary equipment to the IP-BUS terminal with an optional conversion
cable, switch the AUX mode ON.
1. Press the FUNCTION button and select the AUX Setting mode (AUX) in the
Initial Setting Menu.
2. Switch the AUX ON/OFF.
Switching the Speaker Input Mode (SPEAKER INPUT)
When connecting auxiliary equipment to the speaker input terminal, switch the Speaker
Input mode ON.
______________________
1. Press the FUNCTION button and select the Speaker Input mode (SPEAKER
INPUT) in the Initial Setting Menu.
2. Switch the Speaker Input mode ON or OFF.
Page 52
Initial Setting Menu
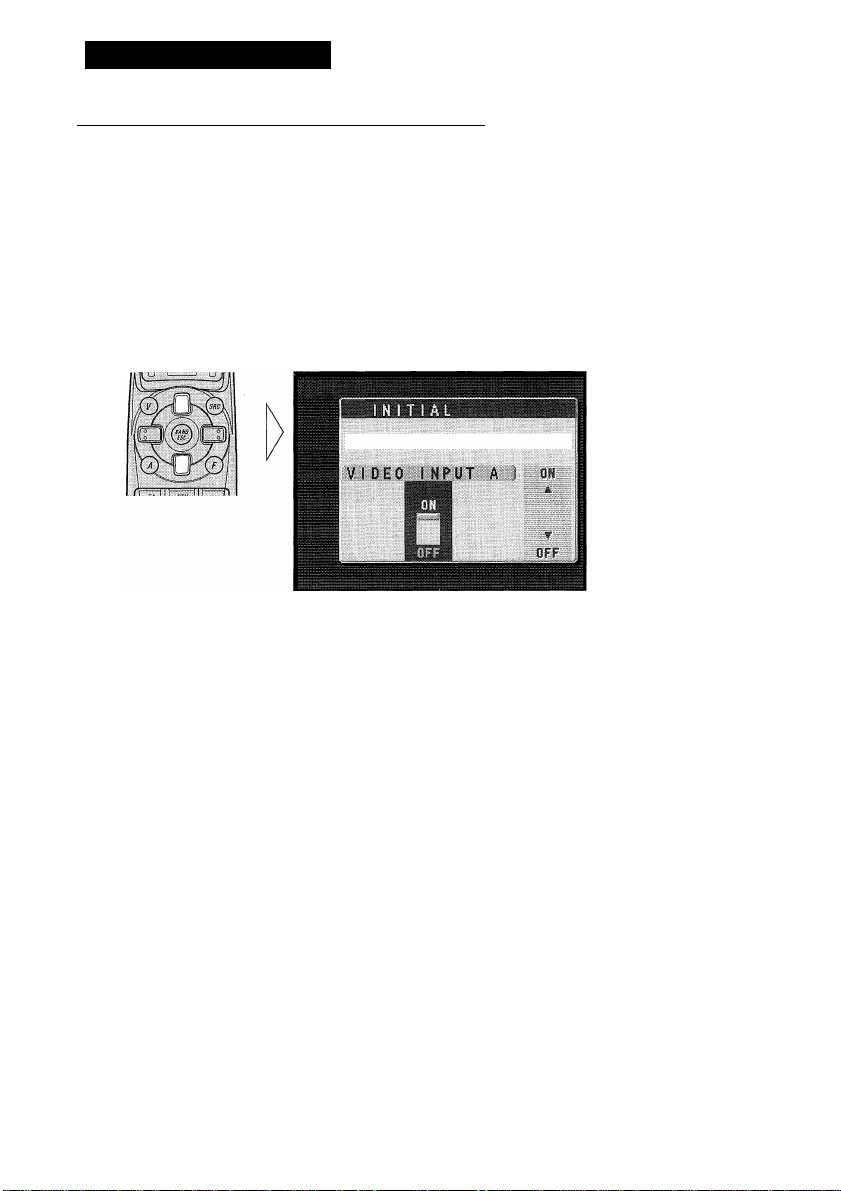
Switching the VIDEO Modes (VIDEO INPUT A/B)
It is possible to use up to two external video components by connecting them to the video
inputs A (VIDEO A mode) and B (VIDEO B mode) on this product.
When connecting an external video component to the video input A, switch the VIDEO A
mode ON.
When also connecting it to the video input B, switch the VIDEO B mode ON.
1. Press the FUNCTION button and select the VIDEO A mode (VIDEO
INPUT A) or VIDEO B mode (VIDEO INPUT B) in the Initial Setting
Menu.
2. Switch the selected VIDEO mode ON or OFF.
9
Page 53

Other Functions
Using the PGM Button (PGM-FUNCTION)
The PGM button can memorize one of the functions in the Function Menu.
It is possible to memorize a different function for each source.
Setting the PGM Button
1. Select the PGM Button’s Setting mode (PGM-FUNCTION) in the Detailed Setting Menu. (Refer to page 14.)
6 /5 8 ©0 2^34^
CORVETTE
PQM-FUNOTl ON ) MEM i
SEL I
m»
2. Select the function you want to memorize in the PGM button.
FUNCTI ON
6 /3 8 © 02‘ 34"
CORVETTE
PiM-ryNCTION ) MEW
SEL.
3. Memorize the function in the PGM button.
I 8 © 02‘ 34"
CORVETTE
POM-FUNCTI ON mu
wmm
Pressing the BAND button cancels the Detailed Setting Menu.
SEl
«1
------
V,
Page 54

Other Functions
Using the PGM Button
The PGM button operates in a different way depending on the function programmed
(memorized).
• Use the PGM button.
I Tuner
Function name (Display)
Best Stations Memory (BSM)
Regional (REGIONAL)
Local Seek Tuning (LOCAL)
Press
OFF
ON/OFF
ON/OFF
Hold for 2 seconds
ON
Entering the Local Seek
Sensitivity mode
I Multi-CD Player
Function name (Display)
Pause (PAUSE)
Repeat Modes (REPEAT)
Random Play (RANDOM)
ITS (ITS)
Press
ON/OFF
Selecting the mode
ON/OFF
ITS Programming
Hold for 2 seconds
ON/OFF
Page 55

Using the AUX Source
To listen to auxiliary equipment connected to the IP-BUS terminal, select the AUX source.
(You can select the AUX source only when switching the AUX mode in the Initial Setting
Menu ON.)
Selecting the AUX Source
• Select AUX. (Refer to page 8.)
AUX
AUX
the Source...
0 VIDEO A . 1
1
AUX Title Input
The display title for AUX source can be changed.
1. Select the Aux Title Input mode (TITLE INPUT) in the Detailed Setting Menu.
TITLE INPUT
Hold for 2 seconds
UP
4 NEXT
AUX ^
DOWN
2. Input the Aux Title.
Refer to “Disc Title Input” on page 33, and perform procedures 3 to 6 in the same way.
Page 56

Other Functions
Using the Speaker Input Source
To listen to auxiliary equipment connected to the Speaker Input terminal, select the speak
er input source. (You can select the Speaker Input source only when the Speaker Input
mode has been set to ON in the Initial Setting Menu.)
Select the Speaker Input. (Refer to page 8.)
Each press changes
the Source ...
Selecting the Picture (Front Display)
You can switch only the picture to another source while listening to the sound from the
current source.
Select the desired picture in the following order:
Each press changes
the Picture ...
Iffl-
T I c
---
ciS» 6 J1 8 O 0 2 ■ 3 4 •
CORVETTE
®Wl!)&
- __ ______
Source screen -► Mobile Navigation Unit —► TV Tuner Unit —► VIDEO A -► VIDEO B
Note:
• You can select the Pioneer Mobile Navigation Unit only when connecting it with this product.
• You can select the TV Tuner Unit only when connecting it with this product. (The video source
selected with the TV Tuner is displayed.)
• To select the VIDEO A and B modes, switch the VIDEO A and B modes in the Initial Setting
Menu ON.
• “YOU CANNOT USE THIS EUNCTION WHILE DRIVING” will not appear on the rear display
regardless of what position the parking brake is in.
Page 57

Using the Rear Display
You can also enjoy video and audio entertainment from external components connected to
video input A (VIDEO A) or video input B (VIDEO B) on a rear display (sold separately).
This is only possible if a rear display is connected.
Switch between VIDEO A and VIDEO B selection.
Each press of the V.SEL button for 2 seconds selects the source in the following order:
VIDEO A “► VIDEO B
Volume Attenuator
The attenuator reduces the volume instantly.
Cut the volume by about 90%.
MULTI OD
« 6
3!BEATESI C
6 CORVETTE
5 BLUE FLAME
LADY
4
3 MANTA RAY
ST ! N61RAY
2
MAKO SHARK
1
8 © 0 2
NA I L
■ 34"
TRACK
U--
me
(MD
Repeat the preceding operation to return to previous volume.
Note:
• If the (+) or (-) buttons are used to cancel the Attenuator mode, the sound will resume at a lower
volume than before.
Page 58

Other Functions
Muting Function
Mobile Navigation Unit Muting
In the following cases, sound from this product’s front speakers are muted automatically:
• When the guidance audio is output from Mobile Navigation Unit connected to this prod
uct. (The guidance audio is output with muted source sound.)
• When you operate the Mobile Navigation Unit connected to this product by voice.
Cellular Telephone Muting
Sound from this system is muted automatically when a call is made or received using a
cellular telephone connected to this product.
The sound is turned off, “MUTE” is displayed and no audio adjustment is possible.
Operation returns to normal when the phone connection is ended.
Page 59

When using the DAB (Digital Audio Broadcasting) Tuner____________________
This section provides information on DAB operations with this product which differs from
that described in the DAB Operation Manual.
About This Product's Indications
The following is an explanation of this product’s indications.
Program Type ID code
nn 6
BBC RADIO
BBC RADIO
LANK
fHXT
€D
DAB mm. ^ ANNC. m TRFC
BBC
6
5
4
3 BBC
2 BBC R2
1
R6
BBC R5
BBC R4
R3
BBC R1
Ci!
u t b H
-A ■ - ^1-
CH
mmm
Service Label
■ Service Component Label
I Indications that light when Function is switched ON
Indication Function
NET
WTHR.*
ANNC.*
TRFC.*
NEWS*
* If the set Announcement Support is received, the icon on the right lights.
Service Follow (SF)
Area Weather Flash (Weather)
Announce (Announce)
Road Traffic Flash or Transport Flash
News Flash (News)
■ DAB status Indications
Indication
XTRA
TEXT
DAB
Status
The currently received Service has a Secondary Service
Component.
The currently received Service has a Dynamic Label.
When DAB reception is possible. (Refer to “About the
“DAB READY” Indicator” on Hide-away DAB Tuner’s
Operation Manual.)
Page 60

Other Functions
Operation
With this product, operation of the following three functions differs. (Reference pages are
in the Hide-away DAB Tuner’s Operation Manual.)
• Changing the Label (Refer to page 12.)
• Changing Display Indications (Refer to page 13.)
• Operating Annoucements with Function Menu (Refer to page 19.)
■ Changing the Label
When operating with the DISPLAY button, indications are displayed in the following
order:
Service Component Label (SERVICE COMPONENT) -► Dynamic Label (DAB TEXT)
-► Ensemble Label (ENSEMBLE LABEL)
Note:
• With a Service Component not containing a Service Component Label or Dynamic Label, selecting
Service Component Label or Dynamic Label causes the display to show a label name, and then
changes to blank display.
■ Changing Display Indications
This product doesn’t have this function.
■ Operating Announcements with Function Menu
When operating with the ◄/► button at step 2, indications are displayed in the following
order:
News Flash (News) -► Area Weather Flash (Weather) -► Announce (Announce)
Note:
• The Announce (Announce) mode combines Warning/Service, Event Flash and Special Event
announcements.
Page 61

Specifications
General
Power source
Grounding system.......................................Negative type
Max. current consumption
Dimensions
Weight......................................................................1.8 kg
.........
14.4 V DC (10.8 - 15.1 V allowable)
...................
.......................................
307 (W) x 41 (H) x 187 (D) mm
10 A
Amplifier
Maximum power output....................................45 W x 4
Continuous power output..................................27 W x 4
Load impedance .........................4n(4-8Q allowable)
Preout maximum output level/output
impedance
Subwoofer output
Crossover frequency
Crossover slope
Tone controls
(Bass)
(Middle)............................................±12 dB (400 Hz)
(Treble)
Loudness contour
..........................
.........................................
..................................................
...........................................
...............
+10 dB (100 Hz), +7 dB (10 kHz)
(DIN45324, +B = 14.4 V)
....................
.............
50 Hz, 80 Hz, 125 Hz
±12 dB (80 Hz)
±12 dB (10 kHz)
(volume: -30 dB)
2.2 V/1
-18 dB/oct.
FM tuner
Frequency range
Usable sensitivity
.................
50 dB quieting sensitivity .... 16 dBf (1.7 pV/75 Ì2, mono)
Signal-to-noise ratio
Distortion .........................0.3% (at 65 dBf, 1 kHz, stereo)
Frequency response
Stereo separation
....................................
11 dBf (1.0 pV/75 0, mono, S/N: 30 dB)
....................
....................
.......................
87.5 - 108 MHz
70 dB (lEC-A network)
30 - 15,000 Hz (±3 dB)
40 dB (at 65 dBf, 1 kHz)
MW tuner
Frequency range
Usable sensitivity
Selectivity..................................................50 dB (±9 kHz)
....................................
..............................
18 pV (S/N: 20 dB)
531 - 1,602 kHz
LW tuner
Frequency range ....................................... 153 - 281 kHz
Usable sensitivity
Selectivity..................................................50 dB (±9 kHz)
..............................
30 pV (S/N: 20 dB)
Video
Composit input level
Composit output level
PAL/SECAM/NTSC/ compatible through outputs from
..........................
........................
1 V/75 Q (±0.2 V)
1 V/75 Q (±0.2 V)
VIDEO AWIDEO B.
Note:
• Specifications and the design are subject to
possible modification without notice due to
improvements.
Page 62

Conteniedo
Guía de botones
• Controlador remoto
Antes de usar este producto
Sobre este producto
Sobre este manual......................................................5
Para asegurar una conducción segura.....................5
Reposición del microprocesador
Precaución .................................................................6
En caso de problema .................................................6
Uso del controlador remoto
• Pilas
....................................
.................
..................................................
.............................
.................
Operación básica ................................. 8
Para escuchar música ...............................................8
Operación básica del sintonizador
• Banda
• Sintonización de búsqueda y manual
• Sintonización de emisoras preajustadas
Operación básica del reproductor
deMulti-CD
• Búsqueda de disco
• Búsqueda de número de disco
(para tipos de 6 discos, 12 discos)
• Búsqueda de pista y avance
rápido/retroceso
Selección del menú de funciones
• Funciones del menú de funciones
Selección del menú de ajustes detallados...............14
• Funciones del menú de ajustes detallados
....................................................
........................
11
...........................
Operación del sintonizador
3
Sintonización de búsqueda local (LOCAL) .... 16
Memoria de las mejores emisoras (BSM) .......17
.................
16
4
Uso de las funciones RDS
4
6
7
10
12
¿Qué es RDS?...........................................................18
Activación/desactivation de la visualización
de frecuencia
• Nombre de servicio de programa
• Información PTY
Función AF (AF) .....................................................19
• Activación/desactivación de la
función AF
Función de búsqueda PI .........................................20
• Búsqueda PI
• Búsqueda PI automática
(para la emisora preajustada)
Función regional (REGIONAL).............................20
• Activación de la funeión regional
Función TA (TRAFFIC ANNC.)
• Activación/desactivación de la
función TA
• Cancelación de anuncios de tráfico
• Ajuste del volumen de la función TA
• Función de alarma TP
Función PTY ...........................................................23
• Búsqueda PTY
• Ajuste de inten'upciôn de programa de
noticias (NEWS)
• Alarma PTY
• Lista de PTY
...................................................
...................
..........................
18
18
21
Page 63

Uso de reproductores de Multi-CD
Modos de repetición (PLAY MODE)
Pausa (PAUSE) .......................................................27
Reproducción aleatoria (RANDOM) ....................28
Reproducción con exploración (SCAN)
Ajuste de la calidad sonido de CD
(COMP SELECT)
• Activación/desactivación de COMP/DBE
ITS (Selección de pista instantánea)
• Programación ITS (ITS INPUT)
• Reproducción ITS (ITS PLAY)
• Borrado de una pista programada
• Borrado de un disco programado
Título de disco .........................................................33
• Ingreso de título de disco (TITLE INPUT)
Función CD TEXT (para el tipo compatible
con CD TEXT) ................................................35
• Cambio de visualización del título
• Desplazamiento de la visualización
del título
Otras funciones........................................................37
• Cambio al reproductor de Multi-CD
• Reproducción de discos en un reproductor
de Multi-CD de 50 discos
..........................................
...
...................
...............
.....................
27
Ajuste de audio.....................................38
Selección del menú de audio
Ajuste del equilibrio
(FADER/BALANCE)
Ajuste de sonidos graves/medios/agudos
(BASS/MID/TREBLE)"..................................40
Ajuste del sonoridad (LOUDNESS)
Uso de un altavoz de graves secundario
• Salida de altavoz de graves secundario
(SUBW.l)
• Fijación de ajuste de altavoz de graves
secundario (SUBW.2)
Función de mejorador de imagen
delantera (FIE)
Ajuste del nivel de la fuente (SLA) ........................44
..................................
.....................................
.....................
................
...............................................
Menú de ajustes iniciales
27
28
30
30
38
39
41
41
Selección del menú de ajustes iniciales
Cambio del paso de sintonía de FM
(FM TUNING STEP)
Ajuste de la función de prioridad DAB
(DAB PRIORITY) ..........................................48
Cambio de la búsqueda PI automática
(AUTO PI SEEK)
Conmutación del modo AUX (AUX) .....................50
Cambio de modo de entrada de altavoces
(SPEAKER INPUT)
Cambio de los modos VIDEO
(VIDEO INPUT A/B) .....................................51
Otras funciones
Uso del botón PGM (PGM-FUNCTION)
• Ajuste del botón PGM
• Uso del botón PGM
Uso de la fuente AUX
• Selección de la fuente AUX
• Ingreso de título para la fuente AUX
Uso de la fuente de entrada de altavoces
Selección de la imagen
(Visualizador delantero)
Uso del visualizador trasero ...................................56
Atenuador de volumen
Función de silenciamiento ......................................57
• Silenciamiento de la unidad de
navegación móvil
• Silenciamiento de teléfono celular
Cuando se usa el sintonizador DAB
(Emisión de audio digital)
• Acerca de las indicaciones de este
producto
• Operación
....................................
Especificaciones .................................
43
....................
.................
.....................................
...........................................
.......................................
.............
.............................................
..............
................................
...........................................
..............................
47
47
48
49
50
52
52
54
55
55
56
58
60
Ajuste de imagen
Ajuste de la imagen
• Color (COLOR)
• Nitidez (SHARP)
...............................
................................................
45
45
Page 64

Guía de botones
Controlador remoto
- Botones 1-6
Botón +/Botón SOURCE
Botón ◄/►
Botón BAND
- Botón FUNCTION
■ Botón MENU
■ Botón PTY
■ Botón PGM
Page 65

Antes de usar este producto
Sobre este producto
Este producto cumple con las Directivas EMC (89/336/CEE, 92/31/CEE) y Directiva de
Marcación CE (93/68/CEE).
Las frecuencias del sintonizador en este producto se han repartidas para uso en Europa
Occidental, Asia, Oriente Medio, Africa y Oceania. El uso en otras áreas puede resultar en
recepción inapropiada. Las funciones RDS operan solamente en áreas con señales RDS de
emisoras FM.
El visualizador de este producto tiene indicadores de orientación de los botones. Esos indi
cadores se encienden para indicar cuáles de los botones A/T/^/^, así como los botones
FUNCTION y AUDIO que pueden usarse. Cuando se está en el menú de funciones o
menú de audio, ellos también ayudan a saber cuáles son los botones A/T/^/^ que se
pueden usar para activar/desactivar las funciones, cambiar los modos de repetición, y
realizar otras operaciones.
Indicatores de orientación de los botones
Ejemplo; Menú de funciones
Ejemplo: Menú de audio
FÜNOT1 ON
6 n 8 0 0 2’ 34"
CORVETTE
CORVETTE
6 n 8
FADER
FRONT
4
Nota:
• Cuando “ON” y “OFF” se encuentran iluminados, puede activar o desactivar (ON/OFF) la función
seleccionada actualmente con los botones A/T.
• Cuando “SEL” se encuentra iluminado, puede usar los botones ◄/► o botones A/T para cambiar
las opciones de selección de la función seleccionada actualmente.
• Cuando se seleccionan los ajustes tales como “ON”, “OFF”, etc., el ajuste seleccionado será
visualizado en color amarillo.
• La imagen a veces fluctúa. Esto no es una falla de funcionamiento.
Page 66

Antes de usar este producto
Sobre este manual
Este producto viene con diversas funciones sofisticadas que aseguran una recepción y
operación superior. El producto ha sido proyectado para uso lo más fácil posible, pero
muchas funciones requieren explicación. El propósito de este manual de operación es ayu
darle a beneficiarse completamente del potencial del producto y maximizar su disfrute de
audición.
Se recomienda familiarizarse con las funciones y operaciones leyendo completamente el
manual antes de usar el producto. Es especialmente importante que lea y observe la
“Precaución” en la página siguiente y otras secciones.
Para asegurar una conducción segura
Para asegurar una operación del vehículo segura, las funciones complicadas no pueden
operarse durante la conducción. Si se selecciona cualquiera de estas funciones complicadas
durante la conducción, en el visualizador se visualiza “YOU CANNOT USE THIS
FUNCTION WHILE DRIVING”. Para usar estas funciones, pare su vehículo y aplique el
freno de estacionamiento.
ATTENTION
YO U CA NNOT USE THI S
FU NCTI ON WHIL E DRIV ING
Una vez que haya parado el vehículo y aplicado el freno de estacionamiento, el sistema
puede ignorar este hecho y visualizar el mensaje “YOU CANNOT USE THIS
FUNCTION WHILE DRIVING”. Esto puede ocurrir cuando:
-El encendido está activado (ON) o desactivado (OFF).
-El interruptor del encendido está girado a la posición ACC, y el motor ha arrancado
para usar el sistema.
-Se presiona el botón RESET.
En los casos anteriores puede suponerse que el sistema no ha detectado que el freno de
estacionamiento se encuentra aplicado. En este caso, suelte el freno de estacionamiento
y luego vuelva a aplicarlo de nuevo.
En algunos vehículos, cuando el encendido está ajustado a la posición OFF o ACC, la
condición del freno de estacionamiento no puede detectarse. Para usar el sistema mien
tras el interruptor de encendido se encuentra en la posición ACC, primero gire el inter
ruptor del encendido a la posición ON, aplique el freno de estacionamiento, y luego
retorne el interruptor del encendido a la posición ACC.
Page 67

Reposición del microprocesador
El microprocesador se debe reposicionar en las siguientes condiciones:
Cuando utilice este producto por la primera vez después de la instalación.
Cuando el aparato no funciona apropiadamente.
Cuando mensajes extraños (incorrectos) aparecen en el visualizador.
Para reposicionar el microprocesador, presione el botón RESET en la unidad con la punta de una pluma u otro instrumento puntiagudo.
Precaución
Guarde este manual a mano como referencia para los procedimientos de operación y
precauciones.
Mantenga siempre el volumen bajo lo suficiente para oír los sonidos de tráfico.
Proteja el producto contra la humedad.
Si la batería del automóvil se desconecta por alguna razón, la memoria programada será
apagada y deberá ser programada nuevamente.
En caso de problema
Cuando este producto no funciona correctamente, comuniqúese con su concesionario o
centro de servicio PIONEER autorizado.
Page 68

Uso del controlador remoto
Este producto se equipa con un controlador remoto para conveniencia en su operación.
• Apunte el controlador en la dirección del receptor de señal en el visualizador en color
(en venta por separado) para operarlo.
• Cuando el controlador remoto no se encuentre en uso, fije firmemente a la base de mon
taje provista.
Precaución:
• No almacene el controlador remoto en altas temperaturas o a la luz directa del sol.
• El controlador puede no funcionar adecuadamente a la luz directa del sol.
• No permita que el controlador remoto se caiga al piso, en donde puede quedar aprisionado debajo
del pedal de freno o acelerador.
Pilas
• Retire la cubierta en la parte trasera del controlador remoto e inserte las
pilas con los polos (+) y (-) apuntando en la dirección apropiada.
Precaución:
• Utilice solamente pilas AAA o lEC R03 de 1,5 V.
• Retire las pilas si el controlador remoto no es usado durante un mes o más tiempo.
• No intente recargar las pilas suministradas.
• No mezcle pilas usadas con nuevas.
• En el caso de fuga de electrólito de la pila, limpie completamente el controlador remoto y coloque
pilas nuevas.
Page 69

Operación básica
Para escuchar música
A continuación se explican los preparativos requeridos antes que se pueda escuchar la
música.
1. Seleccione la fuente deseada en el orden siguiente (tal como el sintonizador.):
Cada presión
cambia la fuente ...
Reproductor de CD (solamente un disco) -► TV Sintonizador -► DAB (Emisión de audio digital) ■
VIDEO A -► VIDEO B -►
► Reproductor de Multi-CD -► AUX ■
Entrada de altavoces
Nota:
• En los casos siguientes, la fuente de sonido no cambiará:
* Cuando la fuente de sonido desde otro producto no está conectado a este producto.
* Cuando ningún magazine está colocado en el reproductor de Multi-CD.
* Cuando ningún disco está colocado en el reproductor de CD.
* Cuando AUX (entrada externa), VIDEO A, VIDEO B y entrada de altavoces están ajustados a
OFF. (Vea las páginas 50, 51.)
2. Suba o baje el volumen.
8 7.5 0 MHz
■fi
CH
SITK
CH
...
e
5
4
3 se. 1 0
2
1
voL 1 :Ì iiiiiniiiiiiii
104.
108.
106.
89 .
87 50
00
00
1 0
SO
Continúa en la siguiente hoja.
Page 70

Operación básica
3. Desactive las fuentes.
S
m
Sostenga durante
1 segundo 0 más.
1
Sil
Page 71

Operación básica del sintonizador
La función AF de este producto se puede activar y desactivar. Se debe desactivar la fun
ción AF para operaciones de sintonización normales. (Vea la página 19.)
Banda
FMI -► FM2
-► FM3 -► MW/LW
. Sintonización de emisoras preajustadas
• Se puede memorizar emisoras en los botones 1 a 6 para una llamada fácil de las emisoras a simple tacto.
Llamada de emisora preajustada
Memoria de preajuste de una emisora 2 segundos o más
2 segundos o menos
Nota:
• Se puede almacenar en la memoria hasta un máximo de 18
emisoras FM (6 en FMl, FM2 y FM3) y 6 emisoras MW/LW.
• También se pueden utilizar los botones A y T para llamar a
las emisoras memorizadas en los botones 1 a 6.
Indicador de banda
Indicador de número
preajustado
Indicador de frecuencia
Sintonización de búsqueda y manual
• Se puede seleccionar el método de sintonización cambiando el lapso de tiempo de presión del botón ◄/►.
Sintonización manual (paso por paso) 0,5 segundos o menos
Sintonización de búsqueda (automática) 0,5 segundos o más
Nota:
• Si se presiona el botón durante más de 0,5 segundos, se puede saltar las emisoras. La sintonización
de búsqueda comienza así que se para de presionar el botón.
• El indicador “CD” se enciende cuando se selecciona una emisora estéreo.
Page 72

Operación básica
Operación básica del reproductor de Multi-CD
Este producto puede controlar un reproductor de Multi-CD. (Con ciertos tipos de respro
ductores de Multi-CD, el uso de un adaptador de conexión múltiple le permite conectar
múltiples unidades que puede controlar con este producto.)
Búsqueda de número de disco (para tipos de 6 discos, 12 discos)
• Se puede seleccionar los discos directamente con los
botones 1 a 6. Basta presionar el número correspondi
Búsqueda
de disco
ente al disco que desea escuchar.
Cuando hay un reproductor de Multi-CD de 12 discos conectado y se
desea seleccionar los discos de 7 a 12, presione los botones 1 a 6
durante 2 segundos o más.
Indicador de
número de pista Indicador de tiempo
Indicador de
número de disco
transcurrido de
reproducción
Si se ha ingresado un título de disco, el
título será visualizado.
Búsqueda de pista y avance rápido/retroceso
Se puede seleccionar entre la búsqueda de pista o el avance rápido/retroceso
presionando el botón ◄/► durante un lapso diferente de tiempo.
Búsqueda de pista
Avance rápido/retroceso Continúe presionando
0,5 segundos o menos
Nota:
El reproductor de Multi-CD puede realizar una operación preparatoria, tal como verificar la pre
sencia de un disco o como leer las informaciones de un disco, cuando se enciende el reproductor o
cuando se selecciona un nuevo disco para reproducción. Se visualiza “READY”.
Si un reproductor de Multi-CD no funciona adecuadamente, se visualiza un mensaje de error tal
como “ERROR-14”. Consulte el manual del propietario del reproductor de Multi-CD.
Si no hay discos en el cargador de CD del reproductor de Multi-CD, se visualiza “NO DISC”.
Page 73

Selección del menú de funciones
El menú de funciones le permite operar funciones simples para cada fuente.
Nota:
Después de seleccionar el menú de funciones, si no se realiza ninguna operación dentro de aproxi
madamente 30 segundos, el menú de funciones se cancela automáticamente.
1. Seleccione el modo deseado en el menú de funciones. (Vea “Funciones del menú de funciones”.)
Cada presión
cambia el modo ...
2. Opere un modo, (tal como la reproducción aleatoria)
El botón usado y la
FÜNCT I ON
»6
n 8 0 0 2*34'
N0 DI SO TITLE
RANDOhf
operación que ello realiza
se indican por el indicador
de guía de botones.
Presione el botón ▲ para
activar el indicador de guía
de botones, y el botón T
para desactivarlo.
3. Cancele el menú de funciones.
OMAG
mu
SÜBVI.
«
N0 D I
1
6 N0
5
4
3 N0
2
m
^ 1
/3 1 © 02' 34" 1
ISO TITLE 1
TITLE
N0
TITLE
TITLE
N0
TITLE
N0
TITLE
TITLE
N0
DISC
A
TBÀCK
w
DISC
<1
Page 74

Operación básica
Funciones del menú de funciones
En la siguiente tabla se muestran las funciones para cada fuente en el menú de funciones.
En la tabla también se muestran las indicaciones para cada función, operaciones y botones
usados para realizar las operaciones. Para más detalles, o cuando desea saber más sobre
una operación, refiérase al número de página indicado en la tabla.
■ Sintonizador
Nombre de la fundón (Visualización)
Memoria de las mejores emisoras (BSM)
Función AF (AF)
Función regional (REGIONAL)
Sintonización de búsqueda local (LOCAL)
Función TA (TRAFFIC ANNC.)
Ajuste de interrupción de programa
de noticias (NEWS)
■ Reproductor de Multi-CD
Nombre de la fundón (Visualización) Botón : Operación Página
Modos de repetición (PLAY MODE)
Reproducción aleatoria (RANDOM) A: Active
Reproducción con exploración (SCAN)
Reproducción ITS (ITS PLAY)
Pausa (PAUSE)
Ajuste de la calidad sonido de CD
(COMP SELECT)
Botón : Operación Página
A: Active
T: Desactive
A: Active
▼: Desactive
A; Active
▼: Desactive
1 A: Active
▼: Desactive
2 ◄ 0 ►: Selección (Sensibilidad)
A: Active
▼: Desactive
A: Active
▼; Desactive
◄ 0 ►: Selección (Gama de reproducción) 27
T: Desactive
A: Active
T: Desactive
A: Active
T: Desactive
A: Active
▼: Desactive
A 0 T: Selección
(Función de calidad sonido)
17
19
20
16
21
25
28
28
31
27
30
Page 75

Selección del menú de ajustes detallados
En el menú de ajustes detallados, se pueden ejecutar funciones convenientes y complejas
para cada fuente.
1. Seleccione el menú de ajustes detallados.
FUNCT I ON
W 6 n 8 0 02* 34‘
N0 D1 SO TITLE
TITLE INPUT
Sostenga durante
2 segundos.
A HEXT
2. Seleccione el modo deseado. (Vea “Funciones del menú de ajustes detallados”.)
Cada presión
cambia el modo .
3. Opere un modo.
Continúa en la siguiente hoja.
HMHMm
_____________
6 J3 8 © 02‘ S4'
N0 DI se TITLE
PiM-FUNCTION I MEM'
SEL
Page 76

Operación básica
4. Cancele el menú del ajustes detallados.
1 MULTi OD
n
: SO
i 01
NC
TI
N0
1
6 N0 TI'
N0 TI TLE
0
TI TLE
4
N0
TI TLE
N0
3
N0 T 1TLE
2
TLE
TLE
1 0
T 1 TL
11
02■34”
E
DISC
A
YlíACK
m—
: -T'
DíaC
Nota:
Se puede cancelar el menú de ajustes detallados presionando el botón FUNCTION de nuevo
durante 2 segundos o más.
Funciones del menú de ajustes detallados
En la siguiente tabla se muestran las funciones para cada fuente en el menú de ajustes
detallados. En la tabla también se muestran las indicaciones para cada función, opera
ciones y botones usados para realizar las operaciones. Para más detalles, o cuando desea
saber más sobre una operación, refiérase al número de página indicado en la tabla.
I Sintonizador
Nombre de la función (Visuaiizadón)
Función de programa (PGM-FUNCTION)
Botón : Operación
1 ◄ 0 ►: Selección (Función)
2 A : Memoria
■ Reproductor de Multi-CD
Nombre de la función (Visualización)
Ingreso de título de disco (TITLE INPUT)
Programación ITS (ITS INPUT)
Función de programa (PGM-FUNCTION)
Botón ; Operación
1 A 0 T: Selección (Letra)
2 ◄ o ►: Selección (Posición)
3 ►: Memoria
A: Memoria
1 ◄ 0 ►: Selección (Función)
2 A: Memoria
Página
52
Página
33
30
52
Page 77

Operación del sintonizador
Sintonización de búsqueda local (LOCAL)
Este modo selecciona solamente emisoras con señales especialmente fuertes.
La sensibilidad puede ajustarse en 4 pasos para la FM y 2 pasos para MW/LW.
1. Presione el botón FUNCTION y seleccione el modo LOCAL (LOCAL) en el menú de funciones.
2. Active o desactive el local.
“LOC”
3. Seleccione la sensibilidad de búsqueda local deseada.
FM : LOCAL 1
MW/LW : LOCAL 1
► LOCAL 2
LOCAL 2
> LOCAL 3 ^ LOCAL 4
Nota:
• El ajuste “LOCAL 4” permite la recepción solamente de las emisoras con las señales más fuertes,
mientras los ajustes inferiores le permiten recibir progresivamente las emisoras con señales más
débiles.
«
Page 78

Operación del sintonizador
Memoria de las mejores emisoras (BSM)
La función BSM almacena las emisoras en la memoria automáticamente.
1. Presione el botón FUNCTION y seleccione el modo BSM (BSM) en el menú
de funciones.
2. Active el BSM.
Las emisoras con las señales más fuertes serán almacenadas bajo los botones 1-6, por
orden de fuerza de sus señales.
Para cancelar el proceso, presione el botón T en el menú de funciones antes
del término de la memorización.
Page 79

Uso de las funciones RDS
;Qué es RDS?
RDS (Sistema de dados radiales) es un sistema para transmisión de dados con los progra
mas de FM. Esos datos, que son inaudibles, proveen una variedad de funciones tales como:
nombre de servicio de programa, indicación de tipo de programa, espera por anuncio de
tráfico, sintonización automática y sintonización por tipo de programa, para ayudar los
oyentes de radio a sintonizar una emisora deseada.
Nota:
• El servicio RDS puede no ser disponible para todas las emisoras.
• Las funciones RDS, como AF (búsqueda de frecuencias alternativas) y TA (espera por anuncio de
tráfico), son solamente activas cuando su radio se sintoniza en emisoras RDS.
Activación/desactivación de la visualización de frecuencia
_________________
Cuando desea conocer la frecuencia de la emisora actual, puede activar la visualización de
la frecuencia.
Activación de la visualización de frecuencia.
Frecuencia
Información PTY
Nombre de servicio de pro
grama
Repita la operación precedente para desactivar (OFF) la visualización de frecuencia.
Nombre de servicio de programa
El nombre de servicio de programa es el nombre de las redes/emisoras que proporcionan el
servicio RDS.
Información PTY
La información PTY (código de identificación de tipo de programa) para la emisora actual
mente sintonizada aparece sobre la visualización. La información está correlacionada con
la lista en la sección “Lista de PTY” en la página 26.
Page 80

Uso de las funciones RDS
Función AF (AF)
La función AF (búsqueda de frecuencias alternativas) se usa para buscar otras frecuencias
en la misma red de la emisora sintonizada actualmente. La función sintoniza de nuevo el
receptor automáticamente a una otra frecuencia en la red con señales más fuertes, cuando
hay problemas en la recepción de la emisora sintonizada actualmente, o si es posible
obtener una mejor recepción en una frecuencia diferente.
Nota:
• La función AF sintoniza el receptor solamente en emisoras RDS cuando se usa la sintonización de
búsqueda o la función BSM con el indicador “AF” encendido.
• Cuando se llama una emisora preajustada, el sintonizador puede aetualizar la emisora preajustada
con una nueva frecuencia desde la lista AF de la emisora. (Esto solamente se dispone cuando se
usan los preajustes en las bandas FMl y FM2.) Ningún número preajustado aparece en el visualizador si los datos RDS para la emisora recibida son diferentes de los datos para la emisora almace
nada originalmente.
• El sonido puede interrumpirse temporalmente por un otro programa durante la búsqueda de fre
cuencia AF.
• Cuando el sintonizador se sintoniza en una emisora no RDS, el indicador “AF” destella.
• La función AF se puede activar y desactivar independientemente para cada banda FM.
Activación/desactivación de la función AF
La función AF está activada por omisión.
1. Presione el botón FUNCTION y seleccione el modo AF (AF) en el menú de funciones.
2. Active o desactive la función AF mientras esté en una banda FM.
ig- Desaparece “AF ”
Page 81

Función de búsqueda PI
El sintonizador busca por una otra frecuencia transmitiendo el mismo programa.
“PI SEEK” (búsqueda PI) aparece en el visualizador y el volumen de la radio se enmudece
durante la búsqueda PI. El enmudecimiento cesa después de completada la búsqueda PI,
tenga la búsqueda PI sido exitosa o no. Si la búsqueda PI no es exitosa, el sintonizador
vuelve a la frecuencia anterior.
Búsqueda PI
Si el sintonizador no logra localizar una frecuencia alternativa apropiada o si la señal de
radiodifusión es muy débil para una recepción apropiada, la búsqueda PI comenzará
automáticamente.
Búsqueda PI automática (para la emisora preajustada)
Cuando no se pueden llamar a emisoras preajustadas, como durante un viaje, se puede
ajustar el producto para realizar la búsqueda PI también durante la llamada de emisoras
preajustadas.
La búsqueda PI automática está desactivada por omisión.
Nota:
• Para más detalles sobre cómo activar y desactivar la búsqueda PI automática, consulte a la sección
“Menú de ajustes iniciales”.
Función regional (REGIONAL)
Cuando se usa la función AF para sintonizar de nuevo el receptor automáticamente, la fun
ción regional (REGIONAL) limita la selección a emisoras que transmiten programas
regionales.
Nota:
• Los programas regionales y redes regionales se organizan de manera diferente dependiendo del país
(es decir, pueden cambiar de acuerdo a la hora, estado o área de radiodifusión).
• El número preajustado puede aparecer en el visualizador si el receptor sintoniza una emisora
regional diferente de la emisora ajustada originalmente.
Activación de la función regional
La función regional se puede activar independientemente para cada banda FM.
1. Presione el botón FUNCTION y seleccione el modo regional (REGIONAL) en el menú de funciones.
2. Active o desactive la función regional mientras esté en una banda FM.
“REG”
Page 82

Uso de las funciones RDS
Función TA (TRAFFIC ANNC.)
La función TA (espera por anuncio de tráfico) le permite recibir anuncios de tráfico
automáticamente, independientemente de la fuente que esté escuchando. La función TA se
puede activar para una emisora TP (una emisora que transmite información de tráfico) o
una emisora EON TP (una emisora que transmite informaciones interreferenciales remisi
vas a las emisoras TP).
Activación/desactivación de la función TA
1. Sintonice una emisora TP o EON TP.
El icono de coche se enciende cuando el receptor se sintoniza en una emisora TP o en una
emisora EON TP.
2. Active la función TA.
“TRFC.”
Icone de coche
El indicador “TRFC.” se enciende, indicando que el sintonizador está esperando por anun
cios de tráfico.
Repita la operación precedente cuando ningún anuncio de tráfico está siendo recibido para
desactivar la función TA.
Nota:
• La función TA también se puede aetivar/desactivar en el menú de funciones.
• El sistema regresa a la fuente original al final de la recepción de anuneio de tráfico.
• La función TA se podrá activar desde fuentes diferentes del sintonizador si el sintonizador estaba
ajustado a la banda FM, pero eso no será posible si ello estaba ajustado a la banda MW/LW.
• Si el sintonizador estaba ajustado a FM, activar la función TA le permite operar otras funciones de
sintonizaeión mientras escucha fuentes diferentes del sintonizador.
• Solamente emisoras TP o EON TP se sintonizan durante el modo de sintonizaeión de búsqueda
cuando el indicador “TRFC.” está encendido.
• Solamente emisoras TP o EON TP se almacenan por la función BSM cuando el indieador “TRFC.”
está encendido.
Page 83

Cancelación de anuncios de tráfico
• Presione el botón TA mientras recibe un anuncio de tráfico para cancelar el anuncio y volver a la fuente original.
El anuncio se cancela pero el sintonizador permanece en el modo TA hasta que se presione
el botón TA nuevamente.
Ajuste del volumen de la función TA
Cuando comienza un anuncio de tráfico, el volumen se ajusta automáticamente a un nivel
preajustado para permitirle oír el anuncio claramente.
• Ajuste el volumen durante la recepción de un anuncio de tráfico.
El nuevo volumen ajustado se almacena en la memoria, siendo llamado para los anuncios
de tráfico subsecuentes.
Nota:
• El atenuador de volumen se cancela si se recibe un anuncio de tráfico en el modo de atenuador de
volumen (refiérase a la página 56 para los detalles concernientes al atenuador de volumen).
Función de alarma TP
Aproximadamente 30 segundos después que se extingue el icono de coche debido a una
señal débil, suena un timbre de 5 segundos para que se seleccione una otra emisora TP o
EON TP.
• Si usted está escuchando al sintonizador, sintonice una otra emisora TP o emisora EON TP.
En fuentes diferentes del sintonizador, el sintonizador busca automáticamente por la
emisora TP con las señales más fuertes en el área actual, 10 (o 30)* segundos después que
se ha desaparecido el icono de coche del visualizador.
* Tiempo requerido para que la búsqueda comience.
Función TA activada 10 segundos
Funciones TA, AF activadas 30 segundos
Page 84

Uso de las funciones RDS
Función PTY
Con la clasificación de ancho y estrecho del tipo de programa, la función PTY proporciona
dos maneras para seleccionar las emisoras por el tipo de programa que se está emitiendo
(PTY Search). La función también provee la sintonización automática a radiodifusiones de
emergencia (PTY Alarm).
Nota:
• No hay necesidad de llevar a cabo el ajuste de búsqueda PTY de nuevo si los ajustes han sido
hechos previamente. Después de cambiar al modo de ajuste de búsqueda PTY en el paso 1, simple
mente lleve a cabo la búsqueda PTY en el paso 4.
Búsqueda PTY
1. Seleccione el modo de ajuste de búsqueda PTY (PTY SELECT).
2. Seleccione el método de búsqueda PTY (ancho, estrecho).
RAD I 03FM
PTY SELEOT
Page 85

3. Seleccione uno entre los servicios PTY.
4. Inicie la búsqueda PTY.
El sintonizador busca por una emisora que transmite el PTY deseado.
Para cancelar el modo de ajuste de búsqueda PTY, sostenga presionado el botón PTY
durante 2 segundos o más.
Nota:
• Si se recibe un código PTY cero de una emisora, “NONE” (ninguno) será visualizado. Eso indica
que la emisora no ha definido el contenido de sus programas.
• El programa de algunas emisoras puede ser diferente de lo indicado por el PTY transmitido.
• Si no se encuentra ninguna emisora transmitiendo el tipo de programa seleccionado, “NOT
FOUND” (no encontrado) se visualiza por 2 segundos, y el sintonizador regresa a la emisora origi
nal.
Page 86

Uso de las funciones RDS
Ajuste de interrupción de programa de noticias (NEWS)
La recepción automática de los programas de noticias con código PTY puede ser activada
o desactivada. Cuando un programa de noticias recibido termina, la recepción del progra
ma precedente continúa.
• Ajuste la interrupción a activado o desactivado.
Sostenga durante
2 segundos.
“NEWS”
Nota:
• También puede activar o desactivar (ON/OFF) el ajuste de interrupción de programa de noticias en
el menú de funciones.
Alarma PTY
La alarma PTY es un código PTY especial para anuncios relativos a emergencias tales
como desastres naturales. Cuando el sintonizador recibe el código de alarma de radio,
“ALARM” (alarma) aparece en el visualizador y el volumen se ajusta al volumen TA.
Cuando la emisora deja de transmitir el anuncio de emergencia, la unidad vuelve a la
fuente anterior.
Nota:
• El sistema cambia nuevamente a la fuente original después de completada la recepción del anuncio
de emergencia.
■ Cancelación de anuncios de emergencia
• Presione el botón TA durante la recepción de anuncio de emergencia para cancelar el anuncio y volver a la fuente anterior.
Page 87

Lista de PTY
Ancho
News&Inf
Popular
Classics
Others
Estrecho
News
Affairs
Info
Sport
Weather
Finance
Pop Mus
RockMus
Easy Mus
Oth Mus
Jazz
Country
Nat Mus
Oldies
Folk Mus
L. Class
Classic
Educate
Drama
Culture
Science
Varied
Children
Social
Religion
Phone In
Touring
Leisure
Document
Detalles
Noticias.
Temas de actualidad.
Información general y consejos.
Programas deportivos.
Informes del tiempo/Información meteorológica.
Informes del mercado de valores, comercio,
operaciones de compraventa, etc.
Música popular.
Música moderna contemporánea.
Música “fácil de escuchar”.
Otros tipos de música, que no se clasifican por
categorías.
Programas basados en música jazz.
Programas basados en música campera.
Programas basados en música nacional.
Música antigua, programas basados en la
“Edad de Oro”.
Programas basados en música folklórica.
Música clásica ligera.
Música clásica seria.
Programas educacionales.
Todas las obras y seriales de radio.
Programas relacionados con cualquier aspecto
de la cultura nacional o regional.
Programas relativos a la naturaleza, ciencias y
tecnología.
Programas de entretenimiento ligero.
Programas para niños.
Programas de asuntos sociales.
Programas o servicios de asuntos religiosos.
Programas basados en teléfono.
Programas de viaje, sin anuncios de problemas
de tráfico.
Programas relativos a pasatiempos favoritos y a
actividades recreativas.
Programas documentales.
Page 88

Uso de reproductores de Multi-CD
Modos de repetición (PLAY MODE)
Hay tres modos de repetición (gama de reproducción): Repetición de una pista, repetición
de disco y repetición de reproductor de Multi-CD. (El modo predefinido es el modo de
repetición de reproductor de Multi-CD.)
1. Presione el botón FUNCTION y seleccione el modo de selección de repetición (PLAY MODE) en el menú de funciones.
2. Seleccione el modo dé repetición deseado en el siguiente orden:
IBIIWlll
..........................................
e e eo2'34"
/% Pk i as, 1- I -y 1
PLAY MODE
Repetición de reproductor de Multi-CD (MAC RPT) -► Repetición de una pista
(TRACK RPT) -► Repetieión de diseo (DISC RPT)
Nota:
• Si se pasa de la gama de reproducción del modo de repetición seleccionado realizando la búsqueda
de pista, avance rápido/retroceso o seleccionando un otro disco o reproductor de Multi-CD, el
modo cambia a un modo de repetición aplicable.
• Cuando se conectan dos o más reproductores de Multi-CD, luego de la repetición de reproductor de
Multi-CD, el modo cambia a repetición completa (se visualiza “AH”). La repetición completa se
realiza en todos los reproductores de Multi-CD conectados.
“TRK”
Pausa (PAUSE)
La función de pausa le permite interrumpir temporalmente la reproducción de la pista actual.
Presione el botón FUNCTION y seleccione el modo de pausa (PAUSE) en el
menú de funciones.
2. Active o desactive la pausa.
“PAUSE”
Page 89

Reproducción aleatoria (RANDOM)
Las pistas se reproducen aleatoriamente dentro de la gama de reproducción del modo de
repetición seleccionado como se describe en “Modos de repetición” en la página 27.
1. Presione el botón FUNCTION y seleccione el modo aleatorio (RANDOM) en el menú de funciones.
2. Active o desactive la reproducción aleatorio.
FUNCT;ÛN
6 n 8 0 0 2’ 34“
N0 DISC TITLE
RANDOM:
“RDM”
Después de seleccionar la gama de reproducción del modo de repetición deseado entre las
mencionadas en “Modos de repetición” en la página 27, active la reproducción aleatoria
del reproductor de Multi-CD.
Visualización Gama de reproducción
DISC, RDM
MAC, RDM
Repetición de disco
Repetición de reproductor de Multi-CD
Nota:
• El modo de repetición de una pista retorna al modo de repetición de disco cuando activa (ON) la
reproducción aleatoria.
• Cuando se conectan dos o más reproductores de Multi-CD, también puede seleccionar el modo de
repetición completa y luego realizar la reproducción aleatoria. Si realiza ésto, se lleva a cabo la
reproducción aleatoria de todas las pistas en todos los CD colocados en todos los reproductores de
Multi-CD conectados.
Reproducción con exploración (SCAN)
En el modo de repetición de disco, se explora el comienzo de todas las pistas en un único
disco durante aproximadamente 10 segundos. En el modo de repetición de reproductor de
Multi-CD se explora el comienzo de la primera pista de todos los discos durante aproxi
madamente 10 segundos.
1. Presione el botón FUNCTION y seleccione el modo de exploración (SCAN) en el menú de funciones.
Continúa en la siguiente hoja.
Page 90

Uso de reproductores de Multi-CD
2. Active la reproducción con exploración.
Después de seleccionar la gama de reproducción del modo de repetición deseado desde los
referidos en “Modos de repetición” en la página 27, active la reproducción con exploración
de reproductor de Multi-CD.
mí oTTr
N0 D1 se TITLE
“SCAN”
3. Al encontrar la pista deseada (o disco), cancele la reproducción con explo
ración.
Si el menú de funciones se cancela automáticamente, seleccione el modo de exploración
en el menú de funciones una vez más.
FUNCT ION
Ш e Л 1 0 0 0' 04'
N0 DISC TITLE
SCAN
Visualización Gama de reproducción
DISC, SCAN
MAG, SCAN
Repetición de disco
Repetición de reproductor de Multi-CD
Nota:
• La reproducción con exploración se cancela automáticamente después que todas las pistas o discos
han sido explorados.
• El modo de repetición de una pista retorna al modo de repetición de disco cuando activa (ON) la
reproducción con exploración.
• Cuando se conectan dos o más reproductores de Multi-CD, también puede seleccionar el modo de
repetición completa y entonces realizar la reproducción con exploración. Si realiza ésto, el comien
zo de cada pista solamente de cada disco colocado en cada reproductor de Multi-CD conectado se
reproduce durante unos 10 segundos.
Page 91

Ajuste de la calidad sonido de CP (COMP SELECT)
El uso de las funciones COMP (Compression) y DBE (Dynamic Bass Emphasis) le
permite ajustar la calidad sonora del reproductor de Multi-CD. Ambas las funciones le
permiten ajustar en dos niveles.
■ COMP
La función COMP (Compression) elimina las distorsiones causadas por desequilibrios
entre los sonidos altos y bajos en volúmenes más altos.
■ DBE
La función DBE (Dyanamic Bass Emphasis) intensifica los niveles de graves para producir
un sonido más fuerte.
______________
Activacíón/desactivación de COMP/DBE
1. Presione el botón FUNCTION y seleccione el modo de cambio de COMP/DBE (COMP SELECT) en el menú de funciones.
2. Seleccione el modo deseado en el siguiente orden:
FÜNCT1 OH
'•6 /5 8 ©02' 34*
N0 Disc TITLE
COMP SELECT
sr:?
llBil
__________
COMP OFF -► COMP 1 -► COMP 2 -► COMP OFF -► DBE !-► DBE 2
Nota:
• Se pueden utilizar estas funciones con reproductores de Multi-CD que las tienen. Si el reproductor
no tiene las funciones COMP/DBE, se visualiza “NO COMP” si se intenta utilizarlas.
ITS (Selección de pista instantánea)
La función ITS le permite buscar la pista que desea reproducir cuando se ha instalado un
más reproductore de Multi-CD. Se puede utilizar la función ITS para programar hasta 24
canciones en cada disco de un total de 100 discos para una reproducción automática. (Se
puede almacenar un programa ITS y datos de título de disco para un máximo de hasta 100
discos en la memoria.)
Programación ITS (ITS INPUT)
Se puede realizar la programación ITS en cualquier modo de reproducción de reproductor
de Multi-CD, excepto en el modo de reproducción ITS.
Page 92

Uso de reproductores de Multi-CD
1. Reproduzca la pista que desea programar.
2. Seleccione el modo de programación ITS (ITS INPUT) en el menú de ajustes detallados. (Vea la página 14.)
3. Programe la pista deseada.
«► 6 n I 0 02' 34"
N0 DI se TITLE
TS INPUT
Nota:
• Después de haber programado más de 100 discos, los datos para un nuevo disco se sobreponen a
los datos del disco que no haya sido reproducido por el período de tiempo más largo.
Reproducción ITS (ITS PLAY)
La reproducción ITS de pistas se realiza dentro de la gama de reproducción explicada en
“Modos de repetición” precedente.
1. Presione el botón FUNCTION y seleccione el modo de reproducción ITS (ITS PLAY) en el menú de funciones.
2. Active o desactive la reproducción ITS.
Después de seleccionar la gama de reproducción del modo de repetición deseado desde los
referidos en “Modos de repetición” en la página 27, active la reproducción ITS.
8 8 ■ © 0 "2 ' 3 4 '
N0 DISC TITLE
TTS”
Nota:
• Si ninguna pista en la gama actual está programada para la reproducción ITS, se visualiza “ITS
EMPTY” (ITS vacío).
»
Page 93

Borrado de una pista programada
1. Durante la reproducción ITS, seleccione la pista que desea borrar.
2. Seleccione el modo de programación ITS (ITS INPUT) en el menú de ajustes
detallados. (Vea la página 14.)
3. Borre la pista.
El modo de programación ITS se cancela y la reproducción ITS de la próxima pista pro
gramada comienza. Si no hay más pistas programadas en la gama actual, se visualiza “ITS
EMPTY” (ITS vacío) y continúa la reproducción normal.
Borrado de un disco programado
1. Seleccione el disco que desea borrar mientras se reproduce el disco.
2. Seleccione el modo de programación ITS (ITS INPUT) en el menú de ajustes
detallados. (Vea la página 14.)
3. Borre el disco programado.
Page 94

Uso de reproductores de Multi-CD
Título de disco
Ingreso de título de disco (TITLE INPUT)
Esta función le permite ingresar hasta un máximo de 100 títulos de disco compuestos de
hasta 10 caracteres. Además, esta función le permite fácilmente buscar y seleccionar un
disco deseado para reproducción. (Se pueden almacenar datos de programa ITS y de título
de disco para hasta un máximo de 100 discos en la memoria.)
1. Reproduzca el disco al cual desea ingresar un título.
2. Seleccione el modo de ingreso de título de disco (TITLE INPUT) en el menú de ajustes detallados. (Vea la página 14.)
Nota:
• Este modo no puede seleccionarse cuando se está reproduciendo un disco CD TEXT en un repro
ductor de Multi-CD compatible con CD TEXT.
3. Seleccione el modo de carácter deseado en el orden siguiente:
ía VIDEO A
© 02' 34" 1
1
aíi:; 1
TITLE INPUT 1
iSÍ' 1
Nhxr i
Cada presión
cambia el modo ...
■
1 FUNCTION
1 N0 DISC T!
^iBi|gi|Í|i|Í|||Íi|i
S n 1
A
DÜWK
Alfabeto (Mayúsculas), números y símbolos -► Alfabeto (minúsculas)
Nota:
• Se puede cambiar al modo de números y símbolos presionando el botón 2.
Page 95

4. Seleccione una letra, número o símbolo.
FÜNCT ION
• 6 n 8 © 02’ 34“
N0 D{SO TITLE
TITLE INPUT
А шл
DOWN
Рага insertar un espacio,
seleccione el cursor.
5. Avance o retroceda cuadro a cuadro.
FUNCTI ON
6 Л 8 0 02’ 34*
N0 DISO TITLE
TITLE INPUT
BACK А шл
<ис0
<
------
---------
DOWN
►
6. Al completar el título, almacénelo en la memoria y el cursor se apagará.
FUNCT i ON
6 Л I © 02* 34*
: N0 DISC TITLE
TITLE INPUT
влек A NEXT
^CORVETTE
DOWN
Nota:
• Los títulos permanecen en la memoria, aún después que se saque el disco del cargador de CD, y se
llaman cuando se inserta el disco nuevamente.
• Después de haber ingresado títulos para 100 discos, los datos para un nuevo disco sobreponen los
datos del disco que no haya sido reproducido por el período de tiempo más largo.
Page 96

Uso de reproductores de MultUCD
Función CD TEXT (para el tipo compatible con CP TEXT)
___________________
Estas funciones se pueden usar cuando se reproduce un disco CD TEXT en un reproductor
de Multi-CD compatible con CD TEXT.
Cambio de visualización del título
Seleccione la visualización del título deseado en el orden siguiente:
\ TA PTY
J
---
L
QD <50)
Cada presión cambia
la visualización ...
Título de disco ■
• Nombre de artista del disco -► Título de pista Nombre de artista de
la pista
Nota:
• Si cierta información no es grabada en un disco CD TEXT, se visualiza “NO (por ejemplo
“NO TRACK TITEE”).
6 n 8 © 02‘ 34‘
DI se ART IST NAME
CORVETTE
BLUE FLAME
LADY NAIL
MANTA RAY
ST1N6RAY
MAKO SHARK
DISC
TRACK
M
DISC
--
№
Page 97

Desplazamiento de la visualización del título
Este producto visualiza solamente las primeras 10 letras del título del disco, nombre de
artista y título de pista. Con textos con más de 10 letras, puede ver el resto del texto
desplazando la visualización.
• Desplazamiento de la visualización del título.
Sostenga durante
2 segundos.
MULTi CD 1
6 8 0
6REATEST C
6 CORVETTE
5 BLUE FLAME:
4 LADY NAIL
3 MANTA RAY
2 STINGRAY
1 MAKO SHARK
m VIDEO A
VrtACK
02' 34"
Disc
A
- -V
DISC
Page 98

Uso de reproductores de Multi-CD
Otras funciones
Cambio al reproductor de Multi-CD
Es posible conectar hasta un máximo de tres reproductores de Multi-CD mediante un adap
tador de instalación múltiple. Cuando se instalan dos o más reproductores de Multi-CD,
sus prioridades se deben especificar. Siga las instrucciones del reproductor de Multi-CD
cuidadosamente, y ajuste los interruptores de dirección correctamente.
• A cada presión del botón BAND se selecciona el reproductor de Multi-CD en el orden siguiente:
“MAGAZINE 1” “MAGAZINE 2” “MAGAZINE 3”
Reproducción de discos en un reproductor de Multi-CD de 50 discos
Cuando se coloca un cargador en un reproductor de Multi-CD de 50 discos, se leen las
informaciones en todos los discos en el cargador.
La lectura no funcionará si los datos para todos los discos no han sido leídos.
Si inicia la reproducción de un disco en un reproductor de Multi-CD de 50 discos, antes de
que la lectura de todos los discos se haya completado, la lectura de la información se para
a mitad de camino. Esto evitará que pueda usar la función ITS. (Si intenta usar esta fun
ción, se visualizará “NOT READY”.)
Si eso ocurre, la lectura de las informaciones empieza de nuevo cuando se conmuta a un
componente que no sea el reproductor de Multi-CD de 50 discos.
Nota:
• Con esta unidad no se pueden usar las funciones “Ejecting a Single Disc” (expulsión de un solo
disco), “Frequency Play” (reproducción de frecuencia), “Music Group Play” (reproducción de
grupo de música) o “ABC Disc Title Search” (búsqueda de título de disco ABC).
■ Búsqueda aproximada de número de disco (solamente para el tipo de 50 discos)
Esta función útil le permite seleccionar discos cargados en un reproductor de Multi-CD de
50 discos usando los botones 1 a 5. Los 50 discos se dividen en cinco bloques, con cada
bloque asignado a uno de los botones de 1 a 5.
Nota:
• Presionar el botón 5 le permite seleccionar solamente el 50mo. disco.
• La búsqueda grosera de discos 1 a 9 no es posible. Utilice los botones A/T para seleccionar el
disco deseado.
• “NOW LOADING” se visualiza en los siguientes casos:
* Si se selecciona el disco en la bandeja extra.
* Si se mueve el disco de la bandeja extra para el cargador.
(Refiérase al manual de instrucciones del reproductor de Multi-CD de 50 discos.)
1. Presione el botón apropiado desde 1~5 para seleccionar el bloque que con
tiene el disco deseado.
2. Presione el botón
A/T
para seleccionar el disco deseado, luego de completar
una búsqueda general.
Page 99

Ajuste de audio
Selección del menú de audio
Con este menú se puede ajustar la calidad sonora.
Nota:
• Después de seleccionar el menú de audio, si no se realiza ninguna operación dentro de aproximada
mente 30 segundos, el menú de audio se cancela automáticamente.
• Puede seleccionar el modo “SUBW.2” solamente cuando la salida de altavoz de graves secundario
está activada (ON) en el modo “SUBW.l”.
1. Seleccione el modo deseado en el menú de audio.
Cada presión
cambia el modo ...
2. Opere un modo.
3. Cancele el menú de audio.
Ä 8 n 8 0 0 2 ’ 3 4 "
CORVETTE
CORVETTE .
BLUE FLAME a
LADY NAIL TRACK
MANTA RAY
STINGRAY ^
MAKO SHARK ' WSC
Page 100

Ajuste de audio
Ajuste del equilibrio (FADER/BALANCE)
Esta función le permite seleccionar un ajuste de potenciómetro/equilibrio que proporciona
las condiciones de audición ideales para todos los presentes.
1. Presione el botón AUDIO y seleccione el modo de potenciómetro/equilibrio (FADER/BALANCE) en el menú de audio.
2. Ajuste el equilibrio de los altavoces delanteros o traseros.
Se visualiza “FRONT +15”
- “REAR +15” a medida
que se mueve desde ade
lante hacia atrás.
3. Ajuste el equilibrio de los altavoces izquierdos y derechos.
Nota:
• “FADER 0” es el ajuste apropiado cuando se usan 2 altavoces.
Se visualiza “LEFT +9” “RIGHT +9” a medida que
se mueve de la izquierda a
la derecha.
 Loading...