

Page 1

Operation Manual
DVD MULTIMEDIA AV NAVIGATION SERVER
AVIC-D3
Notice to all users:
This software requires that the navigation system be properly connected to your vehicle’s
parking brake. If not properly connected and depending on your vehicle, additional installation may be required. For more information, please contact your Authorized Pioneer
Electronics retailer or call us at (800) 421-1404.
Page 2

The screens shown in the examples may differ from the actual screens.
The actual screens may be changed without notice for performance and function improvements.
Page 3

Introduction
License Agreement
PIONEER AVIC-D3 - for U.S.A.
THIS IS A LEGAL AGREEMENT BETWEEN YOU, AS THE END
USER, AND PIONEER ELECTRONICS (USA) INC. (“PIONEER”).
PLEASE READ THE TERMS AND CONDITIONS OF THIS AGREEMENT CAREFULLY BEFORE USING THE SOFTWARE INSTALLED
ON THE PIONEER PRODUCTS. BY USING THE SOFTWARE
INSTALLED ON THE PIONEER PRODUCTS, YOU AGREE TO BE
BOUND BY THE TERMS OF THIS AGREEMENT. THE SOFTWARE
INCLUDES A DATABASE LICENSED BY THIRD PARTY SUPPLIER(S) (“SUPPLIERS”), AND YOUR USE OF THE DATABASE IS
COVERED BY THE SUPPLIERS’ SEPARATE TERMS, WHICH ARE
ATTACHED TO THIS AGREEMENT (Refer to page 3). IF YOU DO
NOT AGREE WITH ALL OF THESE TERMS, PLEASE RETURN THE
PIONEER PRODUCTS (INCLUDING THE SOFTWARE, AND ANY
WRITTEN MATERIALS) WITHIN FIVE (5) DAYS OF RECEIPT OF
THE PRODUCTS, TO THE AUTHORIZED PIONEER DEALER FROM
WHICH YOU PURCHASED THEM. USE OF THE SOFTWARE
SHALL BE DEEMED TO BE YOUR CONSENT TO THE LICENSE
AGREEMENT.
1. GRANT OF LICENSE
Pioneer grants to you a non-transferable, non exclusive license to
use the software installed on the Pioneer products (the “Software”) and the related documentation solely for your own personal use or for internal use by your business, only on such
Pioneer products.
You shall not copy, reverse engineer, translate, port, modify or
make derivative works of the Software. You shall not loan, rent,
disclose, publish, sell, assign, lease, sublicense, market or otherwise transfer the Software or use it in any manner not expressly
authorized by this agreement. You shall not derive or attempt to
derive the source code or structure of all or any portion of the Software by reverse engineering, disassembly, decompilation, or any
other means. You shall not use the Software to operate a service
bureau or for any other use involving the processing of data for
other persons or entities.
Pioneer and its licensor(s) shall retain all copyright, trade secret,
patent and other proprietary ownership rights in the Software. The
Software is copyrighted and may not be copied, even if modified
or merged with other products. You shall not alter or remove any
copyright notice or proprietary legend contained in or on the Software.
You may transfer all of your license rights in the Software, the
related documentation and a copy of this License Agreement to
another party, provided that the party reads and agrees to accept
the terms and conditions of this License Agreement.
2. DISCLAIMER OF WARRANTY
The Software and related documentation are provided to you “AS
IS”. PIONEER AND ITS LICENSOR(S) (for the purpose of provisions 2 and 3, Pioneer and its licensor(s) shall be collectively
referred to as “Pioneer”) MAKES AND YOU RECEIVE NO WARRANTY FOR THE SOFTWARE, WHETHER EXPRESS OR IMPLIED,
AND ALL WARRANTIES OF MERCHANTABILITY AND FITNESS
FOR ANY PARTICULAR PURPOSE FOR THE SOFTWARE ARE
EXPRESSLY EXCLUDED. SOME STATES DO NOT ALLOW EXCLUSION OF IMPLIED WARRANTIES, SO THE ABOVE EXCLUSION
MAY NOT APPLY TO YOU. The Software is complex and may contain some nonconformities, defects or errors. Pioneer does not
warrant that the Software will meet your needs or expectations,
that operation of the Software will be error free or uninterrupted,
or that all non-conformities can or will be corrected. Furthermore,
Pioneer does not make any representations or warranties regarding the use or results of the use of the Software in terms of its
accuracy, reliability or otherwise.
3. LIMITATION OF LIABILITY
IN NO EVENT SHALL PIONEER BE LIABLE FOR ANY DAMAGES,
CLAIM OR LOSS INCURRED BY YOU (INCLUDING, WITHOUT
LIMITATION, COMPENSATORY, INCIDENTAL, INDIRECT, SPECIAL, CONSEQUENTIAL, OR EXEMPLARY DAMAGES, LOST
PROFITS, LOST INCOME, LOST SALES OR BUSINESS, EXPENDITURES, INVESTMENTS, OR COMMITMENTS IN CONNECTION
WITH ANY BUSINESS, LOSS OF ANY GOODWILL, OR DAMAGES)
RESULTING FROM THE USE OF OR INABILITY TO USE THE SOFTWARE, EVEN IF PIONEER HAS BEEN INFORMED OF, KNEW OF,
OR SHOULD HAVE KNOWN OF THE LIKELIHOOD OF SUCH
DAMAGES. THIS LIMITATION APPLIES TO ANY AND ALL
CAUSES OF ACTION INDIVIDUALLY OR IN THE AGGREGATE,
INCLUDING WITHOUT LIMITATION BREACH OF CONTRACT,
BREACH OF WARRANTY, NEGLIGENCE, STRICT LIABILITY, MISREPRESENTATION, AND OTHER TORTS. IF PIONEER’S WARRANTY DISCLAIMER OR LIMITATION OF LIABILITY SET FORTH IN
THIS AGREEMENT SHALL OR FOR ANY REASON WHATSOEVER
BE HELD UNENFORCEABLE OR INAPPLICABLE, YOU AGREE
THAT PIONEER’S LIABILITY SHALL NOT EXCEED FIFTY PERCENT
(50%) OF THE PRICE PAID BY YOU FOR THE ENCLOSED PIONEER PRODUCT.
Some states do not allow the exclusion or limitation of incidental
or consequential damages, so the above limitation or exclusion
may not apply to you. This warranty disclaimer and limitation of
liability shall not be applicable to the extent that they are prohibited by any applicable federal, state or local law which provides
that such a disclaimer or limitation cannot be waived or preempted.
4. EXPORT LAW ASSURANCES
You agree and certify that neither the Software nor any other technical data received from Pioneer, nor the direct product thereof,
will be exported outside the United States except as authorized
and as permitted by the laws and regulations of the United States.
If the Software has been rightfully obtained by you outside of the
United States, you agree that you will not re-export the Software
nor any other technical data received from Pioneer, nor the direct
product thereof, except as permitted by the laws and regulations
of the United States and the laws and regulations of the jurisdiction in which you obtained the Software.
5. TERMINATION
This Agreement is effective until terminated. You may terminate it
at any time by destroying the Software. The Agreement also will
terminate if you do not comply with any terms or conditions of this
Agreement. Upon such termination, you agree to destroy the Software.
6. U.S. GOVERNMENT END USERS
If the Software is being acquired by or on behalf of the United
States government or any other entity seeking or applying rights
similar to those customarily claimed by the United States government, the Data is licensed with “Limited Rights”. Utilization of the
Software is subject to the restrictions specified in the “Rights in
Technical Data” clause at DFARS 252.227-7013, or the equivalent
clause for non-defense agencies. Pioneer Electronics (USA) Inc.,
2265 East 220th Street, Long Beach, CA 90810.
7. MISCELLANEOUS
This is the entire Agreement between Pioneer and you regarding
its subject matter. No change in this Agreement shall be effective
unless agreed to in writing by Pioneer. Pioneer retailers do not
have the authority to change this Agreement. This Agreement
shall be governed by and construed in accordance with the internal laws of the State of California. If any provision of this Agreement is declared invalid or unenforceable, the remaining
provisions of this Agreement shall remain in full force and effect.
1
Page 4

PIONEER AVIC-D3 - for Canada
THIS IS A LEGAL AGREEMENT BETWEEN YOU, AS THE END
USER, AND PIONEER ELECTRONICS OF CANADA, INC. (“PIONEER”). PLEASE READ THE TERMS AND CONDITIONS OF THIS
AGREEMENT CAREFULLY BEFORE USING THE SOFTWARE
INSTALLED ON THE PIONEER PRODUCTS. BY USING THE SOFTWARE INSTALLED ON THE PIONEER PRODUCTS, YOU AGREE
TO BE BOUND BY THE TERMS OF THIS AGREEMENT. THE SOFTWARE INCLUDES A DATABASE LICENSED BY THIRD PARTY
SUPPLIER(S) (“SUPPLIERS”), AND YOUR USE OF THE DATABASE IS COVERED BY THE SUPPLIERS’ SEPARATE TERMS,
WHICH ARE ATTACHED TO THIS AGREEMENT (Refer to page 3).
IF YOU DO NOT AGREE WITH ALL OF THESE TERMS, PLEASE
RETURN THE PIONEER PRODUCTS (INCLUDING THE SOFTWARE, AND ANY WRITTEN MATERIALS) WITHIN FIVE (5) DAYS
OF RECEIPT OF THE PRODUCTS, TO THE AUTHORIZED PIONEER
DEALER FROM WHICH YOU PURCHASED THEM. USE OF THE
SOFTWARE SHALL BE DEEMED TO BE YOUR CONSENT TO THE
LICENSE AGREEMENT.
1. GRANT OF LICENSE
Pioneer grants to you a non-transferable, nonexclusive license to
use the software installed on the Pioneer products (the “Software”) and the related documentation solely for your own personal use or for internal use by your business, only on such
Pioneer products.
You shall not copy, reverse engineer, translate, port, modify or
make derivative works of the Software. You shall not loan, rent,
disclose, publish, sell, assign, lease, sublicense, market or otherwise transfer the Software or use it in any manner not expressly
authorized by this agreement. You shall not derive, or attempt to
derive, the source code or structure of all or any portion of the
Software by reverse engineering, disassembly, decompilation, or
any other means. You shall not use the Software to operate a service bureau or for any other use involving the processing of data
for other persons or entities.
Pioneer and its licensor(s) shall retain all copyright, trade secret,
patent and other proprietary ownership rights in the Software. The
Software is copyrighted and may not be copied, even if modified
or merged with other products. You shall not alter or remove any
copyright notice or proprietary legend contained in or on the Software.
You may transfer all of your license rights in the Software, the
related documentation and a copy of this License Agreement to
another party, provided that the party reads and agrees to accept
the terms and conditions of this License Agreement.
2. DISCLAIMER OF WARRANTY
The Software and related documentation are provided to you “AS
IS”. PIONEER AND ITS LICENSOR(S) (for the purpose of provisions 2 and 3, Pioneer and its licensor(s) shall be collectively
referred to as “Pioneer”) MAKES AND YOU RECEIVE NO WARRANTY FOR THE SOFTWARE, WHETHER EXPRESS OR IMPLIED,
AND ALL WARRANTIES OF MERCHANTABILITY AND FITNESS
FOR ANY PARTICULAR PURPOSE FOR THE SOFTWARE ARE
EXPRESSLY EXCLUDED. SOME STATES DO NOT ALLOW EXCLUSION OF IMPLIED WARRANTIES, SO THE ABOVE EXCLUSION
MAY NOT APPLY TO YOU. The Software is complex and may contain some nonconformities, defects or errors. Pioneer does not
warrant that the Software will meet your needs or expectations,
that operation of the Software will be error-free or uninterrupted,
or that all non-conformities can or will be corrected. Furthermore,
Pioneer does not make any representations or warranties regarding the use or results of the use of the Software in terms of its
accuracy, reliability or otherwise.
3. LIMITATION OF LIABILITY
IN NO EVENT SHALL PIONEER BE LIABLE FOR ANY DAMAGES,
CLAIM OR LOSS INCURRED BY YOU (INCLUDING, WITHOUT
LIMITATION, COMPENSATORY, INCIDENTAL, INDIRECT, SPECIAL, CONSEQUENTIAL, OR EXEMPLARY DAMAGES, LOST
PROFITS, LOST INCOME, LOST SALES OR BUSINESS, EXPENDITURES, INVESTMENTS, OR COMMITMENTS IN CONNECTION
WITH ANY BUSINESS, LOSS OF ANY GOODWILL, OR DAMAGES)
RESULTING FROM THE USE OF OR INABILITY TO USE THE SOFT-
WARE, EVEN IF PIONEER HAS BEEN INFORMED OF, KNEW OF,
OR SHOULD HAVE KNOWN OF THE LIKELIHOOD OF SUCH
DAMAGES. THIS LIMITATION APPLIES TO ANY AND ALL
CAUSES OF ACTION INDIVIDUALLY OR IN THE AGGREGATE,
INCLUDING WITHOUT LIMITATION BREACH OF CONTRACT,
BREACH OF WARRANTY, NEGLIGENCE, STRICT LIABILITY, MISREPRESENTATION, AND OTHER TORTS. IF PIONEER’S WARRANTY DISCLAIMER OR LIMITATION OF LIABILITY SET FORTH IN
THIS AGREEMENT SHALL OR FOR ANY REASON WHATSOEVER
BE HELD UNENFORCEABLE OR INAPPLICABLE, YOU AGREE
THAT PIONEER’S LIABILITY SHALL NOT EXCEED FIFTY PERCENT
(50%) OF THE PRICE PAID BY YOU FOR THE ENCLOSED PIONEER PRODUCT.
Some states do not allow the exclusion or limitation of incidental
or consequential damages, so the above limitation or exclusion
may not apply to you. This warranty disclaimer and limitation of
liability shall not be applicable to the extent that they are prohibited by any applicable federal, state or local law which provides
that such a disclaimer or limitation cannot be waived or preempted.
4. EXPORT LAW ASSURANCES
You agree and certify that neither the Software nor any other technical data received from Pioneer, nor the direct product thereof,
will be exported outside Canada except as authorized and as permitted by the laws and regulations of Canada. If the Software has
been rightfully obtained by you outside of Canada, you agree that
you will not re-export the Software nor any other technical data
received from Pioneer, nor the direct product thereof, except as
permitted by the laws and regulations of Canada and the laws and
regulations of the jurisdiction in which you obtained the Software.
5. TERMINATION
This Agreement is effective until terminated. You may terminate it
at any time by destroying the Software. The Agreement also will
terminate if you do not comply with any terms or conditions of this
Agreement. Upon such termination, you agree to destroy the Software.
6. MISCELLANEOUS
This is the entire Agreement between Pioneer and you regarding
its subject matter. No change in this Agreement shall be effective
unless agreed to in writing by Pioneer. Pioneer retailers do not
have the authority to change this Agreement. This Agreement
shall be governed by and construed in accordance with the internal laws of the Province of Ontario and the federal laws of Canada
applicable therein. If any provision of this Agreement is declared
invalid or unenforceable, the remaining provisions of this Agreement shall remain in full force and effect.
2
Page 5

Terms and Conditions for the Tele Atlas
Data
THIS IS A LEGAL AGREEMENT (THE “AGREEMENT”) BETWEEN
YOU, THE END USER, AND TELE ATLAS NORTH AMERICA, INC.
(“Tele Atlas”). BY USING YOUR COPY OF THE TELE ATLAS DATA,
YOU AGREE TO THE TERMS AND CONDITIONS OF THIS AGREEMENT.
1. Grant of License.
Tele Atlas grants you a non-transferable, non-exclusive license to
use the map data and business points of interest information (the
“POIs”), (together, the “Data”) contained on these discs, solely for
personal, non-commercial use and not to operate a service
bureau or for any other use involving the processing of data of
other persons or entities. You may make one (1) copy of the Data
for archival or backup purposes only but you may not otherwise
copy, reproduce, modify, make derivative works, derive the structure of or reverse engineer the Data. The Data contains confidential and proprietary information and materials, and may contain
trade secrets, so you agree to hold the Data in confidence and in
trust and not to disclose the Data or any portions in any form,
including by renting, leasing, publishing, leasing, sublicensing or
transferring the Data to any third party. You are prohibited from
removing or obscuring any copyright, trademark notice or restrictive legend.
2. Ownership.
The Data is copyrighted by Tele Atlas and its licensors and they
retain all ownership rights in the Data. You agree not to alter,
remove, obliterate, or obscure any copyright notice or proprietary
legend contained in or on the Data.
3. Warranty Disclaimer.
THE DATA IS PROVIDED ON AN “AS IS” AND “WITH ALL FAULTS
BASIS” AND TELE ATLAS AND ITS SUPPLIERS EXPRESSLY DISCLAIM ALL WARRANTIES, EXPRESS OR IMPLIED, INCLUDING
BUT NOT LIMITED TO, THE IMPLIED WARRANTIES OF NONINFRINGEMENT, MERCHANTABILITY, SATISFACTORY QUALITY,
ACCURACY, TITLE AND FITNESS FOR A PARTICULAR PURPOSE.
NO ORAL OR WRITTEN ADVICE OR INFORMATION PROVIDED
BY TELE ATLAS OR ANY OF ITS AGENTS, EMPLOYEES OR THIRD
PARTY PROVIDERS SHALL CREATE A WARRANTY, AND YOU
ARE NOT ENTITLED TO RELY ON ANY SUCH ADVICE OR INFORMATION. THIS DISCLAIMER OF WARRANTIES IS AN ESSENTIAL
CONDITION OF THE AGREEMENT.
4. Limitation of Liability.
TELE ATLAS SHALL NOT BE LIABLE TO YOU FOR ANY INCIDENTAL, CONSEQUENTIAL, SPECIAL, INDIRECT OR EXEMPLARY
DAMAGES ARISING OUT OF THIS AGREEMENT, INCLUDING
LOST PROFITS OR COSTS OF COVER, LOSS OF USE OR BUSINESS INTERRUPTION OR THE LIKE, REGARDLESS OF
WHETHER YOU WERE ADVISED OF THE POSSIBILITY OF SUCH
DAMAGES. NOTWITHSTANDING ANYTHING TO THE CONTRARY
CONTAINED HEREIN, TELE ATLAS SHALL HAVE NO MONETARY
LIABILITY TO YOU FOR ANY CAUSE (REGARDLESS OF THE FORM
OF ACTION) UNDER OR RELATING TO THIS AGREEMENT.
5. Termination.
This Agreement will terminate immediately and automatically,
without notice, if you breach any term of this Agreement. You
agree that in the event of termination of the Agreement, you shall
return the Data (including all documentation and all copies) to
Tele Atlas and its suppliers.
6. Indemnity.
You agree to indemnify, defend and hold Tele Atlas, its Licensors,
and its Suppliers (including their respective licensors, suppliers,
assignees, subsidiaries, affiliated companies, and the respective
officers, directors, employees, shareholders, agents and representatives) free and harmless from and against any liability, loss,
injury (including injuries resulting in death), demand, action, cost,
expense, or claim of any kind or character, including but not limited to attorney's fees, arising out of or in connection with any use
or possession by you of the Data.
7. U.S. Government Rights.
If you are an agency, department, or other entity of the United
States Government, or funded in whole or in part by the United
States Government, then use, duplication, reproduction, release,
modification, disclosure or transfer of this commercial product
and accompanying documentation, is restricted in accordance
with the LIMITED or RESTRICTED rights as described in DFARS
252.227-7014(a)(1) (JUN 1995) (DOD commercial computer software definition), DFARS 227.7202-1 (DOD policy on commercial
computer software), FAR 52.227-19 (JUN 1987) (commercial computer software clause for civilian agencies), DFARS 252.227-7015
(NOV 1995) (DOD technical data – commercial items clause); FAR
52.227-14 Alternates I, II, and III (JUN 1987) (civilian agency technical data and noncommercial computer software clause); and/or
FAR 12.211 and FAR 12.212 (commercial item acquisitions), as
applicable. In case of conflict between any of the FAR and DFARS
provisions listed herein and this License, the construction that
provides greater limitations on the Government’s rights shall control. Contractor/manufacturer is Tele Atlas North America, Inc., 11
Lafayette Street, Lebanon, NH 03766-1445. Phone: 603.643. 0330.
The Data is ©1984-200_ by Tele Atlas. ALL RIGHTS RESERVED.
For purpose of any public disclosure provision under any federal,
state or local law, it is agreed that the Data is a trade secret and a
proprietary commercial product and not subject to disclosure.
If you are an agency, department, or other entity of any State government, the United States Government or any other public entity
or funded in whole or in part by the United States Government,
then you hereby agree to protect the Data from public disclosure
and to consider the Data exempt from any statute, law, regulation,
or code, including any Sunshine Act, Public Records Act, Freedom of Information Act, or equivalent, which permits public
access and/or reproduction or use of the Data. In the event that
such exemption is challenged under any such laws, this Agreement shall be considered breached and any and all right to retain
any copies or to use of the Data shall be terminated and considered immediately null and void. Any copies of the Data held by you
shall immediately be destroyed. If any court of competent jurisdiction considers this clause void and unenforceable, in whole or in
part, for any reason, this Agreement shall be considered terminated and null and void, in its entirety, and any and all copies of
the Data shall immediately be destroyed.
8. Additional Provisions with respect to Canadian
Data only.
a. No Creation of Mailing Lists.
You are prohibited from using the POIs (i) to create mailing
lists or (ii) for other such similar uses.
b. Compliance.
You will use the POIs in compliance with all applicable federal,
state and local laws, rules and regulations.
c. Indemnification.
You shall indemnify and hold infoUSA, Inc. harmless against
all third party claims or liability which are based in whole or in
part of the users failure to comply with such laws, rules and
regulations or which result from the use of the POIs through
you.
d. Warranty.
In addition to the Warranties contained in the Agreement, YOU
UNDERSTAND THAT THE POIS ARE LICENSED ON AN “AS
IS” BASIS WITHOUT GUARANTEE, AND THERE ARE NO
OTHER WARRANTIES MADE WHETHER, EXPRESS OR
IMPLIED, INCLUDING WITHOUT LIMITATION, ANY EXPRESS
OR IMPLIED WARRANTIES OF MERCHANTABILITY OR FITNESS FOR A PARTICULAR PURPOSE.
e. POIs Segregation.
You are prohibited from combining or merging the POIs with
any other POI data. The POIs shall be maintained in such a
way that they are separately identifiable from all other POI data
at all times.
3
Page 6

9. Miscellaneous.
This is the exclusive and complete Agreement between Tele Atlas
and you regarding its subject matter. Nothing in this Agreement
shall create a joint venture, partnership or principal-agent relationship between Tele Atlas and you. The internal laws of California shall govern this Agreement and you consent to the
jurisdiction of the Northern District of California or the State of
California for the County of Santa Clara. Sections 2 – 4 and 7 – 11
shall survive the expiration or termination of this Agreement. This
Agreement may be amended, altered, or modified only by Tele
Atlas. You may not assign any part of this Agreement without Tele
Atlas’ prior written consent. You acknowledge and understand
that the Data may be subject to restrictions on exportation and
agree to comply with any applicable export laws. In the event that
any provision or part of a provision of this Agreement is determined to be invalid, illegal, or unenforceable, such provision or
part thereof shall be stricken from this Agreement and the
remainder of this Agreement shall be valid, legal, and enforceable
to the maximum extent possible. Any notice under this Agreement
shall be delivered by courier to Tele Atlas North America, Inc.,
Attention Contracts Department, 11 Lafayette Street, Lebanon, NH
03766 USA. The covenants and obligations undertaken by you
herein are intended for the direct benefit of Tele Atlas and may be
enforced by Tele Atlas directly against you.
About the Data for the Map Database
• This database was developed and recorded up to April 2006.
Changes to streets/highways made after that time may not be
reflected in this database.
• It is strictly prohibited to reproduce and use any part or the
whole of this map in any form without permission from the
copyright owner.
• If the local traffic regulations or conditions deviate from this
data, follow the local traffic regulations (such as signs, indications, etc.) and conditions (such as construction, weather,
etc.).
• The traffic regulation data used in the map database applies
only to standard sized passenger vehicles. Note that regulations for larger vehicles, motorbikes, and other non-standard
vehicles are not included in the database.
Copyright
©1984-2007 Tele Atlas, Rel. 03/2006
“NOTICE
© 2001 – 2007 Tele Atlas. All rights reserved. This material is proprietary and the subject of copyright protection and other intellectual property rights owned or licensed to Tele Atlas. Tele Atlas is
an authorized distributor of selected Statistics Canada computer
files under Agreement number 6776 and is an authorized distributor of selected Geomatics Canada computer files. The product
includes information copied with permission from Canadian
authorities, including © Canada Post Corporation. The use of this
material is subject to the terms of a License Agreement. You will
be held liable for any unauthorized copying or disclosure of this
material.”
Data by Info USA ©2007 All Rights Reserved.
4
Page 7

Table of Contents
Introduction
License Agreement 1
PIONEER AVIC-D3 - for U.S.A. 1
PIONEER AVIC-D3 - for Canada 2
Terms and Conditions for the Tele Atlas Data 3
About the Data for the Map Database 4
Copyright 4
Table of Contents 5
Manual Overview 9
How to use this manual 9
Terminology 10
About the definition of terminology 10
Important Safety Information 11
Notes Before Using the System and Additional
Safety Information 12
Failure to operate 12
After-sales service for Pioneer products 12
Visit Our Web site 12
Precaution 12
Additional Safety Information 13
To ensure safe driving 13
Purchasing software upgrade 14
Playable Discs 14
DVD-Video disc region numbers 15
Features 15
About WMA 17
About AAC 18
About DivX 18
About the SAT RADIO READY Logo 18
About the XM NAVTRAFFIC Logo 18
To Protect the LCD Screen 19
For Viewing LCD Comfortably 19
What the Marks on DVDs Indicate 19
When an operation is prohibited 19
Resetting the Microprocessor 20
Reset the navigation system without changing
the condition memory 20
Reset the navigation system to the initial (facto-
ry) setting 20
About the data being deleted 20
DVD Map Discs for Your Navigation System 21
Configuration of data recorded on discs 21
Initial Use 21
Chapter 1
Basic Operation
Navigation unit 23
Inserting/Ejecting a Disc 24
Inserting a disc 24
Ejecting a disc 24
Flow from Startup to Termination 24
About NAVI MENU and AV MENU 25
Basic Navigation 25
How to set your destination by address 26
Memory navi mode 29
Basic AV Source 29
Selecting an AV source 29
Adjusting the volume 30
Turning the source off 30
Muting the AV source 30
How to listen to a CD 30
Available buttons 31
Chapter 2
Navigation Menu and Map Display
How to Use Menu Screens 33
NAVI MENU 33
Shortcut menu 34
How to Use the Map 35
Switching the current position screen display
mode 35
How to view the map of the current location 35
Changing the scale of the map 38
Moving the map to the location you want to
see 38
Chapter 3
Setting a Route to Your Destination
Finding Your Destination by Selecting the Type of
Facility 41
Searching for Points of Interest (POI) 41
Finding a POI in your surroundings 42
Searching the facilities around the scroll
cursor 42
Setting an Entrance or Exit of a Freeway as Your
Destination 43
Searching for Your Destination by Specifying the
Telephone Number 43
Route Calculation to Your Home Location or to
Your Favorite Location 43
Selecting Destination from the Destination Histo-
ry and Address Book 43
Canceling the Route Guidance 44
Checking the Set Route 44
Checking the set route with the map 44
Checking the set route by text 45
Checking the entire route overview 45
Checking the set route from the shortcut
menu 45
Recalculating the Route to Your Destination 46
Recalculating the route to the destination using
the Route Options menu 46
Recalculating a specified distance in the route
ahead of your current position 46
5
Page 8

Editing Way Points to the Current Route 46
Editing a way point 46
Skipping a way point 47
Setting Areas to Avoid 47
Registering an area to avoid 47
Changing or deleting an area to avoid 48
Displaying Certain POI on the Map 48
Registering/deleting POI Shortcuts 49
Registering a POI shortcut 49
Deleting a POI shortcut 49
Modifying the Route Calculation Conditions 50
Items that users can operate 50
Perform the route calculation for several route
options, and select one 51
Chapter 4
Editing the Navigation Utilities
Editing Registered Locations 53
Registering your home and your favorite
location 53
Registering a previous location in the Address
Book 54
Editing a location’s information 54
Deleting Address Book or Destination History
information 55
Changing the position of locations registered in
the Address Book 56
Loading registered locations data from a
Disc 56
Using XM NavTraffic Information 57
Viewing traffic list 57
Confirming traffic information on the map 58
Information on avoiding traffic congestion on
route ahead 58
When checking traffic congestion information
manually 59
Traffic flow information 59
Selecting traffic information to display 60
Using the XM Tuner to View Stock, Sports, and
Other Information 61
Displaying stock prices 61
Displaying browsable information 62
Displaying favorite browsable Information 62
Checking the Reception Status of the XM
Tuner 63
Emergency Info 63
Checking the information registered as Emer-
gency Info 63
Registering user information 64
Searching for car service in an emergency 64
Changing Background Picture 66
Setting the Vehicle Dynamics Display 67
Checking the Navigation Status 68
Checking sensor learning status and driving
status 68
Checking the connections of leads and installa-
tion positions 68
Chapter 5
Customizing Your Navigation System
Modifying the Default Settings 71
Items Users can Change 71
Volume 71
System Options 72
Short-Cut Selection 73
Map Display Options 73
Defined Locations 74
Demo Mode 75
Time 75
Modify Current Location 75
Hardware Info 75
Restore Factory Settings 75
Chapter 6
Using the AV Source (Built-in DVD
Drive and Radio)
How to Display each Menu 77
Operating the Built-in DVD drive 79
Switching the media files type 80
Touch key operation 80
Operation using the Function menu 82
Other DVD-Video/DivX function 83
Radio 86
Listening to the radio 86
Switching between the detail information dis-
play and the preset list display 87
Storing and recalling broadcast frequencies 87
Advanced radio operation 88
Storing the strongest broadcast frequencies 88
Tuning in strong signals 88
Chapter 7
Using the AV Source (Pioneer AV
Equipment)
Multi-CD Player 89
Listening a CD 89
Switching between the detail information dis-
play and the list display 89
50-disc multi-CD player 90
Advanced multi-CD player operation 90
Repeating play 90
Playing tracks in a random order 90
Scanning CDs and tracks 90
XM Tuner 91
Listening to XM Satellite Radio 91
Switching the XM channel select mode 92
6
Page 9

Switching between the detailed information dis-
play and the preset list display 92
Switching the XM display 92
Storing and recalling broadcast stations 92
Selecting a channel in the channel category 93
Selecting a channel from the XM channel list
display 93
Selecting an XM channel directly 93
Using the MyMix function 93
Using the direct traffic announcement
function 94
Display the Radio ID 94
Advanced XM tuner operation 94
SIRIUS Tuner 95
Listening to SIRIUS 95
Switching the SIRIUS channel select mode 96
Switching between the detailed information dis-
play and the preset list display 96
Storing and recalling broadcast stations 96
Selecting a channel in the channel category 97
Switching the display 97
Selecting a SIRIUS channel directly 97
Using the MyMix function 97
Using the direct traffic announcement
function 98
Display the Radio ID 98
Advanced SIRIUS tuner operation 98
Hands-free Phoning 100
Hands-free phoning with cellular phones featur-
ing Bluetooth technology 100
About the telephone source standby mode 100
Setting up for hands-free phoning 100
Making a call by entering phone number 101
Making a call from the history list 101
Making a call from the preset dial list 102
Calling a number in the phone book 102
Making a call via voice recognition 103
Taking a phone call 103
Advanced hands-free phoning operation 104
Connecting a cellular phone 104
Registering your cellular phone 106
Displaying BD (Bluetooth Device) address 106
Disconnecting a cellular phone 106
Deleting a registered phone 106
Transferring the phone book 106
Changing the phone book display order 107
Editing the phone book 107
Clearing memory 108
Setting the automatic answering 109
Setting the automatic rejecting 109
Setting a ring tone 109
Setting the automatic connection 109
Echo canceling and noise reduction 109
iPod 110
Operating the iPod 110
Pausing track playback 110
Browsing for a song 110
Performing random play with one touch 111
Playing video 111
Pausing video playback 111
Advanced iPod operation 111
Repeating play 111
Shuffle play 112
Turning on or off charging for the iPod 112
Bluetooth Audio 112
Listening to songs on BT Audio (Bluetooth au-
dio player) 112
Pausing track playback 113
Advanced BT-Audio operation 113
Connecting a Bluetooth audio player 113
Disconnecting a Bluetooth audio player 114
Displaying BD (Bluetooth Device) address 114
External Unit 114
Operating the external unit 114
Operate the external unit by using 1 KEY — 6
KEY 115
Operate the external unit by using F1 — F4 115
Switching the automatic and manual
function 115
AV Input (AV) 115
Selecting AV as the source 115
Chapter 8
Customizing the Audio Source Setting
Audio Adjustments 117
Introduction to audio adjustments 117
Using the equalizer 117
Using balance adjustment 118
Adjusting equalizer curves 118
Setting the simulated sound stage 119
Adjusting loudness 119
Using subwoofer output 119
Using non fading output 119
Using the high pass filter 120
Adjusting source levels 120
Setting Up the DVD/DivX Player 120
DVD/DivX setup adjustments 120
Setting the language 120
Setting assist subtitles on or off 121
Setting angle icon display 121
Setting the aspect ratio 121
Setting the parental lock 121
Displaying your DivX® VOD registration
code 122
Setting the Auto Play 122
Setting the Subtitle File 122
Initial Settings 122
Adjusting initial settings 122
Setting the rear output and subwoofer
controller 122
Editing the PIN code 123
Switching the sound muting/attenuation 123
Adjusting a blurry or low contrast screen 124
Other Functions 124
7
Page 10

Setup adjustments 124
Setting the video input 124
Setting for rear view camera 125
Switching the auto antenna setting 125
Setting the illumination color 125
Setting the screen color 126
Changing the Wide Screen Mode 126
Operating the Picture Adjustment 127
Switching the backlight On/Off 127
Language Code Chart for DVD 128
Appendix
Anti-theft function 129
Setting the password 129
Enter the password 129
Delete the password 129
If the password is forgotten 129
Installing the Program 130
Adjusting the Response Positions of the Touch
Panels (Touch Panel Calibration) 132
Memory Navi Mode 133
Navigation in the memory navi mode 133
About the icon for the memory navi mode 134
Major restrictions during the memory navi
mode 134
Cautions relating to auto reroute in memory
navi mode 135
TRAFFIC icon during the
memory navi mode 135
Operation outside the memorized area 135
Positioning Technology 135
Positioning by GPS 135
Positioning by dead reckoning 136
How do GPS and dead reckoning work
together? 136
Handling Large Errors 137
When the positioning by GPS is impossible 137
Vehicles that Cannot Obtain Speed Pulse
Data 138
Conditions Likely to Cause Noticeable Positioning
Errors 138
About the Data being Deleted 140
Limitation of Functions for Areas not Stored on
the Disc 140
Displaying the map 140
Destination search 140
Guidance 140
Route information 141
Other function limitations 141
Troubleshooting 142
Problems in the navigation screen 142
Problems in the audio screen (during DVD-Vid-
eo playback) 144
Problems in the audio screen (during iPod
playback) 146
Messages and how to react to them 146
Error Messages 151
Handling and Care of the Disc 152
DVD Map Discs 152
DVD drive and care 152
DVD-Video 152
DVD-R/-RW and CD-R/-RW 152
MP3, WMA and AAC files 153
DivX video files 154
DivX subtitle files 155
Ambient conditions for playing a disc 155
Using the Navigation System Correctly 155
Handling the LCD screen 155
Liquid crystal display (LCD) screen 156
Keeping the LCD screen in good condition 156
Small fluorescent tube 156
Route Setting Information 156
Route search specifications 156
Route highlighting 158
Tracking 158
Types of the Road Stored in the Disc 158
Roads included in the route guidance and roads
not included 158
Non routable roads (pink color road) 158
Glossary 159
Specifications 161
Display Information 163
NAVI MENU 163
Shortcut menu 166
Menu in the Audio Screen 167
Sound menu 167
Initial menu 167
System menu 168
Function menu 169
8
Page 11

Manual Overview
1
2
This manual provides the important information you need to make full use of your new navigation system.
Please note that when you have decided what you want to do, you can find the page you need from the
“Table of Contents”.
If you want to check the meaning of each item displayed on the screen, you will find the necessary page
from the “Display Information” section at the end of the manual.
How to use this manual
For safety reasons, it is particularly important that you fully understand your navigation system before
using it. Be sure to read the Introduction, Chapter 1 in particular.
Basic Operation
This chapter describes the names of each part of the navigation system and the
basic operations of this navigation system.
It also describes basic operations for playing a CD in the navigation system.
Navigation Menu and Map Display
Describes how to display the navigation menu screen, and the method of changing map
view or map scale.
Setting a Route to Your Destination
This section describes various ways of searching the destination, editing the current route
3
4
conditions, and the route operation during route guidance.
Editing the Navigation Utilities
Describes convenient functions for navigation, including how to organize information on
places you have visited.
5
6
7
8
Customizing Your Navigation System
The behavior of your navigation system depends on a number of settings. If you need to
change any of the initial settings (default settings), read the relevant section of this chapter.
Using the AV Source (Built-in DVD Drive and Radio)
Describes how to use DVD-Video, CD, ROM, DivX and the radio.
Using the AV Source (Pioneer AV Equipment)
When Pioneer audio equipment is connected to the navigation system, that equipment can
be operated from the navigation system. This chapter describes the operation of the audio
source that can be used when Pioneer audio equipment is connected.
Customizing the Audio Source Setting
Using the audio source, various settings are available to suit your audio-visual taste. This
chapter describes how to change the settings.
9
Page 12

Appendix
Read the appendix to learn more about your navigation system and such information as the
availability of after-care. Please see “Display Information” section at the end of this manual
for checking the details of each item on the menu.
Terminology
Before moving on, take a few minutes to read the following information about the conventions used in
this manual. Familiarity with these conventions will help you greatly as you learn how to use your new
equipment.
• Buttons on your navigation system are described in ALL CAPITAL, BOLD lettering:
e.g.)
MENU button, MAP button.
• Items in the different menus or touch keys available on the screen are described in quotations (“ ”)
and bold:
e.g.)
“Destination”, “Settings”.
• Extra information, alternative use and other notes are presented like this:
e.g.)
❒ After removing the disc from the slot, keep it in the case.
• The references are indicated like this:
e.g.)
➲ Setting the Route Options ➞ Page 50
About the definition of terminology
“Front Display” and “Rear Display”
In this manual, the screen that is attached to the body of this navigation unit will be referred to as the
“Front Display”. Any additional optional screen that is purchased for use in conjunction with this navigation unit will be referred to as the “Rear Display”.
“Video image”
“Video image” in this manual indicates the moving image from DVD-Video in the built-in DVD drive or
from the equipment that is connected to this system with a RCA cable, such as a general-purpose AV
equipment.
10
Page 13

Important Safety Information
Before using your navigation system, be sure to
read and fully understand the following safety
information:
❒ Read the entire manual before operating this
navigation system.
❒ The navigation features of your navigation sys-
tem (and rear view camera option if purchased) are intended solely as an aid to you in
the operation of your vehicle. It is not a substitute for your attentiveness, judgment, and
care when driving.
❒ Do not operate this navigation system (or the
rear view camera option if purchased) if doing
so will divert your attention in any way from
the safe operation of your vehicle. Always
observe safe driving rules and follow all existing traffic regulations. If you experience difficulty in operating the system or reading the
display, park your vehicle in a safe location
and apply the parking brake before making
the necessary adjustments.
❒ Never allow others to use the system unless
they have read and understood the operating
instructions.
❒ Never use this navigation system to route to
hospitals, police stations, or similar facilities
in an emergency. Please call 911.
❒ Route and guidance information displayed by
this equipment is for reference purposes only.
It may not accurately reflect the latest permissible routes, road conditions, one way streets,
road closures, or traffic restrictions.
❒ Traffic restrictions and advisories currently in
force should always take precedence over
guidance given by the navigation system.
Always obey current traffic restrictions, even if
the navigation system provides contrary
advice.
❒ Failure to input correct information about the
local time may result in the navigation system
providing improper routing and guidance
instructions.
❒ Never set the volume of your navigation sys-
tem so high that you cannot hear outside traffic and emergency vehicles.
❒ To promote safety, certain functions are dis-
abled unless the vehicle is stopped and/or the
parking brake is applied.
❒ The data encoded in the disc for the naviga-
tion system is the intellectual property of the
provider, and the provider is responsible for
such content.
❒ Keep this manual handy as a reference for
operating procedures and safety information.
❒ Pay close attention to all warnings in this
manual and follow the instructions carefully.
❒ Do not install the navigation unit where it may
(i) obstruct the driver’s vision, (ii) impair the
performance of any of the vehicle’s operating
systems or safety features, including air bags,
hazard lamp buttons or (iii) impair the driver’s
ability to safely operate the vehicle.
❒ Please remember to wear your seat belt at all
times while operating your vehicle. If you are
ever in an accident, your injuries can be considerably more severe if your seat belt is not
properly buckled.
❒ Using the most current map DVDs will allow
for most accurate destination mapping.
Upgrade DVDs are available for purchase
through your local Pioneer dealer.
❒ Never use headphones while driving.
❒ Do not attempt to install or service your navi-
gation system by yourself. Installation or servicing of the navigation system by persons
without training and experience in electronic
equipment and automotive accessories may
be dangerous and could expose you to the risk
of electric shock or other hazards.
11
Page 14
Notes Before Using the System
and Additional Safety Information
Visit Our Web site
Visit us at the following site:
Information to User
Alteration or modifications carried out without appropriate authorization may invalidate
the user’s right to operate the equipment.
For Canadian model
This Class B digital apparatus complies with
Canadian ICES-003.
Important (Serial Number:)
The serial number of this device is located on the
bottom of this product. For your own security and
convenience, be sure to record this number on
the enclosed warranty card.
Failure to operate
Should the navigation system fail to operate properly, contact your dealer or the nearest authorized
Pioneer service facility.
After-sales service for Pioneer
products
Please contact the dealer or distributor from
where you purchased the product for its aftersales service (including warranty conditions) or
any other information. In case the necessary
information is not available, please contact the
companies listed below:
Please do not ship your product to the companies at the addresses listed below for repair without making advance contact.
N
A
A
D
C
A
S
.
.
U
n
o
e
P
i
e
r
I
n
)
A
S
U
(
M
O
T
S
U
C
I
D
T
R
P
O
B
x
o
.
O
P
.
B
e
n
g
o
L
7
9
0
8
0
1
-
1
0
-
4
2
1
-
8
0
For warranty information, please see the Limited
Warranty sheet included with your product.
c
n
i
o
e
r
E
c
t
l
c
.
P
U
-
S
R
E
V
N
ISI
O
7
6
0
1
A
C
c
a
h
,
6
0
0
4
1
4
A
e
r
e
l
E
c
n
o
e
P
i
s
I
n
c
,
a
n
C
a
d
a
R
M
E
O
T
S
U
C
A
S
E
D
3
0
M
a
L
3
1
-
8
I
T
C
F
A
I
T
S
M
E
T
R
P
A
e
a
t
t
s
l
l
A
0
O
,
m
a
h
k
r
P
2
O
R
9
7
7
-
2
8
3
-
5
f
c
s
n
o
o
i
r
t
.
N
O
N
T
a
y
w
k
P
r
a
o
ari
t
n
0
1
In Canada
1. Register your product. We will keep the details
of your purchase on file to help you refer to this
information in the event of an insurance claim
such as loss or theft.
2. Receive updates on the latest products and
technologies.
3. Download owner’s manuals, order product catalogues, research new products, and much
more.
4. Receive notices of software upgrades and software updates.
Precaution
CAUTION: USE OF CONTROL OR ADJUST-
MENT OR PERFORMANCE OF
PROCEDURES OTHER THAN
THOSE SPECIFIED HEREIN MAY
RESULT IN HAZARDOUS RADIATION EXPOSURE.
CAUTION: THE USE OF OPTICAL INSTRU-
MENTS WITH THIS PRODUCT
WILL INCREASE EYE HAZARD.
• Protect this product from moisture.
• If the battery is disconnected or discharged,
the memory will be erased and must be reprogrammed.
• Handling the cord on this product or cords
associated with accessories sold with the
product may expose you to chemicals
listed on proposition 65 known to the State
of California and other governmental entities to cause cancer and birth defects or
other reproductive harm. Wash hands after
handling.
12
Page 15

• This product contains mercury. Disposal
of this material may be regulated due to
environmental considerations. For disposal or recycling information, please contact your local authorities or the
Electronics Industries Alliance:
www.eiae.org.
• Do not allow this product to come into
contact with liquids. Electrical shock could
result. Also, damage to the product,
smoke, and overheating could result from
contact with liquids.
Additional Safety Information
To ensure safe driving
Parking brake interlock
Certain functions (such as viewing of DVD-Video
and certain touch key operations) offered by this
navigation system could be dangerous and/or
unlawful if used while driving. To prevent such
functions from being used while the vehicle is in
motion, there is an interlock system that senses
when the parking brake is set and when the vehicle is moving. If you attempt to use the functions
described above while driving, they will become
disabled until you stop the vehicle in a safe place,
and apply the parking brake. Please keep the
brake pedal pushed down before releasing the
parking brake.
• When applying the parking brake in order
to view “Video image” or to enable other
functions offered by the navigation system, park your vehicle in a safe place, and
keep the brake pedal pushed down before
releasing the parking brake if the vehicle
is parked on a hill or otherwise might
move when releasing the parking brake.
• Accuracy/performance of interlock may be
impacted by such factors as GPS signal
detection, speed pulse wire connectivity,
and driving habits or conditions of the
place where the vehicle is parked.
• It is strongly suggested that the speed
pulse wire be connected for accuracy of
navigation and better performance of
interlock.
• If the speed pulse wire is unavailable for
some reason, it is recommended that the
pulse generator ND-PG1 (sold separately)
be used.
When you attempt to watch “Video image” while
driving, the warning “Viewing of front seat
video source while driving is strictly prohibited.” will appear on the screen. To watch “Video
image” on this display, stop the vehicle in a safe
place and apply the parking brake. Please keep
the brake pedal pushed down before releasing
the parking brake.
Color difference of the map display
between day and night
• To avoid the risk of damage and injury and
the potential violation of applicable laws,
the navigation system is not for use with a
“Video image” that is visible to the driver.
• In some countries or states the viewing of
“Video image” on a display inside a vehicle even by persons other than the driver
may be illegal. Where such regulations
apply, they must be obeyed.
Night display
The examples in this manual are illustrated using
the daytime display. When driving at night, the
colors you see may differ from those shown.
➲ “Day/Night Display” ➞ Page 74
13
Page 16

When using a display connected to
REAR MONITOR OUT
This product’s REAR MONITOR OUT is for
connection of a display to enable passengers in
the rear seats to watch visual images.
• The rear view mode is to use the navigation system as an aid to keep an eye on the
trailers, or while backing up. Do not use
this function for entertainment purposes.
• NEVER install the rear display in a location that enables the driver to watch visual
images while driving.
To avoid battery exhaustion
Be sure to run the vehicle engine while using this
product. Using this product without running the
engine can result in battery drainage.
• Do not use with vehicles that do not feature an ACC position.
Rear view camera
With an optional rear view camera, you are able
to use the navigation system as an aid to keep an
eye on trailers, or backing into a tight parking
spot.
• SCREEN IMAGE MAY APPEAR
REVERSED.
• USE INPUT ONLY FOR REVERSE OR
MIRROR IMAGE REAR VIEW CAMERA.
OTHER USE MAY RESULT IN INJURY
OR DAMAGE.
Purchasing software upgrade
Using the most current map DVDs will allow for
most accurate destination mapping. Upgrade
DVDs are available for purchase through your
local Pioneer dealer.
Playable Discs
About DVD-Video and CD
DVD and CD discs that display the logos shown
below generally can be played back on this builtin DVD drive.
DVD-Video
CD
• The rear view camera function is to be
used as an aid to keep an eye on trailers, or
while backing up. Do not use for entertainment purposes.
• Please note that the edges of the rear view
camera images may differ slightly according to whether full screen images are displayed when backing up, and whether the
images are used for checking the rear
when the vehicle is moving forward.
14
❒ is a trademark of DVD Format/Logo
Licensing Corporation.
❒ It is not possible to play back DVD-Audio
discs. This DVD drive may not be able to play
all discs bearing the marks shown above.
About Dual layer discs
The unit cannot play back DVD-R/-RW discs that
are written in Layer Jump Recording mode. For
more information about the writing method, see
the operation manual for the writing device.
Page 17
About DVD Map Disc
You can use discs intended for this navigation
system. Use only discs approved by Pioneer.
➲ For details on other discs ➞ Page 152
DVD-Video disc region numbers
DVD-Video discs that have incompatible region
numbers cannot be played on this DVD drive. The
region number of the player can be found on the
bottom of this product.
The illustration below shows the regions and corresponding region numbers.
Features
Touch panel key operation
It is possible to operate the navigation function
and the audio function by using touch panel key.
Compatible with the memory navi mode
Memory navigation functions are provided with
the hardware. For details, see page 29, “Memory
navi mode.”
Variety of View Modes
Various types of screen display can be selected
for navigation guidance.
accuracy of the information about the POI which
appears in this database. POI information is subject to change without notice.
Auto Reroute Function
If you deviate from the set route, the system will
re-calculate the route from that point so that you
remain on track to the destination.
❒ This function may not work in certain areas.
Assign an Original Image as a Background Image
You can store your own pictures on a CD-R/-RW
and DVD-R/-RW in JPEG format and import original images in this navigation system. These
imported images can be set as a background
image.
❒ Imported original images will be stored in the
memory, but saving cannot be guaranteed
completely. If original image data is deleted,
set the CD-R/-RW and DVD-R/-RW again and
re-import the original image.
DVD-Video playback
It is possible to play back DVD-Video, DVD-R
(video mode) and DVD-RW (video mode).
❒ Remember that use of this system for com-
mercial or public viewing purposes may constitute an infringement on the author’s rights
protected by the Copyright Law.
➲ “Handling and Care of the Disc” ➞ Page 152
➲ “Playable Discs” ➞ Page 14
CD playback
Music CD/CD-R/CD-RW playback is possible.
➲ “Handling and Care of the Disc” ➞ Page 152
➲ “Playable Discs” ➞ Page 14
Wide Variety of Facility Information for
Points of Interest (POI) Search
You can search your destination from all areas.
– Approximately 11 million POIs are included in
this database as of January 2005.
– Some POI information may not be accurate or
may become inaccurate through the passage of
time. Please directly contact the POI to verify the
MP3 file playback
It is possible to play back MP3 files recorded on
CD-R/-RW/-ROM and DVD-R/-RW/-ROM
(ISO9660 level 1 and level 2, Romeo and Joliet /
UDF1.02).
15
Page 18

❒ Supply of this navigation system only conveys
a license for private, non-commercial use and
does not convey a licence nor imply any right
to use this product in any commercial (i.e. revenuegenerating) real time broadcasting (terrestrial, satellite, cable and/or any other
media), broadcasting/streaming via internet,
intranets and/or other networks or in other
electronic content distribution systems, such
as pay-audio or audio-on-demand applications. An independent licence for such use is
required. For details, please visit
http://www.mp3licensing.com.
➲ “Handling and Care of the Disc” ➞ Page 152
➲ “Playable Discs” ➞ Page 14
WMA file playback
You can play back WMA files recorded on CD-R/RW/-ROM and DVD-R/-RW/-ROM (ISO9660 level
1 and level 2, Romeo and Joliet / UDF1.02).
AAC file playback
You can play back AAC files recorded on CD-R/RW/-ROM and DVD-R/-RW/-ROM (ISO9660 level
1 and level 2, Romeo and Joliet / UDF1.02).
Hands-free phoning
Using Bluetooth adapter (e.g. CD-BTB200) (sold
separately), this unit realizes effortless hands-free
phoning with Bluetooth wireless technology.
Bluetooth audio player compatibility
Using a Bluetooth adapter (e.g. CD-BTB200) (sold
separately), you can control a Bluetooth audio
player featuring Bluetooth wireless technology.
Dolby Digital
When using Pioneer multi-channel processors
that are planned to be compatible with this navigation system, please consult your dealer or
nearest authorized Pioneer Service Station.
❒ Manufactured under license from
Dolby Laboratories. “Dolby” and the double-D
symbol are trademarks of Dolby Laboratories.
Multi-aspect
Switching between wide screen, letter box and
panscan display is possible.
DivX® video file playback
You can play back DivX video files recorded on
CD-R/-RW/-ROM and DVD-R/-RW/-ROM.
NTSC compatibility
This product is NTSC system compatible. When
connecting other components to the product, be
sure components are compatible with the same
video system or else images will not be correctly
reproduced.
Auto CD title and MP3/WMA/AAC file
listing
Title lists will automatically be displayed when a
CD TEXT, MP3, WMA or AAC disc is played. This
system provides easy-to-operate audio functions
that allow playback simply by selecting an item
from the list.
iPod® compatibility
When you use this navigation system with a Pioneer iPod cable (CD-I200) (sold separately), you
can control your iPod via the touch screen and
recharge it, by connecting it to the dock connector port included with the adapter.
16
Multi-audio, Multi-subtitle, and Multiangle
You can switch between multiple audio systems,
subtitle languages and multiple viewing angles of
a scene recorded on a DVD as desired.
❒ This product incorporates copyright protec-
tion technology that is protected by method
claims of certain U.S. patents and other intellectual property rights owned by Macrovision
Corporation and other rights owners. Use of
this copyright protection technology must be
authorized by Macrovision Corporation, and is
intended for home and other limited viewing
uses only unless otherwise authorized by
Macrovision Corporation. Reverse engineering or disassembly is prohibited.
Rear entertainment
Video from sources with video can be displayed
on the rear display.
Rear view camera ready
You can display what is behind the vehicle if connected to a rear view camera (sold separately).
Page 19

➲ “Rear view camera” ➞ Page 14
Data communication function with XM
tuner
If you connect the optional XM tuner
(GEX-P10XMT) to the navigation system, you can
use traffic information as a part of the navigation
function. A separate subscription to XM NavTraffic is required.
In addition, if you subscribe to XM Audio services, you can utilize the XM display featuring station logos and category icons, to improve your
XM Audio experience.
➲ “Using XM NavTraffic Information” ➞ Page 57
➲ “Listening to XM Satellite Radio” ➞ Page 91
❒ The broadcast station icons contained on this
disc are based on the data provided by XM
Satellite Radio as of November 2006. Any subsequent changes made by XM Satellite Radio
in the lineup or icon of the broadcast station
in the future may not be supported by the navigation system, and may cause the unit not to
display the correct icons.
About XM NavTraffic Service and
Pioneer Navigation
❒ XM NavTraffic subscription is required and is
available only in select markets. Check
www.xmnavtraffic.com for service availability,
pricing information, and other details. The
availability of XM NavTraffic data depends on
the ability of the antenna to receive a signal.
The signal may be unavailable if obstructed
(e.g., by buildings, mountains, trees, bridges,
bad weather, etc.). XM NavTraffic data also
may be unavailable or not current if the original data source is not providing data (e.g.,
scheduled or unscheduled downtime) or has
not been updated itself or if there is a time lag
between the time the original data source is
updated and when you receive the updated
XM NavTraffic data.
❒ Depending on the amount of data being trans-
mitted in your area, it may take several minutes to collect all of the available data.
❒ The information content depends on the infor-
mation provided by XM NavTraffic Service,
including data refresh and availability timing.
❒ Pioneer does not bear responsibility for the
accuracy of the information transmitted.
❒ Pioneer does not bear responsibility for
changes to information services provided by
XM, such as cancellation of the services or
subscription update.
❒ Traffic information is not taken into account
when calculating estimated time of arrival
time or travel time for your destination.
About WMA
The Windows Media™ logo printed on the box
indicates that this unit can play back WMA data.
WMA is short for Windows Media Audio and
refers to an audio compression technology that is
developed by Microsoft Corporation. WMA data
can be encoded by using Windows Media Player
version 7 or later.
Windows Media and the Windows logo are trademarks or registered trademarks of Microsoft Corporation in the United States and/or other
countries.
Notes
• This unit may not operate correctly depending
on the application used to encode WMA files.
• Depending on the version of Windows Media
Player used to encode WMA files, album
names and other text information may not be
correctly displayed.
• There may be a slight delay when starting playback of WMA files encoded with image data.
17
Page 20

About AAC
AAC is short for Advanced Audio Coding and
refers to an audio compression technology standard used with MPEG 2 and MPEG 4. Several
applications can be used to encode AAC files, but
file formats and extensions differ depending on
the application which is used to encode.
This unit plays back AAC files encoded by
®
version 4.6.
iTunes
❒ iTunes is a trademark of Apple Computer, Inc.,
registered in the U.S. and other countries.
About DivX
For satellite radio tuner operation, please refer to
the Operation Manuals of the navigation system
and satellite radio tuner.
Note:
The system will use direct satellite-to-receiver
broadcasting technology to provide listeners in
their cars and at home with crystal-clear sound
seamlessly from coast to coast. Satellite radio
will create and package over 100 channels of digital-quality music, news, sports, talk and children’s programming.
“SAT Radio”, the SAT Radio logo and all related
marks are trademarks of Sirius Satellite Radio
inc., and XM Satellite Radio Inc.
About the XM NAVTRAFFIC
Logo
DivX is a compressed digital video format created
by the DivX
can play DivX video files recorded on CD-R/RW/
ROM and DVD-R/RW/ROM discs. Keeping the
same terminology as DVD video, individual DivX
video files are called “Titles”. When naming files/
titles on a CD-R/RW or a DVD-R/RW disc prior to
burning, keep in mind that by default they will be
played in alphabetical order.
Official DivX
of DivX
playback of DivX
❒ DivX, DivX Certified, and associated logos are
®
video codec from DivX, Inc. This unit
®
Certified product Plays all versions
®
video (including DivX® 6) with standard
®
media files
trademarks of DivX, Inc. and are used under
license.
About the SAT RADIO READY
Logo
The SAT RADIO READY logo printed below the
CD loading slot indicates that the Satellite Radio
Tuner for Pioneer (i. e., XM tuner and Sirius satellite tuner which are sold separately) can be controlled by this navigation system. Please inquire
with your dealer or nearest authorized Pioneer
service station regarding the satellite radio tuner
that can be connected to this navigation system.
Required $12.95 basic monthly XM radio subscription and XM NavTraffic service subscriptions
sold separately. XM NavTraffic only available in
select markets. Other fees and taxes, including a
one-time activation fee, may apply. Subscription
fee is consumer only. All fees and programming
subject to change. Subscriptions subject to Customer Agreement available at xmradio.com. XM
radio service only available in the 48 contiguous
United States.
© 2005 XM Satellite Radio Inc. All rights reserved.
NAVTEQ Traffic™ is a trademark of NAVTEQ
North America, LLC.© 2005. NAVTEQ North
America, LLC.
18
Page 21

To Protect the LCD Screen
❒ Do not allow direct sunlight to fall on the dis-
play when this product is not being used.
Extended exposure to direct sunlight can
result in LCD screen malfunction due to the
resulting high temperatures.
❒ When using a cellular phone, keep the
antenna of the cellular phone away from the
display to prevent disruption of the video by
the appearance of spots, colored stripes, etc.
❒ To protect the LCD screen from damage, be
sure to touch the touch keys with a finger.
(The stylus is supplied for special calibrations.
Do not use the stylus for normal operations.)
For Viewing LCD Comfortably
Due to its construction, the view angle of the LCD
screen is limited. The viewing angle (vertical and
horizontal) can be increased, however, by using
Brightness to adjust the black density of the
video. When using for the first time, adjust the
black density in accordance with the viewing
angle (vertical and horizontal) to adjust for clear
viewing. Dimmer can also be used to adjust the
brightness of the LCD screen itself to suit your
personal preference.
If the marks other than listed are found on DVD
disc labels and packages, please ask for the DVD
disc supplier for their meaning.
When an operation is prohibited
When you are watching a DVD and attempt to
perform an operation, sometimes it may not be
performed because of the programming on the
disc. When this happens, this product indicates
the icon on the screen.
❒ The icon may not appear in certain discs.
What the Marks on DVDs Indicate
The marks below may be found on DVD disc
labels and packages. They indicate the type of
images and audio recorded on the disc, and the
functions you can use.
Mark Meaning
2
2
3
16 : 9 LB
1
Indicates the number of audio systems.
Indicates the number of subtitle languages.
Indicates the number of viewing angles.
Indicates the picture size (aspect ratio:
screen width-to-height ratio) type.
Indicates the number of the region
ALL
where playback is possible.
19
Page 22
Resetting the Microprocessor
• Pressing the RESET button deletes the
contents of the system’s memory.
Reset the navigation system
without changing the condition
memory
Pressing the RESET button of the navigation
system lets you reset the microprocessor to its
initial settings without changing the condition
memory.
The microprocessor must be reset under the following conditions:
• Prior to using this product for the first time
after installation.
• If the product fails to operate properly.
• If there appear to be problems with the operation of the system.
• When changing the combination of the equipment.
• When adding/removing additional products
that connect to the navigation system.
1 Turn the ignition switch OFF.
Reset the navigation system to
the initial (factory) setting
When you want to erase memorized settings and
return the navigation system to its initial (factory)
settings, carry out the following operations.
1 Turn the engine ON or set the ignition
switch to ACC position.
2 Press the RESET button with a pen tip or
other pointed instrument.
❒ Some navigation settings and data are not
erased.
About the data being deleted
The information is erased by pressing the RESET
button or disconnecting the yellow lead from the
battery (or removing the battery itself). However,
the following items are not erased:
• Sensor learning status and driving status
• Memory areas that were memorized manually
• Areas to avoid
• Registered Locations in “Address Book”
• Data registered in “Emergency Info”
2 Press the RESET button with a pen tip or
other pointed instrument.
RESET button
❒ If you have connected other equipment (for
example, a TV tuner) to this navigation system,
be sure to reset that equipment too.
20
Page 23

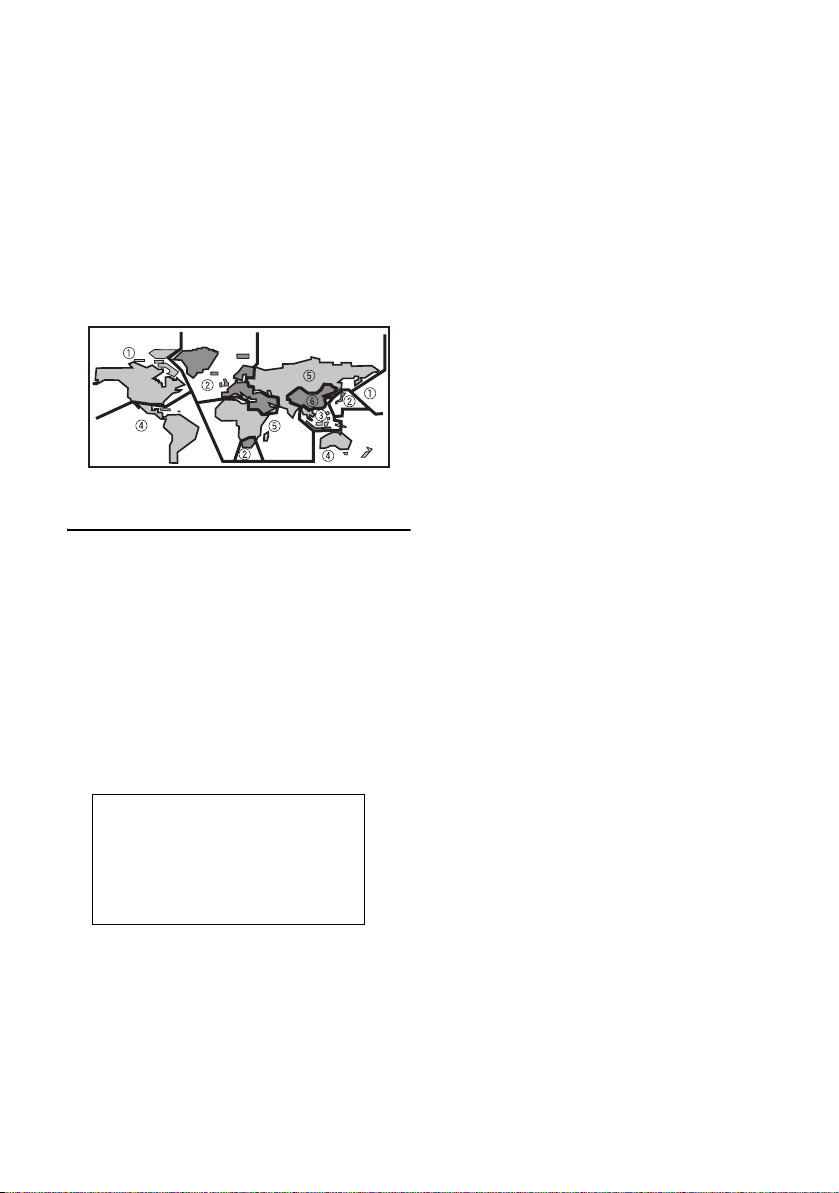
DVD Map Discs for Your Navigation System
Configuration of data recorded on discs
The map for this navigation system is supplied on two discs: one for the west and the other for the east.
Please set the disc to use according to your destination or current location.
The areas recorded on each disc are as follows:
West area disc
❒ Removing the disc and inserting another disc causes the navigation system to automatically restart
and reload the new route. (This automatic “Reroute” operation cannot be canceled.)
East area disc
Initial Use
If the initial learning is not complete, following screen appears.
1 If a message appears, touch “OK”.
When the navigation system begins running for the first time, the 3D Hybrid Sensor automatically
begins initial learning. Positioning is performed solely by GPS satellites until the 3D Hybrid Sensor
initial learning is complete, so the location of your vehicle may not be very accurate. This is not an
error. When the initial learning is complete, the location of your vehicle can be detected with high
accuracy.
❒ “Shop Demo” is the demonstration used in a store. Do not touch “Shop Demo”.
➲ If an error message appears during initial learning ➞ Page 146
21
Page 24

22
Page 25
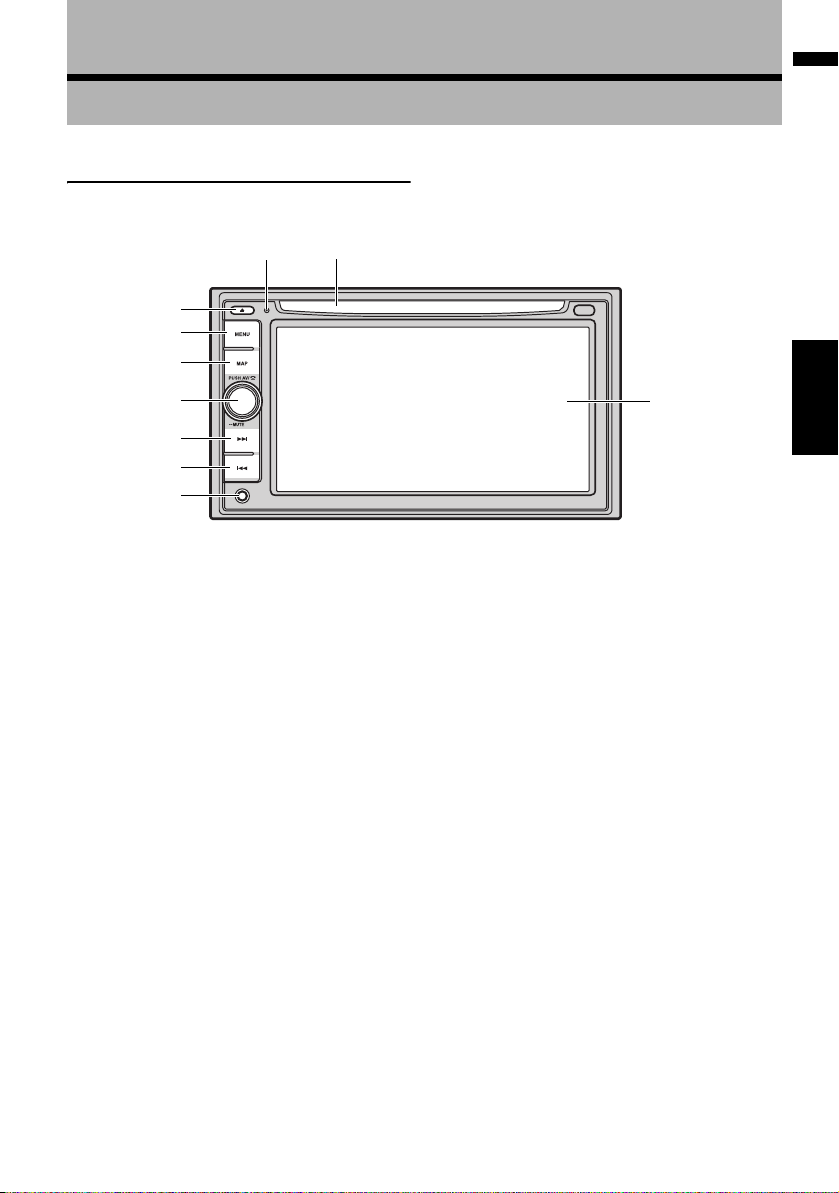
Chapter 1
Basic Operation
Navigation unit
This section gives information about the names of the parts and the main features using the buttons.
2 1
3
4
5
Chapter 1 Basic OperationNAVI/AV
6
7
8
9
1 Disc loading slot
➲ “Inserting/Ejecting a Disc” ➞ Page 24
2 RESET button
➲ “Resetting the Microprocessor” ➞ Page 20
3 EJECT button
4 MENU button
Press to display the navigation menu or audio
menu.
a
5 MAP button
Press to view the map or change view mode.
6 VOLUME knob
Turn to adjust the AV volume or press to change
AV source.
7 Fast forward button
8 Backward button
9 Mini jack
This is the AV-2 input terminal. Use the CD-RM10
(sold separately) to connect the external video
component.
a LCD display
23
Page 26

Inserting/Ejecting a Disc
Inserting a disc
1 Insert a disc into the disc loading slot.
❒ The DVD drive plays one standard 12-cm or
8-cm (single) disc at a time. Do not use an
adapter when playing 8-cm discs.
❒ Do not insert anything other than a disc
Chapter 1
Basic Operation NAVI/AV
into the disc loading slot.
➲ “Playable Discs” ➞ Page 14
❒ If you cannot insert a disc completely or if
a inserted disc is not recognized, check
that the label side of the disc is up. Also,
press the EJECT button to eject the disc,
and check the disc for damage before
inserting the disc again.
❒ If the built-in DVD drive does not operate
properly, an error message such as Error02 may be displayed.
➲ “Error Messages” ➞ Page 151
2 Insert the Pioneer DVD Map Disc to the
disc loading slot.
3 Check the details of the caution message
and touch “OK”.
You can operate the navigation system by
touching keys displayed on the screen.
If the route is already set, it changes to route
guidance mode. The map of your surroundings is displayed.
➲ How to read the current position screen ➞
Page 35
➲ Setting the time ➞ Page 131
4 Press the MENU button in the map
screen.
Displays the NAVI MENU.
5 Allows you to assign a destination and
begin route guidance.
Ejecting a disc
1 Press the EJECT button.
The disc is ejected.
Flow from Startup to Termination
• If the program is not installed, see page
130 and install the program.
1 Start the engine.
After some time, the navigation opening
screen comes on for a few seconds. Then, a
message screen is displayed.
24
➲ Specifying the address and searching the
destination ➞ Page 25
➲ Other search methods ➞ Page 41 to 43
6 Turn off the vehicle engine.
This navigation system is also turned off.
❒ Until the vicinity of the destination is
reached, the set route will not be deleted
even if the engine is turned off.
Page 27

About NAVI MENU and AV MENU
The methods for displaying the NAVI MENU, used for navigation operations, and the AV MENU, used
for AV operations, are different depending on which screen is currently displayed.
NAVI/AV Chapter 1 Basic Operation
Map screen
Press the
VOLUME
knob
Press the
MAP button
AV operation screen
Press the
MAP button
Press the
MENU button
Press the
VOLUME
knob
Press the
MENU button
NAVI MENU
Touch
“AV MENU”
AV MENU
Touch
“NAVI MENU”
Basic Navigation
The most basic search function is Address Search, in which the address is specified and the destination searched. This section describes how to use Address Search and the basics of using the navigation system.
• For safety reasons, you cannot use some of these basic navigation functions while your
vehicle is in motion. To enable these functions, you must stop in a safe place and apply the
parking brake (see page 13 Interlock for details).
25
Page 28
Basic flow of operation
1 Park your vehicle in a safe place, and
apply the parking brake.
How to set your destination by
address
1 Press the MAP button to display the map
screen.
2 Insert the Pioneer DVD Map Disc to
the disc loading slot.
3 Press the MAP button to display the
map screen.
4 Press the MENU button to display the
NAVI MENU.
Chapter 1
5 Touch “Destination” to display
Destination menu.
6 Select the method of searching for
Basic Operation NAVI/AV
your destination.
7 Enter the information about your desti-
nation.
8 Navigation system calculates the
route to your destination, and then
shows the route on the map.
2 Press the MENU button to display the
NAVI MENU.
3 Touch “Destination” to display
Destination menu.
4 Touch “Address Search”.
5 Touch “Zone code key”.
If the destination is in another zone, this
changes the zone setting.
Zone code key
6 Touch the zone code of the destination,
then touch “OK”.
Selected zone
9 After releasing the parking brake,
drive in accordance with the navigation guidance, subject to the important
safety instructions noted on page 12 to
14.
26
Zone code
Page 29
7 Input the house number and touch “OK”.
Touch the characters you wish to input.
:
The input text is deleted letter by letter from
the end of the text. Continuing to this will
delete all of the text.
“Back”:
Returns you to the previous screen.
❒ You may also input a prefix to the house
number.
❒ If the house number you have input is not
found among subsequently selected
“Street” or “City” data, a message appears
saying that the address has not been
found. In that case, try inputting the house
number again.
❒ Touching “OK” with no input allows you to
specify and search a street name or the
name of the city or area first.
8 Input the street name.
Touch the letter you wish to input. If the next
screen is not automatically displayed even
though the street name is entered, try touching “OK”.
“Sym.”:
You can input symbols such as “&”and “+”.
“0-9”:
You can input numbers.
“Back”:
Returns you to the previous screen.
❒ For example, for “Early California Ct”, you can
just enter part of the name, such as “California”.
❒ When entering the characters, the unit will
automatically query the database for all possible options. If there is only one letter that
could possibly follow your entry, that letter will
automatically be entered.
Searching your destination after
specifying the name of the city or area
You can narrow down the search candidates by
initially specifying the name of the city or area
where your destination is located. Inputting the
name of the city or area then selecting the destination city or area from the list returns you to the
Street Name input screen. Now input the street
name, select the street from the list, and proceed
to step 9.
NAVI/AV Chapter 1 Basic Operation
Inputted text.
The number of applicable candidates.
“City”:
Touch if you wish to first specify the destination
city or area.
:
The input text is deleted letter by letter from the
end of the text. Continuing to this will delete all of
the text.
In the selected area, if you touch “City” without
entering the name of the city or area, you can set
the cities or areas that you have searched in the
past from the list. (This function is not available in
the first time and when you have selected an area
that you have never searched before.)
9 Touch the street from the list.
Scroll bar
27
Page 30

Touching the or on the scroll bar scrolls you
through the list and allows you to view the
remaining items.
If an item cannot be displayed in a single line,
touching the to the right of the item allows
you to see the whole line.
• Touching the specifies the selected street
and streets intersecting it, allowing you to set
an intersection as your destination. This is useful when you don’t know the house number of
your destination or cannot input the house
number of the specified street.
• Touching the displays a map of the place
you have selected. (Candidate place names
may appear in the list screen.)
➲ “When appears to the right of the list” ➞
Page 39
❒ If the selected street has only one matching
Chapter 1
location, route calculation starts after pressing the item.
❒ A list appears if multiple options exist, select
the desired one from the list, and proceed to
the next step.
Basic Operation NAVI/AV
If you did not input the house number in Step 7,
the house number input screen comes up after
the “Street” and “City” are determined. You
should now input the house number (perform
Step 5).
❒ If there is more than one place for the house
number input, or if there is no such house
number in that place, a range of house numbers are displayed. To start the route calculation, touch the range within the list you wish
to specify as the destination.
❒ When performing a destination search
with the route already set, select whether
to regard the specified area as your destination and search for a new route, or
search for a route via that area.
➲ Adding way points to the route ➞ Page 46
❒ Once searched for, the location is auto-
matically stored in the “Destination History”.
➲ “Registering a previous location in the
Address Book” ➞ Page 54
10Drive in accordance with the screen and
voice information.
Your navigation system gives you the following information with the timing adjusted to
the speed of your vehicle:
• Distance to the next turning point
• Direction of travel
• Road number of the freeway
• Way point (If this is set)
•Your destination
➲ Searching for another route ➞ Page 46
➲ “Canceling the Route Guidance” ➞
Page 44
❒ Touching the allows you to hear the
information again.
❒ To adjust the navigation volume, go to the
NAVI MENU.
➲ Navigation volume adjustment ➞ Page 71
❒ If you stop at a gas station or a restaurant dur-
ing the route guidance, your navigation system remembers your destination and route
information. When you start the engine and
get back on the road, route guidance
resumes.
❒ You can also see the destination on the
map by touching the to the right of the
list.
➲ “When appears to the right of the list”
➞ Page 39
❒ If you press the MENU button, the calcula-
tion is canceled.
❒ After the route calculation, the system
start storing the map data around the
route for “Memory navi mode”.
28
Page 31

How to view the map screen
This section describes only the items that are displayed on the map screen.
➲ Details of the map screen ➞ Page 35
(4)(1)(3)(2)
(1) Current location
(2) Distance to the destination
(3) Estimated time of arrival (or travel time to
your destination)
(4) Memory navi indicator
➲ “Memory Navi Mode” ➞ Page 133
Basic AV Source
This section describes basic AV operations, such
as adjusting the volume, switching the source
and stopping the source, using CD operations as
an example.
Selecting an AV source
1 Press the VOLUME knob to switch to the
Audio operation screen.
2 Press the MENU button to change to the
AV MENU.
NAVI/AV Chapter 1 Basic Operation
Memory navi mode
While the DVD Map Disc is inserted, you can
store the map data into the internal memory of
the navigation system. If the DVD Map Disc is
removed from the navigation system after storing
is completed, navigation is performed using the
data in the memory (memory navi mode). When
disappears, memory navi mode is ready. You
can now remove the DVD Map Disc. In the memory navi mode, you can play a music CD or DVDVideo on the navigation system while navigating
at the same time. The operation automatically
switches to the memory navi mode when the
DVD Map Disc is removed from the navigation
system.
Some functions are restricted and different from
the navigation using the DVD Map Disc (DVD
navi mode). If you want to use these functions,
please insert the DVD Map Disc again.
During the memory navi mode, navigation is performed only using the data read into the memory.
❒ You may need to insert the DVD Map Disc and
store new data in the memory during navigation operation, such as when the destination
is far away. The memory navi mode uses the
following map data to perform navigation.
➲ Refer to page 133 for more detail information.
3 Touch the source icon to select the
desired source in the AV Source screen.
❒ Also, press the VOLUME knob repeatedly
when the Audio operation screen is displayed to switch between sources:
“DISC” [CD, ROM, DVD-V, DivX] (built-in
DVD drive) — “RADIO” (tuner) — “iPod”
(iPod) — “XM” (XM tuner) “SIRIUS” (SIRIUS tuner) — “BT-TEL” (Bluetooth Telephone) — “BT-AUDIO” (Bluetooth Audio)
— “M-CD” (multi-CD player) — “AV-1”
(video input1) — “AV-2” (video input2) —
“EXT-1” (external unit 1) — “EXT-2” (external unit 2)
❒ Touch “OFF” to switch the source to OFF.
❒ Press and hold the VOLUME knob to
switch the source to mute.
❒ Sources that are not connected to the nav-
igation system, sources that are busy reading a disc or magazine, and sources with
incomplete settings cannot be used.
29
Page 32

❒ The term “external unit” refers to a Pioneer
product (such as one available in the future)
that, although incompatible as a source,
enables control of basic functions by the navigation system. Two external units can be controlled by the navigation system. When two
external units are connected, the navigation
system allocates them to external unit 1 or
external unit 2.
❒ When the navigation system’s blue lead is
connected to the vehicle’s auto-antenna relay
control terminal, the vehicle’s antenna
extends when ACC (ignition) is turned on. To
retract the antenna, turn the ACC (ignition)
off.
The vehicle’s antenna extends regardless of
whether the navigation system’s source is
turned on or off.
Chapter 1
Adjusting the volume
1 Use the VOLUME knob to adjust the audio
sound level.
With this product, rotate the VOLUME knob
Basic Operation NAVI/AV
to increase or decrease the volume.
❒ To adjust the navigation volume, go to the
NAVI MENU.
➲ Navigation volume adjustment ➞ Page 71
1 Press and hold the VOLUME knob.
Press and hold the VOLUME knob again for
at least 2 seconds or adjust the volume to stop
the muting.
How to listen to a CD
You can listen to an audio CD by removing the
DVD Map Disc from the navigation system.
➲ About Memory Navigation ➞ “Memory navi
mode” on page 29. (For details, see page 133.)
1 Press the EJECT button to remove the
DVD Map Disc.
2 The audio CD set in the navigation sys-
tem is played.
Turning the source off
1 Press the VOLUME knob to switch to the
Audio operation screen.
2 Press the MENU button to change to the
AV MENU.
3 Touch “OFF” in the AV Source screen.
❒ This product also can be switched off by
turning the ACC (ignition) OFF.
Muting the AV source
The AV source can be muted manually.
See “Volume” on page 71 for information about
automatic muting when a cellular phone call is
received or when listening to voice guidance.
30
3 Press the VOLUME knob to switch the
Audio screen.
Page 33

Current track information
4 Rotate the VOLUME knob to adjust the
volume.
5 Touch or to select a track you
want to listen to.
Information of the track being played
❒ If you touch the screen, the touch panel
keys are displayed again.
Available buttons
The availability of a specific button or functionality is indicated by its color. Depending on the status of your vehicle, some buttons will be
available, while others will not be.
Black touch key:
The button is operable.
Gray touch key with white letters:
The function is not available during memory navi
mode. Or, the function is not available for areas
not stored on the disc.
Touching this button activates a message indicating that the function is not available.
NAVI/AV Chapter 1 Basic Operation
You can also select a track by pressing the
or button.
6 To fast forward or rewind, keep touching
or .
You can also perform fast rewind/fast forward
by holding the or button.
7 To hide the touch key, touch “Hide”.
Information of the Audio source being played
Distance to the guidance point
Current direction of travel
Next direction of travel
Gray touch key with black letters:
The function is not available (e.g., operation is
prohibited while driving).
31
Page 34

Chapter 1
Basic Operation NAVI/AV
32
Page 35

Navigation Menu and Map Display
Chapter 2
This section describes the basic navigation operations, including how to display the NAVI MENU
and how to use the shortcut menu and the map
screen.
How to Use Menu Screens
There are two types of navigation menu: the
“NAVI MENU” and the “Shortcut menu”.
❒ The functions that cannot be used during the
memory navi mode are indicated in gray with
black letters. If you want to use such functions, insert the DVD Map Disc.
NAVI MENU
Use this menu for basic operation of your navigation system.
1 With the map displayed, press the MENU
button.
2 To change to the menu you want to use,
touch the name of the menu displayed at
the top of the screen.
The NAVI MENU is divided into four submenus: “Destination”, “Info/Traffic”,
“Route Options”, “Settings”.
❒ Touch “AV MENU” changes to the Audio
operation screen.
➲ Audio operation screen ➞ Page 77
3 If you want to return to the map, press the
MAP button.
Destination menu
➲ Specifying the address and searching the des-
tination ➞ Page 26
➲ Other search methods ➞ Page 41 to 43
Info/Traffic menu
Use this menu to check traffic information mainly
using the GEX-P10XMT*.
❒ “Traffic On Route”, “Traffic Events”, “Traf-
fic Flow”, “Stock Info”, “Set My Favorites”,
and “My Favorites” can be used only when
the GEX-P10XMT* is connected to the navigation system.
GEX-P10XMT*:
XM Digital Satellite Data & Audio Receiver (sold
separately). Traffic information only available for
cities where information is provided by XM
NavTraffic service. Active subscription to XM
NavTraffic required to receive traffic information
on the navigation system.
❒ ”Traffic On Route”, “Traffic Events”, and
“Traffic Flow” can only be used in DVD navi
mode.
➲ Confirming traffic information ➞ Page 57
➲ Registering information for emergencies ➞
Page 63
Chapter 2 Navigation Menu and Map DisplayNAVI
Select the destination search method. The route
also can be canceled from this menu.
33
Page 36

Route Options menu
Used to specify the conditions for setting the
route to the destination.
➲ Setting the Route Options ➞ Page 50
❒ “Edit Current Route”, “View Current
Route” and “Recalculate” can be used when
the route is set.
Settings menu
Set the navigation functions so they can be used
Chapter 2
easily.
➲ Settings menu ➞ Chapter 5
Shortcut menu
Shortcuts allow you to perform various tasks,
such as route calculation for the location indicated by the scroll cursor or registering a location
in the Address Book, faster than using the NAVI
MENU.
❒ The shortcuts displayed onscreen can be
Navigation Menu and Map Display NAVI
changed. The shortcuts described here are
those that can be selected with the system as
default setting.
❒ Items marked with an asterisk (*) cannot be
removed from the shortcut menu.
➲ Changing a shortcut ➞ Page 73
1 When the map is displayed, briefly touch
any part of the map.
If you continue to touch the map, it will start
scrolling.
Shortcut menu
: Destination*
Displayed when the map is scrolled. Set the
route to the place specified with the scroll cursor.
➲ Searching the destination by map ➞
Page 39
: Change Route*
Displayed when the map is not scrolled. This
item can be selected only during route guidance. You can add changes to your route and
check it.
➲ “Recalculating the route to the destination
using the Route Options menu” ➞ Page 46
➲ “Recalculating a specified distance in the
route ahead of your current position” ➞
Page 46
➲ “Checking the Set Route” ➞ Page 44
➲ “Canceling the Route Guidance” ➞
Page 44
➲ “Skipping a way point” ➞ Page 47
: Vicinity Search
Select a location with the scroll cursor.
Nearby POIs (Points Of Interest) will also be
found.
➲ Searching the facilities surrounding a cer-
tain place ➞ Page 42
: Registration
Registers the location indicated by the scroll
cursor to Address Book.
❒ Touching “Registration” and selecting
“Save” allows you to register the location
to Address Book.
➲ Registering a place ➞ Page 54
34
Page 37

: Volume Setting
The sound volume for the navigation can be
set.
➲ Setting the guidance volume ➞ Page 71
❒ If the mode is selected by pressing the
MAP button, the screen automatically
switches to the selected map display mode
after 4 seconds.
: Menu Close
Hides the shortcut menu.
How to Use the Map
Most of the information provided by your navigation system can be seen on the map. You need to
get to know how the information that appears on
the map.
Switching the current position
screen display mode
There are four types of map display and two additional view modes.
• Map View
• Driver’s View
• Guide View (during route guidance only)
• Route View (during route guidance only)
• Vehicle Dynamics
• Rear View (Only possible when the “Camera”
is set to “On”.)
❒ If you deviate from the route when the view
mode is Route View or Guide View and
enter a street not recorded on the disc, the
screen changes to Map View. When you
return to the route, the screen returns to the
original view and resumes route guidance.
How to view the map of the current location
Map View
Displays the standard map.
(1)
(2)
(4)
(11)
(5)
Driver’s View
Displays the map from the driver’s viewpoint.
(1)
(2)
(15)
(4)
(11)
(5)
(10) (8)
(3)(12) (9)
(10) (8)
(17)(6)
(17)(6)(9)
(7)
(16)
(7)
(16)
(3)
(12)
Chapter 2 Navigation Menu and Map DisplayNAVI
1 Press the MAP button to display a map of
the area around your current position.
2 Press the MAP button again.
3 Touch the mode name or press the MAP
button to select the mode you want to display.
• In Driver’s View, a small gauge with no
scale is depicted, but is not intended to be
used as a speedometer. Use the actual
speedometer of your vehicle to confirm
speed.
35
Page 38

Guide View
Overlays two arrows onto the standard map
(“Map View”).
(1)
(10) (8)
Rear View
Rear view image is displayed on of the screen.
(2)
(15)
(4)
(11)
(5)
(3) (6)
(12) (17)(9)
Route View
Displays the name of the street you will travel
along next and an arrow indicating the direction
of travel.
(1)
(2)
(15)
(4)
Chapter 2
(11)
(5)
(10) (8)
(12)
(9)
Vehicle Dynamics Display
Indicates the status of your vehicle.
(7)
(16)
❒ If you touch the screen briefly, the screen
changes Map View with shortcut menu. If
you close the shortcut menu the screen
returns to Rear View.
❒ If the “Camera” is set to “Off”, the rear view
image is not displayed. Please set it to “On”.
➲ Camera setting ➞ Page 125
❒ When using a camera set to turn ON/OFF in
conjunction with the reverse signal, no camera images will be displayed in rear view mode
(7)
(16)
(13)
(3)
(6)
(17)
while you are moving forward.
❒ If the camera is set always ON, it can display
images in rear view mode when the vehicle is
moving forward. In that case, you should ask
the camera maker or dealer whether the camera’s functions or longevity would be affected.
Enlarged map of the intersection
When “Close-up of Junction” in the Settings
menu is “On”, an enlarged map of the intersection appears.
Navigation Menu and Map Display NAVI
❒ You can change the items indicated on the left
and right meters.
• In the Vehicle Dynamics Display mode,
the speedometer display may show a different speed than your vehicle’s actual
speedometer, because your unit measures
speed in a different way.
➲ Setting the Vehicle Dynamics Display ➞
Page 67
36
(13)(14)
❒ The system cannot be changed to an enlarged
intersection map in the following mode.
—Driver’s View
—Vehicle Dynamics
—Rear View
Page 39

Display during freeway driving
In certain locations of the freeway, lane information is available, indicating the recommended
lane to be in to easily maneuver the next guidance.
(18)
While driving on the freeway, freeway exit numbers and freeway signs may be displayed when in
the vicinity of interchanges and exits.
(19) (20)
Display items
Guidance point*
The next guidance point (next turning point, etc.)
is shown by a yellow flag.
Destination*
A checker-flag indicates your destination.
(1) Name of the street to be used (or next
guidance point)*
(2) Distance to the guidance point*
Touch to access the next information.
(3) Current location
The current location of your vehicle. The tip of the
triangular mark indicates your heading and the
display moves automatically as you drive.
(4) Distance to the destination (or distance to
way point)*
If way points are set, the display changes with
each touch. When two or more way points are
set, the distance to the destination and the distance to the next way point are switched.
(5) Name of the street your vehicle is traveling along (or City Name, etc.)
(6) Compass
The red arrow indicates north. If the scale is less
than 25 mi (50 km), touching the map changes
the direction that it is displayed in (north up/heading up). When the scale of the map is greater than
25 mi (50 km), it is fixed to “north up”.
Heading up:
The map display always shows the vehicle’s
direction as proceeding toward the top of the
screen.
North up:
The map display always has north at the top of
the screen.
(7) Zoom in/Zoom out
Touch to change the map’s scale.
➲ “Changing the scale of the map” ➞ Page 38
(8) Map scale
The scale of the map is indicated by distance.
➲ “Changing the scale of the map” ➞ Page 38
(9) TRAFFIC icon
This appears when an XM tuner (GEX-P10XMT,
sold separately) is connected, and traffic information is received.
(10) Current time
(11) Estimated time of arrival (or travel time
to your destination)*
The display alternates by pressing it.
The estimated time of arrival is automatically calculated from the Average Speed set and the
actual average speed.
➲ How to set average speed ➞ Page 72
(12) Tracking mark
The tracking mark shows the route your vehicle
has traveled with dots.
➲ Select the tracking setting ➞ Page 74
(13) Map of your surroundings (Side map)
Touching the map briefly shows the shortcut
menu, while touching longer changes the map to
Scroll mode.
➲ “Moving the map to the location you want to
see” ➞ Page 38
(14) Distance to a turning point*
Displayed on the enlarged intersection map. The
green bar gets shorter as your vehicle
approaches a turning point.
37
Chapter 2 Navigation Menu and Map DisplayNAVI
Page 40

(15) Next direction of travel*
When you approach an intersection, it appears
green. The screen displays the distance to the
next guidance point, and the next guidance point
after that.
(16) Direction line*
The direction towards your destination (or scroll
cursor) is indicated with a straight line.
(17) Memory navi indicator
➲ About memory navi indicator ➞ Page 134
(18) Lane information*
Lane information is displayed the first time there
is a voice guidance on your route. When the guidance screen is displayed near an interchange or
exit, the lane information disappears.
(19) Freeway signs*
These show the road number and give directional
information.
(20) Freeway exit information*
Displays the freeway exit.
❒ Information with the mark (*) appears only
when the route is set.
Chapter 2
❒ Depending on the conditions and settings,
some items may not be displayed.
❒ The icon of a registered location and the traf-
fic information icons are displayed when the
map scale is 10 miles (20 km) or lower.
❒ POI icons and the line for traffic congestion
and traffic flow are displayed when the map
scale is 0.75 mile (1 km) or lower.
Moving the map to the location
you want to see
If you touch the display briefly, the shortcut menu
appears.
Touching anywhere on the map for at least 2 seconds changes the map to Scroll mode and the
map begins scrolling in the direction you
touched. The scrolling stops when you release
your finger from the screen. At this time, the
scroll cursor appears at the center of the screen.
Also a line connecting between the current location and scroll cursor appears.
Pressing the MAP button returns you to the map
of your surroundings.
❒ Touch the area close to the center of the
screen to scroll slowly. Touch near the sides
of the screen to scroll quickly.
(3) (2)
(1)
Changing the scale of the map
Touching or allows you to change the map
scale. Touch and holding or allows you to
change the scale in smaller step within a range of
25 yards to 1000 miles (25 meters to 2000 kilometers). When the view mode is set to Map View
or Guide View, “Direct scale key” is displayed.
Touching “Direct scale key” changes the map to
Navigation Menu and Map Display NAVI
the selected scale directly.
❒ In memory navi mode and/or when traversing
an area not stored on the disc, selection of the
scales is limited.
Direct scale key
38
(5)
(4)
(1) Scroll location
The position of the scroll cursor shows the location selected on the current map.
❒ When the scale is 0.25 mi (200 m) or lower,
the road appears light blue in the vicinity of
the scroll cursor.
(2) Direction line
The direction towards the scroll cursor is indicated with a straight line.
(3) Distance from the current location
The distance in a straight line between the location indicated by the scroll cursor and your current location.
Page 41

(4) The street name, city name, area name
and other information for this location.
(The displayed information varies according to
the scale.)
Touching the on the right displays hidden text.
➲ Displaying information on the specified loca-
tion ➞ Page 39
(5) Shortcut menu
➲ How to use shortcut menu ➞ Page 34
Viewing the information of a specified
location
An icon appears at registered places (home location, specific places, address book entries) and
places where there is a POI icon or traffic information icon. Place the scroll cursor over the icon
to view detailed information.
Finding a destination on the map
If you search the location you want to visit by
scrolling the map, touch in the Shortcut
menu to specify your destination on the map.
1 Press the MAP button to access the map
screen.
2 Touch the map for at least 2 seconds.
The map display changes to Scroll mode.
3 Scroll the map and move the scroll cursor
to the place you want to make your destination.
➲ Moving the map to view the part you want
to see ➞ Page 38
4 Touch .
1 Scroll the map and move the scroll cursor
to the icon you want to view.
2 Touch .
Information for a specified location appears.
The displayed information varies according to
the location. (There may be no information for
that location.)
➲ Registering places ➞ Page 53
➲ “Displaying Certain POI on the Map” ➞
Page 48
➲ “Confirming traffic information on the
map” ➞ Page 58
3 Touch “Back”.
You are returned to the previous display.
❒ In the memory navi mode, you can only see
detailed information for registered points
(when available).
When appears to the right of the
list
You can also set a destination by touching to
the right of the destination list such as the
Address Book. Touch “OK” to confirm. The loca-
tion indicated by the scroll cursor will be set as a
destination.
Scroll:
The map display changes to with Shortcut menu.
If you touch anywhere on the map, the map display changes to Scroll mode.
➲ Shortcut menu ➞ Page 34
Chapter 2 Navigation Menu and Map DisplayNAVI
39
Page 42

Chapter 2
Navigation Menu and Map Display NAVI
40
Page 43

Setting a Route to Your Destination
Searching for Points of Interest
• For safety reasons, these route-setting
functions are not available while your
vehicle is in motion. To enable these functions, you must stop in a safe place and
put on the parking brake before setting
your route (see page 13 Interlock for
details).
❒ Some information on traffic regulations
depends on the time when the route calculation is performed. Thus, the information may
not correspond with a certain traffic regulation when your vehicle actually passes the
location. Also, the information on the traffic
regulations provided will be for a passenger
vehicle, and not for a truck or other delivery
vehicles. Always follow the actual traffic regulations when driving.
❒ If you press the MENU button during route
calculation, the calculation is canceled and
the map display appears.
❒ Inserting the DVD Map Disc will cause a
forced reroute. (This rerouting cannot be canceled.)
Finding Your Destination by
Selecting the Type of Facility
(POI)
1 Touch “Destination” in the NAVI MENU,
and then touch “POI Search”.
2 Touch the zone code key of the destina-
tion and touch “OK”.
➲ Selecting the zone where you want to
search ➞ Page 26
3 Touch “Category”.
“Name”:
Touch if you wish to first specify the POI
Name.
“City”:
Touch if you wish to first specify the destination city or area.
4 Touch the desired category.
Chapter 3
Category
Chapter 3 Setting a Route to Your DestinationNAVI
Information about various facilities (Points Of
Interest - POI), such as gas stations, amusement
parks or restaurants, is available. By selecting the
category (or entering the POI Name), you can
search for a POI.
If the category is not sub-divided into more
detailed categories, the list will not be displayed. Proceed to Step 6.
5 Touch the subcategory.
6 Input the name of the POI.
If the list does not automatically appear when
the name of the POI has been entered, try
touching “OK”.
41
Page 44

“City”:
Touch to specify the destination city or area.
❒ If less than six POIs in a subcategory are
available, the screen for inputting the POI
name is skipped. Please proceed to Step 7.
7 Touch POI for your destination.
❒ Touching displays a map of the sur-
roundings of the selected POI.
➲ “When appears to the right of the list”
➞ Page 39
Finding a POI in your surroundings
You can search for Points Of Interest in your surroundings on the map. Use it to find a POI to visit
during a journey.
1 Touch “Destination” in the NAVI MENU,
and then touch “Vicinity Search”.
2 Touch the desired category.
Category
Chapter 3
The selected category will have a red check
mark.
OK:
Starts searching.
Back:
Returns to the previous screen.
Set:
Display the screen for registering POI shortcuts.
➲ Register POI shortcut ➞ Page 49
❒ If you touch one of the POI shortcuts
Setting a Route to Your Destination NAVI
(e.g. ), you can start searching POI
directly for the selected category on the
POI shortcut.
❒ If you want to search for facilities by using
both marked category and POI shortcuts,
select some categories in the list and then
touch the POI shortcut to start searching.
❒ If you want to search with more detailed
categories, touch . When the subcategory list appears, touch the item and touch
“Back”. When only a few types of the
detailed categories are selected, blue
check marks will appear.
❒ You can select from the detailed category
for up to 100 items.
3 Touch “OK”.
Names of POIs and their distance from your
current location appear. They are listed in
order from nearest to farthest.
Distance to the facility
❒ When you touch , the POIs around the
specified location are shown on a map.
➲ “When appears to the right of the list”
➞ Page 39
❒ Searching range is approximately 10 miles
(16 km) square from the current location.
Searching the facilities around
the scroll cursor
1 Scroll the map and move the scroll cursor
to the place where you want to search for
POI.
2 Touch .
See Step 2 of “Finding a POI in your surroundings” for the following operations.
➲ “Finding a POI in your surroundings” ➞
Page 42
❒ This can be used when setting the Vicinity
Search icon to display as a shortcut on the
map screen.
➲ Changing Shortcut ➞ Page 73
❒ The distance indicated in the search result
is the distance from the scroll cursor to the
facility.
42
Page 45

❒ The bottom icons are for shortcuts to your
favorite categories. Touching a shortcut
icon displays a list of the facilities in the
category.
❒ “Vicinity Search” in the NAVI MENU
searches your surroundings. On the other
hand, when using in the Shortcut
menu (➞ Page 34), the area around the
scroll cursor will be searched.
Setting an Entrance or Exit of a
Freeway as Your Destination
You can set the entrance or exit of a freeway as
your destination.
1 Touch “Destination” in the NAVI MENU,
and then touch “Freeway Search”.
2 Touch the zone code key of the destina-
tion and touch “OK”.
3 Enter the name of the freeway and touch
“OK”.
4 Touch the freeway.
The display for selecting your destination to
the entrance or to the exit of the freeway
appears.
5 Touch “Entrance” or “Exit”.
The list of entrances to, or exits from, the
selected freeway appears.
6 Touch your destination.
❒ You can also see the destination by touch-
ing the on the right of the list.
➲ “When appears to the right of the list”
➞ Page 39
Searching for Your Destination
by Specifying the Telephone
Number
If you know the telephone number of your destination, you can quickly search for your destination by specifying the telephone number.
1 Touch “Destination” in the NAVI MENU,
and then touch “Telephone Search”.
2 Input a telephone number.
❒ If there is more than one place for the
number input, a list of those places is displayed. Touch the item you want in the list
and proceed to step 3.
3 If the displayed place is satisfactory,
touch “OK”.
Touching “Scroll” changes the destination.
➲ Searching the destination by map ➞
Page 39
Route Calculation to Your Home
Location or to Your Favorite
Location
If your home location is registered, the route
home can be calculated by a single touch of the
touch key from the NAVI MENU. Also, you can
register one location, such as your workplace, as
your favorite location, and the route is calculated
in a similar way.
1 Touch “Destination” in the NAVI MENU,
and then touch “Return Home” or “Go to”.
➲ “Registering your home and your favorite loca-
tion” ➞ Page 53
Selecting Destination from the
Destination History and Address
Book
Any place that has been searched before is
stored in the “Destination History”. Places that
you have registered manually, such as your
home, are stored in the “Address Book”. Simply
select the place you want to go to from the list
and a route to that place will be calculated.
➲ For information on the Address Book ➞
Chapter 4
➲ For information on the Destination History
➞ Chapter 4
Chapter 3 Setting a Route to Your DestinationNAVI
43
Page 46

1 Touch “Destination” in the NAVI MENU,
and then touch “Address Book” or “Destination History”.
2 Touch your destination name.
Checking the Set Route
You can check information about the route
between your current location and your destination.
You can select from the following methods:
checking the passing streets with a list, checking
the shape of the route by scrolling the map along
the route, and checking the entire distance of the
route in a single screen.
Route calculation starts.
❒ You can also see the destination by touch-
ing on the right of the list.
➲ “When appears to the right of the list”
➞ Page 39
Canceling the Route Guidance
If you no longer need to travel to your destination
or if you want to change your destination, follow
the steps below to cancel the route guidance.
1 Touch “Destination” in the NAVI MENU,
then touch “Cancel Route”.
The message confirming whether to cancel
the current route appears.
2 Touch “Yes (all)”.
Chapter 3
The current route is deleted, and a map of
your surroundings reappears.
Yes (one):
Route is recalculated by canceling the
selected way point.
Setting a Route to Your Destination NAVI
No:
Returns to the previous display without deleting the route.
❒ You can also cancel the route using the
Change Route in the shortcut menu.
Checking the set route with the
map
1 Touch “Route Options” in the NAVI
MENU, then touch “View Current Route”.
❒ “View Current Route” is active only when
the route is set.
❒ You can also see the location by touching
the on the right of the list.
2 Touch “Scroll”.
The screen to selecting the point to start
scrolling appears.
3 Touch the point to start scrolling.
(3)(1) (2)
You can select the following items:
(1) Starting Point
(2) Way Point (If this is set)
(3) Destination
❒ If there are multiple way points, selecting
“Way Point” displays a list of the way
points on the route. Touch the place you
want to start scrolling from and proceed to
step 4.
4 Touch or to scroll the map.
To continue scrolling after you release your
finger, touch and hold or .
If necessary, the scale of the map can be
changed.
44
Page 47

Scroll Cursor
Current Route
Map:
The scroll screen is displayed.
➲ “When appears to the right of the list”
➞ Page 39
5 Touch “Back”.
You can return to the previous display.
4 Touch “Back”.
You can return to the previous display.
❒ When a long distance route is calculated,
your navigation system may not be able to
list all the roads. (In this case, the remaining roads will be shown in the list as you
drive on.)
Checking the entire route overview
You can check the entire shape of the current
route.
❒ When View Current Route is selected dur-
ing the memory navi mode, the information is
displayed up to the location where the route is
in memory.
Checking the set route by text
This function is not available if your vehicle has
deviated from the set route.
❒ When Profile is selected during the memory
navi mode, information is displayed up to the
location where the route is stored in memory.
1 Touch “Route Options” in the NAVI
MENU, then touch “View Current Route”.
❒ “View Current Route” is active only when
the route is set.
❒ You can also see the location by touching
on the right of the list.
2 Touch “Profile”.
3 Check the contents on the display.
Scroll the list as necessary.
Name of the streets you are driving through
Driving distance
1 After touching “Route Options” in the
NAVI MENU, touch “View Current
Route”.
❒ “View Current Route” is active only when
the route is set.
❒ You can also see the location by touching
on the right of the list.
2 Touch “Overview”.
A map of the whole route up to the destination
is displayed.
❒ You can also check the overview by using
the shortcut menu if “Whole Route Over-
view” is selected on the “Short-Cut
Selection”.
Checking the set route from the
shortcut menu
You can also check the information about the set
route from the shortcut menu.
1 Touch the map screen.
The Shortcut menu appears.
2 Touch .
3 Touch “Route Profile” or “Route Scroll”.
➲ “Route Profile” ➞ Page 45 (Step 3)
➲ “Route Scroll” ➞ Page 44 (Step 3 and 4)
Chapter 3 Setting a Route to Your DestinationNAVI
4 Touch “Back”.
You can return to the previous display.
45
Page 48

Recalculating the Route to Your
Destination
Editing Way Points to the Current Route
You can set the length of the area, avoid just a
certain area, or you can even search a new route
from the current location to your destination. (On
the map screen during route guidance, try the following operations.)
Recalculating the route to the
destination using the Route
Options menu
1 Touch “Route Options” in the NAVI
MENU, and then touch “Recalculate”.
This option automatically searches the route
to the destination again.
❒ “Recalculate” is active only when the
route is set.
❒ You can also recalculate (reroute) your
route using the Change Route in the
shortcut menu.
Recalculating a specified distance in the route ahead of your
current position
1 Touch the map screen.
Chapter 3
The Shortcut menu appears.
2 Touch .
3 Touch the distance from the list.
Setting a Route to Your Destination NAVI
Detour distance
Searches detours for a specified distance in
the route ahead of your current position. After
the route is calculated, the map screen shows
your surroundings and route guidance is
resumed.
You can select way points (locations you want to
visit on the way to your destination) and you can
recalculate the route to pass through these locations.
Editing a way point
Up to 5 way points are selected, and selected
points can be sorted automatically or manually.
❒ “Edit Current Route” is active only when the
route is set.
1 Touch “Route Options” in the NAVI
MENU, and then touch “Edit Current
Route”.
2 Select editing method.
❒ You can also see the location by touching
on the right of the list.
Add:
Switch the display to search for points. After
searching for a point, display it on a map, then
touch “OK” to add to the way points. (You can
add up to five way points in total.)
Delete:
You can delete way points from the list.
(You can delete way points successively.)
Sort:
Touch to display a screen listing the way
points. Touching or on the left of the
list allows you to sort the way points manually.
46
Page 49

Automatic:
You can sort the destination and way points
automatically. The system will show the nearest way point (distance in a straight line) from
the current location as way point 1, and sort
the other points (including your destination)
in order of distance from your current location.
Original:
Returns to the original order.
Select from manual order, “Automatic” or
“Original” and touch “Done” to start the
route search.
3 Touch “Done”.
❒ If you set a way point(s) in the route to your
destination, the route up to the next way
point will appear light green. The rest of
the route will be light blue.
Skipping a way point
If the points are set, the next way point along the
route can be skipped.
1 Touch the map screen.
The Shortcut menu appears.
Setting Areas to Avoid
If you register Areas to Avoid, such as crowded
intersections or congested areas, routes can be
calculated that avoid those areas.
❒ An area not stored on the disc cannot be set
as an Area to Avoid.
Registering an area to avoid
This section describes how to register an Area to
Avoid for the first time. You can register up to five
Areas to Avoid.
1 Touch “Route Options” in the NAVI
MENU, then touch “Designate Areas to
Avoid”.
2 Touch “Yes”.
3 Select one of the items shown in “New
Area”.
When registering for the first time, any item
on the list is shown as “New Area”.
Chapter 3 Setting a Route to Your DestinationNAVI
2 Touch .
3 Touch “Skip Way Point”.
A message asking whether you want to skip
the next way point appears.
4 Touch “Yes”.
A new route to your destination through all
the remaining way points, except for the
skipped way point, is calculated.
4 Select the place to register and display
the map.
➲ Address Search ➞ Page 25
➲ Searching places to register ➞ Page 41 to
43
Once a search is complete, a map with the
specified location at its center appears.
❒ If you select the “Map Search”, move the
scroll cursor to the place you want to set
and touch “OK”.
5 Change the map scale and decide the size
of the Area to Avoid.
The Area to avoid is enclosed in a red frame.
You can also change the map scale though
the maximum map scale for registering Areas
to Avoid is 0.1 mile (100 m).
47
Page 50

6 Scroll the map, adjust the position of the
red frame, and touch “OK”.
If you want to stop registration, touch “Back”.
❒ Depending on the setting of route search con-
ditions, you may not be able to avoid the specified areas. A confirmation message is
displayed on the screen at this time.
➲ Information on route calculation conditions ➞
Page 51
Changing or deleting an area to
avoid
You can subsequently change/rename/delete an
Area to Avoid.
1 Touch “Route Options” in the NAVI
MENU, then touch “Designate Areas to
Avoid”.
2 Select the area you want to change or
delete.
Chapter 3
3 Select the desired operation.
Displaying Certain POI on the
Map
POI in a certain category can be shown on the
map, and you can check the location on the display.
1 Touch “Info/Traffic” in the NAVI MENU,
then touch “Overlay POI”.
2 Touch the category you want to display.
The selected item is marked. If you want to
select other categories, repeat this step.
❒ If you want to display more detailed cate-
gories, touch . When the subcategory
list appears, touch the item you want to
display and touch “Back”.
❒ When some sub-categories are selected,
the corresponding category is marked
blue. When all the sub-categories within a
category are selected, that category is
marked red.
❒ You can select up to 100 items from the
detailed category.
❒ If you touch one of the POI shortcuts (e.g.
), you can start searching for POI
directly in the selected category on the POI
shortcut.
3 Press the “MAP” button.
POI’s in the selected category appear on the
map.
❒ You can also display POI by using the shortcut
menu if “Overlay POI” is selected on the
“Short-Cut Selection”.
Rename:
Changes the name. Enter the new name and
touch “OK”. This returns you to the Route
Options menu.
Setting a Route to Your Destination NAVI
Change:
A specified area can be changed. For the next
steps, see Step 3 in the “Registering an area
to avoid” above.
Delete:
Delete the selected Area to Avoid.
48
Page 51

Registering/deleting POI Shortcuts
You can register up to six shortcuts to your favorite POI. You can also change or delete the registered shortcuts.
Registering a POI shortcut
1 Touch “Destination” in the NAVI MENU,
and then touch “Vicinity Search”.
2 Touch “Set”.
5 Touch subcategory.
The selected category is added to the list of
POI.
When registering another icon, repeat steps 3
through 5.
❒ You can register a POI shortcut by touching
“Overlay POI” under “Info/Traffic” in the
NAVI MENU, or by touching the icons such as
and on the map. The steps for registra-
tion are the same as described above.
Deleting a POI shortcut
1 Touch “Destination” in the NAVI MENU,
and then touch “Vicinity Search”.
❒ You can also touch in the shortcut
menu or “Info/Traffic” in the NAVI MENU,
then touch “Overlay POI”.
Displays a list of already registered POI shortcuts.
3 Touch “Add”.
Displays a POI category list.
4 Touch category or .
Touching a category adds that category to the
shortcuts. After touching , please proceed
to Step 5 and select a subcategory.
2 Touch “Set”.
3 Touch “Delete”.
Displays a list of already registered POI shortcuts.
4 Touch the category to be deleted.
A red check appears on the selected shortcut.
All:
A red check will appear on all registered categories.
5 Touch “Delete”.
Deletes the selected shortcut from the list.
Chapter 3 Setting a Route to Your DestinationNAVI
49
Page 52

Modifying the Route Calculation
Conditions
You can change the route calculation conditions
using the Route Options menu. The following
description features an example of changing the
number of routes to be searched.
1 Touch “Route Options” in the NAVI
MENU.
2 Touch “Number of Routes”.
The current settings appear under the name
of the item. Each time you touch the item, the
setting changes. Repeatedly touch the item
until the value you want to set appears.
Items that users can operate
This section describes the details of the each
time. Settings marked with an asterisk (*) show
that they are default or factory settings.
Chapter 3
Edit Current Route
This displays a screen for adding or deleting way
points. The method is the same as described in
“Editing Way Points to the Current Route”.
❒ “Edit Current Route” is displayed only when
the route is set.
➲ “Editing Way Points to the Current Route” ➞
Page 46
View Current Route
➲ “Checking the set route with the map” ➞
Page 44
Setting a Route to Your Destination NAVI
➲ “Checking the set route by text” ➞ Page 45
➲ “Checking the entire route overview” ➞
Page 45
❒ “Recalculate” is displayed only when the
route is set.
➲ “Recalculating the route to the destination
using the Route Options menu” ➞ Page 46
Number of Routes
This setting controls whether the system should
calculate only one route, or several routes.
1*:
Only one route judged as being optimum by your
navigation system is calculated.
Multiple:
Several route options are calculated (maximum 6
routes).
Route Condition
This setting controls whether the route should be
calculated by taking into account the time or the
distance.
Fast*:
Calculate a route with the shortest travel time to
your destination as a priority.
Short:
Calculate a route with the shortest distance to
your destination as a priority.
Avoid Freeway
This setting controls whether freeways may be
included in the road calculation. (A route using a
freeway may be calculated in some cases, such
as when setting your destination far away.)
On:
Calculate a route that avoids freeways.
Off*:
Calculate a route that may include freeways.
Avoid Ferry
This setting controls whether ferry crossings
should be taken into account.
On:
Calculate a route that avoids ferries.
Off*:
Calculate a route that may include ferries.
❒ The system may calculate a route that
includes ferries even if “On” is selected.
Recalculate
Automatically searches the route to the destination again.
50
Page 53

Avoid Toll Road
This setting controls whether toll roads (including
toll areas) should be taken into account.
On:
Calculate a route that avoids toll roads (including
toll areas).
Off*:
Calculate a route that may include toll roads
(including toll areas).
❒ The system may calculate a route that
includes toll roads even if “On” is selected.
Designate Areas to Avoid
➲ About Areas to Avoid ➞ Page 47
Perform the route calculation for
several route options, and select
one
You can get route calculations for several route
options. After route options are calculated, select
the one you want.
1 Set the “Number of Routes” to “Multi-
ple”.
2 Search your destination and set the route.
Calculated routes are shown in different colors (from two to six routes).
3 Touch “Next” to change the displayed
route.
Displays the inability of fulfill the conditions by
icon.
• Pass through Area to Avoid
• Use toll road although the setting
“Avoid Toll Road” is “On”.
• Use Ferry although the setting “Avoid
Ferry” is “On”.
(2) Distance to your destination
(3) Travel time to your destination
❒ The “Avoid Freeway” setting may not be
reflected, depending on the distance to the
destination.
❒ You can see other places while displaying
a possible route by scrolling the map.
Touching “Next” moves the next candidate
route to the center and indicates the map.
4 Touch “Information” to check the infor-
mation on the selected route.
You can also check details of the roads along
the selected route. (If you touch “Back”, you
can return to the previous display.)
➲ “Route Scroll” ➞ Page 44 (Step 3, 4 and
5)
➲ “Route Profile” ➞ Page 45 (Step 3 and 4)
❒ After the route is calculated, it may take
some time until the detailed route information (Route Profile) is displayed.
5 Touch “OK”.
The route you selected is accepted, and the
map of your surroundings appears. When you
start driving, the route guidance begins.
❒ If the above operations are not performed
within 30 seconds after the route calculation is completed and you have already
started your vehicle, the route selected at
the time is automatically chosen.
Chapter 3 Setting a Route to Your DestinationNAVI
(1) (3) (2)
The following information is displayed on this
screen:
(1) Route calculation condition
Displays the conditions set by the Route
Options menu by icon.
• Use/avoid freeway
• Use/avoid toll road
• Use/avoid ferry
51
Page 54

Chapter 3
Setting a Route to Your Destination NAVI
52
Page 55

Editing the Navigation Utilities
1 Touch “Settings” in the NAVI MENU,
• For safety reasons, these functions are not
available while your vehicle is in motion.
To enable these functions, you must stop
in a safe place and put on the parking
brake before setting your route (see page
13 Interlock for details).
Editing Registered Locations
2 Touch “Set ”Go To””.
Chapter 4
then touch “Defined Locations”.
When registering your home location, touch
“Set ”Home””.
The Address Book can store up to 300 registered locations. These can include home location, favorite places and destinations you have
already registered. This registered location information can also be modified. Also, routes to registered locations can be calculated by touching
the screen. Registering places you visit frequently
saves time and effort.
❒ The Address Book is automatically updated in
alphabetic order. However, “Return Home”
and “Go to” always appear at the top.
Registering your home and your
favorite location
Of the 300 registered locations that can be
stored, home location and favorite locations can
be stored separately in the Address Book. Registering your favorite location for the first time is
described here. You can change the registered
information later. You might find it useful to register your workplace or a relative’s home as your
favorite location.
Map icons:
:
Home location icon
:
Favorite location icon
❒ The items already registered under
“Return Home” or “Go to” can be modi-
fied.
3 Search for a location to register.
You can select a method of location search on
the display.
➲ Address Search ➞ Page 25
➲ Information on searching locations to reg-
ister ➞ Page 41 to 43
❒ If you select “Map Search”, move the
scroll cursor to the location you want to set
and touch “OK”.
4 Point the scroll cursor to the location you
want to register and touch “OK”.
5 Touch “Save”.
Completes the registration.
Chapter 4 Editing the Navigation UtilitiesNAVI
53
Page 56

Registering a previous location
in the Address Book
Once a destination or way point is searched, it is
automatically retained and stored in the Desti-
nation History. If a search is canceled while still
in progress, only the places where the map was
displayed and scrolled through or places where
the shortcut menu was displayed are retained
and stored. Note that after 100 places are stored,
new places are automatically overwritten on top
of old ones, in order from oldest to most recent.
Therefore, to ensure that certain places are kept
and not overwritten, be sure to register them in
the Address Book.
1 Touch “Destination” in the NAVI MENU,
then touch “Destination History”.
Editing a location’s information
In the Address Book menu, touching the on
the right-hand side of the place displays the
Address Book Operate menu.
To edit the information about the location:
1 Touch “Destination” in the NAVI MENU,
then touch “Address Book”.
2 Touch on the right-hand side of the
place whose information you want to edit.
2 Touch on the right-hand side of the
place you want to register in the Address
Book.
:
The map of that place can be displayed.
➲ “When appears to the right of the list”
➞ Page 39
3 Touch “Registration”.
Chapter 4
4 Touch “Save”.
Registration is now complete.
❒ If you want to stop registration, touch
“Back”.
➲ “Editing a location’s information” ➞
Page 54
Editing the Navigation Utilities NAVI
:
The map of that place can be displayed.
➲ “When appears to the right of the list”
➞ Page 39
Add:
The screen for selecting the method for registering the location in the Address Book
appears.
➲ Address Search ➞ Page 25
➲ Searching places to register ➞ Page 41 to
43
❒ If you select “Map Search”, move the
scroll cursor to the place you want to set
and touch “OK”.
3 Touch “Edit Information”.
The Address Information menu appears. Refer
to the item corresponding to the subsequent
operation. After finishing the operation, the
Address Book menu appears. You can continue to edit other information items if necessary.
54
Page 57

(1) Name
You can enter the desired name.
(2) Name (2nd line)
The name of the city appears in this column.
(Not editable)
(3) Phone number
You can search by registered telephone number.
(4) Pictograph
The symbol displayed on the map.
(5) Sound
The selected operating sound is played.
(6) Modify Location
You can change the registered location by
scrolling the map.
4 Touch “Save”.
Completes the registration.
Changing a name
1 Touch “Edit Name”.
2 Enter a new name; touch “OK”.
The name of the current location appears in
the text box. Delete the current name, and
enter a new name between 1 and 23 characters long.
3 Touch “Save”.
The details you set are registered.
❒ You cannot change the name of your home.
Selecting a pictograph to appear on the
map
(1)
(2)
1 Touch “Select Image”.
(3)
(4)
2 Touch the Pictograph to appear on the
(5)
(6)
map.
The Address Information menu appears.
❒ You cannot change the mark of your home
and your favorite location.
Selecting sound
1 Touch “Select Sound”.
2 Select the sound.
The Address Information menu appears.
❒ If you want to hear the operating sound,
touch .
Modify the location
➲ Changing the position of locations ➞ Page 56
Deleting Address Book or Destination History information
Items registered in the Address Book or Destination History can be deleted. All entries of the
data in the Address Book or Destination History can be deleted at once.
1 Touch “Destination” in the NAVI MENU,
then touch “Address Book”.
To delete items in the Destination History,
touch “Destination History”.
2 Touch on the right-hand side of the
place you want to delete.
3 Select the deletion method.
Chapter 4 Editing the Navigation UtilitiesNAVI
Entering or changing a phone number
1 Touch “Edit Phone Number”.
2 Input a phone number and touch “OK”.
The Address Information menu appears.
❒ To change a registered phone number,
delete the existing number and then enter
a new one.
Delete This Item:
Delete the location selected in Step 2.
55
Page 58

Delete All Address Book Entries (or
Delete All Destinations):
Delete all the Address Book or Destination
History data.
4 Select “Yes”.
The data you selected is deleted.
Alternative option:
No:
The display shown in Step 3 appears.
❒ Because deleted data cannot be restored,
take extra care not to select “Delete All
Address Book Entries” and “Delete All
Destinations” by mistake.
Loading registered locations
data from a Disc
Address Book data stored on a CD-R/-RW and
DVD-R/-RW can be loaded to the navigation system.
This function is used when moving Address Book
data from a Pioneer navigation system with a PC
card slot (e.g., AVIC-88DVD) to a Pioneer navigation system without a PC card slot.
❒ When moving data, copy the folder named
“POINT” from the PC card to the personal
computer. Then use the personal computer to
store the “POINT” folder in the first level of
the CD-R/-RW and DVD-R/-RW.
Changing the position of locations registered in the Address
Book
You can select a location registered in the
Address Book, display a map of its surroundings and change its position.
1 In the Address Book menu, touch on
the right-hand side of the place whose
position you want to change.
2 Touch “Edit Information”, and then touch
“Modify Location”.
The map of the selected area and its surroundings appears.
3 Touch the display to change its position,
then touch “OK”.
Chapter 4
4 Touch “Save”.
The position is changed.
1 Insert the CD-R (-RW) to the disc loading
slot.
2 Touch “Settings” in the NAVI MENU,
then touch “System Options”.
3 Touch “Read from Disc”.
The list of groups appears.
4 Touch the desired group.
5 Touch the desired locations.
Selected locations are marked. To load the
data from other locations, repeat this step.
Alternative option:
Select All:
All the locations are selected (or canceled) at
once.
6 Touch “OK”.
The data of the selected locations is stored in
the Address Book.
Editing the Navigation Utilities NAVI
56
Page 59

Using XM NavTraffic Information
(1) (2) (5)(4)
If you have a GEX-P10XMT XM Digital Satellite
Data & Audio Receiver (sold separately) attached
to the navigation system, and have an active subscription to XM NavTraffic service, you can view
current traffic conditions and information on your
navigation display. When the unit receives
updated traffic information, the navigation system will overlay the traffic information on your
map, and also display detailed text information
when available. When you are traveling along a
route and there is traffic information on your current route, the system will automatically detect it,
and ask you if you would like to be rerouted. (In
such case, route calculation takes into consideration about 90 mile radius of alternative routes
and its traffic conditions from your current location).
❒ The term “traffic congestion” in this section
indicated the following types of traffic information: stop and go, stopped traffic and
closed/ blocked roads. This information is
always taken into consideration when checking your route, and the information related
with these events cannot be turned off. Additionally, the system also takes into consideration the traffic flow information if “Use the
traffic flow information” is “On”.
Viewing traffic list
Traffic Information is displayed onscreen in a list.
This allows you to check how many traffic incidents have occurred, their location and their distance from your current position.
Checking all traffic information
1 Touch “Info/Traffic” in the NAVI MENU,
then touch “Traffic Events”.
The list with received traffic information is
shown.
2 Touch or to view the incident list.
Places (street names) where incidents have
occurred are displayed in the list.
(3)
(1) Street or place
(2) Direction
(3) Incident
(4) Distance to the location
(5) The incident numbers currently displayed and the total number of incidents
❒ The incidents that have already been read
will be displayed in letters with a white outline. Unread incidents will be in white.
❒ Touching the allows you to check the
place on a map. (Traffic information without positional information cannot be
checked on a map.)
:
You can sort the traffic information in alphabetical order.
:
You can sort the traffic information according
to the incident.
:
You can sort the traffic information by distance from your current position.
:
When new traffic information is received, current information is changed or old information
has been removed, the list is updated to
reflect the new situation.
3 Select an incident you want to view in
detail.
The details of the selected incident are displayed.
• Touching an incident you want to see
allows you to view the detailed information
of the incident. If the information cannot be
displayed on one screen, touch or to
view the remaining information.
4 Touch “Back” to return to the list with
traffic information.
A list with traffic information appears again.
Chapter 4 Editing the Navigation UtilitiesNAVI
57
Page 60

Checking traffic information on the
route
1 Touch “Info/Traffic” in the NAVI MENU,
and then touch “Traffic On Route”.
The currently set traffic information on the
route appears on the screen.
❒ The method for checking the content dis-
played on the screen is the same for
“Checking all traffic information”.
➲ “Checking all traffic information” ➞
Page 57
(3) Icon for traffic information
Appears only when the scale on the map is 10 mi
(20 km) or lower.
❒ Traffic-related icons are not displayed on ”City
Map”.
➲ “Selecting traffic information to display” ➞
Page 60
If you want to check the traffic information
details, move the scroll cursor onto an icon such
as and touch . This allows you to view
place names and other information.
Confirming traffic information
on the map
The traffic-related information displayed on the
map is as follows.
(3)
(2) (1)
(or , ):
(1) TRAFFIC icon
When a route has been calculated, touch to
check whether there is any traffic congestion
information on your route. When no route has
been calculated, touch to display the traffic list.
Chapter 4
❒ When is displayed, reading from the
DVD Map Disc is required. Please insert the
DVD Map Disc.
❒ When is displayed, the data is being
loaded from the DVD Map Disc.
(2) A line to indicate the length of the traffic
congestion
Displayed only when the scale on the map is 0.75
mile (1km) or lower.
Traffic congestion:
Editing the Navigation Utilities NAVI
Orange with white outline: stop and go traffic
Red with white outline: stopped traffic
Black with white outline: closed/blocked roads
❒ Traffic congestion lines are not displayed on
“City Map”.
Information on avoiding traffic
congestion on route ahead
If you are approaching traffic on your current
route, the navigation system has the ability to recommend an alternative route. Depending on the
information of traffic congestion you have
received and the setting of Use traffic flow information, the navigation system will recommend
an alternate route automatically. On the freeway,
the navigation system will detect at least 1.6
miles (2.6 km) ahead of the specific traffic incident.
If a better route can be calculated, the following
screen will appear.
❒ The following types of traffic incidents on the
route will be checked: stop and go, stopped
traffic and closed/blocked roads.
Difference in distance and travel time between
existing route and new route
Distance from the current position of your vehicle
to the point of entry into the new route.
On this screen, you can select the following
items:
58
Page 61

New:
A new route is displayed on the screen.
Current:
The current route is displayed on the screen.
OK:
Select the route to that displayed on the screen.
❒ When no selection is made, the current route
will be automatically selected after a short
while.
When checking traffic congestion information manually
Touching on the screen allows you to
check for traffic congestion information on your
route.
If there is any information about a traffic congestion on your route, a message appears asking you
whether to search for another route to avoid the
traffic congestion. If there is no traffic congestion
information along the route being guided, it is
announced on screen and by voice.
❒ The following types of traffic incidents on the
route will be checked: stop and go, stopped
traffic and closed/blocked roads.
If there is a traffic congestion information on the route
When receiving information about a traffic congestion, the message announcing the presence
of a traffic congestion is indicated.
On this screen, you can select the following
items:
Yes:
The route is recalculated taking the traffic congestion into account.
No:
The message disappears, and the map display
reappears.
List:
The list with traffic information is displayed.
❒ In the memory navi mode, you can only touch
No.
If there is no traffic congestion information on the route
If there is no traffic congestion information, a
message appears to inform you that there is no
traffic congestion information on the route that is
shown.
On this screen, you can select the following
items:
List:
The list with all traffic information is displayed.
Back:
The message disappears, and the screen returns
to the map screen.
❒ In Memory Navi mode, no detailed informa-
tion is available for traffic information on List.
Traffic flow information
When the map scale is between 0.02 mi (25 m) to
0.75 mi (1 km), red, yellow, or green blinking lines
may appear on either side of a road. These colors
indicate the average speed at which traffic is
flowing along these streets. Here is a guide to the
colors and the average speed they indicate:
Chapter 4 Editing the Navigation UtilitiesNAVI
Flow Icon
The line for traffic flow
Red: average speed in this area is between
5 mph to 15 mph (8 km/h to 24 km/h)
Yellow: average speed in this area is between
20 mph to 40 mph (32 km/h to 64 km/h)
Green: average speed in this area is 45 mph (72
km/h) or faster (An icon without a number indicates the average speed of the road is more than
70 mph (112km/h))
❒ In addition to these blinking lines, a round
icon with a number may appear on the map.
The number in the icon indicates the actual
average speed of that specific area.
❒ The lines for traffic flow are not displayed on
“City Map”.
❒ The flow icon appears only when the scale on
the map is 10 mi (20 km) or lower.
59
Page 62

❒ You can turn off the use of Traffic flow infor-
mation.
➲ “Set use of Traffic flow information setting to
off” ➞ Page 60
Checking traffic flow information on the
list
The traffic flow information on the route can also
be displayed as an onscreen list.
❒ The method for checking the traffic flow infor-
mation displayed on the screen is the same
for “Checking all traffic information”.
➲ “Checking all traffic information” ➞ Page 57
1 Touch “Info/Traffic” in the NAVI MENU,
then touch “Traffic Flow”.
You can use instead of in the
traffic events list screen. The list with the traffic flow information is shown.
The list will be sorted according to the average
speed by touching .
❒ Touching “All” selects all the traffic infor-
mation.
4 Touch “Done”.
The selected traffic information icon is added
to the screen.
❒ Touch “Back” to cancel your selection.
❒ The following types of traffic congestion
cannot be deselected and are always displayed: stop and go, stopped traffic, and
closed/blocked roads.
5 Touch “Back”.
Set use of Traffic flow information setting to off
Selecting traffic information to
display
There are different types of traffic information
that can be received via the XM NavTraffic service, and you can select which types will be incorporated and displayed on your navigation system.
1 Touch “Info/Traffic” in the NAVI MENU,
and then touch “Traffic Settings”.
2 Touch “Change”.
Chapter 4
The names of the displayed traffic information
items and a list of icons appears on the
screen.
Editing the Navigation Utilities NAVI
3 Touch the traffic information item to dis-
play.
A red check appears next to the selected traffic information.
1 Touch “Info/Traffic” in the NAVI MENU,
and then touch “Traffic Settings”.
2 Touch “On”.
The button changes to “Off”.
3 Touch “Back”.
❒ If you wish to use the traffic flow information
again, touch “Off” to turn the button “On” in
the Traffic Settings screen.
60
Page 63

Using the XM Tuner to View
Stock, Sports, and Other Information
When an XM tuner (GEX-P10XMT) is connected,
you can receive stock price, sports, and other
information, and display it onscreen. You may
also register favorite information on the navigation system.
Displaying stock prices
This navigation system can display the prices of
up to 12 stocks.
1 Touch “Info/Traffic” in the NAVI MENU,
and then touch “Stock Info”.
The screen displays a list of stock prices.
❒ Although the stock price information dis-
played onscreen is updated every 30 seconds (approx.), these prices are not realtime values.
Registering stocks to be displayed
1 Touch “Info/Traffic” in the NAVI MENU,
and then touch “Stock Info”.
2 Touch “Add”.
3 Input the Ticker text for the stocks you
wish to display, then touch “OK”.
“Punc”:
You can input punctuation such as “!”and “:”.
“Oper”:
You can input operators such as “+”and “–”.
❒ The method for inputting the text is the
same as for inputting street names.
➲ Text input method ➞ Page 27
❒ If the input ticker symbol does not match
the actual ticker symbol for the stock completely, you may not be able to find it.
Deleting stocks to be displayed
onscreen
This navigation system can display the prices of
up to 12 stocks. If 12 stocks are already registered, delete as many entries as necessary to add
new stocks.
1 Touch “Info/Traffic” in the NAVI MENU,
and then touch “Stock Info”.
2 Touch “Delete”.
3 Touch the ticker of the stock you wish to
delete.
A red check appears next to the ticker you
touched.
❒ To delete all the registered stocks, touch
“All”. Red checks will appear next to all the
tickers.
Chapter 4 Editing the Navigation UtilitiesNAVI
4 Touch “Delete”.
5 A message will appear asking you to con-
firm the deletion. Touch “OK”.
61
Page 64

Displaying browsable information
❒ The displayed items depend on the informa-
tion which is sent from each station.
1 Touch “Info/Traffic” in the NAVI MENU,
then touch “Set My Favorites”.
The screen will display a list of categories. The
information appearing onscreen is automatically updated at regular intervals.
2 Touch the category you want to browse
from the list.
3 Touch the topic you wish to view.
4 Touch an item (topic) to display the con-
tents.
Submenu
The submenu will be displayed. If there is no
submenu for the contents, the Submenu will
be invisible.
Store
Registers the current item (topic) about which
information is displayed as a favorite.
➲ Confirming your favorite information ➞
Page 62
Displaying favorite browsable
Information
XM special contents can be assigned as a shortcut or “My Favorites” so that it can be accessed
without having to search every time an update is
needed. The following are the instructions on
how to do so:
1 Store the desired item (topic).
➲ “Displaying browsable information” ➞
Page 62
2 Touch “Info/Traffic” in the NAVI MENU,
and then touch “My Favorites”.
A list of registered items (topics) appears on
the screen. Touch the item to display information about this item.
Deleting favorite browsable information
1 Touch “Info/Traffic” in the NAVI MENU,
and then touch “My Favorites”.
2 Touch “Delete”.
3 Touch the name of the items you wish to
delete.
A red check appears next to the items you
touched.
❒ To delete all favorite contents, touch “All”.
Red checks will appear next to all the
items.
4 Touch “Delete”.
Chapter 4
Editing the Navigation Utilities NAVI
62
5 A message will appear asking you to con-
firm the deletion. Touch “OK”.
Page 65

Checking the Reception Status
of the XM Tuner
The current XM tuner’s (GEX-P10XMT) reception
status and signal strength appear on screen. (The
information that is transmitted via XM DATA
cable is displayed in this screen.)
1 Touch “Info/Traffic” in the NAVI MENU,
and then touch “XM Status”.
(1)
(2)
(3)
(1) Status
Depending on the XM tuner’s (GEX-P10XMT)
reception status, any one of the following may
appear.
OK
No problem.
Updating
Updating encryption code.
Check antenna
Improper antenna connection.
Not Connected
(2) Signal Strength
Depending on the signal strength, any one of the
following may appear.
• Very Strong
• Strong
• Marginal
• Weak
• No signal
(3) Radio ID
The radio ID appears.
❒ If you have subscribed to either XM audio only
or XM NavTraffic stand alone
“Updating” in the “Status”. This is because
the GEX-P10XMT is constantly checking to see
if you have decided to add the other service
while your navigation system is turned on. If
you subscribe to both services, the appropriate status will be shown in the “Status”.
, you will see
Emergency Info
The Emergency Info screen provides important
emergency information pertaining to your vehicle, insurance, and current location. Such emergency information could be useful in the event of
an accident or vehicle breakdown. The accuracy
of the personal information is dependent on the
accuracy of the information entered into the navigation system by the user.
• The Emergency Info screen is only
intended to provide information to a driver
that may be useful during an emergency
situation, and does not replace the need to
call for emergency assistance, when necessary.
Checking the information registered as Emergency Info
1 Touch “Info/Traffic” in the NAVI MENU,
and then touch “Emergency Info”.
(2)(1)
(4) (3)
The information registered as Emergency
Info appears on the screen.
(1) You are currently at:
Your current position is indicated by the street
name and your latitude and longitude.
(2) Personal Information:
Your VIN number, insurance policy number, and
the telephone number of your insurance company can be displayed once entered by the user.
(3) Emergency TOW service phone:
1 year of free Emergency Roadside Assistance
service is available to all registered owners and
provided by Signature’s Nationwide Auto Club,
Inc. The first year of Emergency Roadside Assis-
Chapter 4 Editing the Navigation UtilitiesNAVI
63
Page 66

tance service is paid for by Pioneer only if your
navigation system is registered with Pioneer and
you sign up on-line with Signature’s Nationwide
Auto Club, Inc. at the time you register your navigation system with Pioneer. If you have not
signed up for this service with Signature’s
Nationwide Auto Club, Inc., or if your free oneyear period has expired, you are subject to
charges by Signature’s Nationwide Auto Club,
Inc. You are also subject to charges by Signature’s Nationwide Auto Club, Inc. for roadside
services not included in the Emergency Roadside
Assistance service. The terms and conditions
regarding the Emergency Roadside Assistance
service provided by Signature’s Nationwide Auto
Club, Inc. are determined solely and exclusively
by Signature’s Nationwide Auto Club, Inc. Please
contact Signature’s Nationwide Auto Club, Inc.
for more information. The telephone number that
appears here by default is the toll free number for
this service. For additional details on registering
for this service, please check your product registration card included with this product. If you are
not interested in the free Roadside Assistance
service, this number can be edited and replaced
by your own roadside assistance telephone number.
❒ The police number is shown as 911 and can-
not be changed.
(4) Locate Car Service
➲ “Searching for car service in an emergency”
➞ Page 64
Registering user information
Chapter 4
1 Touch “Info/Traffic” in the NAVI MENU,
and then touch “Emergency Info”.
2 Touch “Setup”.
3 Touch the desired item to register your
information.
Editing the Navigation Utilities NAVI
❒ If information is already registered, the reg-
istered information will appear.
4 Input the number you wish to register,
and then touch “OK”.
Edit VIN
Register your Vehicle’s Identification Number.
(You can enter between 1 and 17 digits.)
Edit Policy number
Register your insurance policy number.
Edit Insurance Phone
Register your insurance company’s phone
number.
Edit TOW Service Phone
Record a towing company’s phone number.
5 Touch “Save”.
Completes the registration.
❒ If you want to stop registration, touch
“Back”.
Searching for car service in an
emergency
In times of emergency, you can search the Emergency Info for Auto Services in the vicinity of your
current position and set the current route.
• The Emergency Info screen is only
intended to provide information to a driver
that may be useful during an emergency
situation and if they are in a safe location.
If not, or in all major accidents, call 911.
64
Page 67

1 Touch “Info/Traffic” in the NAVI MENU,
and then touch “Emergency Info”.
2 Touch “Locate Car Service”.
A list of auto services appears onscreen.
3 Touch the Category of the auto service
you wish to use.
A red check appears next to the selected category.
❒ The Auto Service categories that can be
selected in the Emergency Info are: “Auto-
motive”, “Rental Car Agency”, and “Car
Dealer”.
When the appears on the right of
the list
You can also set a destination by touching the
to the right of the list. Touch “OK” to confirm.
The location pointed to by the scroll cursor will be
set as a destination.
Alternative option:
Scroll:
The map display changes to the map with Shortcut menu.
If you touch anywhere on the map, the map display changes to Scroll mode.
➲ “Shortcut menu” ➞ Page 34
4 Touch “OK”.
A list of names of facilities in the vicinity and
the distances from your current position will
be displayed.
❒ Touching displays a list of subcatego-
ries. Touch the subcategories you wish to
use from among those displayed and
touch “OK” to select the Auto Service from
the subcategories.
5 Touch the name of the facility to set the
route you want.
Displays the route to the selected facility.
Chapter 4 Editing the Navigation UtilitiesNAVI
65
Page 68

Changing Background Picture
• When you burn a CD-R/-RW and DVD-R/RW, make sure the total data size of the
CD-R/-RW and DVD-R/-RW is greater than
the amount noted below by storing
dummy data or other filler information.
Otherwise, the disc may not be recognized
by the built-in DVD drive.
—CD-R/-RW: 1.8 MB
— DVD-R/-RW: 170 MB
In the menu operation screen, you can specify a
picture for the background. Some pictures are
already stored, but you can also use pictures
(JPEG format data) created by a personal computer or a digital camera. If you save the pictures
to a CD-R/-RW and DVD-R/-RW, you can use
them as background pictures. The following three
types of background pictures can be changed:
• Splash Screen: The screen that appears
when the Navigation system starts up.
• AV Background: Background for the screen
during audio operations or during playback.
• Navigation Background: Background of navigation menu screen.
Several background pictures are stored in the
Pioneer DVD Map Disc. If you want to use these
pictures, insert the Pioneer DVD Map Disc.
Here, a method for changing the background picture is described with an example of loading a
picture stored on a CD-R/-RW and DVD-R/-RW
onto the navigation system as the background
Chapter 4
picture.
❒ When storing original pictures on a CD-R/-RW
and DVD-R/-RW, create a folder named “PIC-
TURES” in the CD-R/-RW and DVD-R/-RW,
and store the picture files in this folder. Up to
20 picture files can be used in the PIC-
TURES folder.
❒ You cannot use a CD-R/-RW and DVD-R/-RW
containing MP3 files or the Audio data part
(CD-DA session) for the “Background Pic-
Editing the Navigation Utilities NAVI
ture Setting” function.
❒ Only JPEG format (“.jpg” or “.JPG”) pictures
can be used as a background picture.
❒ You can only use standard characters (alpha-
bets of both cases: A-Z, a-z) and numbers (0-9)
for the file name of a background picture
(international (accented) characters cannot
be used).
❒ Pictures up to a maximum of 2 048×1 536 pix-
els can be used. We cannot guarantee proper
operation for a picture bigger than this size.
❒ Progressive format JPEG pictures cannot be
used.
1 Insert a CD-R (-RW) to the disc loading
slot.
2 Touch “Settings” in the NAVI MENU,
then touch “System Options”.
3 Touch “Background Picture Setting”.
The picture selected for each screen is indicated on the right side of “Splash Screen”,
“Navigation Background” and “AV Back-
ground” items.
4 Touch “Splash Screen”, “Navigation
Background” or “AV Background”.
5 Touch “Import from Disc”.
The list of the pictures stored in the CD-R
(-RW) is displayed.
On this screen, you can select the following
item:
“Back to Original”:
The picture originally used when the system
was purchased is selected.
❒ Only when a Pioneer DVD Map Disc is
inserted, you can select “Back to Origi-
nal”. Only when the CD-R/-RW and DVD-R/
-RW is inserted, you can select “Import
from Disc”.
❒ In step 5, touching other than “Import
from Disc” allows you to select a back-
ground image stored on the Pioneer DVD
Map Disc.
66
Page 69

6 Touch a picture you want for the back-
ground.
7 Select how to display the picture.
You can select the following items:
“Center”:
Selected picture is displayed at the center of
the screen.
“Repeat”:
Selected picture is repeated in a pattern to
cover the whole screen.
The background image starts changing. After
a short while, the new background image
appears.
❒ When you select images stored on the Pio-
neer DVD Map Disc, you cannot select the
layout method.
❒ When the picture starts to change, do not
turn off the vehicle engine until the message appears to indicate that the picture
has finished changing.
Setting the Vehicle Dynamics
Display
You can change the values displayed by the
instruments on the left and right of the Vehicle
Dynamics Display.
Until the sensor’s initial learning is complete,
only the voltage and clock are available.
1 Switch to the Vehicle Dynamics Display.
➲ Changing the map display mode ➞
Page 35
2 Touch the left or right instrument.
Touch keys are displayed.
3 Touch the items you want to display.
8 Touch “Done”.
On this screen, you can select the following
items:
“Select another Picture”:
This is selected when you want to change to
another picture. Return to Step 5.
“Change another background”:
Select if you want to successively change the
Splash Screen, Audio Operating screen backgrounds or the navigation backgrounds.
Return to step 3.
❒ When the navigation system is reset , or t he
language setting is changed, the background picture may change back to the
original picture. (There is also a possibility
that the system will revert to the original
picture for some other reason). If this happens, set the background picture again.
You can select the following items.
Voltage:
Displays the power supply and voltage supplied from the battery to this system.
Acceleration:
Displays acceleration in a forward direction.
The + sign indicates acceleration while the –
sign indicates deceleration.
Side Acceleration:
Displays acceleration in a side direction, such
as when turning. The + sign indicates a right
turn, while the – sign indicates a left turn.
Angular Velocity:
Displays the vehicle’s turning angle over one
second (how far it has turned in a second).
Slope:
Displays the vehicle’s vertical movement. The
+ side represents the rising angle, and the –
side the falling angle.
Direction:
Displays the direction your vehicle is traveling
in.
Clock:
Displays the current time.
Chapter 4 Editing the Navigation UtilitiesNAVI
67
Page 70

Adjust Look:
Touch “Adjust Look” to display a screen for
selecting the panel pattern. Touch one of the
patterns from among those displayed
onscreen to change the panel to the selected
pattern.
❒ If you touch “Peak Hold Reset”, the maxi-
mum and minimum (green line) values
indicated in “Acceleration” and “Side
Acceleration” are reset.
❒ You cannot change the speedometer at the
center.
❒ Selecting Demo Mode in the Settings
menu enables you to perform a demonstration with random values.
Checking the Navigation Status
The navigation status, including the driving status of a vehicle, positioning status by satellite,
learning status of the 3D sensor and cable connection status, can be checked.
Checking sensor learning status
and driving status
1 Touch “Settings” in the NAVI MENU,
then touch “Hardware Info”.
(4) Degree of learning
Sensor learning situations for distance (Distance), right turn (Right Turn), left turn (Left
Turn) and 3D detection (3D Detection) are
indicated by the length of bars.
❒ When tires have been changed or chains fit-
ted, turning on the Speed Pulse allows the
system to detect the fact that the tire diameter
has changed, and automatically replaces the
value for calculating distance.
❒ If the ND-PG1 is connected, the distance cal-
culation value cannot be replaced automatically.
(5) Speed
Speed detected by the navigation system is
indicated. (This indication may be different
from the actual speed of your vehicle, so
please do not use this instead of the speedometer of your vehicle.)
(6) Acceleration or deceleration/Rotational speed
Acceleration or deceleration velocity of your
vehicle is indicated. Also, rotational speed
when your vehicle turns to left or right is
shown.
(7) Inclination
Degree of slope of the street is indicated.
2 Touch “3D Calibration”.
The 3D Calibration screen appears.
Chapter 4
(5)(7)(6)
(1) Distance
Driving distance is indicated.
(2) Speed Pulse
Total number of speed pulses is indicated.
(3) Learning Status
Editing the Navigation Utilities NAVI
Current driving mode is indicated.
68
To clear values...
If you want to delete the learned results stored in
“Distance”, “Speed Pulse” or “Learning Sta-
(1)
(2)
tus”, touch the relevant result, then touch
(3)
“Clear”.
(4)
❒ The navigation system can automatically use
its sensor memory based on the outer dimensions of the tires.
Checking the connections of
leads and installation positions
Check that leads are properly connected between
the navigation system and the vehicle. Please
also check whether they are connected in the
correct positions.
Page 71

1 Touch “Settings” in the NAVI MENU,
then touch “Hardware Info”.
2 Touch “Connection Status”.
The Connection Status screen appears.
(1) Speed Pulse
The Speed Pulse value detected by the navigation system is shown. “0” is shown while the
vehicle is stationary.
(2) GPS Antenna
Indicates the connection status of the GPS
antenna, the reception sensitivity and from
how many satellites the signal is received.
If the signal is received correctly, “OK” is displayed. If reception is poor, “NOK” appears.
(3) Installation Position
The installation position of the navigation system is shown.
If installed correctly, “OK” appears. Indicates
whether the installation position of the navigation system is correct or not. When the navigation system is installed at an extreme angle
exceeding the limitation of the installing
angle, “Incorrect angle” will be displayed.
When the angle of the navigation system has
been changed, “Excessive vibration” will be
displayed.
(4) Parking Brake
When the parking brake is applied, “On” is
displayed. When the parking brake is
released, “Off” is displayed.
(5) Power Voltage
The power supply (reference value) provided
from the vehicle battery to the navigation system is shown. If the voltage does not fall
within the range of 11 to 15V, check that
power cable connection is correct.
(6) Illumination
When the headlights or small lamps of a vehicle are on, “On” is displayed. (If the orange/
white lead is not connected, “Off” appears.)
(1)
(2)
(3)
(4)
(5)
(6)
(7)
(7) Back Signal
When the gear lever is shifted to “R”, the signal switches to “High” or “Low”. (Which of
these is displayed depends on the vehicle.)
Chapter 4 Editing the Navigation UtilitiesNAVI
69
Page 72

Chapter 4
Editing the Navigation Utilities NAVI
70
Page 73

Customizing Your Navigation System
• For safety reasons, these functions are not
available while your vehicle is in motion.
To enable these functions, you must stop
in a safe place and put on the parking
brake before setting your route (see page
13 Interlock for details).
Modifying the Default Settings
You can tailor default settings, such as navigation functions and information display, for ease of
use.
The following example describes how to change
settings. In this example, the “KM/Mile Setting”
settings is set to “Mile & Yard”.
1 Touch “Settings” in the NAVI MENU.
The Settings menu appears.
2 Touch “System Options”.
The screen changes. “Mile” is displayed
below “KM/Mile Setting”, indicating that
this function is currently set to “Mile”.
❒ When you touch items with a setting below
them, their setting changes. When you
touch items with no setting below them, a
setting screen appears.
❒ Touching “Back” switch to Settings
Menu.
“Mile & Yard” is displayed below “KM/Mile
Setting”, indicating that “KM/Mile Setting”
is set to “Mile & Yard”.
If you want to change another setting, select
the item you want to change and repeat the
procedure in step 3.
Items Users can Change
This section describes the details of the setting
for each item. Settings marked with an asterisk
(*) show that they are default or factory settings.
Volume
The sound volume for the navigation can be set.
You can set the volume of the route guidance and
the beep sound separately.
To display the Volume setting screen, touch “Vol-
ume” in the Settings menu.
Chapter 5
Chapter 5 Customizing Your Navigation SystemNAVI
3 Touch “KM/Mile Setting”.
❒ When you move to the Volume setting screen
by touching “Volume” in the Settings menu,
touching “Back” returns you to the Settings
menu screen.
Guidance Volume
Touch “+” or “–” to change the Guidance volume.
Beep Volume
Touch “+” or “–” to change the Beep volume.
71
Page 74

Voice Guidance
This setting controls whether the volume of the
Audio source is automatically muted during voice
guidance.
On*:
During voice guidance, the volume of the Audio
source is muted automatically.
Off:
Volume of the Audio source stays the same during voice guidance.
❒ When Voice Guidance is “On”, be sure to set
the Mute Input/Guide setting in the AV
MENU to Mute or ATT.
➲ Switching the muting/attenuation ➞ Page 123
System Options
Touch “System Options” in the Settings menu
Chapter 5
to display.
Language Selection
➲ The language displayed can be set ➞
Page 130
Once you change the language, installation of
Customizing Your Navigation System NAVI
the program starts.
Installation Angle Setup
You can correct the installation angle of the navigation system. Correcting the installation angle
improves the accuracy of sensor learning, even if
the unit is not facing center. Select the orientation of the LCD panel from the left, centre, and
right. Check the direction the LCD panel faces,
and touch the corresponding item.
“Facing Left”:
Select this when the angle is 5
from the center.
“Facing Center”*:
Select this when the angle is less than 5
left and right from the center.
“Facing Right”:
Select this when the angle is 5
right from the center.
❒ If the “Learning Status” in the “3D Calibra-
tion Status” is “Simple Hybrid”, the instal-
lation angle can be corrected.
° or more to the left
° to the
° or more to the
Average Speed
When calculating expected time of arrival and the
number of hours to the destination, set the average speed for the freeway or ordinary road using
“+” and “–”.
• Once the installation of the program starts,
do not stop the engine of your vehicle and
do not switch off the navigation system
until the installation is completed and the
map of your surroundings appears.
KM/Mile Setting
This setting controls the unit of distance displayed on your navigation system.
Mile *:
Show distances in miles.
Mile & Yard:
Show distances in miles and yards.
km:
Show distances in kilometers.
72
Minor Ordinary Road
• When the “KM/Mile Setting” is set to “Mile”
or “Mile & Yard”, it can be set in 5 mile increments from 10 miles to 100 miles (35 miles*).
• When the “KM/Mile Setting” is set to “km”, it
can be set in 5 km increments from 20 km to
110 km (55 km*).
Major Ordinary Road
• When the “KM/Mile Setting” is set to “Mile”
or “Mile & Yard”, it can be set in 5 mile increments from 10 miles to 120 miles (45 miles*).
• When the “KM/Mile Setting” is set to “km”, it
can be set in 5 km increments from 20 km to
150 km (70 km*).
Page 75

Freeway
•When the “KM/Mile Setting” is set to “Mile”
or “Mile & Yard”, it can be set in 5 mile increments from 30 miles to (120 miles (60 miles*).
•When the “KM/Mile Setting” is set to “km”, it
can be set in 5 km increments from 60 km to
150 km (95 km*).
Background Picture Setting
➲ “Changing Background Picture” ➞ Page 66
Read from Disc
➲ “Loading registered locations data from a
Disc” ➞ Page 56
Short-Cut Selection
Select shortcuts to display on the map screen. In
the list displayed onscreen, the items with red
checks are displayed on the map screen.
Touch the shortcut you wish to display and then
touch “Done” when a red check appears. You
can select up to three shortcuts.
: Registration*
Register information about the location indicated
by the scroll cursor to the Address Book.
: Vicinity Search*
Find POIs (Points Of Interest) in the vicinity of the
scroll cursor.
➲ “Searching the facilities around the scroll cur-
sor” ➞ Page 42
: Volume Setting*
Set the sound volume for the navigation.
➲ “Volume” ➞ Page 71
: Whole Route Overview
Displays the entire currently set route.
➲ Checking the whole route overview ➞ Page 45
: Overlay POI
Displays marks for surrounding facilities (POI) on
the map.
➲ “Displaying Certain POI on the Map” ➞
Page 48
: Address Book
Displays the Address Book.
➲ Editing the Address Book ➞ Page 54
: Route Options
Displays the Route Options menu.
➲ Displaying Route Options menu ➞ Page 50
: Edit Current Route
Displays the screen for adding or deleting way
points.
➲ Adding or deleting way points ➞ Page 46
: Traffic On Route
Displaying a list of traffic information on the
route.
➲ Displaying traffic information on the route ➞
Page 58
: Stock Info
Displays share prices.
➲ Displaying share prices ➞ Page 61
: Set My Favorites
Displays XM tuner content information.
➲ “Displaying browsable information” ➞
Page 62
: My Favorites
Displays information on your favorite item.
➲ “Displaying favorite browsable Information” ➞
Page 62
Map Display Options
Touch “Map Display Options” in the Settings
menu to display.
Chapter 5 Customizing Your Navigation SystemNAVI
73
Page 76

Tracking Display
The tracking display setting has the following
options.
Always:
Display tracking for all journeys.
This Trip:
Display tracking dots but erase them when the
navigation system is turned off (when turning off
the engine of your vehicle).
Off*:
Do not display tracking dots.
AV Guide Mode
Set whether to automatically switch to the navigation screen from the AV screen when your vehicle approaches a guidance point such as an
intersection while displaying a screen other than
navigation.
On*:
Chapter 5
Switches from audio operation screen to navigation screen.
Off:
Does not switch the screen.
Arrow in AV
Set whether to display the guidance information
with arrows on the Audio Operation screen.
On*:
Displays guidance information with arrows on
the Audio Operation screen.
Off:
Does not display guidance information with
arrows on the Audio Operation screen.
❒ When using a source with video, the arrow
cannot be displayed.
Defined Locations
Touch “Defined Locations” in the Settings
menu to display.
Day/Night Display
To improve the visibility of the map during the
evening, you can change the combination of the
colors of the map.
Nighttime*:
You can change the combination of the colors of
a map according to whether the vehicle lights are
On or Off.
Customizing Your Navigation System NAVI
Daytime:
The map is always displayed with bright colors.
Close-up of Junction
This setting enables switching to an enlarged
map around the point where your vehicle is
approaching an intersection, entrance/exit of
freeway or a junction.
On*:
Switches to an enlarged map.
Off:
Does not switch to an enlarged map.
Set ”Home”
➲ Registering and changing your home location
➞ Page 53
Map In Memory
The memory area is the area in the map, which is
being read in advance for the memory navi mode.
There are two ways of setting the memory area.
Around Current Position
A square that has sides of approximately 10.6
mile (17 km) with the selected location at the center is read into the memory.
Indicate the map you want to store in the memory
by touching , , or . Then, adjust the map
scale to the one you desire, and touch “OK”.
Continuously touching , , or allows you
to rapidly scroll the map screen.
❒ An area not stored in the DVD Map Disc can-
not be memorized.
74
Page 77

Around Current Route
Sets the surrounding currently set route to the
memory area. The route to the destination will
appear on screen. You can memorize the area by
touching “OK”.
❒ The extent of the information that can be set
in the memory area is about 6.6 mi (10.6 km)
surrounding the route.
Set ”Go To”
➲ Registering and changing your favorite loca-
tion ➞ Page 53
Modify Current Location
Touch the screen to adjust the current position
and direction of the vehicle displayed on the map.
Hardware Info
Touch “Hardware Info” in the Settings menu to
display.
Demo Mode
This is a demonstration function for shops. After
a route is set, a simulation of route guidance to a
destination is automatically displayed. Normally,
set this to “Off”.
Repeat:
Repeat demo drive.
Off*:
Demo Mode is set off.
❒ If you eject the DVD Map Disc during the
demo drive, the demo mode will be stopped.
Time
Adjusts the systems clock. The time difference
(+, –) between the time originally set in your navigation system is set here.
You can also select summer time On/Off.
➲ Time settings ➞ Page 131
Summer Time
Choose whether or not to take summer time into
account.
On:
Summer time is taken into account.
Off*:
Summer time is not taken into account.
❒ When the period of summer time comes, or
when the summer time ends, your navigation
system does not automatically change the
summer time setting.
➲ Change the summer time setting ➞ Page 131
Connection Status
➲ “Checking the connections of leads and
installation positions” ➞ Page 68
3D Calibration
➲ “Checking the Navigation Status” ➞ Page 68
Service Info Screen
Displays the disc production number and version
information.
Restore Factory Settings
Reset various settings registered to the navigation system and restores to the default or factory
settings. To restore, touch “Yes”.
❒ About the item return to the default, please
check “Display Information
this manual.
” at the end of
Chapter 5 Customizing Your Navigation SystemNAVI
75
Page 78

Chapter 5
Customizing Your Navigation System NAVI
76
Page 79

Chapter 6
Using the AV Source (Built-in DVD Drive and Radio)
This chapter describes how to display the AV
MENU for AV operations and perform operations
with the DVD drive and radio.
How to Display each Menu
1 Press the VOLUME knob to switch to the
Audio operation screen.
2 Press the MENU button to change to the
AV MENU.
Chapter 6 Using the AV Source (Built-in DVD Drive and Radio)AV
77
Page 80

3 Touch “Sound”, “Function” or “System” to enter the menu you want to operate.
Each menu is displayed. The items that cannot be operated according to the sources or conditions
are indicated in gray.
❒ If you touch “AV Source”, the screen chages to the AV Source screen.
Function menu
(2)
(1)
Chapter 6
❒ When the source is “OFF”, the “Function” key changes to “Initial” key.
(1) Function key
Touch to enter the Function menu for each source.
➲ Using the Function menu ➞ “Operation using the Function menu” and “Advanced <each
source> operation”
(2) Sound key
Touch to select various sound quality controls.
➲ Using the Sound menu ➞ Page 117
(3) System key
Touch to select various setup functions.
➲ Using the System menu ➞ Page 124
Sound menu System menu
4 Press the MENU button to return to the display of each source.
(3)
Using the AV Source (Built-in DVD Drive and Radio) AV
78
Page 81

Operating the Built-in DVD drive
This section explains the operation of DVD-Video,
CD, MP3/WMA/AAC or DivX.
❒ The built-in DVD drive of this unit can recog-
nize the several types of media as following
sources.
— DVD-Video: “DVD”
— Audio data (CD-DA): “CD”
— Compressed audio (MP3/WMA/AAC) files:
“ROM”
— DivX video files: “DivX”
❒ Also see at “Handling and Care of the Disc”
for more cautions about handling each media.
DVD-Video
(2)(1) (4)(3)
CD
(8)(1) (4)
(9) (10)
ROM (MP3/WMA/AAC files)
(12)(1) (4)
(7)
(5)
(6)
(8)
(13)
DivX
(12)(1) (4)(3)
(15)
(6)
(14)
➲ Common operation of the DISC sources ➞
Page 80
➲ More advanced DVD-Video operation ➞
Page 83
(1) Source icon
(2) Title number indicator
(3) Chapter or file number indicator
(4) Play time indicator
(5) Viewing angle indicator
(6) Subtitle language indicator
(7) Audio language indicator
(8) Track number indicator
(9) Repeat/Random/Scan indicator
The marks shown below indicate the current playback status.
and repeat range: Displays the repeat range
: Random
: Scan
(10) Detail information display
Displays the track title, artist and disc title.
: Track title
: Artist
: Disc title (album title)
❒ The “–” mark is displayed if there is no corre-
sponding information.
(11) Current folder name indicator
(12) Folder number indicator
(13) File type indicator
(14) Audio indicator
(15) Repeat indicator
Built-in DVD drive source
Chapter 6 Using the AV Source (Built-in DVD Drive and Radio)AV
(9)(10)
(11)
79
Page 82

Switching the media files type
When playing a disc containing a mixture of various media file types such as DivX and MP3, you
can switch between media files types to play.
❒ This unit allows playback of the following
media file type recorded on CD-R/-RW/ and
DVD-R/-RW discs.
— Audio data (CD-DA)
— Compressed audio (MP3/WMA/AAC) files
— DivX video files
❒ In case of DVD-R/RW/ROM, this unit does not
allow playback of audio data (CD-DA) files.
1 Touch “Media” to switch between media
file types.
Touch “Media” repeatedly to switch between
the following media file types:
Built-in DVD drive source
CD (audio data (CD-DA)) — ROM (MP3/WMA/
AAC files) — DivX (DivX video files)
❒ There is sometimes a delay between starting
up playback and the sound being issued. This
is particularly the case when playing back
Chapter 6
multi-session discs and discs with many folders. When being read in, Reading Format is
displayed.
❒ Playback is carried out in order of file number.
Folders are skipped if they contain no files. (If
folder 001 (ROOT) contains no files, playback
commences with folder 002.)
❒ When playing back files recorded as VBR
(variable bit rate) files, the play time will not be
correctly displayed if fast forward or rewind
operations are used.
❒ If more than 255 tracks are stored in the
folder, some time may be required to display
the track list.
Using the AV Source (Built-in DVD Drive and Radio) AV
Touch key operation
1 Touch “DISC” in the AV Source screen to
select the built-in DVD drive.
When the source icon is not displayed, you
can display it by touching the screen. If no
disc is loaded in navigation system, you cannot select “DISC” (built-in DVD drive).
➲ “Selecting an AV source” ➞ Page 29
2 Touch the screen to display the touch
panel keys.
Touch keys (DVD-Video, Page 1)
❒ The following screen appears when the
vehicle is stopped. When the vehicle is
moving, the shape of the touch keys
changes.
(2)
(1)
(2)
(6)
(7) (4) (3)
Touch keys (DVD-Video, Page 2)
(5)
(7) (4) (3)
Touch keys (CD)
(2)
(1)
80
(2)
(3)
Page 83

Touch keys (ROM)
Touch keys (DivX, Page 1)
(2)
(1)
(5)
(2)
(3)
❒ The following screen appears when the
vehicle is stopped. When the vehicle is
moving, the shape of the touch keys
changes.
(2)
(1)
(5)
(2)
(6)
(7) (4) (3)
Touch keys (DivX, Page 2)
(5)
(7) (4) (3)
(1) Playback and Pause
Pause lets you temporarily stop disc playback.
Touching switches between “playback”
and “pause”.
• DVD, DivX: The icon is displayed and
playback is paused letting
you view a still image.
❒ Depending on the disc and the playback
location on the disc, the icon may be
displayed, indicating that still playback is
not possible.
• CD, ROM: PAUSE is displayed and
playback is paused.
❒ PAUSE is displayed for the DVD or DivX
while the vehicle is running.
(2) DVD: Skip the chapter forward or
backward
Touching skips to the start of the next
chapter. Touching once skips to the start
of the current chapter. Touching again will
skip to the previous chapter.
You can also select a chapter by pressing the
or button.
CD, ROM: Skip the track forward or backward
Touching skips to the start of the next
track. Touching once skips to the start of
the current track. Touching again will skip to
the previous track.
You can also select a track by pressing the
or button.
DivX: Skip the file forward or backward
Touching skips to the start of the next file.
Touching once skips to the start of the
current file. Touching again will skip to the
previous file.
You can also select a file by pressing the
or button.
CD, ROM: Fast rewind or forward
Keep touching or to perform fast
rewind or forward.
You can also perform fast rewind/fast forward
by holding the or button.
(3) Hide the touch keys
Touching “Hide” clears the touch keys.
Touch anywhere on the LCD screen, display
the touch keys again.
(4) Switch the display
• DVD: Touching “Disp” changes the infor-
mation as follows:
Disc information display — Repeat
range display
• DivX: Touching “Disp” changes the infor-
mation as follows:
Audio, SubTitle, Repeat display —
Folder name display — File name
display
(5) DVD: Skip the title forward or backward
Touching skips to the start of the next title.
Touching skips to the start of the previous
title.
Built-in DVD drive source
Chapter 6 Using the AV Source (Built-in DVD Drive and Radio)AV
81
Page 84

ROM, DivX: Move the folder up or down
Touch or to select the desired folder.
You cannot select a folder that does not have
an MP3/WMA/AAC/DivX file recorded in it.
(6) DVD, DivX: Stop playback
When you stop DVD playback by touching ,
that location on the disc is memorized
enabling playback from that point when you
play the disc again.
❒ To play the disc again, touch .
(7) DVD, DivX: Switch to other pages of
touch keys
(ROM) Moving to upper folders
When using an MP3/WMA/AAC disc in which the
data is divided into folders, you can move a track
to upper folders. This is used to play back tracks
recorded in other folders.
Built-in DVD drive source
1 Touch .
❒ is only displayed when the list is
displayed.
❒ If the current folder is the ROOT folder,
Chapter 6
❒ If the upper folder has no MP3/WMA/AAC
is displayed in gray.
files, the track currently playing will not
change.
(ROM) Displaying text information on
MP3 disc
1 Touch .
The next piece of information is displayed.
• Album Title (album title)
• Track Title (track title)
• Folder Title (folder name)
• File Name (file name)
• Artist Name (artist name)
• Genre (genre)
• Year (year)
If specific information has not been recorded
on MP3/WMA/AAC files on disc, nothing may
Using the AV Source (Built-in DVD Drive and Radio) AV
be displayed.
(CD, ROM) Select the track from the list
The list lets you see the list of track titles or folder
names on a disc and select one of them to play
back.
1 Touch “List”.
To return to the previous screen, touch
“Detail”.
❒ Touching or switches to the next or
previous page in the list.
❒ The “–” mark is displayed if there is no cor-
responding information.
(CD, ROM) Randomly play a CD-ROM
with one touch
All of the songs in a disc can be played at random
by only touching one key.
1 Touch “Shuffle All”.
To cancel the random play, switch “Random”
to “Off” in the Function menu.
Operation using the Function
menu
➲ How to display the Function menu ➞
Page 77
Function menu (e.g., CD)
(1) (2) (3)
❒ “Random” and “Scan” cannot be used dur-
ing a DVD-Video or DivX playback.
(1) Repeating play
Each touch of “Repeat” changes the settings as
follows:
DVD:
• Title — Repeat just the current title
• Chapter — Repeat just the current chapter
• Disc — Play throughout the current disc
82
Page 85

❒ If you perform chapter (title) search, fast for-
ward/rewind or slow motion playback, the
repeat play range changes to “Disc”.
CD:
• Disc — Repeat the current disc
• Track — Repeat just the current track
❒ If you perform track search or fast forward/
rewind, repeat play is automatically canceled.
❒ When playing discs with MP3/WMA/AAC files
and audio data (CD-DA), repeat play is performed within the each data session even if
Disc is selected.
ROM:
• Folder — Repeat the current folder
• Disc — Repeat all tracks
• Track — Repeat just the current track
❒ If you select another folder during repeat play,
the repeat play range changes to Disc.
❒ If you perform fast forward/rewind during
Track, the repeat play range changes to
Folder.
❒ When Folder is selected, it is not possible to
play back a subfolder of that folder.
❒ When playing discs with MP3/WMA/AAC files
and audio data (CD-DA), repeat play is performed within the currently playing data session even if Disc is selected.
DivX:
• Folder — Repeat the current folder
• Disc — Repeat all files
• File — Repeat just the current file
❒ If you select another folder during repeat play,
the repeat play range changes to Disc.
❒ If you perform file search or fast forward/
rewind during File, the repeat play range
changes to Folder.
❒ When Folder is selected, it is not possible to
play back a subfolder of that folder.
(2) Play tracks in a random order
Touching “Random” switches between “On” and
“Off”. When using ROM, the selected tracks in
the repeated range are randomly played.
❒ If you turn “Random” to “On” during the
repeat play range is “Track”, the repeat play
range changes to “
Folder” automatically.
(3) CD: Scan tracks of a CD
Touching “Scan” switches between “On” and
“Off”. Scan play lets you hear the first 10 seconds
of each track on the CD. When you find the
desired track touch “Scan” to turn scan play off.
❒ After scanning of a CD is finished, normal
playback of the tracks will begin again.
ROM: Scan folders and tracks
Touching “Scan” switches between “On” and
“Off”. Scan play takes place for the selected
tracks in the repeat range. When you find the
desired track touch “Scan” to turn scan play off.
❒ After track or folder scanning is finished, nor-
mal playback of the tracks will begin again.
❒ If you turn “Random” to “On” during the
repeat play range is “Track”, the repeat play
range changes to “Folder” automatically.
Other DVD-Video/DivX function
(DVD) Operating the DVD menu
Some DVDs allow you to select the disc contents
using a menu.
• You can display the menu by touching “Menu”
or “TOP M.” while a disc is playing. Touching
either of these keys again lets you start playback from the location selected from the
menu. For details, refer to the instructions provided with the disc.
1 Touch the screen to display to touch
panel keys.
2 Touch “TOP M.” or “Menu” to display
touch panel keys to operate the DVD
menu.
3 Touch , , or to select the desired
menu item.
❒ If the “Enter”, “ESC”, , , or keys
disappear from the screen, touch
touch key to display them again.
Built-in DVD drive source
Chapter 6 Using the AV Source (Built-in DVD Drive and Radio)AV
83
Page 86

❒ Even when the “Enter”, “ESC”, , , or
keys are displayed on the screen, the
items can also be selected by touching the
items in the DVD menu. When directly
touching the items, “Enter” does not have
to be touched in step 4.
❒ If an item is touched in the DVD menu at
the same time that the “Enter”, “ESC”, ,
, or key is touched, the “Enter”,
“ESC”, , , or touch keys take priority and those actions are operated.
4 Touch “Enter”.
Playback starts from the selected menu item.
The way to display the menu differs depending
on the disc.
Fast rewind or forward
Touching or to perform fast rewind or
Built-in DVD drive source
forward.
❒ You can also perform fast rewind/fast forward
by holding the or button.
Frame-by-frame playback
Chapter 6
This lets you move ahead one frame at a time during playback.
1 Touch during playback.
Each time you touch , you move ahead one
frame.
To return to normal playback, touch .
❒ Depending on the disc and the playback
location on the disc, the icon may be
displayed indicating that frame-by-frame
playback is not possible.
❒ With some discs, images may be unclear
during frame-by-frame playback.
Slow motion playback
This lets you slow down playback speed.
1 Keep touching until is displayed
during playback.
Using the AV Source (Built-in DVD Drive and Radio) AV
The icon is displayed, forward slow
motion playback begins.
To return to normal playback, touch .
❒ There is no sound during slow motion play-
back.
❒ Depending on the disc and the playback
location on the disc, the icon may be
displayed indicating that slow motion playback is not possible.
❒ With some discs, images may be unclear
during slow motion playback.
❒ Reverse slow motion playback is not possi-
ble.
Searching for a playback location
When playing back a DVD-Video, you can search
for a specific title, chapter or time to begin playback. When playing back DivX, you can search
for a specific folder, file or time to begin playback.
• Chapter search, time search and file search
are not possible when disc playback has been
stopped.
1 Touch “Search” and then touch desired
item.
• When playing a DVD, touch “Title” (title),
“Chapter” (chapter) or “Time” (time).
• When playing DivX, touch “Folder” (folder),
“File” (file) or “Time” (time).
2 Touch 0 — 9 to input the desired number.
For titles and chapters
• To select 3, touch 3.
• To select 10, touch 1 and 0 in order.
• To select 23, touch 2 and 3 in order.
For time (time search)
• To select 21 minutes 43 seconds, touch 2, 1,
4 and 3 in order.
• To select 1 hour 11 minutes, convert the
time into 71 minutes 00 seconds and touch
7, 1, 0 and 0 in order.
To cancel the input numbers, touch “Clear”.
3 While the input number is displayed,
touch “Enter”.
This starts playback from the selected scene.
❒ With some DVD-Video discs, the icon
may be displayed, indicating that titles,
chapters and time cannot be specified.
84
Page 87

Changing audio system and audio language during playback (Multi-audio)
With DVDs or DivX featuring multi-audio recordings, you can switch between languages/audio
systems during playback.
1 Touch “Audio” during playback.
Each time you touch “Audio” switches
between audio mode.
❒ With some DVDs, switching between lan-
guages/audio systems may only be possible while using a menu display.
❒ Display indications such as Dolby D and
5.1ch indicate the audio system recorded
on the DVD or DivX file. Depending on the
setting, playback may not be with the same
audio system as the one indicated.
❒ Touching “Audio” during fast forward/fast
rewind, pause or slow motion playback
returns you to normal playback.
Changing the subtitle language during
playback (Multi-subtitle)
With DVDs or DivX featuring multi-subtitle
recordings, you can switch between subtitle languages during playback.
1 Touch “S.Title” during playback.
Each time you touch “S.Title” switches
between subtitle language.
❒ With some DVDs, switching between sub-
title languages may only be possible using
a menu display.
❒ Touching “S.Title” during fast forward/
fast rewind, pause or slow motion playback
returns you to normal playback.
❒ When using DivX, you can switch between
showing or hiding the subtitles while a
subtitle file is displayed. This switches the
subtitles while displaying subtitles in a
DivX file.
➲ Setting angle icon ➞ Page 121
1 Touch “Angle” during playback of a
scene shot from multiple angles.
Each time you touch “Angle” switches
between angle.
❒ Touching “Angle” during fast forward/fast
rewind, pause or slow motion playback
returns you to normal playback.
(DVD) Resume playback (Bookmark)
When playing DVD-Video discs, you can use this
function.
The Bookmark function lets you resume playback
from a selected scene the next time the disc is
loaded.
1 During playback, touch “B.Mark” at the
point you want to resume playback next
time.
The selected scene will be bookmarked so
that playback resumes from that point next
time.
You can bookmark up to five discs. After that,
the oldest bookmark is replaced by the new
one.
❒ To clear the bookmark on a disc, keep
touching B.Mark during playback.
❒ You can also bookmark a disc by pressing
and holding the EJECT button at the point
you want to bookmark. Next time you load
the disc, playback will resume from the
bookmarked point. Note that you can only
bookmark one disc using this method. To
clear the bookmark on a disc, press the
EJECT button.
Built-in DVD drive source
Chapter 6 Using the AV Source (Built-in DVD Drive and Radio)AV
(DVD) Changing the viewing angle during playback (Multi-angle)
With DVDs featuring multi-angle (scenes shot
from multiple angles) recordings, you can switch
among viewing angles during playback.
• During playback of a scene shot from multiple
angles, the angle icon is displayed. Turn
angle icon display on or off using DVD/DivX
Setup menu.
85
Page 88

(DivX) Playing DivX® VOD content
Some DivX VOD (video on demand) content may
only be playable a fixed number of times.
When you load a disc containing this type of DivX
VOD content, the remaining number of plays is
shown on-screen and you then have the option of
playing the disc (thereby using up one of the
remaining plays), or stopping. If you load a disc
that contains expired DivX VOD content (for
example, content that has zero remaining plays),
Rental expired is displayed.
❒ If your DivX VOD content allows an unlimited
number of plays, then you may load the disc
into your player and play the content as often
as you like, and no message will be displayed.
❒ In order to play DivX VOD content on this unit,
you first need to register the unit with your
DivX VOD content provider. For information
RADIO
about your registration code, refer to Displaying your DivX
122.
❒ DivX VOD content is protected by a DRM (Dig-
ital Rights Management) system. This
Chapter 6
restricts playback of content to specific, registered devices.
®
VOD registration code on page
1 If the message is displayed after loading
a disc containing DivX VOD content,
touch “Play”.
Playback of the DivX VOD content will start.
❒ Touch “Next” or “Previous” to switch
between files.
❒ If you do not want to play the DivX VOD
content, touch “Stop”.
Radio
Listening to the radio
(2)(1) (4)
(3)
(5)
(6) (7)
(8)
These are the basic steps necessary to operate
the radio.
➲ More advanced radio operation ➞ Page 88
(1) Source icon
(2) Band indicator
(3) Preset number indicator
(4) Frequency indicator
(5) Preset list or Detail information display
(6) LOCAL indicator
(7) STEREO indicator
(8) Current radio text
Using the AV Source (Built-in DVD Drive and Radio) AV
1 Touch “RADIO” in the AV Source screen
to select the radio.
➲ “Selecting an AV source” ➞ Page 29
2 Touch “Band” to select a band.
Touch “Band” repeatedly until the desired
band is displayed, FM1, FM2, FM3 for FM or
AM.
86
Page 89

3 To perform manual tuning, touch
or briefly.
The frequencies move up or down step by
step.
4 To perform seek tuning, keep touching
or for about one second and
release.
The tuner will scan the frequencies until a
broadcast strong enough for good reception
is found.
You can cancel seek tuning by touching either
or briefly.
If you keep touching or you can
skip broadcasting stations. Seek tuning starts
as soon as you release the keys.
Switching between the detail
information display and the preset list display
You can switch the left side of the basic screen
according to your preference.
1 Touch “Detail” (or “Preset”).
Each touch of “Detail” (or “Preset”) changes
the detail information display or preset list display.
Preset list display
Storing and recalling broadcast
frequencies
If you touch any of the preset tuning keys P1
(PRESET 1) — P6 (PRESET 6) you can easily store
up to six broadcast frequencies for later recall
with the touch of a key.
Preset tuning keys (P1 — P6)
1 When you find a frequency that you want
to store in memory, keep touching a preset tuning key P1 — P6 until the preset
number (e.g., P.CH 1) stops flashing.
The number you have touched will flash in the
preset number indicator and then remain lit.
The selected radio station frequency has been
stored in memory.
❒ Up to 18 FM stations, 6 for each of the
three FM bands, and 6 AM stations can be
stored in memory.
2 The next time you touch the same preset
tuning key P1 — P6, the radio station frequency is recalled from memory.
❒ You can also use and to recall radio
stations frequencies assigned to preset
tuning keys P1 — P6.
RADIO
Chapter 6 Using the AV Source (Built-in DVD Drive and Radio)AV
Detail information display
87
Page 90

Advanced radio operation
(1)
(1) Function display
➲ How to display the Function menu ➞
Page 77
Storing the strongest broadcast
frequencies
BSM (best stations memory) lets you automati-
RADIO
cally store the six strongest broadcast frequencies under preset tuning keys P1 — P6 and once
stored there you can tune in to those frequencies
with the touch of a key.
Chapter 6
1 Touch “BSM” in the Function menu.
2 Touch “Start” to turn BSM on.
BSM begins to flash. While BSM is flashing
the six strongest broadcast frequencies will
be stored under preset tuning keys P1 — P6
in order of their signal strength. When finished, BSM stops flashing.
To cancel the storage process, touch “Stop”.
❒ Storing broadcast frequencies with BSM
may replace broadcast frequencies you
have saved using P1 — P6.
Tuning in strong signals
Local seek tuning lets you tune in only those
radio stations with sufficiently strong signals for
good reception.
1 Touch “Local” in the Function menu.
2 Touch “On” to turn local seek tuning on.
To turn local seek tuning off, touch “Off”.
3 Touch or to set the sensitivity.
There are four levels of sensitivity for FM and
two levels for AM:
FM: 1 — 2 — 3 — 4
AM: 1 — 2
The FM “4” (AM “2”) setting allows reception
of only the strongest stations, while lower settings let you receive progressively weaker stations.
Using the AV Source (Built-in DVD Drive and Radio) AV
88
Page 91

Using the AV Source (Pioneer AV Equipment)
Chapter 7
When Pioneer audio equipment is connected to
the navigation system using IP-BUS, such equipment can be operated from the navigation system.
When reading this chapter, please also refer to
the operation manual of the AV equipment connected to the navigation system.
Multi-CD Player
Listening a CD
(2)(1) (4)
(3)
(5)
(6)
You can use the navigation system to control a
multi-CD player, which is sold separately.
These are the basic steps necessary to play a CD
with your multi-CD player.
➲ “Advanced multi-CD player operation” ➞
Page 90
(1) Source icon
(2) Disc number indicator
(3) Track number indicator
(4) Play time indicator
(5) Disc title, Disc artist, Track title and
Track artist indicator
When playing a CD TEXT disc, each Disc title,
Disc artist, Track title or Track artist is displayed.
Touch “Disp” repeatedly to switch these items.
When using a normal music CD they are display
as “No Title”.
(6) Disc list display
1 Touch “M-CD” in the AV Source screen to
select the multi-CD player.
➲ “Selecting an AV source” ➞ Page 29
2 Touch any of the keys 01 — 12 to select a
disc you want to listen to.
If you want to select a disc located at 7 to 12,
touch or to display 07 — 12.
You can also sequentially select a disc by
touching or .
3 To skip back or forward to another track,
touch or .
Touching skips to the start of the next
track. Touching once skips to the start of
the current track. Touching again will skip to
the previous track.
You can also skip back or forward to another
track by pressing the or button.
4 To perform fast forward or rewind, keep
touching or .
You can also perform fast rewind/fast forward
by keep pressing the or button.
❒ When the multi-CD player has performed
the preparatory operations, READY is displayed.
❒ If the multi-CD player does not operate
properly, an error message such as
ERROR-11 may be displayed. Refer to the
multi-CD player owner’s manual.
❒ If there are no discs in the multi-CD player
magazine, No Disc is displayed.
Switching between the detail
information display and the list
display
You can switch the left side of the basic screen
according to your preference.
1 Touch “Detail” (or “List”).
Each touch of “Detail” (or “List”) changes the
detail information display or list display.
M-CD
Chapter 7AV
Using the AV Source
(Pioneer AV Equipment)
89
Page 92

List display
AV
Detail information display
Repeating play
There are three repeat play ranges for the multiCD player: M-CD (multi-CD player repeat), Track
(one-track repeat) and Disc (disc repeat).
1 Touch “Repeat” in the Function menu.
Each touch of “Repeat” changes the settings
as follows:
• M-CD — Repeat all discs in the multi-CD
player
• Track — Repeat just the current track
• Disc — Repeat the current disc
❒ If you select other discs during repeat play,
the repeat play range changes to M-CD.
❒ If you perform track search or fast forward/
rewind during Track, the repeat play
range changes to Disc.
The marks shown below indicate the current
playback status.
and repeat range: Displays the repeat
range
M-CD
: Random
: Scan
50-disc multi-CD player
Only those functions described in this manual
Chapter 7
are supported for 50-disc multi-CD players.
(But the navigation system can perform the disc
list display up to Disc 12 with a 50-disc multi-CD
player.)
Advanced multi-CD player operation
Using the AV Source
(Pioneer AV Equipment)
(1)
(1) Function display
➲ How to display the Function menu ➞
Page 77
Playing tracks in a random order
Random play lets you play back tracks in a random order within the repeat range, M-CD or
Disc.
1 Select the repeat range.
➲ “Repeating play” ➞ Page 90
2 Touch “Random” in the Function menu.
Touching “Random” switches between “On”
and “Off”.
Tracks will play in a random order within the
previously selected M-CD or Disc ranges.
Scanning CDs and tracks
When the repeat play range is set to Disc, the
beginning of each track on the selected disc
plays for about 10 seconds. When the repeat play
range is set to M-CD, the beginning of the first
track of each disc is played for about 10 seconds.
1 Select the repeat range.
➲ “Repeating play” ➞ Page 90
2 Touch “Scan” in the Function menu.
Touching “Scan” switches between “On” and
“Off”.
The first 10 seconds of each track of the current disc (or the first track of each disc) is
played.
90
Page 93

3 When you find the desired track (or disc)
touch “Scan” to turn scan play off.
❒ After track or disc scanning is finished,
normal playback of the tracks will begin
again.
XM Tuner
Listening to XM Satellite Radio
ALL CH mode
(2)(1) (4)(5)
(3)
(6)
(7)
CATEGORY mode
(8)
You can use the navigation system to control an
XM satellite digital tuner (e.g. GEX-P10XMT),
which is sold separately.
For details concerning operation, refer to the XM
tuner’s operation manuals. This section provides
information on XM operations with navigation
system which differs from that described in the
XM tuner’s operation manual.
Only the logo data that is contained in the navigation DVD Map Disc can be displayed for each
channel. The icon of a newly established channel
that is not contained in the disc cannot be displayed. When no icon can be displayed, the following substitute icon is displayed.
Substitute icon
❒ The logo data is not displayed during the
memory navi mode.
❒ The following functions are not available on
the GEX-P10XMT, GEX-P920XM.
— Switching the XM display
❒ The following functions are not available on
the GEX-P910XM.
— Using the MyMix function
— Using the direct traffic announcement
function
— Selecting a channel from the XM channel
list display
❒ The following functions are not available on
the GEX-P900XM.
— Using the MyMix function
— Using the direct traffic announcement
function
— Selecting a channel from the XM channel
list display
— Selecting an XM channel directly
(1) Source icon
(2) XM band indicator
(3) XM preset number indicator
(4) XM channel number indicator
(5) XM channel select mode indicator
Shows what channel select mode has been
selected. You can select a channel from all channels in ALL CH (or CH NUMBER) mode, and
select a channel from a selected category in
CATEGORY mode.
➲ “Switching the XM channel select mode” ➞
Page 92
(6) XM channel category or XM channel
information
(7) Detailed information or preset list display
(8) Category icon
➲ “Switching between the detailed information
display and the preset list display” ➞ Page 92
1 Touch “XM” in the AV Source screen to
select the XM.
➲ “Selecting an AV source” ➞ Page 29
2 Touch “Band” to select an XM band.
Touch “Band” repeatedly until the desired XM
band is displayed: XM1, XM2 or XM3.
XM
Chapter 7AV
(Pioneer AV Equipment)
Using the AV Source
91
Page 94

3 To perform tuning, touch or .
The channels move up or down step by step. If
AV
you keep touching or , you can
increase or decrease channel number continuously. You can also perform manual tuning
by pressing the or button.
❒ You can also perform tuning within
selected channel category.
➲ “Selecting a channel in the channel cate-
gory” ➞ Page 93
Switching the XM channel
select mode
You can switch modes between the two methods
for selecting and listing channels.
ALL CH Mode (or CH NUMBER Mode):
You can select a channel from all channels.
CATEGORY Mode:
You can select a channel within the selected category.
1 Touch “Mode” to select the desired chan-
nel select mode.
XM
Touch “Mode” repeatedly to switch between
the two modes.
Switching between the detailed
information display and the pre-
Chapter 7
set list display
You can switch the left side of the basic screen
according to your preference.
1 Touch “Detail” (or “Preset”).
Each touch of “Detail” (or “Preset”) changes
the detail information display or preset list dis-
Using the AV Source
play.
Detail information display
(Pioneer AV Equipment)
(e.g. ALL CH mode)
Preset list display
(e.g. ALL CH mode)
Switching the XM display
1 Touch “Disp”.
Each touch of “Disp” changes the information as follows:
GEX-P900XM:
Channel number — Channel name — Artist
name/future — Song/program title — Information
GEX-P910XM:
Channel name — Artist name/future — Song/
program title — Channel category
Storing and recalling broadcast
stations
If you touch any of the preset tuning keys
Preset1 (or P1) — Preset6 (or P6) you can easily
store up to six broadcast stations for later recall
with the touch of a key.
1 Select the channel that you want to store
in memory.
2 Touch “Preset” to display the preset list.
3 Keep touching a preset tuning key
Preset1 (or P1) — Preset6 (or P6) until the
XM preset number (e.g., P.CH 1) stops
flashing.
The number you have touched will flash in the
XM preset number indicator and then remain
lit. The selected station has been stored in
memory.
The next time you touch the same preset tuning key Preset1 (or P1) — Preset6 (or P6) the
station is recalled from memory.
❒ Up to 18 stations, 6 for each of three XM
bands can be stored in memory.
92
Page 95

❒ You can also touch or to
recall stations assigned to preset tuning
keys Preset1 (or P1) — Preset6 (or P6) in
the detailed information display when the
“ALL CH (or CH NUMBER)” mode is
selected.
Selecting a channel in the channel category
1 Touch “Mode” to select the CATEGORY
mode.
2 Touch or to select the
desired category.
❒ You can also select the category by press-
ing the or button.
3 Touch or to select the
desired channel within the selected category.
❒ When using the GEX-P10XMT or
GEXP920XM, press and hold the or
button to continuously move up or
down the channels in the category.
Selecting a channel from the XM
channel list display
The list content can be switched so you can
search for the track you want to listen to not only
by the channel name but also by the artist name
or song title.
❒ The channel list shows all the channels dur-
ing the “ALL CH” mode, and the channels
included in the selected category during the
“CATEGORY” mode. To switch the channel
mode, touch “Mode”.
1 Touch “List”.
The XM channel list appears in the display.
Each touch of “List” changes the settings as
follows:
Detail information display or Preset list
display — Ch Name List (Channel name) —
Song Title List (Song title) — Artist Name
List (Artist name)
2 Touch the desired channel that you want
to listen to.
Press or to switch to the next page or the
previous page.
❒ In the CATEGORY mode, touch or
to switch to another category.
Selecting an XM channel
directly
You can select an XM channel directly by entering the desired channel number.
1 Touch “Direct”.
2 Touch 0 — 9 to input the desired channel
number.
To cancel the input numbers, touch “Clear”.
3 While the input number is displayed,
touch “Enter”.
The entered XM channel is selected.
4 Touch “Back”.
You can return to the previous display.
Using the MyMix function
The MyMix function memorizes the song title and
artist name of the song currently being received.
When a track that matches the memorized song
title and artist name is being broadcast on a station other than the one you are listening to, you
will be alerted, and you can switch the station to
listen to that song.
❒ A track itself is NOT downloaded BUT only the
song title and the artist name are memorized.
Memorizing the song title and the artist
name of a song
The song title and artist name of the song you are
listening to can be memorized.
XM
Chapter 7AV
(Pioneer AV Equipment)
Using the AV Source
93
Page 96

1 Touch “Memo”.
The song title and artist name of the song you
AV
are listening to are memorized, and a confirmation message appears.
❒ Up to 12 song titles and artist names can be
memorized. Trying to save more than 12
tracks will overwrite old ones.
❒ You cannot memorize the song title or the art-
ist name when “– – – – – – – –” is displayed on
the title information.
❒ You cannot memorize the song title or the art-
ist name of the channel 000.
❒ There is a possibility the memorized title is not
displayed correctly.
When the memorized track is broadcast
A beep sounds, and a message is displayed.
Touch “Yes” to switch to that station and listen to
that track.
❒ If the memorized track is not selected in the
MyMix list, no notification will be provided
even when that track is broadcast.
XM
❒ Notification may not be provided depending
on the situation of the Navigation System.
➲ “Setting the notification of memorized tracks”
➞ Page 95
❒ If there is slight difference between the mem-
Chapter 7
orized title and the title of the track being
broadcast, no notification will be provided
even though they are the same song.
Using the direct traffic
announcement function
You can listen to a memorized traffic channel by
Using the AV Source
directly calling it up with the TRFC touch key.
(Pioneer AV Equipment)
Calling up the memorized traffic channel
1 Touch “TRFC”.
❒ You can call up a traffic channel from
sources other than XM.
❒ To cancel traffic announcement, touch
TRFC Off.
Display the Radio ID
If you select CH: 000, the Radio ID is displayed.
1 Touch “Direct”.
2 Input “000” and then touch “Enter”.
If you select another channel, display of the
Radio ID is canceled.
Display of the Radio ID repeats displaying
“RADIO ID” and the ID code one after the
other.
❒ You can also display the Radio ID to select
“RADIO ID” from channel category in the
CATEGORY mode.
Advanced XM tuner operation
(1)
(1) Function display
➲ How to display the Function menu ➞
Page 77
Memorize a traffic channel
1 Tune in to a Traffic channel.
2 Touch and hold “TRFC” for two seconds
or more.
The traffic channel will be memorized.
❒ The channels 000 and 001 can not be memo-
rized (although the channel 001 is the
default).
94
Page 97

Setting the notification of memorized
tracks
The list of song titles memorized for the MyMix
Function (MyMix list) is displayed. You can
change the notification setting when the track is
broadcast again. You can enable or disable notification for each track.
1 Touch “Memo” in the Function menu.
2 Touch the song title that you want to
exclude from the notification list.
The check mark is removed, and the song title
is excluded from the notification list.
Deleting the memorized tracks
You can delete each one of the memorized tracks
from the song title list.
1 Touch “Memo” in the Function menu.
2 Touch the track you want to delete and
hold it for two seconds or more.
That track will be deleted from the song title
list.
❒ To delete all of the memorized tracks, then
“Delete All”.
3 A message will appear asking you to con-
firm the deletion. Touch “Yes”.
Switching the alert setting
You can enable or disable alerts for all items at
the same time. This function is useful when you
want to turn alerts off temporarily without changing the condition of each memorized song.
1 Touch “Memo” in the Function menu.
2 Touch “Alert On” or “Alert Off”.
❒ Touch to toggle the selection.
SIRIUS Tuner
Listening to SIRIUS
ALL CH mode
(2)(1) (4)(5)
(3)
(6)
CATEGORY mode
(7)
You can use the navigation system to control a
Pioneer Sirius satellite digital tuner, which is sold
separately.
For details concerning operation, refer to the SIRIUS tuner’s operation manuals. This section provides information on SIRIUS operations with
navigation system which differs from that
described in the SIRIUS tuner’s operation manual.
❒ The following functions are not available on
the SIR-PNR1.
— Selecting team for game alert
— Displaying game information
— Using the song alert function
— Using the direct traffic announcement
function
— Using the MyMix function
(1) Source icon
(2) SIRIUS band indicator
(3) SIRIUS preset number indicator
(4) SIRIUS channel number indicator
SIRIUS
Chapter 7AV
(Pioneer AV Equipment)
Using the AV Source
95
Page 98

(5) SIRIUS channel select mode indicator
Shows what channel select mode has been
AV
selected. You can select a channel from all channels in ALL CH mode, and select a channel from
the selected category in CATEGORY mode.
➲ “Switching the SIRIUS channel select mode”
➞ Page 96
(6) Detailed information or preset list display
(7) Category icon
1 Touch “SIRIUS” in the AV Source screen
to select the SIRIUS tuner.
➲ “Selecting an AV source” ➞ Page 29
2 Touch “Band” to select a SIRIUS band.
Touch “Band” repeatedly until the desired SIRIUS band is displayed, SIRIUS1, SIRIUS2 or
SIRIUS3.
3 To perform tuning, touch or .
The channels move up or down. Channels that
cannot currently be selected are skipped, and
the next channel is selected. If you keep
touching or , you can increase
SIRIUS
or decrease channel number continuously.
You can also perform manual tuning by pressing the or button.
Switching the SIRIUS channel
Chapter 7
select mode
You can switch modes between the two methods
for selecting and listing channels.
ALL CH Mode:
You can select a channel from all channels.
CATEGORY Mode:
You can select a channel within selected cate-
Using the AV Source
gory.
(Pioneer AV Equipment)
1 Touch “Mode” to select the desired chan-
nel select mode.
Touch “Mode” repeatedly to switch between
the two modes.
Switching between the detailed
information display and the preset list display
You can switch the left side of the basic screen
according to your preference.
1 Touch “Detail” (or “Preset”).
Each touch of “Detail” (or “Preset”) changes
the detail information display or preset list display.
Detail information display
(e.g. ALL CH mode)
Preset list display
(e.g. ALL CH mode)
SIRIUS channel information
Storing and recalling broadcast
stations
If you touch any of the preset tuning keys P1 —
P6 to easily store up to six broadcast stations for
later recall with the touch of a key.
1 Select the channel that you want to store
in memory.
2 Touch “Preset” to display the preset list.
3 Keep touching a preset tuning key P1 —
P6 until the SIRIUS preset number (e.g.,
P.CH 1) stops flashing.
The number you have touched will flash in the
SIRIUS preset number indicator and then
remain lit. The selected station has been
stored in memory.
The next time you touch the same preset tuning key P1 — P6 the station is recalled from
memory.
❒ Up to 18 stations, 6 for each of three SIR-
IUS bands can be stored in memory.
96
Page 99

❒ You can also touch or to
recall stations assigned to preset tuning
keys P1 — P6 in the detailed information
display when the “ALL CH” mode is
selected.
Selecting a channel in the channel category
1 Touch “Mode” to select the CATEGORY
mode.
2 Touch or to select the
desired category.
❒ You can also select the category by press-
ing the or button.
3 Touch or to select the
desired channel within the selected category.
Switching the display
1 Touch “Disp”.
Touching “Disp” changes the information as
follows:
Channel number — Channel name — Channel category — Artist name/feature — Song/
program title — Composer
❒ When using the SIR-PNR2, touch and hold
“Disp” to switch the information scroll On/
Off.
Using the MyMix function
The MyMix function memorizes the song title and
artist name of the song currently being received.
When a track that matches the memorized song
title and artist name is being broadcast on a station other than the one you are listening to, you
will be alerted, and you can switch the station to
listen to that song.
❒ A track itself is NOT downloaded BUT only the
song title and the artist name are memorized.
Memorizing the song title and the artist
name of a song
The song title and artist name of the song you are
listening to can be memorized.
1 Touch “Memo”.
The song title and artist name of the song you
are listening to are memorized, and a confirmation message appears.
❒ Up to 12 song titles and artist names can be
memorized. Trying to save more than 12
tracks will overwrite old ones.
❒ You cannot memorize the song title or the art-
ist name when “– – – – – – – –” is displayed on
the title information.
❒ You cannot memorize the song title or the art-
ist name of the channel 000.
❒ There is a possibility the memorized title is not
displayed correctly.
SIRIUS
Chapter 7AV
(Pioneer AV Equipment)
Using the AV Source
Selecting a SIRIUS channel
directly
You can select a SIRIUS channel directly by
entering the desired channel number.
1 Touch “Direct”.
2 Touch 0 — 9 to input the desired channel
number.
To cancel the input numbers, touch “Clear”.
3 While the input number is displayed,
touch “Enter”.
The entered SIRIUS channel is selected.
4 Touch “Back”.
You can return to the previous display.
When the memorized track is broadcast
A beep sounds, and a message is displayed.
Touch “Yes” to switch to that station and listen to
that track.
❒ If the memorized track is not selected in the
MyMix list, no notification will be provided
even when that track is broadcast.
❒ Notification may not be provided depending
on the situation of the Navigation System.
➲ “Setting the notification of memorized tracks”
➞ Page 98
❒ If there is slight difference between the mem-
orized title and the title of the track being
broadcast, no notification will be provided
even though they are the same song.
97
Page 100

Using the direct traffic
announcement function
AV
You can listen to a memorized traffic channel by
directly calling it up with the TRFC touch key.
Memorize a traffic channel
1 Tune in to a Traffic channel.
Advanced SIRIUS tuner operation
2 Touch and hold “TRFC” for two seconds
or more.
The traffic channel will be memorized.
❒ The channels 000 and 001 can not be memo-
rized (although the channel 001 is the
default).
Calling up the memorized traffic channel
1 Touch “TRFC”.
❒ You can call up a traffic channel from
sources other than SIRIUS.
❒ To cancel traffic announcement, touch
SIRIUS
“TRFC Off”.
Display the Radio ID
If you select CH: 000, the Radio ID is displayed.
1 Touch “Direct”.
Chapter 7
2 Input “000” and then touch “Enter”.
If you select another channel, display of the
Radio ID is canceled.
Display of the Radio ID repeats displaying
“RADIO ID” and the ID code one after the
other.
❒ You can also display the Radio ID to select
Using the AV Source
“RADIO ID” from channel category in the
(Pioneer AV Equipment)
CATEGORY mode.
(1)
(1) Function display
➲ How to display the Function menu ➞
Page 77
Setting the notification of memorized
tracks
Display the song title list memorized for the
MyMix Function (MyMix list). You can change the
setting of the notification when the track is broadcast again. You can enable or disable notification
for each track.
1 Touch “Memo” in the Function menu.
2 Touch or to select the desired song.
3 Touch “On / Off” to turn “On” the setting.
❒ Touch “On / Off” again to turn the setting
“Off”.
Deleting the memorized tracks
You can delete each one of the memorized tracks
from the song title list.
1 Touch “Memo” in the Function menu.
2 Touch the track you want to delete and
hold it for two seconds or more.
That track will be deleted from the song title
list.
98
3 A message will appear asking you to con-
firm the deletion. Touch “Yes”.
Switching the alert setting
You can enable or disable alerts for all items at
the same time. This function is useful when you
want to turn alerts off temporarily without changing the condition of each memorized song.
 Loading...