


531 Series
Serie 531
Série 531
Two Handle Kitchen Pull-Out Faucet
Grifo De Extracción Para Cocina Con Dos Manijas
Mitigeur De Cuisine À Bec Arroseur Avec Deux Poignées
|
|
Price Pfister |
|
|
|
|
|
Price Pfister |
|
|
|
Price Pfister |
|
|
|
|
|
|
|
|
|
|
|||
|
Lifetime Limited Mechanical & Pfinish Warranty |
|
|
|
|
|
Garantía Mecánica y sobre el Acabado Limitada de por Vida |
|
Une garantie limitée à vie |
|||
|
Covers Pfinish and Pfunction for as Long as You |
|
|
|
|
|
Cubre las funciones y el acabado por el tiempo en que usted sea |
|
pour ce qui est de l’aspect mécanique et de la finition, |
|||
|
|
Own Your Home |
|
|
|
|
|
propietario de su casa |
|
|
tant et aussi longtemps que vous serez propriétaire |
|
|
(Commercial Applications Limit the Duration of the |
|
|
|
|
|
(Las Aplicaciones Comerciales Limitan la Duración |
|
|
de votre domicile. |
||
|
Warranties as Provided Below) |
|
|
|
|
|
de las Garantías) |
|
|
(Garantie limitée en cas d’utilisation commerciale |
||
|
Price Pfister provides the following Warranties for its products. Proof |
|
|
|
|
|
Price Pfister suministra las siguientes Garantías para sus productos. Es |
|
|
– voir ci-dessous) |
||
|
|
|
|
|
|
posible que se requiera lapresentación de una Prueba de compra para obtener |
|
|
|
|||
|
of Purchase may be required in order to obtain any of the benefits set |
|
|
|
|
|
cualquiera de los beneficios indicados a continuación. |
|
Veuillez noter qu’une preuve d’achat peut être requise en cas de recours |
|||
|
forth below. |
|
|
|
|
|
|
Garantías Limitadas: Price Pfister garantiza que por el tiempo en que el |
|
au titre de la garantie. |
|
|
|
|
|
|
|
|
|
|
|
|
|||
|
Limited Warranties: Price Pfister warrants that for as long as the original |
|
|
|
|
|
comprador original sea propietario de la casa en el que se hubiese instalado |
|
Garantie limitée : Tant et aussi longtemps que l’acheteur sera propriétaire |
|||
|
purchaser owns the home in which the Price Pfister product (the “Product”) |
|
|
|
|
|
inicialmente el producto Price Pfister (el “Producto”), este Producto estará |
|
||||
|
|
|
|
|
|
libre de todo defecto en material y mano de obra que pueda afectar el |
|
du domicile dans lequel le produit Price Pfister a été installé, nous lui |
||||
|
is originally installed, the Product will be free of all defects in material |
|
|
|
|
|
|
|||||
|
|
|
|
|
|
uso proyectado y correcto del Producto. Si el Producto se instala en una |
|
garantissons que ce dernier sera exempt de tout défaut de matériau ou |
||||
|
and workmanship that would impair the intended and proper use of the |
|
|
|
|
|
|
|||||
|
|
|
|
|
|
aplicación comercial, la garantía mecánica que antecede estará limitada a un |
|
vice de fabrication pouvant en entraver l’utilisation correcte tel que prévu. |
||||
|
Product. If the Product is installed in a commercial application, the above |
|
|
|
|
|
|
|||||
|
|
|
|
|
|
período de diez (10) años a partir de la fecha de compra del Producto. |
|
Dans le cas des produits d’utilisation commerciale, la garantie exprimée |
||||
|
mechanical warranty shall be limited for a period of ten (10) years from the |
|
|
|
|
|
|
|||||
|
|
|
|
|
|
|
|
|
ci-dessus est restreinte à une période de dix (10) ans. |
|||
|
date of purchase of the Product. |
|
|
|
|
|
Price Pfister garantiza el acabado del Producto contra deterioro por el |
|
||||
|
|
|
|
|
|
|
|
|
||||
|
Price Pfister warrants against deterioration of the Product’s finish for as long |
|
|
|
|
|
tiempo en que el comprador original sea propietario de la casa en la que |
|
Par ailleurs, tant et aussi longtemps que l’acheteur sera propriétaire |
|||
|
|
|
|
|
|
hubiese instalado inicialmente el Producto. Si el Producto se instala en |
|
|||||
|
as the original purchaser owns the home in which the Product is originally |
|
|
|
|
|
una aplicación comercial, la garantía sobre el acabado que precede para |
|
du domicile dans lequel le produit Price Pfister a été installé, nous lui |
|||
|
installed. If the Product is installed in a commercial application, the above |
|
|
|
|
|
Productos que no contengan el acabado “Pforever” estará limitada a un |
|
garantissons un article dont la finition ne pourra se détériorer. Dans le cas |
|||
|
finish warranty for Products that do not contain the Pforever finish shall be |
|
|
|
|
|
periodo de cinco (5) años a partir de la fecha de compra. |
|
des produits d’utilisation commerciale qui ne comportent pas la finition |
|||
|
limited to a period of five (5) years from the date of purchase. |
|
|
|
|
|
Recurso exclusivo: En el caso de que haya un defecto en el Producto |
|
“Pforever”, la garantie est restreinte à une période de cinq (5) ans. |
|||
|
|
|
|
|
|
|
|
|
|
|
||
|
Exclusive Remedy: In the event of any defect in the Product that breaches |
|
|
|
|
|
que viole las garantías que preceden, Price Pfister, a su opción, reparará o |
|
Recours exclusif : En cas de défaut du produit relevant de la garantie, |
|||
|
|
|
|
|
|
reemplazará la pieza defectuosa del Producto. La reparación o el reemplazo |
|
|||||
|
the foregoing warranties, Price Pfister, at its option, will repair or replace |
|
|
|
|
|
|
le fabricant pourra, à sa discrétion, réparer ou remplacer la partie |
||||
|
|
|
|
|
|
del Producto es el recurso exclusivo. |
|
|
||||
|
the defective part of the Product. Repair or replacement of the Product is |
|
|
|
|
|
|
|
défectueuse. Cette mesure constitue un recours exclusif. |
|||
|
|
|
|
|
|
|
|
|
||||
|
the exclusive remedy. |
|
|
|
|
|
|
Para todo recurso con respecto a esta garantía, Price Pfister deberá ser |
|
|
|
|
|
|
|
|
|
|
|
|
|
COPY |
|||
|
|
|
|
|
|
|
|
notificado, con una descripción del problema. Para notificar a Price Pfister y |
|
Pour tout recours au titre de la garantie, les clients doivent communiquer |
||
|
For any remedy under this warranty, Price Pfister is to be notified describing |
|
|
|
|
|
recibir ayuda o servicio bajo esta garantía, el comprador original puede: (1) |
|
avec le fabricant pour lui faire part du problème. L’acheteur d’origine |
|||
|
the problem. In order to notify Price Pfister and receive assistance or service |
|
|
|
|
|
llamar al 1-800-Pfaucet (1-800-732-8238) para hablar con un representante |
|
peut : (1) composer le 1 800 732-8238 pour parler à un représentant qui |
|||
|
under this warranty, the original purchaser may: (1) call 1-800-Pfaucet |
|
|
|
|
|
de servicio al cliente que lo pueda ayudar, o (2) escribir al departamento de |
|
l’assistera; (2) écrire au service à la clientèle : Price Pfister Inc., 19701 |
|||
|
(1-800-732-8238) for a consumer service representative who can assist |
|
|
|
|
|
servicio al consumidor, c/o Price Pfister Inc., 19701 DaVinci, Lake Forest, |
|
DaVinci, Lake Forest, |
CA 92610 U.S.A., et fournir une explication du |
||
|
you, or (2) write consumer service department c/o Price Pfister Inc., 19701 |
|
|
|
|
|
CA 92610 U.S.A., e incluir una descripción del problema, el número del |
|
problème, en précisant le numéro de modèle, son nom, son adresse et |
|||
|
DaVinci, Lake Forest, CA92610, and include a description of the problem, |
|
|
|
|
|
modelo, su nombre, dirección, número de teléfono y fecha aproximada de |
|
son numéro de téléphone, ainsi que la date d’achat approximative; (3) |
|||
|
|
|
|
|
|
compra, o (3) enviar un e-mail al departamento de servicio al consumidor |
|
communiquer par courrier électronique avec le service à la clientèle en |
||||
|
model number, your name, address, phone number and approximate date |
|
|
|
|
|
|
|||||
|
|
|
|
|
|
de Price Pfister entrando en la página web www.PricePfister.com, o (4) |
|
utilisant le site www.PricePfister.com, ou (4) aviser le détaillant qui a |
||||
|
of purchase, or (3) email Price Pfister’s customer service department by |
|
|
|
|
|
|
|||||
|
|
|
|
|
|
avisarle al lugar o al distribuidor en donde se compró el Producto. En |
|
vendu le produit. On peut être obligé de retourner le produit au fabricant, |
||||
|
going to www.PricePfister.com, or (4) notify the location or distributor |
|
|
|
|
|
|
|||||
|
|
|
|
|
|
cualesquiera de los casos, podría pedírsele devolver el Producto a Price |
|
et une preuve d’achat peut être exigée. |
||||
|
from which the Product was purchased. In any case, you may be required |
|
|
|
|
|
Pfister para su inspección y es posible que se requiera la presentación de |
|
|
|
||
|
to return the Product to Price Pfister for inspection and proof of purchase |
|
|
|
|
|
una prueba de compra. |
|
|
Limitations et exclusions : |
||
|
may be required. |
|
|
|
|
|
|
Limitaciones y Exclusiones: |
|
|
PRICE PFISTER NE SERA PAS RESPONSABLE DES AUTRES |
|
|
|
|
|
|
|
|
|
|
|
DOMMAGES OU PERTES, Y COMPRIS LES DOMMAGES |
||
|
Limitations and Exclusions: |
|
|
|
|
|
PRICE PFISTER NO SE HARÁ RESPONSABLE DE NINGÚN OTRO DAÑO |
|
||||
|
|
|
|
|
|
|
INDIRECTS, INDÉPENDAMMENTDETOUTETHÉORIE JURIDIQUE, |
|||||
|
PRICE PFISTER WILLNOT BE LIABLE FORANYOTHER DAMAGES |
|
|
|
|
|
O PERJUICIO, INCLUYENDO, PERO SIN ESTAR LIMITADO A DAÑOS |
|
||||
|
|
|
|
|
|
|
Y COMPRIS TOUTE RÉCLAMATION SELON LAQUELLE IL |
|||||
|
OR LOSSES, INCLUDING, BUT NOT LIMITED TO, INCIDENTAL |
|
|
|
|
|
INCIDENTALESY/OCONSECUENTES, SINIMPORTARLATEORÍALEGAL |
|
||||
|
|
|
|
|
|
|
Y AURAIT EU RUPTURE DE GARANTIE, QUE CE SOIT PAR |
|||||
|
AND/OR CONSEQUENTIAL DAMAGES, REGARDLESS OF THE |
|
|
|
|
|
A LA QUE SE ALEGUE, INCLUYENDO TODO RECLAMO O VIOLACIÓN DE |
|
||||
|
|
|
|
|
|
|
RAPPORT À UN CONTRAT OU PAR VOIE DE NÉGLIGENCE (cela |
|||||
|
LEGALTHEORYASSERTED, INCLUDINGANYCLAIM OR BREACH |
|
|
|
|
|
LAGARANTÍAPRESENTEOCUALQUIEROTRACAUSA,YYASEANCOMO |
|
||||
|
|
|
|
|
|
|
comprend la négligence et la responsabilité stricte). |
|||||
|
OF WARRANTY HEREUNDER OR ANY OTHER CAUSE, AND |
|
|
|
|
|
RESULTADO DE LA LEY CONTRACTUAL O LA DE ANTECEDENTES |
|
||||
|
|
|
|
|
|
(incluyendo negligencia y responsabilidad estricta). |
|
|
|
|||
|
WHETHERARISING IN CONTRACTOR INTORT(including negligence |
|
|
|
|
|
|
Price Pfister se réserve le droit de discontinuer ou de modifier un produit |
||||
|
and strict liability). |
|
|
|
|
|
|
|
|
|
||
|
|
|
|
|
|
|
Price Pfister tiene el derecho de discontinuar o modificar cualquier producto |
|
en tout temps. Certaines provinces ne permettent pas l’exclusion ou la |
|||
|
|
|
|
|
|
|
|
|
||||
|
Price Pfister has the right to discontinue or modify any product at any |
|
|
|
|
|
en cualquier momento. Ciertos estados no permiten limitaciones o |
|
limitation des dommages indirects, de sorte que la limitation exprimée |
|||
|
|
|
|
|
|
exclusiones de daños incidentales o consecuentes, de manera que es posible |
|
peut ne pas s’appliquer. La présente garantie octroie aux clients certains |
||||
|
time. Some states do not allow limitations or exclusions of incidental or |
|
|
|
|
|
que las limitaciones o exclusiones que preceden no correspondan en su caso. |
|
droits d’ordre juridique, et ceux-ci pourraient en avoir d’autres, selon la |
|||
|
consequential damages, so the above limitations or exclusions may not |
|
|
|
|
|
Esta garantía le otorga derechos legales específicos y es posible que usted |
|
province où ils habitent. |
|||
|
apply to you. This warranty gives you specific legal rights, and you may |
|
|
|
|
|
también tenga otros derechos que difieren entre un estado y otro. |
|
La garantie ne s’applique pas aux dommages résultant d’un entretien, |
|||
|
also have other rights which vary from state to state. |
|
|
|
|
|
|
|
|
|||
|
The above warranties do not cover damage resulting from improper |
|
|
|
|
|
Las garantías que preceden no cubren daños y perjuicios ocasionados |
|
d’un nettoyage ou d’une installation fautivement effectués, ou encore |
|||
|
|
|
|
|
|
como resultado de mantenimiento, reparaciones, limpieza o instalación |
|
d’usages fautifs, d'abus, de modifications, d'accidents ou de catastrophes |
||||
|
maintenance, repair, cleaning or installation, misuse, abuse, alterations, |
|
|
|
|
|
inadecuados, mal uso, abuso, alteraciones, accidentes o causas de fuerza |
|
naturelles. |
|
||
|
accidents or acts of God. |
|
|
|
|
|
mayor. |
|
|
|
|
|
|
|
|
|
|
|
|
|
|||||
|
07-08-09 EO7406B |
|
|
|
|
|
|
|
|
|
32691-0200 |
|
|
SAMPLE |
|
|
|
|
|||||||
|
Copyright © |
2009, Price Pfister, Inc. |
|
|
|
|
|
|
|
|
A |
COMPANY |

ENGLISH
ENGLISH
Thank you for purchasing this Price Pfister product. All Price Pfister products are carefully engineered, and factory tested to provide long trouble-free use under normal conditions. This product is easy to install using basic tools and our easy to follow illustrated instructions. If you have any questions regarding this product, call 1-800-Pfaucet (1-800-732-8238).
 1 BEFORE PROCEEDING
 WARNING: Read all the instructions completely before proceeding. Price Pfister recommends calling a professional if you are uncertain about installing this product! This product should be installed in accordance with all local and state plumbing and building codes.
2 |
2 SHUT OFF WATER SUPPLY
Locate water supply inlets and shut off the water supply valves. These are usually found under the sink or near the water meter. If you are replacing an existing faucet, remove the old faucet from the sink and clean the sink surface thoroughly.
3 |
3 TOOLS RECOMMENDED
• Plumber's putty |
• Slotted screwdriver |
• Philips head screwdriver |
• Pliers |
• Adjustable wrench |
• Flashlight |
• Cloth |
|
|
Your installation may require new supply lines and / or shut-off valves or other additional tools.
4 |
C |
F |
F |
M |
M |
|
B |
G |
G |
|
H |
E |
J |
A |
D |
L |
K |
|
F |
G |
H |
4 CHECKING THE CONTENTS OF THE BOX
Upon opening the box, check to ensure that all of the following items are included:
A Spout Body |
B Valve Bodies (2X) |
C Handles (2X) |
D Spray Head |
E Hose |
F Putty Rings (3X) |
G Square Washers (3X) |
H Locknuts (3X) |
J Soap Dispenser |
K Weight |
L Quick Connector |
M Stem Extender |
If any of these items are missing, please contact Price Pfister Consumer Services at
1-800-Pfaucet (1-800-732-8238).
2
5 |
5A |
5C |
5D |
5E |
5B |
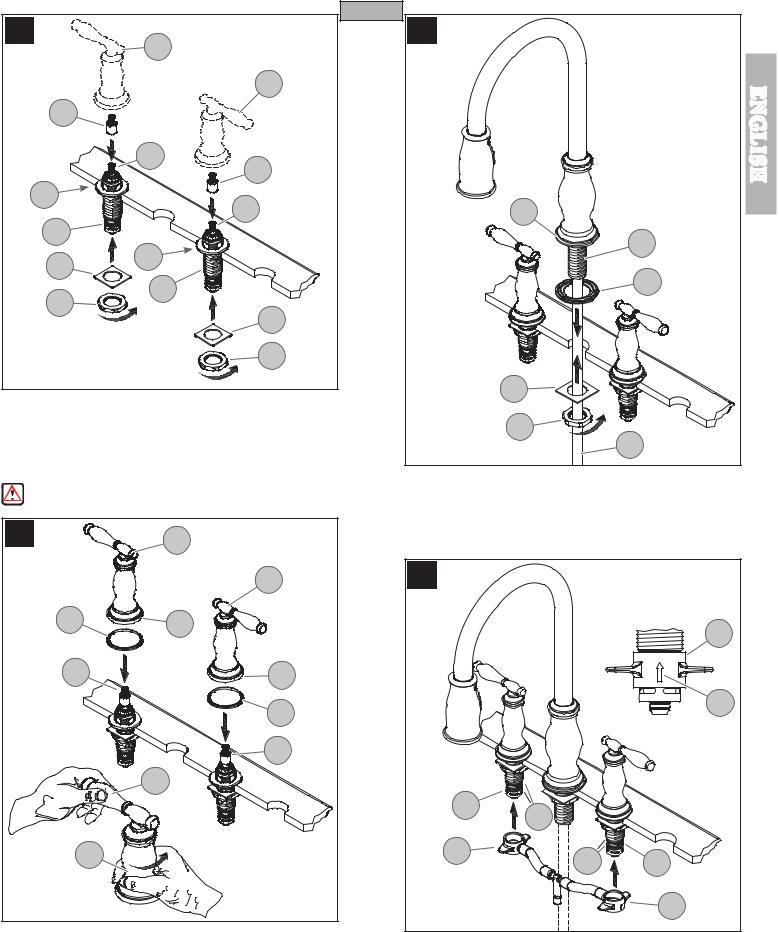
5 VALVE BODY PREPARATION
First, remove Clip (5A) then remove Inlet Connector (5B) from Valve Bodies (5C) and save. Next, remove Locknut (5D), and Square Washer (5E) from Valve Bodies (5C) and save.
FAUCET INSTALLATION
6 |
6B |
6C |
6A |
6A |
4” [102 mm]
 4” [102 mm]
4” [102 mm]
1 |
1/ ” [32 mm] MIN. |
|
4 |
1 1/2” [38 mm] MAX. |
|
|
DIA. HOLES |
|
6B |
6 VALVE BODY ATTACHMENT
From above sink, insert Valve Bodies (6A) through Mounting Holes (6B). The HOT valve, with Red Ring (6C), should be positioned to the left side of the spout.
7 |
|
ENGLISH |
7E |
9 |
|
|
|
|
|
7E |
ENGLISH |
|
7G |
|
|
|
|
|
7A |
|
|
7G |
|
|
7F |
|
|
7A |
9B |
|
7C |
9C |
|
7F |
|
|
|
|
|
7B |
9A |
|
7C |
|
|
|
|
|
7D |
|
|
7B |
|
|
7D |
|
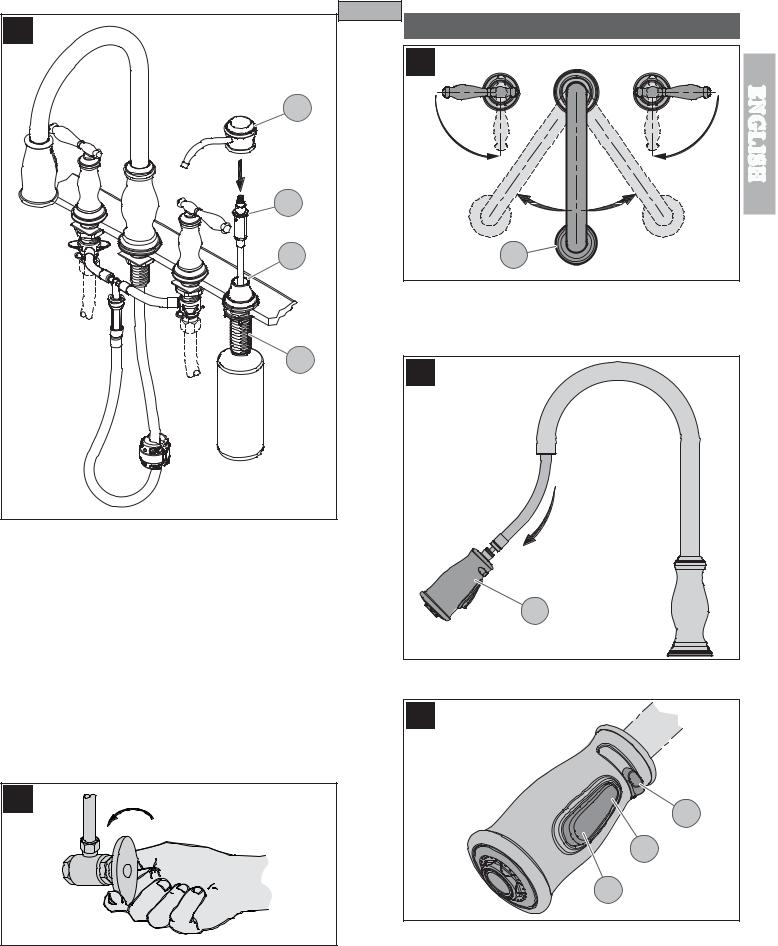
7 VALVE BODY INSTALLATION |
9D |
|
|
||
Before proceeding, Valve Stems (7A) are to be set in the closed position. From |
|
|
underneath sink, place Square Washer (7B) onto Valve Shank (7C) and tighten loosely |
9E |
|
with Mounting Nut (7D). Place Stem Extenders (7G) onto Valve Stems (7A). Temporarily |
9F |
|
place Handle (7E) onto Valve Stem (7A) to make sure the handle levers are properly |
||
aligned to sink. Remove Handle (7E) and tighten Mounting Nut (7D) until Valve Body |
9 SPOUT BODY INSTALLATION |
|
(7F) is firmly secured to sink. |
||
|
Do not use Handles (7E) to tighten or to rotate Valve Bodies (7F)! |
Apply plumber’s putty into groove on bottom of Gasket (9A) per manufacturer’s |
|
recommendations. Place Gasket (9A) under base of Spout Body (9B). From above |
|
8 |
|
sink, insert Mounting Shank (9C) through center hole of sink. |
|
From underneath sink, place Square Washer (9D) and Locknut (9E) over Pull-Out Hose |
|
8C |
(9F). Thread loosely onto Mounting Shank (9C). Tighten faucet firmly to sink. |
|
8C |
10 |
8A |
8B |
|
10A |
8D |
8B |
|
10D |
|
8A |
|
8D |
|
8E |
|
|
10B |
|
|
10C |
|
8B |
10A |
10B |
|
10C |
10A |
8 HANDLE ATTACHMENT
Place Plastic Seal Rings (8A) against the bottom of Handle Hubs (8B). Connect Handles (8C) onto Valve Adapters (8D) and be sure Valves and Levers are in the “OFF” position. Secure handles by holding the Lever (8E) in place and tighten the Hubs (8B) by rotating them in a clockwise direction.
To remove handles, rotate Hubs (8B) in a counterclockwise direction.
3
10 HOSE CONNECTION TO VALVE BODY
Slide the End Connectors (10A) with arrow (10D) pointing up onto the Valve Bodies (10B). Push the End Connectors (10A) all the way up until completely seated. Be careful not to damage O-Rings (10C).
Reverse steps to remove Hose Connection.

11 |
ENGLISH |
13 |
ENGLISH |
11C |
11D |
|
11C |
|
|
11A |
|
11C |
11D |
|
11A |
|
|
|
11E |
|
|
|
|
|
11B |
HOT |
|
13B |
|
|
|
|
|
|||
|
11B |
COLD |
|
13A |
|
|
|
|
|
||
11 WATER SUPPLY CONNECTIONS |
|
|
|
||
First, thread Inlet Connectors (11A) into Water Supply Lines (11B). Then, insert Inlet |
|
|
|||
Connectors (11A) into Valve Bodies (11C). Hot water supply lines go into left inlet. |
13D |
|
|||
Cold water supply lines go into right inlet. (Supply lines not included). Please follow |
13C |
||||
|
|||||
manufacturer’s instructions when installing supply lines. Next, insert Clips (11D) into |
|
||||
|
|
||||
Valve Body Holes (11E), to secure unit. |
|
|
13 WEIGHT ATTACHMENT |
|
|
WARNING: Do not twist Inlet Connectors (11A) once installed! |
|
|
|||
|
Discard Cardboard Fitting (13B) from Weight (13A). |
Place Weight (13A) above the |
|||
12 |
|
|
beginning of hose bend (13C) at the spout side (as shown in shaded area). Secure |
||
|
|
Weight (13A) with Screws (13D). |
|
||
|
|
|
|
||
|
|
|
14 |
|
|
14A |
12C
14B
12C
12A
12D
|
12D |
12B |
14C |
|
|
||
12A |
12A |
|
|
|
|
12A |
|
12 PULL-OUT HOSE ATTACHMENT |
14D |
From underneath sink, push Quick Connector (12A), located on the end of the Pull-Out |
|
Hose (12B) firmly upward onto the Receiving Tube (12C), until unable to push any |
|
further. Pull down on the Quick Connector (12A). If the housing and the Inner Collet |
|
(12D) separate slightly but do not pull off, the Receiving Tube (12C), quick connect is |
14 SOAP DISPENSER INSTALLATION |
secure. |
|
To remove Pull-Out Hose (12B), Push up on Quick Connector (12A). Holding Plastic |
From above sink, insert threaded Shank (14A) of soap dispenser body through Foam |
Collet (12D) in place, pull downward on Quick Connector (12A) until Tube (12C) is |
Gasket (14B) and sink hole. From below sink, tighten Nut (14C) and thread on Bottle |
free. |
(14D) to Shank (14A). |
|
4 |
ENGLISH
15
15D |
15B |
15A |
15C |
15 SOAP DISPENSER HEAD INSTALLATION
Pour in liquid soap (not included) into the Shank Orifice (15A). Insert Pump Mechanism (15B) into Soap Dispenser Body (15C). Install Dispenser Head (15D) by pushing firmly onto Pump Mechanism (15B).
FAUCET FUNCTIONS
17 |
HOT |
OPEN
17A |
COLD
OPEN
ENGLISH |
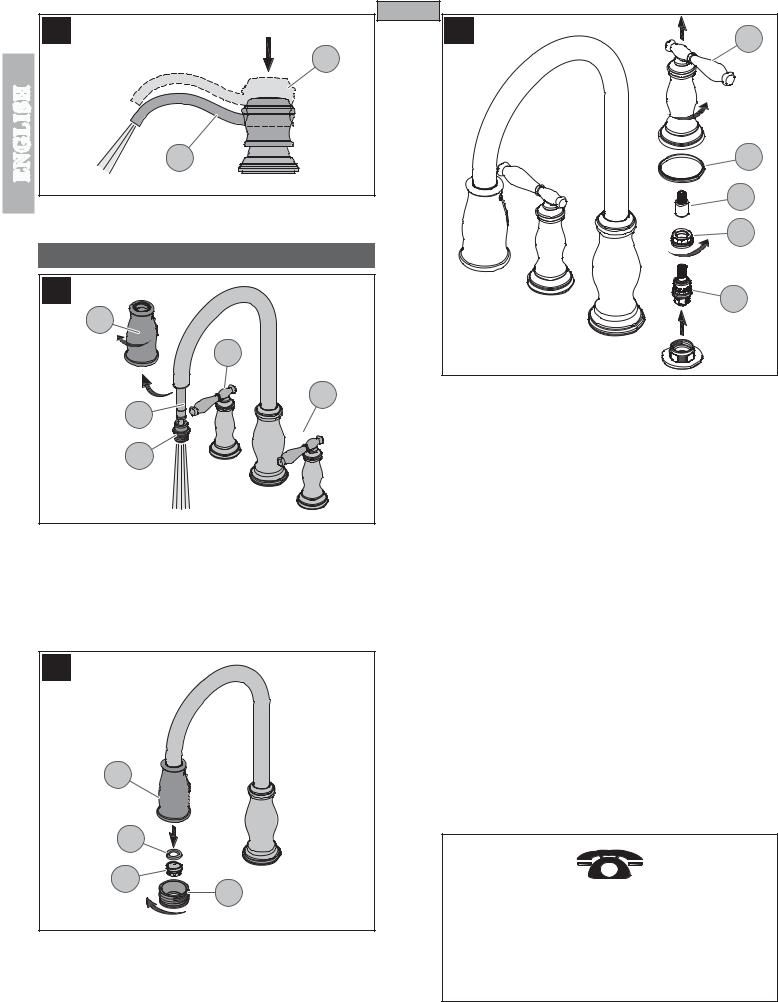
17 FAUCET FUNCTION
COLD valve: close-counterclockwise, open-clockwise; HOT valve: close-clockwise, open-counterclockwise. The Spout (17A) can be rotated around the Faucet Body in any direction.
Note: Flush faucet before turning on valve (see step 21).
18 |
18A |
18 PULL-OUT OPERATION
The Spray Head (18A) can be pulled forward to spray water in any direction.
16 |
16 UNIT START UP
Turn on hot and cold water supplies, and check for leaks above and below the sink.
19 |
19C |
19B |
19A |
19 SPRAY OPERATION
To activate the spray mode, simply press Toggle Button (19A) located under the spray head. You can change between spray and stream by pressing the opposite sides of the Toggle Button (19A/19B) while the faucet is in operation. The water flow will increase by sliding Spray Selector Switch (19C) from side to side (in spray mode only).
Note: The faucet will always turn on in regular stream mode.
5
|
|
ENGLISH |
|
|
20 |
23 |
23A |
|
20B |
|
|
ENGLISH |
20A |
|
23B |
|
|
||
|
20 SOAP DISPENSER OPERATION |
|
23C |
|
|
|
|
|
To activate Soap Dispenser (20A), press Dispenser Head (20B) to spray liquid soap. |
|
23D |
|
|
|
MAINTENANCE & CARE
21 |
23E |
|
21A |
21C |
21C |
23 VALVE CARTRIDGE REPLACEMENT |
Turn off water supplies and relieve pressure before working on your faucet (see |
|
21D |
step 2). Remove Handles (23A), Seal Rings (23B) (see step 8) and Stem Extender |
|
(23C). Unscrew Retainer Nut (23D) by turning it counter-clockwise and lift out Cartridge |
|
Assembly (23E) and inspect. Replace parts as necessary. |
21B |
|
21 FLUSHING
To prevent damage to the internal parts of your faucet from debris that may have collected in the water lines, it will be necessary to flush the faucet. Flushing requires the removal of the Spray Head (21A). To remove the Spray Head (21A), hold metal Hose Fitting (21B) and turn the Spray Head (21A) counterclockwise. Turn the Valve Lever Handles (21C) to the full on position. Run water for one minute. Repeat in hot and cold positions. Reassemble the Spray Head (21A) to the Pull-Out Hose (21D) by turning Spray Head (21A) clockwise.
Caution: do not over tighten spray head and pull-out hose.
22 |
22B |
22C |
22D |
22A |
22 AERATOR CLEANING
Over time, the aerator in your faucet may become clogged with debris. To clean the aerator, unscrew Aerator Housing (22A) from Spray Head (22B). Remove Aerator Seal (22C) and Aerator Cartridge (22D) from Aerator Housing (22A). Clean Aerator Cartridge (22D) and Aerator Housing (22A).
 CAUTION: Maintenance
DISASSEMBLY
1.Replacement parts may be available at the store where you purchased your faucet.
2.When replacement parts are not available, please write or call Price Pfister Consumer Service.
3.Always turn off water and relieve pressure before working on your faucet.
 NOTE: Trim Care
Cleaning Instructions:
For all Handles and decorative finishes, use only a soft damp cloth to clean and shine. Use of polish, detergents, abrasive cleaners, organic solvents or acid may cause damage. Use of other than a soft damp cloth will nullify our warranty!
Special Trim:
Trim products which contain Porcelain or other similar substance are not acceptable for public areas or Commercial use. Installation of Said Trim is at Users Risk!
1–800–PFAUCET (1–800–732–8238)
For Toll-Free Pfaucet information call 1–800–PFAUCET (1–800–732–8238) or visit www.pricepfister.com
•Installation Support
•Care and Warranty Information
6
 Loading...