


0X8 ● JX8 Series |
|
|
||
Serie |
0X8 ● JX8 |
|
|
|
Série |
0X8 ● JX8 |
|
|
|
TUB & SHOWER |
|
|
||
Single Control, Pressure Balancing |
|
|||
Valve Body |
|
|
||
Cuerpo de válvula monomando de equilibro |
|
|||
de presión para |
|
|
||
BAÑERIAY DUCHA |
|
|
||
BAIN ET DOUCHE |
|
|
||
Corps de mitigeur à régulation de pression |
|
|||
Pfister™ |
Pfister™ |
Pfister™ |
||
Lifetime Limited Mechanical & Pfinish Warranty |
Garantía Mecánica y sobre elAcabado Limitada de por Vida |
Une garantie limitée à vie |
||
Covers Pfinish and Pfunction for as Long as You |
Cubre las funciones y el acabado por el tiempoCOPYen que usted sea pour ce qui est de l’aspect mécanique et de la finition, |
|||
Own Your Home |
propietario de su casa |
tant et aussi longtemps que vous serez propriétaire |
||
(Commercial pplications Limit the Duration of the |
( asAplicaciones Comerciales Limitan la Duración |
de votre domicile. |
||
Warranties as Provided Below) |
de las Garantías) |
(Garantie limitée en cas d’utilisation commerciale |
||
PfisterprovidesthefollowingWarrantiesforitsproducts. ProofofPurchase |
fistersuministralassiguientesGarantíasparasusproductos.Esposibleque |
– voir ci-dessous) |
||
serequieralapresentacióndeunaPruebadecompraparaobtenercualquiera |
|
|||
may be required in order to obtain any of the benefits set forth below. |
de los beneficios indicados a continuación. |
Veuillez noter qu’une preuve d’achat peut être requise en cas de recours |
||
LimitedWarranties: Pfisterwarrantsthatforaslongastheoriginalpurchaser |
GarantíasLimitadas: Pfistergarantizaqueporeltiempoenqueelcomprador |
au titre de la garantie. |
||
owns the home in which the Pfister product (the “Product”) is originally |
originalseapropietariodelacasaenelquesehubieseinstaladoinicialmente |
Garantielimitée:Tantetaussilongtempsquel’acheteurserapropriétaire |
||
installed,theProductwillbefreeofalldefectsinmaterialandworkmanship |
elproductoPfister(el“Producto”),esteProductoestarálibredetododefecto |
|||
en material y mano de obra que pueda afectar el uso proyectado y correcto |
du domicile dans lequel le produit Pfister a été installé, nous lui |
|||
thatwouldimpairtheintendedandproperuseoftheProduct.IftheProductis |
||||
installedinacommercialapplication,theabovemechanicalwarrantyshallbe |
del Producto. Si el Producto se instala en una aplicación comercial, la |
garantissons que ce dernier sera exempt de tout défaut de matériau ou |
||
|
vicedefabricationpouvantenentraverl’utilisationcorrectetelqueprévu. |
|||
SAMPLEgarantía mecánica que antecede estará limitada a un período de diez (10) |
||||
limitedforaperiodoften(10)yearsfromthedateofpurchaseoftheProduct. |
años a partir de la fecha de compra del Producto. |
Dans le cas des produits d’utilisation commerciale,la garantie exprimée |
||
Pfister warrants against deterioration of the Product’s finish for as long as |
Pfister garantiza el acabado del Producto contra deterioro por el tiempo |
ci-dessus est restreinte à une période de dix (10) ans. |
||
the original purchaser owns the home in which the Product is originally |
en que el comprador original sea propietario de la casa en la que hubiese |
Par ailleurs, tant et aussi longtemps que l’acheteur sera propriétaire du |
||
installed. If the Product is installed in a commercial application, the above |
instalado inicialmente el Producto. Si el Producto se instala en una |
|||
finish warranty for Products that do not contain the Pforever finish shall be |
aplicación comercial, la garantía sobre el acabado que precede para |
domiciledanslequelleproduitPfisteraétéinstallé,nousluigarantissons |
||
limited to a period of five (5) years from the date of purchase. |
Productos que no contengan el acabado “Pforever” estará limitada a un |
unarticledontlafinitionnepourrasedétériorer. Danslecasdesproduits |
||
|
|
periodo de cinco (5) años a partir de la fecha de compra. |
d’utilisation commerciale qui ne comportent pas la finition “Pforever”, |
|
Exclusive Remedy: In the event of any defect in the Product that breaches |
Recurso exclusivo: En el caso de que haya un defecto en el Producto que |
la garantie est restreinte à une période de cinq (5) ans. |
||
the foregoing warranties, Pfister, at its option, will repair or replace the |
|
|||
defective part of the Product. Repair or replacement of the Product is the |
violelasgarantíasquepreceden,Pfister,asuopción,repararáoreemplazará |
Recours exclusif : En cas de défaut du produit relevant de la garantie, |
||
exclusive remedy. |
|
lapiezadefectuosadelProducto. LareparaciónoelreemplazodelProducto |
le fabricant pourra, à sa discrétion, réparer ou remplacer la partie |
|
|
es el recurso exclusivo. |
|||
|
|
défectueuse. Cette mesure constitue un recours exclusif. |
||
For any remedy under this warranty, Pfister is to be notified describing the |
Paratodorecursoconrespectoaestagarantía,Pfisterdeberásernotificado, |
|||
Pourtoutrecoursautitredelagarantie,lesclientsdoiventcommuniquer |
||||
problem. In order to notify Pfister and receive assistance or service under |
con una descripción del problema. Para notificar a Pfister y recibir ayuda |
|||
this warranty, the original purchaser may: (1) call 1-800-Pfaucet (1-800- |
o servicio bajo esta garantía, el comprador original puede: (1) llamar al |
avec le fabricant pour lui faire part du problème. L’acheteur d’origine |
||
732-8238) for a consumer service representative who can assist you, or (2) |
1-800-Pfaucet(1-800-732-8238)parahablarconunrepresentantedeservicio |
peut : (1) composer le 1 800 732-8238 pour parler à un représentant |
||
write consumer service department c/o Pfister Inc., 19701 DaVinci, Lake |
al cliente que lo pueda ayudar, o (2) escribir al departamento de servicio |
qui l’assistera; (2) écrire au service à la clientèle : Pfister Inc., 19701 |
||
Forest, CA92610,andincludeadescriptionoftheproblem,modelnumber, |
al consumidor, c/o Pfister Inc., 19701 DaVinci, Lake Forest, CA 92610 |
DaVinci, Lake Forest, CA 92610 U.S.A., et fournir une explication du |
||
yourname,address,phonenumberandapproximatedateofpurchase,or(3) |
U.S.A., e incluir una descripción del problema, el número del modelo, su |
problème, en précisant le numéro de modèle, son nom, son adresse et |
||
emailPfister’scustomerservicedepartmentbygoingtowww.pfisterfaucets. |
nombre, dirección, número de teléfono y fecha aproximada de compra, o |
son numéro de téléphone, ainsi que la date d’achat approximative; (3) |
||
(3) enviar un e-mail al departamento de servicio al consumidor de Price |
communiquer par courrier électronique avec le service à la clientèle en |
|||
com, or (4) notify the location or distributor from which the Product was |
||||
Pfister entrando en la página web www.pfisterfaucets.com, o (4) avisarle al |
utilisant le site www.pfisterfaucets.com, ou (4) aviser le détaillant qui a |
|||
purchased. Inanycase,youmayberequiredtoreturntheProducttoPfister |
lugar o al distribuidor en donde se compró el Producto. En cualesquiera de |
venduleproduit. Onpeutêtreobligéderetournerleproduitaufabricant, |
||
for inspection and proof of purchase may be required. |
loscasos,podríapedírseledevolverelProductoaPfisterparasuinspección |
et une preuve d’achat peut être exigée. |
||
Limitations and Exclusions: |
|
y es posible que se requiera la presentación de una prueba de compra. |
Limitations et exclusions : |
|
|
|
|||
PFISTER WILL NOT BE LIABLE FOR ANY OTHER DAMAGES |
Limitaciones y Exclusiones: |
|||
PFISTERNESERAPASRESPONSABLEDESAUTRESDOMMAGES |
||||
OR LOSSES, INCLUDING, BUT NOT LIMITED TO, INCIDENTAL |
PFISTER NO SE HARÁ RESPONSABLE DE NINGÚN OTRO DAÑO O |
OU PERTES, Y COMPRIS LES DOMMAGES INDIRECTS, |
||
AND/OR CONSEQUENTIAL DAMAGES, REGARDLESS OF THE |
PERJUICIO, INCLUYENDO, PERO SIN ESTAR LIMITADO A DAÑOS |
|||
INDÉPENDAMMENTDETOUTETHÉORIEJURIDIQUE,YCOMPRIS |
||||
LEGALTHEORYASSERTED,INCLUDINGANYCLAIMORBREACH |
INCIDENTALESY/OCONSECUENTES, SINIMPORTARLATEORÍALEGAL |
TOUTE RÉCLAMATION SELON LAQUELLE IL Y AURAIT EU |
||
OF WARRANTY HEREUNDER OR ANY OTHER CAUSE, AND |
ALAQUESEALEGUE,INCLUYENDOTODORECLAMOOVIOLACIÓNDE |
RUPTURE DE GARANTIE, QUE CE SOIT PAR RAPPORT À UN |
||
WHETHERARISINGINCONTRACTORINTORT(includingnegligence |
LAGARANTÍAPRESENTEOCUALQUIEROTRACAUSA,YYASEANCOMO |
|||
and strict liability). |
|
RESULTADO DE LA LEY CONTRACTUAL O LA DE ANTECEDENTES |
CONTRAT OU PAR VOIE DE NÉGLIGENCE (cela comprend la |
|
|
|
(incluyendo negligencia y responsabilidad estricta). |
négligence et la responsabilité stricte). |
|
Pfisterhastherighttodiscontinueormodifyanyproductatanytime. Some |
Pfister tiene el derecho de discontinuar o modificar cualquier producto en |
Pfister se réserve le droit de discontinuer ou de modifier un produit en |
||
states do not allow limitations or exclusions of incidental or consequential |
cualquiermomento. Ciertosestadosnopermitenlimitacionesoexclusiones |
tout temps. Certaines provinces ne permettent pas l’exclusion ou la |
||
damages,sotheabovelimitationsorexclusionsmaynotapplytoyou. This |
||||
de daños incidentales o consecuentes, de manera que es posible que las |
limitation des dommages indirects, de sorte que la limitation exprimée |
|||
warrantygivesyouspecificlegalrights,andyoumayalsohaveotherrights |
limitaciones o exclusiones que preceden no correspondan en su caso. Esta |
peutnepass’appliquer. Laprésentegarantieoctroieauxclientscertains |
||
which vary from state to state. |
|
garantíaleotorgaderechoslegalesespecíficosyesposiblequeustedtambién |
droits d’ordre juridique, et ceux-ci pourraient en avoir d’autres, selon la |
|
The above warranties do not cover damage resulting from improper |
tenga otros derechos que difieren entre un estado y otro. |
province où ils habitent. |
||
|
||||
maintenance, repair, cleaning or installation, misuse, abuse, alterations, |
Las garantías que preceden no cubren daños y perjuicios ocasionados |
Lagarantienes’appliquepasauxdommagesrésultantd’unentretien,d’un |
||
accidents or acts of God. |
|
como resultado de mantenimiento, reparaciones, limpieza o instalación |
nettoyageoud’uneinstallationfautivementeffectués,ouencored’usages |
|
|
|
inadecuados, mal uso, abuso, alteraciones, accidentes o causas de fuerza |
fautifs,d'abus,demodifications,d'accidentsoudecatastrophesnaturelles. |
|
|
|
mayor. |
|
|
02-28-12 EO7947A
Copyright © 2012, Price Pfister, Inc.
ENGLISH
ENGLISH
Thank you for purchasing this Price Pfister product. All Price Pfister products are carefully engineered, and factory tested to provide long trouble-free use under normal conditions. This valve is easy to install using basic tools and our easy to follow
illustrated instructions. If you have any questions regarding this product, call 1-800-Pfaucet (1-800-732-8238).
 1 BEFORE PROCEEDING:

 WARNING: Read all the instructions completely before proceeding. Price
Pfister recommends calling a professional if you are uncertain about installing this product!
This product should be installed in accordance with all local and state plumbing and building codes.
Use only 1z2” Iron or Copper Pipe between valve and tub spout (No PEX)!
2 WATER SHUT-OFF:
Locate water supply inlets and shut off water supply valves. These are usually found near water meter.
SURFACE PREPARATION:
For optimum performance of your new Price Pfister Single Control Pressure Balancing Valve, a minimum water pressure of 20 PSI is required. Have the basic tools ready for removal of old valve. If you are replacing an existing Valve, disconnect the old valve and clean the mounting surface thoroughly. Align and adjust water supply pipes to recommended dimensions. For new construction, Install water supply pipes to recommended dimensions.
3 |
|
INSTALLATION |
|
|
4 |
2 |
5/8” - 3 |
1/2” |
|
|||
|
4C |
4B |
|
|
|
|
|
|
FINISHED |
|
4D |
|
|
|
|
|
WALL |
SHWR |
|
|
|
||
|
48” |
|
|
SHOWER |
4A |
30” |
ONLY |
|
TUB & |
FLOOR |
|
SHOWER |
4E |
|
|
|
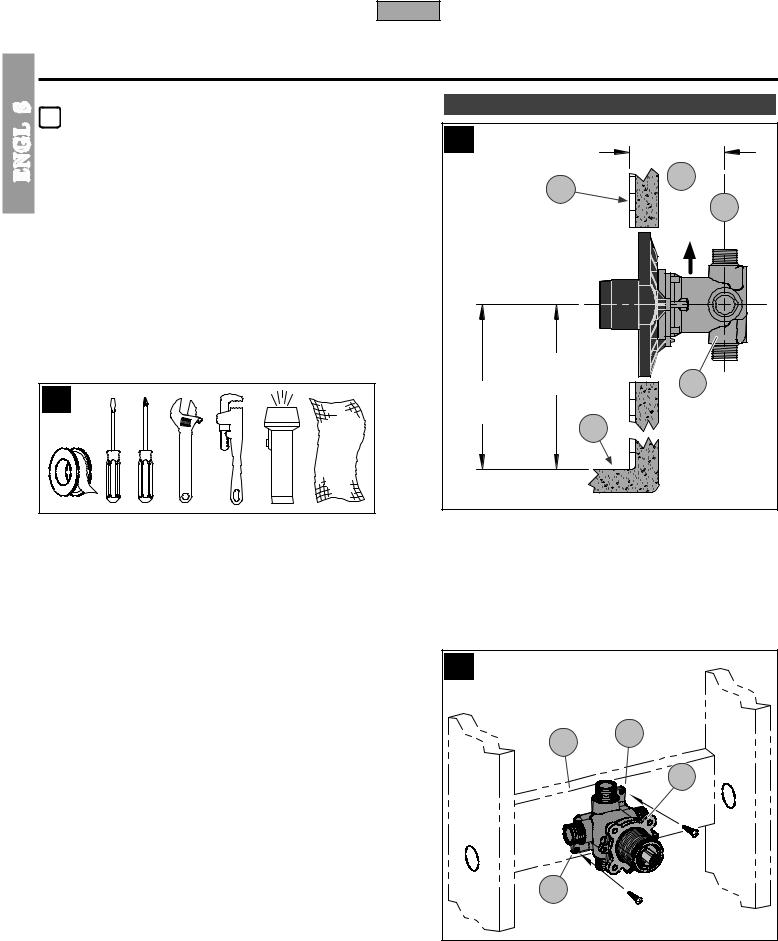
3 TOOLS RECOMMENDED: |
|
|
For Iron Pipe Installation: |
|
|
● PTFE Plumber’s Tape or Thread Sealant |
● Slotted screwdriver |
|
● Phillips Screwdriver |
●Adjustable wrench |
● Pipe Wrench |
● Flashlight |
● Cloth |
|
For soldered copper and non-standard installations, some additional tools may be required.
4 VALVE INSTALLATION
 CAUTION: Be sure to position Valve Body (4A)correctlyinwall,”SHWR” marking up.
Depth (4B) for valve body in wall is measured from center of shower outlet (4D) to finished wall surface (4C). Minimum distance (4B) is 2 5/8" and maximum is 3 1/2". Height is measured from bottom of floor (4E) to center of valve body
(30" for Tub & Shower and 48" for Shower only).
5 |
5C
5B
5A |
5B
5 SECURING VALVE BODY
3/16” Dia. Screw holes (5B) are provided to secure Valve Body (5A) to framing (5C) or other solid support. For special direct mount (Thin Wall Installation) go to step 18. For PEX installation, connect PEX lines prior to securing.
2
|
|
|
|
|
ENGLISH |
|
|
6 |
HOT |
6B |
|
|
7 |
7D |
|
|
|
|
|
|
|
||
|
|
|
6C |
|
|
|
|
6A |
|
|
6B |
|
|
|
ENGLISH |
IRON PIPE |
|
|
6A |
|
7A |
||
|
|
|
|
|
|||
|
|
|
|
|
|
|
|
|
|
|
|
|
|
7C |
|
|
|
|
|
COLD |
|
48” |
|
|
|
|
|
|
|
|
|
PEX PIPE |
|
|
|
|
|
7B |
|
|
HOT |
6B |
6C |
|
|
|
|
|
|
|
|
|
|
|
|
6A |
|
|
|
|
8” Min |
|
|
|
|
|
|
|
|
||
6D |
|
|
|
6A |
|
7D |
|
|
|
|
|
|
|
|
|
|
|
|
6B |
|
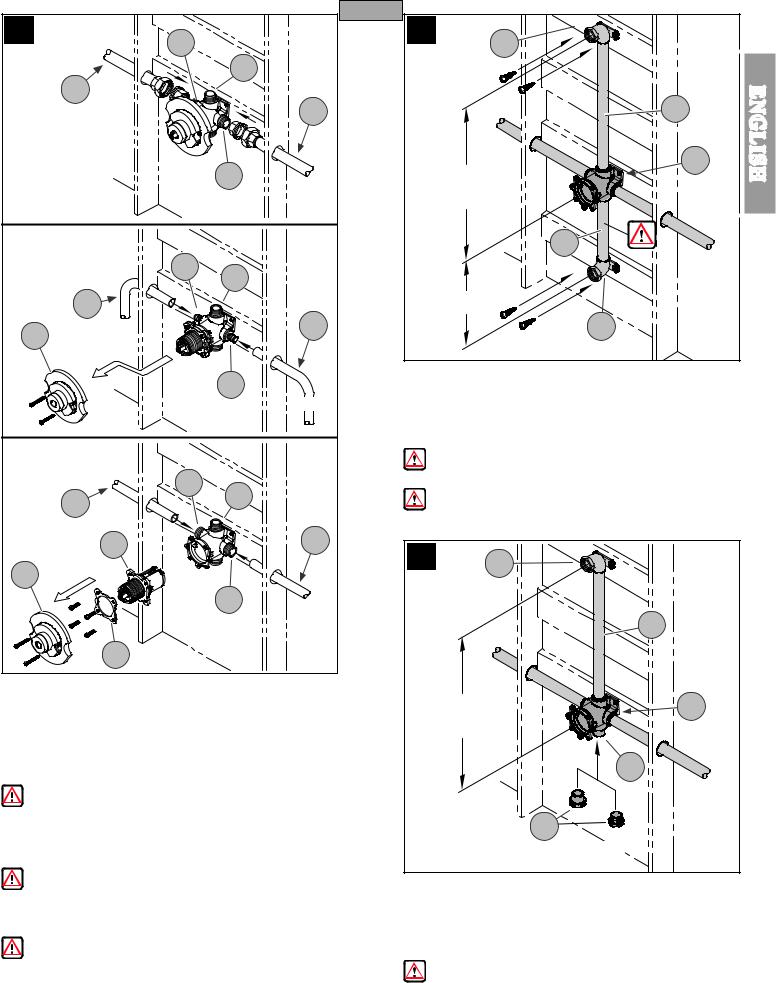
7 TUB & SHOWER OUTLET CONNECTIONS |
|
|
|
|
|
|
Connect Shower (7A) and Tub (7B) Outlet Pipes to Valve Body (7C). Connect |
|
||
|
|
|
|
COLD |
Pipe Elbows (7D) (not included) to ends of both pipes. We recommend using |
|
|
|
|
|
|
drop elbows (7D) (not included). Securely fasten to framing or other solid |
|
||
|
|
|
|
|
|
||
|
|
|
|
|
support. The height for outlet pipes is measured from the center of pipe elbow |
|
|
COPPER |
|
|
|
|
to center of the valve body, as shown. |
|
|
|
|
|
|
|
|
|
|
PIPE |
HOT |
|
|
|
|
WARNING: For Iron Pipe Connections or threaded fittings, use thread |
|
|
6B |
|
|
sealant or PTFE Plumber’s tape according to manufacturer’s instructions. |
|
||
|
|
6C |
|
|
|||
6A |
|
|
|
|
WARNING: Use only 1/2” Iron or Copper Pipe between valve |
|
|
|
|
|
|
|
|
||
|
|
|
|
|
and tub spout (No PEX)! Do not reduce the inner pipe diameter! |
|
|
|
6F |
|
|
6A |
8 |
|
|
6D |
|
|
|
|
8E |
|
|
|
|
|
|
|
|
|
|
|
|
|
6B |
COLD |
|
|
|
|
|
|
|
|
8A |
|
|
|
|
|
|
|
|
|
|
|
6E |
|
|
|
|
|
|
6 SUPPLY CONNECTIONS |
|
|
|
Proper fittings for your valve body type are required. |
|
|
8B |
Connect water Supply Lines (6A) to Valve Body Inlets (6B). Hot water supply lines |
|
30” Min |
|
go into left inlet. Cold water supply lines go into right inlet. (Supply lines are not |
|
|
|
included). Please follow manufacturer’s instructions when installing supply lines. |
|
|
|
IRON PIPE: Valve Body Inlets (6B) and Outlets (6C) are designed to |
|
8C |
|
accommodate 1/2-14 NPT pipe. Use thread sealant or PTFE Plumber’s tape |
|
|
|
on all threaded fittings, according to manufacturer’s instructions. |
|
|
|
CAUTION: For iron pipes, it is not recommended to reduce outlet pipe |
|
|
|
diameter. |
|
8D |
|
PEX PIPE: Valve Body inlets (6B) are designed to accommodate a 1/2” PEX |
|
|
|
|
This Part Is Supplied For |
|
|
pipe and outlets (6C) are designed to accommodate a 1/2” copper pipe. |
|
|
|
Remove Plaster Guard (6D). |
|
Shower Only Installation |
|
NOTE: For PEX, be sure to use correct fitting for crimping and / or the |
|
8 SHOWER ONLY OUTLET CONNECTIONS |
|
correct tool for cold expansion. |
|
ConnectShowerOutletPipe(8A) to Valve Body (8B). Plug Bottom Outlet (8C) |
|
COPPER PIPE: Valve Body inlets (6B) and outlets (6C) are designed to |
|
with Pipe Plug (8D). Connect Pipe Elbow (8E) (not included) to end of the pipe. |
|
|
For copper pipe outlets, we recommend using drop elbows (8E) (not included). |
||
accommodate a 1/2” copper pipe. |
|
||
|
|
Securely fasten to framing or other solid support. The height for the outlet |
|
WARNING: Remove Plaster Guard (6D), Backup Plate (6E) and Cartridge |
|
pipe is measured from center of pipe elbow to center of valve body, as shown. |
|
Assembly (6F) prior to soldering any inlet or outlet connections. Failure to do |
|
WARNING: For Iron Pipe Connections or threaded fittings, use thread |
|
so can result in water damage. For valves with integral stops, open valve stems |
|
||
prior to soldering (see step 12). |
3 |
sealant or PTFE Plumber’s tape according to manufacturer’s instructions. |
|
|
|
|
|

|
9 |
9E |
|
|
|
ENGLISH |
|
9D |
|
|
|
|
|
9C |
|
|
9B |
9A
9B |
9A |
9F |
9G |
9A |
9C |
9H |
9G |
9J |
9 CARTRIDGE REASSEMBLY
Once all pipe joints are soldered, reassemble the Cartridge Assembly (9A) and Backup Plate (9B) into Valve Body (9C). Be sure that Notch (9D) from the Bonnet (9E) is pointing down (For back-to-back installation see step 20).
 WARNING: When reassembling unit, be sure that Tabs (9F) from the Cartridge Assembly (9A) are set properly on the Valve Body groves (9G).
 WARNING: When reassembling the Cartridge Assembly (9A) and Backup Plate (9B), be certain that the placement of the O-ring (9H) is within the groove andnotpinchedbetweenthebackupflange(9G) and casting wall (9J). Failure to do so will result in water leaks and water damage.
ENGLISH |
10 |
10A |
10D |
10A |
10D |
10B |
OFF ON
10C |
10 PRESSURE TESTING VALVE
Use two 1/2" iron pipe plugs (10A) (not included) on both Shower Outlet (10B) and Tub Outlet (10C). Turn Stem (10D) counterclockwise to full on position and check all connections for leaks. Rotate Stem (10D) clockwise to turn off. Look for leaks from the outlets.
 WARNING: Pressure testing is not to exceed 250 PSI. Make sure pressure is balanced between hot and cold inlets.
 WARNING: Differential pressure of hot and cold inlets must not exceed
100 PSI.
 CAUTION: Slowlyremovepipeplugs(10A) from tub and shower outlets to relieve pressure.
11 UNIT START UP
Turn on water supplies, and check all connections for leaks.
12 |
12A |
12D |
12C |
12A |
12B |
12 MODEL WITH INTEGRAL VALVE STOPS
IntegralStops(12A) provide an alternate means to shut off the water supply. With a flat head screwdriver (12B), the entire water supply can be shut off by rotating the valve stem (12C) clockwise. The integral stops can be used for temporary shutting off the water supply to allow access to the cartridge assembly (12D) for
4 maintenance.

13 |
13A |
ENGLISH
13C |
13B |
13 FLUSHING
For Tub and Shower Combinations
Turn on water supply lines by rotating Stem (13A) counterclockwise allowing water to flow from tub spout outlet (13B) until all foreign matter has cleared the line. Water should not be flowing from shower outlet (13C) during this test. If water is flowing from shower outlet, please check your valve to see that the casting mark “SHWR” is facing up (see step 4).
14 |
14B |
14C |
14A |
15 |
15A |
15B |
15B |
15B |
15A |
15C |
15D |
15A |
15B |
15D |
15A |
15C |
15B |
FULL TRAVEL |
LIMITED TRAVEL |
ENGLISH |
14 FLUSHING |
|
15 TEMPERATURE ADJUSTMENT |
For shower Only Installation |
|
Adjustment Gear (15A) is factory-set to prevent stem from reaching full hot |
Be sure to plug Bottom Outlet with Pipe Cap or Plug (14A)usingThreadSealant. |
|
position. To adjust stem rotation: Remove Adjustment Gear (15A). Rotate |
Rotate stem (14B) counterclockwise, allowing water to flow from shower outlet |
|
Stem (15B) counterclockwise to determine a maximum desired temperature. |
(14C) until all foreign matter has cleared the line. |
|
Replace Gear (15A)aligningAdjustmentStop(15C)tostemTabSurface(15D) |
If water flow becomes low or no flow at all, (refer to Step 20). |
5 |
so Stem (15B) cannot move beyond adjusted point. |
|
|

16 |
ENGLISH |
16A |
16B |
16 PLASTERGUARD REPLACEMENT
Replace plasterguard (16A) into Valve Body and secure with Screws (16B). Proceed to finish wall.
ENGLISH
NON STANDARD INSTALLATIONS
18 |
18B
18C
SHWR
4” Dia
18B
TUB
18D |
18A |
|
|
|
18C |
18 THIN WALL INSTALLATION
Knock out Center Section (18A) of Plaster Guard (18B) and remove Screws (18D). For installation of thin walls, use Support Plate (18C) in addition to Plaster Guard (18B). For installation to other wall types, do not use Support
Plate (18C). Use of Plaster Guard (18B) is optional. For center hole on a thin wall use 4” diameter.
17 |
1/4” Dia |
|
1 |
19 |
|
|
|
19C

 4 3/4” Dia
HOT |
COLD |
19B |
|
1 1/4” Dia |
|
|
COLD |
HOT |
|
|
19A |
19A |
180° |
17 FINISH WALL PREPARATION |
|
|
||
|
|
|
||
Makeappropriateholestofinishedwall. PricePfisterrecommendsthatallTub |
|
|
|
|
Spout and Shower Outlet holes be 1 1/4” diameter. For center hole on plaster |
|
|
|
|
wall use 4 3/4” diameter. |
|
19 REVERSED INLET LINES |
|
|
CAUTION: Make sure that leak tests and flushing are performed before |
|
If hot and cold inlets are reversed (back-to-back installation), (19C) unscrew |
||
|
the plaster guard and bonnet assembly. Rotate the Bonnet Assembly (19A) |
|||
preparing the finished wall. |
6 |
180° with Notch (19B) facing up and reassemble. |
|
|
|
|
|
|
|
 Loading...