

Page 1
‘ii
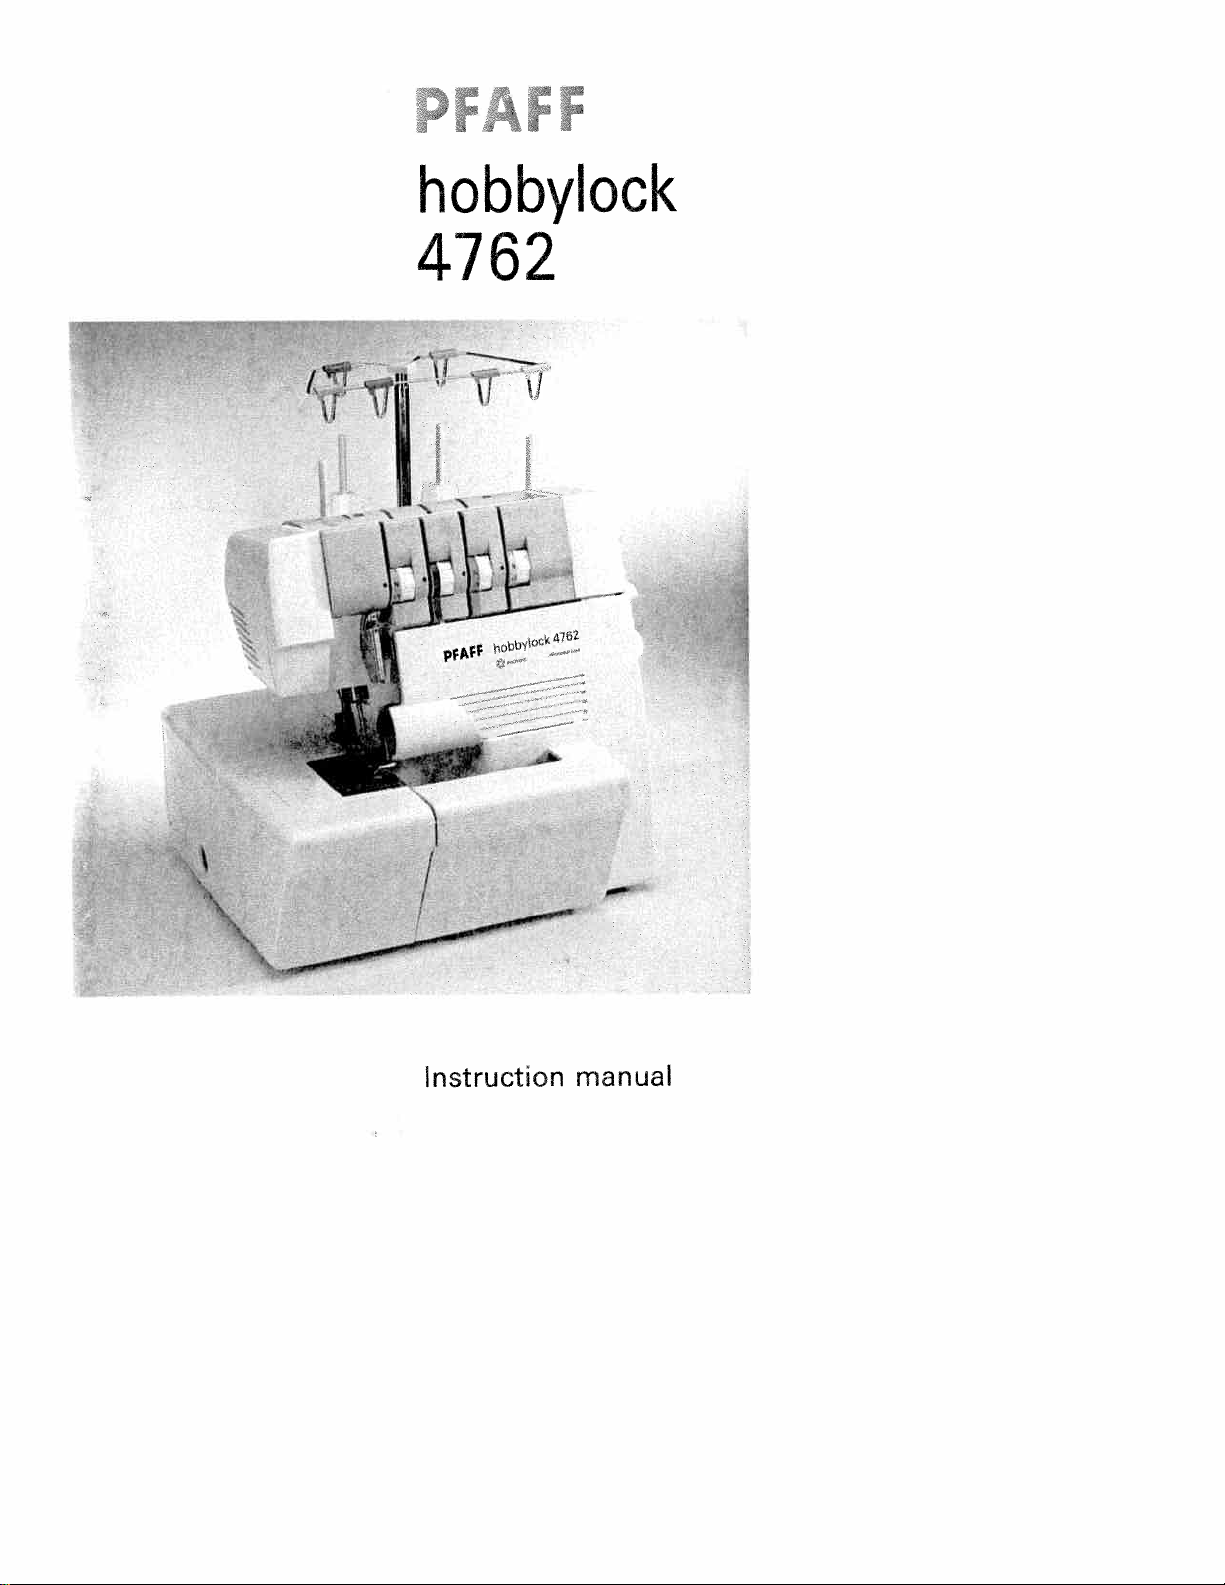
hobbylock
4762
_i
L
Instruction
manual
Page 2
/
For
please
I
j
easier
\
understanding
thisorthe
fold
Safety
For
The
the
three
The
ding
last
the
leads
safety
pins.
wires
to
of
rules
United
in
the
this
page
must
lead
the
followg
instruction
out
Kingdom
definitely
terminal
mains
when
lead
code:
only
not
I
nortoa
manual
reading.
be
coloured
are
connected
plug
-J
to
with
accor
Brown.
the
As
this
appliance
colour
es
ceed
wire
The
to
ted
N
ter
or
wire
The
nected
letter
L
Cut-off
disposed
but
leads
Only3A
ASTA
by
cover
colour
ding
plug
The
Spare
suppliers
Please
2.
page
colours
coding
follows:
which
the
coloured
which
to
or
mains
must
must
fuse
also
of
may
of
terminal
terminal
the
coloured
plugs
of
replaced
be
spare
according
marked
be
code.
neverbeused
must
covers
or
the
observe
Live
wires
the
correspond
not
terminals
the
coloured
is
whichismarked
black.
coloured
is
which
red.
definitely
are
immediately.
fuses
to
are
PFAFF
the
completely.
must
BS
A
3
available
agencies.
general
in
blue
brown
be
1362
or
mains
the
in
your
must
must
marked
is
nottobe
Defective
used
and
with
without
from
safety
with
plug,
be
with
es
the
the
fuse
electrical
lead
the
pro
connec
the
be
con
the
with
used,
mains
approved
fuse
correspon
cover.
notes
of
let
on
I
and
5
You
will
find
the
Contents
on
pages
4
Page 3

appliance,
to
sewing
instructions
es
follows:
machine.
basic
safety
Read
precau
all
States
an
electrical
safety
only
adhered
be
using
this
Important
United
the
For
you
should
use
always
before
When
I
tions
instructions
reduce
from
unplug
reach
place
in
or
sewing
it
has
the
use
operate
unplug
needle.
use
use
pull
the
unplug
when
when
observe
To
machine
the
before
a
for
or
store
drop
or
To
usedasa
to
be
children.
near
machine
recommended
sewing
this
been
authorized
sewing
the
sewing
or
insert
outdoors.
where
turn
pulling
by
awey
proper
the
or
bent
or
push
sewing
sewing
making
rewinding
the
DANGER
sewing
The
1.
appliance
Always
2.
not
Do
3.
Do
not
4.
place
not
V(ARNlNG
allow
not
Do
1.
used
by
this
Use
2.
attachments
3.
4,
5.
6.
7.
8.
9.
10.
11.
1
2.
1
3.
14.
1
5.
6.
1
17.
Please
operate
Nover
if
perly,
nearest
the
adjustment.
nical
operate
Never
of
nings
loose
cloth.
drop
Never
not
Do
not
Do
administered.
To
disconnect,
operateona
Never
blocked.
not
Do
fingers
Keep
machine
Always
not
Do
not
Do
Switch
suchasthreading
etc.
Always
or
ting,
manual.
plug
Hold
also
should
electric
relamping.
sewing
sewing
a
into
reduce
dropped
dealer
machine
any
aerosol
controls
all
soft
from
blunt
fabric
machine
needle,
any
general
risk
the
never
outlet
machine
machine
water
the
toy.
for
only
by
machineifit
or
or
machine
and
object
(spray)
surface
cord.
on
moving
all
plate.
needle
needles.
while
off
changing
machine
other
into
safety
electric
of
left
be
immediately
Replace
that
other
or
risk
of
attention
Close
intended
its
manufacturer
the
has
damaged,
service
with
control
foot
any
into
products
off
to
(“0”)
as
such
unplug,
To
parts.
The
Use
stitching.
when
(“0”)
needle,
the
from
servicing
user
reel.
cord
notesonpage
shock:
unattended
bulb
fallen
has
where
liquid.
burns,
damaged
a
dropped
or
centerfor
air
any
free
opening.
position,
a
bed
Special
wrong
needles
It
may
making
threading
electric
Do
when
using
after
with
same
into
fall
can
it
electric
fire,
necessary
is
describedinthis
use
as
containedinthis
as
cord
into
examination,
openings
from
being
are
then
couch
or
the
grasp
care
can
plate
recommended
deflect
any
outlet
adjustments
allow
not
2.
plugged
before
and
rated
type
Unplug
water.
pulled
or
be
shock,
when
plug,
or
water.
repair,
blocked.
accumulation
the
or
used
remove
the
where
not
plug,
required
is
cause
by
needle,
the
adjustments
bobbin,
or
removing
when
mentioned
plugtowhip
Alweys
in.
cleaning
1
into
injury
or
sewing
this
manual.
is
if
it
Return
electrical
Keep
where
plug
air
cord.
the
around
needle
the
manufacturer
the
causingitto
in
changing
when
unplug
it.
Watts.
5
immediately.
or
sink.
tub
a
persons:
to
machine
working
appliance
the
or
ventilation
lint,
of
oxygen
outlet.
the
to
needle
the
presser
covers,
instruction
the
rewinding.
Use
dust
is
break.
manual.
not
from
openings
in
this
only
pro
mecha
ope
and
being
may
sewing
only.
break.
area,
foot,
lubrica
Do
is
to
be
Keep
sewing
This
these
machine
instructions
manufactured
designed
is
and
in
for
safe
a
HOUSEHOLD
place
only.
use
Page 4
Page 5

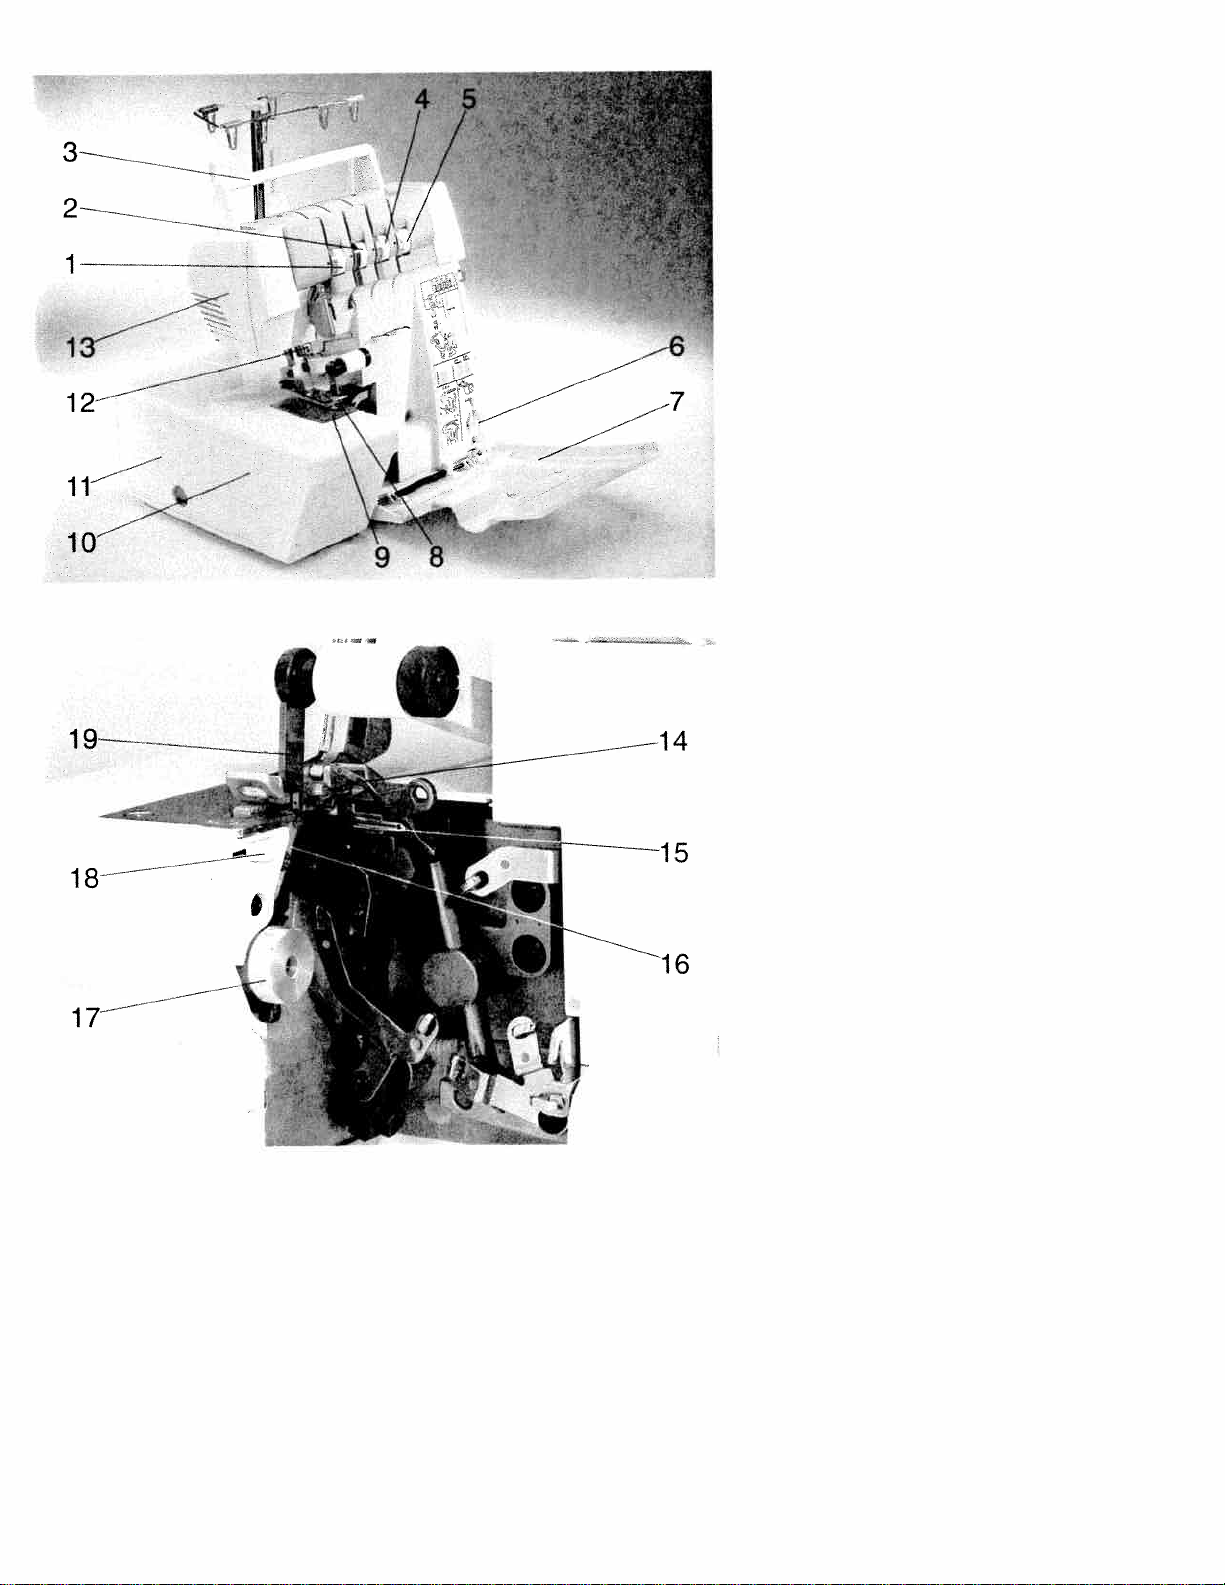
Parts
of
the
hobbylock
4762
Thread
1
Thread
2
3
Carrying
Thread
4
5
Thread
Converter
6
7
Looper
8
Sewing
Needle
9
Detachable
0
1
Accessory
11
Needle
2
1
Lamp
13
tension
tension
handle
tension
tension
cover
foot
plate
holder
cover
work
box
dial/left
dial/right
dial/right
dial/left
support
needle
needle
looper
looper
Right
14
Left
1
5
Fixed
1
6
17Seam
Bed
1
8
Movable
1
9
overedge
overedge
lower
width
slide
for
upper
looper
looper
knife
adjustment
stitch
knife
width
knob
chaining
land
Page 6
Notes
Notes
machines
60335-2-28
EN
The
1.
tion
movement
stantly
sewing.
When
2.
ded,
when
accessories,
machine
out
3.
The
the
The
4.
be
5.
The
tion
tion
Do
6.
on
7.
Do
—
—
—
which
is
8.
Do
socket
If
9.
than
it
accept
caused,
To
10.
not
parts
user
responsibility
vice
Be
11.
parts.
11.
Be
parts.
on
safety
on
accordance
user
with
during
replacing
the
maximum
sewing
tension
adjusted
machine
in
plate.
not
the
not
there
its
function
wet,
is
it
brought
not
this
that
wrongly
is
avoid
open
inside
can
staff.
sure
sure
Safety
for
and
must
regard
the
of
observe
leaving
maintenance
always
from
mains
lamp
of
by
must
accordance
any
insert
machine.
the
use
visible
is
e.g.
occur
can
into
pull
the
its
by
appliance
which
for
operated,
liability
any
risk
the
the
the
repair.
to
use
use
to
domestic
with
IEC
exercise
the
to
needle
sewing
the
machine
the
mechanical
mains
the
plug.
permissible
15
is
drive
the
PFAFF
a
be
with
objects
sewing
damage.
disturbed
is
condensation
with
when
warm
a
mains
cord.
is
used
it
electric
of
machine.
machine
This
our
of
only
only
sewing
60335-2-28.
adequate
and
up
con
and
area
unatten
work
parts
disconnect
pulling
by
wattage
Watts.
may
belt
mechanic.
into
put
indica
the
openings
in
machine
cold
a
room.
out
plug
for
a
intended
is
cannot
we
is
any
There
which
solely
damage
shock,
for
qualified
original
original
cau
down
while
or
the
only
opera
if:
machine
the
of
purpose
or
no
are
the
the
ser
PFAFF
PFAFF
1
2.
1
3.
Environment
or
The
temperature
to
for
The
interference;
rated
radios,
etc.
This
tronic-mechanical
for
operated
ted
light,
objects,
For
be
both
Care
Always
if
damage
dropping.
Cleaning
do
Housing
To
and
removed
paraffin.
Please
Do
products
fluid
machine
The
with
supply
+1-10%
+1-4%.
used
When
outer
the
of
tronically
reach
up
low
speed
order
to
recommended
80%.
machine
electronic
near
TVs,
sewing
supervised
in
to:
dust,
static
corrosive
ventilation
free-standing,
and
firm
the
of
protect
which
the
clean
lint-free
withasoft
Notel
not
use
such
chemicals
designed
is
nominal
a
rated
a
and
properly,
components
controlled
85°C.
to
therefore
is
damage.
avoid
environment
10°Cto
suppressed
is
however,
broadcasting
PCs,
machine
appliance;
in
use
suchaway
severe
electricity,
chemicals
purposes
on
even.
machine
machine
the
occur
may
housing
Any
cloth.
insecticides
any
benzine
as
cleaning
for
voltage
frequency
the
foot
Constant
not
40°
C,
and
should
it
devices
high-quality
is
a
home.
the
that
dampness,
heat-producing
the
surface
a
by
dry,
a
use
stubborn
cloth
and
(petroleum)
mains
for
a
of
of
temperature
non-elec
of
a
control
use
permitted
Ambient
is:
Humidity
immune
notbeope
such
as
transmitters
a
is
it
should
It
not
is
it
direct
liquids.
or
machine
which
against
knocking
clean,
dirt
alcohol
chemical
or
housing.
the
can
at
a
20%
elec
machine
subjec
sun
must
is
or
soft
can
or
or
in
to
be
be
2
Page 7
Simple,
up-to-date
sewing
Congratulations!
hobbylock
and
operation.
PFAFF
this
as
now
you
manual,
certainly
is
to
put
have
you
dealer.
help
now
that
and
find
it
will
take
to
or
let’s
hours
hobbylock
technology,
instruction
out
any
advice.
product
new
stride
one
Your
design
use
If
tion
It
way
and
If
PFAFF
any
So,
enjoyable
ideas.
You
provides
4760
sew,
little
a
nothing
well
time
just
full
use.
further
He
is
get
started!
creating
have
unique
can
trim
manual
time
can
what
happy
bought
take
and
neaten
features
anditis
to
amiss.
go
spent,
your
questions
to
We
your
high-quality
a
advantages.
material
any
for
up
the
very
just
as
to
follow.
is
the
study
itisthe
since
machine
just
—
beofservice
you
wish
very
many
own
Your
in
you
latest
easy
instruc
only
do
can
ask
your
with
fashion
its
in
in
to
3
Page 8
Contents
sewing
stitch
the
foot
tape
box
the
the
the
foot
the
the
the
the
rubber
foot
feed
sewing
.
seam
stitch
thread
foot
light
lower
needle
sewing
machine
Accessory
Accessories
Adjusting
Adjusting
Adjusting
Bead
Blind
Changing
Changing
Changing
Changing
Cleaning
Cleaning
Connecting
Cording
Differential
Elastic
Engaging/disengaging
2-thread
Folded
3-thread
Folded
arm
Free
cover
the
cover
maintenance
switch
the
position
summary
bed
the
foot
foot
problems
foot
accessories
foot
converter
lift
pressure
sewing
Lace
Lint
box
Looper
Lubricating
Machine
Machine
Mains
Mounting
Needle
Program
Setting
Sewing
Sewing
Sewing
Shirring
Special
Specifications
sewing
String
stand
Thread
spool
width
bulb
feet
control
rolled
rolled
machine
slide
and
foot
length
tension
knife
foot
foot
the
for
(sewing
hem
hem
stitch
their
upper
solutions.
light)
knife
width
chaining
.
land
Page
7
7
22
23
32-43
53
48
46
45
11
19
44
44
8
52
24—25
50
20
42
38
26
54
9
9
44
7
44
8
21
11
28—31
27
19
23
56—57
51
47-54
58
49
10
4
Page 9
Telescopic
Thread
Thread
thread
spool
unreeling
Threading/guide
Threading
Threading
Threading
Threading
Thread
Thread
Thread
2-needle,
2-thread
2-thread
2-thread
3-thread
3-thread
3-thread
3-thread
4-thread
right
left
right
left
reel
chain
table
3-thread
overedge
serging
rolled
overedge
serging
decorative
rolled
overedge
net
overedge
needle
change
cutter
for
guide
disc
wires
overedge
needle
on
3-
2-,
overedge
seam
seam
hem
seam
seam
seam
hem
seam
.
looper
looper
(green)
A
B
(blue)
threaded
and
FLATLOCK
(wide,
(wide,
(wide,
serging
(red)
(yellow)
machine
4-thread
closing
narrow)
narrow)
narrow)
overedge
seam.
(wide,
seam
.
narrow).
FLATLOCK/wide,
narrow
Page
10
10
12
13
14—15
16
17
18
19
55
43
39
40
41
34
35
36
37
32—33
5
Page 10

I
I
I?
A
W;e4Wtj
I
i
Page 11
44,
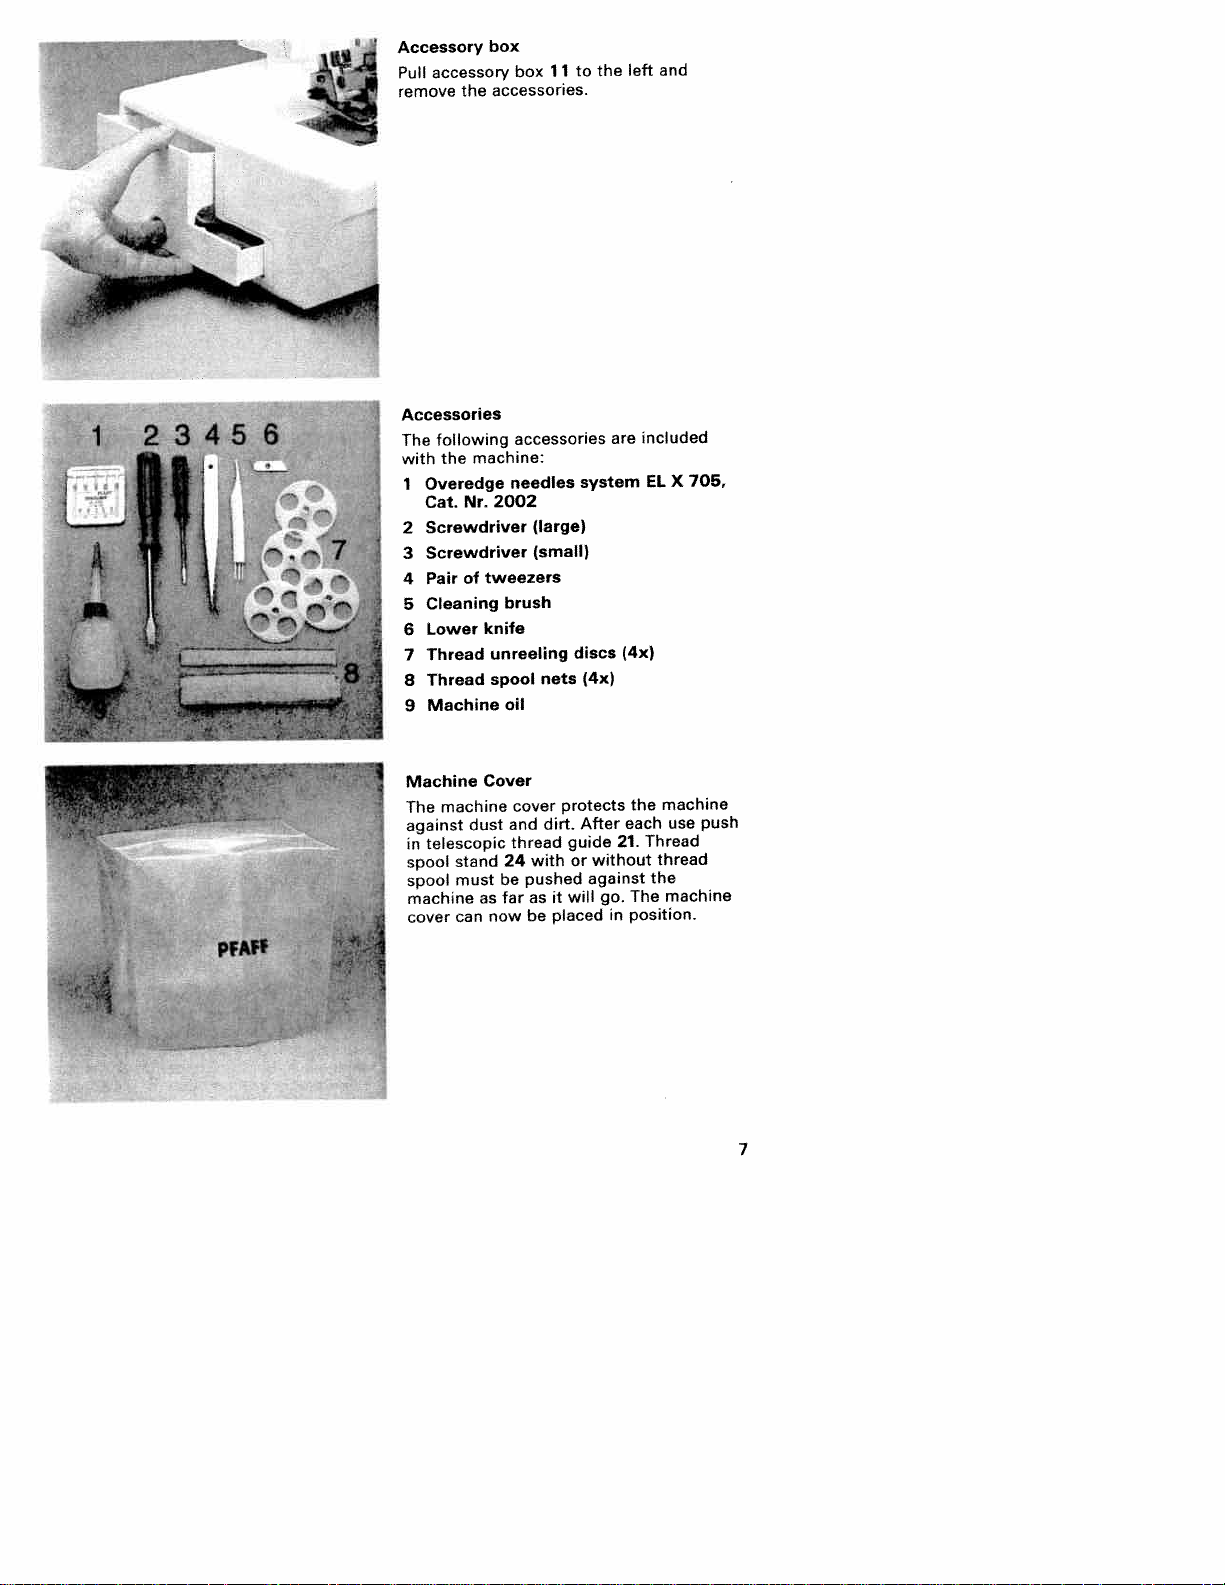
Accessory
accessory
Pull
remove
Accessories
following
The
the
with
Overedge
1
Cat
Screwdriver
2
Screwdriver
3
Pair
4
Cleaning
5
Lower
8
Thread
7
Thread
8
Machine
9
box
accessories.
the
machine:
2002
Nr.
tweezers
of
knife
unreeling
spool
11
box
accessories
needles
(large)
(small)
brush
nets
oil
the
to
system
discs
(4x)
are
(4x)
left
included
EL
and
X
705,
Machine
machine
The
against
telescopic
in
spool
spool
machine
cover
dust
stand
must
can
Cover
be
far
as
now
cover
and
thread
24
dirt.
with
pushed
it
as
placed
be
protects
After
guide
or
without
against
will
go.
in
the
each
21.
Thread
The
position.
machine
use
thread
the
machine
push
7
Page 12
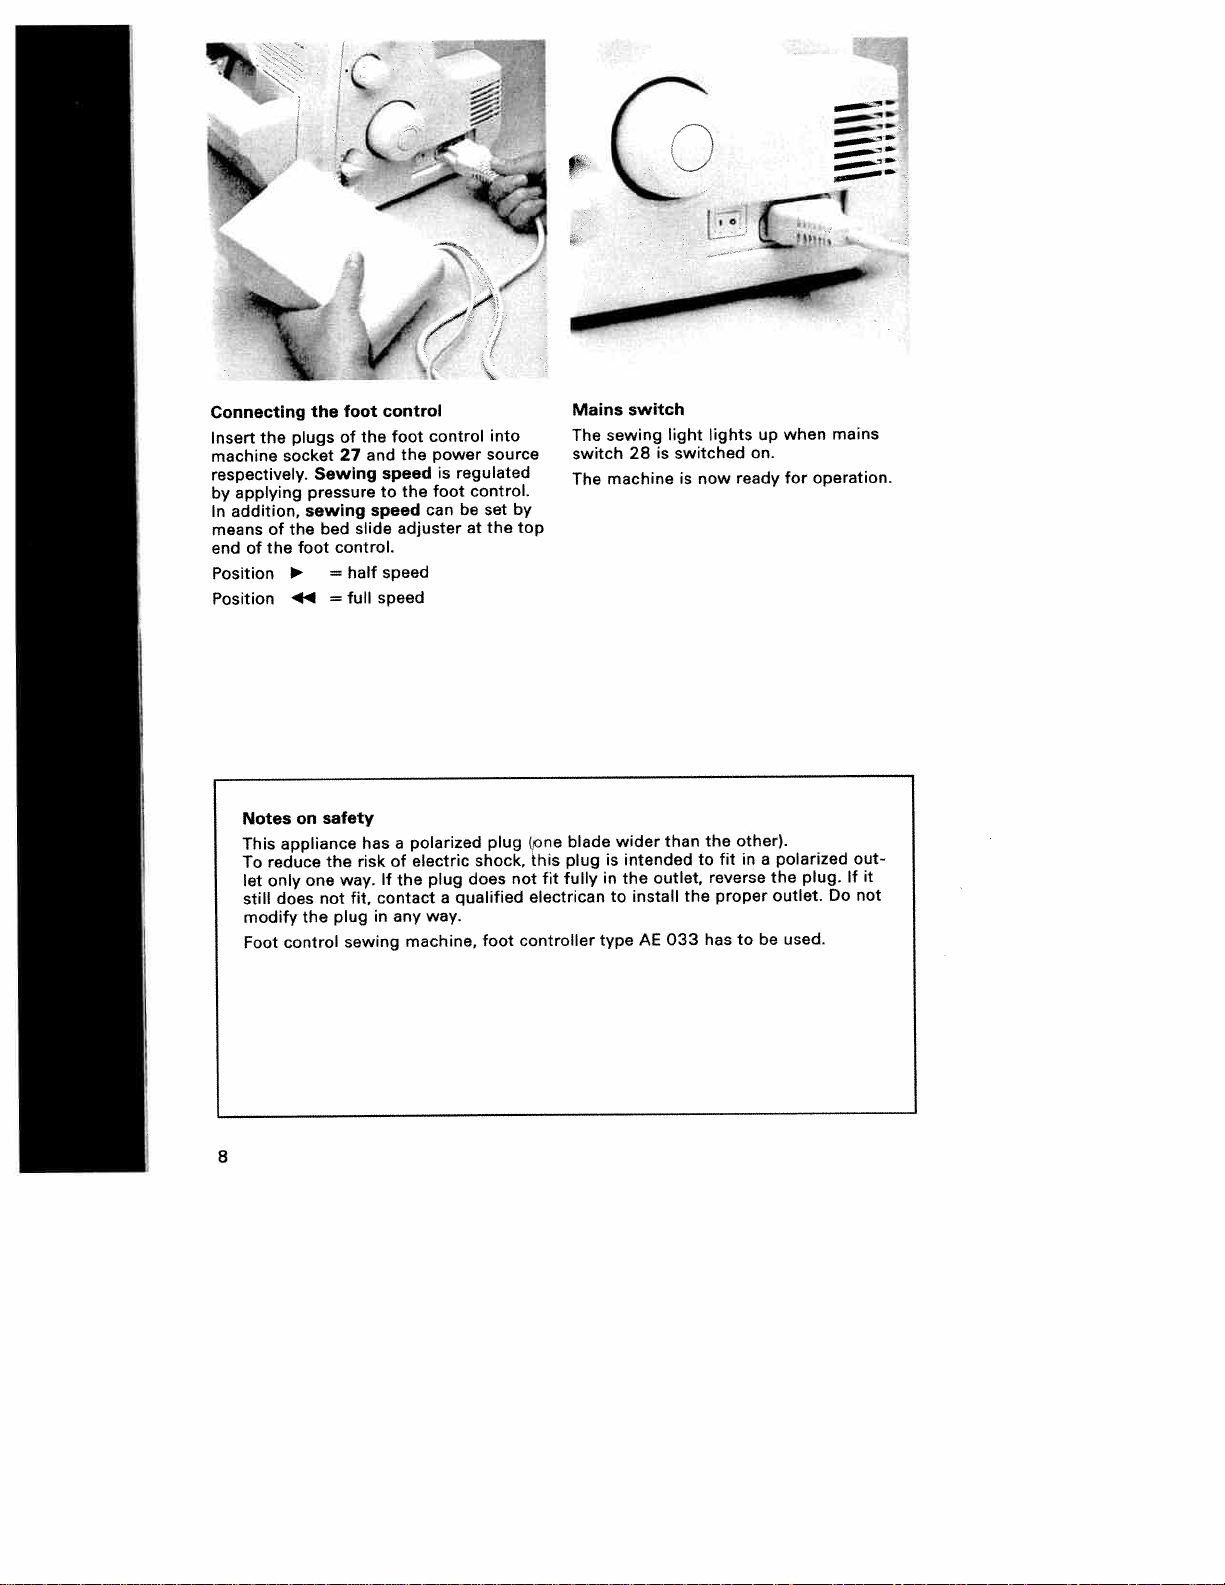
Connecting
Insert
the
machine
respectively.
applying
by
addition,
In
of
means
the
of
end
Position
Position
Notes
This
To
reduce
only
let
does
still
modify
Foot
the
plugs
socket
Sewing
pressure
sewing
bed slide
the
foot
44
safety
on
appliance
the
one
not
the
control
foot
of
27
control.
half
=
full
=
way.
fit,
plug
sewing
the
and
speed
has
risk
in
control
foot
the
speed
to
the
adjuster
speed
speed
a
of
If
the
contact
any
machine,
control
power
is
foot
can
polarized
electric
plug
qualified
a
way.
into
source
regulated
control.
be
set
at
the
plug
shock,
does
foot
Mains
The
switch
The
by
top
blade
(one
plug
this
fully
fit
not
electrican
controller type
switch
sewing
28
machine
wider
is
intended to
outlet,
the
in
install
to
AE
light
switched
is
is
than
the proper
033
lights
now
the
reverse
has to
fit
up
on.
ready
other).
in
a
be
when
for
polarized
plug.
the
outlet.
used.
mains
operation.
out
If
not
Do
it
8
Page 13

Lint
Insert
the
box
the
upper
4
upper
of
slots
PFAcF
tabs
looper
of
hobbYkk
4l62
lint
cover
box
part
snap
box,
cover.
use
4762
of
into
the
contai
the
the
hobbYkCk
the
lower
the
of
of
sequence.
PIAFF
the
the
lower
tabs
looper
lint
I
4
against
Press
until
into
34
7.
ner
lower
For
reverse
slots
removal
Looper
Slide
the
dual
colour
well
cover
looper
right
threading
on
the
as
looper.
edge
procedure
common
most
symbolically.
cover
and
the
threading
for
swing
paths
inside
addition,
In
the
stitch
as
far
7
downwards.
it
are
the
of
method
converter
types
it
as
displayed
machine,
of
mounting
the
and
are
will
the
the
shown
go
Indivi
in
over-
three
soon
power
as
i.e.
sup
the
9
is
interrupted,
as
the
Note:
cover
looper
to
as
to
ply
machine
the
machine
will
is
not
opened,
operate.
reasons,
safety
For
the
Page 14
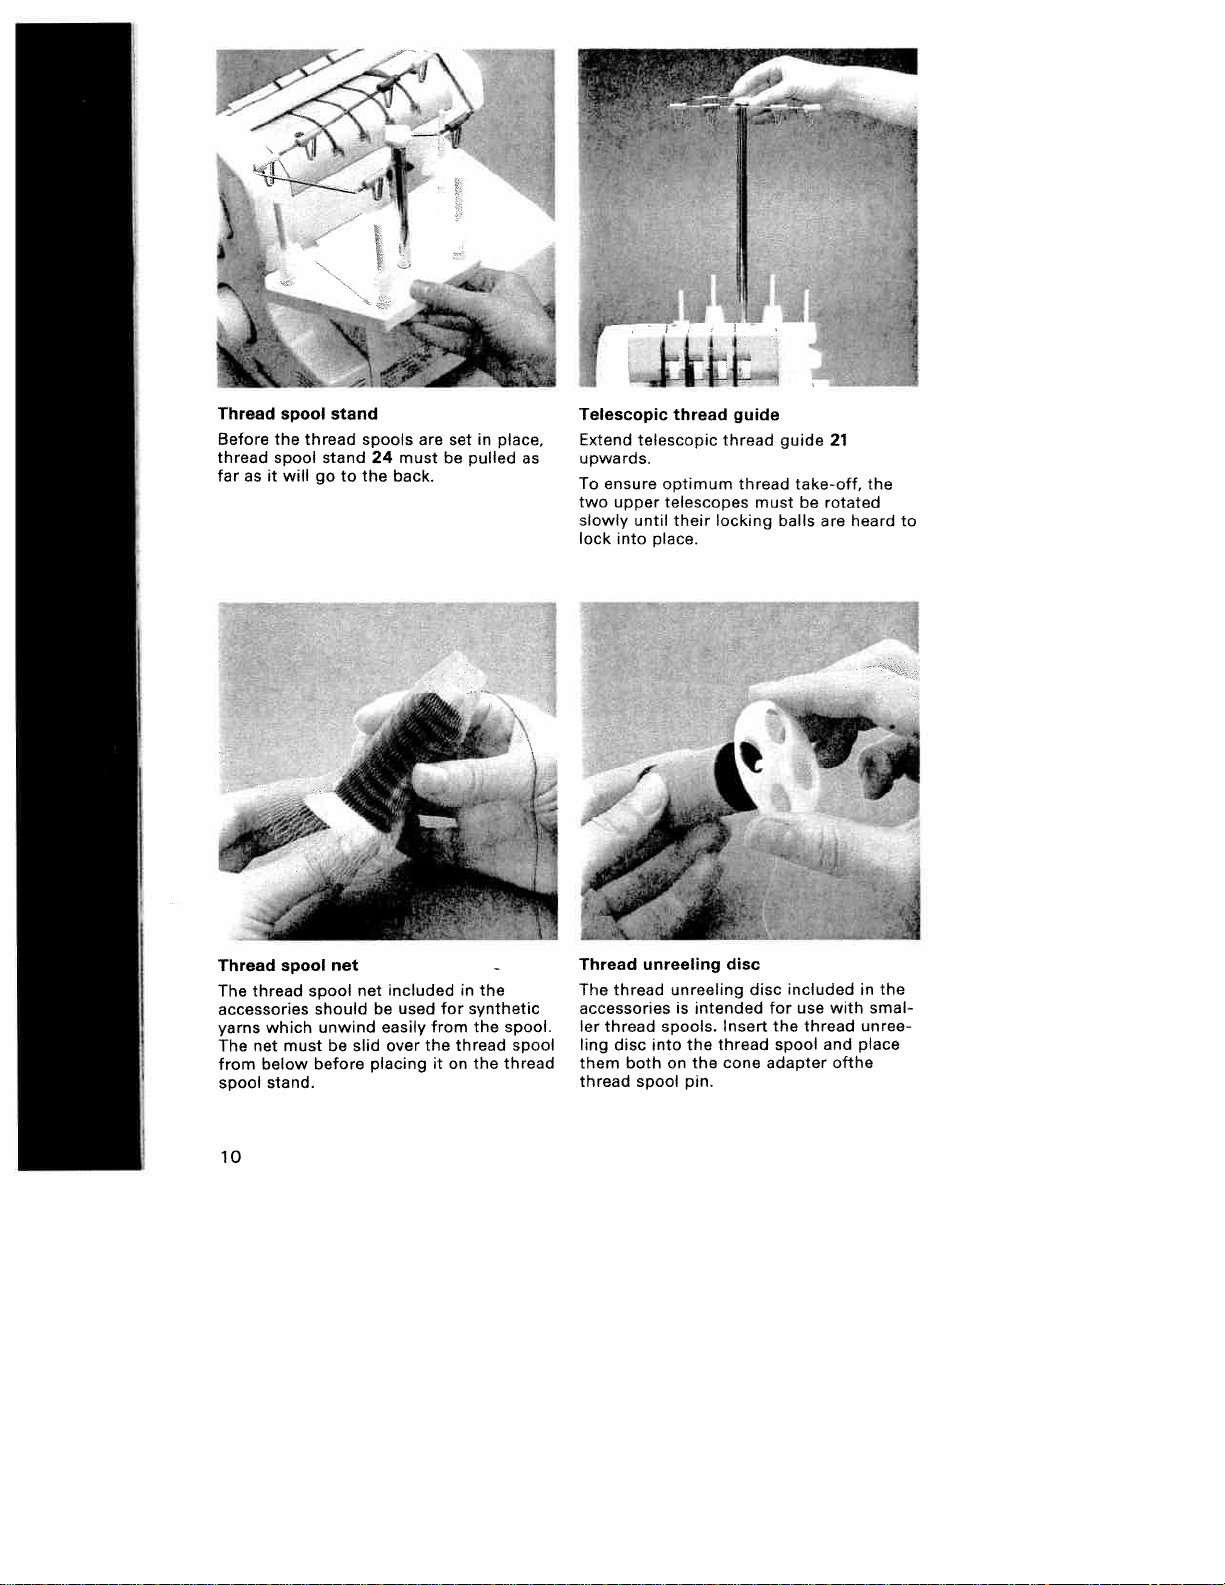
Thread
Before
thread
as
far
the
spool
it
spool
will
stand
thread
stand 24
gotothe
spools
are
mustbepulled
back.
setinplace,
Telescopic
Extend
upwards.
as
ensure
To
two
slowly
lock
telescopic
upper
until
into
thread
optimum
telescopes
their
place.
guide
thread
thread
locking
must
guide
take-off,
be
balls
21
rotated
are
the
heard
to
Thread
The
thread
accessories
yarns
which
net
The
below
from
spool
stand.
10
spool
net
spool
shouldbeused
unwind
must
be
before
includedinthe
net
easily
over
slid
placing
from
the
for
it
synthetic
the
thread
the
on
spool.
spool
thread
Thread
The
thread
accessories
ler
thread
ling
disc
them
both
thread
unreeling
unreeling
is
spools.
into
on
spool
intended
the
thread
the
pin.
disc
disc included
for
Insert
the
cone
adapter
spool
use
thread
with
and
ofthe
in
smal
unree
place
the
Page 15
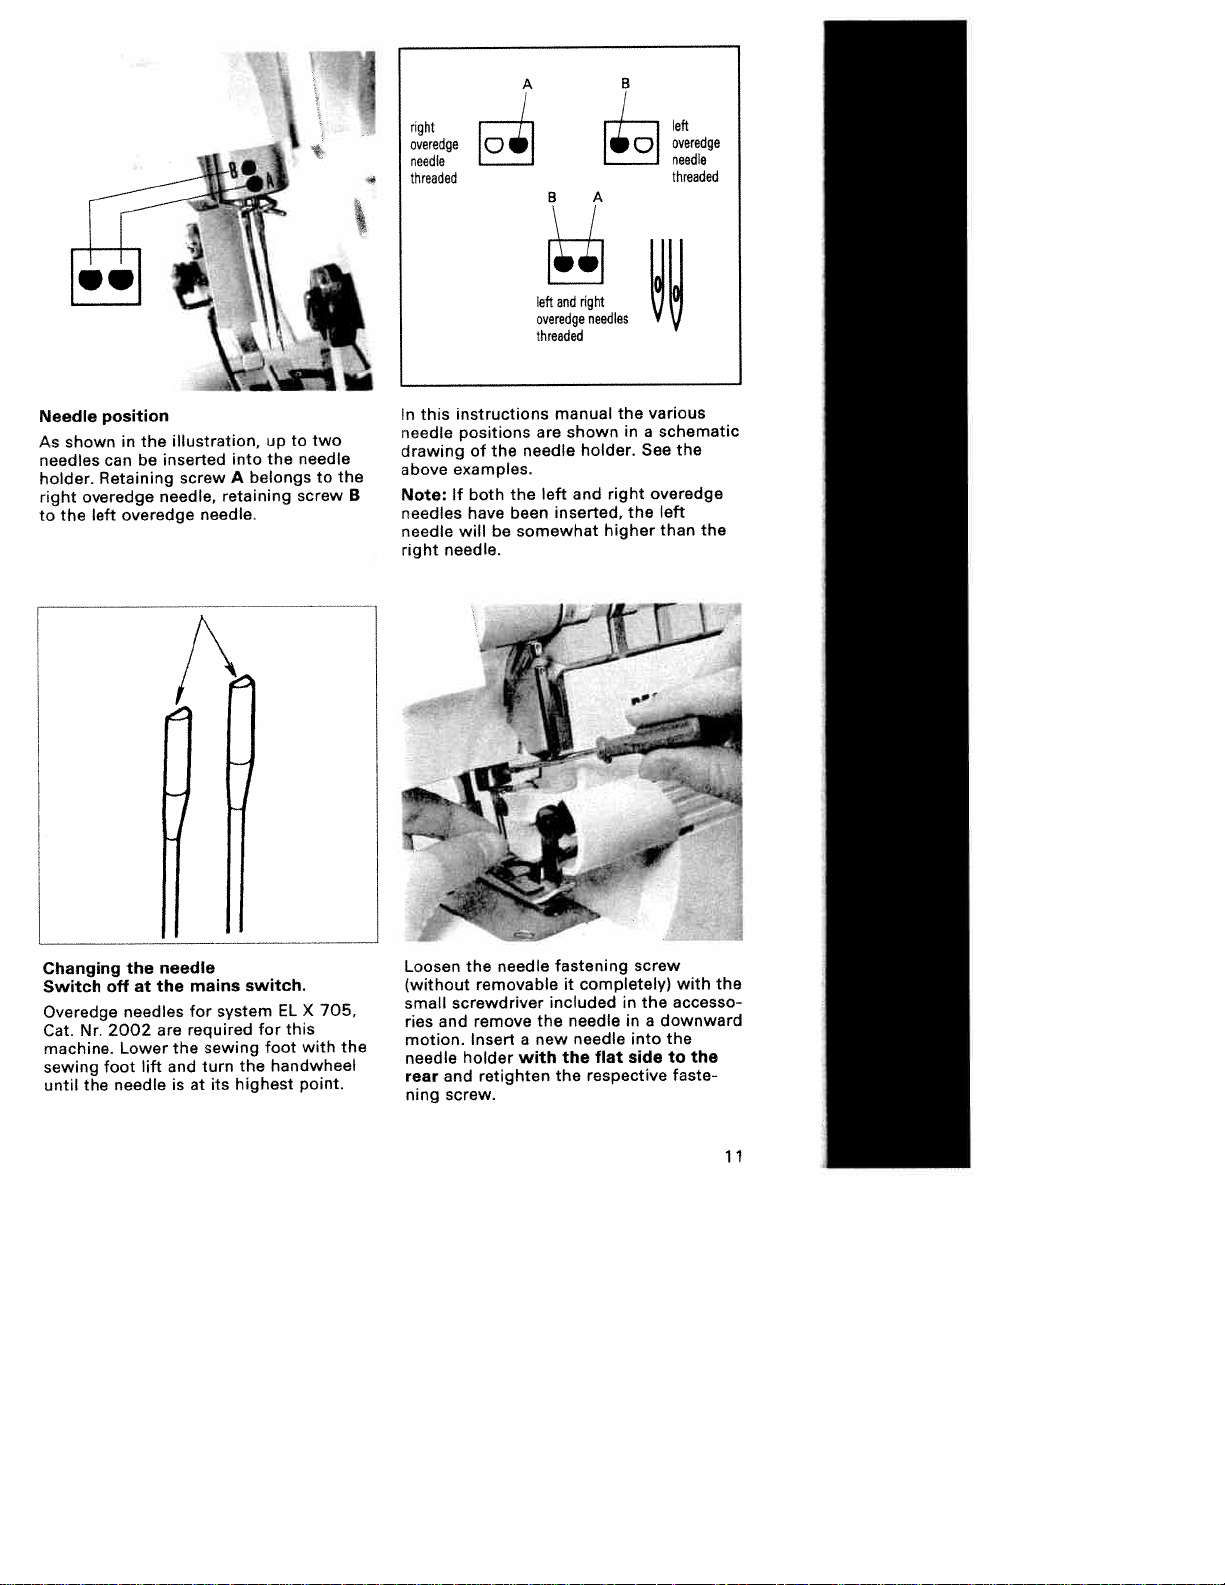
Needle
shown
As
needles
holder.
right
the
to
position
in
can
Retaining
overedge
left
overedge
the
be
needle,
illustration,
inserted
screw
needle.
into
A
belongs
retaining
up
the
to two
needle
to
screw
the
B
I
right
overedge
needle
threaded
In
this
needle
drawing
above
Note:
needles
needle
right
o
instructions
positions
of
the
examples.
If
both
have
will
be
needle.
A
left
overedge
threaded
are
needle
left
the
been
somewhat
right
and
needles
manual
shown
holder.
and
inserted,
B
the
in
right
the
higher
Q
various
schematic
a
See
overedge
left
overedge
needle
threaded
the
left
than
the
Changing
Switch
Overedge
Cat.
Nr.
machine.
sewing
the
until
off
2002
foot
needle
the
at
needles
Lower
lift
needle
the
are
the
and
is
mains
system
for
required
sewing
turn
its
at
switch.
for
foot
the
highest
705,
X
EL
this
with
handwheel
point.
the
Loosen
(without
small
ries
motion. Insert
needle
rear
ning
the
removable
screwdriver
remove
and
holder
and
retighten
screw.
needle
a
with
fastening
included
the
new
the
completely>
it
needle
needle
the
flat
respective
screw
with
in
the
accesso
inadownward
the
into
the
to
side
faste
the
11
Page 16
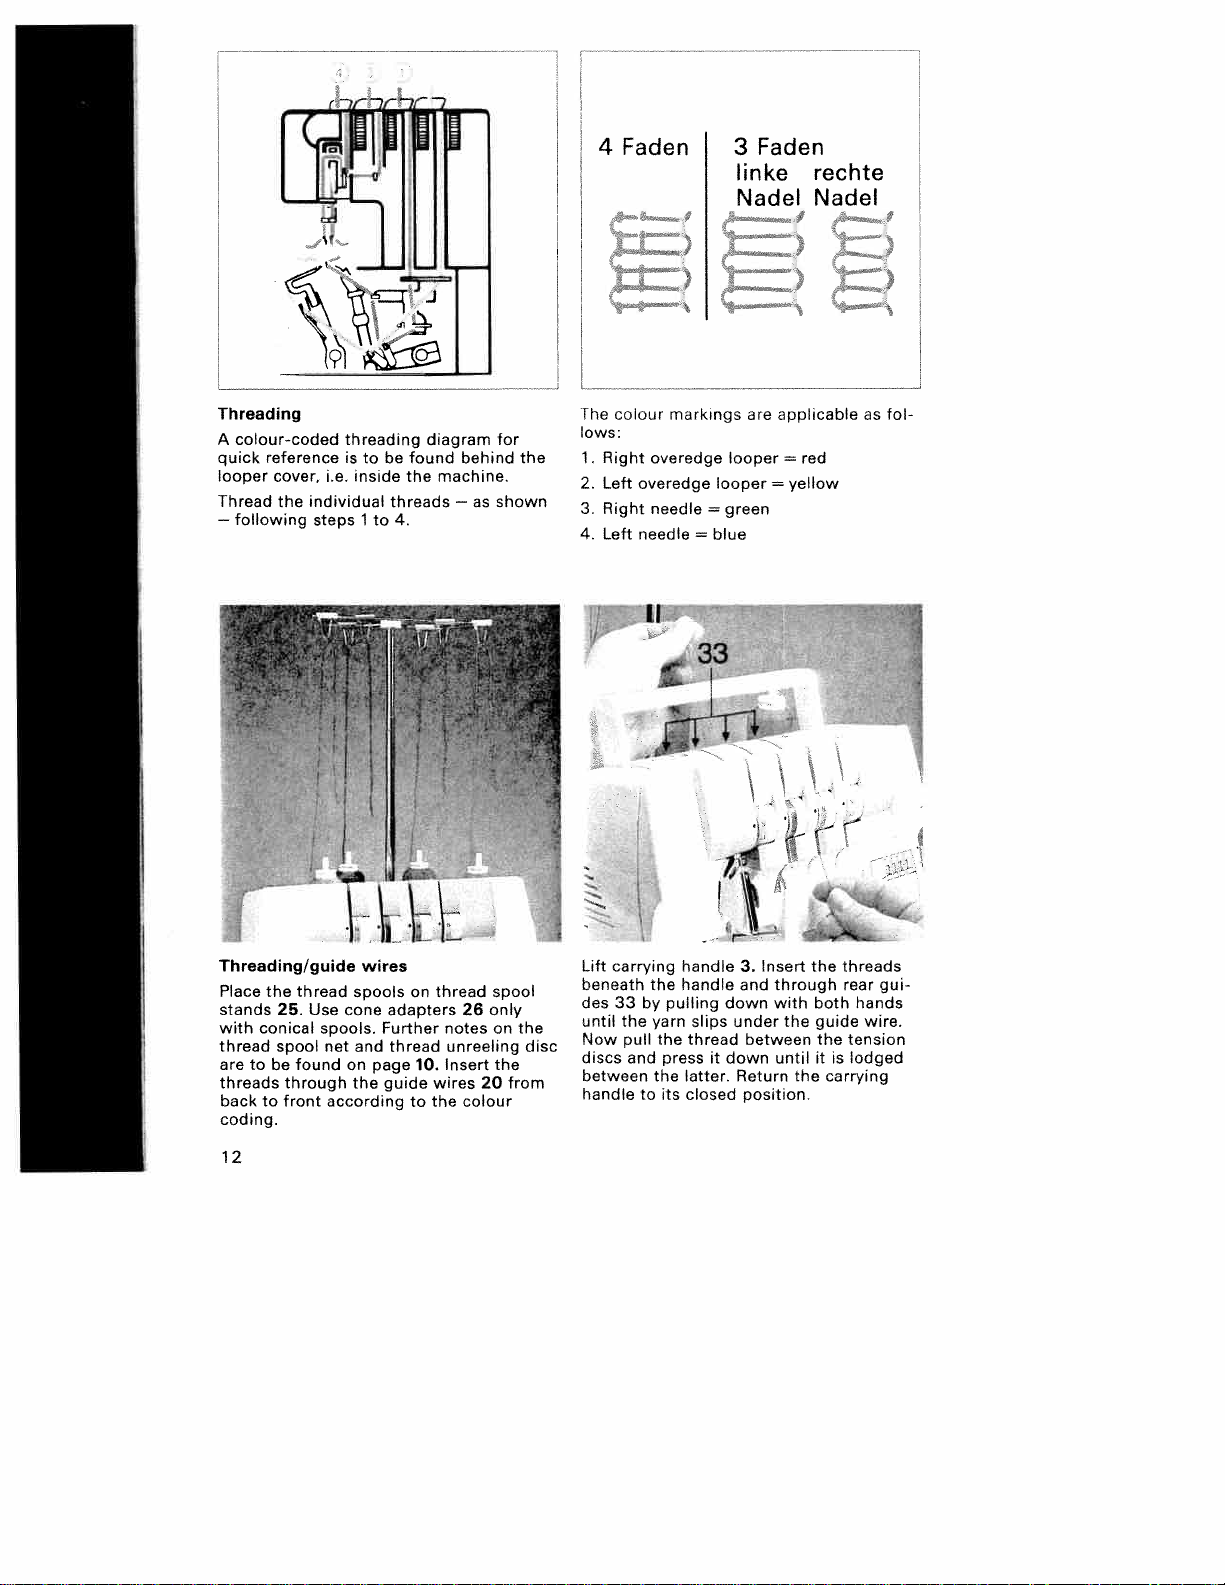
Threading
A
colour-coded
quick
reference
looper
Thread
—
following
cover,
the
threading
is
inside
i.e.
individual
steps
tobefound
the
threads—as
ito
4.
diagram
behind
machine.
for
the
shown
4
Faden
The
colour
lows:
1.
2.
3.
4.
Right
Left
Right
Left
markings
overedge
overedge looper=yellow
needle
needle=blue
H
Faden
3
linke
Nadel Nadel
are
applicable
looper=red
=
green
rechte
fol
as
Threading/guide
Place
the
25.
conical
spool
through
to front
thread
Use
stands
with
thread
are tobefound
threads
back
coding.
12
I
wires
spoolsonthread
cone
on
and
the
adapters
thread
page
guide
to
spools. Further
net
according
10.
the
26
notes
unreeling
Insert
wires
colour
20
spool
only
on
the
the
from
disc
Lift
carrying
beneath
des33by
until
Now
discs
between the
handle
the handle
the
pull
and
to
yarn
handle3.Insert
pulling
the thread
pressitdown
its
slips
latter.
closed
down
under
and
between
Return
position.
the
through
with
both
the
guide
the
untilitis
the
threads
rear
hands
tension
lodged
carrying
gui
wire.
Page 17
J1
3
I
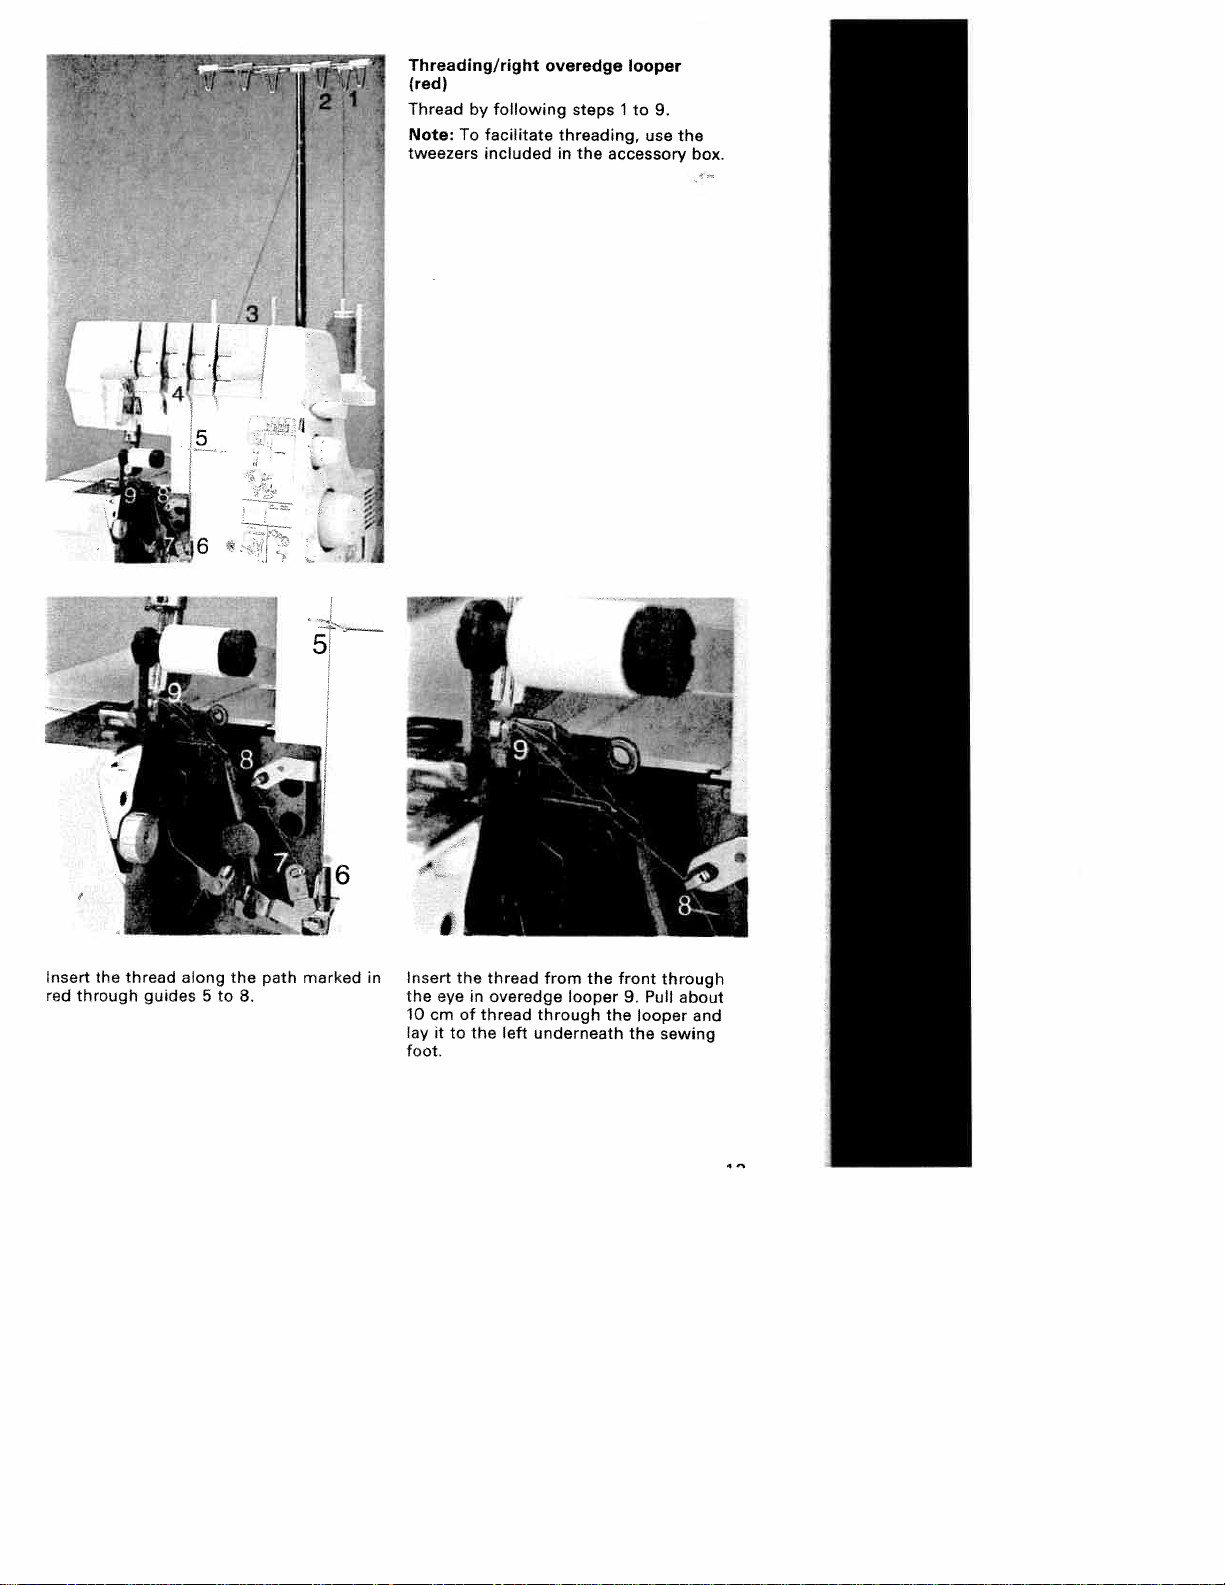
Threading/right
(red)
Thread
tweezers
by
following
Note:Tofacilitate
included
overedge
steps
threading,
in
the accessory
looper
ito
use
9.
the
box.
tnsert
red
the thread
through
along
guides5to
the
5—
path
8.
marked
in
Insert
the
the
eyeinoveredge
10cmof
layitto
foot.
the
thread
thread
left
from
the
looper
through
underneath
the
front
9.
the
through
Pull
looper
sewing
about
and
Page 18
the
direction
looper15is
right.
loopers
of
the
left
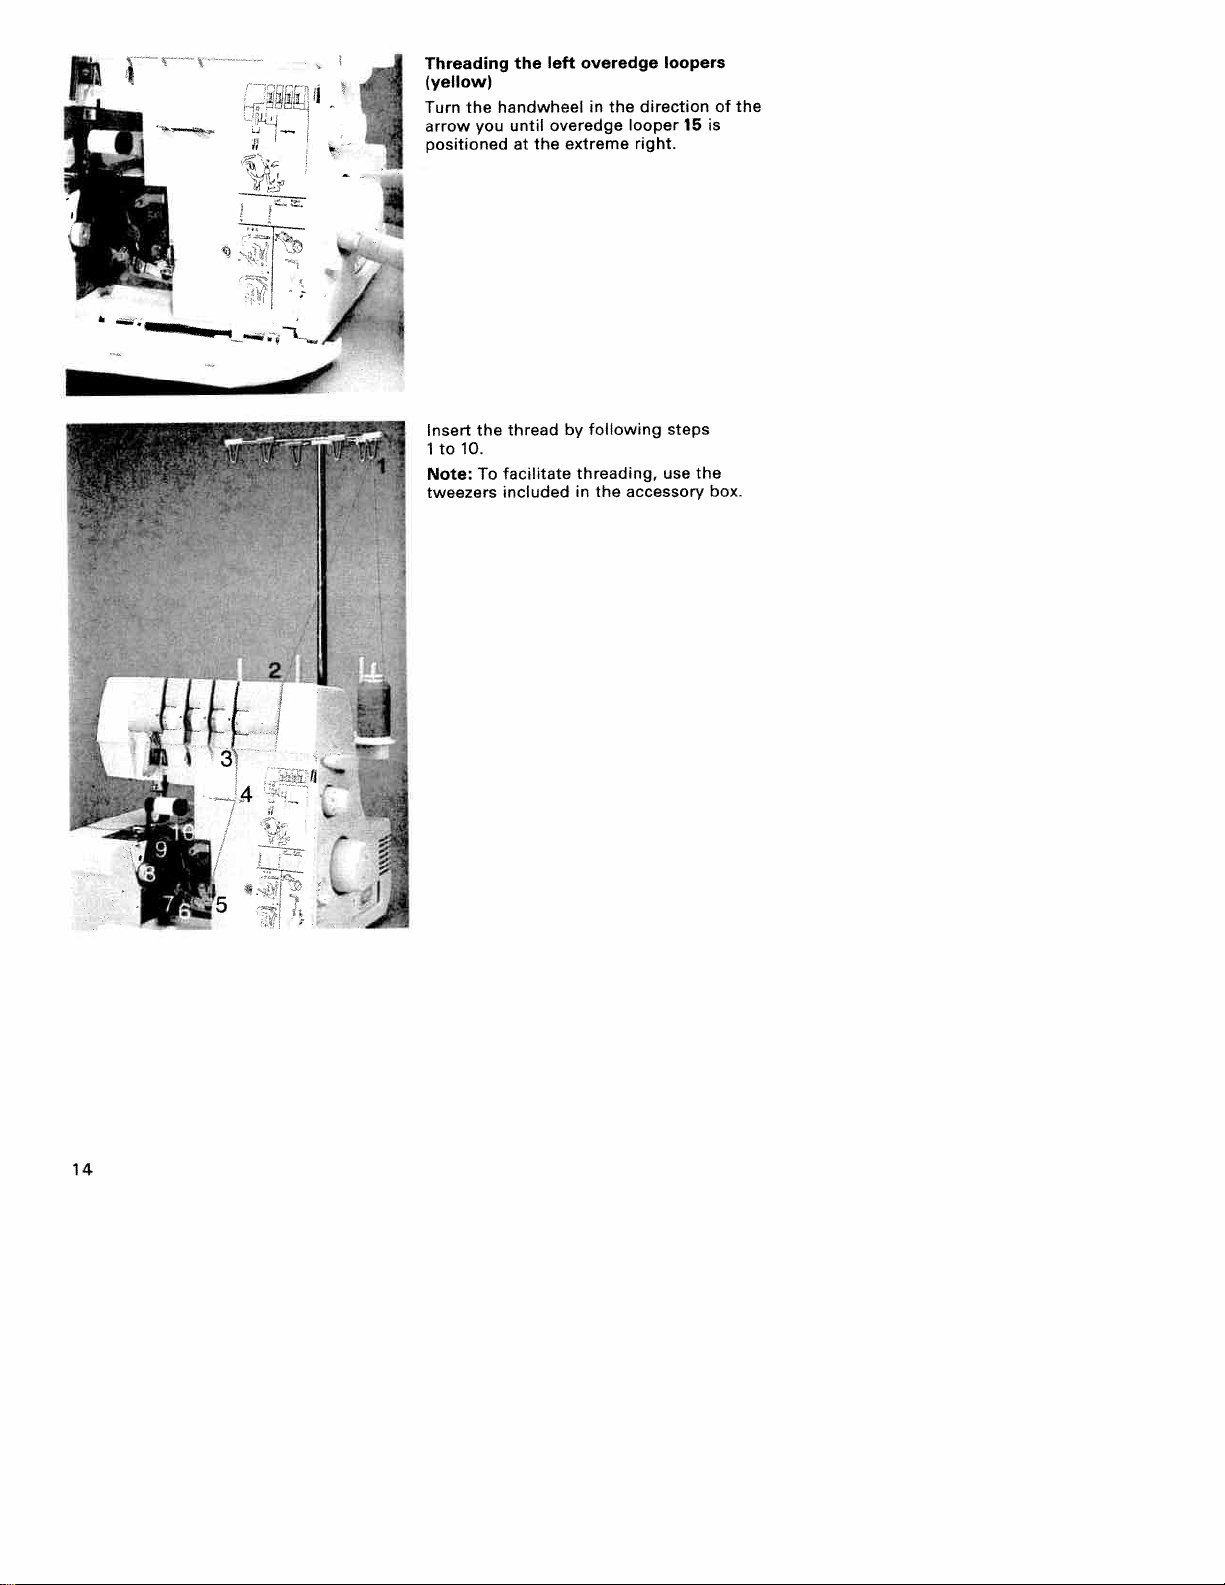
Threading
:J
‘:
(yellow)
Turn
arrow
positionedatthe
the
you
the
handwheel
until
overedge
in
overedge
extreme
I
‘I
Insert
ito
10.
Note:
tweezers
the
To
thread
facilitate
included
following
by
threading,
in
the
steps
use
accessory
the
box.
14
Page 19
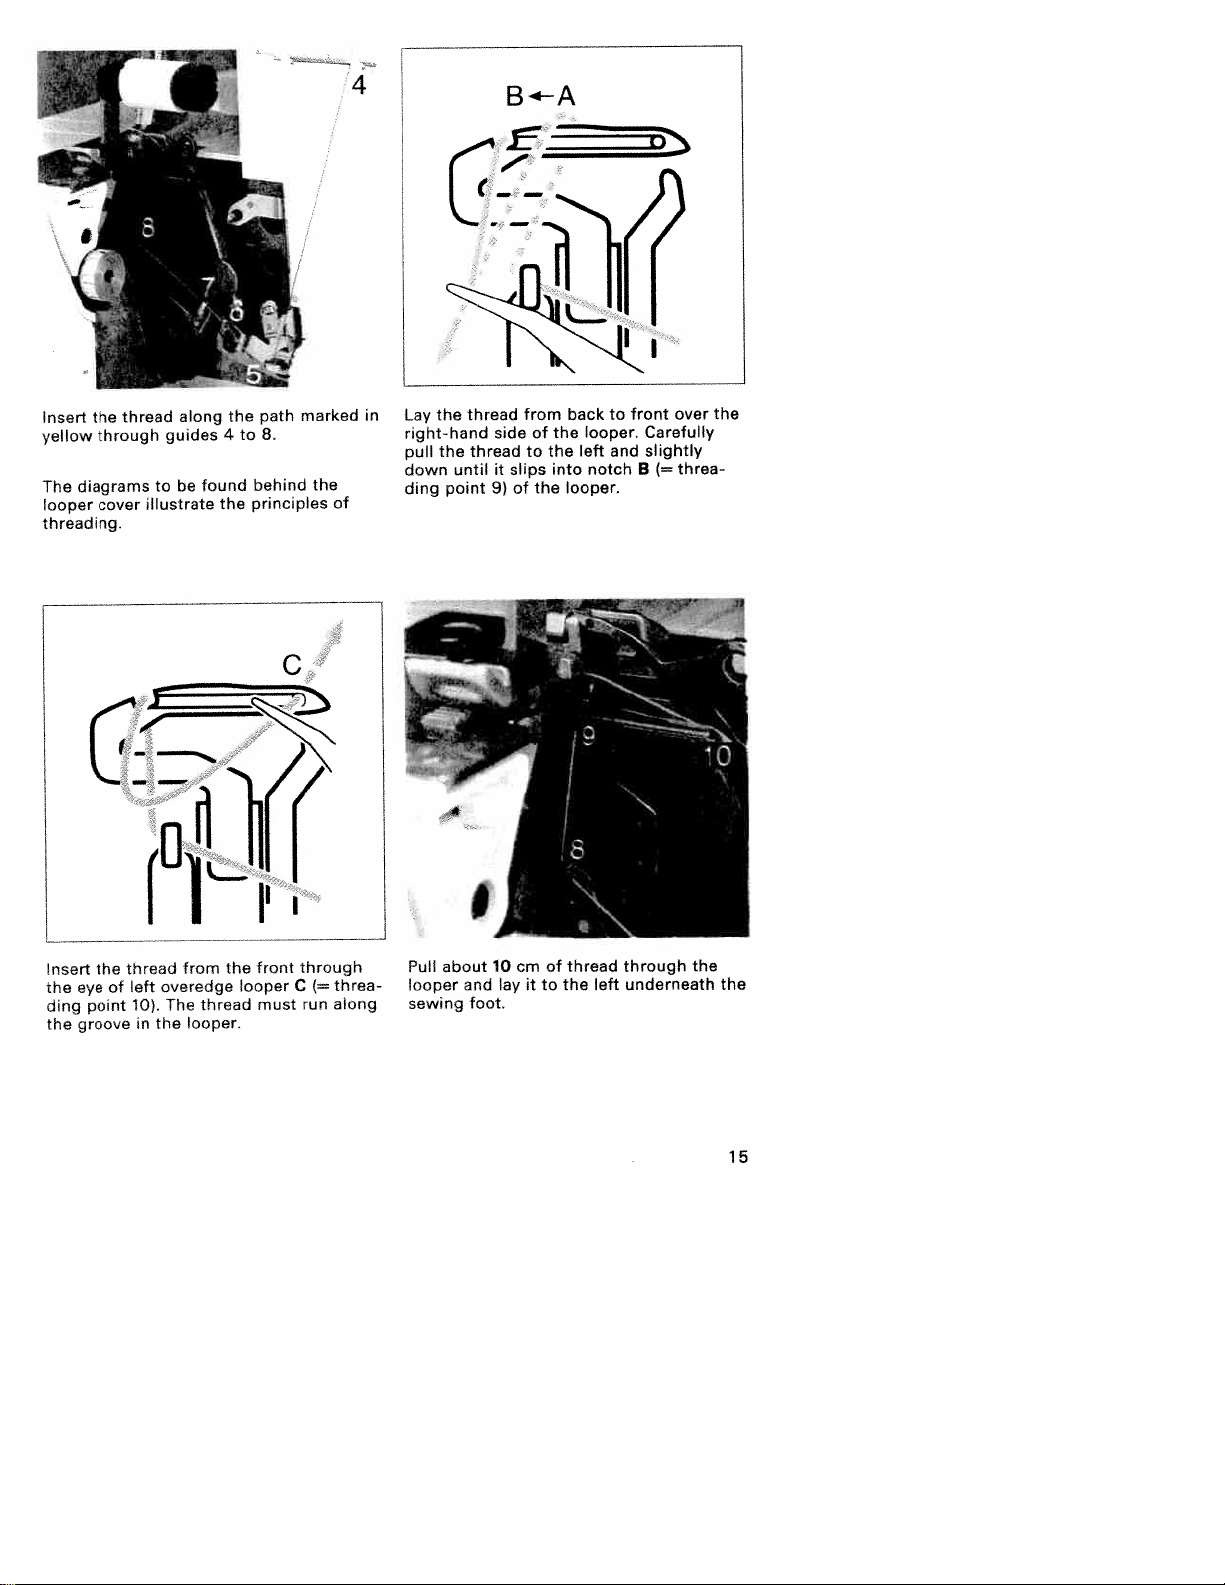
4
the
Insert
yellow
diagrams
The
looper
threading.
Insert
ihe
eye
point
ding
groove
the
thread
through
cover
thread
the
left
of
guides
tobefound
illustrate
overedge
The
10).
the
in
along
from
looper.
4to8.
the
the
thread
the
behind
principles
looper
path
front
must
C
C
marked
the
of
through
(=
run
threa
along
in
the
Lay
right-hand
the
pull
untilitslips
down
ding
point9)of
Pull
about
looper
sewing
thread
sideofthe
thread
10cmof
and
foot.
from
to
the
layitto
the
into
back
looper.
left
looper.
thread
the
notch
left
front
to
Carefully
slightly
and
B
through
underneath
(=
over
threa
the
the
the
15
Page 20
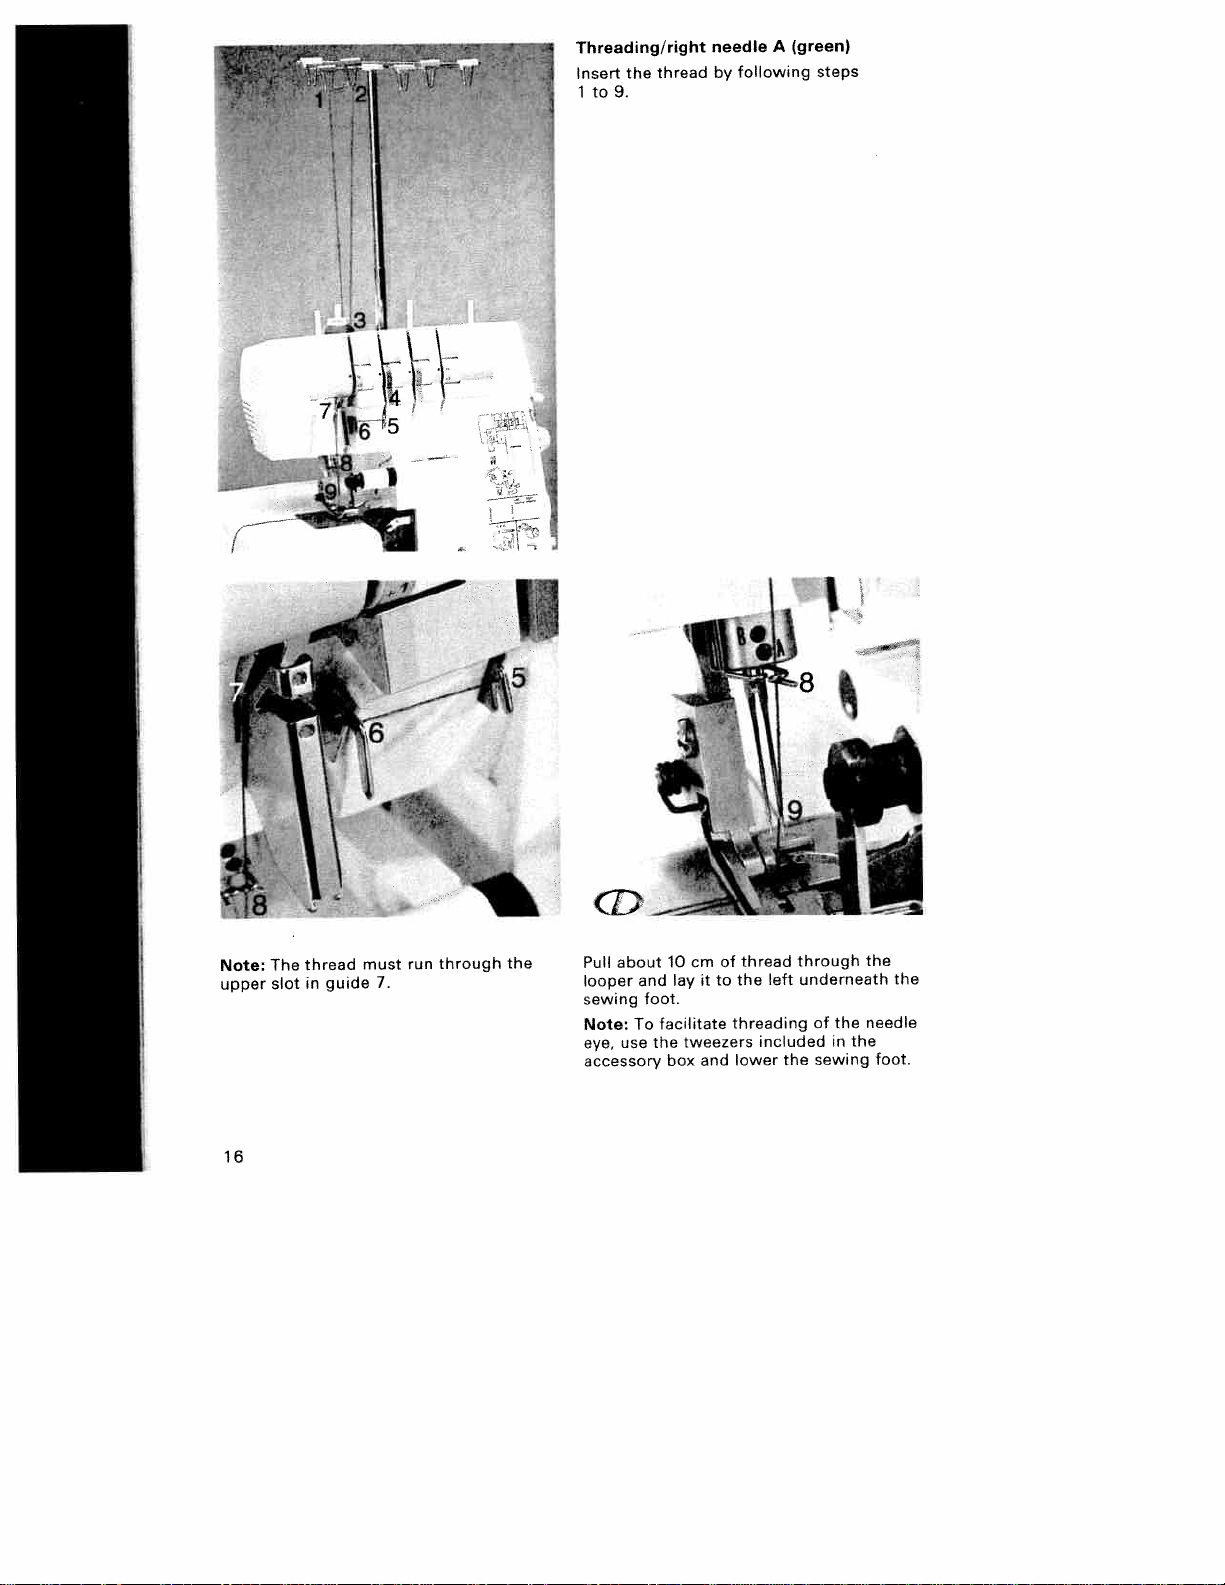
Threading/right
thread
the
Insert
1
9.
to
needleA(green)
following
by
steps
Note:
upper
16
The
slot
thread
guide
in
must
7.
run
through
the
Pull
about
looper
sewing
Note:
use
eye,
accessory
and
foot.
To
10
lay
facilitate
tweezers
the
box
cm
it
and
thread
of
to
the
threading
lower
through
underneath
left
included
the
the
of
in
sewing
I
the
the
needle
the
foot.
Page 21

Hi
Threading/left
steps
the
ito
Thread
B
B
(blue>
by
following
needle
needle
left
7.
Note:
lower
The
slot
thread
in
guide
must
5.
run
through
the
Pull
about
needle
neath
Note:
use
eye,
accessory
eye
the
To
10
and
sewing
facilitate
tweezers
the
box
cm
lay
and
thread
of
it
to
foot.
threading
lower
through
the
included
the
left
of
sewing
under
the
the
in
the
needle
foot.
17
Page 22
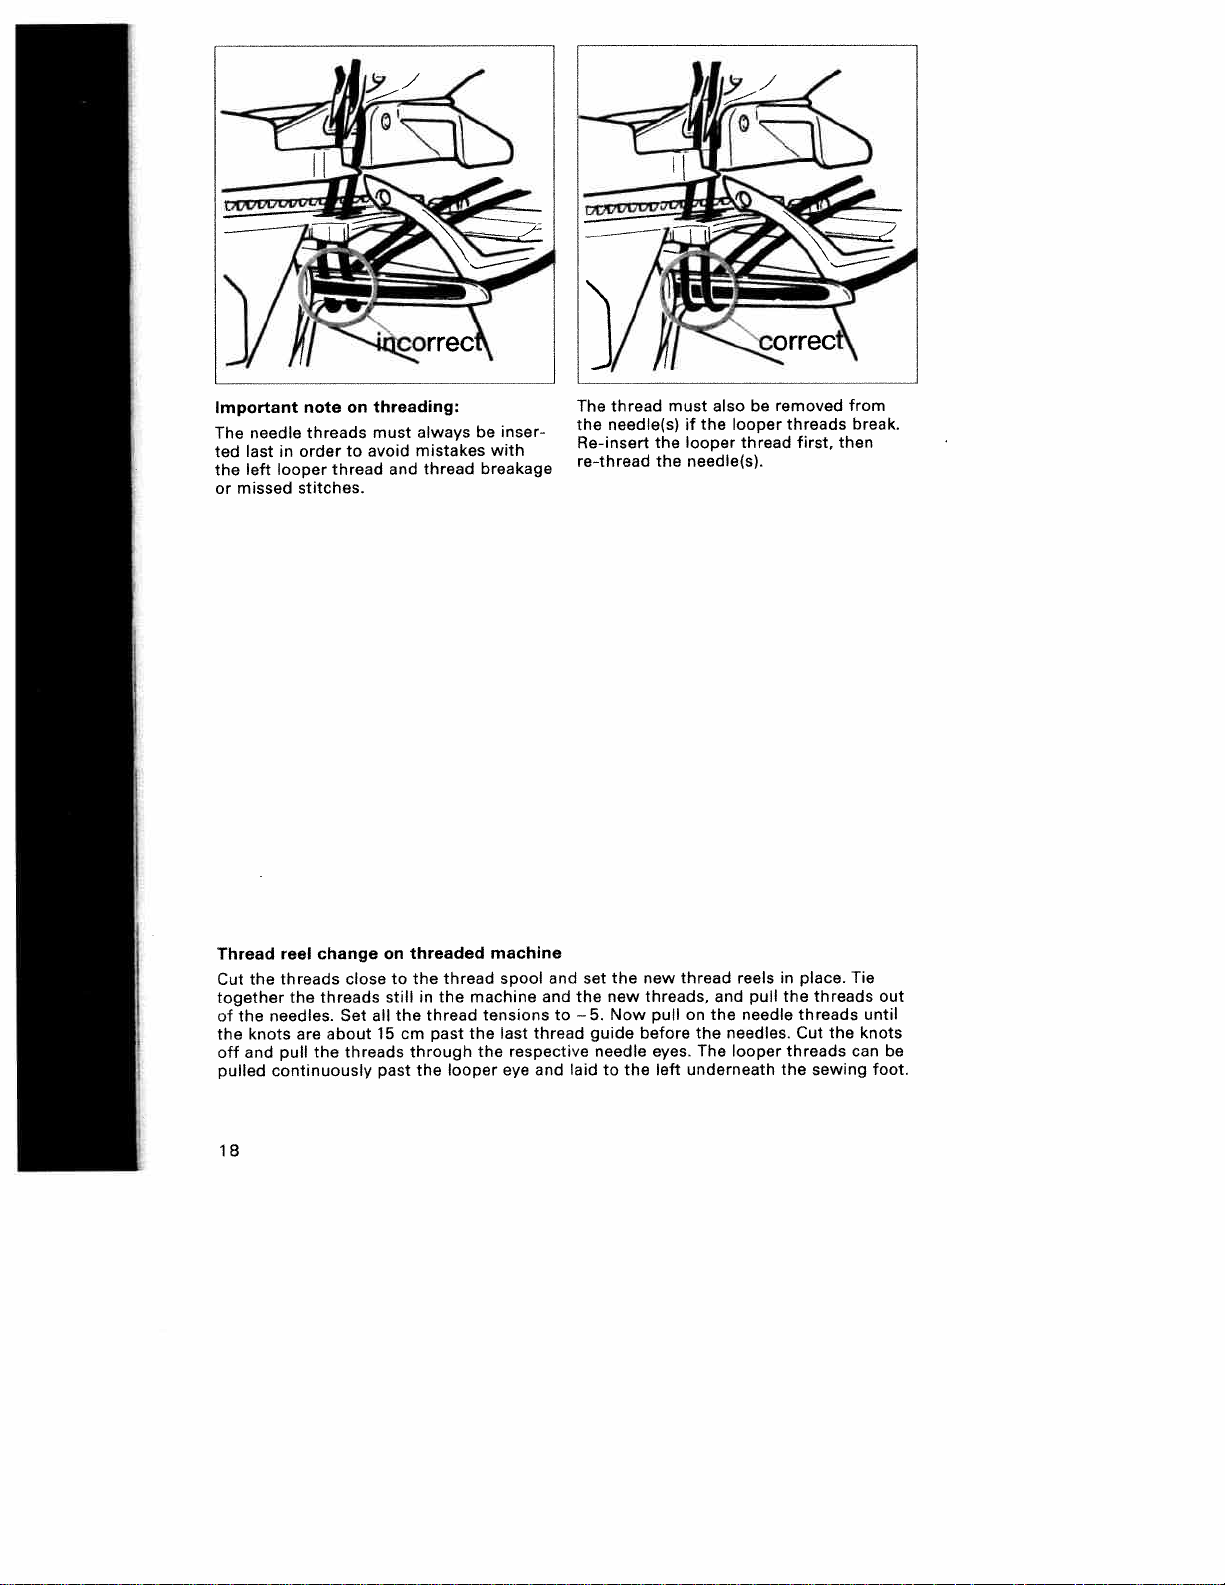
Important
The
needle
lastinorder
ted
left
the
or
missed
note
looper
stitches.
threads
thread
on
to
threading:
must
avoid
and
always
mistakes
thread
be
inser
with
breakage
The
thread
the
needle(s)
Re-insert
re-thread
the
the
must
if
looper
needle(s).
the
also
be
looper
thread
removed
threads
first,
from
break.
then
Thread
Cut
the
together
of
the
knots
the
off
and
pulled
18
reel
change
threads
threads
the
needles.
about
are
pull
the
continuously
on
closetothe
stillinthe
Set
all
the
15
cm
threads
past
threaded
thread
thread
past
through
looper
the
machine
spool
machine
tensions
the
last
the
eye
and
and
to
thread
respective
and
the
—5.
laid
set
guide
needle
new
to
the
Now
the
new
threads,
pull
before
eyes.
left
thread
and
the
on
needles.
the
The
looper
underneath
reels
pull
needle
in
place.
the
threads
Cut
threads
the
threads
the
sewing
Tie
knots
can
out
until
be
foot.
Page 23

Sewing
The
red
mum
foot
achievedbyalso
foot
foot
sewing
with
foot canberaised
sewing
vertical
for
particularly thick
lift
towards
lift
liftof6
lift
foot
mm
depressing
the
back.
32.
for
fabrics
The
the
the
and
maxi
can
sewing
lowe
sewing
be
Thread chain
After
finishingaseam, continuetosew
thread
thread
chain
cutter
be
cut.
cutter
chainof15—20
chain
towards
23.
The
thread
the
cm.
front
Pull
chain
the
over
wilt
a
thread
thus
Changing
Switch
To
highest
Press
sewing foot
be
and
lift
To
insert
that
red,
sewing
Check:
ensure
locked into
the
sewing foot
off
at the
remove:
released
canberemovedtothe
the
insert:
when
the
Raise
position and
the
white
holder.
automatically
spring
Lift
the
sewing
the
pinofthe
foot
holder.
Please
that
the
place.
slightly.
the
sewing
mains
needle(s)
the
lift
leveratthe
The
spring
foot
under
foot
foot
lift
the
sewing
sewing foot
switch
the
sewing
rearofthe
sewing foot
from
the
left.
slightly
the
leverislowe
locks into
foot
properly
is
to
the
foot.
will
holder
Todothis,
and
holder
the
lever
so
to
19
Page 24

Disengaging
Switch
Raise
position
Detach
cover.
ble
off
upper
by
the
Now
upper
Engaging
Slide
the
towards
knife
knife
back
position.
attach
the
at
knife
rotating
lint
slide
knife
the
holder
until
Close
lint
the
the
box
fully
upper
the
it
the
box.
upper
mains
19
to
its
the
and
holder
the
towards
knife
movable
of
the
right
and swing
locks
looper cover
knife
switch
upppermost
handwheel.
open
the
of
the
the
into
its
looper
mova
right.
upper
the
working
and
Turn
from
horizontal
re
the
you
head
until
position.
of
the
the
upper
upper
knife
knife
away
locks
into
a
20
Page 25

Mounting
Switch
converter
The
2-thread
3-thread
lint
the
Converter
machine
Insert hub
aperture
the
at
off
seams
overedge
box
and
6
housing.
A
of
converter
the
must
located
is
of
the
and
open
the
right
mains
be
the
closing
the
Pull
converter
overedge
switch
mounted
2-needle,
seam.
looper
in
the
it
out.
front
into
for
Detach
cover.
of
the
looper.
all
the
Rotate
edge
movable
the
Rotate
press the
the
that
of
eye
converter
The
ing
these
the
looper
the
the
handwheel
is
upper
converter
upper
of
tip
looper.
directions
positioned
knife.
part
converter
the
be
can
in
until
to
towards
slightly
removed
reverse
the
the
the
to
locks
right
right
the
by
order.
over-
left
rear
into
follow
of
and
so
the
21
Page 26

Adjusting
Switch
Detach
continuously
be
3.0
mm
adjustment
can
be
holderispushed
knife
off
the
to
more
seam
at
mt
4.5
knob
the
box.
mm
easily
width
mains
The
adjusted
by
The
17.
adjusted
switch
seam
as
turning
seam
slightly
width
desired
seam
width
the
if
to
upper
the
can
from
width
is
right.
The
needle
ment
adjustments
plate.
for
rolled
R
are
is
the
seams.
5,2rnm
marked
seam
11
the
on
width
adjust
Note:
needle
width
22
The
only.
can
seam
For
continuously
be
width
the
adjustments
needle,
left
adjusted
the
between
value
set
from
5.2
3.0
increased
is
mm
mm
to
6.7
and
4.5
by
mm.
2.3
O24)
mm
apply
mm,
i.e.
the
right
to
seam
the
Page 27

3
Adjusting
The
from
stitch
For
adjustment
I
When
the
Sewing
The
pressure
fabrics.
The
to
or
ever
sure.
In
from
for
The
set
weight
the
fabrics:
set
Note:
it
strikes
screw
Now
set.
the
length
stitch
1
F
(
length
sewing
most
working
adjustment
toot
machine’s
is
sewing
changed
be
heavier
this
fabrics
become
event,
accessory
the
adjusting
pressure
screwtothe
fabrics:
screw
set
increase
to
screw
Turn
against
back
standard
the
can
to
mm>
adjustment
work,
shouldbeset
knob
with
knob
pressure
factory-set
suitable
pressure
foot
for
necessary
insert
sewing
the
is
adjusted
left
reduce
to
the
pressure
right.
the
set
the
the
the
to
be
4
mm
close-knit
to
for
most
sewn,
are
the
box
or
left.
screw
top
left,
sewing
the
pressure
rotating
desired
set
as
turning
by
31.
knob
length
stitch
at
3
fabrics,
4
mm.
sewing
medium-heavy
does
fabrics.
to
reset
small
into
foot
by
right.
For
by
to
lid.
foot
foot
not
lighter
If
it
may
the
screwdriver
screw
set
pressure.
turning
light
For
by
heavyweight
turning
right
the
turn
Then
it
6
pressure
mm.
set
need
how
pres
22
the
turning
the
until
the
times.
is
length
stitch
23
Page 28

Differential
The
differential
(A
dogs
which
other,
lever
ment
the
front
amount
be
adjusted
The
standard
the
which
chronously
front
the
same
the
The
Note:
also
feed
selected
A
feed
arranged
+
B),
move
30
feed
fabric
of
within
front
with
rear
and
amount
effectiveness
depends
the
and
consists
feed
the
regulates
(A),
dog
tobefed
the
adjustment
dog
feed
the
rear
feed
fabric.
of
on
type
of
one
behind
workpiece,
movement
the
thus
and
through.Itcan
0.5
range
is
1
moves
(A)
feed
dogs
both
the
of
stitch
the
fabric
of
two
the
Adjust
the
and
by
.0,
dog
(B),
move
differential
lenght
used.
feed
of
2.0.
syn
i.e.
If
differential
to
set
fast
as
dog
feed
fabric
a
As
24
0.5,
as
as
result,
the
the
feeds
the
the
feed
front
rear
rear
adjustment
feed
through
feed
fabric
feed
dog
dog.
only
dog.
is
stretched,
lever
moves
i.e.
half
the
is
30
half
front
much
as
prevents
This
gathered
fabrics
such
smooth
a
is
Fashionable
in
duced
using
when
when
this
the
sewing
as
silk
seam
touches
way,
rib
knit
seam
and
(A).
such
(B).
can
very
taffeta.
also
as
delicate
be
the
The
intro
wave
result
effect
becoming
from
Page 29

4
Set
differential
to
10
so
twiceasfastasthe
front
feed
fabricasthe
much
Asaresult,
The
following
should
you
Fabric
very
thin
normal
fine
cord,
thin
knitted
fine
knitwear
thick knitted
knitwear.
Stretch—wave
fabrics,
openings,
feed
that
the
feeds
dog
fabric
the
table
always
type/Effects
fabrics:
fabrics:
thermal
fabrics:
and
fabrics:
Jersey,
skirt
adjustment
front
feed
dog
feed
rear
through
rear
indicates
performasewing
silk,
lightweight cotton,
fabrics.
cuffs,
effect:
knitwear,
hems,
feed
is
gathered.
satin,
Jersey,
sweatshirt
medium-
frilled
set
dog,
twice
dog.
possible
poplin,
polo
tight
lever
moves
i.e.
edges
stitch
30
the
as
testonyour
taffeta,
medium
fabric,
fabric,
and
lightweight
on
length.
This
stretched
suchasJersey
result
Fashionable
ducedinthis
effect
(D).
settings
lining
cotton,
nicki,
thick
cuffs,
sleeves
prevents
isasmooth seam
when
for
fabrics.
frotté,
knitted
and neck
the
when
touches
way,
using
the
differential
fabric before
•
sewing
and
knitted
rib
stitch
(C).
can alsobeintro
suchasthe gather
very
delicate
feed.
starting
Differential
gather
2,O
from
seam
becoming
fabrics
goods.
fabrics
However,
work.
feed
normal
)1,O(
The
setting
stretch
O,5
Crimping:
seam
shirts,
slightly
or
sewing
Frills
allowancesincircular
skirts,
crimping sleeve
sleeves
made
from
round
pockets,
onto
cuffsorwristbands.
fabrics
thin
cut-outs,
flaps
(shoulder) curves,
and
curvesonblouses,
lapels,
and
lace,
gathering
25
Page 30

pcAFF
Sewing with
Detach
Remove
work
Reattach
The
sewing
and
arm.
the
the
support
free
tubular
sleeves.
the
arm
the
work
lint
10
lint
is
particularly
items
Insert
free
arm
support
box
and
towards
box.
suchastrouser
article
the
pull
detachable
the
useful for
left.
over
the
legs
free
26
Reattaching
Position
that
it
is
then
slide
position.
the
level
it
the
work
detachable
with
to
the
support
work
the
machine
right
untilitlocks into
support
cover,
so
Page 31

Setting
width
For
standard
the
Set
position
I
the
chaining
slide
bed
S.
bed
slide
land
overlock
for
for
the
seams:
chaining
stitch
land
18
N
.-
Chaining
All
with
to
standard
this
landAwill
overlock
adjustment.
be
seams
pushed
can
forward
be
sewn
4
For
rolled
Set
the
position
hems
bed slide
R.
for
chaining
land
18
to
Chaining
All
rolled
adjustment.
land
hems
A
will
pushed
can
be
sewn
be
backward.
with
this
27
Page 32

Program
Program
4-thread
summary
overedge
position
Application
material,
elastic
any
fabrics,
serging.
with
seam
-
Sewing
especially
simultaneous
together
Needle
=
=
links
rechts
3-thread
3-thread-overedge
3-thread
3-thread
overedge
serging
serging
tsLsLt;\
3-thread
decorative
seam
seam
seam
seam
\
seam
(wide)
(narrow)
(wide)
(narrow)
Serging
flatlock
As
together
a
as
tightly-woven
frayed)
lightweight
tightly-woven
lightweight
medium-heavy
decorative
Serging
(easily
Serging
(easily-frayed)
Serging
(non-fraying)
Serging
(easily-frayed)
seam
stretch
fabrics
fabrics
fabrics
fabrics
finished
for
fabrics
fabrics.
sewing
and
edge
[.oj
3-thread
3-thread
28
decorative
rolled
hem
seam
Serging
flatlock
As
together
decorative
a
as
Serging
Decorative
medium-heavy
stretch
medium-heavy
seam
finished
finished
for
fabrics
sewing
edges.
fabrics.
and
edge
fabrics.
I
10
o.J
Page 33

Needle
The
fabrics
thread
settings
and
tension
are
normal
medium-heavy
for
polyester
yarn
Stitch
length
Stitchwidth
Position
of
bed
chaining
for
land
slide
Converter
=
with
S
=
with-
D
out
blue
green
N
—2
N
N
N
N
red
—2
—2
—2
-5
-5
yellow
-1
—1
—1
+35
+4
3
3
3
3
3
3.5
3.5
3.5
35
3,5
S
S
S
S
S
D
D
D
D
C
—4.5
—4.5
-1
+2
N
N
+2
+2
-1
3
3
F
3.5
3.5
R
5
S
R
C
C
C
29
Page 34

Program
Programs
summary
Application
Needle
2!J
position
=Ieft
right
=
Folded
2-thread
FLATLOCK
2-thread
FLATLOCK
2-thread
2-thread
2-thread
3-thread
oeredge
o
serging
.<<
<
serging
:-
-...
‘
rolled
rolled
•je
seam
seam
seam
hem
(wide>
(wide)
(narrow>
Serging
medium-heavy
Decorative
Serging
flatlock
As
together
Serging
flatlock
As
together
Serging
lightweight
finished
medium-heavy
seam
stretch
lightweight
seam
stretch
lightweight
fabrics.
for
fabncs
for
fabrics.
to
edges.
fabrics.
sewing
fabrics.
sewing
fabrics.
i•°I
(narrow>
—
Serging
lightweight
fabrics.
r
seam
osi
lightweight
hem
Serging
fabrics.
Decorative
very
finished
edges.
Folded
2-needle,
ciosing
30
2-thread
3-thread
seam
‘
V_
‘
:
.
.
4_
rolled
\
s..\
hem
overedge
Serging
fabrics.
Decorative
Sewing
simultaneous
lightweight,
of
fabrics.
very
together
lightweight
finished
serging
high-stretch
edges.
and
Page 35

Needle
The
fabrics
blue
thread
settings
and
tension
are
normal
green
meddium-heavy
for
polyester
red
yarn
yellow
Stitch
length
Stitch
width
Position
of
bed
slide
for
chaining
land
Converter
=
with
1
=
with-
D
out
—4
N
-2
—4
N
N
+3
+25
+2
—3.5
—3.5
F
3
3
3
3
R
35
3.5
3.5
3.5
R
S
S
S
S
D
I
S
S
S
—1
—4
-1
—2
+1
-2
—4
F
F
3
R
R
3.5
R
R
S
I
S
S
31
Page 36

Adjusting
following
The
setting
Adjust
wheel
rnng
desired
thread
the
setting.
the
pages
tension
until
thread
tensions
by
the
tension
contain
for
turning
dot
all
marker
directions
programs.
tensio
the
is
at
for
the
The
and
test
tension
Tip:
dual
redge
Note:
length,
settrngs
needle
seam
settings.
When
thread
looper
All
stitch
for
gsuc’
cnc
to
testrig,
tensions,
with
further
PFAFF
adjusting
will
the
it
yellow
settings
etc.)
width,
hobbylock
thread
influence
interlocking
a
good
is
thread
e.g.
yarn.
required
are
to
seam
idea
etc.
be
tension
of
to
right
the
for
found
are
results.
threads.
thread
use
overedge
individual
in
recommendations,
this
It
may
colours
programs
program
blue
N
all
edge
reason
be
looper
overedge
tensions
threads
of
For
the
4-thread
If
looper
‘ery
Fabric
always
is
it
necessary
corresponding
red
with
(needle
summary
seam
green
—2
optimally
are
be
will
fabric
the
type,
correct
to
yarn,
position,
pages
on
red
—2
interlocked
best
to
the
set,
yarn
the
stitch
28
to
the
left
the
quality
sew
thread
indivi
ove
to
yeIIowj
—1
two
the
at
a
31.
32
Page 37

left
The
Increase
The
reverse
the
ncrease
and/or
thread.
right
needle
the
looper
the
reduce
tension
side
tension
the
thread
thread
of
tension
the
of
of
(blue)
the
(red)
fabric.
the
blue
red
of
is
is
the
too
thread,
visible
thread
yellow
loose.
on
The
right
loose.
Increase
The
the
on
Increase
and/or
thread.
left
needle
the
looper
face
the
reduce
tension
side
tension
the
thread
thread
of
tension
the
of
of
(green)
green
the
(yellow)
fabric.
the
of
yellow
the
is
thread.
visible
is
red
too
thread
33
Page 38

3-thread
wide
[
overedge
blue
N
J
seam
green
red
-2
yellow
—1
needle
The
Increase
needle
the
thread.
thread
tension
loose.
too
is
respective
the
of
[narrow
The
the
Increase
and,’or
thread,
right
reverse
reduce
blue
tooper
the
side
tension
the
I
green
thread
of
N
the
of
tension
T
(red)
fabric,
the
I
yellow
red
the
visible
s
thread
yellow
-1
visible
yellow
the
of
is
thread
red
of
tension
the
of
(yellow)
fabric.
the
the
left
looper
face
the
reduce
side
tension
the
The
on
on
Increase
and/or
thread.
thread
-2
red
of
34
Page 39

3-thread
wide
serging
blue
N
seam
green
red
—5
yellow
1
needle
The
Increase
needle
the
thread.
thread
tension
loose.
is
too
of
respective
the
narrow
The
partly
fabric.
Reduce
increase
or
thread.
right
looper
looped
the
blue
tension
the
thread
around
tension
green
N
of
the
<red)
edge
the
of
redjyellow
—5
only
is
the
of
thread
red
yellow
the
+4
and!
left
The
the
on
Increase
and/or
thread.
looper
face
the
reduce
side
tension
the
thread
of
tension
the
of
(yellow)
fabric.
yellow
the
of
the
is
red
visible
thread
35
Page 40

_______________________________________
3-thread
FLATL.OCK
wide
narrow
decorative
blue
-4,5
blue
I
I
green
green
seam
I
1
serging,
red
N
red
N
yellow
j
yellow
I
j
+2
+2
j
The
Reduce
needle
needle
thread.
the
thread
tension
tight.
too
is
respective
the
of
right
The
reverse
the
Increase
looper
the
side
tension
thread
of
the
of
(red)
fabric,
the
red
visible
is
thread.
on
left
The
loose.
Increase
looper
the
thread
tension
(yellow)
of
the
yellow
is
too
thread.
Page 41

3-thread
—
blue
The
the
Increase
and/or
thread.
right
reverse
reduce
rolled
looper
the
—
green
side
tension
hem
the
thread
the
of
tension
of
red
+2
(red>
fabric.
the
too
The
right
needle
thread
(green)
is
loose.
yellow
Increase
the
tension
the
of
green
thread.
-1
visible
yellow
the
of
is
thread
red
of
tension
the
fabric.
of
(yellow)
the
is
thread
red
yellow
the
of
the
on
Increase
and/or
thread.
face
the
reduce
side
tension
the
thread
looper
left
The
on
visible
37
Page 42

Folded
blue
[
3-thread
green
-2
rolled
tension
thread
is
(green)
of
green
the
too
thread.
The
right
hem
red
N
j
yellow
÷3
oose.
Increase
needle
the
The
loops
Reduce
or
increase
thread.
38
right
around
the tension
looper
the
thread
the edge
tension
partly
only
(red)
fabric.
the
of
red
of
the
thread
and/
yellow
of
the
The
left
on
the
Increase
and/or
thread.
looper
face
the
reduce
thread
sideofthe
tension
the
tension
fabric.
of
(yellow)
yellow
the
of
the
s
visible
thread
red
Page 43

24hread
overedge
seams
FLATLOCK
yellow
red
[
+
narrow
)-
I
Attach
Note:
sewrng
for
1
FLATLOCK).
needle
The
thread
looper
the
the
thread
yellow
Increase
needle
of
blue
the
2thread
thread
tension
thread.
green
converter
is
(yellow)
and/or
-4
overedge
too
is
of
the
reduce
red
(see
loose
too
respective
seams
or
tight.
the
yellow
page
the
tension
+2
21)
left
left
The
on
the
Increase
and/or
thread
looper
reverse
the
reduce
tension.
thread
side
tension
the
(yellow)
the
of
of
the
respective
fabric.
yellow
needle
is
visible
thread
39
Page 44

Attach
sewing
needle
the
serging
thread
yellow
2-thread
wide
narrow
Note:
for
(FLATLOCK).
The
Increase
needle
of
blue
N
blue
2-thread
thread
the
seam
I
I
I
the
tension
and/or
thread.
green
green
N
converter
serging
too
is
of
reduce
the
I
I
I
loose.
I
red
I
red
I
I
j_3,5J
page
(see
seams
respective
tension
the
yellowl
yellow
21)
I
I
40
left
The
loose.
Increase
looper
the
thread
tension
(yellow)
the
of
yellow
is
too
thread.
Page 45

2-thread
Note:
sewing
for
The
tight.
Reduce
and/or
thread
Attach
right
rolled
2-thread
needle
tension
the
increase
the
hem
converter
thread
the
rolled
the
of
tension
(see
hems
(green)
green
of
page
the
too
is
thread
yellow
21)
The
tight
Reduce
and/or
thread
left
looper
tension
the
increase
thread
the
(yellow)
the
of
tension
yellow
of
the
is
too
thread
green
41
Page 46

Folded
blue
[
Note:
for
Attach
sewing
2-thread
2-thread
green
the
rolled
converter
rolled
hem
red
(see
hems.
elloj
page
21)
The
loose.
Increase
and/or
thread.
The
tight.
Reduce
and/or
thread.
right
left
needle
the
reduce
looper
the
increase
tension
the
thread
tension
thread
tension
the
of
the
(yellow)
the
of
tension
(green)
green
of
the
yellow
of
is
yellow
is
the
too
thread
too
thread
green
42
Page 47

2-needle,
seam
blue
(
[-i
Note:
sewing
for
closing
Attach
seams.
3-thread
green
-2
the
2-needle,
reverse
overedge
converter
3-thread
side
red
(see
side
face
closing
yeiiowj
page
overedge
face
-
side
21)
left
The
Increase
needle
the
thread
tension
reverse
of
side
(blue)
the
blue
is
face
too
thread.
face
side
loose.
side
right
The
loose,
Increase
needle
the
tension
reverse
thread
side
thread
tension
reverse
of
(yellow)
yellow
the
is
thread.
too
43
side
looper
left
too
green
is
thread.
(green)
the
of
The
tight.
Reduce
the
Page 48

Machine
Cleaning
Switch
Detach
cover.
remove
Lubricating
Switch
point
The
with
ted
time
drops
sufficient.
from
red
require
maintenance
the
at
off
lint
the
Disengage
sewing
the
off
shown
the
machine
the
PFAFF
of
All
special
lubrication.
machine
the
box
the
the
at
oil
other
mains
and
the
foot.
machine
mains
above
from
is
sewing
material
switch
open
upper
should
the
cleaned.
machine
parts
looper
the
and
knife
switch
be
accessories
One
manufactu
are
do
and
lubrica
or
oil
not
every
two
are
Use
remove
upper
Cleaning
Clean
to
good
the
time
lint
lint
lower
and
the
with
stability.
brush
from
rubber
the
machines
rubbing
from
the
knives
the
needle
and
feet
rubber
alcohol.
accessories
the
plate,
looper
from
feet
This
to
area.
time
ensures
44
Page 49

W11
Changing
Switch
Removal:
looper
the
and
knife
uppermost
driver
lower
screw
Insertion:
recess
the
ning
close
off
from
knife
and
screw.
the
the
at
Detach
cover.
move
position.
the
retaining
the
Insert
provided
Engage
looper
lower
mains
the
the
Disengage
needle(s)
the
accessories
lower
new
a
cover.
knife
lint
Use
screw
knife.
and
the
switch
box
the
lower
tighten
upper
the
to
arge
to
A.
open
and
upper
the
screw
loosen
Remove
knife
the
knife
the
into
retai
and
45
Page 50

Changing
Switch
the
Use
sories
sewing
removed.
be
Push
half-turn
remove
and
to
the
off
large
loosen
light
the
at
bulb
in
cover
a
it.
the
screwdriver
light
mains
switch
(sewing
bulb
from
retaining
the
into
1
the
3
until
socket,
the
counter-clockwise
the
screw
latter
give
light)
acces
of
can
a
it
direction
Insert
socket
bulb
the
socket,
direction
sewing
the
retaining
new
a
and
lock
thereby
rotate
until
lamp
screw.
bulb
in.
(max.
it
Push
rotating
it
is
cover
until
firmly
the
1
and
the
it
5
bulb
in
in
Watt)
two
a
place.
tighten
into
cams
the
into
clockwise
Replace
the
the
of
Page 51
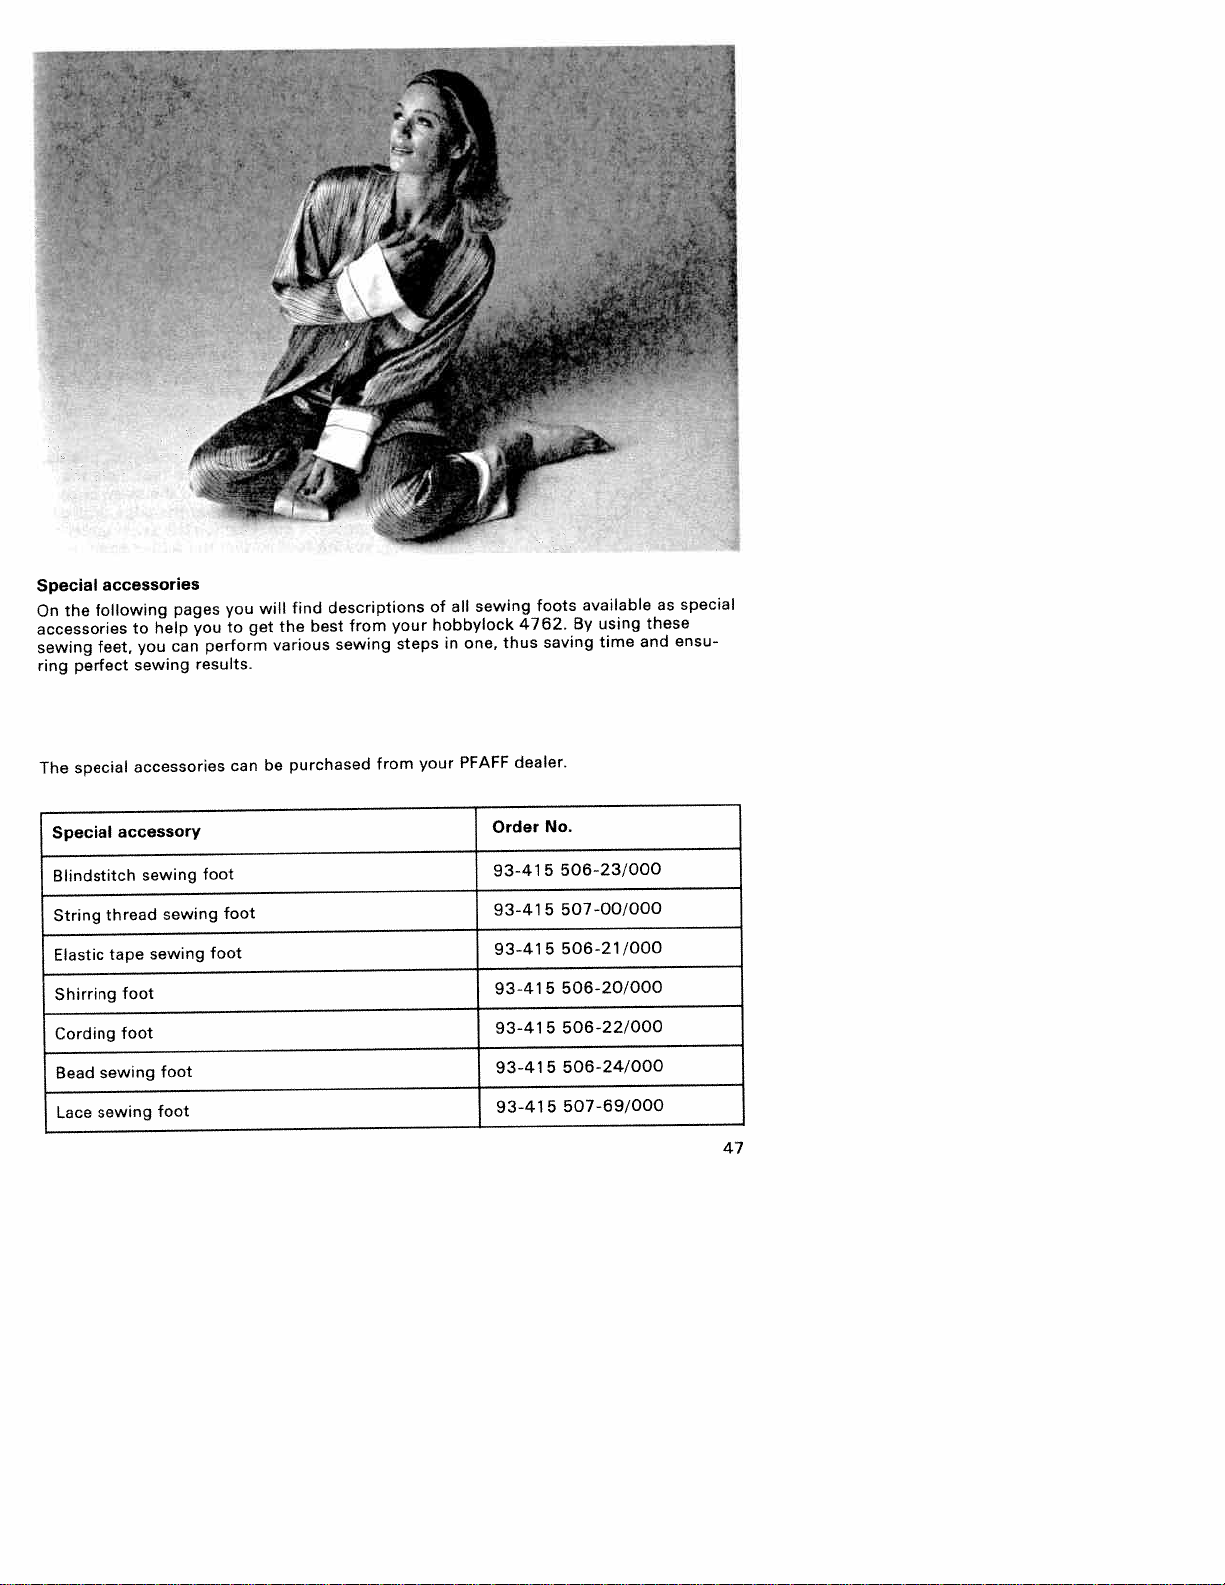
Special
the
On
accessories
sewing
perfect
ring
special
The
Special
Blindstitch
String
Elastic
Shirring
Cording
Bead
Lace
accessories
following
to
feet,
you
sewing
accessories
accessory
sewing
thread
tape
foot
foot
sewing
sewing
pages
help
can
sewing
sewing
foot
foot
you
perform
results.
foot
foot
you
to
can
foot
will
get
find
the
various
purchased
be
descriptions
from
best
sewing
from
your
steps
all
of
hobbylock
in
PFAFF
your
sewing
one,
thus
dealer.
Order
93-41
93-41
93-415
93-415
93-41
93-41
93-41
foots
4762.
available
By
saving
No.
5
506-23/000
507
5
506-21/000
506-20/000
5
506-22/000
5
506-24/000
507-69/000
5
using
time
-00/000
these
and
as
special
ensu
47
Page 52

blindstitch
thick
and
serged
the
the
stitch
needle
the
insert
inwards.
outwards
1
cm.
foot
beneath
thereby
foot
invisible
of
and
machine
left
overedge
length
blindstitch
the
Position
so
run
foot
fabrics.
,,blind’
needle.
to
Now
so
that
edge
along
is
4.
its
fold
that
the
guide
for
ideal
seams
The
stitched
Set
seam
uppermost
foot.
the
the
seam
the
folded
2.
the
professio
medium-
on
seam
your
(narrow)
Fold
seam
edge
seam
Crease
edge
trim
is
sin
a
in
machine
and
position
the
once
protrudes
under
part
4
guide
of
the
Blindstitch
The
sewing
nal
heavy
med,
operation.
gle
Setting
Remove
3-thread
to
select
Working;
Raise
and
seam
again
approx.
sewing
lies
3
must
2.
N
N
4
48
)
Loosen
guide2so
thread
needle.
set
of
Sew
the
screw
that
upper
a
test
upon
and
1
penetration
fabric
seam.
adjust
is
edge
caught
only
by
one
the
Page 53

—
String
This
sewing
gimp
thickness
a
to
wavelike
evening
for
curtains.
Setting
your
Set
hem.
led
Jorking
laise
insert
nd
gimp
he
hrough
the
y
hat
ack.
stitches,
w
ewing
ide
ew
lote:
setting
y
utting
ireadline.
sewing
threads
hem
the
machine
the
hole
thread
projects
it
Hold
foot
the
of
test
a
The
your
foot
dresses
machine
needle
the
thread
the
and
fabric
seam.
wave
the
workpiece
foot
is
used
(cords,
1
of
.0
finish
to
to
string
into
into
2
under
approx.
gimp
lay
then
continue
should
effect
differential
synthetic
mm.
delicate
in
and
folded
its
uppermost
sewing
guide
lateral
guides
10
thread
the
can
diagonal
for
It
bridal
fabric
sewing
be
feed
sewing
threads)
creates
fabrics
gowns
3-thread
foot.
and
1
guide
4
and
towards
cm
place
in
upwards).
accentuated
be
to
position
Insert
pull
3.
under
(the
0.5
to
in
a
5
the
or
rol
Then
so
with
and
up
e.g.
it
the
a
the
face
49
Page 54

is
the
and
contracting
width
elastic
to
elastic
so
I
into
4
sewing
10cm
the
on
the
foot
used
same
4-thread
to
its
that
approx.
by
opening
foot
behind
1.
greater
the
gather
for
operation,
serged,
determined
is
tape.
uppermost
tape
brake
so
more
The
the
elastic
sewing
and
elastic
overedge
sewing
2
2
that
the
pressure
tape
effect.
at
3
mm.
and
it
latter.
the
on
the
also
tape.
by
position
foot.
ope
Insert
pull
protru
screw
and
Sew
it
a
sewing
tape
Elastic
tape.
trimmed
is
the
The
the
insert
screw
is
2
tape
approx.
3
the
seam.
foot
in
the
by
machine
machine
seam
the
of
needle
the
opened
the
screw
exerts
greater
sewing
This
elastic
fabric
gathered
Setting
your
Set
seam.
width
the
Working
Raise
1
//
and
Loosen
ning
elastic
beneath
des
Re-tighten
tightened,
is
brake
thus
test
50
next
The
tape towards
stic
machinels
figure>.
(see
Sewing
stretching
seams>
Loosen
pass
can
drance.
step
elastic
on
stretch
in
screw
through
is
non-elastic
a
of
the
normally
left
the
(expandable)
seams
fabrics.
until
1
opening
(e
the
stitch
to
one
with
stitches
tape
shoulder
g.
non-elastic
without
2
the
of
prevents
ela
your
tape
hin
Page 55

Shirring
The
sewn
automatically
dren’s
red
tiered
Setting
Set
seam
foot
shirring
together,
wear,
valances
skirts.
the
your
and
Working
the
Raise
insert
and
sewing
shirred
fabric
sewing
the
sew
test
Note:
ged
two
the
seam.
by
foot
(face
ply
foot
The
adjusting
foot
as
for
machine
machine
the
needle
the
and
(face
so
plies.
two
degree
enables
whereby
gathered.
well
curtains,
differential
to
shirring
insert
up>.
side
side
that
Lower
fabric
of
the
It
fascinating
as
4-thread
to
uppermost
its
foot.
the
Insert
down>
plate
the
plies
shirring
differential
two
bottom
the
ideal
is
table
feed
fabric
under
1
sewing
together.
fabrics
Lift
the
lies
can
ply
for
gathe
linen
overedge
2.
to
position
the
ply
second
the
between
foot
Sew
be
feed.
to
chil
or
to
and
chan
be
is
be
a
51
Page 56

Cording
sewing
This
ther
two
between
casual
covers.
Setting
Set
your
seam
Working
Raise
insert
and
fabric
side
to
between
tape
workpiece
that
ring
groove
wear,
and
the
plies
face
foot
toot
fabric
them,
machine
the
machine
seam
needle
the
on
side)
beneath
the
in
1
plies,
in
sports
width
cording
top
the
cording
foot.
the
allows
one
bags
to
its
to
of
and
two
the
you
a
with
operation.
and
4-thread
4,5
uppermost
foot.
another
one
insert
plies.
cording
(piping)
Sew
to
cording
upholstery
overedge
mm.
Place
the
Position
runs
test
a
sew
Ideal
cording
foot,
seam.
toge
tape
position
the
(face
the
ensu
through
for
two
Page 57

sequins,
cords.
the
machine
needle
the
beads
of
approx,
2
then
foot
foot
machine
or
length
the
the
foot
is
strass
wide
bead
into
5
beads
lay
and
to
to
cm
the
used
3-thread
should
its
sewing
guide
in
fabric
sew
sewing
for
bands,
depending
be
uppermost
foot.
1
behind
place
face
the
lead
overedge
between
and
the
with
beads
on
and
on
bead
position
Insert
beneath
sewing
few
a
under
up
onto
3
the
sewing
Bead
sewing
This
beads,
ordinary
Setting
your
Set
(narrow
seam
Stitch
size).
4.
and
Working
2
I
Raise
insert
and
string
guide
foot.
stitches,
sewing
the
selvedge.
the
Hold
For
Note:
recommend
loopers
tension
the
wish
you
Ii
as
fabric
tension
thread
the
Lay
and
side
while
knife
beading
the
test
a
Sew
sewing
threading
with
if
to
shown
material
guide
sewing.
seam.
on
thread
bulk
necessary.
sew
to
must
reverse
the
is
now
lead
the
the
be
crease
Pull
on
beading,
two
the
and
beading
left,
loose
side
the
top.
correcting
the
(approx.
to
past
fabric
we
overedge
the
into
needle
reverse
upper
the
apart;
-5).
53
Page 58

sewing
wide
foot
bands
foot
enables
together
you
or
to
onto
sew
ano
sewing
Lace
lace
The
and
/
4
1,
ace
ther
workpiece.
•
8
Setting
your
Set
seam
between
the
machine
(narrow)
1
.5
machine
and
2.0.
and
to
select
3-thread
a
overedge
stitch
length
Working
Use
accessories
2
guide
lace
the
Tighten
fabric,
the
1.5
of
allowance)
it
sew
guided
position
the
to
so
as
face
to
on.
toge
flush
V
1
Raise
and
large
loosen
2
that
close
screw
side
2.0
away
When
ther,
along
insert
screwdriver
screw
needle
the
the
to
Lay
1.
face
to
(depending
cm
from
sewing
two
the
edge
the
the
lace
1
edge
the
side,
two
halves
guide
sewing
from
and
penetrates
as
lace
at
selvedge
lace
3.
the
adjust
possible.
onto
distance
a
seam
on
workpieces
must
foot.
and
be
uppermost
its
to
needle
the
54
Page 59

Thread
chart
for
2-,
4-thread
and
3-
overedge
seam
Fabric
Lightweight
Organdy,
taffeta,
light-knit
silk,
Medium-heavy
Cotton,
dress
Heavy
Tweed,
denim,
tricot,
materials
fabrics:
suit
heavy
Knitwear:
3-thread
or
2-
hems
rolled
fabrics:
fabrics
lining
fabrics:
linnen.
materials,
cloth
fabric,
Faden
Cotton
Synthetic
Cotton
Synthetic
Cotton
Synthetic
Cotton
Synthetic
Polyester
Mercerized
(bulk
thread)
yarn
yarn
yarn
yarn
yarn
yarn
No.
No.
No.
No.
No.
No.
No.
No.
No.
50
70
40
70
30
70
40
70—
120
Stichlänge
4,0
—
70
—
140
—
—
140
—
—
140
—
—
60
50
60
2.0
2.0
2.0
2.0
mm
4.0
—
mm
4,0
—
mm
mm
4,0
—
140
mm
—
2.0
140
1,0
—
55
Page 60
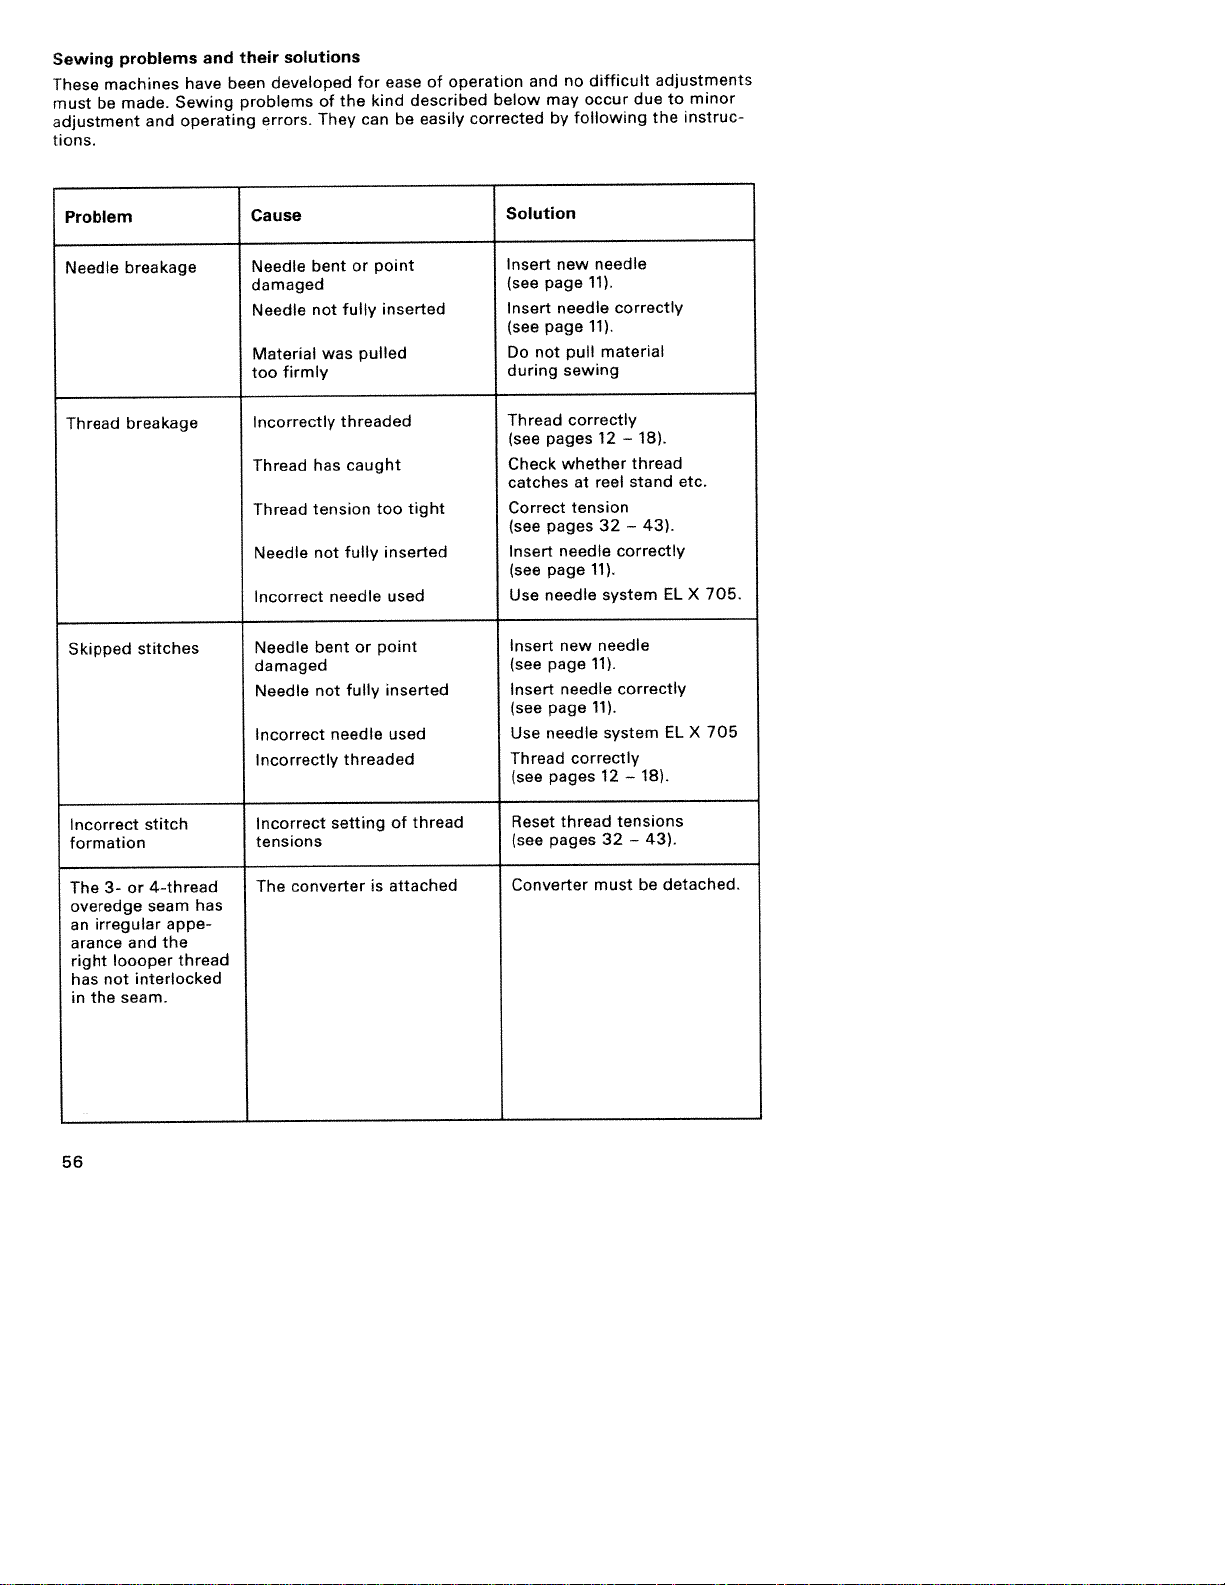
Sewing
machines
These
be
must
adjustment
tions.
problems
made.
and
and
have
Sewing
operating
their
been
problems
errors.
solutions
developed
of
They
the
for
can
kind
ease
be
operation
of
described
easily
below
corrected
and
no
may
by
difficult
occur
following
adjustments
to
due
the
minor
instruc
Problem
Needle
Thread
Skipped
breakage
breakage
stitches
Cause
Needle
damaged
Needle
Material
firmly
too
Incorrectly
Thread
Thread
Needle
Incorrect
Needle
damaged
Needle
Incorrect
Incorrectly
bent
not
was
threaded
has
tension
not
needle
bent
not
needle
point
or
fully
pulled
caught
too
fully
point
or
fully
threaded
inserted
tight
inserted
used
inserted
used
Solution
Insert
page
(see
Insert
(see
page
not
Do
during
Thread
(see
Check
catches
Correct
(see
Insert
(see
needle
Use
Insert
(see
Insert
(see
Use
Thread
(see
new
needle
pull
sewing
correctly
pages
whether
tension
pages
needle
page
new
page
needle
page
needle
correctly
pages
at
needle
11).
correctly
11).
material
12
reel
32
11).
system
needle
11).
11).
system
12
18).
—
thread
stand
-.
43).
correctly
correctly
—
18).
EL
EL
etc.
705.
X
X
705
Incorrect
formation
The
overedge
an
irregular
arance
right
has
in
the
56
or
3-
and
I000per
not
seam.
stitch
4-thread
seam
appe
the
thread
interlocked
has
Incorrect
tensions
converter
The
setting
of
attached
is
thread
thread
Reset
(see
pages
Converter
32
must
tensions
—
43).
be
detached.
Page 61

Problem
Machine
operate,
mainns
Fabric
neatly
Puckered
will
although
switch
not
trimmed
seams
not
Cause
interrupted
supply
Power
is
on
blunt
too
upper
tight
Sewing
lower
and
Lower
Thread
lint
knife
knifeis
tension
between
Solution
Close
page
(see
Clean
Replaces
(see
page
Reduce
looper
knifes
thread
9).
lower
45).
cover
knife
tension.
Workpiece
through
transportiert
not
evenly
fed
Incorrect
differential
Thread
incorrect
Stitches
Sewing
low
for
Sewing
for
high
setting
feed
caught
hgas
threading
short
too
pressure
foot
fabrics
heavy
pressure
foot
lightweight
of
due
too
to
fabrics
pages
correctly
pages
page
page
page
diffential
24.
12
stitch
23).
sewing
23).
sewing
23).
Re-adjust
(see
Thread
to
(see
Increase
(see
Increase
(see
Reduce
(see
25).
18).
—
length
foot
foot
feed
presure
pressure
57
Page 62

Specifications:
Sewing
Max.
width
Seam
length
Stitch
Sewing
foot
Lubrication
Sewing
foot
Overedge
system
Needle
Needle
Number
size
of
Dimensions
Weight
height
stroke
threads
(length
speed
x
height
x
width)
1300
—
3
F
(‘
hinged
manual
4.5
.5
1
X
EL
80/11,
3.
2.
300
6,5
stitches
6.7
1
mm)
mm
mm
705,
4
x
kg
mm
90/14
285
—
Cat.
x
per
4
275
mm
No.
minute
2002
mm
Contents
1
1
1
1
1
58
machine
control
foot
instruction
lint
box
machine
cardboard
of
manual/guarantee
cover
box
certificate
Page 63

44
Page 64

hobbylock
4762
parts
Thread
20
Telescopic
21
Set
22
Thread
23
Thread
24
Spool
25
Cote
26
27
Machine
Mains
28
Handwheel
29
Adjustment
30
stitch
31
Sewing
32
33
Rear
guides
screw
chain
spool
pin
adapter
switch
length
thread
thread
for
socket,
foot
with
guide
adjusting
cutter
stand
foot
for
lever
adjustment
lift
guides
colour
differential
coding
sewing
control
knob
foot
with
mains
feed
pressure
cord
34
35
36
37
Lint
Foot
Foot
Mains
box
control
control
plug
plug
for
machine
Page 65

 Loading...