

Page 1
-F’
0
N
I
-‘I
11
7
C,
c)
0
0
C)
Page 2
For
please
easier
understanding
told
this
The
be
nor
The
according
As
of
colour
proceed
The
connected
with
The
connected
with
Under
mains
disposed
leads
Only
approved
and
with
The
covers.
electrical
Please
notes
or
Safety
the
For
connected
the
this
wire
the
plug
the
rules
United
leads
to
a
plug
wires
Blue:
Brown
colours
appliance
coding
as
wire
which
the
letter
which
the
letter
no
circumstances
plugs
of
must
3
A
spare
by
fuse
corresponding
the
must
Spare
suppliers
also
on
pate
of
this
last
page
Kingdom
must
to
with
in
the
the
to
Neutral
Live
of
of
follows:
is
to
the
N
is
to
the
L
or
used.
be
immediately.
be
completely
fuses
ASTA
cover
never
fuse
observe
2
instruction
out
under
the
safety-lead
three
mains
following
the
wires
may
not
terminals
the
coloured
terminal
or
coloured
coloured
terminal
coloured
They
must
according
must
be
covers
or
the
the
reading.
when
only.
no
circumstances
pins.
lead
are
coloured
code:
mains
in
the
correspond
in
your
blue
must
which
is
black
must
brown
whichismarked
red.
should
cut-off
should
used
to
marked
code.
without
available
safety
be
BS
agencies.
Defective
replaced.
be
be
colour
used
are
PFAFF
general
terminal
to
plug,
be
marked
mains
as
1362
3
A
fuse
from
I
lead
the
be
or
Zlfinhecontentsonnd>
Page 3
Page 4
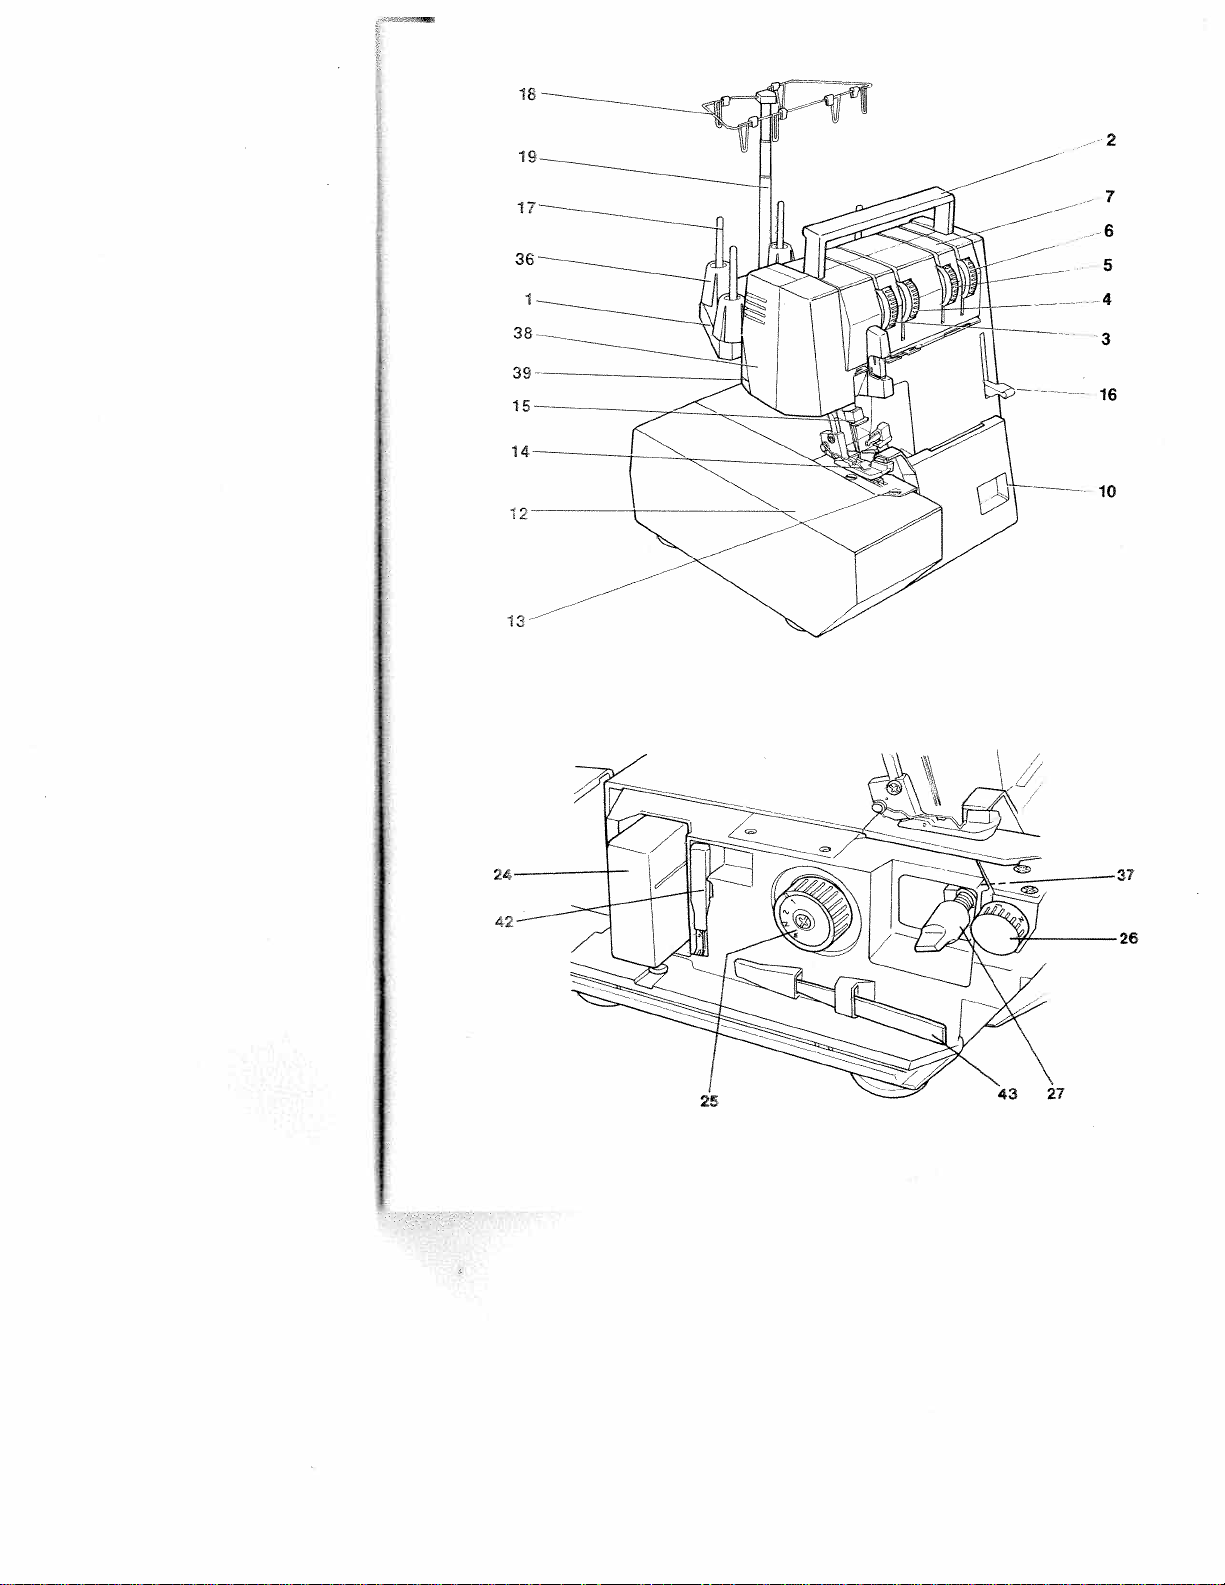
Parts
(10)
(12)Swivel-type
(13)
(14)
(15)
(16)
(1
(18)
(19)
(24)
(25)
(26)
(27)
(36)
(37)
(38)
(39)
(42)
(43)
of
(1)
Thread
Carrying
(2)
(3)
Left
(4)
Right
Right
(5)
Left
(6)
Thread
(7)
Looper
Needle
Sewing
Needle
Sewing
Thread
7)
Color-coded
Telescopic
Accessory
Stitch
Seam
Rotary
Thread
Upper
Lamp
Thread
Needle
Tweezers
the
needle
needle
looper
looper
spooler
length
width
lever
spool
knife
cover
cutter
threader
hobbylock
spool
stand
handle
thread
thread
thread
thread
tension
cover
with
work
plate
foot
holder
foot
lifting
thread
thread
box
adjustment
adjustment
for
centering
arresting
tension
tension
cover
recess
support
lever
holder
guide
upper
tension
tension
guides
knife
piece
screw
4760
dial
dial
dial
dial
bar
knob
knob
disengagement
Page 5

Important
For
United
use
always
using
States
an
electrical
be
this
the
When
you
ons should
before
tions
safety
only
appliance,
sewing
to
machine.
adhered
instructions
as
basic
follows:
safety
Read
precauti
all
instruc
DANGER
The
1.
sewing
appliance
Always
2.
3.
4.
Do
Do
not
not
not
place
unplug
reach
place
VVARNING
1.Donot
2.
3.
4.
5.
6.
7.
8.
9.
10.
11.
12. Always
13.
14.
15.Switch
16.
1
7.
Please
allow
used
byornear
this
Use
attachments
Never
operate
perly,
ifithas
nearest
authorized
adjustment.
Never
operate
of
the
sewing
cloth.
Never
drop
Do
not
use
operate
Do
not
administered.
disconnect,
To
Never
operate
blocked.
not
unplug
Do
fingers
Keep
machine
use
Do
not
use
not
pull
Do
the
as
threading
Always
unplug
when
making
plug
Hold
also
observe
reduce
To
machine
from
in
or
sewing machine
recommended
or
outdoors.
away
needle.
the
bent
or
sewing
needle,
when
should
the
electric
before
forasewing
store
or
drop
into
To
reduce
be
to
used as
children.
this
sewing
been
dropped
dealer
the
sewing
machine
insert
any
where
turn
all
on
a
soft
pulling
by
from
proper
or
blunt
push fabric
machine
changing
sewing
any
other
rewinding
the
general
a
the
risk
never be
outlet
relamping.
machine
sewing
water
the
a
only
by
machine
or
or
service
machine
and foot
object
aerosol
controls
surface
cord.
on
moving
all
needle
needles.
while
off
machine
user
servicing
into
safety
of
machine
or
risk
toy.
for
the
damaged,
control
into
(spray)
to
such as
plate.
stitching.
(“0”)
needle,
from
cord
electric
left
unattended
immediately
Replace
that
has
where
other
liquid.
burns,
of
Close
attention
its
intended
manufacturer
ifithas
or
center
with
any
free
opening.
any
products
(“0”)
off
a
bed
unplug,
To
parts.
Special
wrong
The
Use
needles
It
when making
threading
electric
the
adjustments
reel.
Do
notes
on
shock:
after
bulb
with
fallen
it
fire,
use
a
damaged
dropped
for
examination,
air
openings
from
are
position,
or
grasp
plate
recommended
may
bobbin,
not
page
using
same
into
can
fallorbe
electric
is
necessary
as
described
contained
as
the
accumulation
being
then
couch
the
care
can
deflect
any
outlet
mentioned
allow
2.
plugged
when
and
type
water.
shock,
or
cord
water.
into
repair,
blocked.
used
remove
where
plug,
is
required
cause
needle,
the
adjustments
changing
or
removing
when
plug
to
before
rated
Unplug
pulled
when
in
in
this
plug,
or
the
not
the
by
in
the
whip
in.
cleaning
15
into
injury
or
this
this
manual.
if
Return
electrical
Keep
of
lint,
where
from
plug
openings
air
the
cord.
around
needle
the
manufacturer
causing
in
the
presser
instruction
when
unplug
Always
it.
Watts.
immediately.
tub
or
a
persons:
to
sewing
manual.
itisnot
covers,
the
appliance
or
ventilation
dust,
oxygen
outlet.
the
sewing
break.
to
ittobreak.
needle
foot,
rewinding.
Use
working
mechanical
and
is
may
lubricating,
manual.
sink.
machine
only
openings
loose
being
be
only.
area,
etc.
this
pro
to
such
Do
is
the
or
Keep
sewing
This
these
machine
instructions
is
designed
and
manufactured
in
safe
a
for
place
HOUSEHOLD
use
only.
Page 6
Notes
Notes
on
machines
28
or
IEC
1.
The
user
with
of
the
sewing
When
2.
maintenance
mechanical
always
the
mains
plug.
The
3.
maximum
sewing
4. The
tension
be
adjusted
5.
The
machine
according
specification
Do
6.
not
the
machine.
7.
Do
not use
—
there
—
its
function
—
it
is
8.
Do
not
socket
If
9.
this
than
pose
rated,
any
damage
To
10.
avoid
open
the
inside
repair.
of
our
11.
Be
sure
parts.
on
safety
according
335,
must
regard
needle
area
leaving
disconnect
lamp
place
is
visible
wet,
pull
by its
appliance
intended
we
will
the
machine.
machine
the
This
qualified
to
safety
for
domestic
to
Section
exercise
to
the
up
and
constantly
during
the
work
parts
or
by
pulling
permissible
is
15
Watts.
of
the
drive
by
a Piaff
must
be
the
indications
to
plate.
any
objects
the
sewing
damage,
is
disturbed,
e.g.
with
mains
the
cord.
is
used
or
not
accept
caused.
risk
of
electric
There
which
is
solely
service
only
use
sewing
57
DIN
adequate
and
down
or
when
accessories,
the
machine
out
the
wattage
belt
mechanic.
into
put
in
machine
plug
out
for
another
ifitis
any
shock,
are
the
the
responsibility
700,
must
openings
wrongly
no
user
28.
work.
machine,
condensation.
staff.
original
PFAFF
Section
caution
moving
observe
during
changing
from
mains
for
only
operation
on
the
if:
of
the
pur
liability
do
parts
can
on
ope
not
the
the
for
Environment
The
recommended
temperature
80%.
This
sewing
nic-mechanical
supervised
rated
in
such
dust,
severe
tic
electricity,
rosive
chemicals
For
ventilation
used
on
protect
night
clean
which
Note!
not
use
such
cleaning
a
the
dirt,
even.
Treatment
Always
which
Cleaning
Housing:
To
cloth
stubborn
paraffin.
Please
Do
ducts
for
10°
machine
appliance;
use
in
a
way
dampness,
heat-producing
purposes
free
surface,
the
occur
housing,
is
free
use
any
insecticides
as
petrol
the
housing.
environment
to
40°
C
is
the
home.
that
or liquids.
machine
hitting
by
use
of
fluff.
soft
a
(gas)orthin
C,
Humidity
high-quality
a
it
isamachine
it
is
direct
the
machine
which
against
a
dry,
To
cloth
or
It
should
not
sunlight,
objects,
is
both
or
dropping
clean
remove
with
chemical
is:
Ambient
20%
electro
be
subjected
must
firm
damage
and
any
alcohol
chemicals
to
for
ope
to:
sta
cor
be
and
it.
soft
or
pro
2
Page 7
Simple,
up-to-date
sewing
Congratulations!
product
that
hobbylock
and
will
sew,
operation.
Your
PFAFF
design
as
If
manual
It
to
to
If
dealer.
help
So
able
this
you
is
certainly
find
full
you
or
now
hours
and
instruction
now
take
nothing
out
just
use.
have
any
He
is
advice.
let’s
creating
You
provides
4760
can
trim
and
hobbylock
technology,
manual
a
bit
can
time
well
what
further
happy
get
to
started!
your
have
unique
take
neaten
features
and
of
time
go
amiss.
spent,
your
questions
be
bought
any
it
is
machine
of
service
We
very
a
advantages.
material
for
up
the
very
is
just
to
follow.
to
study
since
it
can
just
with
wish
you
own
fashion
high-quality
Your
in
its
you
in
one
latest
as
easy
to
the
instruction
is
the
only
and
do
ask
your
any
many
enjoy
ideas.
new
stride
in
use
way
put
PFAFF
it
3
Page 8
Contents
Accessory
Electrical
Master
Foot
control
Notes
on
How
to
Opening
Threading
Threading
Threading
Threading
Needle
Thread
Inserting
Seam
allowance
Sewing
Points
to
Thread
cutter
Securing
Setting
Possibilities
3-thread
Engaging
Thread
tension
Thread
chart
Adjusting
Adjusting
Disengaging
Adjusting
box
connection
switch
safety
handle
the
guide
the
the
the
threader
reel
change
the
test
observe
the
the
standard
requiring
overedge
and
the
the
the
and
the thread
looper
wires
right
left
left
and
lint
box
during
seam
disengaging
adjustment
stitch
differential
the
upper
seam
sewing
cover and
18
looper
looper
right
on
threaded
thread
thread
seam
length
knife
width
light
spool
and
threading
/
needle
sewing
tensions
the
for
feed
stand
the
22
machine
tension
converter
sewing
swivel-type
slide
corrections.
with1needle
work
support.
.
and2threads
4
Page 9
Changing
Changing
Cleaning
Rolled
Rolled
Changing
Changing
Changing
Changing
Upper
Cleaning
Oiling
Stitch
Sewing
the
the
the
hem
with
with2threads
hem
the
the
the
the
arresting
knife
the
machine
the
selection
problems
thread tensions
knives
Accessories
Thread
spool
Mountingofthe
Special
accessories
Specifications
sewing
bulb
light
3
threads
needles
knives
upper
knife
lower
table
and
net/thread
Converter
contents
/
foot
knife
their
removal
unreeling
of
the
.
disc
cardboard
box
•
• •
•
28,
•
26
27
29
30
31
.
31
44
45
48
53
5
Page 10

Accessory
Swing
accessory
out
accessory
The
compartment
in
its
shown
guide
groove
of
the
open
in
box
box
the
faces
work
support
box
box
illustration
is
up
the
24.
12
can
onlybeinserted
when
held
at
and
the
machine.
and
as
left.
The
projection
pull
Electrical
Use
or
on
Connecting
29
Then
wer
Caution:
use,
switch
from
any
C
this
a
the
of
connect
source.
always
the
objects
connection
machine
special
foot
control
When
switch
21
and
power
on
only
machine
control
in
mains
machine
the
it
disconnect
source.
foot
the
on
table.
28:
machine
plug
off
at
do
control.
flat
a
30
master
the
not
Insert
socket
to
is
not
plug
place
surface
plug
a
po
in
20.
Page 11

Switching
and
Power
switched
21.
Switching
switch.
Press
switched
are
the
sewing
on
on:
machine
and
off
Machine
on.
light
with
ON
together
master
and
and
sewing
OFF
are
switch
light
Switching
switch
Press
sewing
control
Foot
The
speed
ted
as
more
The
down,
off:
light
of
follows:
you
faster
the
Machine
again.
switched
are
Hobbylockisregula
the
the
press
the
foot
machine
off.
and
control
will
sew.
Notes
This
reduce
outlet
zed
reverse
install
For
this
safety
on
appliance
the
the
the
sewing
risk
only
plug.
proper
has
a
electric
of
one
It
outlet.
machine
polarized
way.
it
still
shock,
If
does
Do
has
the
not
to
plug
plug
not
motify
be
this
(one
does
fit,
used
blade
plug
contact
the
foot
wider
is
intended
fully
fit
not
a
pluginany
controller
than
in
qualified
to
fit
the
way.
modell
other).
the
in
a
outlet,
electrican
AE
To
polari
to
013.
7
Page 12
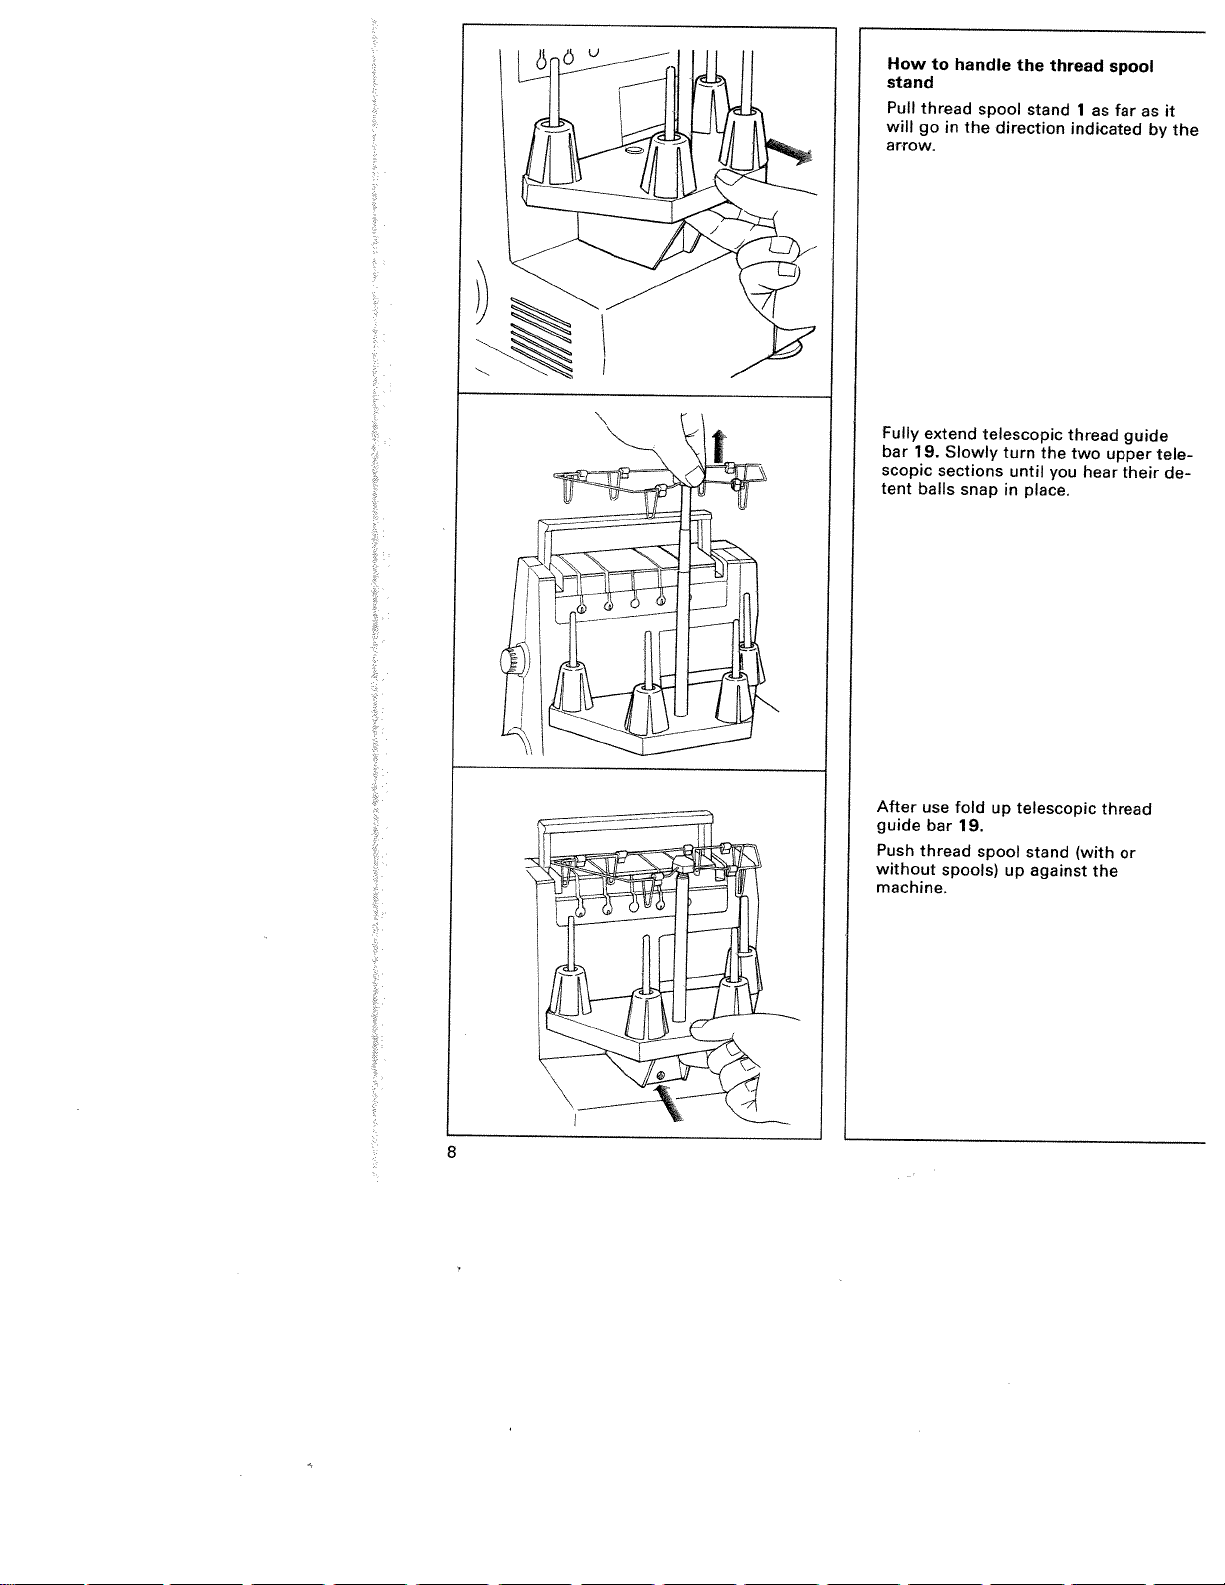
How
stand
Pull
will
arrow.
Fully
bar
scopic
tent
to
thread
go
extend
19.
balls
handle
spool
in
the
Slowly
sections
snap
the
stand
direction
telescopic
turn
until
place.
in
thread
the
you
1
as
indkated
thread
two
upper
hear
spool
farasit
guide
their
by
the
tele
de
After
use
fold
up
guide
bar
Push
thread
without
machine.
8
spools)
19.
spool
telescopic
stand
against
up
(with
the
thread
or
Page 13
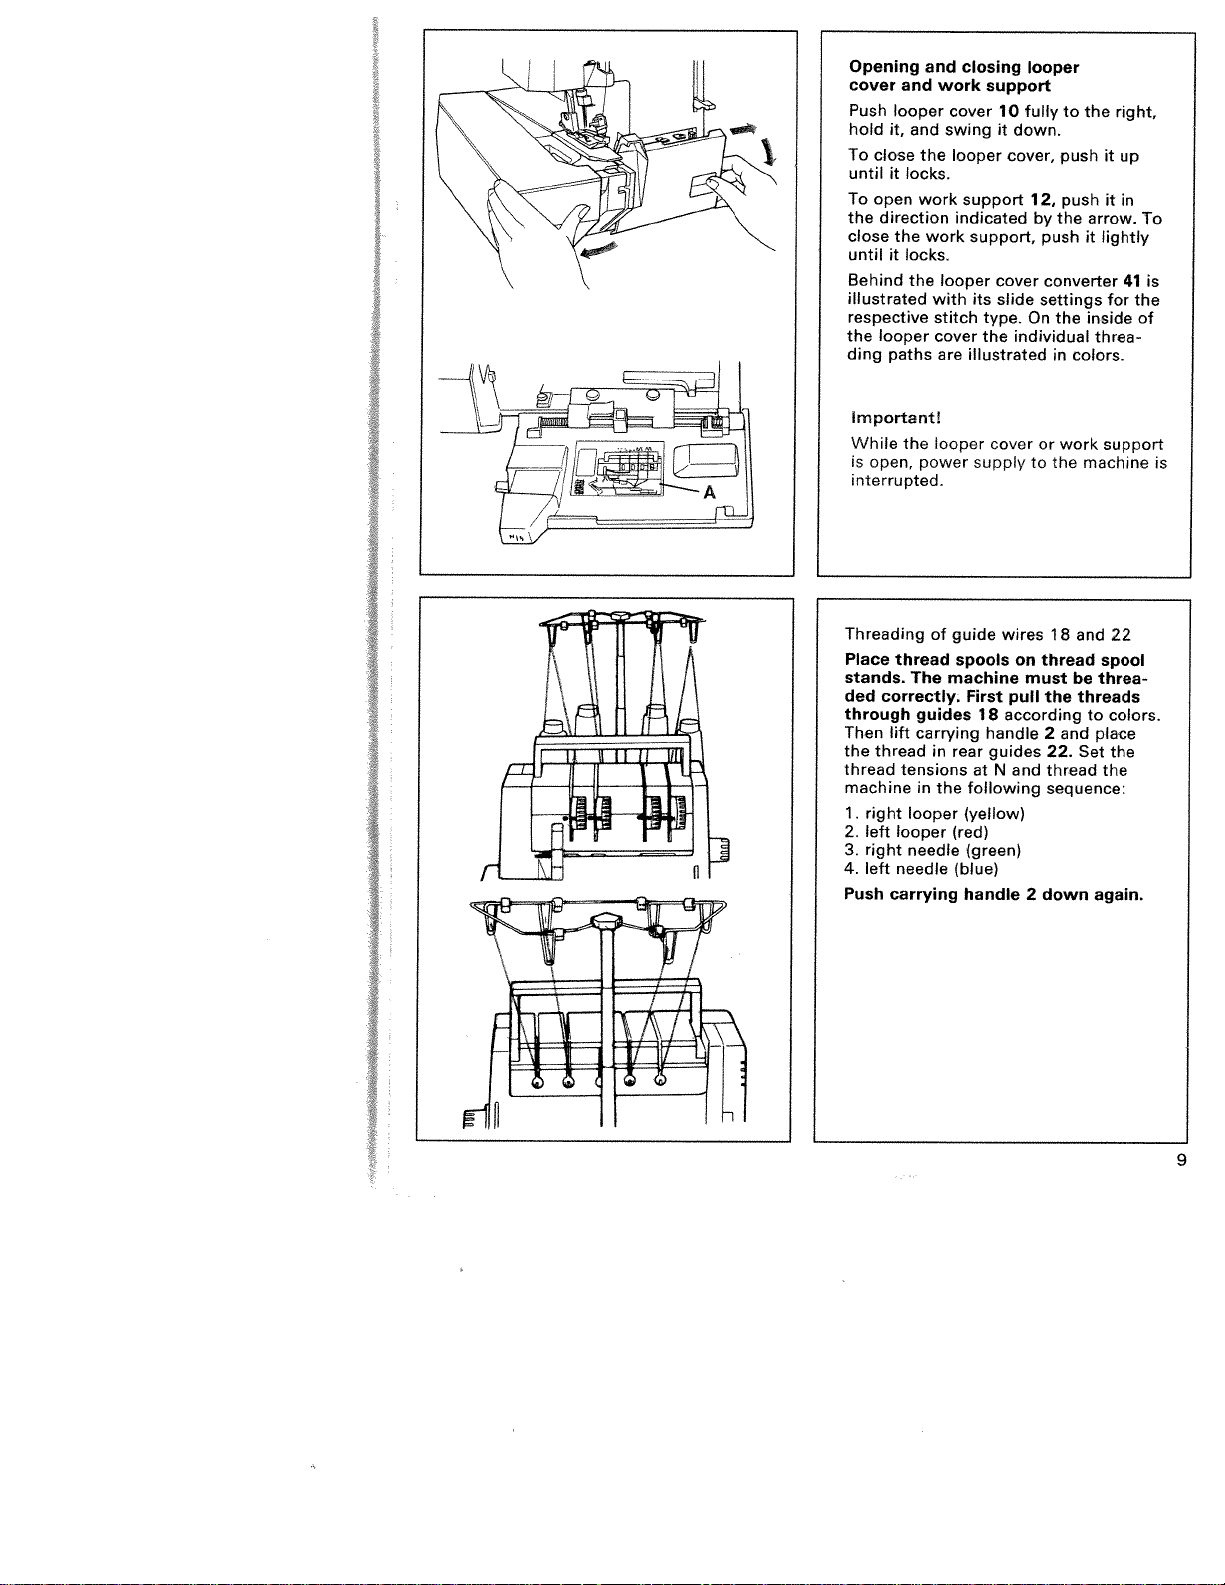
Opening
cover
and
Push
looper
hold
it,
To
close
until
it
To
open
the
direction
close
the
until
it
Behind
illustrated
respective
the
looper
ding
paths
Important!
While
the
is
open,
interrupted.
and closing
work
cover
and
swing
the
looper
locks.
work
work
locks.
the
looper
with
stitch
cover
are
looper
power
support
10
it
support
indicated
support,
cover
its
slide
type.
the
illustrated
cover
supply
looper
fully
down.
cover,
12,
by
push
converter
settings
On
individual
or
to
to
push
push
the
the
in
work
the
the
arrow.
it
inside
threa
colors.
machine
right.
it
up
it
in
lightly
41
for
support
To
is
the
of
is
Threading
Place
thread
stands.
correctly.
ded
through
Then
lift
the thread
thread
machine
1.
right
left
2.
looper
right
3.
4.
left
needle
Push
carrying
of
The
guides
carrying
in
tensions
in
the
looper
needle
guide
spools
machine
First
18
handle
rear
guides
at
following
(yellow)
(red)
(green)
(blue)
handle
wires
on
must
pull
according
N
and
2
18
and
thread
be
the
threads
2
and
22.
Set
thread
sequence:
down
spool
threa
to
place
the
again.
22
colors.
the
9
Page 14
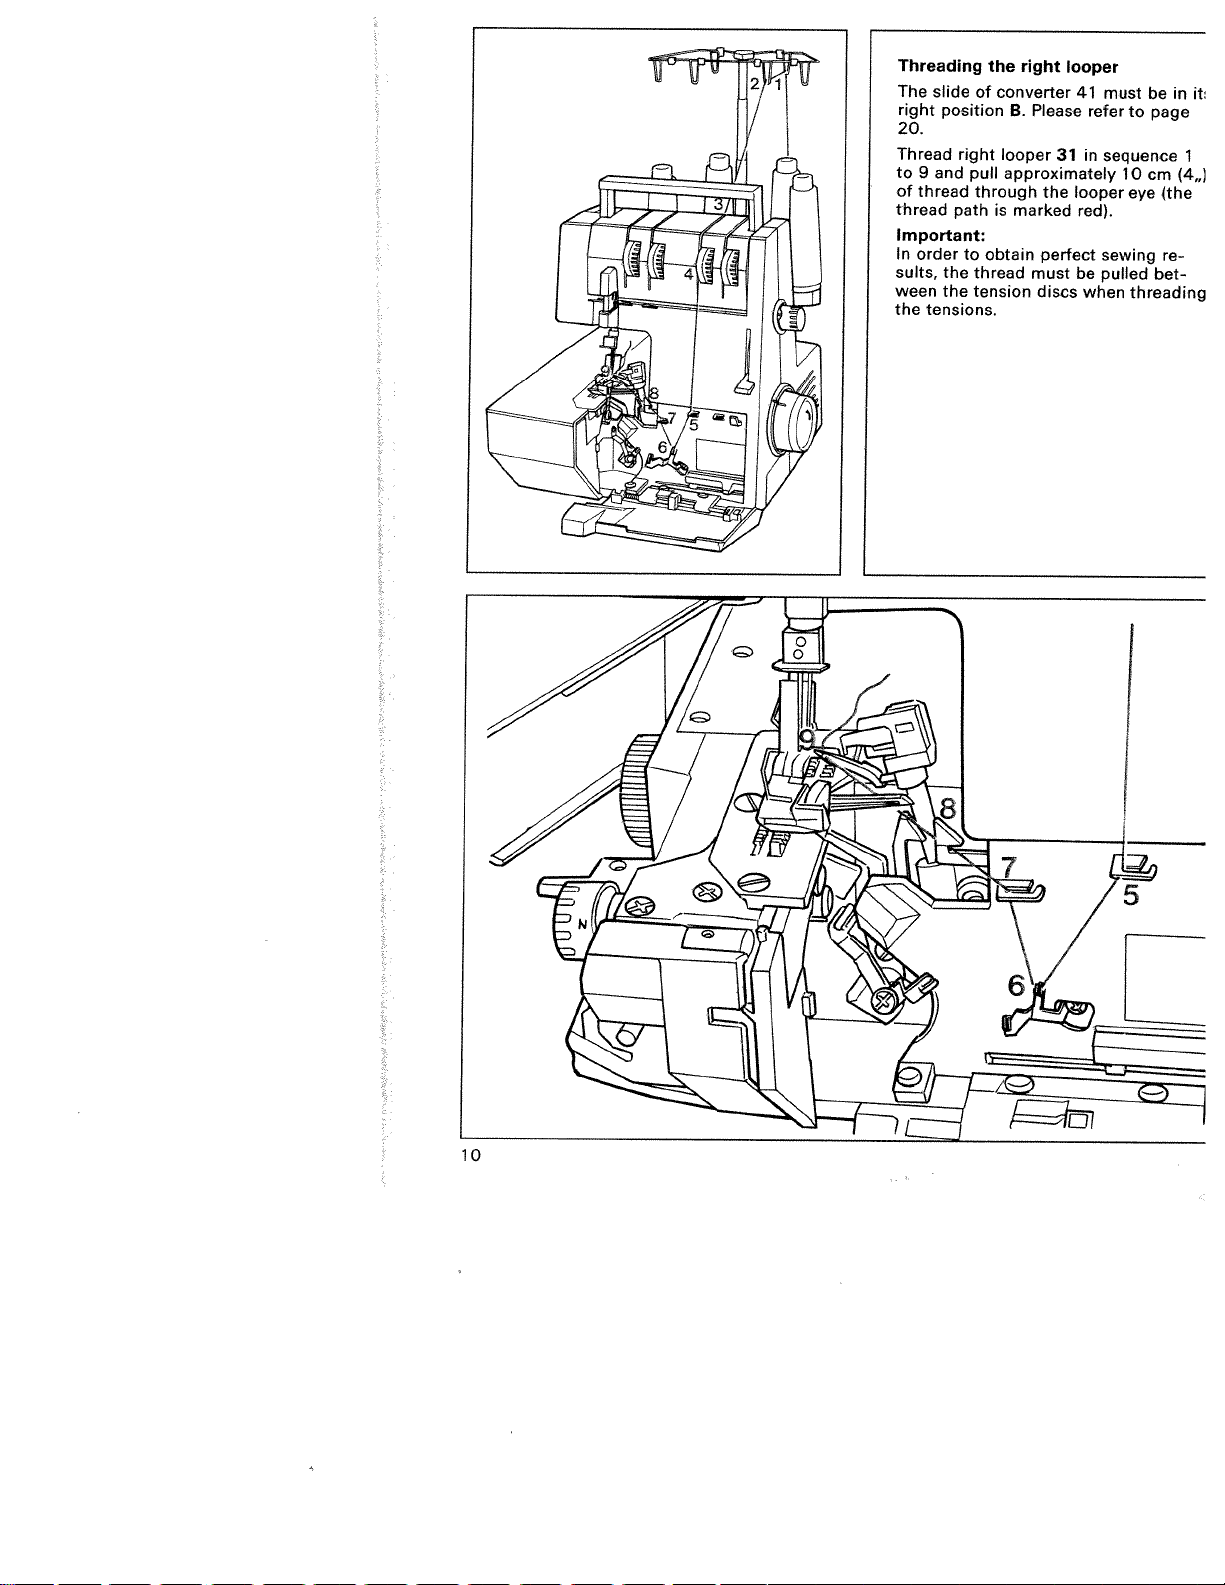
Threading
The
slideofconverter
right
position
20.
Thread
to9and
of
thread
Important:
In
suits,
ween
the
thread
order
the
the
tensions.
right
path
to
the
B.
looper
pull
approximately
through
is
marked
obtain
thread
tension
right
Please
must
discs
looper
31
the
perfect
41
refer
in
looper
red).
be
when
must
to
sequence
10cm
eye
sewing
pulled
threading
be
page
(the
re
bet
it:
in
1
(4
10
Page 15
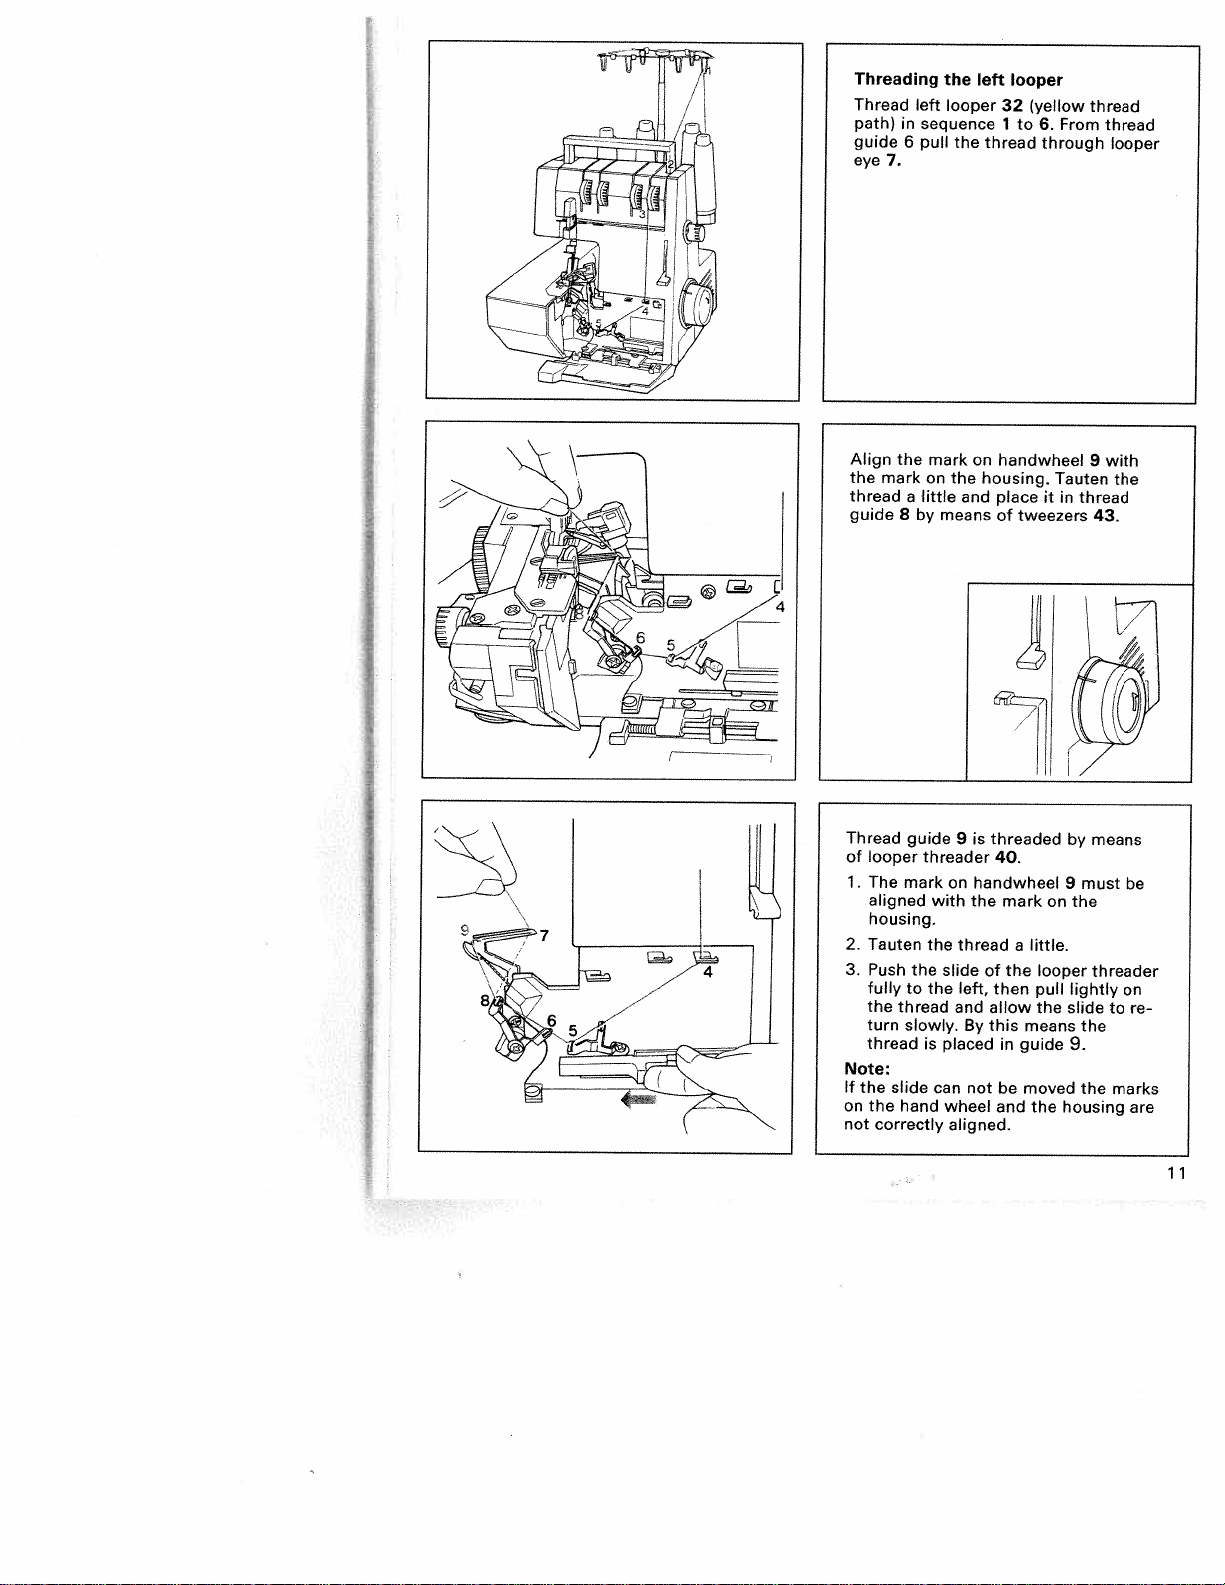
Threading
Thread
left
the
looper
path)insequence
guide6pull
eye
7.
Align
mark
the
thread
guide
the
8
a
little
by
mark
on
means
the
the
left
thread
on
housing.
and
looper
(yellow
32
to
6.
1
through
handwheel
place
it
of
tweezers
From
Tauten
thread
in
thread
thread
looper
9
with
the
43.
Thread
of
looper
The
1.
aligned
housing.
Tauten
2.
Push
3.
fully
the
turn
thread
Note:
If
the
on
the
not
guide
mark
the
to
thread
slowly.
slide
hand
correctly
9
threader
on
with
thread
the
slide
left,
the
and
is
placed
can
wheel
aligned.
threaded
is
40.
handwheel
mark
the
of
the
then
allow
By
this
in
not
be
and
a
little.
pull
means
guide
moved
the
9
on
looper
the
housing
means
by
must
the
threader
lightly
slide
the
9.
the
be
on
to
re
marks
are
11
Page 16
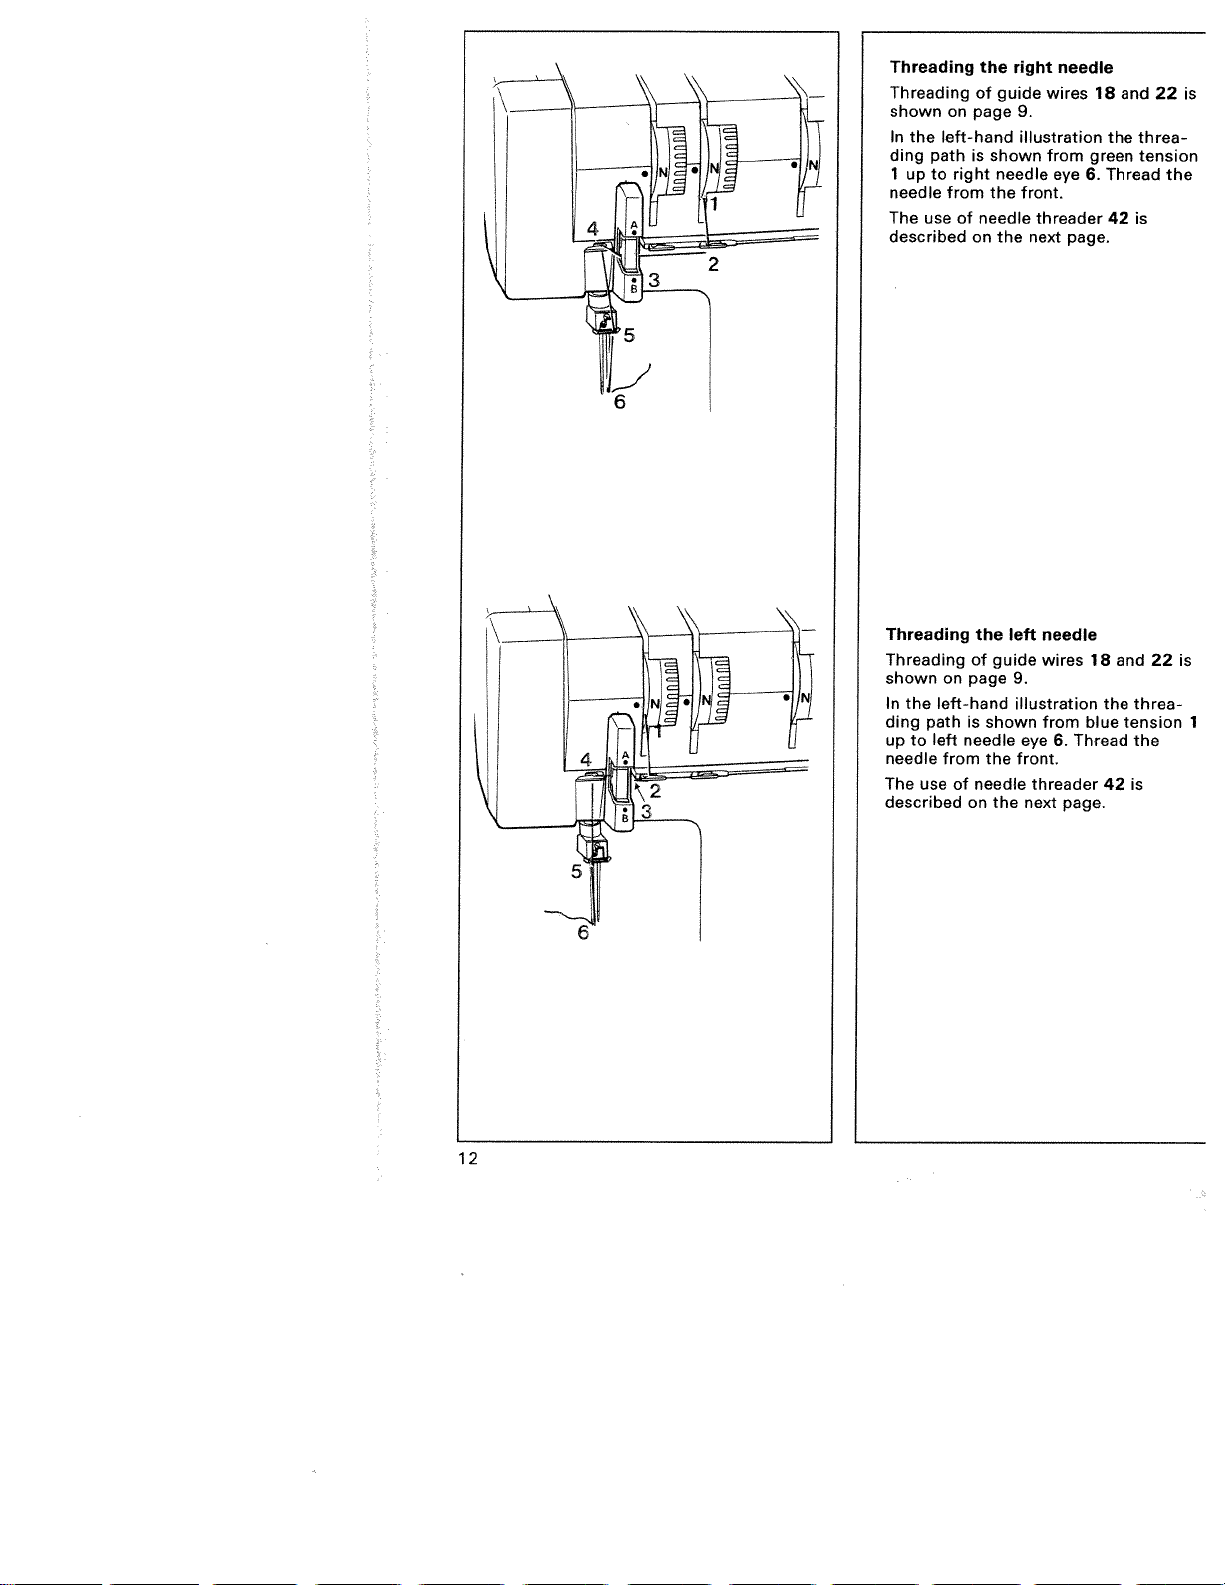
Threading
Threading
shown
In
the
ding
path
1
up
to right
needle
The
use
described
the
of
on
page
left-hand
is
from
needle
of
on
right
guide
shown
needle
the
the
needle
wires
9.
illustration
from
eye 6.
front.
threader
next
page.
18
the
green
Thread
42
and
22
threa
tension
is
is
the
12
Threading
Threading
shown
In
the
ding
path
to
left
up
needle
The
use
described
the
of
on
page
left-hand
is
needle
from
needle
of
on
left
guide
shown
the
the
needle
wires
9,
illustration
from
eye
6.
front.
threader
next
page.
18
the
blue
Thread
42
and
threa
tension
the
is
22
is
1
Page 17
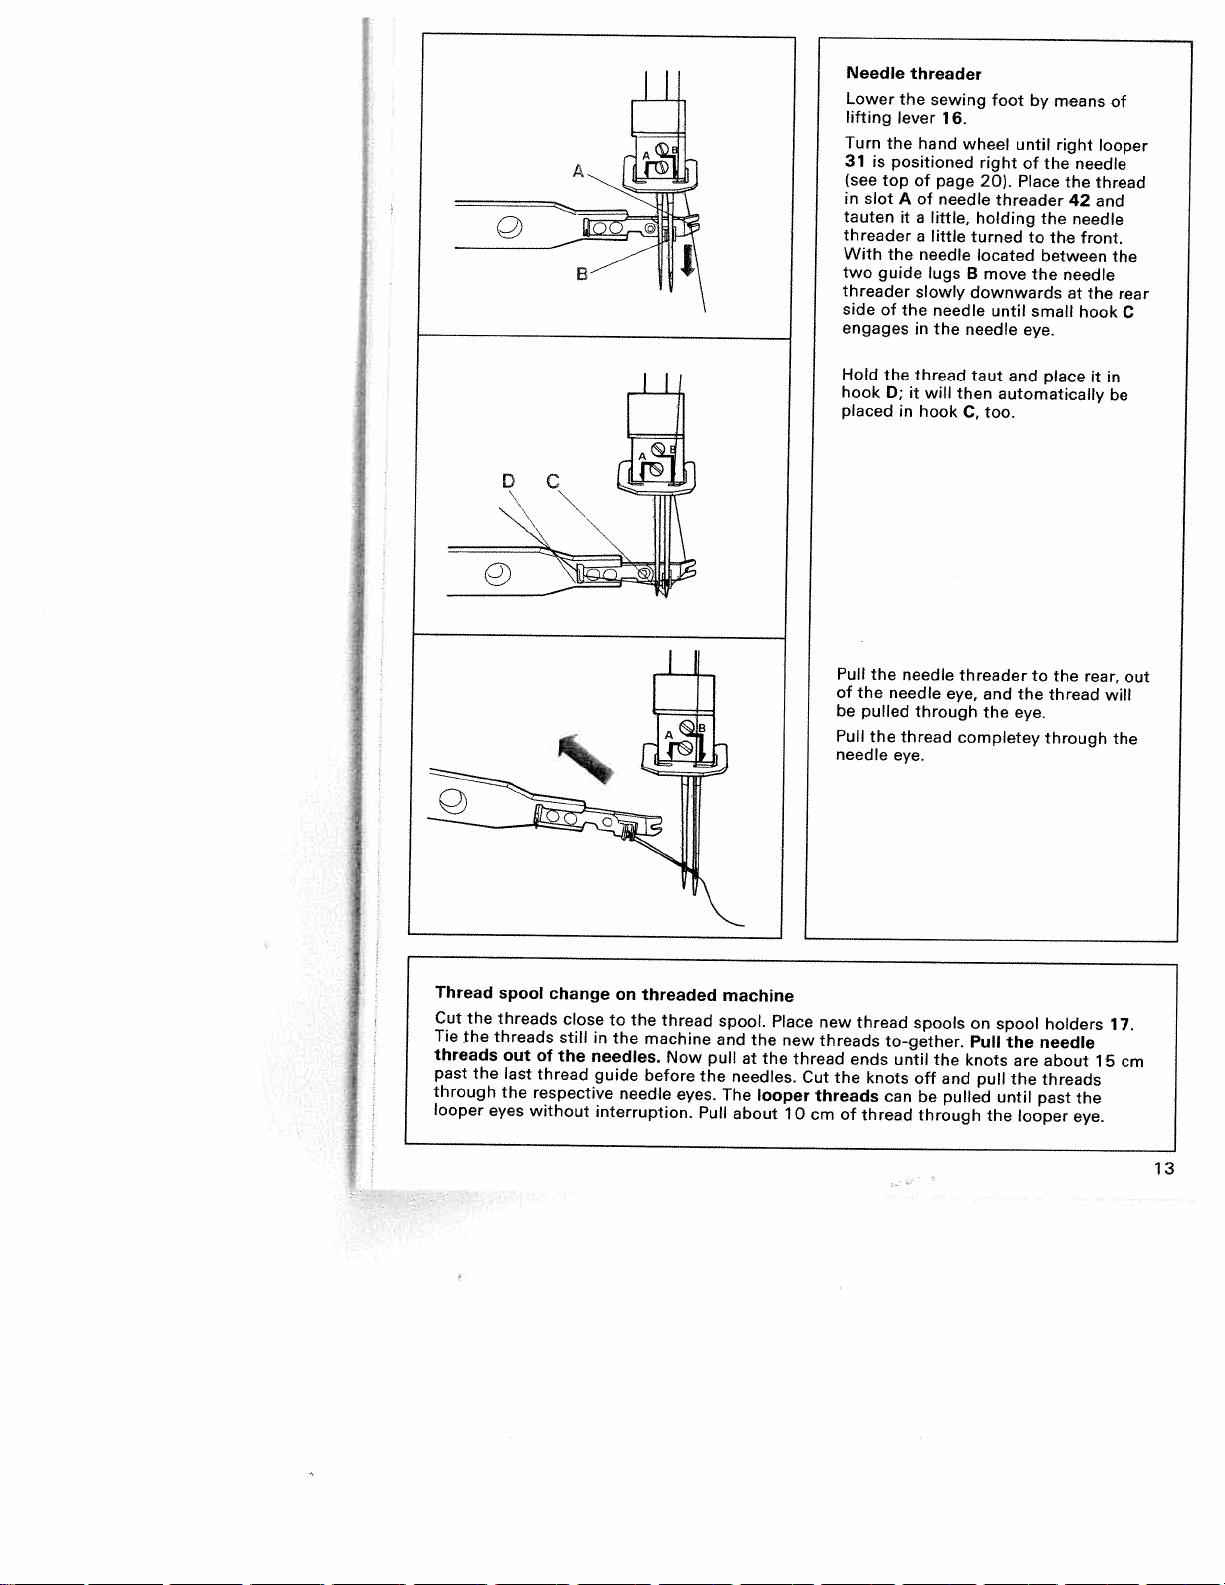
Needle
Lower
lifting
Turn
31
is
(see
in
slot
tauten
threader
With
two
guide
threader
side
engages
Hold
hook
placed
threader
the
lever
the
hand
positioned
top
of
A
of
it
a
a
the
needle
slowly
of
the
in
the
thread
it
D;
in
hook
sewing
16.
page
needle
little,
little
lugs
needle
the
will
foot
wheel
right
20).
threader
holding
turned
located
move
B
downwards
until
needle
taut
then
automatically
too.
C,
and
by
until
of
Place
to
the
small
eye.
means
right
the
needle
the
42
the
needle
the
between
needle
at
hook
place
looper
thread
and
front.
the
it
of
the
rear
C
in
be
Thread
the
Cut
Tie
the
threads
past
through
looper
the
spool
threads
threads
out
last
the
eyes
change
close
still
of
the
thread
respective
without
on
threaded
the
to
in
the
machine
needles.
guide
before
needle
interruption.
thread
Now
eyes.
and
pull
the
Pull
machine
spool.
the
at
needles.
The
looper
about
the
Place
new
10
thread
Cut
threads
cm
Pull
of
be
Pull
needle
new
threads
ends
the
of
the
the
pulled
the
thread
knots
thread
needle
needle
through
thread
eye.
spools
to-gether.
until
off
can
be
through
threader
eye,
completey
the
and
pulled
and
the
on
Pull
knots
pull
the
eye.
spool
the
are
the
until
to
the
through
needle
about
threads
past
looper
the
thread
holders
the
eye.
rear,
15
out
will
the
17.
cm
Page 18
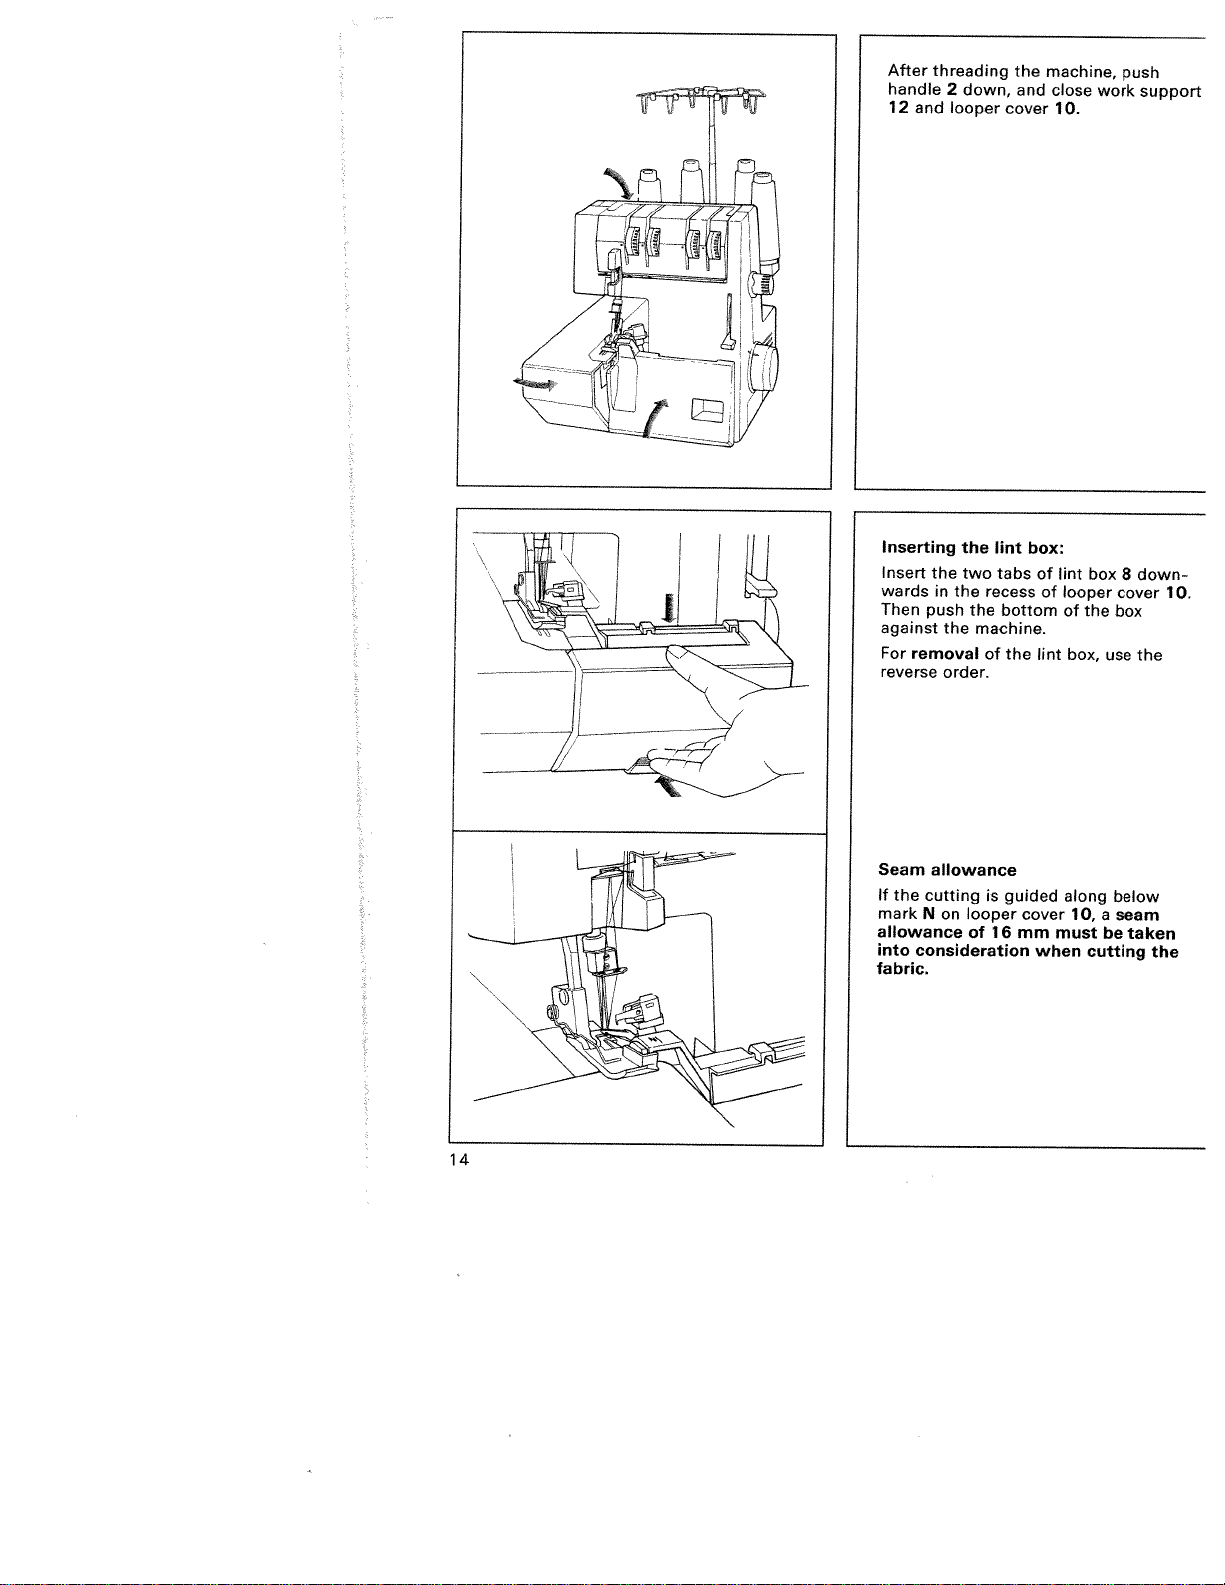
After
handle
12
and
threading
2
down,
looper
the
and
cover
machine,
close
10.
work
push
support
Inserting
Insert
the
wards
in
Then
push
against
For
removal
reverse
Seam
allowance
If
the
cuttingisguided
mark
N
allowance
into
consideration
fabric.
the
two
the
the
order.
on
lint
tabs
recess
the
machine.
of
looper
16
of
box:
bottom
the
cover
mm
of
of
lint
when
lint
looper
of
box,
along
10,
must
box
the
use
a
be
cutting
8
cover
box
below
seam
taken
down
10.
the
the
14
Page 19

Sewing
After
be
Raise
the
Hold
hand
your
ted
Hold
back
sure
during
test
threading,
made.
sewing
illustration.
the
thread
while
right
by
the
the
threads
under
the
threads
sewing
turning
hand
arrow
sewing
a
foot
ends
in
on
interlock
(thread
sewing
lever
the
the
the
taut
foot
16,
with
hand
direction
wheel.
and
14.
chain).
test
as
your
wheel
lay
Make
correctly
should
shown
left
indica
them
in
with
Insert
11
and
the
test
lower
fabric
sewing
up
foot
to
upper
knife
lever
16.
15
Page 20

Points
Sew
chine
fabric
up
to
Since
not
hands
the
pull
to
has
under
the
the
for
observe
first
been
needle
fabric
or
guiding
stitches
sewing
push
during
slowly.
rethreaded,
foot
before
is
automatically,
fed
fabric.
the
only.
sewing
place
14
and
starting
Use
If
the
ma
the
push
it
to
sew.
do
your
Thread
In
order
39
it
end
of
thread
from
left).
Securing
Knot
the
crochet
a
thread
the
Or:
Sew
about
seam.
sew
a
sewn
cutter
tobeable
is
necessary
the
chain
the
rear
the
thread
needle
Turn
few
without
seam.
through
(see
seam:
chain
5
cm
the
stitches
cutting
to
to
sew
Draw
the
illustration
chain.
can
be
into
the
beyond
(2”)
workpiece
over
the
use
For
the
used
seam.
the
thread
thread
beyond
resulting
thread
below
knit
to
the
around
seam
cutter
the
cutter
fabrics,
pull
end
and
just
chain.
of
16
Page 21
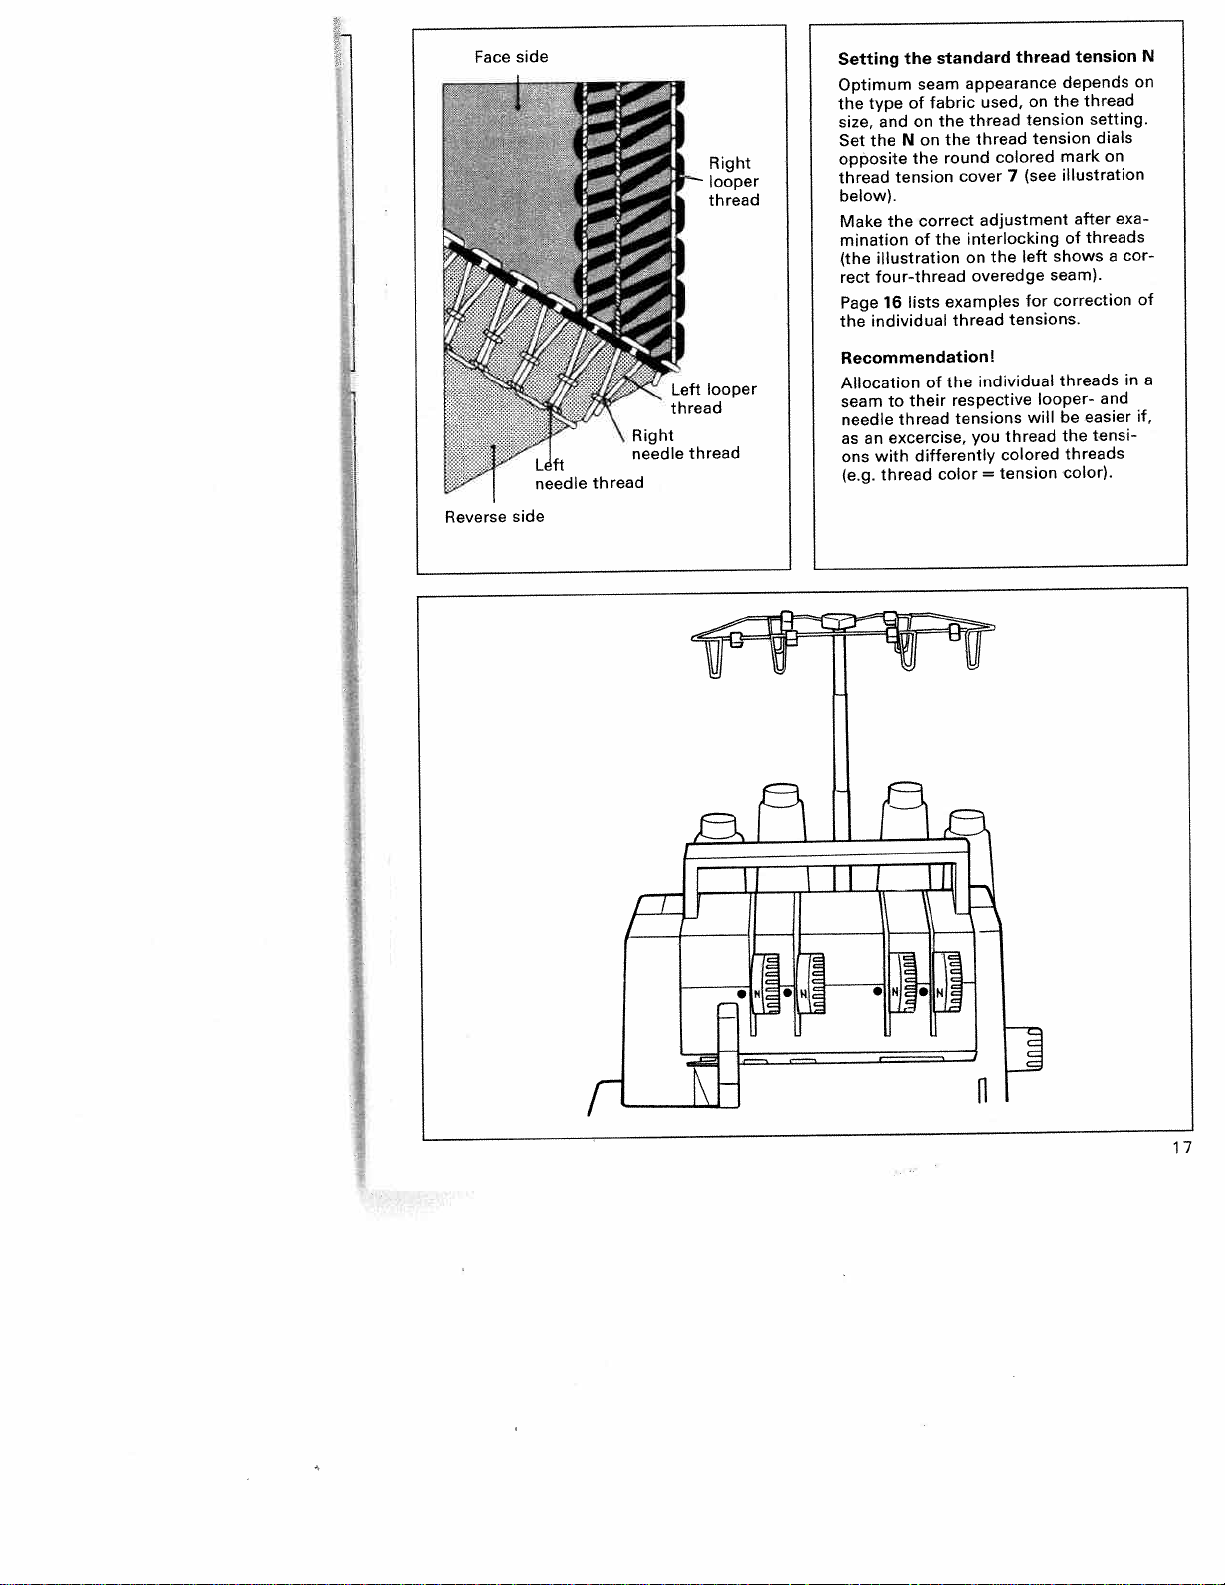
Face
side
Right
looper
thread
standard
Setting
Optimum
the
size,
Set
opposite
thread
below).
Make
mination
(the
rect
Page
the
Recommendation!
Allocation
seam
needle
as
ons
(e.g.
the
type
of
on
and
the
N
the
tension
the
illustration
four-thread
lists
16
individual
their
to
thread
an
excercise,
with
thread
seam
fabric
the
on
round
correct
the
of
of
differently
color
appearance
used,
thread
thread
the
colored
cover7(see
adjustment
interlocking
the
on
overedge
examples
thread
individual
the
respective
tensions
thread
you
colored
tension
=
thread
on
tension
tension
left
seam).
for
tensions.
looper-
will
tension
depends
thread
the
setting.
dials
on
mark
illustration
after
threads
of
shows
correction
threads
and
easier
be
tensi
the
threads
color).
a
exa
cor
in
N
on
of
a
if,
Ft
17
Page 22

Face
side
Reverse
side
decreased.
The
(blue
The
(green
1.
The
(red
2.
The
(yellow
3.
Both
When
(+)
When
Possibihties
corrections
the
direction,
turned
left
needle
thread
right
thread
right
thread
left
looper
thread
tensions
thread
needle
looper
tension>.
requiring
the
in
(—)
thread
tension).
thread
tension>.
thread
thread
tension).
must
tension
tension
direction
be
thread
is
is
A
is
too
B
is
too
C
is
0
is
too
corrected.
tension
turned
increased.
it
is
loose
loose
too
tight
loose
in
18
1.
2.
3.
The
(yellow
The
loose
Both
left
looper
thread
right
(red
tensions
looper
thread
thread
tension).
thread
tension).
must
D
be
corrected.
is
too
tight
C
is
too
Page 23
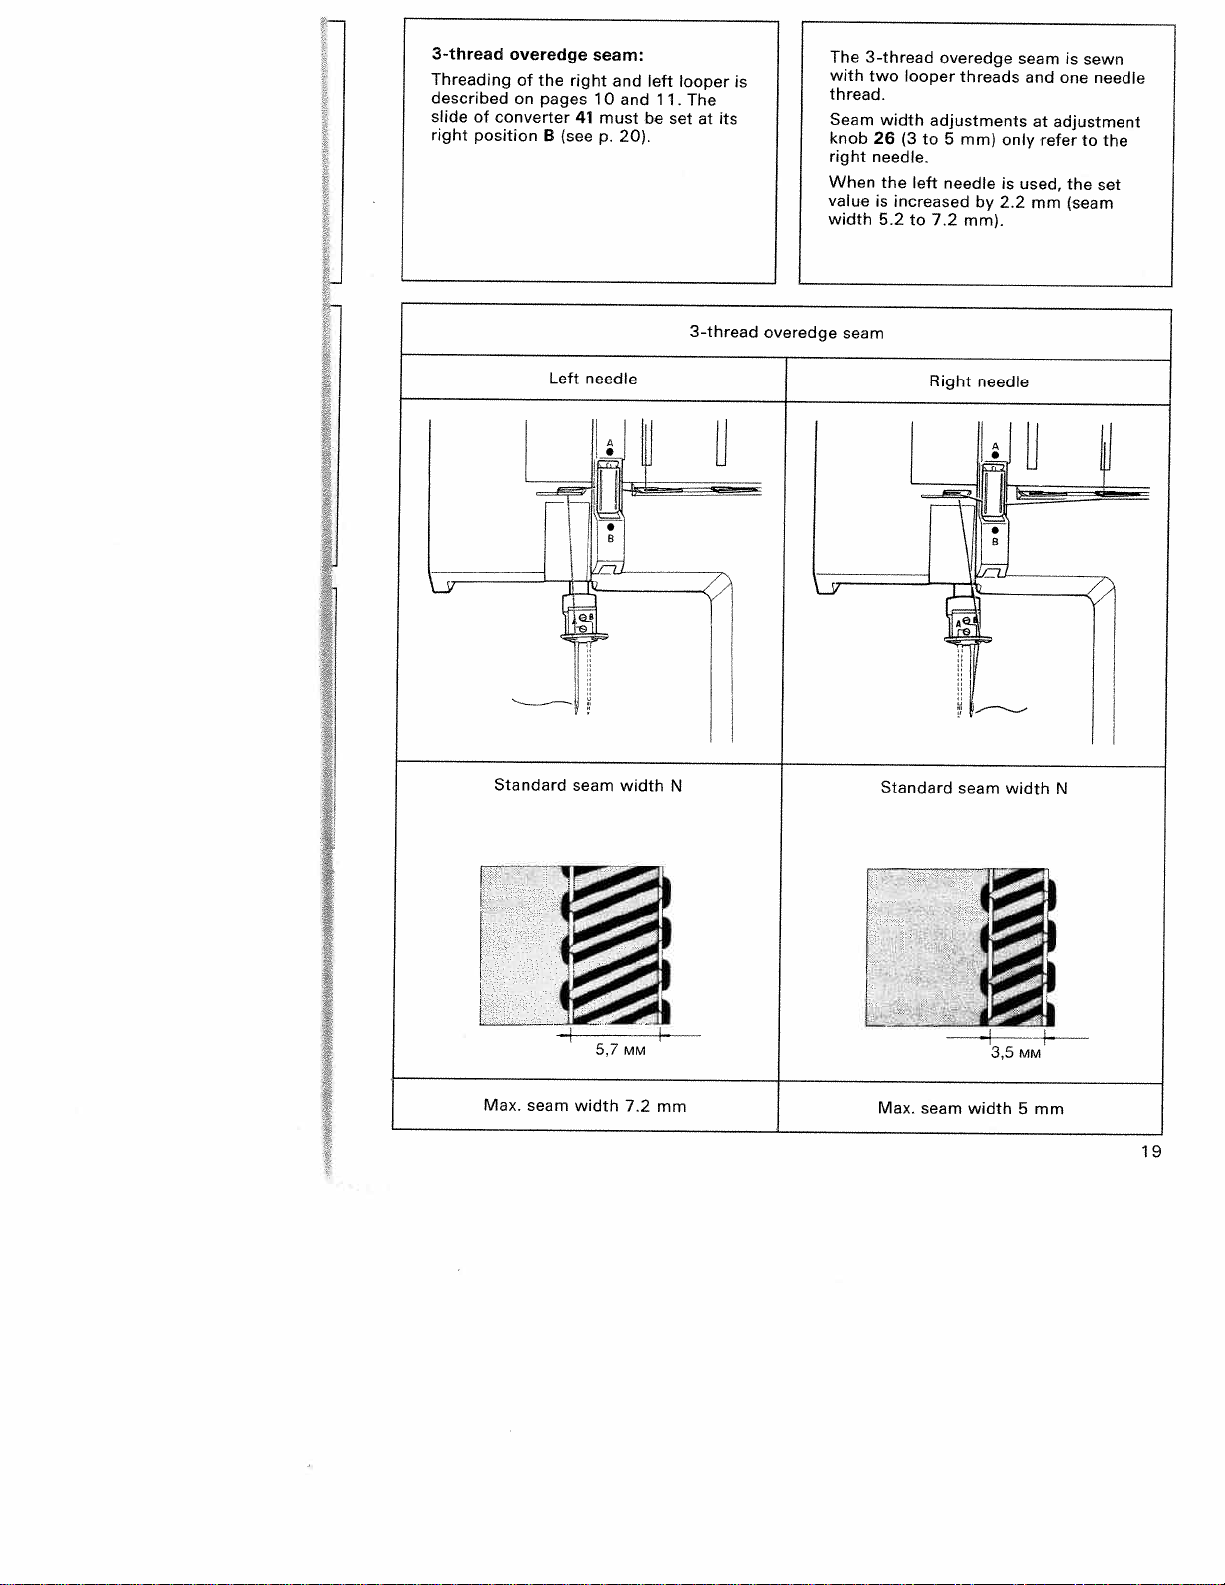
3-thread
Threading
described
slide
of
position
right
overedge
of
the
on
converter
pages
B
right
(see
41
seam:
and
10
must
p.
and
20).
left
11.
be
looper
The
setatits
The
3-thread
with
is
thread.
Seam
knob
right
When
value
width
two
26
needle.
is
5.2
looper
width
(3
the
increased
to
overedge
adjustments
to
5
left
needle
7.2
threads
mm)
by
mm).
only
is
2.2
seam
and
at
refer
used,
mm
is
sewn
one
needle
adjustment
to
the
the
set
(seam
Standard
Left
needle
seam
width
3-thread
N
overedge
seam
Standard
Right
seam
needle
width
N
Max.
seam
-1
width
5.7
MM
7.2
I
mm
El
MM
3,5
Max.
seam
width
5
mm
19
Page 24

Engaging
Turn
the
31
positioned
is
For
sewing
looper
pulled
All
seams
only
sewn
with
one
The
left
looper
31
of
point
of
the
arrow,
illustration.
hand
thread
out
or
looper
the
the
with
of
sewn
with
two
must
right
converter
wheel
converter
must
the
with
left
needle
thread
be
shown
as
right
looper
pulled
looper
until
the
of
be
cut
eye.
converter
looper
threads.
placed
over
in
in
the
right
needle.
41
off
32
over
the
looper
the
right
and
41
are
and
right
the
direction
left-hand
20
Push
the
left
until
aligned
the
point
the
eye
Converter
Converter
Disengaging
Turn
hand
looper
thread
right
looper
ter
in
this
threading
slide
the
with
the
of
of
the
engaged
disengages
wheel
31.
position
the
converter
of
triangular
each
other.
slide
looper,
the
converter
9
drops
Disengage
right
symbols
must
see
=
position
=
position
slowly
from
(position
looper,
41
As
you
engage
Fig.
A
until
point
the
the
B).
seep.10.
to
the
are
do
A.
B
the
conver
For
so
in
left
of
Page 25

Left
needle
2-thread
overedge seam
Right
needle
Adjustable
ceside•Heve
Standard
r
L__
range
seam
5,7
5.2
width
MM
to
7.2
N
mm
The
2-thread
set
Standard
Adjustable range3to5mm
left-hand
overedge
thread tensions.
seam
illustration
seam
width
shows
with
N
the
correctly
I
Possible
1.
Looper
thread
2.
Needle
green
3.
Both
Looper
1.
thread
2.
Needle
green
3.
Both
correction
thread
tension>.
threadBis
thread
tensions
thread
tension>.
threadBis
thread
tensions
requirements:
Aistoo
too
tension).
havetobe
is
too
A
too
tension).
havetobe
loose
tight
corrected.
tight
loose
corrected.
(yellow
(blue or
(yellow
(blue
or
21
Page 26

!
Light
materials:
Organdy,
fabric,
lining
materials
Medium-heavy
materials:
Cotton,
linen,
dress
Heavy
materials:
Tweed,
denim,
Knit
fabrics:
Rolled
hem
or
2
threads
3
thread)
(bulk
Material
light-knit
Taffeta,
tricot
suit
heavy
with
silk
materials
materials,
cloth
Thread
Cotton
Silk
Synthetic
Cotton
Silk
Synthetic
Cotton
Silk
Synthetic
Polyester
Mercerized
chart
Cotton
Silk
Synthetic
for
thread
thread
thread
thread
thread
thread
2-,
3-,
Thread
No.
No.
No.
No.
No.
No.
No.
No.
No.
No.
No.
No.
No.
4-thread-
80
—
80
—
70
—
60—
50
—
70
—
40
—
40
—
70
—
40
—
40
—
70
—
1
20
—
100
100
140
100
100
140
60
60
140
60
60
140
140
overedge
seam
2,0
1,0
2,0
2,0
2.0
to
to
to
to
to
Stitch
4,0
4,0
4,0
4,0
2.0
length
mm
mm
mm
mm
mm
22
Setting
Open
Hold
length
length
Standard
the
work
hand
wheel
adjustment
desired
setting
stitch
support
between
9
N
length
12.
fast
knob
is
and
set
stitch
25
at
the
1
and
3
mm.
stitch
4
mm.
Page 27

Adjusting
The
the
differential
shift.Itconsists
ranged
both
at
The
be
the
feed
versa.
results
rential
you
24).
at
Setting
Setting
Setting
to
The
tely from
one
behind
pickupand move
the
same
time.
feed
amountofeither
set separately,Itis
workpiece
thanbythe
dog
Owing
are
accomplished.
feed accordingtothe
wish to
The
button
process
following
23:
=
0.5
=
N
1.5
=
2
differential
0.5to2,
Note
The
following
obtain
fashionable
to
garments:
The
gather
differential
when
wave
The
differential
medium to
effectisobtainedata
feed
light
fabrics
effectisobtained
feed
heavy
processed.
differentia’
feed
of
two
the
prevents
feed
other,
the
feed
dogs,
workpiece
feed
possibletohave
moved
morebythe
rear
very
one
good
to
that
Set
material
table
(see
settings
are
Short strokeoffront
feed
dog,
rear feed
Same
feed
Long
feed
of
feed
variants
settingof1
setting
elastic
long
dog
strokeofboth
dogs
strokeoffront
dog,
short
rear feed
can be
also
during sewing.
can
be
effects
are
processed.
of
0.5
fabrics
dog
set
on
.5—2
at
inter-ply
ar
which
dog
front
and
vice
sewing
diffe
the
on
page
possible
stroke
stroke
infini
employed
a
when
are
can
of
23
Page 28
;s
settino
renusi
table
tead
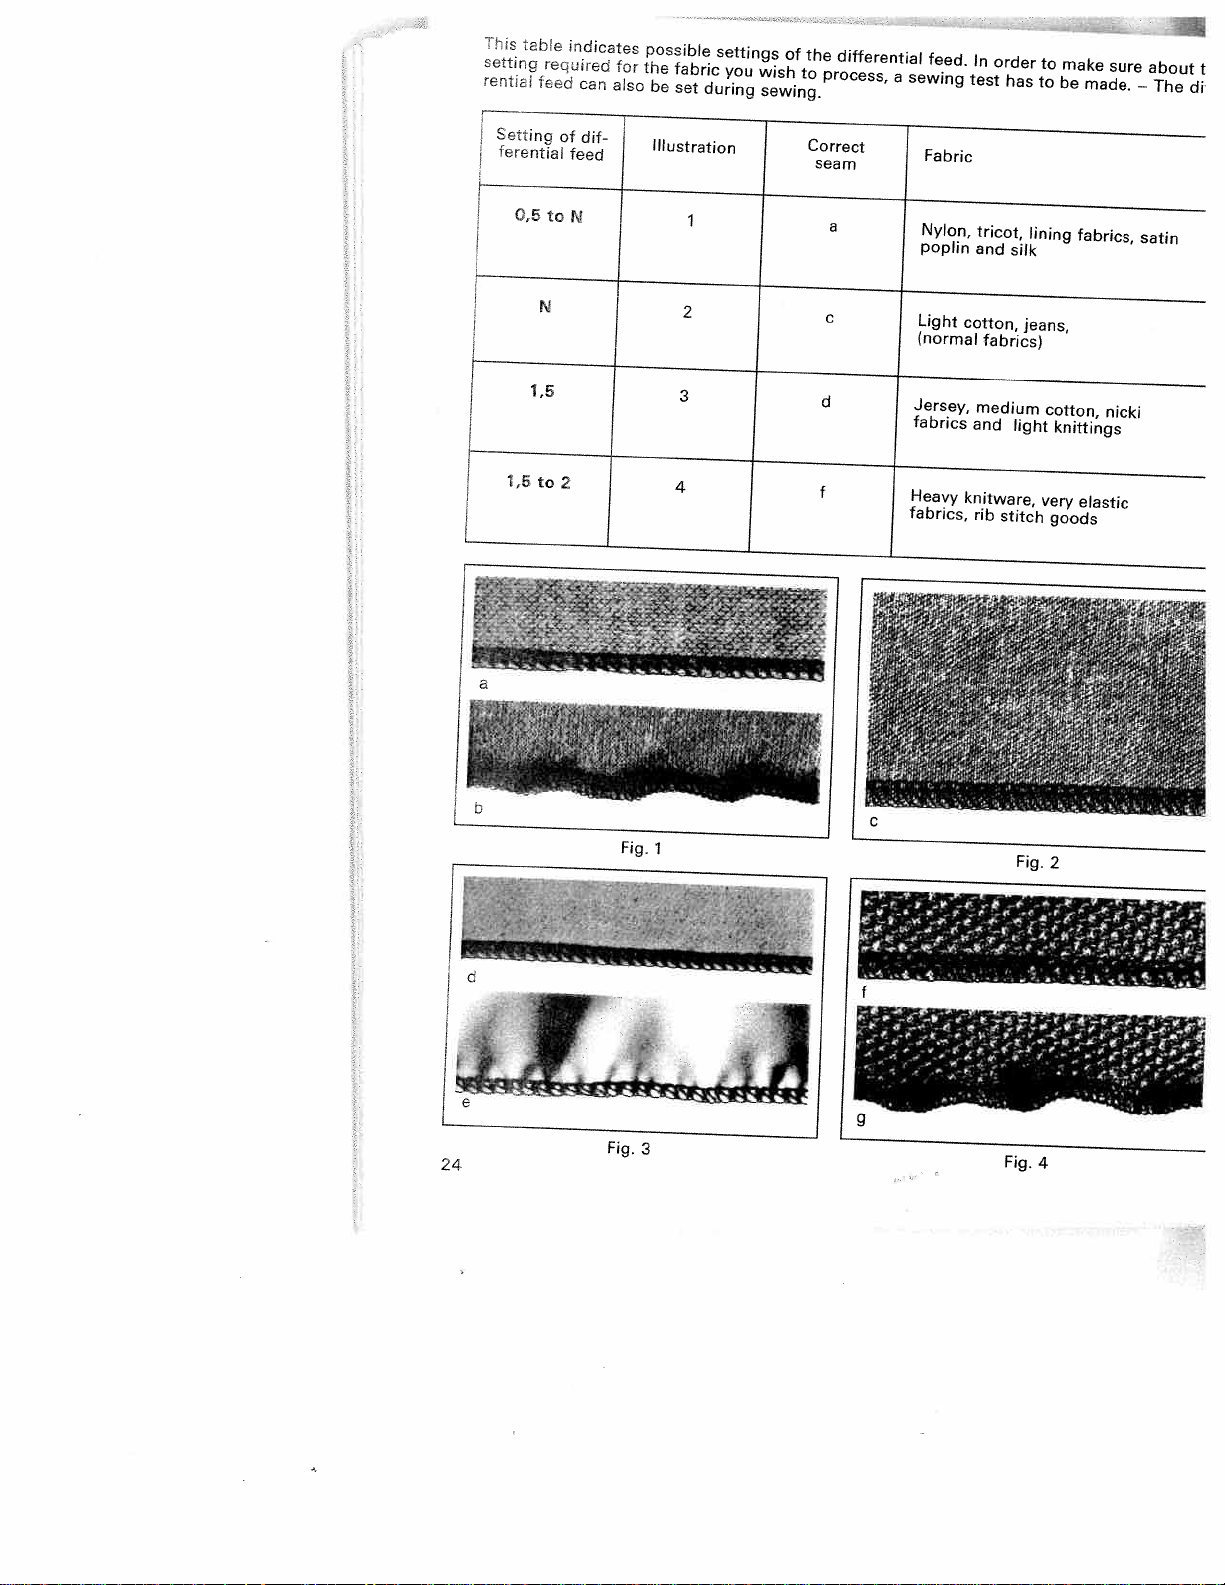
indicates
recuired
can
for
also
possible
the
fabric
be
set
settings
you
during
of
wish
sewing.
the
to
process,
differential
a
feed.
sewing
In
test
order
has
to
make
sure
about
to
be
made.
—
The
t
di
Setting
rerential
6,5
1,5
1,5
of
dif-
feed
to
N
N
to
2
Illustration
1
2
3
4
Correct
seam
a
c
d
f
Fabric
Nylon,
poplin
Light
(normal
Jersey,
fabrics
Heavy
fabrics,
tricot,
and
cotton,
fabrics)
medium
and
knitware,
rib
stitch
silk
light
lining
jeans,
very
fabrics,
cotton,
knittings
elastic
goods
satin
nicki
24
b
Fig.
1
r
C
C
NI
Fig.
2
J
g
Fig.
3
Fig.
4
Page 29

Disengaging
Remove
12
and
loosen
upper
Push
rotary
knife
guide
and
turn
ges
in
the
upper
knife
lint
looper
it
forwards
hole
the
box
8.
cover
knife
lever
fully
to
of
is
disengaged.
upper
Open
arresting
27
the
until
the
10.
of
knife.
knife
work
If
the
right,
the
support
necessary,
screw
axial
upper
hold
pin
enga
Now
the
37.
it,
I
I
i
I
I
Adjusting
The
standard
marked
Disengage
above
the
The
desired
justing
seam-width
from
3
Set
the
again
and
When
sewing
screw
37
system
Sew
test
a
Note
The
seam
adjustment
refer
to
needle
sed
by
7.2
mm).
with
description.
knob
to
5
upper
close
of
securely
width
the
is
used
2.2
mm
seam
the
seam
N
(3.5
upper
seam
26.
adjustment
mm,
knife
the
thick
the
upper
(see
seam.
adjustments
knob
right
the
(seam
width
width
mm).
knife
width
The
scale
its
at
looper
materials,
p.
26(3to
needle.
value
width
setting
11
according
is
set
tne
on
knob
ranges
basic
cover.
tighten
knife
arresting
34).
made
5
mm)
When
setisincrea
5.2
is
with
position
only
the
to
to
ad
at
left
25
Page 30

Changing
Raise
sewing
Disengage
lever
F.
the
the
sewing
foot
sewing
lifting
foot
foot
lever
by
16.
pressinc
G
Engaging
Place
foot
sewing
of
the
sewing
Changing
Pull
out
Loosen
Open
Behind
light
is
Removing
Push
the
fully
to
the
holder
foot
foot
foot
the
lamp
the
it.
situated.
light
the
the
sewing
engages
the
lamp
the
the
left.
sewing
so
that
lifting
holder.
light
mains
cover
cover.
light
light
bulb
foot
when
lever,
in
bulb:
plug.
retaining
bulb
bulb:
upwards
foot:
under
you
crosspiece
groove
of
the
the
screw
and
sewing
lower
H
of
sewing
turn
the
G
the
38.
it
2E
Inserting
Insert
the
/
/
-
turn
Close
pins
it
the
fully
and
the
in
new
the
to
fasten
light
bulb
slots,
the
right.
lamp
bulb:
(15
push
watt
cover.
it
max.)
up,
with
and
Page 31

Cleaning
the
At
tension
arrows.
remove
the
Set
the
Use
remove
tension
Reset
values
Press
tension
the
by
snap
points
cover
thus
it
4
dust
discs
all
set
the
cover
arrows,
in
place.
the
loosening
towards
thread
cleaning
and
thread
before
individual
thread
indicated,
the
in
7
the
tensions
brush
lint
the
of
tensions
cleaning.
the
in
until
tensions:
press
direction
the
front.
(accessories)
from
tensions.
4
tabs
direction
tabs
the
cover,
—
at
between
N,
to
the
of
thread
of
5.
or
thread
indicated
audibly
the
then
to
to
the
the
Then
corners
indicated
ensure
cover.
sion
press
proper
of
against
the
by
the
the
in
cover
arrows
engagement
two
the
in
bottom
direction
order
of
the
to
ten
27
Page 32

Reverse
side
Fold-over
sewn
A
rolled
fabrics
open
sew
professional
scarves,
This
rolled
threads
with
hem
and
edges.
shawls
(see
3-thread
polyester
is
is
an
Without
hem
page
rolled
used
attractive
rolled
and
valances.
is
sewn
29).
thread
for
any
light,
effort
hems
with
hem
finish
on
three
120
-140
delicate
for
you
neck
ca
I
Face
side
Reverse
side
3-thread
rolled
hem
28
2
Page 33

Rolled
hem
with
polyester
thread
Preparation
Needle:
Sewing
Seam
width:
Stitch
Thread:
Threading
right
1.
left
looper,
2.
3.
needle
For
threading
Tension
Red
thread
Yellow
Green
thread
Depending
or
lower.
Rolled
This
hem
Preparation
Thread:
polyester
foot:
length:
looper,
thread,
setting:
thread
hem,
requires
thread
the
sewing
of
remove
engage
3.0
from
1.0
from
polyester
path:
red
path
yellow
path
green
of
needle
tension,
right
tension,
tension,
on
sewn
material
needle
with
three
of
the
machine,asdescribed
thread
bulk
120-140
machine:
left
needle
rolled-hem
to
4.0
to
2.0
thread
path
and
loopers,
looper
left
looper
and
thread,
bulk
threads,
—
for
mm
mm
thread
thread:
red
green
/
foot
(depending
(short
1
20-140
approx.
the
one
tension
and
insert
,,R”
polyester
polyester
polyester
see
fold-over
hem,
approx.,,
+5
respective
bulk
yellow
right
stitch
for
pages
thread
above.
green,
Fig.
,,N”
needle
on
material)
length)
thread
thread
thread
9
to
3-thread
I
N”
thread
and
tensions
1
red
two
3.
and
tension
polyester
yellow
3-thread
Fig.
approx.
approx.
approx.
must
thread
2
be
threads
+
,,N”
,,N”
tensions
hem,
5
to
to
set
120
—
1
+
higher
—140.
1
Threading
right
1.
left
2.
needle
3.
For
threading
Tension
Red
thread
Yellow
Green
thread
Note:
Rolled
threads
Depending
lower.
or
looper,
looper,
thread,
setting:
thread
hems
must
path:
yellow
of
tension,
tension,
tension,,
can
then
on
material
red
path
path
green
path
needle
and
looper
right
left
needle
alsobesewn
be
threaded
and
loopers,
looper
thread
thread,
with
in
the
see
two
the
pages
fold-over
hem,
approx.
approx.
approx.
bulk
and
left
respective
9
Fig.
,,N”
±
,,N”
threads
right
bulk
polyester
polyester
to
1
3-thread
1
to
5
and
looper.
thread
thread
3.
—3
one
thread
thread
polyester
tension
120—
120—140
3-thread
Fig.
2
approx.
approx.
approx.
must
140
hem,
,,N”
,,N”
,,N”
thread.
be
+5
to
The
bulk
set
higher
29
Page 34

0
CD
CD
c1)c)z
C
0
CD
CD
Cd)
a
CT)
3
C
D
DCDCL
‘J
033
0)
CD
D
0
C),
0
D
C),
CD
-o
CD
0
9:
ø
3
0
0
CD
3
_
CD
—
CD
0)
DO)
CD
3
D-
D3
CDØ
—CD
0
9:
3
CD
=
CD
Z
0—
0
0
CD
rs
-4
CD
0)
0
CD
CD
3
0
Page 35
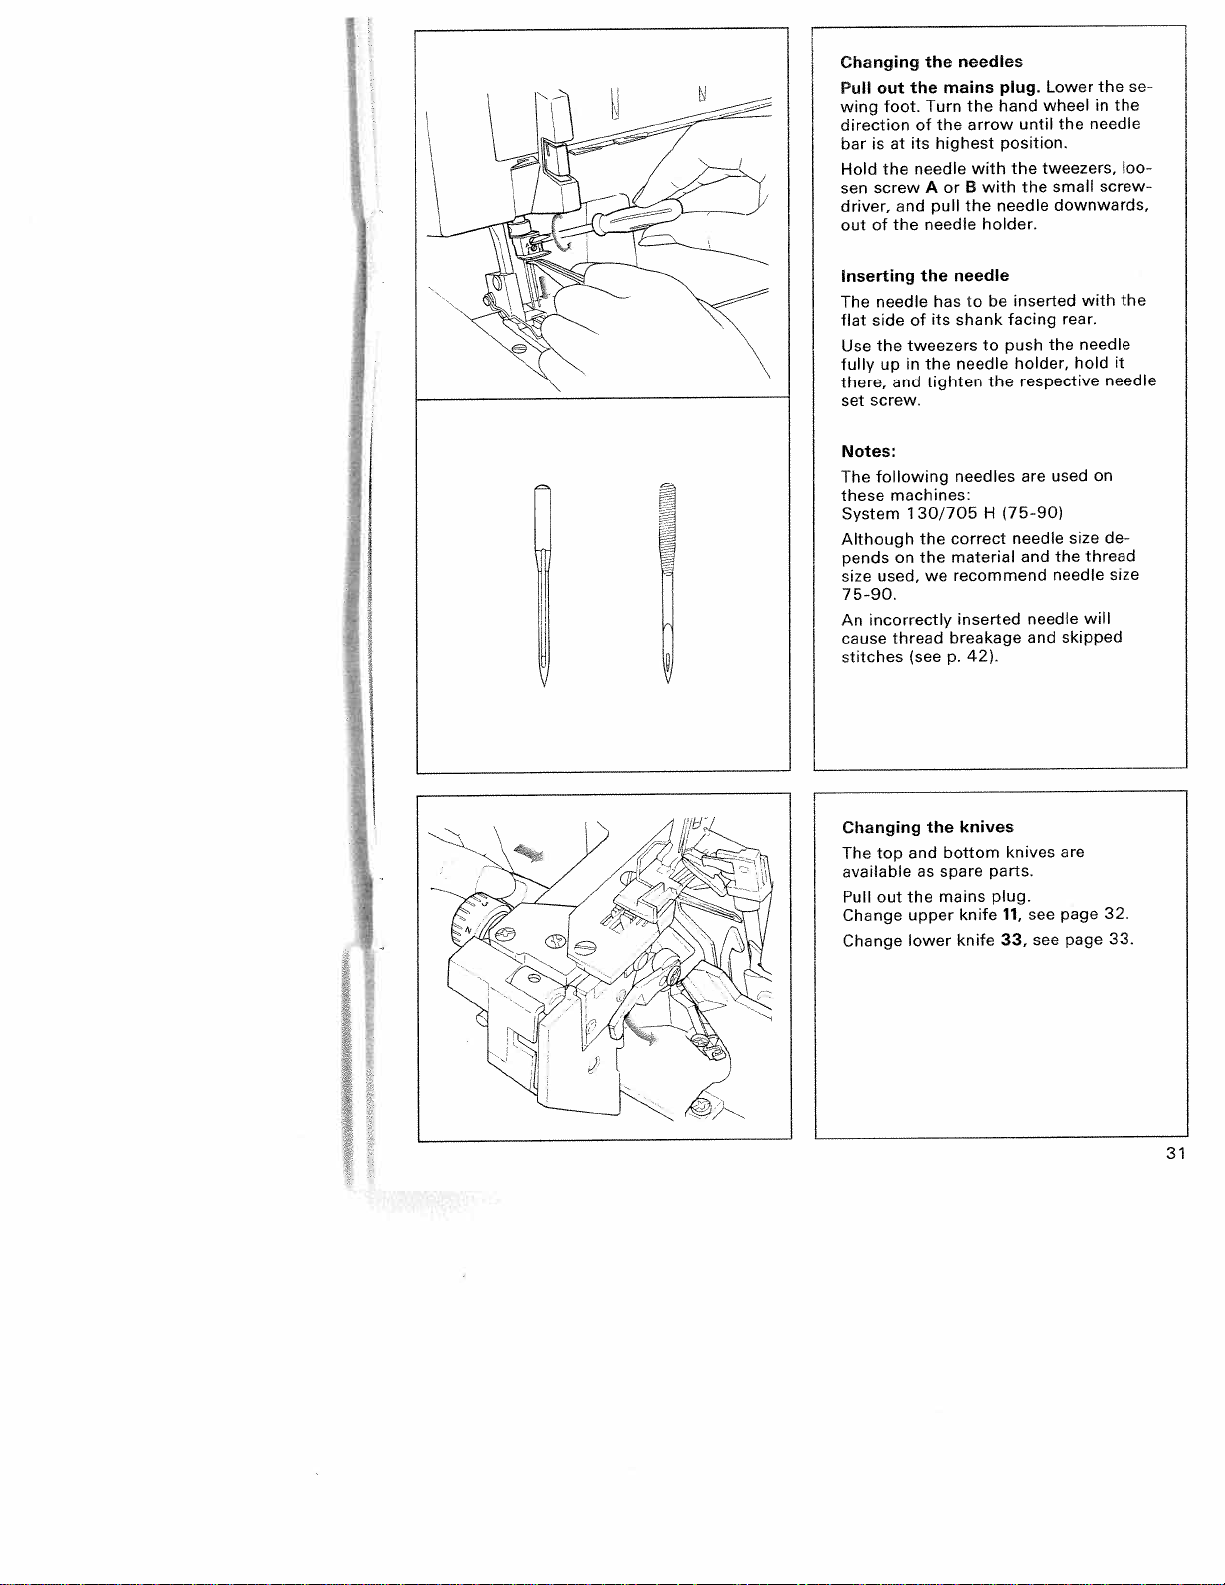
Changing
out
Pull
foot.
wing
direction
is
at
bar
Hold
the
screw
sen
driver,
of
out
Inserting
needle
The
flat
side
the
Use
fully
up
there,
screw.
set
Notes:
following
The
machines:
these
System
Although
pends
size
used,
75-90.
incorrectly
An
cause
stitches
the
of
its
needle
and
the
of
tweezers
in
and
130/705
on
thread
(see
the
Turn
the
highest
A
pull
needle
the
has
its
the
tighten
the
the
we
mains
or
p.
needles
plug.
hand
the
arrow
position.
with
with
B
needle
the
holder.
needle
to
be
shank
push
to
needle
the
needles
H
(75-90)
correct
material
recommend
inserted
breakage
42).
wheel
until
tweezers,
the
the
inserted
facing
holder,
respective
are
needle
and
needle
and
the
Lower
in
needle
the
small
screw
downwards,
with
rear.
needle
the
hold
on
used
size
thread
the
needle
will
skipped
se
the
loo
the
it
needle
de
size
Changing
top
The
available
out
Pull
Change
Change
the
and
as
the
upper
lower
knives
bottom
spare
mains
knife
knife
knives
parts.
plug.
11,
33,
see
see
are
page
page
32.
33.
Page 36

Changing
out
Pull
Unscrew
remove
Disengage
page
see
Insert
its
retaining
upper
the
upper
the
knife
the
knife
the
25.
new
upper
mains
retaining
knife
upper
upper
screw
its
to
knife:
plug!
11.
knife,
knife
securely.
cutting
screw
and
position.
35
Reset
and
tighten
L
32
Set
(cutting
El
It)
until
position.
In
upper
below
knife.
this
the
position,
knife
the
position).
upper
must
cutting
Turn
knife
the
be
edge
is
front
O5
the
at
its
edge
to
of
handwheel
lowest
of
mm
1
lower
the
the
up
27
guide
knife
with
knife
upper
Page 37

Changing
Pull
out
Disengage
Remove
33.
knife
seam
Turn
position
at
the
Hold
that
the
lower
of
the
taining
pressure
the
the
the
retaining
width
3
new
pin
screw
tab.
lower
mains
upper
(smallest
lower
extends
knife.
34
knife
plugl
knife
screw
adjustment
seam
knife
into
Then
together
(see
34
in
the
screw
with
lower
of
knob
width).
such
front
down
p.
the
a
25).
26
way
hole
re
Align
knife
plate
Before
align
knife
Set
ment
the
so
surface.
tightening
the
to
the
knob
cutting
that
pressure
cutting
required
26.
is
it
edge
flush
the
tab.
position.
seam
the
of
with
retaining
Reset
width
the
lower
the
at
needle
screw,
upper
adjust
33
Page 38

Upper
Sewing
with
ces
this
On
from
be
can
mely
different
upper
shown
tightening
By
knife
knife
very
different
machine,
extremely
processed.
fabrics
thick
thicknesses,
knife
the
in
arrested
is
arresting
thick
ply
all
thin
be
must
illustration.
screw
axially.
fabrics
thicknesses:
kinds
extremely
to
When
workpieces
or
the
tightened,
37,
and
fabric
of
sewing
screw
the
workpie
thick
extre
with
of
as
upper
the
L
Note:
When
screw
system
turns,
axially.
Cleaning
Disengage
p.
25).
the
Use
move
sewing
of
37
must
that
so
lint
lint
the
the
from
thin
the
be
the
brush
upper
loosened
upper
knives
upper
upper
medium
or
knife
by
knife
knife
(accessories)
and
fabrics,
arresting
about
can
(see
lower
mo
top
to
knifE
2
o
re
34
Page 39

Oiling
the
machine:
Every
into
oil
to
hings
parts
need
month.
sewing
time
operation,
places
the
other
and
made
are
be
to
One
machine
before
oiled
to
you
should
you
indicated.
important
special
of
only
drops
two
oil
take
once
are
the
apply
The
moving
material
twice
or
PFAFF
of
sufficient.
machine
little
a
bus
and
a
35
Page 40
thDc:
.e
-
1k
0Cfl”et&
:csc
c-a:
81!
ers
thioicress,
ferenta[
2-chreed
/2!,
c
rb:ee
cc’
ieec
seams
he
EflG
see1o
ne’e
hr
anc
re-scr.
i:s,
:o
eeorea
depends
for
feco
ddIerea1ei
the
ccc
ae.
a
idea-
cr:cc
::
c-:dieco
ee
appcat!oc,
c
c
ee&
coth
cea.
see
CewS
labnc
c
e
oeedue
ccshic
Le.
.
0
2
seam
he
ci
24).
enor:
scc
‘crIed
be
u6C.
C0
acccrdcc
on
2-neeche
the
type
1oht!.
the
sethr
of
slide
fe
sc
I
2-thrcd
harrow)
N
N
ow
NeedIe-Sy
130/705
15
A
a
1
C
C
Sic
9C
14
Fe!:!c
[able
sec
22’
:
cc-
scac
cc
=ecL
serene
Eitt
scSSffi
oc:
ct”
:
sean
SeC.
1
1
g
meci:’:
heavy
C’Et5c
1+0.
meourc
“eeole
:ensc
—
-4
three:
--
-
cit
—
2
-
Loc’per
€enS!ofl
red
rh:eao
ye!
+
N
-—5V-
sec.
ore
as
rccc
it-
Size
90
14
-1
Page 41
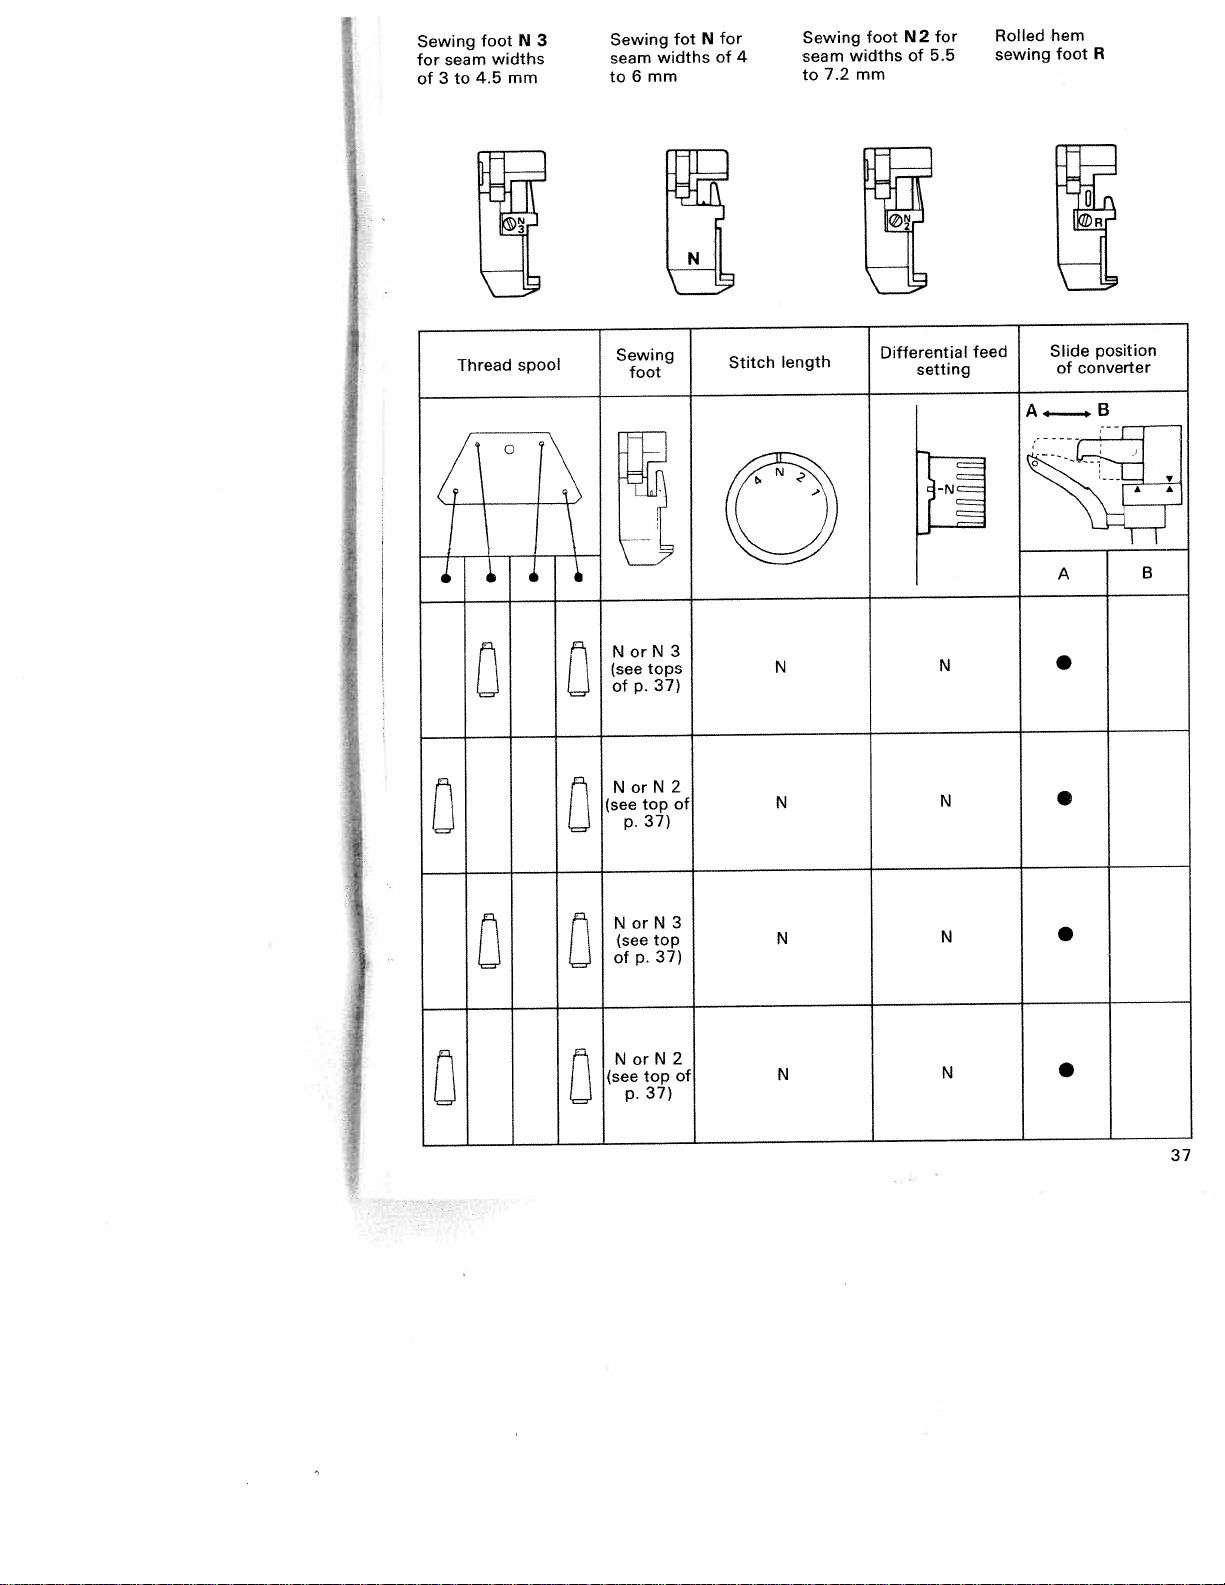
Sewing
seam
for
3
of
hem
N2
for
5.5
of
7.2
foot
widths
mm
for
N
6
widths
mm
fot
4
of
3
foot
N
widths
4.5
mm
to
Sewing
seam
to
Sewing
seam
to
Rolled
sewing
foot
R
I
I
37
Page 42

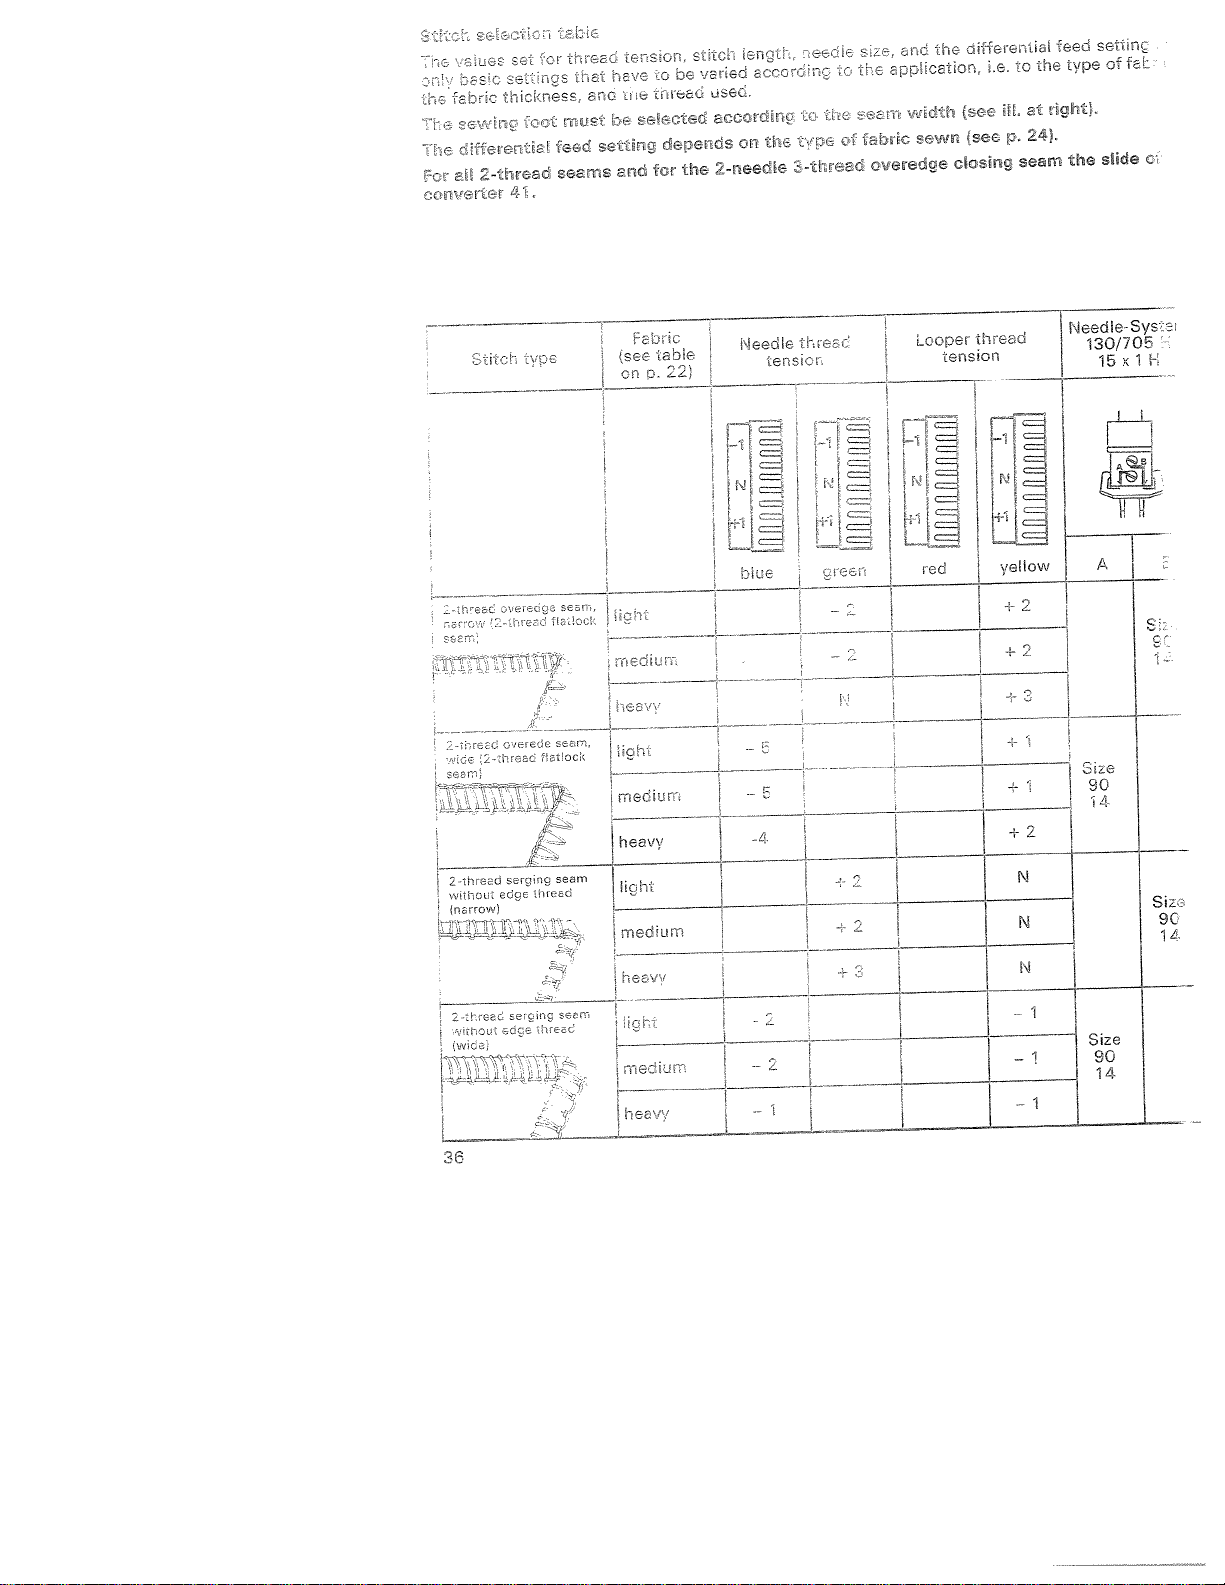
Stitch
type
(see
on
Fabric
table
p.
22)
Neeae
tension
thread
Looper
tension
thread-
Needle-Syst
2-thread
hem
Folded
rolled
3-thread
seam
[
-‘
rears
3-thread
without
(narrow)
(narrow)
(narrow)
hre
roiled
2-thread
hem
—-
.c
.wio.:
edge
A,
overedge
eseredge
se-awn
An
thread
7’
-
w:.m
-
light
medium
light
[medium
medium
heavy
..
light
medium
heavy
-
light
blue
-_________
green
—
2
red
-2
N
yellow
1
—
-1
—
1
to
toN
to
A
N
—
7
N
—
N
1
—
N
I
+1
N
N
N
j
2
—
4
-3
—
-2
N
N
c
N
1
—
-1
—
Size
14
+
+2
N
2
—
N
N
N
N
3
-
-3
.
H--
38
heavy
flL
light
medium
-
•
heavy
3
-2
N
N
-3
4
-
-4
-4
+2
+
+2
+4
3
—
14
Page 43

N
(see
of
N
(see
of
N
(see
of
N
(see
of
3
or
N
top
p.
37)
2
or
N
top
37)
p.
N
3
or
top
p.
37)
N
2
or
top
37)
p.
39
Page 44

Oh
Page 45
4
I
I
I
I
I
I
N
(see
of
3
N
or
top
35)
p.
N
(see
of
or
2
N
top
35)
p.
Page 46
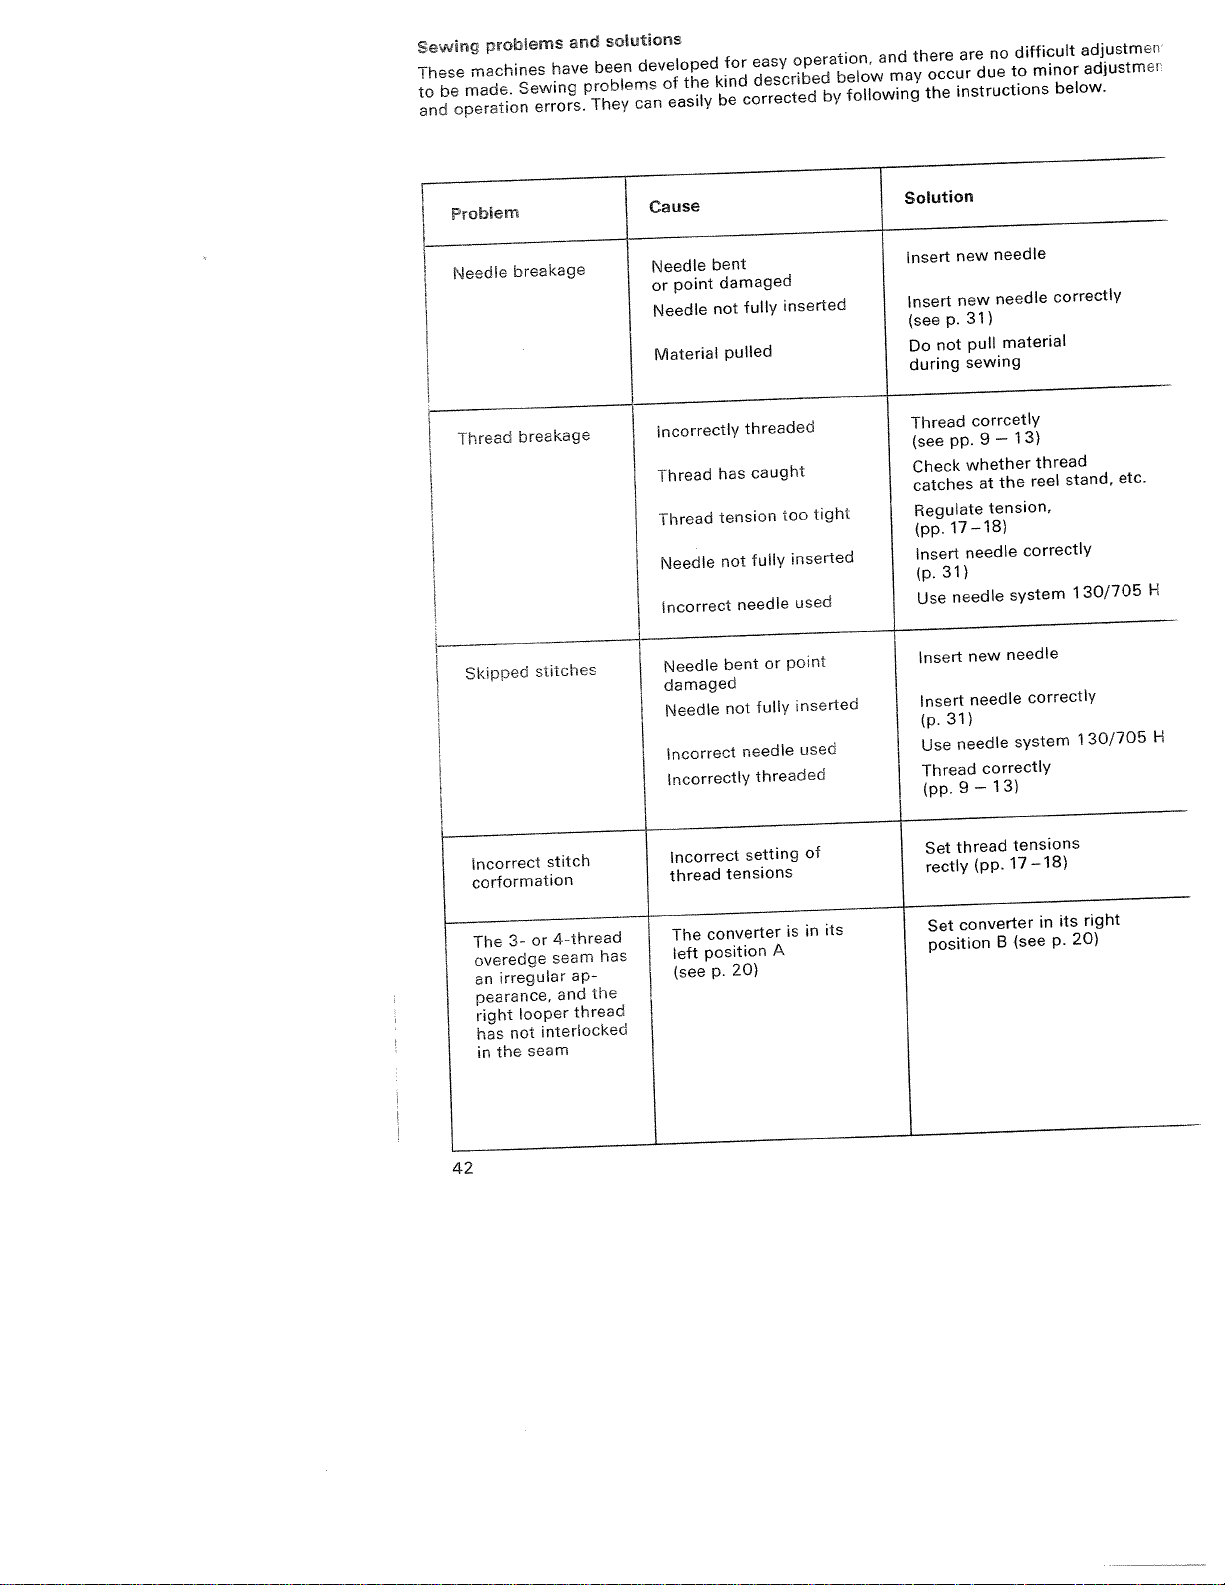
Sewing
These
be
to
and
problems
machines
made.
operation
Sewing
errors.
have
and
been
problems
They
solutions
developed
can
of
easily
the
for
kind
be
easy
described
corrected
operation,
below
by
and
may
following
there
occur
the
difficult
no
are
to
due
instructions
minor
adjustmen
adjustmer
below.
Problem
Needle
Thread
Skipped
breakage
breakage
stitches
Cause
Needle
point
or
Needle
Material
incorrectly
Thread
Thread
Needle
incorrect
Needle
damaged
Needle
Incorrect
Incorrectly
bent
damaged
fully
not
pulled
threaded
caught
has
tension
not
needle
bent
not
needle
inserted
too
fully
point
or
fully
threaded
tight
inserted
used
inserted
used
Solution
new
Insert
new
Insert
(seep.31)
not
Do
during
Thread
(seepp.9—13)
Check
catches
Regulate
17—18)
(pp.
Insert
31)
(p.
needle
Use
Insert
Insert
31)
(p.
needle
I
Use
Thread
9
(pp.
needle
needle
material
pull
sewing
corrcetly
whether
the
at
tension,
needle
new
needle
correctly
13)
—
reel
correctly
system
needle
correctly
system
correctly
thread
stand,
30/705
1
30/705
1
etc.
H
H
Incorrect
corformation
The
overedge
irregular
an
pearance,
right
has
the
in
42
3-
looper
not
or
seam
stitch
4-thread
seam
ap-
the
and
thread
interlocked
has
Incorrect
thread
converter
The
position
left
(see
tensions
p.
setting
20)
of
its
in
is
A
Set
rectly
Set
position
(pp.
converter
B
17—18)
in
see
right
its
20)
p.
tensions
thread
Page 47
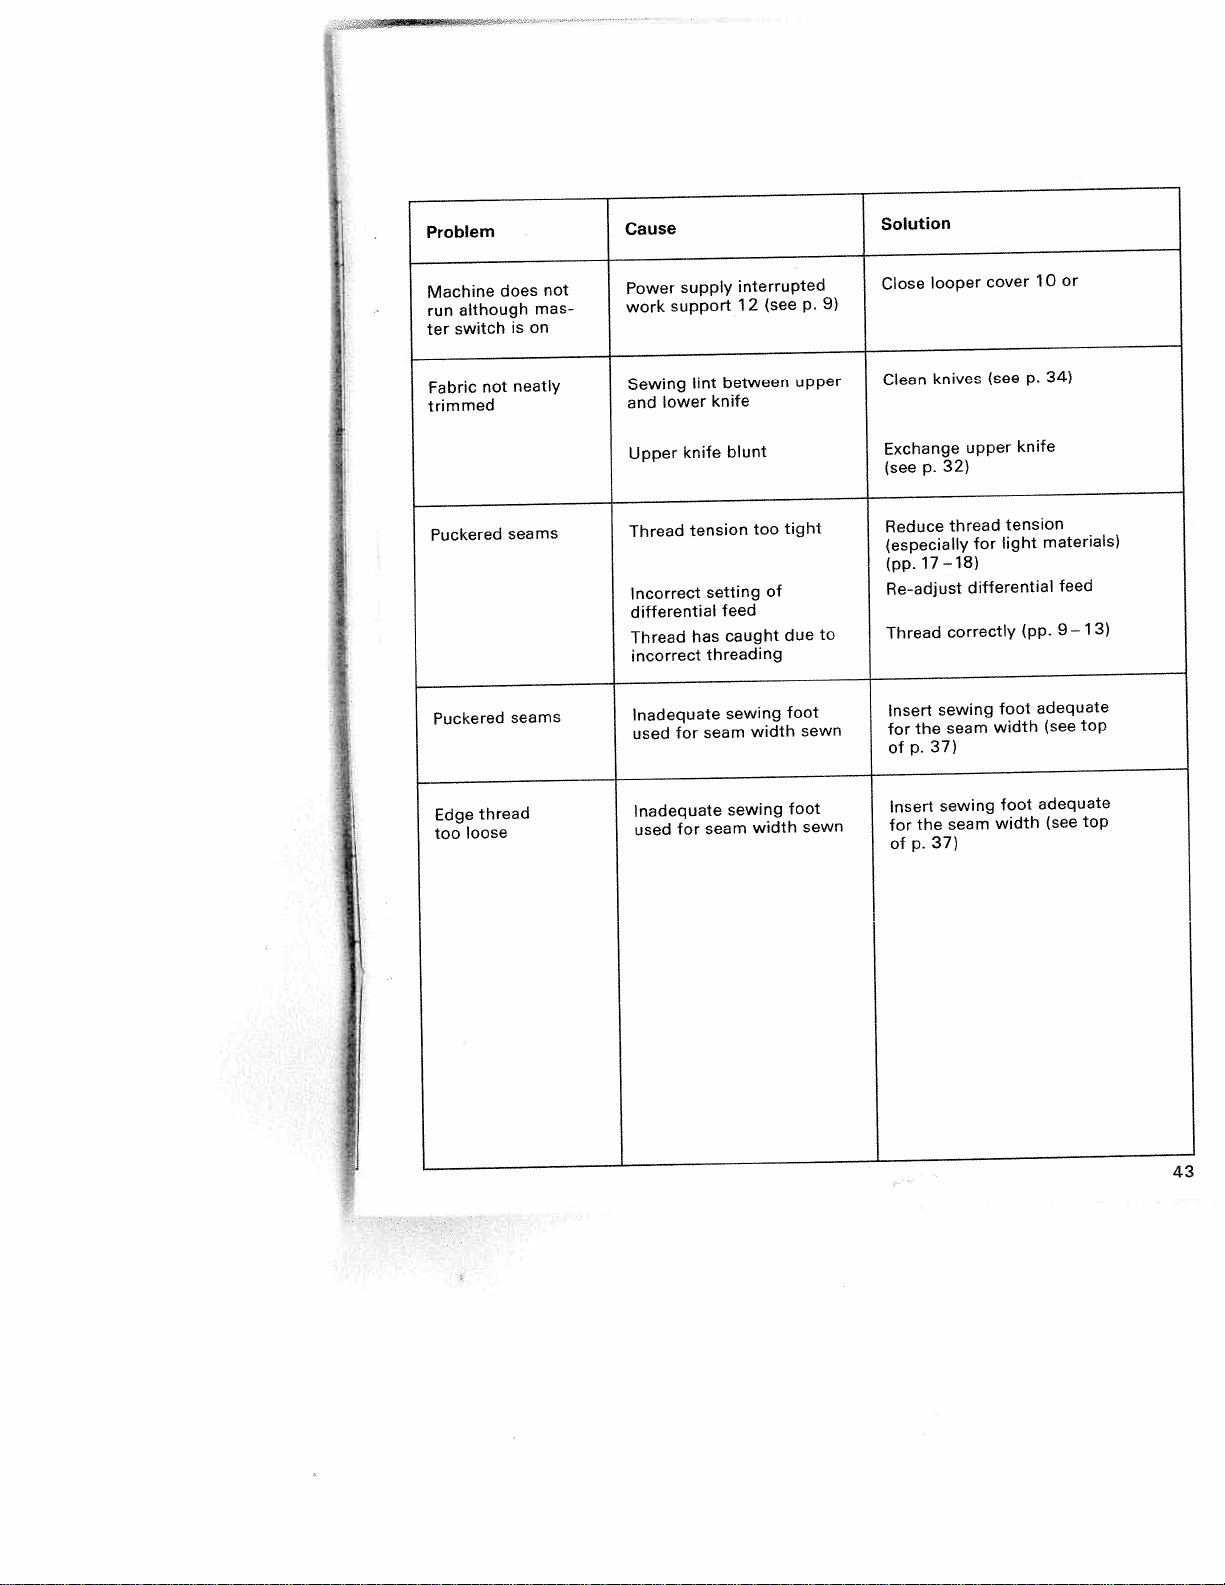
Problem
Machine
although
run
switch
ter
Fabric
trimmed
Puckered
Puckered
Edge
loose
too
does
not
thread
on
is
neatly
seams
seams
not
mas-
Cause
Power
support
work
Sewing
lower
and
Upper
Thread
Incorrect
differential
Thread
incorrect
Inadequate
for
used
Inadequate
used
supply
lint
knife
tension
has
for
interrupted
12
between
knife
blunt
setting
feed
caught
threading
sewing
seam
sewing
seam
(see
too
of
width
width
upper
tight
due
foot
foot
p.
to
sewn
sewn
Solution
or
10
cover
looper
Close
9)
34)
p.
(see
knives
Clean
knife
p.
17—18)
the
37)
p.
the
37)
p.
upper
32)
thread
differential
correctly
sewing
seam
sewing
seam
for
tension
light
foot
width
foot
width
materials)
(pp.
adequate
(see
adequate
(see
feed
9—
1
top
top
3)
Exchange
(see
Reduce
(especially
(pp.
Re-adjust
Thread
Insert
for
of
Insert
for
of
43
Page 48
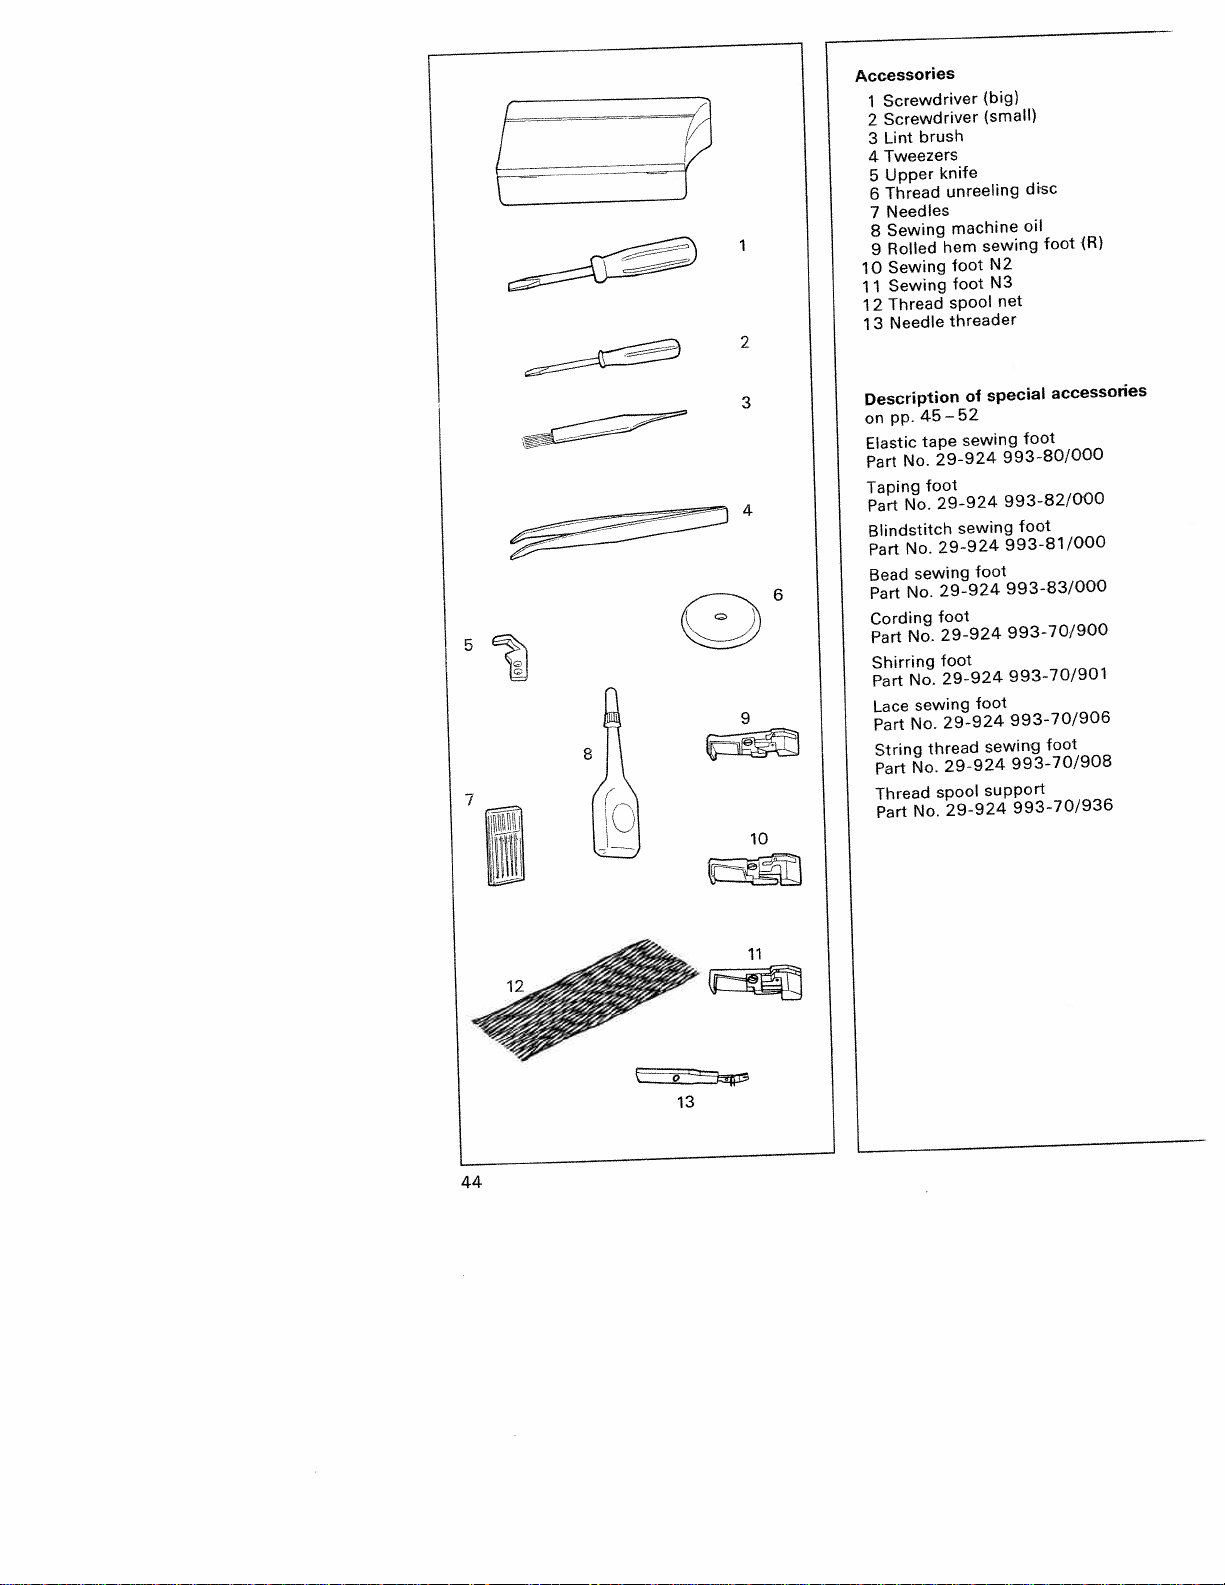
Accessories
knife
unreeling
machine
hem
foot
foot
spool
threader
(big)
(small)
sewing
N2
N3
net
disc
oil
foot
(R)
Screwdriver
1
Screwdriver
2
Lint
3
Tweezers
4
Upper
5
Thread
6
Needles
7
Sewing
8
Rolled
9
Sewing
10
Sewing
1
1
Thread
2
1
Needle
13
brush
2
special
45—52
tape
foot
No.
sewing
No.
No.
No.
sewing
No.
No.
No.
29-9
29-924
29-924
9-924
2
foot
29-924
foot
29-924
29-924
thread
29-924
spool
2
of
sewing
24
sewing
foot
foot
sewing
support
9-924
3
Description
on
pp.
Elastic
No.
Part
Taping
No.
Part
Blindstitch
Part
Bead
Part
Cording
Part
Shirring
Part
9
Lace
Part
String
Part
7
Thread
Part
accessories
foot
993-80/000
993-82/000
foot
993-81/000
993-83/000
993-70/900
993-70/90
993-70/906
foot
993-70/908
993-70/936
1
10
44
13
Page 49

Thread
Very
tend
down
useful
to
(Fig.
spool
for
become
A).
net
synthetic
loose,
threads
unravel
and
which
slip
4
I
[.
Thread
The
item
smaller
Remove
36
Put
pin
on
facing
Blindstitch
Preparing
Differential
teed
Needle:
Sewing
Stitch
Stitch
Thread
The
in
Before
2
This
Place
sewing
is
of
edgeofguide
Regulating
needle
Loosen
adjust edge
one
by
unreeling
thread
6ofthe
thread
thread
from
the
the thread
and
place
topofit,
down,
setting:
foot:
width:
length:
tension:
hemistrimmed,
one
operation.
sewing,
cm.
avoids
the
prepared
foot
under
edge
the
outer
in
the outer
adjusting
thread
the
needle.
disc
unreeling disc
accessories
spools.
spool
reel
thread
spool
the
thread
with
rounded-off
shown
as
sewing
the
shifting
so
fabric
the
guide
of
foot
machine
set
at
insert
insert blindstitch
,,N”
longest
,,N”
cut
hem
of
hem
that
folded
guide
-2-.
must
—2—.
penetration
fabric
screw
—2—
the
outer
shown
is
used
centering
pin.
on
the
in
N
the
(red,
serged
part
the
under
run
—
so
fabriciscaught
piece
thread
unreeling
section
Fig.
B.
right
stitch length
yellow,
and
—3—
hem.
the
hem
part
Crease
line
along
of
the
1
—
and
only
that
as
for
reel
disc
needle
foot
blue)
sewn
in
the
C
by
-3-
-4-
.1
45
Page 50

Ag.
1
sewing
Bead
This
special
nary
cords.
1.
Set
Insert
2.
For
3.
For
Push
4.
For
all
5.
guide
6.
Caution:
7.
Stitch length:3to4mm
As
certain
8.
Note:
toot
sewing
These
differential feedatN.
sewing
bead
small
beads
large
beads
the
bead
seam
width
the
fabric
only
work
correct
If
the
bead
(disengage
tenson:
Thread
The
needle should
(Fg.
1)
footisfor
operations
foot.
use
the
use
the
tape
throught
settings
along
with
thread
tapeissewn
upper
needle
right
looper
left
loope
penetrate
fabric
right
left
the
the
knife).
are
right-hand
tension
aL
sewing
on
carrieo
needle
needle.
guides
itispossibie
upper
knife
by
onto the
=
—3to—5
=
1to—3
=
-i
2
tO
about
oeeos,
cut
1
anc2o
sewing
at
makng
sb-ic
±
3
tO
1.5
wrtF
ic
—
,5
sequrs,
one
rteedrt,
the
work
settings
enc
withcScdrcr-;ce
cc,
edge.
ro’
seam
a
est
edge, the
oni
irom
dre
mm
srass
o
toe
ft
c
(N=ste.
led
tec:
ieec
ordi
-
i
caic
setring
stccuser
eoç
-
46
Page 51

Elastic
This
onanelastic
tion
and
elastic
special
the
also
tape.
tape
fabric
gathered
sewing
sewing
tape;
is
foot
foot
in
the
trimmed
by
the
is
for
sewing
same
opera
and
serged,
contracting
Preparing
I
-
I
Differential
feed
Needles:
I
Sewing
I
I
I
I
I
I
I
Thread
Stitch
Stitch
Inserting
Loosen
at
opening
mm.
it
back
—
1
—
screw
pressure
tape
fect.
Note:
When
elastic
brake
setting:
tension:
width:
length:
screw
Place
under
with
—2—
and
the
tape
—
1
foot:
the
screw
of
thus
—
the
elastic
—2—
—4—
in
elastic
the
is
turned,
brake
the
sewing
should
slightly
machine
set
use
depending
width
insert
foot
,,N”
4
to
approx.
so
opened
is
foot.
-2-
—
1
greater
foot
be
braked.
at
1
4.5
tape:
that
tape
Tighten
again.
the
—
on
pulled
N
or
elastic
4
—3—
stronger
the
the
is
raised,
2
needles,
on
brake
by
The
gather
through
tape
taping
—
1.5
and
brake
more
elastic
to
the
1
pass
the
—
2
ef
47
Page 52

Taping
special
This
On
tapes.
seams
the
when
a
Preparing
Differential
setting:
feed
Needles:
width:
Stitch
length:,,
Stitch
Thread
inserting
needle
1.
Set
Disengage
2.
Raise
3.
guides
Push
4.
slide
5.
Adjust
needle
Place
6.
test.
foot
sewing
stretch
are
tape
is
the
tension:,,
the
sewing
-1tape
—2—.
location
turning
by
fabric
prevented
sewn
machine
depending
width
3
for
4to9
tape:
at
highest
upper
foot
from
right
to
in
and
foot
materials
on.
at
set
use
1
to
5
tape
a
N”
N”
knife.
and
right.
stop
tape
of
adjusting
carry
is
for
(knitwear)
from
N
or
2
mm
width
mm)
position.
place
with
in
out
sewing
stretchirg
needles,
on
tape
(adjustable
from
tape
relation
screw
sewing
a
cr
ir.
tc
-3
48
Page 53

Cording
special
This
a
wing
in
plies
Preparing
Differential
setting:
feed
Needles:
Sewing
knife:
Upper
Thread
width:
Stitch
length:
Stitch
Inserting
Raise
1.
needle
Set
2.
Place
3.
top
ply
together
and
The
4.
guide
in
Lower
5.
Make
6.
Thread
big
When
10,000
to
place
to
prepare
To
pieces
holders
left.
at
foot
cording
one
the
foot:
tension:
the
the
bottom
(face
insert
cording
the
sewing
a
spool
thread
meters)
them
upside
36
17,
sewing
tape
operation.
machine
set
two
engage
engaged
,,N”
3
fabric
sewing
its
at
ply,
side
under
to
up
(piping)
1.
sewing
support
spools
thread
on
machine,
the
shown
as
foot
between
at
needles
5
to
plies
foot
highest
cording
face
to
the
sewing
upper
the
foot.
test.
recommendable
is
it
down
in
is
N
cording
must
are
spool
place
on
the
used
two
or
position
tape
side)
foot
knife.
be
used
supports.
centering
thread
illustration
for
fabric
left
foot
and
flush,
placed
(5,000
spool
se
one
When
thread
slipping
entangled,
reeling
synthetic
spool
thread
thus
the
of
threads
supports
windings
guaranteeing
thread.
are
prevent
from
used,
down
becoming
perfect
the
un
49
Page 54

bottom
Raise
-
Set
Place
needle
insert
Place
lush
(face
and
Lower
Make
special
two
setting:
foot:
knife:
thread
length:
needle
with
insert
foot
pieces
ply
the
the
the
bottom
plate
up
top
side
the
sewing
a
sewing
of
in
machine
fabric
sewing
at
upper
to
fabric
the
to
up
sewing
foot
fabric
one
set
two
engage
engaged
+3
its
fabric
and
ply
bottom
face
to
test.
operation.
2
at
or
+5
to
plies
foot.
highest
ply
shirring
knife.
2
side),
stop
foot.
used
is
and
one
shirring
1
opening
in
ply
4.
for
shirring
position.
between
foot,
joi
foot
and
3
Shirring
This
ning
the
Preparing
Differential
feed
Needles:
Sewing
Upper
Needle
tension:
Stitch
Inserting
1
2.
3.
•
4.
5.
6.
50
.-:
Page 55

sewing
String
This
special
in
wing
threads)
this
By
finish
hem
dresses,
Preparing
Differential
setting:
feed
Needle:
width:
Stitch
length:
Stitch
Thread
section
(cf.
,,Rolled
Inserting
Raise
1
Engage
2.
Place
3.
4.
Thread
hole
the
of
Sew
5.
gimp
up
means
curtains,
the
tension
hem):
the
sewing
fabric
gimp
then
1,
sewing
test
a
sewing
threads
to
achieved
is
upper
toot
thickness
a
wavy,
a
etc.).
machine
set
insert
(HL
3to4
1.0
right
approx.
left
needle
approx.
gimp
foot
knife.
under
thread
place
foot
seam.
foot
(cords,
at
787,
to
looper
thread
and
the
it
shoe.
is
i.e.
(e.g.
N
right
mm
1.5
looper
(cord)
in
used
of
more
on
788)
N
thread
N
set
sewing
guide
for
synthetic
mm.
1.0
firm
wedding
needle
mm
5
+
needle
foot.
through
2
se
up.
51
Page 56

for
used
is
ceDa
sewinc
cc•oars
ooi
ogether
or
or
cc
rg:
ha-
ochine;
se
nsert
N
at
(witc
N
right
upper
needle
knife
rro
eec
Neec
so:;
c:
engaged)
mm
2.0
to
.5
looper
righz
looper
iett
thread
needle
set
and
too!
adjust
and
3
screv’
ccseo
aa
a
;enera!ss
•rece
lace
e
--H
sewing
-o
5
‘3
“7’
guioe
rce
ucderlying
ie
•
med
enc
ace
ecng
Vusrra!ed).
-
•
es
•
a
ihat
and
Tighten
the
it
i
during
edge
seam.
during
the
lace
through
(engage
fabric
lace
fabric
the
guide
close
as
fabric
screw
on
guide
attaching,
the
upper
must
needle
sewing
to
underne
3.
fabric,
not
is
1
+
±
—
guide
thee
alor.
2
knife:
to
be
2
2
1
the
bo;
to
to
-
ec
-,
be
9!
Page 57

I
I
I
Specifications:
stitches/mm.
Maximum
Seam
width
length
Stitch
Sewing
Lubrication
Sewing
system
Needle
size
Needle
Number
Dimensions
Weight
foot
foot
of
sewing
height
threads
speed
.
.
1,300
3-7.2mm
1—4mm
Hinged
Manual
5mm
130/7O5Horl5xl
75—9Oorll—14
2,3,4
315x280x330mm
8.5kg
H
Contents
machine
1
1
foot
1
instruction
1
lint
1
machine
of
control
box
cardboard
motor
with
manual/guarantee
cover
box
certificate
53
 Loading...