

Page 1

PFAFF
©v
34©=7
Instruction
Instrucciones
Mode
Libretto
dëmploi
Book
istruzioni
de
manejo
Page 2
K
out
Fold
Extienda
Rabattre
Girare
this
esta
ce
questa
page
hoja
volet
pagina
vers
I’extérieur
verso
l’esterno
)
4
Some
Take
a)
fingers
Make
b)
cord
machine
change
parts.
Be
C)
bulb
Safety
page
see
Normas
para
segén
Debido
a)
usuarlo
deberá
durante
vista
Siempre
b)
aguja,
Ia
limpiar
cuando
tarse
desenchufarse.
La
C)
bombilla
safety
care
by
sure
whenever
or
mechanical
to
sure
in
the
rules
2
sabre
máquinas
DIN
57730,
al
de
tener
el
Ia
de
el
de
placa
o
no
eléctricamente,
potencia
rules
avoid
to
needle
the
unplug
you
you
want
only
use
sewing
United
for
medidas
de
movimiento
toda
todo
trabajo
zona
haya
que
prensatelas,
pie
aguja,
engrasar
use,
se
maxima
de
es
injury
have
clean
to
and
a
lamp.
coser
sección
máquina
el
no
y
costura.
de
que
10
Ia
deberá
vatios.
15
your
to
during
power
the
leave
to
it,
accessory
15-watt
Kingdom
seguridad
de
domésticas
2C
Ia
de
de
cuidado
apartar
cambiar
Ia
mismo
maquina,
desconec
decir,
es
admisible
sewing.
it
oil
light
aguja,
coser
posible
Ia
Ia
canilla
que
o
deberá
de
the
or
al
4
sécurité
Mesures
a)
b)
c)
Norme
cucire
DIN
el
o
Ia
o
a)
b)
c)
de
Toujours
continuellement
Toujours
secteur
avant
cas
mécaniques
Puissance
l’ampoule:
IEC
ln
dell’ago,
sufficiente
constantemente
lavoro.
Nel
placca
custodite
di
Ia
Ia
La
Ia
faire
débrancher
avant
travaux
les
de
remplacement
sicurezza
di
usa
per
parte
57700
parte
335
del
virtü
I
cambiare
d’ago.
manutenzione
corrente
dalla
spina
potenza
lampadina
preuve
surveiller
de
d’accessoires.
ou
maximale
Watts.
15
famiglia
28
28
movimento
‘utente
attenzione
ago,
nelle
lavoro
del
della
presa
massima
è
de
Ia
quitter
d’entretien
de
admissible
per
macchine
secondo
deve
e
d’occhio
piedino,
interruzioni
e
deve
si
macchina
a
consentita
Watt.
15
di
prudence
travail.
le
machine
machine,
Ia
et
pièces
alternativo
prestare
tenere
punto
il
spolina
durante
disinserire
togliendo
muro.
en
de
non
lavori
i
et
du
per
di
e
per
A,
Contents
Indice
C
page
Pág.
61
63
on
Ia
en
D
I
Page 3
4
Page 4
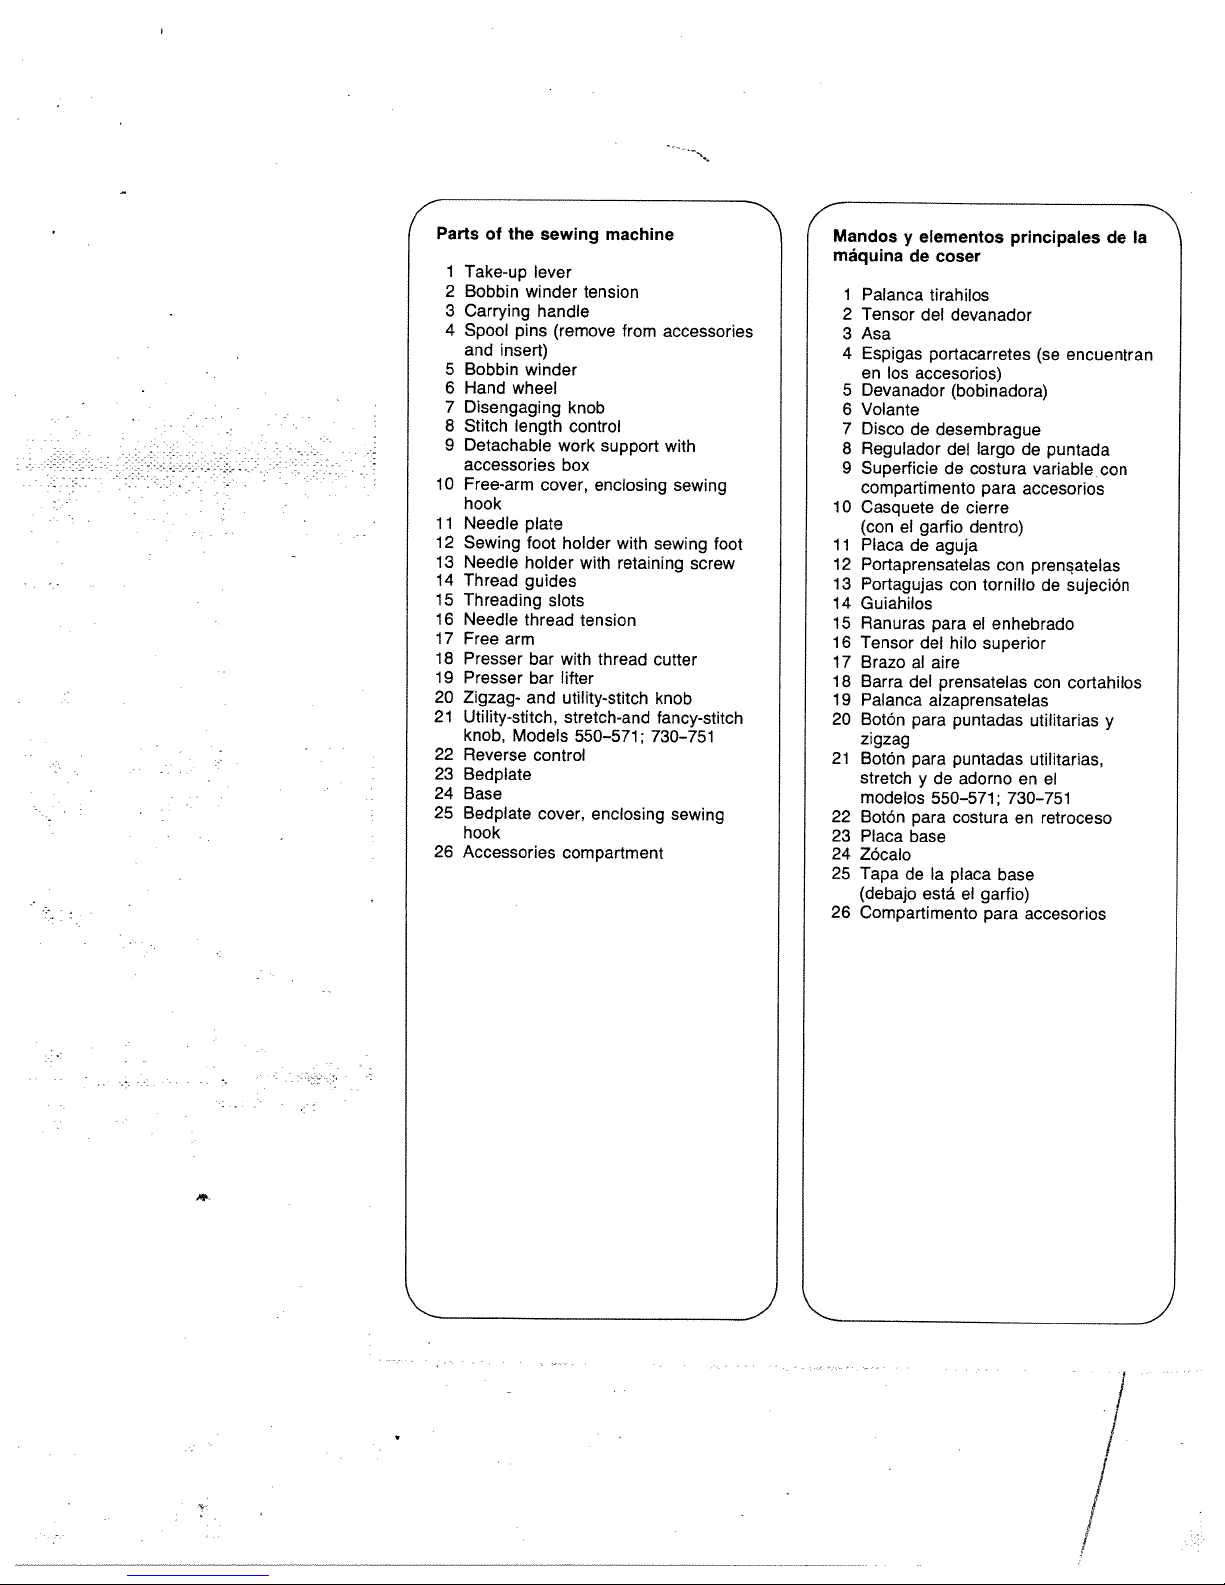
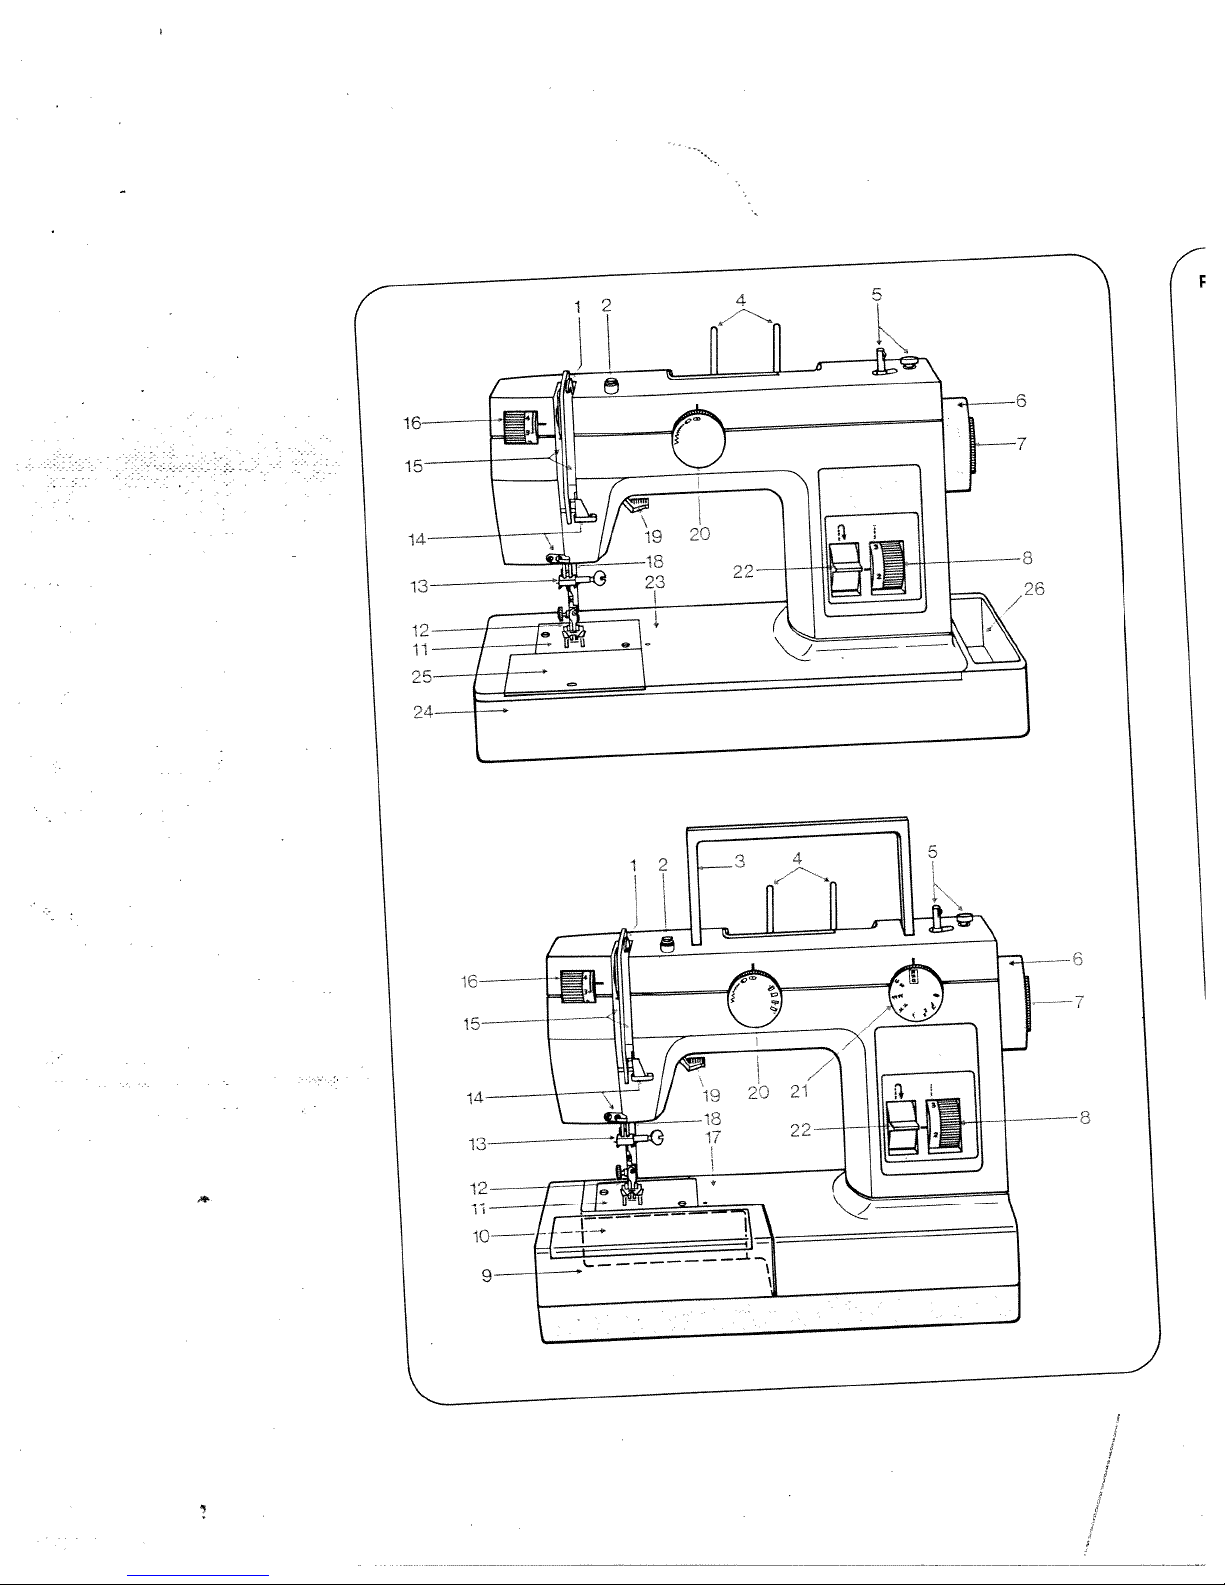
Parts
Take-up
1
2
Bobbin
3
Carrying
4
Spool
and
Bobbin
5
Hand
6
Disengaging
7
8
Stitch
Detachable
9
accessories
Free-arm
10
hook
1
1
Needle
Sewing
12
13
Needle
14
Thread
Threading
15
16
Needle
17
Free
18
Presser
19
Presser
20
ZigzagUtility-stitch,
21
knob,
22
Reverse
23
Bedplate
24
Base
Bedplate
25
hook
26
Accessories
of
the
winder
pins
insert)
winder
wheel
length
plate
foot
holder
guides
thread
arm
and
Models
sewing
lever
handle
(remove
knob
control
work
box
cover,
holder
slots
bar
with
bar
lifter
utility-stitch
stretch-and
control
cover,
compartment
machine
tension
from
support
enclosing
with
retaining
with
tension
thread
550—571;
enclosing
accessories
with
sewing
sewing
screw
cutter
knob
fancy-stitch
730—75
1
sewing
foot
Mandos
máquina
1
Palanca
2
Tensor
Asa
3
4
Espigas
en
los
Devanador
5
Volante
6
7
Disco
Regulador
8
9
Superficie
compartimento
10
Casquete
(con
11
Placa
Portaprensatelas
12
13
Portagujas
14
Guiahilos
Ranuras
15
16
Tensor
17
Brazo
18
Barra
19
Palanca
20
BotOn
zigzag
21
BotOn
stretch
modelos
Botón
22
23
Placa
Zócalo
24
25
Tapa
(debajo
26
Compartimento
elementos
y
coser
de
tirahilos
devanador
del
portacarretes
accesorios)
(bobinadora)
desembrague
de
el
de
al
del
para
para
para
base
de
largo
del
costura
de
para
cierre
de
garfio
dentro)
aguja
con
tornillo
paraelenhebrado
hilo
del
y
superior
aire
prensatelas
alzaprensatelas
puntadas
puntadas
adorno
de
550—571;
costura
Ta
placa
está
el
garfio)
para
principales
(se
puntada
de
variable
accesorios
con
prensatelas
de
con
utilitarias
utilitarias,
el
en
730—75
en
retroceso
base
accesorios
de
encuentran
con
sujeciôn
cortahilos
y
1
Ia
//
1
Page 5

4
Elements
coudre
Levier
1
2
Tension
Poignee
3
Broches
4
accessoires;
Dévidoir
5
6
Volant
7
Disquededebrayage
8
Sélecteur
9
Boite
travail
10
Capot
crochet
11
Plaque
12
Support
avec
Pince-aiguille
13
14
Guide-fil
15
Passage
16
Tension
Bras
17
18
Barre
coupe-fil
19
Releveur
20
Boutondereglage
utilitaires
et
21
Modéles
Bouton
points
fantaisie
22
Levier
23
Plateau
24
Socle
25
Cache
crochet
26
Compartiment
constitutits
releveur
dévidoir
du
bobines
a
de
rangement
de
couvrant
aiguille
a
de
semelle
semelle
du
du
fil
libre
pied
de
du
550—571;
de
reglage
utilitaires,
marche
de
fondamental
couvrant
machine
Ia
de
fil
de
(jointes
mettre
a
longueurdepoint
le
avec
til
d’aiguille
presseur
pied
points
le
a
accessoires
place)
en
formant
compartiment
du
pied
vis
fixation
de
avec
presseur
points
zigzags
730—751:
elastique
arrière
compartimont
aux
plan
presseur
du
du
a
de
et
Parti
della macchina
1
Leva
2
Tensione
3
Maniglia
Perni
4
corredo
Spolatore
5
6
Volantino
7
Disco
Regolatore
8
punto
9
Piano
scomparto
10
Sportellino,
11
Placca
12
Supporto
13
Morsetto
14
Guide
15
Fessure
16
Tensione
17
Braccio
18
Barra
19
Leva
20
Bottone
per
21
Bottone
flexi
730—751
Tasto
22
Placca
23
24
Zoccolo
25
Chiusura
base,
26
Scomparto
tendifilo
per
porta-rocchetti
infilarli)
e
di
disinnesto
della
di
lavoro
per
dietro
d’ago
del
dago
del
fib
per
superiore
libero
premistoffa
premistoffa
regolatore
punti
utili
i
regolatore
ricami
e
periiritorno
base
scorrevole
sotto
ii
per
per
spolatore
Ic
lunghezza
variabile
accessori
il
piedino
con
rinfilatura
con
per
per
nel
modelli
crochet
gli
accessori
cucire
(togliere
crochet
con
vite
di
rasa-filo
Ic
punti
della
dal
del
con
piedino
fissaggio
zig-zag
utili,
550—571;
placca
e
4
L
1’
/
Page 6

Some
valid
safety
for
United
rules
Kingdom
only
The
wires
coloured
Neutral
Blue:
Brown:
As
the
colours
of
this
lead
correspond
terminals
follows:
must
be
is
marked
black.
The
wire
connected
be
marked
Please
When
a
3-ampere
in
this
according
Live
appliance
with
in
your
the
wire
connected
with
which
the
with
note:
13-ampere
fuse has
of
the
to
mains
the
the
plug,
which
coloured
is
the
letter
to
letter
to
lead
following
in
wires
may
not
coding
colour
proceed
coloured
is
terminal
the
to
N
or
brown
terminal
Lorcoloured
is
plug
used
fitted.
be
are
code:
the
as
coloured
which
a
mains
of
the
blue
which
must
is
red.
Inserting
spool
Two
accessories.
provided
in
Colocaciôn
los
En
accesorios
portacarretes.
previstos
ducidos.
Mise
Aux
broches
vement
effet
en
place
en
accessoires
a
dans
dans
spool
the
pins
the
de
bobines.
le
pins
are
included
these
Insert
machine.
los
portacarretes:
se
ColOquelosenlos
Ia
máquina
des
broches
sont
Les
les
logements
corps
de
in
in
the
encuentran
déjelos
y
a
jointes
deux
engager
prevus
Ia
machine.
the
holes
dos
orificios
intro
bobines
définiti
a
cet
Come
inserire
corredo
Nel
rocchetti.
negli
appositi
rimangono
2
troverete
Questi
fori
montati.
i
porta-rocchetti
due
devono
sulla
essere
macchina
perni
porta
inseriti
e
Page 7
4
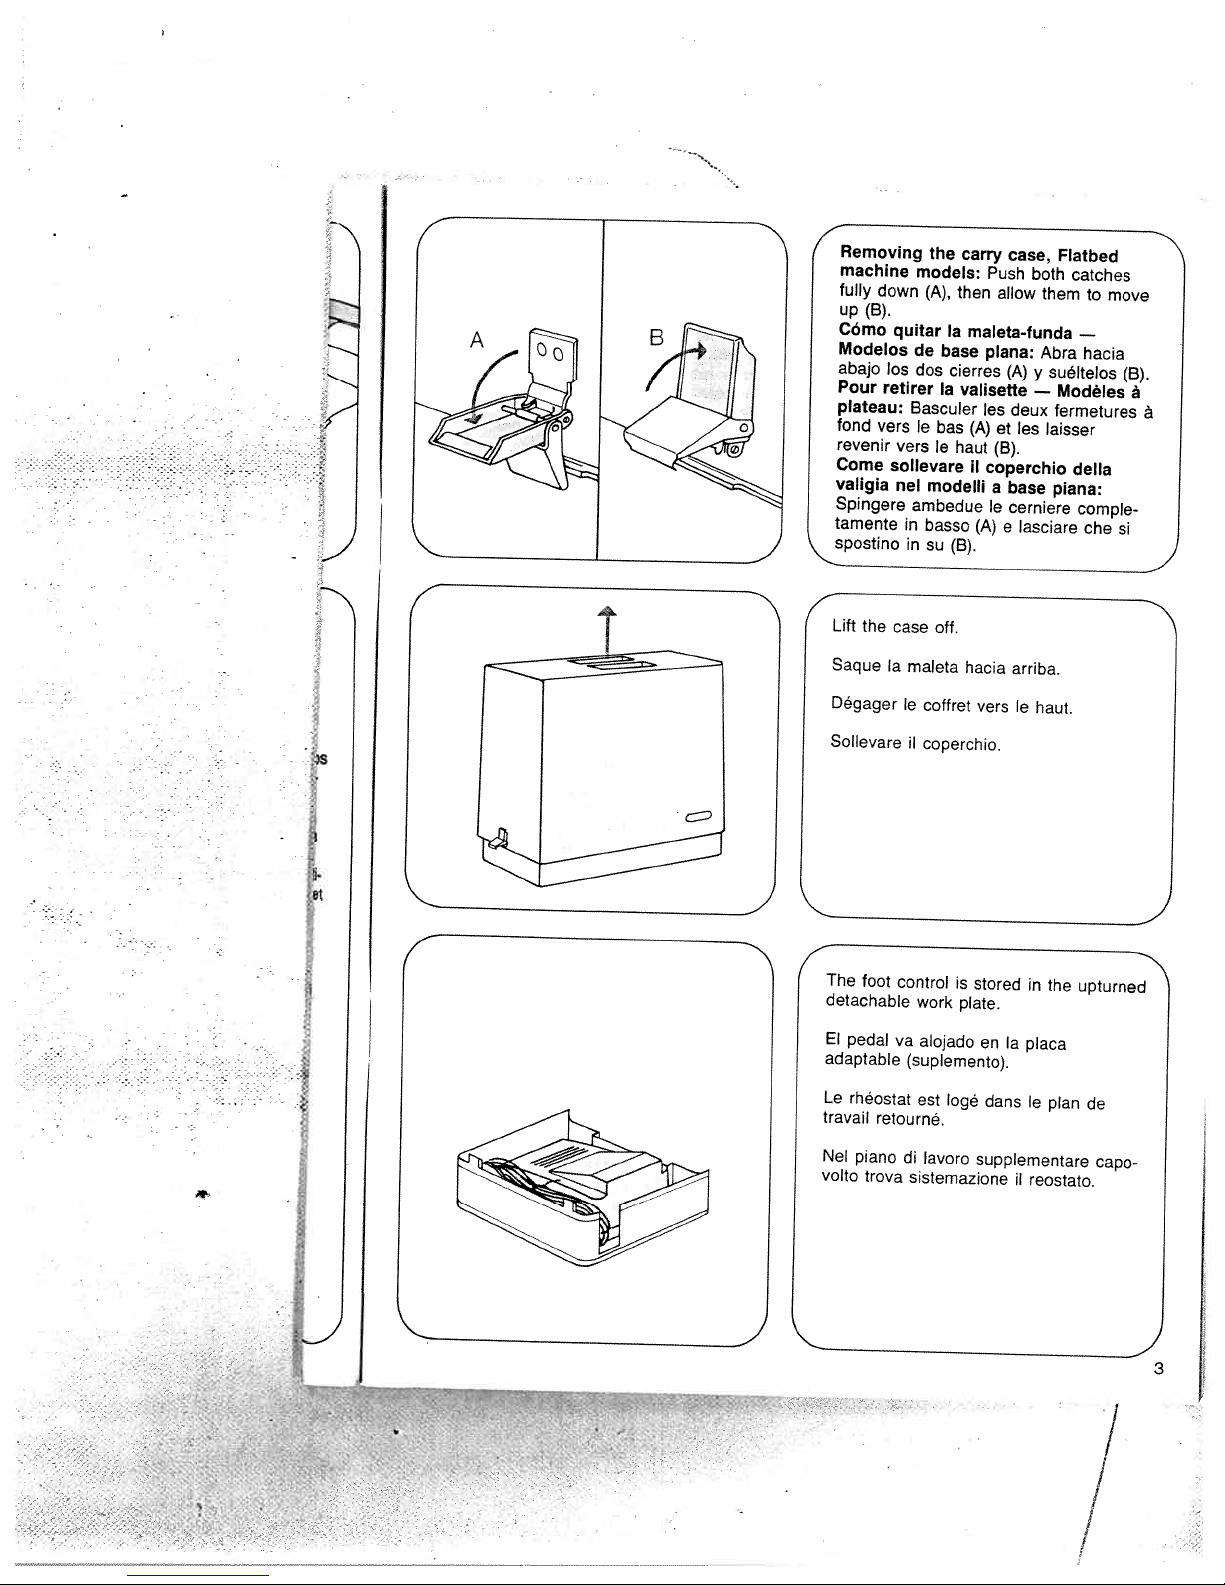
Removing
machine
fully
up
Cómo
Modelos
abajo
Pour
plateau:
fond
revenir
Come
valigia
Spingere
tamente
spostino
down
(B).
los
retirer
vers
sollevare
models:
quitar
de
dos
Basculer
le
vers
nel
ambedue
in
in
the
carry
(A),
then
Ia
base
cierres
Ia
valisette
bas
le
haut
modelli
basso
su
(B).
case,
Push
both
allow
them
maleta-funda
plana:
Abra
(A)
y
suéltelos
—
les
deux
(A)
et
es
laisser
(B).
il
coperchio
a
base
le
cerniere
(A)
e
lasciare
Flatbed
catches
to
move
—
hacia
Modéles
fermetures
della
plana:
comple
che
(B).
a
a
Si
4
Lift
Saque
Dégager
Sollevare
The
detachable
El
adaptable
Le
travail
Nel
volto
the
foot
pedal
rheostat
retourné.
piano
trova
case
off.
Ta
maleta
le
coffret
ii
coperchio.
control
work
va
alojado
(suplemento).
est
loge
di
lavoro
sistemazione
hacia
arriba.
vers
Ia
is
stored
plate.
Ia
en
dans
supplementare
ii
haut.
in
the
placa
le
plan
reostato.
-
upturned
de
capo
3
/7
Page 8

4
4
Removing
models
Fold
Cômo
modelos
Eche
flecha.
a
Pour
Modèles
Basculer
Come
modelli
\.bbassare
down
sacar
hacia
retirer
sollevare
a
the
the
de
atrás
a
bras
poignee
Ia
braccio
Ia
carry
carrying
maleta-funda
Ia
brazo
el
valisette
Ia
libre
ii
coperchio
libero.
maniglia.
al
asa
vers
case,
aire
free-arm
handle.
direcciOn
en
—
l’arrière.
de
del
los
de
/
N
4
off
ahora
el
enchufe
case.
the
de
valisette.
Ia
connection:
the
on
and
eléctrica
el
A
rheostat
le
Ia
dans
B
Ia
floor.
plug
pedal
Ia
en
de
electrique:
fiche
hacia
maleta
Set
Insert
B
in
the
suelo.
el
en
maquina,
Ia
red.
pédale
a
dansIamachine
A
murale.
prise
Ia
arriba.
the
plug
wall
lntroduzca
Ia
y
sur
foot
A
socket.
clavija
le
Lift
Tire
Enlever
Sollevareiicoperchio.
Electrical
control
machine
Conexión
Coloque
clavija
Ia
en
Branchement
Placer
Brancher
a
fiche
in
sol.
N
the
B
et
Collegamento
il
Porre
A
spina
presaamuro.
reostato
nella
elettrico:
pavimento.
sul
macchina,
Inserire
e
spinaBnella
J
4
Page 9

Bobbin
work
under
towards
Preparación
izquierda
mano
desvielo
Preparer
sousIabolte
celle-ci
Preparazione
mano
\quest’ultimo
sotto
winding
preparations:
support
left.
the
para
&
por
hacia
le
versIagauche.
izquierda.
Ia
bobinage:
rangement9et
de
per bobinare:
II
piano
verso
sinistra.
pull
and
9
devanado:
del
debajo
PasserIamain
di
lavoro
Reach
out
it
Meta
brazo9y
retirer
Infilare
estrarre
ed
Ia
Ia
7-
Remove
arm
cover10downwards.
QuiteIatapa25de
el
casquete
Enleverlecache25ou
10
verslebas.
TogliereIaplacca
25
oppure
chiusura
Raise
case.
LevanteIabisagrita
cápsula.
LeverleloquetAet
canette.
Alzare
della
spolina.
plate
bed
cierre
de
aprire
verso
basso.
latchAand
sportelloAe
cover25or fold
placa
Ia
scorrevole
sportellino
10
pull
A
retirer
togliereIacapsula
base
10
hacia abajo.
ouvrirlecapot
della
the
out
saqu
y
Ia
bolte
o
di
bobbin
Ia
free
abra
base
N
a
4
Release
SuelteIabisagrita
Lãcherleloquet
Rilasciare
spolina.
latchAand take
A
y
AetretirerIacanette.
sportello
Aetogliere
saque
out
the
Ia
bobbin.
canilla.
Ia
J
5
/
Page 10
4
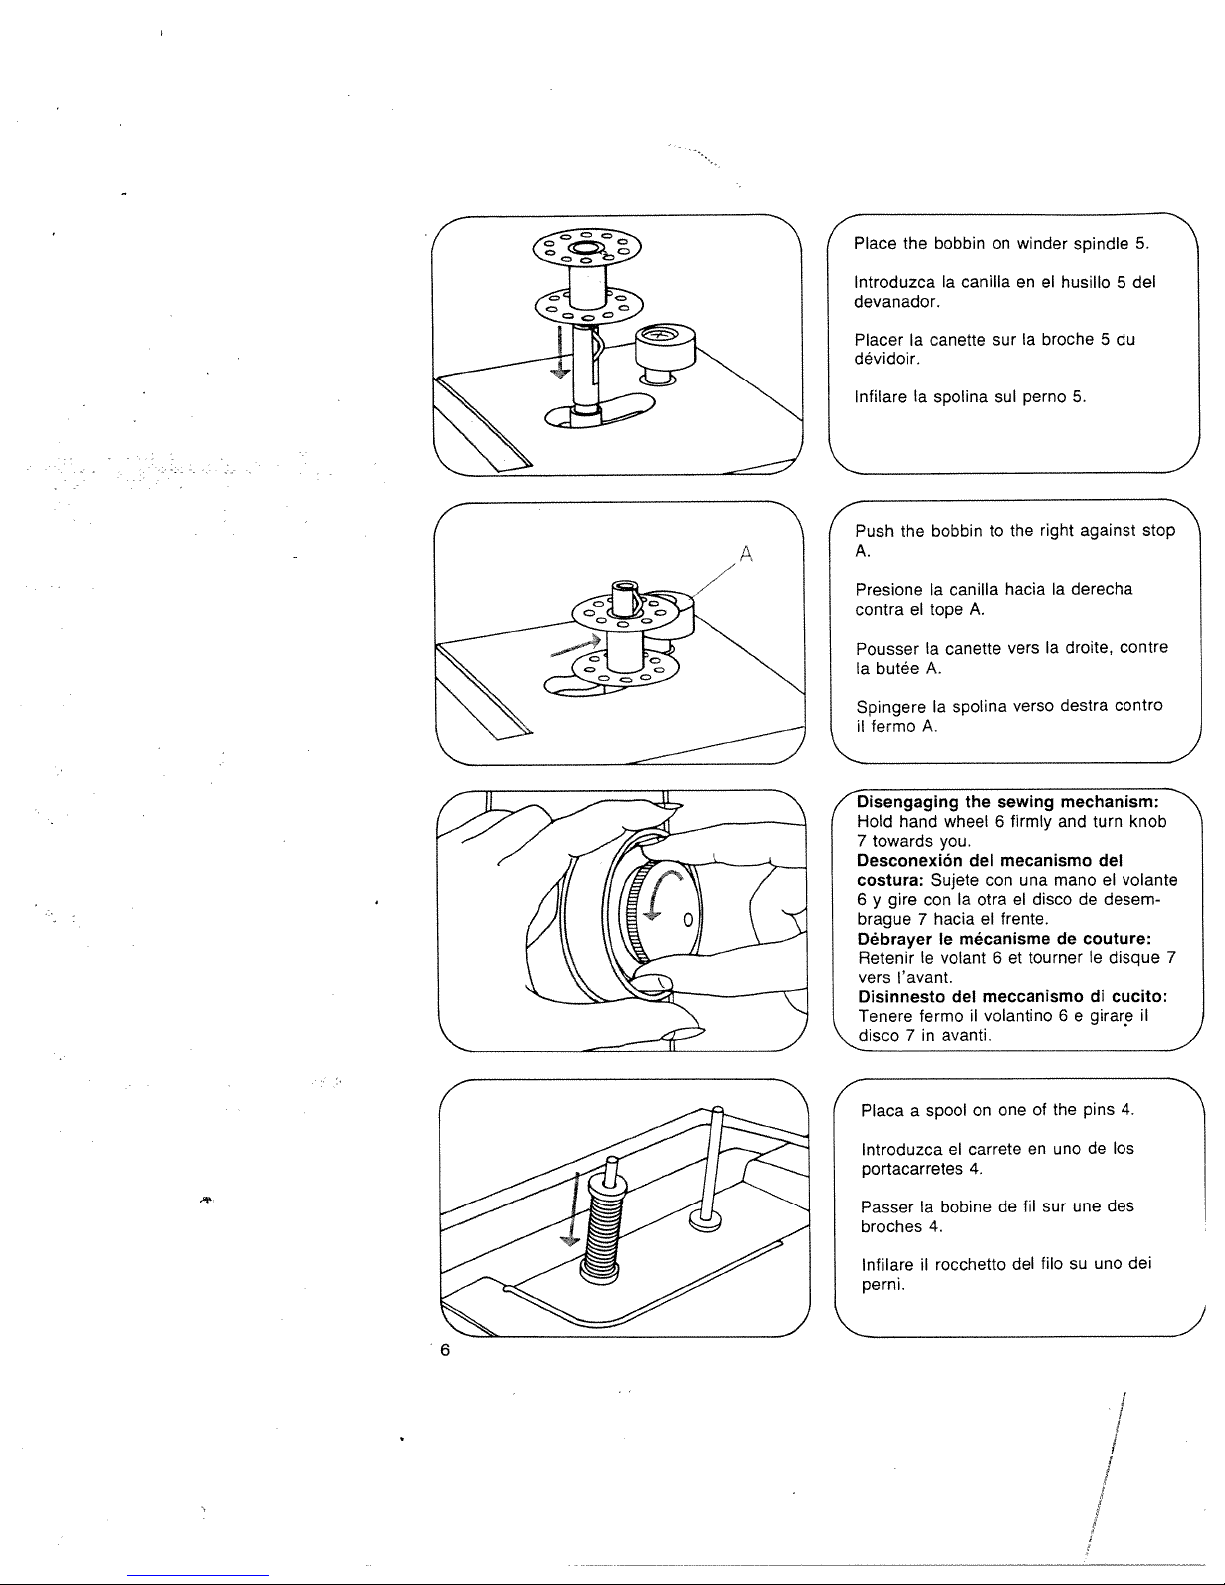
Place
the
lntroduzca
devanador.
PlacerIacanette
dévidoir,
Infilareaspolina
bobbin
Ia
canilla
on
sur
sub
winder
en
el
Ia
broche
perno
spindle
husillo
5.
5.
del
5
5
du
the
Push
A.
Presione
contraeltope
Pousser
butée
Ia
Spingere
fermo
ii
,4bisengaging
Hold
hand
towards
7
Desconexión
costura:
6ygire
brague
Debrayer
Retenirlevolant
‘avant.
vers
Disinnesto
Tenere
Placa
7inavanti.
a
\sco
4
bobbin
Ia
Ia
A.
Ia
A.
you.
Sujete
con
7
hacia
le
fermo
spool
to
canilla
A.
canette
spolina
the
wheel
del
con
otra
Ia
el
mécanisme
del
meccanismo
il
volantino
on
right
the
hacia
Ia
Ia
vers
verso
sewing
firmly
6
mecanismo
una
mano
el
discododesem
frente.
tourner
et
6
the
of
one
against
derecha
contre
droite,
contro
destra
mechanism’”\
turn
and
de
6
del
el
couture:
be
di
girare
e
pins
knob
volante
disque
cucito:
4.
stop
7
il
carrete
4.
do
del
en
sur
fil
fib
lntroduzca
portacarretes
Passer
broches
Infilare
perni.
6
el
Ia
bobine
4.
rocchetto
ii
uno
su
une
de
uno
los
des
dei
Page 11
I
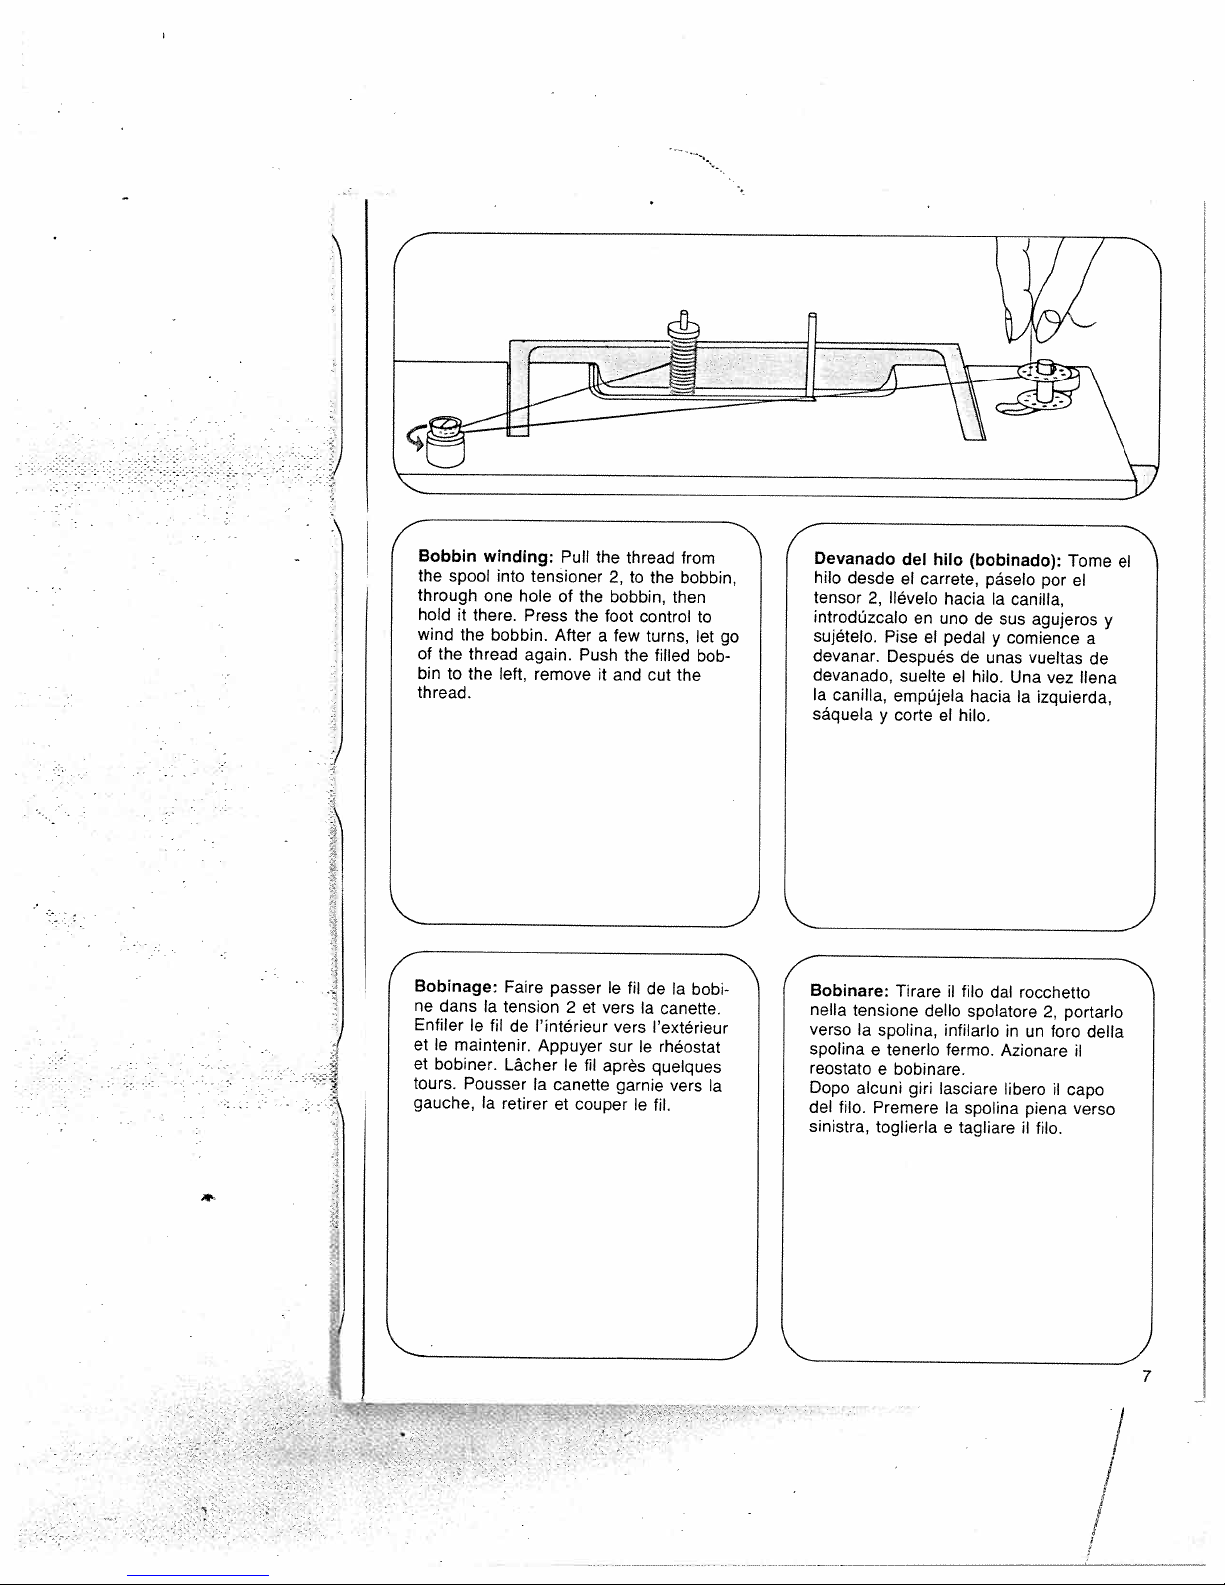
Bobbin
the
through
hold
wind
of
bin
thread.
J
the
to
spool
it
the
thread
the
winding:
into
one
there.
bobbin.
left,
tensioner
hole
Press
again.
remove
Pull
of
the
After
the
the
Push
2,
bobbin,
foot
few
a
it
and
thread
to
control
turns,
the
cut
the
filled
from
bobbin,
then
to
let
bob
the
go
Devanado
hilo
desde
tensor
2,
introdüzcalo
sujételo.
devanar.
devanado,
Ia
canilla,
saquela
J
del
el
Ilévelo
Pise
Después
suelte
empüjela
corte
y
hilo
carrete,
hacia
en
unodesus
el
pedal
el
el
(bobinado):
páselo
Ia
canilla,
comience
y
de
unas
hilo.
Una
hacia
hilo.
por
agujeros
vueltas
vez
Ia
izquierda,
Tome
el
a
de
Ilena
el
y
J
4
Bobinage:
ne
clans
Enfiler
et
Ie
et
bobiner.
tours.
gauche,
Faire
Ia
tension
Ie
fil
de
maintenir.
Lâcher
Pousser
Ia
retirer
passer
2
et
I’intérieur
Appuyer
le
fil
Ia
canette
couper
et
le
vers
vers
sur
après
garnie
fil
deIabobi
Ia
canette.
l’extérieur
le
rheostat
quelques
fil.
le
vers
Bobinare:
nella
verso
spolina
Ia
reostato
Dopo
del
sinistra,
tensione
Ia
alcuni
fib.
Tirare
spolina,
tenerlo
e
bobinare.
e
gin
Premere
toglierla
ii
dello
infilarlo
fermo.
lasciare
a
e
fib
dal
spolatore
spolina
tagliare
rocchetto
2,
in
un
Azionare
libero
piena
ib
fib.
portarlo
foro
il
ii
capo
verso
della
I
7
/
Page 12
4
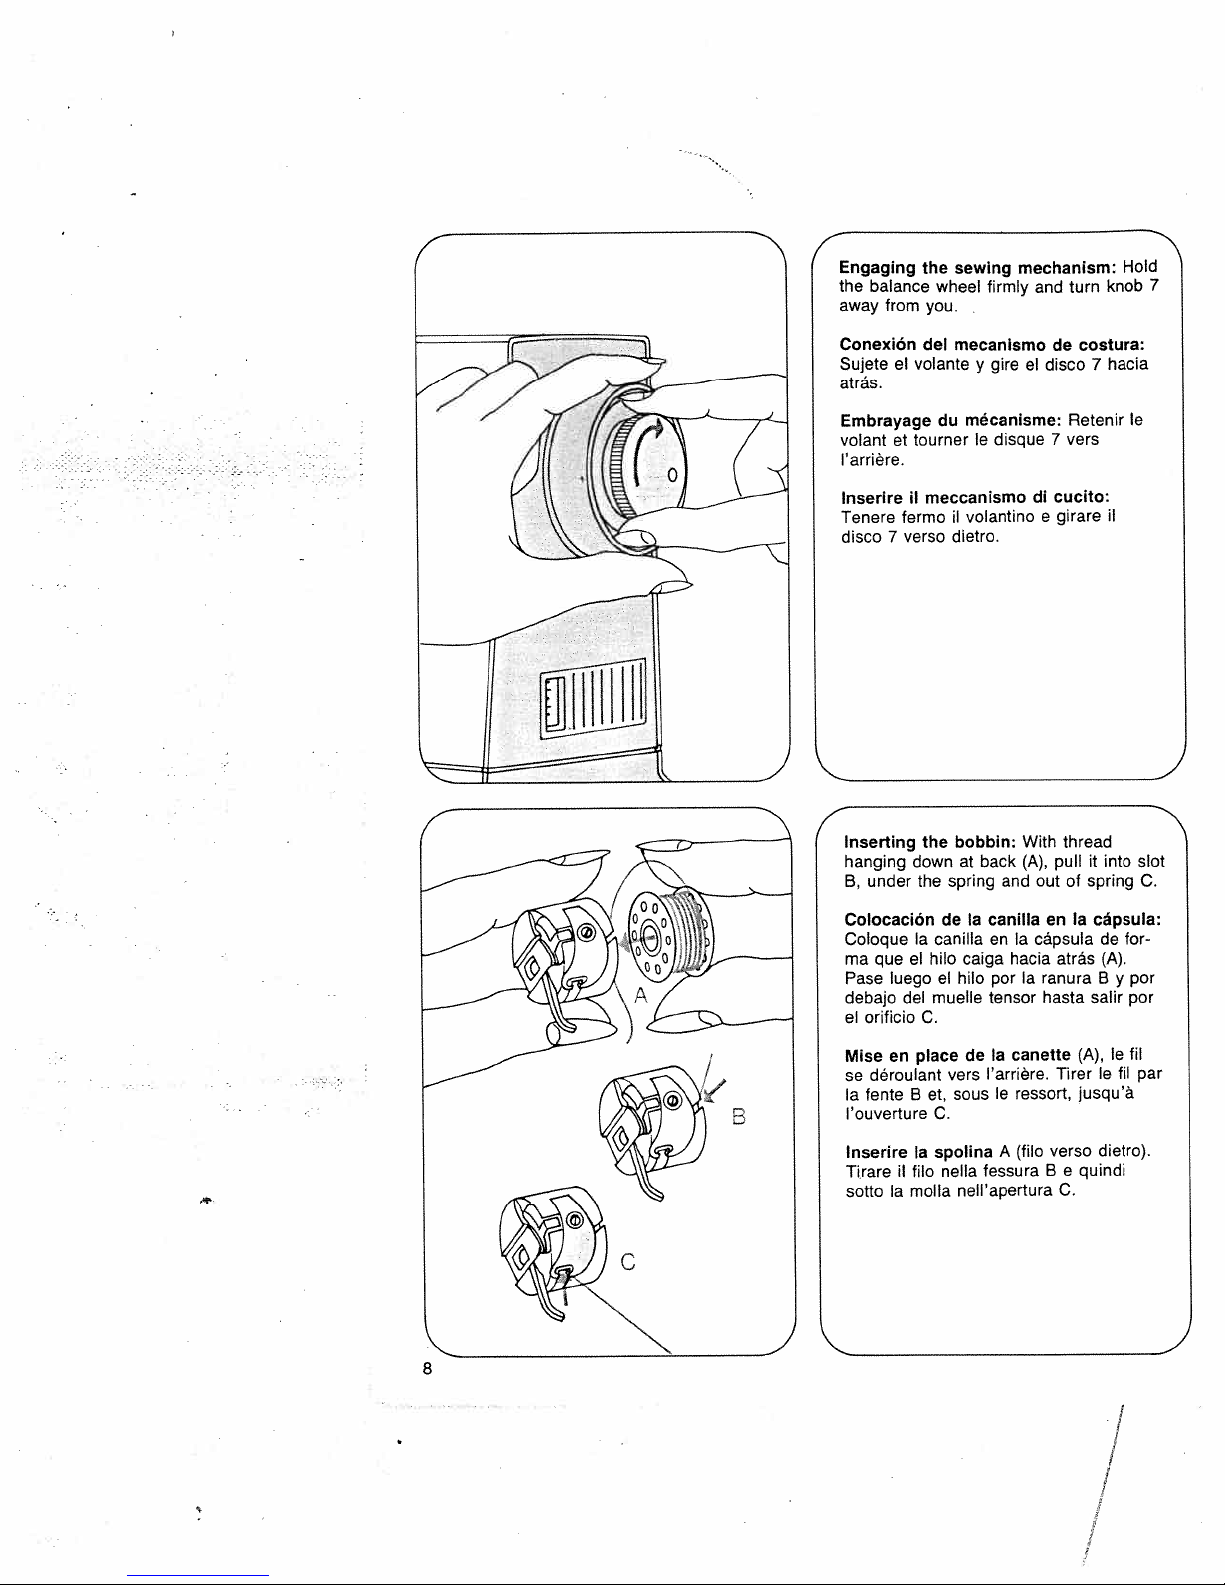
Engaging
the
balance
from
away
the
you.
sewing
wheel
mechanism:
firmly
and
turn
Hold
knob
7
Conexiôn
el
Sujete
atrás.
Embrayage
et
volant
I’arrière.
lnserire
Tenere
7
disco
Inserting
hanging
B,
under
Colocación
Coloque
ma
que
luego
Paso
debajo
orificio
el
del
mecanismo
volanteygire
mécanisme:
du
tourner
ii
fermo
verso
down
Ia
el hilo
del
le
meccanismo
volantino
ii
dietro.
bobbin:
the
at
spring
the
Ia
de
canilla
caiga
el
hilo
muelle
C.
disque
back
and
canilla
en
por
tensor
el
With
(A),
Ia
hacia
Ia
de
disco
7
di
cucito:
girare
e
thread
pull
out
en
cápsula
atrás
ranura
hasta
costura:
7
Retenir
vers
it
spring
of
Ia
cápsula:
salir
hacia
ii
into
de
(A).
B
le
slot
C.
for-
por
y
por
Tirer
verso
B
e
C.
(A),
Ie
jusqu’à
dietro).
quindi
par
fil
Mise
déroulant
Se
fente
Ia
louverture
Inserire
Tirare
sotto
8
Ia
B
ii
molla
Ia
fib
vers
et,
sous
C.
spolina
nella
neIl’apertura
I’arriére.
ressort,
le
A
(fib
fessura
canette
Ia
de
place
en
fil
le
ii
Page 13
4
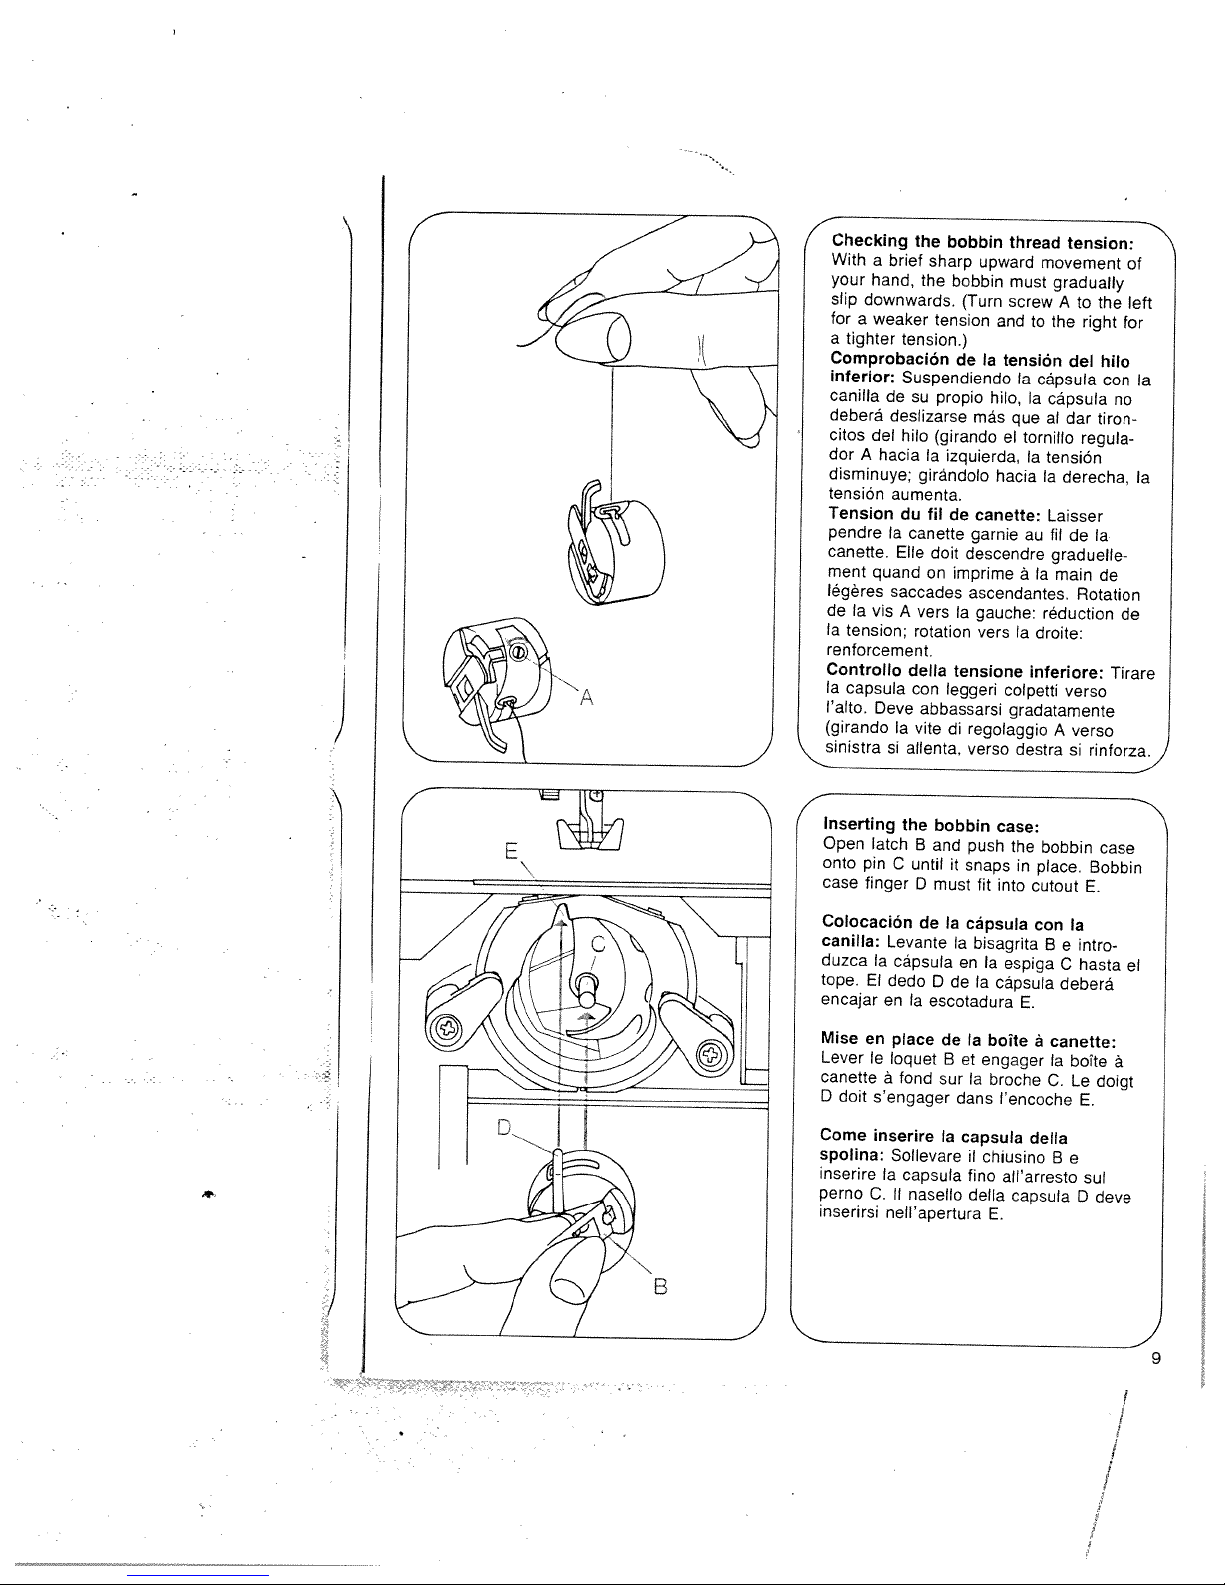
Checking
With
your
slip
for
tighter
a
Comprobación
inferior:
canilla
deberã
citos
dor
disminuye;
tensiOn
Tension
pendre
canette.
ment
Iegères
de
Ia
a
tension;
renforcement,
Controllo
Ia
capsula
l’alto.
/
(girando
sinistra
4
Inserting
Open
onto
case
Colocación de
canilla:
duzca
tope.
encajar
the
brief
a
hand,
downwards.
weaker
a
tension.)
Suspendiendo
desupropio
deslizarse
del
hilo
A
hacia
aumenta.
du
Ta
canette
ETle
quand
saccades
vis
A
rotation
della
con
Deve
Ta
vite
si
allenta,
the
latch
B
pin
C
until
finger
D
Levante
Ia
cápsula
El
dedo
en
Ia
bobbin
sharp
upward
the
bobbin
(Turn
tension
de
Ia
más
(girando
Ia
izquierda,
girandoto
fildecanette:
garnie
doit
descendre
on
imprime
ascendantes.
vers
gauche
Ta
vers
tensione
leggeri
abbassarsi
di
regolaggio
verso
bobbin
and
push
it
snaps
must
fit
Ia
cãpsula
Ia
bisagrita
en
Ia
de
Ta
D
escotadura
thread
movement
must
screw
and
to
tension
Ia
capsula
hilo,
Ia
capsula
que
al
el
tornillo
Ia
tension
hacia
Ia
au
a
Ta
reduction
Ta
droite:
inferiore:
colpetti
gradatamente
destra
case:
the
bobbin
in
place.
into
cutout
con
B
espiga
cOpsula
E.
tension:
gradually
A
to
the
right
del
dar
regula
derecha,
Laisser
fit
de
graduelle
main
Rotation
verso
A
verso
si
rinforza.
Bobbin
E.
Ia
intro
e
hasta
C
deberá
the
hilo
con
tiron
Ia
de
Tirare
case
of
left
for
Ia
no
Ia
de
el
Mise
Lever
canette
doit
D
Come
spolina:
inserire
perno
inserirsi
en
place
Te
Toquet
a
fond
s’engager
inserire
SolTevare
capsula
Ta
nasello
C.
Il
nell’apertura
de
B
sur
Ia
Ia
boite
engager
et
Ta
dans
capsula
il
chiusino
fino
delTa
broche
T’encoche
della
aTl’arresto
capsula
E.
canette:
a
Ta
C.
B
boite
Le
E.
e
suT
D
a
doigt
deve
9
Page 14
4
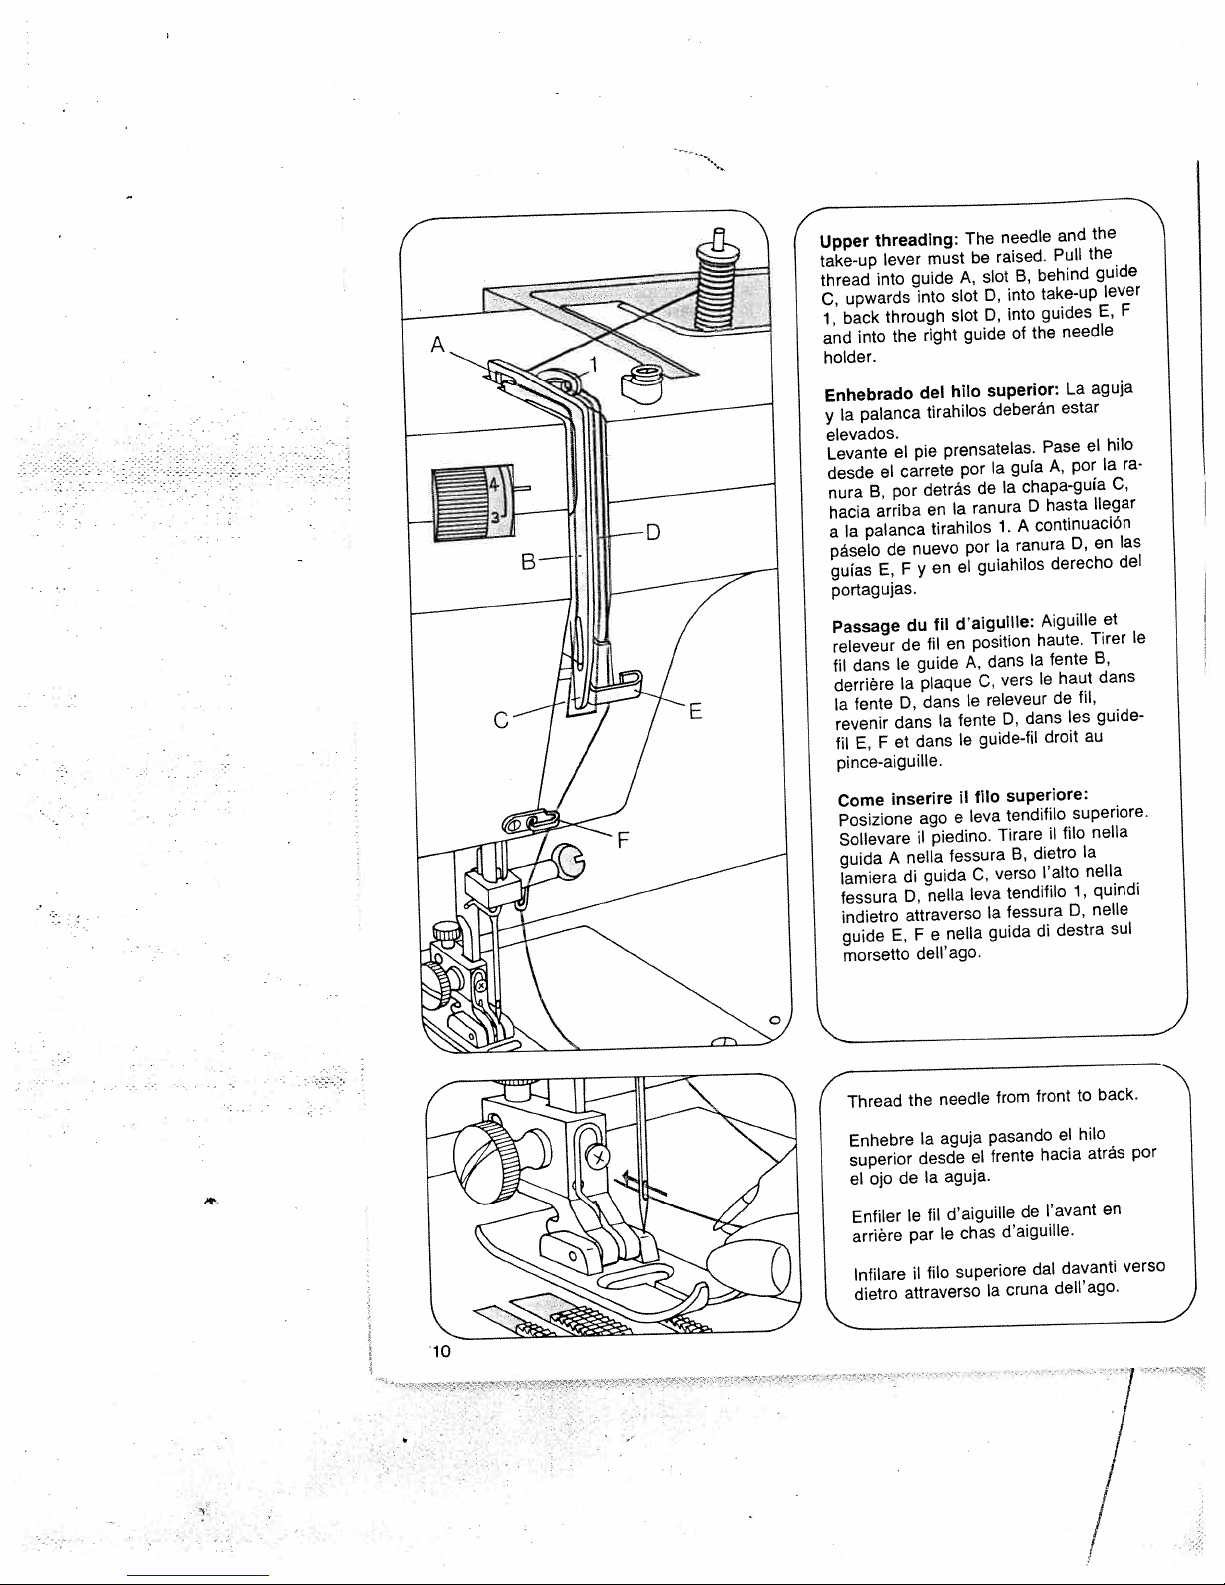
Upper
take-up
thread
C,
1,
and
holder.
Enhebrado
y
elevados.
Levante
desde
nura
hacia
a
páselo
gulas
portagujas.
Passage
releveur
fil
derriere
Ia
revenir
fil
pince-aiguille.
Come
Posizione
Sollevare
threading:
into
upwards
back
into
palanca
Ia
B,
arriba
palanca
Ia
E,
dans
fente
F
E,
guida
lamiera
fessura
indietro
guide
morsetto
lever
guide
through
the
pie
el
carrete
el
por
nuevo
de
F
du
de
le
Ia
D,
dans
dans
et
inserire
nella
A
di
D,
attraverso
F
E,
must
A,
slot
into
slot
right
hilo
del
tirahilos
prensatelas.
por
detrãs
Ia
en
tirahilos
el
en
y
d’aiguille:
fit
en
fil
guide
plaque
dans
fente
Ia
le
II
e
ago
il
piedino.
fessura
guida
nella
nella
e
dell’ago.
The
raised.
be
slot
D,
D,
guide
superior:
deberán
Ia
de
ranura
la
por
guiahilos
position
dans
A,
C,
releveur
le
guide-uI
fib
leva
verso
C,
leva
Ia
guida
needle
behind
B,
take-up
into
into
the
of
gula
chapa-gula
Ia
D
continuaciôn
A
1.
ranura
Aiguille
haute.
Ia
le
vers
dans
D,
superiore:
tendifilo
Tirare
dietro
B,
tenditilo
fessura
di
and
Pull
guides
needle
La
estar
Pase
por
A,
hasta
D,
derecho
fente
haut
de
les
droit
superiore.
fib
1
l’alto
1,
D,
destra
the
the
aguja
el
Tirer
fil,
au
nella
Ia
nella
nelle
guide
lever
E,
hilo
Ia
C,
llegar
las
en
del
et
B,
dans
guide
quindi
sul
F
ra
le
•10
4
Thread
Enhebre
superior
el
ojo
Enfiler
arrière
Infilare
dietro
needle
the
aguja
Ia
desde
Ia
aguja.
de
d’aiguille
fil
le
be
par
fib
ii
attraverso
from
pasando
frente
el
d’aiguille.
chas
superiore
Ia
de
cruna
front
hacia
l’avant
dal
delb’ago.
to
hilo
el
atrãs
davanti
back.
por
en
verso
I
I
/
Page 15
\
4
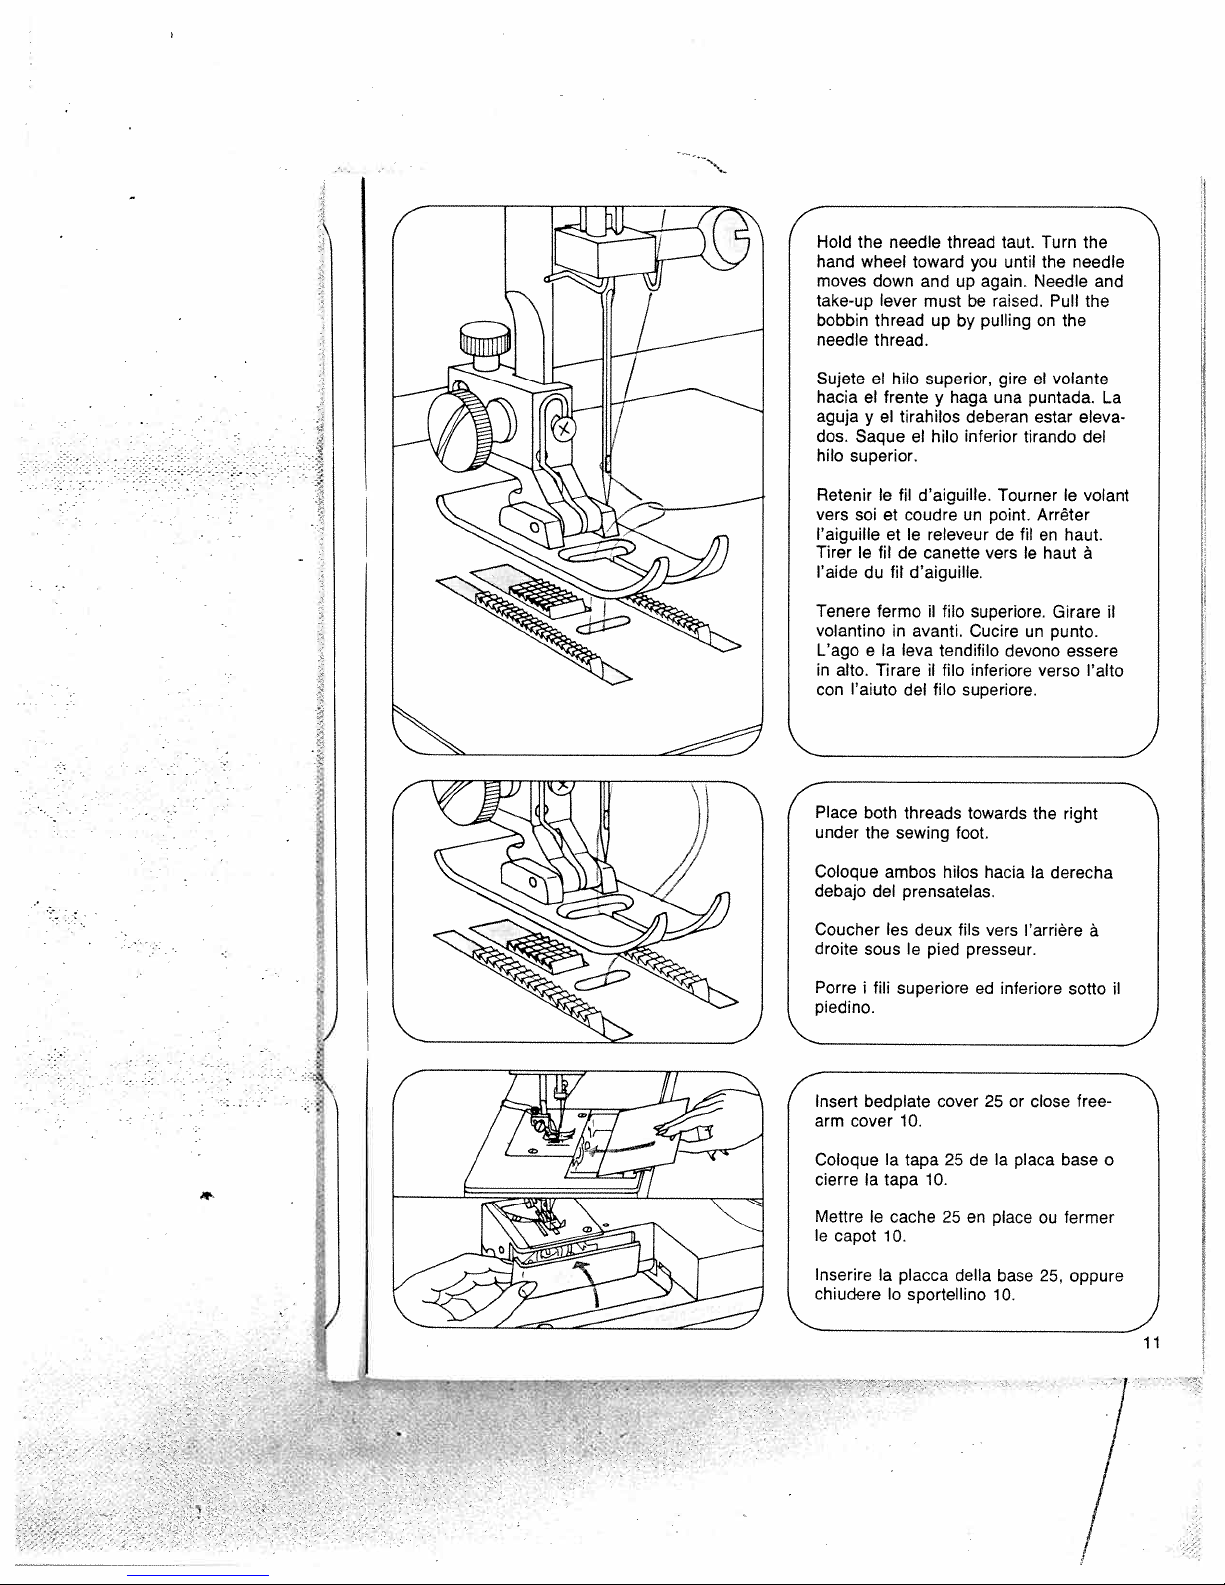
Hold
hand
moves
take-up
bobbin
needle
the
wheel
down
thread
thread.
needle
toward
and
lever
mustberaised.
up
thread
you
up
by
taut.
until
again.
pulling
Turn
the
Needle
Pull
on
the
needle
N
the
and
the
•1
Sujete
el
hacia
aguja
dos.
hilo
Retenir
vers
l’aiguilleetle
Tirer
l’aide
Tenere
volantino
L’agoeIa
in
con
Place
under
Coloque
debajo
Coucher
droite
hilo
el
frenteyhaga
tirahilos
el
y
Saqueelhilo
superior.
le
fiT
soT
et
le
fTIde
fit
du
fermo
in
alto.
Tirareilfib
l’aiuto
both
the
sewing
ambos
del
les
souslepied
superior,
deberan
inferior
d’aiguille.
coudre
un
releveurdefiT
canette
d’aiguille.
ii
fib
superiore.
avanti.
Cucireunpunto.
tendifibo
leva
del
threads
prensatelas.
deux
fib
fibs
inferiore
superiore.
towards
foot.
fils
presseur.
volante
gire
el
puntada.
una
estar
eleva
tirando
Tournerlevolant
point.
vers
le
devono
hacia
vers
Arréter
en
haut.
haut
Girare
verso
the
right
Ia
derecha
l’arrière
del
a
essere
l’alto
La
II
N
a
I.
....II.
Porre
I
fili
bedpbate
cover
a
le
Ia
Ta
tapa
10.
superiore
cover25or
10.
25
tapa
10.
cache25en
pbacca
della
piedino.
Insert
arm
Coloque
cierre
Mettre
le
capot
Inserire
chiudereIasportellino
inferiore
ed
close
placa
de
Ta
placeoufermer
base
25,
10.
sotto
free-
base
oppure
1/
II
o
J
11
Page 16

4
Free-arm
sewing
Los
provistos
articulos
Les
bras
d’articles
I
modelliabraccio
braccio
Push the
the machine
Acopleelsuplemento
forma
orificio.
Mettre
broches
trous
SpingereIIpiano
macchina
entrare
models
tubular
modelos
de brazo
tubuluares.
modèles
libre
pourIamise
tubulaires.
libero
detachable
queelperno
le
plan
doivent
correspondants).
(i
negli
have
shaped
brazo
de
al
a
bras
libero
per
cucire
(guide
travailenplace
de
sengager
di
di
perni
appositi
a
free
articles.
al
aire van
aire
para
libre
possèdent
en
ceuvre
hanno
capi
support
work
pininhole).
Ia
mãquina
a
gula
encaje
dans
verso
lavoro
guida
devono
fori).
for
arm
coser
un
tubolari.
en
(les
les
Ia
un
onto
de
el
12
4
Place
fabric
ColoqueIatela
prensatelas.
Placer
du
PorreIastoff
4
Lower
presser
BajeIapalanca
Descendre
AbbassareIaleva
under
debajo
sous
tissu
sotto1piedino.
a
bar
alzaprensatelas
levier
le
the
sewing
del
le
pied
lifter
19.
19.
premistoffa
foot.
pie
presseur.
19.
N
19.
I
I’
I
Page 17
4
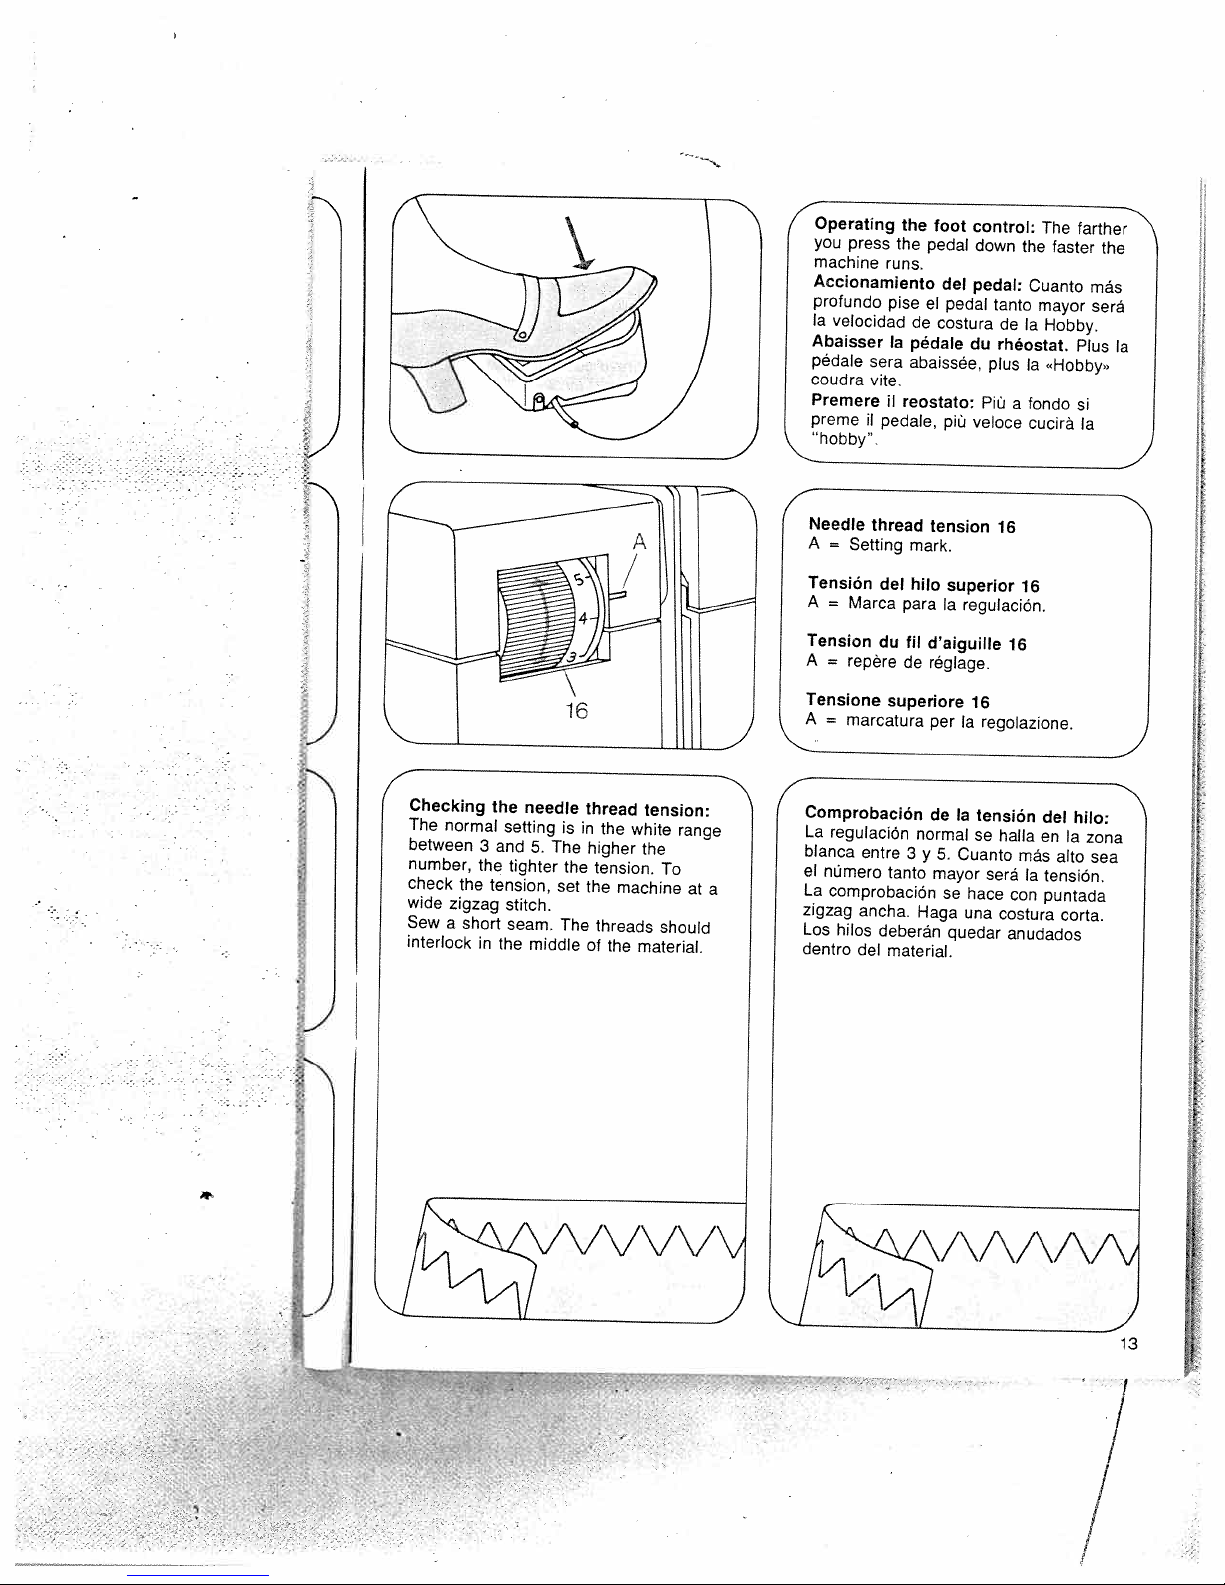
Operating
you
press
machine
Accionamiento
profundo
Ia
velocidad
Abaisser
pédale
coudra
Premere
preme
“hobby”
sera
vito.
ii
pedale,
the
the
runs.
pise
de
Ia
pédale
abaissée,
ii
reostato:
foot
pedal
del
el
pedal
costura
piü
contro’:
down
pedal:
tanto
de
du
rheostat.
plus
PiU
veloce
the
Cuanto
Ia
a
fondo
a
cucirà
The
faster
mayor
Hobby.
Hobby”
farther
the
más
será
Plus
Si
Ia
N
Ia
4
Checking
The
between
number,
check
wide
Sew
interlock
normal
the
the
zigzag
a
short
the
setting
and
3
tension,
stitch.
in
the
tighter
seam.
needle thread
in
is
The
set
The
the
the
higher
tension.
the
threads
of
the
5.
middle
tension:
white
the
machine
material.
range
To
at
should
Needle
A
Tension
A
Tension
A
Tensione
A
=
Setting
=
Marca
repère
=
marcatura
thread
del
para
du
superiore
tension
mark.
hilo
fil
d’aiguille
do
réglage.
per
superior
Ia
regulacion.
16
Ia
regolazione.
16
16
16
4
Comprobación
La
regulacion
blanca
entre
el
a
nümero
La
comprobaciOn
zigzag
ancha.
Los
hilos
dentro
del
normal
3
tanto
deberán
material.
de
y
mayor
Haga
Ia
Cuanto
5.
so
quedar
tensiOn
se
serã
hace
una
halla
más
a
con
costura
anudados
del
hilo:
en
Ia
alto
tension.
puntada
corta.
zona
sea
13
/
/
1’
Page 18
4
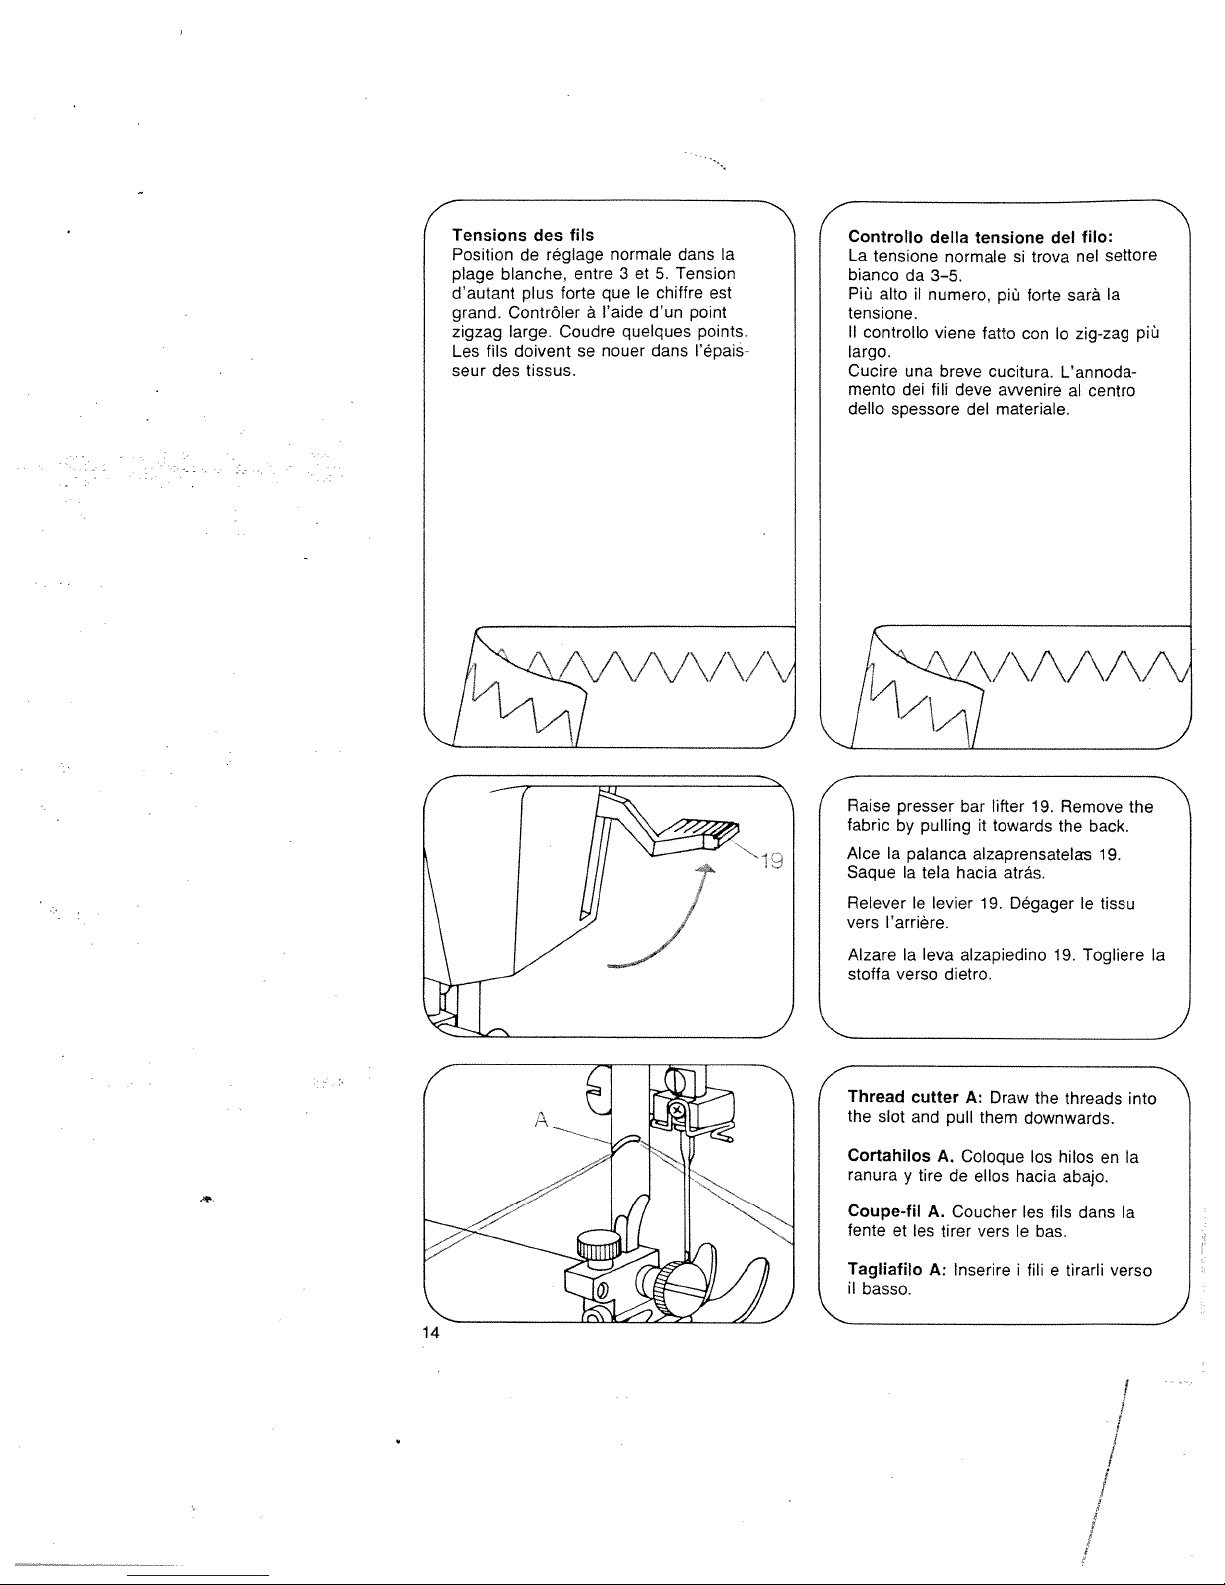
Tensions
Position
plage
d’autant
grand.
zigzag
Los
fiTs
seur
des
I
fits
des
reglage
do
plus
doivent
tissus.
entre
forte
blanche,
ContrOler
large. Coudre
a
so
normale
3et5.
que
I’aide
quelques
nouer
le
chiffre
d’un
dans
dans
Tension
est
point
points.
lépais
4
tensione
da
alto
il
ne.
una
dei
spessore
della
normale
3—5.
numero,
viene
breve
fili
deve
del
tensione
si
piü
fatto
cucitura.
avvenire
materiale.
forte
con
Ia
Controllo
La
bianco
PiU
tensio
II
controllo
largo.
Cucire
mento
dello
del
trova
ito:
f
neT
sara
zig-zag
To
L’annoda
al
centro
settore
Ia
piü
//\
Raise
presser
fabric
by
Alce
Ia
Saque
Ia
Relever
vers
l’arriére.
Alzare
verso
stoff
a
‘-
L1J
Thread
the
slot
Cortahilos
ranura
Coupe-fit
fente
et
Tagtiafito
ii
basso.
pulling
palanca
tela
levier
le
Ia
leva
cutter
and
A.
tire
y
A.
les
A:
j
bar
lifter
it
towards
alzaprensatelas
hacia
19.
alzapiedino
dietro,
A:
Draw
pull
them
Coloque
de
ellos
Coucher
tirer
vers
Inserire
19.
Remove
the
atrás.
Degager
19.
the
threads
downwards.
los
hilos
hacia abajo.
los
fiTs
To
bas.
i
fili
e
back.
le
Togliere
dans
tirarli
19.
tissu
en
verso
Ia
the
into
Ia
Ia
N
14
I
/
Page 19

Setting
Set
the
4
mm,
from
at
0
to
the
stitch
required
mark
1
is
for
stitch
A.
sewing
length
The
(8):
length,
red
setting
buttonholes.
from
0
range
to
Regulación
Gire
puntada
con
se
Selection
Tourner
longueur
0
La
coudre
Regolazione
punto
Si
desiderata
marcatura
serve
I
Reverse
Press
sews
key
Costura
Pulse
máquina
botón
el
Ia
usa
et
4
plage
regola
per
down
backwards
is
held
el
esté
botOn
deseado
marca
para
de
le
bouton
de
mm,
soit
rouge,
es
boutonnières.
(8):
Ia
lunghezza
girando
A.
Ia
cucitura
sewing:
control
down.
en
retroceso:
botOn
cose
pulsado.
del
hasta
A.
coser
Ia
point
della
II
22
hacia
largo
entre
La
ojales.
longueur
8
désirée,
placée
entre
lunghezza
tra
settore
22.
as
long
hacia
de
que
0
zona
jusqu’a
face
0
del
0
rosso
degli
The
abajo.
atrás
puntada
el
argo
4
y
roja
du
entre
au
et
1,
punto
e
4
occhielli.
machine
as
the
mientras
coincida
entre
point
ce
quo
repère
sort
del
sulla
tra
0
control
La
de
(8):
0
pour
e
el
(8):
Ia
1
y
1
A.
Couture
Abaisser
en
arrière
touche
Cucire
Premere
rimane
indietro.
en
arrière:
Ia
touche
aussi
est
tenue
indietro:
1
tasto
premuto
22.
La
longtemps
abaissée.
22.
Fintanto
Ia
macchina
machine
que
che
cucirà
cette
il
coud
tasto
/
15
I
j
Page 20

For
sewing
the
stitch
Stretch
turning
shortened
Para
coser
(sector
dor
do
Girando
alargar
para
adaptarse
tejido.
Pour
coudre
bouton
place
sur
Suivant
elastique
bouton
du
tion
vers
Per
cucire
regolare
lunghezza
A
seconda
allungare
girando
Stitch
Models
Turn
the
For
A.
pages
stretch
length
stitches
the
control
by
control
can
turning
stitches
be
towards
puntadas
Verde)
hay
le
sobre
“+“
a
point
que
o
puntada
Ia
las
puntada
hacia
acortar
o
sélecteurdopoint
le
symbole
genre
le
peut
vors
—.
punti
i
il
bottone
del
del
accorciare
o
verso
pattern
340—541
required
table
a
de
êtro
+
punto
tipo
+
o
knob
and
stitch
of
S.
tissu,
agrandi
ou
flexi
regolatore
sul
di
—
Ia
20
720,
stitch
18/19.
(green),
at
S.”
“S.
lengthened
“+“
it
towards
elásticas
colocar
el
hacia
simbolo
“—“
el
se
elãstica
caracteristicas
elastique
8
(Vert),
devra
S.
le
point
rotation
par
raccourci
(verde)
par
occorre
per
simbolo
stoffa
Si
puO
il
punto
flexi
manopola.
721
symbol
to
patterns
by
or
(stretch)
regula
S.
S.
puede
del
être
rota
Ia
S.
S.
mark
see
set
le
16
Botón
selector
modelos
los
de
GireelbotOn
Véase
los
rotation
bottone
modelli
deseado
Ia
18
modèlos
face
des
motivo
il
Ia
de
regolatore
A.
tabella
puntada
A.
paginas
Sélecteur
pour
Par
désiré
Tableau
II
nei
Giraro
marcatura
Vedere
18/19.
de
340—541
forma
do
coincida
do
tabla
19.
y
points
340—54
bouton,
du
repere
au
points,
340—541
dosiderato
dei
puntadas
y
que
puntadas
20
1et720,
placer
A.
voir
pages
dei
e
720,
motivi
720,
el
con
punti
721.
sotto
a
20
721:
tipo
Ia
en
le
point
18,
20
Ia
pagina
do
marca
las
721.
19.
Page 21
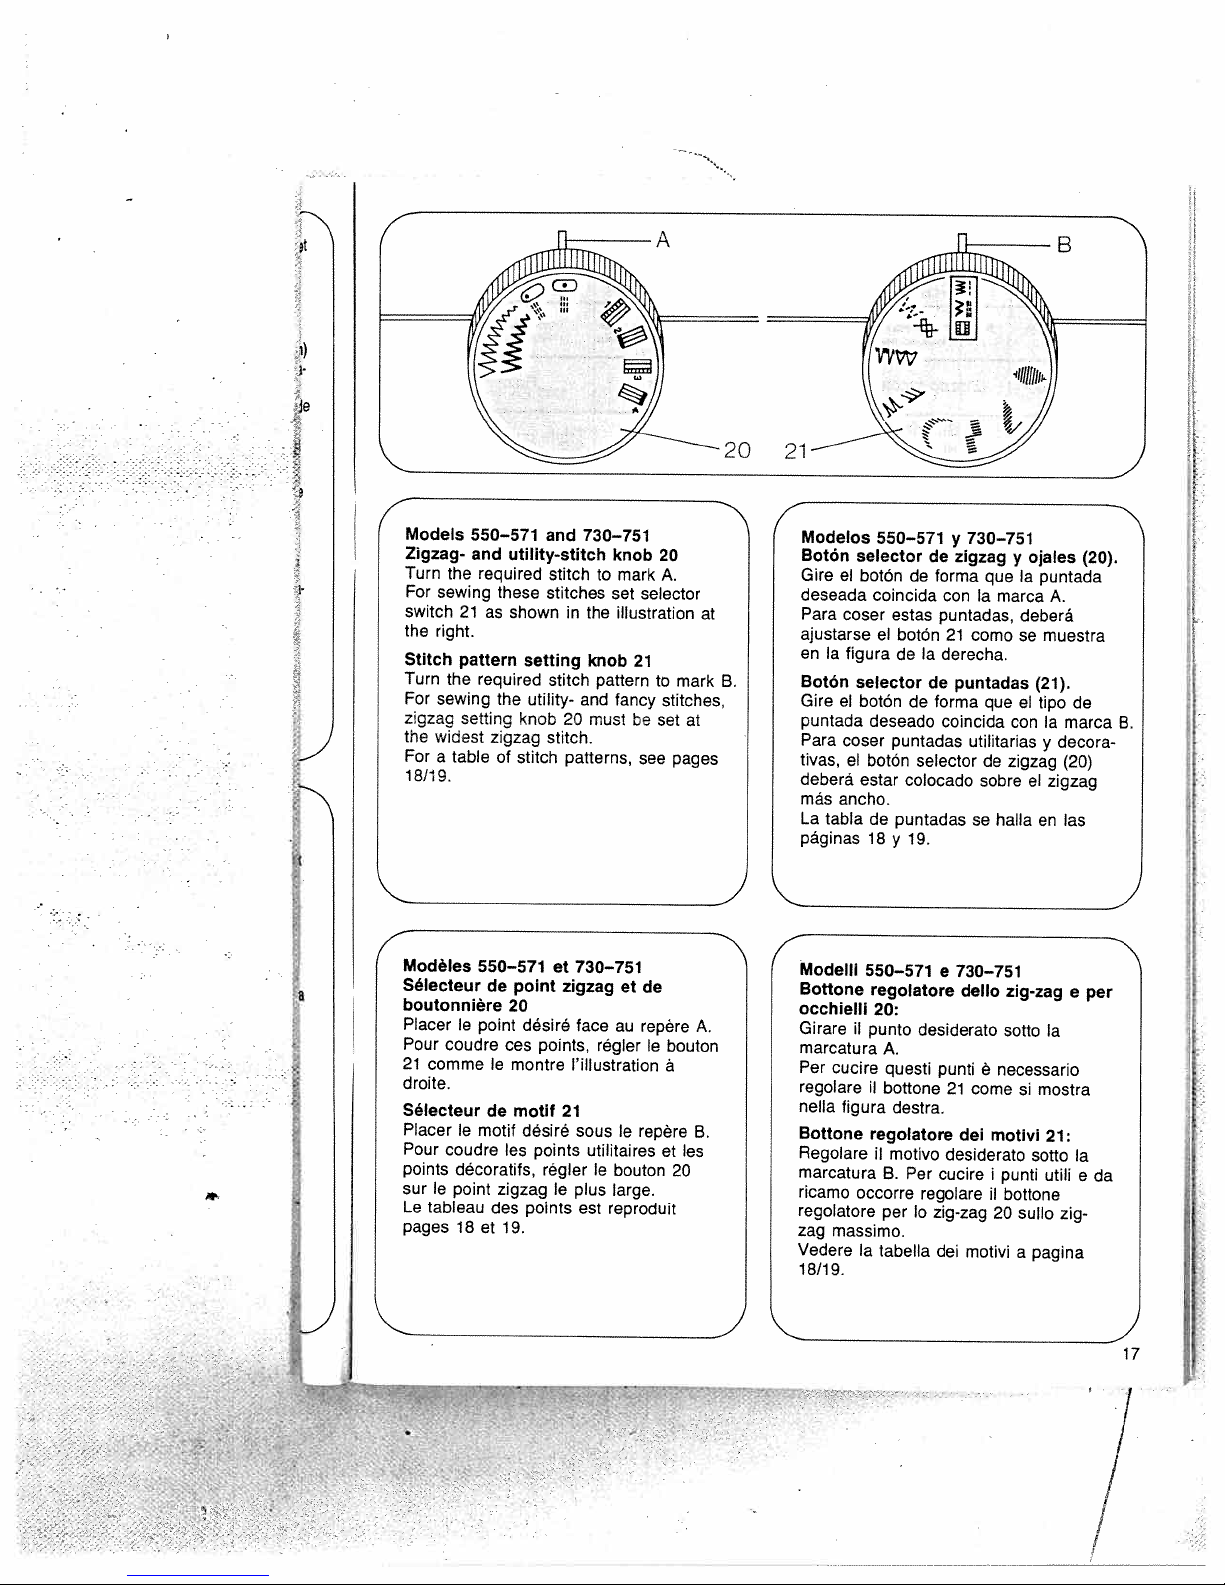
Models
Zigzag-
Turn
For
switch
the
Stitch
Turn
For
zgzag
I
J
the
For
18119.
the
sewing
21
right.
pattern
the
sewing
seting
widest
table
a
550—571
and
utility-stitch
required
these
as
shown
required
the
knob
zigzag
of
stitch
and
stitch
stitches
setting
stitch
utility-
stitch.
730—751
to
the
in
knob
pattern
and
must
20
patterns,
knob
20
mark
A.
selector
set
illustration
21
to
fancy
stitches.
be
set
see
mark
at
pages
Modelos
Botón
Gire
at
B.
deseada
Para
ajustarse
en
Botón
Gire
puntada
Para
tivas,
deberã
más
La
pãginas
el
Ia
el
ancho.
tabla
selector
botOn
coser
figura
selector
botón
coser
el
botán
estar
coincida
deseado
de
18
550—571
de
forma
de
conIamarca
estas
el
puntadas,
botón
deIaderecha.
de
forma
de
coincida
puntadas
selector
colocado
puntadas
19.
y
730—75
y
zigzag
queIapuntada
como
21
puntadas
que
utilitarias
de
sobre
halla
se
1
ojales
y
deberá
se
(21).
el
con
zigzag
el
A.
muestra
tipo
Ia
marca
decora-
y
(20)
zigzag
en
las
(20).
j.
de
B.
.
L
.fl___
a
•
Modèles
Sélecteur
boutonniere
Placer
le
Pour
coudre
21
comme
droite.
Sélecteur
Placer
le
Pour
coudre
points
décoratifs,
sur
le
point
Le
tableau
pages
18et19.
550—571
de
point
20
point
désiré
ces
le
montre
motif
de
motif
désiré
les
zigzag
points
des
et
points,
points
régler
le
730—751
zigzag
face
regler
lillustration
21
sous
utilitaires
le
plus
large.
est
reproduit
et
de
repère
au
repère
le
bouton
le
bouton
a
es
et
20
ModellI
Bottone
A.
B.
occhielll
Girare
marcatura
Per
cucire
regolare
nella
figura
Bottone
Regolare
marcatura
ricamo
regolatore
zag
massimo.
Vedere
18/19.
550—571
regolatore
20:
ii
punto
A.
questi
ii
bottorie
destra.
regolatore
1
motivo
8.
occorre
per
a
tabella
e
desiderato
punti
21
desiderato
Per
cucire
regolare
lo
zig-zag
dei
730—751
dello
zig-zag
sotto
è
necessario
come
dei
motivi
punti
i
il
bottone
20
motivi
si
sullo
a
Ia
mostra
21:
sotto
utili
zig-
pagina
e
per
a
e
da
‘7,
1’
I:
/
Page 22

“SymboIISimboIo
SymbolelSimboll
Stitch
pattern
table
Tabla
de
puntadas
Tableau
des
C)
t)
\/\JiAAJVA
=
‘‘‘v--
jJ
tAPI
,
vvv
1
JJ
‘\[‘\[
Jfi
i
\,‘
\\\
Strarght
stItch,
Strarght
stitch,
Zigzag
Straight
stretch
Zigzag
stretch
Buttonhole
Elastic
Honeycomb
Elastic
Pullover
Shell-edging
Overlock
Stitch
toddle
left
stitch
blind
needle
needle
range
triple
stitch
triple
stitch
symbols
seam
stitch
stitch
stitch
stitch
stitch
sition
posuon
Punto
Punto
rect
Simbolos
Punto
Punto
Puntada
bordes
Punto
recto,
p
poscidn
Punto
Punto
triple
Punto
triple
Costura
invisible
Punto
en
(overlock)
Puntada
sIcidtt
central
icqulerda
zigzag
recto
extensible
zigzag
extensible
para
elástica
nido
de
pullover
para
forma
sobrehilar
de
de
de
ojales
abeja
elâstico
remate
choncha
de
Ia
Ia
puntalla
punted
de
PoInt
PoInt
Point
Triple
Triple
Symboles
Point
Point
Point
invisible
Point
Point
Point
posItion
droll,
position
droll.
couture
point
de
zigzag
nid
Point
cocotte
overlock
mddlane
gauche
zigzag
point
zigzag
boutonniere
piqué
d’abeille
eiastique
tricot
droit
18
Illillic
‘1Q11
‘IlIJ
1111111
11th!!
11
pt
\J\J
\/\7
Closed
Elastic
Fancy
Fancy
Fancy
Fancy
Joining
overlock
decorative
Feather
stitch
stitch
stitch
stitch
stitch
stitch
stitch
stitch
Punto
Punto
Punto
Punto
Punto
Punto
Punto
cerrado
elástico
Punto
do
de
de
do
do
sobrehilar
de
(overlock)
pluma
adorno
adorno
adorno
adorno
enlace
do
adorno
Point
Point
Point
Point
Point
Point
Point
overlock
zigzag
Point
fantaisie
fantaisie
fantaisie
fantaisie
en
crénau
large
d’epi
fermé
fantaisie
Page 23

its
l
uflO
ho
‘unto
Punto
tabella
diotto
dntto
Punto
pottzona
posiziona
del
ago
ago
punti
Canon
OniOn
340
341
350
351
520
521
530
531
540
541
Modelle
550
551
Types
560
561
570
571
720
730
740
721
731
,
,
•
741
750
751
,
,
nt
zag
onnière
ue
iIIe
istique
1c
is
droit
Settore
Cucitura
Cucitura
Simboli
Purito
Punto
Punto
Punto
Punto
Punto
Punto
Punto
dello
tripla
tripla
zig-zagflexi
per
l’occhiello
elastico
nido
invisibile
pullover
conchiglia
Overlock
ornamentale
ornamentale
.
zigzag
diritta
d’ape
elastico
a
flexi
0
—
I
0
‘)
—
I
I
0
0
0
0
I
)
I
I
I
I
I
I
I
I
Jo
Jau
kmé
iaisie
Punto
1
Punto
Punto
Punto
overlock
Punto
ornamentale
Punto
ornamentale
ornamentale
congiuntura
chiuso
elastico
piuma
I
I
I
I
I
I
I
I
I
0
/
/
1’
Page 24

Changing
(System
Loosen
Push
the
towards
Tighten
the
1301705
screw
needle
the
screw.
the
needle
A.
back)
H):
Take
(with
up
out
its
flat
far
as
as
side
it
facing
will
go.
needle.
the
Cambio
(sistema
Afloje
duzcaIanueva
atrás)
Remplacement
(système
Desserrer
Engager
talon
serrer
Sostituzione
(sistema
Allentare
ago
nuovo
dietro)
vite.
Dropping
Remove
cover
=
C
for
sewing.
Ocultaciôn
Retire
abra
CorriendoIapalanca
oculto
pasa
B,
Ia
aguja
de
130/705
el
tornillo
hasta
vers
Ia
completamente
10.
feed
Ia
Ia
el
tope.
el
130/705
Ia
vis
l’aiguille
l’arrière)
vis.
dell’ago
130/705
vite
A.
(parte
feed:
the
bedpiate
Push
disengaged,
del
25
tapa
tapa
10
transportador;
posición
Ia
a
A.
aguja
de
A
Togflere
the
transportador:
del
H):
Saque
Aprieteeltorniilo.
I’aiguille
H):
et
neuve
jusqu’à
H):
piatta
cover
drop-feed
de
brazo
(lada
retirer
(le
‘ago.
del
in
sü.
25
and
Ia
placa
hacia
corriéndola
normal
aguja.
Ia
piano
l’aiguille.
meplat
butée
a
fusto
Fissare
or
control
to
base
aire.
al
C,
para
Intro
hacia
du
inserire
verso
free-arm
B
again
o
queda
hacia
coser.
et
Ia
to
20
Abaissement
Enlever
bras
10
du
Levier
escamotée;
position
en
Abbassareiitrasporto:
Togliere
sportello
I’abbassamento
spostare
de
le
cache
libre.
en
position
levierenposition
couture.
Ia
placca
Spostareiicursore
10.
verso
verso
B
Ia
25
C
della
=
griffe:
ou
=
C
in
posizione
ouvrir
griffe
base
=
le
capot
B
=
0
aprire
25
per
abbassato.
cucito.
I
1’
griffe
Page 25

ing
o.
;go.
qtO
cii
U
et
Changing
the
Camblo
botón
Changement
Enfoncer
est
Sostituzione
bottoncino
disinnesta.
f
Attaching
presser
reposition
fits
sewing
rojo
libérée.
bar
in
slots
del
the
foot,
A.
le
rosso
the
the
C.
sewing
push
pie
prensatelas:
prensatelas
El
de
bouton
del
A.IIpiedino
sewing
lifter
sewing
semelle
Ia
rouge
piedino:
and
at
foot
foot:
the
red
se
du
A;Iasemelle
Premere
foot:
the
same
so
To
release
button
Pulse
suelta.
pied:
Si
Lower
that
the
time
stud
A.
el
B
Colocación
palanca
mismo
tiempo
que
el
puente
Mise
en
levier
le
semelle
s’emboite
Applicazione
eva
maniera
scanalatura
Hole
attaching
is
D
para
DetE
bord.
semelle.
DeE
lineale.
supporto
premistoffa
E
and
Sewing
the
sirven
E
y
fijar
servent
La
servono
du
de
che
FeIa
del
el
B
de
pied
manière
dans
del
ii
perno
C.
Screw
an
edge
foot
para
el
soporte
a
visFfixe
per
vite
piedino.
del
pie
prensatelas
encaje
Ia
presseur
rainures
es
piedino:
inserire
e
D
guide,
holder
fijar
fixer
le
ii
di
alzaprensatelas
place
prensatelas:
posicione
y
en
Ia
semelle:
et
que
l’étrier
Abbassare
ii
Bsiinnesti
are
used
while
srew.
guias.
del
prensatelas.
l’ètrier
support
fissaggio
fissaggio
forma
de
ranura
Abaisser
deplacer
B
C.
piedino
for
screw
F
sirve
guide
de
del
per
Baje
nella
ii
Ia
al
C.
Ia
Ia
in
J
F
j
21
Page 26

1
98-694
98-694414-00
2
563-00
I
Sewing
Ordinary
1
foot
Clear-view
2
Pies
Prensatelas
1
normal
Prensatelas
2
transparente
Pieds
Semelle
1
Semelle
2
transparerite
Semelle
3
invisible
(standard
feet
sewing
prensatelas
presseurs
norrnale
a
foot
point
accessories)
Blindstitch
3
Zipper
4
(accesorios
Prensatelas
3
puntada
Prensatelas
4
cremalleras
(accessoires
Semelle
4
poser
fermeture
glissiere
foot
normales)
para
invisible
para
standards)
pour
a
a
98-694
(Mod.
D
407-00
540—751)
4
98-694
104-00
I
piedini
1
2
(corredo
piedino
normale
piedino
trasparente
Accessory
(Free-arm
open
To
of
cover
Compartimento
(Modelos
Abriendo
encuentra
accesorios.
Compartiment
(Modeles
le
Lever
9
travail
couture,
de
Scomparto
(Modelli
Sollevare
9.
lavoro
accessori.
normale):
compartment:
models)
accessory
support
work
brazo
de
tapa
Ia
espacio
a
bras
a
couvercle
accéder
pour
per
a
braccio
ii
coperchio
si
Sotto
piedino
3
punto
piedino
4
cerniere
compartment
9.
accesorios
para
aire)
al
del
suplemento
para
accessoires
libre)
dans
aux
accessori:
libero)
del
trova
invisibile
colocar
plan
le
accessoires
piano
posto
per
per
per
raise
9
de
di
se
gli
22
I
I
II
I
Page 27

it
es)
ara
ble
ara
jds)
8
“Accessory
(Flatbed
Compartment
Compartimento
(Modelos
Se
halla
Compartiment
(Modèles
compartiment
Ce
dans
le
Scomparto
(Modelli
scomparto
‘...
7-
Detachab’e
(Flatbed
Attach
hooks
engage
base.
Suplemento
(Modelos
lntroduzca
los
dos
del
zOcalo.
Plateau
(Modèles
Glisser
facon
que
s’accrochent
pondants
Piano
di
(Modelli
Accostarlo
innestano
compartment
machine
isinright
de
base
aIaderecha
a
plateau)
a
socle
(26).
per
a
base
è
work
machine
the
work
in
de
de
base
el
suplemento
ganchos
amovible
a
plateau)
plateau
le
deux
les
dans
socle.
du
lavoro
base
a
maniera
in
nelle
models)
side
para
accesorios
plana)
en
trouve
se
destra
support
models)
openings
the
plana)
encajen
contre
crochets
es
el
nello
so
trous
che
sullo
accessoires
accessori
piana)
a
support
costura
supplementare:
piana)
aperture
of
zOcalo
droite,
a
that
de
forma
los
en
a
machine
corres
i
due
base
(26).
zoccolo
its
on
the
orificios
ganci
zoccolo.
(26).
(26),!
two
que
do
51
I
After
downwards
Una
nelo
Ensuite,
l’horizontale.
Dopo
leggermente
attaching
vez
encajado
un
poco
abaisser
aver
the
little.
a
hacia
le
agganciato
in
basso.
support,
el
suplemento,
abajo.
plateau
il
piano
push
it
presio
amovible
premerlo
a
I
23
I
Page 28

C\
4
/
B
Topstitching
Sewing
Stitch:
Edge
all
Fitting
(Special
Push
secure
guide
ching
With
to
stitch
either
making
along
E).
accurate.
guide
sewing
edge
the
sew
parallel
the
The
foot:
the
it
can
margin
parallel
follows
parallel
seam
0
Ordinary
clear-view
guide
straight
A
can
feet.
edge
accessory):
guide
in
position
be
adjusted
for
edge
guide
lines
to
the
an
lines
preceding
thus
(special
be
guide
A
through
with
various
attached,
of
edge.
edge
of
line
made
sewing
foot
stitch
with
used
hole
screw
to
the
applications.
stitches
The
(Fig.
D)
stitches
of
stitches
looks
foot
or
and
edge
accessory):
nearly
B
and
C.
The
desired
it
is
easy
or
to
guide
or
when
runs
(Fig.
neat
and
stit
/=iiL=ri/
Pespunteados
Prensatelas:
Puntada:
guia
La
con
Fijación
Pase
con
ajustar,
deseada.
Con
coser
las
Ia
D)
el
esta
impecables.
casi
el
a
o
pespuntes
gula
o
a
caso
forma
marginal
todos
de
a
gula
tornillo
segün
ayuda
con
marcha
10
de
—-U
Normal
Ia
especial)
Punto
Ia
A
toda
largo
costuras
se
guia
A
los
pies
gula
por
el
C.
La
a
labor,
a
de
facilidad
al
canto.
10
a
Ia
de
obtienen
o
el
marginal
recto
puede
(accesorio
agujero
gula
gula
argo
costura
paralelas
transparente,
(accesorio
emplearse
prensatelas.
especial):
B
se
puede
a
a
distancia
se
pueden
costuras
En
tales
del
borde
anterior
(fig.
costuras
y
parale
fijela
casos,
(fig.
E).
DJ
y
en
De
24
I.
Page 29

4
Surpiquage
Pied
Point:
Le
les
Fixation
Glisser
Ia
guide
Le
es
surpiquage
bord
precédente
couture
presseur:
guide-droit
pieds
du
le
vis
Suivant
C.
sur
guide-droit
surpiqâres
tissu
du
sera
pied
presseur
pied
a
glas
et
(accessoire
droit
point
A
convient
presseurs.
guide-droit:
guide
lécartement
par
A
l’application,
facilite
paralléles
bords.
des
suitleguide-droit
toujours
(fig.
D)
ou
normal
en
special)
presque
B
regler
le
faisant,
Ia
(fig.
reguliere.
et
plexi
et
piqüre
E).
semelle
guide-droit
a
trou
le
désiré.
considérablement
et
Ce
bien
nette
tous
serrer
le
di
ou
Piedino:
Punto:
II
lineale
piedini.
Fissaggio
(accessorio
Lavori
le
La
Passare
fissarlo
neccessità
desiderata.
E
usando
Ia
La
sempre
facile
cucitura
direzione
impunture:
piedino
trasparente
(accessorlo
punto
A
Si
pUO
del
fuori
ii
lineale
con
Ia
si
puO
eseguire
il
lineale.
parallela
della
corretta.
normale
diritto
usare
lineale:
corredo)
A
vite
regolare
cuciture
II
cucitura
lineale
e
fuori
con
attraverso
seconda
C
a
bordo
precedente
piedino
o
di
corredo)
quasi
a
distanza
parallele
(fig.
sara
ii
D)
guida
foro
della
oppure
(fig,
cosi
tutti
B
E).
e
25
/
/
/
Page 30

4
Elastic
Sewing
Tension:
Thread:
Stitch:
Stitch
length:
Needle:
Howtoregulate
penetration
Place
the
stitch
sewing
outer
fabric
the
blindstitch
Turn
screw
far
to
the
only
one
penetrating
First
make
of
waste
blind
foot:
prepared
runs
A
left
thread
on
a
material.
stitch
blindstitch
needle
little
ordinary
elastic
3—4
size
the
foot.
along
sewing
to
adjust
that
the
of
the
left
sewing
slack.
70
hem
The
the
thread
blind
or
need!e
crease
edge
foot.
edge
needle
outer
side
test
foot
sewing
stitch
80
under
(Figs.
using
tension
thread
the
line
guide
guide
picks
fabric
C
a
blind-
of
B
B
up
when
and
piece
a
the
of
so
D).
4
Punto
Prensatelas:
TensiOn
superior:
Hilo:
Puntada:
Largo
Aguja:
Regulación
aguja:
Coloque
puntada
preparado.
te
rior
deberá
del
prensatelas.
Coneltornillo
ahora
ma
que
izquierda
(fig.
C
Haga
prueba
invisible
del
hilo
de
puntada:
de
Ia
debajo
invisible
El
deslizarse
tope
al
sOlo
D).
sobre
regulador
B
clavarse
prenda
un
el
y
primeramente
elástico:
Prensatelas
puntada
Algo
normal
Normal
Puntada
elastica
3
a
N°
penetración
del
prensatelas
el
dobladillo
borde
contra
hacia
Ia
aguja
un
una
retal.
más
4
70
u
del
A
a
izquierda
hilo
costura
invisible
floja
invisible
80
previamen
doblez
el
deberá
por
del
para
de
para
tope
Ta
de
de
Ia
supe
correr
de
borde
lo
B
for-
26
I
/
/
/
Page 31

I
Point
invisible
presseur:
Pied
Tension:
lo
Fil:
Point:
Longueur
point:
Aiguille:
de
elastique:
Pied
a
Fil
daiguille
tendu
coudre
Fil
a
invisible
Point
4
3
a
Grosseur
points
70
invisibles
moms
elastique
ou 80
f
Punto
Piedino:
Tensione:
Filato:
Punto:
Lunghezza
punto:
Ago:
invisibile
piedino
allentare
tensione
filato
punto
3—4
grossezza
elastico:
per
leggermente
superiore
per
cucire
invisibile
punto
70
elastico
o
80
invisibile
Ia
a
amen
B
Orre
le
rde
for
Reglage
Poser
l’ourlet
points
invisibles,
extérieur
points
invisibles.
A
l’aide
a
butée
l’aiguille,
qu’un
fil
r
Réaliser
d’essai
de
sur
de
longe
B
au
du
tout
Ia
a
vers
point
tissu
une
jetée
prepare
Ia
vis
Ia
d’abord
chute
du
sous
cassure
La
butée
reglage
de
gauche
gauche,
extérieur
une
de
point
B
du
de
couture
tissu.
le
ne
(fig.
pied
du
pied
A,
sorte
saisisse
C
a
tissu
a
déplacer
que
et
D).
come
si
del
in
preparato
scorre
piedino.
Ia
vite
modo
di
regola
La
in
che
(fig.
eseguire
Ecco
nel
tessuto:
Porre
I’orlo
invisibile.
punto
superiore
guida
B
Girare
con
sinistra
neIl’entrataasinistra
stoffa
superiore
Si
consiglia
un
ritagliodistoffa.
su
l’entrata
sotto
piegatura
tal
A
Ia
l’ago
solo
C
maniera
guida
prenda
un
e
D).
prima
ii
piedino
della
B
fib
deirago
lungo
verso
una
per
stoffa
a
della
prova
27
I
/
/
I
Page 32

4
f
/
.:
“V
4
Sewing
(Models
Sewing
Tension:
Thread:
Stitch
Needle:
1
Set
buttonhole
roughly
Sew
end,
right.
right.
Insert
2.
the
through
again,
raise
Set
3.
about
needle
Set
4.
buttonhole
Raise
Set
5.
tacking
Set
6.
ber
Cut
(special
buttonholes
341,
340,
foot:
length:
zigzag
at
first
the
needle
the
Turn
the
sewing
180°,
lower
needle.
the
zigzag
the
five
at
at
knob
needle
knob
stitches.
knobatD
the
securing
of
buttonhole
accessory).
520
clear-view
needle
slack
little
machine
tine
thread
buttonhole
70/80
sizes
stitch
seam
“B”.
buttonhole
must
20
knob
needle
turn
foot,
set
the
knob
tacking
left.
“B”
seam
left.
at
“C”
at
stitches.
open
and
thread
knob
width
one
the
at
the
sewing
at
stitches.
and
long
as
and
Raise
1
521)
foot
tension
embroidery
range
to
20
2
of
seam.
raised
be
place
right,
material
the
knob
foot
“C”
the
sew
as
about
sew
the
sew
and
with
(red)
sew
mm,
to
raise
at
and
and
Raise
second
the
needle.
slitting
At
“B”
a
a
a
i.
at
the
sew
first.
five
num
e.
the
the
knife
4
Ojales
(modelos
Prensatelas:
TensOn
hilo
Hilo:
Largo
puntada:
Aguja:
1.
2.
3.
4.
5.
6.
del
superior:
de
el
Con
una
elija
aprox.
ojal.
derecha
Ia
a
botón
el
derecha.
Haga
derecha,
180°,
tela
B,
a
aguja.
Gire
unas
Eleve
Gire
cosa
B
y
igual
Ia
aguja
Gire
unas
aguja.
Gire
haga
Abra
sorio
340,
botón
anchura
en
aguja
La
20
que
alce
baje
botán
el
puntadas
5
aguja
Ia
nuevo
de
largo
de
a
botón
el
puntadas
5
el
botán
unas
ojal
el
especial).
520
341,
Transparente
más
Algo
normal
fino
Hilo
del
Zona
u
70
°
selector
de
el
Cosa
B.
deberá
elevada.
y
paso
un
dave
se
prensatelas,
el
de
prensatelas
al
20
de
Ia
a
botOn
el
segundo
que
izquierda.
Ia
al
20
a
20
puntadas
el
con
nuevo
de
gire
el
el
4”
521):
y
de
floja
bordar
de
(sector
ojal
80
del
zigzag
unos
2
primer
quedar
Gire
hacia
aguja
Ia
el
eleve
y
C
sector
presilla.
izquierda.
20
labio
primero.
el
sectorCy
presilla.
recto
punto
remate.
de
descosedor
10
mm,
labio
al
ahora
a
a
gire
botón
y
al
del
Eleve
J
rojo)
20
del
final
Ia
Ia
20
Ia
haga
sector
ojal
Eleve
haga
Ia
y
(acce
28
Page 33

4
Boutonnières
(modèles
Pied
Tension:
Fit:
ir
rojo)
g20
bio
del
!ilfinal
liora
la
Jire
a
6n20
te
a
haga
ctor
ojat
H..
-z*.
Eleve
haga
leveta
D
(acce
y
Longueur
du
Aiguilte:
1.
2.
3.
4.
5.
coudre
6.
Régter
quelques
Ouvrir
(contre
position
bouton
Descendre
tissu;
Remettre
descendre
remonter
Tourner
C
Sortir
gauche.
Remettre
coudre
tongue
taiguitle
Régter
presseur:
point:
A
‘aide
targeur
tes
lèvres
premiere
tourner
et
coudre
t’aiguilte
te
le
Ia
supplement>.
340,
du
bouton
de
point
(position
tèvre.
haute
20
dun
t’aiguilte
te
bouton
te
t’aiguitte.
le
bouton
env.
te
bouton
Ta
deuxième
que
a
a
gauche
bouton
env.
5
bouton
points
boutonniere
341,
520
Pied
a
semette
transparente
Fit
daiguitte
moms
tendu
Fit
a
broder
Plage
rouge
(boutonniere)
Grosseur
20,
d’env.
B).
Arréter
a
droite.
cran
vers
a
presseur
20
5
tissu
en
20
sur
d’arrêt
droite
20
sur
points
sur
tèvre
position
sur
d’arrêt.
sur
au
l’ouvrage
pied
du
premiere.
points
et
521)
un
fin
70
a
choisir
2
mm
Coudre
laiguille
Tourner
ta
de
180°.
sur
le
et
un
d’arrêt.
en
position
te
cran
aussi
Arréter
le
cran
et
coudre,
place.
Découvit
peu
80
une
pour
Ia
droite.
dans
cran
cran
B
haute.
C
en
le
le
B;
en
et
et
4
Occhielli:
(modetti
Piedino:
Tensione:
Fitato:
Lunghezza
Ago:
1.
Regotare
zag
2
mm,
prima
termine
bottone
2.
Penetrare
it
piedino,
riportare
tacca
atzare
3.
Regolare
tacca
di
travetta.
4.
Regotare
cucire
tunghezza
sinistra.
5.
Regolare
re
circa
tago.
6.
Regotare
alcuni
Aprire
t’occhielto
(accessorio
340,
20
per
all’incirca
costina.
a
20
B,
abbassare
‘ago.
presso
it
Ia
seconda
bottone
5
bottone
punti
a
parte).
341,
punto:
II
bottone
un
destra
una
con
girare
it
bottone
it
bottone
Atzare
bottone
delta
punti
di
con
520
piedino
tensione
leggermente
lentata
filato
macchina
settore
(rosso)
grossezza
cordoncino
su
Lago
in
tacca
I’ago
Ia
C
e
cucire
‘ago
costina
prima.
su
di
travetta.
su
fissaggio.
un
e
521)
trasparente
superiore
per
ricamo
occhielti
regolatore
largo
B.
Cucire
rimane
alto.
Spostare
verso
a
destra,
stoffa
di
nuovamente
it
piedino
zig-zag
su
su
circa
a
sinistra.
tacca
in
Aizare
tacca
C
Alzare
9D
e
cucire
taglia-asole
at
70—80
zig
Ia
al
destra.
atzare
180°,
su
e
una
5
punti
B
e
uguate
t’ago
e
cuci
a
circa
ii
a
29
I
/
/
I
Page 34

4
Sewing
(Models
Sewing
Tension:
Thread:
Stitch
Models
550—571
730—751:
Needle:
1,
2.
buttonholes
350,
foot:
length:
and
utility-stitch
Set
sew
the
the needle.
knob
Set
six
tacking
530—751)
and
351
clear-view
thread
needle
little
slack
fine
machine
thread
buttonhole range
Utility-stitch
red
buttonhole
sizes
70
knob
buttonhole
first
20
at
iJJ
stitches.
sewing
to
20
and
Raise
knob
80
foot
tension
embroidery
(red)
21
symbol
at
1J
Raise
seam.
four
sew
needle.
the
at
and
N
Ojales
(modelos
a
to
Prensatelas:
TensiOn
hilo
Hilo:
Largo
puntada:
Selector
puntada
tarialen
modelos
550—571 y
730—751:
Aguja:
1.
350,
del
superior:
de
de
utili
el
el
Ponga
utilitaria20en
Iabio
selectordepuntada
ojal.
del
530—751)
351
y
Transparente
más
AIgo
normal
fino
del
sOmbolo
u
70
y
Eleve
de
80
Ia
Hilo
Zona
En
N°
floja
ojal
cosa
de
bordar
(sector
para
aguja.
10
ojal rojo
el
primer
rojo)
30
3.
4.
5.
6.
knob
Set
second
first.
the
knob20at
Set
tacking
six
Set
knob20at
securing
buttonhole
Cut
(special
20
at
buttonhole
Raise
the
stitches.
stitches.
accessory).
ir
ED
with
and
seam
needle.
and
Raise
and
special
sew
as
sew
sew
the
knife
the
long
four
a
as
to
needle.
few
2.
Ponga
6
4
a
aguja.
Ponga
3.
segundo
el
que
4.
Pongaelbotón
6
4
a
aguja.
Ponga
5.
unas
el
Abra
6.
sorio
el
botôn20en
puntadas
botôn
el
labio
primero.
puntadas
el
botOn
puntadas
ojal
especial).
con
•
de
20
del
Eleve
20
de
20
de
el
presilla.
en
1J
ojal
igual
aguja.
Ia
en
presilla.
en
ED
remate.
descosedor
y
Eleve
y
y
Eleve
y
•
haga
cosa
de
haga
haga
de
Ia
el
largo
de
Ia
(acce
11/
Page 35

Boutonnières
modèles
Pied
Tension:
Fil:
Longueur
r
rojo)
o1
aI
rojo
1
primer
laga
de
ye
Ia
sa
el
largo
L
•
aga
leve
haga
r
de
Ia
(acce-
point:
Bouton
Modèles
550—571
730—751:
Aiguille:
1
2.
3.
4.
5.
Régler
coudre
6.
Ouvrir
(contre
presseur:
a
Régler
sur
111
Arrêter
Régler
coudre
l’aiguille
Régler
coudre
longue
I’aiguIIe
coudre
I’aiguille
350,
351
Pied
transparente
Fil
moms
Fil
du
Plage
(boutonniere)
points
utilitaires
et
symbole
rouge
Grosseur
le
bouton
et
coudre
l’aiguille
le
bouton
4
6
points
a
en
haut.
le
bouton
Ia
deuxième
que
Ia
premiere.
en
haut.
le
bouton
4
a
6
points
en
haut.
le
bouton
quelques
Ia
boutonniere
supplement).
et
530—751)
semelle
a
d’aiguille
tendu
a
broder
rouge
20
(points
a
premiere
en
position
20
sur
d’arrèt.
20
sur
Iévre
20
sur
d’arrét.
20
sur
points
au
un
fin
21
de
boutonniere
70
a
,UJJ
Ill’
aussi
Arréter
de
nouage.
Découvit
peu
80
utilitaires)
lèvre.
haute.
et
Arréter
et
et
Arrêter
et
Occhielli:
(modelli
Piedino:
Tensione:
Filato:
Lunghezza
del
punto:
Bottone
Modellos
550—571
730—751:
Ago:
1.
Regolare
ill
lago.
2.
Regolare
4—6
3.
Regolare
Ia
lunghezza
4.
Regolare
4—6
5.
Regolare
alcuni
6.
Aprire
(accessorio
350,
regolatore
e
e
cucire
punti
seconda
punti
punti
I’occhiello
351
e
piedino
tensione
leggermente
filato
per
fine
settore
occhielli
per
simbolo
grossezza
bottone
a
prima
bottone
di
travetta.
bottone
costina
della
prima.
bottone
di
travetta.
bottone
di
fissagglo.
con
a
parte).
530—751)
trasparente
superiore
allentata
ricamo
punti
per
occhielli
70—80
per
punti
costina.
20
Jill
su
Aizare
20
su
tIll
nella
medesima
Aizare
20
su
Aizare
20
su
ii
taglia-asole
a
macchina
(rosso)
utili
utili
e
‘ago.
e
e
I’ago.
e
21
rosso
20
Aizare
cucire
cucire
‘ago.
cucire
cucire
sul
su
/
/
Page 36

Sewing
Sewing
Stitch:
Feed:
Thread:
the
Place
beforehand
sewing
holder
foot
needle
the
Raise
in
sition
holeofthe
right
is
wheel
stitches
in
ches
Sewing
buttons
the
Lower
match
a
the
Lower
zigzag
ber
of
of
end
bobbin
and
stem
the
on
foot:
foot
into
which
turned.
and
the
on
in
on
about
(D)
buttons
without
clear-view
straight
position
dropped
fine
button
and
holder.
into
the
needle.
a
left
buttons
heavy
needle
the
sewing
stitches
6
threads
and
sewing
in
push
the
left
Turn
needle
the
button
Sew
number
only
materials)
into
middle
foot
inches.
tie
sewing
stitch,
the
it
Lower
button.
hole
six
of
(A).
with
the
(B).
and
through
off
foot
left
thread
location
under
the
Lower
of
the
knob
enters
when
eight
to
securing
stems
left
the
of
Sew
leave
the
Pull
threads.
the
foot
the
sewing
button.
20
the
hole.
button.
(C).
or
with
needle
marked
the
a
to
the
hand
zigzag
stit
(for
Place
num
a
thread
a
needle-
Wrap
po
large
N
Costura
Prensatelas:
Puntada:
Posiciôn
Ia
Transportador:Oculto
Hilo:
Coloque
previamente
soporte
Ia
en
Ia
zigzag
ante,
botOn.
unas
izquierdo
Botón
grandes
Clave
del
o
prensatelas
puntadas
de
al
de
puntada:
barra
agujero
el
aguja.
hasta
se
Haga
puntadas
con
Ia
botón.
similar
hilo.
de
ado
puntadas
las
de
botones:
de
botón
el
prensatelas.
del
del
prensatelas.
Gire
dave
(fig.
cuello
generos
en
aguja
Coloque
en
en
Pase
abajo
e
de
el
transparente
Sin
transparente
Punto
lzquierda
Hilo
introdüzcalo
izquierdo
el
que
en
6
de
A).
en
centro
zigzagydeje
los
prensatelas
recto
fino
punto
el
en
Haga
Clave
del
botOn20en
Ia
aguja,
el
agujero
puntos
8
a
remate
en
(costura
pesados):
el
agujero
palillo
un
botôn.
del
(B).
superior
hilos
arrOllelos
(C),
anüdelos.
(D)
y
a
marcado
debajo
descender
Ia
botón.
Ia
girar
al
derecho
en
el
de
botones
izquierdo
de
Haga
unos
airededor
con
del
aguja
Eleve
zona
el
zigzag
agujero
dientes
Baje
unas
15
inferior
e
N
el
de
vo
del
y
el
cm
32
Page 37

D,,
Pose
de
presseur:
le
le
20
ce
pique
Executer
du
boutons
piquer
du
milieu
zigzags
de
fib.
es
enrouber
bouton
tes
fits.
boutons
bouton
auparavant
presseur.
presseur
trou
gauche
en
position
dans
que
dans
points
bouton
a
tige
l’aiguille
bouton.
du
bouton.
(B)
et
Passer
pour
sans
pied
a
transparente
point
droit
gauche
escamotée
Fit
a
coudre
a
l’emplacement
et
Descendre
et
faire
du
haute.
Ia
plage
t’aiguille,
le
trou
6
a
8
sur
place
(A).
sur
tissus
dans
Poser
et
coudre
laisser
depasser
les
fits
sur
es
former
pied
presseur
semelte
déporté
fin
sous
le
piquer
bouton.
Tourner
point
en
tournant
droit
points
zigzags
dans
tourds.
be
trou
une
ablumette
Descendre
quelques
sur
be
fits
aches
Ia
tige
support
le
support
l’aiguille
Arrêter
zigzag’
du
le
env.
tissu
(D).
trou
le
ou
a
le
le
et
Attaccatura
Piedino:
Punto:
Trasporto:
Fitato:
Porre
spingerlo
Abbassare
penetrare
bottone.
20
girando
destra.
punti
Bottone
su
stoffe
Far
Porre
bottone.
alcuni
di
fib.
(C)
e
i
tilt.
it
net
settore
Cucire
diritti
penetrare
un
Abbassare
sopragitti
Passare
avvolgere
bottone:
senza
piedino
punto
sinistra
abbassato
filato
bottone
sotto
it
supporto
‘ago
Alzare
dello
ii
volantino
6—8
nel
foro
con
gambo,
pesanti.
‘ago
fiammifero
e
fili
it
gambo
piedino
trasparente
diritto,
fine
sul
punto
it
supporto
net
foro
‘ago.
zig-zag
penetri
punti
a
sinistra
nel
sut
ii
piedino
tasciare
superiore
del
a
Girare
zig-zag
per
foro
centro
(D)
oppure
posizione
segnato,
del
piedino.
sinistra
ii
finchè
nel
(A).
bottoni
a
sinistra.
del
(B).
circa
ed
inferiore
e
annodare
piedino.
del
bottone
foro
e
alcuni
grossi
Cucire
15
cm
N
ago
e
Fare
‘ago,
a
Pied
Point:
Griffe:
Fit:
-
arado
ajc
del
scender
a
aguja
.
Eleve
zona
recho
zigzag
:agujero
el3nes
‘;uierdo
dierites
Bate
3ga
unas
e
infericr
de
del
y
el
-.
-.
.
:15cm
Poser
marqué
du
du
dans
t’aiguille
bouton
jusquà
votant,
bouton.
quelques
gauche
Boutons
Grands
Faire
gauche
sur
pied
points
15
cm
(C)
sous
Nouer
pied
pied
te
presseur
et
be
33
H
/
Page 38

4
Sewinginzippers
Sewing
Stitch
length:
Stitch:
Thread:
This
is
Insert
the
back
groove
foot
upwards,
in.
The
zipper
positions:
Completely
in
Baste
zipper
foot
Place
the
its
teeth
on
the
sole
half
about
required
material,
in
the
close
the
foot
again,
across
sew
Sew
the
margin.
same
the
seam
material,
zip
(Fig.
the
again
and
34
foot:
how
foot
left
concealed
zip
by
to
open
run
of
the
width.
zip
continue
the
other
leave
raise
sewtothe
zipper
2
Straight
needle
sewing
the
with
E
and
until
foot
(Fig.
hand
the
zip
along
the
length
Leave
raise
(Fig.
end.
side
Shortly
the
the
D).
to
3
zipper
the
the
can
A),
left
under
the
foot
C).
of
zipper
Lower
sewing
stitch,
position
thread
back
push
front
right,
first.
as
right
(Fig.
of
the
the
Lower
the
the
before
needle
the
end.
foot
be
zip
far
the
seam
the
pin
pushed
or
closure
Push
as
the
guiding
B).
zip
needle
zipper
zip
down
foot
zipper
foot
middle
is
pin
shoe
centre.
it
foot
Sew
at
the
and
at
the
and
engaged
in
the
of
the
F
snaps
to
the
will
go.
so
edge
the
down
foot
and
zipper
then
the
end
in
the
open
foot
the
that
of
Costura
Prensatelas:
Largo
puntada:
Puntada:
Posición
puntada:
Ia
Hilo:
Colocación
cremalleras:
Enganche
Ia
ranura
arriba
Ia
barrita
se
a
(fig.
A)
Cremalleras
Hilvane
las
hacia
Coloque
prensatelas
cremallera
Ia
guIa
Ia
anchura
a
aproximadamente.
Ia
en
cremallera
terminedehacer
costura
Cosaelsegundo
paralelamente
Poco
clavada
satelas,
el
prensatelas
de
de
de
Ia
posterior
Ia
planta
anteriorF.El
posiciones
las
central.
y
Ia
cremallera.
Ia
Ia
derecha
alce
tela,
(fig.
lateral
antes
Ia
aguja
abra
cremalleras
Prensatelas
cremalleras
2
Punto
Central
Normal
del
barrita
cubiertas
izquierda
cremallera
de
discurran
(fig.
deseada
del
Ia
para
a
3
recto
prensatelas
posterior
empuje
E
y
del
pie
hasta
pie
puede
derecha,
del
todo
Corra
hasta
el
abierta
forma
que
los
largo
a
lo
Cosa
B).
Deje
el
prensatelas
Baje
C).
Ia
remate.
de
lado
Ia
a
y
final
en
cremallera
termineIacostura.
y
Ia
hastaIamitad
Ia
aguja
el
prensatelas,
costura
Ia
de
misma
de
tela.
Ia
Ia
costura,
y
Alce
(fig.
para
del
pie
hacia
que
encaje
correr
izquierda
el
prensate
tope.
debajo
dientes
de
cremallera
clavada
cierre
y
haga
cremallera
distancia.
deje
el
pren
D),
baje
en
del
de
Ia
Ia
Ia
//
Page 39

D
liacia
Ia
Iierda
1
ensate-
bajo
Jntes
mallera
dtad
jc!avada
i€rre
telas,
ga
1allera
..ancia.
el
O),
•ra.
a
pie
encaje
correr
de
Ia
deje
pren
baje
Insertion
Pied
Longueur
Point:
FiI:
Mise
glissière
Accrocher
dans
Ia
en
del
de
Ia
a
semelle
s’accroche
peut
(fig.
Insertion
couverte
Bâtir
Faire
gauche
ture
presseur
Ia
barrette
fermeture
environ
restant
presseur
(fig.
continuer
de
Ia
couture
ment
ture
avant
l’aiguille
presseur
(fig.
D).
terminer
presseur:
Point
Fil
en
Ia
rainure
être
A)
ou
tout
glisser
jusqu’à
a
glissière
a
dans
et
C).
Rabaisser
fermeture
transversale.
Ia
deuxième
a
glissiere
Ia
fin
dans
et
Rabaisser
Ia
de
de
droit
a
coudre
place
le
jusqu’a
a
glisse
au
d’une
d’abord
le
de
sorte
droite
a
glissière
Ia
distance
I’ouvrage,
fermer
a
coudre
de
le
ouvrir
couture.
fermetures
Pied
glissiere
point:
en
du
pied
pied
avec
arrière
ce
son
tour.
a
droite.
milieu.
fermeture
Ia
fermeture
pied
presseur
Ia
butée;
ouverte
que
(fig.
Ia
fermeture
le
jusqu’à
a
glissiere
bande
a
distance
Ia
couture,
tissu,
Ia
fermeture
le
pied
a
fermeture
2
a
3
position
a
sa
E
et
que
Le
a
poser
sous
les
dents
B).
Surpiquer
jusqu’au
voulue.
remonter
pied
presseur,
et
Coudre
de
egale.
Iaisser
remonter
presseur
a
glissiere
a
mm
médiane
fermeture
tige
arrière
faire
remonter
Ia
tige
avant
pied
presseur
gauche
a
glisslére
a
glissiere.
vers
a
ferme
le
pied
longent
milieu
L’aiguille
le
glissiere
I’extrémité
faire
a
parallele
Ia
ferme
Peu
le
pied
a
glissiere
et
Ia
Ia
pied
Attaccatura
Piedino:
Lunghezza
Punto:
Filato:
a
Agganciare
perno
posteriore
F
to,
finchè
II
piedino
posizioni
centro.
Cerniera
Imbastire
a
destra
cerniera
maniera
guida
destra
per
circa
rata.
Lasciare
piedino
Abbassare
mine
della
una
cucitura
Cucire
Ia
parallelamente
prima
del
stoffa.
Alzare
cerniera
terminare
punto:
il
posteriore
E
e
il
perno
puO
destra,
lampo
Ia
cerniera.
fino
all’arresto,
aperta
che
i
(fig.
Ia
metà
e
chiudere
ii
piedino,
cerniera
trasversale
seconda
termine
il
(fig.
D).
a
cucitura.
della
piedino
nella
premere
anteriore
essere
sinistra
coperta
sotto
dentini
B).
nella
I’ago
Ia
parte
in
uguale
lasciare
piedino
Abbassare
cerniera
piedino
2—3
punto
posizione
filato
per
per
scanalatura
Ia
spostato
(fig.
Spostare
porre
il
piedino
scorrano
Cucire
Iarghezza
nella
stoff
cerniera
cucire
ed
eseguire
di
della
distanza.
e
aprire
lampo:
per
diritto,
ago
cucire
cerniere
suoletta
F
si
A)
ai
due
Ia
in
lungo a
Ia
cerniera
a.
(fig.
fino
fissaggio.
cerniera
l’ago
Ia
ii
piedino,
cerniere
centro
con
in
innesti.
nelle
o
lati:
il
piedino
deside
Alzare
C).
alter-
infine
Poco
nella
il
al
ii
*
/
Page 40

t
Seam-like
For
machine
the
How
inserted:
Press
left
the
left
the
that
so
pressed
the
sewn
Move
the
that
opening.
guiding
beginning
the
teeth
guiding
and
end
Close
material
Open
right
pin
and
Fig.
in
right
Finish
the
zip
along
(Fig.
zipper
edges
the
seam
side
its
along
zipper
the
needle
The
groove
little
a
groove.
secure
zip.
at
zip.
seam
the
E.
guiding
sewing
tape
the
G).
zipper
setting
allowance
the
of
teeth
edge
this
stitches
zip
in
of
feed
to
other
Pin
beginning
Remove
allowance
latter
zip
The
groove
the
letting
guiding
closure
see
prepared
is
of
the
open
protrude
(Fig.
edge.
to
foot
teeth
the
seam
the
them
the
Sew
it.
side
the
the
to
teeth
in
zip.
the
edge
page
placket.
(Fig.
zip
a
B).
the
into
run
foot
seam
of
seam
of
pin,
with
fabric,
now
the
Now
zip
of
in
little
The
middle
the
into
(Fig.
lift
into
zip
turn
the
foot
sew
teeth
the
34
and
Fold
A).
position
beyond
seam
the
C).
up
the
to
to
(Fig.
zip
as
run
(Fig.
foot
Place
so
middle
left
At
the
the
D).
the
out
tape,
shown
into
down
run
out
is
F).
the
Cremallera
(Para
véase
Preparación
cremallera:
Doble
abertura.
izquierdo
encima,
izquierdo
dientes
poco
discurre
Corra
que
central.
curren
prensatelas
costura.
dientes
gula.
Cierre
comienzo
cremallera.
margen
cinta
retirado
un
fig.
curren
preparación
Ia
Ia
planche
y
de
del
el
Ia
aguja
Los
por
para
Termine
Ia
segundo
el
er
de
alfiler
Los
E.
ahora
prensatelas
cremallera.
cremallera
Ia
prensatelas.
del
mallera
de
largo
cosida
34)
Pág.
colocaciOn
y
el
Gire
afuera
hacia
muestra
como
abierto
cremallera
Ia
planchado.
canto
largo
lo
a
prensatelas
se
dientes
ranura
Ia
(fig.
deberá
que
Ia
cremallera.
Ia
de
Gire
costura
de
cremallera,
Ia
alfiler,
el
costura,
Ia
a
dientes
por
(fig.
Pespuntee
sobreIacostura
discurren
guia
Ia
costura
una
en
máquina,
Ia
de
de
de
cantos
los
margen
Ia
de
del
dave
de
Al
C).
levantarunpoco
entren
costura
de
ado
costura
ahora
derecho
fije
y
deIacremallera
ranura
Ia
Terminedecoser
F).
Los
ahora
del
costura
de
A).
(fig.
Ia
fig.
cremallera.
sobresalen
La
canto
planchado.
centro
al
agujero
el
en
cremallera
Ia
izquierda
comenzar
Ia
en
remátela.
y
Prenda
Ia
cremallera
D)
(fig.
hacia
junto
despues
dicha
como
derecha
ahora
dientes
fuera
por
prensatelas
con
muestra
de
Ia
Ia
Coloque
el
B,
costura
forma
de
del
Ia
ranura
un
abra
y
afuera
de
cinta
cinta
Ia
ancho
al
Ta
(fig.
Los
pie
los
con
a
lado
un
dis
alfi
al
Ia
el
Ia
haber
con
Ia
dis
del
Ia
de
cre
lo
G).
36
•
/1
I
1
Page 41

,,_
,/
C
,/ermeture
Reglage
Void
insérer
Repasser
le
sra
cloque
n
el
ado
.
Los
un
en
istura
;ichado.
forma
1
ero
leadis
l
pie
Ia
4
los
cu
ra
eIa.
alfi
lun
lera
al
a
abra
.era
el
:
Con
Ia
haber
Ia
con
eStra
Ia
era
dis
ha
del
-coser
Ia
tinta
de
ncho
‘laalo
fi
l’extérieur
glissiere
place,
dents
repasse.
cassure.
milieu
exactement
median.
glissiere
gauche
couture,
Ia
Terminer
points
Fermer
a
glissiere
et
le
de
enlever
le
deafermeture
de
glissière
droite
tion
quer
glissiere
Ia
de
.arrette
comment
Ia
relarge
comme
dépassant
de
du
rainure,
de
Ia
deuxième
ouvrir
relarge
Ia
fermeture
d’abord
montre
couture.
du
de
Ia
Ia
bande
largeur
Ia
fermeture
a
gIissièe
deIamachine
il
faudra
fermeture
les
bords
gauche
et
La
Aligner
sorte
Les
s’engagent
atm
Ia
fixation.
fermeture
au
Ia
droit
Ia
s’engagent
pied
fermeture
a
du
a
I’extérieur
(fig.
A).
mettre
le
piqüre
que
dans
dents
pied
d’introduire
les
dresser
couture
partie
debut
fermeture
du
vers
figure
a
Les
(fig.
de
une
distance
pied
a
du
Ouvrir
montre
quelque
le
le
(fig.
deIacouture
tissu
les
glissiere
dents
Ia
presseur.
glissiere
invisible
voir
page
procéder
glissiere:
a
Ia
de
fente.
tissu
vers
Ia
a
se
pied
l’aiguille
trou
de
deafermeture
epingles
E.
F).
fermeture
bande
gauche
Ia
figure
peu
trouve
dans
presseur
pique
d’aiguille
Ia
fermeture
dans
Ia
C).Audebut
et
a
l’extérieur,
dans
a
fermeture
(fig.
rainure
les
dents
quelque
coudre
glissiere.
glissiere.
a
avec
Ia
et
epingler
sur
deIafermeture
Ia
rainure
Terminer
glissiere.
correspondant
Les
longent
G).
le
quelques
Ia
le
a
34
pour
Replier
D,
bord
Ia
au
a
de
dans
peu.
Epingler
a
(fig.
Replier
bande
mais
comme
bande
relarge
l’inser
Surpi
dents
Ia
‘\
a
en
les
Ia
D)
a
a
4
Cerniera
Per
pag.
Ecco
cerniera:
Stirare
bordo
(fig.
aperta
fig.
leggermente
cucitura
Spostare
che
del
scorrono
sinistra
introdurre
cucitura
mente.
termine
Spillare
all’inizio
cerniera.
fettuccia
prima
cerniera
fig.
ora nella
(fig.
cerniera.
cerniera
cucitura.
scorrono
Ia
regolazione
34.
come
i
bordi
sinistro
A).
Porre
della
B.
I
dentini
viene
l’ago
piedino.
del
nella
Eseguire
e
Ia
di
D.
I
dentini
Terminare
F).
americana:
prepara
si
deII’apertura.
da
sopra
cerniera
della
dal
eseguita
il
piedino
penetri
dentini
I
nella
scanalatura
piedino
dentini
i
scanalatura
fissarla.
seconda
della
cucitura
Voltare
della
cerniera
togliere
sulla
cucitura
della
scanalatura
Cucire
distanza
a
dentini
I
all’esterno
della
macchina
esiapplica
cucire
verso
Ia
parte
come
cerniera
bordo
stirato.
sul
in
centro,
nell’apertura
della
(fig.
C).
alI’inizio
Ia
cucitura
Chiudere
parte
(fig.
bordo
il
verso
I’ago
spillare
e
come
cerniera
destra
Ia
cucitura
Ia
fettuccia
di
piedino
della
cerniera
della
Voltare
sinistra
indicato
bordo
cerniera
di
Per
della
alzarli
fino
Ia
della
4)
destro
del
della
guida.
I’esterno
sporgono
La
stirato.
in
maniera
centrale
guida
legger
al
cerniera.
cerniera
aprire
e
con
l’esterno
Ia
indicato
scorrono
piedino
della
sulla
(fig.
vedi
Ia
il
in
a
Ia
Ia
da
G).
37
Page 42

4
Zippers
For
Move
it
will
Baste
the
teeth
to
the
zip
edge
the
downinthe
open the
and
zip.
Pin
intended
(Fig.
Open
position
so that
fabric
the
fabric,
zip. Lower
sewing the
zip
machine
the
go.
placket
are
the
same
teeth
of
end
finish
the
B).
seam
seam
in
ladies’
zipper
Press
closed
the
on
still
underside
timeasyou
run
the
foot
of
the
fabric,
zip,
sewing
overlapping
seam
zip.
Attach
it
for
it
moves
(Fig.
C).
leave
the
raise
the
seam.
with
setting
foot
the
the
visible.
along
(Fig.
seam
lower
line.
the
along
Shortly
the
zipper
zipper
a
bartack.
slacks
see
to
edges
zip to
wrong
Pin
and
stitch
the
leave
raise
the zipper
the
edge
Baste
the
edge
desired
needle
Secure
the
the
sew
right
A).
seam.
the
before
foot
foot
page
left
of
right
side
facing
it
the
guiding
Shortly
the
the
along
left
guide
seam
edge
down
and
and
the
zipper
Close
34.
far
as
as
the placket.
edge
its
that
so
strip
D
down
at
zip.
The
before
needle
foot,
foot
again
the
the
zip
edge
and
margin
the
of
the
end
in
the
close the
finish
of
the
end
4
Cremalleras
señora
(Para
Ia
preparacion
Pag.
véase
Corra
el
bordes
los
Ia
prendida
dientes
largo
(fig.
A).
prensatelas,
el
con
el
lado
B).
lo
a
Poco
aguja clavada
Ia
pie
hastaeltope.
doblado
tapeta
deIaguia
dejeIaaguja
el
largo
antes
el
of
of
izquierda
los
cremallera
derecho
visibles
ahora
quede
Los
Ic
las
costura,
alce
bajeelprensatelas
Cierreacremallera.
Prenda
siguiendo
vane
(fig.
AbraIacremallera.
ginalyposiciOnela
curra
C).
deje
prensatelas,
prensatelas
Asegure
presilla.
pantalones
para
34)
cremalleras
para
Ia
abertura.
de
cerrada
por
forma
de
dientes
Poco
finaldeIa
de
D
con
también
Ia
cremallera
de
derecha
antes
y
y
del
del
termine
el
Coloque
de
borde
final
Ia
alfileres
trayectodeIa
izquierdo
cierre
y
de
Ia
máquina,
de
hacia
Doble
y
Hilvane
del
debajo
que
Ia
cremallera.
alfileres
clavadaenIa
abra
termine
borde
ue
forma
enIatela,
cremallera,
Ia
costura
para que
Ia
por
discurren
del
del
final
Ia
cremallera,
a
saliente
costura.
Ia
cremallera
Ia
guia
que
de
Ia
deIacostura,
costura.
con
Ia
planche
Ia
lado
queden
costura.
prensate
Ia
de
tela,
costura.
Hil
mar
dis
tela
aIe
baje
una
Fije
a
(fig.
el
el
38
Page 43

____\
H
era.
—
•
•
urren
iensate
‘iiateIa,
imalIera,
costura.
tente
ira.
aIlera
lula
:dis
te
:t
aie
baje
fl
na,
ci
Ia
planche
Ia
e
ado
ueden
ara
que
ostura.
Hit
mar
a
(fig.
ira.
el
una
Fije
el
B
Fermeture
dame
Reglage
Gtissor
Ia
gauche
tes
bords
a
glissiere
a
fente
fermeture
Epingler
tout
par
a
fermeture
droite,
Peu
laiguille
presseur,
rabaisser
couture.
Epingler
to
trace
gauche
(fig.
B).
Ouvrir
place
geur
droit
avant
t’aiguitle
prosseur
gtissiere.
terminer
couture,
avant
do
longo
do
to
de
de
soient
a
une
a
comme
dans
ouvrir
to
Former
Ia
de
de
Ia
Ia
fermeture
etatigner
Ia
piqüre
to
Ia
fin
de
dans
et
former
Rabaisser
Ia
couture.
coudre
a
glisslére
Ia
machine
pied
fermeture
jusqu’à
Ia
fente.
fermée
manière
encore
sous-patte
couture.
glissière
le
a
fin
de
le
tissu,
a
pied
presseur,
Ia
sous-patte
Ia
couture.
fermeture
to
do
bord
a
couture,
to
tissu,
un
pour
voir
Ia
butée.
Bâtir
sous
te
que
visibtes.
D
et
Les
longent
montre
Ia
couture,
retever
fermeture
fermeture
dépassante
Bétir
a
gtissiere.
guido-droit
sorte
du
tissu
romonter
Ia
fermoturo
to
pied
A
Ia
tin
arrêt.
pantalon
page
gtissiere
a
Repasser
Ia
fermeture
bord
es
dents
assembler
dents
Ia
a
figure
to
a
et
terminer
a
Ia
partie
glissiere
Mettre
sur
que
to
(fig.
taisser
presseur
de
Ia
34.
droit
de
de
Ia
barrette
A.
laisser
pied
glissiere,
gtissiere.
solon
Ia
tar
guide
C).
Peu
te
pied
a
et
vers
de
Ia
en
Cerniere
Per
pag.
Spostaro
att’arrosto
detl’apertura.
sotto
in
maniera
le
a
siano
preparata
insieme
corniera
(fig.
cucitura
Alzare
Abbassare
cucitura.
bordo
spitti
tmbastire
(fig.
Aprire
guida
lungo
prima
con
chiudere
no
o
Fermaro
una
travetta.
regotazione
34.
it
bordo
ancora
alla
scorrono
A).
Poco
fermarsi
it
piedino,
Chiudore
sporgente
in
direzione
Ia
B).
Ia
cerniera.
e
fissarto
it
bordo
del
termine
t’ago
netta
Ia
torminare
it
per
it
piedino
a
sinistra.
che
visibili.
D
con
cerniera.
prima
it
piedino
parte
delta
stoffa.
cerniera.
Ia
termine
pantaloni
delta
per
Porre
ta
stirato
a
i
dontini
Fissare
dogli
tungo
del
con
aprire
e
Ia
cerniora.
detl’apertura
delta
sinistra
Applicare
in
maniera
stoffa
delta
Atzare
Abbassare
cucitura.
dotla
(per
macchina
cerniera
Stirare
corniera
dostra
delta
spitti
I
dontini
Ia
termine
I’ago
Ia
corniera.
terminare
cucitura.
delta
cho
(fig.
cucitura
cucitura
i
e
guida
netta
con
it
tinoate
C).
it
signora)
vodi
fino
bordi
chiusa
o
imbastiro
cerniera
a
patolta
cucirta
delta
dostra
delta
stoffa.
Ia
Fissaro
degti
cerniera
scorra
Poco
formarsi
piedino,
it
piedi
con
it
di
39
I
I
/
Page 44

4
Darning
Preparing
Sewing
Stitch
Needle
Tension:
Thread:
Needle:
to
How
Remove
secure
making
screw
draw
First
both
threads
Then
make
material.
damaged
shown
each
line.
covered
90°
and
stitches
is
covered.
On
this
stitch
fabric
foot:
type:
position:
fit
the
the
sure
shank
Stitch
area
in
Fig.
evenly,
darn
(Fig.
type
length
back
the
the
sewing
darning
that
C.
up
the
when
few
a
When
over
E)
of
yourself
and
machine:
Darning
accessory)
Straight
Centre
Ease
tension
Fine
embroidery
Size
darning
foot
foot
wire
bobbin
beginning
stitches
back
in
serpentine
D,
rounding
the
turn
the
until
work
forward.
foot
stitch
needle
machine
70
foot
holder,
with
is
B
thread
in
and
forth
damaged
the
fabric
preceding
the
damaged
determine
you
moving
by
thread
screw
resting
to
the
fashion,
the
(special
thread
then
A,
on
and
sew.
over
end
of
spot
through
rows
spot
the
the
is
the
hold
as
of
4
Zurcidos
Prensatelas:
Puntada:
Tension
hilo
superior:
Hilo:
Aguja:
Transportador:
Colocación
Retire
pie
zurcidor
que
de
portatornillos
Para
mente
Ia
por
ahora
los
da
zurza
redondo
pronto
Tan
memente
90°yzurza
mente
quede
largo
El
misma
del
el
soporte
el
estribo
comenzar
el
hilo
punta
unas
hilos
el
trozo
a!
final
como
el
(fig.
E)
cerrado
de
puntada
moviendo
Pie
rio
Punto
Algo
normal
Hilo
N
Oculto
del
pie
del
el
con
B
C.
zurcir
a
inferior.
al
comenzar
puntadas
bien
pegados
dañado
de
esté
trozo
los
hilos
hasta
por
Ia
para
especial)
recto
más
fino
70
zurcidor:
prensatelas
tornillo
se
apoye
Sujete
en
(fig.
cada
recubierto
dañado,
tensados
que
completo.
10
determina
tela
zurcir
floja
zurcir
de
A.
extraiga
ambos
a
coser.
Ia
tela.
unos
D).
costura
gire
el
trozo
en
vaivén.
(acceso
lo
de
y
Asegüse
contra
primera
Haga
Extien
a
otros
Zurza
(fig.
unifor
Ia
tela
anterior
danado
usted
fije
el
el
hilos
y
en
E).
40
Page 45

I
I
4
(acceso
I
de
Lir
1
y
eguse
r1ra
primera
nbos
per.
Extien
•.
a
Zurza
(fig.
Ia
to
unifor
teta
ha
larterior
añado
10
usted
ten.
to
fije
Haga
otros
et
hitos
en
E).
A-1-I-f-4-4-1-
PH-H-
-t-
-i--
D
Travaux
Preparation
Pied
Point:
Tension
d’aiguitte:
Fit:
Aiguitte:
Griffe:
el
y
Mise
Entever
‘aide
tout
repose
Faire
Au
deux
points
étroitement
couvrir
En
comme
Lemplacement
régutièrement,
droit
prealabtement
‘emplacement
ment
Ia
t’opératrice.
presseur:
en
de
en
veiltant
sur
remonter
debut
fits.
dans
l’endroit
bout
te
coudre
et
couvert.
longueur
de
de
fit
du
place
te
support
Ia
vis
a
de
Executer
te
‘un
couture,
de
montre
de
reprisage
Ia
machine:
Pied
supplement)
Point
moms
Fit
a
Grosseur
abaissée
du
pied
de
fixer
A,
a
ce
tige
C
d’abord
Ia
couture,
d’abord
tissu.
côté
a
endommagé
Ia
repriser
a
tourner
ces
fits
(fig.
E),
a
repriser
Pendant
point
—--—i
repriser
a
droit
forte
broder
70
repriser
a
pied
presseur;
te
pied
que
t’étrier
du
pince-aiguitle.
te
fit
maintenir
quetques
Placer
de
I’autre
former
figure
D.
étant
te
tissu
sur
ceux
jusqu’à
soit
cette
est
déterminée
-,
)
--
-
(contre
fin
a
repriser
B
de
canette.
tes
fits
et
(voir
fig.
un
arc
couvert
angle
a
tendus
ce
que
complete
operation,
tes
par
a
D).
E)
Rammendo:
Preparazione
Piedino:
Punto:
Tensione
superiore:
Fitato:
Ago:
Trasporto:
Come
rammendo
Togliere
con
Durante
attenzione
morsetto
Far
cucitura
fermi.
Tendere
coprire
stoffa
fig.
D).
tornanti
da
rammendare
regotarmente
stoffa
precedentemente
parte
chiusa.
La
tunghezza
narta.
ed
indietro.
apphcare
it
supporto
Ia
vite
questa
che
C.
satire
it
tenere
Cucire
film
I
quindi
con
cuciture
Ai
termini
rotondi.
di
90°
danneggiata
Lei
net
piedino
(acessorio
punto
leggermente
fib
grossezza
abbassato
alla
A
fito
delta
macchina:
per
rammendo
fuori
diritto
ricamo
70
II
piedino
del
staffa
punti
parte
danneggiata
di
rammendo.
delte
cuciture
E).
stata
cuciture
tesi
(fig.
sia
completamente
punto
it
atlentata
piedino
per
B
ravvicinata
Quando
coperta
puo
tessuto
per
macchina:
it
piedino
operazione
a
inferiore.
ambedue
alcuni
in
maniera
Ia
(fig.
è
dalle
esirammenda
del
muovere
corredo)
macchina
a
da
rammendo.
fare
appoggi
Alt’inizio
i
capi
dei
sulla
stoffa.
eseguire
si
gira
sopra
E)
finchè
determi
fissare
sut
delta
fili
delta
(vedi
a
pane
Ia
i
avanti
e
fiti
Ia
41
If
/
/
Page 46

t
\
Cleaning
Raise
Remove
take
and
dog
feed
the
of
B
ring
hook
hook
Caution:
and
needle
the
the
off
with
sewing
sewing
and
raceway.
raceway
do
oiling
and
needle
two
needle
the
brush.
the
hook
hook
Apply
occasionally.
drop
not
sewing
the
plate
plate.
Push
outwards.
C.
drop
a
the
screws
Clean
Take
Clean
of
sewing
foot.
catches
the
to
oil
hook.
out
the
the
limpieza
dos
de
de
un
0.
y
aguja
a
tornillos
aguja.
pincel.
A
B
y
Ponga
aceite
suelo.
al
del
el
cuide
y
Gire
garfio
garfio
de
en
prensatelas.
el
fijaciOn
de
Limpie
hacia
(lanzadera).
C.
vez
pista
Ia
que
de
y
transportador
el
afuera
Limpie
cuando
en
del
no
retire
Ia
garfio.
caiga
se
Afloje
Ia
el
Retire
pista
una
el
del
go
el
Engrase
Eleve
los
placa
A
con
pestillo
anillo
garf
ta
Atención!
garfio
Nettoyage
Lever
Dévisser
plaque
Nettoyer
Basculer
vers
navette
temps
d’huile
Attention!
ber
42
et
pied
le
les
aiguille
a
griffe
Ta
es
l’extérieur.
Nettoyer
C.
autre,
a
dans
Veiller
navette.
Ia
huilage
presseur
deux
verrous
Retirer
donner
coursière
Ta
vis
et
a
a
et
de
enlever
‘aide
de
A
l’anneau
coursière.
Ia
une
pas
ne
l’aiguille.
fixation
cette
pinceau.
du
coursière
Ta
goutte
navette.
de
laisser
Ta
de
plaque.
et
B
De
torn
Ta
4
Pulizia
Alzare
di
Pulire
Aprire
l’esterno.
Pulire
ogni
Attenzione:
fissaggio
tanto
crochet.
lubrificazione:
e
piedino.
e
ago
togliere
e
trasporto
ii
del
fermi
i
Estrarre
corsiera
Ta
qualche
non
Svitare
Ta
un
con
crochet
anello
crochet.
del
goccia
lasciare
le
placca
pennello.
verso
A
crochet
e
B
d’olio.
cadere
due
d’ago.
Mettere
ii
viti
C.
Page 47

4
Changing
Pull
upwards,
out.
enter
and
Cambio
Desenchufe
Empuje
hacia
bombilla
en
las
girela
y
out
Insert
slots
turn
A
ranuras
the
then
it
de
a
bombilla
saquela.
y
de
hacia
the
mains
the
C,
in
direction
a
Ia
forma
B.
bulb
plug.
in
direction
new
push
bombilla
mãquina
Coloque
que
C,
empüjela
bulb
the
hacia
bulb
B.
las
Push
so
de
arriba,
gulas
A
and
that
upwards
Ia
red.
Ia
hacia
the
pull
the
girela
nueva
encajen
arriba
bulb
it
pins
.
Afloje
etire
jsportador
el
ira
Retire
).
pista
una
do
yfio.
4caIga
Changement
a
Débrancher
Pousser
tourner
el
del
go
el
‘ampoule
tenons
Pousser
tourner
Sostituzione
Togliere
Spingere
verso
A
lampadina
neite
fessure
in
sü
e
de
a
‘ampoule
vers
A
neuve
s’engagent
‘ampoule
vers
B.
della
a
spina
a
lampadina
toglierla.
e
in
maniera
C.
girarla
in
l’ampoule
machine
vers
et
I’enlever.
de
manière
dans
vers
lampadina:
data
inserire
Premere
senso
presa
in
che
B.
du
le
haut,
les
le
haut
sü,
i
Ia
secteur.
Ia
Placer
que
ses
fentes
et
Ia
a
muro.
girarla
a
nuova
perni
entrino
lampadina
C.
‘,
4)
Page 48

Needle
the
Using
working
up
chart
adequate
the
of
Fabric
light
Needle
60,70,75
needle
material.
weight:
size:
guarantees
a
better
Fabric
medium
Needle
80,90
weight:
size:
weight:
Fabric
heavy
Needle
100,110,120
size:
Needle
system
130/705
80
70,
130/705
110
70,
130/705
90
75,
130/705
110
70,
130/705
90—110
130/705
20
70—1
130/705
80—110
130
H-N
70—110
No.
&
H
H-SUK
H-PS
H-SKF
H-J
H-LR
H-PCL
points
[
Profile
—
cEZEEEE
—
embroidery
delicate
Lastex.
and
workwear,
Twill,
light
and
Leather,
leathers.
Imitation
plastic
Seams
No.
or
for
needle
fine
woolens,
knitted
fabrics,
for
stretch
canvas.
suede,
leathers,
sheeting
topstitched
synthetic
30/3
for
linen,
velvet,
work.
fabrics,
Quiana
needle
Pfaff.
corsetry,
heavy
calf
and
fine-meshed
chiffon,
fancy
Lastex.
Simplex.
and
developed
Particularly
knitted
and
Lycra,
linen,
goatskin
and
materials,
plastic
oilcloth.
with
buttonhole
thread.
batiste,
seams
double-
suitable
fabrics.
Simplex
blue
jeans
silk
&
eye
Point
point
ball
Light
I
Medium
—
—
point
ball
Medium
point
ball
Heavy
point
ball
Acute
round
Narrow
twist
Narrow
point
left-twist
Light
long
point
point
with
ball
eye
wedge
groove
point,
Suitable
Universal
synthetics,
organdy,
and
Coarse
jersey
Stretch-fabric
especially
for
Wide-meshed
130/705
100
44
H-WING
heavily
Hemstitching
point
C
‘—
Attractive
dressed
glass
hemstitching
materials,
cambric.
on
organdy
and
Page 49

Needle
chart
:_ejeans
Decorative
Before
fabric
U
80
80
80
Special
130/705
9
H-ZWI-Ho
(
100
I
j
System
&
130/705H-ZWI
80
130/705H-ZWI
80
90
100
designs
you
start
properly.
Decorative
sewing,
In
this
and
130/705H-ZWI
hemstitching
80
No.
sewn
Stitch
2.5mm
2.5
2.5
2.5
3.0mm
with
turn
way,
needle
zigzag
0.5—1.5
0.5—1.5mm
0.5—1.5
twin
2.0—3.0
2.0—3.0mm
length
mm
mm
mm
twin
the
handwheel
patterns
mm
needle
mm
needles
breakage
mm
Stitch
—
—
—
—
—
and
can
wide
narrow
narrow
very
very
width
check
be
largely
narrow
narrow
to
make
prevented.
r
1
Needle
spacing
1.6
2.0
2.5
3.0mm
4.0
sure
1.6
2.0mm
2.5
-
—
mm
mm
mm
mm
the
mm
mm
needles
Suitable
for
Medium-wide
cording
Wide
cording
Extra
wide
Extra-wide
stitch
into
the
Ornamentations
Ornamentations
Ornamentations
Decorative
stitching
Heavily
fabrics
ticularly
hem
effect
dressed
are
par
suitable.
cording
cording
als,
silk
3
45
Page 50

Tabla
elecciOn
La
obtener
una
de
de
agujas
aguja
Ia
buena
correcta
costura.
impcrtante
muy
algo
es
para
Punta
Sistema
nUmero
y
130/705
70/80
N°
130/705
70/110
N°
130/705
75
N°
130/705
70/110
130/705
90
N°
60
H
H-SUK
+
90
-110
Género
ligero
aguja
de
H-PS
H-SKF
H-J
70
las
75
agujas
Perfil
-
Genero
medio
aguja
90
80
universal
fina,
terciopelo,
de
interlock,
diseñada
para
punto
de
lastex,
ropa
pesado,
para
mo
fino,
punto
géneros
delicados.
base
a
profesional
vaqueros,
Fomia
—
—
1
r
—
—
y
punta
esferica
Punta
pequena
Punta
media
Punta
media
Punta
grande
Punta
puntiaguda
del
estérica
esférica
esferica
redonda
Ia
de
Apropiada
ojo
Aguja
malla
lana,
bordados.
Géneros
lastex,
Aguja
Especial
ros
Corseteria
simplex,
Sarga,
1mb
Género
pesado
aguja
100
tejidos
para
chitOn,
costuras
malla
de
simplex.
quiana,
especialmente
elásticos
malla
de
y
lena
120
110
sintéticos
batista,
decorativas,
gruesa.
para
gruesa,
trabajo,
de
ligera.
organdi,
tricot,
Pfaff.
gene
y
licra,
de
130/705
N°
130/705
N°
130
N°
130/705
N°
46
70
80
100
100
-
H-N
H-LR
120
H-PCL
-110
-110
H-WINGI
CC
cabra
piel
hilo
de
de
de
del
vainica
mucho
de
hule.
seda
N°
para
30/3
de
apresto,
gran
1’
box-calf,
ante,
a
con
Cuero,
(cabritilla).
sintético,
Cuero
Pespunteados
ojales
Calados
efecto
organdi
hilo
0
y
en
y
pléstico,
con
sintético
costuras
géneros
similares
cortante
Punta
Ia
derecha
al
cortante
Punta
izquierda,
Ia
canal
—<
—
—
Punta
pequena,
alargado
Punta
vainica
y
en
esférica
calados
punta
ojo
para
/
/
Page 51

Tabla
de
agujas
tEtiCOS
ist1.
rativas,
esa,
x.
para
s
y
abajo,
jera.
bra
de
organdi,
tricot,
Pfatf.
gene
licra,
[
jJ.
Motivos
Antes
se
[1
!
I
Sistema
nOmero
y
130/705
N°
130/705
N°
80
N°
90
N°
decorativos
de
comenzar
clavan
perfectamente;
Adornos/Zigzag
130/705
N°
80
N°
80
N°
80
Vainica/Agujas
130/705
H-ZW1-HO
N°
80
N°100
80
100
H-ZWI
H-ZWJ
Ia
H-ZW1
con
labor
gemelas
Largo
puntada
2,5
mm
2,5
mm
2,5
mm
2,5
mm
3,0mm
agujas
gemelas
deseada,
de
esa
forma
0,5—1,5
0,5—1,5
0,5—1,5
especiales
2,0—3,0
2,0—3,0mm
de
mm
mm
mm
mm
gire
evitarä
—
—
el
volante
a
ancho
estrecho
estrecho
muy
muyestrecho
Ancho
puntada
—
—
con
rotura
estrecho
de
Ia
de
mano
las
para
agujas.
Distanca
entre
1,6mm
2,0
mm
2,5
mm
3,0
mm
4,0mm
comprobar
agujas
Apropiada
Lorzas
Lorzas
Lorzas
Lorzas
anchas
si
las
para
normales
normales
anchas
muy
agujas
1
1,6
2,0
2.5
mm
mm
mm
Adornos
Adornos
Adornos
Calados
camuydeco
rativos
en
neros
de
apresto,
similares.
y
y
vaini
gé
mucho
organdi
lapara
ide
gran
Presto,
iw
rw4p
47
7W
/
1
Page 52

Tableau
des
aiguilles
choix
Le
important
Pointes
Designation
130/705
Grosseur
l’aiguille:
130/705
Grosseur
l’aiguille:
pointe
de
Ia
garantft
et
Matières:
legères
Aiguilles:
60
d’aiguille
H
de
70,
80
H-SUK
de
110
70
a
70
d’aiguille
meilleurs
de
75
Fomie
de
pointe
adequate
résultats.
trés
est
Matières:
moyennes
Aiguilles:
80
90
Pointe
et
chas
pointe
bNe fine
pointe Tissus
bille
l’aiguille
de
moyenne
Utilisations
Aiguille
maille
tissus
mentation
Lastex,
I
universelle
fine,unfin,
lame,
velours,
et
pour
tricotés
Interlock,
chiffon,
grande
Quiana,
Matières:
Aiguilles:
100
pour tissus
pour
broderies
maille,
lourdes
110
120
synthétiques
batiste, organdi,
coutures
Simplex
dome
tissus
maille,
130/705
Grosseur
l’aiguille:
130/705
Grosseur
l’aiguille:
130/705
Grosseur
l’aiguille:
130/705
Grosseur
l’aiguille:
130/705
Grosseur
l’aiguille:
130
H-N
Grosseur
l’aiguille:
130/705
Grosseur
laiguille:
48
H-PS
de
75a90
H-SKF
de
70a110
H-J
de
90a110
H-LR
de
70
a
H-PCL
de
80a110
de
70a110
H-Wing
de
100
120
Aiguille
Stretch,
pour
vétements
toile
veau,
plastique,
avec
ajours
organdi,
spécialement
Pfaff.
tissus
maille
Lastex
a
soie
30/3
stretch
de
voiles
chevreau
a
trés
Convient
(gaines,
travail,
fine
feuilles
boutonniere
décoratives
batiste.
et
maille
combines,
ins
plastiques,
développée
tout
lourds,
ou
sur
particuliè
délicats.
etc.)
pointe
bille
moyenne
pointe
-
-
—
—
grande
bille
pointe
pointue
pointe
a
pointe
avec
que
petite
bille,
chas
pointe
C
broderies ajours
droite
rainure
(a
long
ronde
coupante
coupante
gauche)
pointe
pour
obli-
pour
rement
Lycra
Lycra,
Croisé,
blue-jeans,
Cuir,
Similicuir,
toile
PiqOres
fil
Coutures
tissus
L
machines
grande
Simplex,
daim,
cirée
synthétique
fins,
I
I
I
I
/
I
Page 53

Tableau
I
des
aiguilles
r
jj_
I
Coutures
vant
nent
1]
I
III
j
f
I
,
Designation
1301705H-ZWI
Grosseur:
130/705H-ZWI
Grosseur:
Grosseur:
Grosseur:
d’omementation
couture
a
dans
Ia
plaque.
Motifs
[
au
130/705H-I
Grosseur:80
Grosseur:
Grosseur:80
Ourlet
ajour/Aiguille
130/705
H-ZWI-HO
Grosseur:
Grosseur:
Longueur
point
80
80
90
100
d’ornementation,
point
80
80
100
2,5mm
2,5mm
2,5
2,5
3,0
avec
Ainsi
vous
d’omementation/Motifs
0,5—1,5
0,5—1,5mm
0,5—1,5mm
double
2,0—3,0mm
2,0—3,0
mm
mm
mm
aiguilles
tournez
ne
risquez
mm
mm
de
jumelées
spéciale
le
pas
volant
que
large
étroite
étroite
trés
trés
Largeur
point
—
—
—
—
et
es
au
point
étroite
étroite
de
contrOlez
aiguilles
zigzag
51
les
cassent
1,6
2,0mm
2,5mm
—
—
Espacement
des
aiguilles
1,6mm
2,0mm
2,5
mm
3,0mm
4,0
mm
aiguilles
au
cours
mm
pénètrent
de
a
I
Ornementations
I
Effet
d’ourlet
Sont
ment
es
prétésetle
batiste.
Utilisations
nervures
normales
nervures
nervures
extra-larges
couture.
Ornementations
Ornementations
larges
impeccable
décoratif
ajours,
particullére
appropriés
tissus
trés
ap
4
1
1
I
Page 54

Tabella
degli
aghi
scelta
Le
deII’ago
Qualitä
punte
La
lavorazione
Denominazione
130/705
Grossezza
70/80
130/705
Grossezza
70/110
130/705
Grossezza
75+90
130/705
Grossezza
70/110
130/705
Grossezza
90-1
10
130/705
Grossezza
70/120
130/705
Grossezza
80-110
130
H-N
Grossezza
70-110
130/705
Grossezza
100
50
materiale
del
della
leggera
ago
60/70/75
H
ago:
H-SUK
ago:
H-PS
ago:
H-SKF
ago:
H-J
ago:
H-LR
ago:
H-PCL
ago:
ago:
H-Wing
ago:
giusto
stoffa
degli
Profilo
C
garantisce
da
r-E
“—
-
-
-
-
cucire,
aghi
.._—
—
una
I
C
migliore
Qualitá
media
80/90 100/110/120
Punta
e
Cruna
puntaasfera
pccola
punta
a
media
sfera
puntaasfera
media
sfera
punta
a
grande
punta
rotonda
puntaalama
(taglio
puntaaama
(scanalatura
cruna
a
verso
destra)
sinistra)
puntaastera
piccola
crunalunga
punta
per punto
giorno
a
della
stoffa
Qualitá
della stoffa
pesante
ago ago
Indicata
ago
maglia
organdis,
ornamentali,
stoffe a
genere,
per
universale
fine,
lino fino,
stoffedilana,
maglia
Lastex,
ricami
larga,
per
Interlock,
tessuti
chiffon,
tessuti
sintetici
velluto,
Quiana,
Simplex
speciale
ago
particolarmente
elastiche
tessuti
Simplex,
fustagno,
pesante
pelle,
similpelle,
cerata
impunture
in
e
per
busti
Lastex
abiti
blue
scamosciato,
plastica,
con
Pfaff
per
maglia
a
da
jeans,
seta
per
punti
stoffe
maglia
larga,
lavoro,
tessuti
tela
per
nappa,
foglidinailon,
grossa0fib
delicate
30/3
iavoridipunto
tessuti
fortemente
a giornodieffetto
apprettati,
batistarigido
batista,
in
flexi.
vela
capretto
organdis,
cuciture
maglia
Adatto
Lycra,
di
fine
tela
sintetico
su
a
in
lino
/
/
/
Page 55

Tabella
degli
aghi
Uastoffa
ante
0
tfHici
f4batista,
‘to,
magliain
exi.
hcate
a,
‘ti
I
rteta
cuciture
Adatto
Lycra,
di
afine
mo
80
80
90
100
con
motivo
tunghezza
2,5mm
2,5
mm
2,5
mm
2,5
mm
3,0mm
aghi
gemelli
ornamentate
net
foro
0,5
-
1,5mm
0,5
-
1,5mm
0,5
-
1,5mm
speciale
2,0
-
3,0
delta
a
mm
placca
zigzag
doppia
—
—
—
—
—
desiderata
d’ago.
largo
stretto
I
stretto
motto
controltare
Si
evitano
stretto
distanza
1,6
2,0
2,5
3,0
4,0mm
girando
cosi
1,6mm
2,0mm
2,5mm
mm
mm
mm
mm
it
possibiti
aghi
votantino
rotture
Indicato
nervature
nervature
nervature
nervature
cotarmente
se
gil
aghi
di
aghi.
motivi
ornamentati
motivi
ornamentati
motivi
ornamentati
lEffettoapunto
giorno
a
‘tivo.
particotarmente
tessuti
apprettati
suti
rigido
Si
prestano
fortemente
in
batista
decora
e
per
normaU
normali
targhe
parti
targhe
tes
Denominazione
i
130/705
Motivi
Prima
entrano
p
I
I
j
11
Grossezza:
130/750
Grossezza:
Grossezza:
Grossezza:
ornamentali
di
senza
Motivi
Grossezza:
Grossezza:
Grossezza:
Orb
130/705
H-ZWI
Grossezza:
Grossezza:
H
U
1I
Ii
a
U
S
I
hç
H-ZWI
H-ZWI
eseguire
it
difficoltä
ornamentali/Motivi
80
80
80
a
giomo/cucitura
+
HO
so
100
,
I
1
ilo
sintetico
su
gandis,
g
2
I
7
Page 56

I
--
Faults
and
how
to
remedy
them
Cause:
Machine
1.
Needle
Wrong
Needle
Machine
Needle
2.
Thread
thread
will
not
needle
bent
too
Needle
any
that
Needle
go.
of
tension
not
bent.
too
case
For
Poor-quality
excessive
3.
Needle
Needle
Needle
Needle bent
because
Bobbin
skips
stitches
used.
blunt.
or
improperly.
for
thread
breaks
above
too
strong.
knotty
become
or
too
strikes
and
improperly
correctly.
up
inserted
threaded
thin
thread
the
or
has
storage.
breaks
pushed
thin
workispushed
used.
reasons.
thread
too
far
as
thick.
needle
or
inserted.
used,
dry
as
pulled.
by
it
plate
Remedy:
the
go,
its
back.
Chart.
as
push
far
it
it
far
Push
needle
flat
shank
system
Insert
Insert
new
Check
threading.
Select
needle
See
par.1above.
Regulate
Use
or
only
Insert
new
asitwill
new
Insert
Needle
See
Let
machine
Only
guide
When
in
as
far
inserting
as
up
facing
side
130/705
needle.
according
thread tensions.
good-quality
needle
needle.
Chart.
feed the
the
will
it
and
material
the
bobbin
go.
go.
as
will
as
toward
H
needle.
Needle
to
thread.
pushitup
alone.
work
lightly.
case,
4.
Seam
Tension
Thread
Bobbin
Kinks
material.
is
out
too
thread
appear
not
of
adjustment.
thick,
wound
on
uniform
knotty
and
top
or
hard.
unevenly.
bottom
lower
only.
pass
properly
tensions.
not hold
do
through
it
and
the
check
upper
Check
Use first-class
During
thread
bobbin
of
Thread
both
tensions.
bobbin
in
hand,
tension
machine
and
thread
winding,
but
stud.
/
/
ji
Page 57

Cause:
Remedy:
J(.
art.
Machrne
5.
Lint
rows
Feed
right.)
at
Machine
6.
Thread
7.
Important
Never
foot.
the
master
has
feeds
accumulated
of
feed
dog.
dog
dropped.
runs
endsinhook
notes:
runathreaded
If
you
have
switch.
irregularly
between
(Drop-feed control
with
difficulty
raceway.
machine
leave
to
the
particularly important
This
is
or
notatall
tooth
unless there
machine,
Remove
is
Flick
Remove
oil
into
isapieceoffabric
even
forashort
when
needle
drop-feed
thread
hook
while,
children
plate and clean
controltothe
ends
and
raceway.
under
be
suretoswitch
are
putadrop
the
around.
out
left.
sewing
lint.
of
off
V
4
4
4
*
4€
44+
53
Page 58

4
Fallosyremedios
Causa
1.
La
máquina
La
agujanoestã
aguja
mãquina
aguja
El
hilo
as
razones
tension
hilo
no
aguja
aguja
aguja
aguja
tirardeIa
cápsula
colocado
estã
es
superior
es
no
está
es
choca
debidamente.
Noseha
La
La
debidamente.
La
utilizado.
2.
Por
anteriormente.
La
El
nudosooha
demasiado
3.Laaguja
La
La
La
gruesa.
La
por
La
colocada
hace
puntadas saltadas
bien
colocada.
Ia
aguja
torcidaodespuntada.
no
demasiado
del
tiempo.
está
demasiado
de
enhebrada
estã
fina
se
rompe
nombradas
hiloesdemasiado
buena
rompe
bien
contra
canilla
calidad
almacenado
colocada.
finaodemasiado
Ia
placa
no
de
estado
se
torcida.
telaoempujarla.
Ia
correcta.
para
o
de
está
el
tuerte
es
aguja
hilo
Remedio
Compruebe
topeycon
Coloque
130/705
Coloque
Compruebeelenhebrado.
Elija
agujas.
Compruebe
nümero
ReguleIatensiOn
Utilice
buenas
Compruebe
el
tope.
Coloque
Siga
tela
La
ünicamente
Al
colocar
deberã
encaje
si
está
el
lado
una
aguja
H.
una
aguja
Ia
aguja de
los
1.
hilosdebuena
condiciones.
si
está
una
aguja
las
normasdeIa
deberá
por
Ia
cOpsula
presionarse
perfectamente.
introducida
pIano
del
nueva.
acuerdo
puntos citadosenel
los
de
calidad
introducida
nueva.
tabla
ser
arrastrada
Ia
máquina.
conIacanilla
un
hacia atrãs.
sistema
con
Ia
hilos.
de
poco
hasta
hasta
tabla
en
y
hasta
agujas.
el
de
que
costura
4.
La
tensiOn
La
regulada.
Hilo
demasiado
El
hilo
devanado.
Los
hilos
material.
noesuniforme
de
los
Ia
canilla
de
noseanudan
sino
encima
hilos
fuerte,
no
o
no
nudosoorigido.
está
está
bien
dentro
debajo.
bien
del
Compruebe
hilo
Use
Haga
pasar
siempre
Compruebe
ambos
hilos.
Ia
tensiOndeambos
de
buena
el
hilo
llene
que
el
enhebrado
calidad.
poreltensor
Ia
canilla.
y
Ia
tensiOn
hilos.
previo
de
/
Page 59

I
e
Causa
5.
La
Se
ha
las
hileras
El
transportador
está
a
6
La
maquina
En
a
pista
7.
Nota
No
ponga
costura.
desconecte
máquina
acumulado
de
dientes
Ia
derecha).
del
importante
en
marcha
Siempre
el
interruptor
no
esta
va
garilo
que
arrastra
polvo
del
oculto
forzada
hay
a
abandone
el
material
y
suciedad
transportador.
(Ia
palanca
restos
maquina
Ia
general,
entre
de
hilos.
enhebrada
máquina,
sobre
o
todo
Remedlo
10
hace
Retire
pincel
Ponga
Limpie
gota
sin
aunque
si
irregularmente
a
placa
el
transportador.
a
palanca
Ia
pista
de
aceite.
haber
sea
hay
niños
de
del
colocado
por
cerca.
aguja
a
garfio
corto
Ia
izquierda.
antes
tiempo,
y
y
una
limpie
ponga
pieza
con
una
un
de
4
c
•‘i
Page 60

I
et
Causes
derangements
de
remèdes
Causes:
1.
L’aiguille
prescriptions
L’aiguille
L’aiguille
L’enfilage
L’aiguille
2.
Pour
Tensions
Eudemauvaise
cassant.
3.
L’aiguille
L’aiguulle
L’aiguille
En
dévie surIaplaqueaaiguulle.
La
correctement.
manqués
Points
pas
nest
n’est
pas
déformée
est
pas
n’est
trop
est
d’aiguille
du
Casse
les
Casse
tirantoupoussant
boite
fil
causes
trop
d’aiguille
nest
déformée.
est
est
trop
a
canette
précitees.
fortes.
qualite
pas
placee
du
correct.
fine
engagée
grosse
n’est
selon
système
épointée.
ou
pourlefil.
noueux
ou
l’ouvrage,
pas
es
prescrit.
ou
fond.
a
trop
fine.
l’aiguille
introduite
Remèdes:
Engager
talon
vers
N’utiliser
130/705
Placer
une
Contrôler
Choisir
aiguilles.
Voirl.
Regler
N’employer
Introduire
Remplacer
Tenir
Laisser
Guider
Appuyer
mise en
perceptible.
l’aiguille
convenablement
compte
Ia
egèrement
fond,
aiguilles
neuve.
du
fiT
de
aiguille
entrainer
l’ouvrage.
le
le
es tensions.
qualite.
des
emboItage
l’aiguille
que
H.
surIaboIteacanette
place.
l’arrière.
des
aiguille
es
passages
que
Ia
nouvelle
I’aiguille.
du
machine
jusqu’a
a
d’après
du
tableau
méplat
système
du
fiT.
tableau
a
aiguilles.
seule.
fond.
a
sa
du
des
56
4.
Couture
La
tension
Le
fiT
Canette
Des
sous
laissant
est
trop
est
irrégulièrement
boucles
l’ouvrage.
deréglee.
gros,
de
fiT
a
noueux
torment
se
desirer
garnie.
ou
sur
dur.
ou
Verifier
de
Nutiliser
passerTefiT
dévidoir.
Veiller
tensions
Ne
les
crochet.
bobiner
pas
a
que
T’enfilage
des
tensions
des
a
par
Ia
fiTs.
des
fiTs
de bonne
libre
main
pretension
correct;
fiTs
d’aiguille
mais
contrOler
et
qualitè.
faire
du
les
1’
Page 61

Causes:
5.
La
machine
Bourres
a
Griffe
en
6.
Des
‘A
coursièro
7.
Ne
No
machine
onfants
agglomérées
gritfe.
abaissée
position
Marche
bribes
Remarques
jamais
pas
oublier
que
dans
droite).
dure
do
du
mettre
n’entraine
(levier
de
fil
so
crochet.
importantes
on
do
toujours
pour
quelques
Ia
méme
entre
de
machine
Ia
sont
marcho
pièce.
pas
es
marche
prises
Ia
débrayer
instants.
ou
irregulièrement
dents
arrière
dans
machine
Remèdes
de
Enlever
bourres
Placer
gauche.
Ia
Enlever
goutte
onfilée
l’interrupteur
Cola
est
sans
general,
surtout
Ia
plaque
au
levier
le
los
d’huile
tissu
nécessaire
pinceau.
do
bribes
dans
sous
méme
a
aigaille,
marcho
fil
de
Ia
le
si
s’il
Oter
arrière
of
mettre
coursière.
pied
presseur.
Ion
no
a
y
des
les
a
une
quitte
Ia
;
a
F
r
-
J
57
I
Page 62

/7
Possibili
Inconveniente
1.
L’ago
E
L’ago
La
L’ago
2.IIfib
Vedi
La
Filato
troppo
3.
L’ago
aH’arresto.
L’ago è
L’agoetroppo
Tirandoospingendoiimateriale
Ia
placca
La
inconvenientiecome
La
macchina salta
inserito
non
è
inseritounago
stato
storto0spuntato,
è
macchina
perimotivi
tensioneètroppo
L’agosirompe
cucitura
capsula
non
troppo
è
nodosoodi
secco
nonèstato
delI’ago.
fine
superiore
perché
storto.
sottileotroppo
‘agoSipiegaeurta
nonèstata
punti
bene.
sbagliato.
infilata
è
periifib.
Si
rompe
precedenti.
stretta.
cattiva
vecchio.
inserito
bene
bene.
qualitàofilato
sino
inserita,
ovviarli
grosso.
durante
sulla
Come
ovviare
Inserire
parte
piatta
Inserire
Cambiare
Controblare
Scegliere
aghi.
Vedi
Regolare
Usare
qualità.
Inserire
Cambiare
Vedere
La
da
con
Dopo
leggermente
un
punto
sempre
I’ago
tabella
macchina
sola.
mano
avere
‘ago
I’ago.
I’ago
beneIatensione.
II
aIl’arresto,
fino
del
fusto
verso
ago
sistema
I’infilatura.
secondo
1.
solo
nuovo
‘ago.
degli
deve
tessutovasolamente
leggera.
inserito
finché
130/705
Ia
filato
di
sino
aghi.
trasportareiimateriale
Ia
capsula
non
sièinnestata.
con
dietro.
H.
tabella
buona
aII’arresto.
guidato
premere
Ia
degli
4.Lacucitura
tensione
La
Filato
troppo
II
fib
inferiore
maniera
Si
tessuto.
regolare.
formano
nonèregobare
nonècorretta.
nodoso,
della
grossooduro.
nonèstato
asole sopra
bobinato
o
sotto
ControllareIatensione
quella
inferiore.
Usare
solo
filato
in
ii
bobinareamano
Mai
sempre
ii
fib
I’annaspatoio.
Infilare
beneecontrollare
tensioni
superiore
attraverso
perfetto.
libera,
ed
inferiore.
superiore
ma
Ia
tensione
bene
e
passare
per
be
Page 63

Inconveniente
Come
ovviare
5.Lamacchina
TraIdentini
della
polveredicucito.
II
trasportoeabbassato.
II
dispositivo
Si
trova
a
V
V
-
V
V
6.Lamacchina
Vi
sono
dei
7.
Avvisi
Non
far
funzionareIamacchina
Quandosiabbandona
I’interruttore
Vj
-V
non
del
trasporto
per
abbassaroiitrasporto
destra.
sforza
residui
nel
importanti
principale
trasporta0trasporta
siepressata
crochet.
senza
Ia
macchina
(importante)
aver
anche
in
presenzadibambini.
solo
irregolarmente
TogliereIaplacca
dentini
conunpennello.
Spostareiidispositivo
Eliminare
gocciadiolio
messo
per breve
i
prima
tempo
residui
sul
della
occorre
dell’agoepulire
a sinistra.
dei
fili
e
mettere
crochet.
stoffa sottoilpiedino.
spegnere
I
una
\
Page 64

Special
The
obtained
be
special
accessories
accessories
from
your
below
listed
dealeratan
are
intended
extra charge.
for
special
sewing
jobs.
They
can
/cessory
Appliqué
Binder
Cording
(twin
Cording
(twin
Fringe
Edge
Straight-stitch foot
Needle
Felling
Felling
Buttonhole
Shirring
Sing!e-needle
Overlock
Hemmer
foot 93-035920-91
(remove sewing foot
foot,
needle
foot,
needle
sewing
guide
plate
foot, 4.5
foot,
6.5
foot
foot
foot
foot
Part
No.
holder)
grooves
5
with
1.8—2.5
grooves
7
with
1.4—1.8
foot
with
round
mm
mm
cording foot 93-035915-91
(rolled
needle
mm
mm
needle
needle
edge),2mm
gauge)
gauge)
hole
98-053484-91
9335
950
93335
953
943-91
93-035
98-802422-00
98-694
803-00
in
preperation
93-035946-91
93-035948-91
98-694411
93-035998-91
98-620404-00
98-694
-
-00
804-00
Sewing
Operation
For
appliqué
For
binding
For
91
91
cording
(needle
for
fine
needle
For
sewing fringes and
For
top-stitching
For
topstitching
sewing
and
For
felled
For
sewing
For
shirring
For
single-needle
finishing
For
fabrics
edges
For
hemming
edges
work
size
cording
size
70)
very
soft fabrics
seams
buttonholes
valances
simultaneously
and
work
80,
(wadding)
and
delicate
(silk
raw
edges
with
jersey,
cording
edges
with
tape
for
basting
for
or
overcasting
zigzag
etc.)
joining
stitches
‘N
elastic
their
Hemmer
Darning
Teflon
-5titch
60
foot,
mm
3
foot
(remove
sewing
foot
holder)
foot
foot
4
98-694
93-1
06
98-694
98-694
401-00
103-91
801-00
879-00
For
hemming
Darning
sewing
For
sewing
For
fabric
edges
and
plastic
fancy
wool
materials
paerflS
1’
Page 65

Contents
Removing
Electrical
Bobbin
Disengaging
Bobbin
Inserting
Checking
Inserting
Upper
Drawing
Operating
Needle
Checking
Thread
•
Setting
Reverse
Sewing
Stitch
ZigzagChanging
Dropping
Changing
Sewing
Accessory
Detachable
Top-stitching
Elastic
Sewing
Sewing
Sewing
Inserting
Seam-like
Zippers
Darning
Cleaning
Changing
Needle
Faults
Special
connection
winding
winding
the
the
the
threading
up
the
thread
the
cutter
the
sewing
stretch
pattern
and
the
the
the
feet
compartment
work
blind
buttonholes,
buttonholes,
on
buttons
zippers
zipper
in
ladies’
and
the
chart
and
how
accessories
the
carry
preparations
and
engaging
bobbin
bobbin
bobbin
the
bobbin
foot
control
tension
needle
stitch
length
stitches
knob,
utility-stitch
needle
feed
sewing
support
stitch
Models
closures
slacks
oiling
bulb
to
remedy
case
thread
case
thread
thread
Models
knob,
foot
Models
340—541
340,
350,
them
the
sewing
tension
tension
Models
341,
351
mechanism
and
720—721
550—571
520
and
and
530—751
and
521
730—751
34,
36,
38,
40,
44,
52,
22,
24,
26,
28,
30,
32,
13,
45
53
43
37
39
41
42
33
35
29
31
25
27
23
23
22
20
20
21
6,
17
5,
16
16
3,
15
4
4
6
8
7
8
9
9
10
11
13
13
14
14
15
60
Page 66

Accesorios
labores
Para
especiales
costura puede
de
adquir)r
agenda
en
su
tioncla
accesorjos
especiales.
/cesorio
Pie
prensatelas
Aparato
(retirese
Pie
prensatelas
(agujas
gemelas
Pie
prensatelas
(agujas
Pie
prensatelas
marginal
Gula
Pie
prensetelas
Placa
de eguja
Sobrecargador
Sobrecargador
Pie
para
Pie
fruncidor
Pie
prensateles
Pie
prensetelas
ribeteador
el
soporte
gemelas
ojales
pare
apiicaciones
del
para
Iorzas,
con
separación
para
lorzas,
con
separación
para flecos
pare
punto
con
agujero
mm
4.5
mm
6.5
para
cordoncillo
pare
overlock
prensatelas)
con5ranuras
con
recto
redondo
1,8ó2,5
ranuras
7
1,4o1,8
No.depedido
93-035
9805348491
9303595091
mm)
93-035953-91
mm)
93-035943-91 Para
98-802422-00
98-694803-00
en
preparacion
93-035
93-035948-91
98-694411-00
93-035998-91
93-035915-91
98-620404-00
920-91
946-91
OperaciOn
Para
coser
aplicaciones
Para
ribetear
con cinta
Para
hacer
bordOnycosturas
(aguja
finas
Para
Para
finas
de
Pare
Pare
Pare
Pare
Pare
elésticos
lorzas,
del
No.
del
No.
70)
coser
flecos
pespunteados
pespuntearypare
y
blandas
seda,
etc.)
costuras
coser
fruncir
trabajos
trabajosdesobrehilado
ojales
con
volentes.
de
costura
sobrecargades
alforzas,
similares
para
80;
lorzas
para
marcar
y
(acoichados)
coser
(generodepunto
etc.
cordoncillo
de
unionaIa
telas
en
con
muy
a
base
generos
vez
hilván
Dobledillador. (arrollado)
Dobladillador.
Pier
zurcidor
(retirese
Pie
prensatelasdeteflOn
\Pi
pare
62
el
soporte
puntadas
mm
3
del
de
mm
2
prensatelas)
adorno
98-694804-00
98-694401-00
93-106
1
03-91
98-694801-00
98-694
879-00
Para
dobladillar
Pare
dobladillar
Pare
zurciryremendar
Pare
coser
Pare
costures
bordes
bordes
sintéticos
decoretives
con
punto
zigzag
/
I
I
1
Page 67

Indice:
22,
13,
32,
34,
36,
38,
54,
28,
30,
24,
26,
46,
18,
40,
62
13
16
17
20
43
21
8
9
4
3,
23
9
14
4
14
33
35
15
37
39
8
6,
7
42
10
11
55
20
29
31
12
25
22
5,
6
16
27
15
23
47
19
41
Accesosios
Accionamiento
Botón
BotOn
Cambio
Cambio
Cambio
ColocaciOn
-
-
:..
.
.
.
-
ColocaciOn
Cómo
Compartimento
ComprobaciOn
ComprobaciOn
ConexiOn
Cortahilos
Costura
Costura
Costura
Cremallera
Cremallera
DesconexiOn
Devanado
Engrase
Enhebrado
ExtracciOn
Fallos
OcultaciOn
Ojales
Ojabes
Palanca
Pespunteados
Pies
PreparaciOn
Puntadas
Punto
RegulaciOn
Suplemento
Tabla
Tabla
Zurcidos
especiales
selector
selector
Ia
de
Ia
de
pie
del
de
de
Ia
quitar
eléctrica
botones
de
cremalleras
de
retroceso
en
cosida
para
del
limpieza
y
del
del
remedios
y
del
Modelos
Modelos
aizaprensatelas
prensatelas
elásticas
invisible
del
agujas
de
puntadas
de
pedal
del
puntadas
de
puntadas
de
aguja
bombilla
prensatelas
canilla
Ia
cápsula
Ia
maleta-funda
para
accesorios
Ia
tensiOn
de
Ia
tensiOn
de
en
pantalones
mecanismo
del
hilo
superior
bib
inferior
fib
transportador
340,
350,
devanado
el
para
elOstico
largo
costura
de
una
341,
351
de
Modelos
Modelos
en
Ia
con
costura
520
530—751
y
puntada
capsula
Ia
del
del
de
de
y
canilla
hilo
hilo
seinora
costura
521
340—541
550—571
.
-.
inferior
superior
conexiOn
y
720,
y
730—751
y
721
-i
4.
I
/
/
/
Page 68

Accessoires
accessoires
Ces
facturation.
spéclaux
pour
des
travaux
particuiiers
sont
contre
dépositaire
votre
chez
vente
en
Pfaff
103-91
879-00
Operations
applications
bordage
couture
(aiguilles
nervures
pour
aiguilles
couture
surpiquage
surpiqüres
fins
trés
coutures
boutonnières
froncement
de
pose
surfilage
assemblage
bords
ouriage
ourlage
reprisage
I
coutures
synthetiques
1
couture
de
de
de
ruban
au
nervures
no
n0
70)
franges:
et
couples
at
rabattues
cordons
de
coupe
de
de
normal
cur
de
80;
fines,
coutures
de
bords
et
bords
bords
matléres
motifs
Ijersey
volants,
de
surfilage
au
et
décoratifs
batissage
sur
etc.
coupe;
point
Ia
a
plastiques
tissus
de
simultané
zigzag
lame
sole)
de
et
/cessoires
applications
pour
Pied
pied)
du
support
a
a
Pied
pose
Guide-droit
pour
Pied
Plaque
Rabatteur
Rabatteur
Pied
fronceur
Pied
guide-cordonnet
Pied
overlock
Pied
Ourleur
Ourleur
a
Pied
Pied
\Piepour
(enlever
nervures,
en
nervures,
en
franges
point
aiguille
a
4,5
6,5
boutonniéres
(bord
mm
3
reprier
semelle
a
points
rainures
5
écartements
rainures
7
écartements
droit
avec
mm
mm
roulé)
Teflon
décoratifs
(aiguilles
de
(aiguilles
de
rond
trou
mm
2
1,8;
1,4:
mm)
2,5
mm)
1,8
Bordeur
Pied
jumelees
Pied
jumelées
4.
Références
93-035920-91
98-053484-91
950-91
93-035
93-035953-91
93-035943-91
98-802
98-694
j
preparation
en
93-035946-91
93-035948-91
98-694411-00
L
93-035998-91
93-035915-91
98-620404-00
98-694804-00
98-694401-00
06
93-1
98-694801-00
98-694
422-00
803-00
64
Page 69

Table
des
Mise
en
Enlèvement
Branchement
Preparation
Debrayage
Bobinage
Embrayage
Mise
Tension
Mise
Passage
Tensions
Coupe-fil
Selection
Couture
Point
Sélecteur
Sélectour
Sélecteur
Tableau
Remplacement
Remplacement
Piecis
Compartiment
Plateau
Surpiquage
Point
Boutonnières
Boutonnières
Pose
Insertion
Fermeture
Fermeture
Travaux
Nettoyage
Changement
Tableau
Causes
Accessoires
place
en
place
du
place
en
du
des
deIaIongueur
en
élastique
des
presseurs
amovible
invisible
de
boutons
de
de
des
de
matlères
des
deIavalisette
electrique
bobinage
du
mécanisme
du
mécanisme
du
deIacanette
fil
de
canette
deIaboTte
fil
d’aiguille
fils
arrière
points
de
de
points
motifs
de
points
de
l’aiguille
de
Ia
accessoires
a
elastique
(modèles
(modèles
fermetures
a
glissière
glissière
a
reprisage
et
huilage
de
l’ampoule
aiguilles
derangements
speciaux
broches
(modèles
(modèles
semelle
340,
350,
a
invisible
pour
a
de
canette
a
du
point
340—541
550—571
du
341,
351
glissiere
pantalon
et
remècies
bobines
couture
pied
520
et
et
720,
et
730—751)
presseur
et
521)
530—751)
dame
721)
13,
28,
30,
48,
2
3
4
5
6
7
8
8
9
10
14
14
15
15
16
16
17
17
18
20
21
22
22
23
24
26
29
31
32
34
36
38
40
42
43
49
56
64
ii
Page 70

Accessori
Gli
accessori
Pt
at
f.
fuori
fuori
corredo
corredo
servono
per
avon
di
cucito
special).
Si
possono
acquistare
nei
negozi
essonio
Piedino
Piedino
(rimuovere
Piedino
(ago
Piedino
(ago
Piedino
Riga
Piedino
Placca
Ribattitore
Ribattitore
Piedino
Piedino
Piedino
Piedino
Piedino
Piedino
Piedino
(rimuovere
Pied
\edino
66
per
per
nervature
gemello
nervature
gemello
per
diguida
per
d’ago
per
arricciatore
per
overlock
orlatore
orlatore
da
no
TEFLON
ornamentale
applicazioni
bordare
portapiedino)
5
con
distanza
7
con
distanza
frange
punto
diritto
con
foro
4,5
mm
6,5
mm
occhiefli
cordoncino
(roulé)
3mm
rammendo
portapiedino)
scanalature
aghi
scanalature
aghi
rotondo
mm
2
18—2,5
1,4—1,8
mm)
mm)
No
93-035920-91
98-05348491
93-035
93-035953-91
93-035943-91
98-802422-00
98-694803-00
in
preparazione
93-035946-91
93-035948-91
98-694411-00
93-035998-91
93-035915-91
98-620404-00
98-694804-00
98-694401-00
93-106
98-694801-00
1
98-694879-00
dordine
950-91
103-91
lavoro
per
avon
Bordare
cuciture
(grossezza
per
nervature
per
cucire
per
inipunture
per
impunture
tessuti
e
morbidi
per
ribattiture
Confezionare
per
cucire
per
eseguire
per
cucire
bordi
di
adatto
per
per
onlature
per
onlature
rammendare
per
cucire
sintetico
per
cucire
di
Cucito
di
applicazioni
con
i
bordator
di
nervature
ago
80,
fini
70)
frange
e
e
particolarmente
stoffe
per
(maglina
occhielli
volante
e
cordoncini
contemporaneamente
e
tagliate;
stoffe
elastiche.
con
punto
plastica
e
genere
in
punti
ornamentaji
per
passare
cucire
(mi
di
jersey
arricciature
particolarmente
a
zig-zag
materiale
ecc.)
le
in
marche
genere
rifinire
i
Page 71

Indice
Come
Coperchio
Collegamento
Preparaziorie
Bobinare
Inserire
Controllo
Come
InfNatura
La
leva
II
reostato
Controllo
Regolazione
Regolazione
Regolazione
Regolazione
La
tabella
Cam
blare
Abbassare
Sostituzione
I
piedini
Scomparto
Piano
supplementare
Impunture
Punto
invisibile
Occhielli
Occhielli
Attaccatura
Cerniere
Rammendo
Pulizia
e
Sostituzione
Tabella
Possibili
degli
inserire
inserire
(modelli
(modelli
lampo
lubrificazione
inconvenienti
ii
delta
elettrico
per
II
meccanismo
della
tensione
Ia
alza-piedino
della
tensione
lunghezza
punti
del
punti
del
motivi
del
punti
ago
ii
trasporto
del
piedino
accessori
elastico
340,
350,
bottoni
lampadina
aghi
porta-rocchetti
valigia
bobinare
del
cucito
inferiore
capsula
flexi
punto
modelli
modelli
341,
351
e
come
delta
superiore
520
e
spolina
340—541
550—571
e
521)
530—751)
ovviarti
e
720,
e
730—751
721
13,
28,
30,
34—38
50,
58,
59
2
3
4
5
7
8
9
g
10
12
13
14
15
16
16
17
18
20
20
21
22
23
23
24
26
29
31
33
40
42
43
51
67
•1
/
 Loading...