

Page 1
hobby
307/309
Instruction
Mode
Instrucciones
Libretto
d’emploi
istruzioni
Book
de
manejo
Page 2
out
Fold
Rabattre
Extienda
Girare
this
ce
esta
questa
Safety
For
The
nected
nor
The
according
As
lead
spond
minals
The
connected
ked
The
be
marked
Cut-off
be
Defective
completely.
Only
approved
and
or
The
fuse
ble
PFAFF
Please
notes
page
volet
hoja
pagina
rules
United
the
leads
to
a
to
wires
Blue:
Brown:
colours
the
this
of
with
in
wire
with
wire
connected
used,
3
the
with
plug
cover.
from
vers
must
the
plug
the
in
the
to
appliance
the
your
which
to
letter
the
which
with
mains
but
mains
spare
A
by
fuse
corresponding
the
must
electrical
agencies.
also
page
on
l’extérieur
verso
Kingdom
definit&y
safety
three
with
mains
following
Neutral
Live
the
of
colour
plug,
coloured
is
terminal
the
N
coloured
is
the
to
letter
the
plugs
disposed
leads
fuses
ASTA
cover
never
Spare
observe
3.
only
lead
pins.
lead
code:
wires
may
coding
proceed
coloured
or
terminal
or
L
definitely
are
of
must
must
according
must
be
covers
fuse
suppliers
the
!‘esterno
con
be
not
terminal
coloured
are
mains
the
in
corre
not
the
of
follows:
as
must
blue
is
which
black.
brown
which
coloured
not
immediately.
replaced
be
used
be
BS
to
marked
be
used
colour
or
general
code.
without
are
the
I
ter
mar
must
is
red.
as
availa
safety
be
to
1362
A
3
Contents
Table
Indice
lndice
des
página
pagina
page
on
matières,
67
69
63
page
65
/
Page 3
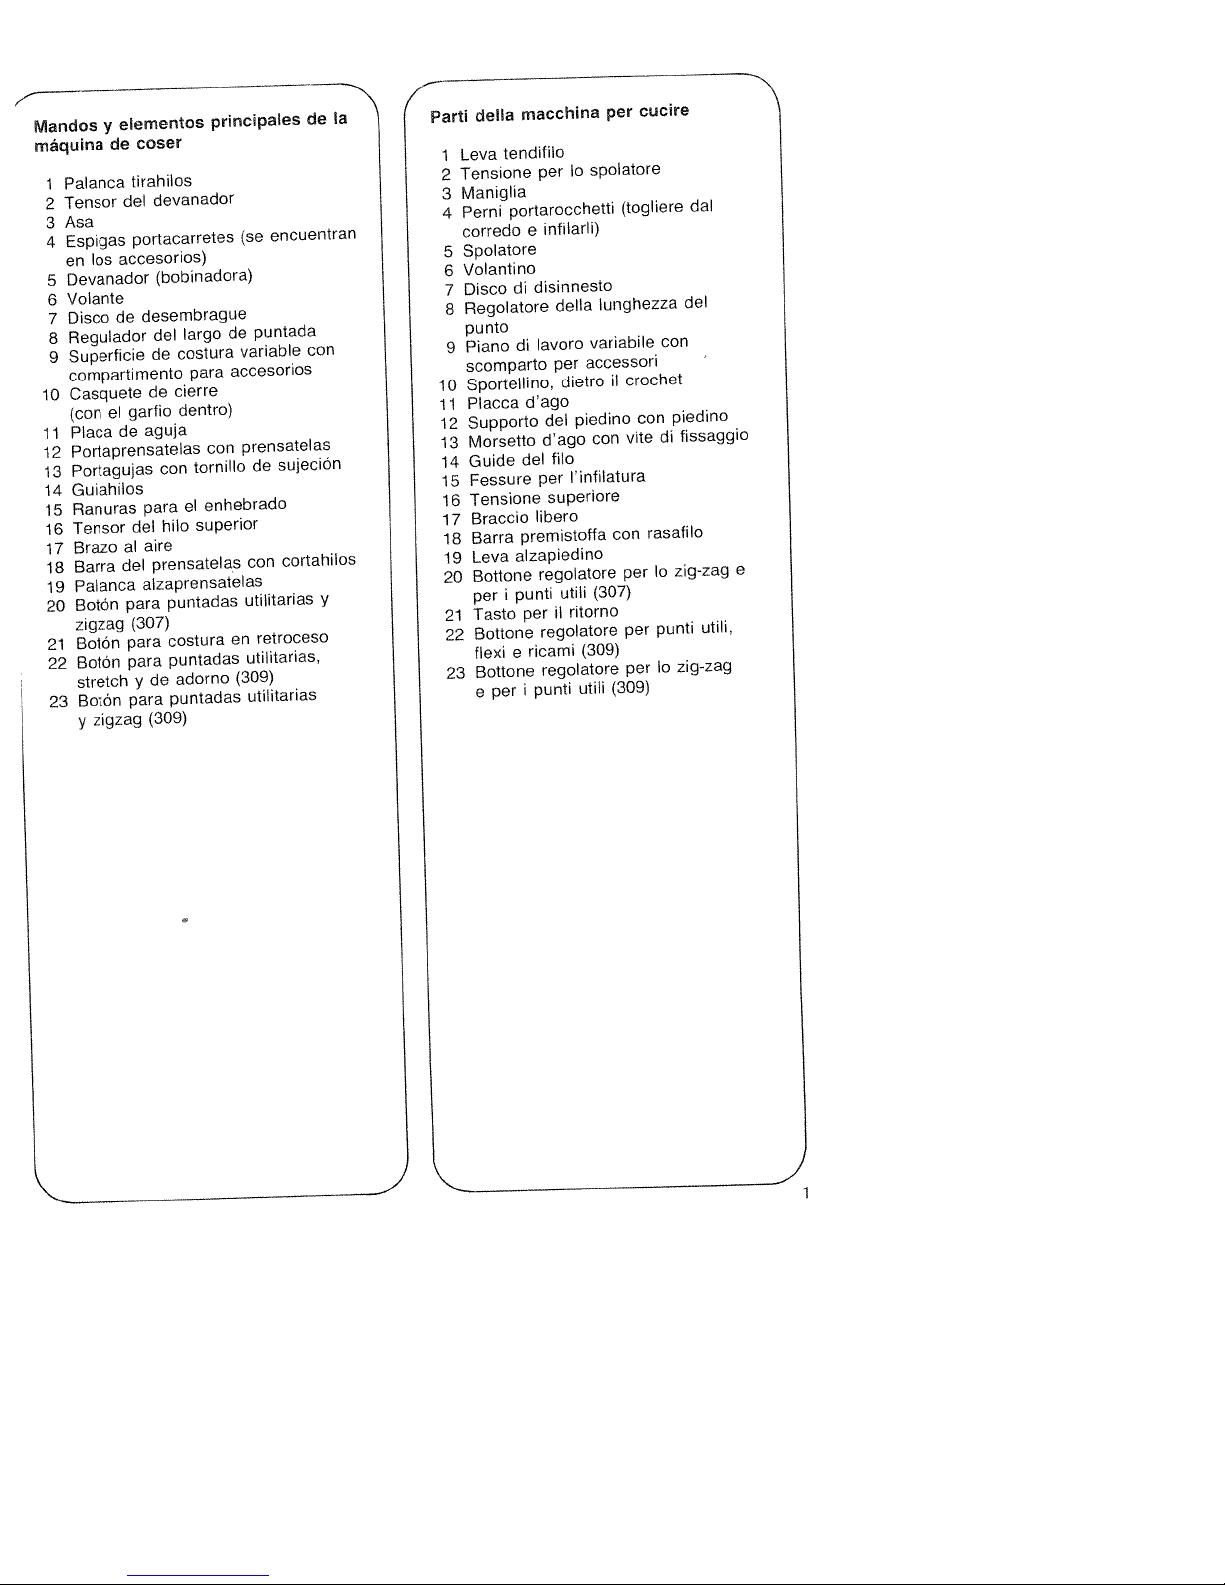
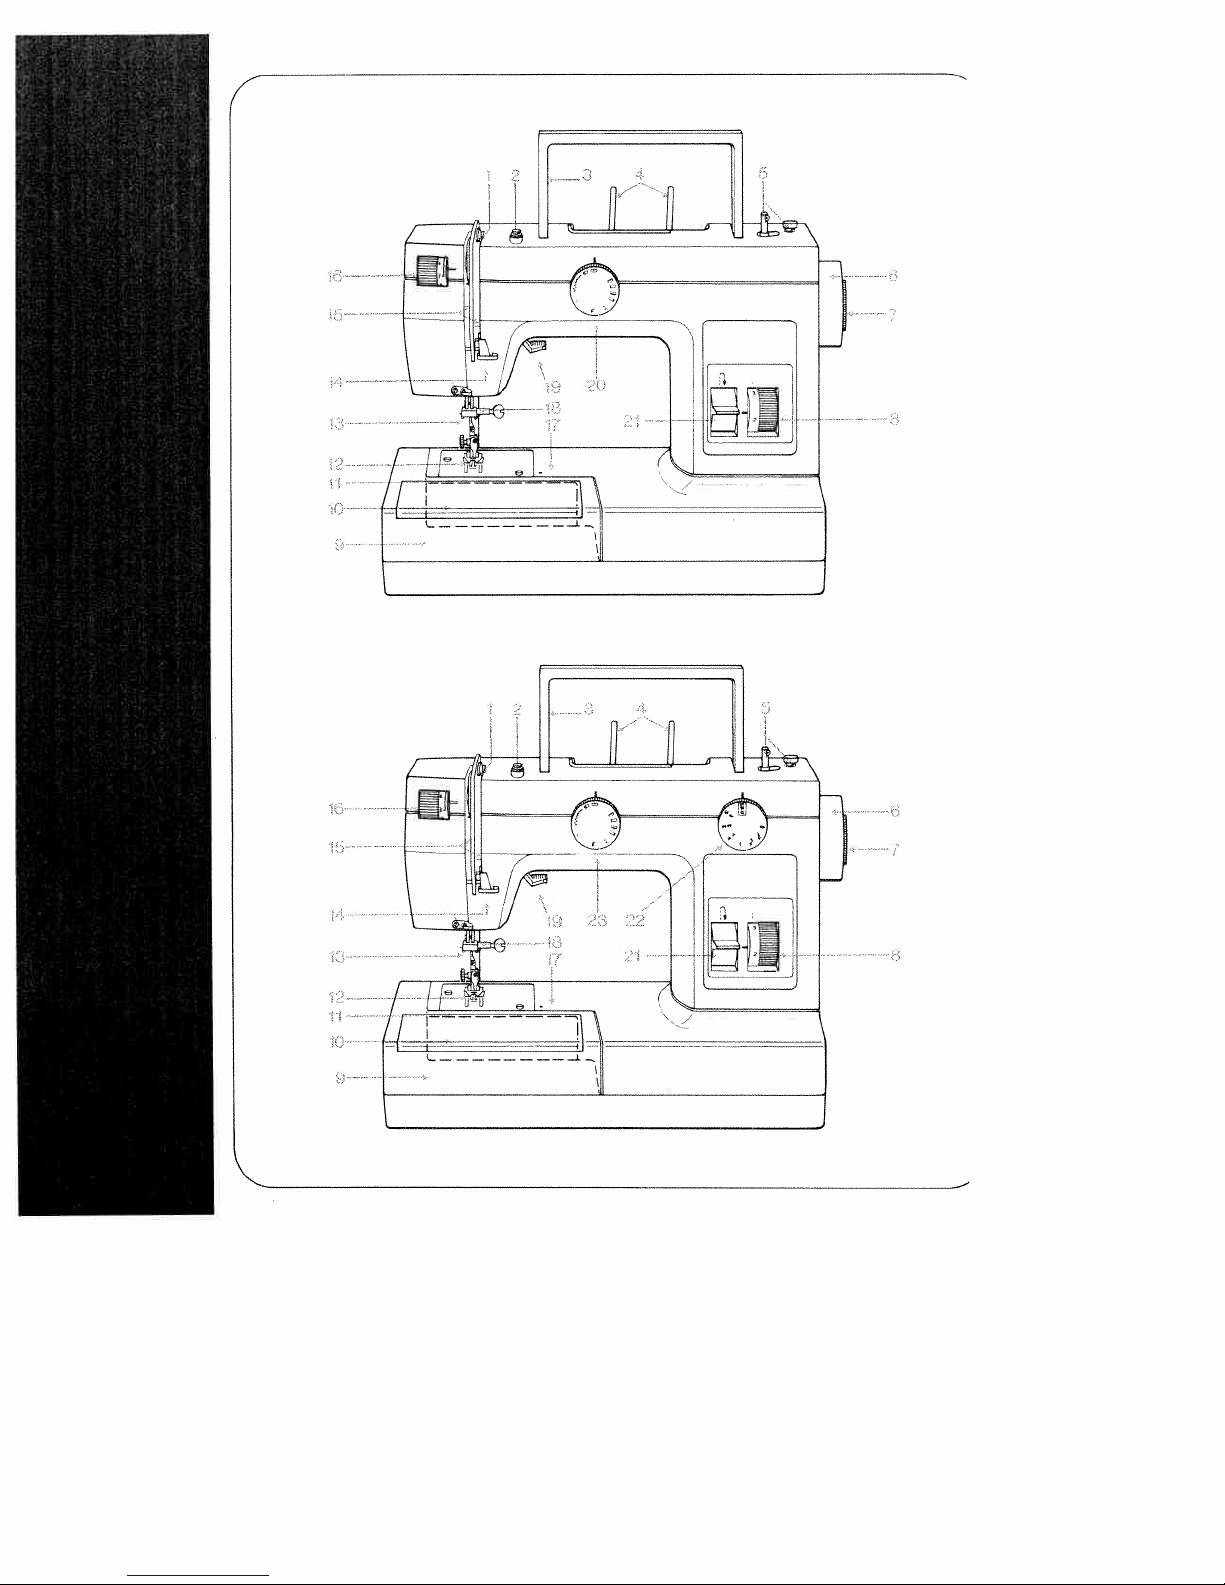
Mandos
máquina
Palanca
Tensor
2
Asa
3
Espigas
4
en
Devanador
5
Volante
6
Disco
7
Regulador
8
Superficie
9
compartimento
Casquete
10
(con
Placa
11
Portaprensatelas
12
Portagujas
13
Guiahilos
14
Ranuras
15
Tensor
16
Brazo
17
Barra
18
Palanca
19
BotOn
20
zigzag
Botón
21
BotOn
22
stretch
Botón
23
y
elementos
y
de
accesorios)
los
de
el
de
zigzag
del
a!
del
easer
tirahilos
devanador
portacarretes
(bobinadora)
desembrague
argo
del
costura
de
para
cierre
de
dentro)
garfio
aguia
con
el
para
hilo
del
aire
prensatelas
aizaprensatelas
puntadas
para
(307)
costura
para
puntadas
para
adorno
de
y
puntadas
para
(309)
principales
de
accesorios
con
tornillo
enhebrado
superior
en
(309)
encuentran
(Se
puntada
variable
prensatelas
sujeciOn
de
cortahilos
con
utilitarias
retroceso
utilitarias,
utilitarias
de
con
cucire
spolatore
lo
della
variabile
accessori
per
dietro
piedino
con
fib
l’infilatura
superiore
utili
ritorno
il
(309)
utili
per
(togliere
lunghezza
crochet
ii
vite
con
per
(307)
per
per
(309)
con
di
rasafilo
lo
punti
be
del
con
piedino
fissaggio
zig-zag
zig-zag
dal
e
utili,
a
y
Parti
1
2
3
4
5
6
7
8
9
10
11
12
13
14
15
16
17
18
19
20
21
22
23
tendifilo
Leva
Tensone
Maniglia
portarocchetti
Perni
corredo
Spolatore
Volantino
di
Disco
Regolatore
punto
Piano
scomparto
Sportellino,
Placca
Supporto
Morsetto
Guide
Fessure
Tensione
Braccio
Barra
alzapiedino
Leva
Bottone
i
punti
per
Tasto
Bottone
e
flexi
Bottone
per
e
per
infilarli)
e
disinnesto
lavoro
di
d’ago
del
d’ago
del
per
libero
premistoffa
regolatore
per
regolatore
ricami
regolatore
punti
i
macchina
della
)
)
Page 4
4
Page 5
Parts
1
Take-up
Bobbin
2
Carrying
3
Spool
4
and
Bobbin
5
Hand
6
Disengaging
7
Stitch
8
Detachable
9
accessories
Free-arm
10
hook
Needle
11
Sewing
12
Needle
13
Thread
14
Threading
15
Needle
16
Free
17
Presser
18
Presser
19
Zigzag-
20
Reverse
21
Stitch
22
Zigzag
23
of
the
windet
pins
insert)
winder
wheel
length
arm
pattern
and
sewing
lever
handle
(remove
cover,
plate
foot
holder
guides
slots
thread
bar
bar
and
control
machine
tension
knob
control
support
work
box
enclosing
with
holder
with
tension
thread
with
lifter
utility-stitch
setting
buttonhole
accessories
from
sewing
retaining
cutter
knob
knob
with
sewing
foot
screw
(307)
Eéments
coudre
Levier
1
Tension
2
Poignée
3
Broches
4
accessoires:
Dévidoir
5
Volant
6
Disque
7
Sélecteur
8
Boite
9
travail
Capot
10
crochet
Plaque
11
Support
12
avec
Pince-aiguille
13
Guide-fil
14
Passages
15
Tension
16
Bras
17
Barre
18
coupe-fil
Releveur
19
Bouton
20
et
Levier
21
Bouton
22
points
Bouton
23
utilitaires
constitutifs
releveur
du
a
de
de
couvrant
a
de
semelle
libre
de
de
utilitaires
de
de
elastiques
de
de
dévidoir
bobines
mettre
a
débrayage
longueur
de
rangement
aiguille
semelle
avec
ii
f
du
daiguille
fil
du
presseur
pied
pied
du
reglage
(307)
marche
réglage
reglage
(309)
Ia
de
til
(jointes
en
do
formant
compartiment
le
du
vis
de
presseur
points
arriére
points
fantaisie
et
points
machine
aux
place)
point
pied
fixation
avec
zigzags
utilitaire
zigzags
plan
di
press
(309)
Page 6
Notes
machines
IEC
or
The
1.
caution
down
constantly
during
When
2.
maintenance
ging
ries, always
machine
out
The
3.
for
The
4.
only
mechahic.
The
5.
tion
on
Do
6.
on
7.
Do
—
—
Do
8.
the
If
9.
purpose
wrongly
any
10.
To
do
no
the
the
service
Be
11.
PFAFF
on
safety
according
335-2-28,
user
with
moving
work.
leaving
mechanical
the
mains
maximum
the sewing
tension
be
adjusted
machine
according
the
specification
not
place
the
machine.
not
use
there
is
its
function
itiswet,
not
pull
socket
this
appliance
than
operated,
liability
avoid
the
not
open
parts
inside
user can
responsibility
staff.
sure
to
parts.
must
observe
from
of
the
visible
e.g.
the
by
the
use
domestic
for
to
exercise
regard
of
the
the
the
machine,
work
parts
disconnect
the mains
plug.
permissible
lamp
the
drive
by
must
be
the
to
nay
objects
sewing
damage,
is
disturbed,
with
mains
its
cord.
is
used
intended
we
for
any
risk
of
machine.
the
repair.
of
only
EN
60
adequate
the
to
up
needle
sewing
or
when
or
accesso
the
by
wattage
is15Watts.
belt
Pfaff
a
put
into
indications
plate.
in
machine
condensation.
plug
for
orifit
will
not
damage
electric
There
machine
This
is
our
qualified
original
sewing
335-2-28
and
and
area
during
chan
pulling
must
opera
openings
out
of
another
is
accept
caused.
shock,
are
which
solely
Environment
The
recommended
Ambient
Humidity
This
temperature
20%
sewing
electronic-mechanical
machine
It
it
should
is
not
for
be
subjected
dampness,
tricity,
sive
For
must
ist
both
heat-producing
chemicals
ventilation
be
used
firm
to
80%.
machine
supervised
operated
direct
or liquids.
purposes
on
a
and
even.
environment
10CC
isahigh-quality
appliance;
useinthe
in
such
to:
dust,
sunlight,
objects,
the
free
surface,
to
40CC,
way
a
severe
static
machine
is:
itisa
home.
that
elec
corro
which
Treatment
Always
damage
dropping
protect
which
it.
the
might
machine
occur
against
by
hitting
or
Cleaning
Housing:
To
clean
the
any
alcohol
Note!
use
housing,
stubborn
any
such
for
cleaning
which
if:
and
soft cloth
remove
cloth
with
Please
Do
not
cal
products
chemicals
use
free
is
dirt,
or
paraffin.
insecticides
petrol
as
the
a
dry,
of
fluff.
use
a soft
or
(gas)
housing.
clean
chemi
or
To
thin
Page 7
rescriptions
coudre
a
es
60335-2-28
N
le
Vu
1
cendant
toujours
surveiller
Avant
2.
de
cas
rempacement
de
niques
toujours
réseau
puissance
La
3.
lampoule
Touours
4.
tension
sion
Mettre
5.
indications
es
tique.
pas
Ne
6.
ques
machine.
pas
Ne
7.
de:
dommages
—
panne
—
humidité
—
par
Ne
8.
céble.
Aucune
9.
mée
suite
erronée
Pour
10.
electrique,
machine.
aucune
teur.
Pfaff
N’utiliser
11.
d’origine.
de
familiales
ou
mouvement
de
faire
to
quitter
de
travaux
d’accessoires,
ou
couper
retirant
en
est
confier
de
mécanicien
un
a
machine
a
enficher
dans
utiliser
de
ex.).
retirer
pas
garantie
des
pour
dune
de
éviter
Celle-ci
pièce
Seul
habilité
est
quo
sécurité
selon
335-2-28
IEC
ascendant
laiguille,
preuve
en
travail
a
es
ne
le
machine,
Ia
d’entretien
de
machine
Ia
Ia
admissible
maxi
15
de
règlage
le
courrole
en
a
sur
d’objets
orifices
machine
a
apparents,
fonctionnement,
de
(eau
fiche
a
ne
degâts
utilisation
machine.
a
risque
tout
jamais
ne
reparer
a
service
a
pièces
des
machi
pour
norme
Ia
et
lutilisateur
prudence
de
permanence.
et
pièces
faut
ii
fiche.
W
de
transmis
de
Pfaff.
service
signalé
plaque
quelcon
Ia
de
en
condensation,
secteur
être
peut
survenus
inadequate
décharge
de
ouvrir
renferme
par
après-vonte
réaliser
ce
PFAFF
des
dolt
en
lors
méca
du
do
a
selon
cas
par
assu
a
a
‘utilisa
travail.
Environnement
Valeurs
Temperature
—10Cot
Humidité
et
Cette
electronique-mecanique
rieure
jours
Elle
no
a
soleil,
to
a
ou
recommandèes:
ambiante
+40
de
machine
to
dont
surveillé.
ètre
être
peut
ne
Otro
pas
dolt
une
objets
produits
corrosifs.
Pour
machine
base
Elle
èlectromagnètique
fours
radioelectriques
Manipulation
Veiller
tomber
Nettoyage
Bottler
Pour
utiliser
no
En
fo
Attention!
N’utilisor
do
ou
nettoyer
humidité.
forte
‘electricité
a
dègageant
chinjiques
raisons
des
do
plane.
être
dolt
micro-ondes
a
no
a
machine.
a
écran
ot
nettoyer
chiffon
un
seffilochant
d’encrassement,
as
imbibe
oux
on
produits
produits
des
a
preference
pas
chimiques
machine,
entre
C
20
entre
air
coudre
a
fonctionnement
exposee
eloignee
le
aucun
de
utilisée
aux
statique,
chaleur,
Ia
de
ou
ventilation,
de
sur
do
puissant,
ou
peuvent
heurter
d’affichage:
boitier
propre
sec,
pas.
dalcool.
cas
tels
chimiques
95°/a.
et
appareil
un
est
qualite
dolt
‘extérleur
a
a
poussière,
a
rayons
a
du
des
a
liquides
des
placer
solide
une
champ
tout
que
tel
émetteurs
los
produire.
en
pas
ne
a
et
machine,
Ia
do
et
un
utiliser
d’insocticides
quo
fluides
l’essence
supe
tou
et
des
Ia
los
faire
doux,
chif
ou
pour
3
Page 8
Normasdeseguridad
nasdecoser
EN
60335-2-28
1
Debidoalpeligrodeaccidentes
domésticas
para
EC
335-2-28
6
ropresentaelmovimientodeIa
aguja,01usuario
el
cuidado
no
deberá
y
deberá
posible
duranteeltrabajo
apartarIavistadeIa
zonadecostura.
Antesdocambiar
2.
casoaccesorios,
reaNzar
trabajos
piezas
lo
de
enIamáquina,acuando
use,
deberá
camente,
el
enchufe
3.Lapotencia
bombilla
4. La
tensiondeIa
deberá
es
es
ser
deconectarse
decir,
deIared.
max.
admisible de
15
vatios.
de
correa
ajustada
deberá
porunmecá
nicodePfaff.
La
máquina
5.
chadeacuerdo
Ia
de
En
las
6.
deberán
deberá ponerse
con
las
placadecaractoristicas.
aberturas
ponerse
deIamaquina
objetosdeninguna
clase.
maquina
7.
La
los
siguientes
—
danos
—
funcionamiento
—
cuando
marse
El
enchufedeIa
8.
deIacaja de
no
casos:
visibles,
esté
agua
enchufe
debera
defectuoso,
mojada,
condensada.
red
cable.
CuandoIamáquina
9.
maneje
ostO
guna
para
dostinada,
garantia
so
otros
finesalos
noseasumirá
para
los
ellosodoriven.
10.
Para
evitarelriesgodesacudidas
olOctricas,noabra
su
interiornoexisten
doban
ser
reparadas
tal
fin
Para
deberé
Ia
recurrirse
4
las
máqui
segUn
poner
todo
mecáni
mismo
mantenimiento
deberá
máquina.
piezas
porelusuario.
que
noseIa
eléctri
sacarse
motriz
sOlo
en
indicaciones
utilizarse
p.
ej.alfor
sacarse
sin tirar del
utilice
o
que
nn
daños
que
que
impe
Ia
En
quo
mar
no
en
riosamentealpersonal
del
servicio
postventa.
11.
SOlo
originales de
está
permitido
PFAFF.
utilizar
piezas
Ambiente
Los
margenes recomendados
Temperatura
Humedad
Esta
&
máquinadecoseresuna
herramiente
que deborá
posible
chanodeberá
humedad,
directas,aIa
objetos
productos
a
ambiente:
del
aire:
20
al
oloctrOnico-mocánica,aIa
prestarse
todaIaatenciOn
durantesuuse. Durantesumar
exponerse
a
las
radiaciones
electricidad
sometidosaIa
quimicos
corrosibles
—10°C
95%i
al
estática,
acciOn
son:
+40
valiosa
polvo,aalt
solares
a
del
calor
o
C
lIquidos.
Por
razonesdoventilaciOn,
doberá
instalarse
sobre
una
Ia
máquina
superficio
Ilanayfija.
Mantenga
de
intensidad,
puodan
microondasyomisoras
Ia
máquina
do
campos eloctromagneticos
tales
como
aquellos
genorarso,p.ej.,dohornos
do
coser
radio.
alejada
de
que
gran
Tratamiento
Cuidedoquosumaquinanochoque
ningOn
sitioydo
quo
nosocaiga
en
al
suolo.
Limpieza
display:
y
limpiar
limpio,
manchas
limpiar
do
carcasa
Ia
blando
dificiles
conunpano
alcoholoparafina.
limpiarIacarcasa
productos
o
quimicos, como
utilico un
sin
hilachas.
y
quitar,sopuo
do
no
blando
use
ompa
insoctici
quimicasdoalta
pano
gaso
de
Carcasa
Para
soco,
Las
den
pado
Nota!
Para
das
linaosubstancias
fluidez.
Page 9
60335-2-28
A
1.
di
domestiche
causa
Norme
cucire
EN
dell’ago,
cautela
punto
ii
Quando
2.
durante
zione
meccaniche
staccare
rente
presa
massima
La
3.
Ia
per
4.Latensione
sione
sivamente
macchina
La
5.
conformemente
targhetta
Non
6.
della
Non
7.
caso
danni
—
disturbi
—
presenza
—
acqua
Estarre
8.
tirare
Ia
Se
9.
scope
destinata
declina
eventuali
Per
10.
elettriche,
AlI’interno
sono
rati
esclusiva
di
assistenza
di
11.
Devono
pezzi
sicurezza
o
movimento
del
occorre
osservare
ed
cucitura
di
lascia
si
interventi
per
o
macchina
Ia
estraendo
muro.
a
lampadina
della
essere
dovrà
da
delle
introdurre
macchina.
Ia
usare
di
visibili
di
di
spina
Ia
ii
cavo.
macchina
diverso
in
0
qualsiasi
danni,
escludere
non
della
che
pezzi
dall’utente.
essere
ricambio
di
macchine
per
secondo
335-2-28
IEC
usare
continuamente
durante
macchina,
Ia
di
sostituzione
Ia
accessori,
o
spina
Ia
potenzd
ammissibile
pan
è
cinghia
aggiustata
un
meccanico
essere
dovrà
dali
ai
specifiche.
oggetti
macchina
funzionamento
umidità,
di
condensa.
della
viene
quello
da
scorretto,
modo
responsabilità
rischio
ii
aprire
macchina
possano
interventi
Tali
competenza
autorizzato.
utilizzati
originali
alternativo
sufficiente
ii
manuten
occorre
dalia
dalla
15
a
di
installata
riportati
nelle
cucire
da
per
presa
usata
cui
a
di
scosse
macchina.
a
non
essere
del
soltanto
Pfaff.
da
lavoro.
parti
di
cor
Watt.
trasmis
esclu
Pfaff.
sulla
aperture
es.
senza
per
è
si
per
ci
sono
servizio
uno
ripa
Ambiente
valori
I
temperatura
-10°Ce
umiditá
Questa
giato
stata
circostante
consigliati
ambiente
+40CC
dell’aria
macchina
apparecchio
studiata
Sono:
fra
fra
20%
cucire
de
elettromeccanico,
luso
per
95°/a
e
un
è
domestico
pre
ed
sotto
è
sorveglianza.
Occorre
esporla
irradiazione
motivi
Ia
e
campi
quelli
oggetti
o
macchina
Ia
statica,
chimici
Per
care
solido
Tenere
forti
es.
in
usarla
polvere,
a:
solare
irradianti
corrosivi.
liquidi
ventilazione
di
piano.
macchina
elettromagnetici,
causati
modo
elevata
diretta,
da
da
sola,
a
forni
tale
calore,
debita
umiditã.
elettricitá
occorre
un
su
distanza
come
microonde
a
agenti
collo
ripiano
da
per
e
non
da
radiotrasmettitori.
Maneggio
tuttavia
in
Fate
far
cadere
attenzione
vostra
Ia
a
macchina
da
cucire.
0
urtare
non
Pulizia
pulizia
Ia
Corpo
corpo
del
sciutto,
sporcizia
La
essere
assieme
Importante
usare
Non
benzina
come
fluide,
esterno
esterno
pulito,
eliminata
alcool.
a
insetticidi
per
a
display:
e
morbido
particolarmente
con
I
sostanze
o
pulizia
usare
un
o
del
per
panno
un
privo
e
panno
prodotti
chimiche
corpo
di
ostinata
morbido
chimici,
esterno.
a
filacci.
puO
5
Page 10
MPORTANT
electric
is
appliance,
before
This
sewing
When
including
all
Read
using
the
instructions
machine
an
following:
DANGER
1.
The
sewing
unplug this
cleaning.
Always
2.
Do
not
3.
Do
not
4.
sink.Donot
‘AIAMM’
Do
not allow
1.
machineisused
this
Use
2.
only
attachments
Never
3.
working
Return
nation,
4.
Never
openings
lint,
dust,
Never
5.
Do
not
6.
7.
Do
not
being
To
disconnect,
8.
Never
9.
may
be
10.Donot
11.
Keep
sewing
Always
12.
Do
not
13.
only.
Do
not
14.
Switch
15,
area,
presser
16.
Always
lubricating,
instruction
the
Hold
17.
machine should
appliance
forasewing
placeinor
sewing
properly,
appliance
of
the
and
outdoors.
blocked.
machine
the
use
bent
or
sewing
as
foot,
unplug
or
when
before
to
machine
this
electrical
the
sewing
loose
where aerosol
turn
on
by
away
proper
push
threading
etc.
sewing
when
manual.
unplug
reach
placeorstore
operate
the
repair,
operate
droporinsert
use
operate
administered.
operate
unplug
fingers
use
pull
the
such
plug
be
by
or
recommended
sewing
ifithas
sewing
all
a
pulling
needle.
or
blunt
fabric
machine
rewinding
winding.
SAVE
6
SAFETY
using
reduce
machine
drop
To
reduce
to
persons:
as
children.
only
the
mechanical
or
machine
machine
object
controls
surface
on
all
needle
needles.
while
needle,
machine
and
never
the
into
a
machine
been
nearest
cord.
plate.
off
into
designed
To
from
relamping.
sewing
used
near
to
cloth.
any
soft
from
making
manufactured
safety
basic
sewing
this
risk
be
Replace
that
or
the
risk
Close
its
intended
the
if
dropped
authorized
adjustment.
with
foot
and
any
products
off
(“0”)
such
as
unplug,
To
parts.
The
Use
needles
when
changing
the
from
other
cord
of
left
outlet
has
where
manufacturer
it
any
opening.
wrong
It
user
reel.
the
electric
machine
water
toy.
for
by
into
(spray)
to
moving
stitching.
(“0”)
any
THESE
NSTRUCTONS
for
HOUSEHOLD
schock:
into
can
not
should
when
same
water.
fall
orbepulled
fire,
is
necessary
contained
as
from
free
being
remove
then
the
plug,
care
can
cause
the
needle
any
adjustments
threading
outlet
adjustments
allow
always
plugged
after
type
rated
Unplug
electric
cord
or
dropped
blocked.
the
used
where
not
is
required
the
by
bobbin,
when
plug
using
schock,
when
in
or
center
or
plug
the
the
causing
removing
to
precautions
machine.
electric
unattended
immediately
with
bulb
fallen
it
liquid.
other
of
burns,
attention
useasdescribed
hasadamaged
or
damaged,
dealerorservice
openings
air
controller
are
position,
bed or couch
a
grasp
Special
plate
recommended
may deflect
making
needle,
electrical
servicing
Do
NSTRUCTONS
only.
use
followed,
be
in.
and before
Watts.
15
immediately.
into
a
or
this
manual.
this
manual.
this
in
if
plug,
into
for
ventilation
Keep
accumulation
where
the
needle
oxygen
from
air
openings
cord.
around
to break.
manufacturer
it
to
in
the
changing
or
mentioned
whip when
Always
tub
injury
sewing
Use
is
it
water.
exami
outlet.
break.
needle
covers,
or
not
of
is
the
in
re
Page 11
4
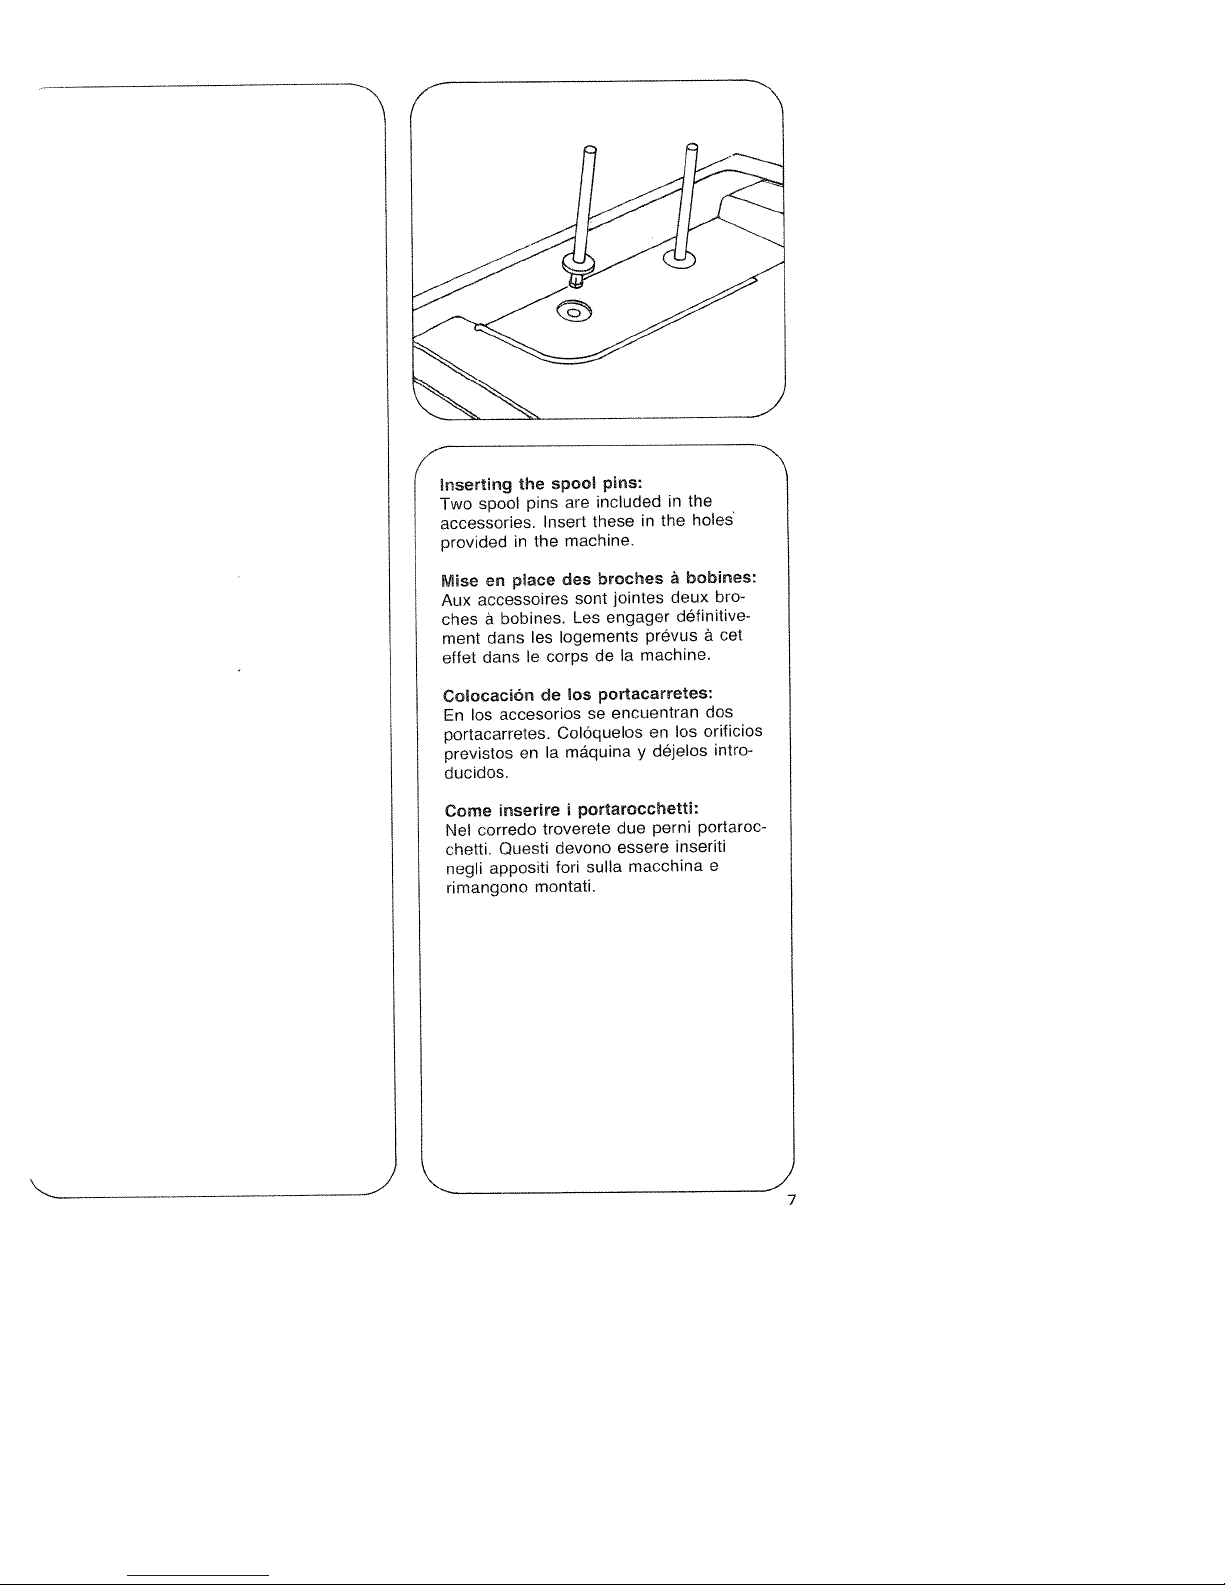
Inserting
Two
accessories.
provided
Mise
Aux
ches
ment
effet
Colocación
En
portacarretes.
previstos
ducidos.
the
spool
in
place
en
accessoires
bobines.
a
dans
dans
accesorios
los
en
pins
the
los
le
spool
Insert
corps
de
Ia
pins:
included
are
these
machine.
broches
des
jointes
sont
engager
Los
logements
de
portacarretes:
los
encuentran
se
Coloquelos
máquina
in
machine.
Ia
y
in
the
a
deux
prévus
en
déjelos
the
holes
bobines:
bro
definitive
cet
a
dos
oriticios
los
intro
Come
corredo
Nel
chetti,
appositi
negli
rimangono
inserire
Questi
portarocchetti:
troverete
devono
fori
montati.
sulla
due
essere
macchina
perni
portaroc
inseriti
e
7
Page 12
N
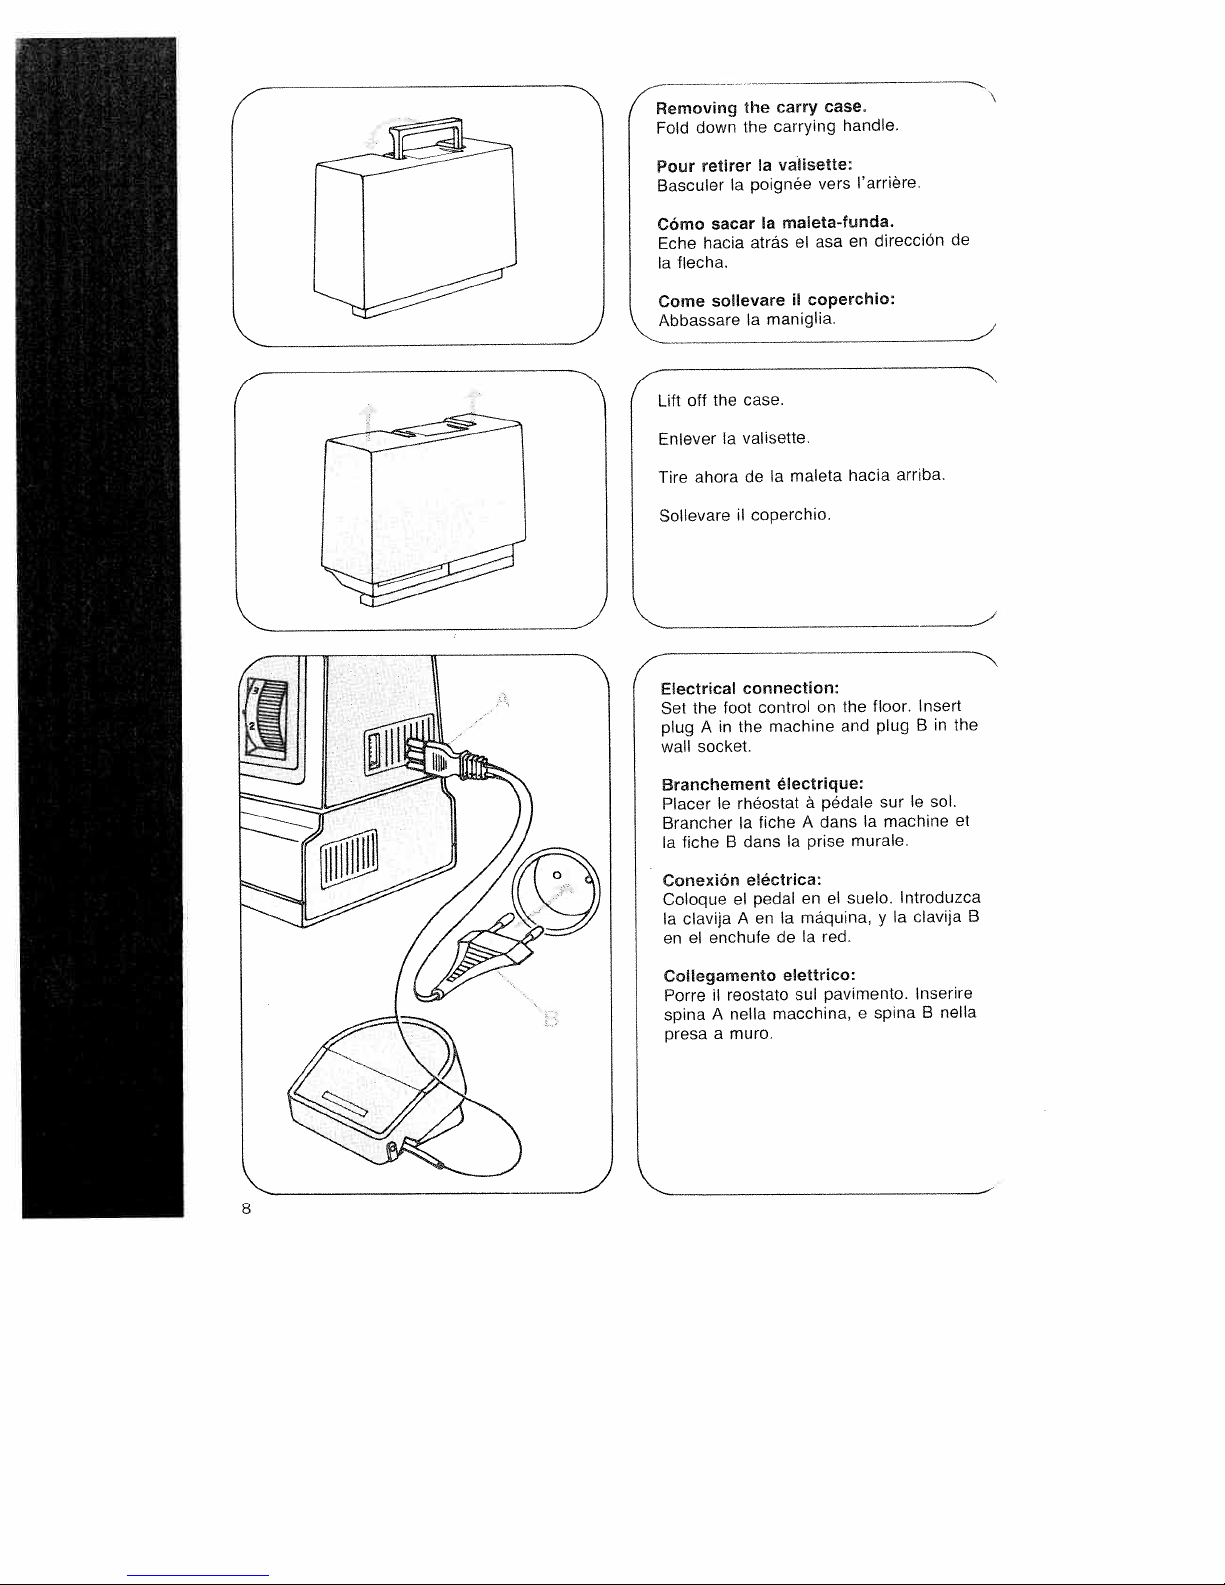
Removing
down
Fold
retirer
Pour
Basculer
Cómo
hacia
Eche
flecha.
Ia
Come
Abbassare
the
the
poignee
Ia
sacar
atrás
sollevare
Ia
carry
carrying
valisette:
Ia
maleta-funda.
Ia
el
coperchio:
II
maniglia.
vers
asa
case.
handle.
l’arrière.
direcciOn
en
de
t
4
the
off
Enlever
ahora
Tire
Sollevare
Electrical
Set
plug
wall
foot
the
in
A
socket.
Branchement
Ic
Placer
Brancher
fiche
Ia
Conexión
Coloque
clavija
Ia
enchufe
en
el
case.
valisette.
a
de
ii
coperchio.
connection:
control
the
rheostat
Ia
fiche
dans
B
eléctrica:
el
pedal
A
en
maleta
Ia
machine
electrique:
a
A
prise
a
en
máquina,
Ia
Ia
de
on
pédale
dans
el
red.
hacia
the
and
Ia
murale.
suelo.
arriba.
floor.
plug
sur
machine
lntroduzca
Ia
y
Insert
in
B
sol.
le
clavija
the
et
B
Collegamento
1
Porre
A
spina
a
presa
8
reostato
nella
muro.
elettrico:
sul
macchina,
pavimento.
spina
e
lnserire
nella
B
Page 13
support
left.
bobinage:
e
Ia
il
capot
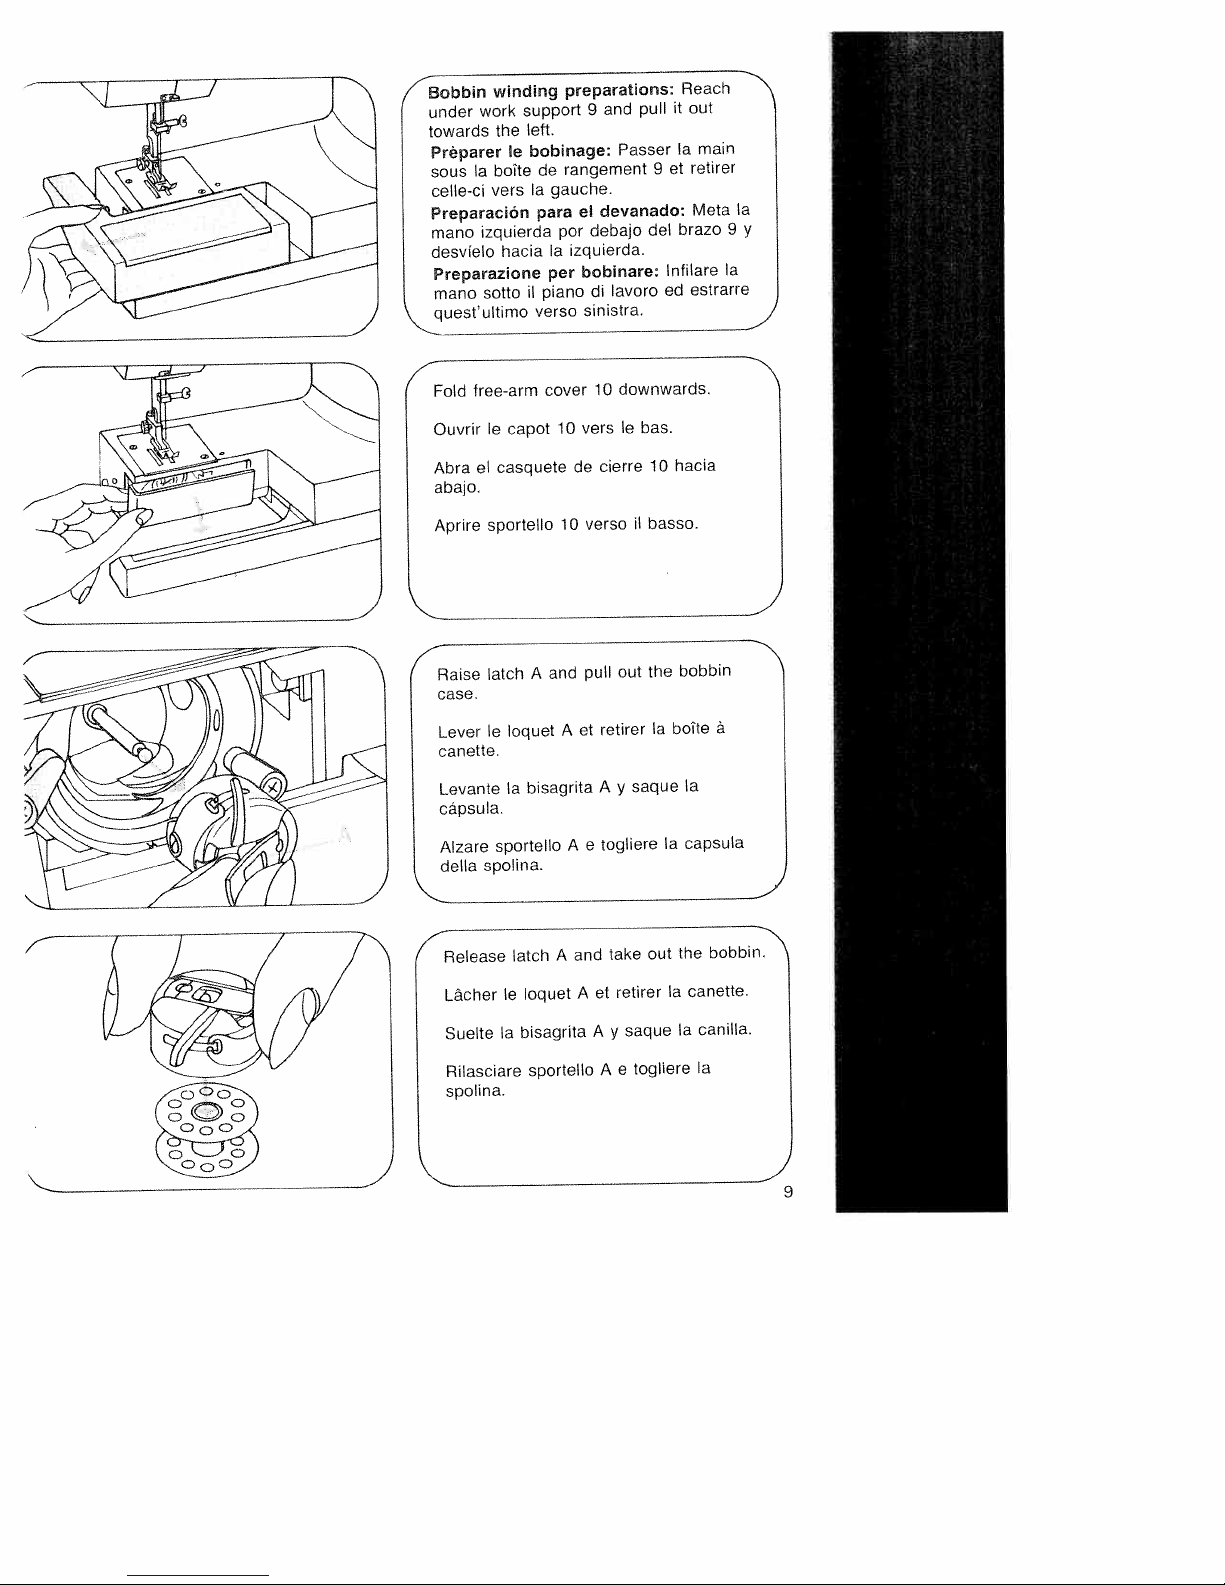
preparations:
rangement
de
gauche.
para
por
izquierda.
Ia
per
piano
verse
cover
10
10
and
9
devanado:
el
debajo
bobinare:
lavoro
di
sinistra,
10
vers
cierre
de
verse
Passer
downwards.
le
7’Bobbin
under
towards
Preparer
sous
celle-ci
Preparacion
mane
desvielo
N
a
winding
work
the
bolte
Ia
vers
zquierda
hacia
Preparazione
sotto
mano
questultimo
Fold
free-arm
le
Ouvrir
casquete
el
Abra
abajo.
sportello
Aprire
pull
bas.
il
et
9
del
Infilare
ed
10
basso.
Reach
it
out
Ia
brazo
hacia
main
retirer
Meta
estrarre
Ia
9
y
Ia
OQ
Raise
case.
Lever
canette.
Levante
cápsula.
Alzare
della
Release
Lâcher
Suelte
Rilasciare
spolina.
latch
loquet
le
Ia
sportello
spolina.
latch
le
Ia
and
A
hisagrita
A
loquet
bisagrita
sportello
out
retirer
A
y
togliere
take
retirer
et
A
y
e
A
the
saque
out
saque
togliere
Ia
boite
Ia
the
Ia
Ia
Ia
capsula
canette.
canilla.
Ia
pull
et
A
e
A
and
A
bobbin
N
a
bobbin.
)
9
Page 14
___________________
000
0
00
(Place
I
Placer
dévidoir.
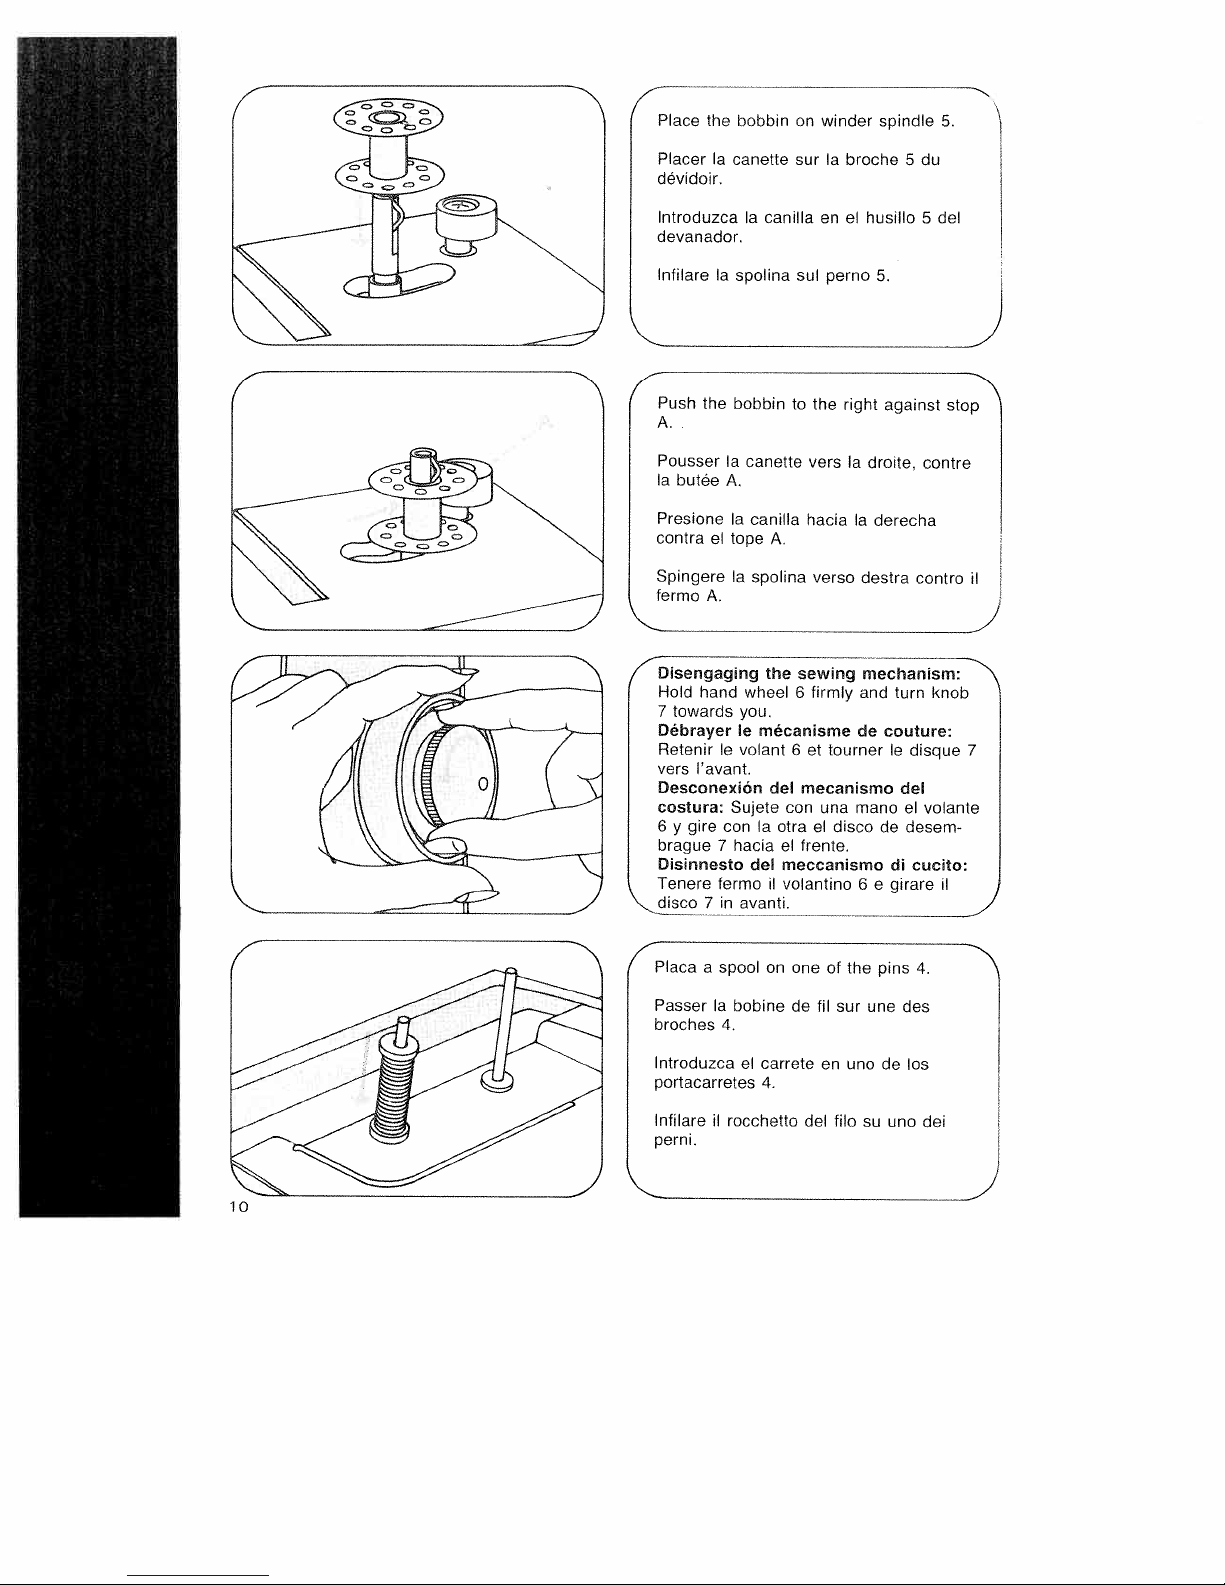
the
a
bobbin
canette
winder
on
surIabroche
spindle
5
___
5.
du
Introduzca
devanador.
Infilare
ush
I
7Thisengagrng
(
I
I
I
I
I
the
A.
Pousser
a
butée
Presione
contra
Spingere
fermo
Hold
hand
7
towards
Débrayer
Retenir
vers
‘avant.
Desconexión
costura:
6ygire
brague
Disinnesto
Tenere
canilla
a
a
spolina
bobbin
Ia
canette
A.
Ia
canilla
el
tope
Ia
spolina
A.
wheel
you.
le
mécanisme
le
volant
Sujete
conIaotra
7
haciaelfrente.
del
fermo
7hiavanh.
enelhusillo
sul
perno
to
the
vers
haciaIaderecha
A.
verso
the
sewing
firmly
6
6ettourner
del
mecanismo
con
una mano
el
meccanismo
il
volantino
right
a
destra
mechanism:
and
de
disco
6egirare
5.
against
droite,
turn
couture:
le
de
di
contro
disque
del
el
desem
cucito:
del
5
stop
contre
knob
volante
ii
il
7
10
4
laca
F
Passer
broches
lntroduzca
portacarretes
I
Infilare
perni.
a
spool
a
4.
ii
on
bobine
el
carrete
4.
rocchetto
one
de
del
of
pins
the
fil
sur
en
uno
fib
su
une
de
uno
4.
des
los
dei
Page 15
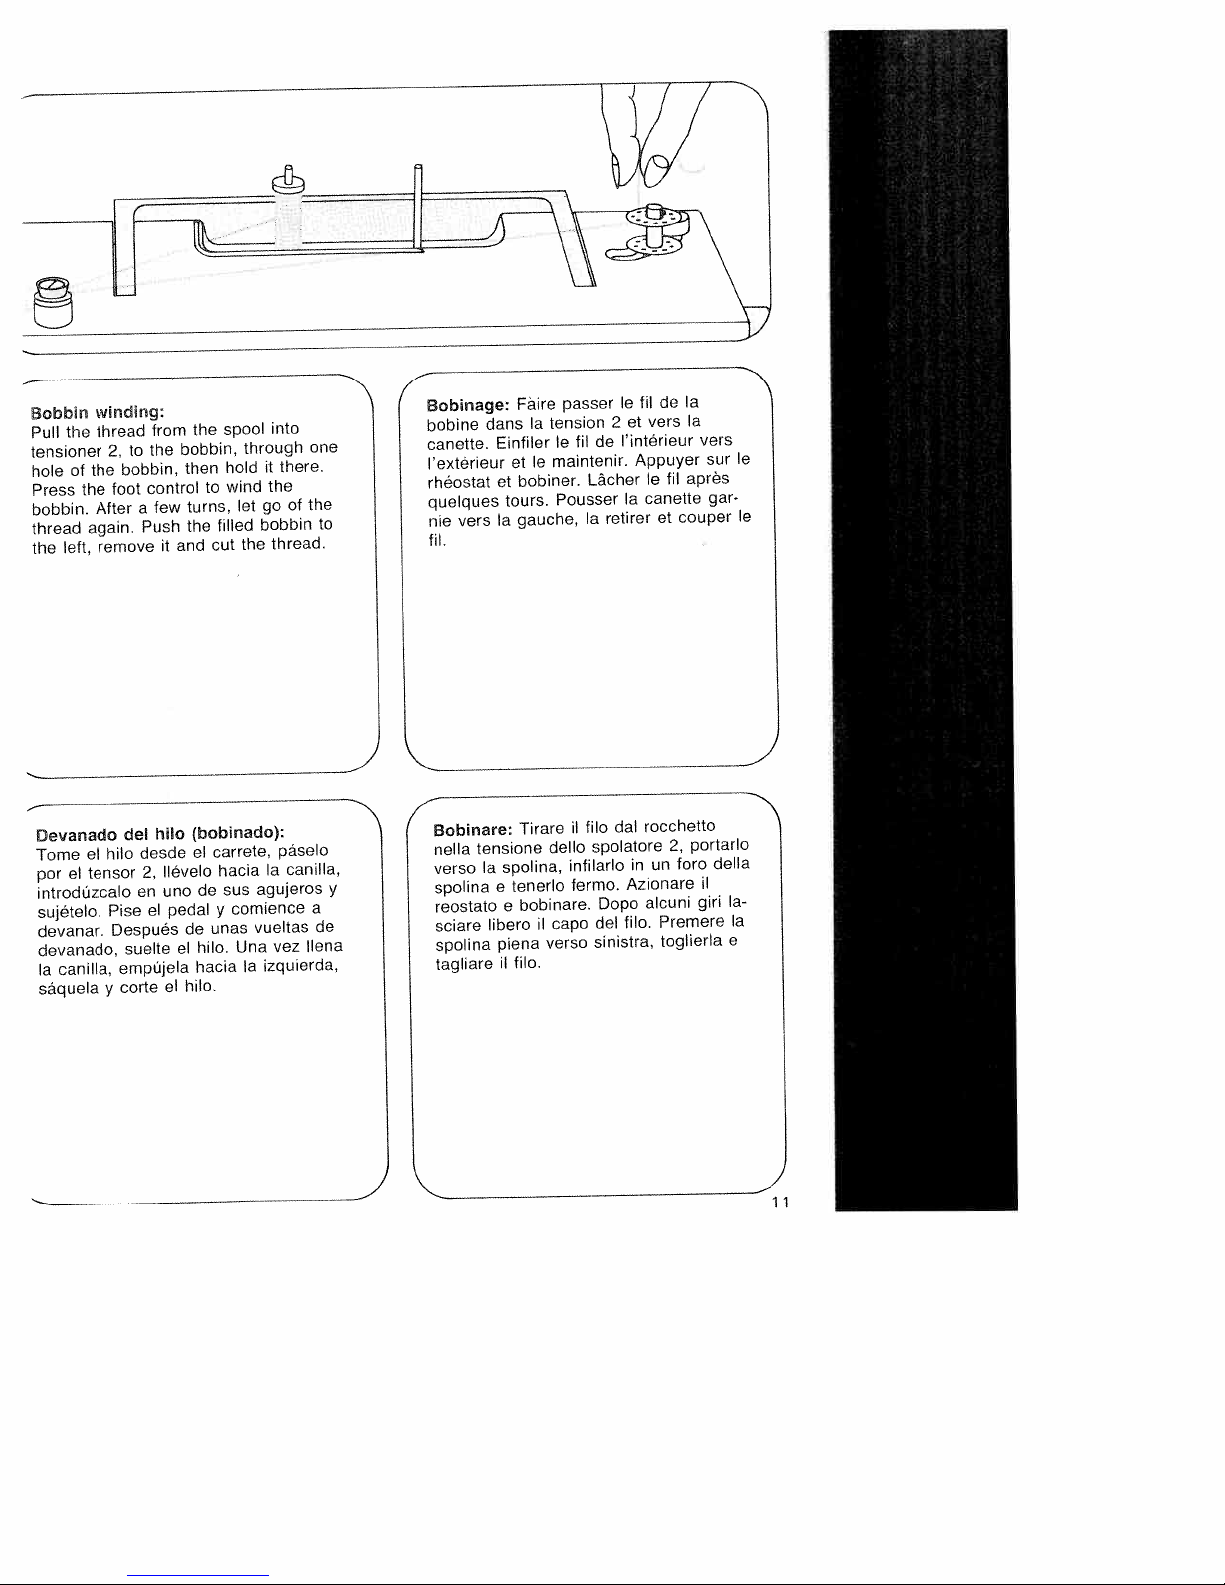
Bobbin
the
Pull
tensioner
of
hole
the
Press
bobbin.
again.
thread
left,
the
Devanado
el
Tome
tensor
el
por
introdüzcalo
sujételo.
devanar.
devanado,
canilla,
Ia
saquela
winding:
thread
to
2,
bobbin,
the
foot
After
remove
del
hilo
Pise
Después
suelte
empéjela
corte
y
from
the
control
few
a
Push
hUo
desde
2,
en
el
the
bobbin,
then
turns,
the
and
it
(bobinado):
el
llévelo
uno
pedal
de
el
hilo.
el
to
cut
carrete,
de
unas
hilo.
hacia
spool
through
hold
wind
let
filled
the
hacia
sus
comience
y
Una
Ia
into
there.
it
the
of
go
bobbin
thread.
páselo
canilla,
Ia
agujeros
vueltas
vez
izquierda,
one
the
a
de
lena
4
Bobinage:
bobine
canette.
l’extérieur
rheostat
quelques
to
y
nie
f
ii.
Bobinare:
nella
verso
spolina
reostato
sciare
spolina
tagliare
vers
tensione
dans
Einfiier
et
Ia
spolina,
Ia
e
libero
piena
il
Faire
Ia
le
et
bobiner.
tours.
gauche,
Tirare
tenerlo
bobinare.
e
fib.
tension
le
maintenir.
Pousser
delbo
il
capo
verso
passer
fil
Lâcher
Ia
fib
ii
infilarlo
fermo.
le
2
I’intérieur
de
Ia
retirer
dal
spolatore
Dopo
fib.
del
sinistra,
de
fil
vers
et
Appuyer
fil
le
canette
of
rocchetto
2,
un
in
Azionare
alcuni
Premere
toglierla
Ia
Ia
vers
après
couper
portarlo
fore
ii
girl
sur
gar
della
le
le
la
a
e
)
Page 16
4
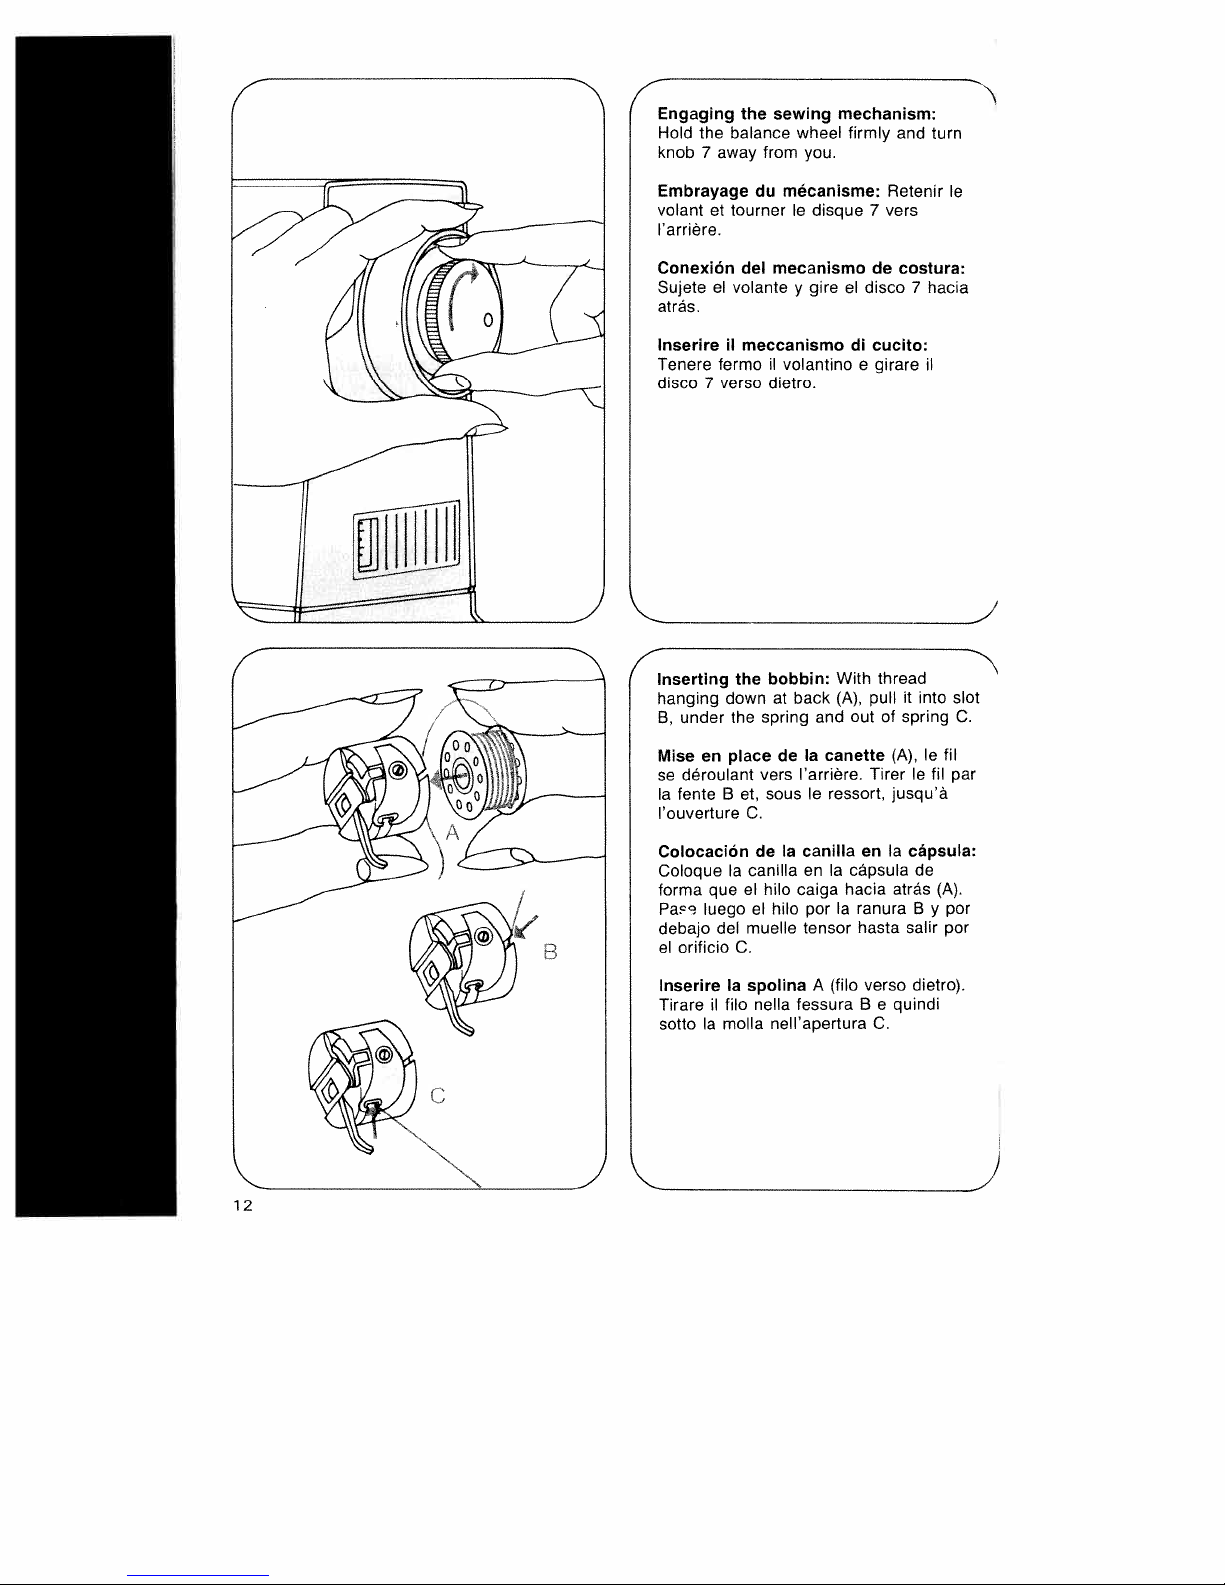
Engaging
Hold
knob7away
the
the
balance
from
sewing
wheel
you.
mechanism:
firmly
and
N
turn
Embrayage
volant
et
I’arrière.
Conexión
Sujete
el
atrás.
Inserire
Tenere
disco
Inserting
hanging
B,
Mise
se
Ia
l’ouverture
termoiivolantino
7
under
en
déroulant
fenteBet,
du
tourner
del
volante
ii
meccanismo
verso
dietro.
bobbin:
the
down
the
spring
place
vers
sous
C.
mécanisme:
le
disque
mecanismo
gire
y
at
back
and
canette
de
Ia
l’arrière.
ressort,
le
Retenir
7
vers
de
el
disco7hacia
di
cucito:
e
girare
With
thread
pull
(A),
of
out
(A),lefil
Tirerlefil
jusqu’a
costura:
II
into
it
spring
le
slot
C.
par
12
Colocación
Coloque
forma
que
Pas
luego
debajo
del
el
orificio
lnserire
Tirare
il
sotto
Ia
Ia
el
C.
Ia
fib
molla
Ia
de
canilla
hilo
el
hilo
muelle
spolina
nella
nell’apertura
canilla
en
caiga
por
tensor
A
fessura
enIacápsula:
a
capsula
hacia
ranura
Ia
hasta
(fib
verso
B
e
C.
de
atrás
B
salir
dietro).
quindi
y
(A).
por
por
Page 17
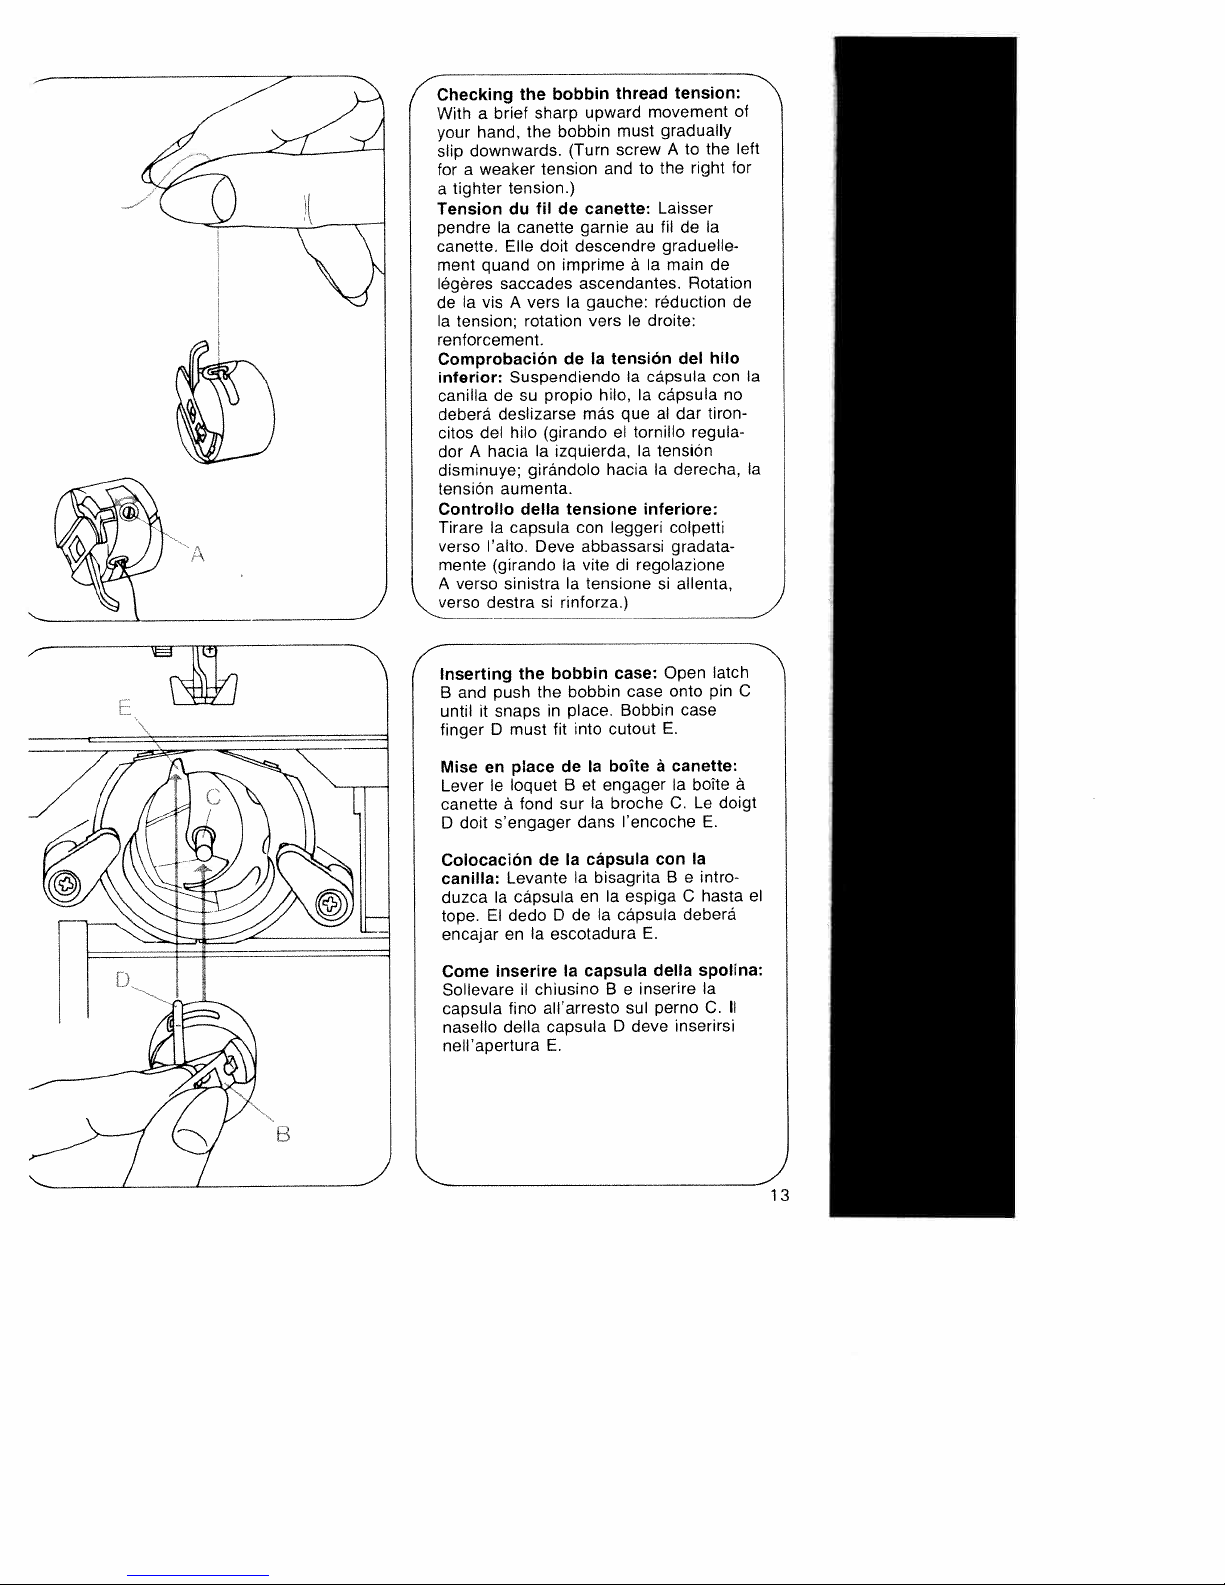
Checking
With
your
slip
for
tighter
a
Tension
pendre
canette.
ment
légères
de
Ia
tension;
renforcement.
Comprobación
inferior:
canilla
deberá
citos
dor
disminuye;
tensiOn
Controllo della
TirareIacapsula
verso
mente
verso
A
verso
Inserting
and
B
until
finger
the
sharp
brief
a
the
hand,
downwards.
a
weaker
tension.)
du
fil
canette
Ia
Elle
on
quand
saccades
Ia
A
vers
vis
rotation
Suspendiendo
su propio
de
deslizarse
hilo
del
Ia
hacia
A
girándolo
aumenta.
Deve
‘alto.
(girando
sinistraatensione
destra
the
the
push
snaps
it
must
D
bobbin
bobbin
(Turn
tension
de
doit
descendre
imprime
Ia
de
(girando
izquierda,
tensione
con
Ia
si
rinforza.)
bobbin
bobbin
place.
in
fit
into
thread
upward
must
screw
to
and
canette:
garnie
au
a
ascendantes.
gauche:
vers
le
Ia
tension
Ia
Ia
hilo,
que
más
tornillo
el
Ia
hacia
inferiore:
leggeri
abbassarsi
vite
regolazione
di
case:
case
Bobbin
cutout
tension:
movement
gradually
Atothe
right
the
Laisser
fil
de
graduelle
Ia
main
Rotation
reduction
droite:
del
cápsula
cápsula
al
dar
regula
tensiOn
Ia
derecha.
colpetti
gradata
si
allenta,
Open
onto
case
E.
Ia
de
hilo
con
tiron
latch
pin
of
left
for
do
Ia
no
a
)
C
canette:
Mise
en
le
Lever
canette
D
ColocaciOn
canilla:
duzca
tope.
encajar
Come
Sollevare
capsula
nasello
nell’apertura
doit
a
s’engager
Ia
El
en
inserire
della
place
loquet
fond
de
Levante
capsula
dedo
Ia
chiusino
il
allarresto
fino
Ia
de
et
B
sur
Ia
dans
cãpsula
Ia
bisagritaBe
Ia
en
D
de
escotadura
capsula
Ia
capsula
E.
a
bolte
engager
brocheC.Le
l’encoche
con
Ia
espiga
cápsula
Ia
E.
della
e
inserire
B
perno
sul
deve
D
Ia
bolte
E.
Ia
intro
hasta
C
deberã
spolina:
Ia
C.
inserirsi
a
doigt
el
II
B
J
13
Page 18
4
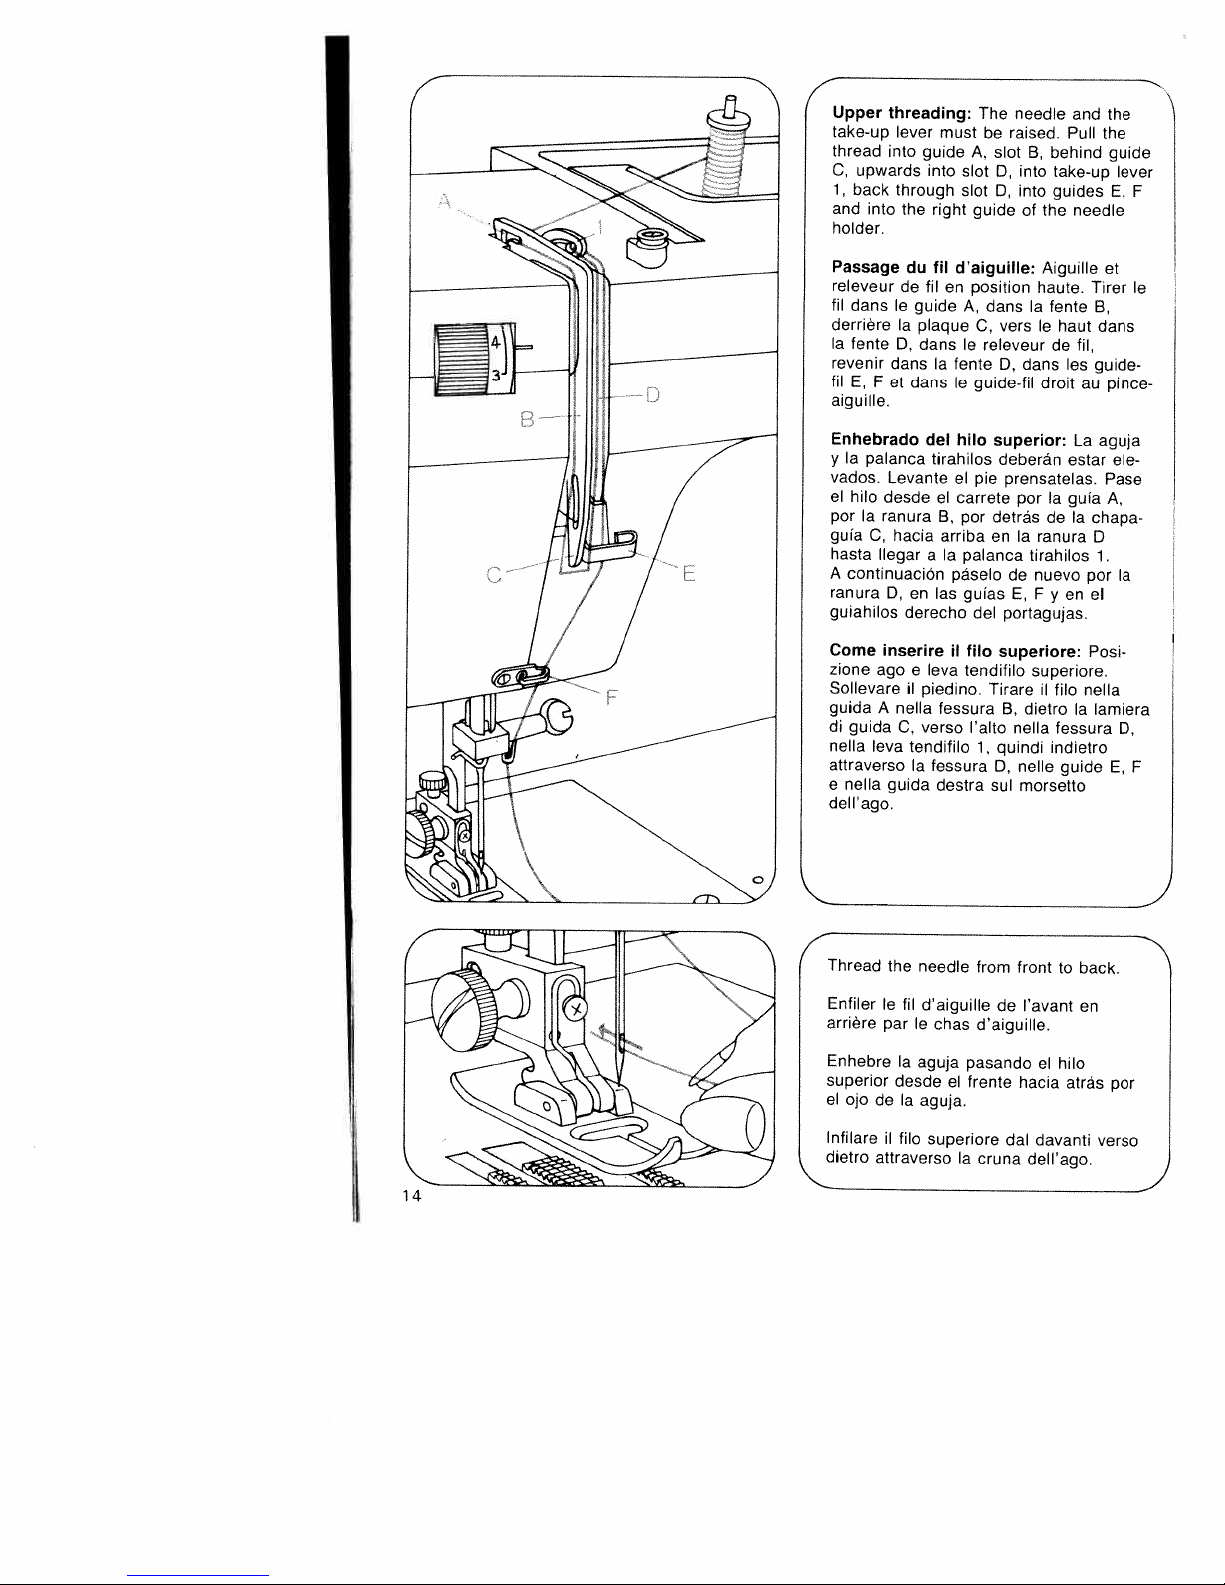
Upper
take-up
thread
upwards
C,
1,
back
and
holder.
threading:
lever
into
through
into
the
must
guide
into
right
A,
slot
slot
The
be
guide
slot
D,
D,
needle
raised.
B,
into
into
of
behind
take-up
guides
the
and
Pull
needle
the
the
guide
lever
E,
F
-
I
//
Passage
releveur
hI
dans
derriere
Ia
fente
revenir
fil
E,
F
aiguille.
Enhebrado
Ia
palanca
y
vados.
el
hilo
por
Ia
gula
C,
hasta
Ilegar
A
continuación
ranura
guiahilos
Come
zione
agoeeva
Sollevare
guida
A
guida
di
nella
leva
attraverso
nella
e
dell’ago.
du
de
le
Ia
D,
dans
et
Levante
desde
ranura
hacia
D,
derecho
inserire
II
nella
C,
guida
guide
plaque
dans
dans
en
tendifilo
Ia
iii
d’aiguille:
filenposition
A,
dans
C,
le
releveur
Ia
fente
guide-fil
le
del
hilo
el
el
carrete
B,
por
arriba
páselo
las
gulas
ii
fib
tendifilo
fessura
destra
superior:
pie
detrás
enIaranura
del
Tirare
lalto
1
quindi
D,
sul
tirahilos
aIapalanca
piedino.
verso
fessura
Aiguille
haute.
fente
Ia
vers
le
de
dans
D,
droit
deberán
prensatelas.
porIaguia
deIachapa
tirahilos
nuevo
de
E,
F
y
portagujas.
superiore:
superiore.
fib
1
dietro
B,
nella
fessura
indietro
nelle
morsetto
haut
Ill.
les
La
estar
en
guide
Tirer
au
por
el
Posi
nella
a
et
B,
dans
guide
pince
aguja
ele
Pase
A,
D
1.
Ia
lamiera
D,
E,
le
F
NN:
14
—2
\
\.
0
C
4
Thread
Enfiler
arrière
Enhebre
superior
el
ojo
Infilare
dietro
the
needle
fil
d’aiguille
le
le
par
Ia
aguja
desde
Ia
de
aguja.
il
fib
attraverso
chas
pasando
el
frente
superiore
Ia
front
from
de
d’aiguille.
hacia
dal
cruna
to
‘avant
el
hilo
atrás
davanti
dell’ago.
back.
en
N
por
verso
j
Page 19
the
stitch
are
fil
le
puntada
palanca
más
un
devono
Hold
hand
until
up.
of
the
le
Arrêter
haut.
en
haut
el
volante
alta.
del
Girare
punto.
verso
the
wheel
both
Pull
volant
a
tirahilos
hilo
essere
l’alto
right
out
il
thread:
bobbin
the
bobbin
soi
le
du
hallen
alto.
l’aiuto
up
thread
you
and
thread.
le
et
fil
el
frente
el
que
el
fermo
Ia
e
Tirare
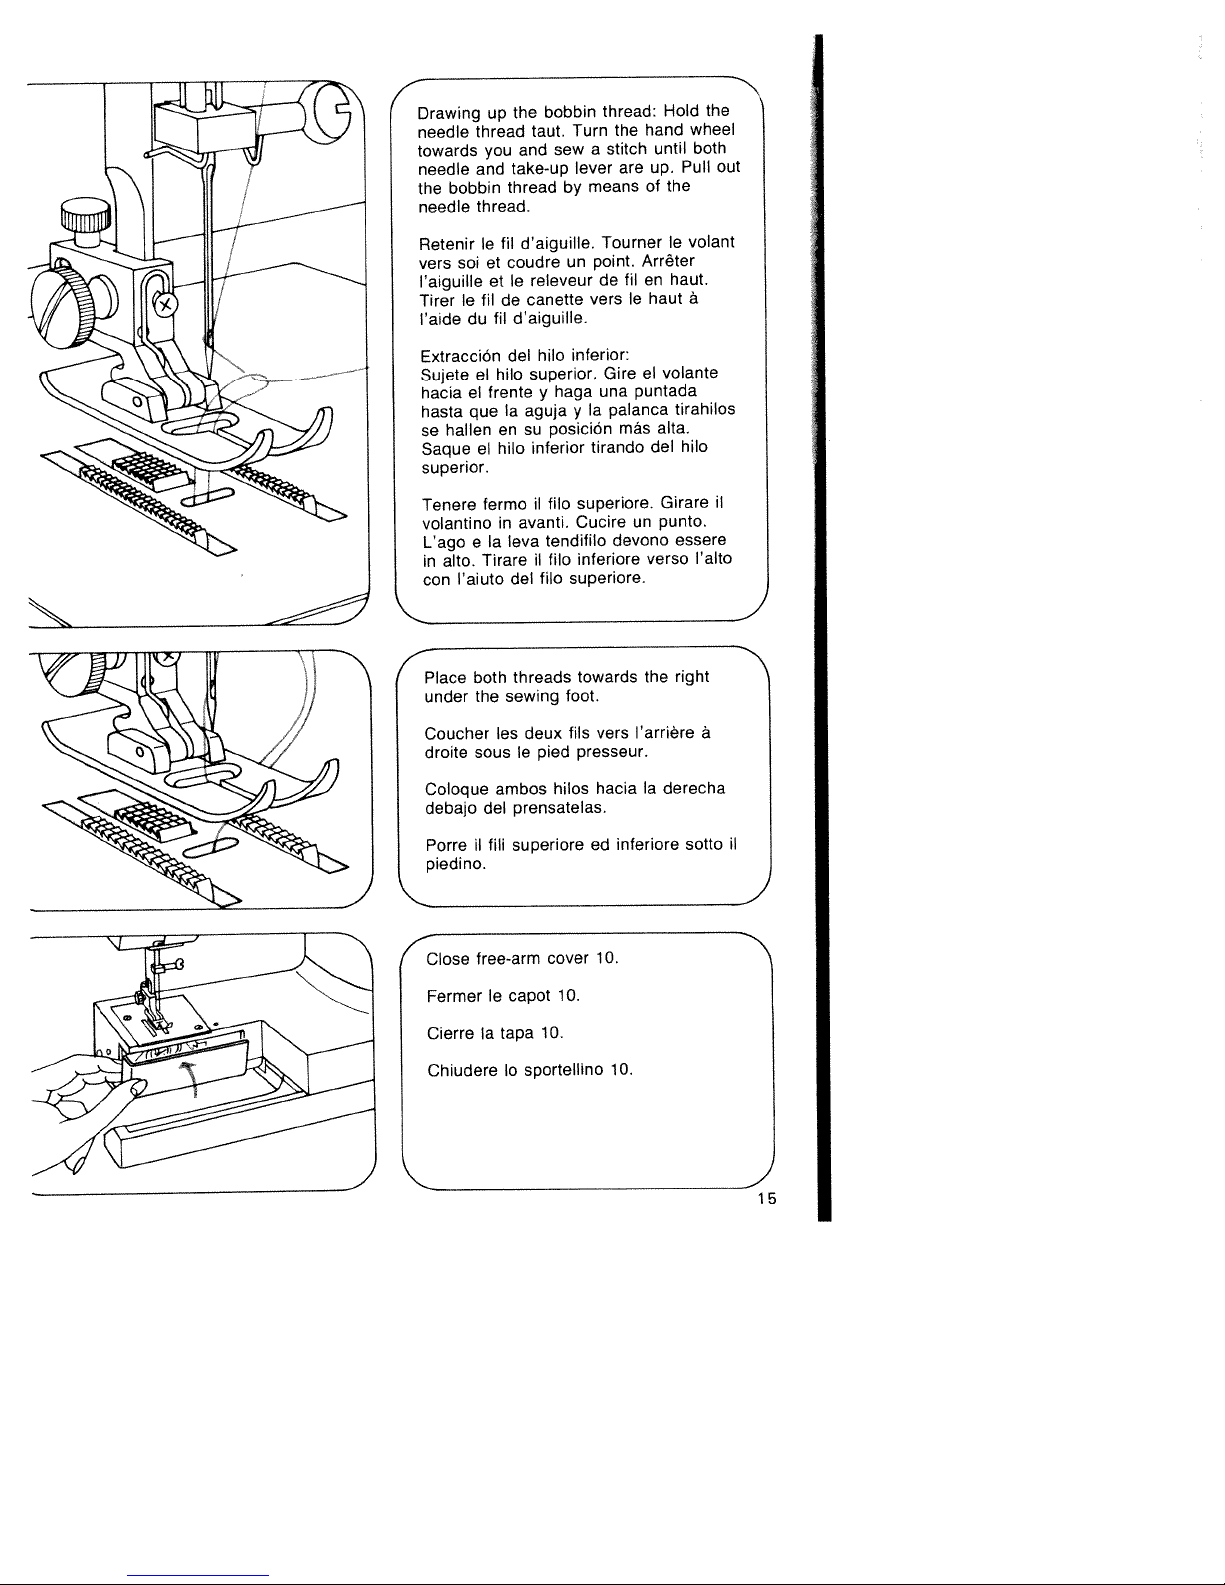
both
the
take-up
thread
fil
coudre
le
et
de
d’aiguille.
fil
del
hilo
a
en
hilo
in
leva
del
threads
sewing
taut.
sew
and
by
daiguille.
releveur
canette
hilo
superior.
haga
y
aguja
posiciOn
su
inferior
fib
il
avanti.
tendifilo
fib
Il
fib
Turn
a
lever
means
Tourner
point,
un
de
vers
inferior:
Gire
una
Ia
y
tirando
superiore.
Cucire
inferiore
superiore.
towards
foot.
Drawing
needle
towards
needle
the
needle
Retenir
vers
l’aiguille
(
/
o
Tirer
Extracción
Sujete
hacia
hasta
se
Saque
superior.
Tenere
volantino
L’ago
in
con
“ace
‘aide
under
the
Ia
derecha
sotto
a
il
vers
presseur.
hacia
inferiore
ed
10.
10.
l’arrière
—
if
‘
Coucher
droite
Coboque
debajo
Porre
piedino.
Close
Fermer
Cierre
Chiudere
les
sous
ambos
del
fili
1
superiore
free-arm
capot
le
Ia
tapa
bo
le
pied
hibos
prensatelas.
cover
10.
10.
sportellino
fils
deux
Page 20
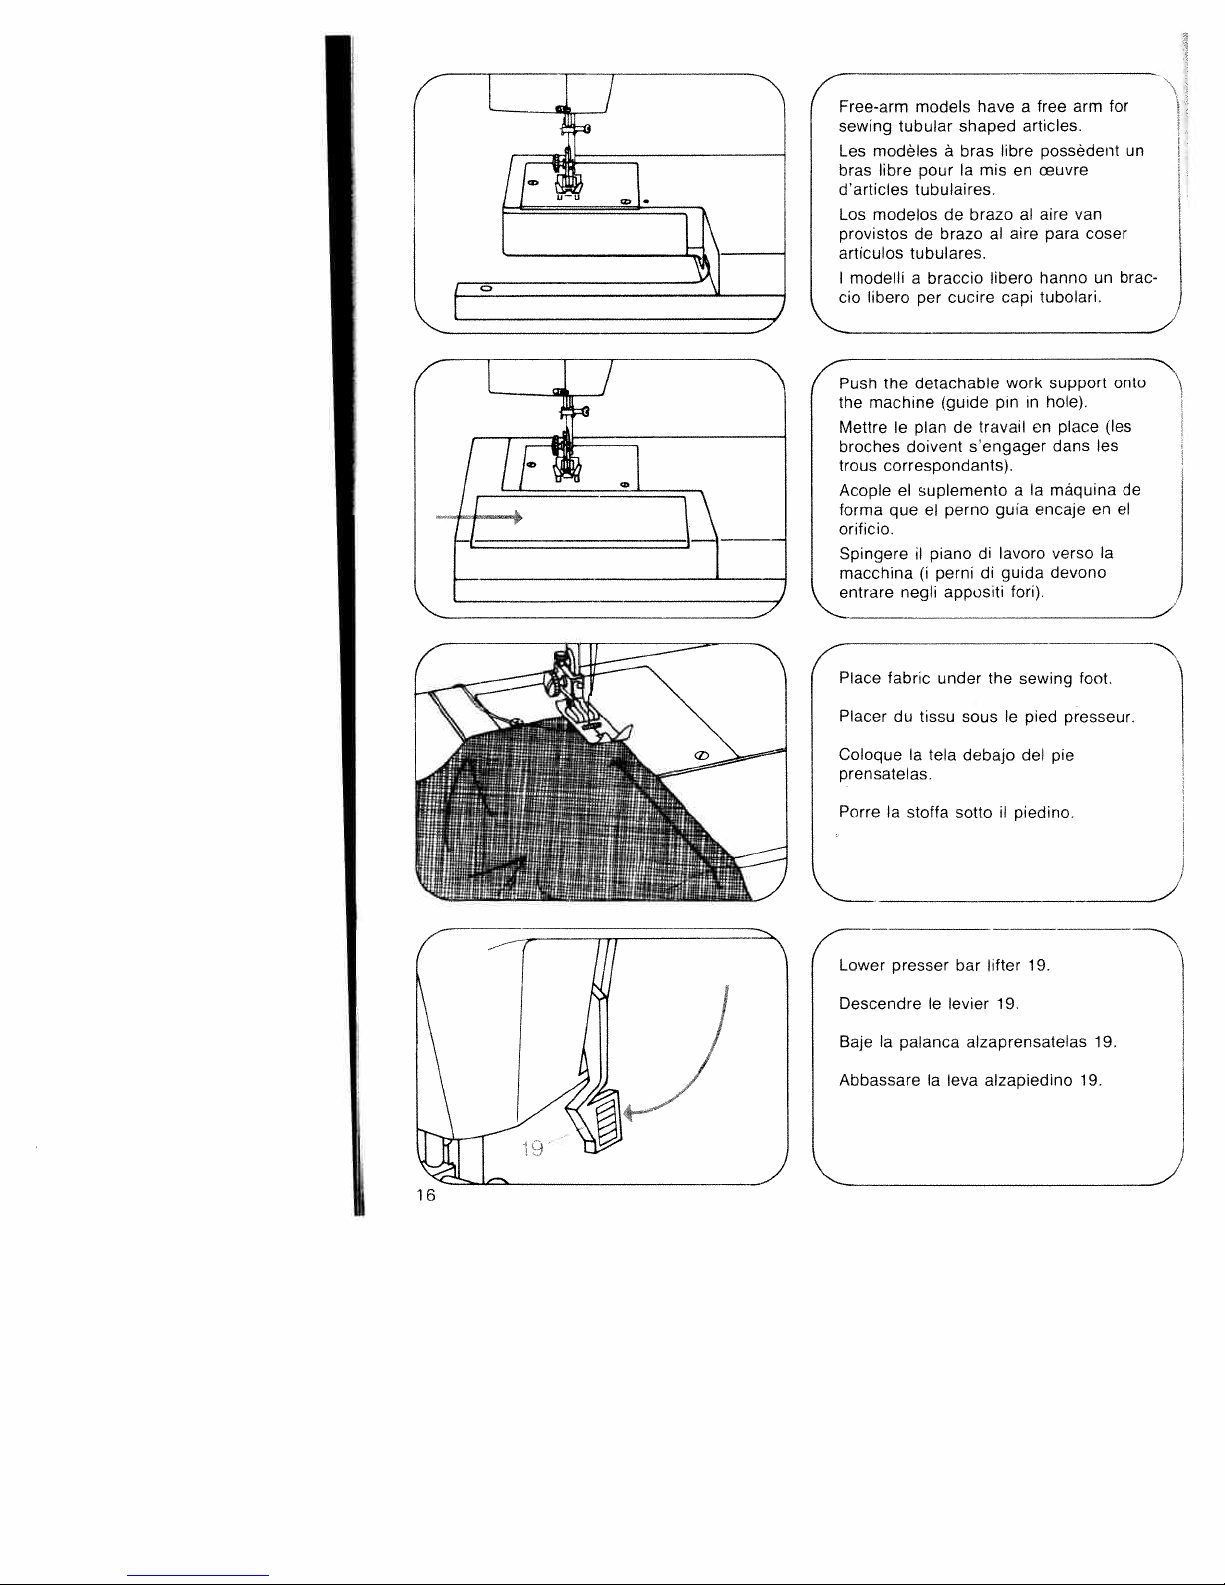
Free-arm models
sewing
bras
darticles
provistos
articulos
cio
Les
Los
I
modelli
tubular
modèles
libre
modelos
libero
a
pour
tubulaires.
de
brazo
de
tubulares.
braccio
a
per
have
shaped
bras
libre
Ia
mis
brazoalaire
al
libero
capi
cucire
a
articles.
en
aire
free arm
possedent
ceuvre
van
para
hanno
tubolari.
coser
un
for
un
brac
4
[/4j
+
4
Push
the
Mettre
broches
trous
Acopleelsuplemento
forma
orificio.
Spingere
macchina
entrare
Place
Placer
ColoqueIatela
prensatelas.
Porre
detachable
the
machine
plan
le
doivent
correspondants).
el
que
II
piano
(I
negli
fabric
du
tissu
Ia
stoffa
(guide
travail
de
sengager
perno
di
perni
di
appositi
under
souslepied
debajo
sotto
work
support
pininhole).
en
dans
maquina
a
Ia
encaje
guia
lavoro
verso
guida
devono
tori).
the
sewing
del pie
1
piedino.
place
en
foot.
presseur.
onto
les
les
de
el
Ia
4
lifter
Lower
presser
bar
19.
Descendre
BajeIapalanca
Abbassare
le
Ia
19.
levier
alzaprensatelas
alzapiedino
eva
19.
19.
Page 21
/Operating
press
you
machine
Abaisser
pedale
coudra
Accionamiento
profundo
velocidad
Ia
Premere
preme
in
runs.
sera
vite.
pedale.
il
the
the
pédale
Ia
abaissée.
pise
de
reostato.
II
foot
pedal
del
el
costura
pedal
piU
control:
down
rheostat.
du
plus
pedal:
tanto
de
PiU
veloce
the
Ia
Cuanto
Ia
fondo
a
cuce
The
fartherN
faster
machine
mayor
máquina.
Plus
si
Ia
the
Ia
más
será
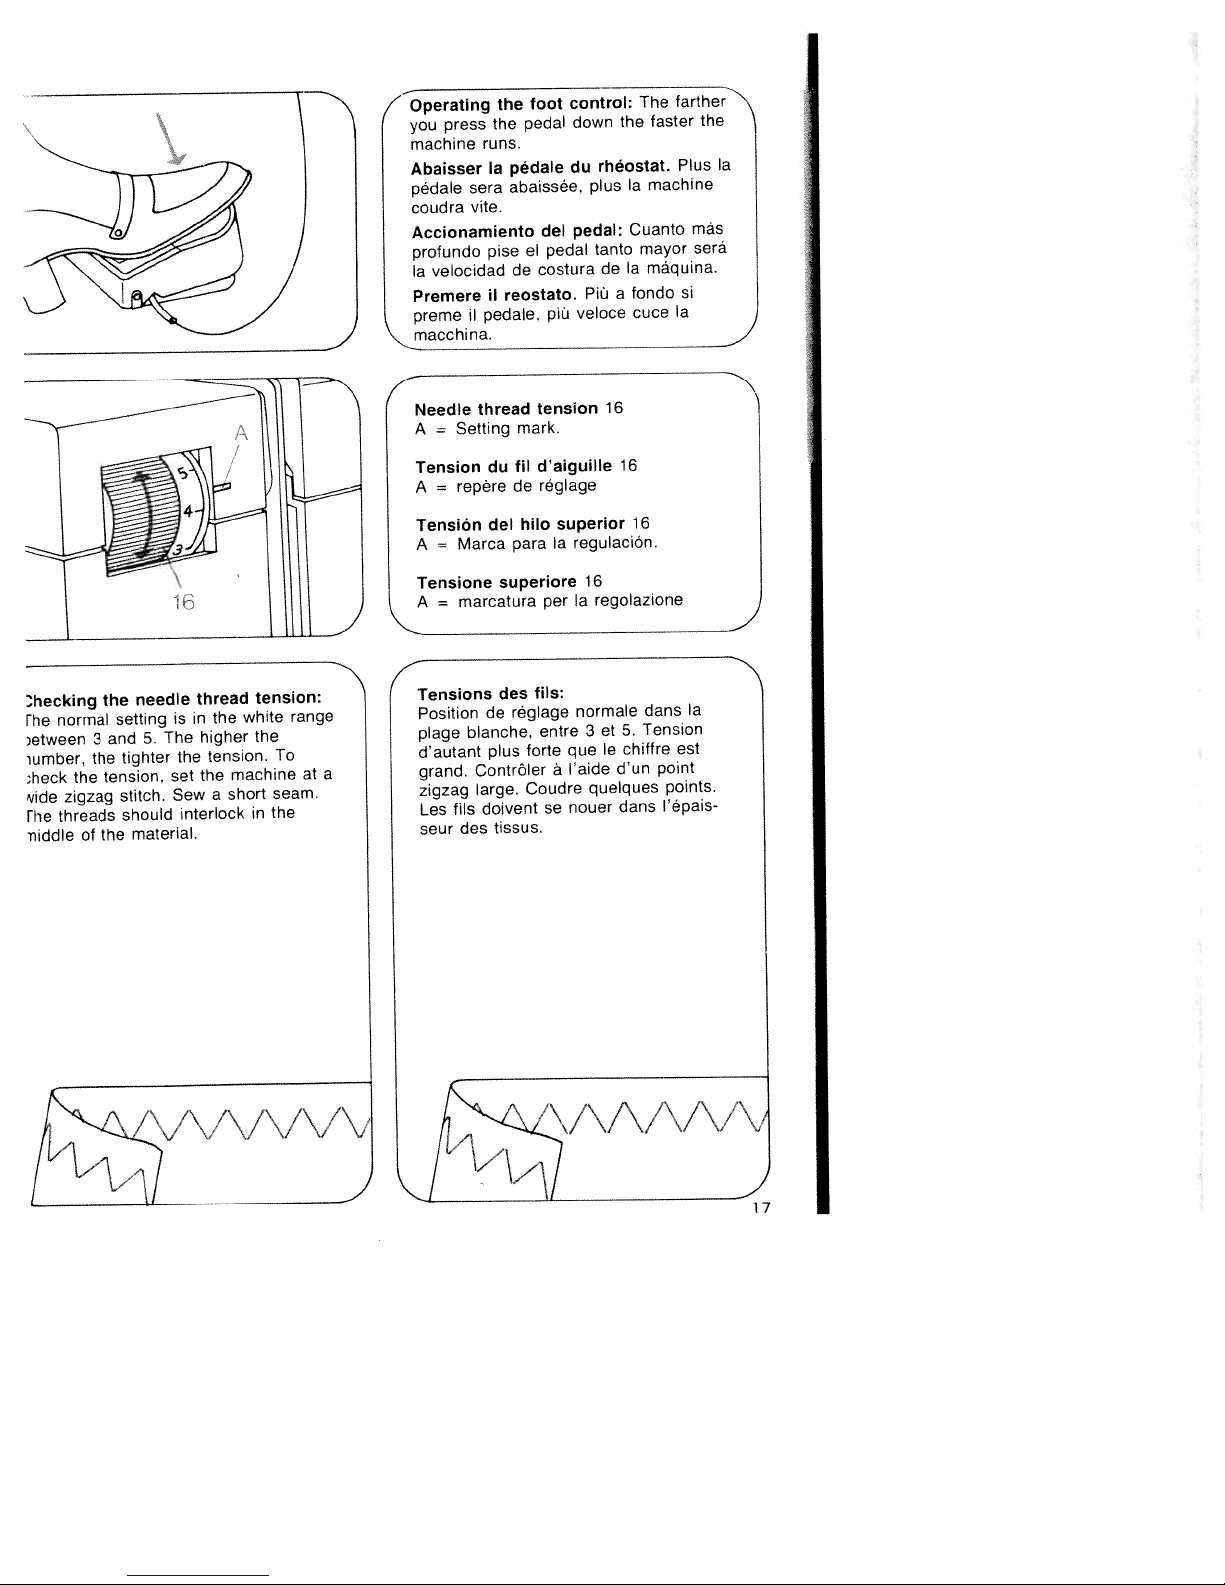
Theckng
normal
rhe
)etween
iumber,
Theck
zigzag
vide
threads
fhe
,iddle
the
3
the
of
the
setting
and
tighter
tension,
stitch.
should
material.
the
needle
The
5.
thread
in
is
higher
the
the
set
Sew
interlock
the
tension.
machine
short
a
tension:
white
the
in
To
seam.
the
range
at
f
superior
regulacion.
a
16
a
normale
3
que
‘aide
a
nouer
16
16
16
regolazione
dans
Tension
5.
et
chiffre
le
d’un
quelques
dans
Ia
est
point
points.
I’épais
du
de
del
para
superiore
des
reglage
de
plus
doivent
tissus.
tension
mark.
d’aiguille
fil
reglage
hilo
per
tils:
entre
forte
Coudre
se
=
thread
Setting
Needle
A
Tension
repere
=
A
Tension
Marca
=
A
Tensione
marcatura
=
A
N
4
Tensions
Position
blanche,
plage
dautant
ContrOler
a
grand.
zigzag
Les
seur
large.
fils
des
/VVWv
VA)
LI
Page 22
Comprobaciôn
regutaciOn
La
entre
blanca
nümera
el
La
comprobaciOn
ancha.
zigzag
Los
dentro
hitos
deberán
del
v1i/1
/
normal
3
y
tanto
Haga
material.
Ia
de
5.
mayor
se
quedar
\\J/’\
tension
se
Cuanto
será
hace
una
halla
con
costura
anudadas
\
más
Ia
del
Ia
en
alto
tension.
puntada
corta.
j\
hilo:
zona
/\,
sea
4
fib:
si
plU
jJ\/\
alto
It
del
trova
numero,
it
contralto
argo.
della
settore
net
Cucire
del
spessore
plU
viene
una
fill
/1
tensione
tensione
sara
con
cucitura.
avvenire
materiale.
della
Ia
to
normale
a
5.
tensione.
zig-zag
PiU
L’annodamento
centro
at
Contralto
La
biancoda3
forte
fatto
breve
deve
del
I’
/
4
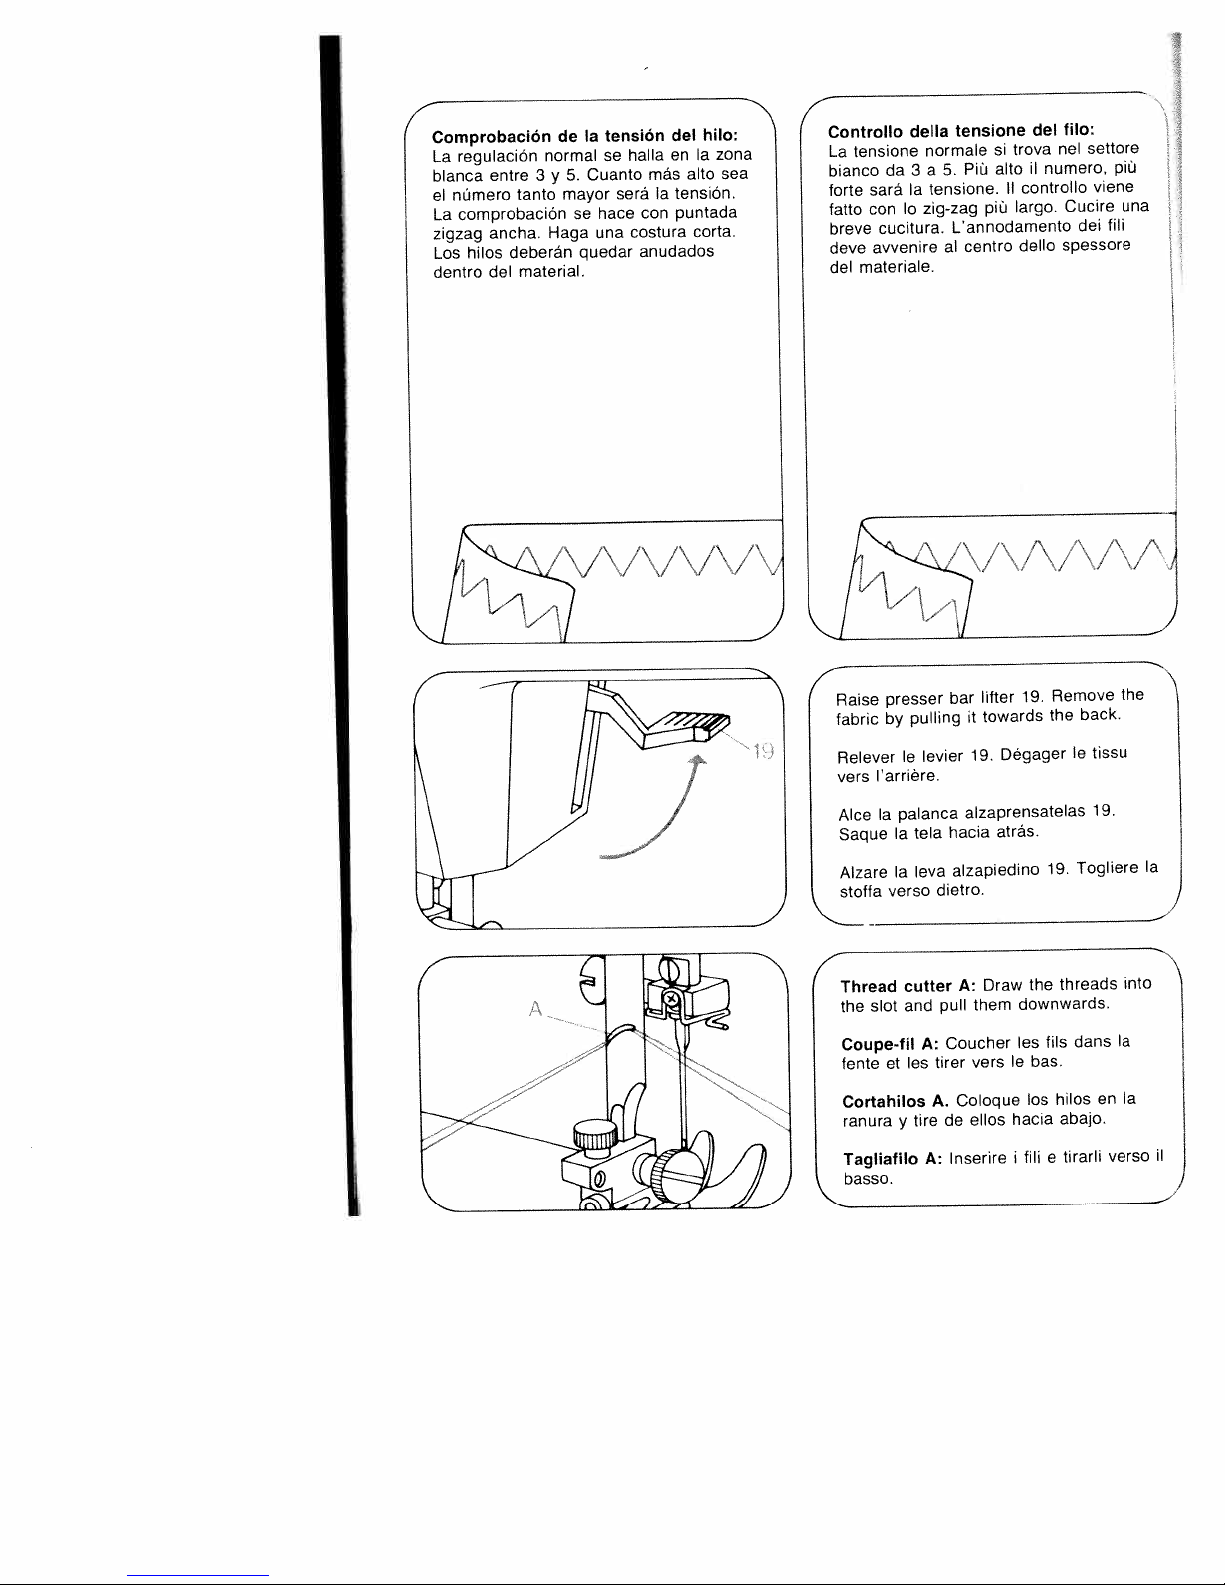
Raise
fabric
Relever
vers
Atce
Saque
Alzare
stoffa
presser
pulling
by
le
l’arrière.
palanca
Ia
tela
Ia
leva
Ia
versa
bar
levier
hacia
alzapiedino
dietra.
lifter
towards
it
19.
alzaprensatelas
4
Draw
A:
slot
et
cutter
and
les
tire
y
A:
firer
A.
A:
pull
Caucher
vers
Coloque
eltas
de
Inserire
them
Thread
the
—
Coupe-fil
fente
Cortahilos
ranura
Tagliafibo
basso.
19.
Degager
atrás.
the
downwards.
les
le
bas.
los
hacia
i
fill
Remove
the
19.
threads
fits
hilos
abajo.
e
back.
le
Togliere
dans
tirarti
tissu
19.
en
the
into
Ia
Ia
versa
Ia
II
/
Page 23
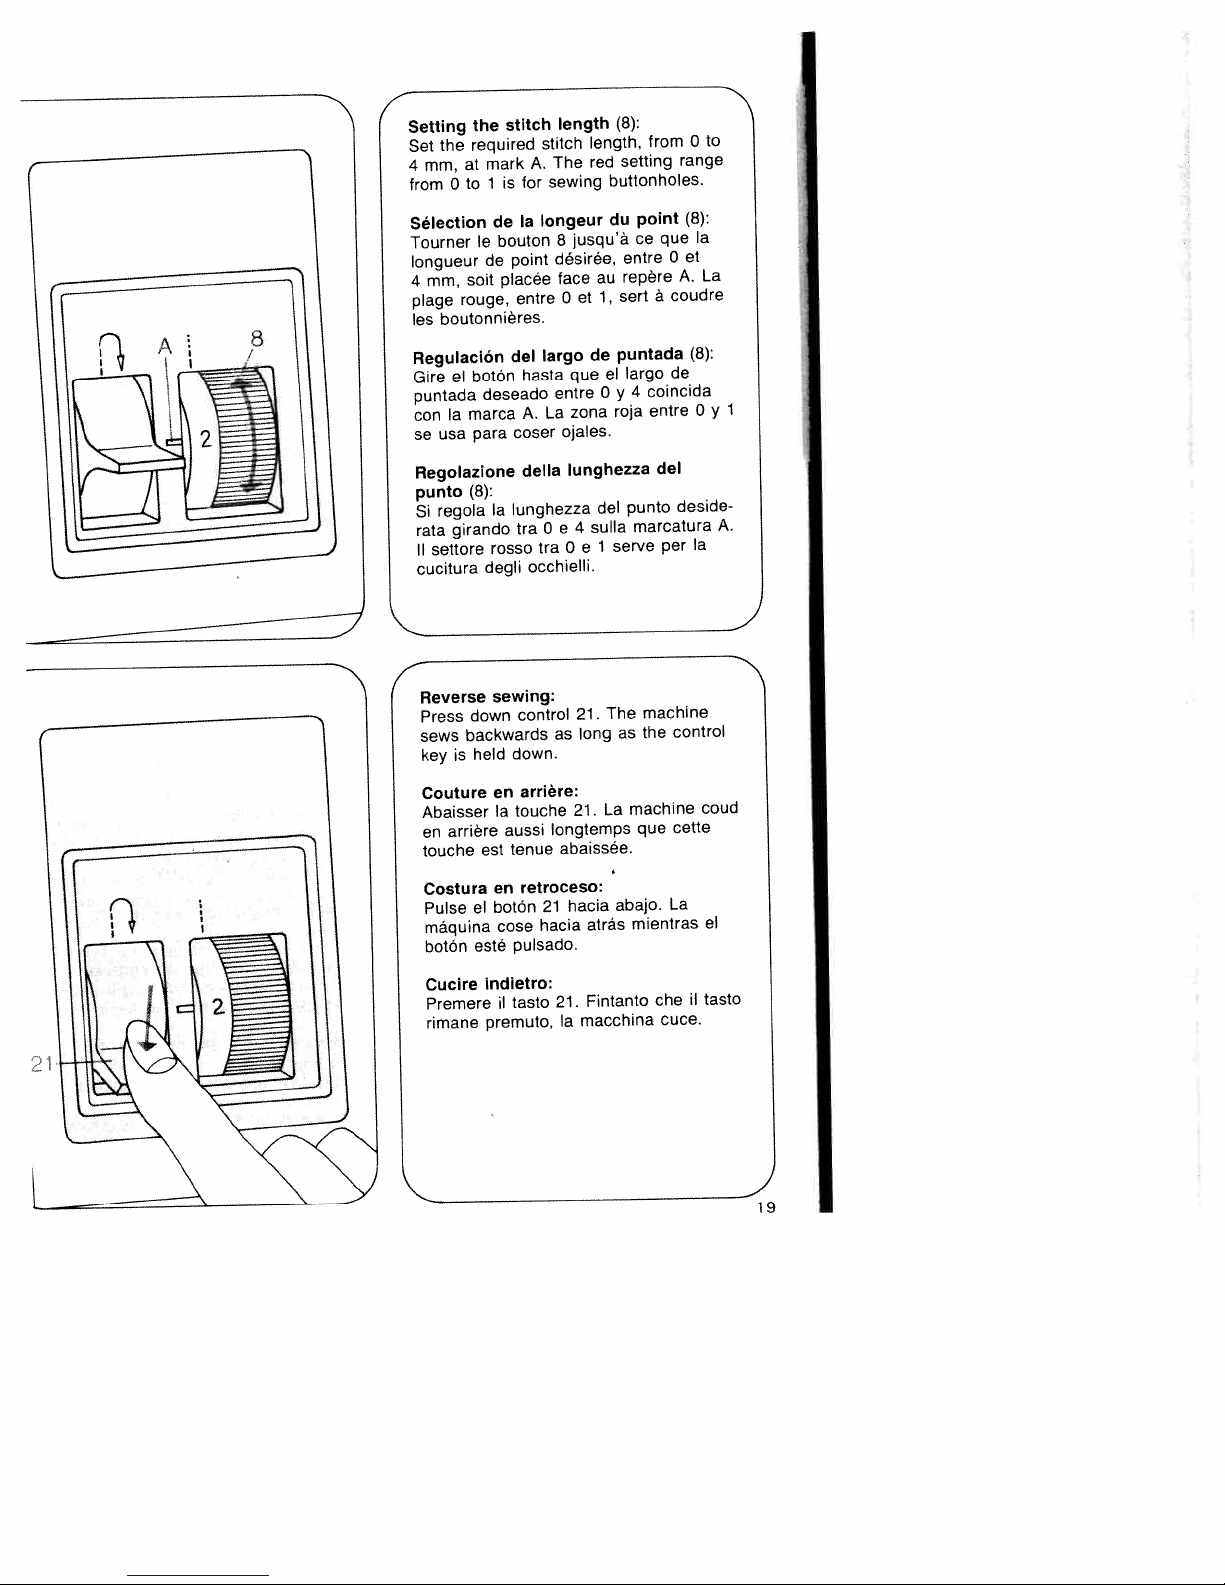
Setting
the
Set
mm,
4
0
from
Selection
Tourner
longueur
4
mm,
rouge,
plage
boutonnières.
es
Regulacion
el
Gire
puntada
Ia
con
usa
se
the
required
mark
at
1
to
de
le
de
soit
botón
deseado
marca
para
stitch
for
is
Ia
bouton
point
placée
entre
del
hasta
A.
coser
stitch
The
A.
sewing
longeur
désirée,
largo
entre
La
length
jusqu’à
8
face
et
0
quo
zona
ojales.
(8):
length,
setting
red
buttonholes.
du
entre
repère
au
sert
1,
puntada
de
largo
el
4
0
y
roja
from
point
que
ce
a
coincida
entre
0
range
(8):
et
0
A.
coudre
(8):
de
to
Ia
La
1
0
y
2
Regolazione
punto
regola
Si
rata
settore
II
cucitura
4
Reverse
Press
sews
key
Couture
Abaisser
en
touche
Costura
Pulse
maquina
botôn
Cucire
Premere
rimane
(8):
girando
down
backwards
held
is
arrière
est
el
esté
della
Iunghezza
Ia
tra
rosso
occhielli.
degli
sewing:
control
down.
arrière:
en
Ia
touche
aussi
tenue
retroceso:
en
botón
cose
pulsado.
indietro:
tasto
1
premuto,
Iunghezza
4
e
0
0
tra
21.
as
21.
Iongtemps
abaissée.
hacia
21
hacia
21.
Ia
del
sulla
serve
1
e
The
as
long
La
abajo.
atrás
Fintanto
macchina
del
punto
marcatura
per
machine
the
machine
que
La
mientras
che
cuce.
deside
Ia
control
coud
cette
1
A.
el
tasto
19
Page 24

sewing
For
lenght
stitch
Depending
stretch
turning
by
tened
coudre
Pour
sélecteur
ton
symbole
le
sur
Suivant
peut
tique
bouton
vers
coser
Para
que
hay
el
sobre
Girando
alargar
adaptarse
para
tejido
cucire
Per
bottone
ii
punto
seconda
A
gare
o
verso
stretch
control
on
stitches
control
the
turning
genre
le
être
vers
puntadas
colocar
simbolo
hacia
acortar
o
i
regolatore
simbolo
sul
del
accorciare
-
+
o
the
le
de
+
punti
Ia
can
point
S.
agrandi
ou
“+
tipo
stitches,
“S.
a
type
be
towards
towards
it
elastique.
8
point
S.
tissu.
de
raccourci
elásticas
regulador
el
S.
S.
hacia
o
‘
puntada
a
caracteristicas
las
a
flexi
per
S.
S.
stoffa
di
punto
1
manopola.
set
S.’
fabric,
of
lengthened
“i-
devra
point
le
rotation
par
par
de
“-“
elástica
occorre
lunghezza
Ia
si
flexi,
the
the
or
“
le
ètre
rotation
(stretch)
puntada
se
regolare
pub
girando
by
shor
bou
place
élas
du
puede
del
del
allun
4
Stitch
the
Turn
mark
stitch
For
Sélecteur
pour
rotation
Par
désiré
Tableau
Botón
Modelo
Gire
puntada
marca
pbginas
las
Bottone
modelli
nei
Portare
marcatura
Vedere
23.
22,
pattern
A.
es
face
selector
el
A.
required
pattern
de
modèles
au
des
307
botón
deseado
Véase
regolatore
307
motive
ii
A.
tabella
Ia
knob
points
du
repère
points,
de
22
stitch
table
307
bouton,
puntadas
de
forma
coincida
tabla
Ia
23.
y
desiderato
dei
20:
20
voir
dei
motivi
symbol
see
placer
A.
que
(for
page
pages
con
de
punti
model
to
22/23.
point
le
22.
20:
tipo
el
Ia
puntadas
20
sotto
pagina
a
307)
23.
de
en
Ia
Page 25

Model
Zigzag
Turn
For
knob
the
Stitch
Turn
For
turn
stitch.
For
309
and
the
sewing
22
right.
pattern
the
sewing
zigzag
stitch
buttonhole
desired
these
shown
as
desired
the
knob
pattern
stitch
stitches
setting
stitch
utility
23
table
in
to
the
knob
and
at
knob
mark
set
illustration
pattern
fancy
widest
the
pages
see
23
A.
setting
22
to
on
mark
stitches,
zigzag
22,
23.
4
Modèle
Sélecteur
boutonniere
Placer
Pour
23
Sélecteur
B.
Placer
Pour
points
le
Le
pages
coudre
comme
coudre
point
tableau
309
de
23
point
le
ces
le
de
motif
le
décoratifs,
zigzag
des
23.
22,
point
désiré
points,
montre
motif
désiré
points
es
le
points
zigzag
face
l’illustration.
22
sous
regler
large.
plus
est
et
au
régler
le
utilitaires
bouton
le
reproduit
de
repére
le
repere
et
A.
bouton
B.
les
22
sur
Modelo
Botón
el
Gire
deseada
Para
ajustarse
Ia
en
Botón
Gire
puntada
B.
Para
tivas,
deberá
más
tabla
La
paginas
selector
botOn
coser
figura
selector
botón
el
coser
el
ancho.
309
coincida
estas
botón
el
de
deseado
puntadas
botón
estar
de
22
de
forma
de
puntadas,
Ia
de
forma
de
selector
colocado
puntadas
23.
y
zigzag
Ia
con
como
23
derecha.
puntadas
coincida
utilitarias
se
que
marca
que
de
sobre
y
deberá
se
con
zigzag
halla
ojales
puntada
a
(22).
el
el
A.
muestra
de
tipo
marca
Ia
decora
y
(22)
zigzag
las
en
(20).
Modelli
Bottone
occhielli
Portare
marcatura
cucire
Per
regolare
figura
nella
Bottone
Portare
catura
ricamo
regolatore
massimo.
Vedere
23.
22,
309
regolatore
23:
punto
1
A.
questi
bottone
il
destra.
regolatore
motivo
il
Per
B.
occorre
per
tabella
Ia
desiderato
punti
23
desiderato
cucire
regolare
zig-zag
Jo
dei
dello
come
del
i
motivi
zig-zag
necessario
é
motivi
punti
1
22
sotto
si
sotto
utili
bottone
sullo
pagina
a
e
Ia
mostra
22:
Ia
cia
e
zig-zag
per
mar
21
Page 26

Symbol/Symbole
Simbolo/Simboli
Stitch
pattern
table
Tableau
des
points
c::
\yt\/vVvA
1J
tAAi
‘
It!
vv
jLJ\,
I..
Sira
Straight
Zigzag
Straight
Zigzag
Buttonhole
Honeycomb
Elastic
ght
St
stitch
triple
triple
Elastic
Stitch
mrddte
teh
olt
stitch
blind
needs
stretch
stretch
symf
seam
stitch
stitch
position
range
position
stitch
stitch
Point
P0
St
Point
Triple
Triple
Symboles
Point
Point
Point
droit
posit
position
drot.
Pot
couture
point
de
zigzag
nid
invisible
on
medians
gatiche
zigzag
point
zigzag
boutonniere
piqué
dabeille
elastique
droit
nt
tricot
‘\[\[
\
\\
IlHII1IjjIlI
-_
•9IHIlIhIJ
111111
I’ll’’
h1
22
Shell-edging
-
Overlock
Fancy
Fancy
Fancy
Fancy
-
stitch
stitch
stitch
stitch
stitch
stitch
Point
cocotte
I
Point
overlock
Point
fantaisie
I
Point
tantaisie
Point
fantaisie
Point
fantaisie
-
Page 27

Tabla
reco
o
recto
triple
triple
Simbolos
Punto
de
Puntada
posicion
poscon
Punto
Punto
extensible
Punto
extensible
Costura
nido
puntadas
ceotra
zqterda
zigzag
recto
(stretch)
zigzag
(stretch)
para
elástica
de
a
de
de
ojales
abaja
pontasa
a
puntada
La
Punto
Porno
Settore
Cucitura
Cucitura
Simboli
tabella
dritto
dfrtto
tripla
Punto
Punto
posoore
posrzon
dello
tripla
per
nido
punti
del
ago
zig-zag
diritta
zig-zag
a
l’occhiello
elastico
dape
centro
sastra
flexi
flexi
hobby
Modelos
307
hobby
309
Punto
Puntada
)rdes
nto
invisible
Punto
en
de
Punto
Punto
Punto
Punto
pullover
para
forma
sobrehilar
de
de
de
de
elástico
remate
de
(overlock)
adorno
adorno
adorno
adorno
de
choncha
invisibile
Punto
Punto
Punto
Punto
Punto
j
Punto
Punto
Punto
elastico
pullover
conchiglia
Overlock
ornamentale
ornamentale
ornamentale
ornamentale
23
Page 28

needle
‘Changing
(System
Loosen
Push
towards
Tighten
Remplacement
(système
Desserrer
f
Engager
talon
serrer
Cambio de
—
(sistema
Afloje
duzca
atrãs)
the
130/705
A.
screw
needle
the
back)upas
the
screw.
the
130/705
vis
Ia
laiguille
l’arrière)
vers
Ia
vis.
Ia
aguja
130/705
el
tornillo
a
nueva
hastaeltope.
H):
out
Take
its
(with
de
l’aiguille
H):
Aetretirer
neuve
jusquá
H):
Saque
A.
(lada
aguja
Apriete
the
flat
far
(le
Ia
needle.
side
it
will
as
l’aiguille.
méplat
Ia
butée
aguja.
pIano
el
tornillo.
facing
go.
du
et
Intro
hacia
>___
Sostituziorie
(sistema
Allentare
ago
dietro)
130/705
vite
nuovo
fino
Dropping
free-arm
Open
Push
the
drop-feed
disengaged,
Abaissement
le
Ouvrir
en
en
capot
position
position
couture.
Ocultación
a
Ah-i
tapa10del
Corriendo
B,
pasa
a
transportador;
el
oculto
Abbassare
sportello
Aprire
l’abbassamento
spostare
verso
dell’ago
A.
(parte
fondo.
in
the
andtoB
de
C
B
del
palanca
Ia
posiciOn
Ia
trasporto:
ii
H):
Togliere
piatta
Fissare
feed:
cover
10.
control
again
griffe:
Ia
bras
10
du
=
griffe
escamotée;
griffe
en
=
transportador:
brazo
hacia
normal
Spostare
10.
verso
C
=
posizione
B
lago.
del
fusto
Ia
to
C
for
libre.
position
aire,
al
C.
queda
corriéndola
para
il
cursore
=
abbassato,
Inserire
verso
vite.
=
sewing.
Levier
cucito.
feed
levier
hacia
coser.
per
24
Page 29

Changing
sewing
the
Changement
Enfoncer
libérée.
est
Cambio
rojo
botOn
Sostituzione
bottocino
disinnesta.
Attaching
in
levier
bar
slots
en
presser
reposition
fits
Mise
le
semelle
s’emboite
Colocación
palanca
tiempo
mismo
puente
el
que
Applicazione
premistoffa
leva
maniera
scanalatura
sewing
the
push
foot,
Ia
de
bouton
le
prensatelas:
pie
del
prensatelas
El
A.
piedino:
del
A.
rosso
sewing
the
and
lifter
sewing
the
C.
de
place
du
de
aizaprensatelas
pied
manière
dans
del
presseur
es
pie
prensatelas
el
encaje
8
del
e
perno
II
che
C.
foot:
the
semelle
rouge
piedino
II
foot:
the
at
foot
semelle:
Ia
que
rainures
prensatelas:
piedino:
inserire
si
B
To
red
du
A;
Se
Premere
same
so
et
létrier
posicione
y
Ia
en
ii
innesti
release
button
pied:
semelle
Ia
Pulse
suelta.
si
Lower
time
stud
that
Abaisser
deplacer
B
C.
Baje
forma
de
ranura
Abbassare
piedino
nella
A.
el
the
B
Ia
Ia
al
C.
a
in
E
Hole
attaching
the
is
et
F
D
bord.
semelle.
E
D
y
tijar
para
E
e
D
lineale.
supporto
and
sewing
servent
vis
La
sirven
el
servono
E
del
screw
an
soporte
e
edge
toot
a
fixe
F
para
per
vite
Ia
piedino.
D
guide,
holder
fixer
le
fijar
ii
di
used
are
l’étrier
support
gulas.
prensatelas.
del
fissaggio
fissagglo
while
srew.
for
guide
de
F
del
per
screw
sirve
F
Il
25
Page 30

4
Sewing
Ordinary
1
foot
Clear-view
2
feet
(standard
sewing
foot
accessories)
Blindstitch
3
Zipper
4
foot
foot
9R694
:4O7fl()
standards):
Semelle
a
poser
fermeture
glissiere
normales)
Prensatelas
puntada
Prensatelas
cremalleras
piedino
invisibile
punto
piedino
cerniere
pour
a
para
invisible
para
per
per
normale
point
a
(accessoires
4
(accesorios
3
4
normale):
3
4
presseurs
Pieds
1
Semelle
Semelle
2
transparente
Semelle
3
invisible
2
)
Pies
prensatelas
1
Prensatelas
normal
Prensatelas
2
transparente
Piedini
1
piedino
normale
piedino
2
trasparente
(corredo
26
4
Accessory
open
To
cover
Compartiment
Lever
travail
couture.
de
Compartimento
Abriendo
encuentra
accesorios.
Scomparto
Sollevare
lavoro
accessori.
accessory
work
of
couvercle
le
pour
9
9.
Ia
Sotto
compartment:
compartment
support
accessoires:
a
dans
accéder
para
del
tapa
accessori:
per
coperchio
trova
si
para
espacio
1
9.
plan
le
accessoires
aux
accesorios:
suplemento
colocar
piano
del
posto
per
de
di
raise
9
gIl
se
Page 31

Page 32

r
)
—
0
C
D
1
4-.
Topstitching:
Sewing
Stitch:
Edge
all
Fitting
Push
secure
guide
ching
With
to
stitch
either
making
along
(Fig.
and
guide
sewing
edge
can
margin
the
sew
parallel
follows
the
E).
accurate.
foot:
feet.
edge
the
guide
in
it
be
edge
parallel
parallel
preceding
The
Ordinary
clear-view
guide
straight
can
A
position
adjusted
various
for
guide
lines
to
the
an
lines
seam
(special
be
guide
A
through
edge
thus
sewing
foot
stitch
used
with
to
attached,
stitches
of
edge.
(Fig.
of
stitches
line
made
foot
edge
and
accessory):
nearly
with
B
hole
C.
screw
desired
the
applications.
of
The
D)
stitches
is
it
or
guide
or
runs
looks
or
and
The
easy
to
when
stit
neat
4
Surpiquage:
Pied
Point:
Le
les
Fixation
Glisser
Ia
guide
droit
qüres
bords.
(fig.
le
toujours
presseur:
guide-droit
presseurs.
pieds
du
le
guide
C.
Suivant
vis
guide-droit
l’écartement
sur
facilite
parallelesetle
faisant,
Ce
ou
D)
nette
presseur
pied
a
pied
et
glas
(accessoire
droit
point
convient
A
guide-droit:
par
A
‘application,
considérablement
bien
(fig.
Ia
et
reguliere.
surpiquage
bord
le
piqure
E).
semelle
guide-droit
special)
presque
a
trou
le
désiré.
du
précédente
couture
La
normal
en
et
B
regler
Le
les
tissu
ou
plexi
tous
serrer
le
guide
surpi
des
suit
sera
-I
Page 33

Pespunteados:
Prensatelas:
Puntada:
La
con
Fijación
(accesorio
Pase
con
alustar,
deseada.
pueden
paralelas
casos,
guia
casi
el
borde
anterior
E).
(fig.
costuras
marginal
todos
de
guia
a
tornillo
segUn
coser
Ia
(fig.
en
De
Normal
guia
Ia
especial)
Punto
A
los
guia
Ia
especial):
par
A
La
C.
labor,
Ia
a
ayuda
Con
con
pespuntes
a
marcha
gula
a
a
D)
el
caso
torma
esta
impecables.
o
marginal
recto
puede
pies
el
guia
toda
to
argo
de
el
transparente,
emplearse
prensatelas.
aguero
se
a
a
a
de
facilidad
canto.
at
to
a
de
costuras
obtienen
se
(accesorio
B
y
puede
distancia
guia
costuras
En
del
argo
costura
Ia
paralelas
fijela
se
tales
4
Lavori
y
Piedino:
Punto:
lineale
II
piedini.
Fissaggio
Passare
fissarlo
neccessità
desiderata.
parallele
(fig.
cedente
barra
direzione
corretta.
di
piedino
sparente
(accessorio
con
oppure
D)
del
impuntura:
diritto
punto
pUO
si
A
l’ne&e:
del
II
lineale
vite
Ia
puô
si
facile
E’
usando
E)
(fig.
lineale
della
normale
e
usare
A
C.
regolare
lineale.
1
cucitura
Ia
devono
parallela
cucitura
o
lineale
opzionale)
con
attraverso
seconda
A
eseguire
coincidere
sara
piedino
guida
di
quasi
ii
distanza
Ia
cuciture
II
bordo
paraltela
piedino.
at
cosi
foro
della
sempre
tra
tutti
pre
con
i
e
B
Ia
La
)
29
Page 34

__
Elastic blind
Sewing
Tension:
Thread:
Stitch:
Stitch
Needle:
foot:
length:
Howtoregulate
penetration:
the
sewing
fabric
blindstitch
adjust
needle
the
the outer
left
side
prepared
runs
edge
fabric
(Figs.Cand
test
Place
stitch
outer
the
to
that
of
the
sewing
a
material.
stitch:
blindstitch
needle
thread
slack.
little
ordinary sewing
elastic
blind
3—4
size70or 80
needle
the
hem
foot.
ewing
guideBso
usingapiece
crease
The
along
edge
foot.
picksuponly
when
foot
tension
thread
stitch
under
the
lineofthe
guideBof
Turn
fartothe
one
penetrating
D).
First
waste
of
blind-
screw
thread
make
left
on
4
—
\9
4
Point
invisible
Pied
a
presseur:
Tension:
Fil:
Point:
Longueur
point:
Aiguille:
Reglage
Poser
l’ourlet
points
invisibles.
extérieur
points
A
reglage
gauche
gauche,
extérieur
d’abord
chute
invisibles.
A,
do
do
do
deIajetee
prepare
longe
déplacer
sorte
no
saisisse
(fig.
CetD).
une
couture
tissu.
elastique:
Pied
a
points invisibles
Fil
d’aiguille moms
Fil
a
coudre
Point
invisible
4
3
a
Grosseur
du
point:
souslepied
cassure
La
Ia
butée
Bdupied
A
‘aide
Ia
butéeBvers
quo
l’aiguille,
qu’un
Réaliser
d’essai
élastique
70ou80
du
deIavis
au point
fildutissu
tout
sur
tendu
a
tissu
a
de
Ia
une
J
30
Page 35
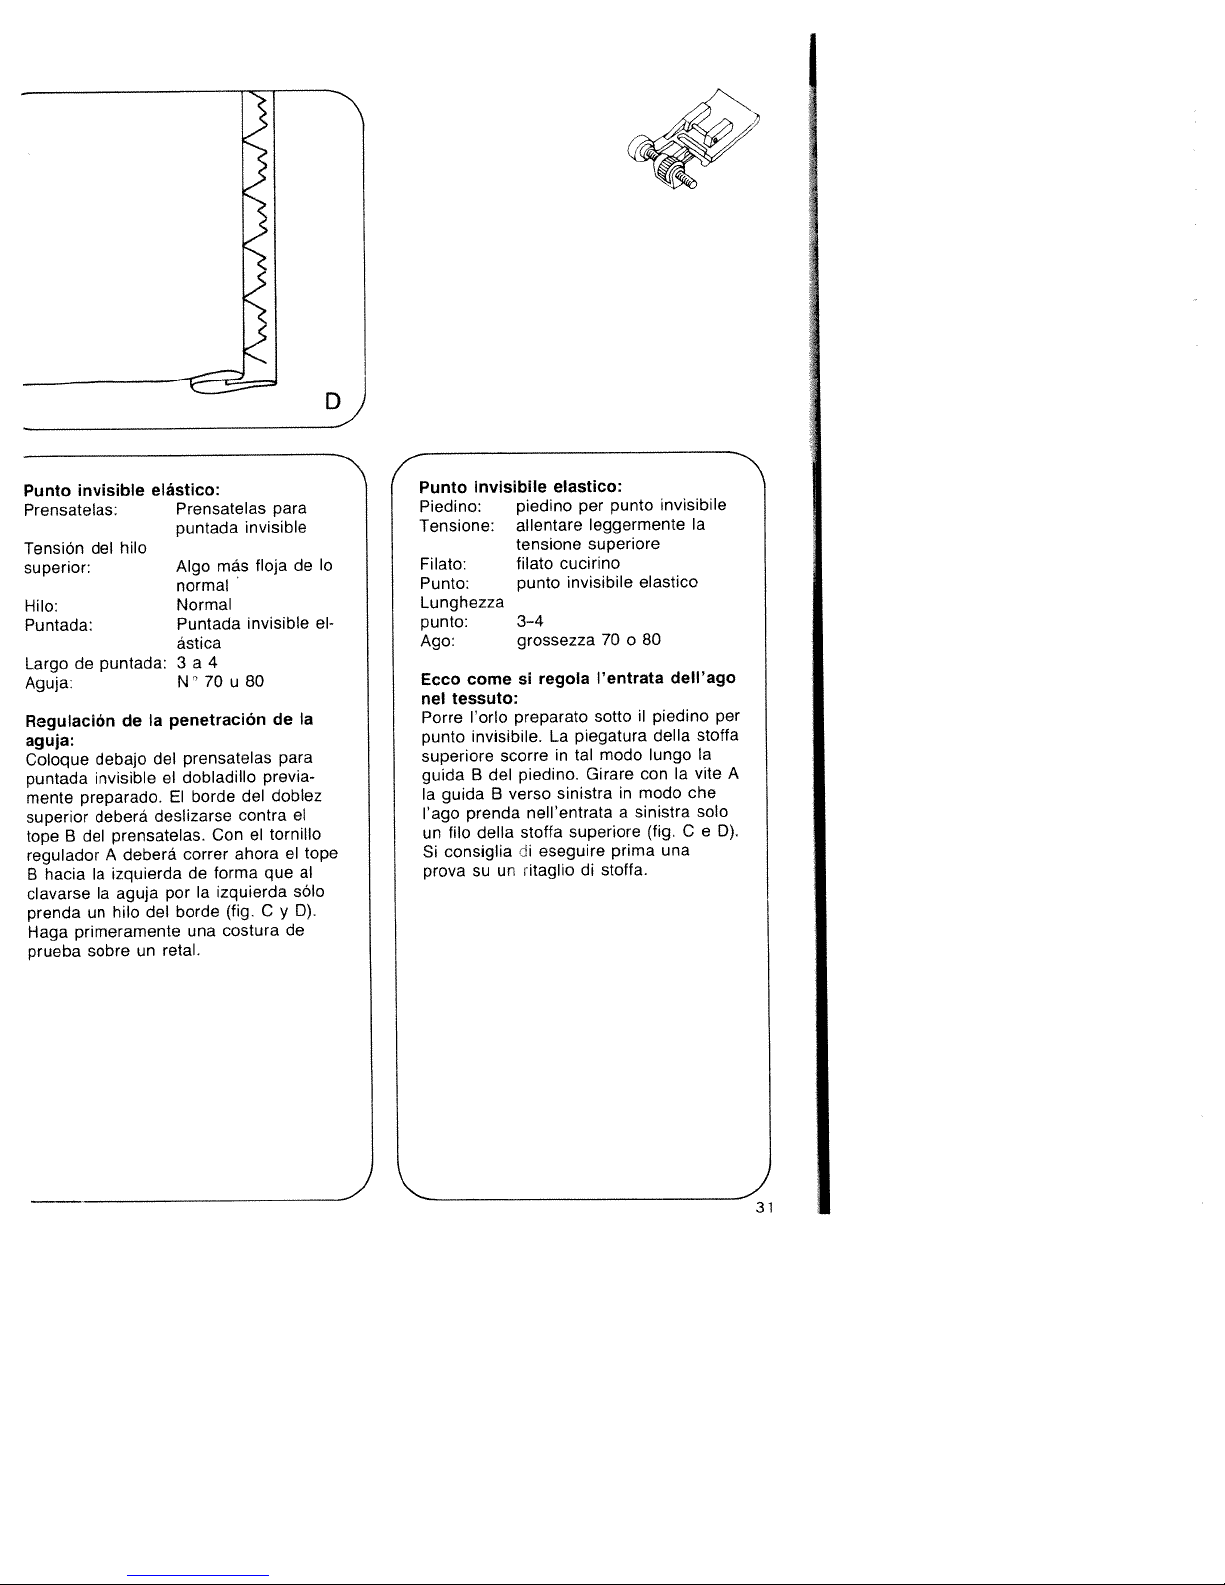
3
3
3
-S
3
invisible
Punto
Prensatelas:
Tension
superior:
Hilo:
Puntada:
Largo
de
Aguja:
Regulacion
aguja:
Coloque
puntada
preparado.
mente
superior
del
B
tope
regulador
hacia
B
clavarse
prenda
primeramente
Haga
prueba
hilo
del
puntada:
debajo
invisible
deberá
prensatelas.
A
izquierda
Ia
aguja
Ia
hilo
un
sobre
Ia
de
deberá
del
un
elástico:
Prensatelas
puntada
Algo
normal
Normal
Puntada
ástica
a
3
N’
penetracion
prensatelas
del
dobladillo
el
borde
El
deslizarse
correr
de
Ia
por
borde
una
retal.
invisible
más
4
70u80
del
contra
Con
ahora
forma
izquierda
(fig.Cy
costura
para
floja
invisible
de
para
previa
doblez
tornillo
el
el
que
de
de
Ia
el
tope
al
solo
D).
piedino
allentare
tensione
filato
punto
3-4
grossezza
si
preparato
scorre
piedino.
verso
nell’entrata
stoffa
di
ritaglio
un
elastico:
cucirino
invisibile
regola
piegatura
La
tal
in
sinistra
superiore
eseguire
per
punto
leggermente
superiore
70o80
I’entrata
sotto
modo
Girare
in
a
prima
di
stoffa.
invisibile
elastico
il
piedino
della
lungo
con
modo
sinistra
(fig.Ce
una
Ia
deII’ago
stoffa
Ia
vite
Ia
che
solo
per
A
D).
invisibile
Punto
Piedino:
Tensione:
lo
el
Filato:
Punto:
Lunghezza
punto:
Ago:
come
Ecco
nel
tessuto:
Porre
l’orlo
invisibile.
punto
superiore
B
guida
guida
Ia
prenda
‘ago
fib
un
consiglia
Si
su
prova
del
8
della
I
31
Page 36

Sewing
Sewing
Tension:
Thread:
Stitch
Needle:
1.
Set
sew
the
2.
Set
tacking
Set
3.
second
the
Set
4.
tacking
Set
5.
securing
Cut
6.
(special
buttonholes:
foot:
length:
utility-stitch
first
the
needle.
knob
20
stitches.
20
knob
buttonhole
Raise
first.
20
knob
stitches.
20
knob
stitches.
buttonhole
accessory).
clear-view
needle
slack
little
machine
fine
thread
buttonhole
sizes
70
knob
buttonhole
at
Raise the
at
1and
the
at
lIT
Raise
atSD
with
thread
to
and
seam
needle.
and
and
special
sewing
tension
embroidery
range
80
20
at
seam.
sew
sew
as
sew
the
sew
foot
(red)
jJ
and
Raise
four
needle.
the
long
four
needle.
few
a
knife
N
Boutonniéres:
Pied
a
six
to
as
to
six
presseur:
Tension:
Fi
I:
Longeur
du
point:
Aiguille:
1.
Regler
res)
Arréter
Rdgler
2.
coudre
laiguille
3.
Regler
coudre
longue
laiguille
4.
Régler
coudre
laiguille
5.
Regler
coudre
sur
Piedasemelle
transparente
Fil
moms
Eu
Plage
(boutonniere)
Grosseur
le
bouton
et
coudre
I’aiguille
le
bouton
4
a
6
points
haut.
en
le
bouton
Ia
deuxieme
Ia
que
en
haut.
le
bouton
points
4a6
en
haut.
le
bouton
quelques
daiguille
tendu
broder
a
rouge
20/23
position
en
20/23
d’arrèt.
20/23
premiere.
20/23
20/23
points
70
Ia
premiere
sur
sur
lèvre
sur
darrêt.
sur
un
fin
a
80
(points
aussi
Arréter
ElIet
€E)
de
nouage.
peu
utilitai
lèvre.
haute.
et
Arrèter
et
Arréter
et
6.
Ouvrir
(contre
boutonniere
a
supplement).
au
Découvit
Page 37

Ojales:
Prensatelas:
TensiOn
superior:
hilo
Hilo:
de
Largo
puntada:
Aguja:
1
Ponga
utilitaria
labio
Ponga
2.
4a6
aguja.
Ponga
3.
segundo
que
Ponga
4.
4a6
aguja.
Ponga
5.
unas
Abra
6.
(accesorio
del
el
20
del
el
puntadas
el
primero.
el
el
puntadas
el
puntadas
el
ojal
Transparente
más
Algo
normal
fino
Hilo
del
Zona
70
N
selector
en
Eleve
ojal.
20
botOn
de
20
botOn
del
labio
Eleve
20
botOn
de
20
botOn
de
con
especial).
floja
de
ojal
80
u
puntada
de
cosa
a
enLiI1
presilla.
en
ojal
en
presilla.
enaz)
remate.
descosedor
el
bordar
(sector
el
aguja.
y
igual
aguja.
Ia
de
y
y
Ic
primer
haga
Eleve
cosa
de
haga
Eleve
haga
rojo)
de
el
largo
de
Occhielli:
Piedno:
Tensione:
Filato:
Lunghezza
punto:
del
Ago:
Regolare
1.
su
lago.
Regolare
2.
3.
4.
5.
6.
4-6
Regolare
Ia
lunghezza
Regolare
4-6
Ia
Ia
cucire
e
punti
seconda
punti
Regolare
punti
alcuni
locchiello
Aprire
(accessorio
piedino
tensione
mente
filato
macchina
settore
grossezza
fine
bottone
Ia
bottone
travetta.
di
bottone
costina
della
bottone
travetta.
di
bottone
di
opzionale).
trasparente
superiore
allentata
per
occhielli
70-80
per
prima
20/23
20/23
nella
prima.
20/23
20/23
fissaggio.
con
ricamo
(rosso)
punti
costina.
su
Alzare
su
medesima
Aizare
su
Alzare
suEDe
il
taglia-asole
legger
a
utili
J1J
l’ago.
Eli
lago.
e
e
lago.
e
20/23
Aizare
cucire
cucire
cucire
cucire
33
Page 38

4
Sewing
Sewing
Stitch:
Feed:
Thread:
Place
the
beforehand
sewing
holder
foot
needle
Raise
the
positioninwhich
hole
right
wheelisturned.
stitches
chesinthe
Sewing
large
(for
Lower
the
match
a
Lower
the
of
zigzag
ber
endofabout
bobbin
and
stem
the
on
buttons:
foot:
wiThout
clear-view
straight
position
dropped
fine
buttoninthe
and
into
the
needle.
of
left
buttons
buttons
needle
on
sewing
threads
(D)
pushitunder
holder.
the
left
the
the
button
Sew
only
the
middleofthe
stitches
6
inches.
and
tie
foot
into
andanumber
on
sewing
Lower
button.
hole
Turn
needle
(A).
with
in
heavy
into
foot
through
off
sewing
foot
stitch,
thread
location
the sewing
Lower
of
the
knob
when
six
to
securing
of
stems
materials):
the
left
(B).
Sewanum
and leave
Pull
the
foot
needle
left
marked
the
button.
20toa
enters
the
eight
hole.
button.
needle-
the
(C).
threads.
or
the
hand
zigzag
stit
thread
a
Wrap
with
the
Place
4
Pose
de
presseur:
le
auparavant
presseur.
presseur
le
trou
20/23
jusqu’à
le
volant.
bouton.
quelques
du
boutons
piquer
du
esseur
zigzags
cm
de
(C)etes
sous
(D).
boutons:
bouton
gauche
en position
dansIaplage
ce
Executer
points
bouton
a
tige:
l’aiguille
bouton.
Passer
fil.
le
Nouer
Pied
Point:
Griffe:
Fil:
Poser
qué
pied
pied
dans
laiguille
bouton
zag”
nant
du
et
gauche
Boutons
Grands
Faire
gauche
surlemilieudubouton.
pied
points
15
tissu
aches
tige
sans
pied
presseur
piedasemelle
ou
transparente
point
droit
gauche
escamotée
filacoudre
a
et
Descendre
et
faire
que laiguille,
pique
sur
(B)etcoudre
laisser
et
enrouler
bouton pour former
es
déporté
fin
lemplacement
souslesupport
(A).
fils.
le
support
piquer
laiguille
bouton.
du
haute. Tourner
‘poInt
dansletrou
points
6a8
sur place
tissus
Poser
es
dans
Descendre
dépasser
fils
sur
dansletrou
lourds.
le
une
quelques
sur
les
trou
a
mar-
du
Arréter
zig
en
tour
droit
zigzags
allumette
le
env.
le
fils
a
du
le
34
Page 39

botones:
puntada:
reviamente
barra
agujero
el
aguja.
hasta
botón.
unas
ag
y
igujero
con
3otón
jrandes
Ia
Dlave
botôn.
lel
similar
)rensatelas
)untadas
hilo.
le
ado
il
puntadas
las
le
de
de
el
botón
e
prensatelas.
del
prensatelas.
del
Gire
quo
dave
se
Haga
puntadas
izquierdo
cuello
generos
en
aguja
Coloque
el
en
transparente
en
Pase
abajo
de
Sin
transparente
Punto
lzquierda
Hilo
izquierdo
el
zigzag
los
Dostura
Drensatelas:
Duntada:
‘osiciOn
a
rransportador:oculto
-lila:
Doloque
;oporte
a
?n
a
igzag
,olante,
Jel
prensatelas
recto
fino
el
en
introdüzcalo
20
batOn
aguja,
a
el
en
6a8
de
de
A).
(fig.
(costura
pesados):
agujero
el
en
un
del
centro
deje
y
hilos
arrOllelos
(C),
anüdelos.
(D)
y
punto
debajo
Haga
Clave
botOn.
del
en
al
agujero
puntos
remate
de
palillo
baton.
(B).
unos
superior
con
a
marcado
del
descender
a
aguja
Eleve
zona
a
el
girar
derecho
en
en
botones
izquierdo
dientes
de
Baje
Haga
15
inferior
e
alrededor
et
de
zig
el
unas
cm
4
Attaccatura
Piedino:
Punto:
Trasporto:
Filato:
Porre
spingerlo
Abbassare
penetrare
bottone.
20/23
‘ago,
a
foro
alcuni
Bottone
stoffe
su
penetrare
Far
Porre
tone.
alcuni
fib.
di
el
inferiore
annodare
bottone:
senza
trasparente
punto
sinistra
abbassato
filato
il
bottone
sotto
1
l’ago
Alzare
settore
nel
girando
destra.
diritti
punti
con
pesanti.
fiammifero
un
Abbassare
sopraggitti
Passare
(C),
fill.
I
piedirio
diritto,
cucirino
sul
supporto
1
supporto
nel
l’ago.
della
volantino,
1
Cucire
nel
gambo,
‘ago
il
e
fill
avvolgere
posizione
punto
del
a
foro
Girare
zig-zag
6-8
foro
per
nel
foro
centro
sul
piedino
lasciare
superiore
II
oppure
fine
segnato,
del
piedino.
sinistra
penetri
punti
sinistra
a
bottoni
a
(b).
circa
gambo
piedino.
il
bottone
finchO
zig-zag
sinistra.
del
Cucire
ed
piedino
ago
e
Fare
del
nel
(A).
grossi
bot
cm
15
e
(D)
e
35
Page 40

Sewing
Sewing
Stitch
Stitch:
Thread:
This
engaged:
Insert
back
foot
in.
positions:
Completely
Baste
zipper
Place
its
on
about
required
in
close
foot
sew
of
before
needle
zipper
Lower
the
36
length:
is
the
groove
upwards,
The
teeth
the
the
the
again,
across
the
end.
zippers:
in
foot:
the
how
foot
E
zipper
left,
concealed
by
zip
in
to
foot
open
the
along
run
of
sole
the
half
width.
material,
zip
continue
the
zipatthe
end
the
down
and
toot
zipper
the
zipper
to
2
Straight
needle
sewing
zipper
with
and
until
foot
right,
hand
left
the
zip
the
length
Leave
raise
(Fig.
end.
same
of
in
the
open
foot
sewing
3
position
thread
the
push
the
can
or
first.
as
under
the
foot
of
the
C).
the
Sew
the
material,
the
stitch,
foot
back
the
front
be
centre.
zip
farasit
right
(Fig.
the
the
zipper
Lower
seam
margin.
seam
again
foot
is
pin
shoe
pin
pushed
closure:
Push
the
guiding
B).
zip
needle
the
leave
zip
and
middle
in
F
the
foot
Sew
at
toot
the
and
other
Shortly
raise
(Fig.
the
of
snaps
to
will
so
edge
the
down
zipper
then
side
the
the
D).
sew
the
the
go.
that
and
a
mm
droit
a
sa
E
ce
son
a
milieu.
fermeture
presseur
poser
pied
le
longent
Ia
environ
pied
le
glissiere
a
couture
a
avant
(fig.
terminer
glissiere:
position
en
fermeture
tige
faire
et
Ia
que
tour.
a
droite,
glissiere
a
a
vers
fermeture
Ia
presseur
barrette
Ia
fermeture
restant
presseur
continuer
Ia
de
transver
deuxième
Ia
glissiere
Ia
fin
dans
ouvrir
et
Rabaisser
D).
Ia
a
arrière
remon
tige
pied
Le
a
glissiere.
Ia
Ia
a
dans
(fig.
C).
fermeture
a
de
le
tissu,
couture.
a
gau
a
de
a
et
a
Ia
Ia
presseur:
point:
en
Ia
F
tout
glisser
jusqu’a
que
(fig,
glissiere
Coudre
de
pied
de
place
pied
le
rainure
jusqu’a
s’accroche
peut
(fig.A)ou
d’une
d’abord
le
a
ouverte
es
dents
B).
jusqu’au
voulue.
remonter
Ia
termeture
pied
le
jusqu’a
faire
et
parallelement
termeture
Ia
egale.
laisser
le
pied
glissiere
a
presseur
Piedafermeture
glissiere
3
2
a
Point
médiane
Filacoudre
pied
du
avec
arrière
glissO
étre
au
fermeture
Ia
pied
butée:
sous
Surpiquer
milieu
L’aiguille
presseur,
I’extrémité
Ia
Peu
I’aiguille
presseur
et
Insertion
Pied
Longueur
de
Point:
Fil:
Mise
glissiere:
Accrocher
dans
terIasemelle
avant
presseur
gauche
Insertion
couverte:
Bãtir
Faire
che
glissiere
sorte
droite
glissiere
distance
I’ouvrage.
fermer
Rabaisser
coudre
a
sale.
to
bande
distance
couture.
remonter
fermeture
le
fermetures
I
Page 41

Costura
Prensatelas:
Largo
puntada:
Puntada:
Posiciôn
Ia
Hilo:
Colocación
cremalleras:
Enganche
a
arriba
Ia
rrerse
izquierda
Cremalleras
Hilvane
de
do
do
puntada:
Ia
posterior
ranura
planta
Ia
anterior
barrita
las
a
y
cremallera.
Ia
Ia
hacia
as
Coloque
prensatelas
Ia
guia
a
aproximadamente.
en
cremallera
termine
costura
segundo
monte
antes
clavada
satelas,
el
cremallera
derecha
anchura
Ia
tela,
Ia
de
lateral
y
del
prensatelas
Ia
lado
a
final
Ia
abra
/
cremalleras:
Prensatelas
eras
cremal
3
a
2
recto
Punto
Central
Normal
prensatelas
del
barrita
E
pie
del
F.
posiciones
central.
cubiertas
izquierda
cremallera
forma
de
discurran
B),
(fig.
deseada
Deje
ol
prensatelas
alce
C).
(fig.
Ia
hacer
remate.
do
Ia
de
Ia
misma
Ia
do
en
aguja
cremallera
Ia
termino
y
,I,//
para
posterior
empuje
y
hasta
pie
El
derecha.
del
Corra
hasta
abierta
quo
a
Cosa
hasta
Ia
el
Baje
costura
cremallera
distancia.
costura,
tela.
Ia
Ia
para
del
hacia
quo
puede
todo:
prensate
el
tope.
el
debajo
dientes
los
largo
lo
cremallera
Ia
mitad
Ia
aguja
y
prensatelas,
haga
y
Cosa
paralela
Poco
deje
Alce
(fig.
costura.
pie
encaje
co
do
clavada
cierre
el
ol
baje
D),
en
del
de
Ia
Ia
pren
D
per
per
spostato
(fig.
Spostare
piedino
lungo
Ia
stoffa.
Ia
cerniera
cucire
ed
lampo:
cerniere
posizione
per
cerniere
scanalatura
Ia
suoletta
F
o
centro.
A)
due
su
porre
in
Ia
cerniera
desiderata.
Alzare
fino
eseguiro
di
fissaggio.
della
distanza.
I’ago
aprire
e
1
piedino,
cerniere:
con
in
si
innesta.
nelle
lati:
1
piedino
cor
Ia
maniera
guida
per
il
(fig.
alter-
infine
cerniera
Poco
nella
Ia
ago
posi
C).
cer
termi
37
cerniera
innestare
posteriore
finchè
destra,
aporta
dentini
i
(fig.
metà
Ia
e
della
cucitura
Ia
del
Alzare
(fig.
Ia
cucitura.
della
piedino
2-3
punto
centro
filato
il
piodino
E
e
1
porno
puo
sinistra
lampo
Ia
cerniera.
fino
sotto
scorrano
B).
I’ago
chiudere
1
piedino,
cerniera
soconda
termine
D).
diritto,
cucirino
ii
piedino
nella
premere
anteriore
essere
coperta
all’arresto,
il
Cucire
Iarghezza
nella
nella
trasversale
parte
uguale
a
Iasciare
1
piedino
Abbassare
Attaccatura
Piedino:
Lunghezza
punto:
Punto:
Filato:
Come
Agganciaro
1
porno
posterioro
alto,
piodino
II
zioni
Cerniera
lmbastire
a
sinistra
niora
che
destra
circa
Lasciare
piedino
Abbassare
mine
Ia
una
Cucire
parallelamente
prima
stoffa.
niora
nare
Page 42
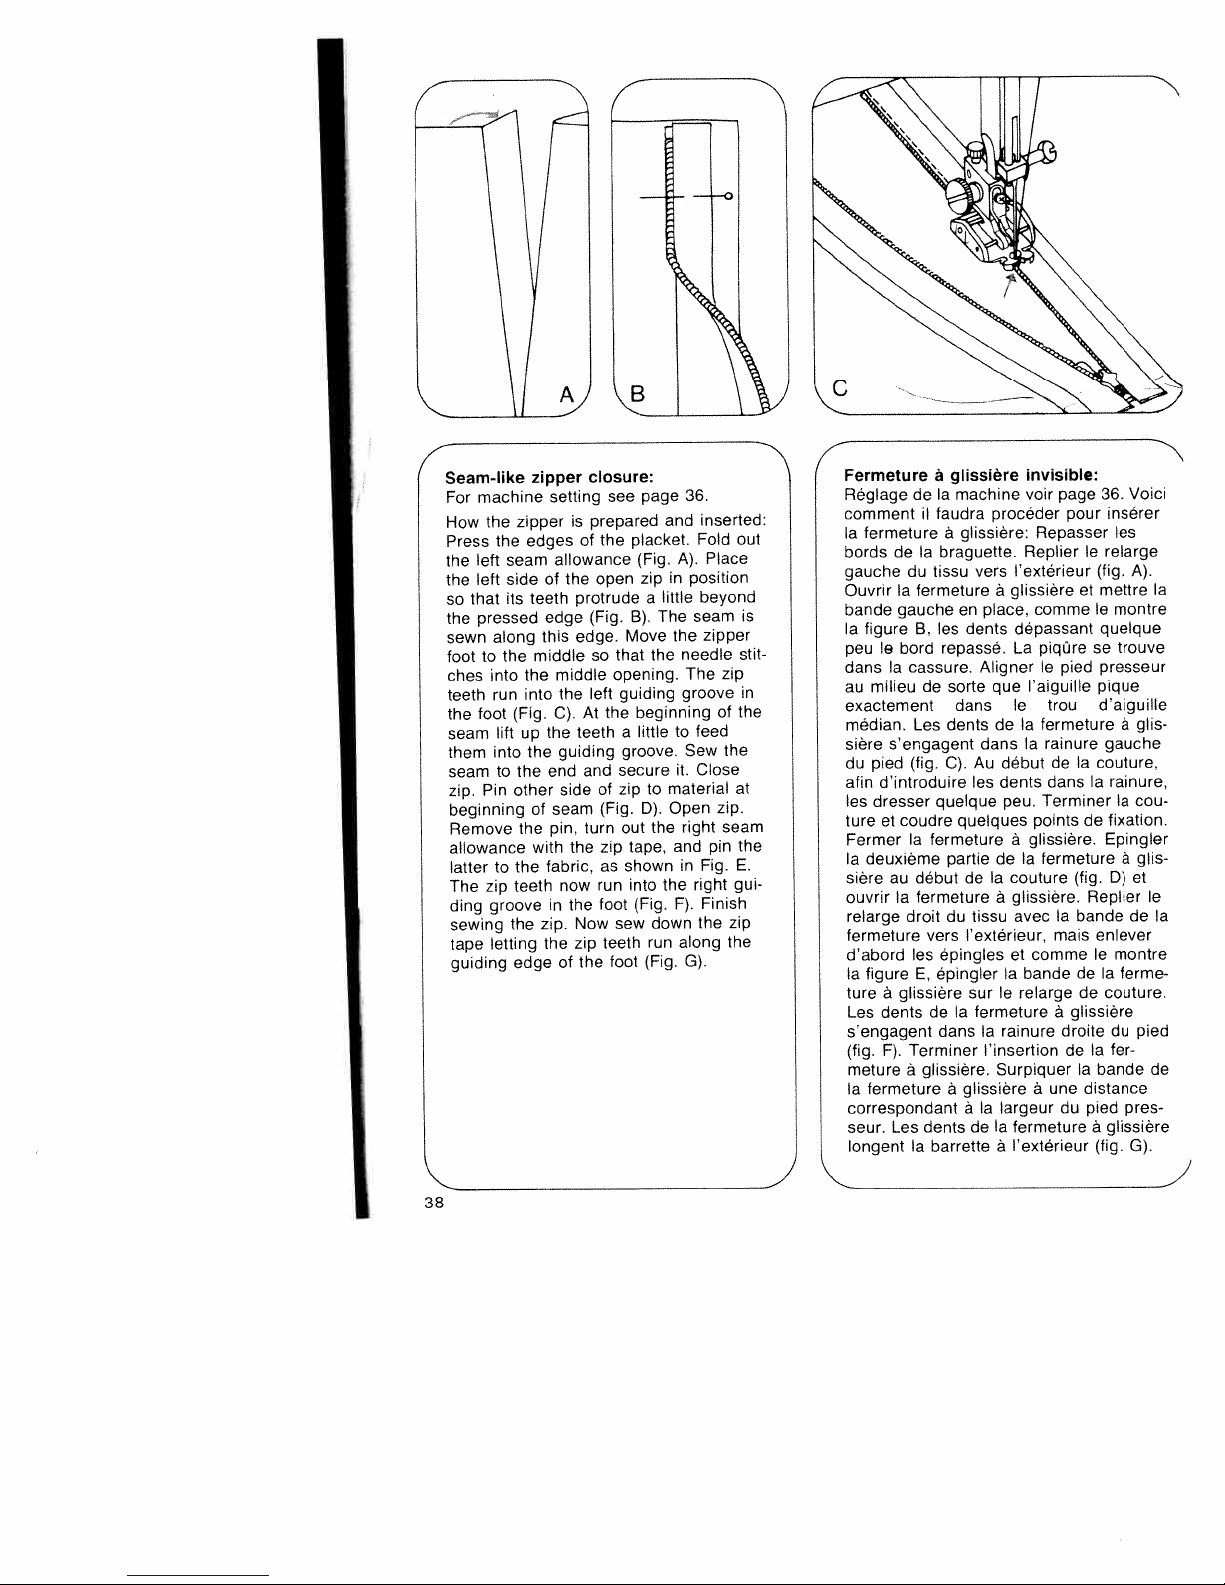
4
38
Seamlike
machine
For
the
How
Press
left
the
left
the
that
so
pressed
the
sewn
to
foot
into
ches
teeth
foot
the
seam
them
seam
Pin
zip.
beginning
Remove
allowance
latter
zip
The
groove
ding
sewing
letting
tape
guiding
the
seam
side
its
along
the
run
lift
into
to
to
zipper
edges
the
into
(Fig.
up
the
the
other
the
the
teeth
the
edge
zipper
setting
allowance
of
teeth
edge
this
middle
middle
C).
the
end
of
seam
pin,
with
fabric,
in
zip.
the
closure:
is
prepared
of
the
protrude
(Fig.
edge.
so
left
the
At
teeth
guiding
and
side
turn
the
now
the
Now
zip
of
the
see
the
open
that
opening.
the
of
(Fig.
zip
as
run
foot
sew
teeth
foot
page
placket.
(Fig.
zip
a
B).
Move
the
guiding
beginning
little
a
groove.
secure
zip
to
D).
the
out
tape,
shown
into
(Fig.
down
run
(Fig.
and
A).
in
little
The
the
needle
groove
to
it.
material
Open
right
and
in
the
F).
along
G).
36.
inserted:
Fold
Place
position
beyond
seam
zipper
The
of
feed
Sew
Close
zip.
pin
Fig.
right
Finish
the
out
stit
zip
the
the
at
seam
the
E.
gui
zip
the
4
Fermeture
Reglage
comment
Ia
fermeture
bordsdeIa
gauche
OuvrtrIafermeture
is
in
bande
Ia
figure
le
peu
dansIacassure.
milieudesorte
au
exactement
median.
sière
s’engagent
pied
du
afin
d’introduire
les
dresser
tureetcoudre
Fermer
Ia
deuxième
sière
ouvrir
relarge
fermeture
d’abord
Ia
figure
tureftglissiere
Les
dents
s’engagent
(fig.
F).
meture
fermeture
Ia
correspondant
seur.
ongent
de
du
gauche
B,
bord
Les
(fig.
Ia
debut
au
fermeture
a
droit
les
E,
Terminer
ft
Les
Ia
glissiere
a
Ia
machine
faudra
il
ft
glissière:
braguette.
tissu
en
dents
les
repassé.
dans
dents
C).Audebut
quelque
quelques
fermeture
partiedeIa
de
du
vers
l’extérieur,
epingles
epingler
Ia
de
dans
glissiere.
glissiere
ft
ft
dents
barrette
invisible:
voir
procéder
Repasser
Replier
l’extérieur
vers
ft
glissiere
comme
place,
dépassant
La
piqüre
Aligner
es
tissu
sur
fermeture
Ia
de
le
laiguille
que
trou
le
deIafermeture
dansIarainure
dansIarainure,
dents
Terminer
peu.
pointsdefixation.
ft
glissiere.
fermeture
a
couture
ft
glissiere.
avecIabande
comme
et
bande
Ia
le
relarge
rainure
Ia
l’insertion
Surpiquer
une
ft
largeur
Ia
fermeture
l’extérieur
a
page
pour
pied
de
mais
ft
glissiere
droite
de
du
36.
le
(fig.
et
mettre
le
quelque
se
presseur
pique
d’aiguille
couture,
Ia
(fig.
Replier
enlever
le
Ia
de
de
Ia
Ia
bande
distance
pied
a
(fig.
Voici
insérer
les
relarge
A).
montre
trouve
glis
ft
gauche
Ia
cou
Epingler
ft
glis
et
D)
de
montre
ferme
couture.
pied
du
fer
pres
glissiere
G).
Ia
le
Ia
de
)
Page 43
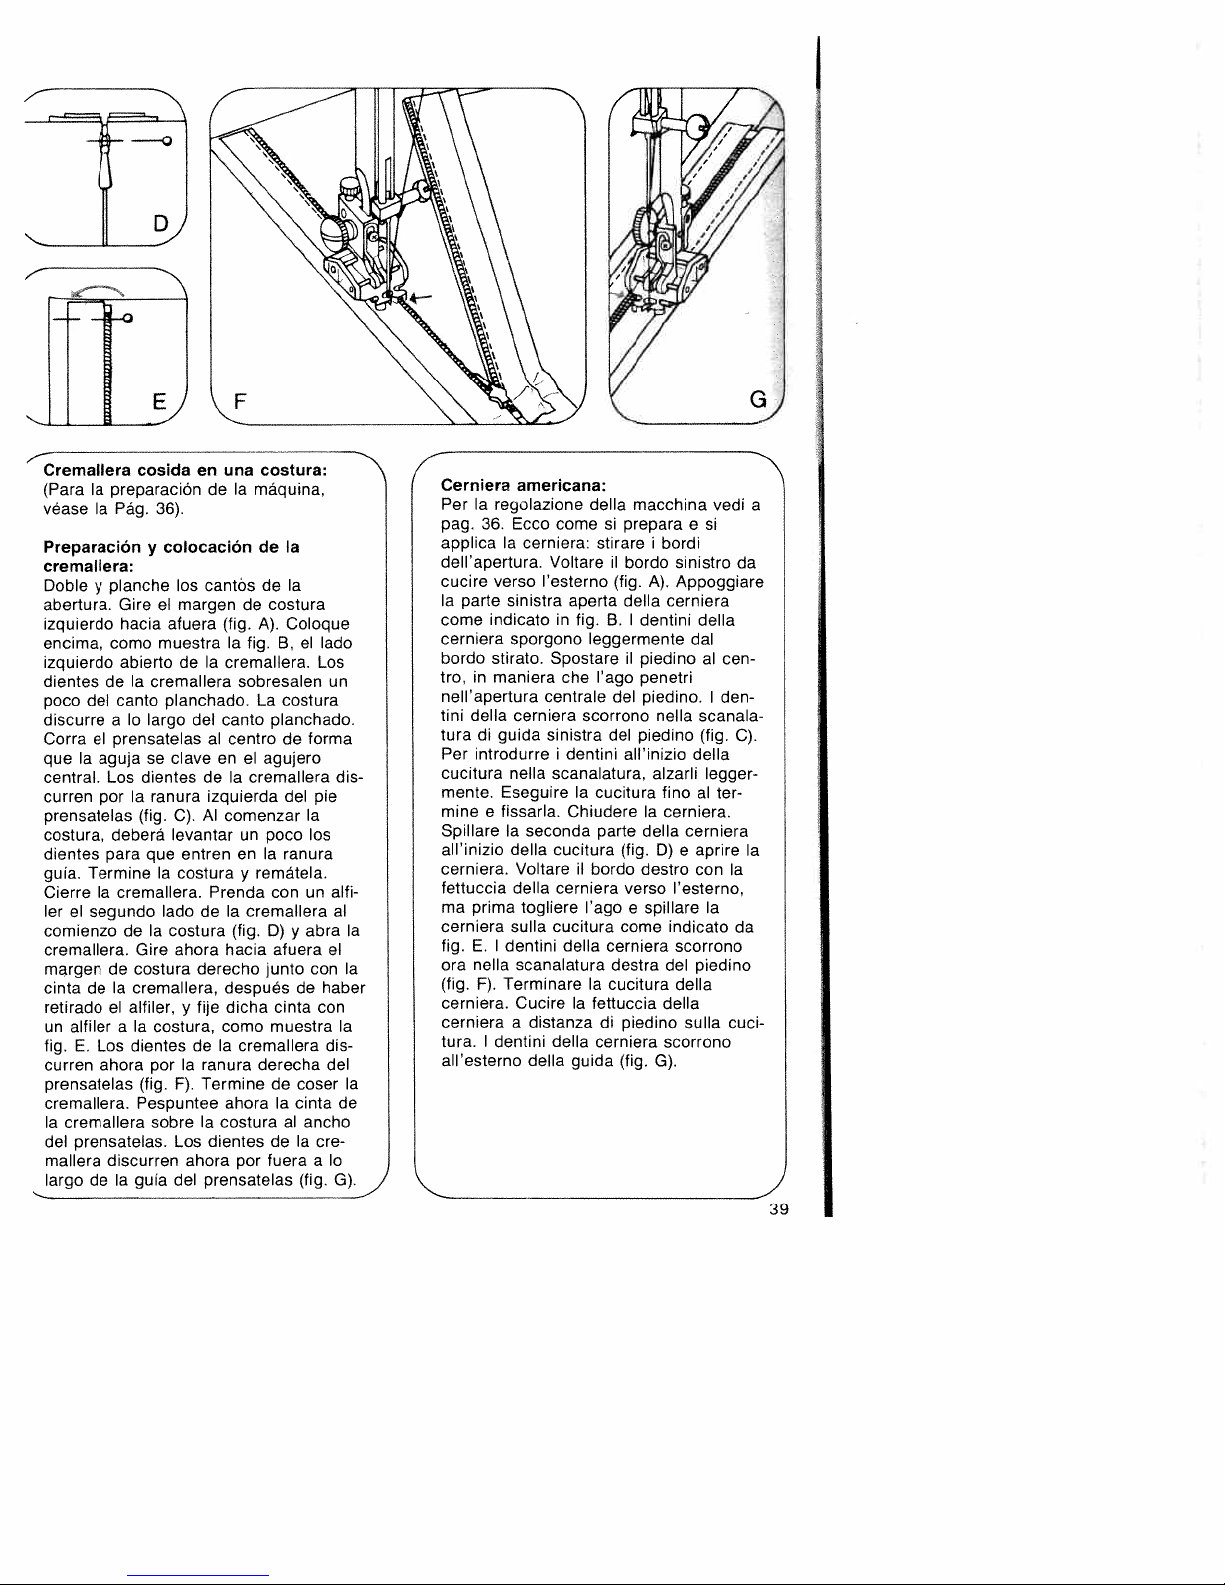
//
/
S
Cremallera
cosida
(ParaIapreparaciOndeIa
véaseIaPãg.
Preparaciónycolocación
36).
en
una
costura:
máquina,
de
cremallera:
Doble
abertura.
planche
y
Gireelmargendecostura
izquierdo hacia
encima,
como
izquierdo abiertodeIa
dientesdeIa
poco
del
canto
discurreaIo
cantosdeIa
los
afuera
(fig.
A).
muestraIafig.B,el
cremallera.
cremallera
planchado.
Iargo
del
sobresalen
La
canto
planchado.
Corraelprensatelasalcentro de
Ia
agujasedaveenel
que
central.
curren
prensatelas
costura,
dientes
guia.
dientesdeIa
Los
porIaranura
(fig.
deberá
para
C).
levantarunpoco
que
entrenenIa
TermineIacostura
CierreIacremallera.
lerelsegundo
comienzodeIa
cremallera.
margen de
cintadeIa
lado
costura
ahora hacia afuera
Dire
costura derecho
cremallera,
retiradoelalfiler,yfije
un
alfileraIa
fig.E.Los
curren
prensatelas
cremallera.
cremallera
Ia
prensatelas.
del
mallera
largo
deIaguia
dientesdeIa
ahora
por
(fig.
Pespuntee
sobre
discurren
costura,
Ia
F).
Los
ahora
del
de
ranura
Terminedecoser
Ia
agujero
cremallera
izquierda
Al
comenzar
remátela.
y
Ia
cremallera
(fig.
conunalfi
D)
Prenda
junto
después
dicha
cinta
como
muestra
cremallera
derecha
Ia
ahora
costuraalancho
dientes
por
de
fueraaIc
prensatelas
Ia
Coloque
lado
Los
costura
forma
del pie
Ia
los
ranura
abra
y
con
de
con
cinta
Ia
cre
(fig,
un
dis
al
el
Ia
haber
Ia
dis
del
de
G).
4
Cerniera
PerIaregolazione
pag.
applicaIacerniera: stirare
deII’apertura.
cucire verso
Ia
come
cerniera
bordo
tro,inmaniera
nell’apertura
tini
turadiguida sinistra
Per
cucitura
mente.
mineefissarla.
SpillareIaseconda
all’inizio
cerniera.
fettuccia
ma prima
Ia
cerniera
fig.E.I
ora
(fig.
cerniera.
cerniera
tura.Identini della
all’esterno
americana:
36.
Ecco
comesiprepara
Voltareilbordo sinistro
I’esterno
parte
sinistra
indicato
aperta
in
sporgono
stirato.
Spostareilpiedino
che
centrale
della
cerniera
introdurreidentini
nella
scanalatura,
Eseguire
Chiudere
della
cucitura
Voltareilbordo
della
cerniera
togliere
sulla
cucitura
dentini
nella
F).
Terminare
della
scanalatura destra
CucireIafettuccia della
a
distanzadipiedino
della
guida
della
macchina
i
(fig.
A).
della
fig.B.I
dentini
leggermente
I’ago
penetri
del
piedino.Iden
scorrono
del
piedino
all’inizio
alzarli
Ia
cucitura
Ia
parte
della
(fig.
destro
verso
I’agoespillare
come
cerniera
Ia
cucitura
cerniera
(fig. G).
vedi
e
si
bordi
Appoggiare
cerniera
della
dal
al
nella
scanala
(fig.
della
legger
fino
alter-
cerniera.
cerniera
D)eaprire
con
I’esterno,
Ia
indicato
scorrono
del
piedino
della
sulla
scorrono
a
da
cen
C).
Ia
Ia
da
cuci
Ia
39
Page 44

N
ITI
—Q
4
Zippers
For
Move
it
Baste
the
teeth
to
the
zip
edge
the
downinthe
open
and
zip.
intended
(Fig.
guide
seam
edge
the
down
and
and
end
machine
will
placket
the
same
teeth
end
finish
Pin
end
in
the
go.
the
are
underside
of
the
of
the
the
Open
B).
and
margin
the
of
of
the
in
close
finish
the
of
ladies’
setting
foot
zipper
Press
the
closed
zip
the
on
visible.
still
and
timeasyou
run
along
(Fig.
foot
seam
the
fabric,
lower
zip,
sewing
overlapping
line.
seam
zip.
position
that
so
fabric
the
seam
fabric,
the
zip.
sewing
zip
seam
slacks:
see
to
edges
to
wrong
Pin
the
leave
raise
the
the
Baste
Attach
for
it
(Fig.
leave
raise
Lower
the
with
the
the
stitch
sew
right
A).
zipper
seam.
moves
it
C).
seam.
page
left
of
right
side
facing
it
the
Shortly
the
the
edge
left
the
the
Shortly
the
the
the
bartack.
a
30.
as
the
so
strip
down
zip.
guiding
needle
zipper
foot
Close
along
zip
edge
desired
along
needle
zipper
zipper
Secure
far
placket.
edge
that
at
The
before
foot,
again
the
the
edge
before
foot
foot
D
the
the
pantalon
Ia
sous
encore
montre
couture,
tissu.
fermeture
la
presseur
fermeture
Ia
a
fermeture
aligner
et
Ia
Ia
dans
et
arrèt.
pour
voir
butée.
Bátir
le
que
D
Les
longent
relever
dépassante
Bátir
piqOre
le
bord
fin
le
fermer
pied
le
A
Ia
glissiere
a
Ia
bord
les
visibles.
assembler
et
dents
Ia
laisser
et
glissiere
a
le
de
de
tissu,
fin
page
Repasser
fermeture
droit
dents
de
barrette
Ia
figure
pied
le
glissiere,
a
terminer
glissiere.
a
partie
Ia
glissiere.
a
guide-droit
sorte
tissu
du
couture,
a
remonter
fermeture
a
presseur
Ia
de
30.
de
A.
selon
cou
vers
les
a
de
le
Ia
Peu
Ia
que
a
et
a
de
fermée
de
Ia
une
comme
Ia
fin
dans
Fermer
Ia
de
de
Ouvrir
en
largeur
Peu
laiguille
presseur
coudre
glissiere
machine
a
jusqu’à
braguette.
manieère
soient
sous-patte
couture.
glissiere
a
de
le
ouvrir
pied
le
sous-patte
Ia
couture.
Ia
fermeture
place
de
longe
avant
Rabaisser
couture.
Ia
un
fermeture
le
Ia
Fermeture
dame:
as
of
its
Reglage
Glisserlepied
gauche
Ia
bordsdeIa
glissiere
Ia
fente
Ia
fermeture
Epingler
par
tout
fermeture
droite,
avant
l’aiguille
presseur,
rabaisser
couture,
Epingler
le
trace
gauche
B).
(fig.
Mettre
sur
Ia
guide-droit
le
(fig.
C).
laisser
le
pied
glissiere.
terminer
ture,
40
Page 45
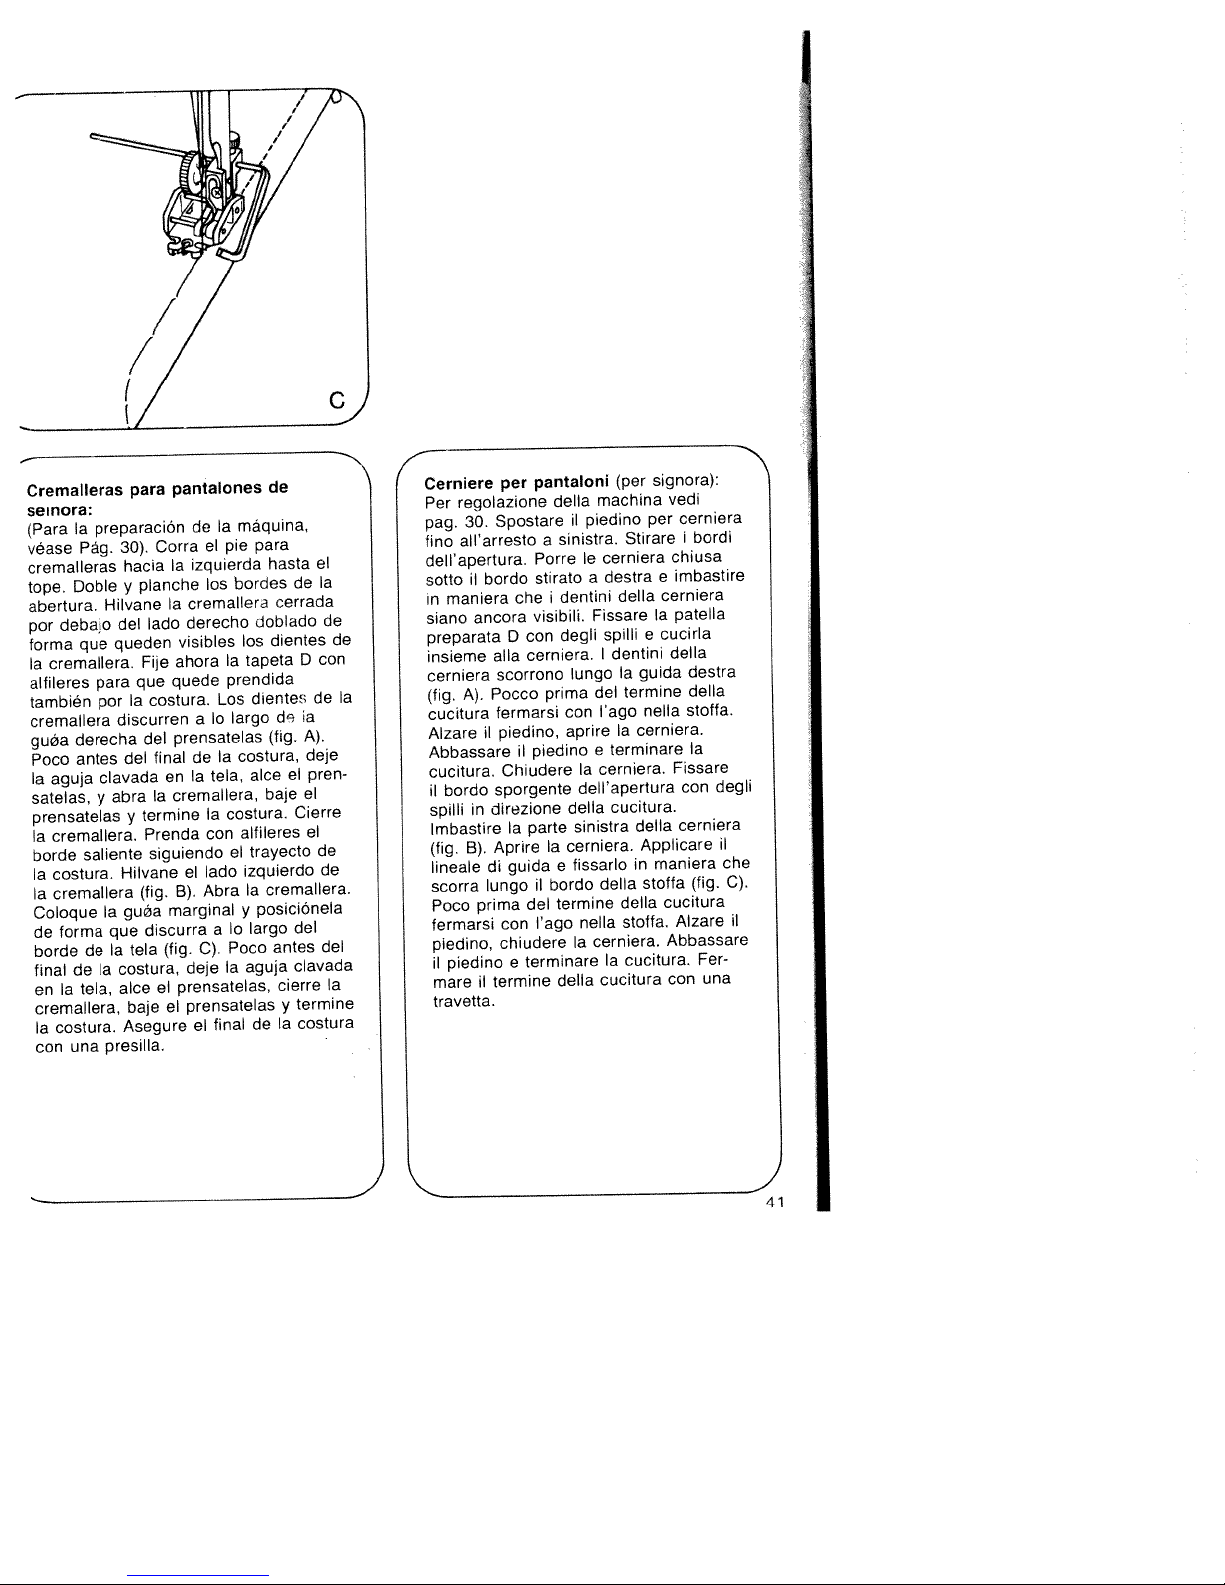
Cremalleras
seinora:
a
(Para
Pág.
véase
cremalleras
Doble
tope.
abertura.
debajo
por
que
forma
cremallera.
a
aifileres
también
cremaliera
derecha
guèa
antes
Poco
Ia
aguja
satelas,
prensatelas
cremallera.
Ia
saliente
borde
costura,
Ia
cremallera
Ia
Coloque
forma
de
de
borde
de
final
tela,
Ia
en
cremallera,
costura.
Ia
una
con
para
preparaciOn
30).
hacia
y
Hilvane
del
queden
para
por
discurren
del
clavada
abra
y
y
Hilvane
Ia
guda
que
Ia
costura,
Ia
alce
Asegure
presilia.
Corra
planche
lado
Fije
que
costura.
Ia
del
final
termine
Prenda
siguiendo
(fig.
discurra
tela
baje
a
ci
pantalones
de
ci
izquierda
a
los
cremaliera
Ia
derecho
visibles
ahora
quede
10
a
prensatelas
de
tela,
a
en
cremallera,
a
con
ado
ci
Abra
B).
marginal
(fig.
C).
deje
prensatelas,
prensatelas
ci
final
ci
máquina,
a
pie
bordes
los
a
prendida
Los
argo
costura,
a
costura,
alfileres
ci
izquierdo
y
0
a
Poco
Ia
de
para
hasta
de
cerrada
doblado
dientes
tapeta
dientes
de
(fig.
ci
alce
baje
Cierre
frayecto
cremallera.
Ia
posiciOnela
del
largo
antes
clavada
aguja
cierre
termine
y
costura
Ia
do
D
A).
ci
de
a
deje
pren
ci
ci
Ia
con
de
de
de
del
Signora):
pantaloni
regolazione
30.
all’arresto
bordo
ii
maniera
ancora
A).
ii
bordo
in
B).
di
lungo
prima
piedino
ii
per
Spostare
Porre
stirato
che
visibili.
con
D
cerniera.
alla
scorrono
Pocco
fermarsi
piedino,
piedino
ii
Chiudere
sporgente
direzione
parte
Ia
Aprire
guida
ii
del
con
chiudere
terminare
e
termine
della
a
i
prima
Ia
e
bordo
termine
l’ago
Cerniere
Per
pag.
fino
deII’apertura.
softo
in
siano
de
Ia
Ia
preparata
insieme
cerniera
(fig.
cucitura
Alzare
Abbassare
cucitura.
H
spilli
imbastire
(fig.
lineale
scorra
Poco
fermarsi
piedino,
II
mare
travetta.
machina
piedino
ii
sinistra.
cerniera
Ic
destra
a
dentini
Fissare
spilli
degli
I
lungo
del
con
aprire
e
cerniera.
Ia
dell’apertura
della
sinistra
cerniera.
fissarlo
della
nelIa
cerniera.
Ia
Ia
cucitura
della
(per
per
Stirare
defla
Ia
e
dentini
guida
Ia
termine
ago
nella
Ia
cerniera.
terminare
cucitura.
della
Applicare
maniera
in
stoffa
della
stoffa.
cucitura.
vedi
cerniera
i
bordi
chiusa
imbastire
e
cerniera
patella
cucirla
della
destra
della
stoffa.
Ia
Fissare
con
cerniera
(fig.
cucitura
Alzare
Abbassare
Fer
con
degli
ii
che
C).
ii
una
j
41
Page 46
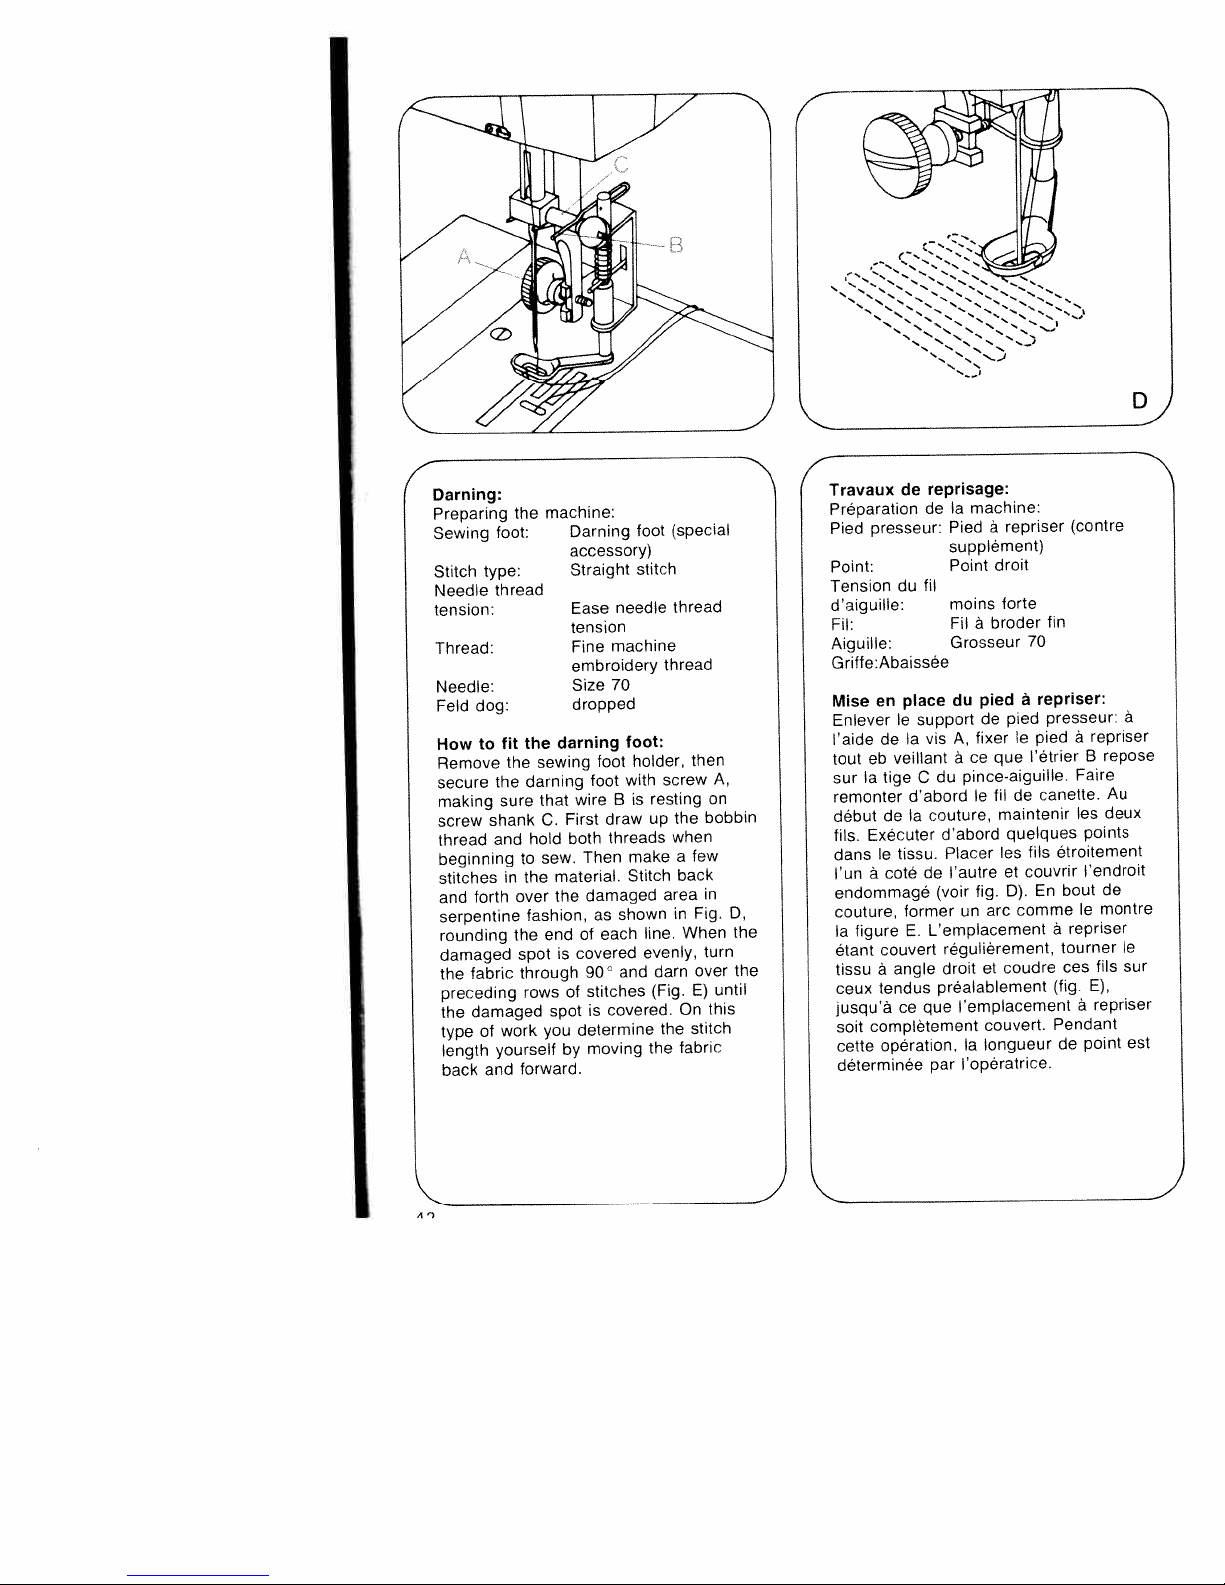
Darning:
Preparing
Sewing
Stitch
Needle
tension:
Thread:
Needle:
dog:
Feld
How
Remove
secure
making
screw
thread
beginning
stitches
forth
and
serpentine
rounding
damaged
fabric
the
preceding
damaged
the
type
length
back
foot:
type:
thread
fit
to
the
sure
shank
and
work
of
yourself
and
the
the
the
darning
to
the
in
over
fashion,
the
spot
through
rows
forward.
machine:
sewing
that
C.
hold
sew.
matenal.
the
end
spot
you
Darning
accessory)
Straight
Ease
tension
Fine
embroidery
Size
dropped
darning
foot
foot
wire
First
both
Then
damaged
as
each
of
covered
is
90
stitches
of
is
determine
moving
by
foot
stitch
needle
machine
70
toot:
holder,
with
is
B
draw
threads
make
Stitch
shown
line.
evenly,
and
covered.
(special
thread
thread
screw
resting
the
up
when
area
in
darn
(Fig.
the
the
then
few
a
back
Fig.
When
over
E)
On
stitch
fabric
A,
on
bobbin
in
D,
turn
until
this
the
the
4
Travaux
Preparation
Pied
Point:
Tension
d’aiguille:
Fi
I:
Aiguille:
Griffe:Abaissée
Mise
Enlever
‘aide
tout
sur
remonter
debut
fils.
dans
l’un
endommage
couture,
figure
Ia
étant
tissu
ceux
jusqu’a
soit
cette
déterminée
reprisage:
de
de
presseur:
fil
du
place
en
support
le
vis
Ia
de
veillant
eb
a
Executer
complétement
tige
C
dabord
Ia
de
tissu.
le
de
coté
former
E.
couvert
angle
a
tendus
que
ce
operation.
du
couture,
d’abord
(voir
L’emplacement
droit
préalablement
par
machine:
a
repriser
Pied
supplement)
droit
Point
forte
moms
broder
Fil
a
Grosseur
pied
du
A,
a
Placer
l’autre
regulierement,
l’emplacement
a
pied
de
le
fixer
ce
que
pince-aiguille.
de
fil
le
maintenir
quelques
les
et
fig.
D).
comme
arc
un
coudre
et
couvert.
Iongueur
Ia
I’operatrice.
fin
70
repriser:
presseur:
pied
l’étrier
canette.
étroitement
fils
couvrir
En
a
(fig.
Pendant
(contre
Faire
les
points
l’endroit
bout
le
repriser
tourner
ces
a
point
de
repriser
repose
B
Au
deux
de
montre
fils
E),
repriser
a
le
sur
est
Afl
Page 47
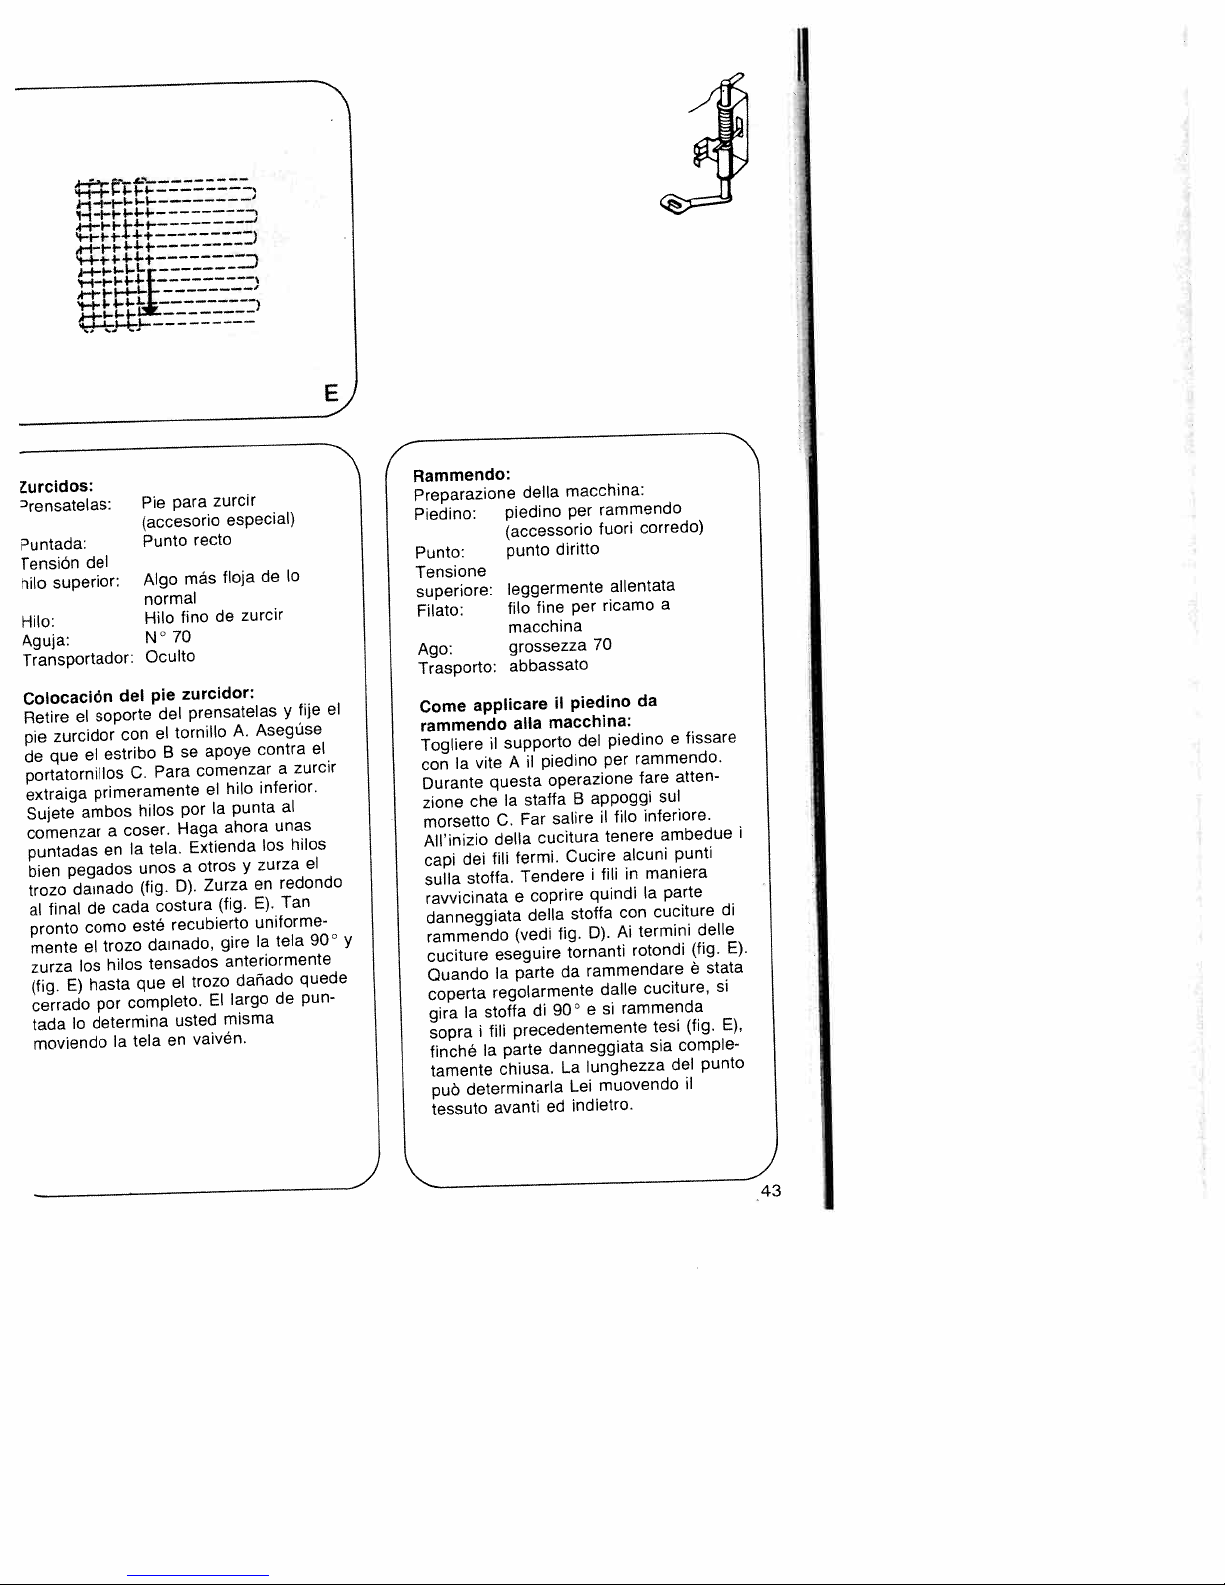
urcidos:
rensatelas:
untada:
Tension
nib
del
superior:
Hilo:
Aguja:
Transportador:
Colocación
soporte
el
Retire
zurcidor
pie
el
que
de
portatornillos
extraiga
Sujete
primeramente
ambos
comenzar
puntadas
pegados
bien
dainado
trozo
final
al
pronto
mente
zurza
(fig.
cerrado
tada
de
como
el
los
hasta
E)
determina
Ic
por
moviendo
44.4.j
del
con
estribo
C.
coser.
a
Ia
en
cada
trozo
hilos
completo.
Ia
---—------
para
Pie
(accesorio
Punto
Algo
normal
Hilo
70
N
Oculto
pie
del
el
B
Para
hilos
tela.
unos
(fig.
costura
recubierto
esté
dainado,
tensados
el
que
en
tela
zurcir
recto
más
de
fino
zurcidor:
prensatelas
tornillo
apoye
se
comenzar
el
Ia
por
Haga
Extienda
otros
a
Zurza
D).
(fig.
gire
trozo
El
usted
vaivén.
--
—
-
—-
—-
especial)
10
de
floja
zurcir
y
Aseguse
A.
contra
zurcir
a
inferior.
hilo
al
punta
unas
ahora
y
los
zurza
en
E).
hilos
redondo
Tan
uniforme
tela
Ia
anteriormente
dañado
de
largo
misma
fije
el
el
90
quede
pun
I
Rammendo:
Preparazione
Piedino:
Punto:
Tensione
superiore:
Filato:
piedino
macchina:
della
per
(accessorio
diritto
punto
leggermente
fine
fib
rammendo
fuori
per
allentata
ricamo
corredo)
a
macchina
piedino
II
macchina:
del
piedino
operazione
B
salire
cucitura
Cucire
stoffa
fig.
tornanti
da
90
di
danneggiata
La
Lel
indietro.
ed
70
da
piedino
rammendo.
per
fare
appoggi
inferiore.
fib
il
tenere
alcuni
maniera
in
fili
I
Ia
quindi
con
termini
Al
D).
rotondi
rammendare
cuciture,
dalle
rammenda
si
e
sia
lunghezza
muovendo
fissare
e
atten
sul
ambedue
punti
parte
cuciture
(fig.
tesi
comple
del
II
delle
(fig.
é
punto
i
di
E).
stata
Si
E),
Ago:
Trasporto:
el
Come
rammendo
Togliere
con
Durante
zione
morsetto
AIl’inizio
capi
sulla
ravvicinata
danneggiata
y
rammendo
cuciture
Quando
coperta
gira
sopra
finché
tamente
pua
tessuto
grossezza
abbassato
applicare
supporto
il
A
vite
Ia
questa
Ia
che
C.
della
fill
del
stoffa.
eseguire
Ia
regolarmente
stoffa
Ia
fill
I
parte
Ia
chiusa.
determinarla
avanti
aBa
il
staffa
Far
fermi.
Tendere
coprire
e
della
(vedi
parte
precedentemente
)
43
Page 48

1°
4
f
C’eaning
Raise
Remove
take
and
dog
feed
the
of
B
ring
hook
hook
Caution:
Nettoyage
Lever
Dévisser
plaque
Nettoyer
Basculer
vers
crochet
temps
dhuile
Attention:
le
ber
and
needle
the
two
the
off
the
with
sewing
sewing
and
raceway.
raceway
Do
et
pied
le
es
aiguille
a
a
griffe
los
l’extérieur.
Nettoyer
C.
autre,
a
dens
Veiller
crochet.
011mg:
and
needle
needle
brush.
the
outwards.
hook
hook
Apply
occasionally.
drop
not
huilage:
presseur
vis
deux
enlever
et
laide
a
verrous
Retirer
Ia
donner
Ia
coursière
a
the
plate
plate.
C.
drop
a
the
et
de
A
de
lanneau
coursière.
une
pas
no
sewing
Push
Clean
of
sewing
laiguille.
fixation
cette
pinceau.
du
a
goutte
crochet.
de
laisser
foot.
screws
Clean
catches
Take
the
oil
to
hook.
de
plaque.
coursière
B
De
the
out
Ia
et
tom
the
4
de
un
Byel
de
tanto
a
aguja
tornillos
pincel.
A
Ponga
aceite
al
e
ago
ii
i
fermi
Ia
limpieza:
y
suelo.
trasporto
el
y
de
Limpie
aguja.
Dire
garfio
del
garfio
vez
de
en
cuide
de
lubrificazione:
piedino.
e
togliere
e
del
Estrarre
corsiera
qualche
non
prensatelas.
filacion
el
hacia
(Ianzadera).
Limpie
C.
en
a
pista
que
Svitare
a
un
con
chrochet
anelle
crochet.
del
goccia
lasciare
Afloje
retire
y
transportador
afuera
Retire
a
pista
cuando
garfio.
del
caiga
no
se
le
due
dago.
placca
pennello.
A
verso
chrochet
e
B
Mettere
d’olio.
cadere
a
el
el
del
una
el
viti
C.
ii
Engrase
Eleve
los
dos
A
le
placa
con
pestillo
anillo
garfio.
gota
Atención!
garfio
Pulizia
Alzare
fissaggio
di
Pulire
Aprire
lesterno.
Pulire
ogni
Attenzione:
crochet.
)
Page 49

4
Changing
Pull
upwards,
out.
enter
and
Changement
Débrancher
Pousser
ner
neuve
sengagent
I’ampoule
vers
de
Cambio
Desenchufe
Empuje
hacia
bombilla
en
y
Sostituzione
Togliere
Spingere
verso
lampadina
entrino
lampadina
La
Iampadina
out
Insert
slots
turn
vers
de
B.
‘ampoule:
Aysaquela.
(as
girela
A
potenza
the
mains
the
then
the
C,
in
it
l’ampoule
et
A
manière
dans
vers
Puissance
Ia
de
bombilla
Ia
forma
de
ranuras
hacia
spina
Ia
Ia
toglierla.
e
in
nelle
in
massima
è
bulb:
plug.
in
direction
new
push
direction
I’ampoule:
de
machine
a
vers
‘enlever.
que
es
haut
Ie
maximale
Watts.
15
bombilla:
Ia
máquina
que
empUjela
C,
B.
della
dalla
Iampadina
maniera
fessure
e
alto
15
Watt.
di
Push
A
bulb
so
bulb
the
B.
du
le
Placer
SOS
fentes
Ia
et
de
arriba,
hacia
Coloque
as
lampadina:
presa
in
alto,
Inserire
che
Premere
C.
girarla
consentina
the
and
that
upwards
secteur.
haut.
Iampoule
tenons
Pousser
C.
tourner
admissible
red.
Ia
nueva
a
guias
hacia
a
girarla
nouva
(a
perni
senso
in
bulb
pull
the
Ia
girela
encajen
arriba
muro.
Ia
per
I
it
pins
tour
B.
Ia
Page 50

________
Needle
Using
the
Needle
System
size
i75H
70,
130/705
70.
130/705
75,
130/705
70.110
130/705
90-110
130/705
70-120
130/705
80-110
130
70—110
H
130/705
Needle
75,
130/705
Needle
75,
60-80
80
110
90
H-N
30/705
100
90
90
130/705
Needle
&
H-SUK
H-PS
H-SKF
H-J
H-LL
H-PCL
H-WING
H-E
thickness:
H-O
thickness:
H-M
thickness:
chart
adequate
Fabric
light
Needle
60, 70,
needle
needle
weight:
size:
75
points
Profile
guaranteesabetter
Point&eye
Small
Medium
ball
point
Medium
ball
point
Large
ball
point
Acute
round
Narrow
twist
(right
Narrow
point
left-twist
Small
long
Hemstitching
point
Medium
Light
point
Acute
point
working uptothe
Fabric
weight:
medium
Needle
size:
80,90
ball
point Universal
point
point
cutting)
wedge
with
groove
ball
point,
eye
ball
specially
ball
point
round
material.
Suitable
synthetics,
organdy,
and
Coarse
Quiana
Specific
suitable
fabrics.
Wide-meshed cosetry,
and Lastex.
Twill,
and
Leather,
leathers.
lmitaon
plastic
Seams
Attractive
dressed
glass
Specially
For
for
needle
fine
woolens,
embroidery
knitted
and
Simplex
stretch-fabric
for
delicate
workwear, heavy
light
canvas.
suede,
leathers,
sheeting
topstitched
No.
30/3
cambric.
working
synthetic
hemstitching
materials,
for
developed
with
for
linen,
work.
fabrics,
ca
and
embroidery
micro
Fabric
weight:
heavy
Needle size
WOlO
2
OH
fine-meshed
chiffon,
fancy
Lastex,
needle.
and
Lycra,
linen, blue
buttonhole
on
heavily
and
work
needle
fibres
batiste,
interlock,
Particularly
Simplex
velvet,
stretch
and goatskin
plastic materials,
oilcloth.
with
thread.
organdy
quilting
1
seams
knitted
jeans
silk
46
Page 51

eedle
chart
•
,
Decorative
Before
fabric
r
Decorative
130/705
80
80
j
80
—
Special
-
II
.
!)I]
-:
System
needle
130/705
80
130/705
80
90
100
designs
start
you
properly.
130/705
H-ZWI-Ho
80
100
&
size
H-ZWI
H-ZWI
sewn
sewing,
way,
this
In
zigzag
and
H-ZWI
hemstitching
Stitch
2.5mm
2.5
2.5
2.5mm
3.0
with
turn
needle
0.5-1.5
0.5—1.5
0.5—1.5
twin
2.0-3.0
2.0—3.0
length
mm
mm
mm
twin
handwheel
the
patterns
needi
brekage
mm
mm
mm
mm
mm
needles
Stitch
-
-
-
-
-
and
can
wide
narrow
narrow
very
very
check
be
width
largely
narrow
narrow
make
to
prevented.
F
I
Needle
spacing
1.6mm
mm
2.0
2.5
3.0mm
4.0
sure
1.6
2.0
2.5
-
-
mm
mm
mm
mm
mm
the
needles
Suitable
for
Medium-wide
cording
cording
Wide
wide
Extra
Extra-wide
stitch
into
Ornamentations
Ornamentations
Ornamentations
Decorative
stitching
dressed
Heavily
and
fabrics
cambric
cularly
are
suitable.
cording
cording
the
hem
effect.
glass
parti
47
Page 52
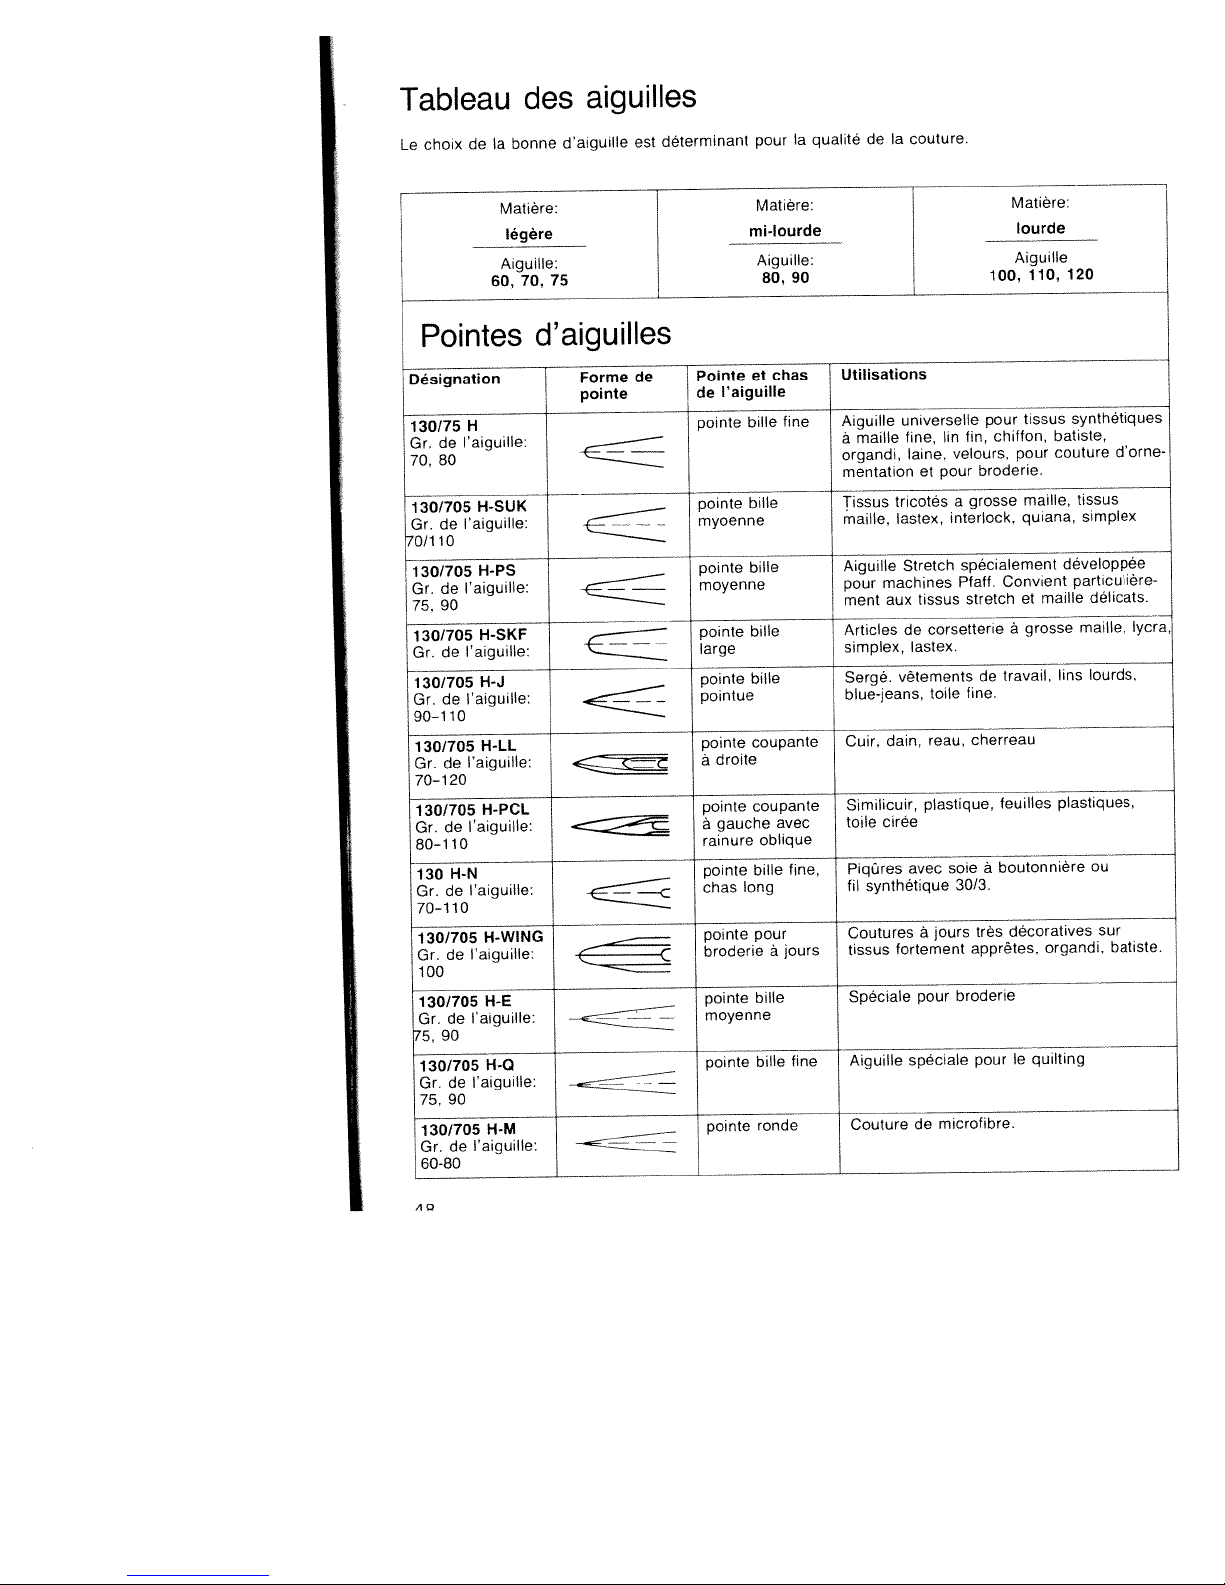
Tableau
de
choix
Le
Ia
des
bonne
aiguilles
d’atguIIe
est
determinant
pour
Ia
qualite
a
couture.
de
Pointes
Designation
H
130/75
‘aiguille:
de
Gr.
80
70,
130/705
l’aiguille:
de
j7r.
130/705
l’aiguille:
de
Gr.
90
75,
130/705
I
de
‘
Gr.
130/705
l’aiguille:
de
Gm,
90—110
130/705
l’aiguille:
de
Gr.
70-120
130/705
de
Gr.
80-110
I-f-N
130
l’aiguille:
Gr.
de
70-110
130/705
Gr.
de
100
130/705
Gr.de
Matiére:
Iegere
Aiguille:
60,
H-SUK
H-PS
H-SKF
‘aiguiHe:
H-J
H-LL
H-PCL
‘aiguille:
H-WING
l’aiguille:
H-E
l’aiguilfe:
75
70,
d’aiguilles
Forme
pointe
—
—
-
1’
de
—
EE
I
(
Pointe
I’aiguille
de
pointe
pointebule
myoenne
pointe
moyenne
pcntebiIle
large
pointe
pointue
pointe
droite
a
pointe
1’
gauche
a
rainure
pointe
chas
pointe
broderie
pointe
moyenne
mi-lourde
Aiguille:
80,
chas
et
bille
bille
bille
coupante
coupante
avec
oblique
bille
long
pour
a
bille
90
fine
fine,
jours
lourde
AigulIe
100,
1
Utilisations
lin
velours,
pour
a
interlock,
toile
reau,
soie
30/3.
jours
broderie
pour
chiffon,
fin,
pour
broderie.
grosse
spécialement
Convient
Pfaff.
stretch
travail,
de
fine.
cherreau
feuilles
boutonniere
a
décoratives
trés
apprétes,
unwerselle
Aigu!lIe
a
organdi,
mentation
lissus
maille,
Aiguille
pour
ment
Articlesdecorsetterieàgrossemalelycra,
simplex.
Serge.
blue-jeans,
Cuir,
‘‘
maille
machines
aux
dam,
Similicuir,
cirée
toile
Piqures
fil
synthetique
Coutures
tissus
Speciale
fine,
lame,
et
tricotés
lastex,
Stretch
tissus
lastex.
vêtements
plastique,
avec
a
fortement
pour
110,
tissus
maille,
quiana,
maille
et
organdi,
120
synthetiques
batiste,
couture
tissus
simplex
développée
particuliere
délicats.
lourds.
lins
plastiques,
ou
sur
dome
batiste.
130/705
Gr.
75,90
130/705
Gr.
60-80
AO
de
de
H-O
l’aiguille:
H-M
l’aiguille:
EEEZ
—EEEEEj
pointe
pointe
fine‘Aiguille
bille
ronde
Couture
spéciale
microfibre.
de
pour
le
quilting
Page 53

bleau
des
aiguilles
utures
‘ant
ant
P
:
i;,;
j
dans
Designation
130/705
Grosseur:
130/705
Grosseur:
Grosseur:
Grosseur:
d’ornementation
couture
a
plaque.
a
au
Motifs
130/705
Grosseur:
Grosseur:
Grosseur:
ajour/Aiguille
Ourlet
130/705
H-Zwl-HO
Grosseur:
Grosseur:
Longeur
point
HZWl
80
H-ZWI
80
90
100
2.5
2.5
2,5
2.5
3,0
avec
ci’ornementation,
point
H-ZWI
80
80
80
80
100
vous
Ainsi
d’orenmentation/Motif
0,5-1.5
0,5-1,5
0,5-1,5
2,0-3,0
2,0—3,0
mm
mm
mm
mm
mm
ne
double
de
aiguilles
tournez
risquez
mm
mm
mm
speciale
mm
mm
Largeur
point
-
-
-
-
-
jumelées
volant
le
pas
que
au
large
étroite
étroite
très
très
contrôlez
et
es
point
étroite
étroite
de
aiguilles
zigzag
Espacement
aiguilles
des
mm
1,6
mm
2,0
mm
2,5
mm
3,0
mm
4,0
aiguilles
es
si
cassent
mm
1,6
mm
2,0
mm
2,5
-
-
au
pénètrent
cours
Utilisations
nervures
normales
nervures
larges
nervures
extra-larges
impeccable-
couture.
Ia
de
Ornementations
Ornementations
Ornementations
décoratif
Effet
d’ourlet
Sont
ment
es
prétés
ajours.
particuliére
appropries
tissus
et
batiste.
le
trés
ap
49
Page 54

____--
_____
Tabla
eleccion
La
Punta
Sistema
nümero
y
130/75
N°70180
130/705
70/110
N°
30/705
130/705
70/110
60
H
H-SUK
H-PS
H-SKF
de
agujas
deaaguja
Genero
ligero
aguja
70 75
de
correcta
las
Perfil
es
aigo
agujas
muy
Forma
punta
Punta
pequena
Punta
media
Punta
grande
Importante
Género
medio
aguja
80
Ia
de
del
ojo
y
estérica
esférica
esférica
para
90
.
Apropiada
Aguja
malla
lana.
bordados
Géneros
lastex,
iaesciaiaraeneros
Corseteria
simplex,
obtener
universal
fina,
terciopelo.
interlock,
una
buena
para
para
lino
fino,
de
punto
a
basedemaHa
lastex.
100
chifOn,
costuras
de
quiana,
costura.
Género
pesado
tejidos
malla
aguja
110 120
sinteticos
batista,
decorativas,
grtricoTi
simplex
elásticos
gruesa,
de
organdi.
y
licra,
1130/705H-J
N°90
-
110
H
130/705
N°70
130/705
N°
H-LL
—
120
H-PCL
—110
80
13011-N
70-110
N°
130/705
N°
130/705
N°
/705
N°
130/705H-Mi__---N°
50
H-WING
100
H-E
75/90
H-O
75/90
75/90
J
I
—
EJ.ZZ
Punta
—
—
—
tuntsesfermca
.,,
redonda
puntiaguda
Punta
cortante
atIaderecha
Punts
cortante
Ia
izquierda,
canal
en
Punts
es
pequena.
alargado
Punta pars
vainica
calados
y
Punts
esterica
media
pequens
Punts
redondeada
punts
ojo
‘
Sarga,ropa
mo
pesado.
—
Cuero.
(cabritilla).
a
Cuero
con
c
espunteados
ojalesohilo
Calados
efecto
organdi
Especial
Especmalmentedesarrollada
quilt.
Pare
prfesional
vaqueros,
.-
ante,
box-calf,
sintetico,
smntético
costuras
y
en
generos
similares
y
para
confeccionsr
yde
Ions
pie!decabra
plästico.
con
hilodesedapara
del
de
vainica
de
mucho
bordados.
generosdemicrohbras.
hule.
N°
trabalo.
lmgera.
30/3
degran
apresto,
pare
bores
de
I
J
Page 55

bIa
de
agujas
Motivos
Antes
clavan
se
Adornos/Zigzag
N°
N°
N°
Vainica/Agujas
1301705
H-ZWIHo
N°
N°
Sistema
nUmero
y
130/705
N°
80
130/705
80
N°
90
N°
100
N°
decorativos
comenzar
do
perfectamente:
80
80
80
80
100
H-ZWI
H-ZWI
H-ZWI
con
labor
Pa
gemelas
Largo
puntada
2.5
2.5
2,5
2,5
3.0
de
‘
0,5-1,5
0,5-1,5
0,5-1,5
I
mm
mm
mm
mm
mm
agujas
deseada,
esa
espciales
2,0—3,0
2.0-3,0
de
gemelas
forma
mm
mm
mm
mm
mm
gire
oP
evitará
Ancho
puntada
-
-
-
-
-
volante
Pa
ancho
estrecho
estrecho
muy
muy
de
con
rotura
estrecho
estrecho
Distancia
agujas
entre
1.6
mm
mm
2.0
mm
2,5
mm
3,0
mm
4,0
para
1.6
2.0
2,5
comprobar
mm
mm
mm
mano
Ia
las
de
agujas.
Apropiada
Lorzas
Lorzas
Lorzas
Lorzas
anchas
siasagujas
Adornos
Adornos
Adornos
Calados
ca
rativos
I
neros
muy
normales
normales
anchas
muy
vaini
y
deco
en
gé
mucho
de
para
_
51
Page 56
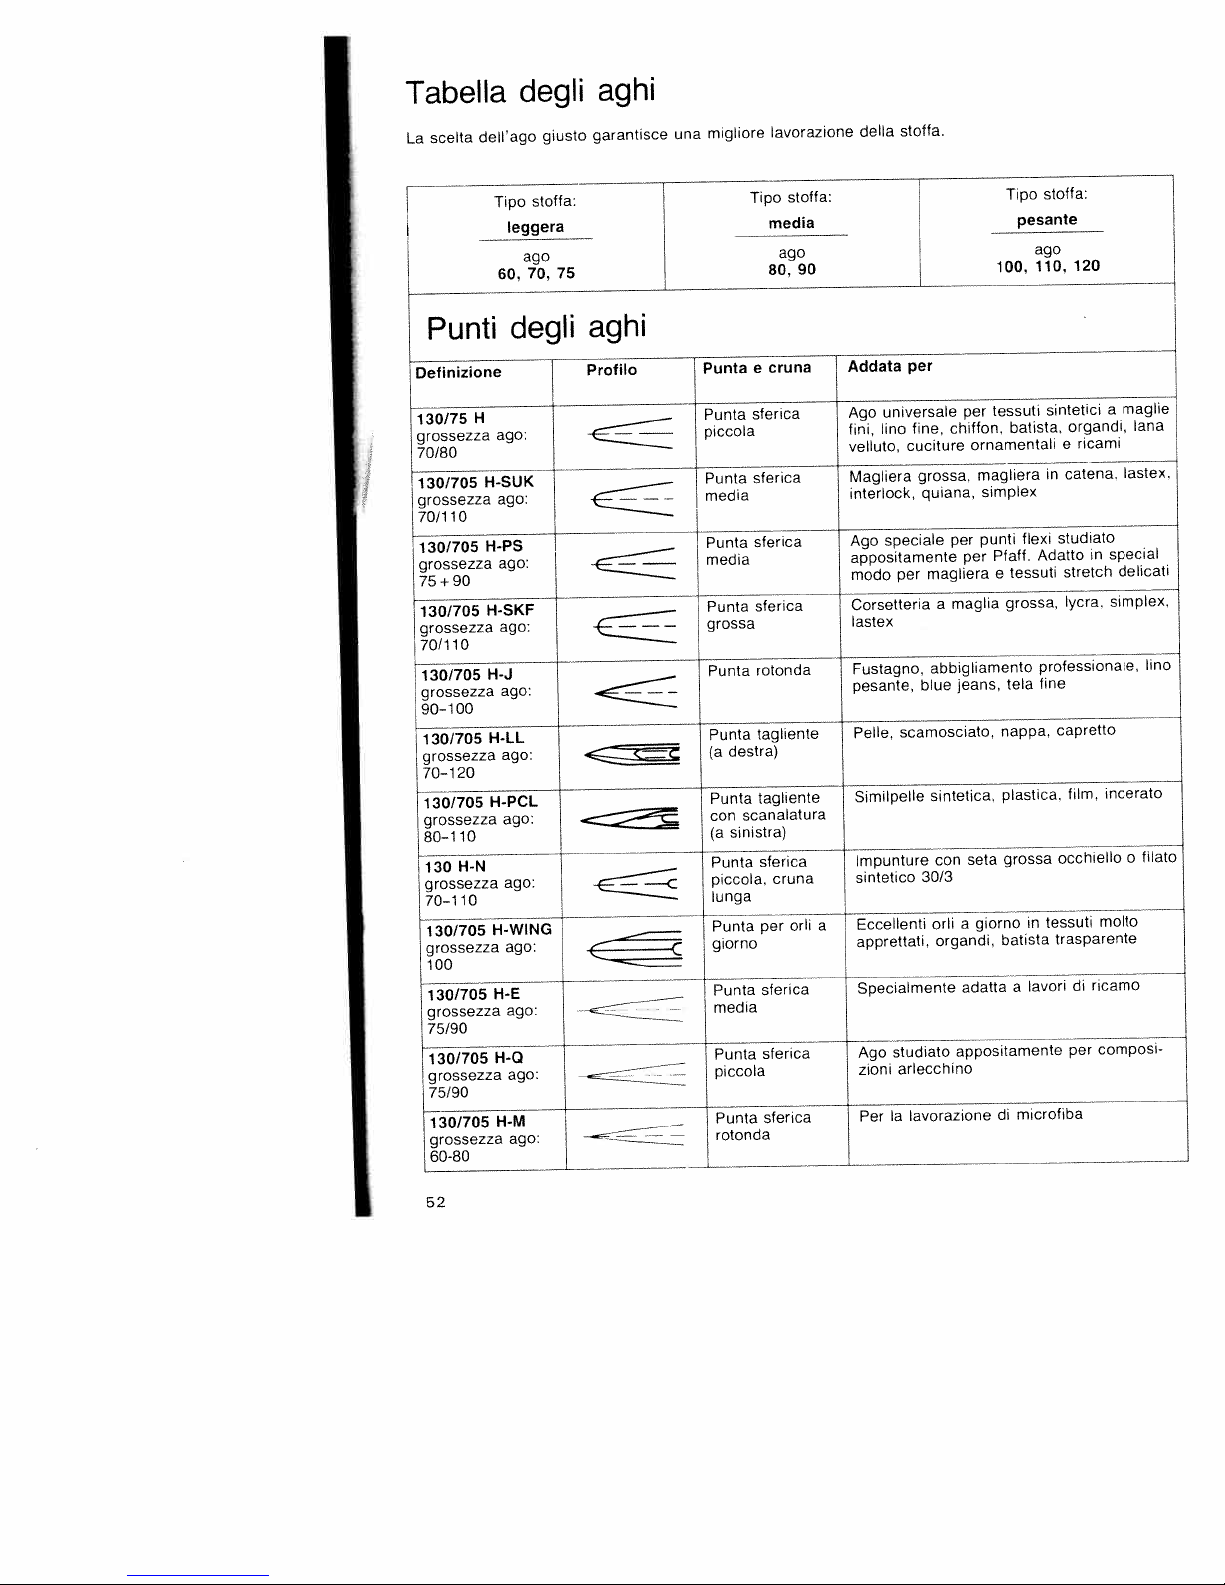
Tabella
dell’ago
scelta
La
Tipo
leggera
degli
giusto
stoffa:
aghi
garanhsce
una
migliore
avorazione
stoffa:
lipo
media
90100,iO,12
della
stoffa,
Tipo
pesante
stoffa:
Punti
Definizione
130/75
grossezza
70/80
I
130/705
grossezza
130/705
grossezza
90
+
75
130/705
grossezza
70/110
130/705
grossezza
90-100
130/705
grossezza
70-120
130/705
grossezza
80—110
H-N
130
grossezza
70—110
130/705
grossezza
100
130/705H-E
grossezza
75/90
130/705
grossezza
75/90
130/705
grossezza
60-80
H
ago:
H-SUK
H-PS
H-SKF
H-J
H-IL
H-PCI
H-WING
H-Q
H-M
degli
ago:
ago:
ago:
ago:
ago:
ago:
ago:
ago:
ago:
ago:
ago:
-
—
aghi
Profilo
—
—
E’::-::
CE
—.--—-—-—
-E
—
per
cruna
e
Punta
sterica
Punta
—
piccola
I
sferica
Punta
media
sferica
Punta
media
sferica
Punta
grossa
—
—
Addata
Ago
universale
fine,
mo
fini,
cuciture
velluto.
Magliera
interlock,
Ago
speciale
appositamente
per
modo
Corsetteria
lastex
grossa,
quiana,
magliera
a
per
chiffon.
ornamentali
magliera
simplex
punti
per
per
maglia
tessuti
batista,
aft.
Pt
tessuti
e
grossa.
flexi
sintetici
in
studiato
Adatto
organdi,
ricami
e
catena,
stretch
lycra,
in
maglie
a
lana
laste
special
delicati
simplex.
I
rotonda
Punta
tagliente
Punta
destra)
(a
tagliente
Punta
scanalatura
con
sinistra)
(a
sferica
Punta
c
---
piccola,
lunga
Punta
giorno
Punta
media
Punta
piccola
Punta
rotonda
cruna
per
sterica
sferica
sferica
orli
Fustagno,
1
pesante,
Pelle,
Similpelle
lmpunture
sintetico
I
Eccellenti
a
apprettati,
Specialmenteadattaavondiricamo
Ago
zioni
Per
abbighamento
blue
scamosciato,
sintetica,
con
30/3
orli
organdi.
studiato
arlecchino
lavorazione
a
jeans,
seta
giorno
a
appositamente
professionalejino
fine
tela
nappa,
plastica.
grossa
in
batista
microfiba
di
capretto
film,
occhiello
tessuti
trasparente
per
icerato
o
molto
composi
filato
52
Page 57

abella
degli
I
aghi
-
Motivi
Pnma
entrano
Denominazione
---
K-ZWI
H-ZWb
130/705
Grossezza:
130/705
Grossezza:
Grossezza:
Grossezza:
ornamentali
eseguire
di
Motivi
130/705
Grossezza:
Grossezza:
Grossezza:
Orb
130/705
H-ZWI
difficoltà
senza
ornamentali/Motivi
H-ZWI
giorno/cucitura
a
Ho
+
Grossezza:
Grossezza:
100
80
80
80
80
80
80
90
100
con
ii
motivo
_J
Iunghezza
punto
-__
2.5
2.5
-___
2,5
2.5
3,0
aghi
ornamentale
foro
nel
0.5—1,5
0,5-1.5
0,5-1.5
2,0-3,0
mm
mm
mm
mm
mm
gemebli
della
a
speciale
zigzag
mm
mm
mm
mm
desiderato,
placca
doppia
Iarghezza
-
-
d’ago.
argo
stretto
stretto
jO
controllare.
evitano
Si
distariza
mm
1.6
2.0
2,5
3.0
girando
cosi
1,6
2.0
2,5
mm
mm
mm
mm
possibilit
mm
mm
mm
aghi
AcolarmentelarOhe
ii
volantino,
rotture
Indicato
nervature
nervature
nervature
nervature
motivi
motivi
per
gli
se
aghi.
di
ornamentalil
ornamentalii
ornamentali
motivi
a
Effeto
giorno
a
prestano
Si
tivo.
particolarmente
fortemente
tessuti
apprettati
in
batista
suti
rigido
normali
normal
larghe
pant
aghi
punto
decora
e
tes
53
Page 58

4
Faults and
howtoremedy them
Cause:
Machine
1.
Needle
Wrong
Needle bent
Machine
Needle
2.
Thread tension
thread
not
needle used.
too
Needle
any
that
Needle
go.
of
not
bent.
too
bent
case
For
Poor-quality
excessive
3.
Needle
will
Needle
Needle
Needle
because
Bobbin
inserted
threaded
thin
thread
the above
has
storage.
breaks
pushed
thinortoo
workispushedorpulled.
skips
blunt.
or
improperly.
for
too
or
knotty
become
and
strikes
improperly
stitches
correctly.
thread used.
breaks
reasons.
strong.
thread
too
farasit
up
as
thick.
needle
inserted.
used,
dry
by
plate
Remedy:
Push
needle
flat
shank
Insert
Insert
Check
Insert
par.1above.
See
Regulate
or
Use
only
Insert
it
will
as
Insert
Needle
See
machine
Let
Only
guide
When
inasfar
upasfarasit
side
facing toward
system
new
stronger
new
new
130/705Hneedle.
needle.
threading.
needle.
thread tensions.
good-quality
needle
go.
needle.
Chart.
feed
the material
inserting
asitwill
the
and
the
bobbin
go.
will
go,
the
back.
thread.
pushitupasfar
work
alone.
lightly.
push
case,
its
it
Seamisnot
4.
Tension
Thread
Bobbin
Kinks
appear
material.
uniform
outofadjustment.
thick,
too
thread
knottyorhard.
wound
on
top
unevenly.
and
bottom
Check
upper
and
lower
tensions.
first-class
Use
During
threadinhand,
bobbin
of
Thread
both
tensions.
thread
bobbin
winding,
tension stud.
machine
but
properly
pass
only.
do not
it
through
and
hold
the
check
Page 59

Cause:
Machine
5.
Lint
rows
Feed
at
right
Machine
6.
Thread
has
of
dog
feed
or
ends
feeds
accumulated
dog.
dropped.
rear.)
at
runs
in
hook
irregularly
between
(Drop-feed
difficulty
with
raceway.
not
or
tooth
control
Remedy:
all
at
clean
and
plate
drop-feed
front.
into
needle
thread
hook
control
ends
raceway.
to
and
Remove
Flick
is
the
Remove
oil
the
put
left
a
out
or
drop
lint.
to
of
7.
Never
foot.
the
Important
run
If
you
master
threaded
a
have
switch.
notes:
to
leave
This
machine
the machine,
particularly
is
unless
there
even
important
is
for
a
piece
a
short
when
fabric
of
while,
children
be
are
under
sure
the
to
around.
sewing
switch
off
55
Page 60
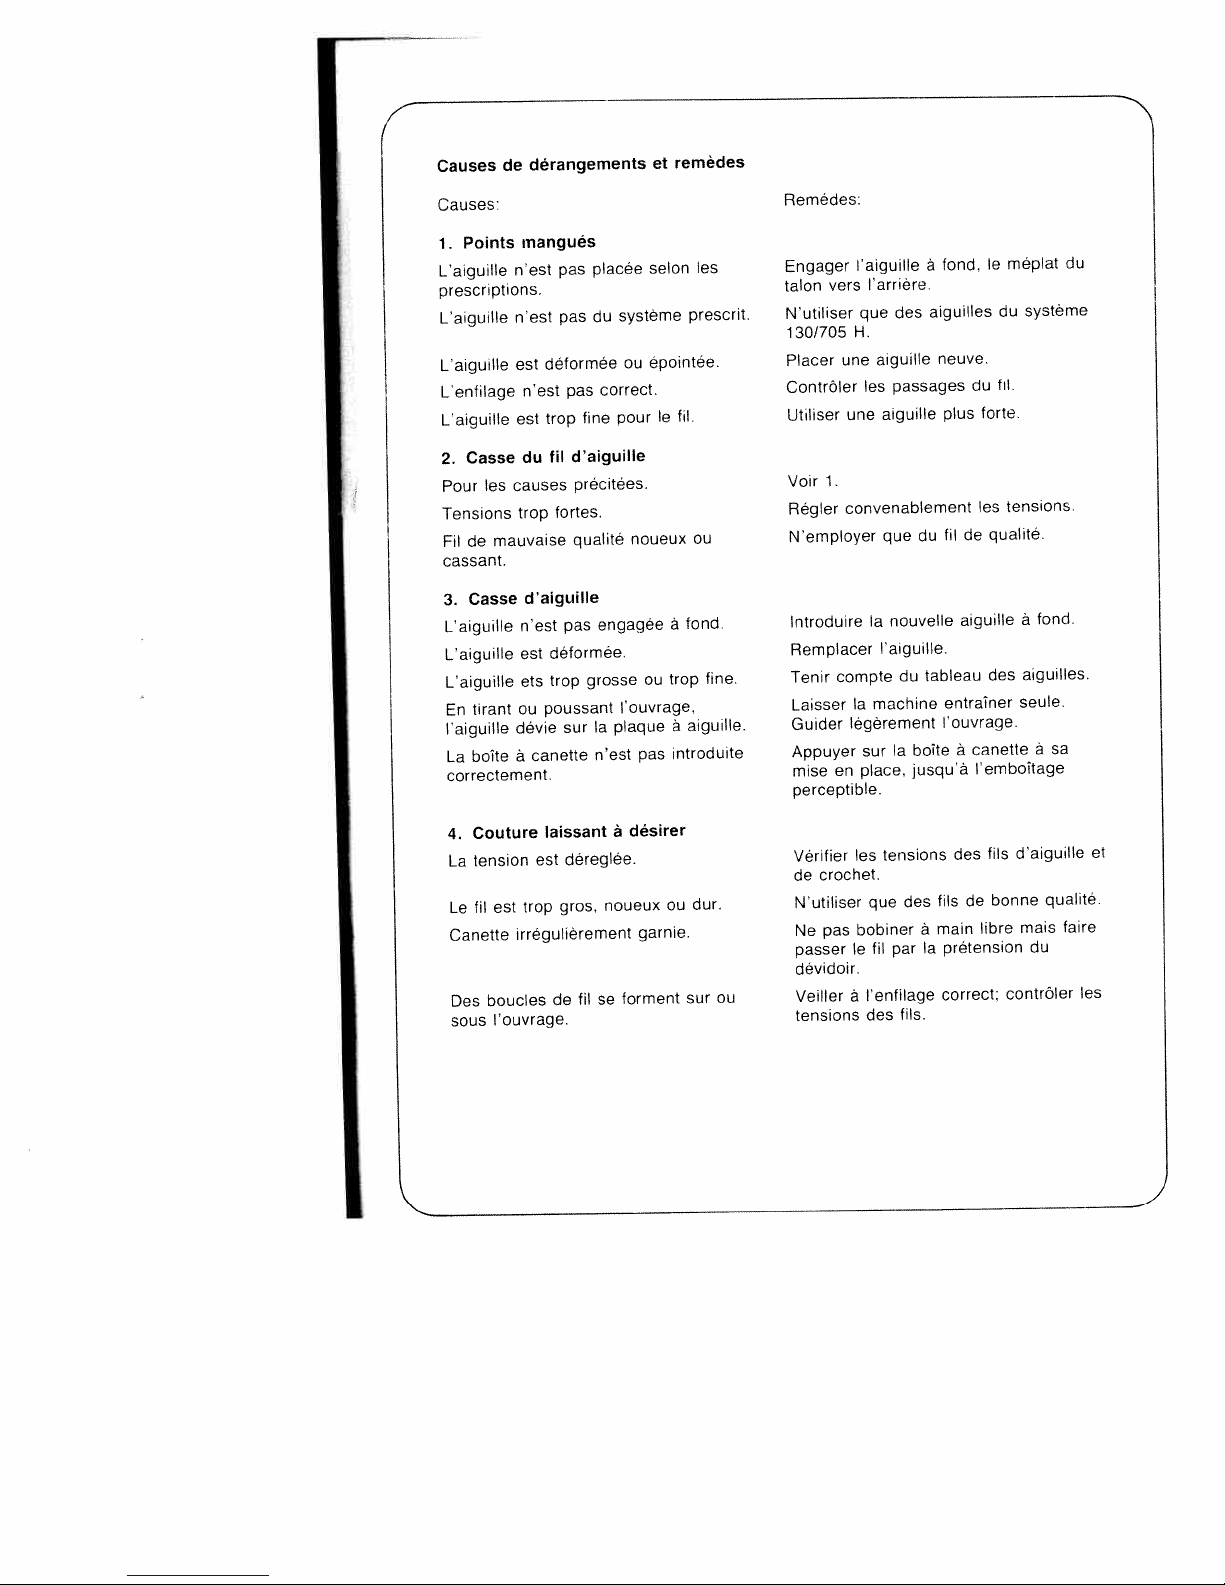
Causes
Causes:
1.
L’aiguiHe
prescriptions.
Laiguilie
Laiguille
Lenfilage
Laiguille
2.
Pour
Tensions
de
Points
Casse
les
mauvaise
Fil
de
cassant.
Casse
3.
Laiguille
Laiguille
Laiguifle
tirant
En
l’aiguille
boite
La
correctement.
derangements
mangués
pas
nest
pas
nest
déformée
est
nest
pas
est
trop
d’aiguilie
til
du
causes
tortes.
trop
d’aiguille
pas
nest
déformée.
est
trop
ets
poussant
ou
sur
dévie
canette
a
placée
du
correct.
tine
précitèes.
qualité
engagee
grosse
plaque
Ia
nest
et
selon
système
epointee.
ou
pour
noueux
ou
louvrage
pas
remèdes
prescrit.
iii.
le
tond.
a
trop
aiguille.
a
introduite
ou
les
tine.
Remédes:
Engager
vers
talon
Nutiliser
130/705
Placer
ContrOler
Utiliser
1.
Voir
Regler
Nemployer
Introduire
Remplacer
compte
Tenir
Laisser
Guider
Appuyer
en
mise
perceptible.
larrière.
des
aiguille
passages
aiguille
que
nouvelle
Ia
laiguille.
du
machine
a
a
aiguilles
du
tableau
boite
jusqua
laiguille
que
H.
une
les
une
convenablement
Ia
lègerement
sur
place,
fond
neuve.
du
plus
les
fil
de
aiguille
entrainer
louvrage.
canette
a
lemboitage
le
du
hI.
forte.
qualite.
des
méplat
système
tensions.
fond.
aiguilles.
seule.
a
du
sa
Couture
4.
tension
La
fil
Le
Canette
Des
sous
est
trop
est
irregulierement
boucles
louvrage.
laissant
dereglee.
gros
de
fil
a
noueux
torment
Se
desirer
garnie.
ou
dur.
sur
ou
Verifier
crochet.
de
Nutiliser
pas
Ne
passer
dévidoir.
Veiller
tensions
les
que
bobiner
fil
le
l’enfilage
a
des
tensions
des
par
fils,
tils
main
a
pretension
Ia
correct;
des
de
fils
bonne
libre
daiguille
qualité.
mais
du
contrôler
et
faire
les
Page 61
N
Causes:
La
5.
Bourres
griffe.
a
Griffe
larrière
Marche
6.
bribes
Des
coursière
7.
Remarques
jamais
Ne
pas
Ne
machine
enfants
machine
agglomerees
abaissée
en
ou
dure
de
du
mettre
oublier
que
dans
n’entraine
(levier
position
de
se
fil
crochet.
importantes
en
de
pour
même
Ia
entre
descamotage
droite).
machine
Ia
sont
marche
toujours
quelques
pièce.
pas
les
prises
debrayer
ou
dents
dans
machine
Ia
instants.
Remèdes:
irregulierement
Enlever
de
bourres
Placer
a
lavant.
Enlever
a
goutte
enfilée
linterrupteur
est
Cela
sans
général,
surtout
Ia
au
levier
le
es
dhuile
tissu
plaque
pinceau.
descamotage
bribes
dans
sous
méme
nécessaire
aiguille,
a
de
Ia
le
mettre
fil
et
coursière.
pied
Ion
si
a
sil
y
es
Oter
a
ou
presseur.
quitte
ne
des
une
Ia
57
Page 62

Fallos
remedios
y
Causa:
máquina
La
1.
aguja
La
ha
se
No
aguja
La
máquina
La
debidamente.
aguja
La
utilizado.
hilo
El
2.
razones
as
Por
anteriormente.
tension
La
no
hilo
El
nudoso
demasiado
aguja
La
3.
aguja
La
La
aguja
La
aguja
gruesa.
aguja
La
tirar
por
cápsula
La
colocada
está
no
colocado
torcida
está
no
demasiado
es
superior
hilo
del
es
de
estado
ha
o
tiempo.
se
estábien
no
torcida.
está
demasiado
es
choca
Ia
tela
de
de
debidamente,
puntadas
hace
bien
aguja
Ia
o
enhebrada
estã
se
nombradas
es
buena
almacenado
rompe
contra
o
canilla
Ia
colocada.
correcta.
despuntada.
para
fina
rompe
demasiado
calidad
colocada.
fina
placa
Ia
empujarla.
no
saltadas
o
demasiado
o
de
está
el
fuerte
es
aguja
hilo
Remedio:
Compruebe
con
y
tope
Coloque
130/705
Coloque
Compruebe
Ia
Elija
agujas.
Compruebe
nümero
Regule
Utilice
buenas
Compruebe
tope.
el
Coloque
las
Siga
tela
La
Unicamente
colocar
Al
deberá
encaje
está
si
lado
el
aguja
una
H.
aguja
una
enhebrado.
el
de
aguja
puntos
los
1.
Ia
tensiOn
buena
de
hilos
condiciones.
si
está
aguia
una
normas
ser
deberá
por
cápsula
Ia
presionarse
perfectamente.
introducida
pIano
del
nueva.
acuerdo
los
de
introducida
nueva.
Ia
de
arrastrada
máquina.
Ia
un
hacia
sistema
con
citados
hilos.
calidad
tabla
con
poco
Ia
hasta
atrás.
Ia
en
y
hasta
de
canilla
hasta
tabla
el
en
agujas.
que
el
do
La
4.
tensiOn
La
ada.
regul
demasiado
Hilo
hilo
El
devanado.
hilos
Los
material,
costura
de
no
sino
de
Ia
no
los
fuerte,
canilla
anudan
se
encima
es
hilos
unitorme
no
nudoso
está
no
o
esta
bien
dentro
debajo.
bien
o
del
rigido.
Compruebe
hilo
Use
pasar
Haga
siempre
Compruebe
ambos
de
que
hilos.
tensiOn
Ia
buena
hilo
el
Ilene
enhebrado
el
do
calidad.
por
canilla.
Ia
el
ambos
tensor
Ia
y
hilos.
previo
tensiOn
de
Page 63

Causa:
La
5.
hace
to
o
ha
Se
as
hileras
transportador
El
a
está
La
6.
Ia
En
Nota
7.
ponga
No
brada
pieza
done
tiempo,
sobre
ral,
máquina
irregularmente
acumulado
de
derecha).
Ia
máquina
del
pista
importante
en
haber
sin
costura.
de
máquina,
Ia
desconecte
todo
no
dientes
está
va
gartio
marcha
colocado
si
arrastra
polvo
del
oculto
forzada
hay
Siempre
aunque
el
hay
el
suciedad
y
transportador.
(Ia
restos
maquina
Ia
antes
que
sea
interruptor
niinos
material
palanca
aban
por
cerca.
de
una
entre
hilos.
enhe
corto
gene
Remodlo:
Retire
pincel
Ponga
Limpie
de
gota
placa
Ia
transportador.
eI
palanca
Ta
pista
Ia
aceite.
I
un
con
limpie
y
aguja
de
izquierda.
Ia
a
una
ponga
y
garfio
del
Page 64

6
La
stato
macchina
fib
N
motivi
tensione
Lago
durante
urta
capsula
La
bene
La
4.
tensione
La
Filato
fUo
H
maniera
formano
Si
tessuto.
1
inconvenienti
macchina
non
inserito
storto
è
troppo
e
nodoso
secco
non
storto.
e
troppo
è
sufla
inserita.
cucitura
troppo
inferiore
Possibili
Inconveniente:
1.
Lago
E
Lago
La
Lago
2.
Vedi
La
Filato
troppo
3.
Lago
allarresto.
Lago
Logo
Tirando
inserito
è
un
o
non
fine
superiore
precedenti.
eccessiva.
è
o
perche
rompe
si
stato
è
spingendo
o
cucitura.
Ia
placca
della
non
nodoso.
regolare.
della
salta
bene.
ago
spuntato.
infilata
è
per
si
cattiva
di
vecchio.
inserito
sottile
d’ago.
spolina
non
corretta.
è
è
non
asole
come
e
punti
sbagliato.
bene.
tilato.
ii
rompe
qualità,
fino
troppo
o
matertale
1
sic
ago
non
regolare
è
grosso
stato
sopra
ovviarvi
grosso.
piega
stata
è
duro.
0
bobinato
o
o
sotto
filato
e
in
Rimedio:
nserire
piatta
parte
Inserire
Cambiare
Controllare
Utilizzare
punto
Vedi
Aegolare
Usare
qualita.
lnserire
Cambiare
Rispettare
macchina
La
materiale
mente
Dopo
leggermente
Controllare
quella
Usare
bobinare
f\4ai
passare
tensione
bnfilare
tensioni
ago
un
ago
bene
sempre
ago
de
guidato
avere
inferiore,
solo
II
bene
superiore
allarresto,
fino
fusto
del
sistema
ago
ago.
linfilatura,
piü
1.
Ia
solo
nuovo
ago.
tabella
Ia
dove
sola.
con
inserito
finché
tensione
Ia
filato
mano
a
sempre
fib
l’annaspatoio.
per
controllare
e
verso
grosso.
tensione.
filato
fino
degli
trasportare
tessuto
II
mano
Ia
non
perfetto
in
ed
con
dietro.
130/705
buona
di
allarresto.
aghi.
va
leggera.
capsula,
d
si
superiore
stato.
libera.
attraverso
bene
inferiore.
Ia
H.
il
sola
premere
innestata.
e
ma
Ia
Ic
Page 65

Inconveniente:
macchina
La
5.
dentini
I
Tra
polvere
della
trasporto
II
abbassare
per
destra
o
dietro.
del
di
abbassato.
è
ii
non
trasporto
cucito,
trasporto
trasporta
si
dispositivo
II
Si
pressata
è
trova
trasporta
0
a
irregolarmente
solo
Togliere
dentini
Spostare
avanti.
Rimedio:
con
placca
a
un
dispositivo
it
dell’ago
pennello.
a
e
sinistra
pulire
in
o
macchina
La
6.
sono
Vi
Avvisi
7.
azionare
Non
Quando
I’interruttore
residui
dei
importanti
abbandona
si
sforza
net
macchina
a
principale.
crochet.
senza
a
macchina
Ciô
aver
importante,
e
anche
messo
Etiminare
goccia
prima
breve
per
sopratutto
di
della
tempo,
in
residui
i
olio
stoffa
presenza
sul
sotto
occure
fill
dei
crochet.
ii
spegnere
bambini.
di
mettere
e
piedino.
una
I
61
Page 66

Special
special
The
obtained
be
(Accessory
Binder
Cording
(twin
Cording
(twin
Fringe
Edge
Straight
accessories:
accessories
from
(remove
5
foot.
with
needle
7
foot.
w4h
needH
foot
sewing
guide
stitch
your
sewing
grooves
1.8-2.5
grooves
1,4-1.8
foot
below
listed
dealer
holder)
foot
mm
mmneediegauge)9303595391
round
with
an
at
needle
needle
extra
are
gauge)
hole
intended
charge.
special
for
No.
Part
98-053484-91
950-91
93-035
943-91
93-035
422-00
98-802
803-00
98-694
sewing
Sewing
For
[
For
(needle
for
needle
For
For
Caution
1
stitch,
and
binding
cording
fine
sewing
top-stitching
topstitching
For
soft
jobs.
Operation
edges
work
80.
size
cording
70)
size
fringes
Machine
centre
fabrics
They
needle
and
(silk
can
tape
with
and
(wadding)
must
position.
sewing
jersey,
for
be
basting
set
very
etc.)
at
straight
delicate
foot.
Felling
—-——----
foot,
Felling
tonhole
But
Shirring
Single-needle
Overlock
Hemmer
Darning
foot
Teflon
-,,ancy-stitch
toot
foot
foot.
foot
4.5
6
foot
mm
mm
5
cording
mm
3
(remove
foot
foot
sewing
foot
holder)
946-91
93-035
948-91
93-035
98-69441
998-91
93-035
93-03591
404-00
98-620
98-694401-00
93-106
98-694
98-694
1-00
5-91
103-91
801-00
879-00
J
For
For
For
For
For
fabrics
edges
felled
sewing
shirring
single-needle
finishing
hemming
For
Darning
sewing
For
sewing
For
seams
buttonholes
valances
raw
simultaneously
and
edges
fabric
plastic
fancy
and
cording
edges
wool
materials
patterns
for
or
overcasting
joining
elastic
their
I
Page 67

Contents
Accessory
Bobbin
Bobbin
Bobbin
Changing
Changing
Cleaning
Darning
Disengaging
Drawing
Dropping
guide
Edge
Elastic
Electrical
Engaging
Faults
Inserting
Inserting
Inserting
Needle
Needle
Operating
Reverse
Sewing
Sewing
Sewing
Sewing
Special
Stitch
Stitch
Stitch
Stretch
Thread
Topstitching
Upper
Zipper
Zippers,
Zippers
compartment
thread
winding
winding
the
the
and
the
the
up
the
blind
connection
the
how
and
the
the
the
chart
thread
the
sewing
buttonholes
buttons
on
feet
foot,
accessories
length,
pattern
pattern
stitches
cutter
threading
closure,
sewing
ladies’
in
tension,
preparations
bulb
needle
oiling
sewing
bobbin
feed
stitch
sewing
to
bobbin
bobbin
spool
tension
foot
changing
setting
knob
table
seam-like
in
checking
mechanism
remedy
case
pins
control
the
slacks
mechanism
thread
them
attaching
and
the
42,
30,
54,
9,
46,
32,
34,
22,
28,
38,
36,
40,
26
13
11
10
45
24
44
43
10
15
24
25
31
8
12
55
12
13
7
47
17
17
19
33
35
26
25
62
19
20
23
20
18
29
14
39
37
41
63
Page 68

Accessoires
accessoires
Ces
contre
facturation,
spéciaux:
pour
des
travaux
particuliers
sont
depositaire
votre
chez
vente
en
Accessoires
Bordeur
nervures,
Pied
a
jumelees
nervures,
Pied
a
jumelees
pose
Pied
Guide-droit
pour
Pied
Plaque
Rabatteur
Rabatteur
Pied
a
fronceur
Pied
guide-cordonnet
Pied
overlock
Pied
Ourleur
(enlever
ecartements
en
ecartements
en
franges
point
,
a
aiguille
mm
4,5
mm
6,5
boutonnières
mm
3
support
rainures
5
rainures
7
droit
avec
avec
trou
pied)
du
(aiguilles
1,8;
de
(aiguites
de
1,4;
trou
rond
2,5
1,8
rood
Références
98-053484-91
mm)
mm)
—
93-035950-91
93-035953-91
93-035943-91
422-00
98-802
803-00
98-694
preparation
en
93-035946-91
-----
93-035948-91
98-694411-00
93-035998-91
93-035915-91
98-620404-00
98-694401-00
Operations
bordage
couture
(aiguilles
nervures
pour
uilles
ai
couture
surpiquage
-
surpiqures
finsatsouples
trés
coutures
boutonniéres
froncement
de
pose
surfilage
assemblage
bords
de
ourlage
au
nervures
de
n0
no
franges:
de
et
rabattues
cordons
de
coupe
de
ruban
80;
fines,
70
coutures
de
bords
et
bords
bétissage
(jersey
volants,
de
surfilage
sur
etc.
coupe;
simultané
tissus
de
soie)
de
Pid
64
Pied
Pied
repriser
a
semelle
a
pour
points
Teflon
décoratifs
103-91
06
93-1
98-694801-00
98-694879-00
reprisage
coutures
synthetiques
couture
normal
sur
de
matières
motifs
a
at
décoratifs
Ia
lame
plastiques
at
Page 69

des
Table
Normes
Mise
Enlèvement
Branchement
Preparation
Débrayage
Bobinage
Embrayage
Mise
Tension
Mise
Passage
Tensions
Coupe-fil
Selection
Couture
Sélecteur
Tableau
Remplacement
Remplacement
Pieds
Compartiment
Surpiquage
Point
Boutonnières
Pose
Insertion
Fermeture
Fermeture
Travaux
Nettoyage
Changement
Tableau
Causes
Accessoires
de
place
en
place
en
du
place
en
du
en
des
presseurs
invisible
boutons
de
de
des
de
des
de
matières
sécurité
des
Ia
de
electrique
bobinage
du
mécanisme
du
mécanisme
du
de
de
fil
de
d’aiguille
fil
fils
longueur
Ia
de
arrière
points
de
points
de
de
accessoires
a
elastique
fermetures
glissiere
a
glissiere
a
reprisage
huilage
et
lampoule
de
aiguilles
derangements
spéciaux
broches
valisette
canette
Ia
canette
Ia
bolte
l’aiguille
semelle
Ia
de
a
du
glissiére
a
invisible
pour
et
bobines
a
couture
canette
point
du
pantalon
remédes
pied
presseur
dame
20,
28,
30,
32,
34,
36,
38,
40,
42,
48,
56,
3
7
8
8
9
10
11
12
12
13
13
14
17
18
19
19
21
22
24
25
26
26
29
31
33
35
37
39
41
43
44
45
49
57
64
65
Page 70

Accesorios
Para
labores
7
Accesono
Aparato
(retirese
Pie
prensatelas
(agujas
Pie
presatelas
(agujas
Pie
prensatelas
Guia
marginal
ribeteador
el
soporte
gemelas
gemelas
especiales
costura
de
del
para
con
separaciOn
para
lorzas.
con
separactOn
para
puede
prensatelas)
lorzas,
flecos
con
con
180
7
1,4
adquirir
ranuras
5
2.5
ranuras
6
1.8
mm)
mm)
.-...t
en
su
No.
98-053484-91
93-035
93035
J9303594391
98-802
agencia
de
422-00
pedido
950-91
953-91
tienda
.—
-f
accesorios
OperaciOn
Para
Para
bordón
(aguja
j
finas
Para
Para
ribetear
con
hacer
lorzas,
costuras
y
del
No.
del
No.
70)
coser
flecos
pespunteados
especiales.
cinta
alforzas,
similares
80,
para
para
y
(acolchados)
orzas
marcar
con
hilván
Pie
prensatelas
con
agujero
.—---—.____________
Sobrecargador
—______________________________
Sobrecargador
Pie
para
Pie
truncidor
Pie
prensatelas
Pied
prensatelas
Dobladiliador,
Pier
zurcidor
(retirese
Pie
prensatelas
\pj
para
66
redondo
ojales
ci
soporte
puntadas
4.5
6.5mm
para
mm
3
de
para
para
de
punto
mm
cordoncillo
overlock
del
prensatelas)
teflon
adorno
recto
98-694
803-00
93-035
93-035
946-91
948-91
—
986944i100[Paracoseroias
93-035
998-91
93-035915-91
98-620404-00
98-694401-00
93-106
103-91
98-69480100
98-694
879-00
—--
Para
tinas
de
[
—----
Para
Para
1-
Para
Para
elásticos
Para
Para
Para
Para
pespuntear
blandas
y
seda,
costuras
truncir
trabajos
trabajos
dobiadiliar
zurcir
coser
costuras
etc
volantes,
con
remedar
y
sintélicos
costura
para
y
(género
sobrecargadas
etc.
cordoncillo
de
do
sobrehilado
do
bordes
decoratives
coser
do
uniOn
punto
en
telas
generos
a
muy
a
base
a
vez
Page 71

Iridice
Accesorios
Accionamiento
selector
BotOn
Cambio
Cambio
Camblo
ColocaciOn
ColocaciOn
COmo
Compartimento
Comprobación
ComprobaciOn
ConexiOn
Cortahilos
Costura
Costura
Costura
Cremallera
Cremallera
DesconexiOn
Devanado
Engrase
Enhebrado
Extracción
Fallos
Normas
OcultaciOn
Ojales
Palanca
Pespunteados
Tabla
de
de
del
quitar
y
Modelos
prensatelas
Pies
Preparaciôn
invisible
Punto
RegulaciOn
de
de
Tabla
Zurcidos
elOctrica
de
de
en
y
remedios
de
alzaprensatelas
agujas
puntadas
especiales
del
de
agua
Ia
bombilla
a
prensatelas
pie
canilla
Ia
de
cápsula
a
de
maleta-funda
Ia
para
de
de
botones
cremalleras
retroceso
cosida
pantalones
para
mecanismo
del
hilo
del
limpieza
hilo
del
hilo
del
seguridad
transportador
del
para
elástico
argo
del
pedal
puntadas
accesorios
tensiOn
Ia
tensiOn
Ia
una
en
superior
inferior
devanado
el
de
en
con
costura
puntada
cápsuia
a
del
del
de
de
a
canilla
hilo
hilo
seinora
costura
inferior
superior
y
conexión
17,
58,
50,
22,
66
17
21
24
45
25
12
13
8
26
13
18
8
18
35
37
19
39
41
10
11
44
14
15
59
5
24
33
16
29
26
10
9,
31
19
51
23
43
Page 72

Accessori
accessorie
Gli
rivenditori.
I
fuori
corredo:
fuori
corredo
servono
per
avon
die
cucito
speciali.
Si
possono
acquistare
presso
7
Accessorio
Piedino
(togliere
Piedino
(ago
Piedino
(ago
Piedino
Lineale
Piedino
Ribattitore
—-—-—-
Ribattitore
Piedino
Piedino
Piedino
Piedino
Piedino
per
portapiedino)
nervature
gemello
nervature
gemello
per
di
guida
per
per
arricciatore
per
overlock
orlatore
bordare
con
con
frange
punto
4,5
mm
mm
6,5
occhiellli
cordoncino
3
scanalature
5
distanza
7
scanalature
distanza
diritto
mm
con
aghi
aghi
foro
1
8
—_L
14—1,8
rotondo
mm>
No.
dordine
484-9
98-053
93-035
950-9
-.-
953-91
93-035
943-91
93-035
422-00
98-802
803-00
98-694
946-91
93-035
—
93-035948-91
98-694411
93-035998-91
93-035915-91
404-00
98-620
98-694401-00
lavoro
per
bordare
1
cucitura
1
(grossezza
nervature
per
cucire
per
impunture
per
Attenzion&
con
Per impuntureeper
particolarmente
(maglina
per
-00
per
per
per
per
bordi
adatto
per
di
cucito
con
di
nervature
ago
tini
frange
Impostare
posizione ago
di
jersey
ribattiture
confezionare
volants
cucire
eseguire
cucire
cordoncini
e
contemporaneamente
tagliate;
di
stotte
stoffe
per
orlature
ii
bordatore
80,
70>
e
per
al
fini
e
ecc.)
occhieili
e
elastiche.
passare
soltato
centro.
tessuti
cucire
morbidi
arricciature
particolarmente
le
punto
in
marche
diritto
genere
rifinire
i
dinoornamentaIe
Piedino
rammendo
da
(rimuovere_portapiedino)
teflon
Piedino
103-91
93-106
98-694801-00
879-00
98-694
rammendare.
per
per
cucire
sintetico
cucire
per
plastica
in
punti
genere
anche
materiale
e
ornamentali
lana
-
-
Page 73

Indice
di
Norme
inserire
Come
Collegamento
Sollevamento
Preparazione
Bobinare
Inserire
Controllo
Come
lnfilatura
La
II
Controllo
Tagliafilo
Regolazione
Cucire
II
La
II
inserire
alzapiedino
leva
reostato
indietro
buttone
tabella
Sostituzione
Abbassare
Sostituzione
piedini
I
Scomparto
Impunture
invisibile
Punto
Occhielli
Attaccatura
Cerniere
Rammendo
e
Pulizia
Sostituzione
Tabella
Possibili
degli
sicurezza
portarocchetti
ii
elettrico
coperchio
bobinare
per
meccanismo
tensione
della
capsula
a
tensione
della
lunghezza
regolatore
del
punti
dell’ago
trasporto
il
pledino
del
accessori
elastico
bottoni
lampo
lubrificazione
lampadina
aghi
inconvenienti
del
dei
cucito
inferiore
della
superiore
punto
punti
come
e
spolina
ovviarvi
17,
20,
22,
37—41
52,
60,
5
7
8
8
9
11
12
13
13
14
16
17
18
18
19
19
21
23
24
24
25
26
26
29
31
33
35
43
44
45
53
61
69
Page 74

M.
PFAFF
G.
Aktiengeseflschaft
Werk
Karisruhe-Durlach
Gritznerstra8e11
D-76227
Subjecttoatterabons
Sous
Salvo
Con
Nr.
englisch/franzosisch/spanischlitatienisch
7313
Karsruhe
reservedvmodifications
toute
moditicaciones
riservadimodifiche
995-77/000R04/95
29-629
9/5
/3/10
in
design.
thcnicas,
techiche.
techniques.
 Loading...