


EasyTouch® 8 and 4
Indoor Control Panel
Installation and
User’s Guide
IMPORTANT SAFETY INSTRUCTIONS READ AND FOLLOW ALL INSTRUCTIONS SAVE THESE INSTRUCTIONS
© 2005 Pentair Water Pool and Spa, Inc. All rights reserved
This document is subject to change without notice
1620 Hawkins Ave., Sanford, NC 27330 • (919) 566-8000
10951 West Los Angeles Ave., Moorpark, CA 93021 • (805) 553-5000
Trademarks and disclaimers: EasyTouch, IntelliChlor, IntelliFlo, QuickTouch and the Pentair Water Pool and Spa logo are trademarks of Pentair Water Pool and Spa, Inc. Other trademarks and trade names may be used in this document to refer to either the entities claiming the marks and names or their products. Pentair Water Pool and Spa, Inc. disclaims proprietary interest in marks and names of others.
P/N 520617 Rev B - 12/19/05

i
Contents |
|
IMPORTANT SAFETY PRECAUTIONS ............................................................................................ |
iii |
EasyTouch Indoor Control Panel Kit Contents .................................................................................. |
v |
Related Manuals .............................................................................................................................. |
v |
EasyTouch Accessories ................................................................................................................... |
v |
Technical Support ............................................................................................................................. |
vi |
Section 1: System Overview ......................................................................................................... |
1 |
Easy Touch Pool and Spa Control System Overview ......................................................................... |
1 |
Operating EasyTouch ....................................................................................................................... |
1 |
IntelliChlor Electronic Chlorine Generator .......................................................................................... |
1 |
EasyTouch Indoor Control Panel Overview ........................................................................................ |
2 |
EasyTouch Indoor Control Panel Buttons .......................................................................................... |
3 |
EasyTouch Indoor Control Panel Display .......................................................................................... |
5 |
EasyTouch Wireless Control Panel (Optional) .................................................................................. |
6 |
iS4 Spa-Side Remote Controller (Optional) ....................................................................................... |
6 |
QuickTouch QT4 Wireless Controller (Optional) ................................................................................ |
6 |
Quick Start Spa and Pool Operations .......................................................................................... |
7 |
Heat your spa or pool ................................................................................................................... |
7 |
Adjust your spa or pool heat settings ........................................................................................... |
7 |
Switch on lights manually ............................................................................................................. |
8 |
Using the Once Only timer feature ................................................................................................ |
8 |
Schedule start and stop times for equipment ................................................................................ |
9 |
Program your Spa or Pool............................................................................................................. |
9 |
Schedules .................................................................................................................................... |
9 |
Setting the Egg Timer Feature ...................................................................................................... |
10 |
Section 2: Setting up EasyTouch .................................................................................................. |
11 |
Setting up the System for the First Time .......................................................................................... |
11 |
EasyTouch Menu Structure .............................................................................................................. |
13 |
EasyTouch Menus .......................................................................................................................... |
14 |
Main Screen ................................................................................................................................. |
14 |
Lights Menu ................................................................................................................................. |
15 |
Heat Menu.................................................................................................................................... |
16 |
Pool Temp/Src ........................................................................................................................... |
16 |
Spa Temp/Src ............................................................................................................................ |
16 |
Delay Cancel Menu ...................................................................................................................... |
17 |
Schedules Menu .......................................................................................................................... |
18 |
Using the Schedules menu ........................................................................................................ |
18 |
Program your Spa or Pool .......................................................................................................... |
19 |
Schedules.................................................................................................................................. |
19 |
Using the Once Only feature ...................................................................................................... |
20 |
Using the Egg Timer (count-down) Feature ................................................................................ |
21 |
Settings Menu: Clock ................................................................................................................... |
22 |
Settings Menu: IntelliFlo 4 ............................................................................................................ |
23 |
Settings Menu: IntelliChlor ............................................................................................................ |
24 |
Settings Menu: Circuit Names ...................................................................................................... |
25 |
Labeling Circuit Buttons on the Indoor Control Panel .................................................................. |
25 |
Hi-Temp/Lo-Temp Controls for Single Body System ................................................................... |
25 |
EasyTouch Circuit Names .......................................................................................................... |
26 |
EasyTouch Indoor Control Panel Installation and User’s Guide
ii
Contents |
|
Section 2: EasyTouch Menus (Continued) |
|
Settings Menu: Circuit Types ........................................................................................................ |
27 |
Assigning Circuit Types ................................................................................................................ |
27 |
Freeze Protection ...................................................................................................................... |
27 |
Circuit Types .............................................................................................................................. |
27 |
Preset Circuit Types................................................................................................................... |
28 |
Settings Menu: Custom Names .................................................................................................... |
29 |
Settings Menu: Valves .................................................................................................................. |
29 |
Settings Menu: 2-Speed Pump ..................................................................................................... |
30 |
Settings Menu: Solar .................................................................................................................... |
30 |
Settings Menu: Delays ................................................................................................................. |
31 |
Settings Menu: F° / C° (Celsius/Fahrenheit) ................................................................................. |
32 |
Settings Menu: iS4 Spa-Side Remote Controller ........................................................................... |
32 |
Settings Menu: QuickTouch (QT4) Wireless Remote .................................................................... |
33 |
Settings Menu: Man Heat (Off/On) ................................................................................................ |
34 |
Settings Menu: Calibration ........................................................................................................... |
34 |
Settings Menu: Erase EEPROM (Erase System Memory) ........................................................... |
35 |
Spa Side [On/Off] ......................................................................................................................... |
35 |
Diagnostics Menu: Software Rev .................................................................................................. |
36 |
Diagnostics Menu: Bootloader Rev ............................................................................................... |
36 |
Diagnostics Menu: Self Test ......................................................................................................... |
37 |
Diagnostics Menu: Chlorinator ...................................................................................................... |
38 |
Diagnostics Menu: Water Temp .................................................................................................... |
38 |
Diagnostics Menu: Solar Temp ..................................................................................................... |
38 |
Diagnostics Menu: Air Temp ......................................................................................................... |
39 |
Diagnostics Menu: Disp Codes .................................................................................................... |
39 |
Diagnostics Menu: Cir Names: [Off/On] ........................................................................................ |
39 |
Diagnostics Menu: Reset System ................................................................................................ |
39 |
Diagnostics Menu: Flash Update .................................................................................................. |
40 |
Section 3: Troubleshooting ........................................................................................................... |
41 |
Troubleshooting ................................................................................................................................ |
41 |
Frequently Asked Questions (FAQ) .................................................................................................. |
41 |
How do I setup a two-speed pump? .................................................................................................. |
41 |
Can I switch the heater on and change the temperature from the spa? ............................................. |
41 |
How do I switch on solar heating? .................................................................................................... |
41 |
EasyTouch Error Messages ............................................................................................................. |
42 |
Error Codes ...................................................................................................................................... |
42 |
Self Test Error Codes ....................................................................................................................... |
42 |
Maximum Programs Exceeded ........................................................................................................ |
43 |
IntelliChlor Error Messages .............................................................................................................. |
43 |
System Problem Diagnosis .............................................................................................................. |
44 |
Problem: iS4 fails to operate. ........................................................................................................... |
44 |
Problem: The Quick Touch remote will not work, or will not work dependably ................................... |
45 |
Synchronizing EasyTouch Control Panel .......................................................................................... |
45 |
Section 4: EasyTouch Indoor Control Panel Installation ............................................................ |
47 |
Installing the EasyTouch Indoor Control Panel .................................................................................. |
47 |
Drill control panel wall mounting holes .............................................................................................. |
47 |
EasyTouch Indoor Control Panel cutout template.............................................................................. |
48 |
Cabling the Indoor Control Panel at the Load Center ......................................................................... |
49 |
Mount and Cable the EasyTouch Indoor Control Panel...................................................................... |
50 |
Glossary .......................................................................................................................................... |
52 |
EasyTouch Indoor Control Panel Installation and User’s Guide

iii
IMPORTANT SAFETY PRECAUTIONS


 Important Notice:
Attention Installer: This manual contains important information about the installation, operation and safe use of this product.This information should be given to the owner and/or operator of this equipment.
 WARNING - Before installing this product, read and follow all warning notices and instructions which are included. Failure to follow safety warnings and instructions can result in severe injury, death, or property damage. Call (800) 831-7133 for additional free copies of these instructions.
 WARNING - Water temperature in excess of 100 degrees Fahrenheit may be hazardous to your health. Prolonged immersion in hot water may induce hyperthermia. Hyperthermia occurs when the internal temperature of the body reaches a level several degrees above normal body temperature of 98.6° F (37° C). The symptoms of hyperthermia include drowsiness, lethargy, dizziness, fainting, and an increase in the internal temperature of the body.
The effects of hyperthermia include: 1) Unawareness of impending danger. 2) Failure to perceive heat. 3) Failure to recognize the need to leave the spa. 4) Physical inability to exit the spa. 5) Fetal damage in pregnant women. 6) Unconsciousness resulting in danger of drowning.
 WARNING - To reduce the risk of injury, do not permit children to use this product unless they are closely supervised at all times.
 WARNING - The use of alcohol, drugs, or medication can greatly increase the risk of fatal hyperthermia in hot tubs and spas.
 WARNING - Control System is intended to control heaters with built-in high limit circuits ONLY. Failure to do so may cause property damage or personal injury.
 WARNING - Do not use this product to control an automatic pool cover. Swimmers may become entrapped underneath the cover.
 WARNING - For units intended for use in other than single-family dwellings, a clearly labeled emergency switch shall be provided as part of the installation. The switch shall be readily accessible to the occupants and shall be installed at least 10 feet (3.05 m) away, adjacent to, and within sight of, the unit.
 CAUTION - Except for listed spa-side remote controls, install a minimum of five (5) feet from the inside wall of the pool and spa.
EasyTouch Indoor Control Panel Installation and User’s Guide

iv
IMPORTANT SAFETY PRECAUTIONS (Continued)
General Installation Information
1.All work must be performed by a licensed electrician, and must conform to all national, state, and local codes.
2.Install to provide drainage of compartment for electrical components.
3.If this system is used to control underwater lighting fixtures, a ground-fault circuit interrupter (GFCI) must be provided for these fixtures. Conductors on the load side of the ground-fault circuit-interrupter shall not occupy conduit, junction boxes or enclosures containing other conductors unless such conductors are also protected by a ground-fault circuit-interrupter. Refer to local codes for details.
4.A terminal bar stamped  is located inside the supply terminal box. To reduce the risk of electric shock, this terminal must be connected to the grounding means provided in the electric supply service panel with a continuous copper wire equivalent in size to the circuit conductors supplying this equipment (no smaller than 12 AWG or 3.3 mm). The bonding lug(s) provided on this unit are intended to connect a minimum of one No. 8 AWG for US installation and two No. 6 AWG for Canadian installations solid copper conductor between this unit and any metal equipment, metal enclosures or electrical equipment, metal water pipe, or conduit within 5 feet (1.5 m) of the unit.
5.The electrical supply for this product must include a suitably rated switch or circuit breaker to open all ungrounded supply conductors to comply with Section 422-20 of the National Electrical Code, ANSI/ NFPA 70.1987. The disconnecting means must be readily accessible to the tub occupant but installed at least 10 ft. (3.05 m) from the inside wall of the pool.
6.Supply conductor must be sized to support all loads. Maximum supply conductor current must be 125 Amps at 125 VAC.
EasyTouch Indoor Control Panel Installation and User’s Guide
v
EasyTouch Indoor Control Panel Kit Contents
The following items are included in the EasyTouch indoor control panel kit. If any items are missing please contact Pentair Technical Support (see page vi).
•EasyTouch indoor control panel
•Plastic anchors and mounting screws
•EasyTouch Indoor Control Panel Installation and User’s Guide (this manual)
Related Manuals
•EasyTouch 8 and 4 Pool and Spa Control System User’s Guide (P/N 520584)
•EasyTouch 8 and 4 Installation Guide (P/N 520583)
EasyTouch Accessories
EasyTouch Indoor Control Panel, 4 Circuits |
(P/N 520548) |
|||||
EasyTouch Indoor Control Panel, 8 Circuits |
(P/N 520549) |
|||||
EasyTouch Wireless Control Panel, 4 circuits |
(P/N 520546) |
|||||
EasyTouch Wireless Control Panel, 8 circuits |
(P/N 520547) |
|||||
iS4 Four-Function Spa-Side remote, 150 ft. cable |
(P/N 520094) |
|||||
Two-Speed Three HP Relay up to three additional valve actuators |
(P/N 520198) |
|||||
Three HP Power Relay |
(P/N 520106) |
|||||
QuickTouch four-function wireless remote kit with transceiver assembly |
(P/N 520148) |
|||||
IntelliChlor Acid Cleaning Kit |
(P/N 520670) |
|||||
IntelliChlor Spacer pass-through cell for new pool start-up |
(P/N 520588) |
|||||
|
|
|
|
|
|
|
|
|
|
|
|
|
|
|
|
|
|
|
|
|
|
|
POWER ON |
EasyTouch 4 Indoor Control |
EasyTouch 8 Indoor Control |
EasyTouch Wireless Control Panel |
Panel (P/N 520548) |
Panel (P/N 520549) |
(8 circuit) (P/N 520547) |
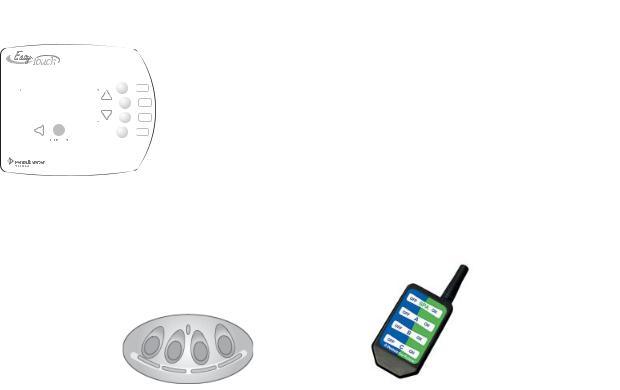
iS4 Spa-Side Remote |
QuickTouch Remote |
Controller (P/N 520094) |
Controller (P/N 520148) |
|
EasyTouch Indoor Control Panel Installation and User’s Guide |
vi
Technical Support
Contact Technical Support at:
Sanford, North Carolina (8 A.M. to 5 P.M.)
Phone: (800) 831-7133
Fax: (919) 566-8920
Moorpark, California (8 A.M. to 5 P.M.)
Phone: (800) 831-7133 (Ext. 6312)
Fax: (805) 553-5515
Web sites: visit www.pentairpool.com and www.staritepool.com
EasyTouch Indoor Control Panel Installation and User’s Guide
1
Section 1
EasyTouch System Overview
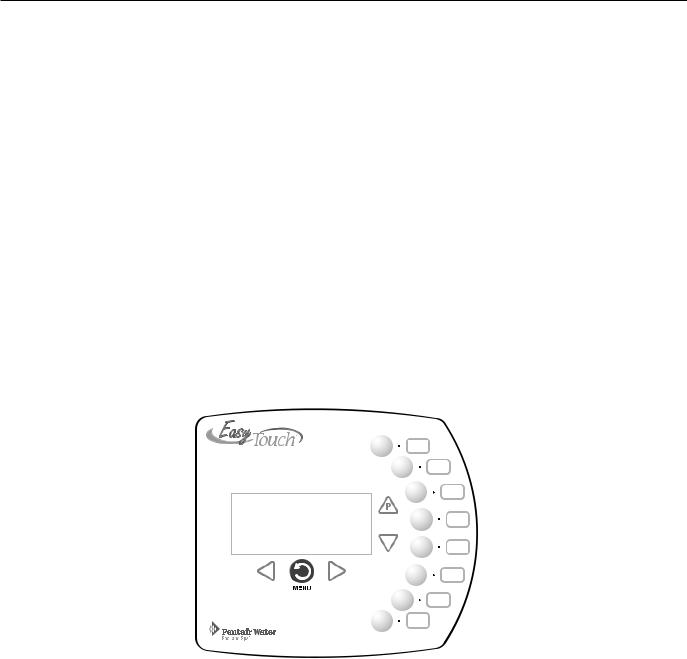
EasyTouch Indoor Control Panel
The EasyTouch Indoor Control Panel provides you with one touch automatic control for all of your pool and spa daily operations from inside your home. The EasyTouch Indoor Control Panel is designed to be used with the EasyTouch 8 or EasyTouch 4 system.
Operating EasyTouch
The EasyTouch system can automatically control your pool and spa equipment, lights and other optional equipment. You can also manually control all EasyTouch system operations from the outdoor control panel located at the pool equipment pad. Using the outdoor control panel buttons you can manually override any automatic settings. For more information, refer to the EasyTouch User’s Guide (P/N 520584).
AUTO |
HEATER |
SPA |
100°F / 95°F |
AIR |
70°F |
MON |
09:30 AM |
EasyTouch Indoor Control Panel
EasyTouch Indoor Control Panel Installation and User’s Guide

2
EasyTouch Indoor Control Panel Overview
The EasyTouch Indoor Control Panel makes it easy for you to control your pool and spa daily operations from inside your home. Using the “Pool” and “Spa” buttons allows one touch control to heat and filter your spa and pool. EasyTouch automatic system operations can be performed either at the Indoor Control Panel or from the outdoor control panel. The Indoor Control Panel connects to the motherboard in the EasyTouch load center.
Pool (Lo-Temp) Button: Switches the filter pump on, rotates valve actuator (to isolate pool water from spa water), and switches heater on. Lo-Temp (EasyTouch single body system) sets the low temperature settings for the pool (see page 25)
|
|
|
|
|
|
|
For details about the |
|
|
|
AUTO |
|
HEATER |
|
|
|||||
control panel LCD status |
|
|
|
SPA |
100°F / 95°F |
|
messages, see page 5 |
|
|
|
AIR |
|
70°F |
|
|
|
|
MON |
09:30 AM |
|
|
|
|
|
|
|
|
|
|
|
|
|
||
Menu/Back button, |
|
|
|
|
|
|
see page 4 |
|
|
|
|
|
|
|
|
|
|
|
|
|
|
|
|
|
|
|
|
Spa (Hi-Temp) Button: Switches the filter pump on, rotates valve actuator (to isolate spa water from pool water), and switches the heater on. Hi-Temp (EasyTouch single body system) sets the high temperature settings for the spa (see page 25)
Circuit LED
Circuit name label
Seven user defined auxiliary circuits. Buttons switch the assigned circuit function on/off (12 hour time-out). If solar equipment is not being used, use the AUX EXTRA (Down arrow button) for an additional circuit (see page 4 for details).
Indoor Control Panel (EasyTouch 8) - (P/N 520549)
Pool (Lo-Temp) Button: |
|
|
|
|
Switches the filter pump on, |
|
|
|
|
rotates valve actuator (to isolate |
|
|
|
|
pool water from spa water), and |
|
|
|
|
switches heater on. |
|
|
|
|
Lo-Temp (EasyTouch single |
|
|
|
|
body system) sets the low |
|
AUTO |
HEATER |
|
temperature settings for the pool |
|
SPA |
100°F / 95°F |
|
(see page 25) |
|
AIR |
70°F |
|
|
|
MON |
09:30 AM |
|
|
|
|
|
|
Indoor Control Panel (EasyTouch 4) - (P/N 520548)
Spa (Hi-Temp) Button: Switches the filter pump on, rotates valve actuator (to isolate spa water from pool water), and switches the heater on. Hi-Temp (EasyTouch single body system) sets the high temperature settings for the spa (see page 25)
Circuit LED
Circuit name label
Seven user defined auxiliary circuits. Buttons switch the assigned circuit function on/off (12 hour time-out). If solar equipment is not being used, use the AUX EXTRA (Down arrow button) for an additional circuit (see page 4 for details).
EasyTouch Indoor Control Panel Installation and User’s Guide
3
EasyTouch Indoor Control Panel Buttons
You can fully automate your pool, spa, and lighting operations from the EasyTouch Indoor Control Panel or from the outdoor control panel located at the pool equipment pad. The EasyTouch menu features let you create customized schedules for your pool and spa equipment, heat temperatures, and chlorination settings to switch on and off at a set day and time. Scheduled automatic operations can be performed at the EasyTouch Indoor Control Panel or from the outdoor control panel. For menu options, refer to “EasyTouch Menu Structure,” on page 13. Before operating the EasyTouch Indoor Control Panel, familiarize yourself with the LCD status messages and operating buttons.
|
|
|
|
|
|
|
|
AUTO |
HEATER |
|
|
|
|
|
|
SPA |
100°F / 95°F |
|
|
|
|
|
|
AIR |
70°F |
|
|
|
|
|
|
MON |
09:30 AM |
|
|
|
|
|
|
|
|
|
|
||||
|
|
|
|
|
|
|
|
|
|
|
|
|
|
|
|
EasyTouch Indoor Control Panel
EasyTouch Indoor Control Panel Buttons
Spa button/LED: For spa operations. Press this button to rotate valves and activate the filter pump automatically so that only the spa water is circulated through the system. If the heater is enabled, pressing this button also switches the heater on (if enabled in the Heat menu). When this button is pressed the circuit is activated, the LED is on and “SPA” is displayed on the screen with the current and set point water temperatures. The default time before the filter pump will switch off is 12 hours. When this button is pressed, the LEDs on the outdoor control panel Filter Pump (F) button, Valves
(V) button, and Heater button (if enabled in the Heat menu) will be on.
|
Pool Button: For pool operations. Press this button so that only the pool water is circulated through |
|
P |
|
U the system. Note that the filter pump will switch off while the pool/spa valves are rotating into |
|
position. If the heater is enabled, pressing this button also switches the heater on (if enabled in the |
|
Heat menu). When this button is pressed the circuit is activated and “POOL” is displayed on the |
|
screen with actual and set point water temperatures. The default time before the filter pump will |
|
switch off is 12 hours. When this button is pressed, the LEDs on the outdoor control panel Filter |
|
Pump (F) button, Valves (V) button, and Heater button (if enabled in the Heat menu) will be on. |
EasyTouch Indoor Control Panel Installation and User’s Guide

4
Controls and buttons (Continued)
Pool button (Continued)
•Single-Speed Filter Pump: If the pump is currently off, press the Pool button to switch the pump on. Press the Pool button again to switch the pump off. However, if the heater is operating, and a delay is enabled for valves, this allows the heater to cool down (heater cool-down), then when you press the Pool button to switch off the pump, only the heater will turn off, then the filter pump will automatically switch off after 10 minutes to allow the heater to cool down. Pentair heaters do not require a cool down time. To override the “heater cool-down,” press the Pool button again to switch off the pump.
•Two-Speed Filter Pump: Press the Pool button to switch the two-speed pump on in high speed. Press the Pool button again to run the pump in low speed. In order to use the “2-Speed Pump” menu assignments (see page 30), the 2-Speed relay option must be installed in the EasyTouch Load Center.
Notes about Freeze Protection: This function protects the pool, plumbing, and equipment against freeze damage. If the outside air temperature sensor falls below 36° F, “Freeze Protection” is activated and the Filter Pump relay is switched on to circulate the pool water. To enable freeze protection for a circuit, see “Settings Menu: Circuit Types, ” on page 27.
Liquid Crystal Display (LCD): The main system display consists of a 16 x 4 alphanumeric character LCD with EL backlighting for easy viewing of the menu items, and status messages. Press the Menu button twice to refresh the display. For main screen status information, see page 5.
|
Y |
Left button: Use the Left button to scroll through sub-menu selections, setting and values. While |
|
editing settings, press and hold the Left button to fast reverse through settings and values. |
Menu/Back button: Use the Menu/Back button to access, save and exit the EasyTouch system menu settings. Use this button to exit from main menu or sub-menu items. Pressing the Menu/Back
|
MENU |
button while in a menu item will return to the main status screen. If no menu activity is detected |
|
|
|
|
|
after five minutes, the main screen is displayed. All menu settings are permanently saved and |
|
|
retained in the control panel even after power is removed from the control panel. Control panel |
|
|
buttons are disabled while in menu mode. |
|
Z |
Right button: Use the Right button to select a sub-menu item for editing. After pressing the Menu |
button to access the main menu items, use the Right button to select the menu item and access the |
||
|
|
sub-menu items for adjustment. For convenience, while editing a settings, press and hold the Right |
|
|
button to fast forward through settings and values. |
|
|
Up/Down buttons: Use the Up and Down buttons to scroll through the main menu items and to |
|
U adjust or change settings. Use these buttons after pressing the Menu button to access the main menu |
|
V items. While editing settings, press and hold the Up or Down button to fast forward or fast reverse through settings and values.
V Down arrow button (Aux Extra): This button switches the assigned circuit on or off. This “extra” auxiliary circuit shares the solar circuit and is only available if the solar output plug (J17) on the motherboard is not being used for solar equipment. Refer to the EasyTouch User’s Guide
(P/N 520584) for more information.
EasyTouch Indoor Control Panel Installation and User’s Guide

5
Controls and buttons (Continued)
AUX buttons/LEDs: The auxiliary output circuit buttons operate the pool and spa system valves, lights and other equipment. These auxiliary (AUX) circuits are assigned in the “Circuit Type” menu, see page 27 for details. There are three auxiliary circuits (AUX 1- 3) on the EasyTouch 4 indoor control panel and seven auxiliary circuits (AUX 1- 7) on the EasyTouch 8 indoor control panel. The Down arrow button can also be used as an “extra” auxiliary circuit if solar equipment is not being used. Refer to “Down arrow button” on page 4 for more information. Labels can be affixed next to each auxiliary button to identify the circuit function. When an auxiliary circuit is activated or the button is pressed, the LED is on. Pressing an auxiliary circuit button will activate the corresponding circuit in either “Auto” or “Service” mode. When a circuit relay is switched on manually, it remains on until either you switch it off manually, or the next time the relay is scheduled to be switched off. For example, if the filter pump is scheduled to automatically run from 9:00 AM to 5:00 PM daily then the filter pump is switched on manually at 9:00 PM, it will run continuously until the next day at 5:00 PM then switch off. The schedule will then continue from then on.
EasyTouch Indoor Control Panel Display
The Indoor Control Panel screen displays when the system is in automatic mode (AUTO) or in service mode (SERVICE). Service mode is enabled from EasyTouch outdoor control panel at the pool equipment pad. The following describes the main status screen.
AUTO (Automatic): The system is in normal operating mode.
Scheduled programs will run automatically.
HEATER: Displays the heat source (Off, Heater, Solar Prf.,
Solar) as specified in the Heater menu settings (see page 16).
POOL (Spa): Indicates that the Valves (V) button is in “Pool” or “Spa” mode and the Filter Pump (F) button has been pressed to switch on the filter pump. If this display line is blank, it indicates no spa or pool function is active. For an EasyTouch single body system, Hi-Temp (Spa) / Lo-Temp (Pool) sets the temperature settings (see page 25)
95° F / 100° F: Displays the actual spa or pool water temperature (95° F) and the set point temperature (100° F) as set in the “Heater” menu.
AIR: Displays the actual outside air temperature (70° F) as read by the air sensor located near the EasyTouch Load Center.
Date and Time: Displays the EasyTouch system day and time as specified in the “Clock” menu settings (see page 22).
AUTO |
HEATER |
SPA |
95°F / 100°F |
AIR |
70°F |
MON |
09:30 AM |
|
|
EasyTouch Indoor Control Panel Installation and User’s Guide
6
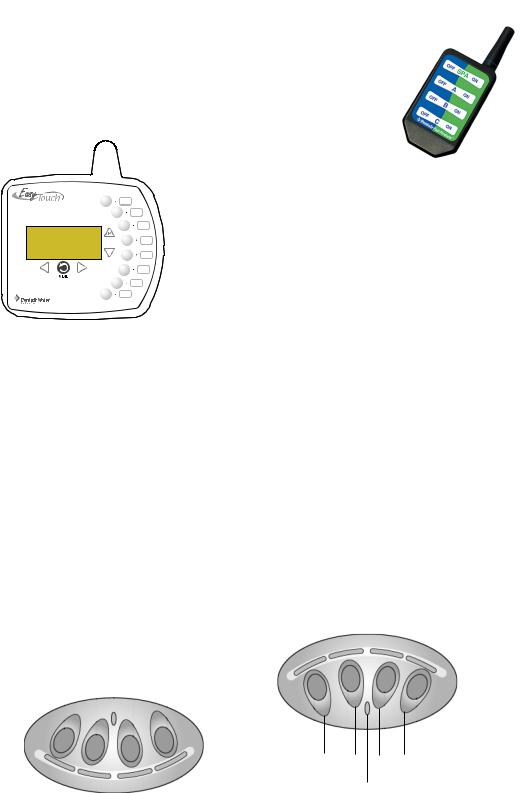
EasyTouch Wireless Control Panel (Optional)
The EasyTouch wireless control panel (8 or 4 circuits) gives you the freedom to control your pool and spa daily operations from around your pool and spa area. The wireless device can operate up to 300 feet from the EasyTouch transceiver module which is typically located near the EasyTouch load center. There is enough battery power to operate the whole summer season without
changing batteries, Using the power saving menu
options you can also reduce power consumptionand extend battery life. The EasyTouch wireless control panel is water
resistent, however, is not intended to be submersible.
The EasyTouch wireless control panel is designed to be used with the EasyTouch 8 or EasyTouch 4 system.
QuickTouch QT4 Wireless Controller (Optional)
The QuickTouch QT4 wireless controller provides switching of up to four circuits. You can use the QT4 wireless controller to activate the spa circulation, and for operating three auxiliary pieces of equipment (such as lights, jet pump, air
blower, waterfall, etc.). Each of the four functions on the QT4 wireless controller has an on and an off button. For more about assigning circuits to the QT4 buttons, refer to “Settings Menu: QuickTouch (QT4) Wireless Remote,” on page 33. Note: The QT4 wireless controller may be used with wet hands, but should never be submersed in water as this could damage the QT4. If accidental submersion occurs, dry the QT4 out by removing battery cover and removing battery. Position the QT4 so that water can drain out. Reassemble when the QT4 is completelydry.
iS4 Spa-Side Remote Controller (Optional)
The iS4 Spa-Side remote controller is a double-insulated, waterproof device that is UL (1563) listed for installation at the water’s edge. Pentair recommends that the iS4 always be installed above the water line of the spa wall, or in the deck within arm’s reach of a spa occupant. The iS4 provides remote switching of up to four control circuits from the spa location. It is typically used for activating spa circulation and any three auxiliary pieces of equipment (such as lights, jet pump, air blower, etc.). The red status LED indicator glows steady when in Spa mode and flashes while the spa is heating. For more about assigning circuits to the iS4 buttons, refer to “Settings Menu: iS4 Spa-Side Remote controller,” on page 32. The iS4 two installation choices are shown:
1 |
2 |
3 |
4 |
|||
|
|
|
|
|
|
|
|
|
|
|
|
|
|
|
4 |
3 |
2 |
1 |
|
|
Red power |
||
|
|
LED indicator |
||
iS4 Spa-Side Remote Controller |
iS4 Spa-Side Remote Controller |
|||
(Wall or tile mount) |
(Deck mount) |
|
||
EasyTouch Indoor Control Panel Installation and User’s Guide

7
Quick start pool and spa operations
The following describes how to run some of the general day-to-day spa and pool operations.
Heat your spa or pool
AUTO |
HEATER |
SPA |
95°F / 100°F |
AIR |
70°F |
MON |
09:30 AM |
First enable the heat source in the Heat menu (see “Heat Menu,” on page 20). Press the Spa button (top button) to switch the filter pump on, rotate the valve actuator (to isolate spa water from pool water), and switch the heater on. Note: By default, the setting “Man Heat’ is set to “On” (see page 34) which allows the spa to begin to heat whenever it is manually turned on. Press the Pool button to switch the filter pump on, rotate the valve actuator (to isolate pool water from spa water), and switch the heater on. For Pool and Spa button location, see page 2.
Adjust your spa or pool heat settings
From the “Heat” menu ( > Heat > Spa Temp/Src/Pool Temp/Src) you can select the heat source and set the water temperature. The spa or pool water will heat to the settings specified. The EasyTouch system allows for solar and conventional heaters. The EasyTouch will use the heating source that is selected. The heat source selections are:
•OFF - No heating even though pump and other circuits may be operating.
•HEATER - Gas heater only.
•SOLAR ONLY - Solar heating system to be the only heat source. In order to display “Solar Only” as a heat option in the “Heat” menu, you must first enable solar in the Settings > Solar menu
(see page 30).
•SOLAR PREF. (Solar Preferred) - Used if solar and gas heating are combined and you want to use solar heating only when it is most effective. In order to display “Solar Preferred” as a heat option in the “Heat” menu, you must first enable solar in the Settings > Solar menu (see page 30).
To set the spa temperature set point and select the heat source:
Getting There
▼ HEAT
Pool Temp/Src |
S |
X Spa Temp/Src |
|
|
T |
|
|
Spa |
S |
Temp: 85° F |
|
Heat: Off |
T |
Right button: Select spa temperature and heat source. Up/Down button: Adjust the spa water temperature. (from 40° F to 106° F or 4° C to 41° C).
Right or Left button: Move to Heat source options.
Up/Down: Set the Heat option: Off, Heater, Solar, or Solar Preferred.
 Press the Back button save the settings and to return to the Heat menu or press the button again to return to the Main screen.
Note: Select “Pool Temp/Src” to adjust your pool temperature.
EasyTouch Indoor Control Panel Installation and User’s Guide
8
Switch on lights manually
From the Lights screen you can manually switch all lights on or off, and synchronize colored lights. Up to 12 lights can be controlled. For more information about setting up lights, refer to “Lights Menu” on
page 15.
Getting There
LIGHTS
▲
SETUP LIGHTS
To manually switch on all lights:
Setup Lights
Mode: All Off
S
T
Up/Down button: Select: All off, All on, or Sync. The Sync feature allows a combination of up to 12 SAm, SAL, or FIBERworks lights to synchronize their colors before switching the lights on.
 Press the Back button save the settings and to return to the main menu items or press the button again to return to the Main screen.
Using the Once Only timer feature
The Schedules “Once Only” timer feature enables you to automatically switch equipment on for one time. This feature allows you to program a circuit to turn on at a particular time on a one-time basis. For example, if you wanted the spa to be heated when you arrive home, you could program the heater to switch on at a specific time and after you have finished using the spa you can switch the heater off manually. After the program has run, it is automatically erased. Unlike using the regular “Schedule” program, the “Once Only” program does not repeat. The circuit must be turned off manually or wait for the 12 hour automatic shut-off. However, you could also reset the 12 hour factory shut-off by entering an “Egg Timer” count down program to extend past the default 12 hours shut-off.
The following example describes how to set a “Once Only “ program for the spa. The same steps apply when selecting the pool or any auxiliary circuit.
Getting There
▼ SCHEDULES ▲ SPA
XSpa |
0 |
S |
Pool |
0 |
|
Aux 1 |
0 |
|
Aux 2 |
0 |
T |
|
|
|
Spa |
0/0 S |
|
Mode: None (New) |
||
|
|
|
|
|
|
Spa |
1/1 S |
|
Mode: Once Only |
|
|
08:00A |
_ |
|
s m t |
w t f s |
T |
Right button: Select the Spa circuit.
Right button: Select Mode if there are existing programs. Skip this step to create a new program.
Up/Down button: Select New to create a new program.
Right button: To create a new program and enter the “Mode” settings.
Up/Down button: 1/1 indicates that this circuit has one program. If there are existing programs assigned to this circuit, use these buttons to view and select the existing program settings.
Right button: To select the “Once Only” settings. Right button: Move to start time settings.
Up/Down and Right buttons: Set the start hour (A/P) and minutes. A (AM) and P (PM) time is set when setting the start hour.
Right button: Move to day of the week to run the program.
Right button: Select which day to run the program then press the Up/Down button to enable the bar on top of the letter. A bar on top of the letter indicates the day selected to run the program.
 Press the Back button to save the settings and to return to the Schedules menu options. Press the button again to return to the main menu options or press again to return to the Main screen.
EasyTouch Indoor Control Panel Installation and User’s Guide

9
Schedule start and stop times for equipment
You can set timers (schedules) to automatically run equipment like pool filtration or lights. Any EasyTouch circuit can be set to switch on and off on every or any day of the week. Up to 12 total programs may be created for all circuits combined.
Program your Spa or Pool
You can use the “Schedule” feature to set the time and day(s) when to switch the filter pump on and rotate the pool/spa valves into the “Pool” or “Spa” position. The heater will automatically heat the pool or spa water up to the set point temperature as set in the “Heat” menu (see page 16). If the pool has a separate jet pump or blower controlled by AUX 1 and/or AUX 2 , these need to be scheduled separately.
Schedules
To create a schedule for your spa or pool:
Getting There
▼ SCHEDULES
▲
SPA
X Spa |
0 |
S |
Pool |
0 |
|
Aux 1 |
0 |
|
Aux 2 |
0 |
T |
|
|
|
Spa |
0/0 S |
|
Mode: None (New)
Right button: Select the Spa circuit. The generic circuit names are: Spa, Pool, Aux1-7 (EasyTouch 8), Aux 1-3 (EasyTouch 4), and Aux Extra “Aux Extra” is only available if the Solar output (J17) plug on the EasyTouch motherboard is not being used for solar equipment.
Right button: Select Mode if there are existing programs. Skip this step to create a new program.
Up/Down button: Select New to create a new program.
Right button: To create a new program and enter the “Mode” settings.
Spa |
1/1 S |
Mode: Schedule |
|
08:00A -_05:00P |
|
s m t w t f |
s T |
Up/Down button: 1/1 indicates that this circuit has one program. If there are existing programs assigned to this circuit, use these buttons to view and select the existing program settings.
Right button: To select the “Schedule” settings. Right button: Move to start and stop time settings.
Up/Down and Right buttons: Set start and stop hour (A/P), minutes. The A (AM) and P (PM) time is set when setting the start and stop hour. Right button: Move to days of the week to run the program.
Right and Up/Down buttons: By default the program is set to run all the days of the week. If you wish to edit which days to run the program, select the day of the week, then press the Up/Down button to remove the bar from the top of the letter. A bar on top of the letter indicates the day selected to run the program.
 Press the Back button to save the settings and to return to the Schedules menu options. Press the button again to return to the main menu options or press again to return to the Main screen.
EasyTouch Indoor Control Panel Installation and User’s Guide

10
Setting the Egg Timer Feature
The “Egg Timer” feature lets you manually switch on equipment program the system to automatically switch off after a specified time. You can set this timer feature for other equipment such as lighting, spa, or spa jets. Equipment can be set to be on for one minute to 24 hours. An Egg Timer program is factory set to switch off after 12 hours. You also have the option to use the “Don’t Stop” feature to run a circuit continuously until manually switched off.
Please note that in the event of a power failure, the Egg Timer feature will not switch the circuit back on. Use the “Service” mode to turn the equipment back on. For more information, refer to the “EasyTouch User’s Guide (P/N 520584).
Note: When running the filter pump continuously during a new pool start up, it is recommended to use the “Service” mode, which will automatically restart the filter pump in the event of a power failure.
To set the Egg Timer feature:
Getting There
▼ SCHEDULES
▲
SPA
XSpa |
0 |
S |
Pool |
0 |
|
Aux 1 |
0 |
|
Aux 2 |
0 |
T |
|
|
|
Spa |
0/0 S |
|
Mode: None (New)
Right button: Select the Spa circuit. The generic circuit names are: Spa, Pool, Aux1-7 (EasyTouch 8), Aux 1-3 (EasyTouch 4), and Aux Extra “Aux Extra” is only available if the Solar output (J17) plug on the EasyTouch motherboard is not being used for solar equipment.
Right button: Select Mode.
Up/Down button: Select New to create a new program.
Right button: To create a new program and enter the “Mode” settings.
Spa |
1/1 S |
|
Mode: Egg Timer |
Up/Down button: 1/1 indicates that this circuit has one program. You create a total |
|
Time: 05:00 |
|
|
|
|
|
Tof 12 programs. If there are existing programs assigned to this circuit, use these buttons to view and select the existing program settings.
Right button: To select the “Egg Timer” settings. Right button: Move to the time settings.
Up/Down and Right buttons: Set the hour and minutes for the program to run. The count down time can be set from 00:01 to 23:59 and Don’t Stop. The “Don’t Stop” feature allows the circuit to run continuously until manually switched off.
 Press the Back button to save the settings and to return to the Schedules menu options. Press the button again to return to the main menu options or press again to return to the Main screen.
EasyTouch Indoor Control Panel Installation and User’s Guide

11
Section 2
Setting up EasyTouch
Setting up the System for the First Time
Use the following steps if you are setting up the EasyTouch system for the first time.
Note: The following setup steps assume that the EasyTouch Load Center is installed at the equipment pad and ready for operation. For EasyTouch Load Center installation instructions, refer to the EasyTouch 8 and 4 Load Center Installation Guide (P/N 520583).
The recommended first time installation steps for the EasyTouch system are:
1.Set the system date and time (page 22)
Set the current date and time.
2.Assign circuit names (pages 25)
Assign the generic default circuit names for output auxiliary equipment. Rename (if necessary) and assign circuit names to the auxiliary (AUX 1, AUX 2) connections. Note the factory set auxiliary names correspond to the plug-in location of the relay on the EasyTouch motherboard. Assign circuit names from the available of circuit names. There are nearly 100 circuit names available (see page 26 for the complete list).
3.Creating custom names for auxiliary circuits (page 29)
If you cannot find a circuit name that fits your application you can create up to 10 additional customized names that can be created before assigning circuit names.
4.Assign a circuit type to a circuit name (Page 27)
Assign “Circuit Types” (functions) to circuits. From the Circuit Type menu, you can assign special logic to a circuit by selecting one of the available circuit types. For the complete list of Circuit Types. If an auxiliary circuit (AUX) is assigned GENERIC (simple ON/OFF when the button is pushed) then nothing needs to be done.
5.Configure valve actuators (controlled by AUX circuit) (page 29)
The EasyTouch system can drive two auxiliary valve actuators for applications such as solar heating and water features. Assign which circuits that will activate valves A and B. Auxiliary valve actuators can be controlled by any AUX circuit. Valve A is automatically assigned to solar if “Solar” is enabled in the “Solar” menu.
EasyTouch Indoor Control Panel Installation and User’s Guide
12
6.Set up optional equipment, solar, 2-speed pump (page 29 and 30)
Set up additional equipment such as solar, 2-speed pump, and optional equipment if required. Set up the control panel to operate with the optional IntelliChlor chlorine generator. To configure EasyTouch for special equipment:
•Is solar heating available? Is solar being used for a heat pump?
•What circuits will turn 2-Speed pumps to High Speed?
•Cool-down cycle for the heater - Lets you set circuits that switch the filter pump to high speed.
•Do you want to delay turning off the filter pump for 10 minutes when the heater is turned off?
•Do you want the spa to heat whenever the Spa button is pressed?
7.Configuring the heater system options (page 16)
Set the type of heat source being used (Heater, Solar, Solar Preferred).
8.Configure the iS4 spa-side remote, QuickTouch wireless remote buttons (page 32 and 33)
Assign four circuits to the iS4 and/or QuickTouch remote buttons. Once you have checked that all buttons operate properly, place labels on remote buttons.
9. Set the delays feature (page 31)
Enable the one time “delay” feature for the heater, 2-speed pump, and automatic pool cleaner.
10.Schedule on/off times for circuit (page 18 - 21)
Set times for automatic circuit activation. Up to 12 total programs can be created for all circuits combined. One circuit can have up to a maximum of 9 programs (9/9), which leaves 3 programs that can be used by one circuit or three separate circuits for a total of 12 programs. All user created programs are active all the time; so check that there are not conflicting automated times.
11.Setup the lighting settings (page 15)
From the lighting menu you can enable special control of your pool and yard lighting, such as rotating colored lights, and synchronized colored lights.
EasyTouch Indoor Control Panel Installation and User’s Guide
 Loading...