


EasyTouch®
Wireless Control Panel
Installation and
User’s Guide
IMPORTANT SAFETY INSTRUCTIONS
READ AND FOLLOW ALL INSTRUCTIONS
SAVE THESE INSTRUCTIONS
© 2005 Pentair Water Pool and Spa, Inc. All rights reserved
This document is subject to change without notice
1620 Hawkins Ave., Sanford, NC 27330 • (919) 566-8000
10951 West Los Angeles Ave., Moorpark, CA 93021 • (805) 553-5000
Trademarks and disclaimers: EasyTouch, IntelliChlor, IntelliFlo, QuickTouch and the Pentair Water Pool and Spa logo are trademarks of Pentair Water Pool and Spa, Inc. Other trademarks and trade names may be used in this document to refer to either the entities claiming the marks and names or their products. Pentair Water Pool and Spa, Inc. disclaims proprietary interest in marks and names of others.
P/N 520688 - Rev A - 12/21/2005

i
Contents |
|
IMPORTANT SAFETY PRECAUTIONS ............................................................................................ |
iii |
EasyTouch Wireless Control Panel Kit Contents .............................................................................. |
v |
Related Manuals .............................................................................................................................. |
v |
EasyTouch Accessories ................................................................................................................... |
v |
Technical Support ............................................................................................................................. |
vi |
Section 1: EasyTouch Wireless Control Panel Overview ........................................................... |
1 |
Introduction ...................................................................................................................................... |
1 |
EasyTouch Wireless Control Panel Overview .................................................................................... |
2 |
EasyTouch Wireless Control Panel Buttons and LEDs ..................................................................... |
3 |
EasyTouch Wireless Control Panel Display ...................................................................................... |
5 |
Battery Overview ............................................................................................................................... |
6 |
Safety Precautions when using batteries ...................................................................................... |
6 |
Checking the battery charge ........................................................................................................ |
6 |
Power save options ...................................................................................................................... |
7 |
Backlight Options ........................................................................................................................ |
7 |
Installing batteries ........................................................................................................................ |
7 |
Setting up the EasyTouch wireless control panel for the first time ..................................................... |
9 |
Synchronizing control panels ............................................................................................................ |
10 |
Quick Start Spa and Pool Operations .......................................................................................... |
11 |
Heat your spa or pool ................................................................................................................... |
11 |
Adjust your spa or pool heat settings ........................................................................................... |
11 |
Switch on lights manually ............................................................................................................. |
12 |
Using the Once Only timer feature ................................................................................................ |
12 |
Schedule start and stop times for equipment ................................................................................ |
13 |
Program your Spa or Pool............................................................................................................. |
13 |
Schedules .................................................................................................................................... |
13 |
Setting the Egg Timer Feature ...................................................................................................... |
14 |
Section 2: Setting up EasyTouch .................................................................................................. |
15 |
Setting up the System for the First Time .......................................................................................... |
15 |
EasyTouch Menu Structure .............................................................................................................. |
17 |
EasyTouch Menus .......................................................................................................................... |
18 |
Main Screen ................................................................................................................................. |
18 |
Lights Menu ................................................................................................................................. |
19 |
Heat Menu .................................................................................................................................... |
20 |
Pool Temp/Src ........................................................................................................................... |
20 |
Spa Temp/Src ............................................................................................................................ |
20 |
Delay Cancel Menu ...................................................................................................................... |
21 |
Schedules Menu .......................................................................................................................... |
22 |
Using the Schedules menu ........................................................................................................ |
22 |
Program your Spa or Pool .......................................................................................................... |
23 |
Schedules.................................................................................................................................. |
23 |
Using the Once Only feature ...................................................................................................... |
24 |
Using the Egg Timer (count-down) Feature ................................................................................ |
25 |
Settings Menu: Clock ................................................................................................................... |
26 |
Settings Menu: IntelliFlo 4 ............................................................................................................ |
27 |
Settings Menu: IntelliChlor ............................................................................................................ |
28 |
Settings Menu: Circuit Names ...................................................................................................... |
29 |
Labeling Circuit Buttons on the Wireless Control Panel ............................................................. |
29 |
Hi-Temp/Lo-Temp Controls for Single Body System ................................................................... |
29 |
EasyTouch Circuit Names .......................................................................................................... |
30 |
EasyTouch Wireless Control Panel Installation and User’s Guide
ii
Contents |
|
Section 2: EasyTouch Menus (Continued) |
|
Settings Menu: Circuit Types ........................................................................................................ |
31 |
Assigning Circuit Types ................................................................................................................ |
31 |
Freeze Protection ...................................................................................................................... |
31 |
Circuit Types .............................................................................................................................. |
31 |
Preset Circuit Types................................................................................................................... |
32 |
Settings Menu: Custom Names .................................................................................................... |
33 |
Settings Menu: Valves .................................................................................................................. |
33 |
Settings Menu: 2-Speed Pump ..................................................................................................... |
34 |
Settings Menu: Solar .................................................................................................................... |
34 |
Settings Menu: Delays ................................................................................................................. |
35 |
Settings Menu: F° / C° (Celsius/Fahrenheit) ................................................................................. |
36 |
Settings Menu: iS4 Spa-Side Remote Controller ........................................................................... |
36 |
Settings Menu: QuickTouch (QT4) Wireless Remote .................................................................... |
37 |
Settings Menu: Man Heat (Off/On) ................................................................................................ |
38 |
Settings Menu: Calibration ........................................................................................................... |
38 |
Settings Menu: Erase EEPROM (Erase System Memory) ........................................................... |
39 |
Settings Menu: Backlight ............................................................................................................. |
39 |
Settings Menu: Power Save .......................................................................................................... |
40 |
Settings Menu: Wireless Addr ...................................................................................................... |
40 |
Spa Side [On/Off] ......................................................................................................................... |
40 |
Diagnostics Menu: Software Rev .................................................................................................. |
41 |
Diagnostics Menu: Bootloader Rev ............................................................................................... |
41 |
Diagnostics Menu: Self Test ......................................................................................................... |
41 |
Diagnostics Menu: Chlorinator ...................................................................................................... |
42 |
Diagnostics Menu: Water Temp .................................................................................................... |
42 |
Diagnostics Menu: Solar Temp ..................................................................................................... |
42 |
Diagnostics Menu: Air Temp ......................................................................................................... |
43 |
Diagnostics Menu: Disp Codes .................................................................................................... |
43 |
Diagnostics Menu: Cir Names: [Off/On] ........................................................................................ |
43 |
Diagnostics Menu: Reset System ................................................................................................ |
43 |
Diagnostics Menu: Flash Update .................................................................................................. |
44 |
Power OFF ................................................................................................................................... |
44 |
Section 3: Troubleshooting ........................................................................................................... |
45 |
Troubleshooting ................................................................................................................................ |
45 |
Frequently Asked Questions (FAQ) .................................................................................................. |
45 |
How do I setup a two-speed pump? .................................................................................................. |
45 |
Can I switch the heater on and change the temperature from the spa? ............................................. |
45 |
How do I switch on solar heating? .................................................................................................... |
45 |
EasyTouch Error Messages ............................................................................................................. |
46 |
Self Test Error Codes ....................................................................................................................... |
46 |
Maximum Programs Exceeded ........................................................................................................ |
47 |
IntelliChlor Error Messages .............................................................................................................. |
47 |
System Problem Diagnosis .............................................................................................................. |
48 |
Problem: iS4 fails to operate. ........................................................................................................... |
48 |
Problem: The Quick Touch remote will not work, or will not work dependably ................................... |
49 |
Section 4: EasyTouch Transceiver Installation ............................................................................ |
51 |
Installing the EasyTouch Transceiver ................................................................................................ |
51 |
EasyTouch wireless control panel kit ................................................................................................ |
51 |
Mounting the EasyTouch Transceiver ............................................................................................... |
51 |
Connecting the Transceiver to the Load Center ................................................................................. |
53 |
Glossary of Terms .......................................................................................................................... |
55 |
EasyTouch Wireless Control Panel Installation and User’s Guide
iii
IMPORTANT SAFETY PRECAUTIONS
Important Notice:
Attention Installer: This manual contains important information about the installation, operation and safe use of this product. This information should be given to the owner and/or operator of this equipment.
 WARNING - Before installing this product, read and follow all warning notices and instructions which are included. Failure to follow safety warnings and instructions can result in severe injury, death, or property damage. Call (800) 831-7133 for additional free copies of these instructions.
 WARNING - Water temperature in excess of 100 degrees Fahrenheit may be hazardous to your health. Prolonged immersion in hot water may induce hyperthermia. Hyperthermia occurs when the internal temperature of the body reaches a level several degrees above normal body temperature of 98.6° F (37° C). The symptoms of hyperthermia include drowsiness, lethargy, dizziness, fainting, and an increase in the internal temperature of the body.
The effects of hyperthermia include: 1) Unawareness of impending danger. 2) Failure to perceive heat. 3) Failure to recognize the need to leave the spa. 4) Physical inability to exit the spa. 5) Fetal damage in pregnant women. 6) Unconsciousness resulting in danger of drowning.
 WARNING - To reduce the risk of injury, do not permit children to use this product unless they are closely supervised at all times.
 WARNING - The use of alcohol, drugs, or medication can greatly increase the risk of fatal hyperthermia in hot tubs and spas.
 WARNING - Control System is intended to control heaters with built-in high limit circuits ONLY. Failure to do so may cause property damage or personal injury.
 WARNING - Do not use this product to control an automatic pool cover. Swimmers may become entrapped underneath the cover.
 WARNING - For units intended for use in other than single-family dwellings, a clearly labeled emergency switch shall be provided as part of the installation. The switch shall be readily accessible to the occupants and shall be installed at least 10 feet (3.05 m) away, adjacent to, and within sight of, the unit.
 CAUTION - Except for listed spa-side remote controls, install a minimum of five (5) feet from the inside wall of the pool and spa.
EasyTouch Wireless Control Panel Installation and User’s Guide

iv
IMPORTANT SAFETY PRECAUTIONS (Continued)
General Installation Information
1.All work must be performed by a licensed electrician, and must conform to all national, state, and local codes.
2.Install to provide drainage of compartment for electrical components.
3.If this system is used to control underwater lighting fixtures, a ground-fault circuit interrupter (GFCI) must be provided for these fixtures. Conductors on the load side of the ground-fault circuit-interrupter shall not occupy conduit, junction boxes or enclosures containing other conductors unless such conductors are also protected by a ground-fault circuit-interrupter. Refer to local codes for details.
4.A terminal bar stamped  is located inside the supply terminal box. To reduce the risk of electric shock, this terminal must be connected to the grounding means provided in the electric supply service panel with a continuous copper wire equivalent in size to the circuit conductors supplying this equipment (no smaller than 12 AWG or 3.3 mm). The bonding lug(s) provided on this unit are intended to connect a minimum of one No. 8 AWG for US installation and two No. 6 AWG for Canadian installations solid copper conductor between this unit and any metal equipment, metal enclosures or electrical equipment, metal water pipe, or conduit within 5 feet (1.5 m) of the unit.
5.The electrical supply for this product must include a suitably rated switch or circuit breaker to open all ungrounded supply conductors to comply with Section 422-20 of the National Electrical Code, ANSI/ NFPA 70.1987. The disconnecting means must be readily accessible to the tub occupant but installed at least 10 ft. (3.05 m) from the inside wall of the pool.
6.Supply conductor must be sized to support all loads. Maximum supply conductor current must be 125 Amps at 125 VAC.
Canada - Industry Canada (IC) - This device complies with RSS210 of Industry Canada. (1999). Operation is subject to the following two conditions: (1) this device may not cause interference, and
(2) this device must accept any interference, including interference that may cause undesired operation of the device.
FCC Standard - 47 CFR Part 15, Subpart C (Section 15.247). This version is limited to chapter 1 to chapter 11 by specified firmware controlled in the U.S.A.
Instruction to user - This equipment has been tested and found to comply with the limits for a Class B digital device, pursuant to Part 15 of the FCC Rules. These limits are designed to provide reasonable protection against harmful interference in a residential installation. This equipment generates, uses and can radiate radio frequency energy and, if not installed and used in accordance with the instructions, may cause harmful interference to radio communications. However, there is no guarantee that interference will not occur in a particular installation. If this equipment does cause harmful interference to radio or television reception, which can be determined by turning the equipment off and on, the user is encouraged to try to correct the interference by one or more of the following measures:
•Reorient or relocate the receiving antenna.
•Increase the separation between the equipment and receiver.
•Connect the equipment into an outlet on a circuit different from that to which the receiver is connected.
•Consult the dealer or an experienced radio/TV technician for help.
Note: The user is cautioned that changes and modifications made to the equipment without the approval of the manufacturer could void the user’s authority to operate this equipment.
EasyTouch Wireless Control Panel Installation and User’s Guide
v
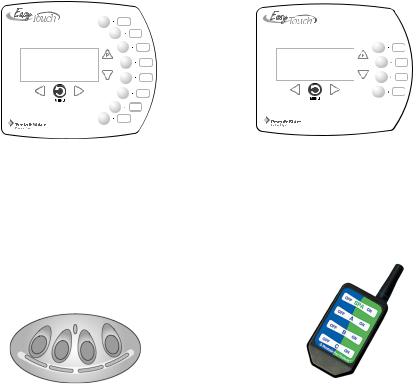
EasyTouch Wireless Control Panel Kit Contents
The following items are included in the EasyTouch wireless control panel kit. If any items are missing please contact Pentair Technical Support (see page vi).
•EasyTouch wireless control panel
•Four AA-size alkaline batteries
•EasyTouch transceiver module (with four plastic anchors and mounting screws)
•EasyTouch Wireless Control Panel User’s and Installation Guide (this manual)
Related Manuals
•EasyTouch 8 and 4 Pool and Spa Control System User’s Guide (P/N 520584)
•EasyTouch Indoor Control Panel User’s and Installation (P/N 520617)
•EasyTouch 8 and 4 Installation Guide (P/N 520583)
EasyTouch Accessories
|
|
|
|
|
|
|
|
|
EasyTouch 4 Indoor Control |
||
EasyTouch 8 Indoor Control |
|||||
Panel (P/N 520549) |
Panel (P/N 520548) |
||||
iS4 Spa-Side Remote |
QuickTouch Remote |
Controller (P/N 520094) |
Controller (P/N 520148) |
EasyTouch Wireless Control Panel Installation and User’s Guide
vi
EasyTouch Accessories (continued)
EasyTouch Indoor Control Panel, 4 Circuits |
(P/N 520548) |
EasyTouch Indoor Control Panel, 8 Circuits |
(P/N 520549) |
EasyTouch Wireless Control Panel, 4 circuits |
(P/N 520546) |
EasyTouch Wireless Control Panel, 8 circuits |
(P/N 520547) |
iS4 Four-Function Spa-Side remote, 150 ft. cable |
(P/N 520094) |
Two-Speed Three HP Relay up to three additional valve actuators |
(P/N 520198) |
Three HP Power Relay |
(P/N 520106) |
QuickTouch four-function wireless remote kit with transceiver assembly |
(P/N 520148) |
IntelliChlor Acid Cleaning Kit |
(P/N 520670) |
IntelliChlor Spacer pass-through cell for new pool start-up |
(P/N 520588) |
Technical Support
Contact Technical Support at:
Sanford, North Carolina (8 A.M. to 5 P.M.)
Phone: (800) 831-7133
Fax: (919) 566-8920
Moorpark, California (8 A.M. to 5 P.M.)
Phone: (800) 831-7133 (Ext. 6312)
Fax: (805) 553-5515
Web sites: visit www.pentairpool.com and www.staritepool.com
EasyTouch Wireless Control Panel Installation and User’s Guide

1
Section 1
EasyTouch Wireless Control Panel Overview
Introduction
The EasyTouch wireless control panel gives you the freedom to control your pool and spa daily operations from around your pool and spa area. The wireless device can operate up to 300 feet from the EasyTouch transceiver module which is typically located near the EasyTouch load center. There is enough battery power to operate the whole summer season without changing batteries, Using the power saving menu options you can also reduce power consumption and extend battery life. The EasyTouch wireless control panel is water resistent, however, is not intended to be submersible.
The EasyTouch wireless control panel is designed to be used with the EasyTouch 8 or EasyTouch 4 system. For more information about operating the EasyTouch system, refer to the EasyTouch User’s Guide.
AUTO |
HEATER |
||
SPA |
95°F / 100°F |
||
AIR |
70°F |
||
MON |
09:30 AM |
|
|
|
|
||
|
POWER ON |
||
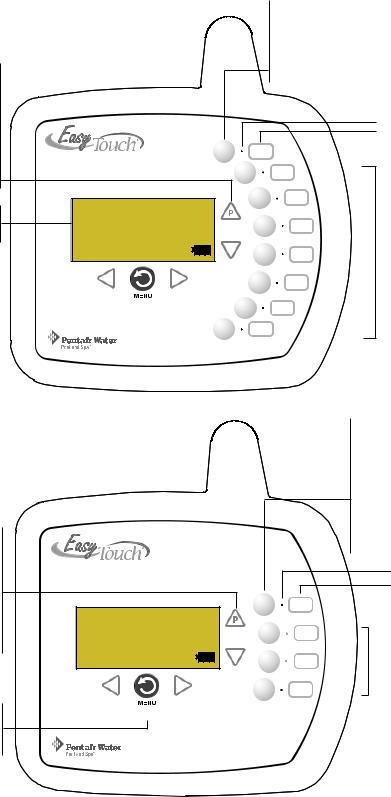
EasyTouch Wireless Control Panel (eight auxiliary circuits)
EasyTouch Wireless Control Panel Installation and User’s Guide
2
EasyTouch Wireless Control Panel Overview
The EasyTouch wireless control panel makes it easy for you to control your pool and spa daily operations from around your pool area. Using the “Pool” and “Spa” buttons allows one touch control to heat and filter your spa and pool. EasyTouch automatic system operations can be performed either from the EasyTouch wireless control panel or the outdoor control panel at the equipment pad.
Pool (Lo-Temp) Button: |
|
|
Switches the filter pump on, |
|
|
rotates valve actuator (to isolate |
|
|
pool water from spa water), and |
|
|
switches heater on. |
|
|
Lo-Temp (EasyTouch single |
|
|
body system) sets the low |
|
|
temperature settings for the pool |
|
|
(see page 29) |
|
|
For details about the |
AUTO |
HEATER |
control panel LCD status |
SPA |
95°F / 100°F |
messages, see page 8 |
AIR |
70°F |
|
MON |
09:30 AM |
Menu/Back and Power On |
POWER ON |
||
button (see page 4 for |
|||
|
|
||
details) |
|
|
|
|
|
|
|
Spa (Hi-Temp) Button: Switches the filter pump on, rotates valve actuator (to isolate spa water from pool water), and switches the heater on. Hi-Temp (EasyTouch single body system) sets the high temperature settings for the spa (see page 29)
Circuit LED
Circuit name label
Seven user defined auxiliary circuits. Buttons switch the assigned circuit function on/off (12 hour time-out). If solar equipment is not being used, use the AUX EXTRA (Down arrow button) for an additional circuit (see page 4 for details).
Pool (Lo-Temp) Button: Switches the filter pump on, rotates valve actuator (to isolate pool water from spa water), and switches heater on.
Lo-Temp (EasyTouch single body system) sets the low temperature settings for the pool (see page 29)
Menu/Back and Power On button (see page 4 for details)
EasyTouch Wireless Control Panel (8 circuits) - (P/N 520547)
|
|
Spa (Hi-Temp) Button: |
|
|
Switches the filter pump on, |
|
|
rotates valve actuator (to |
|
|
isolate spa water from pool |
|
|
water), and switches the |
|
|
heater on. Hi-Temp |
|
|
(EasyTouch single body |
|
|
system) sets the high |
|
|
temperature settings for the |
|
|
spa (see page 29) |
|
|
Circuit LED |
|
|
Circuit name label |
AUTO |
HEATER |
|
SPA |
95°F / 100°F |
Three user defined |
AIR |
70°F |
auxiliary circuits. |
MON |
09:30 AM |
Buttons switch the |
|
|
|
|
|
assigned circuit function |
|
|
on/off (12 hour time-out). |
|
POWER ON |
If solar equipment is not |
|
being used, use the |
|
|
|
|
|
|
AUX EXTRA (Down |
|
|
arrow button) for an |
|
|
additional circuit (see |
|
|
page 4 for details). |
EasyTouch Wireless Control Panel (4 circuits) - (P/N 520546)
EasyTouch Wireless Control Panel Installation and User’s Guide
3
EasyTouch Wireless Control Panel Buttons and LEDs
You can fully automate your pool, spa, and lighting operations from the EasyTouch wireless control panel or from the outdoor control panel located at the pool equipment pad. The EasyTouch menu options lets you create customized schedules for your pool and spa equipment, heat temperatures, and chlorination settings to switch on and off at a set day and time. Scheduled automatic operations can be performed at the EasyTouch wireless control panel or from the outdoor control panel. For menu options, refer to “EasyTouch Menu Structure,” on page 17. Before operating the EasyTouch wireless control panel, familiarize yourself with the LCD status messages and operating buttons.
AUTO |
HEATER |
|
SPA |
95°F / 100°F |
|
AIR |
70°F |
|
MON |
09:30 AM |
|
|
||
|
|
|
POWER ON
EasyTouch Wireless Control Panel
(eight circuit)
Control Panel Buttons and LEDs
Spa button/LED: For spa operations. Press this button to rotate valves and activate the filter pump automatically so that only the spa water is circulated through the system. If the heater is enabled, pressing this button also switches the heater on (if enabled in the Heat menu). When this button is pressed the circuit is activated, the LED is on and “SPA” is displayed on the screen with the current and set point water temperatures. The default time before the filter pump will switch off is 12 hours. When this button is pressed, the LEDs on the outdoor control panel Filter Pump (F) button, Valves
(V) button, and Heater button (if enabled in the Heat menu) will be on.
|
Pool Button: For pool operations. Press this button so that only the pool water is circulated through |
|
P |
|
U the system. Note that the filter pump will switch off while the pool/spa valves are rotating into |
|
position. If the heater is enabled, pressing this button also switches the heater on (if enabled in the |
|
Heat menu). When this button is pressed the circuit is activated and “POOL” is displayed on the |
|
screen with actual and set point water temperatures. The default time before the filter pump will |
|
switch off is 12 hours. When this button is pressed, the LEDs on the outdoor control panel Filter |
|
Pump (F) button, Valves (V) button, and Heater button (if enabled in the Heat menu) will be on. |
EasyTouch Wireless Control Panel Installation and User’s Guide

4
Controls and Buttons and LEDs (Continued)
Pool button (Continued)
•Single-Speed Filter Pump: If the pump is currently off, press the Pool button to switch the pump on. Press the Pool button again to switch the pump off. However, if the heater is operating, and a delay is enabled for valves, this allows the heater to cool down (heater cool-down), then when you press the Pool button to switch off the pump, only the heater will turn off, then the filter pump will automatically switch off after 10 minutes to allow the heater to cool down. Pentair heaters do not require a cool down time. To override the heater cool-down process, press the Pool button again to switch off the pump.
•Two-Speed Filter Pump: Press the Pool button to switch the two-speed pump on in high speed. Press the Pool button again to run the pump in low speed. In order to use the “2-Speed Pump” menu assignments (see page 34), the 2-Speed relay option must be installed in the EasyTouch Load Center.
Notes about Freeze Protection: This function protects the pool, plumbing, and equipment against freeze damage. If the outside air temperature sensor falls below 36° F, “Freeze Protection” is activated and the Filter Pump relay is switched on to circulate the pool water. To enable freeze protection for a circuit, see “Settings Menu: Circuit Types, ” on page 31.
Liquid Crystal Display (LCD): The main system display consists of a 16 x 4 alphanumeric character LCD with EL backlighting for easy viewing of the menu items, and status messages. Press the Menu button twice to refresh the display. For EasyTouch main screen status information, see page 5. For details about the battery status icon, see page 6.
Y |
Left button: Use the Left button to scroll through sub-menu selections, setting and values. While |
editing settings, press and hold the Left button to fast reverse through settings and values. |
Menu/Back and Power On button: This button has three functions. Use this button to access the menu options, access a previous menu level or item and switch power on to the wireless device. The
MENU
POWER ON
device can be manually switched off using the “Power Off” menu option (see page 44 for details). Use the Menu button to access the EasyTouch menu system, save and exit settings. Control panel buttons are disabled while in the menu. Use this button to exit from main menu or sub-menu items. Pressing the Menu button while in a menu item will return to the main screen. If no menu activity is detected after five minutes, the main screen is displayed. All menu settings are permanently saved and retained in the control panel even after power is removed from the device.
Z |
Right button: Use the Right button to select a sub-menu item for editing. After pressing the Menu |
button to access the main menu items, use the Right button to select the menu item and access the |
sub-menu items for adjustment. For convenience, while editing a settings, press and hold the Right button to fast forward through settings and values.
U Up/Down buttons: Use the Up and Down buttons to scroll through the main menu items and to adjust or change settings. Use these buttons after pressing the Menu button to access the main menu
Vitems. While editing settings, press and hold the Up or Down button to fast forward or fast reverse through settings and values. The down arrow button has a second function
VDown arrow button (Aux Extra): This button switches the assigned circuit on or off. This “extra” auxiliary circuit shares the solar circuit and is only available if the solar output plug (J17) on the motherboard is not being used for solar equipment. Refer to the EasyTouch User’s Guide
(P/N 520584) for more information.
EasyTouch Wireless Control Panel Installation and User’s Guide
5
Controls and buttons (Continued)
AUX buttons/LEDs: The auxiliary output circuit buttons operate the pool and spa system valves, lights and other equipment. These auxiliary (AUX) circuits are assigned in the “Circuit Type” menu, see page 31 for details. There are three auxiliary circuits (AUX 1- 3) on the EasyTouch 4 wireless control panel and seven auxiliary circuits (AUX 1- 7) on the EasyTouch 8 wireless control panel. The Down arrow button can also be used as an “extra” auxiliary circuit if solar equipment is not being used. Refer to “Down arrow button” on page 4 for more information. Labels can be affixed next to each auxiliary button to identify the circuit function. When an auxiliary circuit is activated or the button is pressed, the LED is on. Pressing an auxiliary circuit button will activate the corresponding circuit in either “Auto” or “Service” mode. When a circuit relay is switched on manually, it remains on until either you switch it off manually, or the next time the relay is scheduled to be switched off. For example, if the filter pump is scheduled to automatically run from 9:00 AM to 5:00 PM daily then the filter pump is switched on manually at 9:00 PM, it will run continuously until the next day at 5:00 PM then switch off. The schedule will then continue from then on.
EasyTouch Wireless Control Panel Display
The EasyTouch wireless control panel screen displays when the system is in automatic mode (AUTO) or in service mode (SERVICE). Service mode is enabled from EasyTouch outdoor control panel at the pool equipment pad. The following describes the main status screen.
AUTO |
HEATER |
SPA |
95°F / 100°F |
AIR |
70°F |
MON |
09:30 AM |
|
POWER ON |
AUTO (Automatic): The system is in normal operating mode. Scheduled programs will run automatically.
HEATER: Displays the heat source (Off, Heater, Solar Prf., Solar) as specified in the Heater menu settings (see page 20).
POOL (Spa): Indicates that the Valves (V) button is in “Pool” or “Spa” mode and the Filter Pump (F) button has been pressed to switch on the filter pump. If this display line is blank, it indicates no spa or pool function is active. For an EasyTouch single body system, Hi-Temp (Spa) / Lo-Temp (Pool) sets the temperature settings (see page 29)
95° F / 100° F: Displays the actual spa or pool water temperature (95° F) and the set point temperature (100° F) as set in the “Heater” menu.
AIR: Displays the actual outside air temperature (70° F) as read by the air sensor located near the EasyTouch Load Center.
Date and Time: Displays the EasyTouch system day and time as specified in the “Clock” menu settings (see page 26).


 Battery icon: Displays the available battery power usage for the device. See page 6 for details.
EasyTouch Wireless Control Panel Installation and User’s Guide

6
Battery Overview
The average battery life for the EasyTouch wireless control panel can last the summer season with normal use. Battery life varies depending on the type of batteries used and the amount of usage. The following battery types are compatible with the EasyTouch wireless control panel:
•
•
AA-size alkaline battery (quantity 4 provided in the kit)
AA-size Ni-MH rechargeable battery (quantity 4, bought separately)
Safety Precautions when using batteries
Read the following important information before installing batteries into the EasyTouch wireless control panel.
•Never use batteries with split or peeling outer casings
•Never use combinations of different types of batteries or new and used batteries together
•Do not use manganese or Ni-Cd batteries
•Ensure that batteries poles are clean. Dirty poles can shorten battery life
•The time for which AA-size alkaline batteries can be used vary depending on the brand. Some brands may provide less power than others. Note that the time Alkaline batteries can be used decreases in cold conditions (0° C to 10° C (32° F to 50° F)). Therefore, it is recommended to use AA-size Ni-MH batteries in the unit.
•When first purchased, or if left unused for a long period, the amount of time that the AA-size alkaline, Ni-MH, or rechargeable batteries can be used, may be shortened.
Checking the battery charge
Acheck battery status icon displays on the main screen of the EasyTouch wireless control panel. The check battery icon is located in the lower right corner of the main screen.
AUTO |
HEATER |
||
SPA |
95°F / 100°F |
||
AIR |
70°F |
||
MON |
09:30 AM |
|
|
|
|
|
|
Check battery icons


 Ample battery charge.

 Sufficient charge left in the batteries to operate the unit. The unit’s estimated battery life varies greatly depending on use and backlight display time (see page 7).

 Batteries are depleted. Before the batteries are completely depleted this icon will start flashing,
  indicating that the LCD will shortly go blank and the EasyTouch wireless will stop working. Replace or recharge the batteries. Depending on the type of batteries installed, this icon may display more quickly.
EasyTouch Wireless Control Panel Installation and User’s Guide

7
Power Save Options
Use the power save function to reduce power consumption and extend battery life. The power save options are:
•Idle Time: If there is no control panel activity, the idle time can be set to 60 seconds (default), 30 seconds, or five minutes before it shuts down. The default time is 60 seconds. For information about accessing the idle time options menu, see page 40.
Note: If the unit is not used for 60 seconds the power save function switches off the unit. To switch the unit on, press the POWER ON button (see page 4).
Backlight Options
Use the backlight on time power save options to reduce power consumption and extend battery life. To access the Backlight options menu, see page 39. The backlight options are:
•On Time: Backlight is on for 60 seconds, 30 seconds, five minutes, or off. The default setting is 30 seconds.
•Brightness: Backlight brightness can be set to low, medium or high. The default setting is medium.
Installing Batteries
The EasyTouch wireless control panel is shipped with fourAA-size alkaline batteries. Before using the unit install the batteries.
To install batteries:
1.Place the EasyTouch control panel face down on a flat clean surface. Remove the six screws securing the battery cover. Set the cover aside.
Screw (6x)
Battery cover
Easy Touch Control Panel (rear view)
EasyTouch Wireless Control Panel Installation and User’s Guide

8
Installing batteries (Continued)
2.Load the four batteries into the battery compartment. Orient the positive polarity end of each battery as shown below.
(+) positive polarity
3.Install the battery cover and secure with the six screws. Make sure that the battery cover is secure and that all the screws are hand tightened. CAUTION - DO NOT OVER TIGHTEN THE SCREWS.
OVER TIGHTENING THE SCREWS CAN DAMAGE THE UNIT.
Secure battery cover with the six screws
Battery cover
Easy Touch Control Panel (rear view)
4.Power up the unit: To switch the unit on, press the Power On button located on the front of the unit.
5.Display messages after replacing batteries: After replacing depleted batteries a check battery message is displayed on the screen. Press the MENU button to continue.
6.The screen will then display a second message to check the battery cover. After checking that the battery cover is secure and that all screws are tightened, press the MENU button.
The battery icon should display the fully charged icon (


 ). The unit is ready for use.
EasyTouch Wireless Control Panel Installation and User’s Guide

9
Setting up the EasyTouch wireless control panel for the first time
Setting up the EasyTouch wireless control panel
In order for the EasyTouch wireless control panel to communicate with the EasyTouch system outdoor control panel, the first time the wireless device is powered up it must first be assigned a unique communication address. For this process you need to access the menu for each control panel. For conveniens it’s easier to setup the wireless device at the outdoor control panel.
Note: Before you start verify that the transceiver antenna is connected to the EasyTouch load center. For installation instructions, refer to “EasyTouch Transceiver Installation,” on page 51.
From the EasyTouch load center outdoor control panel
1.Switch power on to the EasyTouch load center.
2.Press Menu button, and select Settings > Address and press the Right arrow button.
Address Wireless |
|
Address Wireless |
Scanning ... |
|
Sending Address.. |
|
|
<MENU> |
The EasyTouch outdoor control panel will display "Scanning..." for about five seconds while it searches for the EasyTouch wireless device within range of the transceiver antenna. After the scanning process has finished, "Sending Address" is displayed. The system is now waiting to lock on to the EasyTouch wireless control panel. Proceed to step 3.
From the EasyTouch wireless control panel
3.Press the Power On button located on the front of the wireless device.
Note: After replacing depleted batteries a check battery message is displayed on the screen. Press the MENU button twice to continue.
4.Press Menu button, and select Settings > Address and press the Right arrow button.
5.Select “Address” and press the Right arrow button to lock on to the unique address that is being transmitted from the outdoor control panel.
NO ADDRESS
XAddress
Abort
Note: If you choose "Abort," the device can continue to operate using the factory default address. If the outdoor control panel has been previously addressed, the wireless may not operate the system. Each time the device is switched on the “NO ADDRESS” will be displayed. This mode is not recommended for permanent use.
6.After selecting “Address” the wireless device unit will lock on to a unique address and display
"Found ADDRESSED." Press the Back button to save and exit this mode. The device is ready for operation. If “Unit Mismatch” displays
Address Lock
Found
ADDRESSED
<MENU>
Note: “Unit Mismatch” displays if the outdoor control panel has an existing system image. See page 10 for details.
Unit Mismatch S
Download from
Outdoor
T
7. On the outdoor control panel: Press the outdoor control panel  Back button three times to exit the "Sending Address" mode and return to the main screen. The system will continue to transmit an address until the Menu is button is pressed to stop the process.
Note: To re-address the EasyTouch wireless device, repeat steps 2 through 7 on the wireless device to restart the address process.
EasyTouch Wireless Control Panel Installation and User’s Guide
10
Synchronizing control panels
If the EasyTouch outdoor has been previously setup with specific pool and spa information and you install the EasyTouch wireless control panel with factory default information, the outdoor control panel will automatically download the existing system information to the wireless control panel. If the wireless control panel has a different firmware revision level than the outdoor control panel or it contains previous setup information, you can choose which system image to upload or download.
Synchronizing the control panels is initiated from the wireless control panel. The following describes how to synchronize the wireless control panel with the outdoor control panel.
Download from outdoor to wireless control panel
•Press the  Menu button to download the system image from the EasyTouch outdoor control panel to the wireless control panel.
Unit Mismatch S
Download from
Outdoor
T
Upload to outdoor from wireless control panel
1.Press the Up/Down button to access the “Upload” screen.
2.Press the  Menu button to upload the system image from the wireless control panel to the EasyTouch outdoor control panel.
Unit Mismatch
Upload to
Outdoor
S
T
Note: To erase existing control panel system information, use the “Erase EEPROM” feature. Refer to “Erase EEPROM” on page 39 for more information.
EasyTouch Wireless Control Panel Installation and User’s Guide

11
Quick start pool and spa operations
The following describes how to run some of the general day-to-day spa and pool operations.
Heat your spa or pool
AUTO |
HEATER |
|
SPA |
95°F / 100°F |
|
AIR |
70°F |
|
MON |
09:30 AM |
|
|
|
|
First enable the heat source in the Heat menu (see “Heat Menu,” on page 18). Press the Spa button (top button) to switch the filter pump on, rotate the valve actuator (to isolate spa water from pool water), and switch the heater on. Note: By default, the setting “Man Heat’ is set to “On” (see page 38) which allows the spa to begin to heat whenever it is manually turned on. Press the Pool button to switch the filter pump on, rotate the valve actuator (to isolate pool water from spa water), and switch the heater on. For Pool and Spa button location, see page 3.
Adjust your spa or pool heat settings
From the “Heat” menu (Menu > Heat > Spa Temp/Src/Pool Temp/Src) you can select the heat source and set the water temperature. The spa or pool water will heat to the settings specified. The EasyTouch system allows for solar and conventional heaters. The EasyTouch will use the heating source that is selected. The heat source selections are:
•OFF - No heating even though pump and other circuits may be operating.
•HEATER - Gas heater only.
•SOLAR ONLY - Solar heating system to be the only heat source. In order to display “Solar Only” as a heat option in the “Heat” menu, you must first enable solar in the Settings > Solar menu
(see page 34).
•SOLAR PREF. (Solar Preferred) - Used if solar and gas heating are combined and you want to use solar heating only when it is most effective. In order to display “Solar Preferred” as a heat option in the “Heat” menu, you must first enable solar in the Settings > Solar menu (see page 34).
To set the spa temperature set point and select the heat source:
Getting There |
|
|
|
▼ HEAT |
|
|
|
|
|
|
|
|
|
|
|
Pool Temp/Src |
S |
||
|
|||
X Spa Temp/Src |
|
||
|
|
|
T |
|
|
|
|
Spa |
S |
Temp: 85° F |
|
Heat: Off |
T |
Right button: Select spa temperature and heat source. Up/Down button: Adjust the spa water temperature. (from 40° F to 106° F or 4° C to 41° C).
Right or Left button: Move to Heat source options.
Up/Down: Set the Heat option: Off, Heater, Solar, or Solar Preferred.
 Press the Back button save the settings and to return to the Heat menu or press the button again to return to the Main screen.
Note: Select “Pool Temp/Src” to adjust your pool temperature.
EasyTouch Wireless Control Panel Installation and User’s Guide

12
Switch on lights manually
From the Lights screen you can manually switch all lights on or off, and synchronize colored lights. Up to 12 lights can be controlled. For more information about setting up lights, refer to “Lights Menu” on page 19.
To manually switch on all lights:
Getting There
LIGHTS |
▲ SETUP LIGHTS |
Setup Lights S
Mode: All Off
T
Up/Down button: Select: All off, All on, or Sync. The Sync feature allows a combination of up to 12 SAm, SAL, or FIBERworks lights to synchronize their colors before switching the lights on.
 Press the Back button save the settings and to return to the main menu items or press the button again to return to the Main screen.
Using the Once Only timer feature
The Schedules “Once Only” timer feature enables you to automatically switch equipment on for one time. This feature allows you to program a circuit to turn on at a particular time on a one-time basis. For example, if you wanted the spa to be heated when you arrive home, you could program the heater to switch on at a specific time and after you have finished using the spa you can switch the heater off manually. After the program has run, it is automatically erased. Unlike using the regular “Schedule” program, the “Once Only” program does not repeat. The circuit must be turned off manually or wait for the 12 hour automatic shut-off. However, you could also reset the 12 hour factory shut-off by entering an “Egg Timer” count down program to extend past the default 12 hours shut-off.
The following example describes how to set a “Once Only “ program for the spa. The same steps apply when selecting the pool or any auxiliary circuit.
Getting There
▼ SCHEDULES
▲
SPA
XSpa |
0 |
S |
Pool |
0 |
|
Aux 1 |
0 |
|
Aux 2 |
0 |
T |
|
|
|
Spa |
0/0 S |
|
Mode: None (New) |
||
|
|
|
|
|
|
Spa |
1/1 S |
|
Mode: Once Only |
|
|
08:00A |
_ |
|
s m t |
w t f s |
T |
Right button: Select the Spa circuit. The generic circuit names are: Spa, Pool, Aux1-7 (EasyTouch 8), Aux 1-3 (EasyTouch 4), and Aux Extra “Aux Extra” is only available if the Solar output (J17) plug on the EasyTouch motherboard is not being used for solar equipment.
Right button: Select Mode if there are existing programs. Skip this step to create a new program.
Up/Down button: Select New to create a new program.
Right button: To create a new program and enter the “Mode” settings.
Up/Down button: 1/1 indicates that this circuit has one program. If there are existing programs assigned to this circuit, use these buttons to view and select the existing program settings.
Right button: To select the “Once Only” settings. Right button: Move to start time settings.
Up/Down and Right buttons: Set the start hour (A/P) and minutes. A (AM) and P (PM) time is set when setting the start hour.
Right button: Move to day of the week to run the program.
Right button: Select which day to run the program then press the Up/Down button to enable the bar on top of the letter. A bar on top of the letter indicates the day selected to run the program.
 Press the Back button to save the settings and to return to the Schedules menu options. Press the button again to return to the main menu options or press again to return to the Main screen.
EasyTouch Wireless Control Panel Installation and User’s Guide
13
Schedule start and stop times for equipment
You can set timers (schedules) to automatically run equipment like pool filtration or lights. Any EasyTouch circuit can be set to switch on and off on every or any day of the week. Up to 12 total programs may be created for all circuits combined.
Program your Spa or Pool
You can use the “Schedule” feature to set the time and day(s) when to switch the filter pump on and rotate the pool/spa valves into the “Pool” or “Spa” position. The heater will automatically heat the pool or spa water up to the set point temperature as set in the “Heat” menu (see page 20). If the pool has a separate jet pump or blower controlled by AUX 1 and/or AUX 2 , these need to be scheduled separately.
Schedules
To create a schedule for your spa or pool:
Getting There
▼ SCHEDULES
▲
SPA
XSpa |
0 |
S |
Pool |
0 |
|
Aux 1 |
0 |
|
Aux 2 |
0 |
T |
|
|
|
Spa |
0/0 S |
|
Mode: None (New)
Spa |
1/1 S |
Mode: Schedule |
|
08:00A -_05:00P |
|
s m t w t f |
s T |
Right button: Select the Spa circuit. The generic circuit names are: Spa, Pool, Aux1-7 (EasyTouch 8), Aux 1-3 (EasyTouch 4), and Aux Extra “Aux Extra” is only available if the Solar output (J17) plug on the EasyTouch motherboard is not being used for solar equipment. Use the Down arrow button to switch the “extra” circuit on and off. Use the Down arrow button to switch the “extra” circuit on and off.
Right button: Select Mode if there are existing programs. Skip this step to create a new program.
Up/Down button: Select New to create a new program.
Right button: To create a new program and enter the “Mode” settings.
Up/Down button: 1/1 indicates that this circuit has one program. If there are existing programs assigned to this circuit, use these buttons to view and select the existing program settings.
Right button: To select the “Schedule” settings. Right button: Move to start and stop time settings.
Up/Down and Right buttons: Set start and stop hour (A/P), minutes. The A (AM) and P (PM) time is set when setting the start and stop hour. Right button: Move to days of the week to run the program.
Right and Up/Down buttons: By default the program is set to run all the days of the week. If you wish to edit which days to run the program, select the day of the week, then press the Up/Down button to remove the bar from the top of the letter. A bar on top of the letter indicates the day selected to run the program.
 Press the Back button to save the settings and to return to the Schedules menu options. Press the button again to return to the main menu options or press again to return to the Main screen.
EasyTouch Wireless Control Panel Installation and User’s Guide
 Loading...