

Page 1

3900
Hydrogenation Apparatus
Operating Instruction Manual
271M
3910 Hydrogenation Apparatus
3920 Hydrogenation Apparatus
Page 2

Table of Contents
Table of Contents
Preface
Scope — 3
Related Instructions — 3
Safety Information — 3
Explanation of Symbols — 4
General Specifi cations — 4
Environmental Conditions — 4
Provisions for Lifting and Carrying — 4
Intended Usage — 5
The User’s Responsibility — 5
Unpack Carefully — 5
Cleaning & Maintenance — 5
Assembly Instructions — 6
Operating Procedure — 7
Standardization — 7
Pressure Limits — 8
Safety Barricades — 8
General Precautions — 8
Catalysts — 9
Bottle Heater — 9
Water Jacket — 9
Temperature Measurement and
Control — 10
Semi-micro Operations — 11
Alternate Parts — 11
Maintenance Instructions
Fuse Ratings — 11
Special Instructions for the 3921
Hydrogenator
Motor and Gear Box — 12
Bottle Connectors — 12
Glass Reaction Bottles — 12
Stainless Steel Bottle — 13
Bottle Heater — 14
Temperature Measurement — 14
References — 14
Parts Lists
3910 Hydrogenation Apparatus — 16
3920 Hydrogenation Apparatus — 18
Bottle Clamp Assembly - Series 3910 — 20
Shaker Column Assembly - Series 3910 — 21
Flywheel Assembly - Series 3910 — 22
Connecting Rod Assembly - Series 3920 — 23
AA92CA Single Valve Assembly — 24
3A93CA Double Valve Assembly — 25
3910 Wiring Schematic — 26
3920 Wiring Schematic — 27
Explosion Proof Switch Assembly for 1765EEG 115V Series 3910 — 28
Explosion Proof Switch Assembly for 1765EEK 220V -
Series 3910 — 29
Explosion Proof Switch Assembly for A388EEG 115V
& 220V - Series 3920 — 30
Explosion Proof Switch Assembly for A388EEK 220V -
Series 3920 — 31
Thermocouple Assemblies — 32
Reaction Bottles for Parr Hydrogenators — 33
Heating Mantles — 33
Air Motor Assembly — 34
Switch Box Assembly 115V — 35
Switch Box Assembly 230V — 35
Customer Service:
Questions concerning the installation or operation of this instrument
can be answered by the Parr Customer Service Department:
1-309-762-7716 • 1-800-872-7720 • Fax: 1-309-762-9453
E-mail: parr@parrinst.com • http://www.parrinst.com
2
Parr Instrument Company
Page 3

Product Line
Preface
Scope
These instructions describe the installation, operation and maintenance of Parr 3911 or 3921 Hydro-
genators offered with bottle sizes of 250, 500, 1000,
1700, 2000 or 2250 mL. They cover the basic steps
to be followed when installing these reactors and
describe the function of all standard components.
They are intended to be used in conjunction with
several related instruction sheets listed below. This
information describes several components that are
common to most Parr pressure reaction equipment,
and includes safety precautions and other related
information applicable to all reaction laboratories.
The users should study all of these instructions
carefully before starting to use these hydrogenators
so that they will fully understand the capabilities
and limitations of the equipment.
Related Instructions
The following Parr publication is also included to
further your understanding of this instrument and
its component parts:
Safety Information
To avoid electrical shock, always:
1. Use a properly grounded electrical outlet of correct voltage and current handling capability.
2. Ensure that the equipment is connected to electrical service according to local national electri-
cal codes. Failure to properly connect may create
a fi re or shock hazard.
3. For continued protection against possible haz-
ard, replace fuses with same type and rating of
fuse.
4. Disconnect from the power supply before maintenance or servicing.
To avoid personal injury:
1. Do not use in the presence of fl ammable or com-
bustible materials; fi re or explosion may result.
This device contains components which may
ignite such material.
2. Refer servicing to qualifi ed personnel.
No. Description
201M Limited Warranty
311M Supplemental Instructions for the Parr
4833 Controller
448M CAL 9500P Manual
www.parrinst.com
3
Page 4
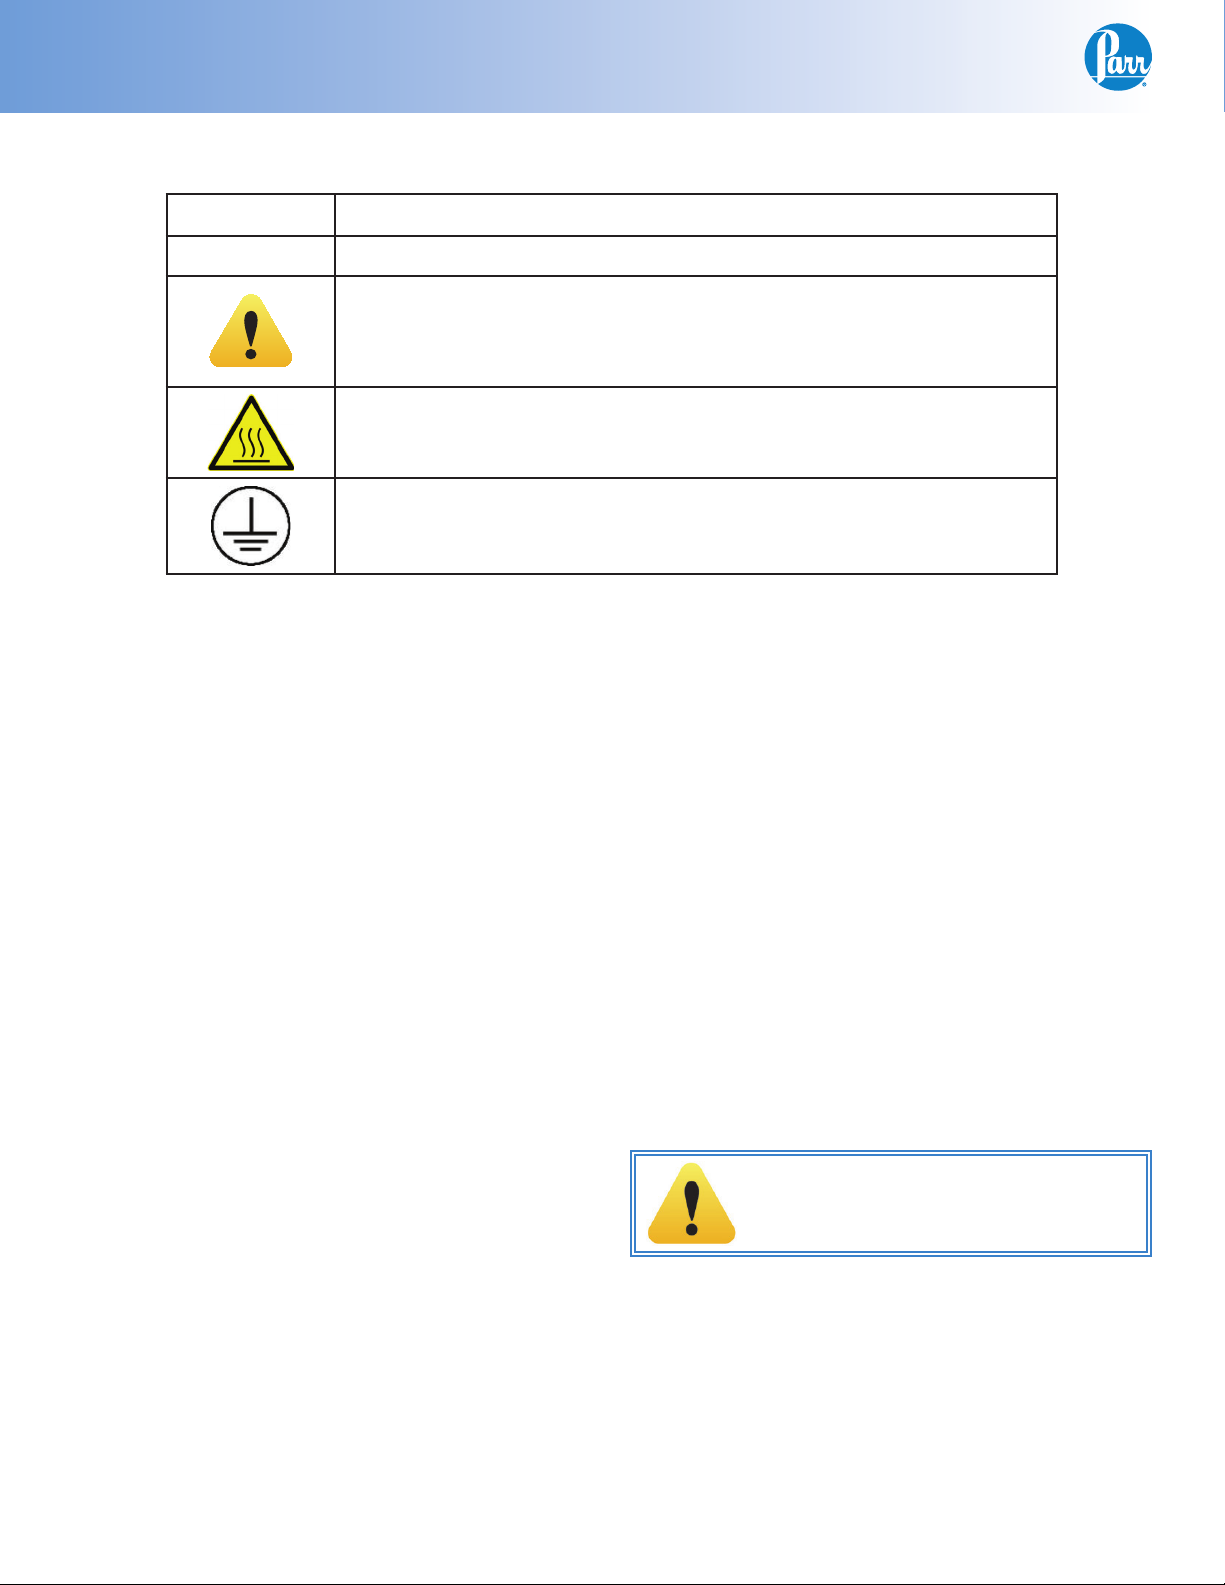
Hydrogenation Apparatus
Explanation of Symbols
I On Position
O Off Position
This CAUTION symbol may be present on the Product Instrumentation
and literature. If present on the product, the user must consult the appropriate part of the accompanying product literature for more information.
This CAUTION symbol indicates that the surface may be hot.
Protective Earth (PE) terminal. Provided for connection of the protec-
tive earth (green or green/yellow) supply system conductor.
General Specifi cations
Electrical Ratings
3911 & 3921 Rated:
115 Vac, 60 Hz, 8.0 Amps or
115 Vac, 60 Hz, 3.6 Amps or
115 Vac, 60 Hz, 3.3 Amps or
230 Vac, 50 Hz, 2.1 Amps or
230 Vac, 50 Hz, 8.0 Amps
The electrical ratings are identifi ed on the data plate
of the instrument.
Before connecting any Parr Hydrogenation Apparatus to an electrical outlet, the user must be certain
that the electrical outlet has an earth ground connection and that the line, load and other character-
istics of the installation do not exceed the following
limits:
Voltage: Fluctuations in the line voltage should not
exceed 10% of the rated nominal voltage shown on
the data plate.
Frequency: Hydrogenation apparatus can be oper-
ated from a 50 or 60 Hertz power supply without
affecting the apparatus. The frequency ratings are
identifi ed on the data plate of the instrument.
Environmental Conditions
This apparatus is to be used indoors.
Operating: 10 ºC to 35 ºC; maximum relative humidity of 80% non-condensing. Installation Category II
(over voltage) in accordance with IEC 664.
Pollution degree 2 in accordance with IEC 664.
Altitude Limit: 2,000 meters.
Storage: -25 ºC to 65 ºC; 10% to 85% relative humidity.
Electromagnetic Compatibility In accordance with
2004/108/EC.
Provisions for Lifting and Carrying
The 3900 Series Hydrogenation Apparatus and its
components are very heavy. Before moving ensure
all cables are disconnected. Use proper and safe
lifting techniques when installing or moving the ap-
paratus and/or its components.
CAUTION!
Do not use in hazardous atmospheres.
Current: The total current drawn should not exceed
the rating shown on the data plate by more than 10
percent.
4
Parr Instrument Company
Page 5
Hydrogenation Apparatus
Intended Usage
This apparatus has been designed, built, and tested
to strict physical and electrical standards. However,
it is the user’s responsibility to install and operate
it in conformance with local pressure and electrical
codes. If this equipment is used in a manner beyond its intended usage, the protection provided by
the equipment may be impaired.
The User’s Responsibility
The user must realize that it is their responsibility
to keep their equipment in good condition and to
use it only within the prescribed temperature and
pressure limits. They must be constantly aware of
the serious consequences that can result from such
things as: opening the wrong valve, mixing combustible vapors with air or oxidizing gases, adding
reactants too fast or failing to observe and prevent
sudden increases in temperature or pressure. Qualifi ed personnel should make frequent checks to be
sure that all safety rules are being observed. In the
absence of a supervised safety program the user
must take time to become completely familiar with
their equipment and to consider any hazards inherent in the reactions they intend to perform.
Unpack Carefully
Unpack the equipment carefully and check all the
parts against the packing list. If shipping damage
is discovered, report it immediately to the deliver-
ing carriers. Examine the components closely for
any loose parts or shipping damage and be sure to
check all layers of packing materials thoroughly so
as not to overlook any parts which might otherwise
be discarded.
Cleaning & Maintenance
Periodic cleaning may be performed on the exterior
surfaces of the instrument with a lightly dampened
cloth containing mild soap solution. All power
should be disconnected when cleaning the instrument.
There are no user serviceable parts inside the product other than what is specifi cally called out and
discussed in this manual. Advanced troubleshooting
instructions beyond the scope of this manual can
be obtained by calling Parr Instrument Company in
order to determine which part(s) may be replaced or
serviced.
CAUTION!
Ensure that any hot surfaces have had
adequate time to cool before cleaning or
maintaining the hydrogenation apparatus
and/or its components.
www.parrinst.com
5
Page 6

Hydrogenation Apparatus
Assembly Instructions
Rinse or blow air through the hydrogen tank to
remove any dust or foreign material. Likewise, blow
out the gas hose and valves to be sure that they are
dust-free and clean.
Set the apparatus on a sturdy bench or table where
there is convenient access to an electrical outlet with
the appropriate supply voltage and current ratings
in accordance with national and local electrical code
requirements. The supply voltage must not exceed
the marked nominal voltage shown on the instru-
ment by more than 10%. The supply voltage recep-
tacle must have an earth ground connection.
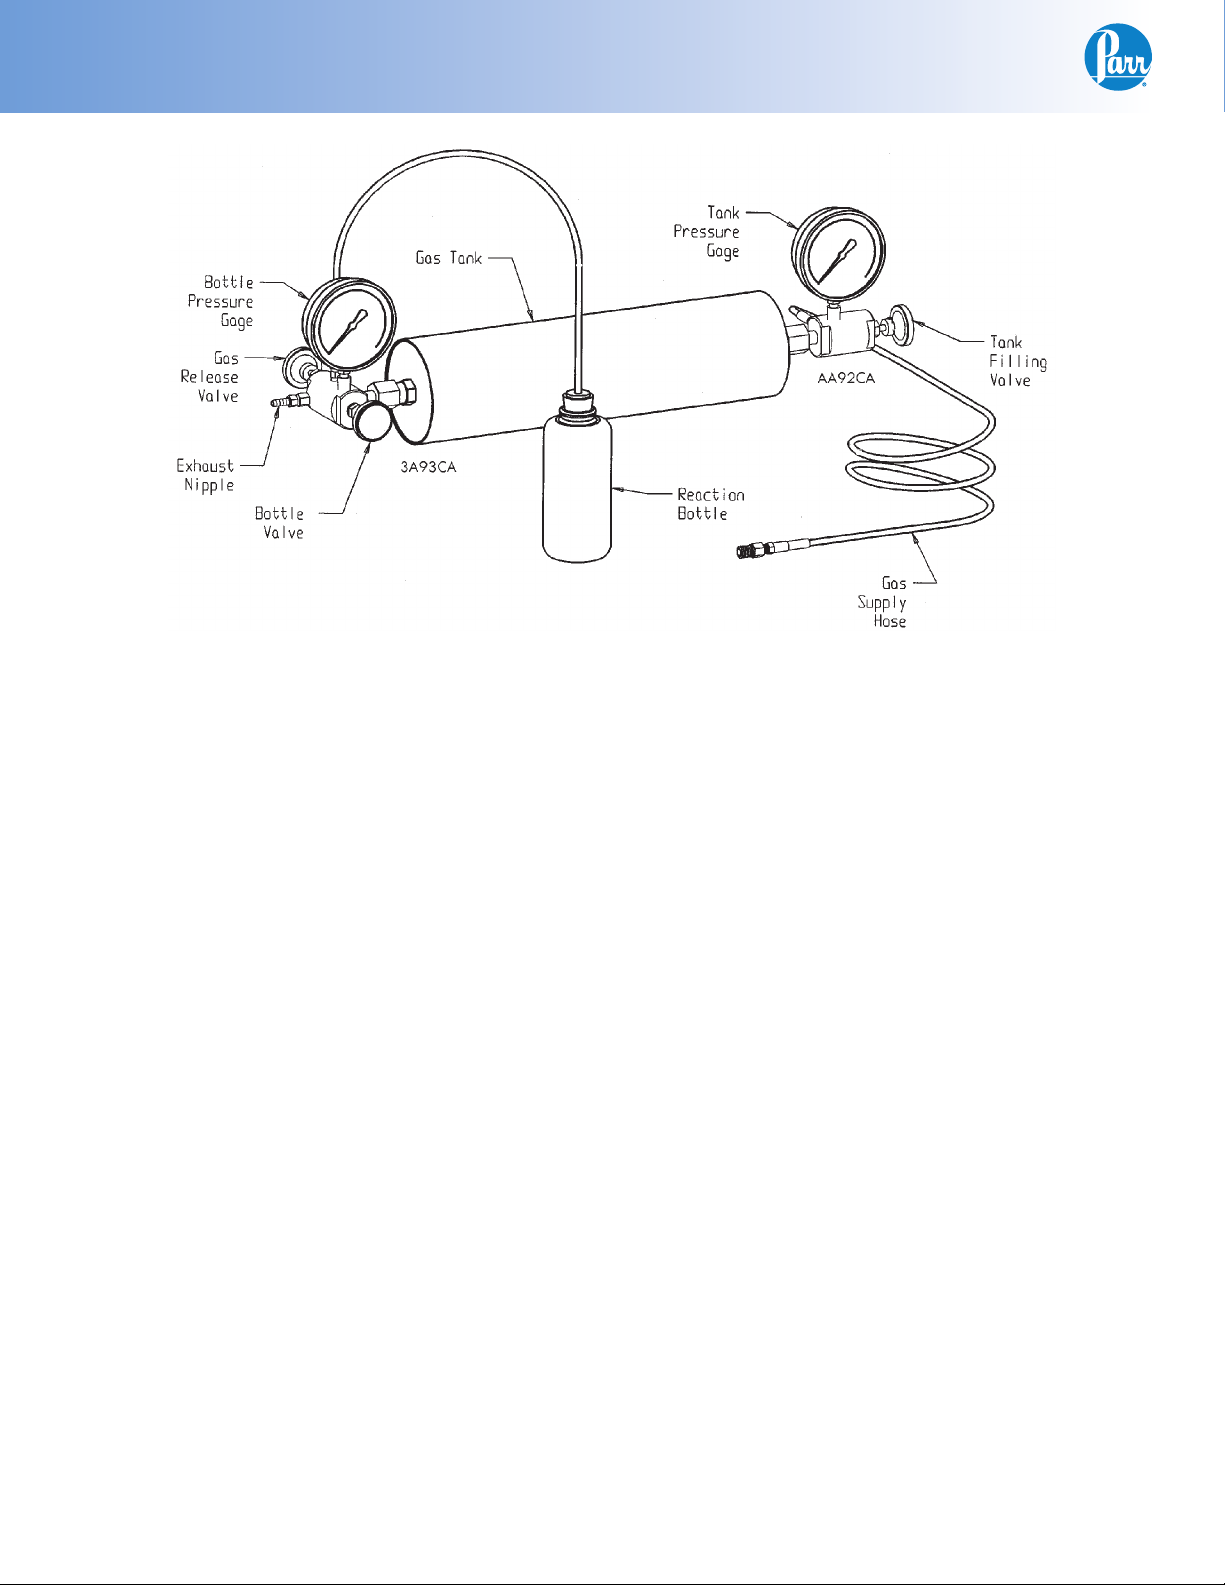
Attach the valves to the hydrogen tank and tighten
the couplings fi rmly with a wrench. This tank is fi lled
through the AA92CA valve which is attached to the
right end. The gage on this valve shows the tank
pressure when the valve is closed. The gage on the
3A93CA valve at the left end of the tank shows the
pressure in the reaction bottle and connecting tube.
The front knob on the 3A93CA valve controls the
fl ow of gas from the tank to the bottle. The rear knob
at the opposite end of the block is used when discharging gas from the bottle or when evacuating the
bottle through the hose nipple.
A 6-ft hose (A118CA) is furnished for connecting the
apparatus to the pressure regulator or needle valve
on a commercial hydrogen tank. Screw one end of
the hose into the socket in the AA92CA valve and
connect the other end to the pressure regulator or
tank valve. The 1/8” NPT pipe threads on the ends of
the pressure hose should be coated with Tefl on tape,
plastic lead or other thread dope to ensure tight
seals. The 1/8” to 1/4” bushing can be removed from
the hose if it is not required but do not unscrew the
fi ttings which anchor the end nipples to the hose
itself.
Before using a new apparatus for the fi rst time,
assemble it with an empty bottle and test for gas
leaks, as follows: Fill the tank with hydrogen to
40 psig; then close the tank fi lling valve. Open the
bottle valve and allow the full tank pressure into
the bottle; then close the bottle valve. The tank and
bottle gages should now read the same. Record
these pressures and continue to observe them over
a period of four to six hours. The pressures should
remain constant throughout this period unless there
is a signifi cant change in room temperature. If a
noticeable drop is observed in either gage, fi nd and
correct the leak before starting to use the apparatus.
Any leaks can usually be detected by brushing the
joints with a soap solution.
The 25-inch length of polypropylene tubing leading
to the reaction bottle must be fi rmly connected to
the outlet fi tting on the 3A93CA valve. No special
clamps or fi ttings are required to fasten this tube
into the bottle stopper. Simply slide the end of the
tube through the 61CA4 washer and through the
166CA retaining ring, then push the tube through
the one-hole Neoprene stopper leaving a projection
of about one inch below the bottom of the stopper.
Slide the safety screen over the bottle; place the
bottle into the holder and tighten the thumb nuts on
the ends of the two tie rods. The clamping pressure
developed by the thumb nuts will hold the bottle in
the shaker mechanism and it will also anchor the
connecting tube in the stopper.
6
Parr Instrument Company
Page 7

Hydrogenation Apparatus
Operating Procedure
Samples to be treated in a Parr hydrogenator are
placed in a reaction bottle with a catalyst and
clamped in a shaking mechanism. A gas connection
is made to the bottle from a multiple valve and all
air is removed either by evacuation or by fl ushing
with hydrogen. Hydrogen is then introduced from
a 4-liter reservoir while the bottle is shaken vigor-
ously to initiate the reaction. Heating or cooling can
be applied, if necessary. After the reaction reaches
the desired point the shaker is stopped, the bottle
vented and the product and catalyst are recovered.
The individual steps in this operating procedure are
listed below. These can be varied to suit each individual application.
1. Place the catalyst, solvent and sample in the
reaction bottle, adding the catalyst fi rst to avoid
possible vapor ignition by the dry catalyst. The
total volume of solution should not exceed two-
thirds the capacity of the bottle.
2. Attach the stopper with connecting tube and
slide the bottle into the guard screen, then set
the assembly in the bottle holder and tighten the
knurled clamping nuts.
3. If air is removed from the bottle by evacuation, attach a vacuum hose to the nipple on the
3A93CA valve; close the bottle valve: open the
gas release valve and evacuate until the solvent
starts to boil. If a low boiling solvent is not used,
evacuate to a negative pressure suffi cient to
remove most of the air. Air can also be removed
by alternately fi lling the bottle with hydrogen to
20 or 30 psig. and venting it at least three times.
After purging the bottle, close the gas release
valve and leave it closed throughout the run.
4. Starting with the hydrogen tank fi lled to 30
psig. open the bottle valve and read the bottle
pressure gage after equilibrium has been established.
5. Start the shaker and follow the progress of the
reaction by observing the bottle pressure gage.
If complete hydrogenation is desired, continue
shaking until there is no further pressure drop.
For partial or quantitative hydrogenation, contin-
ue shaking until the pressure drops to a calculated value as determined by prior standardization
runs.
6. At the end of the run, stop the shaker; close
the bottle valve and allow the catalyst to settle.
Any residual pressure in the bottle and connecting tube can be discharged by opening the gas
release valve.
7. Open the bottle clamp and remove the bottle.
Decant the solution leaving the catalyst in the
bottle for a second reduction, or remove the
catalyst on a fi lter.
Standardization
The apparatus can be standardized by making a
preliminary run with a known amount of any compound that can be completely and quantitatively
reduced. The pressure drop per mole of hydrogen
consumed in such tests is then used as a basis for
estimating the progress of a reaction with unfamiliar materials. A procedure is described in reference
(3) for standardizing the apparatus by reducing 11.6
grams (0. 1 mole) of pure maleic acid dissolved in
150 mL of 95% ethanol using 0.1 gram of catalyst.
The reaction is carried out as previously described
with shaking continued until no more hydrogen is
consumed. This usually takes twenty to thirty minutes, after which the pressure drop in the tank is
recorded. Since exactly 0.1 mole of hydrogen has
been consumed in this run, this decrease in tank
pressure can be used as a basis for measuring or
regulating the amount of hydrogen consumed when
treating other compounds.
Standardization tests are not limited to runs with
maleic acid. Fumaric acid is equally suitable for
this purpose, or any other pure compound can be
used provided that it is completely or quantitatively
reduced. If the intended usage for the apparatus
involves the consumption of only a small amount
of hydrogen, the apparatus can be standardized
with the tank valve closed. The gage will then give a
more signifi cant reading as gas is consumed from
the connecting tube and bottle alone while these
parts are isolated from the tank.
www.parrinst.com
7
Page 8
Hydrogenation Apparatus
Gas Tank and Valve System
Pressure Limits
The use of glass bottles in these reactors introduces
certain pressure limitations and a potential hazard
which the user must understand. Although each
bottle is pressure tested before it is sold, the physical characteristics of glass are such that it is impossible to guarantee these bottles against breakage
or to predict their service life. For this reason, each
apparatus is equipped with a bottle shield to restrain
fl ying glass in case of breakage. The user must take
whatever additional precautions he considers necessary to protect himself from injury in case a bottle
should unexpectedly fail. Working pressures should
never exceed 60 psig when using either 250 or 500
mL bottles in the 3911 apparatus, and never more
than 40 psi for one liter bottle and 30 psi for two liter
bottle in the 3921 apparatus.
Safety Barricades
If a barricade is used it should be built of concrete,
brick or steel in whatever thickness or form is considered necessary to protect the operator from fl y-
ing fragments if the reaction bottle should explode.
Glass shields, either plain or reinforced with wire
mesh, are not recommended. The requirements
for barricades differ so widely that each should be
designed and built in order to protect against the
potential hazards inherent in each installation. This
subject is well covered in the references listed on
page 15.
General Precautions
Pressure reactions with hydrogen are not unduly
hazardous if the user maintains his hydrogenator in
good condition and operates it with the realization
that hydrogen is highly fl ammable and that pressures and reaction rates must be carefully controlled
at all times.
Parr shaker type hydrogenators are usually operated
in an open laboratory without additional barricades
or protective screens, but the operator must realize
that additional protection may be necessary if there
is any possibility that a reaction might run out of
control, or if unexpected bottle breakage would produce a hazardous spill of toxic or fl ammable materials. Potentially explosive reactions are best handled
with the apparatus located behind a suitable barricade or in a pressure test cell.
8
Parr Instrument Company
All catalysts must be handled cautiously because of
their highly reactive nature. Do not add dry catalyst
to a bottle containing a fl ammable solution or vapor.
The vapor might ignite. Instead, add the catalyst
fi rst and cover it immediately with the sample in
solution. Precautions must also be taken to wash the
catalyst from the thermocouple, the inlet tube and
the stopper when opening the bottle. Any catalyst
left on these parts may ignite when exposed to the
Page 9
Hydrogenation Apparatus
air. If breakage or spills occur, fl ush the contaminated area immediately with large volumes of water
and keep the area wet until all traces of catalyst
have been removed.
Vacuum fi ltration through a paper fi lter can be
dangerous if air is drawn through the fi lter in the
presence of a catalyst. To reduce this hazard, keep
the paper covered with solution while it is under
suction, or use a fi lter made of a non-fl ammable
material.
Care must be taken to keep the apparatus free of impurities which might poison the catalyst. Although
a small amount of air trapped in the bottle will not
interfere with most hydrogenations, the reaction
rate can sometimes be improved by evacuating the
bottle before adding hydrogen. Or the air can be
removed by fi lling the bottle with hydrogen to 20
or 30 psig and venting it at least three times before
starting the shaker.
If the reaction proceeds too rapidly it can usually
be checked by stopping the shaker. If overheating
becomes a dangerous problem, the bottle can be
cooled by using the A103CA water jacket described
below.
There should be no gas burners or open fl ames near
a hydrogenation apparatus. The room must be well
ventilated and any gas released from the apparatus
should be discharged into an explosion proof hood
or ventilating duct. Care must be taken to prevent
ignition by a static charge from an insulated object.
For this reason, a good ground connection through
the power cord or directly to the base of the apparatus must be maintained at all times.
Loss of gas is an annoying factor which can be
avoided by careful maintenance and frequent test-
ing. It should not be necessary to use extreme force
to close any of the valves on this apparatus. If a
tight seal cannot be secured without a hard turn on
the valve handle, dismantle the valve and replace
the 20VB valve seat and any other worn or damaged
parts. If the valve leaks through the packing, back
the needle away from its seat and tighten the 8VB2
packing nut. If this does not stop the leak replace the
4VB3 packing rings.
Catalysts
The most active catalysts for hydrogenation reactions in this apparatus are made of platinum and
palladium. A hydrated platinum oxide, often called
Adams catalyst, is used in many procedures. This
is prepared by drying and heating chloroplatinic
acid in air to form a brown oxide which can then be
reduced to the more active black form by shaking
with hydrogen either before or after mixing with the
sample. Instructions for preparing this and other
catalysts are given in the references on page 15.
Raney nickel is used in certain procedures but other
less active nickel catalysts require pressures outside
the range of this apparatus. Platinum oxide and
other catalytic chemicals can be obtained from most
laboratory supply houses.
Bottle Heater
Bottle temperatures up to 80 ° C can be developed
in the 3911 Hydrogenator by wrapping a glass fabric
heating mantle (A450E) around the 500 mL bottle.
The mantle then takes the place of the perforated
metal guard screen. No special fi ttings are needed
for attaching this heater. Simply wrap the mantle
tightly around the bottle and run the connecting
cord through the slot in the bottle clamp. Use the
plastic cable clip (453E) furnished with the heater
to anchor the heater cord to the top of the bottle
clamp, then run the cord out from the shaker pivot,
arranging it for minimum fl exing when the shaker is
operating.
Water Jacket
The 500 mL reaction bottle can be
cooled while it is clamped in the
shaker mechanism by installing an
A103CA water jacket. This jacket fi ts
into the bottle clamp in place of the
65CA perforated steel guard. A soft
rubber ring seals the neck of the
bottle into the jacket. The only change
required when adding a water jacket
is to use the special cut-down stop-
per which is furnished, or cut 1/4 inch
from the top of the regular 62CA stopper to shorten
the overall height of the combined assembly. Always install the soft rubber sealing ring with the
large diameter downward and the smaller diameter
at the top: otherwise it will be very diffi cult to remove the bottle from the cooling jacket.
A103CA
Water Jacket
www.parrinst.com
9
Page 10
Hydrogenation Apparatus
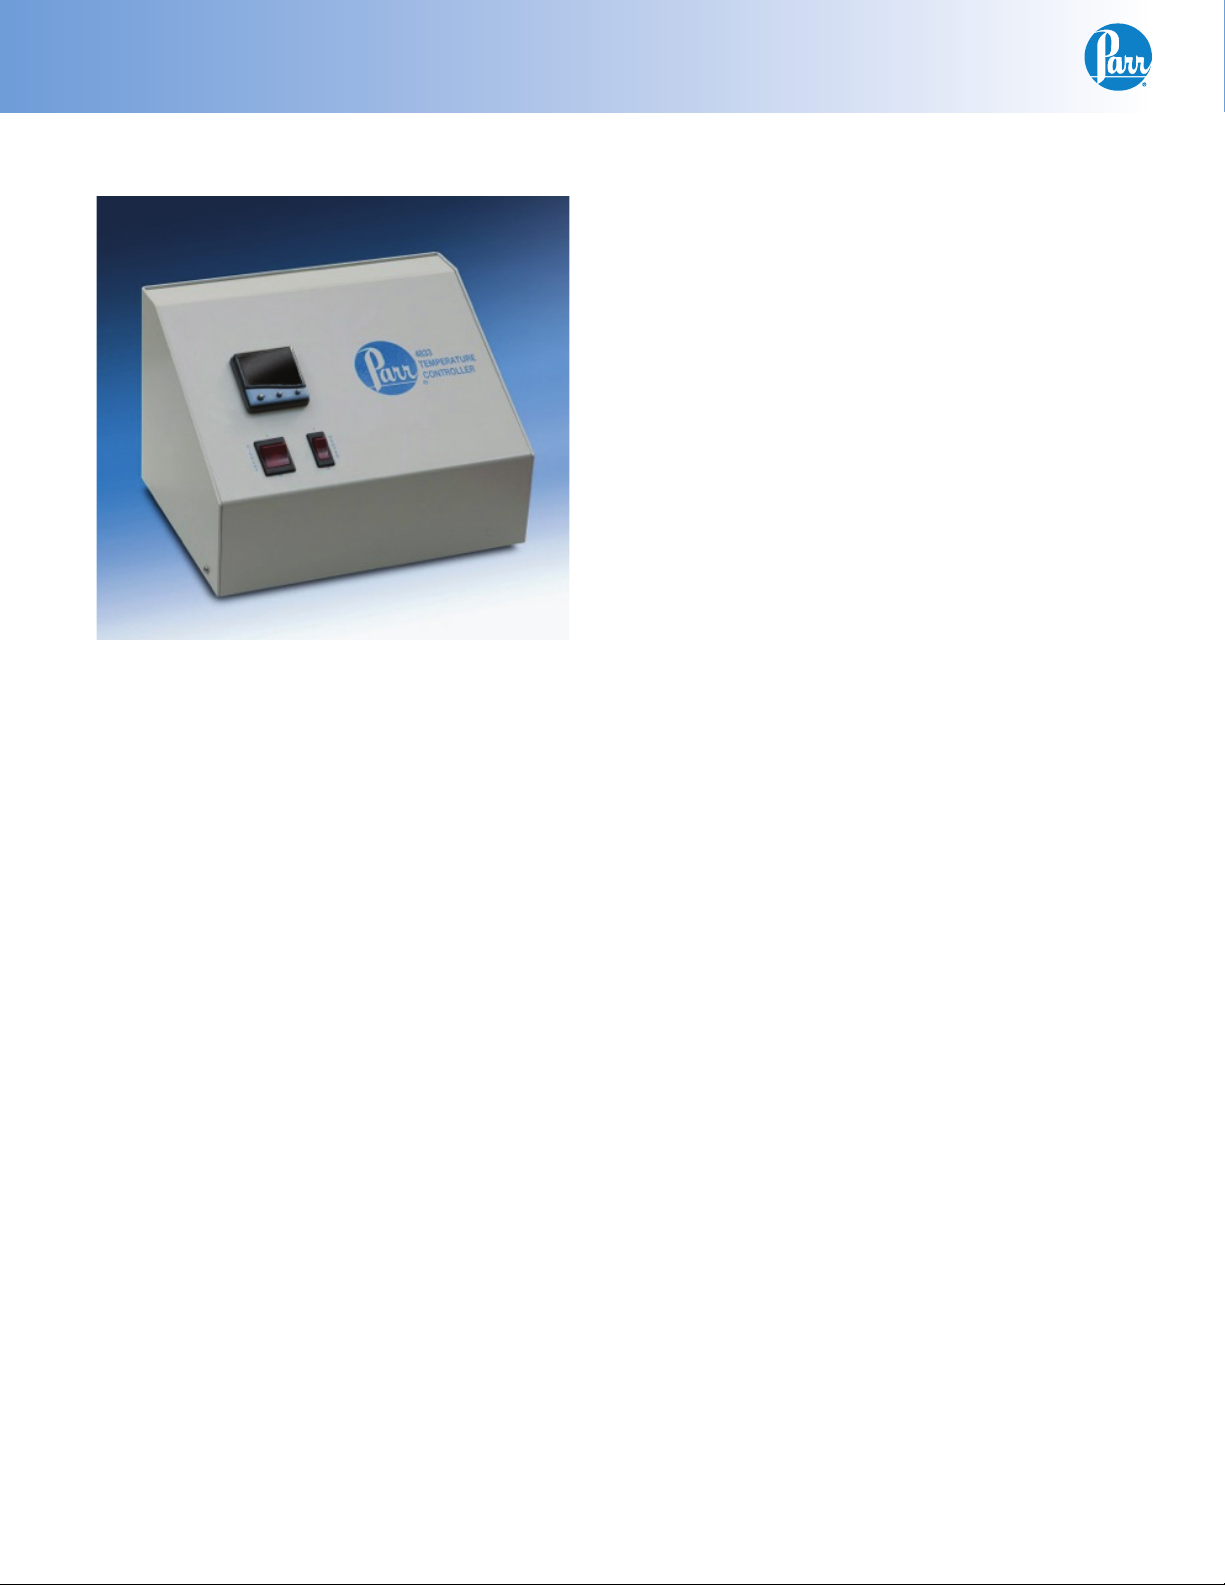
Temperature Measurement and Control
4833 Temperature Controller
Reaction temperatures can be measured and con-
trolled with a Parr 4833 Temperature Controller
which operates with an A295E, Type J (iron-constan-
tan) thermocouple installed in the reaction bottle.
The thermocouple is sealed in an 1/8” diameter
stainless steel sheath and held in an A159CA bottle
connector assembly which carries both the probe
and the gas passage through a single opening in
the bottle stopper. A295E thermocouples are made
in two lengths to fi t different bottle sizes as listed on
page 30.
To install the A159CA bottle connector, remove the
existing gas inlet tube and fi ttings and install the
new fi ttings which are provided. Clamp the bottle in
the shaker with the thermocouple positioned so that
the tip of the probe reaches a point three-fourths of
the distance from the neck of the bottle. This distance can be changed by loosening the cap nut at
the top of the connector and sliding the probe up or
down in the tee fi tting.
Loop the thermocouple wire downward and fasten it
above the tee fi tting using one of the cable ties furnished with the bottle connector; then run the wire
along the polypropylene tube, fastening it fi rmly
to the tube at several points to prevent excessive
fl exing and breakage. Bring the bottle heater cord
upward and fasten it under the clip at the top of the
shaker; then run the cord parallel to the shaker pivots and plug it into the heater socket on the controller.
To activate the heater, plug the thermocouple and
the heating mantle into sockets on the rear panel
of the controller, and connect the controller to an
electric supply that corresponds to the voltage of
the heater. Turn the DISPLAY and HEATER switches
ON, and set the controller to the desired operating
temperature using the UP and DOWN arrow keys
on the front of the controller module. The indicator
light in the heater switch will illuminate when the
switch is ON and current is being supplied to the
heater. The set point can be changed at any time
regardless of whether the heater is on or off. Copies
of Parr Bulletin 311M, Supplemental Instructions for
the 4833 Controller, and the CAL-9500 User’s Manual
furnished with the 4833 Controller provides instruc-
tions for tuning the Controller and using the alarm
features.
The 4833 Temperature Controller has dual displays:
one for the process temperature and the other for
the set point. The operating range of the Controller
covers the span from 0 ° to 100 ° C with the high
limit extending somewhat beyond the temperature
limit for the 3911 and 3921 Hydrogenators. These hydrogenators should not be operated at temperatures
above 80 ° C.
The 4833 Controller is sensitive to temperature
changes of less than 0.5 ° C but temperature varia-
tions in the reaction bottle may be larger than this
due to lag in the heating system and turbulence in
the bottle. In most cases temperatures in a 500 mL
bottle will not vary by more than one degree above
or below the set point. Variations in larger bottles
may run as much as two degrees, but this is still
within permissible limits for most reactions. Bottle
temperatures will tend to overshoot at low tempera-
tures in the 30° to 40° range. There will be less over-
shoot at higher settings. Overshoot can be avoided
by setting the controller several degrees low during
the initial period, then raising the temperature in
one or two steps after cycling has been established
slightly below the working level.
Fail-safe protection against a thermocouple break
is provided in the controller. This can be tested by
disconnecting the thermocouple from the controller,
which should turn off the heater.
10
Parr Instrument Company
Page 11

Hydrogenation Apparatus
Semi-micro Operations
Small samples can be treated in a 3911 Hydrogena-
tor by replacing the standard 500 mL bottle with
a smaller 250 mL bottle (66CA2). This requires a
101CA2 spacer to compensate for the difference in
bottle heights. To install the 250 mL bottle, remove
the stopper and the 61CA4 washer from the gas
inlet tube and slide the 101CA2 spacer onto the tube,
then clamp the bottle and spacer in the holder in
the usual manner. Since small samples may require
only small amounts of hydrogen, it may be advantageous to replace the standard four liter hydrogen
tank with an alternate one liter tank (A16CA2) for
semi-micro operations. The same tank valves are
used on both sizes and are easily transferred to the
small tank.
Augustine (reference 1 on page 15) describes an
interesting holder for handling small samples in a
3911 Hydrogenator which he prepares by sealing a
50 mL or smaller heavy walled fl ask inside a larger
bottle.
Alternate Parts
If bottle pressure measurements are not required,
the gage can be removed from the 3A93CA valve
assembly and replaced with a 94CA plug.
Tefl on tubing can be furnished in place of the standard 119CA polypropylene tube for use with chemicals which might attack polypropylene. The same
fi ttings are used to attach either Tefl on or polypropylene tubing to the 3A93CA valve.
about once a month. Lubricate the fl ywheel shaft
by placing a few drops of light oil in the oil cup at
regular intervals. A light application of a lithium
grease such as “Lubriplate” on the shaker pivots is
also advisable. The spacing of these pivots should
be adjusted so that the bottle clamp swings freely
without excessive friction.
To inspect and replace the valves, unscrew the 8VB2
packing nut and remove the needle and knob. The
internal parts can then be removed with a small
wire hook. These will come out in the following se-
quence: 6VB packing cover, two 4VB3 packing rings,
21VB lantern ring, and 20VB valve seat. If the plastic
valve seat will not slide out of its socket, use a 1
1/2” wood screw as a removal tool. Replace these
parts in the same order; insert the valve needle and
tighten the 8VB2 packing nut fi rmly with a wrench.
Caution: Always back the valve needle away from its
seat before tightening the packing nut.
It will be necessary to use a new plastic ferrule in
the A102CA connector whenever a new polypropylene tube is installed. A new A102CA connector is
furnished with each replacement A154CA polypro-
pylene tube so that a complete set of parts will be
available when changing tubes. If the body and cap
nut in the old connection are in good condition they
can be used with the ferrule from the new connector. But if there is any question about the old parts,
discard them and install a new connector. The steps
required to attach the tube to the connector are as
follows: Be sure that the end of the tube has been
cut squarely; then disassemble the connector and
slide the cap nut and ferrule onto the tube. Insert the
tube into the connector body and tighten the cap
nut fi rmly.
Maintenance Instructions
Periodic cleaning may be performed on the exterior
surfaces of the instrument with a lightly dampened
cloth containing mild soap solution. All power
should be disconnected when cleaning the instrument. There are no user serviceable parts inside the
product other than what is specifi cally called out
and discussed in this manual. Advanced troubleshooting instructions beyond the scope of this
manual can be obtained by calling Parr Instrument
Company in order to determine which part(s) may
be replaced or serviced.
The connecting rod has oil-impregnated bronze
bearings which do not require heavy lubrication.
Place a drop or two of light oil on each bearing
Fuse Ratings
The replacement of protective fuses should be performed by qualifi ed personnel.
Parr No. Type Ratings
139E21 Slo-blo 5 Amps, 250 Vac
139E20 Slo-blo 4 Amps, 250 Vac
139E8 Slo-blo 2.5 Amps, 250 Vac
139E25 Slo-blo 10 Amps, 250 Vac
139E26 Slo-blo 6 Amps, 250 Vac
Note: Check the labels on Switch Box for correct fuse rating.
www.parrinst.com
11
Page 12

Hydrogenation Apparatus
Special Instructions for the 3921 Hydrogenator
Customer installed location of
Blue Plastic Vent Plug
All instructions given in the preceding sections of
this Manual apply equally to both the 3911 and 3921
Hydrogenators. Both models use the same hydrogen tank and valves, but the 3921 apparatus has a
larger and heavier bottle clamp and shaker mechanism to accommodate larger reaction bottles.
Motor and Gear Box
Before starting the motor, replace the uppermost
pipe plug on the gearbox with the blue plastic vent
plug which is furnished. The hole in the vent plug
must point up. See Boston gear instruction sheets
for lubricating instructions.
Bottle Connectors
Attach the valves to the gas tank and connect the
polypropylene tube to the reaction bottle by slid-
ing the tube through the 82CA2 washer and 166CA
retaining ring, then push the tube through the bottle
stopper leaving a projection of about one inch below the stopper. To complete the assembly, set the
bottle on top of the rubber pad in the holder: slide
the tube through the slot in the clamping screw and
tighten the screw fi rmly. Always attach the steel
guard screen to the front of the bottle holder before
pressurizing the bottle.
An 80CA2 spacer must be placed between the
clamping screw and the stopper to compensate for
the difference in bottle heights when using a 1000
mL bottle, Assemble the inlet tube with the 80CA2
spacer and 166CA retaining ring above the stopper
and clamp the bottle in the shaker in the usual man-
ner. The 82CA2 washer is not required when using a
spacer.
Glass Reaction Bottles
The 1000 and 2000 mL reaction bottles (71CA and
72CA) supplied with this apparatus have been
individually pressure tested to 80 psig and 60 psig
respectively. In spite of these tests, the Parr Instrument Company cannot guarantee that these bottles
will not break at lower pressures. The user must
therefore be constantly aware of the hazards involved in handling large volumes of liquids in glass
bottles under pressure, and he must take whatever
precautions he considers necessary to protect him-
self from injury in case a bottle should unexpect-
edly fail. It is recommended that working pressures
in these 1000 and 2000 mL bottles should never
exceed 40 psi and 30 psi respectively. Pressures
should be held below this maximum whenever pos-
sible.
12
Parr Instrument Company
Page 13

Alternate 1000 and 2000 mL reaction bottles with
a fi berglass covering (71CA2 and 72CA3) can be
furnished for the 3921 Hydrogenator. These coated
bottles are no stronger than the plain bottles, but
the fi berglass envelope will usually retain any
broken glass and prevent the loss of valuable reac-
tants in case of accidental breakage. The maximum
working pressures mentioned above applies to both
plain and coated bottles alike. Both styles use the
same connecting tube and fi ttings.
If higher pressures up to 60 psig are required for
treating large amounts of reactants, users are urged
to purchase the special 2500 mL heavy duty bottle
(72CA4) which is made specifi cally for this purpose.
This is a hand blown, borosilicate glass bottle with
an extra heavy wall which is much stronger than the
standard machine-made bottles.
Stainless Steel Bottle
Hydrogenation Apparatus
The breakage hazard which is always present when
using glass bottles can be eliminated by substituting
a 1700 mL stainless steel reaction bottle which can
be used at working pressures up to 60 psig maxi-
mum. The complete stainless steel bottle assembly
with cover, spacer spool, connecting tube and fi ttings can be ordered under Cat. No. A129CA3.
To install the stainless bottle, slide the 133CA2
spacer spool onto the polypropylene tube with the
parts arranged so that the plain end of the spool will
rest on the cover, leaving the shallow depression in
the other end of the spool to engage the clamping
screw. Attach the O-ring to the cover, close the bottle
and slide the assembly into the holder. Tighten the
clamping screw and attach the guard screen before
pressurizing the bottle.
A129CA3 Stainless Steel Bottle Assembly
www.parrinst.com
13
Page 14

Hydrogenation Apparatus
Bottle Heater
The 71CA one liter bottle, 72CA two liter bottle
and the A129CA3 stainless bottle assembly may
be heated in the 3921 Hydrogenator by wrapping
a glass fabric heating mantle (A451E) around the
bottle. No special fi ttings are needed for attaching
this heater. Simply wrap the mantle tightly around
the bottle and run the connecting cord through the
slot in the top housing. Use the plastic clip furnished
with the heater to anchor the cord to the top edge of
the bottle clamp: then run the cord out laterally on
the axis of the shaker, arranging it to avoid excessive fl exing when the shaker is operating.
Note: Connect cord to temperature controller
to control operations of heater. See page 10 for
instructions on Parr’s temperature controller and
thermocouple.
The 72CA4 heavy wall bottle should not be used
with the heating mantle because the heat will destroy the protective polyvinyl coating on the bottle.
Temperature Measurement
Temperatures in the reaction bottle can be measured by installing a stainless sheathed thermocouple using the same fi ttings described for the 3911
Hydrogenator on page 10, but with a longer sheath
on the thermocouple to match the larger bottles. The
various assemblies are identifi ed in the Parts List on
page 30.
References
No attempt is made here to list the hundreds of
references to the Parr hydrogenator which have appeared in chemical literature since Dr. Roger Adams
published his fi rst paper describing an apparatus of
this kind in 1923. More than fi ve hundred literature
references are cited in Augustine’s book on Catalytic
Hydrogenation which is listed below. Additional
references can be obtained from other books in
this list. Among these, the books by Augustine,
Freifelder and Rylander will be particularly help-
ful to those users who want additional information
regarding hydrogenation techniques, catalysts and
procedures for treating specifi c functional groups.
The following references are therefore highly recommended:
R.L. Augustine, Catalytic Hydrogenation, Marcel
Dekker, Inc.: New York , 1965.
Morris Freifelder, Practical Catalytic Hydrogenation,
Wiley-Interscience Div. of John Wiley & Sons, Inc.:
New York, 1971.
Gilman-Blatt, Organic Synthesis, Collective Volume I,
p. 65, John Wiley & Sons, Inc.: New York, 1948.
H.W. Lohse, Catalytic Chemistry, Chemical Publish-
ing Co., Inc.: New York, l945.
Paul N. Rylander, Catalytic Hydrogenation Over
Platinum Metals, Academic Press: New York, 1967.
14
Paul N. Rylander, Catalytic Hydrogenation in Organic
Synthesis, Academic Press: New York, 1979.
Paul N. Rylander, Hydrogenation Methods, Academ-
ic Press: New York, 1985.
Biennial conferences originally held at the New York
Academy of Sciences and now in a variety of locations by ORCS (Organic Reaction Catalysis Society)
in even-numbered years starting in 1966 have pro-
duced excellent collections of papers under the gen-
eral title, Catalytic Hydrogenation and Analogous
Pressure Reactions. The initial set is published in the
Annals of The New York Academy of Sciences, Vol.
145, Art. 1, pp. 1-206, 1967. Currently titled Catalysis
of Organic Reactions published by Marcel Dekker,
Inc.: New York.
Parr Instrument Company
Page 15

Notes
www.parrinst.com
15
Page 16

Hydrogenation Apparatus
Parts Lists
15
6
7
5
8
14
8
4
12
9
13
11
21
10
17
(4 PL)
16
3
(4 PL)
2
31
19
20
22
(2 PL)
45
(2 PL)
44
(4 PL)
24
(4 PL)
26
54
(4 PL)1852
3910 Hydrogenation Apparatus
39 38
51
16 35
43
48
49
32
30
41
33
42
28
34
27
(2 PL)
17
29
17
40
37
37
(2 PL)
24
(2 PL)
26
36
23
16
25B 25E
25A
25C
25D 25
Parr Instrument Company
53
56
531
Page 17

Hydrogenation Apparatus
ITEM
NO.
1 221CA BASE PLATE 1
2 2CA2 SHAKER COLUMN 1
3 SB3118HX14 5/16-18 X 7/8 HHCS 8-18 SS 4
4 54CA BOTTLE CLAMP TOP 1
5 453E CLIP, 3/8 DIA TENSION CLEAR 1
6 SA1332RD04 6-32 X 1/4 RHMS SLOTTED 1
7 SW13FT #6 BOLT WASHER 18-8 SS 1
8 59CA KNURLED NUT, TIE ROD 2
9 A55CA TIE ROD SHORT ASSEMBLY 1
10 66CA REACTION BOTTLE 500ML 1
11 62CA
12 61CA4 WASHER, 1" ALUMINUM 1
13 166CA
14 101CA2 SPACER FOR 250ML BOTTLE 1
15 HL0025TB040 POLYPROPYLENE TUBE 2.08 FT
16 5CA3 PIVOT PIN 2
17 SC2520SC04 1/4-20 X 1/4 SHSS 18-8 SS 7
18 65CA BOTTLE GUARD T304, 500 mL 1
19 53CA2 BOTTLE CLAMP BASE 1
20 TD3118SC12 5/16 X 3/4 SH SHLD BOLT STEEL 1
21 56CA TIE ROD, LONG 1
22 SN3124HX 5/16-24 HEX JAM NUT 18-8 SS 1
23 1765EEF MOTOR 230/50 1/4HP 1425 RPM 1
24 SB3118HX10 5/16-18 X 5/8 HHCS 18-8 SS 6
25 X2291EB
25A 909E SWITCH, POWER 16AMP 1
25B 1471E
25C 911E FILTER, INTERFERENCE; 10AMP 1
25D 139E8
PART
NUMBER
221CA2 BASE PLATE (AIR) 1
221CA3 BASE PLATE (EXP) 1
66CATC REACTION BOTTLE 500ML PED 1
66CA2 REACTION BOTTLE 250ML 1
66CA2TC REACTION BOTTLE 250ML PED
65CA2 BOTTLE GUARD T304, 250 mL
1765EEA MOTOR 115/60 1/6 HP 1725 RPM 1
1765EEG
1765EEK
X2353 AIR MOTOR PACKAGE 3910 1
DESCRIPTION QTY
STOPPER, #6 NEOPRENE
1-HOLE
RETAINING RING; TRIANGLE
PUSH
MOTOR 115/60 EP 1/6HP
1725 RPM
MOTOR 230/50 EP 1/6HP
1425 RPM
SWITCH BOX PKG
115V(3910/3920)
CARRIER, FUSE 3AG 1/4 X
1-1/4
FUSE 3AG SLO-BLO 250V 2.5
AMP
1
1
1
1
1
1
2
ITEM
NO.
25E 139E26 FUSE SLO-BLO 6 AMP 250V 1
26 SW31FT 5/16 BOLT WASHER 18-8 SS 6
27 4CA BASE, ALUM FLYWHEEL 1
28 8CA3 FLYWHEEL W/SHAFT 1
29 18CA2 COLLAR W/SET SCREWS 1
30 A58CA
31 SR3118
32 19CA3 CRANK PIN W/NUT 1
33 SN2520HX 1/4-20 HEX JAM NUT 1
34 50CA OIL HOLE COVER 1
35 A16CA HYDROGEN TANK 4L T304SS 1
36 49CA TANK SUPPORT 1
37 XC0210 TRIM, PROTECTIVE BLACK 2
38 11CA TANK CLAMP 1
39 SB3118HX24 5/16-18 X 1-1/2 HHCS 18-8 SS 1
40 34CA3
41 37CA3 VEE BELT, NOTCHED 25" 1
42 SA3118FT14 5/16-18 X 7/8FHMS 18-8 SS 3
43 A150CA BELT GUARD 1
44 SA2520RD10 1/4-20 X 5/8 RHMS 18-8 SS 2
45 SW25NL
46 SW16NL
47 SA1632RD08 8-32 X 1/2 RHMS 18-8 SS 2
48 AA92CA SINGLE VALVE ASSY W/GAGE 1
49 A118CA GAS HOSE ASSY, NYLON, 6FT 1
51 3A93CA DOUBLE VALVE W/GAGE 1
52 64PR FOOT, RUBBER; W/ 1/4-20 THRD 4
53 328E7 HOLE PLUG 1/2 2
57 504HCAA
PART
NUMBER
139E21
139E20
X2291EE
A16CATC
A16CATD
DESCRIPTION QTY
FUSE 3AG SLO-BLO 250V 5.0
AMP
FUSE 3AG SLO-BLO 250V 4.0
AMP
SWITCH BOX PKG 230V
(3910/3920)
CONNECTING ROD ASSY W/
BUSHINGS
5/16 DIA X 1-1/8 ROLLPIN
420SS
HYDROGEN TANK 4L T304SS
PED
HYDROGEN TANK 4L T304
(CHINESE)
MOTOR PULLEY W/SET
SCREW
1/4 LOCK WASHER, INT TOOTH
410S
#8 LOCK WASHER INT TOOTH
410SS
REDUCING BUSHING,
1/8NPTF-1/4NPTM
1
2
1
1
1
1
1
1
2
2
1
www.parrinst.com
17
Page 18

Hydrogenation Apparatus
(2 PL)
58
60
38
37
54
40
53
52
51
41
(4 PL)
39
(10 PL)
30
31
32
26
(4 PL)
33
34
25
35
23
(4 PL)
6
5
8
22
42
46
42
43
45
(2 PL)
48
44
47
24
(4 PL)
5
19
20
21
(4 PL)
17
3920 Hydrogenation Apparatus
26
34
33
32
31
30
25
29
36
18
10
15
14
11
7
5
16
9
59
9
4
12
13
1
2
18
52 86550 49
(4 PL)
Parr Instrument Company
(2 PL) (2 PL)
6 8
5027 28
(4 PL)
49B
49C
49D49A
Page 19

Hydrogenation Apparatus
ITEM
NO.
1 73CA6 BASE PLATE 1
4 49CA TANK SUPPORT 1
5 SW31FT 5/16 BOLT WASHER 18-8 SS 12
6 TW31SL 5/16 LOCK WASHER STEEL PLATED 14
7 SB3118HX14 5/16-18 X 7/8 HHCS 18-8 SS 2
8 SN3118HX JAM NUT, 5/16-18 THD 7
9 XC0210 TRIM, PROTECTIVE BLACK 2
10 11CA TANK CLAMP 1
11 A16CA HYDROGEN TANK 4L T304SS 1
12 SA2520RD28 1/4-20 X 1-3/4 RHMS 18-8 SS 1
13 SN2520HX 1/4-20 HEX JAM NUT 18-8 SS 1
14 SW25FT 1/4 BOLT WASHER (FLAT) 18-8 SS 1
15 SN2520WG 1/4-20 WING NUT 18-8 SS 1
16 AA92CA SINGLE VALVE W/GAGE 1
17 180HC MOTOR SUPPORT 4
18 3A93CA DOUBLE VALVE W/GAGE 1
19 A387E2 GEAR BOX W/BASE 10-1 RATIO 1
20 1748HC DRIVE KEY MACH. .185 SQ X 1” LG 1
21 A388EEL MOTOR 110/220V 60 HZ 1/4 HP 1
22 220CA FLYWHEEL GUARD 1
23 SB3118HX10 5/16-18 X 5/8 HHCS 18-8 SS 8
24 SB3118HX36 5/16-18 X 2-1/4 HHCS 18-8 SS 4
25 92HC5 ROCKER COLUMN 2
26 TC2520SC04 1/4-20 X 1/4 SHSS ALLOY STEEL 4
27 TW75FT 3/4 BOLT WASHER STEEL PLATED 2
28 TB7516HX16
29 A76CA2 REAR GUARD ASSEMBLY 1
30 TB5020HX36 1/2-20 X 2-1/4 HHCS STEEL 2
PART
NUMBER
X2290EA MOTOR GROUP 115/60
X2290EF MOTOR GROUP 230/50
X2290EG MOTOR GROUP 115/60EP
159X40EGX MOTOR GROUP 115/60 EPX
X2290EK MOTOR GROUP 230/50 EP
159X40EKX MOTOR GROUP 230/50 EPX
159X40EY MOTOR GROUP AIR
DESCRIPTION
3/4-16 X 1 HHCS STEEL GRD5
PLATED
QTY
2
ITEM
NO.
31 427E4 BUSHING, INNER 2
32 1055HC SPHERICAL BEARING PTFE LINED 2
33 427E3 BUSHING, OUTER 2
34 SN5020HC 1/2-20 HEX CAP NUT 18-8 SS 2
35 74CA2 BOTTLE HOLDER BASE 1
36 172CA BOTTLE PAD NEOPRENE 1
37 75CA BOTTLE HOLDER TOP 1
38 79CA2 BOTTLE CLAMP SCREW 1
39 SB2520BT08 1/4-20 X 1/2” BHSCS 18-8 SS 10
40 A77CA2 FRONT GUARD ASSEMBLY 1
41 A83CA THUMB SCREW 1/4-20 X 1/2L 4
42 109CA2 SPACER 2
43 89CA2 CRANK PIN W/NUT 1
44 1065HC FLYWHEEL 1
45 SC3118SC06 5/16-18 X 3/8 SHSS CUP PT 18-8 2
46 SB3716SC16 3/8-16 X 1 SHCS 18-8 SS 1
47 SW39FT .625 X .390 X .063 WASHER 18-8 1
48 A87CA4 CONNECTING ROD ASSEMBLY 1
49 X2291 SWITCH BOX PACKAGE 1
49A 909E SWITCH, POWER 16 AMP 1
49B 1470E
49C 1471E CARRIER, FUSE 3AG 1/4 X 1-1/4 1
49D 911E FILTER, INTERFERENCE, 10AMP
50 328E7 HOLE PLUG 1/2 2
51 72CA REACTION BOTTLE 2000ML 1
52 62CA STOPPER, #6 NEOPRENE 1 HOLE 5
53 166CA
54 82CA2 WASHER 9/32” 1
58 HL0025TB040 POLYPROPYLENE TUBE 1
59 A118CA GAS HOSE ASSY NYLON 6FT 1
60 A102CA
PART
NUMBER
71CA REACTION BOTTLE 1000ML
71CATC REACTION BOTTLE 1000ML PED
72CATC REACTION BOTTLE 2000ML PED
DESCRIPTION
FUSEHOLDER, INTERNATIONAL
1/4”
RETAINING RING, TRIANGLE
PUSH
MALE CONN: 1/4T-1/8 NPT
BRASS
QTY
1
1
1
www.parrinst.com
19
Page 20

Hydrogenation Apparatus
Bottle Clamp Assembly - Series 3910
20
Parr Instrument Company
Page 21

Shaker Column Assembly - Series 3910
R1
DATE
SHAKER COLUMN ASSEMBLY
R1 WAS CK, REDRAWN; [EC10291] 07-02-09 JPR
APPROVED
BY
BY
SCALE
DWG NO.
DATE
DRAWN
DESCRIPTION
REVISIONS
FOR
SHEET 2
REVISED AND REDRAWN; 01-15-02 RPE
08-23-94
1:2
3910 HYDROGENATION APPARATUS
RPE
SIZE
C
3910
ANGULAR ... ±1/2°
PARR INSTRUMENT CO.
211 53rd STREET
MOLINE, ILLINOIS 61265
DO NOT SCALE DRAWING
TOLERANCES
IN INCHES
UNLESS OTHERWISE SPECIFIED
1/X .... ±1/64
.00 .... ±.010
.000 .... ±.003
08-24-94
VGM
COMPANY.
DRAWN IN 3rd ANGLE PROJECTION
OR BETTER
64
MACHINED SURFACES:
UNMARKED RADII .03"
PROPRIETARY
NEITHER THE DRAWING
NOR INFORMATION
CONTAINED HEREIN
MAY BE COPIED,
REPRODUCED, OR
OTHERWISE USED
WITHOUT WRITTEN
PERMISSION FROM
PARR INSTRUMENT
R2 REVISED 65CA [EC10603];09-14-10 JPR
Hydrogenation Apparatus
WHITE LUBE
TYP (2) PLACES
3910 SHEET 1
CRANK PIN W/NUT
19CA3
FLYWHEEL W/SHAFT
8CA3
34CA3
SC2520SC04
MOTOR PULLEY
1/4-20 X 1/4 SHSS
37CA3
W/SET SCREW
VEE BELT, NOTCHED 25"
SN2520HX
1/4-20 HEX JAM NUT
2CA2
SC2550SC04
TYP (4) PLACES
1/4-20 X 1/4 SCSS
SHAKER COLUMN
5CA3
PIVOT PIN
TYP (2) PLACES
www.parrinst.com
21
Page 22

Hydrogenation Apparatus
Flywheel Assembly - Series 3910
22
Parr Instrument Company
Page 23

Connecting Rod Assembly - Series 3920
Hydrogenation Apparatus
www.parrinst.com
23
Page 24

Hydrogenation Apparatus
AA92CA Single Valve Assembly
A150VB
KNOB
6VBBB
PACKING
CONE
8VB2
PACKING
NUT
112VB4AK
VALVE
NEEDLE
12CA GAGE
70
60
50
40
30
80
20
90
LBS. PER SQ. INCH
10
100
0
arr
P
21VBBB
LANTERN
RING
PARR
INSTRUMENT
COMPANY
4VB3
PTFE
20VB
VALVE
PACKING
SEAT
NOTE:
ALL PIPE THREADS TO BE
SEALED WITH TEFLON TAPE
24
92CA VALVE BODY
124VB NIPPLE
9VB1 NUT
Parr Instrument Company
Page 25

12CA
70
60
3A93CA Double Valve Assembly
80
90
100
Hydrogenation Apparatus
50
40
30
20
LBS. PER SQ. INCH
10
60HW Nipple
0
arr
P
A102CA
GAGE FACES
21VBBB
(2) PLACES
PARR
COMPANY
INSTRUMENT
4VB3
20VB
93CA
(2) PLACES
(4) PLACES
9VB1
A150VB
124VB
Note: AA93CA Valve Assembly as show except without gage.
6VBBB TYP
(2) PLACES
(2) PLACES
www.parrinst.com
8VB2
(2) PLACES
112VB4AK
(2) PLACES
25
Page 26

Hydrogenation Apparatus
3910 Wiring Schematic
26
Parr Instrument Company
Page 27

3920 Wiring Schematic
Hydrogenation Apparatus
www.parrinst.com
27
Page 28

Hydrogenation Apparatus
Explosion Proof Switch Assembly for 1765EEG 115V - Series 3910
28
Parr Instrument Company
Page 29

Hydrogenation Apparatus
Explosion Proof Switch Assembly for 1765EEK 220V - Series 3910
www.parrinst.com
29
Page 30

Hydrogenation Apparatus
Explosion Proof Switch Assembly for A388EEG 115V & 220V - Series 3920
30
Parr Instrument Company
Page 31

Hydrogenation Apparatus
Explosion Proof Switch Assembly for A388EEK 220V - Series 3920
www.parrinst.com
31
Page 32

Hydrogenation Apparatus
Thermocouple Assemblies
Assembly
No.
A159CAPA A295E 66CA2 250 mL
A159CA2PA A295E 66CA 500
A159CA3PA A295E2 71CA 1000
A159CA4PA A295E2 72CA 2000
A159CA5PA A295E2 129CA3 1700
Equipped with
Thermocouple No.
Fits Bottle
No. Size
72CA4 3000
A159CA2
Thermocouple
Assembly
32
Parr Instrument Company
Page 33

Reaction Bottles for Parr Hydrogenators
Hydrogenation Apparatus
Apparatus
No.
Bottle
No.
Size
mL
Bottle Type
Maximum
Working
Pressure
psig
Requires
Connector
No.
3911 66CA2 250 Borosilicate Glass 60 A122CA2*
3911 66CA 500 Borosilicate Glass 60 A122CA
3911 66CA3 500 Borosilicate Glass Fiberglass Covered 60 A122CA
3921 71CA 1000 Borosilicate Glass 40 A123CA2*
3921 71CA2 1000 Borosilicate Glass Fiberglass Covered 40 A123CA2*
3921 72CA 2000 Borosilicate Glass 30 A123CA
3921 72CA3 2000 Borosilicate Glass Fiberglass Covered 30 A123CA
3921 72CA4 2500 Hand Blown, Heavy Wall Borosilicate Glass 60 A123CA
3921 A129CA3 1700 Stainless Steel Bottle Assembly 60 A155CA
Tube with
133CA2
Spacer
Spool
3921 A226CA Cylinder only, Stainless Steel, 1700 mL
A129CA3
Stainless
Bottle
72CA
2.0 L
Bottle
71CA
1.0 L
Bottle
66CA
500 mL
Bottle
66CA2
250 mL
Bottle
Heating Mantles
Mantle No. Watts Volts Use with Bottle No.
A450EEB 100 11 5 66CA, 66CA2
A450EEE 10 0 230 66CA, 66CA2
A451EEB 200 115 71CA, 72CA, A129CA3
or A226CA
A451EEE 200 230 71CA, 72CA, A129CA3
or A226CA
www.parrinst.com
33
Page 34

Hydrogenation Apparatus
Air Motor Assembly
34
Parr Instrument Company
Page 35

Switch Box Assembly 115V
Hydrogenation Apparatus
Switch Box Assembly 230V
Note: All components are the same
as 115V except as noted.
www.parrinst.com
35
Page 36

Revision 03/14/13
 Loading...