

Page 1

PISTOLA A SPRUZZO PER
VERNICIARE PFS 100 B2
PISTOLA A SPRUZZO PER VERNICIARE
Indicazioni per l’uso e per la sicurezza
Traduzione delle istruzioni d’uso originali
PAINT SPRAY GUN
Operation and Safety Notes
Translation of original operation manual
IAN 87779
PISTOLA DE PINTURA
Instruções de utilização e de segurança
Tradução do manual de instruções original
FARBSPRITZPISTOLE
Bedienungs- und Sicherheitshinweise
Originalbetriebsanleitung
Page 2

Prima di leggere aprire le due pagine con le immagini e prendere confidenza con le diverse funzioni
dell’apparecchio.
Antes de começar a ler abra as duas páginas com as imagens e, de seguida, familiarize-se com todas as
funções do aparelho.
Before reading, unfold both pages containing illustrations and familiarise yourself with all functions of the
device.
Klappen Sie vor dem Lesen die beiden Seiten mit den Abbildungen aus und machen Sie sich anschließend
mit allen Funktionen des Gerätes vertraut.
IT / MT Indicazioni per l’uso e per la sicurezza Pagina 5
PT Instruções de utilização e de segurança Página 15
GB / MT Operation and Safety Notes Page 25
DE / AT / CH Bedienungs- und Sicherheitshinweise Seite 33
Page 3
A
9
10
1 2
14
B
5
8
6
7
4
8 9
3
1113 12
Page 4
C
D
14
FE
x
x
Page 5

Indice
Introduzione
Utilizzo secondo la destinazione d‘uso ........................................................................................ Pagina 6
Dotazione ........................................................................................................................................ Pagina 6
Ambito di fornitura .......................................................................................................................... Pagina 6
Dati tecnici ...................................................................................................................................... Pagina 6
Istruzioni di sicurezza generali per utensili elettrici
1. Sicurezza dell’area di lavoro .................................................................................................... Pagina 7
2. Sicurezza elettrica ..................................................................................................................... Pagina 7
3. Sicurezza delle persone ............................................................................................................ Pagina 7
4. Utilizzo attento di dispositivi elettrici ........................................................................................ Pagina 8
5. Assistenza ................................................................................................................................... Pagina 9
Indicazioni di sicurezza aggiuntive per pistole a spruzzo.......................................................... Pagina 9
Indicazioni di lavorazione
DIN -Sec / Viscosit à ......................................................................................................................... Pagina 9
Preparazione del liquido da spruzzare ........................................................................................ Pagina 9
Preparazione della superficie di spruzzatura .............................................................................. Pagina 10
Avvio
Scelta dell’ugello ............................................................................................................................ Pagina 10
Accensione e spegnimento ............................................................................................................ Pagina 10
Spruzzatura..................................................................................................................................... Pagina 10
Manutenzione e pulizia .................................................................................................. Pa gi n a 11
Assistenza ..................................................................................................................................P agi na 11
Garanzia ..................................................................................................................................... Pa gi n a 11
Smaltimento ............................................................................................................................. Pagina 12
Dichiarazione di conformità / Fabbricante .................................................... Pa gina 13
5 IT/MT
Page 6

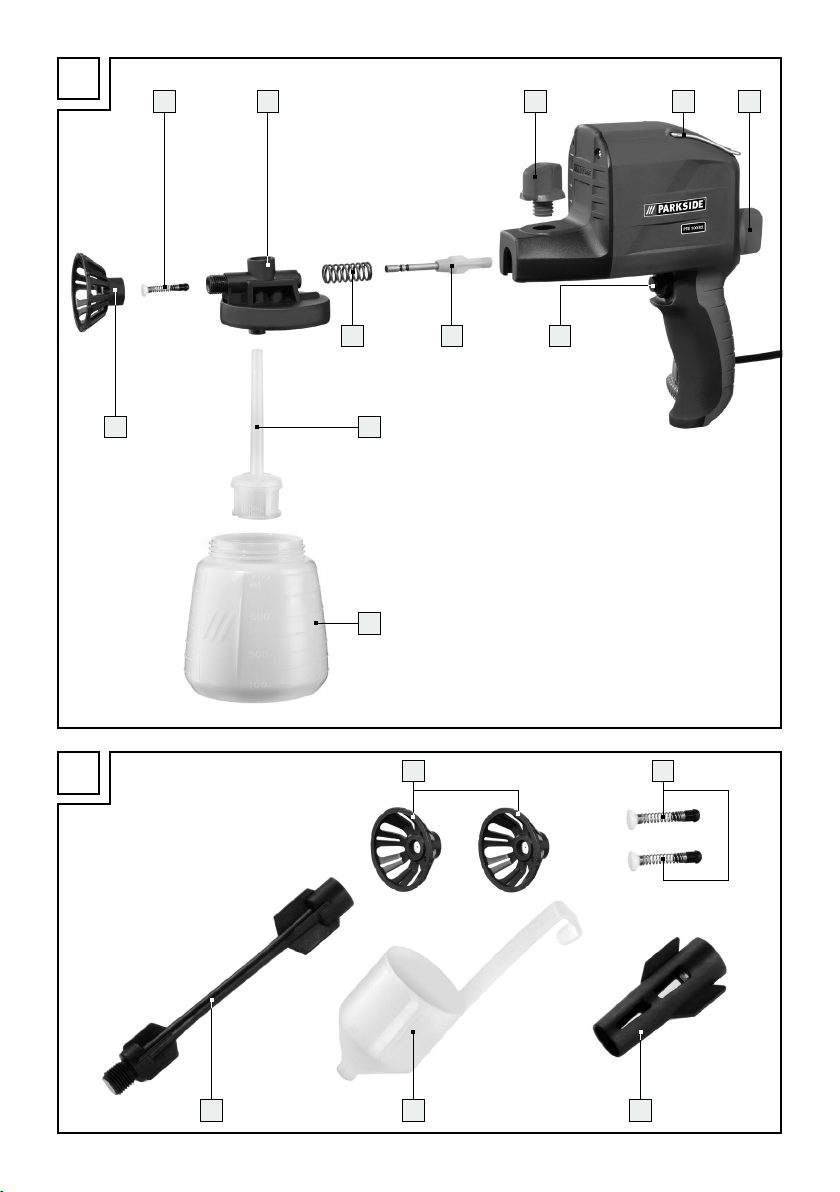
Pistola a spruzzo per verniciare
PFS 100 B2
13
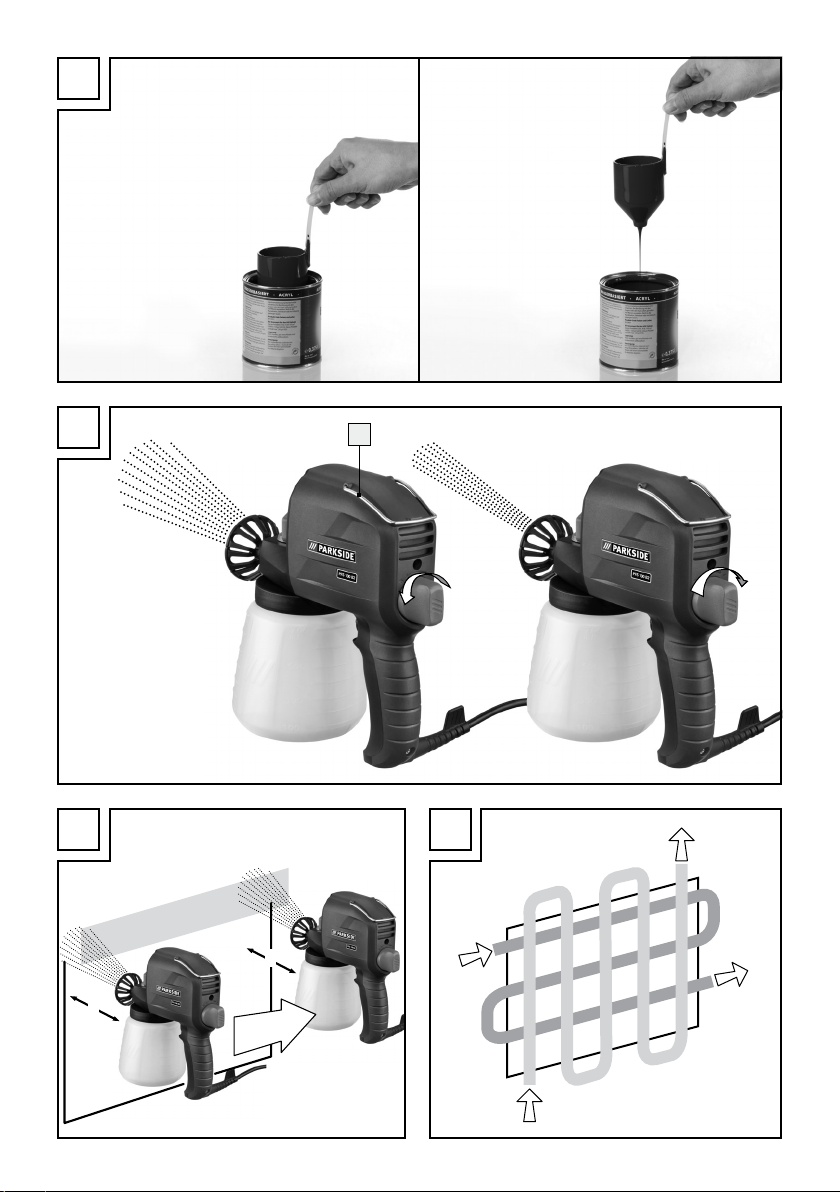
Prolunga dell’ugello
14
Staffa metallica
Q
Introduzione
Ci congratuliamo con voi per l’acquisto del
vostro nuovo prodotto. Avete optato per un prodotto di alta
qualità. Le istruzioni d’uso sono parte integrante di
questo prodotto. Esse contengono importanti avvertenze sulla sicurezza, l‘impiego e lo smaltimento.
Prima dell‘utilizzo del prodotto, prendere conoscenza di tutte le istruzioni d‘uso e delle avvertenze di
sicurezza. Utilizzare il prodotto solo come descritto
e per i campi di applicazione indicati. Consegnare
tutte le documentazioni su questo prodotto quando
viene ceduto a terzi.
Q
Utilizzo secondo la
destinazione d‘uso
Questo apparecchio è adatto all’applicazione di
colori e vernici. Con questo apparecchio si può
spruzzare materiale fino a 80 DIN-sec. Ogni altro
utilizzo o modifica dell’apparecchio si considera
non conforme alla destinazione d’uso e porta con
sé un notevole rischio di incidenti. Il produttore non
risponde di eventuali danni derivanti da un utilizzo
dell’apparecchio secondo la destinazione d’uso.
L’apparecchio e destinato solamente alluso privato.
Q
Dotazione
1
Vite di arresto
2
Manopola di regolazione
3
Interruttore di ON / OFF
4
Pistone della pompa
5
Molla
6
Tubo di aspirazione
7
Serbatoio colore
8
Ugello
9
Valvola di aspirazione e di pressione
10
Alloggiamento della pompa
11
Ugello di pulizia
12
Misurino
Q
Ambito di fornitura
1 Pistola a spruzzo per verniciare PFS 100 B2
2 Ugelli* 1 x 0,6 mm, 1 x 0,8 mm
2 Valvola di aspirazione e di pressione*
1 Ugello di pulizia
1 Prolunga dell’ugello
1 Misurino
1 Istruzioni d‘uso
* 1 x premontati
Q
Dati tecnici
Potenza nominale: 100 W
Portata: 320 ml / min (acqua)
Viscosità: max. 80 DIN-sec
Pressione: max. 160 bar
Serbatoio colore: 700 ml
Classe di protezione: II /
Informazioni per il rumore e le vibrazioni
I valori di misurazione sono stati accertati in applicazione delle norme EN 50144. Il livello di pressione
acustica stimato A ammonta tipicamente a:
Livello di pressione acustica: 91,2 dB(A)
Livello di intensità sonora: 104,2 dB(A)
Scostamento di K: 3 dB
Utilizzare strumenti di protezione
dell‘udito!
Accelerazione valutata, generalmente: 15,002 m / s
Scostamento di K = 1,5 m / s
2
Il valore relativo al livello di
vibrazioni indicato nelle presenti istruzioni d’uso è
stato misurato in conformità alla procedura di misurazione esplicata nella norma EN 50144 e può
essere utilizzato per il confronto tra apparecchi.
Il livello di vibrazioni si modifica a seconda del tipo
di utilizzo dell’apparecchio elettrico, ed in alcuni
2
6 IT/MT
Page 7

Introduzione / Istruzioni di sicurezza generali per utensili elettrici
casi può essere superiore al valore indicato nelle
presenti istruzioni d’uso. Il carico di vibrazione
potrebbe essere sottostimato qualora l’apparecchio
elettrico fosse regolarmente utilizzato in tale modo.
Nota: Per una valutazione precisa del carico di
vibrazioni nel corso di un determinato periodo temporale devono essere considerati anche i tempi in
cui l’apparecchio è in funzionamento ma non viene
effettivamente utilizzato. Tale circostanza può fortemente ridurre il carico di vibrazioni.
Istruzioni di sicurezza generali
Q
per utensili elettrici
Leggere tutte le indicazioni e gli avvisi di
sicurezza! Eventuali mancanze
nell’osservanza delle indicazioni e degli avvisi di
sicurezza possono provocare una scossa elettrica,
un incendio e / o gravi lesioni.
Conservare tutte le indicazioni e gli avvisi
di sicurezza per eventuali necessita’ future!
La parola “attrezzo elettrico“ utilizzata nelle istruzioni
d’uso si riferisce agli attrezzi elettrici funzionanti
all’interno di una rete (con cavo di rete) e agli attrezzi elettrici che funzionano mediante batterie
(senza cavo di rete).
1. Sicurezza dell’area di lavoro
a) Mantenere l’area di lavoro pulita e
ben illuminata. Il disordine ed aree di lavoro
poco illuminate possono determinare incidenti.
b) Non lavorare con l’apparecchio in
un’atmosfera dove si trovino liquidi
infiammabili, esplosiva, gas e polveri.
Gli utensili elettrici generano scintille che possono infiammare la polvere o i gas.
c) Durante l’utilizzo del dispositivo elet-
trico tenere lontani bambini e persone
estranee. In caso di distrazione potreste
perdere il controllo dell’apparecchio.
2. Sicurezza elettrica
a) La spina di connessione dell’apparec-
chio deve essere adatta alla presa elettrica nella quale essa viene inserita.
In nessun caso l’adattatore deve
essere modificato. Non utilizzare
spine con apparecchi messi a terra.
Spine non modificate e prese adatte riducono
il rischio di una scossa elettrica.
b)
Evitare il contatto del corpo con superfici
messe a terra, quali ad esempio quelle
di tubi, caloriferi, cucine economiche
e frigoriferi. Sussiste un elevato rischio di
scossa elettrica, qualora il Vostro corpo fosse
messo a terra.
c) Mantenere l’apparecchio lontano da
pioggia o umidità. La penetrazione di
acqua in un apparecchio elettrico accresce il
rischio di scossa elettrica.
d) Non utilizzare il cavo in modo non
conforme, cioè per tirare l’apparecchio, per appenderlo o per estrarre la
spina dalla presa elettrica. Tenere il
cavo lontano da calore, olio, spigoli
acuti o di parti in movimento dell’apparecchio. Cavi danneggiati o attorcigliati
accrescono il rischio di scossa elettrica.
e) In caso di lavori all’aperto utilizzare
solamente prolunghe ammesse anche
per un loro utilizzo all‘aperto. L’utilizzo
di una tale prolunga riduce il rischio di scossa
elettrica.
f) Qualora non si possa evitare l‘eserci-
zio dell’elettroutensile in un ambiente
umido, fare uso di un interruttore
differenziale, circostanza che riduce il
rischio di una scossa elettrica.
3. Sicurezza delle persone
a) Fare sempre estrema attenzione a ciò
che si fa e accostarsi al lavoro con il
dispositivo elettrico sempre in modo
cosciente. Non utilizzare l’apparecchio
quando si è stanchi o sotto l’influsso
di droghe, alcol o medicinali. Un solo
7 IT/MT
Page 8

Istruzioni di sicurezza generali per utensili elettrici
attimo di disattenzione nell’utilizzo dell’apparecchio può provocare serie lesioni.
b) Indossare sempre l’equipaggiamento
di protezione personale e gli occhiali
protettivi. Indossando l’equipaggiamento di
protezione personale, quale una mascherina
antipolvere, scarpe di sicurezza antisdrucciolevoli, un casco di protezione o una protezione
auricolare, a seconda del tipo e dell’utilizzo
dell’apparecchiatura elettrica, riduce il rischio
di lesioni.
c) Evitare qualsiasi avvio involontario
dell’utensile. Assicurarsi che l’utensile
sia disinserito prima di collegarlo alla
rete di alimentazione elettrica, di sollevarlo o di trasportarlo. Se durante il
trasporto dell’apparecchio il dito dell’utilizzatore si trova sull’interruttore ON / OFF oppure
l’apparecchio è inserito, possono determinarsi
incidenti.
d) Prima di avviare l’apparecchio,
rimuovere il dispositivo di regolazione
o la chiave per dadi. Un utensile o una
chiave che si trovi in una parte di apparecchio
in rotazione può provocare lesioni.
e) Mantenere una postura del corpo nor-
male. Assicurarsi di avere un sostegno
sicuro e mantenere sempre l’equilibrio.
In questo modo è possibile controllare meglio
l’apparecchio, in modo particolare in caso di
situazioni impreviste.
f) Indossare un abbigliamento appro-
priato. Non indossare un abbigliamento largo o bigiotteria. Mantenere
capelli, abbigliamento e guanti lontano da parti in movimento. Abbigliamento
sciolto, gioielli o capelli lunghi possono essere
trascinati da parti in movimento.
g) Quando vengono montati dispositivi
di aspirazione e di cattura della polvere, assicurarsi che questi siano stati
montati ed utilizzati correttamente.
L’utilizzo di questi dispositivi riduce i pericoli
provocati dalla polvere.
4. Utilizzo attento
di dispositivi elettrici
a) Non sovraccaricare l’apparecchio.
Per un determinato lavoro utilizzare
sempre il dispositivo elettrico a ciò appropriato. Con il dispositivo elettrico appro-
priato si lavora meglio e con maggiore sicurezza
nello specifico ambito di utilizzo.
b) Non utilizzare dispositivi elettrici il cui
interruttore sia difettoso. Un dispositivo
elettrico che non si può più accendere e spegnere rappresenta un pericolo, e deve essere
riparato.
c) Estrarre la spina dalla presa elettrica
prima di eseguire regolazioni
all‘apparecchio, sostituire accessori o
riporre l‘apparecchio. Queste misure di
prudenza impediscono l’avvio involontario
dell’apparecchio.
d) Mantenere dispositivi elettrici non uti-
lizzati fuori dalla portata di bambini.
Non fare utilizzare l’apparecchio da
persone che non lo conoscano o del
quale non abbiano letto le istruzioni
d’uso. I dispositivi elettrici sono pericolosi se
utilizzati da persone inesperte.
e) Avere cura dell’apparecchio. Control-
lare se parti mobili dell’apparecchio
funzionano perfettamente e non si
bloccano, se parti di esso sono rotte
o danneggiate, che la funzionalità
dell’apparecchio non sia messa a rischio
Fare riparare le parti danneggiate prima di utilizzare di nuovo l’apparecchio.
Molti incidenti sono provocati dal fatto che i
dispositivi elettrici non vengono sottoposti ad
una corretta manutenzione.
f) Mantenere gli utensili di taglio affilati
e puliti. Utensili di taglio curati con attenzione
e fornitidi bordi taglienti si incastrano meno
frequentemente e sono semplici da guidare
durante il lavoro.
g) Utilizzare dispositivi elettrici, accessori,
i dispositivi da inserire ecc, in conformità alle presenti istruzioni e nel modo
descritto per questo particolare tipo-
.
8 IT/MT
Page 9

Istruzioni di sicurezza generali per utensili elettrici / Indicazioni di lavorazioneIstruzioni di sicurezza generali per utensili elettrici
logia di apparecchio. In questo senso,
tenere presente le condizioni di lavoro
e l’attività da eseguire. L’utilizzo di dispo-
sitivi elettrici per scopi diversi da quelli previsti
può provocare situazioni di pericolo.
5. Assistenza
a) Fare riparare l’apparecchio dal Centro
di Assistenza o da un elettricista specializzato e solo con pezzi di ricambio
originali. In questo modo viene garantita la
sicurezza dell’apparecchio.
Q
Indicazioni di sicurezza aggiuntive per pistole a spruzzo
La pistola a spruzzo non deve essere
utilizzata per la spruzzatura di materiali infiammabili. Le pistole a spruzzo
non devono essere pulite con solventi
infiammabili.
Non spruzzare alcun tipo di liquido la
cui pericolosità è sconosciuta.
Osservare con attenzione le indicazio-
ni di pericolo, le informazioni e le
schede del produttore dei colori e degli utensili di spruzzatura.
Indossare una mascherina protettiva!
Il respirare la vernice nebulizzata e i vapori di
solventi rappresenta un pericolo per la salute.
Lavorare in ambienti sufficientemente
ventilati.
Indossare occhiali di protezione!
Non indirizzare lo spruzzo in direzione
di esseri viventi.
PERICOLO DI ESPLOSIONE! L’apparecchio
non si deve usare in un ambiente nel quale si
trovano gas / fiamme libere / fuoco / boiler per
acqua calda azionati a gas.
E’ VIETATO FUMARE!
La vernice e i solventi (diluenti) devo-
no avere un punto di infiammabilità
superiore ai 21 °C.
Q
Indicazioni di lavorazione
Q
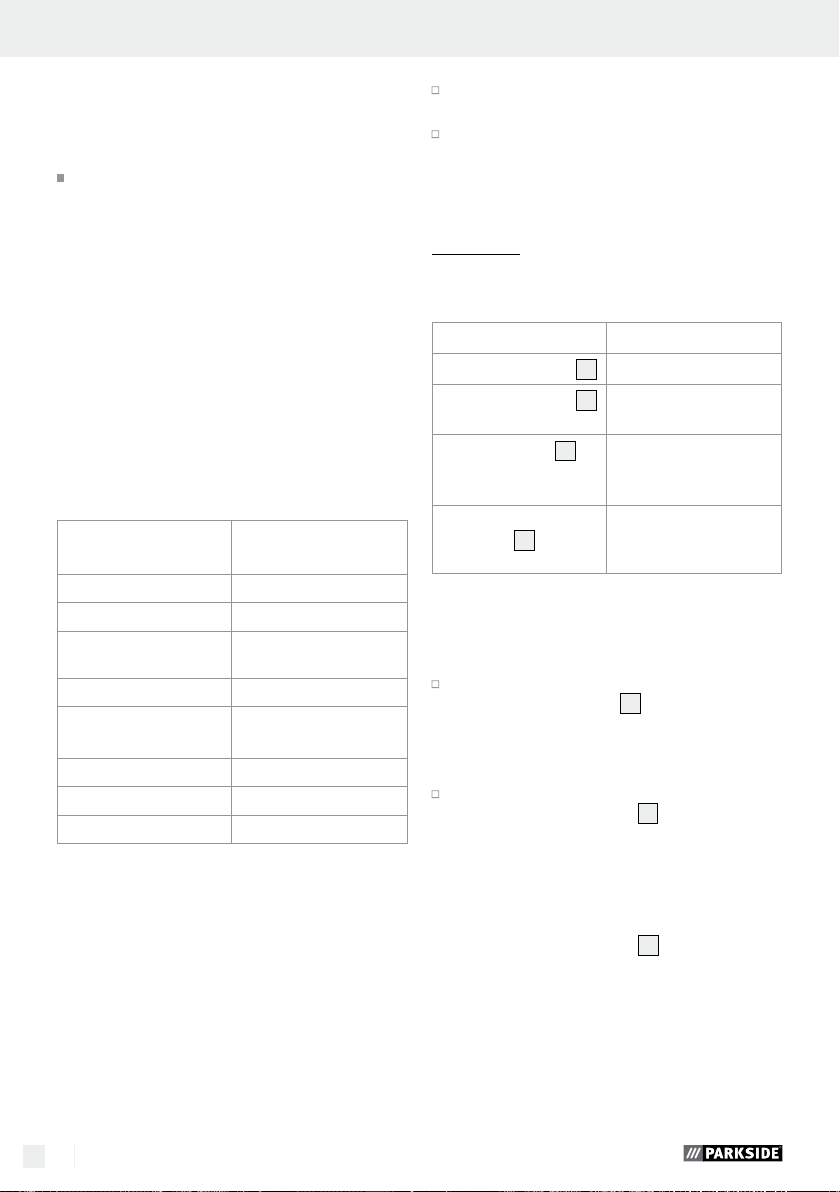
DIN-Sec / Viscosità
Con la pistola a spruzzo per verniciare PFS 100 B2
potete spruzzare un liquido con una massima viscosità di 80 secondi DIN. La viscosità viene definita
mediante un processo semplificato con l’aiuto
dell’allegato recipiente graduato.
1. Riempire il misurino
lo con il liquido da spruzzare.
2. Togliere il misurino
da spruzzare e lasciare fuoriuscire il liquido
(vedi figura C).
3. Misurare il tempo di passaggio in secondi fino
a quando cessa lo scorrere del liquido. Questo
tempo è chiamato “secondi DIN (DIN-s)”.
4. In caso di valore troppo alto aggiungere del
diluente in piccole quantità e a poco a poco al
liquido da spruzzare, ed in seguito miscelare.
A questo proposito procedere come descritto
dal capitolo “Preparazione del liquido da
spruzzare”
5. Misurare nuovamente i secondi DIN. Ripetere
la procedura fino a quando vengono raggiunti
i valori indicati nella tabella.
Q
Preparazione del
12
in dotazione fino all’or-
12
sollevandolo dal liquido
liquido da spruzzare
AVVERTENZA: Le vernici e i colori... che si trovano
sul mercato sono, in linea generale, messi a punto
per l’applicazione a pennello ma non a spruzzo.
Per ottenere un corretto risultato di lavoro si dovrebbe procedere ad una messa a punto corretta della
viscosità delle vernici e dei colori... attenendovi
alla normativa DIN (v. tabella).
Raggiungere la giusta diluizione con l’aiuto di un
idoneo diluente.
Non superare il valore massimo di viscosità
per l’apparecchio. Per rendere possibile la
spruzzatura il liquido da spruzzare non deve
essere troppo spesso. In caso contrario l’apparecchio potrebbe intasarsi.
Fare attenzione a che il tipo di diluizione sia
adatto al liquido da spruzzare. In caso di utiliz-
9 IT/MT
Page 10
Indicazioni di lavorazione / Avvio
zo di una diluizione errata si formano grumi
che intasano l’apparecchio. Non miscelare
mai vernici con resina artificiale con la procedura della nitrodiluizione.
Ricavare le informazioni necessarie sul tipo di
diluizione adatto (acqua, solvente) al liquido
da spruzzare dalle indicazioni fornite dal produttore.
1. Miscelare il liquido da spruzzare non diluito in
modo accurato e portarlo ad una temperatura
ambiente media (20–22 °C).
Non modificare il grado di viscosità con un
ulteriore riscaldamento.
2. Aggiungere un diluente adatto.
3. Verificare il grado di viscosità come descritto
precedentemente (vedi fig. C).
Nota: Mai mettere a punto vernici a legante resinoide con l’aiuto di diluente nitrico !
Esempi di
Direttiva DIN
materiale
Vernice per automobili 16-20 DIN-sec
Vernice acrilica 25-30 DIN-sec
Vernice a legante
25-30 DIN-sec
resinoide
Prima mano 25-30 DIN-sec
Impregnazione
25-30 DIN-sec
del legno
Vernice trasparente 25-30 DIN-sec
Vernice martellata 30-35 DIN-sec*
Idropittura 40-80 DIN-sec
Irruvidire le superfici lisce ed in seguito rimuovere
la polvere di levigatura.
Coprire per intero l’ambiente della superficie
dove viene eseguita spruzzatura. Il nebulizzato
può inquinare l’ambiente circostante.
Q
Avvio
Q
Scelta dell’ugello
Ugello Utilizzo
Tutti i colori e vernici
Ugello 0,6 mm (R6)
Ugello 0,8 mm (R8)
8
Liquido da spruzzare
8
spesso
getto sottile, duro, per
Ugello di pulizia
11
la pulizia puntuale di
superfici
Prolungamento
dell‘ugello
13
per la verniciatura a
spruzzo di angoli di
difficile accessibilità
Q
Accensione e spegnimento
Accensione:
Per avviare l‘elettrountensile premere
l‘interruttore ON / OFF
3
e mantenerlo
premuto.
Spegnimento:
Per spegnere l‘elettroutensile rilasciare
l‘interruttore di ON / OFF
3
.
* I prodotti granulosi / contenente corpi di vario
tipo non devono essere spruzzati. La loro azione
smerigliante abbrevia la durata di vita della pompa e della valvola.
Q
Preparazione della
superficie di spruzzatura
La superficie di spruzzatura deve essere pulita,
asciutta e priva di grassi.
10 IT/MT
Q
Spruzzatura
1. E’ possibile regolare il getto operando sulla
manopola di regolazione
2
, (vedi fig. D). La
regolazione del getto è corretta, quando non
si forma nessuna gocciolina e la struttura della
spruzzatura stessa appare fine e uniforme.
2. Non accendere o spegnere l’apparecchio sulla superficie da spruzzare, ma iniziare e terminare la spruzzatura a circa 10 cm al di fuori
della superficie di spruzzatura.
Page 11
Avvio / Manutenzione e pulizia / Assistenza / GaranziaIndicazioni di lavorazione / Avvio
NOTA: La distanza dell’ugello dal pezzo dipende dal liquido di spruzzatura (da circa 20
a 35 cm di distanza di spruzzatura a seconda
del cono di spruzzatura del materiale sul quale
eseguire l’applicazione).
Utilizzare l’apparecchio solamente in posizione
orizzontale (come mostrato nella fig. D).
Rilevare la distanza alla superficie di spruzza-
tura di volta in volta utile facendo un tentativo.
Cominciare ad una notevole distanza.
3. Spruzzare anzitutto su angoli o piccole decorazioni con piccole spruzzate.
In seguito eseguire la spruzzatura vera e propria.
4. Eseguire la spruzzatura come illustrato nella
Fig. E
– condurre la pistola in modo parallelo alla
superficie – non agitarla
– condurre la pistola sempre con la medesima
velocità uniforme
– applicare uno strato di vernice il più sottile
possibile
– lo strato / gli strati di vernice richiede / richie-
dono un intervallo di essiccazione, prima di
applicare in forma incrociata lo strato successivo (vedi Fig. F).
5. Non spruzzare fino che il serbatoio
7
è vuoto
- infatti si formano gocce.
Q
Manutenzione e pulizia
Indicazioni generali:
1.
Togliere la spina dalla
presa di corrente, sia per interruzioni del
lavoro che per eseguire degli interventi all‘apparecchio stesso.
2. Dopo ogni impiego spruzzare diluente (solo
all’aperto - pericolo di esplosione)
diluente o acqua attraverso l‘apparecchio.
3. Dopo la pulizia potete spruzzare dell‘olio da
macchina da cucire attraverso l‘apparecchio
quale protezione antiruggine.
4.
PERICOLO DI MOR-
TE DETERMINATO DA UNA SCOSSA
ELETTRICA! Non immergere mai l‘apparecchio
in un liquido detergente.
5. L’apparecchio non deve essere pulito con
solventi infiammabili.
6. Per la pulizia dell’alloggiamento utilizzare un
panno asciutto. Non utilizzare mai benzina,
solventi o detergenti aggressivi per la plastica.
Indicazioni di pulizia:
1. Rimuovere la vite di arresto
2. Rimuovere l’alloggiamento della pompa
1
, vedi fig. A.
10
verso il basso.
3. Svitare l’ugello
aspirazione e di pressione
4. Estrarre il pistone della pompa
dall’alloggiamento della pompa
5. Pulire i componenti
8
e rimuovere la valvola di
9
.
4
e la molla 5
10
.
4, 5, 8, 9
utilizzando
un apposito diluente.
6. Montare nuovamente i componenti in ordine
inverso.
Suggerimento: Appendere l’elettroutensile alla
staffa metallica
Q
Assistenza
14
dopo l’uso o la sua pulizia.
Fare riparare l’elet-
troutensile solamente da personale
tecnico qualificato e solamente con
pezzi di ricambio originali. In questo
modo si garantisce che la sicurezza dell’elettroutensile rimanga immutata.
La sostituzione del-
la spina o del cavo di alimentazione
deve essere eseguita esclusivamente
dal fabbricante dell’apparecchio o dal
relativo servizio clienti. In questo modo si
garantisce che la sicurezza dell’elettroutensile
rimanga immutata.
Q
Garanzia
Questo apparecchio è garantito per tre
anni a partire dalla data di acquisto.
L’apparecchio è stato prodotto con cura
e debitamente collaudato prima della
consegna. Conservare lo scontrino come
prova d’acquisto. In caso di interventi in
garanzia, contattare telefonicamente il
proprio centro di assistenza. Solo in questo
11 IT/MT
Page 12

Garanzia / Smaltimento
modo è possibile garantire una spedizione
gratuita della merce.
La garanzia vale solo per i difetti di materiale o
fabbricazione, non per i danni da trasporto, parti
soggette a usura o danni a parti fragili come ad
es. interruttori o accumulatori. Il prodotto è destinato esclusivamente all’uso domestico e non a quello
commerciale.
La garanzia decade in caso di impiego improprio
o manomissione, uso della forza e interventi non
eseguiti dalla nostra filiale di assistenza autorizzata.
Questa garanzia non costituisce alcun limite ai diritti legali del consumatore.
Il periodo di garanzia non viene prolungato in caso
di un intervento in garanzia. Ciò vale anche per le
componenti sostituite e riparate. I danni e difetti
presenti già all’acquisto devono essere comunicati
immediatamente dopo il disimballaggio, e non oltre
due giorni dalla data di acquisto. Le riparazioni effettuate dopo la scadenza del periodo di garanzia
sono a pagamento.
IT
Assistenza Italia
Tel.: 02 36003201
e-mail: kompernass@lidl.it
Non gettare gli utensili
elettrici nei rifiuti domestici!
In conformità alla direttiva europea 2002 / 96 / EC
sui rifiuti di apparecchiature elettriche ed elettroniche
e relativa trasposizione nel diritto nazionale, gli utensili elettrici usati devono essere raccolti separatamente e riciclati in maniera compatibile con l’ambiente.
Informazioni sulle possibilità di smaltimento di
apparecchi giunti al termine della loro vita utile
sono disponibili presso le amministrazioni comunali.
Impatto ambientale e smaltimento
del materiale:
I colori e le vernici... sono rifiuti speciali e devo-
no essere smaltiti secondo le normative vigenti.
Attenersi alle normative locali.
Osservare le istruzioni del produttore.
Prodotti chimici inquinanti non devono penetrare
nel suolo, nella falda acquifera sotterranea o
nelle acque di superficie.
Non sono ammessi lavori di spruzzatura ai
margini di acque o in prossimità di specchi
d’acqua (aree di raccolta d’acqua).
Acquistando colori e vernici... prestare atten-
zione al loro impatto ambientale.
IAN 87779
MT
Assistenza Malta
Tel.: 80062230
e-mail: kompernass@lidl.com.mt
IAN 87779
Q
Smaltimento
L’imballaggio è composto da materiali
ecologici, che possono essere smaltiti
presso i siti di riciclaggio locali.
12 IT/MT
Page 13

Q
Dichiarazione di conformità /
Fabbricante
Noi, KOMPERNASS GMBH, responsabile per la
documentazione: sig. Semi Uguzlu, BURGSTR. 21,
44867 BOCHUM, GERMANY, dichiarano con la
presente che questo prodotto è conforme con le
seguenti norme, documenti normativi e direttive
dell’Unione Europea:
Direttiva macchine
(2006 / 42 / EC)
Direttiva CE sulla bassa tensione
(2006 / 95 / EC)
Compatibilità elettromagnetica
(2004 / 108 / EC)
RoHS Direttiva
(2011 / 65 / EU)
Norme utilizzate ed armonizzate
EN 50144-1/A2:2003, EN 50144-2-7:2000
EN 62233:2008
EN 55014-1/A1:2009
EN 55014-2/A2:2008
EN 61000-3-2/A2:2009
EN 61000-3-3:2008
Dichiarazione di conformità / FabbricanteGaranzia / Smaltimento
Tipo / Denominazione dell’apparecchio:
Pistola a spruzzo per verniciare PFS 100 B2
Date of manufacture (DOM): 02–2013
Numero di serie: IAN 87779
Bochum, 28.02.2013
Semi Uguzlu
- Direttore del Reparto Qualità -
Modifiche tecniche nel senso dello sviluppo
rimangono riservati.
13 IT/MT
Page 14

14
Page 15

Índice
Introdução
Utilização correcta ......................................................................................................................... Página 16
Equipamento ................................................................................................................................... Página 16
Material fornecido ......................................................................................................................... Página 16
Dados técnicos ............................................................................................................................... Página 16
Indicações de segurança gerais para ferramentas eléctricas
1. Segurança no local de trabalho ............................................................................................... Página 17
2. Segurança eléctrica ...................................................................................................................Pág i n a 17
3. Segurança pessoal .................................................................................................................... Pág i n a 17
4. Manuseamento e utilização cuidada de ferramentas eléctricas .......................................... Pág ina 18
5. Assistência .................................................................................................................................. Pá gina 19
Indicações de segurança complementares para pistolas de pintura ........................................ Página 19
Indicações de trabalho
Seg. DIN / V iscosidade .................................................................................................................. Página 19
Preparação do material de pulverização .................................................................................... Página 19
Preparar a superfície a pulverizar ................................................................................................ Página 20
Colocação em funcionamento
Seleccionar pulverizador ............................................................................................................... Página 20
Ligar / Desligar ................................................................................................................................ Página 20
Processo de pulverização .............................................................................................................. Página 20
Manutenção e limpeza ................................................................................................... Página 21
Assistência técnica .............................................................................................................. Página 21
Garantia ...................................................................................................................................... Página 21
Eliminação .................................................................................................................................. Página 22
Declaração de conformidade / Fabricante .................................................... Página 23
15 PT
Page 16

Pistola de pintura PFS 100 B2
Q
Material fornecido
Q
Introdução
Congratulamo-lo pela compra do seu novo aparelho
Acabou de adquirir um produto de grande qualidade. O manual de instruções é parte integrante deste
produto. Contém indicações importantes referentes
à segurança, utilização e eliminação. Familiarize-se
com todas as indicações de utilização e de segurança
d
o produto. Utilize o produto apenas como descrito
e para as áreas de aplicação indicadas. Se transmitir o artigo a terceiros, entregue também os respectivos documentos.
Q
Utilização correcta
Este aparelho destina-se à aplicação de tintas e
vernizes. Com este aparelho, pode processar material de pulverização até ao máximo de 80 seg. DIN.
Qualquer outra utilização ou alteração do aparelho
é indevida e implica riscos de acidente consideráveis. Não assumimos qualquer responsabilidade
por danos resultantes de uma utilização indevida.
O aparelho destina-se apenas ao uso doméstico.
Q
Equipamento
1 pistola de pintura PFS 100 B2
2 bocais* 1 x 0,6 mm, 1 x 0,8 mm
2 válvulas de pressão de sucção*
1 bocal de limpeza
.
1 extensão do bocal
1 doseador
1 manual de instruções
* 1 dos quais pré-montado
Q
Dados técnicos
Potência nominal: 100 W
Débito: 320 ml / min (água)
Índice de viscosidade: máx. 80 seg. DIN
Pressão: máx. 160 bar
Reservatório: 700 ml
Classe de protecção: II /
Informações sobre ruído e vibração:
Valor de medição para o ruído determinado em
conformidade com EN 50144. O nível de ruído
da ferramenta eléctrica avaliado com A importa
tipicamente em:
Nível de pressão sonora: 91,2 dB(A)
Nível da potência acústica: 104,2 dB(A)
Tolerância K: 3 dB
1
Parafuso de fixação
2
Botão de regulação
3
Interruptor para LIGAR / DESLIGAR
4
Pistão da bomba
5
Mola
6
Tubo de sucção
7
Reservatório
8
Bocal
9
Válvula de pressão de sucção
10
Carcaça da bomba
11
Bocal de limpeza
12
Doseador
13
Extensão do bocal
14
Arco metálico
16 PT
Utilizar protecção auditiva!
Aceleração estimada, tipicamente: 15,002 m / s
Tolerância K = 1,5 m / s
2
2
O nível de ruído indicado nas instru-
ções foi medido através de um processo de medição
segundo a norma EN 50144 e pode ser utilizado
para fins comparativos de aparelhos.
O nível de ruído altera de acordo com a aplicação
da ferramenta eléctrica, excedendo, em alguns
casos, o valor indicado. O grau de vibração pode
ser subestimado quando a ferramenta é utilizada
frequentemente desta forma.
Page 17

Introdução / Indicações de segurança gerais para ferramentas eléctricas
Nota: Para uma avaliação exacta da intensidade
de vibração, durante um determinado período de
utilização, deveriam também ser tidos em consideração os períodos de tempo em que o aparelho
desligado ou está ligado, mas não está efectiva
a ser utilizado. Tal pode reduzir significativamente
a intensidade de vibração ao longo de todo o período de utilização.
Q
Indicações de segurança gerais
está
mente
para ferramentas eléctricas
Leia todas as indica-
ções de segurança e instruções!
A inobservância das indicações de
segurança e instruções pode conduzir a choques
eléctricos, incêndios e / ou ferimentos graves.
Guarde todas as indicações de segurança
e instruções para consulta futura!
O conceito “ferramenta eléctrica”, utilizado nas indicações de segurança, refere-se a ferramentas
eléctricas alimentadas a electricidade (com cabo
de rede) e a ferramentas eléctricas alimentadas
por bateria (sem cabo de rede).
1. Segurança no local de trabalho
a) Mantenha o seu local de trabalho lim-
po e bem iluminado. A desordem e a má
iluminação da área de trabalho podem provocar acidentes.
b) Não utilize o aparelho em áreas po-
tencialmente explosivas, nas quais se
encontrem líquidos, gases ou poeiras
inflamáveis. As ferramentas eléctricas pro-
duzem faíscas que podem inflamar as poeiras
ou os vapores.
c) Não deixe que crianças ou quaisquer
outras pessoas se aproximem quando utilizar a ferramenta eléctrica. Se se
distrair pode perder o controlo do aparelho.
2. Segurança eléctrica
a) A ficha de ligação do aparelho tem de
estar em conformidade com a tomada.
A ficha não deve ser alterada, de forma
alguma. Não utilize fichas adaptadoras
com aparelhos protegidos por ligação
à
terra. As fichas não sujeitas a modificações
e as respectivas tomadas reduzem o risco de
choque eléctrico.
b) Evite o contacto físico com superfícies
ligadas à terra tais como tubos, aquecedores, fogões e frigoríficos. Se o seu
corpo estiver ligado à terra, existe um risco
elevado de choque eléctrico.
c) Mantenha o aparelho afastado de
chuva ou humidade. A penetração da
água no aparelho eléctrico aumenta o risco
de choque eléctrico.
d) Não use o cabo para fins inadequados,
como para transportar o aparelho,
para o pendurar ou para puxar a ficha da tomada. Mantenha o cabo
afastado do calor, óleos, arestas afiadas ou peças móveis do aparelho. Um
cabo danificado ou mal enrolado aumenta o
risco de um choque eléctrico.
e) Quando trabalhar com um aparelho
eléctrico ao ar livre, utilize apenas extensões que sejam adequadas para
áreas exteriores. A utilização de uma ex-
tensão destinada a áreas exteriores diminui o
risco de choque eléctrico.
f) Se não for possível evitar a utilização
da ferramenta eléctrica num ambiente
húmido, utilize um disjuntor de corrente
de avaria. A utilização de um disjuntor de cor-
rente de avaria reduz o risco de choque eléctrico.
3. Segurança pessoal
a) Seja prudente, preste sempre atenção
àquilo que está a fazer e utilize a ferramenta eléctrica de forma sensata.
Não utilize o aparelho quando estiver
cansado ou sob a influência de drogas,
álcool ou medicamentos. Mesmo um
17 PT
Page 18

pequeno descuido, durante a utilização do
aparelho, pode causar ferimentos graves.
b) Utilize equipamento de protecção in-
dividual e nunca se esqueça dos óculos
de protecção. A utilização de equipamento
de protecção individual como máscara anti-
-poeiras, calçado de protecção anti-derrapante, capacete ou protecção auditiva, conforme
o tipo e a aplicação da ferramenta eléctrica,
diminui o risco de ferimentos.
c) Evite uma colocação em funcionamen-
to acidental. Certifique-se de que a
ferramenta eléctrica está desligada,
antes de a ligar à fonte de alimentação, levantar ou transportar. Se, duran-
te o transporte do aparelho, tiver colocado o
dedo no interruptor LIGAR / DESLIGAR ou se
o aparelho estiver ligado, este pode causar
acidentes.
d)
Afaste a ferramenta de ajuste ou a cha-
ve de porcas, antes de ligar o aparelho.
Uma ferramenta ou chave que esteja colocada numa peça rotativa do aparelho pode
causar ferimentos.
e) Evite uma postura anormal do corpo.
Certifique-se de que se encontra
numa posição estável e mantenha
sempre o equilíbrio. Desta forma, pode
controlar melhor o aparelho, particularmente
em imprevistos.
f) Use vestuário adequado. Não utilize
roupas largas ou bijutaria. Mantenha
o cabelo, a roupa e as luvas afastados
de peças móveis. O vestuário largo, a bi-
jutaria ou os cabelos compridos podem ficar
presos nas peças móveis.
g) Quando montar dispositivos de aspira-
ção ou recolha de poeiras, certifique-se
de que estes estão bem ligados e são
utilizados correctamente. A utilização
destes dispositivos diminui a existência de
perigos potenciados por poeiras.
18 PT
4.
Manuseamento e utilização
cuidada de ferramentas
eléctricas
a) Não sobrecarregue o aparelho. Utilize
a ferramenta eléctrica mais adequada
para o seu trabalho. Trabalhará melhor e
de forma mais segura se utilizar a ferramenta
eléctrica adequada à respectiva área de trabalho.
b) Não utilize ferramentas eléctricas, cujo
interruptor esteja avariado. Uma ferra-
menta eléctrica que não possa mais ser ligada
ou desligada constitui perigo e tem de ser reparada.
c) Retire a ficha da tomada antes de
efectuar ajustes no aparelho, trocar
acessórios ou quando deixar de utilizar o aparelho. Esta medida de segurança
impede o arranque involuntário do aparelho.
d) Mantenha as ferramentas eléctricas
que não estejam a ser utilizadas fora
do alcance das crianças. Não deixe
que pessoas que não estejam familiarizadas com o aparelho, ou que não
tenham lido estas instruções, o utilizem.
As ferramentas eléctricas são perigosas, quando manuseadas por pessoas inexperientes.
e) Trate do aparelho com cuidado. Veri-
fique se as peças móveis do aparelho
funcionam correctamente, se não
ficam encravadas e se estão partidas
ou danificadas a ponto de prejudicar
o bom funcionamento do aparelho.
Repare as peças danificadas antes da
utilização do aparelho. Muitos acidentes
ocorrem devido à má manutenção das ferramentas eléctricas.
f) Mantenha a ferramenta de corte
afiada e limpa. Ferramentas de corte bem
tratadas com gume afiado ficam encravadas
com menor regularidade e podem ser utilizadas mais facilmente.
g) Utilize a ferramenta eléctrica, acessó-
rios, ferramentas de aplicação, etc.
de acordo com estas instruções e tal
como é indicado para este tipo específico de aparelho. Tenha em atenção as
Page 19

Indicações de segurança gerais para ferramentas … / Indicações de trabalho
condições de trabalho e a actividade
que vai desempenhar. A utilização de
ferramentas eléctricas para outras aplicações
que não as previstas, pode originar situações
de perigo.
5. Assistência
a) Os seus aparelhos devem ser repara-
dos apenas pelo serviço de assistência
técnica ou por pessoal técnico qualificado, e apenas com peças de substituição
originais. Deste modo, assegura a preserva-
ção da segurança do aparelho.
Q
Indicações de segurança complementares para pistolas de
pintura
A pistola de pintura não pode ser
utilizada para pulverizar materiais inflamáveis. As pistolas de pintura não
podem ser limpas com solventes inflamáveis.
Não pulverize quaisquer substâncias
cujo perigo seja desconhecido.
Respeite as indicações de perigo,
informações e fichas de dados do
fabricante das tintas ou materiais de
pulverização.
Utilize uma protecção respiratória! A
inspiração de partículas de tinta e de vapor de
solventes é prejudicial à saúde.
Trabalhe apenas em espaços suficien-
temente ventilados.
Utilize óculos de protecção!
Nunca dirija o jacto de pulverização
para seres vivos.
PERIGO DE EXPLOSÃO! O aparelho não
deve ser utilizado num ambiente onde se encontrem gases / chamas abertas / fogo / esquentadores a gás.
É PROIBIDO FUMAR!
As tintas e solventes (diluentes) devem
ter um ponto de inflamação superior
a 21°C.
Q
Indicações de trabalho
Q
Seg. DIN / Viscosidade
Com a pistola de pintura Parkside PFS 100 B2,
pode processar material de pulverização até ao
máx. de 80 seg. DIN (viscosidade). A viscosidade
é determinada num processo de medição simplificado com o doseador fornecido (ver fig. C).
1. Mergulhe o doseador
rebordo no material de pulverização.
2. Retire o doseador
ção e deixe o líquido sair (ver figura C).
3. Meça o tempo em segundos até o fluxo do
líquido parar.
Este período denomina-se “segundos DIN
(DIN-s)”.
4. No caso de um valor demasiado elevado, adicione progressivamente o diluente apropriado
para o material de pulverização em quantidades pequenas e misture-o. Proceda de acordo
com o capítulo “Preparação do material de
pulverização”.
5. Meça novamente os segundos DIN.
Repita o processo até serem alcançados os
valores indicados na tabela.
Q
Preparação do material
12
fornecido até ao
12
do material de pulveriza-
de pulverização
NOTA: Os revestimentos, tintas, etc. disponíveis no
mercado destinam-se maioritariamente à aplicação
com pincéis e não à pulverização. Para obter bons
resultados, deverá ajustar a viscosidade dos revestimentos, tintas, etc. de acordo com a directiva DIN
(ver tabela).
Pode atingir a diluição necessária com o diluente
adequado.
Não ultrapasse o valor máximo de viscosidade
do aparelho. O material de pulverização não
deve ser demasiado espesso para o processo
de pulverização. Caso contrário, o aparelho
pode ficar obstruído.
Certifique-se de que o material de pulverização
e o diluente são compatíveis entre si. Em caso
de utilização do diluente incorrecto, formam-se
19 PT
Page 20

grumos, que obstruem o aparelho. Nunca misturar tintas de resina sintética com nitro-diluente.
Consulte as informações relativas ao diluente
adequado (água, solvente) nos dados do fabricante do material de pulverização.
1. Misture bem o material de pulverização não
diluído e deixe-o atingir a temperatura ambiente
média (20 - 22 °C).
Não altere a viscosidade através de um aquecimento adicional.
2. Adicione um diluente adequado.
3. Verifique a viscosidade, conforme acima
descrito (ver fig. C).
NOTA: Nunca ajuste tintas de resina sintética com
nitro-diluente!
Exemplo de
material
Valores de
referência DIN
Tinta para automóveis 16-20 seg. DIN
Tinta acrílica 25-30 seg. DIN
Tinta de resina sintética 25-30 seg. DIN
Tinta de fundo 25-30 seg. DIN
Impregnação de
25-30 seg. DIN
madeiras
Verniz 25-30 seg. DIN
Pintura martelada 30-35 seg. DIN*
Tinta de látex 40-80 seg. DIN
* Não podem ser pulverizados produtos granulo-
sos / com corpos sólidos. O seu efeito abrasivo
reduz a durabilidade da bomba e da válvula.
Q
Preparar a superfície
a pulverizar
A superfície a pulverizar deve encontrar-se limpa,
seca e sem gordura.
Lixe as superfícies lisas e, de seguida, retire o
pó que se formou.
Cubra bem o ambiente à volta da superfície
a pulverizar. A névoa de pulverização pode
sujar a área circundante.
Q
Colocação em funcionamento
Q
Seleccionar pulverizador
Pulverizador Utilização
Pulverizador 0,6 mm
8
(R6)
Pulverizador 0,8 mm
8
(R8)
Pulverizador
de limpeza
11
todas as tintas, vernizes
material de pulverização espesso
jacto mais fino, mais
duro, para limpeza
pontual de superfícies
Extensão do
pulverizador
Q
Ligar / Desligar
13
para pulverizar cantos
de difícil acesso
Ligar:
Para colocar a ferramenta eléctrica em funcio-
namento, prima o interruptor LIGAR / DESLIGAR
3
e mantenha-o premido.
Desligar
Para desligar a ferramenta eléctrica, solte o
interruptor LIGAR / DESLIGAR
Q
Processo de pulverização
3
.
1. Pode ajustar o jacto de pulverização deslocando o botão de regulação
2
(ver fig. D). O
jacto encontra-se correctamente ajustado, se
não se formarem gotas e a qualidade de
pulverização for fina e regular.
2. Não ligue / desligue o aparelho sobre a superfície a pulverizar. Inicie e termine o processo
de pulverização a aprox. 10 cm de distância
da superfície a pulverizar.
NOTA: A distância do pulverizador em relação
à peça de trabalho depende do material a
pulverizar (aprox. 20 a 35 cm de distância de
pulverização, dependendo do cone de pulverização e da aplicação de material pretendida).
Utilize o aparelho apenas na horizontal (como
na Fig. D).
20 PT
Page 21

Colocação em … / Manutenção e limpeza / Assistência técnica / Garantia
Determine o afastamento adequado em relação
à superfície de pulverização através de tentativas.
Comece com uma distância maior.
3. Primeiro pulverize os cantos ou pequenos ornamentos com pulverizações curtas.
De seguida, efectue o processo de pulveriza
ção
propriamente dito.
4. Execute o processo de pulverização de acordo
com a fig. E
– desloque a pistola pulverizadora paralela-
mente à superfície
– não oscile o aparelho
– desloque a pistola pulverizadora a uma
velocidade regular
– aplique o material de pulverização tão
diluído quanto possível
– a(s) camada(s) de tinta necessitam de um
período de pausa para secar, antes da
aplicação da próxima camada no sentido
perpendicular (ver fig. F).
5. Não pulverizar com o reservatório
7
vazio –
há formação de gotas!
Q
Manutenção e limpeza
Indicações gerais:
1.
Retire a ficha de rede, mesmo
durante pausas e trabalhos no aparelho.
2. Após cada utilização, pulverize diluente (ape-
nas ao ar livre – perigo de explosão!)
ou água através do aparelho.
3. Para proteger o aparelho contra a ferrugem,
pode pulverizar óleo de máquina de costura
após a limpeza.
4.
PERIGO DE MORTE POR
CHOQUE ELÉCTRICO! Nunca mergulhe o
aparelho em detergente.
5. O aparelho não pode ser limpo com solventes
inflamáveis.
6. Para limpar a caixa, utilize um pano seco.
Nunca utilize gasolina, produtos de limpeza
ou detergentes que agridam o plástico.
Indicações de limpeza:
1. Desaperte o parafuso de fixação
2. Retire a carcaça da bomba
1
, ver fig. A.
10
, puxando para
baixo.
3. Desaparafuse o bocal 8 e retire a válvula de
pressão de sucção
4. Retirar o pistão da bomba
carcaça da bomba
5. Limpe os componentes
9
.
4
10
.
4, 5, 8, 9
e mola 5 da
com
diluente.
6. Monte novamente os componentes pela ordem
inversa.
DICA: Depois da utilização ou limpeza, pendure
a ferramenta eléctrica no arco metálico
Q
Assistência técnica
14
.
As suas ferramentas eléc-
tricas só devem ser reparadas por
pessoal técnico qualificado e apenas
com peças de substituição originais.
Deste modo, é assegurada a preservação da
segurança da ferramenta eléctrica.
A substituição da ficha ou
do cabo de rede deve ser sempre
efectuada pelo fabricante ou pelo serviço de apoio ao cliente. Deste modo, é
assegurada a preservação da segurança da
ferramenta eléctrica.
Q
Garantia
Este aparelho tem 3 anos de garantia a
partir da data de compra. Este aparelho
foi fabricado com o máximo cuidado e
escrupulosamente testado antes da sua
distribuição. Guarde o talão de compra
como comprovativo da compra. Em caso
de reivindicação da garantia, entre em
contacto com o seu serviço de assistência
técnica por telefone. Apenas deste modo
pode ser garantido um envio gratuito do
seu produto.
A garantia abrange apenas defeitos de material
ou de fabrico, não incluindo danos provocados
pelo transporte, peças de desgaste ou danos em
peças frágeis, por ex. interruptores ou baterias. O
21 PT
Page 22

produto destina-se apenas ao uso privado e não
ao uso comercial.
Em caso de utilização incorrecta ou indevida, exercí
de força excessiva e de intervenções não efec
pelo nosso representante autorizado de as
técnica, perderá o direito à garantia. Os seus direitos
legais não são limitados por esta garantia.
O período de garantia não é prolongado em caso
de reivindicação. Isto também se aplica às peças
substituídas e reparadas. Danos e falhas eventualmente já existentes na altura da compra devem ser
comunicados imediatamente após o desempacotamento, o mais tardar, no entanto, dois dias após a
data de aquisição. As reparações realizadas após
o final do período de garantia comportam custos.
PT
Assistência Portugal
Tel.: 70778 0005
(0,12 EUR/Min.)
e-mail: kompernass@lidl.pt
cio
tuadas
sistência
IAN 87779
Impacto ambiental e eliminação
do material:
As tintas, os revestimentos, etc. são resíduos
perigosos e devem ser eliminados como tal.
Respeite as prescrições locais.
Respeite as indicações do fabricante
Os químicos nocivos ao ambiente não podem
atingir o solo, lençóis freáticos ou águas.
Portanto, não são permitidos trabalhos de pul-
verização na margem de águas ou das suas
superfícies adjacentes (área de captação).
Na compra de tintas, revestimentos, etc. tenha
em atenção o seu impacto ambiental.
Q
Eliminação
A embalagem é composta por materiais
recicláveis, que pode eliminar através
dos pontos de reciclagem locais.
Nunca coloque aparelhos
eléctricos no lixo doméstico!
Segundo a directiva europeia 2002 / 96 / EC relativa
a aparelhos eléctricos e electrónicos usados e res
pectiva conversão no direito nacional, as ferramentas
eléctricas usadas devem ser recolhidas separadamente
e sujeitas a uma reciclagem ecológica.
Pode obter informações relativas à eliminação do
aparelho já usado através dos responsáveis legais
pela reciclagem no seu município.
22 PT
-
Page 23

Q
Declaração de conformidade /
Fabricante
Nós, a sociedade KOMPERNASS GMBH, responsável de documentos: senhor Semi Uguzlu,
BURGSTR. 21, 44867 BOCHUM, GERMANY,
explicamos pela presente que este produto corresponde às seguintes normas, os documentos normativos e as directivas CE:
Directiva de Máquinas
(2006 / 42 / EC)
Directiva de baixa tensão CE
(2006 / 95 / EC)
Compatibilidade electromagnética
(2004 / 108 / EC)
RoHS Directiva
(2011 / 65 / EU)
Normas harmonizadas aplicadas
EN 50144-1/A2:2003, EN 50144-2-7:2000
EN 62233:2008
EN 55014-1/A1:2009
EN 55014-2/A2:2008
EN 61000-3-2/A2:2009
EN 61000-3-3:2008
Declaração de conformidade / Fabricante
Designação do tipo / Máquina:
Pistola de pintura PFS 100 B2
Date of manufacture (DOM): 02–2013
Número de série: IAN 87779
Bochum, 28.02.2013
Semi Uguzlu
- Gestor de qualidade -
Ressalvam-se as alterações técnicas no sentido de
um aperfeiçoamento contínuo.
23 PT
Page 24

24
Page 25

Table of contents
Introduction
Proper use ...........................................................................................................................................Page 26
Features and equipment .....................................................................................................................Page 26
Included items ..................................................................................................................................... Page 26
Technical data .....................................................................................................................................Page 26
General safety advice for electrical power tools
1. Workplace safety ........................................................................................................................... Page 27
2. Electrical safety ..............................................................................................................................Page 27
3. Personal safety ...............................................................................................................................Page 27
4. Careful handling and use of electrical power tools .................................................................... Page 28
5. Service ............................................................................................................................................Page 28
Additional safety advice for paint spray guns ................................................................................. Page 28
Advice on use
DIN -sec / Viscosit y ..............................................................................................................................Page 29
Preparing the sprayed medium .........................................................................................................Page 29
Preparing the surface to be sprayed ................................................................................................ Page 30
Bringing into use
Selecting the nozzle ...........................................................................................................................Page 30
Switching On / O ff .............................................................................................................................Page 30
Spraying process ................................................................................................................................ Page 30
Maintenance and cleaning ..............................................................................................Page 30
Service centre .............................................................................................................................Page 31
Warranty ........................................................................................................................................Page 31
Disposal ............................................................................................................................................ Page 31
Declaration of Conformity / Manufacturer........................................................Page 32
25 GB/MT
Page 26

Paint spray gun PFS 100 B2
Q
Included items
Q
Introduction
We congratulate you on the purchase of
device. You have chosen a
high quality product. The
your new
instructions for use are part of the product. They
contain important information concerning safety,
use and disposal. Before using the product, please
familiarise yourself with all of the safety information
and instructions for use. Only use the unit as described and for the specified applications. If you pass
the product on to anyone else, please ensure that
you also pass on all the documentation with it.
Q
Proper use
This device is intended for applying paints and varnishes. You can use the device to apply a sprayed
medium with a viscosity up to 80 DIN-sec. Any other
use or modification shall be deemed to be improper
use and could give rise to considerable risk of acci
dent.
We will not accept liability for loss or damage arising from improper use. The device is intended for
private, domestic use only.
Q
Features and equipment
1
Attachment screw
2
Regulator button
3
ON / OFF switch
4
Pump piston
5
Spring
6
Suction tube
7
Paint cup
8
Nozzle
9
Suction-pressure valve
10
Pump housing
11
Cleaning nozzle
12
Measuring cup
13
Nozzle extension
14
Metal stirrup
26 GB/MT
1 Paint spray gun PFS 100 B2
2 Nozzles* 1 x 0.6 mm, 1 x 0.8 mm
2 Suction pressure valves*
1 Cleaning nozzle
1 Nozzle extension
1 Measuring cup
1 Operating instructions
* 1 x prefitted
Q
Technical data
Rated power: 100 W
Delivery capacity: 320 ml / min (water)
Viscosity capacity: max. 80 DIN-sec
Pressure: max. 160 bar
Paint cup: 700 ml
Protection class: II /
Noise and vibration data:
Measured values for noise are determined in accordance with EN 50144. The A-weighted noise level
of the electrical power tool are typically:
Sound pressure level: 91.2 dB(A)
Sound power level: 104.2 dB(A)
Uncertainty K: 3 dB
Wear ear protection!
Weighted acceleration, t ypical: 15.002 m / s
Uncertainty K = 1.5 m / s
2
2
The vibration level given in these
instructions has been measured in accordance with
a standardised measurement procedure specified in
EN 50144 and can be used to compare devices.
Different uses of the device give rise to different vibration levels and in many cases they may exceed the
values given in these instructions. It is easy to underestimate the vibration load if the electrical power
tool is used regularly in particular circumstances.
Note: If you wish to make an accurate assessment
of the vibration loads experienced during a particular
period of working, you should also take into account
Page 27

Introduction / General safety advice for electrical power toolsIntroduction
the intervening periods of time when the device is
switched off or is running but is not actually in use.
This can result in a much lower vibration load over
the whole of the period of working.
Q
General safety advice for
electrical power tools
Read all the
safety advice and instructions!
Failure to observe the safety advice
and instructions may result in electric shock, fire
and / or serious injury.
Keep all the safety advice and instructions
in a safe place for future reference!
The term “electrical tool” used in the safety advice
refers to electrical tools powered by mains electricity (by means of a mains lead) and electrical tools
powered by rechargeable batteries (without a
mains lead).
1. Workplace safety
a) Keep your working area clean and
well lit. Untidy or poorly lit working areas
can lead to accidents.
b) Do not work with the device in poten-
tially explosive environments in which
there are inflammable liquids, gases
or dusts. Electrical power tools create sparks,
which can ignite dusts or fumes.
c) Keep children and other people away
while you are operating the electrical
tool. Distractions can cause you to lose con-
trol of the device.
2. Electrical safety
a)
The mains plug on the device must match
the mains socket. The plug must not
be modified in any way. Do not use
an adapter plug with devices fitted
with a protective earth. Unmodified
plugs and matching sockets reduce the risk of
electric shock.
b) Avoid touching earthed surfaces such
as pipes, radiators, ovens and refrigerators with any part of your body.
There is an increased risk of electric shock if
your body is earthed
c) Keep the device away from rain or
moisture. Water entering an electrical device
increases the risk of electric shock.
d) Do not use the mains lead for any pur-
pose for which it was not intended, e.g.
to carry the device, to hang up the device or to pull the mains plug out of
the mains socket. Keep the mains lead
away from heat, oil, sharp edges or
moving parts of the device. Damaged
or tangled mains leads increase the risk of
electric shock.
e) When working outdoors with an
electrical power tool always use extension cables that are also approved
for use outdoors. The use of an extension
cable suitable for outdoor use reduces the risk
of electric shock.
f) Use a residual current device (RCD)
for protection if operating the electrical power tool in a moist environment
is unavoidable. The use of an RCD reduces
the risk of electric shock.
.
3. Personal safety
a) Remain alert at all times, watch what
you are doing and always proceed
with caution. Do not use the device if
you are tired or under the influence of
drugs, alcohol or medication. One mo
of carelessness when using the device can lead
to serious injury.
b) Wear personal protective equipment
and always wear safety glasses. The
wearing of personal protective equipment
such as dust masks, non-slip safety shoes, safety helmets or ear protectors, appropriate to
the type of electrical power tool used and
work undertaken, reduces the risk of injury.
ment
27 GB/MT
Page 28

c) Avoid unintentional operation of the
device. Check that the electrical power
tool is switched off before you connect
it to the mains, pick it up or carry it.
Accidents can happen if you carry the device
with your finger on the ON / OFF switch or with
the device switched on.
d) Remove any setting tools or spanners
before you switch the device on. A tool
or spanner left attached to a rotating part of a
device can lead to injury.
e) Avoid placing your body in an unnat-
ural position. Keep proper footing
and balance at all times. By doing this
you will be in a better position to control the
device in unforeseen circumstances.
f) Wear suitable clothing. Do not wear
loose clothing or jewellery. Keep your
hair, clothing and gloves clear of moving parts. Loose clothing, jewellery or long
hair can become trapped in moving parts.
g) If vacuum dust extraction and collection
devices are fitted do not forget to
that they are properly connected and
correctly used. The use of these devices
reduces the hazard presented by dust.
4.
Careful handling and use
check
of electrical power tools
d) When not in use always ensure that
electrical power tools are kept out of
reach of children. Do not let anyone use
the device if he or she is not familiar
with it or has not read the instructions
and advice. Electrical power tools are dan-
gerous when they are used by inexperienced
people.
e) Look after the device carefully. Check
that moving parts are working properly and move freely. Check for any
parts that are broken or damaged
enough to detrimentally affect the
functioning of the device. Have damaged parts repaired before you use
the device. Many accidents have their origins
in poorly maintained electrical power tools.
f) Keep cutting tools clean and sharp.
Carefully maintained cutting tools with sharp
cutting edges are less likely to jam and are
easier to control.
g) Use the electrical power tool, accesso-
ries, inserted tools etc. in accordance
with these instructions and advice, and
the stipulations drawn up for this particular type of device. In doing this, take
into account the working conditions
and the task in hand. The use of electrical
power tools for purposes other than those intended can lead to dangerous situations.
a) Do not overload the device. Always
use an electrical power tool that is
intended for the task you are undertaking. By using the right electrical power
tool for the job you will work more safely and
achieve a better result.
b) Do not use an electrical power tool if
its switch is defective. An electrical power
tool that can no longer be switched on and off
is dangerous and must be repaired.
c) Pull the mains plug from the socket
before you make any adjustments to
the device, change accessories or when
the device is put away. This precaution is
intended to prevent you from unintentionally
starting the device.
28 GB/MT
5. Service
a) Have your device repaired at the ser-
vice centre or by qualified specialist
personnel using original manufacturer
parts only. This will ensure that your device
remains safe to use.
Q
Additional safety advice
for paint spray guns
The spray gun must never be used for
spraying inflammable substances.
Spray guns must never be cleaned
using inflammable solvents.
Page 29

General safety advice for electrical power tools / Advice on useGeneral safety advice for electrical power tools
If you do not know the level of danger
a substance presents, do not spray it.
Precise observation of the hazard
warnings, information and data sheets
available from the sprayed medium
manufacturer is essential.
Wear a breathing / dust mask! The inha-
lation of paint mist and solvent vapour is hazardous to health.
Work in adequately ventilated spaces
only.
Wear protective glasses!
Never aim the spray at living creatures.
DANGER OF EXPLOSION! Do not use the
device in environments containing gases, open
flames, fires or gas-operated water heaters.
NO SMOKING!
Paint and solvents (thinners) must
have a flashpoint above 21°C.
Q
Advice on use
Q
DIN-sec / Viscosity
The Parkside paint spray gun PFS 100 B2 can be
used to apply sprayed media with a viscosity up to
80 DIN-sec. Viscosity is determined in a simplified
measuring procedure using the supplied measuring
cup (see Fig. C).
1. Immerse and fill the supplied measuring cup
to the top with the medium to be sprayed.
2. Lift the measuring cup
12
out of the medium
to be sprayed and let the liquid flow out (see
Figure C).
3. Measure the time in seconds it takes for the
flow of liquid out of the measuring cup to cease.
This time is the “DIN-seconds (DIN-s)” value of
viscosity.
4. If the value is too high, incrementally add and
mix in small quantities of a thinner compatible
with the medium to be sprayed. Proceed in accordance with the section about “Preparing the
sprayed medium”.
5. Remeasure the DIN-seconds value.
Repeat this procedure until a value is obtained
that complies with the values in the table.
12
Q
Preparing the sprayed medium
NOTE: Most paints, varnishes etc. in the shops
are intended to be applied by brush not spray. To
achieve the best spraying result, you should prepare
your paint or varnish etc. in accordance with DIN
guidelines to achieve a suitable viscosity (see table).
Use a suitable thinner to achieve the required
thinning of the medium.
Never exceed the maximum viscosity for the
device. The sprayed medium must not be too
thick for the spraying process, otherwise it
could clog up the device.
Ensure that the sprayed medium and the thinner
are compatible with one another. If the wrong
thinner is used, it can lead to lumps forming
which may clog up the device. Never mix nitrothinners with synthetic resin paint.
Consult the sprayed medium manufacturer’s
documentation for information about suitable
thinners (water, solvents).
1. Thoroughly mix the unthinned sprayed medium
and bring it to average room temperature
(20–22 °C).
Do not increase the temperature to change the
viscosity.
2. Add a suitable thinner.
3. Test the viscosity as described above (see Fig. C).
NOTE: Never use nitro-thinners to thin synthetic
resin paint!
Example of
material
DIN guidance
value
Car body paint 16-20 DIN-sec
Acrylic paint 25-30 DIN-sec
Synthetic resin paint 25-30 DIN-sec
Primer 25-30 DIN-sec
Wood impregnation 25-30 DIN-sec
Glaze 25-30 DIN-sec
Hammer finish paint 30-35 DIN-sec*
Emulsion paint 40-80 DIN-sec
29 GB/MT
Page 30

* This device cannot be used to spray media contain-
ing discrete particles / solids. The abrasive effect
of these media shortens pump and valve life.
Q
Preparing the surface
to be sprayed
The surface to be sprayed must be clean, dry and
free of grease.
Roughen smooth surfaces and remove any
abraded dust.
Always cover the surrounding area around the
surface to be sprayed. The spray cloud may
contaminate the surrounding area.
Q
Bringing into use
Q
Selecting the nozzle
Nozzle Use
Nozzle, 0.6 mm
8
(R6)
Nozzle, 0.8 mm
8
(R8)
Cleaning nozzle
Nozzle extension
all paints, varnishes
thick-flowing sprayed media
11
a thinner, harder spray for
spot-cleaning of surfaces
13
for spraying into corners
which are difficult to reach
set when no drops are formed and the gun
produces a fine, consistent spray pattern.
2. Do not switch the device on or off while it is
over the surface to be sprayed. Instead, start
and stop the spraying process approximately
10 cm outside the surface to be sprayed.
NOTE: The distance between the nozzle and
the workpiece depends on the material being
sprayed (approx. 20 to 35 cm spraying distance, depending on the spray cone and the
desired amount of material to be applied).
Use the device in a horizontal orientation only
(as shown in Fig. D).
Carry out a trial in each case to determine the
most effective spraying distance.
Start with a longer distance.
3. Spray corners or small decorative details first
using short bursts of spray.
Then go on to the actual spraying process.
4. The spray process should follow the sequence
shown in Fig. E
– keep the spray gun moving parallel to the surface
– Do not incline the spray gun
– Move the spray gun at a constant speed
– Apply the sprayed medium as thinly as possible
– The layer(s) of sprayed medium need(s) to
be allowed to dry for some time before you
apply the next coat (Fig. F) at right angles to
the previous coat.
5. Do not allow the paint cup
7
to empty com-
pletely while spraying – drops may form!
Q
Switching ON / OFF
Switching on:
To start the electrical power tool, press the
ON / OFF switch
3
and keep it pressed.
Switching off:
To switch off the electrical power tool, release
the ON / OFF switch
Q
Spraying process
3
.
1. You can vary the spray by adjusting the regulator
2
button
30 GB/MT
(see Fig. D). The spray is correctly
Q
Maintenance and cleaning
General advice:
1.
Pull out the mains plug before you carry out any tasks on the spray gun.
Do the same when you take a break from spraying.
2. After each use, spray thinners (in the open
air only – danger of explosion!) or
water through the device.
3. To protect from rust after cleaning, you can
spray sewing machine oil through the device.
4.
DANGER TO LIFE
THROUGH ELECTRIC SHOCK! Never immerse the device in the cleaning medium.
Page 31

Maintenance and cleaning / Service centre / Warranty / DisposalAdvice on use / Bringing into use / Maintenance and cleaning
5. Never use inflammable solvents to clean the
device.
6. Use a dry cloth to clean the housing. Never
use petrol, solvents or cleaning agents that
might attack plastic.
Cleaning instructions:
1. Unscrew the attachment screw
2. Take off the pump housing
3. Unscrew nozzle
pressure valve
4. Take the pump piston
the pump housing
5. Clean parts
8
and remove the suction-
9
.
4
10
.
4, 5, 8, 9
1
, see Fig. A.
10
downwards.
and spring 5 out of
with thinners.
6. Fit the components back in reverse order.
TIP: After use or cleaning, hang up the electrical
power tool from the metal stirrup
Q
Service centre
14
.
Have your electrical
power tool repaired only by qualified
specialist personnel using original manufacturer parts only. This will ensure that
your electrical power tool remains safe to use.
If the plug or mains
lead needs to be
have the replacement
replaced, always
carried out by
the manufacturer or its service centre.
This will ensure that your electrical power tool
remains safe to use.
The warranty covers only claims for material and
maufacturing defects, but not for transport damage,
for wearing parts or for damage to fragile components, e.g. buttons or batteries. This product is for private use only and is not intended for commercial use.
The warranty is void in the case of abusive and improper handling, use of force and internal tampering not carried out by our authorized service branch.
Your statutory rights are not restricted in any way
by this warranty.
The warranty period will not be extended by repairs
made unter warranty. This applies also to replaced
and repaired parts. Any damage and defects extant
on purchase must be reported immediately after
unpacking the appliance, at the latest, two days after
the purchase date. Repairs made after the expiration
of the warranty period are subject to payment.
GB
Service Great Britain
Tel.: 0871 5000 720
(0,10 GBP/Min.)
e-mail: kompernass@lidl.co.uk
IAN 87779
MT
Service Malta
Tel.: 80062230
e-mail: kompernass@lidl.com.mt
IAN 87779
Q
Warranty
The warranty for this appliance is for 3
years from the date of purchase. The appliance has been manufactured with care
and meticulously examined before delivery. Please retain your receipt as proof
of purchase. In the event of a warranty
claim, please make contact by telephone
with our Service Department. Only in this
way can a post-free despatch for your
goods be assured.
Q
Disposal
The packaging is wholly composed of
environmentally-friendly materials that can
be disposed of at a local recycling centre.
Do not dispose of electrical
power tools with the household
rubbish!
In accordance with European Directive 2002 / 96 / EC
(covering waste electrical and electronic equipment)
31 GB/MT
Page 32

Disposal / Declaration of Conformity / Manufacturer
and its transposition into national legislation, worn
out electrical power tools must be collected separately
and taken for environmentally compatible recycling.
Contact your local refuse disposal authority for more details of how to dispose of your worn out electrical devices.
Environmental compatibility and
disposal of materials:
Paint, varnishes etc. are special wastes which
must be disposed of in the appropriate manner.
Observe the regulations applicable in your area.
Observe the manufacturer’s instructions.
Environmentally damaging chemicals must not
be allowed to enter the soil, groundwater or
watercourses.
Carrying out spraying at the edge of water-
courses or adjoining areas (catchments) is
therefore prohibited.
Consider their environmental compatibility
when buying paints, varnishes etc.
Q
Declaration of Conformity /
Manufacturer
We, KOMPERNASS GMBH, the person responsible
for documents: Mr Semi Uguzlu, BURGSTR. 21,
44867 BOCHUM, GERMANY, hereby declare that
this product complies with the following standards,
normative documents and EU directives:
Machinery Directive
(2006 / 42 / EC)
EU Low Voltage Directive
(2006 / 95 / EC)
Electromagnetic Compatibility
(2004 / 108 / EC)
RoHS Directive
(2011 / 65 / EU)
Applicable harmonized standards
EN 50144-1/A2:2003
EN 50144-2-7:2000
EN 62233:2008
EN 55014-1/A1:2009
EN 55014-2/A2:2008
EN 61000-3-2/A2:2009
EN 61000-3-3:2008
32 GB/MT
Type / Device description:
Paint spray gun PFS 100 B2
Date of manufacture (DOM): 02–2013
Serial number: IAN 87779
Bochum, 28.02.2013
Semi Uguzlu
- Quality Manager -
We reserve the right to make technical modifications
in the course of product development.
Page 33

Inhaltsverzeichnis
Einleitung
Bestimmungsgemäßer Gebrauch ......................................................................................................Seite 34
Ausstattung .......................................................................................................................................... Seite 34
Lieferumfang .......................................................................................................................................Seite 34
Technische Daten ................................................................................................................................Seite 34
Allgemeine Sicherheitshinweise für Elektrowerkzeuge
1. Arbeitsplatz-Sicherheit ...................................................................................................................Seite 35
2. Elektrische Sicherheit .....................................................................................................................Seite 35
3. Sicherheit von Personen .................................................................................................................Seite 35
4. Verwendung und Behandlung des Elektrowerkzeugs ................................................................ Seite 36
5. Service ............................................................................................................................................Seite 37
Ergänzende Sicherheitshinweise für Farbspritzpistolen .................................................................. Seite 37
Arbeitshinweise
DIN -Sec / Viskosität ............................................................................................................................ Seite 37
Spritzgut vorbereiten .......................................................................................................................... Seite 37
Spritzfläche vorbereiten ..................................................................................................................... Seite 38
Inbetriebnahme
Düse wählen ....................................................................................................................................... Seite 38
Ein- / Aussc halten ................................................................................................................................ Seite 38
Spritzvorgang ..................................................................................................................................... Seite 38
Wartung und Reinigung .....................................................................................................Seite 39
Service ............................................................................................................................................... Seite 39
Garantie ...........................................................................................................................................Seite 39
Entsorgung.....................................................................................................................................Seite 40
Konformitätserklärung / Hersteller ......................................................................... Seite 41
33 DE/AT/CH
Page 34

Farbspritzpistole PFS 100 B2
Einleitung
Wir beglückwünschen Sie zum Kauf Ihres neuen
Gerätes. Sie haben sich damit für ein hochwertiges
Produkt entschieden. Die Bedienungsanleitung ist
Teil dieses Produkts. Sie enthält wichtige Hinweise
für Sicherheit, Gebrauch und Entsorgung. Machen
Sie sich vor der Benutzung des Produkts mit allen
Bedien- und Sicherheitshinweisen vertraut. Benutzen
Sie das Produkt nur wie beschrieben und für die
angegebenen Einsatzbereiche. Händigen Sie alle
Unterlagen bei Weitergabe des Produkts an Dritte
mit aus.
Bestimmungsgemäßer Gebrauch
Dieses Gerät ist zum Auftragen von Farben und Lacken geeignet. Sie können mit dem Gerät Spritzgut
bis maximal 80 DIN-sec. verarbeiten. Jede andere
Verwendung oder Veränderung des Gerätes gilt
als nicht bestimmungsgemäß und birgt erhebliche
Unfallgefahren. Für aus bestimmungswidriger Verwendung entstandene Schäden übernehmen wir
keine Haftung. Das Gerät ist nur für den privaten
Einsatz bestimmt.
Lieferumfang
1 Farbspritzpistole PFS 100 B2
2 Düsen* 1 x 0,6 mm, 1 x 0,8 mm
2 Saug-Druck-Ventile*
1 Reinigungsdüse
1 Düsenverlängerung
1 Messbecher
1 Bedienungsanleitung
* 1 x vormontiert
Technische Daten
Nennleistung : 100 W
Förderleistung: 320 ml / min (Wasser)
Viskositätsleistung: max. 80 DIN-sec
Druck: max. 160 bar
Farbbecher: 700 ml
Schutzklasse: II /
Geräusch und Vibrationsinformationen:
Messwert für Geräusch ermittelt entsprechend
EN 50144. Der A-bewertete Geräuschpegel des
Elektrowerkzeugs beträgt typischerweise:
Schalldruckpegel: 91,2 dB(A)
Schallleistungspegel: 104,2 dB(A)
Unsicherheit K: 3 dB
Ausstattung
1
Feststellschraube
2
Regulierknopf
3
EIN- / AUS-Schalter
4
Pumpenkolben
5
Feder
6
Saugrohr
7
Farbbecher
8
Düse
9
Saug-Druck-Ventil
10
Pumpengehäuse
11
Reinigungsdüse
12
Messbecher
13
Düsenverlängerung
14
Metallbügel
34 DE/AT/CH
Gehörschutz tragen!
Bewertete Beschleunigung, typischer weise: 15,002 m / s
Unsicherheit K = 1,5 m / s
2
Der in diesen Anweisungen
angegebene Schwingungspegel ist entsprechend
einem in EN 50144 genormten Messverfahren gemessen worden und kann für den Gerätevergleich
verwendet werden.
Der Schwingungspegel wird sich entsprechend dem
Einsatz des Elektrowerkzeugs verändern und kann
in manchen Fällen über dem in diesen Anweisungen
angegebenen Wert liegen. Die Schwingungsbelas
tung
könnte unterschätzt werden, wenn das Elektrowerkzeug regelmäßig in solcher Weise verwendet wird.
2
Page 35

Einleitung / Allgemeine Sicherheitshinweise für ElektrowerkzeugeEinleitung
Hinweis: Für eine genaue Abschätzung der
Schwingungsbelastung während eines bestimmten
Arbeitszeitraumes sollten auch die Zeiten berücksichtigt werden, in denen das Gerät abgeschaltet
ist oder zwar läuft, aber nicht tatsächlich im Einsatz
ist. Dies kann die Schwingungsbelastung über den
gesamten Arbeitszeitraum deutlich reduzieren.
Allgemeine Sicherheitshinweise
für Elektrowerkzeuge
Lesen Sie alle
Sicherheitshinweise und Anweisungen. Versäumnisse bei der
Einhaltung der Sicherheitshinweise und Anweisungen können elektrischen Schlag, Brand und / oder
schwere Verletzungen verursachen.
Bewahren Sie alle Sicherheitshinweise
und Anweisungen für die Zukunft auf.
Der in den Sicherheitshinweisen verwendete Begriff
„Elektrowerkzeug“ bezieht sich auf netzbetriebene
Elektrowerk
triebene Elektrowerkzeuge (ohne Netzkabel).
zeuge (mit Netzkabel) und auf akkube-
1. Arbeitsplatz-Sicherheit
a) Halten Sie Ihren Arbeitsbereich sauber
und gut beleuchtet. Unordnung und unbeleuch-
tete Arbeitsbereiche können zu Unfällen führen.
b) Arbeiten Sie mit dem Elektrowerkzeug
nicht in explosionsgefährdeter Umgebung, in der sich brennbare Flüssigkeiten, Gase oder Stäube befinden.
Elektrowerkzeuge erzeugen Funken, die den
Staub oder die Dämpfe entzünden können.
c) Halten Sie Kinder und andere Perso-
nen während der Benutzung des Elektrowerkzeugs fern. Bei Ablenkung können
Sie die Kontrolle über das Gerät verlieren.
2. Elektrische Sicherheit
a) Der Anschlussstecker des Elektrowerk-
zeuges muss in die Steckdose passen.
Der Stecker darf in keiner Weise verändert werden. Verwenden Sie keine
Adapterstecker gemeinsam mit
schutzgeerdeten Elektrowerkzeugen.
Unveränderte Stecker und passende Steckdosen
verringern das Risiko eines elektrischen Schlages.
b) Vermeiden Sie Körperkontakt mit ge-
erdeten Oberflächen, wie von Rohren,
Heizungen, Herden und Kühlschränken.
Es besteht ein erhöhtes Risiko durch elektrischen
Schlag, wenn Ihr Körper geerdet ist.
c) Halten Sie Elektrowerkzeuge von Re-
gen oder Nässe fern. Das Eindringen von
Wasser in ein Elektrogerät erhöht das Risiko
eines elektrischen Schlages.
d) Zweckentfremden Sie das Kabel nicht,
um das Elektrowerkzeug zu tragen,
aufzuhängen oder um den Stecker aus
der Steckdose zu ziehen. Halten Sie
das Kabel fern von Hitze, Öl, scharfen
Kanten oder sich bewegenden Geräteteilen. Beschädigte oder verwickelte Kabel
erhöhen das Risiko eines elektrischen Schlages.
e) Wenn Sie mit einem Elektrowerkzeug
im Freien arbeiten, verwenden Sie nur
Verlängerungskabel, die auch für den
Außenbereich zugelassen sind. Die
Anwendung eines für den Außenbereich
geeigneten Verlängerungskabels verringert
das Risiko eines elektrischen Schlages.
f) Wenn der Betrieb des Elektrowerk-
zeuges in feuchter Umgebung nicht
vermeidbar ist, verwenden Sie einen
Fehlerstromschutzschalter. Der Einsatz
eines Fehlerstromschutzschalters vermindert
das Risiko eines elektrischen Schlages.
3. Sicherheit von Personen
a)
Seien Sie stets aufmerksam, achten Sie
darauf, was Sie tun und gehen Sie mit
Vernunft an die Arbeit mit einem Elekt
rowerkzeug. Benutzen Sie kein Elektro-
-
35 DE/AT/CH
Page 36

Allgemeine Sicherheitshinweise für Elektrowerkzeuge Allgemeine Sicherheitshinweise für Elektrowerkzeuge / Arbeitshinweise
werkzeug, wenn Sie müde sind oder
unter dem Einfluss von Drogen, Alkohol oder Medikamenten stehen. Ein
Moment der Unachtsamkeit beim Gebrauch
des Elektrowerkzeuges kann zu ernsthaften
Verletzungen führen.
b) Tragen Sie persönliche Schutzausrüs-
tung und immer eine Schutzbrille. Das
Tragen persönlicher Schutzausrüstung wie
Staubmaske, rutschfeste Sicherheitsschuhe,
Schutzhelm oder Gehörschutz, je nach Art und
Einsatz des Elektrowerkzeuges, verringert das
Risiko von Verletzungen.
c) Vermeiden Sie eine unbeabsichtigte
Inbetriebnahme. Vergewissern Sie sich,
dass das Elektrowerkzeug ausgeschaltet ist, bevor Sie es an die Stromversorgung anschließen, es aufnehmen
oder tragen. Wenn Sie beim Tragen des
Elektrowerkzeuges den Finger am Schalter ha
oder das Gerät bereits eingeschaltet an die
Stromversorgung anschließen, kann dies zu
Unfällen führen.
d) Entfernen Sie Einstellwerkzeuge oder
Schraubenschlüssel, bevor Sie das
Elektrowerkzeug einschalten. Ein Werk-
zeug oder Schlüssel, der sich in einem drehenden
Geräteteil befindet, kann zu Verletzungen führen.
e) Vermeiden Sie eine abnormale Körper-
haltung. Sorgen Sie für einen sicheren
Stand und halten Sie jederzeit das
Gleichgewicht. Dadurch können Sie das
Elektrowerkzeug in unerwarteten Situationen
besser kontrollieren.
f) Tragen Sie geeignete Kleidung. Tragen
Sie keine weite Kleidung oder Schmuck.
Halten Sie Haare, Kleidung und Handschuhe fern von sich bewegenden
Teilen. Lockere Kleidung, Schmuck oder lange
Haare können von sich bewegenden Teilen
erfasst werden.
g) Wenn Staubabsaug- und -auffangein-
richtungen montiert werden können,
vergewissern Sie sich, dass diese
angeschlossen sind und richtig verwendet werden. Die Verwendung einer
Staubabsaugung kann Gefährdungen durch
Staub verringern.
36 DE/AT/CH
ben
4. Verwendung und Behandlung
des Elektrowerkzeugs
a) Überlasten Sie das Gerät nicht. Ver-
wenden Sie für Ihre Arbeit das dafür
bestimmte Elektrowerkzeug. Mit dem
passenden Elektrowerkzeug arbeiten Sie besser
und sicherer im angegebenen Leistungsbereich.
b) Benutzen Sie kein Elektrowerkzeug,
dessen Schalter defekt ist. Ein Elektrowerk-
zeug, das sich nicht mehr ein- oder ausschalten
lässt, ist gefährlich und muss repariert werden.
c) Ziehen Sie den Stecker aus der Steck-
dose, bevor Sie Geräteeinstellungen
vornehmen, Zubehörteile wechseln
oder das Gerät weglegen. Diese Vorsichts-
maßnahme verhindert den unbeabsichtigten
Start des Elektrowerkzeuges.
d) Bewahren Sie unbenutzte Elektrowerk-
zeuge außerhalb der Reichweite von
Kindern auf. Lassen Sie Personen das
Gerät nicht benutzen, die mit diesem
nicht vertraut sind oder diese Anweisungen nicht gelesen haben. Elektrowerk-
zeuge sind gefährlich, wenn sie von unerfahrenen
Personen benutzt werden.
e) Pflegen Sie Elektrowerkzeuge mit
Sorgfalt. Kontrollieren Sie, ob bewegliche Teile einwandfrei funktionieren
und nicht klemmen, ob Teile gebrochen
oder so beschädigt sind, dass die Funktion des Elektrowerkzeuges beeinträchtigt ist. Lassen Sie beschädigte Teile vor
dem Einsatz des Gerätes reparieren.
Viele Unfälle haben ihre Ursache in schlecht
gewarteten Elektrowerkzeugen.
f) Halten Sie Schneidwerkzeuge scharf
und sauber. Sorgfältig gepflegte Schneid-
werkzeuge mit scharfen Schneidkanten verklemmen sich weniger und sind leichter zu führen.
g) Verwenden Sie Elektrowerkzeug,
Zubehör, Einsatzwerkzeuge usw.
entsprechend diesen Anweisungen.
Berücksichtigen Sie dabei die Arbeitsbedingungen und die auszuführende
Tätigkeit. Der Gebrauch von Elektrowerkzeu-
gen für andere als die vorgesehenen Anwendungen kann zu gefährlichen Situationen führen.
Page 37

5. Service
a) Lassen Sie Ihr Elektrowerkzeug nur von
qualifiziertem Fachpersonal und nur
mit Original-Ersatzteilen reparieren.
Damit wird sichergestellt, dass die Sicherheit
des Elektrowerkzeugs erhalten bleibt.
Ergänzende Sicherheitshinweise
für Farbspritzpistolen
Die Spritzpistole darf nicht zum Sprühen
brennbarer Stoffe verwendet werden.
Spritzpistolen dürfen nicht mit brennbaren Lösungsmitteln gereinigt werden.
Keinerlei Stoffe versprühen, von denen
die Gefährlichkeit nicht bekannt ist.
Gefahrenhinweise, Informationen und
Datenblätter des Farben- bzw. Spritzmittelherstellers bitte genau beachten.
Tragen Sie einen Atemschutz! Das Einat-
men des Farbnebels und Lösungsmitteldämpfe
ist gesundheitsschädlich.
Arbeiten Sie nur in ausreichend
belüfteten Räumen.
Tragen Sie eine Schutzbrille!
Sprühstrahl nie auf Lebewesen richten.
EXPLOSIONSGEFAHR! In einer Umgebung,
in der sich Gase / offene Flammen / Feuer / gasbetriebene Warmwasserbereiter befinden, darf
das Elektrowerkzeug nicht benutzt werden.
RAUCHEN VERBOTEN!
Lacke und Lösungsmittel (Verdünnung)
müssen einen Flammpunkt von über
21°C haben.
Arbeitshinweise
DIN-Sec / Viskosität
Mit der Parkside Farbspritzpistole PFS 100 B2 können Sie Spritzgut bis max. 80 DIN-sec. (Viskosität)
verarbeiten. Die Viskosität (Zähflüssigkeit) wird in
einem vereinfachten Messverfahren mit dem beiliegenden Messbecher bestimmt (siehe Abb. C).
1. Schöpfen Sie den mitgelieferten Messbecher
randvoll mit dem Spritzgut.
2. Heben Sie den Messbecher
Spritzgut heraus und lassen Sie die Flüssigkeit
auslaufen (siehe Abbildung C).
3. Messen Sie die Durchlaufzeit in Sekunden
bis der Strom der Flüssigkeit abreißt.
Diese Zeit nennt man „DIN-Sekunden (DIN-s)“.
4. Fügen Sie bei einem zu hohen Wert das zum
Spritzgut passende Verdünnungsmittel in geringen
Mengen schrittweise zu und mischen Sie es.
Gehen Sie hierzu gemäß Kapitel „Spritzgut
vorbereiten“ vor.
5. Messen Sie die DIN-Sekunden erneut.
Wiederholen Sie den Vorgang so lange, bis die
der Tabelle angegebenen Werte erreicht werden.
12
aus dem
Spritzgut vorbereiten
HINWEIS: Die im Handel erhältlichen Lacke, Far-
ben,… sind meistens zum Streichen und nicht zum
Spritzen eingestellt. Für ein korrektes Arbeitsergebnis
sollten Sie die Viskosität der Lacke, Farben,… gemäß
DIN-Richtlinie einstellen (siehe Tabelle).
Die notwendige Verdünnung erreichen Sie mit dem
geeigneten Verdünnungsmittel.
Überschreiten Sie den maximalen Viskositäts
für das Gerät nicht. Das Spritzgut darf für den
Spritzvorgang nicht zu dick sein. Andernfalls
kann das Gerät verstopfen.
Achten Sie darauf, dass Spritzgut und Verdün-
nung zueinander passen. Bei Verwendung der
falschen Verdünnung entstehen Klumpen, die
das Gerät verstopfen. Kunstharzlacke nie mit
Nitroverdünnung mischen.
Entnehmen Sie Informationen über die passende
Verdünnung (Wasser, Lösungsmittel) den jeweiligen Herstellerangaben zum Spritzgut.
1. Mischen Sie das unverdünnte Spritzgut gründlich durch und bringen Sie es auf mittlere
Raumtemperatur (20–22 °C).
Verändern Sie die Viskosität nicht durch zusätzliches Erwärmen.
2. Geben Sie ein geeignetes Verdünnungsmittel
hinzu.
3. Prüfen Sie die Viskosität wie zuvor beschrieben
(siehe Abb. C).
12
in
wert
37 DE/AT/CH
Page 38

Arbeitshinweise / Inbetriebnahme Wartung und Reinigung / Service / Garantie
HINWEIS: Kunstharzlacke nie mit Nitroverdünnung einstellen!
Materialbeispiel DIN Richtlinie
Autolack 16-20 DIN-sec
Acryllack 25-30 DIN-sec
Kunstharzlack 25-30 DIN-sec
Grundierung 25-30 DIN-sec
Holzimprägnierung 25-30 DIN-sec
Lasur 25-30 DIN-sec
Hammerschlaglack 30-35 DIN-sec*
Dispersionsfarbe 40-80 DIN-sec
* Körnige / körperhaltige Fabrikate dürfen nicht
gespritzt werden. Deren schmirgelnde Wirkung
verkürzt die Lebensdauer von Pumpe und Ventil.
Spritzfläche vorbereiten
Die Spritzfläche muss sauber, trocken und fettfrei sein.
Rauhen Sie glatte Flächen auf und entfernen
Sie anschließend den Schleifstaub.
Decken Sie die Umgebung der Spritzfläche
gründlich ab. Der Sprühnebel kann das Umfeld
verunreinigen.
Inbetriebnahme
Düse wählen
Düse Verwendung
Düse 0,6 mm (R6)
Düse 0,8 mm (R8)
Reinigungsdüse
Düsenverlängerung
38 DE/AT/CH
8
sämtliche Farben, Lacke
8
dickflüssiges Spritzgut
11
dünner, harter Strahl,
zur punktuellen Reinigung von Flächen
13
zum Spritzen von
schwer zugänglichen
Ecken
Ein- / Aussc halten
Einschalten:
Drücken Sie zur Inbetriebnahme des Elektro-
werkzeuges den EIN- / AUS-Schalter
halten Sie ihn gedrückt.
Ausschalten:
Lassen Sie zum Ausschalten des Elektrowerk-
zeuges den EIN- / AUS-Schalter
3
und
3
los.
Spritzvorgang
1. Durch Verstellen des Regulierknopfes 2 können
Sie den Spritzstrahl einstellen (siehe Abb. D).
Der Strahl ist dann richtig eingestellt, wenn sich
keine Tröpfchen bilden und das Spritzbild fein
und regelmäßig ist.
2. Schalten Sie das Gerät nicht über der Spritzfläche ein /
Sie den Spritzvorgang ca. 10 cm
der Spritzfläche.
HINWEIS: Der Abstand der Düse zum Werkstück ist abhängig vom Spritzmaterial (ca. 20
bis 35 cm Spritzabstand je nach Spritzkegel
und gewünschtem Materialauftrag).
Verwenden Sie das Gerät nur in waagerechter
Position (wie in Abb. D).
Ermitteln Sie die jeweils zweckmäßige Entfer-
nung zur Spritzfläche durch einen Versuch.
Beginnen Sie zuerst bei einer größeren Distanz.
3. Spritzen Sie zuerst Ecken oder kleine Verzierungen mit kleinen Spritzstößen.
Führen Sie danach den eigentlichen Spritzvorgang durch.
4.
Führen Sie den Spritzvorgang gemäß Abb. E durch
– führen Sie die Spritzpistole dabei parallel zur
– nicht schwenken
– die Spritzpistole mit gleichbleibender
– das Spritzgut so dünn wie möglich auftragen
– die Farbschichte(n) benötigen eine Trocken-
5. Farbbecher
Tropfen!
aus, sondern beginnen und beenden
außerhalb
Fläche
Geschwindigkeit führen
pause, bevor Sie kreuzweise die nächste
Schicht auftragen (siehe Abb. F).
7
nicht leerspritzen – es entstehen
Page 39

Wartung und Reinigung
Allgemeine Hinweise:
1.
bei Pausen und Arbeiten am Gerät.
2. Nach jedem Gebrauch Verdünner (nur im
Freien – Explosionsgefahr!) bzw. Wasser
durch das Gerät spritzen.
3. Zum Rostschutz können Sie nach der Reinigung
Nähmaschinenöl durchspritzen.
4.
DURCH ELEKTRISCHEN SCHLAG! Nie
das Gerät in Reinigungsmittel tauchen.
5. Das Gerät darf nicht mit brennbaren Lösungsmitteln gereinigt werden.
6. Verwenden Sie zum Reinigen des Gehäuses
ein trockenes Tuch. Verwenden Sie niemals
Benzin, Lösungsmittel oder Reiniger, die Kunststoff angreifen.
Reinigungshinweise:
1. Feststellschraube
2. Pumpengehäuse
3. Düse
8
abschrauben und Saug-Druck-Ventil 9
entnehmen.
4. Pumpenkolben
Pumpengehäuse
5. Reinigen Sie die Bauteile
Verdünnungsmittel.
6. Bauteile in umgekehrter Reihenfolge wieder
montieren.
TIPP: Hängen Sie das Elektrowerkzeug nach Gebrauch oder Reinigung am Metallbügel
Service
Lassen Sie Ihr Elektro-
werkzeug nur von qualifiziertem
Fachpersonal und nur mit Originalersatzteilen reparieren. Damit wird sicher-
gestellt, dass die Sicherheit des Elektrowerkzeugs
erhalten bleibt.
Lassen Sie den
Austausch des Steckers oder der Anschlussleitung immer vom Hersteller
des Elektrowerkzeugs oder seinem
Netzstecker ziehen, auch
LEBENSGEFAHR
1
abschrauben, siehe Abb. A.
10
nach unten abnehmen.
4
und Feder 5 aus dem
10
nehmen.
4, 5, 8, 9
14
mit
auf.
Kundendienst ausführen. Damit wird
sichergestellt, dass die Sicherheit des Elektrowerkzeugs erhalten bleibt.
Garantie
Sie erhalten auf dieses Gerät 3 Jahre Garantie ab Kaufdatum. Das Gerät wurde
sorgfältig produziert und vor Anlieferung
gewissenhaft geprüft. Bitte bewahren Sie
den Kassenbon als Nachweis für den Kauf
auf. Bitte setzen Sie sich im Garantiefall mit
Ihrer Servicestelle telefonisch in Verbin
dung.
Nur so kann eine kostenlose Einsendung
Ihrer Ware gewährleistet werden.
Die Garantieleistung gilt nur für Material- oder Fabrikationsfehler, nicht aber für Transportschäden,
Verschleißteile oder für Beschädigungen an zerbrechlichen Teilen, z. B. Schalter oder Akkus.
Das Produkt ist lediglich für den privaten und nicht
für den gewerblichen Gebrauch bestimmt.
Bei missbräuchlicher und unsachgemäßer Behandlung, Gewaltanwendung und bei Eingriffen, die nicht
von unserer autorisierten Service-Niederlassung
vorgenommen wurden, erlischt die Garantie. Ihre
gesetzlichen Rechte werden durch diese Garantie
nicht eingeschränkt.
Die Garantiezeit wird durch die Gewährleistung nicht
verlängert. Dies gilt auch für ersetzte und reparierte
Teile. Eventuell schon beim Kauf vorhandene Schäden
und Mängel müssen sofort nach dem Auspacken
gemeldet werden, spätestens aber zwei Tage nach
Kaufdatum. Nach Ablauf der Garantiezeit anfallende
Reparaturen sind kostenpflichtig.
DE
Service Deutschland
Tel.: 01805772033
(0,14 EUR / Min. aus dem dt.
Festnetz, Mobilfunk max.
0,42 EUR / Min.)
E-mail: kompernass@lidl.de
IAN 87779
39 DE/AT/CH
Page 40

AT
Service Österreich
Tel.: 0820 201 222
(0,15 EUR/Min.)
E-mail: kompernass@lidl.at
IAN 87779
CH
Service Schweiz
Tel.: 0842 665566
(0,08 CHF/Min., Mobilfunk
max. 0,40 CHF/Min.)
E-mail: kompernass@lidl.ch
IAN 87779
Entsorgung
Die Verpackung besteht aus umweltfreundlichen Materialien, die Sie über die örtlichen
Recyclingstellen entsorgen können.
Werfen Sie Elektrowerkzeuge
nicht in den Hausmüll!
Spritzarbeiten am Rande von Gewässern oder
deren benachbarten Flächen (Einzugsgebiet)
sind daher unzulässig.
Achten Sie beim Kauf von Farben, Lacken…
auf deren Umweltverträglichkeit.
Gemäß Europäischer Richtlinie 2002 / 96 / EC
über Elektro- und Elektronik-Altgeräte und Umsetzung
in nationales Recht müssen verbrauchte Elektrowerkzeuge getrennt gesammelt und einer umweltgerechten Wiederverwertung zugeführt werden.
Möglichkeiten zur Entsorgung des ausgedienten
Gerätes erfahren Sie bei Ihrer Gemeinde- oder
Stadtverwaltung.
Umweltverträglichkeit und
Materialentsorgung:
Farben, Lacke… sind Sondermüll, den Sie
entsprechend entsorgen müssen.
Beachten Sie die örtlichen Vorschriften.
Beachten Sie die Hinweise des Herstellers.
Umweltschädliche Chemikalien dürfen nicht ins
Erdreich, Grundwasser oder in die Gewässer
gelangen.
40 DE/AT/CH
Page 41

Konformitätserklärung /
Hersteller
Wir, KOMPERNASS GMBH, Dokumentenverantwortlicher: Herr Semi Uguzlu, BURGSTR. 21,
BOCHUM, DEUTSCHLAND, erklären hiermit, dass
dieses Produkt mit den folgenden Normen, normativ
Dokumenten und EG-Richtlinien übereinstimmt:
Maschinenrichtlinie
(2006 / 42 / EC)
EG-Niederspannungsrichtlinie
(2006 / 95 / EC)
Elektromagnetische Verträglichkeit
(2004 / 108 / EC)
RoHS Richtlinie
(2011 / 65 / EU)
angewandte harmonisierte Normen
EN 50144-1/A2:2003
EN 50144-2-7:2000
EN 62233:2008
EN 55014-1/A1:2009
EN 55014-2/A2:2008
EN 61000-3-2/A2:2009
EN 61000-3-3:2008
44867
en
Konformitätserklärung / HerstellerGarantie / Entsorgung
Typ / Gerätebezeichnung:
Farbspritzpistole PFS 100 B2
Herstellungsjahr: 02–2013
Seriennummer: IAN 87779
Bochum, 28.02.2013
Semi Uguzlu
- Qualitätsmanager -
Technische Änderungen im Sinne der Weiterentwicklung sind vorbehalten.
41 DE/AT/CH
Page 42

KOMPERNASS GMBH
BURGSTRASSE 21
44867 BOCHUM
GERMANY
© by ORFGEN Marketing
Versione delle informazioni · Estado das informações
Last Information Update · Stand der Informationen:
02 / 2013 · Ident.-No.: PFS100B2022013-IT / PT
IAN 87779
 Loading...