

Parkside PESG 120 B2 Assembly Manual

ARC WELDER PESG 120 B2
ELEKTRO-SCHWEISSGERÄT
Montage-, Bedienungs- und Sicherheitshinweise
Originalbetriebsanleitung
ARC WELDER
Assembly, operating and safety instructions
Translation of the original instructions
IAN 273439
ΣΥΣΚΕΥΗ ΗΛΕΚΤΡΟΣΥΓΚΟΛΗΣΗΣ
Οδηγίες συναρμολόγησης, χειρισμού και ασφάλειας
Μετάφραση των αυθεντικών οδηγιών λειτουργίας
273439_Elektro-Schweissgeraet_PESG 120 B2_cover_GB_IE_CY.indd 3 18.01.16 16:33
GB / IE / CY Assembly, operating and safety instructions Page 5
GR / CY Οδηγίες συναρμολόγησης, χειρισμού και ασφάλειας Σελίδα 15
DE / AT / CH Montage-, Bedienungs- und Sicherheitshinweise Seite 27
Before reading, unfold both pages containing illustrations and familiarise yourself with all functions of the
device.
Πριν ξεκινήσετε την ανάγνωση, ανοίξτε τις δυο σελίδες με τις εικόνες και εξοικειωθείτε με όλες τις
λειτουργίες της συσκευής.
Klappen Sie vor dem Lesen die beiden Seiten mit den Abbildungen aus und machen Sie sich anschließend
mit allen Funktionen des Gerätes vertraut.
273439_Elektro-Schweissgeraet_PESG 120 B2_cover_GB_IE_CY.indd 4 18.01.16 16:33
B
8
7
10
A
7 8
10
9
6
3
2
4
7
8
5
1
273439_Elektro-Schweissgeraet_PESG 120 B2_cover_GB_IE_CY.indd 5 18.01.16 16:33

Wiring diagram
Schaltplan
273439_Elektro-Schweissgeraet_PESG 120 B2_cover_GB_IE_CY.indd 8 18.01.16 16:33

5 GB/IE/CY
List of pictograms used ........................................................................................................ Page 6
Introduction
Intended use ........................................................................................................................................ Page 7
Parts description .................................................................................................................................. Page 7
Technical Data ....................................................................................................................................Page 7
Scope of delivery ................................................................................................................................ Page 7
Safety information .................................................................................................................. Page 7
Safety hazards during arc welding ...................................................................................................Page 8
Safety notices specific to the welding shield ..................................................................................... Page 10
Tight and moist spaces .......................................................................................................................Page 10
Protective clothing ............................................................................................................................... Page 10
Protecting against rays and burns ...................................................................................................... Page 10
Assembling the welding shield ..................................................................................... Page 10
Preparing to weld .................................................................................................................... Page 10
Welding ............................................................................................................................................Page 11
Overheat protection ..............................................................................................................Page 11
Maintenance ................................................................................................................................. Page 12
Environmental instructions and disposal information ..............................Page 12
Information about warranty and service processing ............................... Page 12
Warranty terms
Extent of warranty ............................................................................................................................... Page 12
Processing of warranty claims ............................................................................................................ Page 13
Service ...............................................................................................................................................Page 13
EU Conformity Declaration ............................................................................................... Page 13
Table of contents
273439_Elektro-Schweissgeraet_PESG 120 B2_content_GB_IE_CY.indd 5 18.01.16 16:37

6 GB/IE/CY
List of pictograms used
Attention, potential dangers!
Alternating current symbol and
with covered rod electrodes
Welding sparks can cause an
Arc rays can damage the eyes
value in continuous mode
value in intermittent mode Σ
273439_Elektro-Schweissgeraet_PESG 120 B2_content_GB_IE_CY.indd 6 18.01.16 16:37
7 GB/IE/CY
Introduction / Safety information
Arc welder PESG 120 B2
Introduction
Congratulations! You have
chosen a high-quality device
from our company. Familiarise
yourself with the product before using it for the first
time. In addition, please carefully refer to the operating instructions and the safety advice below. Initial
operation of this tool must be performed by trained
personnel.
KEEP OUT OF THE REACH OF CHILDREN!
Intended use
This electric welding equipment is suitable for
manual arc welding using the appropriate coated
electrodes. Improper product handling can be dangerous to persons, animals and objects. Only use
the welding shield with welding glass and protective glass overlay marked accordingly, and only for
welding. The welding shield is not suitable for laser
welding! Only use the product as described and
for the indicated purpose. Keep these instructions in
a safe place. When passing this product on to others,
please also include all the documents. Any use other
than the intended is prohibited and potentially dangerous. Damages resulting from noncompliance or
misuse are not covered by the warranty and are not
included in the manufacturer‘s liability. This device
has been designed for household use and may not
be used for commercial or industrial purposes.
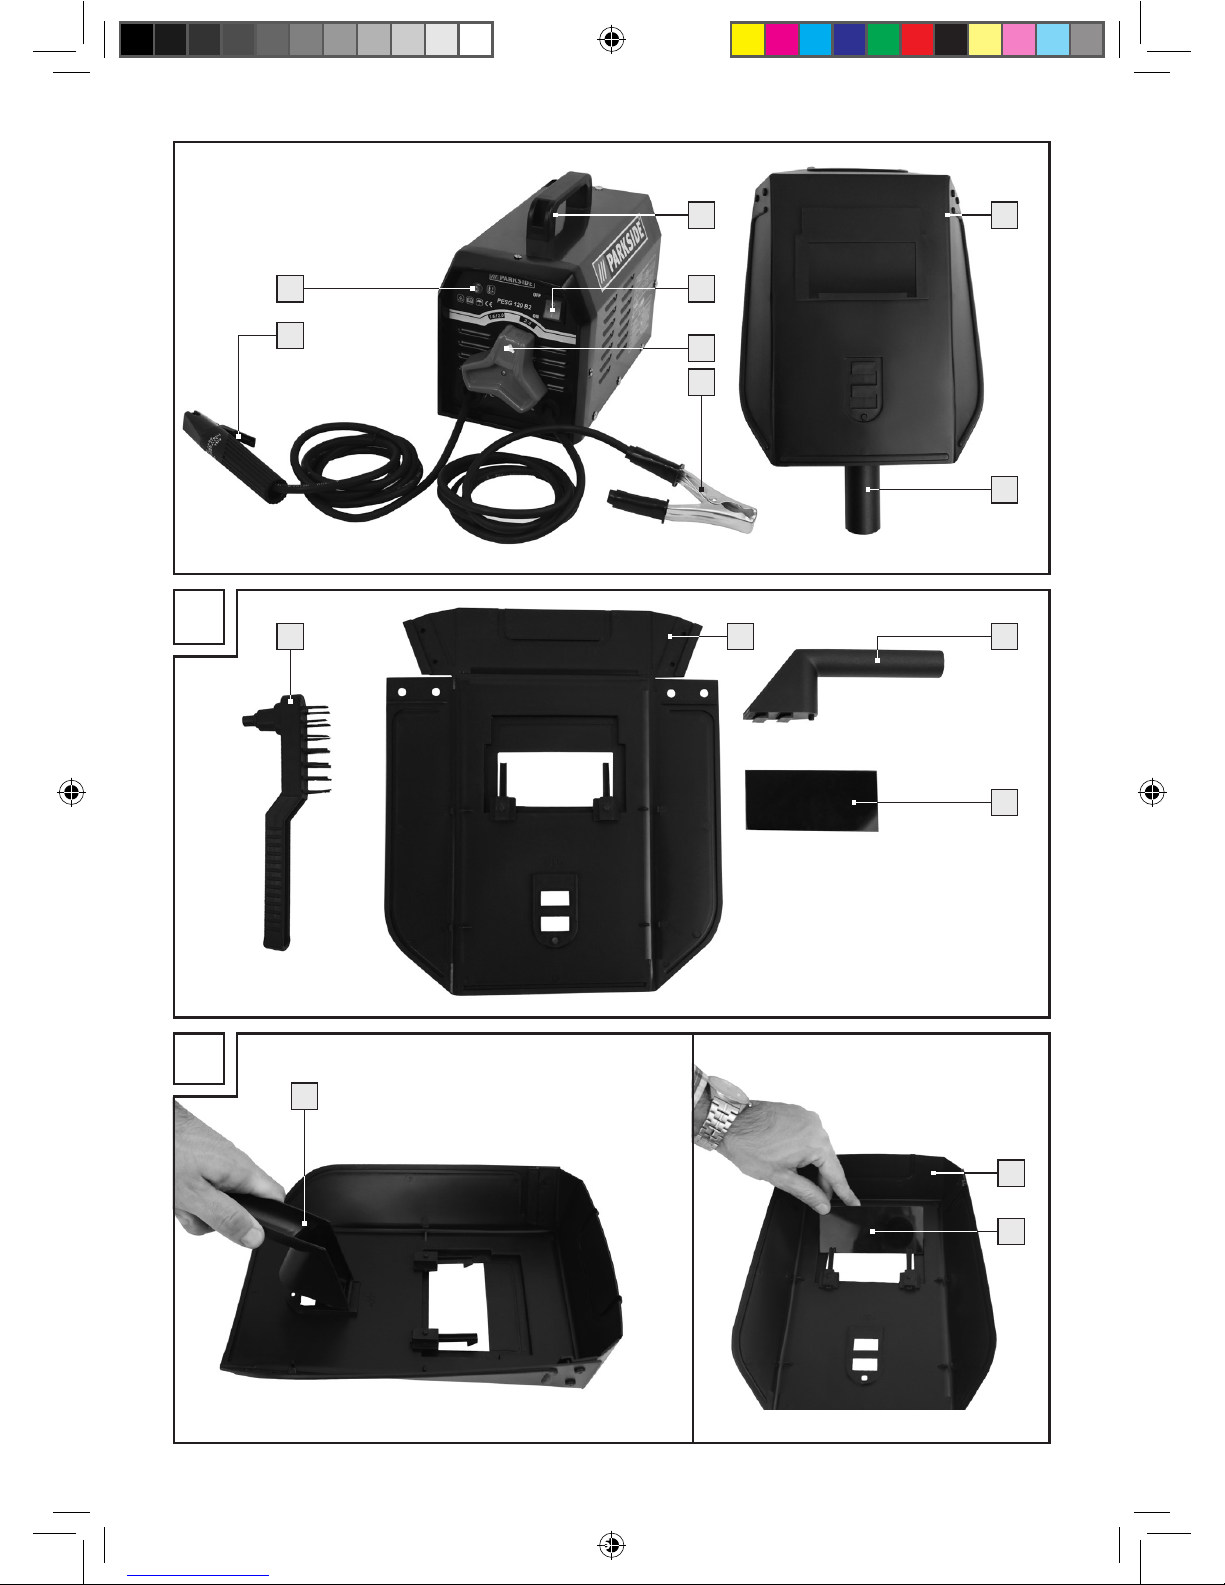
Parts description
Electric Welding Equipment
1
Handle
2
ON / OFF switch
3
Hand wheel
4
Earth terminal
5
Electrode holder
6
Overheating control lamp
Welding shield
7
Welding shield
8
Handle
9
Brush
10
Protective glass
Technical Data
Mains connection: 230 V∼ 50 Hz
Max. welding current
and the respective
conventional load voltage: 75 A /
21 V-100 A / 22 V
Rated value
of the mains current: U
1
: 230 V
Highest rated value
of the mains current: I
1max
: 22.5 A
Maximum effective
input current: I
1eff
: 7 A
Rated value of the
no-load voltage: U
0
: 48 V
Protection type: IP21S
Scope of delivery
1 Arc welder
1 Welding shield
2 Welding cables
1 Combination wire brush with chipping hammer
1 Instructions for assembly and use
Safety information
Please carefully read the instructions for use and follow the specified notices. Familiarise yourself with the
equipment, its proper use and the safety notices using
these instructions for use. The nameplate contains all
the
technical data for this welding equipment, please ob
-
tain information on the technical facts of this equipment.
This device may be used by children age 16
years and up, as well as by persons with reduced
physical, sensory or mental capacities or lacking
experience and / or knowledge, so long as they
are supervised or instructed in the safe use of
273439_Elektro-Schweissgeraet_PESG 120 B2_content_GB_IE_CY.indd 7 18.01.16 16:37
8 GB/IE/CY
Safety information
the device and understand the associated risks.
Do not allow children to play with the device.
Cleaning and user maintenance should not be
performed by children without supervision.
Only have repairs and / or maintenance per-
formed by electrically skilled persons.
Only use the welding cables included (PESG
120 B2 H01N2-D1x10 mm²).
During use the equipment should not be located
directly against a wall, be covered, or be jammed
between other equipment to ensure ample air
can be taken in through the ventilation louvres.
Verify the equipment is correctly connected to
the mains voltage. Avoid any tensile load on the
mains. Unplug the mains plug from the socket
before transferring the equipment to a different
location.
Always switch the equipment off with the ON /
OFF switch when not in use. Set the electrode
holder down on an insulated pad and allow to
cool for 15 minutes before removing the electrodes from the holder.
Pay attention to the condition of the welding
cables, the electrode holders and the earth terminals. Worn insulation and conducting parts can
produce hazards and reduce the welding quality.
Arc welding produces sparks, melted metal
parts and smoke. Therefore note: Remove any
flammable substances and / or materials from
the work area and its immediate surroundings.
Ensure the work area is ventilated.
Do not weld atop containers, receptacles or
pipes, which do or did contain flammable
liquids or gasses.
Avoid any direct contact with
the welding circuit. The no-load voltage between
the electrode holder and earth terminal can be
dangerous, there is a risk of electric shock.
Do not store or use the equipment in a moist or
wet environment or in the rain. The Protection
Provision IP21S applies in this respect.
Protect the eyes with the appropriate safety glass
(DIN Grad 9-10) to be installed in the included
welding shield. Use gloves and dry protective
clothing free from oil and grease to protect the
skin from ultraviolet rays and the arc.
Do not use the welding power
source to thaw pipes.
Remember:
The arc ray can damage the eyes and cause
burns to the skin.
Arc welding produces sparks and drops of
molten metal, the welded work piece begins to
glow and remains very hot for a relatively long
time. Therefore do not touch the work piece with
bare hands.
Arc welding releases noxious fumes. Be careful
not to inhale these as best possible.
Protect yourself from the dangerous effects of the
arc and keep persons not involved in the work
at least 2 m away from the arc.
Attention!
Depending on mains conditions at the connec-
tion point, operating the welding equipment may
interfere with the voltage supply for other loads.
When in doubt, please contact your power
supply company.
Operating the welding equipment may interfere
with the functionality of other devices, e.g.
hearing aids, pacemakers, etc.
Safety hazards
during arc welding
Arc welding produces a variety of safety hazards.
It is therefore particularly important for the welder
to observe the following rules to avoid putting himself and others in danger and to prevent damage
to persons and the equipment
Only have work to the mains voltage end, e.g.
to cables, plugs, outlets, etc. performed by a
electrically skilled person in accordance with
national and local regulations.
In the event of an accident, immediately dis-
connect the welding equipment from the mains
voltage.
If electrical contact voltage occurs, immediately
switch the equipment off and have it inspected
by an electrically skilled person.
Always ensure good electrical contacts on the
welding current end.
Always wear insulating gloves on both hands
whilst welding. These will protect from electric
shock (no-load voltage of the welding current),
273439_Elektro-Schweissgeraet_PESG 120 B2_content_GB_IE_CY.indd 8 18.01.16 16:37
9 GB/IE/CY
Safety information
from hazardous rays (heat and UV rays) and
glowing metal and weld splashes.
Wear solid, insulating shoes. The shoes should
also insulate when exposed to moisture. Low
shoes are not suitable, as glowing metal drops
falling could cause burns.
Wear suitable protective clothing, no synthetic
garments.
Do not look into the arc with unprotected eyes,
only use a welding shield with approved pro-
tective glass per DIN. In addition to light- and
heat rays which could result in blinding or burns,
the arc also emits UV rays. Without adequate
protection, this invisible ultraviolet radiation
causes very painful conjunctivitis which is only
noticed a few hours later. UV rays further cause
burns similar to a sunburn in unprotected areas
of the body.
Persons near the arc or assistants must also be
informed of the risks and outfitted with the nec-
essary protection. If necessary, set up protective
panels.
Ensure an adequate supply of fresh air whilst
welding, particularly in small spaces, as it pro-
duces smoke and harmful gasses.
Do not weld containers in which gasses, fuels,
mineral oils, etc. were stored - even if emptied
a long time ago - as residue poses an explosion
hazard.
Special regulations apply in rooms posing fire-
and explosion hazards.
Welded joints exposed to great strain and
needing to meet certain safety requirements
must be made by specially trained and certi-
fied welders. Examples are pressure vessels,
running rails, tow couplings, etc.
ATTENTION! Always connect the earth termi-
nal as close as possible to the point of weld to
provide the shortest possible path for the weld-
ing current from the electrode to the earth ter-
minal. Never connect the earth terminal to the
housing of the welding equipment!
Never connect the earth terminal to earthed
parts far away from the work piece, e.g. a
water pipe in another corner of the room. This
could otherwise damage the protective bond-
ing system of the room you are welding.
Do not use the welding equipment in the rain.
Do not use the welding equipment in a moist
environment.
Only place the welding equipment in a level
location.
The output is rated at an ambient temperature
of 20 °C. The welding time may be reduced in
higher temperatures.
Danger of electric shock:
Electric shock from a welding electrode
can be fatal. Do not weld in rain or snow.
Wear dry insulating gloves. Do not touch
the electrode with bare hands. Do not wear wet or
damaged gloves. Protect yourself from electric shock
by insulating from the work piece. Do not open the
equipment housing.
Danger due to welding smoke:
Inhaling welding smoke can jeopardize your health.
Keep your head out of the smoke. Use facilities in
open areas. Use ventilation to remove smoke.
Danger due to welding sparks:
Welding sparks can cause an explosion or fire.
Keep flammables away from the welding area. Do
not weld next to flammables. Welding sparks can
cause a fire. Keep a fire extinguisher nearby and
an observer ready to use it. Do not weld on top of
drums or any closed containers.
Danger due to arc rays:
Arc rays can damage the eyes and injure the skin.
Wear a hat and safety goggles. Wear hearing protection and a closed, high shirt collar. Wear welding
helmets and proper filter sizes. Wear full personal
protection.
Danger due to electromagnetic fields:
Welding current produces electromagnetic fields.
Do not use along with medical implants. Never wrap
the welding cables around the body. Consolidate
welding cables.
273439_Elektro-Schweissgeraet_PESG 120 B2_content_GB_IE_CY.indd 9 18.01.16 16:37
10 GB/IE/CY
Safety information / Assembling the welding shield / Preparing to weld
Safety notices specific to the
welding shield
Using a hot light source (e.g. lighter) always
check the welding shield is working properly
before starting to weld.
Welding splashes can damage the glass shield.
Replace damaged or scratched glass shields
immediately.
Promptly replace damaged or heavily soiled /
splashed components.
The equipment may only be operated by per-
sons who have turned 16.
Familiarise yourself with the safety instructions
for welding. Also refer to the safety instructions
of your welding equipment.
Always use the welding shield when welding.
Failure to use the shield may result in serious in-
juries to the retina.
Always wear protective clothing when welding.
Never use the welding shield without protective
glass, as the optics can otherwise be damaged.
Replace the protective glass early to ensure g
ood
visibility and fatigue-proof working.
Tight and moist spaces
When working in tight, moist or hot spaces, use
insulating pads and intermediate layers in ad-
dition to gauntlet gloves made from leather or
other insulating materials to insulate the body
from earth.
When using welding equipment in electrically
dangerous conditions, e.g. in tight spaces from
conductive walls (kettles, pipes, etc.), in wet
spaces (soaking of work clothes), the output
voltages of the welding equipment may not be
higher than 48 Volts (rms value) in open loop.
Based on the output voltage this welding equip-
ment may be used in these conditions.
Protective clothing
Whilst working the welder must be protected
against rays and burns all over the body with
the appropriate clothing and face protection.
Remember the following steps:
- Put on protective clothing before welding.
- Put on gloves.
- Open windows or vent to ensure air supply.
- Wear safety goggles and a mask.
Wear gauntlet gloves made from suitable ma-
terial (leather) on both hands. These must be
in good condition.
Wear suitable aprons to protect the clothing
from sparks and burns. When required based
on the working method, e.g. welding overhead,
wear a protective suit and, if necessary, a head
guard.
Protecting against
rays and burns
Mark the work area with a sign “Danger! Do
not look into flames!“ to indicate the risk to the
eyes. If possible, shield the work areas to protect
persons nearby. Keep unauthorised persons
away from the welding area.
Walls in the direct vicinity of fixed work areas
should be neither light coloured nor glossy.
Protect windows against rays passing through
or reflecting at a minimum to head height, e.g.
with suitable paint.
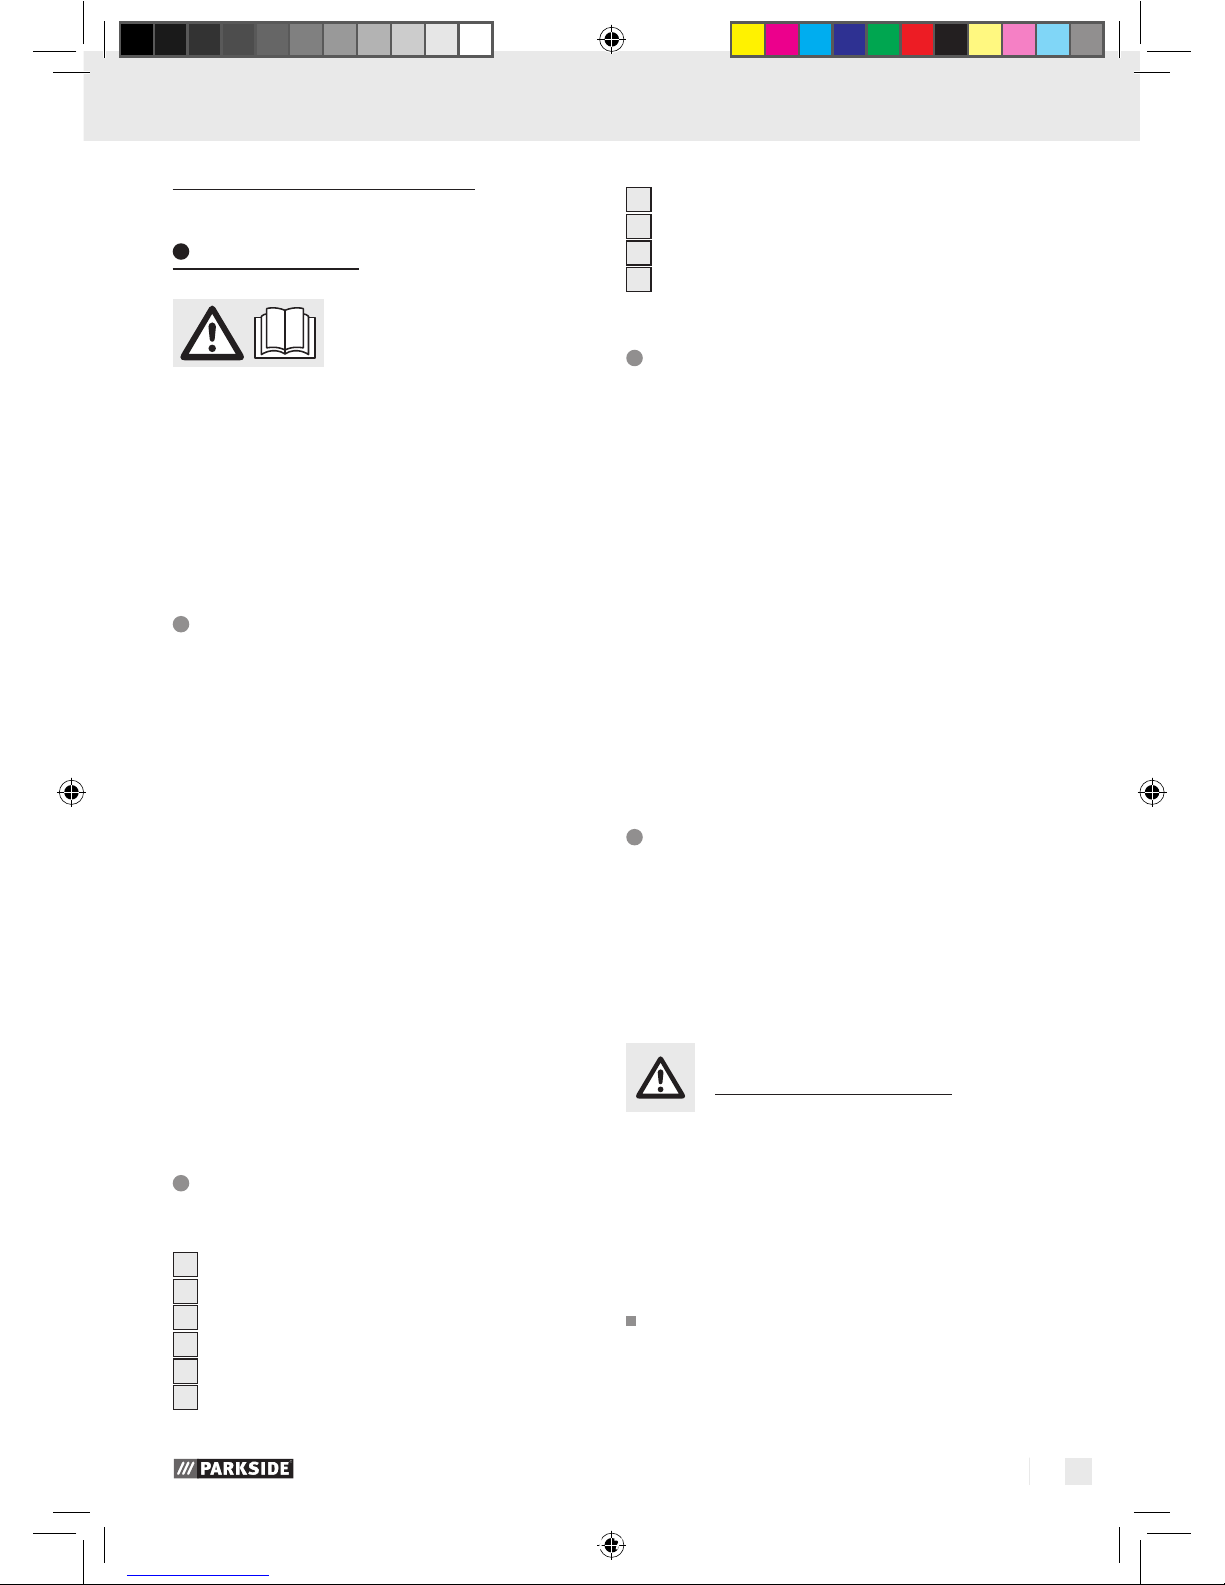
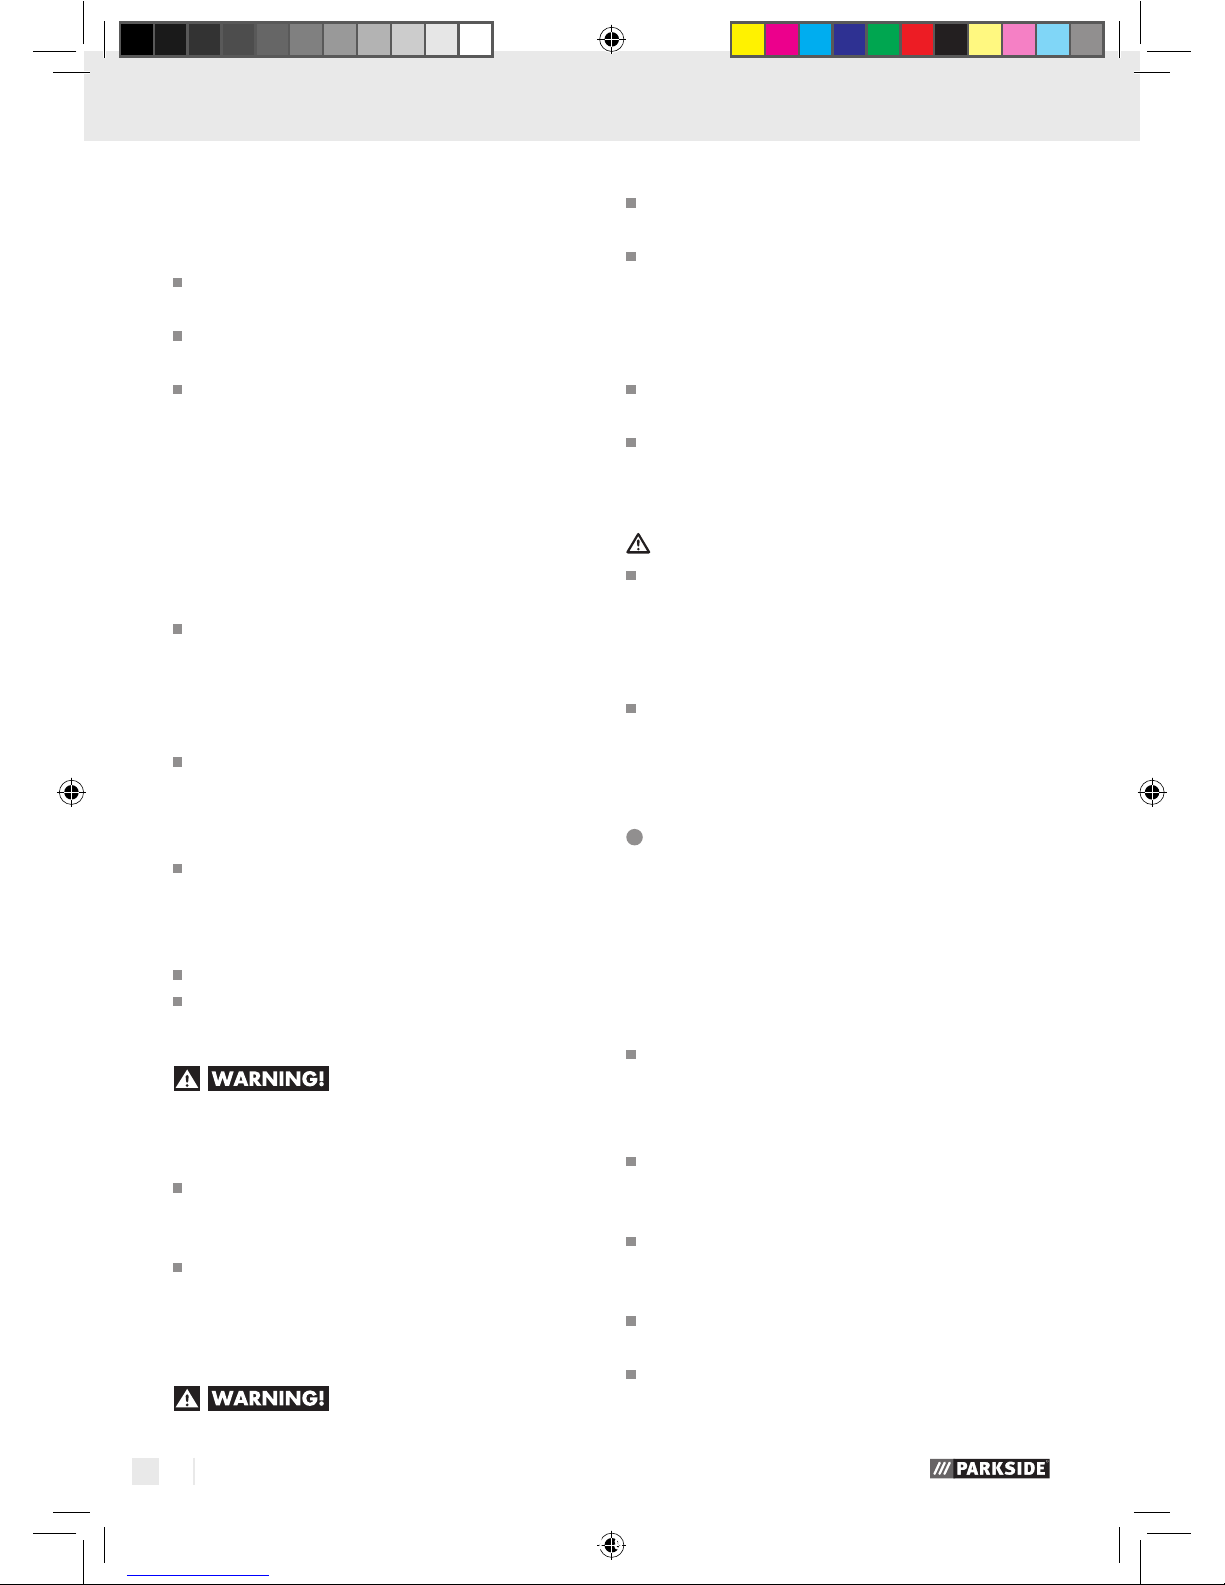
Assembling the welding shield
Attach the handle 8 to the welding shield 7
as shown in Fig. B.
Install the protective glass 10 to the welding
shield
7
as shown in Fig. B.
Then fold the three sides of the welding shield.
The two sides each connect to the top with two
press studs.
Preparing to weld
Note: When activating the power verify the current
indicator moves and the lead screw is not jammed.
273439_Elektro-Schweissgeraet_PESG 120 B2_content_GB_IE_CY.indd 10 18.01.16 16:37

11 GB/IE/CY
Preparing to weld / Welding / Overheat protection
Note: If the tensioning force of the electrode
holder
5
and the earth terminal 4 subsides,
replace immediately.
Connect the electric cables.
Set the ON / OFF switch 2 to the “ON“ posi-
tion. The current indicator will light up when
operation starts.
To end operation, set the ON / OFF switch 2
to the auf “OFF“ position.
Note: The yellow indicator light
6
lighting
up indicates overheating. The electric circuit will
automatically be broken. Operation will end.
Attach the earth terminal 4 directly to the
work piece or to the pad on which the work
piece is placed.
Note: Ensure direct contact to the work piece.
Thus avoid painted surfaces and / or insulation.
Note: Always use the welding shield
7
whilst
welding. It protects the eyes from the light beam
emitted by the arc, yet allows for a clear view
of the work piece.
Welding
After making all the electrical connections for the
power supply and for the welding circuit, proceed
as follows:
Insert the uncoated end of the electrode into
the electrode holder
5
and connect the earth
terminal
4
to the work piece. Be sure the
electrical contact is good.
The device features a latch for setting the plate
thickness. Switch on the device by setting the
ON / OFF switch
2
to the “ON“ position. Then
use the hand wheel
3
to select the electrode
thickness: For 1.6 or 2.0 mm electrodes set the
hand wheel
3
to position 1.6 / 2.0. For 2 mm
electrodes set the hand wheel
3
to position 2.5.
Hold the welding shield 7 in front of your face
and guide the tip of the electrode over the work
piece as if trying to light a match. This is the best
method for sparking the arc.
Use a test piece to check if you selected the
correct electrode and current.
ATTENTION!
Do not dab the work piece with the electrode. It
could become damaged and make it more difficult to
spark the arc. Once the arc is sparked, try to maintain a distance to the work piece appropriate for the
selected electrode diameter. Keep the distance as
consistent as possible whilst welding. The electrode
grade in the work flow direction should be 20–30
degrees.
ATTENTION!
Always use forceps to dispose of used electrodes or
move hot work pieces. Please remember to always
place the electrode holder onto an insulating pad
after welding.
Only remove slag once the seam has cooled. If
continuing to weld on an interrupted weld seam,
first remove the slag at the start of weld.
ATTENTION!
Welding produces heat. The welding equipment
must therefore be operated in open loop after use
for at least half an hour. Or alternatively allow the
equipment to cool off for one hour. Only pack up
and store the equipment once the equipment temperature has normalised.
Switch the equipment off by setting the ON /
OFF switch
2
to the “OFF“ position.
Overheat protection
The welding equipment features overheat protection.
If the overheat protection is triggered, the control
light
6
will light up. Allow the welding equipment
to cool down for a while.
PESG 120 B2 (with AC 230 V 50 Hz power plug):
The supply line fuses to the mains sockets must meet
the requirements (VDE 0100). Earthed wall sockets
must be protected with max. 16 A (model and technical data: NDM1-63, AC 230 / 400 V C16.
IEC 60898.time lag. Manufacturer: Nader) (fuses
or line circuit breaker). Higher fuse ratings can result
in burnt wires or fire damage to the building.
273439_Elektro-Schweissgeraet_PESG 120 B2_content_GB_IE_CY.indd 11 18.01.16 16:37
12 GB/IE/CY
… / Maintenance / Environmental instructions … / Information about … / Warranty terms
Attention: The equipment must be connected to
a mains source with the fuse rating specified above.
If the electrode holder and earth terminal is short
circuited, the fuse can be triggered in 16–20 secon
ds.
Classification per EMV standard: Class A per IEC
60974-10
Warning: Equipment categorised Class A are
intended for industrial use. When used in other
areas, electromagnetic tolerance may not be warranted or failures may occur.
Maintenance
Regularly clean dust and dirt off the equipment.
Clean the equipment with a fine brush or a dry
cloth.
Environmental instructions
and disposal information
Don‘t waste,
recycle!
Device, accessories and packaging
should be recycled in an environmentally friendly manner.
Do not dispose of the power welding equipment with
your household waste, or throw into fire or water. If
possible, non-operational equipment should be recycled. Contact your local retailer for information.
Information about warranty
and service processing
Creative Marketing Consulting GmbH
warranty
Dear customer, the warranty for this device is
3 years from the date of purchase. In the event of
product defects, you have legal rights against the
retailer of this product. Your statutory rights are not
limited in any way by our warranty detailed below.
Warranty terms
The warranty period begins on the date of purchase.
Please retain the original receipt safely. This document is required as your proof of purchase.
Should this device show any fault in materials or
manufacture within three years from date of purchase, it will be repaired or replaced - at our choice
- by us free of charge. This warranty is conditional
on the defective device and the receipt of purchase
(store receipt) being presented within the three year
warranty period, and that there is a brief written
description of the nature of the defect and of the
date it arose.
If the defect is covered by our warranty, we will
return the repaired equipment or replacement thereof.
A repair or exchange of the equipment does not
extend a new warranty period.
Extent of warranty
The appliance has been manufactured to strict
quality guidelines and meticulously examined
before delivery.
The warranty applies to faults in material or manufacture. This warranty does not apply to product
parts subject to normal wear and tear and which
can therefore be considered as wear items, or to
damage to fragile parts, e.g. switches, storage
batteries or glass parts.
This warranty becomes void if the device has been
damaged or improperly used or maintained. All
instructions provided in the operating instructions
must be followed strictly to constitute proper use of
the product. Purposes and practices which the operating instructions warn of or advise against must
be avoided without fail.
This product is intended for private, non-commercial
use only. Any incorrect or improper use of the device,
use of force and changes not performed by our authorized service branch will void the warranty.
273439_Elektro-Schweissgeraet_PESG 120 B2_content_GB_IE_CY.indd 12 18.01.16 16:37
 Loading...