


AIR ANGLE GRINDER PDWS 125 A1
AIR ANGLE GRINDER
Operating instructions
PERSLUCHT-HAAKSE SLIJPER
Gebruiksaanwijzing
IAN 276009
MEULEUSE D’ANGLE PNEUMATIQUE
Mode d’emploi
DRUCKLUFT-WINKELSCHLEIFER
Bedienungsanleitung

Before reading, unfold the page containing the illustrations and familiarise yourself with all functions of
the device.
Avant de lire le mode d'emploi, ouvrez la page contenant les illustrations et familiarisez-vous ensuite avec
toutes les fonctions de l'appareil.
Vouw vóór het lezen de pagina met de afbeeldingen open en maak u vertrouwd met alle functies van het
apparaat.
Klappen Sie vor dem Lesen die Seite mit den Abbildungen aus und machen Sie sich anschließend mit allen
Funktionen des Gerätes vertraut.
GB / IE Operating instructions Page 1
FR / BE Mode d'emploi Page 15
NL / BE Gebruiksaanwijzing Pagina 29
DE / AT / CH Bedienungsanleitung Seite 43


Contents
Introduction ......................................................2
Intended use ................................................................ 2
Features ................................................................... 2
Package contents ............................................................ 3
Technical data .............................................................. 3
General safety rules ...............................................3
Hazards caused by flying parts ................................................. 4
Hazards caused by entanglement ............................................... 4
Hazards during operation ..................................................... 4
Risks due to repetitive movements. . . . . . . . . . . . . . . . . . . . . . . . . . . . . . . . . . . . . . . . . . . . . . . . 5
Hazards caused by accessories ................................................. 5
Hazards in the workplace ..................................................... 6
Risks due to dust and vapours .................................................. 6
Risks due to noise ............................................................ 6
Risks due to vibrations ........................................................ 7
Additional safety instructions for pneumatic machines ................................ 7
Special safety instructions for grinding and abrasive cutting ........................... 8
Additional special safety instructions for abrasive cutting ............................. 8
Kickback and corresponding safety instructions. . . . . . . . . . . . . . . . . . . . . . . . . . . . . . . . . . . . . 8
Operation .......................................................9
Attaching the auxiliary handle .................................................. 9
Attaching the protective cover .................................................. 9
Attaching the grinding disc ....................................................10
Fitting the connector nipple ...................................................10
Operation .................................................................11
Working procedures .........................................................11
Maintenance and cleaning .........................................12
Disposal ........................................................12
Warranty .......................................................12
Service .........................................................13
Importer .......................................................13
Translation of the original Conformity Declaration .....................13
PDWS 125 A1
GB│IE
│
1 ■

AIR ANGLE GRINDER PDWS
125 A1
Wear sturdy work boots!
Introduction
Congratulations on the purchase of your new appliance. You have selected a high-quality product.
The operating instructions are part of this product.
They contain important information on safety, usage
and disposal. Before using the product, please
familiarise yourself with all operating and safety
instructions. Use the product only as described and
for the specified areas of application. Please also
pass on these operating instructions to any future
owner.
Intended use
The compressed air tool is intended for grinding
and abrasive cutting metal and similar materials
without the use of water. Any other use of or modification to the machine is deemed to be improper
and carries the risk of serious personal injury.
Not for commercial use.
Explanation of the symbols
WARNING!
P03/2016 Production date
V03/2019 Expiry date
Read the instruction manual
before use.
Wear safety goggles!
Rotation direction
Oil daily!
Read the original operating
instructions and safety instructions
before initial operation.
Wear ear protection!
Wear protective gloves!
Wear a dust mask!
Not approved for wet grinding
Using damaged cutting or grinding discs is dangerous and may
cause serious injury!
Intended for metal grinding
Diameter of the disc
Features
Air connection with filter
Plug nipple 1/4"
ON/OFF switch
Safety lock-out
Protective cover
Spindle
Auxiliary handle
Rear clamping flange
Grinding disc
Front flange
Open-ended spanner
Two-hole spanner
Oil container
Teflon tape
Hex key
■ 2 │ GB
│
IE
PDWS 125 A1

Package contents
1 air angle grinder PDWS 125 A1
1 auxiliary handle
1 grinding disc (Ø 125mm)
1 two-hole spanner
1 open-ended spanner
1 hex key
1m PTFE tape
1 plug nipple (1/4")
1 oil container
1 operating manual
Technical data
Rated speed: 10000 rpm
Rated air pressure: max. 6.3 bar
Disc size: Ø 125 mm
Threaded mounting: M14
Plug nipple: 1/4"
Weight (with auxiliary handle): approx. 1.72 kg
Noise emission values:
Noise measurement determined in accordance
with ISO 15744.
Sound pressure level: L
Uncertainty: K
Sound power level: L
Uncertainty: K
= 90.2 dB(A)
pA
= 3 dB(A)
pA
= 101.2 dB(A)
WA
= 3 dB(A)
WA
Vibration emission value:
Vibration emission value determined in accordance
with ISO 28927-1 and EN 12096:
= 2.44 m/s
a
h
Uncertainty K = 1.5 m/s
WARNING!
2
2
General
safety rules
WARNING!
► For multiple hazards: Please ensure that you
have read and understood the safety instructions before adjusting, operating, repairing,
maintaining or replacing accessories on the
angle grinder as well as before working in
the vicinity of the machine. Failure to do this
can result in serious bodily injury.
■ The grinding machine for abrasive media should
only be adjusted, set or used by adequately
qualified and trained operators.
■ This machine may not be modified. Modifications
can reduce the effectiveness of the safety measures and increase the risks for the operator.
■ Do not lose the safety instructions – hand them
to the operator.
■ Never use damaged grinding machines for
abrasive media.
PDWS 125 A1
GB│IE
│
3 ■

Hazards caused by flying parts
■ If a workpiece or accessory or even part of the
machine tool itself breaks, parts can be flung
out at high speeds.
■ Always wear shock-resistant eye protection when
operating the grinding machine for abrasive
media. The degree of necessary protection must
be evaluated separately for each individual
task.
■ You must ensure that the workpiece has been
securely fixed.
■ You must ensure that the abrasive media has
been safely attached to the grinding machine
for abrasive media.
■ You must ensure that the maximum operating
rotational speed of the abrasive media calculated in revolutions per minute is the same as
or higher than the rated spindle speed.
■ Ensure that the protective guard has been fitted,
that it is in good condition and properly fixed,
and that it is regularly checked.
■ It is possible that no protective guard is required
during internal grinding under the condition that
the workpiece encloses the abrasive media.
■ You must ensure that the clamping flange is be-
ing used in accordance with the manufacturer's
instructions and that it is in good condition, i.e.
without cracks and flaws, and that it is flat.
■ You must check to see whether the spindle and
spindle thread have become damaged or worn.
■ You must ensure that any sparks or ashes
produced during operation do not cause any
hazards.
■ Always disconnect the grinding machine from
the power supply before replacing the abrasive
media or servicing it.
Hazards caused by entanglement
■ Suffocation, scalping and/or cut wounds can
occur if loose clothing, jewellery, necklaces, hair
or gloves are not kept away from the machine
and its accessories.
Hazards during operation
■ Avoid contact with the rotating spindle and the
fitted grinding disc in order to avoid cuts to the
hands and other body parts.
■ When using the machine, the operator's hands
can be subject to hazards such as cuts, grazing
and heat. Wear suitable gloves to protect your
hands.
■ The operator and maintenance personnel must
be physically capable of handling the size, mass
and power of the machine.
■ Hold the machine correctly:
Be ready to counteract any normal or suddenly
occurring movements. Keep both hands ready
for use.
■ Ensure that your body is balanced and that you
have a secure standing position.
■ Release the start/stop control if there is a disrup-
tion to the power supply.
■ Use only the recommended lubricants.
■ Safety goggles must be worn; wearing of protec-
tive gloves and safety clothing is recommended.
■ Wear a safety helmet if working above head
height.
■ Do not put the machine down after switching
off until the disc has stopped rotating.
■ When abrasive cutting, the workpiece must be
supported so that the cutting slot has a constant
or increasing width during the entire cutting
process.
■ If the abrasive media jams in the cutting slot, the
grinding machine for abrasive media must be
turned off and the grinding disc must be loosened. Before continuing operation, check that
the abrasive media is still properly fixed and
has not been damaged.
■ 4 │ GB
│
IE
PDWS 125 A1

■ Grinding discs and abrasive cutting discs may
not be used for side grinding (exception: grinding discs for side grinding). Grinding machines
for abrasive media may only be operated at a
rotation speed which is less than the abrasive
media maximum speed;
■ ensure that no persons are standing in the im-
mediate vicinity.
■ Personal safety equipment such as suitable
gloves, aprons and protective helmets must be
worn.
■ Sparks caused by grinding can ignite clothing
and cause serious burns. You must ensure that
sparks do not impact clothing. Wear fire-retardant clothing and ensure that there is a bucket of
water in the vicinity.
Risks due to repetitive movements
■ When using a grinding machine for abrasive
media to perform work-related activities, operators may experience uncomfortable sensations
in their hands and arms, as well as in the neck
and shoulders or other parts of the body.
■ When using a grinding machine for abrasive
media, the operator should adopt a comfortable posture whilst ensuring a secure hold
and avoiding awkward postures or positions
in which it is difficult to maintain balance. The
operator should change positions during the
course of long-lasting tasks. This can be helpful
in the prevention of discomfort and fatigue.
■ If the operator notices symptoms such as persis-
tent or recurring illness, discomfort, throbbing,
pain, tingling, burning or stiffness, these indications should not be ignored. In this case, the
operator should inform his/her employer and
consult a suitably qualified physician.
Hazards caused by accessories
■ Disconnect the grinding machine for abrasive
media from the power supply before fitting or
replacing the machine tools or accessories.
■ Use only accessories and supplies of the sizes
and types recommended by the manufacturer
of the grinding machine for abrasive media.
Never use any other types or sizes of accessory
parts and consumables.
■ Ensure that the dimensions of the abrasive me-
dia are compatible with those of the grinding
machine for abrasive media and that the abrasive media fits onto the spindle.
■ Ensure that the thread type and size of the
abrasive media exactly matches the thread type
and size of the spindle thread.
■ Always inspect the abrasive media before use.
Do not use any abrasive media which may
have been dropped or which shows signs of
splintering, cracking or other flaws.
■ Always ensure that the abrasive media has
been properly fixed and tightened firmly
enough before use; the grinding machine for
abrasive media must be operated at idling
speed for at least 1 minute in a safe location;
switch off the machine immediately if you notice
excessive vibration or any other damage; the
cause of these malfunctions must be determined.
■ Ensure that the spindle end does not contact the
bottom of the openings in cut wheels, grinding
cones or whetstones with thread inserts which
are intended for the attachment of machine
spindles, by checking the dimensions and other
important spindle data.
■ In the case of abrasive media which are sup-
plied with reducers or reducing bushings, or
which are intended for use with reducers or
reducing bushings, the operator must ensure
that the reducer or reducing bushing does not
contact the face of the clamping flange and that
the clamping force provides sufficient rotational
drive to prevent slipping of the abrasive media.
■ In cases in which clamping flanges for different
types and sizes of abrasive media have been
provided, always fit the correct clamping flange
for the abrasive media being used.
■ Avoid direct contact before and after use of the
machine tool since it can be hot or have sharp
edges.
■ The abrasive media must be handled and stored
in accordance with the manufacturer's instructions.
PDWS 125 A1
GB│IE
│
5 ■

Hazards in the workplace
■ Slipping, tripping up and falling are the main
causes of injuries at the workplace. Look out
for surfaces which could have become slippery
through use of the machine, and also any tripping hazards caused by air or hydraulic hoses.
■ Proceed with caution in unknown surroundings.
Hidden hazards caused by power or other
supply lines may be present.
■ The grinding machine for abrasive media is not
intended for use in explosive atmospheres and
is not insulated against contact with electrical
power sources.
■ Ensure that no electrical service lines, gas pipes,
etc., which could cause a hazard if damaged
by use of the machine are present.
Risks due to dust and vapours
■ The dust and vapours produced by using the
grinding machine for abrasive media and polishing can be hazardous to health (e.g. cause
cancer, birth defects, asthma and/or dermatitis); it is essential to carry out a risk assessment
in respect of these risks and to implement corresponding regulatory mechanisms.
■ The risk assessment should include all dust
caused by the use of the machine and any
existing dust that may be whirled up at the
same time.
■ The grinding machine for abrasive media must
be operated and maintained in accordance
with the recommendations contained in this
manual to keep the release of dust and vapours
to a minimum.
■ The exhaust air should be routed so that the
raising of dust in already dusty environments is
kept to a minimum.
■ If dusts or vapours are created, the main priority
must be to control these at the site of their release.
■ All inserts or accessories of the machine in-
tended for collecting, extracting or suppressing
airborne dust or vapours or should be used and
serviced in accordance with the manufacturer’s
instructions.
■ Consumables/machine tools should be se-
lected, maintained and replaced in accordance
with the recommendations in this guide in order
to avoid unnecessary intensification of dust or
vapour production.
■ Use breathing equipment as per the instructions
provided by your employer or as required by
health and safety regulations.
■ Processing certain materials can cause emission
of dust and vapours which, in turn, can result in
the formation of an explosive environment.
Risks due to noise
■ Exposure to high noise levels can result in per-
manent hearing damage, loss of hearing and
other problems such as tinnitus (ringing, rushing,
whistling or buzzing in the ear) if sufficient hearing protection is not being worn.
■ Suitable regulatory mechanisms include meas-
ures such as the use of insulation materials to
avoid pinging occurring on the workpieces.
■ Use hearing protection.
■ The grinding machine for abrasive media is to
be operated and maintained in accordance
with the recommendations contained in this
manual to reduce any unnecessary increase
of the noise levels.
■ If the grinding machine for abrasive media is
equipped with a silencer, always ensure that
this in its place and is operational while the
machine is in operation.
■ Consumables/machine tools should be selected,
maintained and replaced in accordance with
the recommendations in this guide in order to
avoid unnecessary increase of the noise levels.
■ 6 │ GB
│
IE
PDWS 125 A1

Risks due to vibrations
■ Vibrations can damage the nerves and cause
problems with the blood circulation in the hands
and arms.
■ When working in a cold environment, wear
warm clothing and keep your hands warm and
dry.
■ If you notice numbness, tingling or pain in your
fingers or hands or notice that the skin of your
fingers or hands has become pale, stop working with the grinding machine for abrasive media, inform your employer and consult a doctor.
■ The grinding machine for abrasive media must
be operated and maintained in accordance
with the recommendations contained in this
manual to reduce any unnecessary increase of
the vibrations.
■ Do not allow the machine tool to rattle against
the workpiece since this would very probably
result in a considerable increase in the vibrations.
■ Consumables/machine tools must be selected,
maintained and replaced in accordance with
the recommendations in this guide in order to
avoid any unnecessary increase in vibration.
■ Always use a stand, a clamp or a compensation
device to support the weight of the machine.
■ Hold the machine securely but not too firmly
while maintaining the necessary hand-reaction
force, as the vibration risk generally increases
the harder the machine is held.
■ Use intermediate layers if these are intended for
the bonded abrasive media.
Additional safety instructions for
pneumatic machines
■ Compressed air can cause serious injuries.
– Ensure that the air supply is switched off,
the hose is not under pressure and that the
machine is disconnected from the air supply
when not in use, and also before exchanging accessories or carrying out repairs.
– Never aim the airflow towards yourself or
any other person.
■ Thrashing hoses can cause serious injury. There-
fore, always check that the hoses and their fixings are not damaged or have not come loose.
■ If universal rotary joints (claw couplings) are
used, locking pins must be used to provide protection; Whipchek
used to provide protection in case of a failure of
the connection of the hose to the machine.
■ Ensure that the maximum permissible pressure
stated on the machine is not exceeded.
■ Never carry compressed air-powered machines
by the hose.
®
air hose restraints must be
PDWS 125 A1
GB│IE
│
7 ■

Special safety instructions for
grinding and abrasive cutting
■ Use only the grinding accessories approved for
your compressed air tool and the appropriate
protective cover for these grinding tools. Grinding tools which are not designed for the compressed air tool can not be sufficiently shielded
and are unsafe.
■ Cranked grinding discs must be fitted so that
their grinding surfaces do not protrude above
the level of the protective cover edge. An im-
properly mounted grinding disc which protrudes
beyond the edge of the protective cover cannot
be sufficiently screened.
■ The protective cover must be securely fixed
to the compressed air tool and adjusted to
ensure maximum safety so that the smallest
possible amount of the grinding tool is exposed to the operator. The protective cover is
designed to protect the operator from fragments
and accidental contact with the grinding tool.
■ Grinding tools should only be used for the
recommended applications. For example:
Never grind with the side surface of a cutting disc. Cutting discs are designed to remove
material with the edge of the disc. Any lateral
application of force on these grinding tools can
lead to breakage.
■ Always use an undamaged clamping flange
of the correct size and shape for the grinding disc you have selected. Suitable flanges
support the grinding disc and reduce the risk of
disc breakage. Flanges for cutting discs can be
different to flanges for other grinding discs.
■ Do not use worn grinding discs from larger
compressed air tools. Grinding discs for larger
compressed air tools are not designed for the
higher rotational speeds of smaller compressed
air tools and can break.
Additional special safety instructions
for abrasive cutting
■ Avoid cutting disc jams or excessive contact
pressure. Do not make any excessively deep
cuts. Overloading the cutting disc increases the
stress and likelihood of tilting or jamming and
thus the possibility of kickback or breakage of
the grinding tool.
■ Avoid the area in front of and behind the
rotating cutting disc. When you move the cut-
ting disc away from yourself in the workpiece it
is possible, in the event of a kickback, that the
compressed air tool along with the rotating disc
might be thrown out directly towards you.
■ If the cutting disc jams or you stop working,
switch the tool off and hold it steady until the
disc has come to a complete standstill. Never
attempt to pull a rotating cutting disc out of a
cut. This could lead to kickback. Identify and
remove the cause of the jam.
■ Do not switch the compressed air tool back
on while it is in the workpiece. Allow the cutting disc to reach its full speed before you
carefully continue the cut. Otherwise, the disc
can jam, jump out of the workpiece or cause
kickback.
■ Support panels or large workpieces to re-
duce the risk of the cutting disc jamming and
causing a kickback. Large workpieces can
bend under their own weight. The workpiece
must be supported on both sides of the disc:
both in the vicinity of the cutting disc and also
at the edge.
■ Be particularly careful when making "pocket
cuts" into existing walls or other obscured areas. The inserted cutting disc may cut into gas
or water pipes, electrical wiring or other objects
that can cause kickback.
Kickback and corresponding safety
instructions
■ Kickback is a sudden reaction caused when a
rotating accessory tool catches or jams.
■ Catching or jamming causes the rotating acces-
sory tool to stop abruptly.
■ 8 │ GB
│
IE
PDWS 125 A1
If this happens, an uncontrolled compressed
air tool turns rapidly against the direction of
rotation of the accessory tool caught in the
blockage.
■ If, for example, a grinding disc catches or jams
in a workpiece, the edge of the grinding disc
that is projecting into the workpiece can get
caught and break off the grinding disc or cause
a kickback. The grinding disc can then fly in
the direction of the operator or away from him,
depending on the direction of rotation of the
disc at the blockage.
This can also break grinding discs.
■ A kickback is caused by incorrect use or misuse
of the compressed air tool. This can be avoided
by taking proper precautions as given below.
a) Hold the compressed air tool firmly
in both hands and position your body and
arms so they can absorb the force of a
kickback. Always use the auxiliary handle,
if available, so you have maximum control
over the kickback force or reaction torques
at full speed. By taking adequate precautions, the operator can stay in control of the
kickback and reaction torques.
b) Never hold your hand close to rotating accessory tools. The accessory tool
could move across your hand in the event
of a kickback.
c) Keep all parts of your body outside
the region in which the compressed air tool
is likely to move in event of a kickback. The
kickback will force the compressed air tool
in the opposite direction to the direction of
rotation of the grinding disc at the blockage.
d) Take special care when working
around corners, sharp edges, etc. Avoid
allowing the accessory tool to bounce back
from the workpiece, or jam. The rotating accessory tool is more likely to jam in corners
or sharp edges or if it bounces. This can
cause a loss of control or kickback.
e) Do not use chains or toothed saw
blades. Such accessories often cause a kickback or loss of control over the power tool.
Operation
NOTE
► Screw the plug nipple
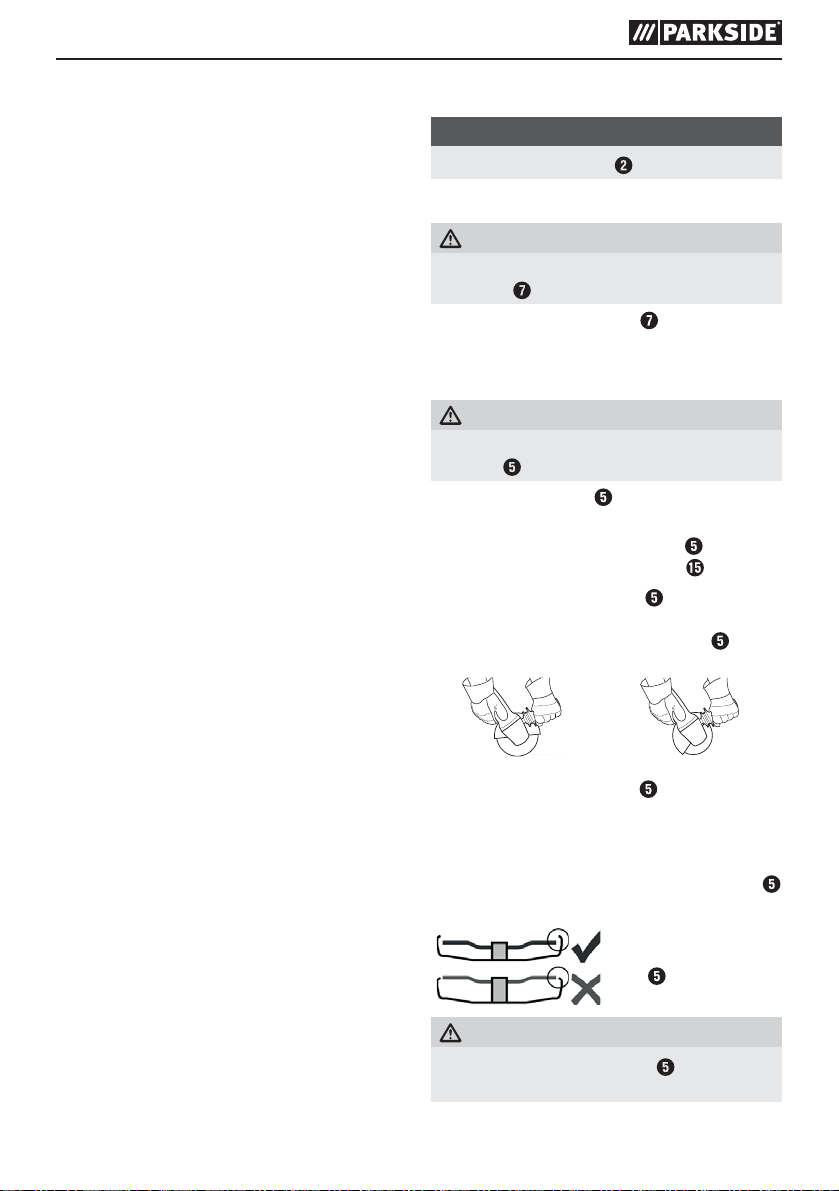
Attaching the auxiliary handle
CAUTION!
► Do not work with the tool if the auxiliary
handle
♦ Screw the auxiliary handle
left-hand or right-hand side of the machine.
is not attached!
Attaching the protective cover
CAUTION!
► For safety reasons, always use the protective
cover
!
■ The protective cover
with 2 screws on the device.
♦ For rotation of the protective cover
remove all screws with the hex key .
♦ Replace the protective cover
hole added to the new position.
The closed side of the protective cover must
always be facing to the operator.
✓
♦ Attach the protective cover with 3 screws on
the device.
Screw the remaining screw into the threaded
hole.
♦ Check for secure seating: The protective cover
must be securely attached.
WARNING!
► The supplied protective cover
disc use only.
on before first use.
firmly onto the
is mounted on delivery
, you first
at most by a
✗
Only use accessory tools
which the protective
cover protrudes beyond by at least 2 mm.
is for grinding
PDWS 125 A1
GB│IE
│
9 ■
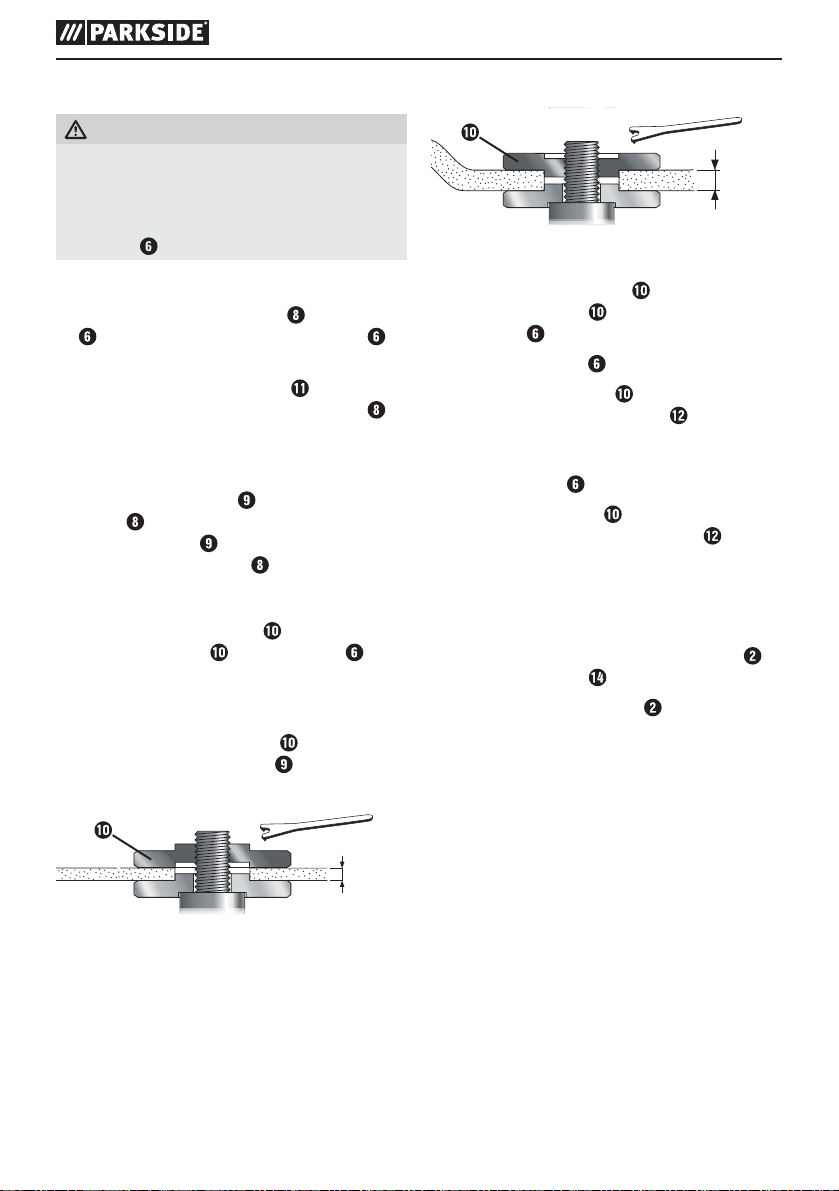
Attaching the grinding disc
12
CAUTION!
► Disconnect the compressed air tool from
the compressed air supply before replacing
the accessory tool or accessories, or before
carrying out adjustments or servicing. The
spindle
Lock the spindle
♦ Place the rear clamping flange
. This is correctly attached if the spindle
cannot be rotated.
♦ Place the open-ended spanner
over the collar of the rear clamping flange to
prevent it from turning.
Attaching the grinding disc
♦ Place the grinding disc
flange .
The grinding disc must be evenly placed on
the rear clamping flange .
Fixing/loosening the front flange
The 2 sides of the front flange
Screw the front flange onto the spindle as
follows:
For thin grinding discs (see figure 1):
♦ The collar on the front flange
so that the thin grinding disc can be safely
clamped.
must be at a standstill.
on the spindle
supplied
on the rear clamping
are different.
faces upwards
For thick grinding discs (see figure 2):
> 3,2 mm
fig. 2
The collar on the front flange
faces downwards
so that the front flange can be safely attached
to the spindle .
♦ Locking the spindle
♦ Tighten the front flange
.
in a clockwise direc-
tion using the two-hole spanner .
Loosening the front flange:
♦ Lock the spindle
♦ Undo the front flange
.
in an anticlockwise
direction using the two-hole spanner .
Fitting the connector nipple
♦ Remove the plastic protective cap from the
appliance‘s air inlet.
♦ Wrap the threads on the connector nipple
with the teflon tape supplied.
♦ Screw the connector nipple
into the air inlet.
fig. 1
■ 10 │ GB
│
≤ 3,2 mm
IE
PDWS 125 A1

Operation
Operating a compressed air tool
NOTE
►
In order to achieve the full power available
from your compressed air tool, always
use compressed air hoses with an internal
diameter of at least 9 mm. A lower internal
diameter can considerably reduce the power.
CAUTION!
► Do not use a compressed air line that con-
tains any water condensation.
► The tool must be sufficiently supplied with
pneumatic oil to ensure long service life. This
can take place as follows:
– Use oiled compressed air by fitting a mist
lubricator.
– Without a mist lubricator: add oil manu-
ally through the compressed air connection
every day. Approx. 3-5 drops
of pneumatic oil for every 15 operating
minutes during continuous use.
► If the tool has been out of operation for sev-
eral days, add around 5 drops of pneumatic
oil manually through the compressed air
connection .
► Allow the tool to run at idling speed for a
short time.
► Always guide the machine using both hands.
► Switch on first, then apply the accessory tool
to the workpiece.
► After switching off, only put the machine down
once the motor has come to a standstill.
♦ 1.) Attach a suitable accessory tool.
♦ 2.) Adjust the operating pressure (measured
at the air intake when the compressed air
tool has been switched on). Please refer to
the section entitled "Technical data" for the
maximum permissible operating pressure
♦ 3.) Connect the compressed air tool to the com-
pressed air supply.
♦ 4.) Switching on: Push the safety lock-out
towards and press the ON/OFF switch .
♦ 5.) Switching off: Release the ON/OFF switch
Working procedures
Sanding:
♦ Press the machine against the workpiece moder-
ately and move it backwards and forwards over
the surface so that the workpiece surface does
not become too hot.
Rough grinding:
♦ Work using an angle of incidence of between
30° and 40° for good working results.
NOTE
► Never use cutting discs for rough grinding.
Abrasive cutting:
♦ Always work against abrasive cutting (see Fig-
ure 3). Otherwise there is a risk that the machine can jump out of the cut in an uncontrolled
manner. Work using moderate forward speed
appropriate to the material being processed.
Do not tilt, do not press, do not oscillate.
.
PDWS 125 A1
Fig. 3
NOTE
Never use rough grinding discs for cutting.
►
GB│IE
│
11 ■

Maintenance and cleaning
WARNING! RISK OF INJURY!
Disconnect the appliance from the
compressed air supply.
CAUTION!
► Any service or repair work over and above
that described in this section may only be
carried out by specialists.
♦ Maintain the compressor tool regularly to ensure
safe operation.
♦ Check bolted connections for a tight fit, retighten
if necessary.
♦ Clean the filter in the compressed air connec-
tion
at least once a week.
♦ We recommend fitting a pressure reducer with
a water separator and an oiler in front of the
compressed air tool.
♦ If there is increased oil or air discharge, check
the compressed air tool and have it serviced if
necessary.
♦ Check the rotation speed regularly and after
every use, and carry out a simple check of the
vibration level.
♦ Regularly check the spindle
clamping devices for wear and tolerances for
accommodating accessory tools.
♦ Avoid contact with hazardous substances which
have accumulated on the tool. Wear suitable
personal safety equipment and remove any
hazardous substances using suitable measures
before servicing.
WARNING!
► Have your appliance repaired by the service
centre or a qualified specialist and only
using genuine replacement parts. This will
ensure that the safety of the appliance is
maintained.
, threads and
Disposal
The packaging consists of environmentally
friendly material. It can be disposed of in
the local recycling containers.
Do not dispose of the appliance in the normal
domestic waste!
Your local community or municipal authorities can
provide information on how to dispose of the wornout appliance.
Warranty
This appliance is provided with a 3-year
warranty valid from the date of purchase.
The appliance has been manufactured with
care and inspected meticulously prior to delivery. Please retain your receipt as proof of
purchase. In the event of a warranty claim,
please contact your Customer Service unit by
telephone. This is the only way to guarantee
free return of your goods.
The warranty only covers claims for material and
manufacturing defects, not for damage sustained
during carriage, components subject to wear and
tear or damage to fragile components such as
switches or batteries. This appliance is intended
solely for private use and not for commercial purposes. The warranty shall be deemed void in cases
of misuse or improper handling, use of force and
modifications/repairs which have not been carried
out by one of our authorised Service centres. Your
statutory rights are not restricted by this warranty.
The warranty period is not prolonged by repairs
effected under the warranty. This also applies to
replaced and repaired components. Any damage
and defects present at the time of purchase must be
reported immediately after unpacking, but no later
than two days after the date of purchase. Repairs
carried out after expiry of the warranty period shall
be subject to charge.
■ 12 │ GB
│
IE
PDWS 125 A1

Service
Service Great Britain
Tel.: 0871 5000 720 (£ 0.10/Min.)
E-Mail: kompernass@lidl.co.uk
IAN 276009
Service Ireland
Tel.: 1890 930 034
(0,08 EUR/Min., (peak))
(0,06 EUR/Min., (off peak))
E-Mail: kompernass@lidl.ie
IAN 276009
Translation of the original
Conformity Declaration
We, KOMPERNASS HANDELS GMBH, documents officer: Mr. Semi Uguzlu, BURGSTR. 21,
44867 BOCHUM, GERMANY, hereby declare that
this product complies with the following standards,
normative documents and EC directives:
Machinery Directive
(2006/42/EC)
Applied harmonised standards:
EN ISO 11148-7: 2012
Importer
KOMPERNASS HANDELS GMBH
BURGSTRASSE 21
44867 BOCHUM
GERMANY
www.kompernass.com
Type designation of machine:
Air angle grinder PDWS 125 A1
Year of manufacture: 06 - 2016
Serial number: IAN 276009
Bochum, 27.01.2016
Semi Uguzlu
- Quality Manager -
The right to effect technical changes in the context
of further development is reserved.
PDWS 125 A1
GB│IE
│
13 ■

■ 14 │ GB
│
IE
PDWS 125 A1

Table des matières
Introduction .....................................................16
Utilisation conforme à l'usage prévu ............................................ 16
Équipement ................................................................ 16
Matériel livré .............................................................. 17
Caractéristiques techniques ................................................... 17
Règles de sécurité générales .......................................17
Risque engendré par des pièces projetées ........................................ 17
Risques de happage. . . . . . . . . . . . . . . . . . . . . . . . . . . . . . . . . . . . . . . . . . . . . . . . . . . . . . . . . 18
Risques en service ..........................................................18
Risques dus aux mouvements répétitifs ...........................................18
Risques engendrés par des accessoires ..........................................19
Risques sur le poste de travail ................................................. 19
Risques causés par la poussière et les vapeurs ....................................20
Risques dus au bruit .........................................................20
Risques causés par les oscillations ..............................................20
Instructions de sécurité supplémentaires pour les machines pneumatiques ............... 21
Avertissements de sécurité spéciaux pour le meulage et le tronçonnage à la meule ........ 21
Autres avertissements de sécurité particuliers concernant le tronçonnage au disque .......22
Recul brutal et consignes de sécurité correspondantes ..............................22
Mise en service ..................................................23
Fixer la poignée supplémentaire ............................................... 23
Fixer le capot protecteur ......................................................23
Fixer la meule/le disque ...................................................... 24
Montage de l‘embout mâle ...................................................24
Utilisation ................................................................. 25
Consignes de travail ......................................................... 25
Maintenance et nettoyage .........................................26
Mise au rebut ...................................................26
Garantie .......................................................26
Service .........................................................27
Importateur .....................................................27
Traduction de la déclaration de conformité originale ...................27
PDWS 125 A1
FR│BE
│
15 ■
 Loading...