

Parkside PDOS 200 B2 User Manual [cs, pl, de, en]

DOUBLE BENCH GRINDER PDOS 200 B2
DOUBLE BENCH GRINDER
Translation of original operation manual
DUPLACSISZOLÓ
Az originál használati utasítás fordítása
DV OJITÁ BRÚSKA
Preklad originá lneho návodu na obsluhu
IAN 102876
SZLIFIERKA PODWÓJNA
Tłumaczenie oryginalnej instrukcji obsługi
DVOJITÁ BRUSKA
Překlad originálního provozního návodu
DOPPELSCHLEIFER
Originalbetriebsanleitung

Before reading, unfold the page containing the illustrations and familiarise yourself with all functions of the
device.
Przed przeczytaniem proszę rozłożyć stronę z ilustracjami, a następnie proszę zapoznać się z wszystkimi
funkcjami urządzenia.
Olvasás előtt kattintson az ábrát tartalmazó oldalra és végezetül ismerje meg a készülék mindegyik
funkcióját.
Před čtením si otevřete stranu s obrázky a potom se seznamte se všemi funkcemi přístroje.
Pred čítaním si odklopte stranu s obrázkami a potom sa oboznámte so všetkými funkciami prístroja.
Klappen Sie vor dem Lesen die Seite mit den Abbildungen aus und machen Sie sich anschließend mit allen
Funktionen des Gerätes vertraut.
GB Translation of original operation manual Page 4
PL Tłumaczenie oryginalnej instrukcji obsługi Strona 19
HU Az originál használati utasítás fordítása Oldal 35
CZ Překlad originálního provozního návodu Strana 51
SK Preklad originálneho návodu na obsluhu Strana 66
DE / AT / CH Originalbetriebsanleitung Seite 81
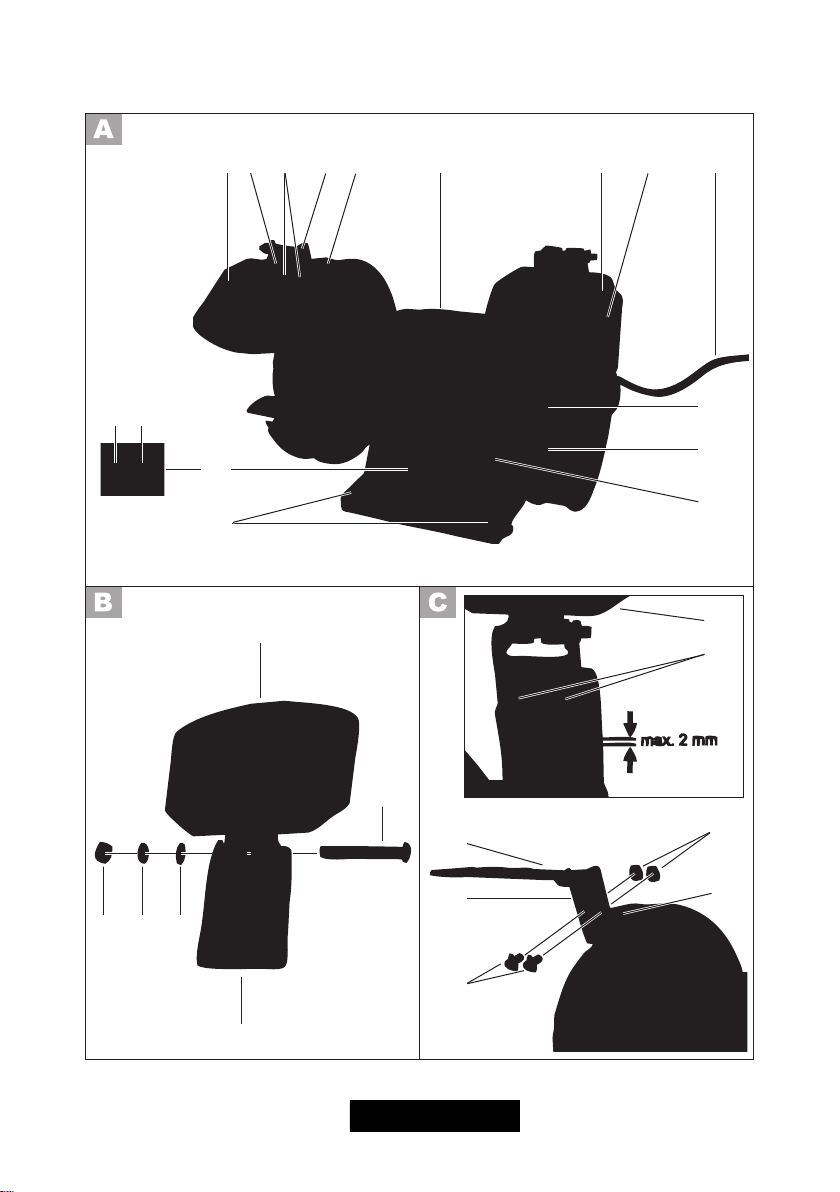
1 4 5 7 8
632
9
14b 14a
4a 4b 4c
14
13
10
11
12
1
4
1
2
1
3
3a
5
3
2

GB
Content
Introduction .................................4
Intended use ................................ 4
General description ...................... 5
Scope of delivery ............................. 5
Function description..........................5
Summary ........................................ 5
Technical specications ................. 6
Safety Instructions........................6
Symbols and icons ........................... 7
General safety instructions ................ 7
Further Safety Instructions .................. 9
Residual risks ................................. 10
Assembly ................................... 10
Assemble/adjust spark protection .... 11
Assemble/set workpiece supports .... 11
Screw device on to workbench ........ 11
Operation .................................. 11
Switching on and off ...................... 12
Grinding with the grinding disc ....... 12
Changing the grinding disc ............. 13
Cleaning and maintenance ......... 14
Cleaning ....................................... 14
General maintenance ..................... 14
Storage ......................................14
Waste disposal and environ-
mental protection ....................... 14
Replacement parts/accessories ... 15
Trouble Shooting ........................ 16
Guarantee .................................17
Repair Service ............................ 18
Service-Center ............................ 18
Importer .................................... 18
Translation of the original
EC declaration of conformity ......97
Exploded Drawing ................... 101
Introduction
Congratulations on the purchase of your
new device. With it, you have chosen a
high quality product.
During production, this equipment has
been checked for quality and subjected to
a nal inspection. The functionality of your
equipment is therefore guaranteed.
The operating instructions constitute
part of this product. They contain
important information on safety, use
and disposal. Before using the product, familiarise yourself with all of
the operating and safety instructions.
Use the product only as described
and for the applications specied.
Keep this manual safely and in the
event that the product is passed on,
hand over all documents to the third
party.
Intended use
The bench double grinder is suitable for
sharpening tools (e.g. knives, scissors,
chisels) and for deburring and grinding of
small workpieces made of metal.
The device is not intended for all other
types of applications (e.g. grinding with
unsuitable grinding tools, grinding with a
coolant solution, grinding hazardous materials such as asbestos).
The equipment is intended for use in the
eld of DIY. It is not designed for commer-
cial use.
The equipment is designed for use by
adults. Young people under the age of 16
are permitted to use the equipment only
under supervision. The manufacturer shall
not be liable for damages caused by use
other than for the intended purpose or by
incorrect operation.
4

GB
General description
The illustrations can be found
on the front and rear fold-out
pages.
Scope of delivery
Unpack the equipment and check that it is
complete. Dispose of the packaging material correctly.
• Appliance
• 2 x spark protection
• mounting material for xing the spark
protection to the spark protection
holder
- 2 x holder for spark protection
- 2 xing screws, 2 spring washers,
2washers, 2 nuts
• mounting material for xing the spark
protection to the device
- 4 adjusting screws incl. washers and
spring washers, 4 nuts
• 2 workpiece supports
• mounting material for xing the work-
piece supports to the device
- 2 star washers, 2 screws, 2 washers,
2 toothed washers
• Instruction Manual
Summary
1 Spark protection
2 Spark protection holder
3 Adjusting screw for spark protec-
tion
4 Fixing screw for spark protection
5 Protective hood grinding disc
6 Motor housing
7 Fixing screws for grinding disc
cover
8 Grinding disc cover
9 Power cable
10 Grinding disc
11 Workpiece support
12 Star grip nut to mount/adjust
the workpiece support
13 Drillholes for table mounting
14 On/off switch
14a On switch
14b Off switch
15 Grinder spindle
Function description
The double bench grinder is a combined
device tted with two grinding discs with
different grain size for coarse and ne
grinding.
The device is provided with a spark protection and protective hoods for the protection
of the user.
For the function of the operating parts,
please refer to the descriptions below.
5

GB
Technical specications
Nominal input voltage ......230 V~, 50 Hz
Power consumption ..................... 200 W
(S2 30 min)*
Safety class .......................................... I
Mechanical rating .......................... IP 20
Measurement idling speed n
Velocity v0 .......................... max. 23 m/s
Grinding disc
Outer diameter ................... Ø 150 mm
Bore hole .......................... Ø 12.7 mm
Thickness .................................20 mm
Hardness ....................................... P5
Grain size ................................ 36/80
Speed n
.................... max. 4500 min
0
Working speed ................ max. 35 m/s
Weight (incl. accessories) .. approx. 5.7 kg
Sound pressure level
(L
) ................... 80 dB(A); KpA=3 dB(A)
pA
Sound power level (L
wA
measured ...........93 dB(A); K
Vibration total value (a
* A break is introduced after 30 minutes of
uninterrupted operating duration until the device temperature differs 2 K (2°C) less than
room temperature.
Noise and vibration values have been
determined according to the standards and
regulations mentioned in the declaration of
conformity.
Technical and optical changes may be
undertaken in the course of further development without notice. All dimensions, references and information in this instruction
manual are therefore not guaranteed. Legal
claims made on the basis of the instruction
manual can therefore not be considered as
valid.
... 2950 min
0
)
=3 dB(A)
) ......... 2,5 m/s
h
wA
The stated vibration emission value was
measured in accordance with a standard
testing procedure and may be used to compare one power tool to another.
The stated vibration emission value may
also be used for a preliminary exposure
assessment.
-1
Warning!
The vibration emission value may
differ during actual use of the
power tool from the stated value
depending on the manner in which
the power tool is used.
Safety precautions aimed at protect-
-1
ing the user should be based on
estimated exposure under actual
usage conditions (all parts of the
operating cycle are to be consid-
ered, including, for example, times
during which the power tool is
turned off and times when the tool
2
is turned on but is running idle).
Safety Instructions
WARNING!
When using power tools, observe
the following basic safety measures
for the prevention of electric shocks
and the risk of injury and re.
Please read all these instructions
before using the electric tools and
please keep the safety instructions.
6

GB
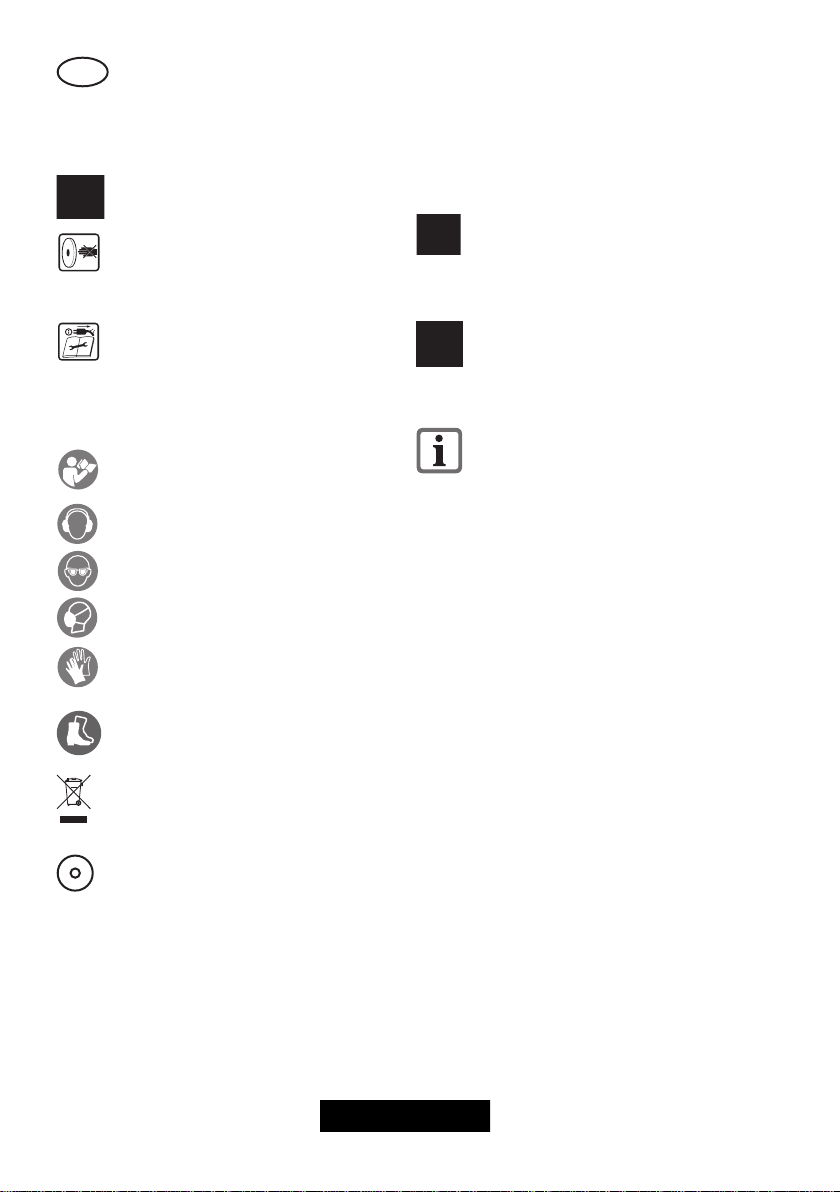
Symbols and icons
Symbols on the device:
Warning!
Risk of injury from the rotating tool!
Keep hands away.
Risk of electric shock! Disconnect
from the mains before carrying out
maintenance and repair work.
Read the instruction manual.
Wear ear protection.
Wear eye protection.
Wear breathing protection.
Wear cut-resistant gloves.
Wear anti-slip safety shoes.
Never use faulty grinding discs.
Do not dispose of electrical equip-
ment in household waste.
Dimensions grinding disc
Symbols in the manual:
Warning symbols with in-
formation on damage and
injury prevention.
Instruction symbols (the instruction is
explained at the place of the excla-
mation mark) with information on
preventing damage.
Help symbols with information on
improving tool handling.
General safety instructions
The term “power tool” used in the safety instructions refers to mains-operated electric
tools (with a mains cable) and to batteryoperated electric tools (without a mains
cable).
Safe operation:
• Keep work area clear. Cluttered
areas and benches invite injuries.
• Consider work area environ-
ment.
- Do not expose tools to rain. Do not
use tools in damp or wet locations.
Water entering a power tool will increase the risk of electric shock.
- Keep work area well lit.
- Do not use tools in the presence of
ammable liquids or gases.
Power tools create sparks which may
ignite the dust or fumes.
• Guard against electric shock.
Avoid body contact with earthed or
grounded surfaces (e.g. pipes, radiators, ranges, refrigerators).
• Keep other persons away.
Do not let persons, especially children,
7

GB
not involved in the work touch the tool
or the extension cord and keep them
away from the work area.
• Store idle tools. When not in use,
tools should be stored in a dry lockedup place, out of reach of children.
• Do not force the tool. It will do
the job better and safer at the rate for
which it was intended.
• Use the right tool.
- Do not force small tools to do the job
of a heavy duty tool.
- Do not use tools for purposes not
intended; for example do not use circular saws to cut tree limbs or logs.
Use of the power tool for operations dif-
ferent from those intended could result in
a hazardous situation.
• Dress properly.
- Do not wear loose clothing or jewellery, they can be caught in moving
parts.
- Anti-slip footwear is recommended
when working outdoors.
- Wear protective hair covering to contain long hair.
• Use protective equipment.
- Use safety glasses.
- Use face or dust mask if working operations create dust.
• Connect dust extraction equip-
ment. If the tool is provided for the
connection of dust extraction and col-
lecting equipment, ensure these are
connected and properly used.
• Do not abuse the cord. Never
yank the cord do disconnect it from the
socket. Keep the cord away from heat,
oil and sham edges.
• Secure work. Where possible use
clamps or a vice to hold the work. It is
safer than using your hand.
• Do not overreach. Keep proper
footing and balance at all times.
This enables better control of the power
tool in unexpected situations.
• Maintain tools with care.
Many accidents are caused by poorly
maintained power tools.
- Keep cutting tools sharp and clean
for better and safer performance.
- Follow instruction for lubricating and
changing accessories.
- Inspect tool cords periodically and if
damaged have them repaired by an
authorized service facility.
- Inspect extension cords periodically
and replace if damaged.
- Keep handles dry, clean and free
from oil and grease.
• Disconnect tools. When not in use,
before servicing and when changing
accessories disconnect tools from the
power supply.
Such preventive safety measures reduce
the risk of starting the power tool acci-
dentaIly.
• Remove adjusting keys and
wrenches. Form the habit of check-
ing to see that keys and adjusting
wrenches are removed from the tool
before turning it on. A wrench or a key
left attached to a rotating part of the
power tool may result in personal injury.
• Avoid unintentional starting.
Ensure switch is in “off” position when
plugging in.
• Use outdoor extension leads.
When the tool is used outdoors, use
only extension cords intended for outdoor use and so marked.
• Stay alert, watch what you are
doing and use common sense
when operating a power tool.
Do not use a power tool while you are
tired or under the inuence of drugs,
8

GB
alcohol or medication. A moment of
inattention white operating power tools
may result in serious personal injury.
• Check damaged parts.
This will ensure that the safety of the
power tool is maintained.
- Before further use of tool, it should be
carefully checked to determine that it
will operate properly and perform its
intended function.
- Check for alignment of moving parts,
binding of moving parts, breakage of
parts, mounting and any other conditions that may affect its operation.
- A guard or other part that is damaged should be properly repaired or
replaced by an authorized service
centre unless otherwise indicated in
this instruction manual.
- Have defective switches replaced by
an authorized service centre.
- Do not use the tool if the switch does
not turn it on and off.
There is a risk of injury.
• Warning.
The use of any accessory or attach-
ment other than one recommended in
this instruction manual may present a
risk of personal injury.
• Have your tool repaired by a
qualied person. This electric tool
complies with the relevant safety rules.
Repairs should only be carried out by
qualied persons using original spare
parts, otherwise this may result in considerable danger to the user.
Further Safety Instructions
• Connect the device only to a power
point with a residual current protective
device (RCD) with a measured residual
current of not more than 30 mA.
• Keep the mains cable and extension
cable away from the grinding disc. In
the event that it is damaged or severed,
immediately disconnect the plug from
the socket.
Do not touch the cable before it has
been disconnected from the mains.
Risk of electric shock.
• The replacement of the plug or the connection line must always be executed
by the manufacturer of the electric tool
or his/her customer service in order to
avoid any hazards.
• Only switch the device on once it is
safely xed to the worktop.
• For your own safety only use accessories and attachments which were
stated in the operating instructions or
recommended or specied by the tool
manufacturer.
• Only use grinding tools recommended
by the manufacturer. Do not use any
saw blades. Ensure that the dimensions
match those of the device.
• Only use grinding discs where the
printed rotational speed is at least as
high as what has been specied on the
name plate of the device.
• Carry out a visual inspection of the
grinding disc before use. Do not use
any damaged or deformed grinding
discs. Replace any damaged or worn
grinding discs.
• Never operate the device without spark
protection or protective hoods.
Periodically readjust the spark protec-
tion in order to offset the wear and tear
of the grinding disc (distance max. 2
mm).
• Replace the grinding disc if the spark
protection and the workpiece support
can no longer be readjusted to a dis-
tance of max. 2 mm at the latest.
9

GB
• Make sure that the sparks produced
by grinding do not present a danger,
e.g. reach people or ignite ammable
substances.
• Always wear safety goggles, safety
gloves, respiratory protection and ear
protection when grinding, brushing
and separating.
• Never keep the ngers between the
grinding disc and spark protection
or in close proximity to the protective
hoods. There is a risk of crushing.
• The rotating parts of the device cannot
be covered due to functional reasons.
Therefore, proceed cautiously and hold
the workpiece rmly in order to avoid
slipping which could cause your hands
to come into contact with the grinding
disc.
• The workpiece gets hot during grinding. Do not touch the machined area,
allow it to cool down. There is a risk
of burning. Do not use coolants or the
like.
• If you are tired or have consumed alcohol or tablets, do not work with the
device. Always have a break on time.
• Switch the device off and remove the
mains plug
- to loosen a blocked insertion tool,
- if the connection line is damaged or
entangled,
- in case of unusual sounds.
Residual risks
Even if properly operating and handling
this electric tool, some residual risks will
remain. Due to its construction and build,
this electric tool may present the following
hazards:
a) Lung damage, if suitable respiratory
protection is not worn.
b) Hearing damage, if suitable ear protec-
tion is not worn.
c) Damages to health due to
- touching the area of the grinding tool
which was not covered;
- the ejection of pieces from workpiece
or damaged grinding discs.
d) Damage to your health caused by
swinging your hands and arms when
operating the appliance for longer periods of time or if the unit is not held or
maintained properly.
Warning! During operation, this
electric tool generates an electro-
magnetic eld which, under certain
circumstances, may impair the functionality of active or passive medical
implants. To reduce the risk of serious or lethal injuries, we recommend
that persons with medical implants
consult their doctor and the manufacturer of their medical implant before
operating the machine.
Assembly
Caution! Risk of injury!
- Ensure that you have sufcient
space in which to work, and that
you do not endanger other people.
- Always fasten the device on to the
work surface with screws featuring
the sufcient length and thickness
in order to maintain control of the
device.
- All covers and protective devices
must be assembled properly before commissioning.
- Disconnect the mains plug before
changing the setting on the device.
10

GB
Figure and Figure show
how to t the spark protection and
workpiece support on the left-hand
side of the device. Fit the second
spark protection and the second
workpiece support
Assemble/adjust spark
protection
You will need a screwdriver and a
spanner (size 8 mm) to use as a coun-
ter holder to t the above.
1. Screw the spark protection (1) to
the spark protection holder (2). To
do this, use the xing screws (4),
nut (4a), spring washer (4b) and
washer (4c) supplied.
2. Fit the second spark protection in
a similar manner.
3. Screw the spark protection holder
(1) rmly to the protective hood
(5). To do this, use the 2 adjus-
ting screws incl. spring washers
and washers (3) and 2 nuts (3a).
4. Adjust the spark protection (1)
with the adjusting screws (3) - the
distance between the grinding
disc (10) and the spark protection must be max. 2 mm (see
small image).
Assemble/set workpiece
supports
1. Screw the workpiece supports
(11) on to the device.
2. To do this, use the screw (12a),
washer (12b), toothed washer
(12c) and star nut (12) supplied.
3. Set the workpiece support (11)
of the grinding disc with the star
grip nut (12) so that the distance
between the grinding disc (10)
and the workpiece support is
max. 2 mm (see small image).
Periodically readjust the workpiece
support in order to offset the wear
and tear of the grinding disc (dis-
tance max. 2 mm).
Screw device on to workbench
Screw the device onto the work-
bench with 4 screws and nuts.
Insert the screws through the 4 bore
holes (13) on the base of the de-
vice.
The screws and nuts required for as-
sembly are not part of the scope of
delivery.
Periodically readjust the spark pro-
tection in order to offset the wear
and tear of the grinding disc (dis-
tance max. 2mm).
Despite the spark protection, you
should always wear protective goggles when working in order to avoid
eye injuries.
Operation
Caution! Risk of injury!
- Always disconnect the plug from
the mains socket before working.
- Use only grinding discs and accessories recommended by the manu-
facturer. The use of other insertion
tools and other accessories may
cause risk of injury.
11

GB
- Only use grinding tools which
bear information about the manufacturer, type of binding, dimension and permitted number of
revolutions.
- Only use grinding discs where
the printed rotational speed is at
least as high as what has been
specied on the name plate of
the device.
- Do not use broken, cracked or otherwise damaged grinding discs.
- Never operate the device without
the visual protection disc.
- Always inspect the grinding disc
before starting the device:
Check the distance between the
spark protection and grinding
disc as well as workpiece support
and grinding disc (distance maximum 2 mm).
- The grinding disc must be re-
placed once the spark protection
and workpiece support on the
grinding disc do not have dis-
tance of max. 2 mm.
- Switch on the equipment only
when it is safely installed on the
work surface.
1. To switch on, press the “I” On switch
and the device starts up (see
2. To switch off, press the “0” off switch
and the device switches off (see
14b).
After switching on the device, wait until the
device has reached its max. speed. Only
then must you start with the grinding.
The disc will continue to
run after the equipment is
switched off. There is a risk of
injury.
Test run:
Before starting work and after each change
of grinding disc, carry out a test run of at
least 60 seconds with no load. Switch off
the equipment immediately if the disc runs
lumpy, substantial vibrations occur, or abnormal noises are generated.
14a).
Grinding with the grinding
disc
The arrow on the protective hood
(
5) shows the direction of rota-
tion of the grinding disc.
Keep your hands away from
the grinding disc when the
device is in operation. Injury
hazard!
Switching on and off
Ensure that the mains voltage
matches the specications on the
rating plate.
Connect the equipment to the mains.
12
• Place the workpiece on the workpiece
support (
its desired angle on the grinding disc
(
10).
• Move the workpiece slightly from side
to side in order to achieve an optimal
grinding result. This way, the grinding
disc is worn uniformly. Occasionally,
allow the workpiece to cool down.
• The magnifying glass set into the spark
protection window (1) helps you to
work accurately.
11) and slowly bring it to

GB
Changing the grinding disc
Information on replace-
ment:
• Never operate the device without
protective equipment.
• Ensure that the rotation speed
stated on the grinding disc (
10) is the same or higher than
the nominal rotation speed of the
device.
• Ensure that the grinding disc
dimensions match those of the
device.
• Only use awless grinding discs
(sound test: an undamaged grinding disc hanging freely on a
string will result in a clear sound
if it is tapped with a plastic hammer).
• Never re-drill a locating hole
which is too small to make it
larger.
• Never use separate bushings or
adapters in order to make grinding discs whose hole is too large
t the device.
• Do not use any saw blades.
• To clamp the grinding tools only
use the clamping ange provided. The pads between the clamping ange and the grinding tools
must be made of elastic materials
e.g., rubber, soft cardboard etc.
• Always reassemble the device
completely after replacing the
grinding disc.
Switch the device off and remove
the mains plug.
Allow the device to cool down.
Wear protective gloves when
changing the grinding discs in order to avoid cutting damages.
The grinding disc nuts (10a) have
different threads (left-hand and
right-hand threads). To avoid damaging the grinding disc spindle
thread (15), never mix up the two
grinding disc nuts (10a).
1. Undo the xing screws ( 7) and
remove the left-hand and righthand grinding disc cover (
2. Unscrew the grinding disc nuts
(10a) by counter-holding the nut
on the opposite grinding disc with
a spanner (size 19 mm).
Unscrewing the left-hand nut
(left-hand thread):
turn clockwise.
Unscrewing the right-hand nut
(right-hand thread):
turn anticlockwise.
3. Remove the clamping ange (10b)
and the grinding disc (10).
4. Set up the new grinding disc (10)
with the intermediate shims (10c)
made of cardboard and the clam-
ping ange (10b) and manually
screw the grinding disc nut (10a)
on.
Screwing the left-hand nut
(left-hand thread) on:
turn anticlockwise.
Screwing the right-hand nut
(right-hand thread) on:
turn clockwise.
5. Screw the left hand and right
hand grinding disc covers (8) on.
6. Adjust the spark protection (
and the workpiece support (
11) - the distance to the grinding
8).
1)
13

GB
disc (10) is max. 2 mm (see „Assembly“)
The grinding disc nut must not be
screwed too tightly in order to
avoid a breaking of the grinding
disc and nut.
7. Test run:
Before starting work and after each
change of grinding disc, carry out a
test run of at least 60 seconds with no
load. Switch off the equipment immediately if the disc runs lumpy, substantial
vibrations occur, or abnormal noises
are generated.
Cleaning and
maintenance
Disconnect the plug before adjust-
ment, maintenance or repair.
Have any work not described
in these instructions carried
out by a specialist workshop.
Use only original components.
Allow the equipment to cool
before carrying out any maintenance and cleaning work.
There is a risk of burns.
Cleaning
Do not use cleaning agents or sol-
vents. Chemical substances may
attack plastic parts of the equipment.
Never clean the equipment under
running water.
General maintenance
Before each use, check the equipment
for obvious defects such as loose, worn
or damaged components and check that
screws or other parts are sitting correctly.
In particular, check the grinding disc (
10). Replace damaged parts.
Storage
• Store the appliance in a dry place well
out of reach of children.
• Grinding discs must be stored dry and
upright and are not to be stacked.
Waste disposal and environmental protection
Be environmentally friendly. Return the
tool, accessories and packaging to a recy-
cling centre when you have nished with
them.
Machines are not to be place with
domestic waste.
Hand over the device at an utilization location. The plastic and metal parts employed
can be separated out into pure materials
and recycling can be implemented. Ask
your Service Center about this. Defective
units returned to us will be disposed of for
free.
• Clean the equipment thoroughly after
each use.
• Clean the surface of the equipment
with a brush or cloth.
14

GB
Replacement parts/accessories
Spare parts and accessories can be obtained at www.grizzly-service.eu
If you do not have internet access, please contact the Service Centre via telephone
(see “Service-Center” page 18). Please have the order number mentioned below ready.
Position Position Description Order
Instruction Exploded number
manual drawing
1,2,3 SET1 Spark protection, holder and adjusting screw 91103556
11 SET3 LEFT Workpiece support, left 91103558
SET3 RIGHT Workpiece support, right 91103559
14 SET2 On/off-switch 91103557
10 5 Grinding disc, left 91103553
28 Grinding disc, right 91103554
10a 3 Grinding disc nut, left 91103551
29 Grinding disc nut, right 91103555
10b 4 Clamping ange 91103552
15

GB
Trouble Shooting
Always disconnect the plug from the mains socket before working.
Danger of electric shock.
Problem Possible Cause Error correction
Check the socket, mains cable,
line, mains plug, repairs to be
carried out by qualied electrician if necessary, check main
circuit breaker.
Repair by Customer Care
Device doesn‘t start
Mains voltage missing
Main circuit breaker is tripped
On/off switch (
defective
Engine faulty
14) may be
Grinding tools do
not move although
the engine is running
Engine is slower
and stops
Grinding disc does
not rotate smoothly,
abnormal noises
can be heard
Grinding disc nut (
loose
Workpiece, remaining workpieces or remaining grinding
tools block drive
Device is overloaded through
workpiece
Grinding disc nut (
loose
Grinding disc (
Spark protection (1) or work-
piece support (
incorrectly
10a)
10a)
10) faulty
11) set
Tighten grinding disc nut (see
„Changing the grinding disc“)
Remove blockages
Reduce pressure on grinding tool
Workpiece unsuitable
Tighten grinding disc nut (see
„Changing the grinding disc“)
Change grinding disc
Set spark protection or work-
piece support (see „Assembly“)
16

GB
Guarantee
Dear Customer, this equipment is provided
with a 3-year guarantee from the date of
purchase. In case of defects, you have stat-
utory rights against the seller of the prod-
uct. These statutory rights are not restricted
by our guarantee presented below.
Terms of Guarantee
The term of the guarantee begins on the
date of purchase. Please retain the original
receipt. This document is required as proof
of purchase.
If a material or manufacturing defect occurs
within three years of the date of purchase
of this product, we will repair or replace –
at our choice – the product for you free of
charge. This guarantee requires the defective equipment and proof of purchase to be
presented within the three-year period with
a brief written description of what constitutes the defect and when it occurred.
If the defect is covered by our guarantee, you
will receive either the repaired product or a
new product. No new guarantee period begins on repair or replacement of the product.
Guarantee Period and Statutory
Claims for Defects
The guarantee period is not extended by
the guarantee service. This also applies for
replaced or repaired parts. Any damages
and defects already present at the time of
purchase must be reported immediately af-
ter unpacking. Repairs arising after expiry
of the guarantee period are chargeable.
Guarantee Cover
The equipment has been carefully produced
in accordance with strict quality guidelines
and conscientiously checked prior to delivery.
The guarantee applies for all material and
manufacturing defects. This guarantee
does not extend to cover product parts
that are subject to normal wear and may
therefore be considered as wearing parts
(e.g. grinding discs, carbon brushes, stopper, protective screen) or to cover damage
to breakable parts (e.g. switches, batteries,
or parts made of glass).
This guarantee shall be invalid if the product has been damaged, used incorrectly or
not maintained. Precise adherence to all of
the instructions specied in the operating
manual is required for proper use of the
product. Intended uses and actions against
which the operating manual advises or
warns must be categorically avoided.
The product is designed only for private and
not commercial use. The guarantee will be
invalidated in case of misuse or improper handling, use of force, or interventions not undertaken by our authorised service branch.
Processing in Case of Guarantee
To ensure quick handling of you issue,
please follow the following directions:
• Please have the receipt and identication number (IAN 102876) ready as
proof of purchase for all enquiries.
• Please nd the item number on the rating plate.
• Should functional errors or other defects occur, please initially contact the
service department specied below by
telephone or by e-mail. You will then
receive further information on the processing of your complaint.
• After consultation with our customer
service, a product recorded as defective
can be sent postage paid to the service
address communicated to you, with the
proof of purchase (receipt) and speci-
cation of what constitutes the defect
and when it occurred. In order to avoid
17

GB
acceptance problems and additional
costs, please be sure to use only the address communicated to you. Ensure that
the consignment is not sent carriage
forward or by bulky goods, express or
other special freight. Please send the
equipment inc. all accessories supplied
at the time of purchase and ensure adequate, safe transport packaging.
Repair Service
For a charge, repairs not covered by the
guarantee can be carried out by our ser-
vice branch, which will be happy to issue
a cost estimate for you. We can handle
only equipment that has been sent with adequate packaging and postage.
Attention: Please send your equipment to
our service branch in clean condition and
with an indication of the defect.
Equipment sent carriage forward or by
bulky goods, express or other special
freight will not be accepted.
We will dispose of your defective devices
free of charge when you send them to us.
Service-Center
Service Great Britain
Tel.: 0871 5000 720
(£ 0.10/Min.)
E-Mail: grizzly@lidl.co.uk
IAN 102876
Importer
Please note that the following address is
not a service address. Please initially con-
tact the service centre specied above.
Grizzly Tools GmbH & Co. KG
Stockstädter Straße 20
D-63762 Großostheim
Germany
www.grizzly-service.eu
18

PL
Spis tresci
Wstęp ........................................ 19
Przeznaczenie ............................ 19
Opis ogólny ............................... 20
Zawartość opakowania ................... 20
Opis działania ............................... 20
Przegląd ........................................ 20
Dane techniczne ......................... 21
Zasady bezpieczeństwa ............. 21
Symbole i piktogramy ...................... 22
Ogólne zasady bezpieczeństwa ....... 22
Dalsze zasady bezpieczeństwa ........ 25
Zagrożenia ogólne..........................26
Montaż ...................................... 26
Montaż i regulacja osłony
przeciwiskrowej .............................. 26
Montaż i regulacja uchwytów do
mocowania obrabianego materiału ... 27
Przykręcanie urządzenia na stole
roboczym ....................................... 27
Obsługa.....................................27
Włączanie i wyłączanie .................. 28
Szlifowanie z tarczą szlierską ......... 28
Wymiana tarczy szlierskiej ............. 29
Oczyszczanie i konserwacja ....... 30
Oczyszczanie ................................ 30
Ogólne czynności konserwacyjne ..... 30
Przechowywanie urządzenia .....30
Usuwanie i ochrona środowiska ..31
Części zamienne/Akcesoria ........ 31
Poszukiwanie błędów ................32
Gwarancja .................................33
Serwis naprawczy .....................34
Service-Center ............................ 34
Importer .................................... 34
Tłumaczenie oryginalnej
deklaracji zgodności WE...............98
Rysunek samorozwijający .......101
Wstęp
Gratulujemy zakupu nowego urządzenia.
Zdecydowali się Państwo na zakup wartościowego produktu.
Niniejsze urządzenie sprawdzono w trakcie produkcji pod kątem jakości, a także
dokonano jego kontroli ostatecznej. W ten
sposób zapewniona jest jego sprawność.
Instrukcja obsługi jest częścią skła-
dową produktu. Zawiera ona ważne wskazówki dotyczące bezpieczeństwa, eksploatacji i utylizacji.
Przed rozpoczęciem użytkowania
produktu należy się zapoznać ze
wszystkimi wskazówkami dotyczącymi obsługi i bezpieczeństwa.
Produkt należy użytkować tylko
zgodnie z opisem i podanym prze-
znaczeniem. Instrukcję należy przechowywać starannie, a w przypad-
ku przekazania produktu osobom
trzecim należy dostarczyć nabywcy
kompletną dokumentację.
Przeznaczenie
Szlierka podwójna przeznaczona jest do
ostrzenia narzędzi (np. noży, nożyczek,
dłut) oraz do gratowania i szlifowania
mniejszych detali z metalu.
Urządzenie nie nadaje się do wszelkich
innych rodzajów zastosowań (np. do szlifowania z użyciem nieodpowiednich narzędzi szlierskich, szlifowania z użyciem
chłodziwa, szlifowania materiałów niebez-
piecznych dla zdrowia, np. azbestu).
Urządzenie jest przeznaczone do amatorskich prac w gospodarstwie domowym.
Nie jest ono przeznaczone do stałego stosowania w celach zarobkowych.
Urządzenie może być używane tylko
przez osoby dorosłe. Osoby młodociane
19

PL
powyżej 16 roku życia mogą używać
urządzenia tylko pod nadzorem.
Producent nie odpowiada za szkody wy-
wołane niezgodnym z przeznaczeniem
użytkowaniem lub nieprawidłową obsługą
urządzenia.
Opis ogólny
Ilustracje znajdują się na
okładce przedniej i tylnej.
Zawartość opakowania
Rozpakuj urządzenie i sprawdź, czy jest
ono kompletne. Prawidłowo posegreguj i
usuń materiały opakowania.
• Urządzenie
• 2 x osłony przeciwiskrowe
• Materiał montażowy do zamocowania
osłony przeciwiskrowej na uchwycie
osłony przeciwiskrowej
- 2 x uchwyt na osłonę przeciwiskrową
- 2 śruby mocujące, 2 pierścienie sprę-
żyste, 2 podkładki, 2 nakrętki
• Materiał montażowy do zamocowania
osłony przeciwiskrowej na urządzeniu
- 4 śruby regulacyjne wraz z podkład-
kami i pierścieniami sprężystymi,
4nakrętki
• 2 podstawy detali
• Materiał montażowy do mocowania
podstaw detali na urządzeniu
- 2 nakrętki gwiazdkowe, 2 śruby,
2podkładki, 2 podkładki zębate
• Instrukcja obsługi
Opis działania
Szlierka podwójna jest podwójnym urządzeniem, wyposażonym w dwie tarcze
szlierskie o różnej ziarnistości do szlifo-
wania zgrubnego i precyzyjnego. W celu
ochrony użytkownika urządzenie posiada
osłonę przeciwiskrową i osłony ochronne.
Funkcje elementów urządzenia są podane
w poniższym opisie.
Przegląd
1 Osłona przeciwiskrowa
2 Uchwyt osłony przeciwiskrowej
3 Śruby regulacyjne osłony prze-
ciwiskrowej
4 Śruba mocująca osłony przeciwi-
skrowej
5 Osłona ochronna tarczy szlier-
skiej
6 Obudowa silnika
7 Śruby mocujące osłonę tarczy
szlierskiej
8 Osłona tarczy szlierskiej
9 Kabel zasilający
10 Tarcza szlierska
11 Podstawa detalu
12 Nakrętka gwiazdkowa do monta-
żu/regulacji podstawy obrabia-
nego materiału
13 Otwory do montażu na stole
14 Włącznik/wyłącznik
14a Włącznik
14b Wyłącznik
15 Wrzeciono szlierskie
20

PL
Dane techniczne
Znamionowe napięcie
wejścia ........................... 230 V~, 50 Hz
Pobór mocy ............. 200 W (S2 30 min)*
Klasa zabezpieczenia ........................... I
Typ zabezpieczenia .........................IP20
Prędkość obrotowa
znamionowa n
Prędkość obrotowa v
Tarcza szlierska
Średnica zewn.................... Ø 150 mm
Otwór............................... Ø 12,7 mm
Grubość................................... 20 mm
Stopień twardości ............................P5
Ziarnistość ............................... 36/80
Prędkość obrotowa n
Prędkość robocza............ maks. 35 m/s
Ciężar .................................. ok. 5,7 kg
Poziom ciśnienia akustycznego
(L
) ................... 80 dB(A); KpA=3 dB(A)
pA
Poziom mocy akustycznej (L
zmierzony .......... 93 dB(A); K
Łączna wartość poziomu
wibracji (a
* Po nieprzerwanej pracy przez 30 minut
następuje przerwa, do momentu schłodzenia
się urządzenia do temperatury odbiegającej
od temperatury otoczenia o mniej niż 2 K
(2°C).
Parametry akustyki i wibracji zostały określone zgodnie z normami wymienionymi w
Deklaracji Producenta.
Zmiany techniczne i optyczne mogą być
wprowadzane bez zapowiedzi w trakcie
procesu dalszego rozwoju urządzenia.
Wszelkie wymiary, wskazówki i dane
podane w niniejszej instrukcji obsługi są
w związku z tym podawane w sposób
niewiążący. Roszczenia zgłaszane na
podstawie treści instrukcji obsługi są nieważne.
.......2950 min-1 (obr/min)
0
...................23 m/s
0
...maks. 4500 min
0
)
wA
=3 dB(A)
wA
) ........................... 2,5 m/s
h
Podana wartość emisji drgań została zmierzona metodą znormalizowaną i może
być wykorzystywana do porównań urządzenia elektrycznego z innymi urządzeniami. Podana wartość emisji drgań może
też służyć do szacunkowej oceny stopnia
ekspozycji użytkownika na drgania.
Ostrzeżenie: Wartość emisji
drgań może się różnić w czasie korzystania z urządzenia od podanej
wartości, jest to zależne od sposobu używania urządzenia.
Istnieje konieczność określenia i
zastosowania środków ochrony
użytkownika, opartych na ocenie
-1
ekspozycji w rzeczywistych warun-
kach używania urządzenia (należy
przy tym uwzględnić wszystkie części cyklu roboczego, na przykład
okresy czasu, w których urządzenie
elektryczne jest wyłączone bądź
jest włączone, ale pracuje bez obciążenia).
2
Zasady bezpieczeństwa
UWAGA!
W czasie korzystania z elektrona-
rzędzi należy w celu zabezpieczenia przed porażeniem prądem elektrycznym, obrażeniami i pożarem
przestrzegać następujących zasad
bezpieczeństwa:
Przed użyciem elektronarzędzia
przeczytać wszystkie wskazówki
bezpieczeństwa opisane w instrukcji oraz przechowywać je staran-
nie.
21
PL
Zasady bezpieczeństwa/symbole
na urządzeniu
Uwaga!
Niebezpieczeństwo zranienia przez
obracające się narzędzie! Trzymaj
ręce w bezpiecznej odległości.
Niebezpieczeństwo porażenia
prądem elektrycznym! Przed rozpoczęciem jakichkolwiek prac przy
urządzeniu wyjmij wtyczkę sieciową z gniazdka.
Przeczytaj instrukcję obsługi urzą-
dzenia i stosuj się do niej.
Nosić ochronniki słuchu.
Noś okulary ochronne.
Noś ochronę dróg oddechowych.
Niebezpieczeństwo skaleczenia!
Noś odporne na przecięcie rękawice.
Nosić antypoślizgowe obuwie
ochronne.
Urządzeń elektrycznych nie należy
wyrzucać razem z odpadami do-
mowymi
Wymiary tarczy szlierskiej
Symbole i piktogramy
Symbole w instrukcji obsługi
Symbol niebezpieczeństwa z
informacjami na temat ochrony osób i zapobiegania szkodom materialnym.
Znak nakazu (w miejscu wykrzyk-
nika objaśnienie nakazu) z informacjami na temat zapobiegania
szkodom.
Znak informacyjny ze wskazówka-
mi ułatwiającymi posługiwanie się
urządzeniem.
Ogólne zasady
bezpieczeństwa
Użyte w wskazówkach bezpieczeństwa
pojęcie „elektronarzędzie“ dotyczy narzędzi elektrycznych zasilanych sieciowo
(przez kabel sieciowy) oraz narzędzi elek-
trycznych zasilanych akumulatorami (bez
kabla sieciowego).
Bezpieczna praca:
• Utrzymuj porządek w miejscu
pracy. Nieporządek w miejscu pracy
może spowodować wypadek.
• Zwracaj uwagą na wpływy oto-
czenia.
- Nie wystawiaj narzędzi elektrycznych na deszcz. Nie używaj narzędzi elektrycznych w mokrym lub
wilgotnym otoczeniu.
Dostanie się wody do wnętrza narzędzia elektrycznego zwiększa ryzyko
porażenia prądem.
- Zapewnij dobre oświetlenie miejsca
pracy.
- Nie używaj narzędzi elektrycznych
22

PL
w otoczeniu, w którym istnieje nie-
bezpieczeństwo pożaru lub wybuchu. Narzędzia elektryczne wytwarzają iskry, które mogą zapalić pył
lub pary.
• Zabezpiecz się przed porażeniem prądem elektrycznym.
Unikaj kontaktu części ciała z uziemionymi częściami (np. rurami, słupkami
metalowymi, kaloryferami, kuchenkami
elektrycznymi, lodówkami).
• Trzymaj inne osoby z dala od
urządzenia. Nie pozwalaj innym
osobom, a w szczególności dzieciom,
dotykać narzędzia elektrycznego ani
kabla przedłużacza. Trzymaj te osoby
daleko od miejsca obszaru.
• Nieużywane narzędzia elektryczne przechowuj w bezpiecznym miejscu. Przechowuj nieużywa-
ne narzędzia elektryczne w suchym,
wysoko położonym lub zamkniętym i
niedostępnym dla dzieci miejscu.
• Nie przeciążaj narzędzia elektrycznego. Pracują one lepiej i bez-
pieczniej w podanym zakresie mocy.
• Używaj właściwego narzędzia
elektrycznego.
- Nie używaj maszyn o małej mocy do
wykonywania ciężkich prac.
- Nie używaj narzędzia elektrycznego
do celów niezgodnych z jego prze-
znaczeniem. Nie używaj na przykład
tarczówki ręcznej do odcinania gałę-
zi drzew czy bali drewnianych.
Używanie narzędzia elektrycznego
do celów niezgodnych z ich przeznaczeniem może prowadzić do niebezpiecznych sytuacji.
• Noś odpowiednie ubranie.
- Nie zakładaj obszernych ubrań ani
biżuterii, mogą one zostać pochwycone przez ruchome części urządze-
nia.
- Podczas pracy na dworze zalecane
jest przeciwpoślizgowe obuwie.
- Jeżeli masz długie włosy, załóż siatkę na włosy.
• Używaj środków ochrony.
- Zakładaj okulary ochronne. Nienoszenie okularów ochronnych może
wywołać zranienie oczu przez iskry
lub cząstki pyłu ściernego.
- Przy pracach, w czasie których po-
wstaje pył, noś maskę przeciwpyłową.
• Podłącz wyciąg pyłu. Jeżeli wystę-
pują króćce przyrządów odsysających
lub wychwytujących pył, upewnij się,
że są one dobrze połączone i prawidłowo używane.
• Nie używaj kabla do celów
niezgodnych z jego przeznaczeniem. Nie wyciągaj wtyczki z
gniazdka ciągnąc za kabel. Chroń
kabel przed gorącem, olejem i ostrymi
krawędziami.
• Zabezpieczaj obrabiany przed-
miot. Używaj uchwytów mocujących
albo imadła do mocowania obrabianych przedmiotów. W ten sposób
przedmioty będą trzymane pewniej niż
ręką.
• Unikaj anormalnej pozycji ciała.
Zapewnij sobie stabilną pozycję i za-
wsze zachowuj równowagę ciała.
Dzięki temu możliwe będzie zachowanie lepszej kontroli nad narzędziem
elektrycznym w nieoczekiwanych sytuacjach.
• Starannie pielęgnuj narzędzia.
Przyczyną wielu wypadków są źle konserwowane narzędzia elektryczne.
- Dbaj o to, by narzędzia tnące były
zawsze ostre i czyste, aby móc lepiej
i bezpieczniej pracować.
- Przestrzegaj wskazówek dotyczących
smarowania urządzenia i wymiany
23

PL
narzędzi.
- Regularnie sprawdzaj kabel zasilający narzędzia elektrycznego; w razie
uszkodzenia zlecaj jego wymianę
wykwalikowanemu elektrykowi.
- Regularnie kontroluj przedłużacze i
wymieniaj je w razie stwierdzenia
uszkodzeń.
- Dbaj o to, by uchwyty były suche
oraz czyste i nie były zanieczyszczo-
ne olejem ani smarem.
• Wyjmij wtyczkę z gniazdka jeżeli
nie używasz narzędzia elektrycznego,
przed rozpoczęciem jego konserwacji i
pielęgnacji oraz przed wymianą narzędzi, takich jak nóż, wiertarka, frez.
Ten środek ostrożności uniemożliwi
przypadkowe uruchomienie narzędzia
elektrycznego.
• Nie zostawiaj w urządzeniu kluczy narzędziowych. Przed włącze-
niem urządzenia zawsze sprawdzaj,
czy zostały wyjęte klucze i przyrządy
służące do ustawiania.
Narzędzie lub klucz znajdujący się w
obrotowej części urządzenia może spowodować zranienie.
• Wyklucz przypadkowe włączenie. Upewniaj się, że włącznik-wyłącz-
nik jest wyłączony podczas podłączania wtyczki do gniazdka prądowego.
• Używaj przedłużaczy dopuszczonych do użytku na dworze.
Na dworze używaj tylko dopuszczonych do używania na dworze i odpowiednio oznakowanych przedłużaczy.
• Zachowuj uwagę, uważaj na
to, co robisz i pracuj narzędziem
elektrycznym rozsądnie. Nie
używaj narzędzia elektrycznego, jeżeli
jesteś zmęczony albo jeżeli pod wpły-
wem narkotyków, alkoholu albo leków.
Chwila nieuwagi podczas używania
narzędzia elektrycznego może dopro-
wadzić do poważnych zranień.
• Sprawdzaj, czy narzędzie elek-
tryczne nie wykazuje uszkodzeń.
Pozwoli to zachować bezpieczeństwo
użytkowania narzędzia elektrycznego.
- Przed użyciem narzędzia elektrycznego sprawdź, czy elementy ochronne
i lekko uszkodzone części działają
prawidłowo i zgodnie ze swoim
przeznaczeniem.
- Sprawdź, czy ruchome części działają, nie są zakleszczone i nie są
uszkodzone. Wszystkie części muszą
być prawidłowo zamontowane i
spełniać wszelkie warunki sprawnej i
bezpiecznej pracy.
- Uszkodzone zabezpieczenia i części
muszą być naprawiane lub wymie-
niane na nowe zgodnie z ich przeznaczeniem przez autoryzowane
warsztaty, o ile w instrukcji obsługi
nie podano inaczej.
- Uszkodzone włączniki-wyłączniki
muszą być wymieniane przez punkt
serwisowy.
- Nie używaj narzędzi elektrycznych,
których włącznika-wyłącznika nie
można włączać i wyłączać.
Istnieje niebezpieczeństwo doznania
obrażeń.
• Uwaga! Używanie innych niż podane
narzędzi i innych akcesoriów może grozić zranieniem.
• Urządzenie elektryczne może
być naprawiane wyłącznie przez
wykwalikowanego elektryka.
To urządzenie elektryczne spełnia obowiązujące przepisy bezpieczeństwa.
Naprawy może wykonywać tylko autoryzowany warsztat przy użyciu oryginalnych części zamiennych, w przeciwnym razie może dojść do wypadku z
udziałem użytkownika.
24

PL
Dalsze zasady
bezpieczeństwa
• Przyłączaj urządzenie tylko do gniazdek wyposażonych w element ochronny
zabezpieczający przed prądem uszkodzeniowym (bezpiecznik Fi) o wartości
znamionowej nie większej od 30 mA.
• Trzymaj kabel sieciowy i kabel przedłużacza w bezpiecznej odległości pracującego tarczą szlierską. W przypadku
uszkodzenia lub przecięcia kabla sieciowego natychmiast wyciągnij wtyczkę
z gniazdka.
Nie dotykaj przewodu przed odłącze-
niem go od sieci elektrycznej. Nie-
bezpieczeństwo z powodu porażenia
prądem elektrycznym!
• Aby uniknąć niebezpieczeństw, wymianę wtyku lub przewodu zasilającego
należy zawsze powierzać producentowi elektronarzędzia lub jego autoryzo-
wanemu serwisowi.
• Urządzenie załączać dopiero wówczas, gdy jest ono bezpiecznie zamontowane na powierzchni roboczej.
• Dla Państwa własnego bezpieczeństwa
proszę używać tylko akcesoriów i urządzeń dodatkowych, wymienionych w
instrukcji obsługi lub zalecanych bądź
podanych przez producenta narzędzia.
• Stosować tylko narzędzia szlierskie
zalecane przez producenta. Nie używać pił. Upewnić się, czy wymiary
narzędzia pasują do urządzenia.
• Stosować tylko tarcze szlierskie, na
których nadrukowana jest prędkość obrotowa co najmniej taka jak prędkość
podana na tabliczce znamionowej
urządzenia.
• Przed użyciem tarczę szlierską poddać kontroli wzrokowej. Nie stosować
uszkodzonych lub odkształconych tarcz
szlierskich. Zużytą tarczę szlierską
wymienić.
• Nigdy nie używać urządzenia bez osłony przeciwiskrowej lub osłon ochronnych.
Osłonę przeciwiskrową okresowo regulo-
wać, aby dopasować ją do stopnia zużycia tarczy szlierskiej (odstęp maks.
2 mm).
• Tarczę szlierską wymienić najpóźniej,
gdy nie da się już ustawić osłony prze-
ciwiskrowej i uchwytu obrabianego
materiału na odstęp maks. 2 mm.
• Pamiętać, aby iskry powstające podczas szlifowania nie powodowały
żadnego niebezpieczeństwa, np. nie
traały w osoby lub nie zapaliły pal-
nych substancji.
• Podczas szlifowania, szczotkowania i
cięcia nosić zawsze okulary ochronne,
rękawice ochronne, ochronę dróg oddechowych i ochronniki słuchu.
• Nigdy nie trzymać palców między tarczą szlierską i osłoną przeciwiskrową
lub w pobliżu osłon ochronnych. Niebezpieczeństwo zmiażdżenia.
• Obracających się części urządzenia z
powodów funkcjonalnych nie można
zakrywać. Dlatego proszę zachować
rozwagę i dobrze trzymać obrabiany
element, aby uniknąć jego ześlizgnięcia się, co mogłoby spowodować nieumyślny kontakt dłoni tarczą szlierską.
• Podczas szlifowania obrabiany element
mocno się nagrzewa. Nie chwytać
za obrabiane miejsce, odczekać do
jego schłodzenia. Niebezpieczeństwo
oparzenia. Nie stosować czynników
chłodzących ani podobnych środków.
• Nie należy pracować z urządzeniem
w przypadku zmęczenia, po spożyciu
alkoholu lub zażyciu tabletek. Zawsze
odpowiednio wcześniej zrobić sobie
przerwę w pracy.
• Wyłączyć urządzenie i wyciągnąć
wtyk sieciowy
25
PL
- aby uwolnić zablokowane narzędzie,
- jeśli przewód zasilający jest uszkodzony lub splątany,
- w przypadku podejrzanych odgłosów.
Zagrożenia ogólne
Nawet przy przepisowej obsłudze urządzenia elektrycznego występują tzw. zagrożenia ogólne. W związku z konstrukcją
i sposobem pracy urządzenia elektrycznego mogą występować następujące zagrożenia ogólne:
a) uszkodzenie płuc, w przypadku niesto-
sowania odpowiednich środków ochro-
ny dróg oddechowych.
b) uszkodzenie słuchu w przypadku nie-
stosowania odpowiednich ochronników
słuchu.
c) szkody zdrowotne spowodowane przez
- kontakt z narzędziem szlierskim w
nieosłoniętym miejscu;
- wyrzucenie części obrabianego elementu lub uszkodzonej tarczy szlier-
skiej.
d) Szkody na zdrowiu będące skutkiem
działania wibracji na rękę i ramię, jeżeli
urządzenie jest używane przez długi
czas lub nie jest odpowiednio prowadzone i przepisowo konserwowane.
Ostrzeżenie! To urządzenie elek-
tryczne wytwarza w czasie pracy
pole elektromagnetyczne. Pole to
może w określonych warunkach
wpływać na aktywne lub pasywne
implantaty medyczne. Aby zmniej-
szyć niebezpieczeństwo doznania
poważnych lub śmiertelnych obrażeń, zalecamy osobom posiadają-
cym implantaty medyczne skonsul-
towanie się z lekarzem i producentem implantatu przed rozpoczęciem
obsługiwania maszyny.
Montaż
Uwaga! Niebezpieczeństwo
obrażeń ciała!
- Należy pamiętać o zapewnieniu
sobie wystarczającej ilości miej-
sca do pracy i o niestwarzaniu
zagrożeń dla innych osób.
- Urządzenie mocować na po-
wierzchni roboczej zawsze za
pomocą śrub o wystarczającej
długości i grubości, aby nie stracić kontroli nad urządzeniem.
- Przed uruchomieniem urządzenia
muszą być prawidłowo zamontowane wszystkie osłony i elementy
zabezpieczające.
- Przed dokonaniem regulacji urządzenia wyciągnąć wtyk sieciowy.
Rysunek oraz rysunek
przedstawiają montaż osłony przeciwiskrowej oraz podstawy detalu
po lewej stronie urządzenia. Drugą
osłonę przeciwiskrową oraz drugą
podstawę detalu zamontować po
prawej stronie odpowiednio, jak w
odbiciu lustrzanym.
Montaż i regulacja osłony
przeciwiskrowej
Do montażu potrzebne będą śru-
bokręt i klucz płaski (rozmiar 8) do
kontrowania.
1. Przykręcić osłonę przeciwiskrową
(1) do uchwytu osłony przeciwiskrowej (2). Użyć do tego celu
dołączoną śrubę mocującą (4),
nakrętkę (4a), pierścień sprężysty
(4b) oraz podkładkę (4c)
2. Zamontować odpowiednio drugą
osłonę przeciwiskrową.
26
PL
3. Przykręcić uchwyt osłony przeciwiskrowej (1) do osłony ochronnej (5). Użyć do tego 2 śrub regulacyjnych wraz z pierścieniami
sprężystymi i podkładkami (3)
oraz 2 nakrętki (3a).
4. Osłonę przeciwiskrową (1) ustawić za pomocą śrub regulacyjnych (3): odstęp między tarczą
szlierską (10) a osłoną przeciwiskrową musi wynosić maksymalnie 2 mm (patrz mały rysunek).
Osłonę przeciwiskrową okresowo
regulować, aby dopasować ją do
stopnia zużycia tarczy szlierskiej
(odstęp maks. 2 mm).
Podczas pracy nosić zawsze mimo
osłony przeciwiskrowej również
okulary ochronne, aby zapobiec
obrażeniom oczu.
Montaż i regulacja uchwytów
do mocowania obrabianego
materiału
1. Przykręcić do urządzenia uchwy-
ty do mocowania obrabianego
materiału (11).
W tym celu użyć dołączonej
śruby (12a), podkładki (12b),
podkładki zębatej (12c) i nakrętki gwiazdkowej (12).
2. Uchwyt obrabianego materiału
dla tarczy szlierskiej (11) ustawić nakrętką gwiazdkową (12) w
taki sposób, aby odstęp między
tarczą szlierską (10) a uchwytem obrabianego materiału wynosił maksymalnie 2 mm (patrz
mała ilustr.).
Uchwyt obrabianego materiału
okresowo regulować, aby dopasować go do stopnia zużycia tarczy
szlierskiej (odstęp maks. 2 mm).
Przykręcanie urządzenia na
stole roboczym
Przykręcić urządzenie na po-
wierzchni roboczej za pomocą 4
śrub i nakrętek.
W tym celu przełożyć śruby przez
4 otwory (13) w podstawie urzą-
dzenia.
Śruby i nakrętki montażowe nie na-
leżą do zakresu dostawy.
Obsługa
Uwaga! Niebezpieczeństwo
zranienia!
- Przed rozpoczęciem jakichkolwiek czynności i prac przy urządzeniu wyjmij wtyczkę z gniazd-
ka sieciowego.
- Używaj tylko ściernic i akcesoriów zalecanych przez producen-
ta. Używanie innych niż podane
narzędzi i innych akcesoriów
może grozić zranieniem.
- Stosować tylko narzędzia szlierskie, na których podano dane
producenta, rodzaj spoiwa,
wymiary i dopuszczalną liczbę
obrotów.
- Stosować tylko tarcze szlierskie,
na których nadrukowana jest
prędkość obrotowa co najmniej
taka jak prędkość podana na tabliczce znamionowej urządzenia.
- Nie używaj połamanych, spęka-
nych czy inaczej uszkodzonych
27

PL
ściernic.
- Nigdy nie używaj urządzenia
bez szyby ochronnej.
- Proszę sprawdzić tarczę szlierską przed jej użyciem:
Sprawdzić odstęp między osłoną
przeciwiskrową i tarczą szlierską oraz uchwytem obrabianego
materiału i tarczą szlierską (odstęp maks. 2 mm).
- Gdy osłona przeciwiskrowa i
uchwyt obrabianego materiału
nie pozwalają przybliżyć się do
tarczy szlierskiej na maks. 2
mm, tarczę szlierską należy wymienić.
- Urządzenie wolno włączyć do-
piero po jego pewny przymocowaniu do podstawy roboczej.
W czasie pracy urządzenia
dłonie należy trzymać z dala
od tarczy szlierskiej. Niebezpieczeństwo zranienia.
Włączanie i wyłączanie
Uważaj, żeby napięcie sieci elek-
trycznej było zgodne z tabliczką
znamionową znajdującą się na
urządzeniu.
Podłącz urządzenie do sieci elek-
trycznej.
1. Aby włączyć, nacisnąć włącznik „I“
(zielony), urządzenie rozpocznie pracę
(patrz
2. Aby wyłączyć, nacisnąć wyłącznik „0“
(czerwony), urządzenie wyłączy się
(patrz
14a).
14b).
Po załączeniu urządzenia odczekać, aż
osiągnie ono swoją maks. prędkość obrotową. Dopiero wówczas możemy rozpocząć szlifowanie.
Ściernica obraca się jeszcze
przez jakiś po wyłączeniu
urządzenia. Niebezpieczeń-
stwo zranienia.
Próba działania:
Przed pierwszym rozpoczęciem pracy i
po każdej wymianie ściernicy sprawdzaj
działanie urządzenia przez 60 sekund
bez obciążenia. Natychmiast wyłącz urządzenie, jeżeli ściernica pracuje nierówno,
występują silne wibracje albo słychać
anormalne odgłosy.
Szlifowanie z tarczą
szlierską
Strzałka na osłonie ochronnej (
5) wskazuje kierunek obrotu tarczy
szlierskiej.
• Położyć obrabiany element na uchwy-
cie (
tarczy szlierskiej (
nym kątem.
• Poruszać lekko obrabianym elementem
tam i z powrotem, aby uzyskać optymalny efekt szlifowania. Dzięki temu
tarcza szlierska ulega równomiernemu
zużyciu. Co pewien czas pozwolić na
schłodzenie się obrabianego elementu.
• Lupa w szkle osłony przeciwiskrowej
(
11) i przysunąć go powoli do
10) pod żąda-
1) umożliwia precyzyjną pracę.
28

PL
Wymiana tarczy szlierskiej
Uwagi dotyczące wymiany:
• Nigdy nie używać urządzenia
bez elementów zabezpieczają-
cych.
• Upewnić się, że podana na tarczy szlierskiej (
obrotowa jest równa lub większa
niż nominalna prędkość obrotowa urządzenia bez obciążenia.
• Upewnić, że wymiary tarczy szlierskiej pasują do urządzenia.
• Proszę używać tylko tarcz szlierskich w dobrym stanie (Próba
dźwięku: zawieszone swobodnie
na sznurze, nieuszkodzone tar-
cze szlierskie wydają po uderzeniu ich plastikowym młotkiem
czysty dźwięk).
• Nie poszerzać zbyt małego
otworu mocowania tarczy szlier-
skiej.
• Nie stosować żadnych oddzielnych tulei redukcyjnych ani ada-
pterów, aby dopasować tarcze
szlierskie z za dużym otworem.
• Nie używać pił.
• Do mocowania narzędzi szlierskich można używać tylko dostarczonych kołnierzy mocujących.
Podkładki między kołnierzem
mocującym i narzędziami szlierskimi muszą być wykonane z elastycznego materiału np. gumy,
miękkiej tektury itp.
• Po wymianie tarczy szlierskiej
ponownie całkowicie zmontować
urządzenie.
Wyłączyć urządzenie i wyciągnąć
wtyk sieciowy. Poczekać do ostygnięcia urządzenia.
10) prędkość
Podczas wymiany tarczy szlier-
skiej nosić rękawice ochronne, aby
uniknąć skaleczenia.
Nakrętki tarcz szlierskich (10a)
mają różne gwinty (gwint lewy i
prawy) . Nigdy nie zamieniać obu
nakrętek tarcz szlierskich (10a),
aby uniknąć uszkodzenia gwintu
wrzeciona szlierskiego (15).
1. Odkręcić śruby mocujące (
7) i zdjąć lewą i prawą osłonę
tarczy szlierskiej (
2. Odkręcić nakrętkę tarczy szlierskiej (10a), przytrzymując
nakrętkę naprzeciwległej tarczy
szlierskiej przy pomocy klucza
płaskiego (rozmiar 19).
Odkręcanie lewej nakrętki (lewy
gwint):
obracać zgodnie z ruchem wskazówek zegara.
Odkręcanie prawej nakrętki (pra-
wy gwint):
obracać przeciwnie do ruchu
wskazówek zegara.
3. Zdjąć kołnierz mocujący (10b) i
tarczę szlierską (10).
4. Założyć nową tarczę szlierską
(10) wraz z przekładkami (10c)
z kartonu oraz kołnierz mocujący
(10b) i przykręcić ręką nakrętkę
tarczy szlierskiej (10a).
Przykręcanie lewej nakrętki (lewy
gwint):
obracać przeciwnie do ruchu
wskazówek zegara.
Przykręcanie prawej nakrętki
(prawy gwint):
obracać zgodnie z ruchem wska-
zówek zegara.
5. Przykręcić lewą i prawą osłonę
ochronną tarczy szlierskiej (8).
8).
29
PL
6. Ustawić osłonę przeciwiskrową
(
1) i podstawę detalu (
11): odstęp od tarczy szlierskiej
(10) musi wynosić maksymalnie
2 mm (patrz „Montaż“).
Nakrętki tarczy szlierskiej nie
wolno dokręcać zbyt mocno, aby
uniknąć pęknięcia tarczy i nakrętki.
7. Próba działania:
Przed pierwszym rozpoczęciem pracy
i po każdej wymianie ściernicy sprawdzaj działanie urządzenia przez 60
sekund bez obciążenia. Natychmiast
wyłącz urządzenie, jeżeli ściernica pracuje nierówno, występują silne wibracje
albo słychać anormalne odgłosy.
Oczyszczanie i
konserwacja
Przed każdym ustawieniem, czyn-
nością konserwacyjną i naprawą
wyjmuj wtyczkę sieciową z gniazd-
ka.
Oczyszczanie
Nie stosuj żadnych ostrych środków
czyszczących ani rozpuszczalników.
Substancje chemiczne mogą nieodwracalnie uszkodzić wykonane z
tworzywa sztucznego części urządzenia. Nigdy nie myj urządzenia
pod bieżącą wodą.
• Po każdym użyciu dokładnie oczyść
urządzenie.
• Oczyść szczeliny wentylacyjne i powierzchnię urządzenia miękką szczotką,
pędzlem lub szmatką.
Ogólne czynności
konserwacyjne
Przed każdym użyciem sprawdzaj, czy
urządzenie nie wykazuje widocznych braków, takich jak np. luźne, zużyte lub uszkodzone części, oraz czy śruby i inne części
urządzenia są dobrze dokręcone względnie zamocowane. Dokładnie sprawdzaj w
szczególności ściernicę (
ne części wymieniaj na nowe.
10). Uszkodzo-
Prace, które nie zostały opi-
sane w tej instrukcji obsługi,
należy zlecać specjalistycz-
nemu serwisowi. Stosuj tyl-
ko oryginalne części. Przed
wszelkimi pracami konserwacyjnymi i oczyszczaniem
zaczekaj, aż urządzenie wystygnie. Niebezpieczeństwo
oparzenia!
30
Przechowywanie
urządzenia
• Przechowuj urządzenie w suchym, zabezpieczonym przed pyłem i niedostęp-
nym dla dzieci miejscu.
• Ściernice należy przechowywać w
stanie suchym i w pozycji stojącej, nie
można ich układać jedna na drugiej.
 Loading...