

Parkside PDMFW 15 A1 Translation Of The Original Instructions
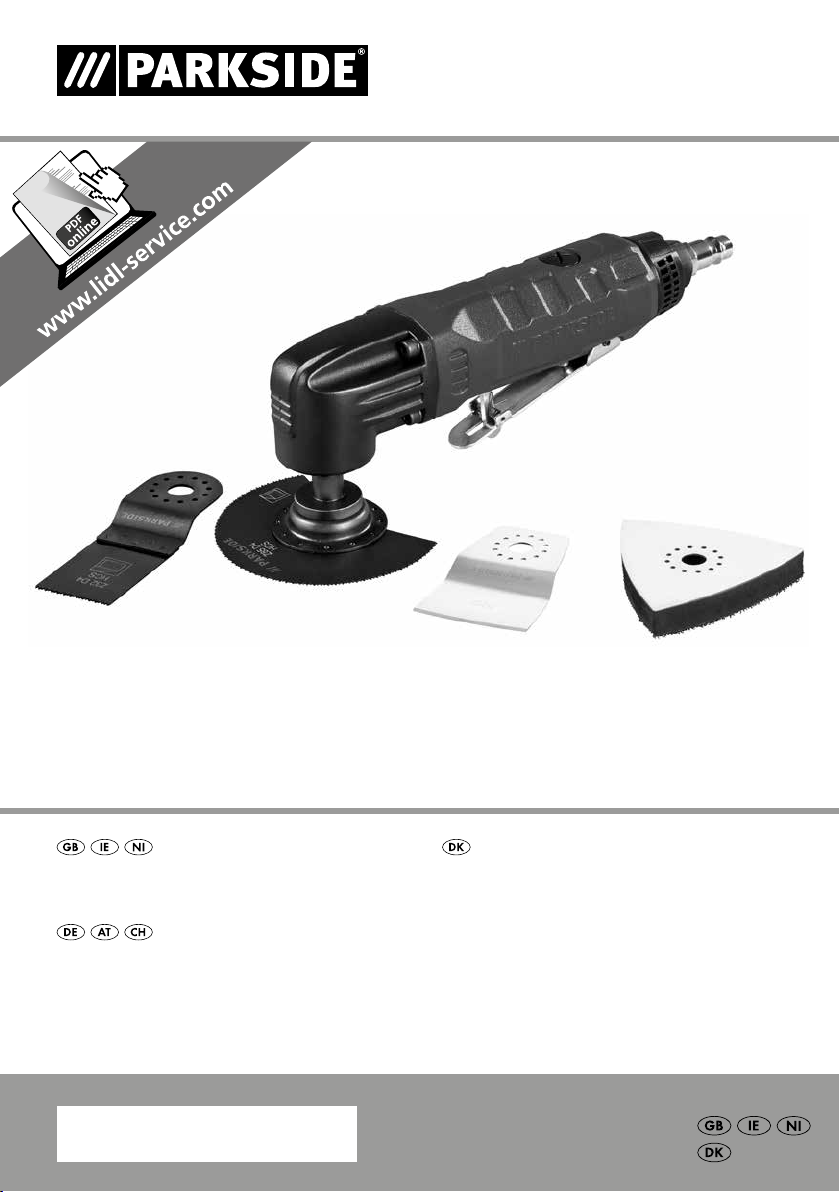
AIR MULTI TOOL PDMFW 15 A1
AIR MULTI TOOL
Translation of the original instructions
DRUCKLUFT-MULTIFUNKTIONSWERKZEUG
Originalbetriebsanleitung
TRYKLUFT-MULTIVÆRKTØJ
Oversættelse af den originale driftsvejledning
IAN 292170

Before reading, unfold the page containing the illustrations and familiarise yourself with all functions of
the device.
Før du læser, vend siden med billeder frem og bliv bekendt med alle apparatets funktioner.
Klappen Sie vor dem Lesen die Seite mit den Abbildungen aus und machen Sie sich anschließend mit allen
Funktionen des Gerätes vertraut.
GB / IE/NI Translation of the original instructions Page 1
DK Oversættelse af den originale driftsvejledning Side 15
DE / AT / CH Originalbetriebsanleitung Seite 29
Z52 C3
Z32 D4
Z85 D4
HCS
HCS

Contents
Introduction ......................................................2
Intended use ................................................................ 2
Features ................................................................... 2
Package contents ............................................................ 3
Technical data .............................................................. 3
General safety instructions for compressed air tools ....................3
Hazards caused by flying parts ................................................. 4
Hazards caused by entanglement ............................................... 4
Hazards during operation ..................................................... 4
Hazards caused by repetitive movements ......................................... 5
Hazards caused by accessories ................................................. 5
Hazards in the workplace ..................................................... 5
Hazards caused by dust and vapours ............................................ 6
Hazards caused by noise ...................................................... 6
Hazards caused by vibrations .................................................. 7
Additional safety instructions ................................................... 7
Additional safety notices ...................................................... 8
Before use .......................................................8
Fitting the connector nipple .................................................... 8
Lubrication ................................................................. 8
Topping up the oil ........................................................... 9
Connecting to a compressed air source ........................................... 9
Before use .......................................................9
Selecting a tool ............................................................. 9
Changing tools ............................................................. 10
Fitting the sanding sheet onto the sanding plate ...................................10
Switching on and off ........................................................11
Maintenance and cleaning .........................................11
Troubleshooting .................................................11
Disposal ........................................................12
Kompernass Handels GmbH warranty ..............................12
Service .........................................................13
Importer .......................................................13
Translation of the original Conformity Declaration .....................13
PDMFW 15 A1
GB│IE│NI
│
1 ■
AIR MULTI TOOL PDMFW 15 A1
Introduction
Congratulations on the purchase of your new appliance. You have chosen a high-quality product. The
operating instructions are part of this product. They
contain important information about safety, usage
and disposal. Before using the product, please
familiarise yourself with all operating and safety
instructions. Use the product only as described and
for the range of applications specified. Please also
pass these operating instructions on to any future
owner.
Intended use
The appliance is intended for sawing, cutting and
grinding. The following materials are preferable
for processing: wood, plastic, drywall elements,
light and non-ferrous metals, fasteners (e.g. nails,
screws) and wall tiles.
It is particularly suitable for near-edge and flush
work.
The tool may only be operated with a compressed
air supply. The maximum permissible operating
pressure specified on the tool must not be exceeded.
This tool must not be operated with explosive,
flammable or health-damaging gases.
Do not use as a lever, crusher or striking tool.
Any other usage or modification of the appliance
is deemed to be improper and carries a significant
risk of accidents. The manufacturer accepts no responsibility for damage(s) resulting from improper
usage. This tool is intended for domestic use only.
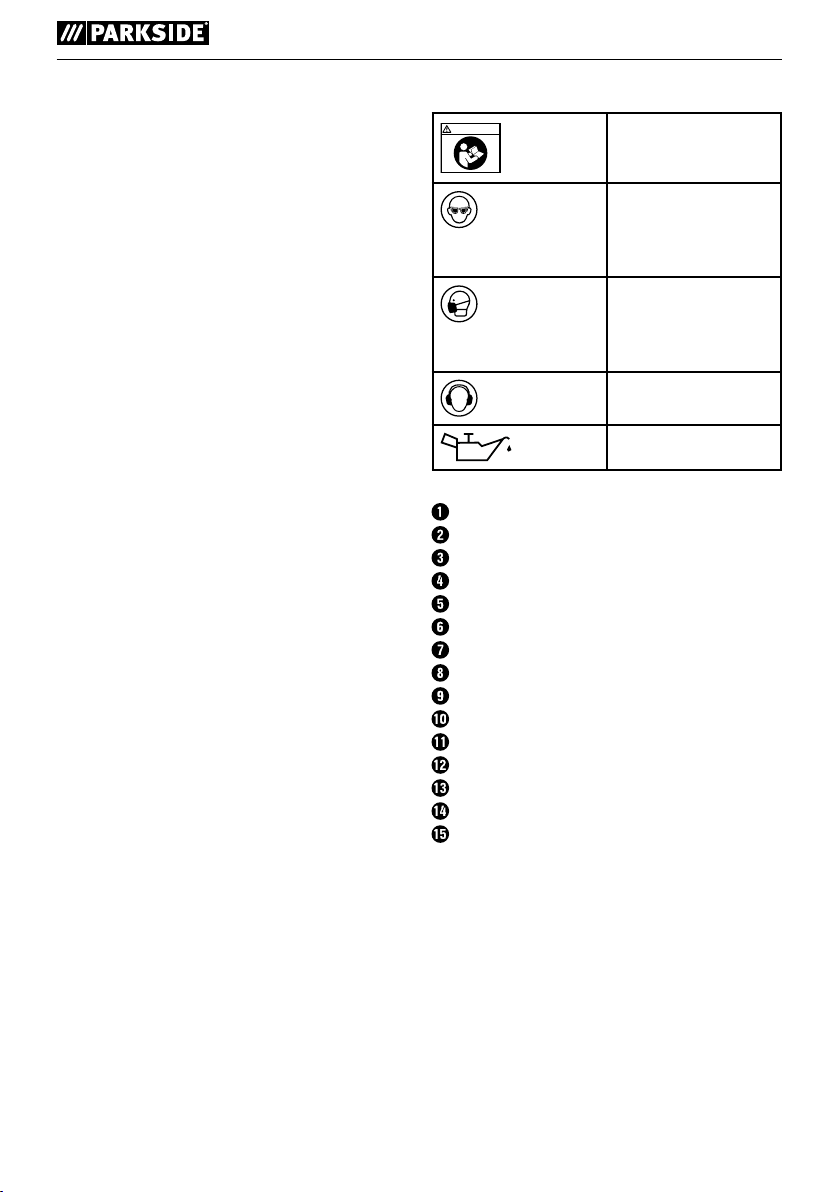
Symbols on the compressed air tool:
WARNING!
Read the operating
instructions before use.
Always wear eye protection when using or
maintaining the compressed air polisher.
Always wear a dust
mask in situations in
which dust is being
generated.
Always wear hearing
protection.
Oil daily
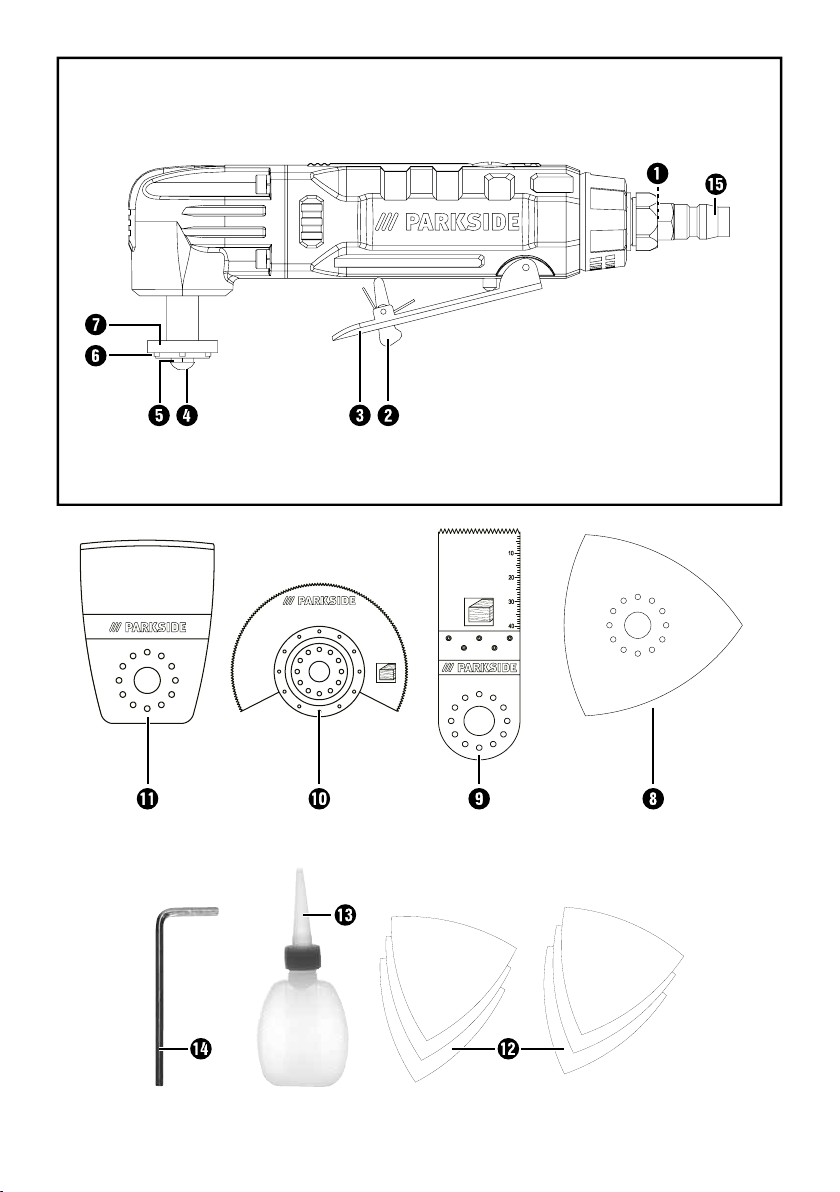
Features
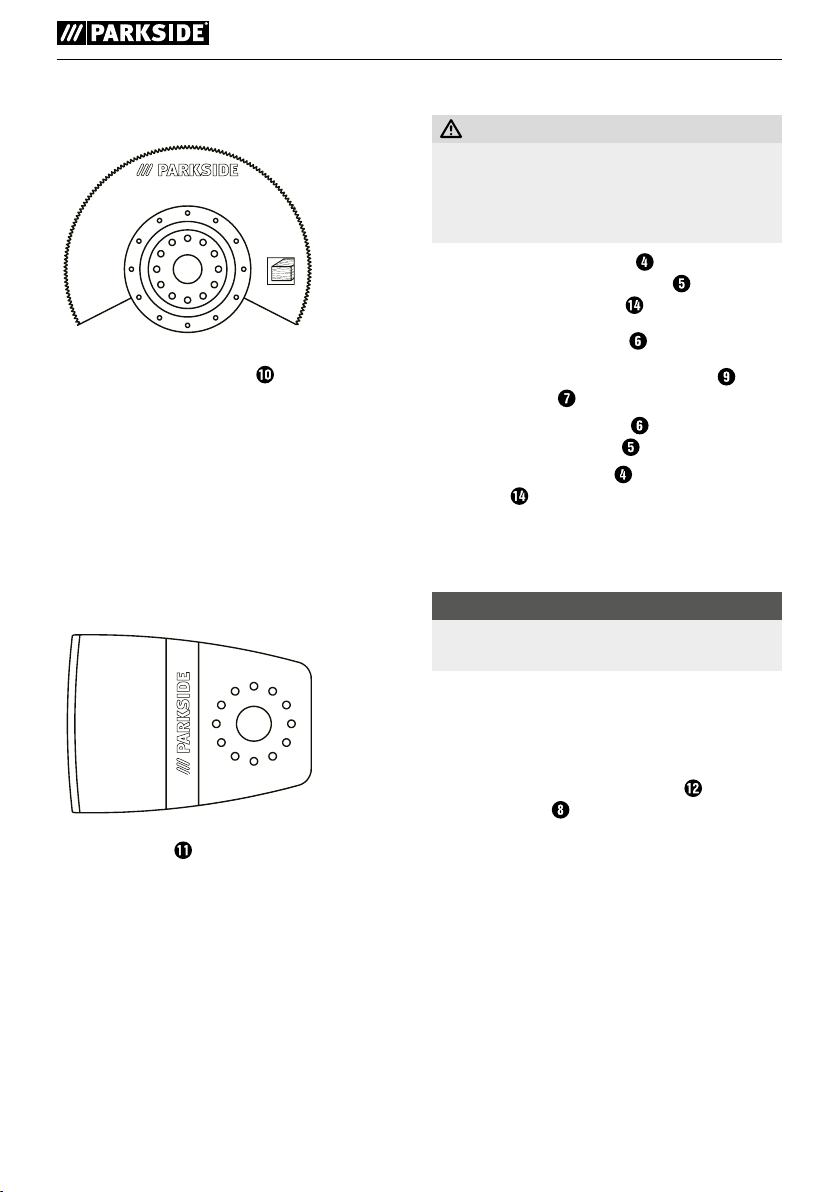
Air inlet
Trigger lock
Trigger
Hex screw
Spring washer
Plain washer
Tool holder
Sanding plate
Plunge saw blade
Segment saw blade
Scraper
Sanding sheets
Oil bottle
Hex key
Connector nipple
■ 2 │ GB
│IE│
NI
PDMFW 15 A1

Package contents
1 air multi tool PDMFW 15 A1
1 plunge saw blade (32 mm) Z32 D4
1 sanding plate
1 segment saw blade Z85 D4
1 scraper Z52 C3
6 sanding sheets for sanding wood
(80/120/240)
1 connector nipple 6.35 mm (1/4")
1 oil bottle
1 hex key
1 carrying case
1 set of operating instructions
Technical data
Rated air pressure: max. 6.3 bar
Maximum frequency: n
Noise emission values:
Noise measurement determined in accordance
with ISO15744:
Sound pressure level: L
Uncertainty: K
Sound power level: L
Uncertainty: K
Wear hearing protection!
Vibration emission value:
Vibration values determined in accordance with
ISO 28927-8 and EN 12096:
a
= 9.73 m/s
h
2
Uncertainty K = 1.42 m/s
18000 rpm
0
= 90 dB (A)
pA
= 3 dB
pA
= 101 dB (A)
WA
= 3 dB
WA
2
WARNING!
► The noise emission levels specified in these in-
structions have been measured in accordance
with the standardised measuring procedure
specified in ISO 15744 and can be used to
make equipment comparisons. The noise emission values vary in accordance with the use
of the compressed air tool and may be higher
than the values specified in these instructions
in some cases. It is easy to underestimate the
noise emission load if the compressed air tool
is used regularly in a certain manner.
NOTE
► For an accurate estimate of the noise emis-
sion load during a certain working period,
the times during which the appliance is
switched off or is running but not actually
being used must also be taken into consideration. This can significantly reduce the noise
emission load over the total working period.
WARNING!
General safety instructions for compressed
air tools
WARNING!
► Read all safety warnings and all instruc-
tions. Failure to follow the warnings and
instructions may result in electric shock, fire
and/or serious injury.
NOTE
► The terms "compressed air tool" or "tool" used
in the following text refer to the compressed air
tools specified in these operating instructions.
PDMFW 15 A1
GB│IE│NI
│
3 ■

Save all warnings and instructions for future
reference.
■ The user must evaluate the specific risks that
may arise due to different kinds of use.
■ Please ensure that you have read and understood
the safety instructions before fitting, operating,
repairing, servicing or replacing any accessories
and before working near the compressed air
tool. Failure to do this can result in serious
bodily injury.
■ The compressed air tool should only be set up,
adjusted or used by adequately qualified and
trained operators.
■ The compressed air tool may not be modified.
Modifications can reduce the effectiveness of
the safety measures and increase the risks for
the operator.
■ Never use damaged compressed air tools.
Maintain compressed air tools with care. Check
regularly whether moving parts function correctly
and do not jam; check whether any parts are
broken or damaged to an extent that the compressed air tool will no longer operate correctly.
Check signs and labels for completeness and
readability. If damaged, have parts repaired or
replaced before using the compressed air tool.
Many accidents are caused by poorly maintained compressed air tools.
Hazards caused by flying parts
■ If a workpiece or accessory of the compressed
air tool breaks, parts can be flung out at high
speeds.
■ Always wear impact-resistant safety goggles
during operation, when replacing accessory
parts or during repair or maintenance of the
compressed air tool. The level of the required
protection must be evaluated separately for
each individual task.
■ You must ensure that the workpiece has been
securely fixed in place.
■ Ensure that sparks and fragments created during
work do not constitute any hazard.
■ Separate the compressed air tool from the com-
pressed air supply before replacing the attachment or accessories or before you adjust the
settings, service or clean the tool.
■ Ensure that no dangers are created for other
persons either.
Hazards caused by entanglement
■ Be careful to avoid entanglement!
Suffocation, scalping and/or cut wounds can
occur if loose clothing, jewellery, necklaces, hair
or gloves are not kept away from the machine
and its accessories.
Hazards during operation
■ When using the compressed air tool, the opera-
tor's hands can be subject to hazards such as
cuts, grazing and heat. Wear suitable gloves to
protect your hands.
■ The operator and maintenance personnel must
be physically capable of handling the size,
weight and power of the compressed air tool.
■ Hold the compressed air tool correctly: be
ready to counteract any normal or sudden
movements – keep both hands ready.
■ Keep proper footing and balance at all times.
■ Prevent unintentional starting. If the air supply is
interrupted, switch off the compressed air tool
using the On/Off switch.
■ Use only the lubricants recommended by the
manufacturer.
■ 4 │ GB
│IE│
NI
PDMFW 15 A1

■ Use personal protective equipment. Always
wear eye protection. Wearing personal protective equipment such as protective gloves,
non-slip safety shoes or hearing protection,
depending on the type and use of the power
tool reduces the risk of personal injuries and it
is recommended.
■ Wear a safety helmet for overhead work.
■ Do not try to brake the saw blades by applying
lateral counterpressure.
■ Torn or deformed saw blades may not be used.
■ Ensure that the saw blades are fitted properly.
■ Sparks must be diverted safely.
■ Ensure that no hazard is caused by sparks cre-
ated during use. Explosive or flammable dusts
can be generated when processing certain
materials. There is a risk of explosion or fire.
Hazards caused by repetitive movements
■ Users of the compressed air tool may experience
unpleasant sensations in their hands, arms,
shoulders, neck area or other body parts.
■ Assume a comfortable position when working
with the compressed air tool, pay attention to
safe footing and avoid unfavourable positions
or such that make it difficult to keep your balance. During work over longer periods, the
operator should change posture regularly to
avoid discomfort and fatigue.
■ If the operator notices symptoms such as persis-
tent discomfort, throbbing, pain, tingling, burning
or stiffness, these warning indications should not
be ignored. The operator should consult a qualified medical doctor.
Hazards caused by accessories
■ Separate the compressed air tool from the com-
pressed air supply before replacing the attachment or accessory.
■ Only use accessories that are intended for this
appliance and comply with the requirements
and specifications listed in these operating
instructions.
■ Avoid direct contact with the accessory tool
during and after use because it may be hot or
have sharp edges.
Observe the following guidelines:
■ Only use tools that are specifically made for
use with this appliance.
■ Do not use cutting discs or any other cutting
tools (other than the saw blades supplied) with
this appliance.
■ Ensure that the maximum operating speed of
the tool is higher than that of the machine.
■ Self-adhesive grinding discs must be applied
concentrically on the mounting plate.
Hazards in the workplace
■ Slipping, tripping up and falling are the main
causes of injuries in the workplace. Watch out
for surfaces that may have become slippery
from the use of the compressed air tool and
tripping hazards caused by the air hose.
■ Proceed with caution in new surroundings.
Hidden hazards caused by power or other
supply lines may be present.
■ This compressed air tool is not suitable for use
in explosive atmospheres and is not insulated
against contact with power sources.
■ Make sure (e.g. by using a metal detector) that
there are no hidden power, water or gas lines
in the location where you are working.
PDMFW 15 A1
GB│IE│NI
│
5 ■

Hazards caused by dust and vapours
■ The dusts and vapours produced by using the
machines can be hazardous to health (e.g.
cause cancer, birth defects, asthma and/or dermatitis); it is essential to carry out a risk assessment in respect of these risks and to implement
corresponding regulatory mechanisms.
■ The risk assessment should include the dust
caused by using the machine and any existing
dust that may be raised at the same time.
■ The compressed air tool is to be operated and
maintained in accordance with the recommendations contained in this manual to keep the
release of dust and vapours to a minimum.
■ The exhaust air should be extracted so that the
minimum amount of dust is raised in an already
dusty environment.
■ If dusts or vapours are created, the main priority
must be to control these where they are released.
■ All components of the compressed air tool or
accessories intended for collecting, extracting
or suppressing airborne dust or vapours or
should be used and serviced properly in accordance with the manufacturer’s instructions.
■ Consumables/tools should be selected, main-
tained and replaced in accordance with the
recommendations in this guide in order to avoid
unnecessary intensification of dust or vapour
production.
■ Use a dust mask as per the instructions provided
by your employer or as required by health and
safety regulations.
■ Working with certain materials can lead to
emissions of dust and vapours that are potentially explosive.
Hazards caused by noise
■ Excessive noise levels in conjunction with insuffi-
cient hearing protection may lead to permanent
hearing damage, loss of hearing and other
problems, such as tinnitus (ringing, buzzing,
whistling or humming in your ears).
■ It is essential to carry out a risk assessment with
regard to these hazards and implement suitable
control mechanisms.
■ Suitable control mechanisms include measures
such as the use of insulating materials to avoid
ringing noises from occurring on the workpieces.
■ Use hearing protection as required by work and
health safety regulations.
■ The compressed air tool is to be operated and
maintained in accordance with the recommendations contained in these instructions in order
to reduce any unnecessary increase of the noise
levels.
■ Consumables and the tool should be selected,
maintained and replaced in accordance with
the recommendations in these instructions in
order to avoid any unnecessary increase of the
noise levels.
■ The integrated silencer may not be removed
and must be in good working order.
■ 6 │ GB
│IE│
NI
PDMFW 15 A1

Hazards caused by vibrations
■ Vibrations can damage the nerves and cause
malfunctions to the blood circulation in the
hands and arms.
■ Wear warm clothing when working in a cold
environment and keep your hands warm and
dry.
■ If you notice that the skin of your fingers or
hands is becoming numb, tingles, hurts or shows
white discolouration, stop working with the
compressed air tool and consult a doctor.
■ The compressed air tool is to be operated and
maintained in accordance with the recommendations contained in this manual to reduce any
unnecessary increase in the vibrations.
■ Consumables and the tool should be selected,
maintained and replaced in accordance with
the recommendations in this guide in order to
avoid unnecessary increase of oscillations.
■ To support the weight of the compressed air
tool, use a stand, clamp or a balancing unit
wherever possible.
■ Hold the compressed air tool securely but not
too firmly while maintaining the necessary
hand-reaction force, as the vibration risk generally increases the harder the machine is held.
■ An inadequately mounted or damaged acces-
sory tool can lead to excessive vibrations.
Additional safety instructions
■ Compressed air can cause serious injury.
■ When the compressed air tool is not in use, the
air supply must always be shut off and the air
hose depressurised. The compressed air tool
must be disconnected from the compressed air
supply before replacing accessories or when
conducting repair work.
■ Never aim the airflow at yourself or anyone
else.
■ Thrashing hoses can cause serious injury. There-
fore, always check whether the hoses and their
fixings are undamaged and have not come
loose.
■ If universal rotary joints (claw couplings) are
used, locking pins must be inserted and Whipcheck hose restraints must be used to provide
protection in the case of a failure of the connection between the hose and the compressed
air tool.
■ Ensure that the maximum permissible pressure
on the compressed air tool is not exceeded.
■ Never carry compressed air tools by the hose.
■ If you are operating the compressed air tool
with a tool holder, ensure that it is securely
fastened. Loss of control can lead to injuries.
PDMFW 15 A1
GB│IE│NI
│
7 ■
Additional safety notices
■ If applicable, observe special work safety or
accident prevention regulations for the handling
of compressors and compressed air tools.
■ Ensure that the maximum permissible working
pressure specified in the Technical Data is not
exceeded.
■ Do not overload this tool – use this tool only
within the capacity range specified in the
Technical Data.
■ Use safe lubricants. Ensure sufficient ventila-
tion at the place of work. In case of increased
discharge:
check the compressed air tool and have it repaired if necessary.
■ Do not use this tool if you are distracted. Be
alert, watch what you are doing and use common sense when operating a compressed air
tool. Do not use tools when you feel tired or are
under influence of drugs, alcohol, or medication. A moment of inattention when operating
the tool can result in serious personal injuries.
■ Keep work area clean and well lit. Cluttered
or dark areas invite accidents.
■ Keep compressed air tools out of reach of
children.
■ Do not store outdoors or in damp environments
without protection.
■ Protect the compressed air tool, in particular
the compressed air connection and operating
elements against dust and dirt.
Before use
NOTE
► The compressed air tool may only be oper-
ated using cleaned, oil-atomised compressed
air and the maximum operating pressure of
6.3 bar must not be exceeded on the appliance. The compressor must be fitted with a
pressure reducer to regulate the working
pressure.
Fitting the connector nipple
♦ Screw the connector nipple into the air
inlet .
Lubrication
NOTE
► Regular lubrication is particularly important
to avoid friction and corrosion damage.
We recommend using a suitable special oil
for compressed air tools (e.g. Liqui Moly
compressor oil).
– Lubrication with mist oiler
A mist oiler (not supplied) continuously
and optimally lubricates the appliance
as a preparation stage after the pressure
reducer. A mist oiler gives off fine drops
of oil into the air flow and thus guarantees regular lubrication.
– Manual lubrication
If you do not have a mist oiler, lubricate
the tool before every use or longer work
sessions. Add 3–4 drops of pneumatic
oil into the connector nipple
.
■ 8 │ GB
│IE│
NI
PDMFW 15 A1
Topping up the oil
To ensure that the tool remains operational for a
long time, the tool must have sufficient pneumatic oil.
The following options are available:
♦ Attach a maintenance unit with an oiler to the
compressor.
♦ Install an add-on oiler in the compressed air line
or the compressed air tool.
♦ Add 3–5 drops of pneumatic oil into the con-
nector nipple
every 15 minutes of operation.
Connecting to a compressed air
source
NOTE
► Before connecting the compressed air source,
– the correct working pressure (6,3 bar)
must be fully reached, and
– make sure that the trigger is in the upper
position.
► Use only connection hoses with an internal
diameter of at least 9 mm.
► Use only filtered, lubricated and regulated
compressed air.
♦ Screw the connector nipple
. Tighten the connection with a pair of pliers.
♦ Attach the tool to a compressor by connecting
the connector nipple
the compressed air source.
into the air inlet
with the supply hose of
Before use
Selecting a tool
NOTE
► The easy-change tool holder fitting is suitable
for standard accessories.
Application:
cutting and shortening pipes and sheets.
HCS
Z32 D4
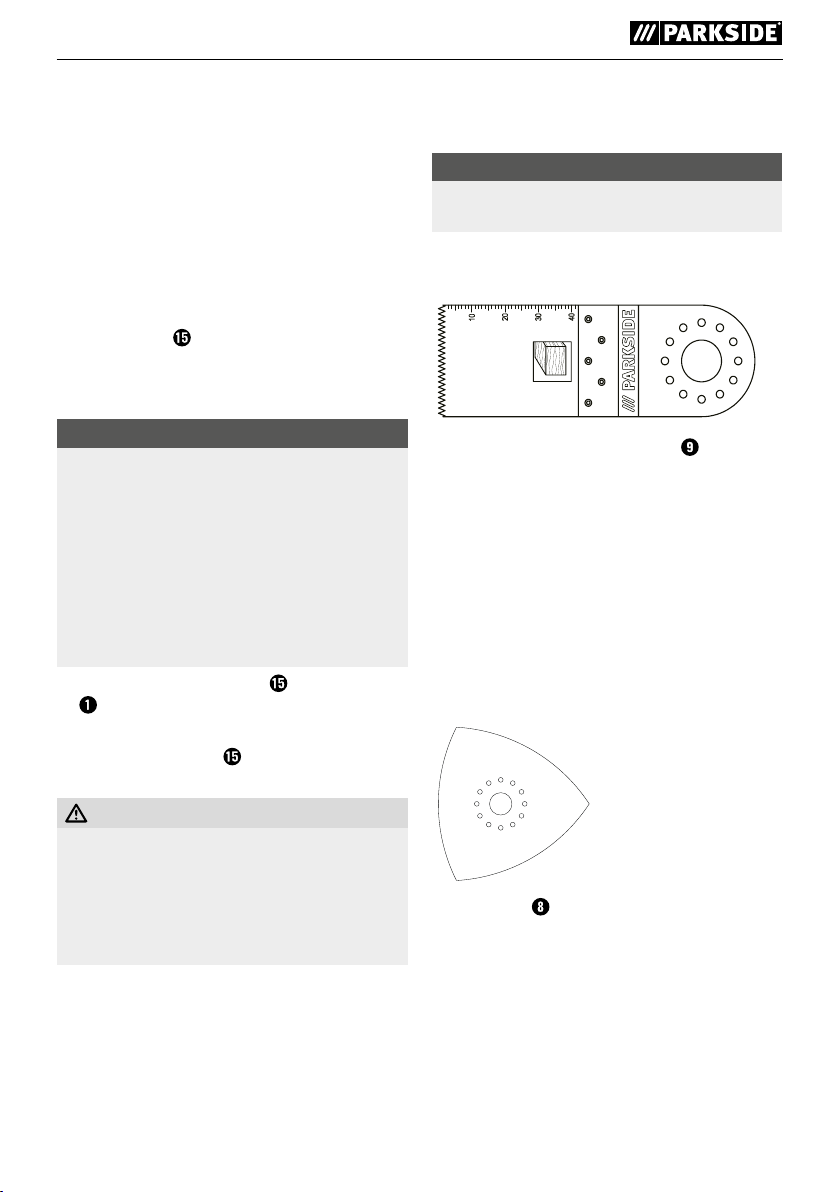
Plunge saw blade (32 mm) Z32 D4
Materials:
wood, plastic, gypsum (plaster) and other soft
materials
Application:
– separation and plunge saw cuts
– sawing close to edges, even in hard-to-reach
areas
Example: sawing recesses in lightweight walls.
CAUTION!
► Ensure that the compressed air hose is
firmly attached. A loose hose can thrash
about uncontrollably causing grave danger.
Likewise, ensure the firm seat of the two screw
connections between the coupling piece and
the appliance.
♦
The compressed air source must be equipped
with a pressure reducer so that you can regulate the air pressure.
PDMFW 15 A1
Sanding plate
Materials:
lumber, metal (sanding sheets included in the
delivery), paints*, stone*
*depending on the sanding sheet
GB│IE│NI
│
9 ■
Application:
sanding up to edges and hard-to-reach areas.
Z85 D4
HCS
Segment saw blade Z85 D4
Material:
wood
Application:
– separation and plunge saw cuts
– sawing close to edges, even in hard-to-reach
areas
Example: working parquet and other flooring
materials, also with plunge cuts.
Changing tools
WARNING! RISK OF INJURY!
■ Always detach the tube from the compressor
before changing accessories.
■ Ensure that the appliance is no longer in
operation.
■ First, loosen the hex screw
together with the spring washer . To do this,
use the supplied hex key .
■ Remove the plain washer
■ Fit the tool (e.g. the plunge saw blade
the tool holder .
■ Replace the plain washer
place the spring washer on top of it.
■ Screw in the hex screw
hex key .
■ Check that the tool is fitted firmly. Incorrectly
or insecurely fitted tools can come loose during
use and cause you an injury.
NOTE
► You can fit the tools in any snap position on
the tool holder.
and remove it
.
onto the tool and
using the supplied
) onto
Z52 C3
Scraper Z52 C3
Materials:
mortar/concrete residues, tile/carpet glue, paint/
silicone residues
Application:
– removal of material residues, such as tile
adhesive, when replacing damaged tiles.
■ 10 │ GB
│IE│
NI
Fitting the sanding sheet onto the
sanding plate
Attachment:
♦ You can attach the sanding sheet
to the
sanding plate using the Velcro.
PDMFW 15 A1
NOTE
► Before fitting a new sanding sheet
any dust and dirt from the sanding plate .
► Ensure that the dust extraction holes of the
sanding plate and sanding sheet are flush.
Removal:
♦ Simply pull the sanding sheet off the sander
plate
.
, remove
Switching on and off
Switching on:
♦ First, press the trigger lock
then the trigger to switch the tool on.
Switching off:
♦ Release the trigger
♦ When you have finished working, disconnect
the tool from the compressed air source.
forwards and
.
Maintenance and cleaning
WARNING! RISK OF INJURY! Discon-
nect the tool from the compressed air
supply.
CAUTION!
► Before maintenance, clean off any hazardous
substances that may have accumulated on
the tool (due to working processes). Avoid
all skin contact with these substances. If the
skin comes into contact with hazardous dusts,
this can lead to severe dermatitis. If dust is
produced or swirled up during maintenance,
it can be inhaled.
NOTE
► To ensure correct functioning and a long
service life for the tool, pay attention to the
following points:
■ Sufficient and continuous oil lubrication is highly
important for optimum functioning.
■ If the tool is exhibiting excessive vibration levels,
the cause of the vibrations must be identified
and repaired.
■ Use only the genuine replacement parts recom-
mended by the manufacturer, otherwise you
could put users at risk. In doubt, contact the
Service Centre.
■ Clean the tool with a soft, dry cloth only.
■ Never use sharp or abrasive cleaning agents
under any circumstances.
Troubleshooting
Fault Possible
cause
Speed too
slow, air
escapes from
the outlet.
Tool does
not move;
compressed
air escapes
completely
through the
outlet.
Motor parts
jamming due
to dirt.
Pressure
supply too
low.
Motor is
jammed due
to material
build-up.
Remedy
Check the
pressure
supply filter
for contamination.
Check the
pressure
supply filter
for contamination.
Lubricate the
tool as described in the
instructions.
If necessary,
repeat the
steps outlined
above.
Lubricate the
tool as described in the
instructions.
PDMFW 15 A1
GB│IE│NI
│
11 ■
 Loading...