

Parkside PDM 600 A1 Operating And Safety Instructions Manual

WOODTURNING LATHE PDM 600 A1
GB
WOODTURNING LATHE
Operating and Safety Instructions
Translation of Original Operating Manual
IAN 322988_1901
DEIE NI
CHAT
DRECHSELMASCHINE
Bedienungs- und Sicherheitshinweise
Originalbetriebsanleitung
NIIE

GB IE NI
Before reading, unfold the page containing the illustrations and familiarise yourself with all functions of the device.
DE AT CH
Klappen Sie vor dem Lesen die Seite mit den Abbildungen aus und machen Sie sich anschließend mit allen Funktionen des Gerätes vertraut.
GB / IE / NI Operating and Safety Instructions Page 01
DE / AT / CH Bedienungs- und Sicherheitshinweise Seite 11
A ( 1 : 1 )
1
2
3
4
5
6
7
8
9
10
11
12
13
A ( 1 : 1 )
1
2
3
4
5
6
A ( 1:1 )
1
2
3
4
5
6
7
8
A ( 1 : 1 )
1
2
3
4
5
6
7
1
2
3
4
5
6
7
8
9
10
11
12
13
14
15
1
3
2
1
4
5 6 7
8
9
10
11
1314
12
AAAA BBBB
1 15
9
10
1 4
2
4 5
6 13
3
11

6
14

Table of contents: Page:
1. Explanation of the symbols on the equipment ..................................................................................................................................................2
2. Introduction .......................................................................................................................................................................................................... 3
3. Device description ...............................................................................................................................................................................................3
4. Scope of delivery ................................................................................................................................................................................................3
5. Intended use ........................................................................................................................................................................................................3
6. Safety information ...............................................................................................................................................................................................4
7. Remaining hazards .............................................................................................................................................................................................5
8. Technical data .....................................................................................................................................................................................................6
9. Before putting into operation..............................................................................................................................................................................6
10. Attachment and operation .................................................................................................................................................................................6
11. Transport ............................................................................................................................................................................................................. 8
12. Cleaning and maintenance ................................................................................................................................................................................ 8
13. Storage ................................................................................................................................................................................................................ 8
14. Electrical connection ........................................................................................................................................................................................... 8
15. Disposal and recycling ....................................................................................................................................................................................... 8
16. Troubleshooting ..................................................................................................................................................................................................9
17. Warranty certificate ..........................................................................................................................................................................................10
18. Declaration of conformity .................................................................................................................................................................................23
1GB/IE/NI
1. Explanation of the symbols on the equipment
GB IE NI
GB IE NI
GB IE NI
GB IE NI
GB IE NI
Warning! Danger to life, risk of injury or damage to the tool are possible by ignoring!
Read instruction manual and safety instructions before starting up and pay attention!
Wear ear-muffs!
Wear a hair net!
Wear safety goggles!
GB IE NI
GB IE NI
The use of gloves is prohibited!
Protection class II (double shielded)
2 GB/IE/NI

2. Introduction
3. Device description
Manufacturer:
scheppach
Fabrikation von Holzbearbeitungsmaschinen GmbH
Günzburger Straße 69
D-89335 Ichenhausen
Dear Customer,
we hope your new tool brings you much enjoyment and success.
Note:
According to the applicable product liability laws, the manufacturer of the device does not assume liability for damages
to the product or damages caused by the product that occurs
due to:
• Improper handling
• Non-compliance of the operating instructions
• Repairs by third parties, not by authorized service technicians
• Installation and replacement of non-original spare parts
• Application other than specified
• A breakdown of the electrical system that occurs due to the
non-compliance of the electric regulations and VDE regulations 0100, DIN 57113 / VDE0113.
We recommend:
Read through the complete text in the operating instructions before installing and commissioning the device.
The operating instructions are intended to help the user to become familiar with the machine and take advantage of its application possibilities in accordance with the recommendations.
The operating instructions contain important information on
how to operate the machine safely, professionally and economically, how to avoid danger, costly repairs, reduce downtimes
and how to increase reliability and service life of the machine.
In addition to the safety regulations in the operating instructions, you have to meet the applicable regulations that apply
for the operation of the machine in your country.
Keep the operating instructions package with the machine at
all times and store it in a plastic cover to protect it from dirt
and moisture. Read the instruction manual each time before
operating the machine and carefully follow its information.
The machine can only be operated by persons who were instructed concerning the operation of the machine and who are
informed about the associated dangers.
In addition to the safety notes contained in the present operating instructions and the special regulations of your country,
the generally recognized technical rules for the operation of
woodworking machines must be observed.
We accept no liability for damage or accidents which arise
due to non-observance of these instructions and the safety information.
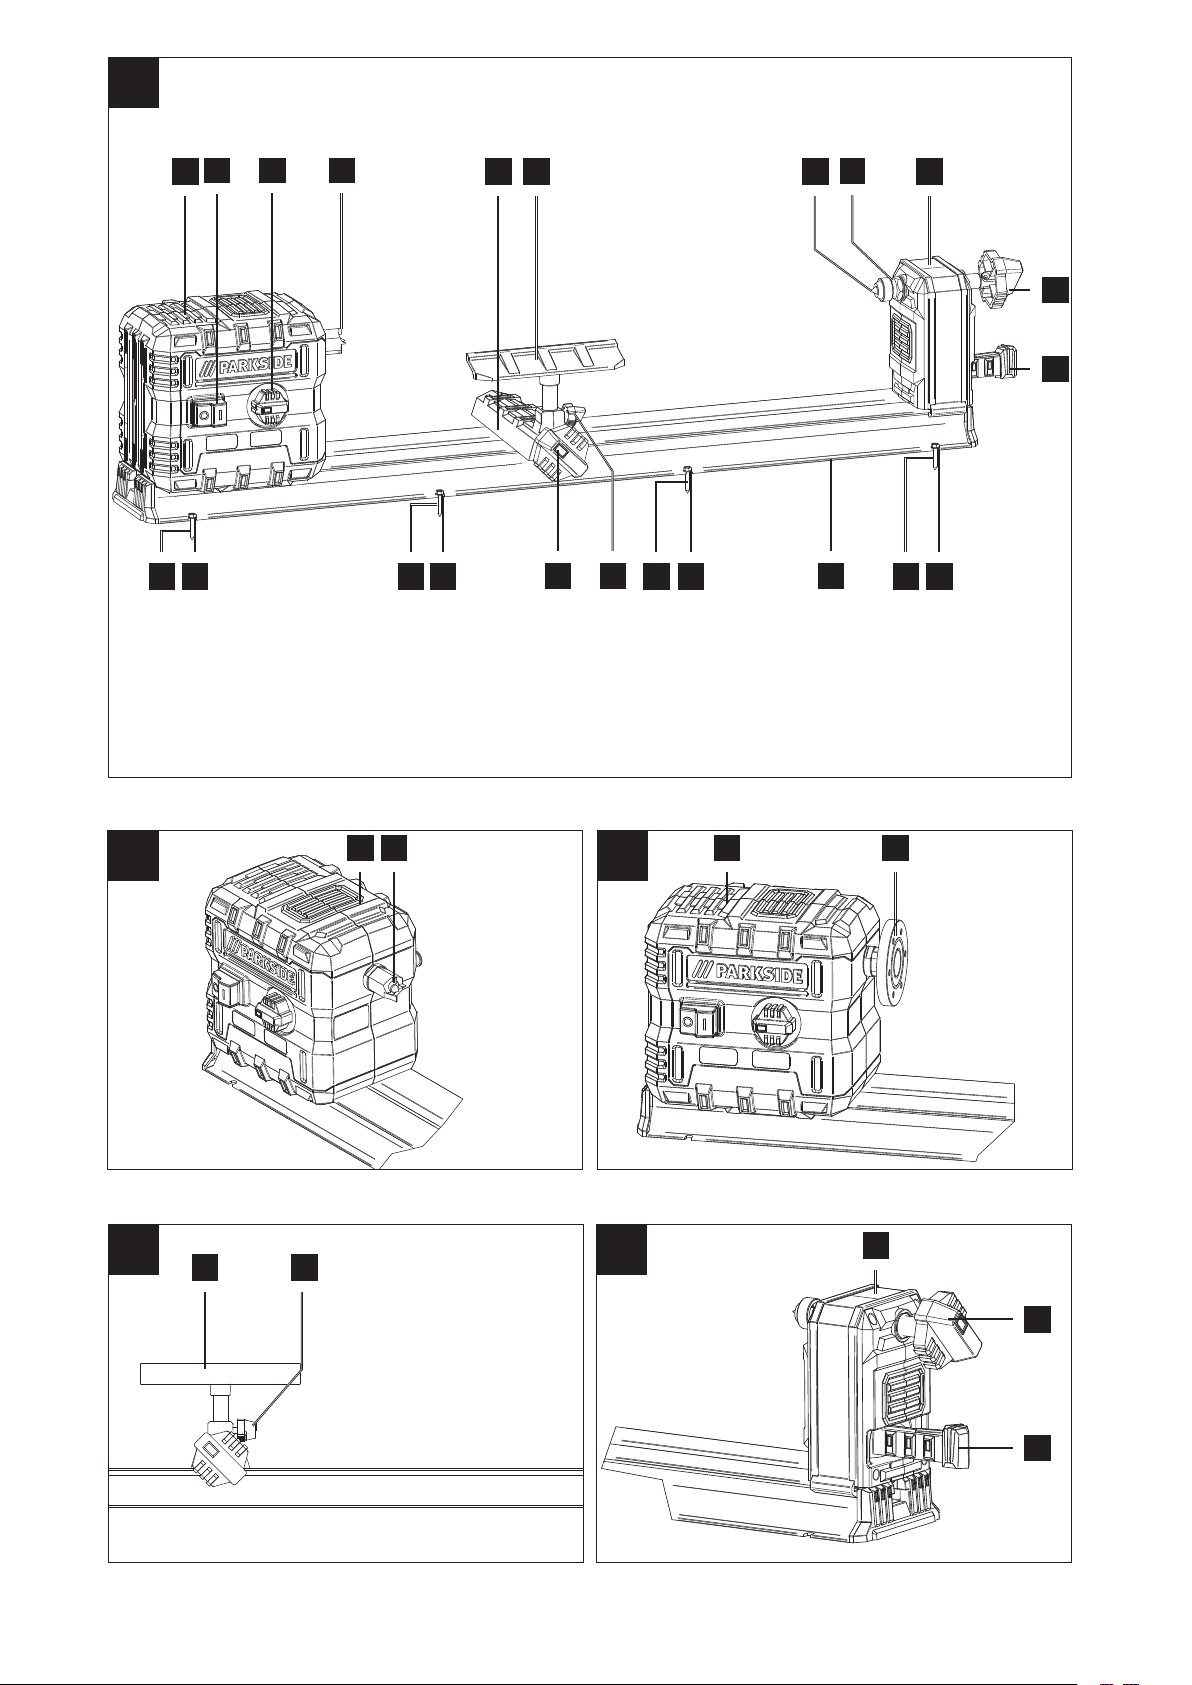
1. Motor unit
2. On/Off switch
3. Speed control
4. Headstock drive centre
5. Tool support
6. Tool rest
7. Centering pin
8. Counternut
9. Tailstock
10. Handwheel
11. Clamping lever tailstock
12. Machine bed
13. Locking screw
14. Clamping lever tool rest
15. Face plate
4. Scope of delivery
• 1 Motor unit
• 1 Headstock drive centre
• 1 Tool rest
• 1 Tool support
• 1 Centering pin
• 1 Tailstock
• 1 Machine bed
• 1 Face plate
• 2 Wrench SW24
• 1 Wood turning chisel, flat/angular
• 1 Wood turning chisel, hollow
• 1 Clamping lever tool rest
• 8 Fastening screws (B)
• 1 Instruction manual
5. Intended use
The machine is only designed for working on wood using a
suitable turning tool.
The machine meets the currently valid EU machine directive.
The manufacturer’s safety, operation and maintenance instructions as well as the technical data given in the calibrations and
dimensions must be adhered to.
Relevant accident prevention regulations and other generally
recognized safety and technical rules must also be adhered to.
The machine may only be used, maintained or repaired by
trained persons who are familiar with the machine and have
been informed about the dangers. Unauthorized modifications
of the machine exclude a liability of the manufacturer for damages resulting from the modifications.
The machine is intended for use only with original spare parts
and original tools from the producer.
Any other use is considered to be not intended. The manufacturer excludes any liability for resulting damages, the risk is exclusively borne by the user.
m Please note that our equipment has not been designed for
use in commercial, trade or industrial applications. Our warranty will be voided if the equipment is used in commercial,
trade or industrial businesses or for equivalent purposes.
3GB/IE/NI

6. Safety information
m CAUTION! The following basic safety precautions must be observed while using electric tools
to protect against electric shock, injury and risk of
ire. Please read all instructions before using this
electric tool and keep the safety instructions in a
safe place.
Safe operation
1. Keep work area clear
- Cluttered areas and benches invite injuries.
2. Consider work area environment
- Do not expose tools to rain.
- Do not use tools in damp or wet locations.
- Keep work area well lit.
- Do not use tools in the presence of flammable liquids
or gases.
3. Guard against electric shock
- Avoid body contact with earthed or grounded surfac-
es (e. g. pipes, radiators, ranges, refrigerators).
4. Keep other people away!
- Do not let other people — especially children — touch
the electric tool or its cable. Keep them clear of the
work area.
5. Store idle tools
- When not in use, tools should be stored in a dry
locked- up place, out of the reach of children.
6. Do not force the tool
- It will do the job better and safer at the rate for which
it was intended.
7. Use the right tool
- Do not force small tools to do the job of a heavy tool.
- Do not use the electric tool for purposes for which it is
not intended. For example, do not use handheld circular saws for the cutting of branches or logs.
8. Wear suitable clothing
- Do not wear wide clothing or jewellery, which can
become entangled in moving parts.
- When working outdoors, anti-slip footwear is recom-
mended.
- Tie long hair back in a hair net.
9. Use protective equipment
- Wear protective goggles.
- Wear a mask when carrying out dust-creating work.
10. Connect the dust extraction device
- If connections for dust extraction and a collecting de-
vice are present, make sure that they are connected
and used properly.
- Operation in enclosed spaces is only permitted with
the use of a suitable extraction system.
11. Do not abuse the cord.
- Never yank the cord do disconnect it from the socket.
Keep the cord away from heat, oil and sham edges.
12. Secure work
- For long workpieces, an additional supporting sur-
face (table, trestles, etc.) is required in order to prevent tipping of the machine.
- Always press the workpiece firmly against the work-
ing surface and stop in order to prevent wobbling or
twisting of the workpiece.
13. Do not overreach
- Keep proper footing and balance at all times.
- Avoid awkward hand positions in which one or both
hands could touch the saw blade as the result of a
sudden slip.
14. Maintain tools with care
- Keep cutting tools sharp and clean for better and
safer performance.
- Follow instruction for lubricating and changing acces-
sories.
- Inspect tool cords periodically and if damaged have
them repaired by an authorized service facility.
- Inspect extension cords periodically and replace if
damaged.
- Keep handles dry, clean and free from oil and grease.
15. Disconnect tools
- Never remove loose splinters, chips or jammed pieces
of wood when the saw blade is running.
- When the electric tool is not in use, before mainte-
nance and when changing tools such as the saw
blade, drill bit, milling cutter.
16. Remove adjusting keys and wrenches
- Form the habit of checking to see that keys and adjust-
ing wrenches are removed from the tool before turning it on.
17. Avoid unintentional starting
- Ensure switch is in “off” position when plugging in.
18. Use outdoor extension leads
- When the tool is used outdoors, use only extension
cords intended for outdoor use and so marked.
- Use the cable drum only in the unrolled state.
19. Stay alert
- m Watch what you are doing, use common sense
and do not operate the tool when you are tired.
20. Check damaged parts
- Before further use of tool, it should be carefully
checked to determine that it will operate properly and
perform its intended function.
- Check whether the moving parts are working properly
and are not becoming jammed or whether parts are damaged. All parts must be correctly fitted and satisfy all conditions to ensure the proper operation of the power tool.
- A guard or other part that is damaged should be
properly repaired or replaced by an authorized service centre unless otherwise indicated in this instruction manual.
- Have defective switches replaced by an authorized
service centre.
- Do not use any faulty or damaged connection cables.
- Do not use the tool if the switch does not turn it on
and off.
21. Warning!
- The use of any accessory or attachment other than
one recommended in this instruction manual may present a risk of personal injury.
22. Have your tool repaired by a qualified person
- This electric tool complies with the relevant safety
rules. Repairs should only be carried out by qualified
persons using original spare parts, otherwise this may
result in considerable danger to the user.
4 GB/IE/NI

Warning! During operation, this power tool produces an
electromagnetic field. Under certain circumstances, this field
may negatively affect active or passive medical implants. In
order to reduce the danger of serious or fatal injuries, we recommend that individuals who wear medical implants should
consult their doctor and the manufacturer of the implant before
operating the power tool.
Operational Safety Instructions for the Wood Turning Lathe
• Familiarise yourself with the machine’s features and woodturning techniques before using the machine.
• Examine all workpieces for splits or knots. Glued joints must
set completely before turning.
• Ensure that the workpiece is securely locked in position and
all attachments are secured.
• Before turning the machine ON ensure that the workpiece
can rotate freely by rotating it by hand.
• Keep your hands and fingers away from the rotating workpiece.
• Switch the machine OFF and wait until it has come to a full
stop before making any adjustments on the workpiece, tailstock, or tool rest.
• Maintenance, adjustment, calibration and cleaning may
only be performed with the motor turned off.
• The machine is designed for use with wood-turning chisels
only.
• Always store away the wood-turning chisels safely before
you leave the workplace.
• Do not run the lathe without its covers and guards in place.
• Keep cutting tools sharp.
• Use the lowest speed when starting a new workpiece.
• Always stop the lathe at its slowest speed. If the lathe is run
so fast that it vibrates, there is a risk that the workpiece will
be thrown or the cutting tool jerked from your hands.
• Do not allow cutting tools to bite into the workpiece. The
wood could be split or thrown from the lathe.
• Always position the tool rest above the centre line of the
lathe when shaping a piece of stock.
• Before attaching a workpiece to the face plate, always rough
it out to make it as round as possible. This minimizes the vibrations while the piece is being turned. Always fasten the
workpiece securely to the faceplate. Failure to do so could
result in the workpiece being thrown away from the lathe.
• Use a brush or compressed air to remove wood shavings;
never your hands. The wood shavings will be sharp.
• The cutting tool must always be tight within the chuck and
adjusted to limit projection from the post. This will reduce the
possibility of the tool breaking or bending.
• Do not reach a cross the lathe while it is running.
• Only feed workpiece into a cutting tool against the direction
of rotation. The workpiece must always be rotating toward
you.
• Do not leave the tool unattended when it is plugged into an
electrical outlet. Turn off the tool, and unplug it from its electrical outlet before leaving.
• This product is not a toy. Keep it out of reach of children.
• Some dust created by power sanding, sawing, grinding,
drilling, and other construction activities, contains chemicals
known to cause cancer, birth defects or other reproductive
harm. Some examples of these chemicals are:
- Lead from lead-based paints
- Crystalline silica from bricks and cement or other ma-
sonry products
- Arsenic and chromium from chemically treated lumber
• Your risk from these exposures varies, depending on how
often you do this type of work. To reduce your exposure to
these chemicals: work in a well ventilated area, and work
with approved safety equipment ,such as those dust masks
that are specially designed to filter out microscopic particles.
• People with pacemakers should consult their physician(s)
before use. Electromagnetic fields inclose proximity to heart
pacemaker could cause pacemaker interference or pacemaker failure. In addition, people with pacemakers should:
- Avoid operating alone.
• Properly maintain and inspect to avoid electrical shock.
• The warnings, precautions, and instructions discussed in this
user manual cannot cover all possible conditions and situations that may occur. It must be understood by the operator
that common sense and caution are factors which cannot be
built into this product, but must be supplied by the operator.
Additional safety instructions for the use of faceplates
• Ensure that the faceplate is the appropriate size to support
the workpiece.
• Ensure that the workpiece is securely fastened to the faceplate.
• Rough cut the workpiece as close as possible to the final
shape before mounting onto a faceplate.
• Only use scraping chisels for faceplate turning. Cutting chisels can easily be torn out of your hands.
• Pay attention that the woodturning chisel cannot interfere
with the holding screws at the finished dimensions of the
workpiece.
7. Remaining hazards
The machine has been built using modern technology in accordance with recognized safety rules.
Some remaining hazards, however, may still exist.
• Only process selected woods without defects such as:
Branch knots, edge cracks, surface cracks. Wood with such
defects is prone to splintering and hazardous.
• Wood which is not correctly glued can explode when being
processed due to centrifugal force.
• Trim work piece to a rectangular shape, center and correctly
secure before processing. Unbalanced work pieces can be
hazardous.
• Injuries can occur when feeding work pieces if tool supports
are not correctly adjusted or if turning tools are blunt. Sharp
turning tools which are free of defects are necessary for professional turning.
• Long hair and loose clothing can be hazardous when the
work piece is rotating. Wear personal protective gear such
as a hair net and tight fitting work clothes.
• Saw dust and wood chips can be hazardous. Wear personal protective gear such as safety goggles and a dust mask.
5GB/IE/NI

• The use of incorrect or damaged mains cables can lead to
injuries caused by electricity.
• Even when all safety measures are taken, some remaining
hazards which are not yet evident may still be present.
• Remaining hazards can be minimized by following the instructions in „Safety Precautions“, „Proper Use“ and in the
entire operating manual.
• Before carrying out any adjustment or maintenance work,
switch off the device and disconnect the mains plug.
8. Technical data
AC motor 220 - 240 V~ 50Hz
Power 550 Watt
Operating mode S1 *
Spindel speed 800 - 3000 min
Max. workpiece length 600 mm
Max. workpiece diameter 25 cm
Headstock thread M 18 x 1,5
Weight 6,7 kg
Dimensions L x W x H mm 1010x154x215
* Operating mode S1, continuous operation
-1
• Before the machine is put into operation, all covers and safety devices must be properly attached.
• In the case of wood which has already been worked with,
check for foreign bodies such as nails or screws etc.
• Before connecting the machine, check that the data on the
type plate matches those of the mains system.
• The machine must only be connected to a properly installed
safety socket which is protected by a fuse of at least 16A.
10. Attachment and operation
m Warning! Risk of injury!
Prepare the workplace where you intend to place the electrical
power tool. Provide enough space to ensure safe and troublefree operation. The power tool is designed for working in enclosed rooms and has to be installed on level and firm ground.
m Important! Pull out the power plug before carrying out any maintenance, resetting or assembly
work on the device!
Fixation of the machine (Fig. 1)
Before operation, the device must be screwed to a workbench,
undercarriage or similar. Use the slotted holes (A) for this purpose.
Noise
Total vibration values determined in accordance with EN
61029.
Sound pressure level L
Uncertainty K
pA
Sound power level L
Uncertainty K
WA
pA
WA
86,6 dB(A)
3 dB
99,6 dB(A)
3 dB
Wear hearing protection.
The effects of noise can cause a loss of hearing. Total vibration
values (vector sum - three directions) determined in accordance
with EN 61029.
9. Before putting into operation
• Open the packaging and remove the device carefully.
• Remove the packaging material as well as the packaging
and transport bracing (if available).
• Check that the delivery is complete.
• Check the device and accessory parts for trans - port damage.
• If possible, store the packaging until the warranty period has
expired.
ATTENTION
The device and packaging materials are not toys!
Children must not be allowed to play with plastic
bags, film and small parts! There is a risk of swallowing and suffocation!
• The machine must be securely installed, i.e. bolted down on
a workbench, base frame or similar.
Installing the tool rest (Fig. 1; 4)
1. Fit the clamping lever for the tool rest (14) as shown in
figure 6.
1. Plug the tool rest (6) into the hole in the tool support (5).
2. Fasten the tool rest (6) at the desired height using the
locking screw (13).
Setting the tool rest (Fig. 1; 4)
1. The height of the tool rest (6) can be set by loosening the
locking screw (13).
2. In order to set the length of the tool rest (6), loosen the
clamping lever for tool rest (14). The tool rest (6) must
be driven as close as possible to the workpiece without
touching it.
3. Retighten the clamping lever for the tool rest (14).
Adjustment of the tailstock (Fig. 1; 5)
1. Loosen the clamping lever (11) for the tailstock (9) in order to set the distance between the tailstock (9) and the
headstock drive centre (4).
2. To adjust the clamping pressure use the handwheel (10)
and secure it with the counternut (8).
Warning! Make sure that the tool rest (6) is tightened securely and cannot turn in towards the
workpiece.
Securing the workpiece on the headstock drive
centre (Fig. 1)
1. Locate the centre of the workpiece by accurately drawing diagonal lines on each end. The intersection point of
these two lines will indicate the centre of the workpiece.
6 GB/IE/NI
 Loading...