

Parkside PBS 350 A1 Operating And Safety Instructions Manual

IAN 292291
BAND SAW PBS 350 A1
NIIEGB
NIIE
BAND SAW
Operating and Safety Instructions
Translation of Original Operating Manual
GB
CHAT
BANDSÄGE
Bedienungs- und Sicherheitshinweise
Originalbetriebsanleitung
DE

GB / IE / NI Operation and Safety Notes Page 01
DE / AT / CH Bedienungs- und Sicherheitshinweise Seite 12
Klappen Sie vor dem Lesen die Seite mit den Abbildungen aus und machen Sie sich anschließend mit allen Funktionen des Gerätes vertraut.
DE AT CH
Before reading, unfold the page containing the illustrations and familiarise yourself with all functions of the device.
GB IE NI
GB IE NI
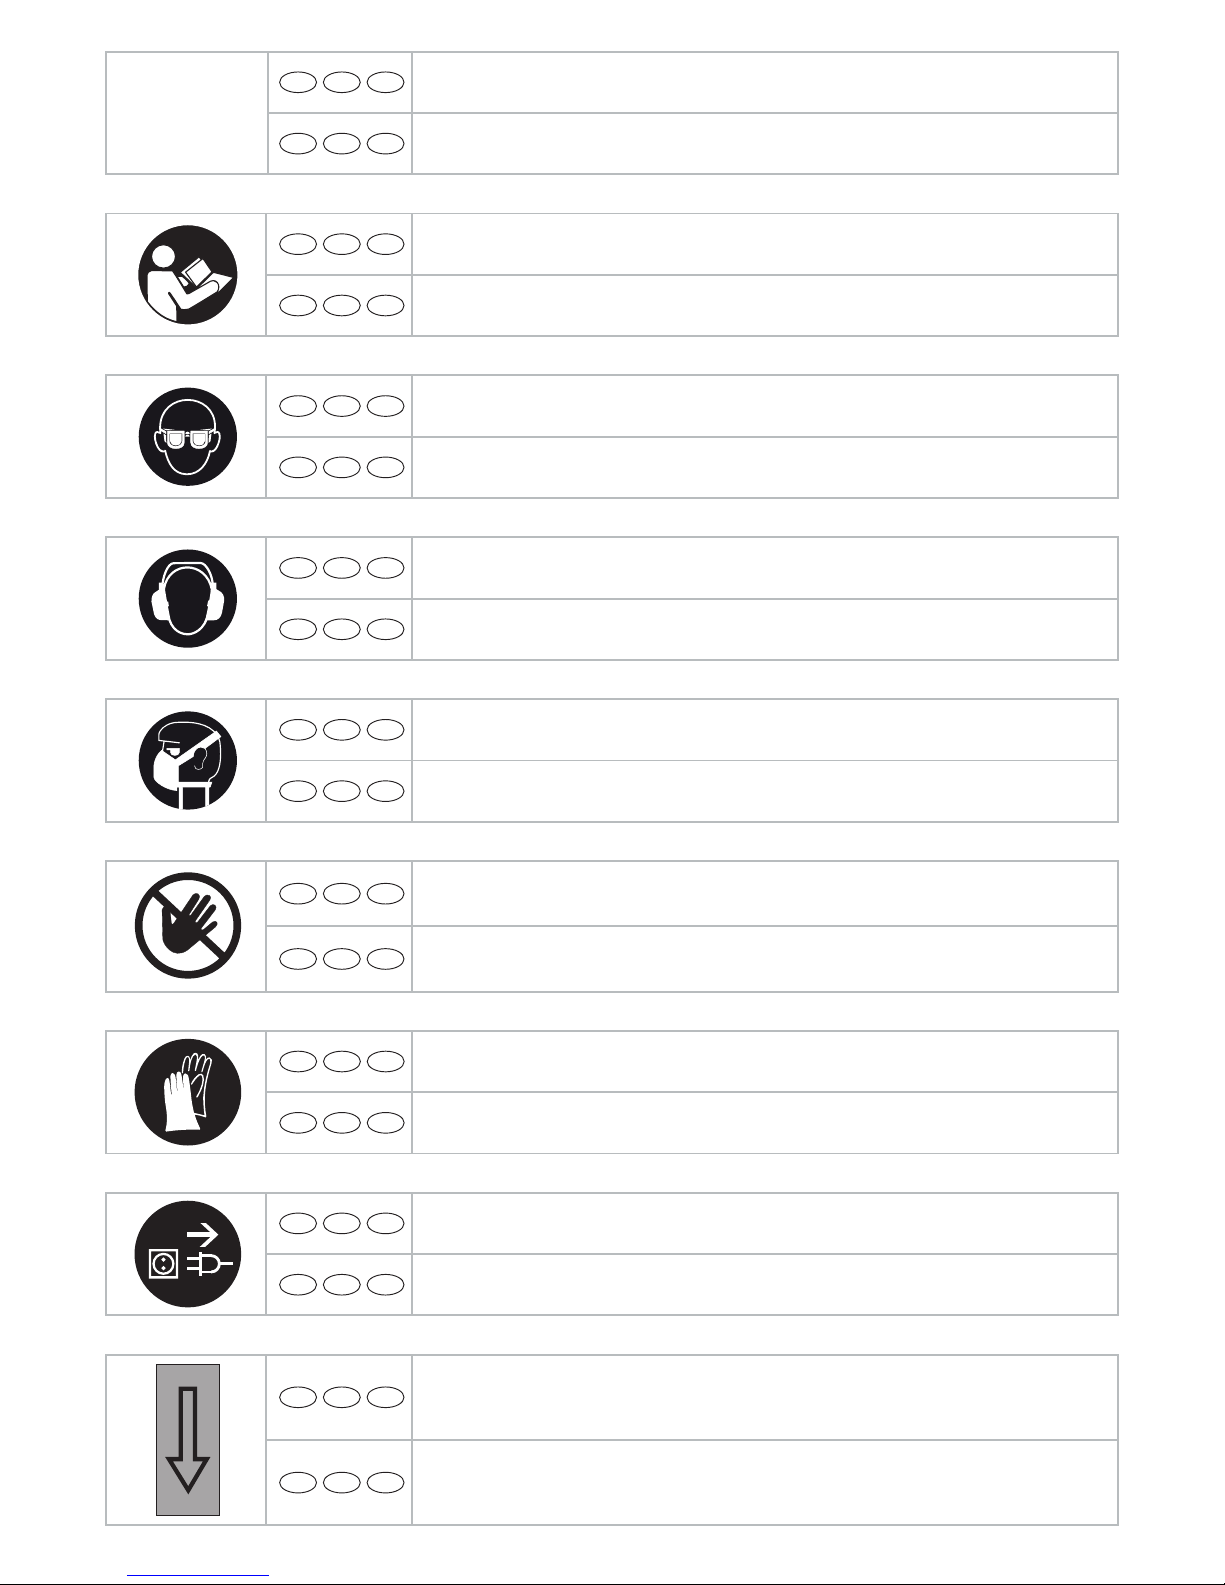
Read and follow the operating and safety instructions before you start working with this power tool!
DE AT CH
Vor Inbetriebnahme Bedienungsanleitung und Sicherheitshinweise lesen und beachten!
GB IE NI
Wear safety goggles!
DE AT CH
Schutzbrille tragen!
GB IE NI
Important! Risk of injury! Never reach into the running saw blade!
DE AT CH
Achtung! Verletzungsgefahr! Nicht in das laufende Sägeblatt greifen!
GB IE NI
Wear protective gloves.
DE AT CH
Tragen Sie Schutzhandschuhe.
GB IE NI
Attention! Before installation, cleaning, alterations, maintenance, storage and transport switch off the
device and disconnect it from the power supply.
DE AT CH
Achtung! Vor Montage, Reinigung, Umbau, Instandhaltung, Lagerung und Transport müssen Sie das
Gerät ausschalten und von der Stromversorgung trennen.
GB IE NI
Wear ear-muffs!
DE AT CH
Gehörschutz tragen!
GB IE NI
Wear a breathing mask!
DE AT CH
Bei Staubentwicklung Atemschutz tragen!
GB IE NI
Attention! Observe the direction of rotation.
DE AT CH
Achtung! Drehrichtung beachten.
m
GB IE NI
Warning! Danger to life, risk of injury or damage to the tool are possible by ignoring!
DE AT CH
Warnung! Bei Nichteinhaltung Lebensgefahr, Verletzungsgefahr oder Beschädigung des Werkzeugs
möglich!
1a
1b
1c
1d
1
2
3
4
5
6
7
3
8
9
10
11
10
10
11
10
13
14
15
16
17
18
19
20
21
22
23
30
29
27 28 51
2425
7
26
12
2
3
4
5
6
8
9
1731
20
32
33
33
34
32
7
20
31
35
36
37
3838
3739
44
45
45
46
46
47
43
23
5
22
7
41
42
40
21
21
21
15
16
14
12
48
26
13
6
24
21
25
10
5
21
11
49
50
12
7
7
7
19
17
18

GB/IE/NI
1
Table of contents: Page:
1. Introduction 2
2. Device description 2
3. Scope of delivery 2
4. Intended use 3
5. General safety information 3
6. Technical data 5
7. Remaining hazards 5
8. Before starting the equipment 5
9. Attachment 6
10. Operation 7
11. Transport 8
12. Working instructions 8
13. Cleaning and maintenance 9
14. Storage 9
15. Electrical Connection 9
16. Disposal and recycling 9
17. Troubleshooting 10
18. Guarantee certificate 11
19. Declaration of conformity 25

GB/IE/NI
2
1. Introduction
Manufacturer:
scheppach
Fabrikation von Holzbearbeitungsmaschinen GmbH
Günzburger Straße 69
D-89335 Ichenhausen
Dear Customer,
We hope your new tool brings you much enjoyment and success.
Note:
According to the applicable product liability laws, the manufacturer of the device does not assume liability for damages
to the product or damages caused by the product that occurs
due to:
• Improper handling,
• Non-compliance of the operating instructions,
• Repairs by third parties, not by authorized service technicians,
• Installation and replacement of non-original spare parts,
• Application other than specified,
• A breakdown of the electrical system that occurs due to
the non-compliance of the electric regulations and VDE
regulations 0100, DIN 57113 / VDE0113.
We recommend:
Read through the complete text in the operating instructions
before installing and commissioning the device. The operating
instructions are intended to help the user to become familiar
with the machine and take advantage of its application possibilities in accordance with the recommendations. The operating instructions contain important information on how to
operate the machine safely, professionally and economically,
how to avoid danger, costly repairs, reduce downtimes and
how to increase reliability and service life of the machine.
In addition to the safety regulations in the operating instructions, you have to meet the applicable regulations that apply
for the operation of the machine in your country. Keep the operating instructions package with the machine at all times and
store it in a plastic cover to protect it from dirt and moisture.
Read the instruction manual each time before operating the
machine and carefully follow its information. The machine can
only be operated by persons who were instructed concerning
the operation of the machine and who are informed about the
associated dangers. The minimum age requirement must be
complied with. In addition to the safety requirements in these
operating instructions and your country’s applicable regulations, you should observe the generally recognized technical
rules concerning the operation of woodworking machines.
We cannot accept any liability for damage or accidents
which arise due to a failure to follow these instructions and
the safety instructions.
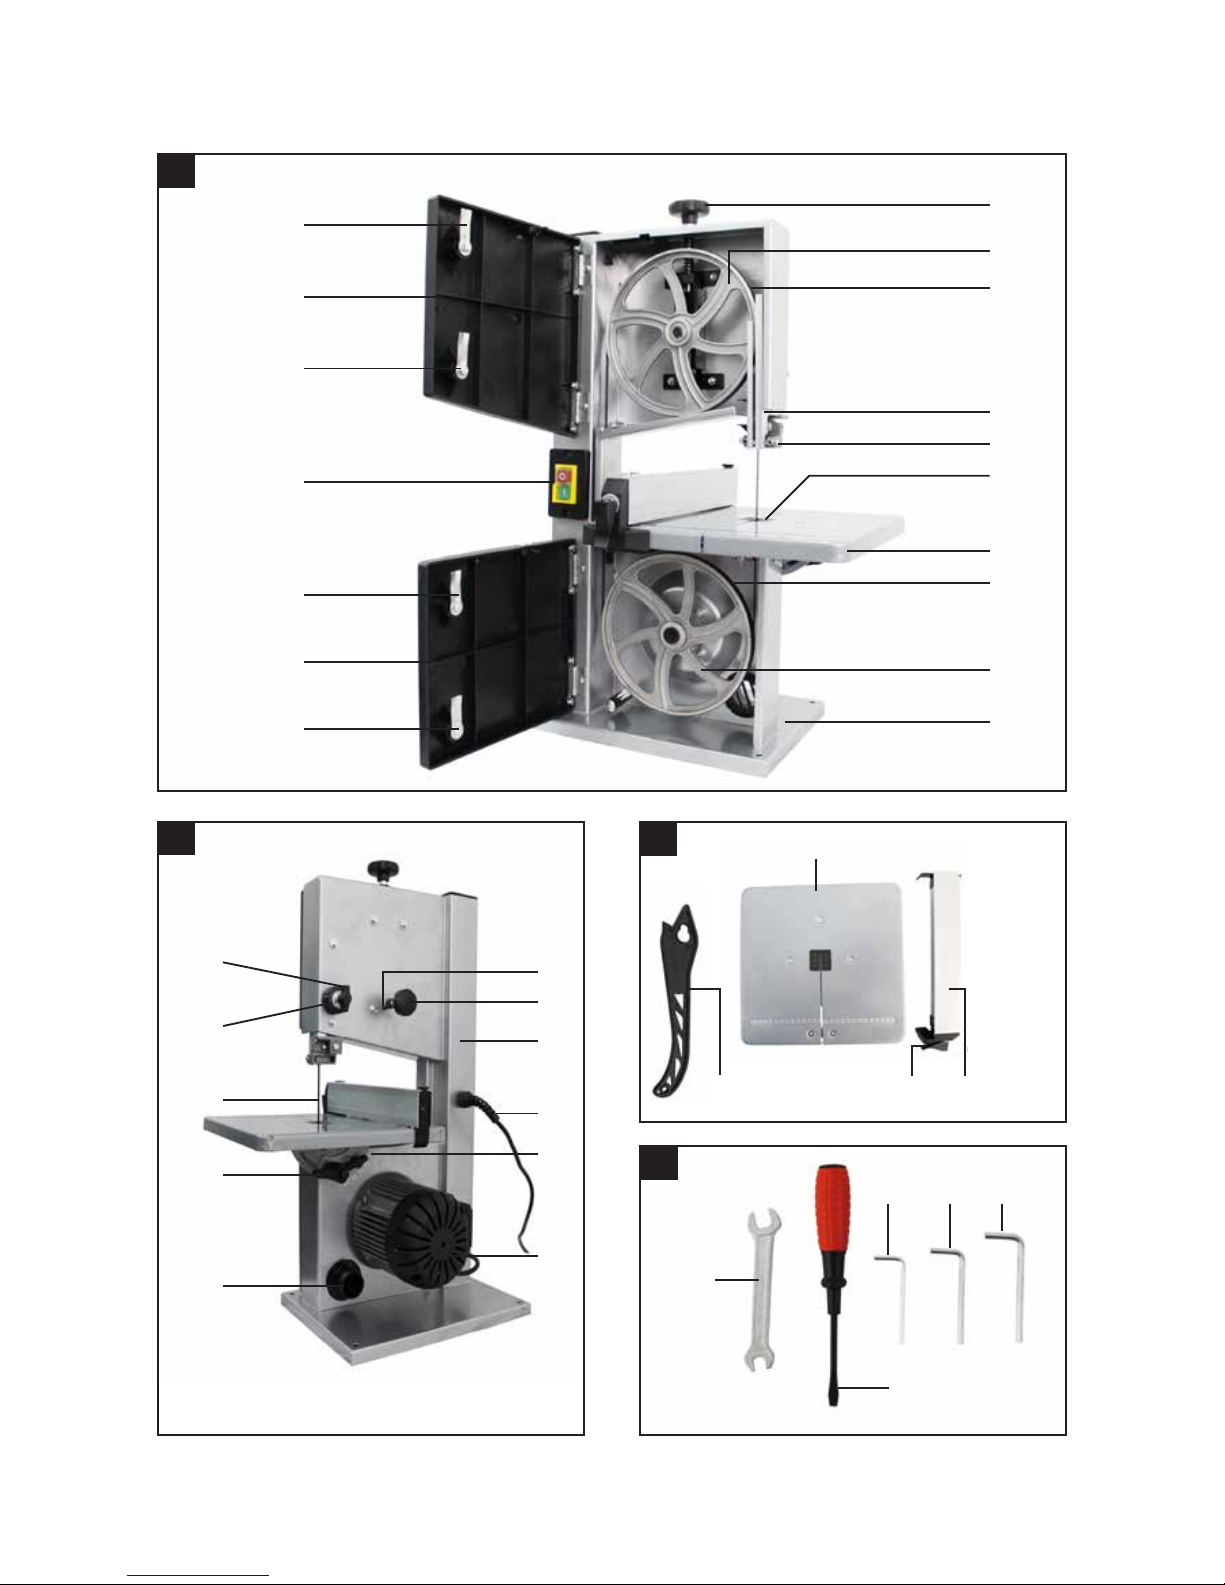
2. Device description (Fig. 1-16)
1. Clamping screw
2. Top saw band roller
3. Rubber surface
4. Saw band guard
5. Top saw band guide
6. Table insert
7. Saw table
8. Bottom saw band roller
9. Foot
10. Cover locking mechanism
11. Side cover
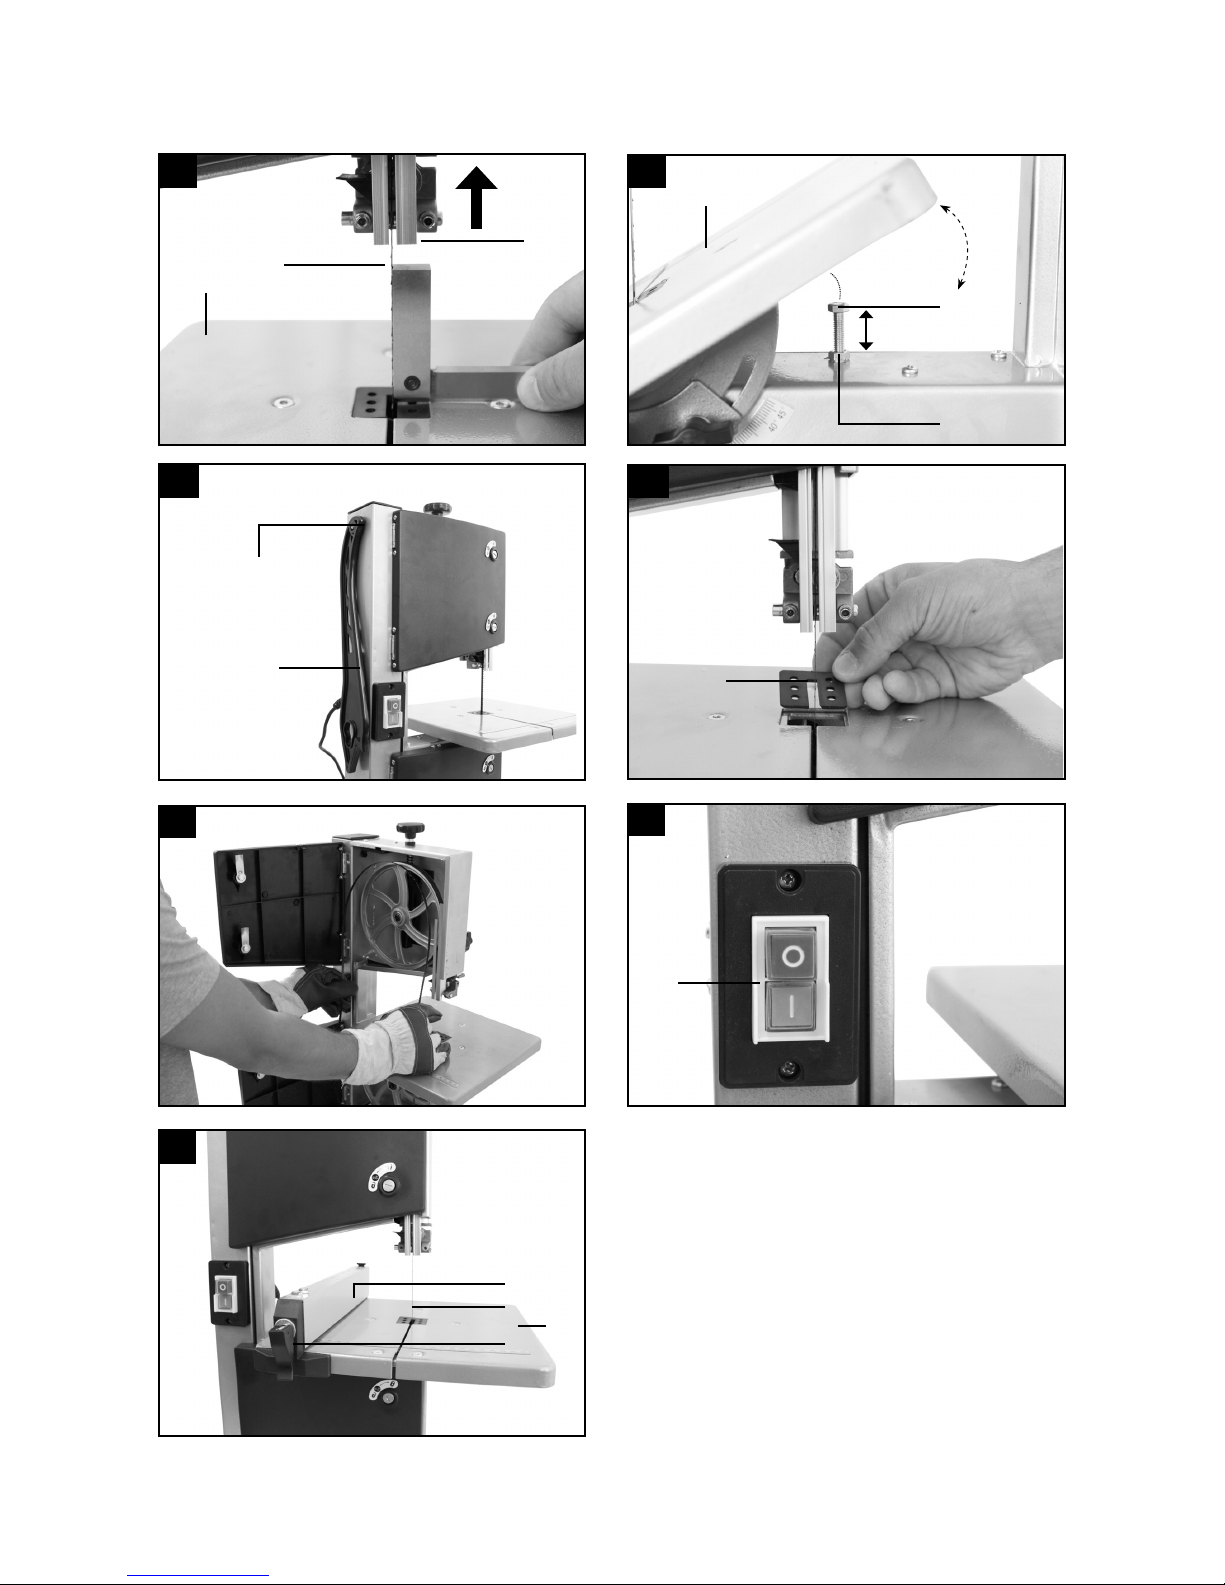
12. On/off switch
13. Locking screw for top saw band roller
14. Set screw for top saw band roller
15. Machine frame
16. Mains cable
17. Degree scale for swivel range
18. Motor
19. Extraction nozzle
20. Locking handle for saw table
21. Bandsaw blade
22. Adjustment handle for saw band guide
23. Locking handle for saw band guide
24. Parallel stop
25. Clamping bar for parallel stop
26. Push stick
27. 3 mm Allen key
28. 4 mm Allen key
29. Screwdriver
30. Open-ended spanner
31. Wing nut
32. Clamping plate
33. Knurled nut
34. U-reinforcement
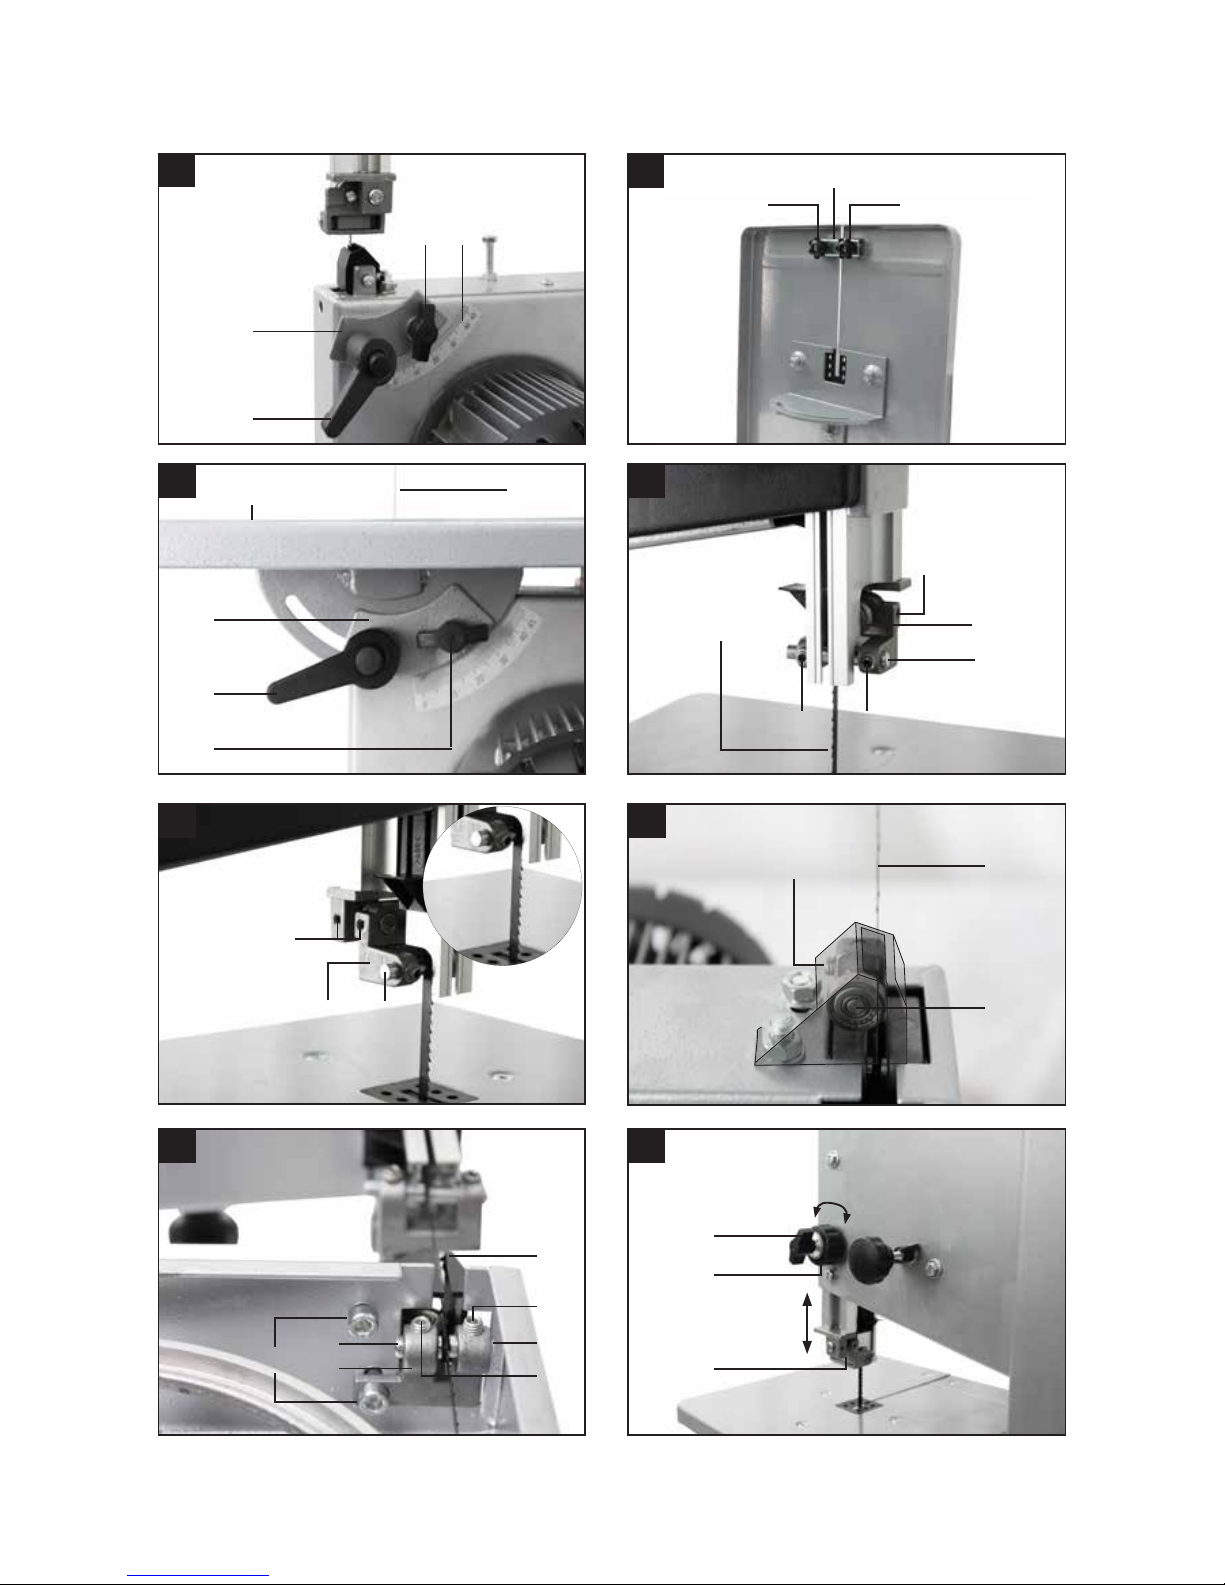
35. Allen screw for top support bearing
36. Top support bearing
37. Top guide pin
38. Allen screw for top guide pins
39. Retainer (top)
40. Allen screw top retainer (2x)
41. Allen screw bottom support bearing
42. Bottom support bearing
43. Screw bottom retainer
44. Saw band protection
45. Allen screw for bottom guide pins
46. Bottom guide pin
47. Retainer (bottom)
48. Push Stick retainer
49. Screw (saw table adjustment)
50. Nut (saw table adjustment)
51. 5 mm Allen key
3. Scope of delivery
• Open the packaging and remove the device carefully.
• Remove the packaging material as well as the packaging
and transport bracing (if available).
• Check that the delivery is complete.

GB/IE/NI
3
• Check the device and accessory parts for transport damage.
• If possible, store the packaging until the warranty period
has expired.
ATTENTION!
The device and packaging materials are not toys! Children
must not be allowed to play with plastic bags, film and small
parts! There is a risk of swallowing and suffocation!
• Bandsaw / Bandsaw blade (pre-assembled)
• Saw table
• Push stick
• Parallel stop
• Open-ended spanner, size 10/13
• Allen key, size 3/4/5
• Screwdriver
• Original operating instructions
4. Intended use
The bandsaw is designed to perform longitudinal and cross
cuts on timber or wood-type materials. To cut round materials you must use suitable holding devices.
The equipment is to be used only for its prescribed purpose.
Any other use is deemed to be a case of misuse. The user /
operator and not the manufacturer will be liable for any damage or injuries of any kind caused as a result of this.
The machine is to be operated only with suitable saw blades.
To use the machine properly you must also o serve the safety
regulations, the assembly instructions and the operating instructions to be found in this manual.
All persons who use and service the machine have to be acquainted with this manual and must be informed about the
machine’s potential hazards. It is also imperative to observe
the accident prevention regulations in force in your area. The
same applies for the general rules of occupational health
and safety.
The manufacturer shall not be liable for any changes made to
the machine nor for any damage resulting from such changes.
Even when the machine is used as prescribed it is still impossible to eliminate certain residual risk factors. The following
hazards may arise in connection with the machine’s construction and design:
• Damage to hearing if ear-muffs are not used as necessary.
• Harmful emissions of wood dust when used in closed
rooms.
• Contact with the blade in the uncovered cutting zone.
• Injuries (cuts) when changing the blade.
• Injury from catapulted workpieces or parts of workpieces.
• Crushed fingers.
• Kickback.
• Tilting of the workpiece due to inadequate support.
• Touching the blade.
• Catapulting of pieces of timber and workpieces.
Please note that our equipment has not been designed for use
in commercial, trade or industrial applications. Our warranty
will be voided if the machine is used in commercial, trade or
industrial businesses or for equivalent purposes.
5. General safety information
Attention! The following basic safety measures must be observed when using electric tools for protection against electric
shock, and the risk of injury and fire. Read all these notices
before using the electric tool and keep the safety instructions
for later reference.
Safe work
1 Keep the work area orderly
– Disorder in the work area can lead to accidents.
2 Take environmental influences into account
– Do not expose electric tools to rain.
– Do not use electric tools in a damp or wet environment.
– Make sure that the work area is well-illuminated.
– Do not use electric tools where there is a risk of fire or
explosion.
3 Protect yourself from electric shock
– Avoid physical contact with earthed parts (e.g. pipes,
radiators, electric ranges, cooling units).
4 Keep children away
– Do not allow other persons to touch the equipment or
cable, keep them away from your work area.
5 Securely store unused electric tools
– Unused electric tools should be stored in a dry, elevated
or closed location out of the reach of children.
6 Do not overload your electric tool
– They work better and more safely in the specified output
range.
7 Use the correct electric tool
– Do not use low-output electric tools for heavy work.
– Do not use the electric tool for purposes for which it is
not intended. For example, do not use handheld circular
saws for the cutting of branches or logs.
– Do not use the electric tool to cut firewood.
8 Wear suitable clothing
– Do not wear wide clothing or jewellery, which can be-
come entangled in moving parts.
– When working outdoors, anti-slip footwear is recommended.
– Tie long hair back in a hair net.
9 Use protective equipment
– Wear protective goggles.
– Wear a mask when carrying out dust-creating work.
10 Connect the dust extraction device if you will be process-
ing wood, materials similar to wood, or plastics.
– If connections for dust extraction and a collecting de-
vice are present, make sure that they are connected
and used properly.
– When processing wood, materials similar to wood, and
plastics. Operation in enclosed spaces is only permitted with the use of a suitable extraction system.
11 Do not use the cable for purposes for which it is not
intended
— Do not use the cable to pull the plug out of the outlet.
Protect the cable from heat, oil and sharp edges.
12 Secure the workpiece
– Use the clamping devices or a vice to hold the work-
piece in place. In this manner, it is held more securely
than with your hand.

GB/IE/NI
4
– An additional support is necessary for long workpieces
(table, trestle, etc.) in order to prevent the machine
from tipping over.
– Always press the workpiece firmly against the working
plate and stop in order to prevent bouncing and twisting of the workpiece.
13 Avoid abnormal posture
– Make sure that you have secure footing and always
maintain your balance.
– Avoid awkward hand positions in which a sudden slip
could cause one or both hands to come into contact
with the saw blade.
14 Take care of your tools
– Keep cutting tools sharp and clean in order to be able
to work better and more safely.
– Follow the instructions for lubrication and for tool re-
placement.
– Check the connection cable of the electric tool regu-
larly and have it replaced by a recognised specialist
when damaged.
– Check extension cables regularly and replace them
when damaged.
– Keep the handle dry, clean and free of oil and grease.
15 Pull the plug out of the outlet
– Never remove loose splinters, chips or jammed wood
pieces from the running saw blade.
– During non-use of the electric tool or prior to mainte-
nance and when replacing tools such as saw blades,
bits, milling heads.
– When the saw blade is blocked due to abnormal feed
force during cutting, turn the machine off and disconnect it from power supply. Remove the work piece and
ensure that the saw blade runs free. Turn the machine
on and start new cutting operation with reduced feed
force.
16 Do not leave a tool key inserted
– Before switching on, make sure that keys and adjusting
tools are removed.
17 Avoid inadvertent starting
– Make sure that the switch is switched off when plugging
the plug into an outlet.
18 Use extension cables for outdoors
– Only use approved and appropriately identified exten-
sion cables for use outdoors.
– Only use cable reels in the unrolled state.
19 Remain attentive
– Pay attention to what you are doing. Remain sensible
when working. Do not use the electric tool when you
are distracted.
20 Check the electric tool for potential damage
– Protective devices and other parts must be carefully
inspected to ensure that they are fault-free and function
as intended prior to continued use of the electric tool.
– Check whether the moving parts function faultlessly
and do not jam or whether parts are damaged.
All parts must be correctly mounted and all conditions must
be fulfilled to ensure fault-free operation of the electric tool.
– The moving protective hood may not be fixed in the
open position.
– Damaged protective devices and parts must be prop-
erly repaired or replaced by a recognised workshop,
insofar as nothing different is specified in the operating
manual.
– Damaged switches must be replaced at a customer
service workshop.
– Do not use any faulty or damaged connection cables.
– Do not use any electric tool on which the switch cannot
be switched on and off.
21 ATTENTION!
– The use of other insertion tools and other accessories
can entail a risk of injury.
22 Have your electric tool repaired by a qualified electrician
– This electric tool conforms to the applicable safety regu-
lations. Repairs may only be performed by an electrician using original spare parts. Otherwise accidents
can occur.
Additional safety instructions
• Wear safety gloves whenever you carry out any maintenance work on the blade!
• When cutting round or irregularly shaped wood, use a
device to stop the workpiece from twisting.
• When cutting boards in upright position, use a device to
prevent kick-back.
• A dust extraction system designed for an air velocity of 20
m/s should be connected in order to comply with woodworking dust emission values and to ensure reliable operation.
• Give these safety regulations to all persons who work on
the machine.
• Do not use this saw to cut fire wood.
• The machine is equipped with a safety switch to prevent it
being switched on again accidentally after a power failure.
• Before you use the machine for the first time, check that
the voltage marked on the rating plate is the same as your
mains voltage.
• If you use a cable reel, the complete cable has to be pulled
off the reel.
• Persons working on the machine should not be distracted.
• Note the direction of rotation of the motor and blade.
• Never dismantle the machineʼs safety devices or put them
out of operation.
• Never cut workpieces which are too small to hold securely
in your hand.
• Never remove loose splinters, chips or jammed pieces of
wood when the saw blade is running.
• It is imperative to observe the accident prevention regulations in force in your area as well as all other generally
recognized rules of safety.
• Note the information published by your professional associations.
• Adjustable protective devices have to be adjusted as close
as possible to the workpiece.
• Important! Support long workpieces (e.g. with a roller table) to prevent them sagging at the end of a cut.
• Make sure the blade guard (4) is in its lower position when
the saw is being transported.
• Safety guards are not to be used to move or misuse the
machine.
 Loading...