

Parkside PBK 4 A1 Translation Of The Original Instructions

4-IN-1 PETROL MULTI-TOOL PBK 4 A1
4-IN-1 PETROL MULTI-TOOL
Translation of the original instructions
Read carefully before using machine!
BENZINDREVET MULTIHAVEMASKINE
4-I-1
Oversættelse af den originale driftsvejledning
Læs venligst omhyggeligt, før du bruger maskinen!
OUTIL MODULABLE À ESSENCE 4 EN 1
Traduction du mode d’emploi d’origine
Lire consciencieusement avant d’utiliser a machine!
BENZIN-KOMBIGERÄT 4 IN 1
Originalbetriebsanleitung
Vor dem Gebrauch der Maschine sorgfältig lesen!
IAN 311700
BENZINE-COMBIAPPARAAT 4-IN-1
Vertaling van de originele gebruiksaanwijzing
Aandachtig lezen voordat u het apparaat gebruikt!

Before reading, unfold both pages containing illustrations and familiarise yourself with all functions of the
device.
Før du læser, vend begge sidene med billeder frem og bliv bekendt med alle apparatets funktioner.
Avant de lire le mode d’emploi, ouvrez les deux pages contenant les illustrations et familiarisez-vous ensuite
avec toutes les fonctions de l’appareil.
Vouw vóór het lezen de beide pagina‘s met de afbeeldingen open en maak u vertrouwd met alle functies
van het apparaat.
Klappen Sie vor dem Lesen die beiden Seiten mit den Abbildungen aus und machen Sie sich anschließend
mit allen Funktionen des Gerätes vertraut.
GB / IE / NI Translation of the original instructions Page 1
DK Oversættelse af den originale driftsvejledning Side 19
FR / BE Traduction du mode d’emploi d’origine Page 37
NL / BE Vertaling van de originele gebruiksaanwijzing Pagina 55
DE / AT / CH Originalbetriebsanleitung Seite 73

5a
5b
5c

1a 1b 1c
1d 1e
1f
2a
2b 2c
3d3a 3b 3c

3e
3f
3g
3h
3i
5c
y
6a 6b
4
5a
H1
H2
5d 5e 5f
6c 6d 6e
5b
y
A

Contents
Introduction .................................2
Intended use ........................................2
Features............................................2
Package contents.....................................3
Technical data.......................................3
Explanation of the symbols used ........................4
Safety instructions............................6
Operational safety instructions for hedge trimmers ...........6
Supplementary safety instructions for hedge trimmers.........7
Operational safety instructions for pole pruners .............7
Precautions against kickback............................8
Operational safety instructions for strimmers................8
Operational safety instructions for cutting blades ............9
Safety devices/equipment .............................9
Before use .................................10
Attaching the round handle............................10
Assembling the quick release mechanism . . . . . . . . . . . . . . . . . 10
Fixing/attaching the carrying harness....................10
Assembling the hedge trimmer .........................10
Removing the hedge trimmer...........................10
Swivelling the hedge trimmer...........................10
Mounting the saw chain and blade .....................10
Removing the saw chain ..............................10
Tightening and checking the saw chain ..................11
Lubricating the chain .................................11
Sharpening the saw chain.............................11
Attaching the extension attachment......................11
Fitting/removing the protective guard ....................11
Installing/replacing the cutting blade ....................11
Installing/replacing the strimmer ........................12
Putting on the carrying harness .........................12
Setting the cutting height ..............................12
Fuel and oil ........................................12
Transport ..................................14
Cleaning ...................................14
Maintenance ...............................14
Storage and transportation ...................15
Troubleshooting.............................16
Engine unit.........................................16
Pole pruner ........................................16
Hedge trimmer......................................16
Maintenance intervals .......................16
Pole pruner ........................................16
Hedge trimmer......................................16
Ordering spare parts ........................16
Disposal ...................................17
Kompernass Handels GmbH warranty..........17
Service ....................................18
Importer...................................18
Translation of the original Conformity Declaration 18
Use .......................................12
Starting when the engine is cold ........................12
Starting when the engine is hot .........................12
Working with the hedge trimmer........................13
Cutting techniques ...................................13
Working with the pole pruner ..........................13
Sawing techniques ..................................13
Working safely .....................................14
PBK 4 A1
GB│IE│NI │
1 ■

4-IN-1 PETROL MULTI-TOOL PBK 4 A1
Introduction
Congratulations on the purchase of your new appliance. You have chosen
a high-quality product. The operating instructions are a part of this product.
They contain important information about safety, usage and disposal.
Before using the product, please familiarise yourself with all operating and
safety instructions. Use the product only as described and for the range of
applications specified. Please also pass these operating instructions on to
any future owner.
Intended use
Long-handled hedge trimmer
This appliance is intended for the cutting and trimming of hedges, bushes
and flowering shrubs in the home environment. This is a hand-held appliance
with an integrated engine unit with linear reciprocating cutting blades.
WARNING!
► Hedge trimmers are not suitable for use by children.
Pole pruner
This appliance is intended for trimming branches in trees.
3-section cutting blade/strimmer
Use with the 3-section cutting blade: for cutting high grass, undergrowth
and light scrub.
Use with strimmer: for cutting grass and small weeds.
Extension attachment
CAUTION!
■ Do not use the extension attachment/boom in combination with
the 3-section cutting blade/strimmer attachment!
Any other use that is not expressly permitted in these operating instructions
may damage the appliance and represents a serious risk for the user.
Please make sure that you pay attention to the restrictions in the safety
instructions. Comply with all national regulations which may restrict the
use of the machine. Any other uses of or modification to the appliance is
deemed to be improper and carries the risk of serious personal injury.
Not intended for commercial use.
PROHIBITED APPLICATIONS!
Due to the physical risk posed to the user, the appliance may not be used
to perform the following activities: cleaning footpaths and as a shredder
for shredding tree and hedge sections. Furthermore, the appliance may not
be used to level ground elevations such as molehills. For safety reasons,
the appliance may not be used as a drive unit for any other devices. The
user, not the manufacturer, is liable for any resulting damage or injuries of
any kind.
Features
Engine unit PBK 4 A1-1
Safety lock-out
On/Off switch
Carrying lug
4 x mounting bolts
Round handle
5a
Rubber ring
5b
Pin
Barrier bar
Screw grip
Boom
Throttle control
Spark plug connector
Choke lever
Starter pull cord
Fuel tank
Filler cap
Fuel pump (primer)
Air filter housing cover
Hedge trimmer attachment PBK 4 A1-3
Handle
Lock/release
Gear housing
Cutter bar
Base plate (hedge trimmer)
Control lever
Front boom (hedge trimmer)
Locking pin
Drive shaft
Pole pruner attachment PBK 4 A1-4
Front boom (pole pruner)
Safety ring
Oil filler cap
Oil tank
Blade
Saw chain
Bench grinder support
Stop
Locking pin
Drive shaft
Nut
Thread
Sprocket cover
Blade guide
Blade hole
Guide rail
Oil dispenser
Chain sprocket
Oil adjusting screw
Chain tensioner pin
Chain tensioner screw
■ 2 │ GB│IE│NI
PBK 4 A1

Strimmer/cutting blade attachment PBK 4 A1-2
2 x bolts (with snap ring, washer)
Blade guard
3-section cutting blade
Strimmer with cutting filament
Front boom (strimmer/3-section cutting blade)
Locking pin
Drive shaft
Extension attachment
Boom
Screw grip
Locking pin
Drive shaft
Accessories
Carrying strap
Protective cover for blade
Chain guard
Organic chain oil
Oil/petrol mixing canister
Safety goggles
Hex key 4 mm
Hex key 5 mm
Open-ended spanner SW 8/10
Spark plug wrench/flat-blade screwdriver
Tool bag
Nut M19 x 1.0 (left-hand thread)
Pressure plate cover
Pressure plate
Drive plate
Cutting filament
Funnel
Package contents
1 engine unit
1 hedge trimmer attachment PBK 4 A1-3 (hereinafter hedge trimmer)
1 pole pruner attachment PBK 4 A1-4 (hereinafter pole pruner)
1 strimmer/cutting blade attachment PBK 4 A1-2
1 extension attachment
1 handle with barrier bar
1 strimmer with cutting filament
1 cutting filament (filament Ø: 2.4 mm/filament length: 6 m)
1 3-section cutting blade
1 Carrying harness
1 chain guard
1 blade guard
1 oil/petrol mixing canister
1 100 ml organic chain oil
1 tool bag
1 4 mm hex key
1 5 mm hex key
1 spark plug wrench/flat-blade screwdriver
1 SW 8/10 open-ended spanner
1 pair of safety goggles
1 funnel
1 operating instructions
Technical data
Engine unit: PBK 4 A1-1
Engine type: 2-stroke engine, air-cooled, chrome cylinder
Engine output (max.): 1.35 kW/1.85 hp
Cylinder capacity: 42.7 cm³
-1
3
(rpm)
-1
(rpm)
-1
(rpm)
-1
(rpm)
-1
(rpm)
-1
(rpm)m
-1
(rpm)
-1
(rpm)
3
Engine idle speed: 3000 min
Max. engine speed
with 3-section cutting blade: 9200 min
with strimmer: 8700 min
with chainsaw: 9200 min
with hedge trimmer: 9200 min
Max. cutting speed
with 3-section cutting blade: 6900 min
with strimmer: 6525 min
with chainsaw: 20 m/s
with hedge trimmer: 1550 min
Ignition: electronic
Drive: centrifugal clutch
Weight:
(empty tank): approx. 5.6 kg
Fuel tank capacity: 1200 cm
Spark plug: CDK L8RTC
Fuel consumption at
max. engine performance: 0.6 kg/h
Specific
fuel consumption
at max. engine performance: 431 g/kWh
Hedge trimmer: PBK 4 A1-3
Cut length: 425 mm
Tooth spacing: 24 mm
Weight
(ready for use): approx. 2.24 kg
Pole pruner attachment: PBK 4 A1-4
Weight (ready for use): approx. 1.6 kg
Oil tank, recommended fill level: 140 cm
Cut length: approx. 260 mm
Blade: Oregon type 100SDEA318
Saw chain: Oregon 91P040X
Strimmer/cutting blade
attachment: PBK 4 A1-2
Strimmer with cutting filament (IAN 311700):
Filament cutting circle Ø: 430 mm
Filament length: 6.0 m
Filament Ø: 2.4 mm
3-section cutting blade (IAN 311700):
Cutting blade cutting
diameter Ø: 255 mm
PBK 4 A1
GB│IE│NI │
3 ■

Noise and vibration information:
Noise measurement value determined in accordance with ISO 22868,
EN 10517. The A-rated noise level of the power tool is typically as follows:
Hedge trimmer:
Sound pressure level L
Uncertainty K
WA
Sound power level L
Guaranteed sound power level L
Uncertainty K
WA
: 98.79 dB(A)
pA
: 2.5 dB
: 109.53 dB(A)
WA
: 114 dB(A)
WA
: 2.5 dB
Pole pruner:
Sound pressure level L
Uncertainty K
WA
: 97.06 dB(A)
pA
: 2.5 dB
Sound power level: 110.87 dB(A)
Uncertainty K
: 2.5 dB
WA
3-section cutting blade:
Sound pressure level L
Uncertainty K
PA
Sound power level L
Uncertainty K
WA
: 97.64 dB(A)
pA
: 2.5 dB
: 111.27 dB(A)
WA
: 2.5 dB
Strimmer:
Sound pressure level L
Uncertainty K
PA
Sound power level L
Uncertainty K
WA
: 99.08 dB(A)
pA
: 2.5 dB
: 111.10 dB(A)
WA
: 2.5 dB
Wear ear protectors to prevent hearing damage!
Vibration values (vector total of three directions) determined in accordance with EN 11806-1, EN ISO 10517, EN ISO 11680-1:
Hedge trimmer:
Vibration on the front handle: vibration emission value
= 4.182 m/s2
a
h,D
Uncertainty K = 1.5 m/s
2
Vibration on the rear handle: vibration emission value
= 9.695 m/s2
a
h,D
Uncertainty K = 1.5 m/s
2
Pole pruner:
Vibration on the front handle: vibration emission value
= 3.855 m/s2
a
h,D
Uncertainty K = 1.5 m/s
2
Vibration on the rear handle: vibration emission value
= 7.590 m/s2
a
h,D
Uncertainty K = 1.5 m/s
2
Strimmer:
Vibration on the front handle: vibration emission value
= 4.864 m/s2
a
h,D
Uncertainty K = 1.5 m/s
2
Vibration on the rear handle: vibration emission value
= 9.750 m/s2
a
h,D
Uncertainty K = 1.5 m/s
2
3-section cutting blade:
Vibration on the front handle: vibration emission value
= 4.622 m/s2
a
h,D
Uncertainty K = 1.5 m/s
2
Vibration on the rear handle: vibration emission value
= 7.708 m/s2
a
h,D
Uncertainty K = 1.5 m/s
2
NOTE
►
The vibration level specified in these instructions has been measured
in accordance with the standardised measuring procedure specified
in EN ISO 11806-1, EN ISO 10517, EN ISO 11680-1 and can be
used to make equipment comparisons. The specified vibration emission value can also be used to make an initial exposure estimate.
WARNING!
► The vibration level varies in accordance with use and may be higher
than the value specified in these instructions in some cases. There is a
risk of underestimation of the vibration load if the appliance is used
regularly in this manner. To estimate the vibration load during a specific working period accurately, periods during which the appliance
is switched off (or running, but not being used) must also be taken
into account. This can significantly reduce the vibration load over the
total working period.
WARNING!
■ You can reduce the vibration risk, for example, the risk of Raynaud's
phenomenon, by taking regular breaks during which you rub your
hands together.
Explanation of the symbols used
Warning! Read the operating instructions before use!
Wear protective gloves!
Wear safety shoes!
Wear ear protection!
Wear a hard hat!
Wear protective goggles!
Important, hot parts. Keep a safe distance away!
1
I
o
ON
1. Switch on the appliance
2
FULL
2. Fill fuel pump (primer)
3
PULL
3. Pull the choke lever
4
PULL
4. Pull the starter pull cord
CHOKE
Pull the choke lever
■ 4 │ GB│IE│NI
PBK 4 A1

Press the fuel pump (primer) 6x
Mixing ratio: 40 parts petrol to 1 part oil
Caution! Poisonous CO vapours (carbon monoxide vapours)!
Do not use the appliance in confined spaces!
Warning! Do not use circular saw blades for the cutting
blade function.
Petrol: ROZ 95/ROZ 98
No E10 refuel
2-stroke-motor oil: ISO-L-EGD/JASO FD
Risk of fatal electrical shock! Keep at least 10m away from
overhead power lines!
Attention! Falling objects.
Especially when cutting above head height.
Attention! Risk of injury due to running blades!
Keep a safe distance away!
General warning!
1. Push the pin on the front boom into the groove on the
engine unit boom as far as the stop.
2. Once it is correctly inserted, the red line must match up
with the one on the engine unit boom.
20 h
Add a little grease after every 20 hours of operation
(gear grease)
A distance of 15 metres must be maintained between the
machine and third parties!
The cutting tool continues running after it is turned off
(cutting blade/cutting filament)!
Sound power level LWA data in dB.
Fire, naked flames and smoking are prohibited!
min
max. 9000
Protect the appliance from rain and moisture!
-1
Max. 9000 min
-1
(rpm)
Attention! Left-hand thread.
Beware of flung objects!
Beware of kickback!
Caution! Risk of injury from rotating cutting blade!
Keep hands and feet away!
Attention – petrol is highly flammable!
Explosion hazard! Do not spill fuel!
Turn the appliance off and disconnect the spark plug before
performing any maintenance work!
Attention! Risk of suffocation!
PBK 4 A1
GB│IE│NI │
5 ■

Safety instructions
IMPORTANT! READ CAREFULLY BEFORE USE!
KEEP FOR YOUR RECORDS.
Operational safety instructions for hedge trimmers
NOTE
The hedge trimmer is supplied completely assembled.
►
► Instructions and pictorial representations regarding the settings and
use of the hedge trimmer and/or its controls, maintenance, lubrication
by the user can be found in these instructions and on the fold-out
page.
► Notes on the working position (see fold-out page).
► Notes on the operating controls (see fold-out page).
► Notes on the safe handling of fuel (see section "Preparation", point f).
► Notes on the recommended replacement or repair of parts or the
Customer Service and specification of spare parts to be used,
inasmuch as these affect the health and safety of the user, can be
found in these instructions.
► The explanation of all graphical symbols, information, features and
technical data as well as the procedure in the event of accidents and
faults can be found in these instructions.
► Blocked tool: Remove any blockages from the cutter bar .
– Do not smoke.
– Refuel outside only.
– Never store the hedge trimmer or the fuel tank in a room where there is
an open flame, for example in a hot water boiler.
– If the petrol has overflowed, do not attempt to start the engine. Remove
the machine from the fuel-contaminated area before restarting.
– Always replace the filler cap after refuelling and close it securely.
– If the tank is empty, this should be done in the open.
g) If the cutting unit comes in contact with a foreign object or if the oper-
ating noise increases or the hedge trimmer starts to vibrate abnormally,
stop the engine and allow the hedge trimmer to come to a standstill.
Pull the spark plug connector off the spark plug and take the following
action:
– check for damage;
– check for loose parts and secure all the loose parts;
– replace damaged parts with equivalent parts or have them repaired.
Wear ear protection!
Wear protective goggles!
WARNING!
■ Children may never use the hedge trimmer.
■ Stay alert, watch what you are doing and use common sense
when operating the appliance. Do not use the appliance while you
are ill, tired or under the influence of drugs, alcohol or medication.
A moment of inattention while operating the appliance may result in
serious personal injury.
■ Avoid improper use. Use the machine only as described under
"Intended use".
Familiarise yourself with the operating instructions before you
operate the appliance.
Preparation
a) THE HEDGE TRIMMER CAN CAUSE SERIOUS INJURIES! Read the
instructions on correct handling, preparation, maintenance, starting and
stopping the hedge trimmer very carefully. Familiarise yourself with all
manual controls and the proper use of the hedge trimmer.
b) Children may never use the hedge trimmer.
c) Beware of overhead power lines.
d) Do not use the hedge trimmer while anyone, especially children, is in
the vicinity.
e) Wear appropriate clothing! Do not wear loose clothing or jewellery
which could get caught in moving parts. We recommend wearing
heavy-duty gloves, non-slip footwear and goggles.
f) Handle fuel carefully. It is highly flammable and the vapours are
explosive. The following points should be followed:
– Use only specially-designed containers.
– Never open the tank filler cap or top up the petrol tank while the motor
is running or hot. Allow the motor and the exhaust components to cool
down before refuelling.
■ Familiarise yourself with the operation of the hedge trimmer so that you
know how to stop immediately in an emergency.
Operation
a) The engine is to be immobilised before:
– cleaning or removal of a blockage;
– inspection, maintenance or work on the hedge trimmer;
– setting the working position of the cutting unit;
– if the hedge trimmer is to be left unattended.
b) Always make sure that the hedge trimmer is in the proper working position
before the engine is started.
c) During operation of the hedge trimmer, always ensure that you have firm
footing, especially when using a ladder.
d) Do not use the hedge trimmer if it has a defective or badly worn cutting
unit.
e) To minimise the risk of fire, ensure that the engine and the silencer are
free of residues, leaves or leaked lubricant.
f) Ensure that all supplied handles and safety guards are mounted when
operating the hedge trimmer. Never attempt to operate an incompletely
assembled hedge trimmer or a hedge trimmer with non-approved modi-
fications.
g) Always use both hands if the hedge trimmer is equipped with two handles.
h) Always familiarise yourself with your environment and be aware of
potential dangers that you may not be able to hear because of the
noise of the hedge trimmer.
■ 6 │ GB│IE│NI
PBK 4 A1

Maintenance and storage
a) If the hedge trimmer is shut down for maintenance, inspection or storage,
switch off the engine, pull the spark plug connector off the spark plug
and ensure that all rotating parts have come to a standstill. Allow the
machine to cool down before carrying out an inspection, settings, etc.
b) Store the hedge trimmer where the petrol vapours cannot come into
contact with flames or sparks. Always allow the hedge trimmer to cool
down before storage.
c) When transporting or storing the hedge trimmer, cover the cutting unit
with the protective cover for the cutting unit.
Supplementary safety instructions for hedge
trimmers
Environmental safety
■ Only operate the hedge trimmer in daylight or good artificial light.
■ While trimming, ensure that you do not come into contact with objects
such as fence wire or plant supports. They could cause damage to the
cutter bar . Inspect the hedge to be cut carefully and remove any
wires or other foreign bodies.
■ Be aware of your environment and all possible hazards that you may
be unable to hear while cutting the hedge.
DANGER!
► In the event of imminent danger or an emergency, switch off the
engine immediately.
Electrical safety
■ Hold the power tool only by the insulated grips as the cutting blades
could come into contact with hidden power lines. Contact between
the blades and a live wire may make exposed metal parts of the power
tool live and could give the operator an electric shock.
Personal safety
■ During operation, no other person or animal may be within a radius
of 15 metres. The operator is responsible for third parties within the
working area.
■ During operation, ensure that you have proper footing and balance at
all times, especially when used on steps or ladders.
■ Never touch the cutter bar of the hedge trimmer.
■ Keep your hands away from the cutting blades. Do not attempt to
clear clippings or hold onto the material to be cut while the blades
are still in motion. Remove any jammed clippings only when the
appliance has been switched off. A moment of inattention while
operating the hedge trimmer may result in serious personal injury.
■ Wait until the tool has come to a standstill before putting it down.
Use and handling
CAUTION!
► Between tasks or after completion of a task, do not set the cutter bar
down on its tip as this could cause damage to the cutter bar
■ Before use, always check that the blades, the blade screws and other
parts of the cutting tool are not worn or damaged. Never work with a
damaged or heavily worn blade.
■ After making settings to the working angle, check whether both setting
levers are clicked firmly into place. If one of the setting levers remains
open, the second could be unintentionally be released by a branch
and the cutter bar could swing down.
■ Never use the hedge trimmer with defective or missing safety devices.
■ Never grasp the hedge trimmer by the safety guards.
.
■ Carry the hedge trimmer by the front handle when switched off,
with the cutter bar facing away from your body. When transporting
or storing the trimmer, always put on the protective cover. Careful
handling of the appliance reduces the likelihood of accidental contact
with the moving blades.
■ Store the hedge trimmer in a dry, high or closed space out of the reach
of children.
■ Do not attempt to repair the equipment unless you have received the
necessary training.
■ For safety's sake, change worn or damaged parts.
DANGER!
► In the event of imminent danger or an emergency, switch off the
engine immediately.
Operational safety instructions for pole pruners
CAUTION! RISK OF INJURY!
► To prevent injuries, never touch the appliance above the safety ring
while it is running!
Preparation
■ Always wear a hard hat, ear protection and safety gloves. Also wear
safety goggles to prevent splashes of oil or sawdust from getting into
your eyes. Wear a dust mask to protect yourself from dust.
■ Wear sturdy, non-slip boots.
■ Do not use the appliance in the rain.
■ Before use, check the appliance's safety condition, especially the blade
and the saw chain.
■ Do not use the appliance near power lines. Maintain a minimum dis-
tance of 10 m to above-ground power lines.
Electrical safety
■ Do not use the appliance in a potentially explosive environment con-
taining flammable liquids, gases or dusts. The sparks generated by the
machine could ignite the vapours or gases.
■ Appliances with defective switches must be repaired immediately to
avoid damage or injuries.
Personal safety
■ Never use the appliance while standing on a ladder.
■ Do not lean too far forward while using the appliance. Ensure you are
standing firmly and keep your balance at all times. Use the supplied
carrying harness to spread the weight evenly on the body.
■ To avoid injuries due to falling branches, do not stand under the
branches that you want to cut off. Be aware of branches that may
spring back and cause injuries. Work at an angle of approximately
60°.
■ Be aware that an appliance kickback can occur.
■ Keep an eye not only on the branches being cut, but also on falling
material, to avoid tripping.
■ Cover the guide rail and the chain with the cover during transport and
storage.
■ Avoid unintentional starting of the appliance.
■ Store the appliance outside the reach of children. Only those who are
fully acquainted with the operating instructions and the appliance itself
may operate the appliance.
PBK 4 A1
GB│IE│NI │
7 ■

Use and handling
■ Never start the appliance before the blade, saw chain and sprocket
covers have been fitted correctly.
■ Do not cut any wood that is lying on the ground and do not attempt to
saw roots that are protruding from the soil. Avoid immersing the saw
chain in the soil at all costs, as this could blunt the saw chain.
■ If the appliance accidentally comes into contact with a solid object, turn
off the engine immediately and inspect the appliance for damage.
■ After 30 minutes of work, take a break of at least one hour.
■ If the pole pruner is shut down for maintenance, inspection or storage,
switch off the engine, pull the spark plug connector off the spark plug
and ensure that all rotating parts have come to a standstill. Allow the
machine to cool down before carrying out an inspection, settings, etc.
■ Service the appliance carefully. Check for misalignment or binding
of moving parts, breakage of parts and any other damage that may
impair the tool’s operation. If damaged, have the power tool repaired
before use. Many accidents are caused by poorly-maintained tools.
■ Keep cutting tools sharp and clean. Properly maintained cutting tools
with sharp cutting edges are less likely to bind and are easier to control.
■ Have the appliance checked by qualified specialists. Use only the re-
placement parts recommended by the manufacturer.
■ Any such reaction can lead to you losing control over the saw and
possibly injuring yourself. Do not rely solely on the chainsaw's built-in
safety devices. As the user of a chainsaw, you can take a number of
measures to avoid accidents and injury. A kickback is caused by incorrect use or misuse. It can be avoided by taking proper precautions, as
described below:
■ Hold the saw firmly with both hands, with your thumb and fingers
around the handles of the chainsaw. Position your body and arms
so you can withstand kickback forces. If suitable measures are taken,
the operator can control the recoil forces. Never let go of the chainsaw.
■ Avoid any abnormal posture and do not saw over shoulder height.
This will prevent inadvertent contact with the tip of the rail and allows
a better control of the chainsaw in unexpected situations.
■ Always use the replacement rails and saw chains specified by the
manufacturer. Incorrect replacement rails and saw chains can lead to
a tearing of the saw chain and/or kickback.
■ Follow the manufacturer's instructions for sharpening and mainten-
ance of the saw chain. Setting the depth limiter too low can increase
the risk of kickback.
■ Do not saw with the tip of the blade. This can lead to a kickback.
■ Ensure that there aren’t any objects on the ground that you can trip
over.
Precautions against kickback
CAUTION KICKBACK!
► Be aware of the danger of kickback when working with the appli-
ance. There is a risk of personal injury. You can avoid kickbacks by
being careful and using the correct sawing technique.
■ Contact with the tip of the rail may in some cases lead to an unexpected
rearwards reaction resulting in the guide rail flying upwards towards
the operator (see fig. A).
Bild 1
Fig. A
■ Kickbacks can occur if the tip of the guide rail touches an object or if
the wood bends and the saw chain gets caught in the cut (see fig. B).
Operational safety instructions for strimmers
Preparation
■ Wear close-fitting clothes that offer good protection, such as long
trousers, sturdy work shoes, heavy-duty protective gloves, a hard hat,
a protective mask for your face or safety goggles to protect your eyes
and good ear plugs or some other hearing protection against noise.
■ Always use the enclosed shoulder strap.
■ Always ensure that the handles are dry and clean and that no petrol
mixture is present.
■ Before working, check the area for objects such as pieces of metal,
bottles, stones, etc, that could get thrown up and cause injuries to the
user.
■ Before starting the engine, make sure that the strimmer is not in contact
with any obstacles.
■ Do not use the appliance until you have familiarised yourself with its
use.
Electrical safety
■ Never use the appliance near highly flammable liquids or gases, either
in closed rooms or in the open. This may result in explosions and/or
fire.
■ Do not work with a damaged or incomplete appliance or an appliance
that has been modified without the consent of the manufacturer. Never
use the unit with defective protective equipment. Do not use the appliance if it has a defective on/off switch. If the appliance has been
dropped, check for significant damage or defects.
Fig. B
■ If the saw chain jams in the upper edge of the guide rail, the rail can
kick back violently towards the operator.
■ 8 │ GB│IE│NI
Personal safety
■ This appliance may only be operated, adjusted and maintained by
appropriately trained individuals and adults.
■ If you are not familiar with the appliance, practice handling the appli-
ance while the engine is off.
■ Do not touch the exhaust.
■ Do not operate the appliance under the influence of alcohol or drugs.
■ Always hold the appliance with both hands. Your thumbs and fingers
should encircle the handles.
PBK 4 A1

■ Work posture: Do not operate the appliance in an uncomfortable pos-
ition, when you are unbalanced, with arms fully stretched or with only
one hand.
■ Always ensure that you have a solid and firm stance.
■ Do not use the appliance if bystanders or animals are in the direct vicin-
ity. Maintain a minimum distance of 15 metres between the operator
and other people or animals when trimming. Maintain a minimum distance of 30 metres between the operator and other people or animals
when mowing down to the ground.
■ When mowing on a slope, always stand at a lower level than the cutting
tool. Never cut or trim on an icy, slippery hill or slope.
■ Any modifications to the product may risk personal safety and void the
manufacturer's warranty.
■ Children should be supervised to ensure that they do not play with the
appliance.
■ Do not use the appliance if it is damaged or if there are visible defects.
Use and handling
■ Use the appliance only for its intended purpose: cutting grass, mowing,
pruning branches, cutting and trimming hedges and bushes.
■ Do not use the appliance for extended periods; take regular breaks.
■ Ensure that screws and connecting elements are firmly tightened. Never
operate the appliance if it is not correctly adjusted, incomplete or if it is
not properly assembled.
■ Open the fuel tank slowly in order to allow any pressure which may
have built up in the tank to dissipate. To prevent the risk of fire, move at
least 3 metres away from the refuelling area before starting the appliance.
■ Guide the strimmer to the desired height. Avoid contact with small
objects (e.g. stones) when using the strimmer.
■ Always hold the strimmer on the ground when the appliance is in oper-
ation.
■ Do not use the appliance unless the appropriate protective guard has
been installed and is in good condition.
■ Do not use any other cutting tools. For your safety, only use the ac-
cessories and additional devices that are indicated in the operating
instructions. The use of parts other than those recommended in the
operating instructions, or other accessories, can put you at risk of injury.
■ Always trim and cut using the high speed range. Do not let the engine
run at a low speed when starting to mow or trim.
■ When starting and operating the appliance, ensure that it does not
come into contact with the ground, stones, wire or other foreign material. Switch off the appliance before you put it down.
■ Switch off the appliance before you put it away.
■ Always turn the engine off before working on the cutting tool.
Operational safety instructions for cutting blades
Preparation
■ The cutting blade flings objects and soil with great force. These can
blind or cause other injuries. Wear eye, face and leg protection.
Always remove objects from the work area before using the cutting blade.
■ The cutting blade continues running after the throttle lever has been
released. A running-down cutting blade can inflict cuts to yourself or
other people standing nearby. Turn the engine off and make sure that
the cutting blade has come to a complete stop before performing any
work on the cutting blade.
Personal safety
■ The appliance can blind and cause injuries to bystanders. Maintain a
minimum distance of 15 metres in all directions between the appliance
and other people or animals.
Use and handling
■ Do not use the appliance if any of the cutting blade accessories have
not been properly installed.
■ The cutting blade can kick back from objects with force. This can cause
injuries to your arms and legs. If the appliance comes into contact with
a foreign body, immediately shut down the engine and wait until the
cutting blade has come to a complete stop. Check the cutting blade for
damage. Always replace the cutting blade if it is bent or cracked.
Safety devices/equipment
The relevant plastic protective guard for the cutting blade or filament
operation must be installed when working with the appliance in order to
prevent objects from being flung away.
WARNING!
■ Never mow/trim while other individuals, especially children or
animals, are in the vicinity.
■ Maintain a safety distance of 15 m. Turn off the appliance immedi-
ately if this distance is not maintained.
CAUTION! RISK OF POISONING!
■ Exhaust gases, fuels and lubricants are toxic. Exhaust gases must
never be inhaled.
WARNING!
■ Petrol is highly flammable. Store petrol only in the containers
provided.
■ Refuel only outdoors and do not smoke.
■ The filler cap must not be opened and refuelling must not take place
while the engine is running or when the appliance is hot.
■ Do not attempt to start the engine if the petrol has overflowed. In-
stead, remove the appliance from the area polluted by petrol. Do not
attempt to restart the appliance until the petrol fumes have dissipated.
■ For safety reasons, the petrol tank and filler cap must be replaced if
they are damaged.
Limit the noise generation and vibrations to a minimum!
■ Only use appliances that are in good condition.
■ Maintain and clean the appliance on a regular basis.
■ Adapt your working method to the appliance.
■ Do not force the power tool.
■ Have the appliance inspected if necessary.
■ Switch the appliance off when not in use.
■ Wear protective gloves.
PBK 4 A1
GB│IE│NI │
9 ■

Before use
CAUTION!
■ Always wear non-slip footwear and appropriate safety clothing
such as protective gloves, a hard hat, a protective mask and safety
goggles as well as hearing protection.
■ Check the area in which the appliance is to be used and remove any
objects that may be caught and slung away.
■ Before use and after dropping or other impacts, always visually in-
spect the appliance to check whether the cutting tool, mounting bolts
and the entire cutting unit are damaged. Worn or damaged cutting
tools and mounting bolts must be replaced.
■ Always carry out a visual inspection before use to check whether the
cutting tools are worn or damaged. To prevent imbalance, worn or
damaged cutting tools and mounting bolts should be replaced only
as complete sets.
Attaching the round handle
♦ Start by fitting the rubber ring 5a on the boom .
♦ Attach the barrier bar onto the rubber ring 5a from below, as
shown in the diagram.
♦ The pin 5b of the barrier bar must be pushed into one of the two
holes on the boom
♦ Push the round handle onto the rubber ring 5a provided on the
boom
♦ Insert the 4 mounting bolts from above through the round handle
♦ Tighten the screws .
.
and fix them onto the barrier bar with the 4 nuts.
Assembling the quick release mechanism
♦ Hook in the carabiner and secure it with the red strap on the quick
release mechanism (see figures). Pull on the red strap if you have to
put down the appliance quickly.
Fixing/attaching the carrying harness
♦ Hook the carrying harness into the carrying lug .
♦ Adjust the length of the carrying harness to your size so that the
carrying lug
to lock into place.
is at hip height when the strap is hooked in place.
Assembling the hedge trimmer
♦ Start by undoing the screw grip on the boom of the engine unit.
♦ Push the pin on the front boom of the
hedge trimmer into the groove on the engine
unit boom
correctly inserted, the red line must match
up with the one on the engine unit boom.
♦ Tighten the screw grip .
NOTE
Assembly of the pole pruner/strimmer/3-section cutting blade/exten-
►
sion attachment is carried out in the same order.
as far as the stop. Once it is
Removing the hedge trimmer
♦ Undo the screw grip and pull the front boom of the hedge trimmer
out of the engine unit boom
NOTE
Removal of the pole pruner/strimmer/3-section cutting blade/extension
►
attachment is carried out in the same order.
.
Swivelling the hedge trimmer
♦ Release the lock/release .
♦ Press the control lever and swivel the hedge trimmer into the desired
position.
♦ Allow the control lever to click into the recess in the base plate
(hedge trimmer)
.
Mounting the saw chain and blade
WARNING!
► Wear protective gloves! There is a danger of injury from the sharp
cutting teeth!
NOTE
► Pay close attention to the running direction of the saw chain on
the blade
► Depending on wear, the blade can be turned.
♦ Undo the nut using the open-ended spanner .
♦ Remove the sprocket cover .
♦ Lay the saw chain over the blade starting at the tip.
♦ Now fit the blade and saw chain .
♦ Lay the guide rail over the blade guide , while inserting the chain
tensioner pin
chain
♦ Now you can tighten the saw chain
checking the saw chain").
♦ Replace the sprocket cover and tighten the nut gently.
and at the base plate (hedge trimmer) .
in the blade hole . At the same time, lay the saw
over the chain sprocket .
(see section "Tightening and
Removing the saw chain
♦ You may have to loosen the saw chain to remove the blade
and the saw chain
chain"). Follow these instructions in reverse order.
(see section "Tightening and checking the saw
■ 10 │ GB│IE│NI
PBK 4 A1

Tightening and checking the saw chain
Fitting/removing the protective guard
WARNING!
► Wear protective gloves! There is a danger of injury from the sharp
cutting teeth!
♦ Turn the chain-tensioner screw in a clockwise direction using the
flat-blade screwdriver
♦ The saw chain must lie against the underside of the blade. Check
whether the saw chain
NOTE
►
A new saw chain stretches and must be tightened more frequently.
to increase the tension.
can be drawn over the blade
by hand.
Lubricating the chain
♦ Remove the oil filler cap .
♦ Fill the oil tank with approx. 100ml of organic chain oil .
♦ The chain lubrication can be increased or decreased using the oil
adjusting screw
♦ Press and then turn the oil adjusting screw clockwise to decrease
the chain lubrication.
♦ Press and then turn the oil adjusting screw anticlockwise to increase
the chain lubrication.
WARNING!
► Never work without lubricating the chain first!
If the saw chain runs dry, the cutting equipment may become irreparably damaged within a short time. Always check chain lubrication
and oil level in the tank before starting work.
NOTE
Use only saw chain oil. Preferably biodegradable. Do not use waste
►
oil, motor oil, etc.
► While working, check whether the chain lubrication is working
correctly.
.
Sharpening the saw chain
NOTE
►
A bench grinder can be attached to the bench grinder support for
a secure grip during grinding.
► You will find detailed information on sharpening in a sharpening set,
e.g. from Oregon.
► Alternatively, you can use an electrical saw chain sharpening device
and follow the manufacturer's instructions.
► If you have any doubts about carrying out the work, the saw chain
should be replaced.
Attaching the extension attachment
CAUTION!
■ Do not use the extension attachment/boom in combination with
the 3-section cutting blade/strimmer attachment!
WARNING!
■ When working with the 3-section cutting blade , the blade guard
must be fitted. The blade guard is positioned under the metal panel
of the boom . The blade guard is now attached to the front boom
with the 2 screws . To do this, use the supplied hex key .
Cutting equipment
3-section cutting blade Blade guard
Strimmer
WARNING!
► Do not use any other cutting equipment apart from that which is
supplied with the product. The use of any other cutting equipment
or protective equipment is deemed to be improper and carries a
significant risk of accidents.
Protective equipment
Blade guard + cutting filament protective guard
C
Installing/replacing the cutting blade
■ Fit/remove the 3-section cutting blade as shown in figures 1a–1f.
■ Find the hole in the drive plate , align it with the opposite hole and
block it with the supplied hex key
■ Place the 3-section cutting blade on the drive plate (see fig. 1b).
The inscription must be visible from above when holding the tool in the
working position (see fold-out page). Both sides of the 3-section cutting
blade
■ Fit the pressure plate over the thread over the splined shaft (see fig.
1c).
■ Fit the pressure plate cover (see fig. 1d).
■ Tighten the nut with the spark plug spanner anticlockwise ACH-
TUNG! Left-hand thread! (see fig. 1f).
■ The 3-section cutting blade is fitted with a plastic cover on delivery.
This must be removed before use and refitted during periods when not
in use.
■ The plastic cover can now be removed.
■ Fit the cutting filament protective guard C on the protective guard .
■ The cutting filament protective guard C must be fitted when working
with the cutting filament. The cutting filament protective guard
(pre-fitted on delivery) is fitted as shown in figure 2a.
■ Ensure that the cutting filament protective guard C is correctly clicked
into place. There is a blade A on the inside of the cutting filament
protective guard C. This is covered with a safety cover (see fig. 2a.).
■ Remove the safety cover before starting work and replace it after finish-
ing work.
■ To remove the cutting filament protective guard C from the protective
can be used.
CAUTION! SHARP EDGES, WEAR PROTECTIVE GLOVES
CAUTION! SHARP EDGES, WEAR PROTECTIVE GLOVES
guard , take a tool, such as a screwdriver, to carefully remove the
three mounting pins.
ATTENTION! RISK OF INJURY!
.
C
NOTE
► Use the extension attachment/boom for working at greater
heights.
♦ Fit the extension attachment/boom between the engine unit and
the hedge trimmer/pole pruner. The assembly is carried out in the
same manner as for the attachments described previously.
PBK 4 A1
GB│IE│NI │
11 ■

Installing/replacing the strimmer
■ Install/replace the strimmer as displayed in figure 2c.
■ Find the hole in the drive plate , align it with the opposite hole and
block it with the supplied hex key .
■ Screw the strimmer onto the thread in an anticlockwise direction.
ATTENTION! Left-hand thread!
Putting on the carrying harness
NOTE
The following adjustments can be made to make sure that you can
■
work without becoming fatigued. The settings may vary depending
on your body size.
■ Before starting work, adjust the carrying harness to suit your body
size.
■ Balance the appliance with the fitted cutting tool so that the cutting
tool swings just over the ground without the need to move the appliance with your hands.
1.) Put on the carrying harness
into place (see fig. 3a).
2.) As shown in figure 3b, pull on the belt
harness
3.) To tighten the two shoulder straps, pull on the two shoulder straps as
shown in figure 3c.
4.) To ensure to the correct position of the appliance on the carrying harness,
pull the belt as shown in figure 3d.
5.) Hook in the carabiner
strap
6.) Now take the appliance and hang it so that the carrying lug
into the carabiner
also be moved by loosening the screw
optimum orientation of the appliance.
centrally on your body and adjust the upper body size.
on the quick release mechanism.
, as shown in figure 3h. The carrying lug can
and close the clasps so that they click
, to position the carrying
(see figs. 3e–3g) and secure it with the red
clicks
and sliding it to achieve the
Setting the cutting height
■ Put on the carrying harness and hook in the appliance (see section
"Putting on the carrying harness").
■ Use the various belt straps on the carrying harness to adjust the
optimum working and cutting position (see section "Putting on the
carrying harness").
■ Perform a few circular movements without starting the engine in order to
find the ideal shoulder strap length (see fig. 6a).
■ The carrying harness is equipped with a quick release mechanism.
Pull on the red strap if you have to release the appliance quickly
(see fig. 3i).
CAUTION!
■ Always use the carrying harness when working with the device.
Put on the carrying harness as soon as you have started the
engine and it is ticking over. Turn off the engine before removing the
carrying harness
.
Fuel and oil
■ Only use a mixture of unleaded petrol (at least ROZ 95) and special
2-stroke engine oil (JASO FD/ISO-L-EGD). Mix the fuel mixture in accordance with the fuel mix table.
■ Add the respective correct amounts of unleaded petrol and 2-stroke oil
to the supplied oil/petrol mixing canister (see “Fuel mix table”).
Then shake the canister well.
Fuel mix table
Mixing process: 40 parts petrol to 1 part oil
Petrol 2-stroke oil
0.5 litres 12.5 ml
Use
CAUTION!
■ Please pay attention to the statutory provisions in the relevant noise
protection regulations.
Before starting the appliance, always check that:
■ The fuel system is not leaking.
■ The protective equipment and cutting equipment is complete and in
perfect working order.
■ All screw connections are firmly tightened.
■ All moving parts can move smoothly and freely.
Starting when the engine is cold
CAUTION!
■ Never allow the starter pull cord to whip back. This could cause
damage.
1.) Fill the fuel tank
“Fuel and oil”).
2.) Push the fuel pump (primer)
3.) Switch the On/Off switch
4.) Pull the choke lever
5.) Hold the appliance firmly and pull out the starter pull cord
point of first resistance. Now pull hard on the starter pull cord
The appliance starts.
6.) If the engine does not start, repeat step 5.
7.) As soon as the engine is running, press first the safety lock-out
then the throttle
If the engine does not start after several attempts, read the “Troubleshooting
guide” section.
CAUTION!
■ Always pull the starter pull cord straight out. Hold the handle of
the starter pull cord
Do not allow the starter pull cord
NOTE
At very high ambient temperatures, it is possible that even a cold
■
engine has to be started without using the choke!
Starting when the engine is hot
(The appliance has been turned off for less than 15–
20 minutes)
1.) Switch the On/Off switch
2.) The choke lever
3.) Hold the appliance firmly and pull out the starter pull cord
point of first resistance. Now pull hard on the starter pull cord
appliance should start after 1–2 pulls. If the appliance still hasn’t started
after 6 pulls, repeat steps 1–7 under “Starting when the engine is cold”.
with the help of the funnel (see also the section
6 times.
to “I”.
into the position “ ”.
to the
.
and
to activate the automatic choke.
firmly when the starter pull cord
does not need to be pulled out to start a warm motor.
to whip back.
to “I”.
retracts.
to the
. The
■ 12 │ GB│IE│NI
PBK 4 A1
Turning the engine off
Emergency stop sequence
If the appliance needs to be stopped immediately, turn the On/Off switch
to "0".
Normal sequence
■ Release the throttle lever and wait until the engine has slowed down
to its idling speed. Then move the On/Off switch to "0".
CAUTION!
■ The 3-section cutting blade must be stationary when the engine is
idling. If the 3-section cutting blade is turning, adjust the carburettor!
Working procedures
Before using the appliance, practice all working techniques (see figs. 6a–6c)
with the engine stopped.
Extending the cutting filament
To extend the cutting filament, run the engine at full speed and tap the
strimmer on the floor. The filament extends automatically. The knife A
C
on the cutting filament protective guard
length (see fig. 6d).
CAUTION!
Grass/weed residues can get caught under the protective guard
■ Remove the remains using a scraper or similar item when the engine
is switched off.
Various cutting methods
Trimming/mowing (3-section cutting blade or strimmer)
■ Swing the appliance in a scything motion (see fig. 6a).
■ Hold the cutting tool parallel to the ground and set the desired cutting
height.
Low trimming (with strimmer)
■ Hold the appliance with a slight incline to the ground (see fig. 6b).
Always cut away from your body. Never pull the appliance towards
you.
cuts the thread to the permissible
.
Prevent kickback
When working with the 3-section cutting blade there is a risk of kickback if
the blade strikes against solid obstacles (tree trunks, branches, tree stumps,
rocks or similar). This will result in the cutting tool being catapulted back
against the direction of rotation. This can lead to the loss of control of the
appliance. Do not use the cutting blade near fences, metal posts, boundary
stones or foundations. To cut low-density shrubs, position the appliance as
shown in fig. 6e to avoid kickbacks.
Working with the hedge trimmer
Cutting techniques
■ The double-sided cutter bar allows cutting in both directions or by using
swinging movements from one side to the other.
■ For a vertical cut, move the hedge trimmer evenly forwards or up and
down in an arc.
■ For a horizontal cut, move the hedge trimmer in a scything motion
along the edge of the hedge so that cut branches fall to the ground.
■ See fold-out page (figure A).
NOTE
Remove thicker branches with a branch cutter.
►
Working with the pole pruner
Sawing techniques
WARNING!
► Always pay attention to the falling clippings.
► Be aware of the danger of branches swinging back.
NOTE
►
Place the stop on the branch. This will help you work more safely
and quietly.
► Now you can begin sawing.
Sawing off small branches
♦ Saw small branches (Ø 0–8 cm) from the top down (see figure).
Short mowing (with strimmer)
■ Short mowing removes all the vegetation right down to the ground.
Angle the strimmer 30° to the right. Set the handle to the desired
position (see fig. 6c).
Cutting against trees/fences/foundations (with strimmer)
NOTE
The filament will wear or fray quickly if it comes into contact with
■
trees, rocks, walls or foundations. The filament will break off if it
strikes fence mesh.
CAUTION!
■ Do not use the appliance to remove any objects from footpaths, etc.!
The appliance is powerful and can fling small stones or other objects
15 metres or more and may cause injuries or damage to cars,
houses and windows.
Seizing
Immediately turn off the engine if the cutting tool becomes blocked.
Remove all grass and scrub from the appliance before restarting the appliance.
Wear protective goggles!
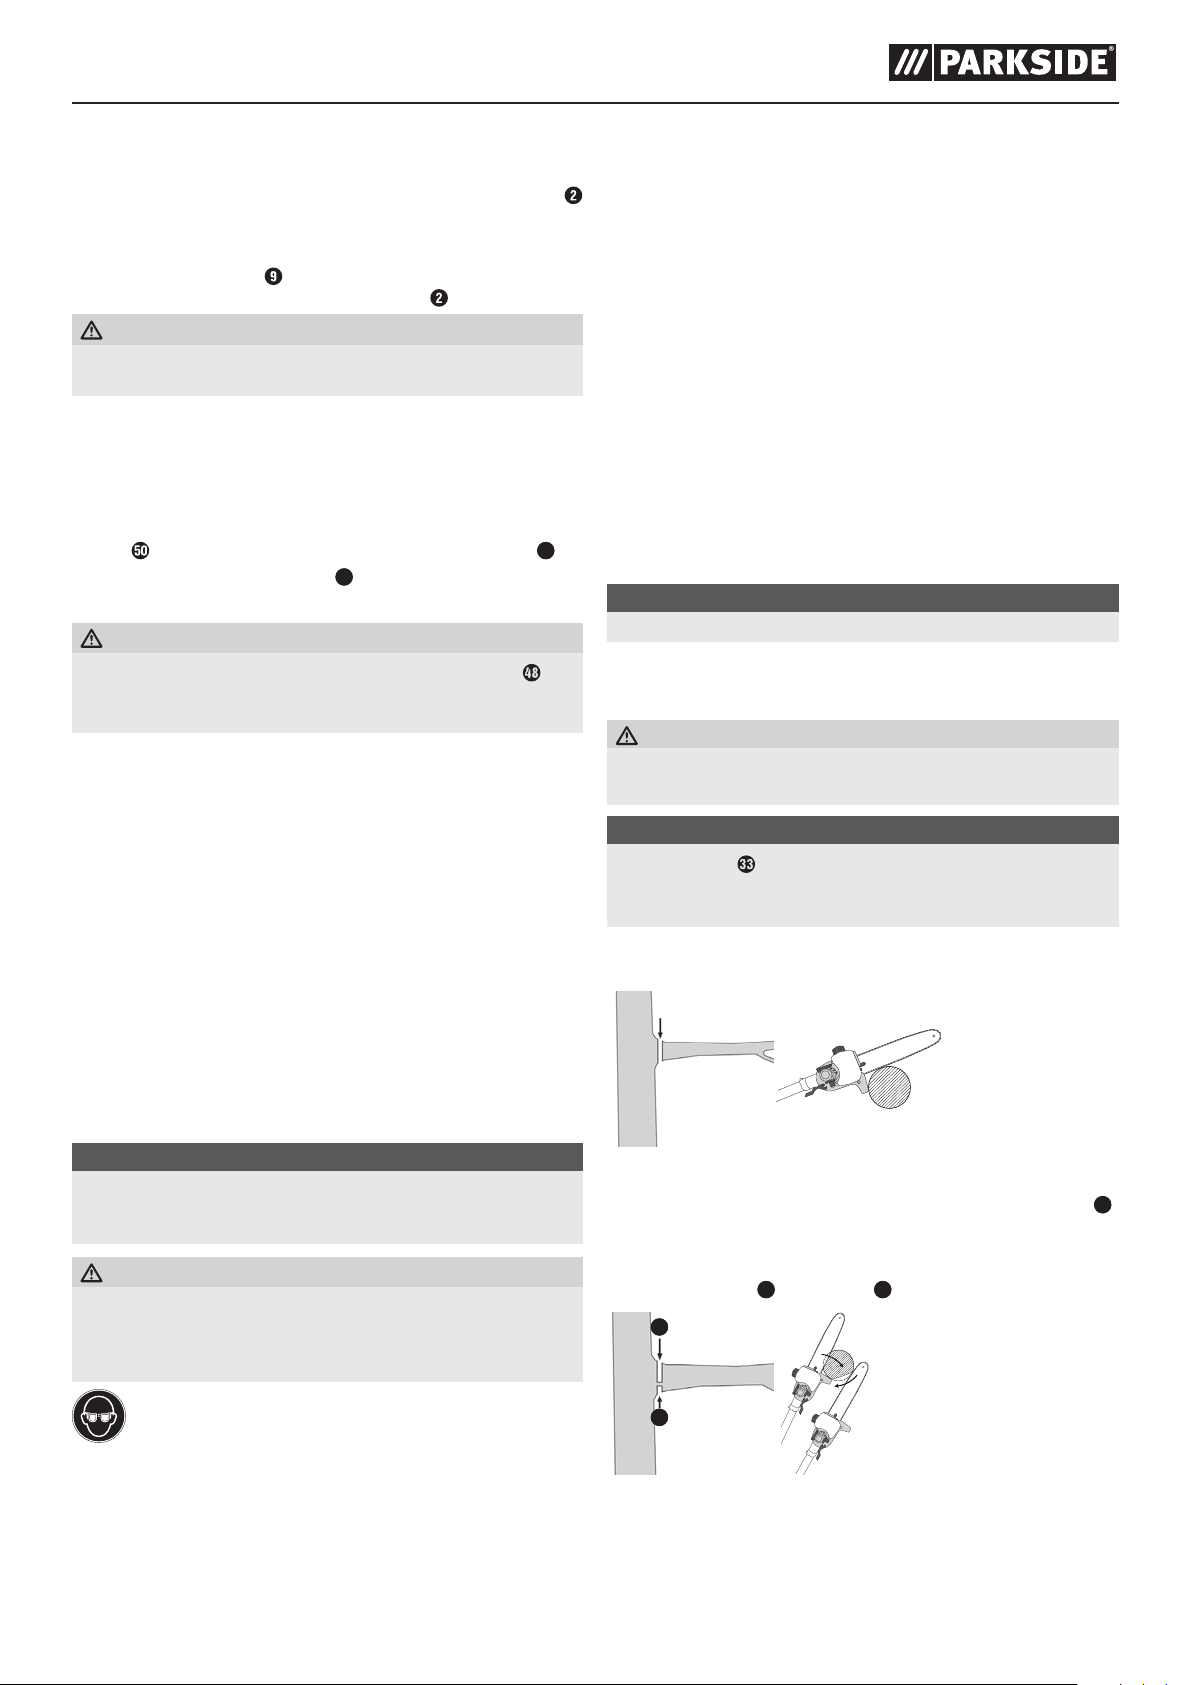
Sawing off larger branches
♦ When sawing larger branches (Ø 8–25 cm), first make a relief cut A
(see figure). A relief cut also prevents peeling of the bark on the main
trunk.
♦ Saw from the top B to the bottom A.
B
A
2
1
PBK 4 A1
GB│IE│NI │
13 ■

Saw in sections
Trim long or thick branches before you make the final cut (see figure).
C A B
cb a
Working safely
■ Keep the appliance, the cutting mechanism and the chain guard in
good condition to prevent injury.
■ If the appliance has been dropped, check for significant damage or
defects.
■ Observe the specified working angle max. 60°±10° to ensure safe
working (see figure).
max. 60°±10°
■ Do not use the appliance while standing on a ladder or with unsteady
footing.
■ Do not be tempted into making a poorly considered cut.
You could endanger yourself and others.
■ Children should be supervised to ensure that they do not play with the
appliance.
■ Change your working position regularly. Using the appliance for a long
time can lead to vibration-related circulation disorders of the hands.
You can extend the usage duration by using appropriate gloves or by
taking regular breaks. Note that any personal predisposition to poor
blood circulation, low external temperatures or large gripping forces
can reduce the usage period.
Transport
■ Use the protective cases / for transporting the appliance.
■ To prevent injuries, ensure that the appliance cannot switch on during
transport (see figure).
Cleaning
Cleaning the engine unit
NOTE
Clean the appliance thoroughly after every use.
■
■ Always switch off the appliance before cleaning and then disconnect
the spark plug connector
■ Clean the appliance regularly with a damp cloth and a mild detergent.
Make sure that no water can penetrate into the interior of the appliance.
Cleaning the pole pruner
■ The pole pruner must be cleaned of sawdust at regular intervals.
♦ Remove the sprocket cover .
♦ Remove the saw chain from the blade and clean the guide rail .
♦ Keep the saw chain sharp and check the tension; check the oil level
and the oil supply.
Cleaning the hedge trimmer
♦ Check the hedge trimmer for loose screws on the cutter bar and
tighten these if necessary.
♦ Remove stuck cuttings.
♦ Maintain the cutter bar using an oil spray or an oil can.
Cleaning the strimmer/cutting blade attachment
♦ Remove stuck cuttings.
♦ Keep the 3-section cutting blade sharp to facilitate your work.
.
Maintenance
Replacing the strimmer/cutting filament
1.) The strimmer
replacing the strimmer". Press the marking (see fig. 5a) and remove the
cover (see fig. 5b).
2.) Remove the spool bobbin
3.) Remove any remaining cutting filament.
4.) Double the new cutting filament and hook the loop that you have made
into the recess on the spool bobbin (see fig. 5d).
5.) Wind the filament tightly in an anticlockwise direction. The spool bobbin
separates the two halves of the cutting filament (see fig. 5d).
6.) Now take the cover in your hand and place the spool bobbin
Make sure that the filament holder of the spool bobbin lines up with the
filament guide on the cover.
7.) Now release the cutting filament from the spool bobbin
it through the metal eyes in the cover.
8.) Put the two halves of the housing back together so that they click into
place.
9.) Cut any excess filament back to about 13 cm. This reduces the load on
the engine when starting and warming up.
10.) Refit the strimmer (see section "Installing/replacing the strimmer").
must be removed as described in the section "Installing/
from the strimmer housing (see fig. 5c).
in it.
and guide
■ 14 │ GB│IE│NI
PBK 4 A1

Air filter maintenance
Contaminated air filters reduce the engine performance due to low air
supply to the carburettor.
Regular inspection is essential. The air filter
every 25 hours of operation and cleaned if necessary.
The air filter must be checked more frequently if the air is dusty.
1.) Remove the cover of the air filter housing
2.) Remove the air filter
3.) Clean the air filter
air).
4.) Assembly is done in the reverse order.
CAUTION!
■ Never clean the air filter with petrol or flammable solvents.
Spark plug maintenance
1.) Pull off the spark plug connector
2.) Remove the spark plug using the enclosed spark plug spanner
3.) Assembly is done in the reverse order.
Electrode gap = 0.6 mm (distance between the electrodes between which
the ignition spark is generated). Check the spark plug for contamination
after the first 10 hours of operation and clean it with a copper wire brush
if required.
Afterwards, service the spark plug after every 50 hours of operation.
Grinding the protective guard blade
A
The blade
be the case, undo the 2 screws that hold the blade
filament protective guard
blade
of the cutting edge.
Adjusting the carburettor
Remove the cover of the air filter housing
Adjusting the throttle cable
If the appliance no longer reaches maximum speed after a while and all
other causes as described in the "Troubleshooting" section have been ruled
out, this may mean that the throttle cable needs to be adjusted. To adjust
the throttle cable, screw in the screw
as the lock nut
Lubricating the gears
■ Add liquid gear grease after every 20 hours of operation (approx.
10 g) to lubricate the angle gear.
♦ To do this, undo the screw (see fold-out page) to press the gear
grease into the gear housing.
(see fig. 2a) can become blunt over time. If you find this to
A
with a sharpening stone and make sure you maintain the angle
H2
correctly (see Fig. 4).
.
by tapping or blowing it out (with compressed
C
. Clamp the blade A in a vice. Grind the
must be inspected after
.
.
A
onto the cutting
.
or the adjusting screw
H1
as well
.
Storage and transportation
■ Store the appliance in a safe location.
■ Store the appliance and accessories in a safe location which is pro-
tected against naked flames and sources of heat/sparks, such as gaspowered water heaters, dryers, oil stoves or mobile heaters, etc.
■ Ensure that the protective guard , the strimmer and the engine are
free of cutting residue when storing.
■ The plastic cover for the 3-section cutting blade must be refitted for
transport and storage.
■ Always turn the appliance off before performing any maintenance work
and remove the spark plug connector .
Storing the appliance
The appliance must be prepared for storage if it is to be stored for longer
than 30 days. Otherwise the residual fuel in the carburettor will evaporate
and leave a gooey sediment. This may make starting the appliance more
difficult and result in expensive repair work.
1.) Remove the filler cap
Carefully empty the fuel tank
2.) To remove all fuel from the carburettor, start the engine and leave it to
run until it stops.
3.) Allow the engine to cool for about 10 minutes.
4.) Remove the spark plug (see section "Spark plug maintenance").
5.) Add 1 teaspoon of 2-stroke oil to the combustion chamber. Pull the
starter pull cord
Replace the spark plug.
NOTE
Store the appliance in a dry place and away from possible ignition
■
sources.
Start-up after storage
1.) Remove the spark plug (see section "Spark plug maintenance").
2.) Pull the starter pull cord
from the combustion chamber.
3.) Clean the spark plug and observe the correct electrode gap on the
spark plug.
4.) Fill the fuel tank
Transport
■ If you are planning to transport the appliance, empty the fuel tank
as explained in the section "Storage".
to relieve any pressure in the fuel tank .
.
several times to wet all mechanical parts with oil.
quickly in order to remove any excess oil
. See the section "Fuel and oil".
♦ After filling the gearbox, close the lubrication hole with the screw .
PBK 4 A1
GB│IE│NI │
15 ■

Troubleshooting
Maintenance intervals
Engine unit
Problem Possible cause Troubleshooting
The engine does
not start.
The engine starts
but does not run
at full power.
The engine does
not run smoothly.
Soot deposits or
wetness on the
spark plug.
Incorrect start-up process. Follow the instructions
regarding starting.
Incorrect adjustment of the
choke lever
Contaminated air filter. Clean air filter.
Incorrect spark plug gap. Clean the spark plug
Incorrect carburettor
adjustment.
.
Set the choke lever
".
to "
and adjust the spark
plug gap or replace
the spark plug.
Clean spark plug or
replace it with a new
spark plug.
Pole pruner
Problem Possible cause Troubleshooting
Motor is running,
saw chain
does not move.
No progress.
Hedge trimmer attachment
or pole pruner attachment
is not connected properly
to the engine unit.
Saw chain
heating or is sagging.
dry/over-
Check assembly.
Top up the oil or regrind, replace or tighten
the saw chain
Hedge trimmer
Problem Possible cause Troubleshooting
Motor is running,
blades do not
move.
Hedge trimmer attachment
or pole pruner attachment
is not connected properly
to the engine unit.
Check assembly.
.
Pole pruner
The figures given here are based on normal operating conditions. In the
event of more difficult conditions, such as strong dust generation and
longer daily operating hours, the given intervals are to be reduced correspondingly.
Appliance part
Lubricating the
chain
Check
saw
chain
Check
guide
rail
Check
sprocket
Action Before
starting
work
Check
and pay
attention to
the sharpness
Check
chain
tension
sharpen X
(wear,
damage)
clean and
turn
deburr X
replace X X
replace
Weekly In the
event
of
faults
X
X
X
X
XX
X
In the
event
of damage
Hedge trimmer
The figures given here are based on normal operating conditions. In the
event of more difficult conditions, such as strong dust generation and longer
daily operating hours, the given intervals are to be reduced correspondingly.
As required
X
■ 16 │ GB│IE│NI
Appliance part
Cutting
blade
Action Before
starting
work
Visual inspection X
Cleaning X X
After
completion
of work
As required
Ordering spare parts
Ordering spare parts
The following information should be provided when ordering spare parts:
■ Type of appliance
■ Item number of the appliance
■ Device ID number
Current prices and information are available at
www.kompernass.com
NOTE
Replacement parts which are not listed (e.g. strimmer, cutting filament)
■
can be ordered via our service hotline.
PBK 4 A1

Disposal
The packaging is made from environmentally friendly material
and can be disposed of at your local recycling plant. The appliance and its accessories are made from various materials, such
as metal and plastic.
Your local community or municipal authorities can provide information on
how to dispose of the appliance.
Dispose of the packaging in an environmentally friendly
manner.
Note the labelling on the packaging and separate the
packaging material components for disposal if necessary. The
packaging material is labelled with abbreviations (a) and
numbers (b) with the following meanings:
1–7: Plastics,
20–22: Paper and cardboard,
80–98: Composites
Your local community or municipal authorities can provide
information on how to dispose of the worn-out product.
Environmental protection
■ Carefully empty the petrol and oil tank and dispose of your appliance
at a recycling plant. The plastic and metal parts used can be separated
and recycled.
■ Dispose of waste oil and petrol at a waste collection centre and do not
dump these into the sewerage or drainage system.
■ Dispose of contaminated maintenance material and working materials
at a collection point provided for this purpose.
Kompernass Handels GmbH warranty
Dear Customer,
This appliance has a 3-year warranty valid from the date of purchase. If
this product has any faults, you, the buyer, have certain statutory rights.
Your statutory rights are not restricted in any way by the warranty described below.
Warranty conditions
The validity period of the warranty starts from the date of purchase. Please
keep your original receipt in a safe place. This document will be required
as proof of purchase.
If any material or production fault occurs within three years of the date of
purchase of the product, we will either repair or replace the product for
you at our discretion. This warranty service is dependent on you presenting
the defective appliance and the proof of purchase (receipt) and a short
written description of the fault and its time of occurrence.
If the defect is covered by the warranty, your product will either be repaired
or replaced by us. The repair or replacement of a product does not signify
the beginning of a new warranty period.
Warranty period and statutory claims for defects
The warranty period is not prolonged by repairs effected under the
warranty. This also applies to replaced and repaired components. Any
damage and defects present at the time of purchase must be reported immediately after unpacking. Repairs carried out after expiry of the warranty
period shall be subject to a fee.
Scope of the warranty
This appliance has been manufactured in accordance with strict quality
guidelines and inspected meticulously prior to delivery.
The warranty covers material faults or production faults. The warranty does
not extend to product parts subject to normal wear and tear or fragile parts
such as switches, batteries, baking moulds or parts made of glass.
The warranty does not apply if the product has been damaged, improperly
used or improperly maintained. The directions in the operating instructions
for the product regarding proper use of the product are to be strictly followed. Uses and actions that are discouraged in the operating instructions
or which are warned against must be avoided.
This product is intended solely for private use and not for commercial
purposes. The warranty shall be deemed void in cases of misuse or improper
handling, use of force and modifications/repairs which have not been
carried out by one of our authorised Service centres.
Warranty claim procedure
To ensure quick processing of your case, please observe the following
instructions:
■ Please have the till receipt and the item number (e.g. IAN 12345)
available as proof of purchase.
■ You will find the item number on the type plate, an engraving on the
front page of the instructions (bottom left), or as a sticker on the rear or
bottom of the appliance.
■ If functional or other defects occur, please contact the service depart-
ment listed either by telephone or by e-mail.
■ You can return a defective product to us free of charge to the service
address that will be provided to you. Ensure that you enclose the proof
of purchase (till receipt) and information about what the defect is and
when it occurred.
You can download these instructions along with many other
manuals, product videos and software on www.lidl-service.com.
PBK 4 A1
GB│IE│NI │
17 ■

Service
WARNING!
■ Have your appliance repaired by qualified specialists only. Always
use genuine spare parts. This will ensure that the safety of the appliance is maintained.
Service Great Britain
Tel.: 0800 404 7657
E-Mail: kompernass@lidl.co.uk
Service Ireland
Tel.: 1890 930 034
(0,08 EUR/Min., (peak))
(0,06 EUR/Min., (off peak))
E-Mail: kompernass@lidl.ie
IAN 311700
Importer
Please note that the following address is not the service address. Please
use the service address provided in the operating instructions.
KOMPERNASS HANDELS GMBH
BURGSTRASSE 21
DE - 44867 BOCHUM
GERMANY
www.kompernass.com
Translation of the original Conformity
Declaration
We, KOMPERNASS HANDELS GMBH, document officer: Mr. Semi Uguzlu,
BURGSTR. 21, DE - 44867 BOCHUM, GERMANY, hereby declare that
this appliance complies with the following standards, normative documents
and EC directives:
Machinery directive
(2006/42/EC)
Electromagnetic compatibility
(2014/30/EU)
Outdoor directive
(2005/88/EC)
(2000 / 14 / EC)
Emissions directive
(2012/46/EU)
2016/1628/EU (amended by the latest 2017/656/EU)
Applied harmonised standards:
EN ISO 11806-1: 2011
EN ISO 10517: 2009+A1
EN ISO 11680-1: 2011
EN ISO 14982:2009
Type/appliance designation:
4-in-1 Petrol Multi-Tool PBK 4 A1
Year of manufacture: 10 - 2018
Serial number: IAN 311700
Bochum, 26/10/2018
Semi Uguzlu
- Quality Manager -
We reserve the right to technical changes in the context of further product
development.
■ 18 │ GB│IE│NI
PBK 4 A1

Indholdsfortegnelse
Indledning .................................20
Anvendelsesområde .................................20
Udstyr ............................................20
Pakkens indhold.....................................21
Tekniske data.......................................21
Forklaring til de anvendte infoskilte .....................22
Sikkerhedsanvisninger.......................24
Arbejdssikkerhedsanvisninger for hækkeklippere ...........24
Supplerende sikkerhedsanvisninger for hækkeklippere .......25
Arbejdssikkerhedsanvisninger for topkappere..............25
Sikkerhedsanvisninger mod tilbageslag...................26
Arbejdssikkerhedsanvisninger for trådspole ...............26
Arbejdssikkerhedsanvisninger for klinger..................27
Sikkerhedsanordninger ...............................27
Før første brug..............................28
Montering af rundt greb ..............................28
Montering af hurtig-løsne-mekanisme ....................28
Fastgørelse/montering af bæresele......................28
Montering af hækkeklipper............................28
Afmontering af hækkeklipperen.........................28
Drejning af hækkeklipper .............................28
Montering af savkæde og sværd .......................28
Afmontering af savkæden .............................28
Stramning og kontrol af savkæden ......................29
Kædesmøring ......................................29
Slibning af savkæden ................................29
Montering af forlængerdel ............................29
Montering/afmontering af beskyttelsesafdækning ..........29
Montering/udskiftning af klinge ........................29
Montering/udskiftning af trådspole......................30
Påsætning af bæresele ...............................30
Indstilling af klippehøjde . . . . . . . . . . . . . . . . . . . . . . . . . . . . . . 30
Brændstof og olie ...................................30
Transport ..................................32
Rengøring .................................32
Vedligeholdelse.............................32
Opbevaring og transport .....................33
Fejlsøgning.................................34
Motorenhed........................................34
Topkapper.........................................34
Hækkeklipper ......................................34
Vedligeholdelsesintervaller ...................34
Topkapper.........................................34
Hækkeklipper ......................................34
Reservedelsbestilling ........................34
Bortskaffelse ...............................35
Garanti for Kompernass Handels GmbH ........35
Service ....................................36
Importør...................................36
Oversættelse af den originale
overensstemmelseserklæring ................. 36
Første brug.................................30
Start ved kold motor .................................30
Start ved varm motor.................................30
Arbejde med hækkeklipper ............................31
Klippeteknikker .....................................31
Arbejde med topkapper ..............................31
Saveteknikker.......................................31
Arbejd sikkert.......................................32
PBK 4 A1
DK │ 19 ■

BENZINDREVET MULTIHAVEMASKINE
4-I-1 PBK 4 A1
Indledning
Tillykke med købet af dit nye produkt. Du har valgt et produkt af høj kvalitet.
Betjeningsvejledningen er en del af dette produkt. Den indeholder vigtige
informationer om sikkerhed, anvendelse og bortskaffelse. Du bør sætte dig
ind i alle produktets betjenings- og sikkerhedsanvisninger før brug. Brug
kun produktet som beskrevet og kun til de angivne anvendelsesområder.
Lad vejledningen følge med produktet, hvis du giver det videre til andre.
Anvendelsesområde
Hækkeklipper med langt skaft
Dette produkt er beregnet til klipning og trimning af hække, buske og prydbuske i private haver. Dette produkt er et håndstyret produkt med integreret
motor, hvor de lineære skær bevæges frem og tilbage.
ADVARSEL!
► Hækkeklippere må ikke bruges af børn.
Topkapper
Dette produkt er beregnet til beskæring af træer.
3-tandsklinge / trådspole
Anvendelse med 3-tandsklinge: Til klipning af højt græs, buske og blød
træbevoksning.
Anvendelse sammen med trådspole: Til klipning af græsplæner og let
ukrudt.
Forlængerdel
OBS!
■ Forlængerdelen / stangen må ikke kombineres med 3-tandsklin-
gen / trådspoledelen!
Al anden form for anvendelse end den, der er beskrevet i denne betjeningsvejledning, er forbudt, da det kan føre til beskadigelse af produktet
og alvorlig fare for brugeren. Overhold altid begrænsningerne i sikkerhedsanvisningerne. Overhold nationale forskrifter, der kan begrænse brugen af maskinen. Al anden form for anvendelse eller ændring af maskinen
anses for at være uden for anvendelsesområdet og indebærer betydelige
farer for uheld.
Produktet er ikke beregnet til erhvervsmæssig brug.
FORBUDTE ANVENDELSESOMRÅDER!
På grund af faren for brugeren må produktet ikke anvendes til følgende arbejde: rydning af fortove og som flishugger til afskårne grene fra træer og
hække. Derudover må produktet ikke anvendes til udjævning af jordbunker
som f.eks. muldvarpeskud. Af sikkerhedsmæssige årsager må produktet
ikke anvendes som motor til andre produkter. Brugeren/ejeren hæfter for
skader eller kvæstelser af enhver art, der er forårsaget af ovenstående.
Udstyr
Motorenhed PBK 4 A1-1
Startspærre
Tænd-/slukknap
Transportring
4 x fastspændingsskruer
Rundt greb
5a
Gummiring
5b
Stift
Afstandsbøjle
Skruegreb
Bom
Gashåndtag
Tændrørsstik
Chokerhåndtag
Startkabel
Benzintank
Tankdæksel
Brændstofpumpe "tipper"
Afdækning til luftfilterhus
Hækkeklipperdel PBK 4 A1-3
Håndtag
Oplåsning / låsning
Gearhus
Knivbjælke
Bundplade (hækkeklipper)
Indstillingsarm
Forreste stang (hækkeklipper)
Låsestift
Drivaksel
Topkapperdel PBK 4 A1-4
Forreste stang (topkapper)
Beskyttelsesring
Olietankdæksel
Olietank
Sværd
Savkæde
Slibebukshjælp
Endestop
Låsestift
Drivaksel
Møtrik
Gevind
Kædehjulsafdækning
Sværdføring
Sværdboring
Føringsskinne
Olieringsenhed
Kædehjul
Oliereguleringsskrue
Kædestrammerstift
Kædestrammerskrue
■ 20 │ DK
PBK 4 A1

Trådspole-/klingedel PBK 4 A1-2
2 x skruer (med sprængring, underlagsskive)
Beskyttelsesafdækning
3-tandsklinge
Trådspole med tråd
Forreste stang (trådspole / 3-tandsklinge)
Låsestift
Drivaksel
Forlængerdel
Stang
Skruegreb
Låsestift
Drivaksel
Tilbehør
Bæresele
Beskyttelsesetui til sværd
Beskyttelsesetui til kæde
Bio-kædeolie
Olie-/benzin-blandeflaske
Beskyttelsesbrille
Unbrakonøgle 4 mm
Unbrakonøgle 5 mm
Gaffelnøgle SW 8/10
Tændrørsnøgle / kærvskruetrækker
Værktøjstaske
Møtrik M19 x 1,0 (venstregevind)
Afdækning trykplade
Trykplade
Medbringerskive
Skæretråd
Tragt
Pakkens indhold
1 motorenhed
1 hækkeklipperdel PBK 4 A1-3 (efterfølgende kaldet hækkeklipper)
1 topkapperdel PBK 4 A1-4 (efterfølgende kaldet topkapper)
1 trådspole-/klingedel PBK 4 A1-2
1 forlængerdel
1 håndtag med afstandsbøjle
1 trådspole med skæretråd
1 skæretråd (tråd-Ø: 2,4 mm / trådlængde: 6 m)
1 3-tandsklinge
1 bæresele
1 beskyttelsesetui til kæde
1 beskyttelsesetui til sværd
1 olie-/benzin-blandeflaske
1 100 ml bio-kædeolie
1 værktøjstaske
1 unbrakonøgle 4 mm
1 unbrakonøgle 5 mm
1 tændrørsnøgle/kærvskruetrækker
1 gaffelnøgle SW 8/10
1 beskyttelsesbrille
1 tragt
1 betjeningsvejledning
Tekniske data
Motorenhed: PBK 4 A1-1
Motortype: 2-taktsmotor, luftafkølet, kromcylinder
Motoreffekt (maks.): 1,35 kW / 1,85 HK
Slagvolumen: 42,7 cm³
Tomgangshastighed motor: 3000 min
Maks. omdrejningstal motor
med 3-tandsklinge: 9200 min
med trådspole: 8700 min
med kædesav: 9200 min
med hækkeklipper: 9200 min
Maks. klippehastighed
med 3-tandsklinge: 6900 min
med trådspole: 6525 min
med kædesav: 20 m/s
med hækkeklipper: 1550 min
Tænding: Elektronisk
Drev: Centrifugalkobling
Vægt:
(tom tank): ca. 5,6 kg
Tankindhold: 1200 cm
Tændrør: CDK L8RTC
Brændstofforbrug ved
maks. motoreffekt: 0,6 kg / h
Specifikt
brændstofforbrug
ved maks. motoreffekt: 431 g / kWh
Hækkeklipper: PBK 4 A1-3
Snitlængde: 425 mm
Tandafstand: 24 mm
Vægt
(driftsklar): ca. 2,24 kg
Topkapper: PBK 4 A1-4
Vægt (driftsklar): ca. 1,6 kg
Olietank anbefalet
påfyldningsmængde: 140 cm
Snitlængde: ca. 260 mm
Sværd: Oregon type 100SDEA318
Savkæde: Oregon 91P040X
Trådspole-/klingedel: PBK 4 A1-2
Trådspole med skæretråd (IAN 311700):
Trådens klippediameter Ø: 430 mm
Trådlængde: 6,0 m
Tråd Ø: 2,4 mm
3-tandsklinge (IAN 311700):
Klingens klippediameter Ø: 255 mm
-1
-1
-1
-1
-1
-1
-1
-1
3
3
PBK 4 A1
DK │ 21 ■

Støj- og vibrationsoplysninger:
Måleværdi for støj beregnet i henhold tilISO 22868, EN ISO 10517.
Det A-vægtede støjniveau udgør typisk:
Hækkeklipper:
Lydtrykniveau L
Usikkerhed K
Lydeffektniveau L
Garanteret lydeffektniveau L
Usikkerhed K
: 98,79 dB(A)
pA
: 2,5 dB
WA
: 109,53 dB(A)
WA
: 114 dB(A)
WA
: 2,5 dB
WA
Topkapper:
Lydtrykniveau L
Usikkerhed K
: 97,06 dB(A)
pA
: 2,5 dB
WA
Lydeffektniveau: 110,87 dB(A)
Usikkerhed K
: 2,5 dB
WA
3-tandsklinge:
Lydtrykniveau L
Usikkerhed K
Lydeffektniveau L
Usikkerhed K
: 97,64 dB(A)
pA
: 2,5 dB
pA
: 111,27 dB(A)
WA
: 2,5 dB
WA
Trådspole:
Lydtrykniveau L
Usikkerhed K
Lydeffektniveau L
Usikkerhed K
: 99,08 dB(A)
pA
: 2,5 dB
pA
: 111,10 dB(A)
WA
: 2,5 dB
WA
Bær høreværn for at undgå høreskader!
Vibrationsværdier (vektorsum i tre retninger) beregnet i henhold til EN ISO
11806-1, EN ISO 10517, EN ISO 11680-1:
Hækkeklipper:
Vibration ved forreste håndtag: Vibrationsemissionsværdi
= 4,182 m/s2
a
h,D
Usikkerhed K = 1,5 m/s
2
Vibration ved bageste håndtag: Vibrationsemissionsværdi
= 9,695 m/s2
a
h,D
Usikkerhed K = 1,5 m/s
2
Topkapper:
Vibration ved forreste håndtag: Vibrationsemissionsværdi
= 3,855 m/s2
a
h,D
Usikkerhed K = 1,5 m/s
2
Vibration ved bageste håndtag: Vibrationsemissionsværdi
= 7,590 m/s2
a
h,D
Usikkerhed K = 1,5 m/s
2
Trådspole:
Vibration ved forreste håndtag: Vibrationsemissionsværdi
= 4,864 m/s2
a
h,D
Usikkerhed K = 1,5 m/s
2
Vibration ved bageste håndtag: Vibrationsemissionsværdi
= 9,750 m/s2
a
h,D
Usikkerhed K = 1,5 m/s
2
3-tandsklinge:
Vibration ved forreste håndtag: Vibrationsemissionsværdi
= 4,622 m/s2
a
h,D
Usikkerhed K = 1,5 m/s
2
Vibration ved bageste håndtag: Vibrationsemissionsværdi
= 7,708 m/s2
a
h,D
Usikkerhed K = 1,5 m/s
2
BEMÆRK
Vibrationsniveauet, som er angivet i disse anvisninger, er målt med en
►
målemetode, der er standardiseret efter EN ISO 11806-1, EN ISO
10517, EN ISO 11680-1, og som kan anvendes til sammenligning
af apparater. Den angivne vibrationsemissionsværdi kan også anvendes til en indledende vurdering af faren ved vibrationsniveauet.
ADVARSEL!
► Vibrationsniveauet ændrer sig afhængigt af værktøjets anvendelse
og kan i mange tilfælde ligge over værdien, der er angivet i disse
anvisninger. Vibrationsbelastningen kan undervurderes, hvis værktøjet
jævnligt anvendes på denne måde. For at opnå en nøjagtig vurdering af vibrationsbelastningen i et bestemt arbejdstidsrum er man
også nødt til at medregne de tidspunkter, hvor produktet er slukket,
eller ganske vist er tændt, men ikke anvendes. Dette kan reducere
vibrationsbelastningen over hele tidsrummet betydeligt.
ADVARSEL!
■ Undgå også risiciene ved vibrationer, f.eks. hvide fingre, ved at holde
hyppige pauser under arbejdet og f.eks. gnide håndfladerne mod
hinanden!
Forklaring til de anvendte infoskilte
Advarsel! Læs betjeningsvejledningen, før produktet tages
i brug!
Bær beskyttelseshandsker!
Brug sikkerhedssko!
Bær høreværn!
Bær sikkerhedshjelm!
Bær beskyttelsesbriller!
Pas på, varme dele. Hold afstand!
1
I
o
ON
1. Tænd produktet
2
FULL
2. Fyld brændstofpumpen (tipper)
3
PULL
3. Træk i chokerhåndtaget
4
PULL
4. Træk i startkablet
CHOKE
Træk i chokerhåndtaget
■ 22 │ DK
PBK 4 A1

Tryk 6x på brændstofpumpen (tipper)
Blandingsforhold: 40 dele benzin til 1 del olie
Forsigtig! Giftige CO-dampe (kuliltedampe)!
Brug ikke produktet i lukkede rum!
Advarsel! Brug under ingen omstændigheder rundsavklinger
som klinge.
Benzin: Oktan 95 / Oktan 98
Ingen E10 brændstof
2-takts motorolie: ISO - L - EGD / JASO FD
Livsfare ved elektrisk stød! Hold mindst 10 meters afstand til
strømledninger.
OBS! Faldende genstande.
Særligt ved beskæring over hovedhøjde.
OBS! Fare for personskader ved aktiverede knive.
Hold afstand!
Generel advarsel!
1. Sæt tappen på den forreste stang ind i noten på motorenhedens stang indtil stop.
2. Når den er sat rigtigt i, skal den røde linje være i niveau
med stangens linje.
20 h
Tilsæt lidt fedt efter hver 20. driftstime (flydende gearfedt)
Afstanden mellem maskinen og andre personer skal være
mindst 15 meter!
Skæreværktøjet (klinge / tråd) har efterløb!
Angivelse af lydeffektniveauet LWA i dB.
Bål, levende ild og rygning forbudt!
min
max. 9000
Beskyt produktet mod regn og fugt!
-1
Maks. 9000 min
-1
(o/m
-1)
OBS! Venstregevind.
Vær opmærksom på dele, der slynges væk!
Pas på tilbageslag!
Forsigtig! Fare for personskader på grund af den roterende
klinge! Hold hænder og fødder væk fra klingen!
Forsigtig – benzin er ekstremt letantændelig!
Eksplosionsfare! Undgå at spilde brændstof!
Sluk produktet og fjern tændrørsstikket, før produktet
vedligeholdes!
OBS! Fare for kvælning!
PBK 4 A1
DK │ 23 ■

Sikkerhedsanvisninger
VIGTIGT! SKAL LÆSES OMHYGGELIGT FØR BRUG.
SKAL OPBEVARES SAMMEN MED DINE DOKUMENTER.
Arbejdssikkerhedsanvisninger for hækkeklippere
BEMÆRK
Hækkeklipperen leveres helt samlet.
►
► Anvisninger og billeder vedrørende indstilling, brug af hækkeklipperen
eller dens indstillingsdele, vedligeholdelse samt smøring udført af
brugeren kan findes i denne vejledning på klap-ud-siden.
► Anvisninger til arbejdsstilling (se klap-ud-siden).
► Anvisninger til indstillingsdele (se klap-ud-siden).
► Anvisninger vedrørende sikker anvendelse af brændstof (se kapitlet
"Forberedelse" punkt f).
► Anvisninger til anbefalet udskiftning eller reparation af dele eller
kundeservice og specifikationer for reservedelene, der skal anvendes,
hvis disse anvisninger vedrører brugerens helbred og sikkerhed, kan
findes i denne vejledning.
► Forklaring til alle grafiske symboler til hækkeklipperen, data, funktioner
og tekniske data samt fremgangsmåden ved ulykker og fejl kan findes
i denne vejledning.
► Blokeret værktøj: Fjern fastklemt materiale fra knivbjælken .
ADVARSEL!
■ Børn må aldrig bruge hækkeklipperen.
■ Vær altid opmærksom og bevidst om, hvad du laver, og arbejd
fornuftigt med produktet. Brug ikke produktet, hvis du er syg eller
træt eller påvirket af narkotika, alkohol eller medicin. Et øjebliks
uopmærksomhed kan medføre alvorlige kvæstelser ved brug af
produktet.
■ Undgå fejlanvendelse, og brug kun produktet som beskrevet under
"Anvendelsesområde".
Sæt dig ind i betjeningsvejledningen, før du betjener produktet.
Forberedelse
a) DENNE HÆKKEKLIPPER KAN FORÅRSAGE ALVORLIGE SKADER! Læs
omhyggeligt anvisningerne vedrørende korrekt arbejde, forberedelse,
vedligeholdelse samt start og opbevaring af hækkeklipperen. Sæt dig
ind i alle indstillingsdele og korrekt brug af hækkeklipperen.
b) Børn må aldrig bruge hækkeklipperen.
c) Pas på luftledninger.
d) Brug af hækkeklipperen skal undgås, hvis der opholder sig personer -
især børn - i nærheden.
e) Bær velegnet påklædning! Bær ikke løs beklædning eller smykker, som kan
gribes fast af bevægelige dele. Det anbefales at bære solide handsker,
skridsikre sko og beskyttelsesbriller.
f) Arbejd forsigtigt med brændstof, da det er let antændeligt, og dampene
er eksplosive. De følgende punkter skal overholdes:
– Brug kun beholderne, der er specielt beregnet hertil.
– Fjern aldrig tankdækslet, og fyld aldrig benzin på, når motoren kører
eller er varm. Lad motoren og udstødningsdelene køle af, før du fylder
benzin på.
– Rygning forbudt.
– Tank kun op udendørs.
– Opbevar aldrig hækkeklipperen eller brændstofbeholderen i et rum,
hvor der befinder sig levende ild som f.eks. en gasvandvarmer.
– Hvis der løber benzin ud, må du aldrig prøve at starte motoren. Fjern
produktet fra stedet med benzin, før motoren startes.
– Sæt altid tankdækslet på efter påfyldning, og luk det, så det sidder fast.
– Hvis tanken tømmes, skal det foretages udendørs.
g) Hvis skæreanordningen kommer i kontakt med et fremmedlegeme, hvis
driftsstøjen øges, eller hækkeklipperen vibrerer usædvanligt meget, skal
du slukke for motoren og vente, til hækkeklipperen er standset.
Tag tændrørsstikket ud af tændrøret, og gør følgende:
– Kontrollér for skader
– Kontrollér for løse dele, og fastgør alle løse dele
– Udskift beskadigede dele med dele af samme kvalitet, eller få dem
repareret.
Anvendelse
a) Motoren skal standses før:
b) Kontrollér altid, at hækkeklipperen befinder sig i en af de korrekte ar-
c) Når hækkeklipperen anvendes, skal du altid sikre dig, at du står fast og
d) Brug ikke hækkeklipperen, hvis skæreanordningen er defekt eller meget
e) For at undgå brandfare skal du være opmærksom på, at motoren og
f) Sørg altid for, at alle greb og sikkerhedsanordninger er monteret ved
g) Brug altid begge hænder, hvis hækkeklipperen har to greb.
h) Vær altid opmærksom på omgivelserne, og pas på eventuelle farer, som
Vedligeholdelse og opbevaring
a) Hvis hækkeklipperen standses på grund af vedligeholdelse eller opbe-
b) Opbevar hækkeklipperen et sted, hvor benzindampe ikke kan komme i
c) Ved transport eller opbevaring af hækkeklipperen skal skæreanordningen
Bær høreværn!
Bær beskyttelsesbriller!
■ Sæt dig ind i hækkeklipperens betjening, så du hurtigt kan standse den
i en nødsituation.
– Rengøring eller fjernelse af en blokering;
– Kontrol, vedligeholdelse eller arbejde på hækkeklipperen;
– Indstilling af arbejdsposition med skæreanordningen;
– Hvis hækkeklipperen er uden opsyn.
bejdsstillinger, før motoren startes.
sikkert - især hvis du bruger en stige.
slidt.
støjdæmperen ikke er dækket af aflejringer, løv eller udløbende smøremidler.
brug af hækkeklipperen. Prøv aldrig på at bruge hækkeklipperen, hvis
den ikke er komplet, eller hvis dens konstruktion er ændret.
du muligvis ikke kan høre på grund af hækkeklipperens lyde.
varing, skal du slukke for motoren. Tag derefter tændrørsstikket ud af
tændrøret, og se efter, om alle roterende dele er standset. Lad produktet
køle af, før du kontrollerer, indstiller osv.
kontakt med levende ild eller gløder. Lad hækkeklipperen køle af, før du
opbevarer den.
altid dækkes til med beskyttelsen til skæreanordningen.
■ 24 │ DK
PBK 4 A1
 Loading...