

Page 1
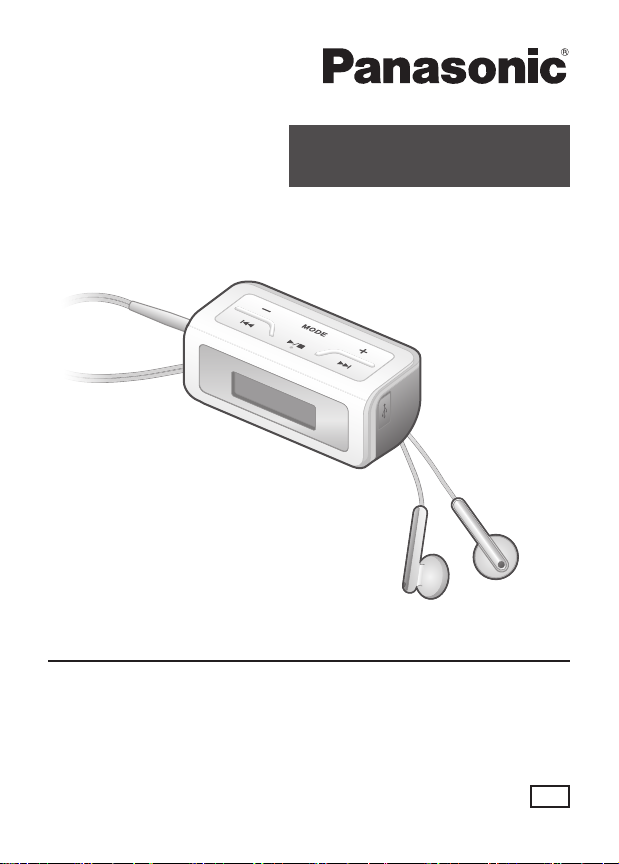
Operating Instructions
Digital Audio Player
Model No.
Dear Customer
Thank you for purchasing this product.
Before connecting, operating or adjusting
this product, please read the instructions
completely. Please keep this manual for
future reference.
Panasonic Consumer Electronics Company,
Division of Panasonic Corporation of North America
One Panasonic Way Secaucus, New Jersey 07094
http://www.panasonic.com
Panasonic Puerto Rico, Inc.
Ave. 65 de Infantería, Km. 9.5 San Gabriel Industrial Park,
Carolina, Puerto Rico 00985
© 2006 Matsushita Electric Industrial Co., Ltd.
SV-MP010
SV-MP020
P
RQTT0855-1P
Page 2
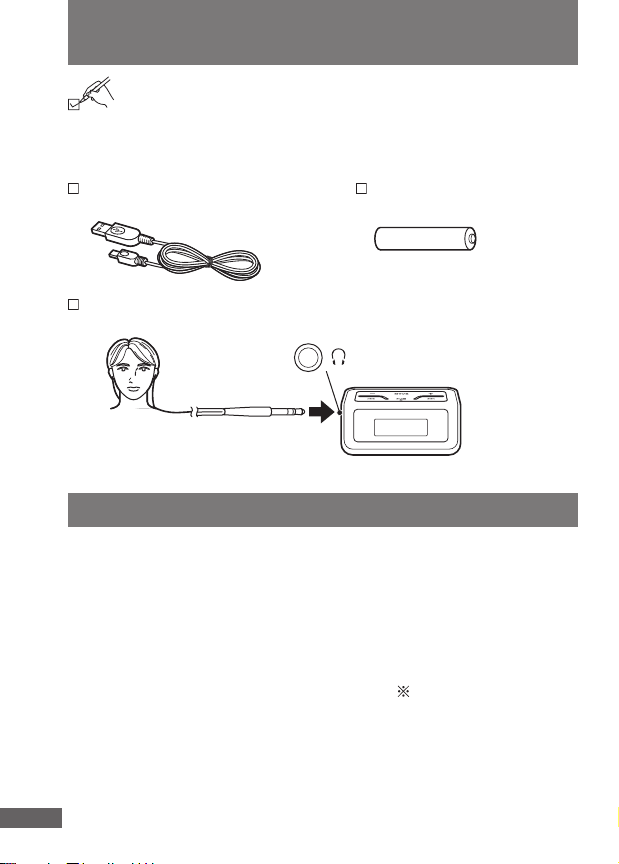
Supplied accessories
Use numbers indicated in parentheses when asking for
replacement parts.
(As of February 2006)
To order accessories, refer to“Accessory Purchases” on
page 9.
USB Cable —1 pc Alkaline battery (AA) —1 pc
(K1HA05AD0004)
Stereo earphones —1 pc
(L0BAB0000197)
LR
Insert firmly.
(Earphones jack)
System requirements
OS: Microsoft® Windows® Me, Windows® 2000 Professional,
Windows® XP Home Edition/Professional
• The player cannot be used on Microsoft® Windows® 3.1, Windows® 95,
Windows® 98, Windows® 98SE, Windows NT® or Macintosh®.
• Operation on an upgraded OS is not guaranteed.
• Operation on an OS other than the one pre-installed is not guaranteed.
• Multi-CPU or Multi-boot environments are not supported.
■ MTP (Media Transfer Protocol) mode
OS: Windows® XP Home Edition (SP1 or SP2)/
Windows Media Player
• When the unit has been connected to the computer in the MTP mode,
it is indicated as “Panasonic Audio Player” on the computer screen.
RQTT0855
Otherwise it is indicated as “Removable Disk”. (MSC (Mass Storage
2
Class) mode)
Professional (SP1 or SP2)
: Windows Media Player 10
Page 3
Table of contents
Introduction
Supplied accessories ...........................................................2
System requirements ...........................................................2
Table of contents ..................................................................3
Safety precautions ................................................................ 5
Product service .................................................................... 7
Battery (included) ...............................................................10
Listening to music ............................................................... 11
Recording music CDs on your computer ............................ 12
Recording music on the unit ...............................................13
Files and folders structure display on your computer .........17
Saving data ..................................................................................18
Basic operations
Name of parts and basic operations ................................... 19
Selecting modes .................................................................20
MUSIC mode
Playing music .....................................................................21
Selecting a playlist and listening to music .......................... 22
Setting mode
Setting various items .......................................................... 24
Making basic settings ...................................................................26
Other information
Erasing folders and files ..................................................... 28
Formatting ..........................................................................30
RESET procedure ..............................................................31
Troubleshooting guide ........................................................32
Specifications .....................................................................34
MTP (Media Transfer Protocol) is a technical specifications developed by
Microsoft to connect Windows PCs to portable devices. By connecting to a PC
in the MTP mode, audio and other data can be transferred from a PC without
the need for a special device driver.
RQTT0855
3
3
3
Page 4

FCC Note:
This equipment has been tested and found to comply with the limits for a Class
B digital device, pursuant to Part 15 of the FCC Rules.
These limits are designed to provide reasonable protection against harmful
interference in a residential installation. This equipment generates, uses and
can radiate radio frequency energy and, if not installed and used in accordance
with the instructions, may cause harmful interference to radio communications.
However, there is no guarantee that interference will not occur in a particular
installation. If this equipment does cause harmful interference to radio or
television reception, which can be determined by turning the equipment off and
on, the user is encouraged to try to correct the interference by one or more of
the following measures:
• Reorient or relocate the receiving antenna.
• Increase the separation between the equipment and receiver.
• Connect the equipment into an outlet on a circuit different from that to which
the receiver is connected.
• Consult the dealer or an experienced radio/TV technician for help.
Any unauthorized changes or modifications to this equipment would void the
user’s authority to operate this device.
This device complies with Part 15 of the FCC Rules. Operation is subject to the
following two conditions: (1) This device may not cause harmful interference,
and (2) this device must accept any interference received, including interference
that may cause undesired operation.
Responsible Party:
Panasonic Corporation of North America
One Panasonic Way
Secaucus, NJ 07094
Telephone No.: 1-800-211-7262
Caution
This unit is not waterproof and should not be exposed to excessive moisture.
To avoid product damage, do not expose this product to rain, water or other
liquids.
RQTT0855
44
4
Page 5

Safety precautions
EST. 1924
• Leave some slack in the cord of the earphones if you wind them around the unit.
• Do not disassemble, remodel, drop, or allow the unit to get wet.
• Do not use or store in locations directly exposed to sunlight, corrosive gases, a
heat vent, or a heating appliance.
• Do not use or store in humid or dusty locations.
• Do not use force to open the battery lid.
Listening caution
Do not use while operating a motorized vehicle. It may create a traffic hazard
and is illegal in many areas. You should use extreme caution or temporarily
discontinue use in potentially hazardous situations. Even if your headphones or
earphones are the open-air type designed to let you hear outside sounds, don’t
turn up the volume so high that you can’t hear what’s around you. Sound can be
deceiving. Over time your hearing “comfort level” adapts to higher volumes of
sound. So what sounds “normal” can actually be loud and harmful to your hearing.
Guard against this by setting your equipment at a safe level BEFORE your
hearing adapts.
To establish a safe level:
• Start your volume control at a low setting.
• Slowly increase the sound until you can hear it comfortably and clearly, and
without distortion.
Once you have established a comfortable sound level:
• Leave it there.
Batteries
• Align the poles (+ and –) properly when inserting the battery.
• Do not recharge ordinary dry cell battery.
• Remove the battery if the unit is not to be used for a long time.
• Do not use batteries if the covering has been peeled off.
• Mishandling of battery can cause electrolyte leakage which can damage items
the fluid contacts and may cause a fire.
If electrolyte leaks from the batteries, consult your dealer.
Wash thoroughly with water if electrolyte comes in contact with any part of your
body.
If electrolyte gets into your eyes, you may lose your sight. Do not rub your eyes but wash
•
them with clean water, and seek medical advice immediately.
• Do not throw into fire, short-circuit, disassemble, or subject to excessive heat.
Do not play your headphones or earphones at a high
volume. Hearing experts advice against continuous
extended play. If you experience a ringing in your ears,
reduce volume or discontinue use.
Introduction
RQTT0855
5
5
5
Page 6

RQTT0855
6
Safety precautions
Allergies
Discontinue use if you experience discomfort with the earphones or any other
parts that directly contact your skin. Continued use may cause rashes or other
allergic reactions.
-If you see this symbol-
Information on Disposal in other Countries outside the European
Union
This symbol is only valid in the European Union.
If you wish to discard this product, please contact your
Recording and operating problems may occur on some computer systems.
Please note that Panasonic and Panasonic dealers cannot be held liable for any
lost audio data or other direct or indirect damage except in cases of intentional
or gross negligence.
This unit conforms with PlaysForSure
which guarantees that music will play
back in the event that the PlaysForSure
logo is displayed for digital music
purchased from an online store.
For details on PlaysForSure, go to
Microsoft’s website.
• The PlaysForSure logo is a trademark or registered trademark of Microsoft
Corporation in the United States and/or other countries.
• WMA is a compression format developed by Microsoft Corporation. It achieves
the same sound quality as MP3 with a file size that is smaller than that of MP3.
• MPEG Layer-3 audio decoding technology licensed from Fraunhofer IIS and
Thomson multimedia.
• Other names of systems and products mentioned in these instructions are
usually the registered trademarks or trademarks of the manufacturers who
developed the system or product concerned.
The ™ and ® marks are not used to identify registered trademarks and
trademarks in these instructions.
• This product is protected by certain intellectual property rights of Microsoft
Corporation and third parties. Use or distribution of such technology outside
RQTT0855
of this product is prohibited without a license from Microsoft or an authorized
6
6
Microsoft subsidiary and third parties.
local authorities or dealer and ask for the correct method of
disposal.
Page 7

Product service
1. Damage requiring service
The unit should be serviced by qualified service personnel if:
(a) Objects or liquids have gotten into the unit; or
(b) The unit has been exposed to rain; or
(c) The unit does not operate normally or exhibits a marked change in
performance; or
(d) The unit has been dropped or the cabinet damaged.
2. Servicing
Do not attempt to service the unit beyond that described in these operating
instructions. Refer all other servicing to authorized servicing personnel.
3. Replacement parts
When parts need replacing ensure the servicer uses parts specified by the
manufacturer or parts that have the same characteristics as the original parts.
Unauthorized substitutes may result in fire, electric shock, or other hazards.
4. Safety check
After repairs or service, ask the servicer to perform safety checks to confirm
that the unit is in proper working condition.
■ Product information
For product information or assistance with product operation:
Refer to “Customer Services Directory” on page 8.
For assistance in the continental U.S.A. in obtaining repairs please ship the
product to:
Panasonic Services Company - Customer Servicenter
Suite B 4900 George McVay Drive
McAllen, TX 78503
In Puerto Rico contact Panasonic Puerto Rico, Inc.
Tel.(787) 750-4300 Fax.(787) 768-2910
When shipping the unit carefully pack and send it prepaid, adequately insured and
preferably in the original carton.
Include a letter detailing the complaint and provide a day time phone number
where you can be reached.
IF REPAIR IS NEEDED DURING THE WARRANTY PERIOD THE PURCHASER
WILL BE REQUIRED TO FURNISH A SALES RECEIPT/PROOF OF
PURCHASE INDICATING DATE OF PURCHASE, AMOUNT PAID AND PLACE
OF PURCHASE. CUSTOMER WILL BE CHARGED FOR THE REPAIR OF ANY
UNIT RECEIVED WITHOUT SUCH PROOF OF PURCHASE.
Also, the purchaser will be responsible for shipping the unit to the above address.
Introduction
RQTT0855
7
7
Page 8
Panasonic Consumer Electronics Company,
Division of Panasonic Corporation of North Americ
a
One Panasonic Way Secaucus, New Jersey 07094
Panasonic Puerto Rico, Inc
Ave. 65 de Infantería, Km. 9.5
San Gabriel Industrial Park, Carolina, Puerto Rico 00985
Panasonic Portable Audio Products Limited Warranty
Limited Warranty Coverage
If your
product does not work properly because of a defect in materials or workmanship, Panasonic
Consumer Electronics Company or Panasonic Puerto Rico, Inc. (collectively referred to as
“the warrantor”)
will, for the length of the period indicated on the chart below, which starts with the date of original purchase
(“warranty period”), at its option either (a) repair your product with new or refurbished parts, or (b) replace it
with a new or a refurbished product. The decision to repair or replace will be made by the warrantor
.
During the “Labor” warranty period there will be no charge for labor. During the “Parts” warranty period,
there will be no charge for parts. You must mail-in your product during the warranty period. This Limited
Warranty excludes both parts and labor for batteries, antennas, and cosmetic parts (cabinet). This warranty
only applies to products purchased and serviced in the United States or Puerto Rico. This warranty is
extended only to the original purchaser of a new product which was not sold
“as is”.
Mail-In Service
For assistance in the continental U.S.A. in obtaining repairs please ship the product to:
Panasonic Service Company
Customer Servicenter
Suite
B
4900 George McVay Driv
e
McAllen, TX 78503
For assistance in Puerto Rico call Panasonic Puerto Rico, Inc. (787)-750-4300 or fax (787)-768-2910.
When shipping the unit carefully pack and send it prepaid, adequately insured and preferably in the original
carton. Include a letter detailing the complaint and provide a day time phone number where you can be
reached.
IF REPAIR IS NEEDED DURING THE WARRANTY PERIOD THE PURCHASER WILL BE REQUIRED TO FURNISH A SALES
RECEIPT/PROOF OF PURCHASE INDICATING DTAE OF PURCHASE. AMOUNT PAID AND PLACE OF PURCHASE.
CUSTOMER WILL BE CHARGE FOR THE REPAIR OF ANY UNIT RECEIVED WITHOUT SUCH PROOF OF PURCHASE.
Limited Warranty Limits And Exclusions
This warranty ONLY COVERS failures due to defects in materials or workmanship, and DOES NOT COVER
normal wear and tear or cosmetic damage. The warranty ALSO DOES NOT COVER damages which
occurred in shipment, or failures which are caused by products not supplied
which
result from accidents, misuse, abuse, neglect, mishandling, misapplication , alteration, faulty
installation, set-up adjustments, misadjustment of consumer controls, improper maintenance, power line
surge, lightning damage, modification, introduction of sand, humidity or liquids, commercial use such as
hotel, office, restaurant, or other business or rental use of the product, or service by anyone other than a
Factory Servicenter or other Authorized Servicer, or damage that is attributable to acts of God.
THERE ARE NO EXPRESS WARRANTIES EXCEPT AS LISTED UNDER “LIMITED WARRANTY COVERAGE”.
THE WARRANTOR IS NOT LIABLE FOR INCIDENTAL OR CONSEQUENTIAL DAMAGES RESULTING FROM
THE USE OF THIS PRODUCT, OR ARISING OUT OF ANY BREACH OF THIS WARRANTY.
excludes damages for lost time, travel to and from the servicer, loss of or damage to media or images, data
or other memory or recorded content. The items listed are not exclusive, but are for illustration only.)
ALL EXPRESS AND IMPLIED WARRANTIES, INCLUDING THE WARRANTY OF MERCHANTABILITY,
ARE LIMITED TO THE PERIOD OF THE LIMITED WARRANTY.
Some states do not allow the exclusion or limitation of incidental or consequential damages, or limitations
on how long an implied warranty lasts, so the exclusions may not apply to you.
This warranty gives you specific legal rights and you may also have other rights which vary from state to
state. If a problem with this product develops during or after the warranty period, you may contact your
dealer or Servicenter. If the problem is not handled to your satisfaction, then write to the warrantor
Consumer Affairs Department at the addresses listed for the warrantor.
PARTS AND SERVICE, WHICH ARE NOT COVERED BY THIS LIMITED WARRANTY, ARE YOUR RESPONSIBILITY.
Product or Part Name
All Portable Audio Products except item listed below
Rechargeable batteries (in exchange for defective item)
Parts
One (1) Year
Ten (10) Days
Labor
One (1) Year
Not applicable
Purchase Parts, Accessories and Instruction Books online for all Panasonic
Products by visiting our Web Site at: http://www.pasc.panasonic.com
or, send your
You may also contact us directly at:
1-800-332-5368 (Phone) 1-800-237-9080 (Fax Only) (Monday - Friday 9 am to 8 pm, EST.)
Panasonic Services Company
20421 84th Avenue South, Kent, WA 98032
(We Accept Visa, MasterCard, Discover Card, American Express, and Personal Checks
Accessory Purchases
Service in Puerto Rico
For hearing or speech impaired TTY use rs, TTY: 1-866-605-1277
Panasonic Puerto Rico, Inc.
Ave. 65 de Infantería, Km. 9.5, San Gabriel Industrial Park, Carolina, Puerto Rico 00985
Phone (787)750-4300, Fax (787)768-2910
Obtain Product Information and Operating Assistance; locate your nearest
Dealer or Servicenter; purchase Parts and Accessories; or make
Customer Service and Literature requests by visiting our Web Site at:
http://www.panasonic.com/consumersupport
or, contact us via the web at:
http://www.panasonic.com/contactinfo
You may also contact us directly at:
1-800-211-P
ANA (7262),
Monday-Friday 9 am-9 pm; Saturday-Sunday 10 am-7 pm, EST.
Customer Services Directory
For hearing or speech impaired TTY use rs, TTY: 1-877-833-8855
Limited Warranty (ONLY FOR U.S.A.)
RQTT0855
8
8
Page 9

Panasonic Puerto Rico, Inc
.
Ave. 65 de Infantería, Km. 9.5
San Gabriel Industrial Park, Carolina, Puerto Rico 00985
IF REPAIR IS NEEDED DURING THE WARRANTY PERIOD THE PURCHASER WILL BE REQUIRED TO FURNISH A SALES
RECEIPT/PROOF OF PURCHASE INDICATING DTAE OF PURCHASE. AMOUNT PAID AND PLACE OF PURCHASE.
CUSTOMER WILL BE CHARGE FOR THE REPAIR OF ANY UNIT RECEIVED WITHOUT SUCH PROOF OF PURCHASE.
Limited Warranty Limits And Exclusions
This warranty ONLY COVERS failures due to defects in materials or workmanship, and DOES NOT COVER
normal wear and tear or cosmetic damage. The warranty ALSO DOES NOT COVER damages which
occurred in shipment, or failures which are caused by products not supplied
by the warrantor, or failures
which
result from accidents, misuse, abuse, neglect, mishandling, misapplication , alteration, faulty
installation, set-up adjustments, misadjustment of consumer controls, improper maintenance, power line
surge, lightning damage, modification, introduction of sand, humidity or liquids, commercial use such as
hotel, office, restaurant, or other business or rental use of the product, or service by anyone other than a
Factory Servicenter or other Authorized Servicer, or damage that is attributable to acts of God.
THERE ARE NO EXPRESS WARRANTIES EXCEPT AS LISTED UNDER “LIMITED WARRANTY COVERAGE”.
THE WARRANTOR IS NOT LIABLE FOR INCIDENTAL OR CONSEQUENTIAL DAMAGES RESULTING FROM
THE USE OF THIS PRODUCT, OR ARISING OUT OF ANY BREACH OF THIS WARRANTY.
(As examples, this
excludes damages for lost time, travel to and from the servicer, loss of or damage to media or images, data
or other memory or recorded content. The items listed are not exclusive, but are for illustration only.)
ALL EXPRESS AND IMPLIED WARRANTIES, INCLUDING THE WARRANTY OF MERCHANTABILITY,
ARE LIMITED TO THE PERIOD OF THE LIMITED WARRANTY.
Some states do not allow the exclusion or limitation of incidental or consequential damages, or limitations
on how long an implied warranty lasts, so the exclusions may not apply to you.
This warranty gives you specific legal rights and you may also have other rights which vary from state to
state. If a problem with this product develops during or after the warranty period, you may contact your
dealer or Servicenter. If the problem is not handled to your satisfaction, then write to the warrantor
’s
Consumer Affairs Department at the addresses listed for the warrantor.
PARTS AND SERVICE, WHICH ARE NOT COVERED BY THIS LIMITED WARRANTY, ARE YOUR RESPONSIBILITY.
Introduction
RQTT0855
99
9
Page 10
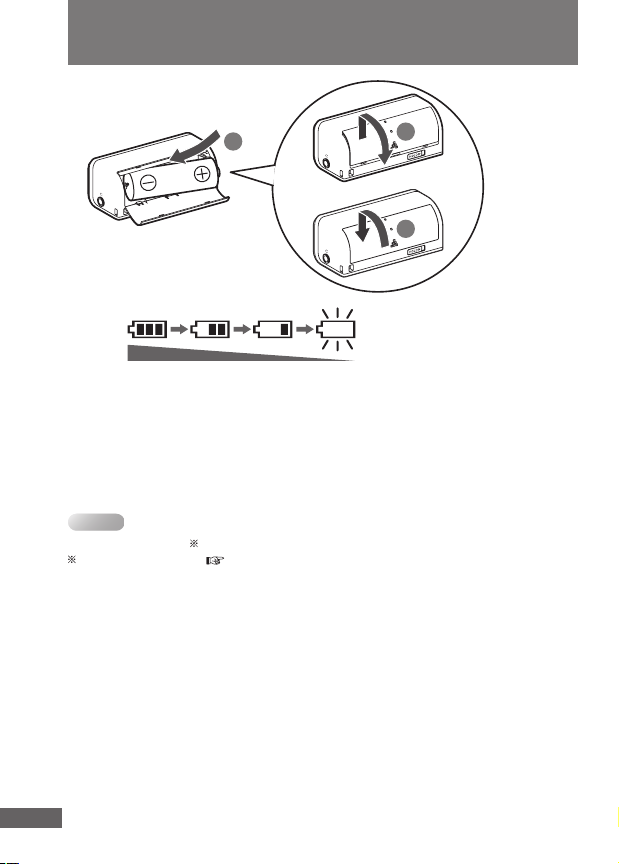
Battery (included)
2
1
3
Note
1 alkaline battery (AA)
■ Battery indicator
Full Empty→ Replace with a fresh battery
• When the battery charge is low and the display flashes, the display
panel backlight will not light.
• If rechargeable batteries are to be used, rechargeable batteries
manufactured by Panasonic are recommended.
• Operation is not guaranteed when used with manganese batteries.
Do not use manganese batteries.
Changing the mode can sometimes cause the battery indicator to change.
Changing the mode ( page 20, Selecting modes)
RQTT0855
10
10
Page 11
Listening to music
Step
Step
Step
Step
Have the music CDs recorded on your computer
beforehand. ( page 12)
1
Use Windows Media Player, a standard Windows
program.
● This unit supports WMA and MP3 music files.
You can also use music content (as either WMA or MP3
music files) downloaded from music distribution services. For
details, go to the sites of the applicable services.
Connect the unit to the computer. ( page 13)
2
Record the music from the computer onto the unit.
(
3
4
page 14)
Use the unit to listen to the music. ( page 21)
®
software
■ Windows Media Player
• If you have Version 8 or earlier, we recommend that you upgrade to
Version 9 or 10. Check which version you have by clicking [About
Windows Media Player] on the [Help] menu.
• If you have Version 9, you will need an auxiliary plug-in program to
convert to the MP3 format.
For details on operation, refer to [Help]; for the latest information or
details on plug-ins, go to the Windows Media Player Web site.
See the Microsoft Web site for details.
Introduction
■ Where the music recorded in the computer is saved
Unless the setting of the destination where the music is to be saved has
been changed, the music will be saved in the following folder:
My Music in My Documents.
(These displays differ depending on the operating system.)
RQTT0855
11
11
Page 12
Recording music CDs on your computer
An example of how to record music CDs is given below using Windows
Media Player (hereafter abbreviated to “WMP”) Version 9 (“WMP9”) or
10 (“WMP10”).
Insert the music CD into your computer, and start
1
WMP.
Select [start] → [All Programs] → [Accessories] → [Entertainment]
→ [Windows Media Player]. (The displays given here are
examples of what may appear.)
● When WMP is started up for the first time
The WMP setup (installation) screen appears. Follow the onscreen instructions.
Before recording music, set the content protection of
2
WMP to disabled.
1. On the [Tools] menu, click [Options…]. (If the [Tools] menu does
not appear, click [ ] at the top right.)
2. WMP9: Select the [Copy Music] tab.
WMP10: Select the [Rip Music] tab.
3. Click to clear the “Copy protect music” check box.
4. Click [OK].
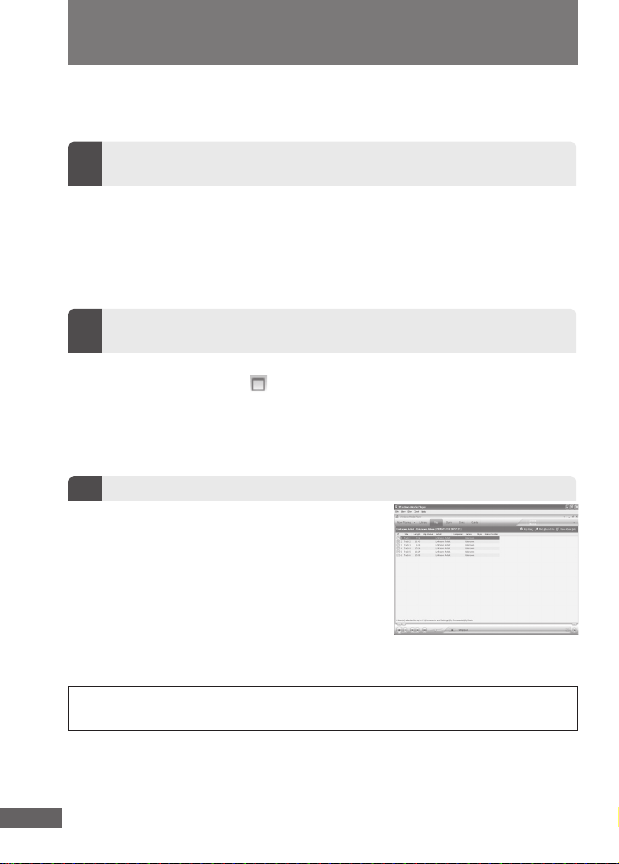
Select the tracks and record them.
3
1. WMP9: Select the [Copy from CD].
WMP10: Select the [Rip].
2. Select the tracks to be recorded.
3. WMP9: Select the [Copy Music].
WMP10: Select the [Rip Music].
Recording now starts.
WMP10 screen
Your attention is drawn to the fact that recording pre-recorded tapes or discs or
other published or broadcast material may infringe copyright laws.
RQTT0855
1212
12
Page 13

Recording music on the unit
Connecting the unit to the computer
•
When the connection is complete, “USB
CONNECTED” appears, and music can be recorded.
• On your computer, open My
Computer, and check whether the
unit is indicated as a "Removable
Disk" or "Panasonic Audio Player".
• When the "LOW BATTERY" or "NO BATTERY" message
appears on the screen, replace the battery with a new one.
Introduction
RQTT0855
13
13
Page 14

Recording music on the unit
Note
• Two or more units cannot be operated even when they have been connected to
one computer.
• Keep the USB cable as straight as possible. Bending the cable too much may
destroy music data or cause problems with the computer.
• Operation cannot be guaranteed if you use a USB hub or extension cable.
• Inserting the cable forcibly into the USB connector diagonally or the wrong way
round may deform the connector, causing problems with the unit and any device
connected to it.
Copy and paste the MP3/WMA
In My Computer or Explorer, open the folder for the
1
unit (Removable Disk or Panasonic Audio Player).
Open the MEDIA folder.
2
Copy and paste or drag and drop the MP3/WMA
3
folder from your computer’s folder into the MEDIA folder.
“ACCESS” appears on the unit’s display. When downloading is
completed, “USB CONNECTED” re-appears.
Computer folder MEDIA folder
■ Recording complete albums
Drag and drop the folder in which the WMA or MP3 files were directly
saved, into the MEDIA folder. The folder name will be displayed as a
playlist name by the unit.
RQTT0855
14
14
Page 15

Using WMP9 or WMP10 to record music
Select [start] → [All Programs] → [Accessories] → [Entertainment] →
[Windows Media Player]. (The displays given here are one example.)
WMP9: Click [Copy to CD or Device].
1
WMP10: Click [Sync].
For WMP10:
1. Select [Tools] → [Options] → [Devices] → “Removable Disk (x:)”
or “Panasonic Audio Player”.
2. Click [Properties] to display “Removable Disk (x:) Properties” or
“Panasonic Audio Player Properties”.
3. Check the “Create folder hierarchy on device” check box on the
“Synchronize” tab to turn this setting on.
(Once performed, this procedure is stored in the memory and so
need not be performed again in the future.)
Select "Items to Copy" and "Removable Disk" or
2
"Panasonic Audio Player" for the "Items on Device."
When WMP9 is used, select the MEDIA folder as the transfer destination.
WMP9: Click [Copy].
3
WMP10: Click [Start Sync].
• The music is recorded from the computer onto the unit.
• Only data selected on the “Items to Copy” list will be transferred.
Note
• The recorded tracks are saved in the unit’s MEDIA folder.
• When music has been recorded using WMP10, the Music folder will be created
automatically in the unit’s MEDIA folder, and the track files will be stored.
• When tracks downloaded from the subscription type music distribution service
are to be recorded in the unit, use the synchronizing function of the WMP10 to
transfer the tracks to the unit.
Subscription type music distribution service:
A music distribution service which enables tracks to be downloaded on a time-
restricted basis
For further details, go to the website of the music distribution service.
■ Do not connect or disconnect the USB cable while
“ACCESS” on the unit’s display
• Otherwise, the music data may be destroyed and problems may be
caused with the computer.
• Trouble may also develop in the unit.
Introduction
RQTT0855
15
15
Page 16

Recording music on the unit
Disconnecting the unit
■
When the unit is indicated as “Removable Disk” (MSC mode)
Right-click the “Safely Remove Hardware” icon on the computer’s
taskbar.
The “USB Mass Storage Device”window appears on the computer
screen. Follow the on-screen instructions to disconnect the USB cable.
Depending on the OS, the display differs.
■ When the unit is indicated as “Panasonic Audio Player”
(MTP mode)
Upon completion of the recording, check that “ACCESS” is not shown
on the unit’s display, and then disconnect the USB cable.
• When the USB cable is disconnected, the playback of the track
recorded first will start after “WAIT...” has appeared on the display.
• If the above procedure is not followed, the music data may be
destroyed, making it impossible to play the data properly. Use the unit
or the computer to delete the music data which has been destroyed. If
the data cannot be deleted, initiate resetting ( page 31).
Once resetting has been initiated, all the stored data will be lost. Re-
record the music data on the unit.
Note
The first 256 characters of the filename created on the computer are displayed on
this unit.
• This unit supports alphanumerics. It may not be able to display characters other
than alphanumerics properly.
• Supports MP3 ID3 V1 tags, ID3 V2.3 tags and WMA tags.
• If there are no ID3 tags, the display shows the “filename.mp3”.
• The ID3 tags recorded for the MP3 will not be displayed properly if they are in a
language other than English.
• Compatible with DRM (PDDRM
• MP3/WMA files should always be saved in the MEDIA folder. If saved in the root
folder, the files cannot be played back or deleted from the unit.
• The saved tracks can be moved to subfolders in the MEDIA folder only on the
computer.
• The subfolders in the MEDIA folder are treated as playlists by the unit.
( page 17, Files and folders structure display on your computer)
• This unit can support the Windows Media Player (Version 10) sync download
function.
RQTT0855
• The unit is PlaysForSure certified to support subscription based music download
services.
16
16
®
and WMDRM10®, Microsoft®).
Page 17

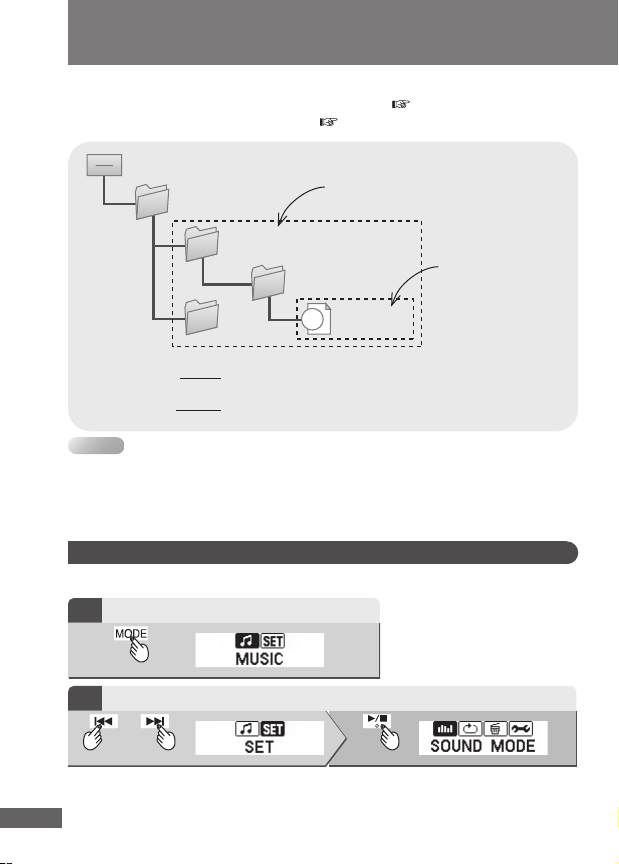
Files and folders structure display on your computer
Introduction
RQTT0855
Page 18

Note
Files and folders structure display on your computer
■ Folders displayed as playlists for the unit
• The MEDIA folders
• Subfolders in the MEDIA folder created by the computer
• The unit cannot recognize folders beyond seven hierarchical levels
(that is, at a depth of eight levels or more).
Introduction
• Playlists can be selected at each hierarchical level of the folders. ( page 22)
• You can record up to the maximum memory capacity of the unit, but the
maximum number of files that can be displayed is 999. The maximum number of
folders (including the MEDIA folder) that can be displayed is 299. The maximum
number of files and folders that can be displayed may be lower depending on
recording conditions.
No. of tracks recorded by
sound quality
(When the play time per
track is 4 minutes)
• This unit is compatible up to Windows Media Audio 9 (WMA9) .
However not with WMA9 Professional/Lossless/Voice and MBR
Multiple Bit Rate: A file that contains the same content encoded at several
• If you use VBR format MP3 files, some of the unit’s functions can not be
operated normally.
• Do not use your computer to format the unit’s memory. Doing so may cause the
unit to malfunction. Use the unit to format its memory. (
64 kbps
96 kbps
128 kbps
different bit rates.
SV-MP010 (1 GB)
Approx. 500 tracks Approx. 999 tracks
Approx. 330 tracks Approx. 660 tracks
Approx. 250 tracks Approx. 500 tracks
SV-MP020 (2 GB)
.
page 30, Formatting)
Saving data
You can use this unit as a removable disk for saving computer data by
connecting the USB cable to a computer. ( page 17, Data storage)
RQTT0855
18
18
Page 19

Name of parts and basic operations
■ Basic playback operations
Basic operations
■ HOLD switch
Button operations are ignored. It prevents:
• The unit turning on unexpectedly causing the battery to run down.
• Interruptions to play.
RQTT0855
19
19
Page 20

Selecting modes
Press
or
Press
Press
Press
or
Press
Press
or
Press
Press
Select the mode to be used from the main menu.
Preparation: Release the HOLD switch. ( page 19)
Turn the unit on.
1
Display the main menu.
2
Main menu
Select mode.
3
Basic operations
• The screens for each of the modes will be displayed.
• If more than 60 seconds pass before proceeding to the next step,
repeat from step 2.
MUSIC mode
Play the files recorded on the unit (WMA and MP3 format) in MUSIC
mode. ( page 21, Playing music)
Select “MUSIC”.
1
Playback screen
SET
You can perform the mode settings. ( page 24, Setting various items)
Select “SET”.
1
RQTT0855
20
Page 21

Playing music
Press
or
Press
Note
Press
Preparation: 1. Record music on the unit. (
2. Put on the earphones. ( page 2)
3. Release the HOLD switch. ( page 19)
Turn the unit on. (Start play.)
1
When playback starts, the playback screen appears for approximately 2
seconds, followed by the track name screen. After the track name has
been displayed, the playback screen reappears.
Playback icon Track number Play time Folder name (The name of
A B C
the folder containing the track now playing is displayed.) Track information
Adjust the volume. (0-25)
2
• When you adjust the volume, the screen will change from track name
display to the volume display.
• Basic playback operations ( page 19)
• Setting various items ( page 24)
Stop play.
3
• To save power, the unit will switch off if left continuously in playback stop mode
for 60 seconds (Auto-off function).
• If “PROTECTED” appears on the display (
A B C
Playback screen Track name screen
page 13)
D
E
D
E
page 33)
MUSIC mode
RQTT0855
2121
21
Page 22

Selecting a playlist and listening to music
or
Press
Press
Press
or
Press
Press
or
Press
Press
Press and hold
Preparation: 1. Recording music on the unit ( page 13)
2. Release the HOLD switch. ( page 19)
3. Put on the earphones. ( page 2)
4. Turn the unit on. ( page 19)
Selecting the track from which play is to start
Example: When you want to select TRACK2 1
Display the playlist selection menu.
1
Select “MEDIA”.
2
Select “ARTIST-B”.
3
Select “ALBUM-B2”.
4
Select “TRACK2” and start play.
5
• After TRACK2 finishes playing, play continues to the
last track of “MEDIA”, and then stops.
• Track numbers are assigned to tracks in the order that the track is
recorded on the unit. Tracks will be played back in order from tracks
with lower numbers to tracks with higher numbers.
Example:
RQTT0855
22
When you have selected the track numbered “002” to play, the next
track to play back will be the track numbered “003” or higher.
Track number
Page 23

Note
Selecting the folder containing the tracks to be played (FOLDER PLAY)
or
Press
Press
MEDIA
ALL
MUSIC
FOLDER
PLAY
FOLDER
PLA
Y
ARTIST-B
ARTIST
-C
ARTIST
-A
Music
ALBUM
-B1
ALBUM
-B2
ALBUM
-C1
TRACK2TRACK1
FOLDER
PLAY
FOLDER
PLA
Y
Example: To play all the tracks in ALBUM-B2 2
Select “FOLDER PLAY” in step 5. When you press [ ], all of the tunes
in “ALBUM-B2” will play in the order in which they were recorded.
Select “FOLDER PLAY”.
5
•
When “FOLDER PLAY” is selected, all the tracks in the
selected folder are played, and then play stops.
FOLDER PLAY icon
is displayed.
• When the lowest track number in the folder selected for “FOLDER
PLAY” is “005”, then playback will start from the track numbered “005”.
■ Playlist selection menu
When music has been recorded
using WMP10, the Music folder
will be created automatically
When “ALL MUSIC”
is selected, all the
tracks under the
MEDIA folder are
played, and then
play stops.
• When there are playlists and tunes in a playlist, both will be displayed as items
you can select.
• Basic playback operations (
• “–:–
playback.
–:– –” will appear when the count of a track exceeds 10 hours during
page 19)
in the unit’s MEDIA
folder, and the track
files will be stored.
2
MUSIC mode
1
RQTT0855
23
23
Page 24

Setting various items
SOUND MODE
SET
PLAY MODE
ERASE MODE
SURROUND
EQ SETTING
REMASTER
SYSTEM BACKLIGHT
BEEP
CONTRAST
FORMA
T
You can set various items.
1 2 3 4
1
2
3
4
5 6 7 8
RQTT0855
2424
D
5
6
7
8
A
A B DC
B
C
The icons matching
the settings are
displayed.
Page 25

■ SET
SOUND MODE EQ SETTING NORMAL : No change in sound
SURROUND ON : The SURROUND effect with
REMASTER ON : Sound enhanced
(Digital Re-master)
PLAY MODE NORMAL :
ALL-REP. :
ONE-REP. :
RANDOM : All tracks in a list random repeat
ERASE MODE TRACK : Erases selected tracks in the playlist.
MEDIA :
ROCK : Adds impact
JAZZ : Adds club-like
POP : Clarifies the treble range
CLASSIC : Adds concert hall-like
presence
OFF : Normal play
OFF : Normal play
Normal play
All tracks in a list repeat
1 track repeat
Erases all tracks in the playlist.
SYSTEM
General system setting below
SYSTEM
BACKLIGHT 5s, 20s, 1min
CONTRAST Adjusting the screen contrast
BEEP ON : A beep is sounded when a button is operated.
FORMAT The unit’s memory can be initialized (formatted) by the
Setting the duration the display will light when a
button is pressed
OFF : A beep is not sounded when a button is
operated.
unit itself. Doing so will erase all the recorded data.
( page 30)
Setting mode
RQTT0855
2525
2525
Page 26

Setting various items
Note
or
Press
Press
Press
or
Press
Press
or
Press
Press
or
Press
Press
Making basic settings
Example: Setting the amount of time for the backlight to be displayed
Preparation: 1. Release the HOLD switch. ( page 19)
2. Turn the unit on. ( page 19)
Display the main menu.
1
Select “SET”.
2
Select “SYSTEM”.
3
The SYSTEM settings menu will be displayed.
Select “BACKLIGHT”.
4
The BACKLIGHT time selection menu will be displayed.
Select “1min”.
5
When the settings are
completed, the playback
screen will reappear.
The next time music is played, the unit will operate under the settings which have
just been established.
RQTT0855
26
26
Each time you press
1min ↔ 5s ↔ 20s
(1 minute) (5 seconds) (20 seconds)
Page 27

Press
or
Press
Press
or
Press
Press
Note
or
Press
Press
■ PLAY MODE settings
Example: When setting “ONE-REP.”
Display the main menu.
1
Select “SET”.
2
Select “PLAY MODE”.
3
Select “ONE-REP.”.
4
The display returns to the playback screen where the “ONE-REP.”
icon was displayed.
NORMAL : Normal play
ALL-REP. :
All tracks in a list repeat
Setting mode
ONE-REP. :
RANDOM : All tracks in a list random repeat
• To release the settings, select NORMAL at the step 4.
• If “FOLDER PLAY” is selected on the playlist menu after “ALL-REP.” or
“RANDOM” has been set, only the tracks in the selected folders are played.
One track repeat
RQTT0855
27
27
Page 28
Erasing folders and files
or
Press
Press
Note
Press
MEDIA
ARTIST_A
ARTIST_B
ALBUM_A
TRACK1.mp3
The recorded data can be erased using the unit menu.
Preparation: 1. Release the HOLD switch. ( page 19)
2. Turn the unit on. ( page 19)
This unit
In the ERASE MODE, two erasure methods can be selected.
1. Erase folders By selecting the MEDIA folder, all the tracks in the
2. Erase tracks The track now playing or stopped is erased.
• You cannot select and erase files in folders using this unit. Use your computer to
select and erase files.
• Do not delete the unit’s system.hds, Devlcon.fil and DevLogo.fil files. Doing so
may cause the unit to malfunction.
selected folder are erased.
When erasing all the tracks in the
MEDIA folder
When erasing
a track
When erasing all the tracks in the folder
Example: When erasing all the tracks in the MEDIA folder
Display the main menu.
1
Select “SET”.
2
RQTT0855
28
28
Page 29

or
Press
Press
or
Press
Press
or
Press
Press
Press
or
Press
Press
or
Press
Press
Press
or
Press
Select “ERASE MODE”.
3
Select the folder to be erased.
4
Select “YES”.
5
Select “YES”.
6
All the tracks in the MEDIA folder will be erased.
When erasing a track
Example: When erasing TRACK1
While “TRACK1” is playing or stopped:
Select “TRACK”.
4
Select “YES”.
5
The selected TRACK1 is erased.
Other information
RQTT0855
29
29
Page 30

Formatting
Press
or
Press
or
Press
Press
or
Press
Press
or
Press
Press
Note
or
Press
Press
The unit’s memory can be initialized (formatted) by the unit itself. Doing
so will erase all the data recorded on it.
Initiate the formatting while the battery indicator shows a full charge.
Preparation: 1. Release the HOLD switch. ( page 19)
2. Turn the unit on. ( page 19)
3. Display the main menu. ( page 20)
Select “SET”. ( page 24, Setting various items)
1
Select “SYSTEM”.
2
Select “FORMAT”.
3
Select “YES”.
4
Select “YES”.
5
• Do not use your computer to format the unit’s memory.
• Do not remove the battery during formatting. Doing so may cause the unit to
malfunction.
• If the remaining battery charge becomes depleted or the battery is removed
RQTT0855
before formatting is completed, initiate the reset procedure. ( page 31)
30
Page 31

Other information
31
Page 32

Troubleshooting guide
Before requesting service, make the below checks. If you are in
doubt about some of the check points, or if the remedies indicated
in the chart do not solve the problem, refer to the “Customer
Services Directory” on page 8.
No operation • The HOLD function is on.
No sound, there is
a lot of noise or it
is hard to hear the
sound
Play doesn’t resume
from the track where
I stopped play
Play doesn’t start
from the first track
The unit stops
working
The display is too
dark or too light
The display just
shows “WAIT…”
RQTT0855
32
• Replace the battery if it is dead.
• Ensure the earphone plug is inserted firmly.
• Wipe the plug clean with a clean cloth.
• Turn up the volume.
• Keep this unit away from mobile telephones.
■ Concerning the noise heard with
"REMASTER" at "ON"
With some CDs, noise may be heard in
the treble range when playing the MP3 or
WMA files created from those CDs with
"REMASTER" at the "ON" setting. If noise is
heard, set "REMASTER" to "OFF".
• This doesn’t work if:
You download or delete files, or change the
battery.
• The random play mode may be on.
•
Play usually resumes from the track where you last
stopped play. Use skip to return to the first track.
• Ensure that "FOLDER PLAY" has not been
selected. ( page 23)
• Reinsert the battery after taking it out and
keeping it out for 5 seconds, and turn on the
power. If there is still no improvement, reset
the unit. ( page 31, RESET procedure)
• Adjust the contrast. (
• “WAIT...” will be displayed while the unit is
writing data to memory after the USB cable
is removed following recording, and also
while the unit is reading music data when
the unit is turned on. Display time will vary
depending on the number of songs recorded
and the number of folders.
For 500 songs and 50 folders: Approx. 10 seconds
page 25)
Page 33

The backlight does
• The battery charge may be low. (
page 10)
not light
The unit is not
recognized even when
it has been connected
• Disconnect the USB cable, reboot the
computer, and then connect the unit to the
computer again.
to the computer
The tracks downloaded
from the subscription
type music distribution
service cannot be
transferred to the unit
• The unit’s “secure clock” has been lost.
First connect the PC to the Internet, and
then use the synchronizing function of the
WMP10 to transfer the tracks to the unit.
using WMP10
■ Displays
NO TRACK There is no audio data in the MEDIA folder.
LOW BATTERY The battery is dead. Change the battery.
NO BATTERY Insert the battery.
HOLD The HOLD switch is on.
OVER LIMIT
PROTECTED • The track is protected so it cannot be played
FILE ERROR This is a file which cannot be played by this unit.
Secure clock: A clock function required to play contents for which a period of
You have tried to record more than 999 tracks into folder.
The number of folder hierarchies exceeds seven.
by the unit as is. Use Windows Media Player to
transfer the tracks on the computer to the unit, and
then play them on the unit. ( page 15, Using
WMP9 or WMP10 to record music)
• The deadline for using the track files downloaded
from the music distribution service has passed.
• The unit’s “secure clock” has been lost since either
the battery is dead or it has not been installed.
First install a new battery, connect the PC to the
Internet, and then use the synchronizing function
of the WMP10 to transfer the track files to the unit
again. ( page 15, Using WMP9 or WMP10 to
record music)
validity or other time-based restriction has been set
Other information
RQTT0855
33
Page 34

Specifications
Memory size SV-MP010 : 1 GB
SV-MP020 : 2 GB
Supported
sampling frequency
Supported bitrates
MP3 : 8 kHz to 48 kHz
WMA : 22.05 kHz, 32 kHz, 44.1 kHz and 48 kHz
MP3 :
8 kbps to 320 kbps (128 kbps is recommend)
WMA :
32 kbps to 192 kbps (96 kbps is recommend)
No. of channels Stereo, 2 channels
Frequency response
Output
20 Hz to 20,000 Hz (+0 dB, –6 dB)
3 mW + 3 mW (16 Ω, Ø3.5 mm (1/8˝) stereo mini jack)
Power supply DC 1.5 V (one alkaline battery)
Approximate play
times
Dimensions
(W × H × D)
80 hours
The play time shown is when the bit rate is 128 kbps
(MP3), EQ SETTING (NORMAL), SURROUND (OFF),
REMASTER (OFF), volume is 12, the backlight is not
used, the ambient temperature is 25°C and supplied
alkaline battery is used.
Maximum: 62.5 mm × 28.5 mm × 29.0 mm
2 4/9˝ × 1 1/8˝ × 1 1/7˝
Cabinet: 62.0 mm × 28.5 mm × 28.5 mm
2 7/16˝ × 1 1/8˝ × 1 1/8˝
Mass
51.5 with battery (1.82 oz.)
28.0 without battery (0.98 oz.)
• Specifications are subject to change without notice.
• The play time shown depends on operating conditions.
• Mass and dimensions are approximate.
• GB means one billion bytes. Useable capacity will be less.
• This product supports the following character codes. The display may not appear
correctly with other character codes.
Language Display Character code
ENGLISH ENGLISH
Unicode
RQTT0855
34
34
Page 35

The serial number of this product can be found inside the battery compartment.
Please note it in the space provided below and keep as a permanent record of
your purchase to aid identification in the event theft.
MODEL NUMBER
SERIAL NUMBER
User memo :
DATE OF PURCHASE
DEALER NAME
DEALER ADDRESS
TELEPHONE NUMBER
Maintenance
If the surfaces are dirty
To clean this unit, wipe with a soft, dry cloth.
• Never use alcohol, paint thinner or benzine to clean this unit.
Other information
RQTT0855
35
35
Page 36

Printed in Taiwan
En
RQTT0855-1P
M0306KS2036
 Loading...