

Page 1
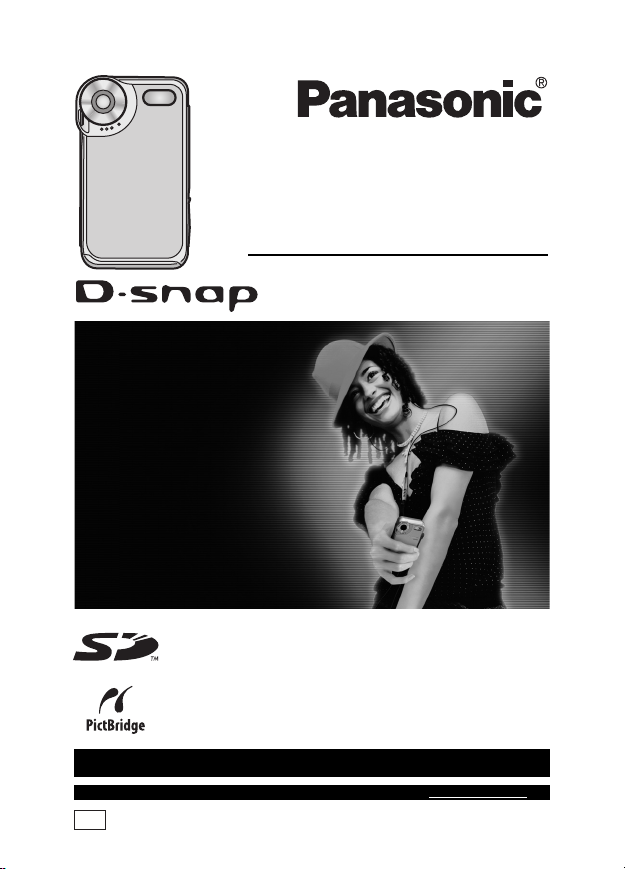
Operating Instructions
SD Multi Camera
Model No. SV-AS3
Before connecting, operating or adjusting this
product, please read the instructions completely.
For USA assistan ce, please call: 1-800-211-PANA (7262) or, contact us via th e web
at: http://www.panasonic.com/conta ctinfo
For Canadian assistance, please call: 1-800-561-5505 or visit us at www.panasonic.ca
PP
VQT0P18
Page 2

Contents
Preparation
Information for Your Safety............... 4
Introduction ....................................... 8
Accessories .................................... 10
Suitable Card .................................. 11
Controls Layout............................... 12
Inserting/Removing the Battery
or the Card .................................. 14
Charging the Battery ....................... 16
Turning This Unit On....................... 18
Switching the Mode ........................ 19
How to Set the Menu ...................... 20
Setup Menu .................................... 22
Setting the Clock............................. 24
Shortcut Menu ................................ 26
Recording
Before Recording ............................ 27
Recording ....................................... 28
Approximate Number of
Recordable Pictures and Time
Changing the Picture Size
and Quality .................................. 33
Enlarging Pictures (Digital Zoom)
Setting the Flash ............................. 36
Recording with the Self-timer.......... 38
Adjusting the Color to Natural Tone
(White Balance) .......................... 39
Recording in Dark Places
(Night Mode) ............................... 40
Compensating the Exposure .......... 41
Setting the ISO Sensitivity .............. 42
...... 31
...... 35
Playback
Playback ......................................... 43
Adjusting Volume ............................ 46
6 Pictures Multi Playback
(Thumbnail Display) .................... 46
Playing Motion Images Repeatedly
(Repeat Playback) ....................... 47
Deleting Files .................................. 47
Preventing Accidental Deletion
of Files (Lock Setting).................. 49
Enlarging Pictures (Target Zoom)
Registering Still Pictures
as “Favorite” ................................ 51
Creating a Slide Show with Audio
Playing Still Pictures
on the Slide Show ....................... 54
Printing Pictures Directly
by Connecting to a Printer
(PictBridge).................................. 55
Setting Still Pictures to be Printed
and the Number of Prints
(DPOF Print)................................ 58
..... 50
..... 52
Playing Music
Playing Music .................................. 61
Selecting Playlists ........................... 65
Playing Repeatedly
(Repeat Playback) ....................... 65
2
VQT0P18
Page 3

Connecting to PC
Operating Environment
of the Software ............................ 66
Before Connecting to a PC
for the First Time (Installation)
Installing the USB Driver ................. 70
Installing SD Viewer ........................ 70
Installing SD-Jukebox ..................... 72
Connecting to a PC ......................... 73
Checking that This Unit is Properly
Recognized by the PC ................. 75
Disconnecting the USB Cable
Safely........................................... 76
Folder Structure of the Card Used
for This Unit ................................. 77
Accessing Files on a Card with a PC
([Picture] • [MPEG4])
Playing Copied Files
([Picture] • [MPEG4]) ................... 78
Using SD Viewer ............................. 80
Using SD-Jukebox .......................... 82
Reading Operating Instructions
of the Software ............................ 83
Uninstalling the Software ................ 84
....... 69
..................... 78
Cautions for Use
This Unit .......................................... 85
The AC Adaptor .............................. 86
The Battery...................................... 87
Charging Error................................. 88
Condensation .................................. 89
LCD Monitor .................................... 90
Card ................................................ 91
Recorded Files ................................ 91
Format............................................. 92
Demonstration Mode ....................... 92
Others
Screen Display ................................ 93
Messages ........................................ 95
Trouble Shooting ............................. 96
Specifications................ 101
Limited Warranty
(For U.S.A. Only) ....... 103
Customer Services
Directory
(For U.S.A. Only) ....... 105
Index............................... 106
Spanish Quick Use Guide/
Guía rápida para el
usuario en español
...... 107
End User License
Agreement ................. 111
3
VQT0P18
Page 4

Preparation
Information for Your Safety
WARNING
TO REDUCE THE RISK OF FIRE OR SHOCK HAZARD AND
ANNOYING INTERFERENCE, USE ONLY THE RECOMMENDED
ACCESSORIES AND DO NOT EXPOSE THIS EQUIPMENT TO
RAIN OR MOISTURE. DO NOT REMOVE THE COVER (OR BACK);
THERE ARE NO USER SERVICEABLE PARTS INSIDE. REFER
SERVICING TO QUALIFIED SERVICE PERSONNEL.
THE SOCKET OUTLET SHALL BE INSTALLED NEAR THE
EQUIPMENT AND SHALL BE EASILY ACCESSIBLE.
CAUTION
Danger of explosion if battery is incorrectly replaced.
Replace only with the same or equivalent type recommended by
the manufacturer.
Dispose of used batteries according to the manufacturer’s
instructions.
Extremely high precision technology is employed to produce the LCD
Monitor screen featuring a total of approximately 61,600 pixels. The
result is more than 99.99% effective pixels with a mere 0.01% of the
pixels inactive or always lit. However, this is not a malfunction and
does not affect the recorded picture.
4
VQT0P18
Page 5

IMPORTANT
Please respect all copyrights.
Whatever you have recorded and created can be used for your
personal entertainment only. Under copyright laws, other
materials cannot be used without obtaining permission from the
holders of the copyrights.
≥ Injury or material damage resulting from any kind of use that is
not in accordance with the operating instructions are the sole
responsibility of the user.
≥ If the SD Multi Camera is used continuously for a long time or used
at a high ambient temperature, red, blue, green or white dots may
appear on the screen and be recorded on a still picture. This is due
to the temperature of the SD Multi Camera increasing. This is not a
malfunction. Under this condition, turn the SD Multi Camera off and
leave it for a while.
≥ The manufacturer shall in no event be liable for the loss of recordings
due to malfunction or defect of this SD Multi Camera, its accessories
or Memory Card.
≥ Please note that the actual controls and components, menu items,
etc. of your SD Multi Camera may look somewhat different from
those shown in the illustrations in these Operating Instructions.
≥ In this Operating Instructions, “Memory Card” and “Card” mean
“SD Memory Card”.
≥ Note that the SD Multi Camera may not play the data recorded or
created on another product and another product may not play the
data recorded on the SD Multi Camera.
≥ The nameplate of the SD Multi Camera is fixed on the bottom of the
battery compartment.
5
VQT0P18
Page 6

Preparation (continued)
FCC Note: (U.S. only)
This equipment has been tested and found to comply with the limits
for a Class B digital device, pursuant to Part 15 of the FCC Rules.
These limits are designed to provide reasonable protection against
harmful interference in a residential installation. This equipment
generates, uses, and can radiate radio frequency energy and, if not
installed and used in accordance with the instructions, may cause
harmful interference to radio communications. However, there is no
guarantee that interference will not occur in a particular installation.
If this equipment does cause harmful interference to radio or
television reception, which can be determined by turning the
equipment off and on, the user is encouraged to try to correct the
interference by one or more of the following measures:
≥ Reorient or relocate the receiving antenna.
≥ Increase the separation between the equipment and receiver.
≥ Connect the equipment into an outlet on a circuit different from
that to which the receiver is connected.
≥
Consult the dealer or an experienced radio/TV technician for help.
FCC Caution:To assure continued compliance, follow the attached
installation instructions and use only shielded interface cables with
ferrite core when connecting to computer or peripheral devices.
Any changes or modifications not expressly approved by the party
responsible for compliance could void the user’s authority to operate
this equipment.
Trade Name: Panasonic
Model No.: SV-AS3
Responsible party:
Support Contact:
6
VQT0P18
Panasonic Corporation of North America
One Panasonic Way, Secaucus, NJ 07094
Panasonic Consumer Electronics Company
1-800-211-PANA (7262) This device complies with
Part 15 of the FCC Rules. Operation is subject to the
following two conditions: (1) This device may not
cause harmful interference, and (2) this device must
accept any interference received, including
interference that may cause undesired operation.
Page 7
This Class B digital apparatus complies with Canadian ICES-003.
SV-AS3
A lithium ion/polymer battery that is recyclable
powers the product you have purchased. Please call
1-800-8-BATTERY for information on how to recycle
this battery.
7
VQT0P18
Page 8
Preparation (continued)
Introduction
Dear Customer,
We would like to take this opportunity to thank you for purchasing this
Panasonic SD Multi Camera. Please read these Operating Instructions
carefully and keep them handy for future reference.
≥ SD logo is a trademark.
≥ MPEG Layer-3 audio decoding technology licensed from Fraunhofer
IIS and Thomson multimedia.
≥ This product is licensed under the MPEG-4 Visual patent portfolio
license for the personal and non-commercial use of a consumer for
(i) encoding video in compliance with the MPEG-4 Visual Standard
(“MPEG-4 Video”) and/or (ii) decoding MPEG-4 Video that was
encoded by a consumer engaged in a personal and non-commercial
activity and/or was obtained from a video provider licensed by MPEG
LA to provide MPEG-4 Video. No license is granted or shall be
implied for any other use. Additional information including that
relating to promotional, internal and commercial uses and licensing
may be obtained from MPEG LA, LLC. See http://www.mpegla.com
≥ Microsoft, Windows and Windows Media are
either registered trademarks or trademarks of
Microsoft Corporation in the United States and/
or other countries.
≥ Adobe, Adobe Acrobat and Acrobat Reader are
trademarks or registered trademarks of Adobe Systems
Incorporated in the United States and/or other countries.
≥ WMA is a compression format developed by Microsoft Corporation. It
achieves the same sound quality as MP3 with a file size that is
smaller than that of MP3.
≥ This unit is not compatible with Multiple Bit Rate (MBR: a file that
contains the same content encoded at several different bit rates).
.
8
VQT0P18
Page 9

≥ Music recognition technology and related data are
provided by Gracenote and the Gracenote CDDB
music recognition service. Gracenote is the industry
standard in music recognition technology and related
content delivery. For more information visit
www.gracenote.com
≥ CD and music-related data from Gracenote, Inc., copyright C 2000–
2003 Gracenote. Gracenote CDDB
.
®
Client Software, copyright
2000–2003 Gracenote. This product and service may practice one or
more of the following U.S. Patents: #5,987,523, #6,061,680,
#6,154,773, #6,161,132, #6,230,192, #6,230,207, #6,240,459,
#6,330,593, and other patents issued or pending.
≥ Gracenote
®
and CDDB® are registered trademarks of Gracenote.
The Gracenote logo and logotype, the Gracenote CDDB logo and
logotype and the “Powered by Gracenote” logo are trademarks of
Gracenote.
≥ Portions of this product are protected under copyright law and are
provided under license by ARIS/SOLANA/4C.
≥ Other names of systems and products mentioned in these Operating
Instructions are usually the registered trademarks or trademarks of
the manufacturers who developed the system or product concerned.
≥ The ™ and
®
marks are not used to identify registered trademarks
and trademarks in these instructions.
≥ The contents or complete reproduction or copy of these Operating
Instructions could be changed without notice.
≥ Licensed AAC Patents (U.S. patent numbers);
08/937,950
5848391
5,291,557
5,451,954
5 400 433
5,222,189
5,357,594
5,752,225
5,394,473
5,583,962
5,274,740
5,633,981
5 297 236
4,914,701
5,235,671
07/640,550
5,579,430
08/678,666
98/03037
97/02875
97/02874
98/03036
5,227,788
5,285,498
5,481,614
5,592,584
5,781,888
08/039,478
08/211,547
5,703,999
08/557,046
08/894,844
5,299,238
5,299,239
5,299,240
5,197,087
5,490,170
5,264,846
5,268,685
5,375,189
5,581,654
05-183,988
5,548,574
08/506,729
08/576,495
5,717,821
08/392,756
9
VQT0P18
Page 10
Preparation (continued)
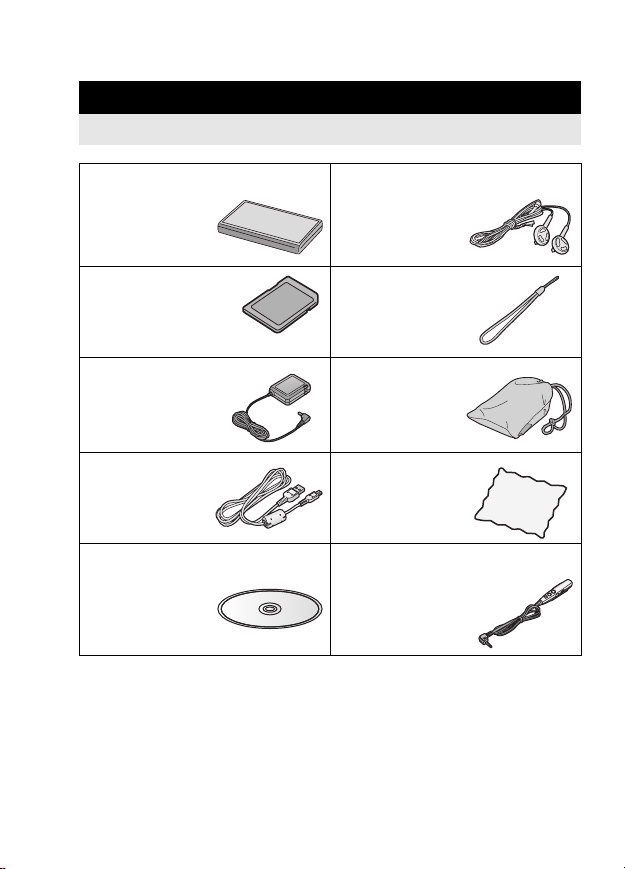
Accessories
Check the accessories before using this unit.
Battery Pack Stereo earphones
L0BAB0000180
SD Memory Card
RP-SDH256VE1
Hand strap
VFC4012
≥ Useable capacity
will be less.
AC adaptor
VSK0668
USB cable
K2KZ4CB00008
Carrying case
VFC4081
Cleaning Cloth
VFC1792
CD-ROM Remote controller
N2QCBD000045
∫ Optional Accessory
≥ Battery Pack (CGA-S302A/1B)
10
VQT0P18
Page 11
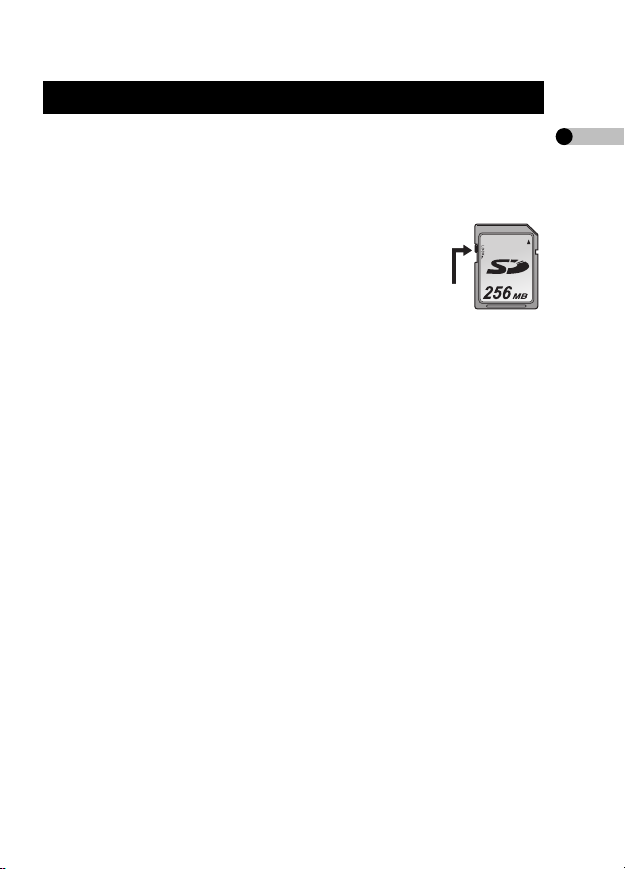
Suitable Card
≥ The card suitable for this unit is SD Memory Card. (MultiMediaCard
is not suitable.)
≥ We recommend using Panasonic SD Memory Card.
∫ About SD Memory Card (supplied)
≥ The SD Memory Card is a small, lightweight and
removable external card. The SD Memory Card is
equipped with a write-protect switch 1 that can
inhibit writing and formatting. (When the switch is
moved towards the LOCK side, it is not possible to
write or delete data on the card and format it. When
the switch is unlocked, these functions become available.)
≥ Pictures recorded onto the SD Memory Card can be played on
Panasonic DVD Video Recorder with a SD Memory Card slot, etc.
(Depending on the file, pictures cannot be played in some cases.)
≥ Motion images (MPEG4 format) recorded with DVD Video Recorder
can be played on this unit.
• [MPEG4] files (ASF format) recorded by this unit may not be played
on a Panasonic MPEG4 motion image player. In this case, the files
may be played by installing SD Viewer 3.4E for D-snap in the
CD-ROM (supplied) and converting the files using [MPEG4
Converter].
• The available recording methods (file formats) vary depending on the
model. For details on the available models, recording methods, etc.,
carefully check the catalogue, the website or the operating
instructions of the equipment.
1
11
VQT0P18
Page 12
Preparation (continued)
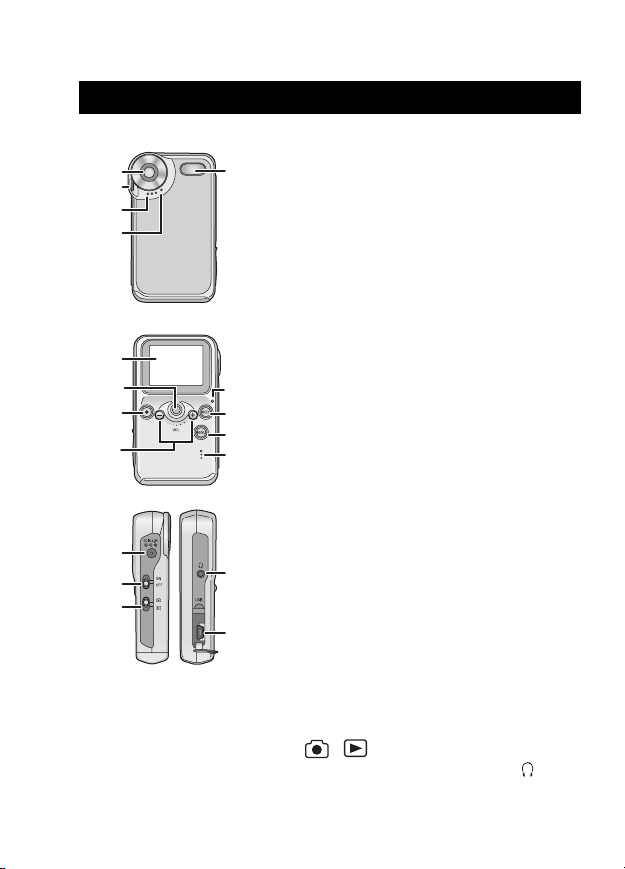
Controls Layout
12
VQT0P18
1
2
3
4
6
7
8
9
14
15
16
5
10
11
12
13
17
18
∫ Body
1Lens
2 Strap Attachment
3 Microphone (P30)
4 Self-timer Lamp (P38)
5 Flash
6 LCD Monitor (P93)
7 Jog Ball (P20)
• It is used for setting the menu, playing
files, zooming, etc.
• It blinks (lights) in red (Recording Mode)
or green (Playback Mode) when you
switch the mode, operate the menu or
turn this unit on.
8 Shutter Button [¥] (P29)
9 Volume Button [s/r] (P46)
10 Power/Charge/Card Access Lamp
(P18)
11 MODE Button [MODE] (P20)
• It is also used to prevent operation
mistakes during playback in [Voice] or
[Audio] mode. (P64)
12 MENU Button [MENU] (P20)
• It is also used to display the shortcut
Menu. (P26)
13 Buzzer
• The operational sounds emerge from the
speaker.
14 DC Input Terminal [DC IN 4.8V] (P16)
15 Power Switch (P18)
16 Record/Playback Mode Switch
[ / ] (P19, 28, 43)
17 Terminal (remote controller) [ ]
18 USB Terminal [USB] (P55, 73)
Page 13
19 Battery Lock [OPEN] (P14)
19
20 Card Slot (P15)
20
2221
23
1
2
6
3
7
4
5
1
2
21 Card/Battery Door (P14)
22 Lock Release Lever (P15)
23 Battery Slot (P15)
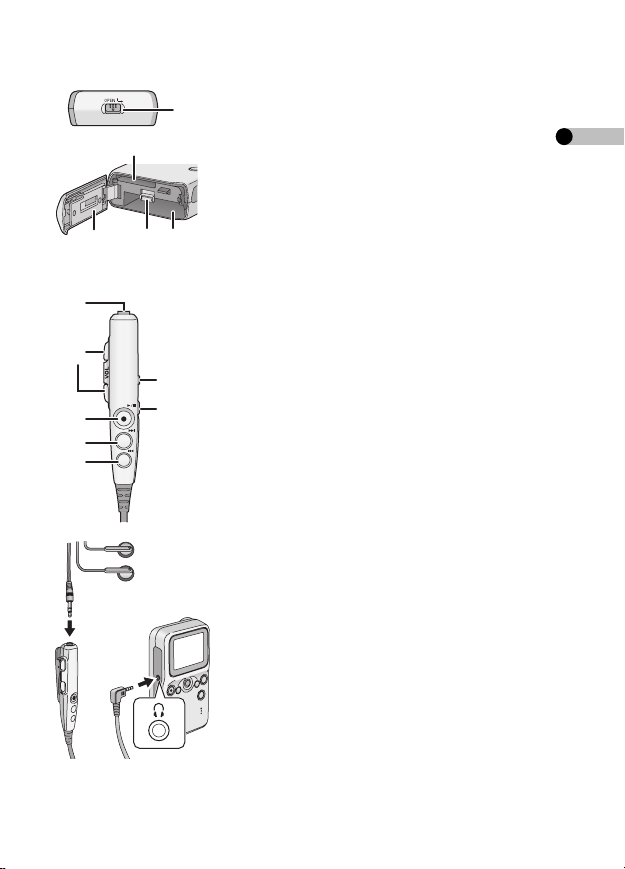
∫ Remote Controller (P29, 63)
1 Stereo Earphone Socket
2 Volume Button [s VOL r]
3 Playback/Stop Button [1/∫]
Shutter Button [¥]
4 Fast-forward Button [9]
5 Fast-rewind Button [:]
6 Hold Switch [1HOLD]
• It locks buttons on the remote controller.
7 Equaliser Button [EQ]
∫ Stereo Earphones (P62)
≥ When you use earphone, be sure to
connect to the remote controller (supplied).
≥ If you use earphones other than the stereo
earphones (supplied), use 6.6 ft. (2 m) or
less length of earphones (10 ft. (3 m) or
less including the remote controller).
1 Stereo Earphones (supplied)
2 Remote Controller (supplied)
13
VQT0P18
Page 14
Preparation (continued)
Inserting/Removing the Battery or the Card
Be sure to turn this unit off before the following operations.
1 Open the Card/Battery Door at the bottom of this unit.
• Release the lock and then open the Door while sliding it.
2 Insert/remove the battery or the card.
• Read the next page carefully.
3 Close the Card/Battery Door.
• Close the Door and then lock it while sliding.
≥ Never open the Card/Battery Door during the access. (P18)
Otherwise, the data on the card may be damaged.
≥ When the Card/Battery Door cannot be completely closed, remove
the card or battery once and then insert it again.
≥ When you are not going to use the SD Multi Camera for a long time,
remove the battery.
≥ Do not use the supplied battery for other equipment.
≥ Please be sure to use genuine Panasonic batteries
(CGA-S302A/1B).
14
VQT0P18
Page 15
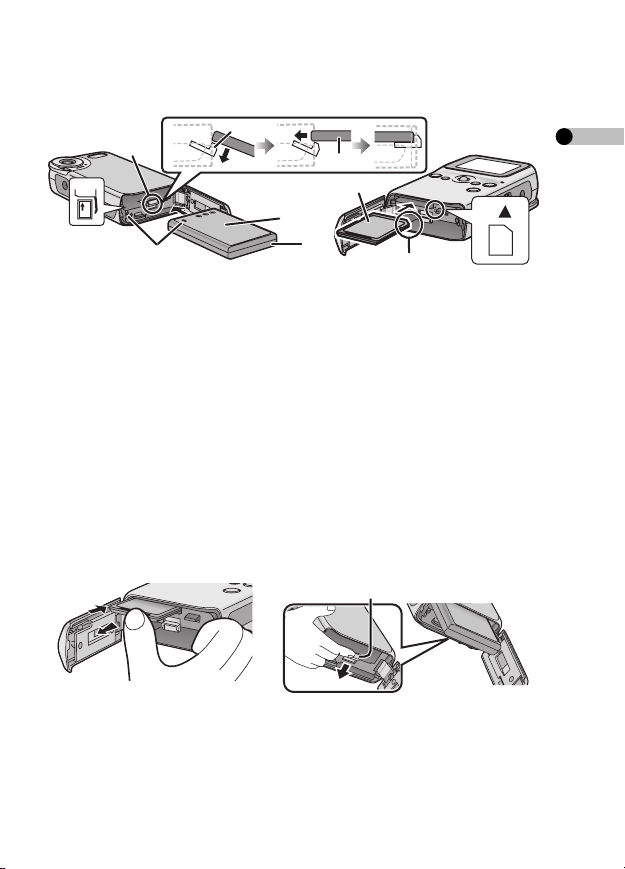
∫ When inserting the card/battery
1
1
2
3
A
B
2
4
Confirm the direction of the battery and the card.
Insert the battery fully into the slot with the Battery Lock 1 lowered.
Make sure if the Battery Lock is hooked on the Battery 2.
≥ Place the battery with the label side upward. A
≥ Insert the battery in the direction indicated by the arrow. B
3 Label 4 Notch
• Insert the card/battery fully and firmly.
(The card clicks if it is fully inserted.)
• Do not touch the connecting terminal on the rear of the card.
• If the Battery Lock is not hooked on the battery or you have difficulty
in closing the Card/Battery Door, the battery may be inserted in the
wrong direction. Pull the battery out with the Battery Lock unlocked
and check the direction of the battery.
∫ When removing the card/battery
1
Press the card until it
clicks and then pull out
the card.
Point the bottom of the unit
downwards with the Door open. Lift
the Battery Lock 1, then remove the
battery.
15
VQT0P18
Page 16
Preparation (continued)
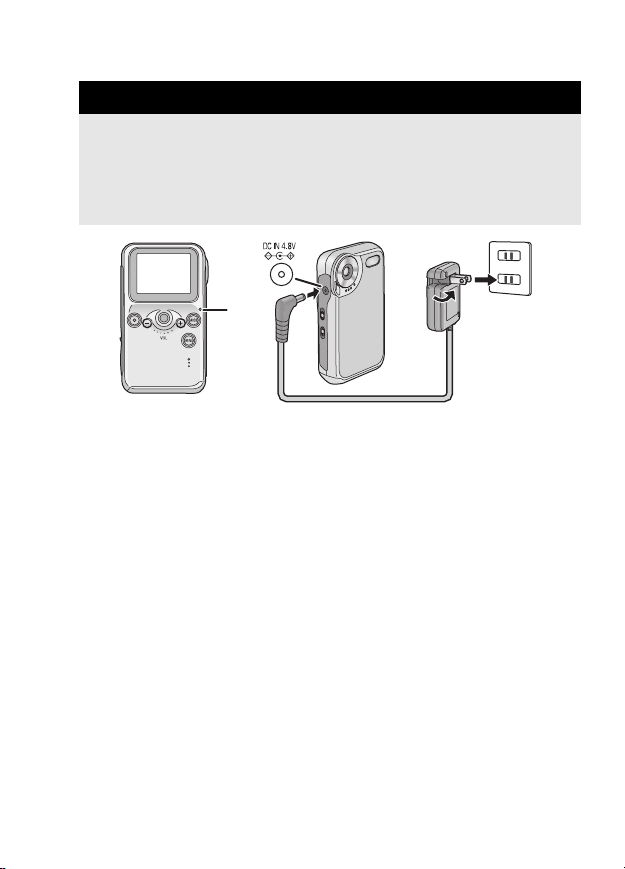
Charging the Battery
Be sure to turn this unit off before charging the battery. (When this
unit is turned on, the battery cannot be charged.) Use the AC adaptor
supplied for this unit.
≥ When the SD Multi Camera is shipped, the battery is not charged.
Charge the battery before use.
1
1 Connect the power plug of the AC adaptor to the
electrical outlet and connect the DC plug to this unit.
• The Charge Lamp 1 blinks and the charging starts.
• When charging is completed (the battery is fully charged in about
160 minutes), the charge lamp turns off.
16
VQT0P18
Page 17
∫ Charging time and the number of recordable pictures/
time (per battery)
Charging time Approx. 160 minutes
The number of
recordable
pictures
[Picture]
Approx. 260 pictures
(Recording conditions by CIPA standards)
Continuous
recording time
Continuous
playback time
[MPEG4]
[MPEG4]
[Audio]
Approx. 140 minutes
Approx. 300 minutes
Approx. 40 hours
When the supplied
stereo earphones
are used
≥ Temperature: 73oF (23oC)/Humidity: 50%
≥ Using the supplied battery and SD Memory Card (256 MB/
RP-SDH256VE1)
≥ CIPA is an abbreviation of “Camera & Imaging Products
Association”.
≥ The times (numbers) shown above may vary depending on the
condition.
≥ The optional battery pack CGA-S302A/1B is also available.
∫ Environment for charging
≥ Charge the battery under temperature of 50–95oF (10–35oC). (The
temperature of the battery should be the same.)
≥ When the battery is normally charged, the charge lamp blinks about
once every 2 seconds. (It turns on about 1 second and turns off
about 1 second.) If the charge lamp blinks faster than above, this is a
malfunction. Refer to P88 for countermeasures for this case.
VQT0P18
17
Page 18

Preparation (continued)
≥ The battery becomes warm during and after charging. The SD Multi
Camera also becomes warm during the operation, however, it is not
a malfunction.
≥ When you do not use this unit, disconnect the DC plug from this unit
and disconnect the AC adaptor from the electrical outlet.
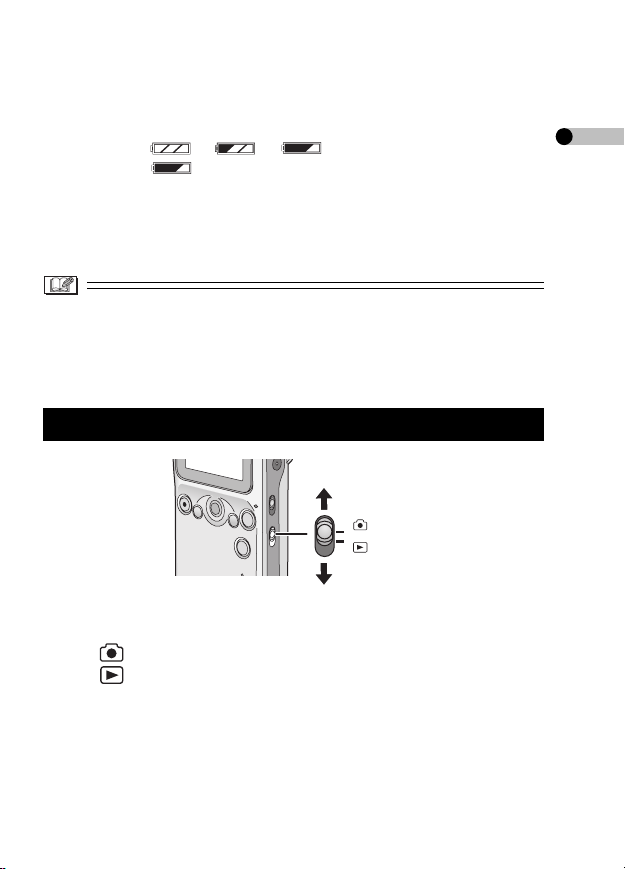
Turning This Unit On
1
1 Slide the Power Switch to [ON].
• This unit is turned off when you slide the Power Switch to [OFF].
∫ Power/Charge/Card Access Lamp 1
Lighting
Blinking
• When the Power/Charge/Card Access Lamp is blinking, do not turn
the power off or remove the battery or card. Otherwise, the card or its
contents may be damaged, or the SD Multi Camera may not work
properly.
• The Power/Charge/Card Access Lamp also blinks when charging the
battery (P16).
This unit is turned on. (The Power/Charge/Card
Access Lamp is turned off when this unit is turned
off.)
This unit is accessing the card.
(For recognizing/recording/reading/deleting, etc.)
18
VQT0P18
Page 19
∫ Battery indicator
≥ It is displayed on the LCD Monitor (P93) when this unit is turned on.
≥ As the remaining battery power is decreased, the indicator is
changed as >>(blinking). When the indicator
is shown as (blinking), the battery will be exhausted in a few
minutes. Charge the battery.
≥ The indication of the remaining battery power may be increased or
decreased depending on each mode. Check the indicator every time
you switch the mode.
≥ If the battery is excessively discharged, the message “INSERT
BATTERY” may appear even if the battery is inserted in this unit or
the USB connection with the PC may not be possible. Charge the
battery before use.
Switching the Mode
1 Slide the Record/Playback Mode Switch to the desired
mode.
• [ ]: When recording
• [ ]: When playing files recorded on the card
19
VQT0P18
Page 20
PicturePicture
EXIT
EXIT
EXITMENU
Preparation (continued)
MPEG4MPEG4
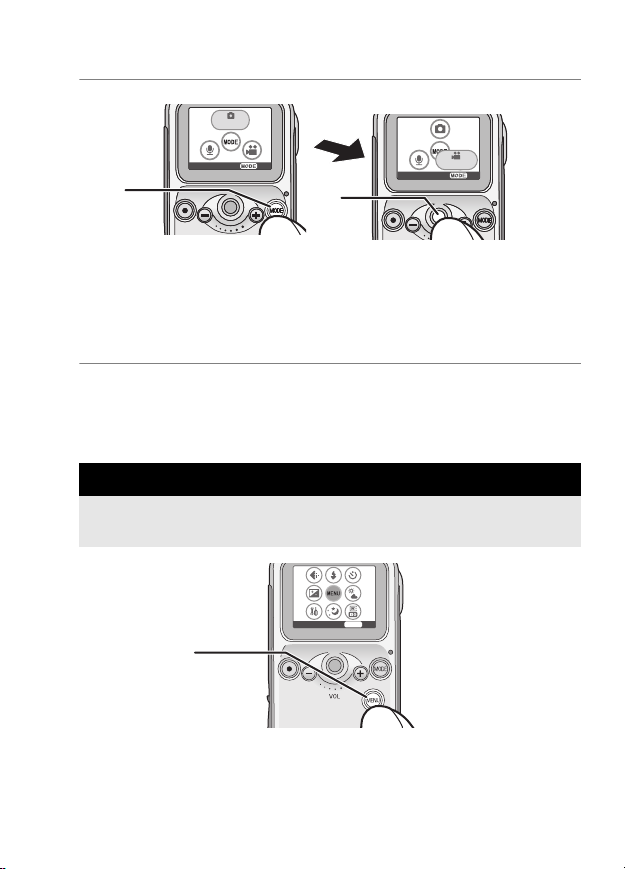
1
2 Press the [MODE] button 1, and then roll the Jog Ball
2 to select the mode.
– The selected icon is enlarged.
• When the [MODE] button is tapped without a card in this unit, the
demonstration mode (P92) is activated.
3 Press the Jog Ball to set.
• Refer to P28 for the modes in the recording mode and refer to P43
for the modes in the playback mode.
How to Set the Menu
Turn this unit on and select the desired mode beforehand. (P18–19)
The available items depends on the mode.
2
1
1 Press the [MENU] button 1.
– The menu screen appears.
20
VQT0P18
Page 21
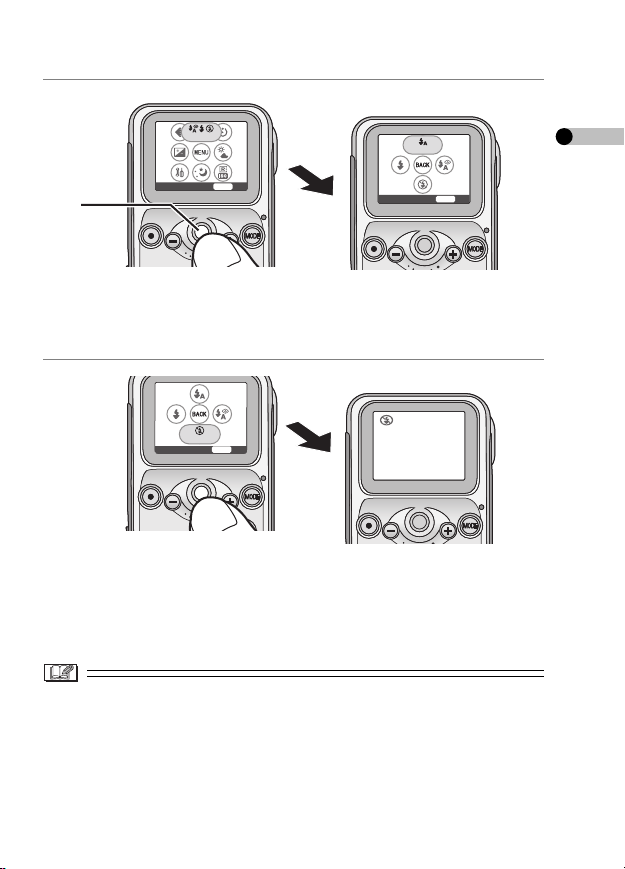
Flash
EXITMENU
Auto
EXITMENU
2
Flash off
EXITMENU
2 Roll the Jog Ball 2 to select the sub-menu, and then
press the Jog Ball to set.
– The sub-menu screen appears.
3 Roll the Jog Ball to select the desired item, and then
press the Jog Ball to set.
– The setting is changed and the menu screen disappears.
• If you have other items to select, repeat Step 3.
≥ To stop the operation, press the [MENU] button.
≥ If the Jog Ball is left without any operation for about 30 seconds, the
unit exits the menu automatically.
≥ When you press the [MENU] button for about 1 second, the shortcut
menu appears. (P26)
21
VQT0P18
Page 22
Preparation (continued)
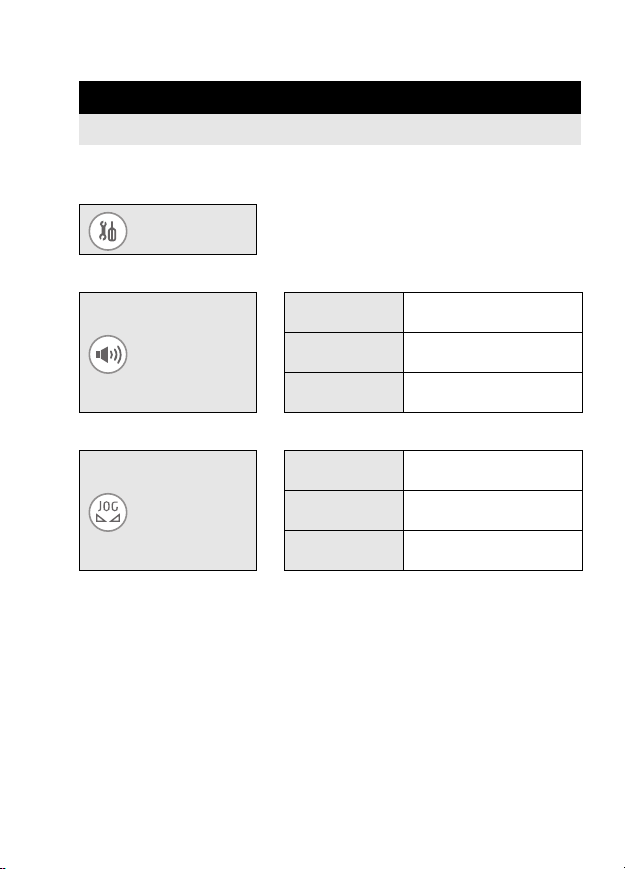
Setup Menu
You can change the settings on this unit in the menu.
1 Press the [MENU] button and then set the desired
items with the Jog Ball. (P20)
Setup
Select the following items for the settings.
l
∫ Setting the operation sound
Turns on the operation
sound.
Turns off the operation
sound.
Adjusts the volume of the
stereo earphones.
Vol um e
l
Main volume
Beep ON
Beep OFF
∫ Setting the Jog Ball
Normal
Sensitivity
(Jog Ball)
≥ The response speed of the Jog Ball is not changed when you select
pictures and move between thumbnails or list display in the playback
mode.
l
Fast
Slow
This is normal response
speed of the Jog Ball.
The response of the Jog
Ball becomes fast.
The response of the Jog
Ball becomes slow.
22
VQT0P18
Page 23
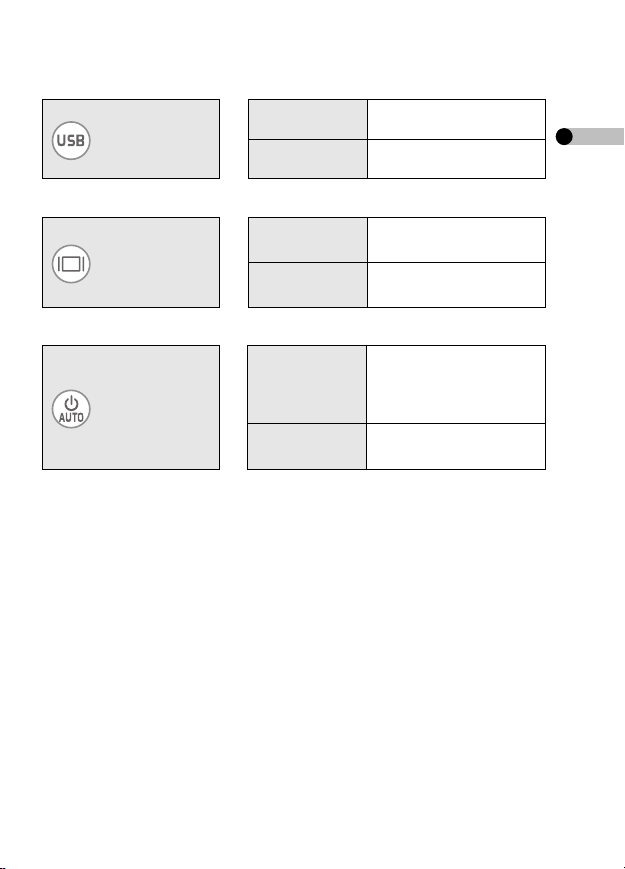
∫ Setting the USB connection
Connection
(USB)
l
Connection
(PC)
PictBridge
Connects to the PC.
(P73)
Connects to the printer.
(P55)
∫ Setting the LCD Monitor
Displays or hides the
icon display.
Adjusts the brightness of
the LCD Monitor.
Display setup
Icon display
l
Brightness
∫ Setting the power
Turns off this unit
5min power off
Auto power off
l
Cancel
≥ When this unit is automatically turned off and you want to turn it on
again, slide the Power Switch to [OFF] and slide it to [ON].
≥ [Auto power off] does not work when connecting in USB connection
mode, recording/playing MPEG4 images, playing the slide show or
music, or recording/playing the [Voice] files.
automatically without any
operation for about
5 minutes.
Will not turn this unit off
automatically.
23
VQT0P18
Page 24
Preparation (continued)
∫ Setting the clock
Clock set Sets the date and time.
∫ Formatting (initializing) the card
Format
∫ Restoring the settings
Reset settings
Setting the Clock
The clock is not set at the time of purchase. Set the clock on the
clock setting screen which appears at the time you turn this unit on.
(If you do not set the clock here, the clock is automatically set to
January 1st, 2000 12:00AM.)
1 Press the [MENU] button and then set the item with the
Jog Ball. (P20)
If the card is formatted, all the data (including
protected files) cannot be recovered. Check the
data before formatting.
Resets to the initial settings except the clock
setting.
24
VQT0P18
Setup
l
Clock set
Page 25
EXIT
MENU
SEL ENTER
Feb
EXITMENU
SEL ENTER
AM
2 Adjust the date and time with the Jog Ball.
• The highlight moves between the items (
) every time you press the Jog Ball. When you roll the Jog Ball up
Minute
or down, the value is changed. (You can set the year from 2000 to 2099.)
• The time is displayed in 12 hour system.
Month, Day, Year, Hour,
3 Press the [MENU] button after adjusting the date and
time.
– The setup screen disappears.
≥ When the fully charged battery is inserted in the SD Multi
Camera for 1 hour or more, the clock setting is stored in the SD
Multi Camera for about 10 hours even after the battery is
removed. (The time to keep the clock setting depends on how long
the battery is inserted. It is stored for about 3 months at a maximum.
If a battery which is not fully charged is inserted, the time may
become shorter.) The clock setting is canceled if more time has
passed without the battery inserted. In this case, set the clock again.
25
VQT0P18
Page 26

400
AUTO
10
OFF
AUTO
100
200
016
OFF
1600
1280
HDTV
640
ALL
OFF
OFF
SD
OFF
NORMAL
-XBS1
-XBS2
TRA IN
OFF
Preparation (continued)
Shortcut Menu
1 Press the [MENU] button for 1 or more seconds and
then set the item with the Jog Ball.
• Roll the Jog Ball up/down/left/right to select the item and then press
the Jog Ball to set the item.
• Press the [MENU] button to exit the shortcut menu.
<Recording Mode> <Playback Mode>
1
234 5
AA
WB
OFF
400
200
100
0
AUTO
AUTO
OFF
2
016
HDTV
1600
1280
640
2
10
910
ALL
SD
OFF
11 13 1412
678
1 Flash (P36)
2 Night mode (P40)
3 White balance (P39)
4 Picture quality (P33)
5 Picture size (P33)
6 Exposure compensation
(P41)
7 ISO sensitivity (P42)
8 Self-timer (P38)
OFF
0
OFF
9 Slide show (P54)
10 Repeat playback (P47)
11 File delete (P47)
12 Lock setting (P49)
13 DPOF print (P58)
14 Mark setting (P51)
15 Playlist (P65)
16 Sound quality (P64)
17 Repeat playback (P65)
15 1716
NORMAL
S-XBS1
S-XBS2
TRAIN
OFF
26
VQT0P18
Page 27
Recording
Before Recording
∫ How to hold the SD Multi Camera
≥ Put your arm on the side of your body.
≥ Fix the SD Multi Camera with your right hand and
put your left hand on the SD Multi Camera.
≥ The shutter speed can be automatically adjusted.
The shutter speed becomes slow in dark places
such as shaded areas or in a room. Therefore, be
careful not to shake the SD Multi Camera and press
the shutter button gently. When you take pictures of
the subjects in quick motion, the picture may be
blurred or the image of the subject may persist.
≥ You can reduce camera shakes by taking pictures with the self-timer
or the remote controller.
≥ If the SD Memory Card has been formatted by a PC or other
equipment, it may not record properly. Format the card with this unit
before use.
27
VQT0P18
Page 28
Recording (continued)
Recording
This unit can focus on a subject at a distance of about 2.0 ft. (60 cm)
or more.
∫ Selecting the desired recording mode
1 Slide the Power Switch to [ON].
– The Power Lamp lights in red.
Slide the Record/Playback Mode
Switch to the recording mode [ ].
2 Press the [MODE] button and then
Picture
Recording mode Recommendable situation Audio
select the desired mode with the Jog
Ball.
EXIT
• Refer to the table below to select the mode.
Picture
(Still picture recording)
MPEG4
(Motion image recording)
Vo ice
(Audio recording)
28
VQT0P18
When you want to capture
still images
When you want to record
and watch motion images
When you want to listen to
sounds for studying
languages or rehearsing a
speech
Cannot be
recorded
Recorded
from the
microphone
on this unit
Page 29

∫ When selecting [Picture]
1 Tap the Shutter button for recording.
• You can also use the Shutter button on the
remote controller.
• Recorded pictures are displayed for a few
seconds after capture.
∫
When selecting [MPEG4] or [Voice]
1 Tap the Shutter button for recording.
–[¥] appears during recording.
• You can also use the Shutter button on the
remote controller.
2 Press the Shutter button to stop
recording.
–[∑] appears while recording is stopped.
• If the memory of the card becomes full during
the recording, the recording is stopped
automatically.
29
VQT0P18
Page 30
Recording (continued)
≥ Do not cover the microphone with your finger or
other objects during recording. Be careful not to
touch the Jog Ball or any other buttons. Noises
may be recorded.
∫ When recording in [Picture] mode
≥ If you select [Advanced setup] > [Reset file No.] on the
menu setting, you can reset the file number in recording to a card to
0001. (The folder number is increased by 1.)
∫ When recording in [MPEG4] mode
≥ If the remaining recording time becomes less than 1 minute,
“R 0h00m” is displayed in red.
≥ You cannot use the flash, night mode and self-timer.
≥ The ISO sensitivity cannot be adjusted.
≥ The audio is recorded in monaural.
≥ If you use a card with a low writing speed, recording in [MPEG4]
mode may be stopped. (We recommend using Panasonic SD
Memory Card.)
≥ Before and after the recording, the click sound may occur around the
Lens or the brightness of the screen may change depending on the
ambient lighting. However, it is not a malfunction.
∫ When recording in [Voice] mode
≥ The LCD Monitor turns off in about 10 seconds after the recording
has started. It turns on again when you press the [MENU] button. (It
also turns on when the recording is stopped.)
≥ The audio is recorded in monaural.
≥ The files that are recorded are automatically protected. (P49)
30
VQT0P18
Page 31

Approximate Number of Recordable Pictures and Time
Picture (Unit: piece)
2016t1512
5 (11) 8 (17) 7 (17) 13 (27) 33 (68)
8 MB
16 MB 13 (26) 20 (40) 19 (40) 31 (64) 77 (150)
32 MB 29 (58) 44 (87) 42 (87) 68 (130) 160 (330)
64 MB 61 (120) 92 (180) 89 (180) 140 (280) 340 (690)
128 MB 120 (240) 180 (360) 180 (360) 290 (580) 700 (1400)
256 MB 240 (480) 360 (720) 350 (720) 560 (1100)
512 MB 490 (960) 730 (1400) 710 (1400)
980
1GB
(1900)
XF
(Extra fine)SF(Super fine)
1 min. 2 min. 5 min. 7 min. 18 min.
16 MB
32 MB 3 min. 4 min. 11 min. 16 min. 38 min.
64 MB 7 min. 9 min. 23 min. 34 min. 1 h. 10 min.
128 MB 14 min. 18 min. 47 min. 1 h. 10 min. 2 h. 40 min.
256 MB 28 min. 36 min. 1 h. 30 min. 2 h. 10 min. 5 h. 10 min.
512 MB 55min. 1h.10min. 3h. 4h.30min. 10h.
1h.50min. 2h.20min. 6h. 9h. 20h.
1GB
HDTV
(1920t1080)
1400
(2800)
1600t1200
1400
(2800)
MPEG4
(Fine)N(Normal)E(Economy)
1280t960 640t480
1100 (2200) 2700 (5400)
2200
(4500)
F
1300 (2700)
5400
(10000)
31
VQT0P18
Page 32

Recording (continued)
Voi ce
25 min.
8 MB
16 MB 58 min. 256 MB 16 h.
32 MB 2h. 512 MB 33 h.
64 MB
≥ The times listed in the above tables are approximate.
≥ The numbers of recordable pictures described in the above [Picture]
4h.
table are applicable when the picture quality is set to [Fine]. The
numbers in brackets are applicable in the case of [Normal].
≥ The remaining number of recordable pictures and time depends on
the subjects being recorded. (In [MPEG4] mode, the remaining time
may reach double the time listed above depending on the recording
condition.)
≥ Even if the remaining number of recordable pictures for [Picture] files
is actually 10,000 or more, it is displayed as [9999] on the screen.
≥ The remaining number of recordable pictures and time displayed on
the LCD Monitor are approximations.
The remaining number of recordable pictures and time vary when
pictures with different picture quality or picture size are mixed or the
data recorded in [Picture], [MPEG4] and [Voice] modes are mixed in
a card.
≥ You can continue to record files as a file up to about 10 hours in
[MPEG4] mode and up to about 24 hours in [Voice] mode. (When the
AC adaptor is used as the power source and files are recorded on a
card having 512 MB or 1 GB storage capacity.)
128 MB 8h.30min.
66 h.
1GB
32
VQT0P18
Page 33

Changing the Picture Size and Quality
1 Press the [MENU] button and then set the item with the
Jog Ball. (P20)
∫ Size and quality of the picture recorded in [Picture]
2016t
1512
HDTV
l
1600t
Quality
∫ Size and quality of the image recorded in [MPEG4]
1200
1280t
640t
Extra fine
Super fine
l
Quality
Normal
Economy
960
480
Fine
l
Normal
320a240
Max. 30 frames per second
320a240
Max. 15 frames per second
320a240
Max. 10 frames per second
176a144
Max. 10 frames per second
176a144
Max. 6 frames per second
Fine
Gives priority to
picture quality.
(High picture
quality)
Gives priority to
the number of
recordable
pictures.
(Standard picture
quality)
33
VQT0P18
Page 34

Recording (continued)
≥ When [HDTV] (picture size: 1920a1080) is selected, the pictures
are recorded with the aspect ratio equal to the High-Definition TV
(16:9).
≥ The larger the picture size (values such as [640a480]), the larger the
file size will become.
≥ If you select a larger picture size in the [Picture] mode, the printed
picture will be clearer.
≥ If the file size of the picture is large, the time required to capture the
picture onto the card becomes longer.
≥ The smaller the picture size, the more pictures you can store on a
card. In addition, it is easier to attach the picture to an e-mail or post
it on a website.
≥ When you set [Quality] in [Picture] mode to [Normal], the recorded
pictures may be shown in a mosaic-like pattern depending on the
subject.
≥ When you set [Quality] in [MPEG4] mode to [N] or [E], the picture
quality of the recorded pictures is deteriorated. (The sound quality
will not be changed.)
≥ [MPEG4] files recorded with this unit cannot be played on Panasonic
SD Multi Camera SV-AS10.
≥ [MPEG4] files recorded with [Quality] set to [XF]
• May not be played properly on other equipments.
• May not be recognized on Panasonic DVD Video Recorders or
digital video cameras which are equipped with functions to play
MPEG4 videos.
• Cannot be played on Macintosh PC.
34
VQT0P18
Page 35

Enlarging Pictures (Digital Zoom)
1. 0
2. 0
1 Press the Jog Ball.
– The zoom magnification appears.
1. 0
t
2 Roll the Jog Ball up or down to set the
zoom magnification.
2. 0
t
≥ The more the picture is enlarged, the more the picture quality is
deteriorated.
≥ You cannot enlarge pictures recorded in [MPEG4] mode.
• You can enlarge the picture up to 4k.
• The magnification is restored to 1k by pressing
the Jog Ball.
35
VQT0P18
Page 36

Recording (continued)
Setting the Flash
The available flash range is about 2.6–3.9 ft. (80 cm–120 cm).
1 Press the [MENU] button and then set the item with the
Jog Ball. (P20)
Auto
Reduced
red eye
l
Flash
Flash off
Flash on
The flash is automatically
activated according to the
recording situation.
The flash is automatically
activated according to the
recording situation before actual
recording.
It reduces the red-eye
phenomenon (eyes of the
subject appear red in flash light).
Use it when you take pictures of
people in dark places, etc.
Even in dark places, the flash is
not activated.
Use it when you take pictures in
places where using flash is not
allowed.
The flash is activated every time
a picture is recorded.
Use it when the subject is
back-lit or under fluorescent
light, etc.
36
VQT0P18
Page 37

∫ The flash is not activated
≥ The flash cannot be activated in the following cases.
– When you set the flash to [Auto] or [Reduced red eye] in bright
places
– When recording in [MPEG4] mode
≥ When you record pictures without using the flash, set the ISO
sensitivity to adjust the brightness. (P42)
≥ If the subject is too close to the SD Multi Camera when taking a
picture, the exposure may not be set properly and the picture may
appear washed out.
≥ You cannot record pictures even if you press the Shutter button while
the flash mark turns red and blinks (while the flash is charging).
≥ Do not use the flash if taking a picture in close proximity to the
subject. The amount of light may overexpose the image causing
color or image degradation.
37
VQT0P18
Page 38

Recording (continued)
Recording with the Self-timer
1 Press the [MENU] button and then set the item with the
Jog Ball. (P20)
You can select the time
10 s
between when the shutter
2s
l
Self timer
(s: second)
2 Press the Shutter button to take a
picture.
• If you press the [MENU] button while the self-
timer is activated (while the Self-timer Lamp 1
is blinking), the self-timer is canceled.
1
≥ Set the self-timer every time you record pictures.
≥ If you set the self-timer to [2 s], it is convenient to prevent camera
shake when pressing the Shutter button.
≥ You cannot use the self-timer when you record pictures in [MPEG4]
and [Voice] mode.
button is pressed and
when the picture is
actually recorded.
The self-timer is turned
OFF
off.
38
VQT0P18
Page 39

Adjusting the Color to Natural Tone (White Balance)
FACE THE CAMERA
TOWARDS A WHITE OBJECT
AND PRESS THE JOGBALL
EXITMENU
ENTER
This mode allows you to reproduce a white color closer to the tone in
real life on the pictures recorded under sunlight, halogen lighting, etc.
where the white color may appear reddish or bluish.
1 Press the [MENU] button and then set the item with the
Jog Ball. (P20)
Auto
Incandescent
White
l
Daylight
balance
Cloudy
Manual For manual setting
∫ Setting in the set mode
After setting to [Manual] on Step 1,
You can automatically record
pictures with natural tones.
For recording under
incandescent lighting
For recording outdoors on a
bright day
For recording under a cloudy
and shady sky
2 Aim this unit at a sheet of white paper
or similar object so that it completely
makes a white frame on the LCD
Monitor and press the Jog Ball.
– The white balance is set.
• Do not move this unit until the indication on the
display is changed.
39
VQT0P18
Page 40

Recording (continued)
≥ The white balance may not be set depending on the condition of the
scene or the light source (e.g. in dark places, etc.).
≥ It is effective to set the white balance in [Manual] in the following
scenes.
– When recording under reddish lighting (halogen light bulb, sodium
vapor lamp, etc.)
– When recording under multiple light sources
– When recording a picture of mono-tone color
The white balance may not be set to [Manual] in extremely bright or
≥
dark places. In this case, set to the other mode.
≥ The setting of the white balance is reflected to other recording
modes and it is retained even if this unit is turned off. When
turning this unit on again in different recording conditions, set
the white balance again, or reset to [Auto].
Recording in Dark Places (Night Mode)
1 Press the [MENU] button and then set the item with the
Jog Ball. (P20)
The subject becomes visible and
ON
l
Night mode
vivid.
OFF Cancels the night mode.
≥ When you use the flash, you can record people against a night
landscape.
≥ When you aim this unit from bright places to dark places, it takes
time for the screen to be brightened.
≥ You cannot use this mode when you record pictures in [MPEG4]
mode.
40
VQT0P18
Page 41

Compensating the Exposure
Use this function when you cannot achieve appropriate exposure due
to the difference of brightness between the subject and the
background, etc.
1 Press the [MENU] button and then set the item with the
Jog Ball. (P20)
EV auto
l
Exposure
∫ Manual adjustment
After setting to [EV manual] in Step 1,
EV manual
The exposure is automatically
determined.
The exposure can be adjusted
manually.
2 Roll the Jog Ball left or right to
compensate the exposure.
• You can compensate it from j2 EV to i2 EV
in steps of 1/3 EV.
EXIT
ADJUST ENTER
MENU
• When the exposure is compensated toward
positive, the picture will be recorded brighter.
When the exposure is compensated toward
negative, the picture will be recorded darker.
Press the Jog Ball to set the
exposure.
≥ When the exposure is compensated, the brightness of the picture on
the LCD Monitor may differ from that of the picture actually recorded.
Check the brightness by playing the picture.
≥ EV is an abbreviation of Exposure Value, and it is the amount of light
given to the CCD.
VQT0P18
41
Page 42

Recording (continued)
Setting the ISO Sensitivity
ISO sensitivity represents the sensitivity to light in values. It is useful
when taking pictures without the flash.
1 Press the [MENU] button and then set the item with the
Jog Ball. (P20)
Advanced
setup
l
Sensitivity
l
Auto
100
≥ When you take a picture in high ISO sensitivity, picture noise
appears and the picture quality is deteriorated.
≥ When the picture is still dim even if the ISO sensitivity is increased,
set [Sensitivity] to [Auto] and use the flash. (The available flash range
is about 2.6–3.9 ft. (80 cm–120 cm).)
≥ You cannot use this function when you record pictures in [MPEG4]
mode.
42
VQT0P18
200
400
The ISO setting is automatically
adjusted according to the
brightness.
The more the ISO sensitivity is
adjusted, the more this unit
becomes suitable for recording
in dark places.
Page 43

Playback
Playback
∫ Selecting the desired playback mode
1 Slide the Power Switch to [ON].
– The Power Lamp lights in red.
Slide the Record/Playback Mode
Switch to the playback mode [ ].
2 Press the [MODE] button and then
Picture
Playback modes Playable files Audio
Picture
(Still picture
playback)
MPEG4
(Motion image
playback)
Voi ce
(Audio playback)
Audio
(Music playback)
select the desired mode with the Jog
Ball.
EXIT
• Refer to the table below to select the mode.
[Picture] files and still
picture files (JPEG
format) recorded with
this unit
[MPEG4] files and
motion image files
(ASF format) recorded
with this unit
[Voice] files recorded
with this unit
Audio files recorded
onto a card with
SD-Jukebox
Cannot be played.
Played from the stereo
earphones (supplied).
(The audio cannot be
played from this unit.)
Refer to P61 for details
about playing music.
43
VQT0P18
Page 44

Playback (continued)
3 Roll the Jog Ball right or left to select
the file you want to play.
• Roll the Jog Ball to the right to display the next
file.
• Roll the Jog Ball to the left to display the
previous file.
∫ When selecting [MPEG4] or [Voice]
After you select the file in Step 3,
4 Press the Jog Ball to start playback.
–[1] appears during playback.
• If there are multiple files, the files will be played
continuously.
• You can fast-forward or fast-rewind the file with the remote controller.
When you keep pressing [9] ([:]) button, the file is fast-forwarded
(fast-rewound). When you tap them, you can move to the beginning of
the next (current) file.
5 Press the Jog Ball to pause playback.
–[∑] appears while playing is stopped.
• When you stop playback halfway and start
playback again, the file will be started from the
position where you previously stopped.
(Resume playback)
44
VQT0P18
Page 45

≥ When playing a still picture, the [ ] icon appears for a moment and
the resolution of the picture may look deteriorated a little. However,
the picture is played with normal quality later.
≥ When starting the resume playback, the file preceeding the position
where you stopped will be played.
≥ Some files may not be played on this unit even if the files are in
JPEG or ASF (MPEG4) format.
≥ [Voice] files cannot be played on Panasonic IC recorders.
≥ MPEG4 and Voice files recorded on Panasonic SD Multi Camera
SV-AS10 cannot be played on this unit.
≥ When a still picture recorded with other equipment is played on this
unit, the following may occur.
• The picture cannot be played.
• The resume playback cannot be operated.
• The quality of pictures may be deteriorated.
• The file size may not be displayed.
• The date/time indication is different from the date/time when the picture
is created.
≥ If you change the folder name or the file name of a picture on your
PC, the picture may not be played.
≥ The date/time indication is stopped while [MPEG4] files are played.
∫ When playing in [Voice] mode
≥ If you do not operate this unit for 10 seconds after you start playback,
the LCD Monitor will turn off to save power. (The Card Access Lamp
blinks during playback.) If you turn the LCD Monitor on again, press
the [MENU] button on this unit.
≥ You can avoid operational mistakes on this unit by pressing down the
[MODE] button (for more than about 2 seconds). (P64)
≥ [Voice] files are fast-forwarded (fast-rewound) at a speed of 10k for
the first 6 seconds. After that, the files will be fast-forwarded (fastrewound) at a speed of 60k.
45
VQT0P18
Page 46

Playback (continued)
Adjusting Volume
1 Press the Volume button.
• The volume turns up with [i].
The volume turns down with [j].
• If the volume adjustment screen is not
operated for a while after adjustment, it will
automatically disappear.
≥ When you want to listen to the audio being played, connect the
remote controller and the stereo earphones (supplied). (The unit is
not equipped with a speaker.)
≥ You can also adjust the volume on the remote controller. (P13)
6 Pictures Multi Playback (Thumbnail Display)
1 Roll the Jog Ball down while the
playback is stopped.
• In [Voice] mode, the list of files which have no
thumbnails are displayed.
∫ To select a file and play 1 picture
After you display 6 files in Step 1,
2 Roll the Jog Ball to select the file.
• If 7 or more files are recorded, the files will be
displayed on the subsequent pages.
Press the Jog Ball.
– The selected file starts playback.
46
VQT0P18
Page 47

Playing Motion Images Repeatedly (Repeat Playback)
1 Set the mode to [MPEG4] mode. (P43)
2 Press the [MENU] button and then set the item with the
Jog Ball. (P20)
OFF
Stops playback after the last
file is played.
Repeat
l
Repeat one
Repeat all Repeats playing all files.
Repeats playing a file.
Deleting Files
Once deleted, files cannot be recovered. Check the files before
deleting.
1 Press the [MENU] button and then set the item with the
Jog Ball. (P20)
Erase one Erases files one by one.
Erase file
l
Erase all
Erases all files in the
mode where you are
playing files.
VQT0P18
47
Page 48

Playback (continued)
2 Select the files to be deleted and then
press the Jog Ball.
(Only when [Erase one] is selected)
3 Select [Yes] on the confirmation
screen and then press the Jog Ball.
• Press the [MENU] button to exit this setting.
≥ You cannot delete protected files (P49), music files and files that do
not conform to DCF standard on this unit.
≥ Be sure to delete [Voice] files on this unit.
≥ When you delete files on this unit, the DPOF information set on other
equipment can also be deleted.
≥ Image files which cannot be played on this unit (other than JPEG)
can be deleted.
≥ Do not turn this unit off or remove the card when deleting.
≥ It takes some time to delete many files at the same time. Use a fully
charged battery.
48
VQT0P18
Page 49

Preventing Accidental Deletion of Files (Lock Setting)
This function prevents deleting or altering precious files by mistake.
1 Press the [MENU] button and then set the item with the
Jog Ball. (P20)
Lock
l
Lock/Unlock
2 Select the files to be protected and
then press the Jog Ball.
– [ ] appears on the bottom of the LCD
Monitor.
• You can select the desired files until you press
the [MENU] button.
∫ When you release protection
Select protected files in Step 2 and then press the Jog Ball.
∫ When you release protection on all files
Select [Unlock all] in Step 1, select [Yes] on the confirmation screen
and then press the Jog Ball. Protection on all files in the playback mode
currently selected can be released.
≥ If you format the card, protected files will also be deleted.
≥ The lock setting may not be effective in other equipment.
≥ Sliding the SD Memory Card Write-Protect switch (P11) to “LOCK”
prevents the file from deletion even if the protection is not set.
≥ [Voice] files can be automatically protected when they are recorded.
≥ It takes some time to set many files at the same time. Use a fully
charged battery.
49
VQT0P18
Page 50

1. 2
4.0
4.0
Playback (continued)
Enlarging Pictures (Target Zoom)
You can enlarge the picture up to 10k.
1 Select a picture in [Picture] mode. (P43)
2 Roll the Jog Ball upwards.
– The target frame appears on the LCD Monitor.
1. 2
t
3 Roll the Jog Ball up or down to select
the zoom magnification and then
4.0
t
4 Roll the Jog Ball to move the target
4.0
t
• Repeat Steps 2–4 if you want to enlarge the picture more.
press the Jog Ball.
• The more you roll the Jog Ball upwards, the
more the zoom magnification is increased (up
to 10k).
frame to the position you want to
enlarge and then press the Jog Ball.
– The picture in the target frame is enlarged.
• After enlarging the picture, the magnification is
restored to 1
rolling it right or left.
k by pressing the Jog Ball or
50
VQT0P18
Page 51

≥ You can cancel the zoom by opening the menu screen.
≥ The more the picture is enlarged, the more the picture quality is
deteriorated.
≥ The zoom may not be done on a picture recorded with other
equipment.
Registering Still Pictures as “Favorite”
Only pictures registered as a “Favorite” can be displayed or watched
on the slide show (P54).
1 Set the mode to [Picture] mode. (P43)
2 Press the [MENU] button and then set the item with the
Jog Ball. (P20)
Mark
l
Select/Unselect
3 Select the desired picture and then
press the Jog Ball.
–[¿] appears on the LCD Monitor and the
picture is registered.
• Press the Jog Ball again to cancel.
• Press the [MENU] button to close the menu.
∫ When you play files registered as “Favorite” only
Select [Play] in Step 2 and then press the Jog Ball.
≥ Roll the Jog Ball right or left to select the picture.
≥ Press the [MENU] button to stop the Mark play function.
∫ When you cancel registration
Select a registered file in Step 3 and then press the Jog Ball.
51
VQT0P18
Page 52

Playback (continued)
∫ When you cancel registration on all files
Select [Unselect all] in Step 2, select [Yes] on the confirmation screen
and then press the Jog Ball. All pictures registered are canceled.
≥ Up to 999 pictures can be registered as a “Favorite”.
Creating a Slide Show with Audio
You can create a slide show with the audio file in the card added as a
BGM (Background Music).
1 Set the mode to [Picture] mode. (P43)
2 Press the [MENU] button and then set the item with the
Jog Ball. (P20)
Slide show
• If you have created a slide show already, a confirmation message
appears. If you select [Yes], you can delete a slide show previously
created and then create a new one. If you select [No], you can change
an existing slide show.
l
Make slide show
3 Roll the Jog Ball left or right to select
the pictures to create a slide show
and then press the Jog Ball.
– [ ] appears on the LCD Monitor.
• Press the Jog Ball again to cancel.
• You can also set other pictures by repeating
this operation.
52
VQT0P18
Page 53

4 Press the [MENU] button.
• If no audio file is recorded in the card, a slide
show without audio is created.
5 (When there are audio files in the
DO YOU NEED
BACKGROUND MUSIC?
Ye s No
card)
Select [Yes] or [No] on the
confirmation screen and then press
the Jog Ball.
• If you select [No], a slide show without audio is
created.
6 (When you select [Yes] in Step 5)
Select the audio file you want to play
during the slide show and then press
the Jog Ball.
• A slide show with audio is created.
≥ The only files attachable as BGM (Background Music) is audio files
that can be played on this unit. (P61)
≥ Up to 36 pictures can be set in a slide show.
≥ During the playback in a slide show with audio, the picture quality is
deteriorated.
53
VQT0P18
Page 54

Playback (continued)
Playing Still Pictures on the Slide Show
Still pictures are automatically played in sequence. This function is
suitable for making a story with still pictures.
1 Set the mode to [Picture] mode. (P43)
2 Press the [MENU] button and then set the item with the
Jog Ball. (P20)
Slide show
Slide show
(with audio)
Slide show
(all pictures)
SD Slide
show
Slide show
(¿ mark)
– A slide show starts.
• Press the Jog Ball to stop the playback halfway.
≥ You can set the pictures which will be played as a slide show in
SD Viewer. On this unit, pictures cannot be played in the interval set
in SD Viewer.
≥ You can adjust the volume with the Volume button on the remote
controller during the slide show (with audio). (The volume control
screen does not appear.)
≥ It may take time to display the slide show (with audio) since the
opening screen appears during a preparation for playback. However,
this is not a malfunction.
54
VQT0P18
l
Plays slide shows with audio (P52) created
on this unit.
Plays all pictures (in the order of the file
number).
Plays slide shows set on the supplied
software SD Viewer.
Plays slide show pictures registered as
“Favorite” (P51).
Play slide show
l
Page 55

≥ When you want to listen to the audio being played, connect the
remote controller and the stereo earphones (supplied). (This unit is
not equipped with a speaker.)
Printing Pictures Directly by Connecting to a Printer (PictBridge)
You can print still pictures played on this unit from a printer
supporting PictBridge connected to this unit with the USB cable
(supplied). (Turn the printer on beforehand.)
1 Set the mode to [Picture] mode. (P43)
2 Press the [MENU] button and then set the item with the
Jog Ball. (P20)
Setup
• Be sure to set the item above before connecting this unit with the
printer.
l
Connection
(USB)
l
PictBridge
3
Connect this unit to the power plug with
the AC adaptor.
• Be sure to insert the charged battery and the
card into this unit.
1
Connect this unit and the printer with
the supplied USB cable 1.
– [ACCESSING PICTBRIDGE/PTP] indication
appears.
• If the message [ACCESSING PC] is displayed,
disconnect the USB cable once and confirm
the setting in Step 2.
VQT0P18
55
Page 56

Playback (continued)
4 Select a picture and then press the
Jog Ball.
5 Check the setting, select [Print start]
㪧㫀㪺㫋㪙㫉㫀㪻㪾㪼
COUNT
Size
Date
Change
ᲴᲫ
Ჴ
PrinterSetting
Ჴ
OFF
Print start
and then press the Jog Ball.
Start
Print start Print starts.
Change
Change
settings
Changes the print
setting.
– When printing is finished, the message
[PRINTING COMPLETED] appears.
• To cancel printing, press the [MENU] button.
∫ To change the print setting
When you select [Change settings] in Step 5, you can change 3 items
described in the table below. Select and set the desired item with the
Jog Ball.
COUNT Size Date
L (3.5a5z)Post Card OFF
1–99
2L (5a7z)A4 ON
PrinterSetting
• The items which are not supported by the printer will not be displayed.
• When [PrinterSetting] is selected, pictures are printed out in the paper
size set on the printer.
• If you press the [MENU] button during the setting, the screen returns to
the picture selection screen (Step 4).
56
VQT0P18
Page 57

≥ Do not use any other USB cables except the supplied one.
≥ While printing or canceling the print, do not disconnect the USB
cable.
≥ Do not replace the card while connecting with the printer. (Ensure
that the printer is not printing anything and then disconnect the USB
cable before replacing the card.)
≥ Pictures recorded on other devices or altered on a PC may not be
printed.
≥ If you unplug the AC adaptor while connecting with the printer,
operations of buttons on this unit will be disabled.
≥ If the following messages appear during printing, check the printer
and then select [Print resume] to restart printing or select [Print
cancel] to stop printing. (If an irretrievable error takes place, only
[Print cancel] will appear.) (Refer to the operating instructions of the
printer you use.)
Messages displayed
NO PAPER
CHECK PRINTER
NO INK
CHECK PRINTER
JAMMED PAPER
CHECK PRINTER
PRINTER BUSY
CHECK PRINTER
PRINTER ERROR
CHECK PRINTER
≥ When the error message of the printer is displayed before printing
begins, you cannot operate this unit until you turn this unit off and the
printer recovers.
57
VQT0P18
Page 58

Playback (continued)
≥ Error messages also appear in the following cases. Check the
message before connecting.
Messages displayed Conditions
USE BOTH AC
ADAPTOR AND
BATTERY
SET TO PLAY MODE When connecting in the recording mode
NO CARD When the card is not inserted
CHECK CARD When MultiMediaCard is inserted
TARGET FILE DOES
NOT EXIST
Setting Still Pictures to be Printed and the Number of Prints (DPOF Print)
DPOF is a system that allows the user to select which pictures are to
be printed on compatible photo printers.
1 Set the mode to [Picture] mode. (P43)
2 Press the [MENU] button and then set the item with the
Jog Ball. (P20)
DPOF
print
l
When the battery is not inserted
When the AC adaptor is not connected
When the AC adaptor is unplugged during
connection
When there is no picture to be selected in the
card
Single print
All prints
Sets the number of prints
for each file independently.
Sets the same number of
prints for all files.
58
VQT0P18
Page 59

3 Roll the Jog Ball left or right to select
COUNT
0
EXITMENU
SEL ENTER
the desired file.
(Only when [Single print] is selected)
4 Roll the Jog Ball up or down to select
the number of prints and then press
the Jog Ball.
• The number of prints can be set from 1 to 99.
• If you want to set DPOF setting on other
pictures when [Single print] is selected, repeat
Steps 3–4.
5 Press the [MENU] button.
– The setting is completed.
∫ When you confirm pictures with DPOF setting
Select [Check DPOF] in Step 2 and then press the Jog Ball.
• Roll the Jog Ball right or left to confirm the picture. Press the [MENU]
button to stop the confirmation.
59
VQT0P18
Page 60

Playback (continued)
∫ When you print the date in DPOF printing
Select [Print date]>[ON] in Step 2, select [Yes] on the confirmation
screen and then press
• Date printing is set to all the pictures that DPOF setting is set. (You
cannot set date printing for each picture.)
• You cannot print the date on the pictures if the recording date is not
recorded.
• The date may be cut or not be displayed depending on the printer.
∫ When you cancel DPOF setting
Set the number of prints to [0] in Step 4.
≥ If the DPOF setting is set, you do not need to indicate which or how
many pictures are to be printed. It is also convenient when you print
pictures with a printer supporting SD Memory Card because you do
not need settings on the printer.
≥ If a file does not conform to the DCF standard (P91), the DPOF
setting cannot be set on the file.
≥ When using the DPOF feature, this unit will overwrite any previous
DPOF settings made by other equipment.
≥ When the message [CARD FULL] is displayed, delete unnecessary
files and set DPOF setting again.
≥ It takes some time to set DPOF setting on many files at the same
time. Use a fully charged battery.
≥ DPOF setting may not be set on a picture recorded with other
equipment.
≥ DPOF is the abbreviation for “Digital Print Order Format”.
the Jog Ball.
60
VQT0P18
Page 61

Playing Music
Playing Music
Files recorded onto a card with SD-Jukebox can be played on this unit.
(You may not be able to play music depending on the file.)
≥ Audio file formats playable on this unit
•MPEG2-AAC •WMA •MP3
Install SD-Jukebox from the supplied
CD-ROM to the PC.
Audio
file
Record audio files from a music CD to the PC.
Connect this unit to the PC.
1 USB cable (supplied)
• Be sure to insert a card into this unit and
connect this unit with the PC to record audio
files. If you record audio files onto a card
inserted in the card slot of the PC or use an
USB Reader Writer etc. for recording, the
recorded audio files may not be played back on
this unit.
1
Record the audio files onto the card by using
SD-Jukebox.
For details of the method to record
music, refer to the operating instructions
of SD-Jukebox (PDF file).
61
VQT0P18
Page 62

Playing Music (continued)
1 Insert a card which includes audio files.
2
1
2 Connect the remote controller and the stereo
earphones.
• You cannot listen to the audio on this unit without the use of
earphones.
3 Slide the Power Switch to [ON].
– The Power Lamp lights in red.
Slide the Record/Playback Mode
Switch to the playback mode [ ].
4 Press the [MODE] button and then
1 Remote Controller (supplied)
2 Stereo Earphones (supplied)
62
VQT0P18
Audio
select [Audio] with the Jog Ball.
EXIT
Page 63

5 Press the [MENU] button and then
List
EXIT
MENU
select [List] with the Jog Ball.
• When you did not select music from [List], the
music will be selected and played from the files
displayed.
6 Roll the Jog Ball up or down to select
the desired music file.
7 Play music.
Remote Controller This Unit
Playback/Stop Press 1/∫. Press the Jog Ball.
Index Ta p : or 9.
Fast-forward/
Fast-rewind
Vol um e
• If you do not operate this unit for about 10 seconds after you start
playback, the LCD Monitor will turn off to save power. (The Card
Access Lamp blinks during playback.) If you want to turn the LCD
Monitor on again, press the [MENU] button on this unit.
• The title and the artist name may not be displayed on this unit.
Hold : or 9.—
i: Turns up the volume.
j: Turns down the volume.
Roll the Jog Ball right or
left. (This operation is
disabled during playback.)
Press the Volume button.
63
VQT0P18
Page 64

Playing Music (continued)
∫ When you switch the sound quality
Press the [EQ] button on the remote controller.
• The sound quality is switched every time you press the [EQ] button as
below.
NORMAL
(Normal
sound)
• The sound quality cannot be switched when the menu screen or the
6 pictures multi playback screen is displayed.
∫ To prevent operation mistakes on this unit
Hold the [MODE] button on this unit for about 2 or more seconds.
• The operations with the buttons on this unit are disabled (except the
Power Switch and Record/Playback Mode Switch) while [HOLD] is
displayed.
• When you hold the [MODE] button for 2 or more seconds, the button
operations are enabled.
• When you operate the Power Switch or the Record/Playback Mode
Switch, the button operations are enabled.
≥ Music files cannot be recorded or deleted on this unit.
≥
When multiple pictures are associated with a music file by SD-Jukebox,
only the picture associated as the first picture will be displayed. (The
picture may not be displayed depending on the picture.)
≥ If the playback of an audio file with associated pictures is started
while the LCD Monitor is turned off, the associated pictures will not
be displayed even if you turn the LCD Monitor on during playback.
These pictures will be displayed when you stop playback.
≥ When you format a card, all the data (files) in the card including
music files will be deleted.
(Heavy and
l
low sound)
S-XBS1
S-XBS2
(Sound heavier
l
and lower than
S-XBS1)
l
TRAIN
(Prevents
leakage of
sound)
64
VQT0P18
Page 65

Selecting Playlists
Playlist
EXIT
You can select and play the playlist set in SD-Jukebox.
1 Press the [MENU] button and then
MENU
select [Playlist] with the Jog
Ball.
– When you select the item listed on the top, all
of the recorded files are played.
Playing Repeatedly (Repeat Playback)
1 Press the [MENU] button and then set the item with the
Jog Ball. (P20)
Stops playback after the last file
is played.
Repeats the file being played.
Repeats playing all files (or all
files in the playlist).
Repeat
l
OFF
Repeat one
Repeat all
65
VQT0P18
Page 66

Connecting to PC
Operating Environment of the Software
Windows Macintosh
98SE Me 2000 XP
Mac OS 9
Mac OS X
Is the installation of
the USB driver
needed?
Is SD Viewer available?
Is SD-Jukebox
available?
Needed
Not available Available Not available
Not needed
Available Not available
OS standard
driver is available.
≥ SD Viewer and SD-Jukebox are not compatible with Macintosh.
∫ Operating environment for USB connection
IBM PC/AT compatible personal computer preinstalled with
PC
Microsoft Windows 98 Second Edition/Millennium Edition/
2000 Professional/XP Home Edition/XP Professional
Macintosh (Mac OS 9/Mac OS X)
∫ Operating environment of the software
66
VQT0P18
SD Viewer Version 3.4E for
(SD Viewer)
D-snap
PC IBM PC/AT compatible personal computer
PC preinstalled with
Microsoft Windows 98
OS
CPU
Second Edition/Millennium
Edition/2000 Professional/
XP Home Edition/XP
Professional
98SE
Intel Pent ium III 450 MHz or
Me
higher/Celeron 400 MHz or
higher (including compatible
2000
XP
CPU)
SD-Jukebox Version
Light Edition (SD-Jukebox)
PC preinstalled with Microsoft
Windows 2000 (Professional
Service Pack 2, 3 or 4)/XP
(Home Edition/Professional or
Service Pack 1, 2 supported)
Intel Pent ium III 500 MHz or
higher
5.0
—
Page 67

SD Viewer Version 3.4E for
(SD Viewer)
D-snap
64 MB (recommended:
98SE
Me
RAM
Free hard disk
space
128 MB) or more
128 MB (recommended:
2000
XP
256 MB) or more
400 MB or more 100 MB or more
High Color (16 bit) or more (True Color (24 bit) or more
recommended.)
Desktop resolution of 800k600 or more (1024k768 pixels
Display
or more recommended.)
VRAM 8 MB or more
(16 MB or more
recommended.)
Sound Windows compatible sound device
Drive
CD-ROM drive—
Used for installation
Interface USB port
DirectX 8.1 or later
Necessary
software
Windows Media Player 6.4
or later
Internet Explorer 5.5 or later
Other
requirements
—
SD-Jukebox Version
5.0
Light Edition (SD-Jukebox)
—
256 MB or more
—
CD-ROM drive—A CD-ROM
drive capable of digital
recording is required. Fourspeed or higher is
recommended. (Recording
cannot work properly with
CD-ROM drives connected
through an IEEE1394
connection.)
Internet Explorer 5.01 or
later
If you are using the CDDB
function, then an Internet
connection is also required.
67
VQT0P18
Page 68

Connecting to PC (continued)
≥ Macintosh, Power Macintosh and Mac OS are trademarks of Apple
Computer, Inc. of the U.S.
≥ IBM and PC/AT are registered trademarks of International Business
Machines Corporation of the U.S.
≥ Intel, Pentium and Celeron are trademarks or registered trademarks
of Intel Corporation in the United States and/or other countries.
≥ Even if the system requirements are fulfilled, some personal
computers can not be used.
≥ Operation is not guaranteed when used on Windows OSs except
Operating environment in the chart on P66.
≥ Operation on an upgraded OS is not guaranteed.
≥ Multi-boot environment is not supported.
≥ This software cannot be used on 64-bit OS.
≥ When your OS is Windows 2000/XP, install the USB driver after
logging in with the user name authorized as the system administrator
(Administrator).
≥ This system requirements guarantee if the application run alone. It is
not guaranteed in the case that any other application or resident
application runs.
≥ This software may not run properly on user-built computers.
≥ When 2 or more USB devices are connected to one PC, or when
devices are connected through an USB hub or by using an USB
extension cable, the operation is not guaranteed.
∫ Cautions for USB driver
≥ This software is not compatible with a multi-CPU environment.
∫ Cautions for SD-Jukebox
≥ This software cannot play and record music CDs that does not have
a “ ” mark on the disk label.
68
VQT0P18
Page 69

≥ Depending on your computer system, you may experience problems
such as being unable to record or use recorded music data. Please
note that Panasonic is in no way liable for any music data you lose,
or for any other direct or indirect damages.
≥ When you use the CDDB function, the environment for the Internet
access is needed.
Before Connecting to a PC for the First Time (Installation)
When your OS is Windows 98SE or Me, the installation of the USB
driver is required before connecting this unit to a PC.
≥ Do not connect this unit to the PC until the installation is completed.
≥ Exit all the other application software before inserting the CD-ROM.
1 Start the PC and insert the CD-ROM
(supplied).
– The setup menu is automatically started.
(When it does not start, double-click
[autorun.exe] in the CD-ROM.)
2 Click the name of the software you
want to install in the setup menu.
• If you stop the installation by pressing [Cancel], the software may not
be properly operated.
∫ When you install SD Viewer
≥ When the message that informs the
absence of DirectX 8.1 or later appears,
install DirectX from the setup menu prior to
the installation of the software.
69
VQT0P18
Page 70

Connecting to PC (continued)
Installing the USB Driver
When your OS is Windows 2000 or XP, the installation of the USB
driver is not required because the OS standard driver is used.
1
Click [USB Driver].
2
Installing SD Viewer
1
2
70
VQT0P18
Click [Finish].
• To enable the driver, restart the
PC.
Click [SD Viewer 3.4E].
Click [Next].
Page 71

3
Click [I agree].
4 Follow the message on the screen to continue the
installation.
5
≥ When the message that informs the absence of Windows Media
Player 6.4 or later appears, update Windows Media Player after the
installation is completed.
≥ If Internet Explorer 5.5 or later is not installed, install it first and then
install SD Viewer.
≥ If Microsoft Data Access Components 2.6 or earlier has been
already installed while Windows 98SE is in use, Microsoft Data
Access Components 2.8 is installed before SD Viewer. Follow the
message on the screen to complete the installation.
Click [Finish].
• SD Viewer can be used after
restarting the PC.
VQT0P18
71
Page 72

Connecting to PC (continued)
Installing SD-Jukebox
1
Click [SD-Jukebox 5].
2
3
4
Click [Next].
Click [Yes].
Enter [Serial No.] (on the
backside of the package of
the CD-ROM) and [Name],
and then click [Next].
5 Follow the message on the screen to continue the
installation.
72
VQT0P18
Page 73

6
Click [Finish].
• SD-Jukebox can be used after
restarting the PC.
Connecting to a PC
When your OS is Windows 98SE or Me, the USB driver is required
for connecting this unit to the PC. (Do not connect this unit to the PC
until the USB driver is installed. (P70))
≥ Turn the PC on beforehand.
1
Turn this unit on and set to
the playback mode.
• Be sure to insert the charged
battery and the card into this unit.
2 Press the [MENU] button and then set the item with the
Jog Ball. (P20)
Setup
l
• Be sure to set the item above before connecting this unit with the PC.
Connection
(USB)
l
Connection
(PC)
73
VQT0P18
Page 74

Connecting to PC (continued)
3
Connect this unit to the
power plug with the AC
adaptor 1.
1
4
Connect this unit to the PC
with the supplied USB cable
2.
– [ACCESSING PC] indication
2
≥ Do not disconnect the USB cable or the AC adaptor from this unit or
remove the card while the Card Access Lamp on this unit is blinking.
The software may not operate properly or the data being transferred
may be damaged.
≥ Do not use any other USB cables except the supplied one.
≥ Do not disconnect the AC adaptor while connecting to the PC.
≥ When the PC connection mode on this unit (displayed as
[ACCESSING PC]) is not canceled, even if you turn the PC off,
disconnect the USB cable.
≥ If the PC is in the power saving mode while connecting to this unit,
the PC may not recognize this unit when recovering from the power
saving mode. In this case, restart the PC after you disconnect this
unit. (When you connect this unit to the PC and use it for a long time,
cancel the setting in the power saving mode beforehand.)
appears.
• If the [ACCESSING PICTBRIDGE/
PTP] indication is displayed,
disconnect the USB cable and
then confirm the setting in Step 2.
74
VQT0P18
Page 75

Checking that This Unit is Properly Recognized by the PC
If this unit is not properly recognized, check the connection again.
∫ In the case of Windows
1
Check that [Removable
Disk] is added to [My
Computer].
• The drive name (E: etc.) varies
depending on the PC used.
∫ In the case of Macintosh
1
Check that the icon of
[untitled] or [NO_NAME]
disk is displayed on the
desktop.
≥ If the icon of [untitled] disk does not appear when your OS is
Mac OS 9, select Mac OS Base in the Extensions Manager and then
restart the PC. When the message to require formatting [untitled]
disk appears, open File Exchange on the Control Panel and then
enable PC Exchange.
75
VQT0P18
Page 76

Connecting to PC (continued)
Disconnecting the USB Cable Safely
1
Double-click the [ ] icon
on the task tray.
2
Select [USB Mass Storage
Device] and then click
[Stop].
3
Check that [MATSHITA SD
Multi Camera USB Device]
is selected and then click
[OK].
4 Click [Close] to close the dialogue.
• You can disconnect the USB cable safely.
≥ Depending on the OS (Windows 98SE or Me, etc.), the icon for safe
removal may not be displayed in the task tray. (There will be no
display depending on the setting on the OS.) Make sure that the
Card Access Lamp of this unit is turned off and then remove the USB
cable.
≥ If you disconnect the USB cable or the AC adaptor from this unit, or
this unit is turned off while the PC is working, an error dialog box may
appear. In such cases, click [OK] to close the dialog box.
≥ When your OS is Macintosh, discard the icon of [untitled] or
[NO_NAME] disk in [Trash] and then disconnect the USB cable.
76
VQT0P18
Page 77

Folder Structure of the Card Used for This Unit
100_PANA
PRL001
SD_VC100
SD Memory
Card
DCIM
MISC
SD_AUDIO
SD_VIDEO
SD_VOICE
≥ Files recorded with this unit are saved in the following folders.
Folder name File name (example)
Picture 100_PANA P1000001.JPG
MPEG4 PRL001 MOL001.ASF
Voi ce SD_VC100 MOB001.VM1
Audio SD_AUDIO AOB001.SA1
≥ Do not delete the folders in the card on the PC. You may not be able
to read the card with this unit.
≥ When you want to format the card, format it with this unit or
SD-Jukebox.
≥ If you recorded data not compatible with this unit on the PC, this unit
cannot recognize the data.
≥ You can record up to 9999 files in the folders such as [100_PANA]
folder.
≥ The files with DPOF setting are recorded in [MISC] folder.
≥ [SD_VOICE] folder and [SD_AUDIO] folder are set as hidden files.
Therefore, these folders and the files in the folders may not be
displayed on the Explorer or [My Computer] depending on the setting
on the PC.
77
VQT0P18
Page 78

Connecting to PC (continued)
Accessing Files on a Card with a PC ([Picture] • [MPEG4])
1 Connect this unit to the PC. (P73)
2
Open [My Computer] and
double-click the folder in the
[Removable Disk] which
includes files.
• When your OS is Macintosh,
double-click the folder in the
[untitled] or [NO_NAME] icon.
3
P1000001
P1000002
P1000003
.JPG
.JPG
.JPG
Drag and drop files to the
destination folder (the hard
disk of the PC).
• Do not copy [Voice] and [Audio]
files onto a PC with Explorer or
other.
Playing Copied Files ([Picture] • [MPEG4])
1
P1000001
.JPG
P1000002
.JPG
P1000003
.JPG
Double-click the file copied
to the PC.
• The software which is used for
playback depends on the type of
the file.
78
VQT0P18
Page 79

• You can also browse [Picture] files and [MPEG4] files with SD Viewer
(supplied).
File type
Picture Depends on the setting on the PC.
MPEG4
Windows Media Player
6.4 or later
Software used for playing files
Windows Macintosh
Windows Media Player
for Macintosh
≥ When you use Windows PC to play [MPEG4] files (ASF format)
recorded with the [Quality] set to [XF] on a PC, you need to install
[MPEG4 Decoder Plug-in] from the Setup menu. If you cannot listen
to the audio when you play [MPEG4] files, install SD Viewer from the
supplied CD-ROM. ([MPEG4 Decoder Plug-in] and the appropriate
software are installed at the same time.)
≥ [MPEG4] files (ASF format) recorded with [Quality] set to [XF] cannot
be played on Macintosh PC.
≥ If you play [MPEG4] files (ASF format) in the card on the PC while
this unit is connected with the PC, frame drop may occur on the
picture. In this case, copy the files which you want to play into the PC
before playback.
≥ When you play [MPEG4] files (ASF format) recorded with this unit for
3 or more minutes on Windows Media Player, the files may be
stopped halfway through. In this case, click [Windows Media Update]
on the setup menu (or double-click [WMP9QFEInst.exe] in
[WMP9QFE] folder) and follow the message on the screen to update
Windows Media Player. (It can be installed when you install
SD Viewer from the supplied CD-ROM.)
≥ When you play [Voice] and [Audio] files in a card by using
SD-Jukebox (supplied), keep this unit connected to a PC. Also use
SD-Jukebox (supplied) when you copy these files to a PC (or when
you return [Audio] files to the PC from the card). (Files copied onto a
PC with Explorer or other cannot be played.)
79
VQT0P18
Page 80

Connecting to PC (continued)
Using SD Viewer
∫ Starting SD Viewer
1
• The indications on the screen may vary depending on OS and
settings in your PC. Accordingly, the operation may be different from
the one described above.
∫ Capturing files with SD Viewer in PC
1
Select [start]>
[All Programs]>
[Panasonic]>
[SD Viewer for D-snap]>
[SD Viewer for D-snap].
Connect this unit to the PC
(P73) and then click
[Acquire].
2
3
80
VQT0P18
Check the target and then
click [OK].
• For details such as classifications,
refer to the operating instructions
of SD Viewer (PDF file).
Click [OK].
Page 81

∫ Reading the operating instructions of SD Viewer
1
Select [Help]>[Manual].
• Adobe Acrobat Reader is
required. (P83)
∫ Closing SD Viewer
1
≥ Using SD Viewer
• You can capture [Picture] files and [MPEG4] files in the card into the
PC.
• You can classify pictures by recording date or keywords.
• You can print recorded pictures with date.
• You can create data for a home page.
• You can create a slide show with captured images.
• For details of the operation procedures, refer to the operating instructions
of SD Viewer (PDF file).
≥ Do not disconnect the USB cable while SD Viewer is used.
Select [File]>[Exit].
• You can also close SD Viewer by
clicking [k] on the upper right
corner of the screen.
81
VQT0P18
Page 82

Connecting to PC (continued)
Using SD-Jukebox
∫ Starting SD-Jukebox
1
• The indications on the screen may vary depending on OS and
settings in your PC. Accordingly, the operation may be different from
the one described above.
• When SD-Jukebox is started for the first
time, the file import screen (the screen to
import audio files from the hard disk to
SD-Jukebox) appears. If you want to start
importing files immediately, click [Yes]. If you
want to import files later, click [No].
• For details of the operation procedures such as the way to import
files, refer to the operating instructions of SD-Jukebox (PDF file).
∫ Reading the operating instructions of SD-Jukebox
1
Select [start]>
[All Programs]>
[Panasonic]>
[SD-JukeboxV5]>
[SD-JukeboxV5].
Click [Help] on the upper
right corner of the screen of
SD-Jukebox.
• Adobe Acrobat Reader is
required. (P83)
82
VQT0P18
Page 83

∫ Closing SD-Jukebox
1
Click [t] on the upper right
corner of the screen of
SD-Jukebox.
≥ Using SD-Jukebox
• You can save your favorite titles on the PC from a music CD or create a
playlist of audio files.
• You can save audio files or playlists saved on the PC to the card.
• For details of the operation procedures, refer to the operating instructions
of SD-Jukebox (PDF file).
≥ Do not disconnect the USB cable while SD-Jukebox is used.
Reading Operating Instructions of the Software
To read the operating instructions of the software (PDF file), Acrobat
Reader 5.0 or later is needed.
≥ If Adobe Acrobat Reader is not installed in
the PC used, click the desired language in
the setup screen (or open a folder of which
name is the name of the desired language in
[Adobe] folder and then double-click
[AR505XXX.exe] or [AR500XXX.exe] file.
“XXX” (the last 3 characters in the name of
the file) varies depending on the language folder you selected) and
follow the message on the screen to install Adobe Acrobat Reader.
83
VQT0P18
Page 84

Connecting to PC (continued)
Uninstalling the Software
If you do not need the software installed any more, uninstall (delete)
it from the PC.
1
2
≥ Depending on the OS, the uninstallation procedure may vary. For
details, refer to operating instructions of the OS used.
Select [start]>[Control
Panel] and then click [Add
or Remove Programs].
Select the software you
want to delete and then click
[Change/Remove].
84
VQT0P18
Page 85

Cautions for Use
This Unit
Keep this unit away from magnetised equipment (such as a
microwave oven, TV, video game equipment, etc.).
≥ If you use this unit on or near a TV, images and sounds may be
disturbed due to electromagnetic wave radiation.
≥ Do not use near cell phone because doing so may cause noise to
adversely affect the picture and sound.
≥ Recorded data may be damaged, or images may be distorted by
strong magnetic fields created by speakers or large motors.
≥ Electromagnetic wave radiation generated by a digital circuit
(including a microprocessor) may adversely affect this unit, causing
the disturbance of images and sounds.
≥ If this unit is affected by magnetically charged equipment and does
not function properly, turn this unit off and remove the battery and
then connect it again. Thereafter, turn this unit on.
Do not use this unit near radio transmitters or high-voltage lines.
≥ If you record near radio transmitters or high-voltage lines, recorded
images or sounds may be adversely affected.
Do not spray insecticides or volatile chemicals onto this unit.
≥ If this unit is sprayed with such chemicals, the SD Multi Camera body
may be damaged and the surface finish may peel off.
≥ Do not keep rubber or plastic products in contact with this unit for a
long period of time.
When you use this unit on a beach or similar place, do not let sand
or fine dust get into this unit.
Do not wet this unit with seawater or other liquids.
≥ Sand or dust may cause a malfunction of this unit such as scratches
or fog on the Lens.
≥ If seawater splashes onto this unit, wet a soft cloth with tap water,
wring it well, and use it to wipe this unit carefully. Then, wipe it again
with a dry cloth.
The same applies when rain water or drops of water splash onto this
unit.
85
VQT0P18
Page 86

Cautions for Use (continued)
When carrying this unit, take care not to drop or hit it.
Do not carry this unit in a pocket.
≥ The SD Multi Camera body may be destroyed by a strong shock, and
it may cause a malfunction of this unit. Store this unit in the carrying
case (supplied).
Do not use benzine, thinner or alcohol for cleaning this unit.
≥ Remove the battery before cleaning this unit.
≥ The SD Multi Camera body may be deformed and the surface finish
may peel off.
≥ Wipe the dust on this unit with a soft, dry cloth. To remove stubborn
stains, soak a cloth in a detergent diluted with water, wring it well,
wipe the stain with it and then finish with a soft, dry cloth.
≥ When you use a chemical cloth, read the instructions of the cloth.
≥ Wipe the stains on the Lens and the LCD Monitor with the cleaning
cloth (supplied). Do not wipe them with pointed materials such as a
cotton swab. The Lens may be scratched or broken, and it may
cause a malfunction of this unit.
The AC Adaptor
≥ Be sure to use the supplied AC adaptor.
≥ If you use the AC adaptor near a radio, radio reception may be
disturbed. Keep the AC adaptor 3.3 ft. (1 m) or more away from the
radio.
≥ When the AC adaptor is in use, it may generate whirring sounds.
However, this is normal.
≥ After use, be sure to disconnect the AC adaptor. (If it is left
connected, about 0.1 W of current is consumed at most.)
≥ Keep the electrodes of the AC adaptor clean at all times.
Put this unit near the outlet to make it easy for the interrupting
device (plug) to reach it.
86
VQT0P18
Page 87

The Battery
Lithium ion battery is a compact and high-capacity battery.
However, when the battery is cooled under low temperature (50xF
(10xC) or less) such as outside in winter, the available time of the
battery becomes shorter and this unit may not work. In this case,
warm the battery and insert it into this unit just before you use this
unit. (If you use a pocket warmer, do not let the pocket warmer
touch the battery.)
Be sure to detach the battery after use.
≥ If it is left attached to this unit, a minute amount of current is
consumed even when this unit is turned off. If it is left for a long time,
over discharge takes place. The battery may become unusable even
after it is charged.
≥ If it is left attached to this unit for a long period of time, self-discharge
may take place. Charge the battery before use.
Bring spare batteries when you use this unit outdoors.
≥ The operating time of the battery may become shorter under low
temperature conditions such as outside on a ski hill.
≥ When you travel, be sure to prepare the AC adaptor (supplied) to
charge the battery on the spot.
If the battery is dropped, check that the terminal is not deformed.
≥ If the battery attached to this unit with a deformed terminal, it may
damage this unit.
Cautions for using battery
≥ Charge only with specified AC adaptor.
≥ Do not dispose of in fire.
≥ Do not disassemble.
87
VQT0P18
Page 88

Cautions for Use (continued)
Cautions to store the battery
≥ Store the battery in a cool and dry place with a relatively stable
temperature. (Recommendable temperature: 59oF–77oF (15oC–
25oC) Recommendable humidity: 40%–60%)
≥ Extremely high or low temperatures will shorten the life of the battery.
≥ If the battery is kept in hot, humid, smoky or dusty places, the
terminals may rust and cause malfunctions.
≥ To store the battery for a long period of time, we recommend
charging it once every year and storing it again after you completely
use up the charged capacity.
≥ Remove dusts from the terminal of the battery.
Do not throw unnecessary (expired) batteries into a fire.
≥ If you heat or burn the battery, it may cause an explosion.
≥ The battery has a limited life. When the operating time of the SD
Multi Camera becomes extremely short even if the battery is properly
charged, the life of the battery may have expired. Buy a new battery.
Charging Error
When the charge lamp blinks quicker or slower, the following
conditions are possible.
When the charge lamp blinks approx. every 6 seconds (lighting
approx. 3 seconds, turning off approx. 3 seconds):
≥ The battery is excessively discharged. You can charge the battery,
however, it may take several hours to start charging the battery
normally.
88
VQT0P18
Page 89

When the charge lamp blinks approx. every 0.5 second (lighting
approx. 0.25 second, turning off approx. 0.25 second):
≥ The room or the battery temperature is extremely high or low. Wait
until the room or the battery temperature becomes adequate and
then recharge the battery. If you still cannot charge the battery, there
may be a defect with this unit, the battery or the AC adaptor. Consult
the dealer.
When the charge lamp turns off:
≥ Charging is completed.
≥ If the charge lamp turns off though the battery is not completely
charged, the AC adaptor or the battery may be defective. Consult the
dealer.
≥ For details about the battery, refer to P87.
Condensation
≥ If moisture forms on the outside of the unit, it is called
“condensation”.
≥ When condensation takes place, the Lens may be fogged or this unit
may not operate normally. Be careful to avoid condensation and take
proper measures when condensation occurs.
Causes of condensation
≥ Condensation takes place when the ambient temperature or
humidity is changed as follows:
• When this unit is moved from cold weather outside to a warm room
• When this unit is brought out of an air-conditioned car
• When a cold room is suddenly warmed
• When cool wind from an air conditioner or other is directly blown onto
this unit
• In humid places
89
VQT0P18
Page 90

Cautions for Use (continued)
When condensation has taken place
≥ Turn this unit off and leave this unit in this condition for about 1 hour.
When this unit becomes close to the ambient temperature, the
condensation disappears naturally.
≥ When you move this unit from a cold place to a hot place, put the
camera into a plastic bag and then take it out after the temperature of
this unit becomes close to the ambient temperature to avoid
condensation.
LCD Monitor
≥ In a place with drastic temperature changes, condensation may form
on the LCD Monitor. Wipe it with a soft, dry cloth.
≥ Do not press the LCD Monitor strongly. It may cause uneven colors
on the LCD Monitor or a malfunction of the LCD Monitor. Do not
touch the LCD Monitor with a hard object. It causes scratches on the
surface of the LCD Monitor.
≥ When the Lens is aimed at a high contrast subject, the picture may
look uneven or after images may appear on the LCD Monitor. This is
not a malfunction.
≥ If the SD Multi Camera is extremely cold when you turn it on, the
image on the LCD Monitor is slightly darker than usual. However, as
the internal temperature increases, it goes back to the normal
brightness.
Extremely high precision technology is employed to produce the
LCD Monitor screen featuring a total of approximately 61,600 pixels.
The result is more than 99.99% effective pixels with a mere 0.01% of
the pixels inactive or always lit. However, this is not a malfunction
and does not affect the recorded picture.
90
VQT0P18
Page 91

Card
When the Card Access Lamp is blinking (or when the message
[ACCESSING CARD] appears), do not open the Card/Battery Door
to remove the card, turn this unit off, or subject it to vibration or
impact.
Do not leave the card in places where there is high temperature or
direct sunlight, or where electromagnetic waves or static
electricity are easily generated. Do not bend, drop, or subject it to
strong vibration.
≥ If the above precautions are not taken, the card or the recorded
content may be damaged.
Be sure to remove and store the card after use.
≥ Keep the card in the storage bag after use and when you store or
carry the card around.
≥ Do not allow dirt, dust or water to enter the terminals on the back of
the card. Do not touch it with your fingers.
≥ Keep the Memory Card out of reach of children to prevent
swallowing.
Recorded Files
This unit complies with DCF standards (Design rule for Camera
File system) established by the Japan Electronics and Information
Technology Industries Association (JEITA).
≥ If files conforming to DCF standard are deleted, all the data related
to the files will be deleted.
≥ If you delete [Picture] or [MPEG4] files, all the data related to the files
will be deleted.
≥ As a result of improper operations, recorded data may be damaged
or erased. We are not responsible for the loss caused by the deletion
of the recorded data. Please note it beforehand.
91
VQT0P18
Page 92

Cautions for Use (continued)
Format
≥ If the SD Memory Card is formatted on other equipment, the time
spent for recording may become longer or the SD Memory Card may
not be recognized. (Do not format it by Explorer on the PC.) Format
the SD Memory Card on this unit or by the application software
“SD-Jukebox”, in this case. Particularly for the card containing audio
files, check in the card using SD-Jukebox with which the audio files
were recorded, then format it. (For details, read the operating
instructions of SD-Jukebox.)
≥ This unit supports SD Memory Cards formatted in FAT12 system and
FAT16 system based on SD Memory Card Specification.
≥ You may not be able to use a card formatted with this unit on other
equipment. In this case, format the card on the equipment to be
used.
≥ If a card cannot be used even if it is formatted, this unit or the card
may be defective. Consult the dealer.
Demonstration Mode
≥ If you turn this unit on and press the [MODE] button when a card is
not inserted, the demonstration mode (screen saver) starts.
≥ If you press any button while the screen saver is displayed, the mode
is set to the virtual still picture recording mode.
≥ You can simulate recording of still pictures in the virtual still picture
recording mode. (If you do not press any button for about 1 minute,
the screen saver starts.)
≥ If you do not press any button in the screen saver for about 5 minutes
when the AC adaptor is not used, this unit automatically turns off.
≥ When canceling the demonstration mode, insert a card after turning
off this unit.
92
VQT0P18
Page 93

016
0h10m10s
30
2. 0
Feb/21/2005
10:00AM
100
10
Others
Screen Display
∫ Screen Display in Recording
1 Recording mode (P28)
12
34567
2
Feb/21/2005
100
10
016
10:00AM
159
0h10m10s
2. 0
t
1
10 11 13 1412
2
/
3
∫ Screen Display on the Thumbnail Screen
PICTURE
2 Flash mode (P36)
8
3 Night mode (P40)
4 White balance (P39)
30
5 Picture quality (P33)
6 Picture size (P33)
7 Battery remaining (P19)
8 Remaining pictures/time
9 Recording/Stop display
10 Digital zoom (P35)
11 Exposure compensation (P41)
12 Counter display
13 ISO sensitivity (P42)
14 Self-timer (P38)
15 Date/time (It is displayed for about
5 seconds after turning this unit on
or setting the clock.)
1 Folder/File number
2 Lock setting (P49)
3 DPOF printing (P58)
4 ¿ mark setting (P51)
5 Slide show (P54)
100-0011
12345
93
VQT0P18
Page 94

016
100-01 2 5
0h 1 0 m 1 0 s
Feb/21/2005
10:00AM
05m05s
-XBS1
HOLD
OUT!/JoJo
Others (continued)
∫ Screen Display in Playback
1 Playback mode (P43)
1
32456
2
0h10m10s
2
10
100-0125
Feb/21/2005
11 12 1398
016
10:00AM
∫ Screen Display in Playing Music
1234 5
S-XBS1
05m05s
MODE
HOLD
OUT!/JoJo
2 Counter display
3 Repeat playback (P47)
7
4 Picture quality (P33)
5 Picture size (P33)
6 Battery remaining (P19)
7 Folder/File number
8 Stop/Play/Reading display
9 Lock setting (P49)
10 No. of DPOF printing (P58)
11 ¿ mark setting (P51)
12 Slide show (P54)
13 Recording date/time
≥ When pictures for HDTV (16:9) are
played, black bands appear on the top
and bottom of the screen.
1 Audio player mode (P62)
2 Audio quality (EQ) (P64)
3 Repeat playback (P65)
4 Playback time
5 Battery remaining (P19)
6 Stop/Play/Fast-forward/Fast-
rewind (P63)
7 [HOLD] setting (P64)
8 Title/Artist name
94
VQT0P18
6 78
Page 95

Messages
The confirmation/error message will be displayed on the LCD Monitor.
Messages Countermeasures
EMPTY BATTERY
INSERT BATTERY
NO CARD Insert the card correctly. (P14, 15)
CHECK CARD
CARD FULL Change the card or delete unnecessary data. (P47)
CARD LOCKED
ACCESSING CARD Processing the data. Please wait for a while.
NO PICTURE FILE Insert the card which includes [Picture] files.
NO MPEG4 FILE Insert the card which includes [MPEG4] files.
NO VOICE FILE Insert the card which includes [Voice] files.
NO TRACK Insert the card which includes [Audio] files.
UNPLAYABLE FILE
FILE LOCKED Operate after releasing the protection. (P49)
TARGET FILE DOES
NOT EXIST
OVER L IM IT
The battery remaining is insufficient. Recharge the
battery. (P16)
Insert the battery into this unit correctly. (P14, 15)
This message also appears when the battery is
excessively discharged. Charge the battery.
MultiMediaCard is not available.
Re-insert the Memory Card. If [CHECK CARD] is
still displayed, format it. (P24) (If you format a card,
all of the data in the card will be deleted.)
Release the lock of the write-protect switch on the
card.
Cannot play files of incorrect formats. Record audio
files onto the card with SD-Jukebox.
There is no file which can be played as a slide show
or there is no file which can be set in DPOF setting.
The number of pictures to play in a slide show or
the number of prints set in DPOF setting exceeds
the limit.
95
VQT0P18
Page 96

Others (continued)
Messages Countermeasures
CANNOT SET FILE Select a still picture recorded by this unit.
SET TO PLAY MODE
USE BOTH
AC ADAPTOR AND
BATTERY
TURN POWER OFF
AND ON
ERROR
Trouble Shooting
Question Answer
This unit will not
turn on.
This unit is
immediately turned
off.
Cannot operate the
Jog Ball or other
buttons.
The mode cannot
be switched even if
the [MODE] button
is pressed.
Switch the Record/Playback Mode Switch to the
playback mode [ ] when connecting this unit to
PC or printer. (P55, 73)
Connect the AC adaptor when connecting this unit
to a PC or printer. (P55, 73)
Turn this unit on again.
After turning this unit off, remove and insert the
battery. If the error persists, consult the dealer.
Turn this unit on again.
Is the battery inserted correctly?
Is the battery exhausted?
Recharge the battery (P16) or insert a fully charged
battery.
Is the battery exhausted?
Recharge the battery (P16) or insert a fully charged
battery.
Is [HOLD] setting displayed?
The Jog Ball and other buttons are enabled when
the [MODE] button is pressed for about 2 or more
seconds and the indication disappears.
Is the card inserted?
If you press the [MODE] button when the card is not
inserted, the mode is set to the demonstration mode
(P92). Turn this unit off and then insert the card.
96
VQT0P18
Page 97

Question Answer
The color or the
brightness of the
LCD Monitor
changes.
The LCD Monitor is
too bright or dark.
Cannot record.
It takes time to
record onto a card.
Recording stops
halfway.
Recorded pictures
appear in mosaiclike pattern.
The pictures
recorded are too
bright or dark.
A vertical red
spectrum appears
on the LCD Monitor.
The color or the brightness of the screen may look
different under fluorescent light.
Adjust the brightness of the LCD Monitor properly.
(P23)
Is the card inserted?
You cannot record pictures when the write-protect
switch on the card is slid toward [LOCK].
Is the memory of the card full?
Delete unnecessary files before recording. (P47)
When you record pictures in [MPEG4] mode, it may
take time to record onto a card depending on the
type of card. However, this is not a malfunction.
Recording in [Voice] mode may be stopped halfway
depending on the type of card.
Pictures may appear in a mosaic-like pattern
depending on the subject or recording conditions.
The brightness of a picture on the LCD Monitor may
be different from that of a picture actually recorded.
Especially when you record a picture in dark places
with long exposure, the picture looks dark on the
LCD Monitor. However, the picture is recorded
brightly.
This is called “smear”. It is specific to CCD, not a
malfunction. It appears when the subject has a
bright part. It is recorded on MPEG4 images, but not
recorded on still pictures.
97
VQT0P18
Page 98

Others (continued)
Question Answer
The flash cannot be
activated.
The pictures
recorded with a
flash are dark.
The colors of the
picture recorded
with the flash are
not similar to the
subject in real life.
Cannot play.
Some pictures
cannot be played as
a slide show.
Cannot play music. Is there an effective music file on the card?
[t] Indication is
displayed during
playback or in the
list screen.
Cannot play when
the card is inserted
into other
equipment.
Is the flash set to [Flash off]? Check the flash mode.
(P36)
Is the flash covered with your finger? Is this unit too
far away from the subject?
When you record pictures with the flash, the white
balance may not be properly adjusted even if the
white balance is set in [Manual]. When you use the
flash, we recommend setting the white balance to
[Auto].
When you record pictures with the flash, the white
balance is automatically adjusted according to the
flash light. However, the white balance may not be
properly adjusted when the flash light does not
adequately illuminate the subject.
Is the card inserted?
Are there playable pictures on the card?
Is the mode set to the playback mode?
Pictures recorded with other equipment may not be
displayed as a slide show or may take time to be
displayed.
The data was either recorded in a different format or
damaged. Such data cannot be played.
If [MPEG4] files recorded with this unit are played
on other equipment, the picture quality or the sound
quality may be deteriorated or the files may not be
readable.
98
VQT0P18
Page 99

Question Answer
When connecting
to a PC, images
cannot be
transferred.
The pictures cannot
be printed with
printers supporting
PictBridge.
Black belts appear
on the top and
bottom of the
printed pictures.
Playing or
recording do not
function and the
screen has frozen.
The LCD Monitor
stays dark when
recording in
[
Picture
] mode or
MPEG4] mode.
[
While playing a
[Voice] file or a
[Audio] file, the
LCD Monitor is
suddenly turned
off.
Is this unit connected to the PC correctly? (P73)
Does the PC recognize this unit properly? (P75)
Set this unit to the playback mode and then check if
[Setup]>[Connection (USB)]>[PictBridge] is
selected in the menu. (P55)
Did you print [Picture] files recorded with the picture
size set to [HDTV]?
Check the picture size. (P33)
Slide the Power Switch to [OFF]. If this unit does not
turn off, remove and insert the battery, and then turn
this unit on. If the error persists, remove the battery
and consult the dealer.
If this unit is left without operation for about
10 seconds when playing or recording in [Voice]
mode or playing in [Audio] mode, the LCD Monitor is
automatically turned off.
Pressing the [MENU] button turns on the LCD
Monitor. However, in the case of not conducting any
operation for about 10 seconds, the LCD Monitor is
turned off again.
99
VQT0P18
Page 100

Others (continued)
Question Answer
If you do not use this unit for a long period of time,
The clock is not set
correctly.
The retouch
software does not
start even if retouch
files (extension
“.ped”) are clicked
on Windows
Explorer etc.
When this unit is
connected to the
PC, the Card
Access Lamp
keeps blinking.
[Found New
Hardware Wizard]
appears though this
unit is connected to
the PC after the
USB driver is
properly installed.
the clock may be reset. When the clock setting
screen appears, set the clock again.
If you record pictures without the clock setting, the
date is recorded as [Jan/1/2000 12:00AM].
If both the SD Viewer supplied with this unit and
SD Viewer Ver. 2.1E supplied with SD Multi Camera
SV-AS10 are installed in the PC and you uninstall
either of them, the association of retouch files with
SD Viewer will be disabled. In this case, uninstall
both versions of SD Viewer and then install the one
you want to use again.
Did you insert an NTFS-formatted Memory Card
into this unit? In this case, log on with [Administrator
(computer administrator)] (or any other user name
having equivalent rights), right-click the Removable
Disk icon in [My Computer], and select [Remove].
Check that the Card Access Lamp is lit and then
cancel the connection between this unit and the PC.
1 Click [Next].
2 Confirm whether your device is configured to the
optimal driver detection setting and click [Next].
3 Insert the supplied CD-ROM into the CD-ROM
drive.
4 Enter the path as “D:\USB Driver\files” (example
of D drive assigned as CD-ROM drive).
5 Click [Next].
6 Click [Next].
7 Click [Finish].
After the procedure above, follow the wizard to
install the hardware.
100
VQT0P18
 Loading...