

Page 1
Operating Instructions
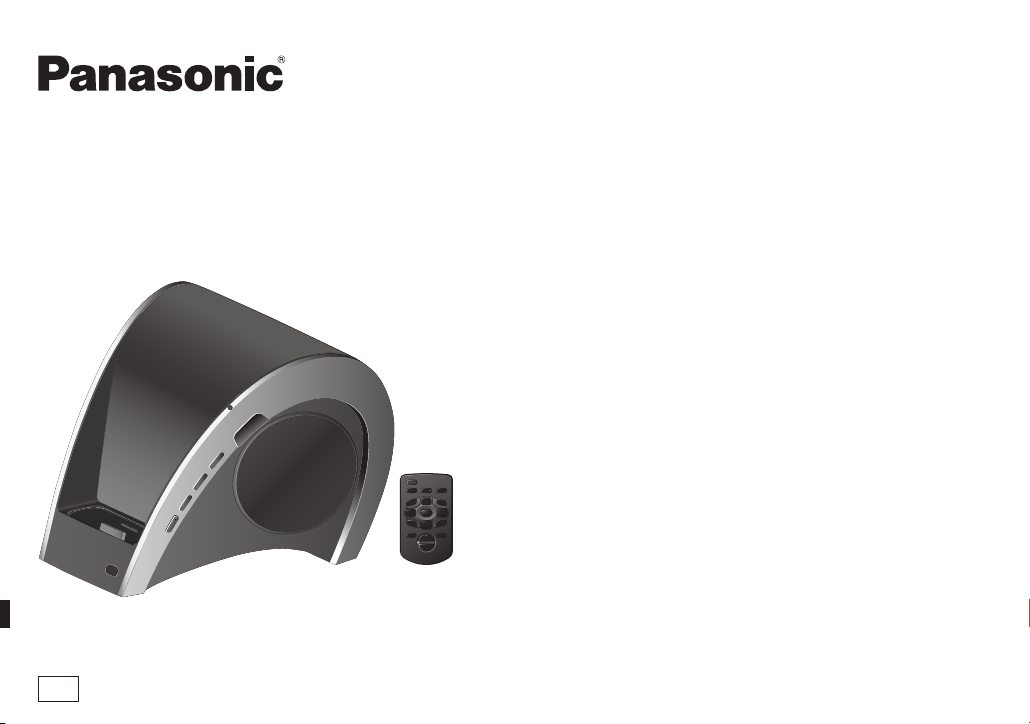
Model No. SC-SP100
EG
Instrucciones de funcionamiento
Instrukcja obsługi
Návod k obsluze
Инструкция по эксплуатации
Інструкція з експлуатації
Compact Stereo System
Sistema estéreo compacto
Kompaktowy system stereo
Kompaktní stereo systém
Компактная стереосистема
Компактна стереосистема
RQTX1009-1R
Page 2

Dear Customer
Thank you for purchasing this product. For optimum performance and safety, please read these instructions carefully.
Before connecting, operating or adjusting this product, please read the instructions completely. Please keep this manual for future
reference.
ENGLISHESPAÑOLENGLISH
RQTX1009
2
2
Page 3
ENGLISH
ESPAÑOLENGLISH
RQTX1009
3
3
Page 4
Table of contents
ENGLISHESPAÑOLENGLISH
RQTX1009
4
4
Safety precautions ..............................................5
Supplied accessories .......................................... 6
Preparing the remote control .............................7
Compatible iPod and iPhone .............................. 7
Charging the iPod or iPhone .............................. 7
Connecting the iPod or iPhone .......................... 8
Listening to the iPod or iPhone..........................9
Connecting to the PC ........................................ 10
Using other equipment .....................................10
Avoid interfering with other Panasonic
equipment ...................................................... 10
Troubleshooting guide ...................................... 11
Maintenance ....................................................... 11
Specifi cations ....................................................11
Page 5

Safety precautions
PlacementPlacement
Set the unit up on an even surface away from direct sunlight, high
temperatures, high humidity, and excessive vibration. These conditions
can damage the cabinet and other c omponents, thereby shortening the
unit’s service life.
Do not place heavy items on the unit.
VoltageVoltage
Do not use high voltage power sources. This can overload the unit and
cause a fi re.
Do not use a DC power source. Check the source carefully when setting
the unit up on a ship or other places where DC is used.
AC mains lead protectionAC mains lead protection
Ensure the AC mains lead is connected c orrectly and not damaged.
Poor connection and lead damage can cause fi re or electric shock. Do
not pull, bend, or place heavy items on the lead.
Grasp the plug fi rmly when unplugging the lead. Pulling the AC mains
lead can cause electric shock.
Do not handle the plug with wet hands. This can cause electric shock.
Foreign matterForeign matter
Do not let metal objects fall inside the unit. This c an cause electric
shock or malfunction.
Do not let liquids get into the unit. This can cause electric shock or
malfunction. If this occurs, immediately disconnect the unit from the
power supply and contact your dealer.
Do not spray insec ticides onto or into the unit. They contain fl ammable
gases which can ignite if sprayed into the unit.
ServiceService
Do not attempt to repair this unit by yourself. If sound is interrupted,
indicators fail to light, smoke appears, or any other problem that is not
covered in these instructions occurs, disconnect the AC mains lead
and contact your dealer or an authorised service centre. Electric shock
or damage to the unit can occur if the unit is repaired, disassembled or
reconstructed by unqualifi ed persons.
Extend operating life by disconnec ting the unit from the power source if
it is not to be used for a long time.
ENGLISH
ESPAÑOLENGLISH
RQTX1009
5
5
Page 6

ENGLISHESPAÑOLENGLISH
RQTX1009
6
6
Supplied accessories
Please check and identify the supplied accessories.
1 AC mains lead
1 AC adaptor
(switching power
supply)
1 Audio cable
1 Remote control
(RAKX1002)
2 Dock adaptors
M12
(for iPhone)
M15
(for iPhone 3G)
1 Lithium Button-Type
battery
(Battery is already installed in
the remote control.)
Warning
Keep the Button-Type
battery out of the reach of
children. Never put ButtonType batter y in mouth. If
swallowed call your doctor.
Page 7
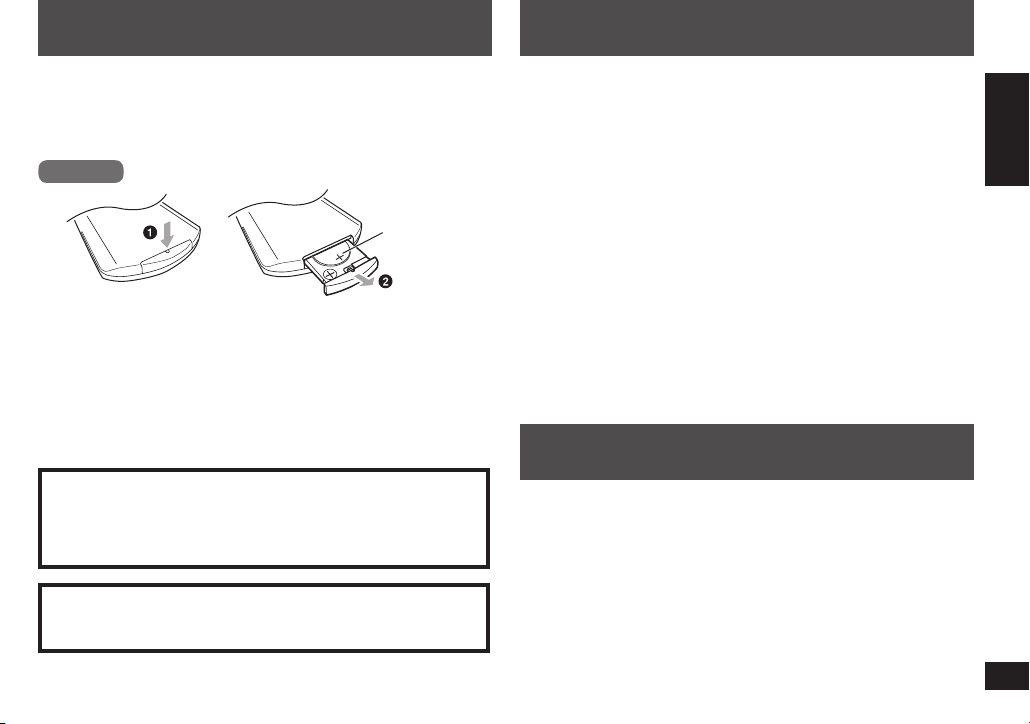
Preparing the remote control
CR2025
Compatible iPod and iPhone
Before using the remote control for the fi rst time, remove the insulation
sheet.
Replace the remote control bat tery when it stops operating, or when
the range seems reduced.
Rear view
Lithium
Button-Type
battery
(CR2025)
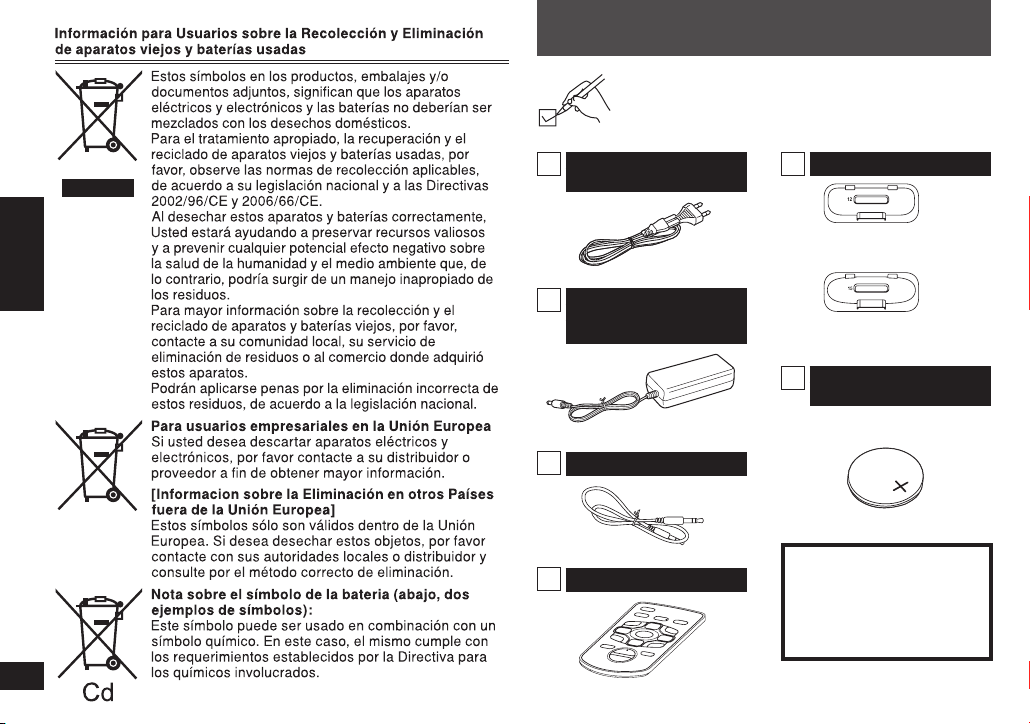
1 Insert an object and push down
to unlock the catch.
Aim at the remote control signal sensor (\ page 9), avoiding
obstacles, at a maximum range of 7 m directly in front of the main unit.
• Do not heat or expose to fl ame.
• Do not leave the battery(ies) in an automobile exposed to direc t
sunlight for a long period of time with doors and windows closed.
• Remove the batter y if the remote control is not going to be used for a
long period of time. Store in a cool, dark plac e.
CAUTION
Danger of explosion if battery is incorrectly replaced. Replace
only with the same or equivalent type recommended by the
manufac turer. Dispose of used bat teries according to the
manufacturer’s instructions.
Warning
Risk of fi re, explosion and burns. Do not recharge, disassemble,
heat above 60°C or incinerate.
Pull
• iPhone 3G (8GB, 16GB)
• iPhone (4GB, 8GB, 16GB)
• iPod touch 2nd generation (8GB, 16GB, 32GB )
• iPod nano 4th generation (video) (8GB, 16GB)
• iPod classic (120GB)
• iPod touch 1st generation (8GB, 16GB, 32GB)
• iPod nano 3rd generation (video) (4GB, 8GB)
• iPod classic (80GB, 160GB)
• iPod nano 2nd generation (aluminum) (2GB, 4GB, 8GB)
• iPod 5th generation (video) ( 60GB, 80GB)
• iPod 5th generation (video) ( 30GB)
• iPod nano 1st generation (1GB, 2GB, 4GB)
• iPod 4th generation (colour display) (40GB, 60GB)
• iPod 4th generation (colour display) (20GB, 30GB)
• iPod 4th generation (40GB)
• iPod 4th generation (20GB)
• iPod mini (4GB, 6GB)
Compatibilit y depends on the soft ware version of your iPod or iPhone.
Charging the iPod or iPhone
• The iPod or iPhone charges automatically when power is supplied to
the main unit.
• Check iPod or iPhone to see if the batter y is fully recharged.
• If you are not using the iPod or iPhone for an extended period of
time after recharging has completed, disconnect it from the main
unit, as the battery will be depleted naturally. (Once fully recharged,
additional recharging will not occur.)
ENGLISH
ESPAÑOLENGLISH
RQTX1009
7
7
Page 8
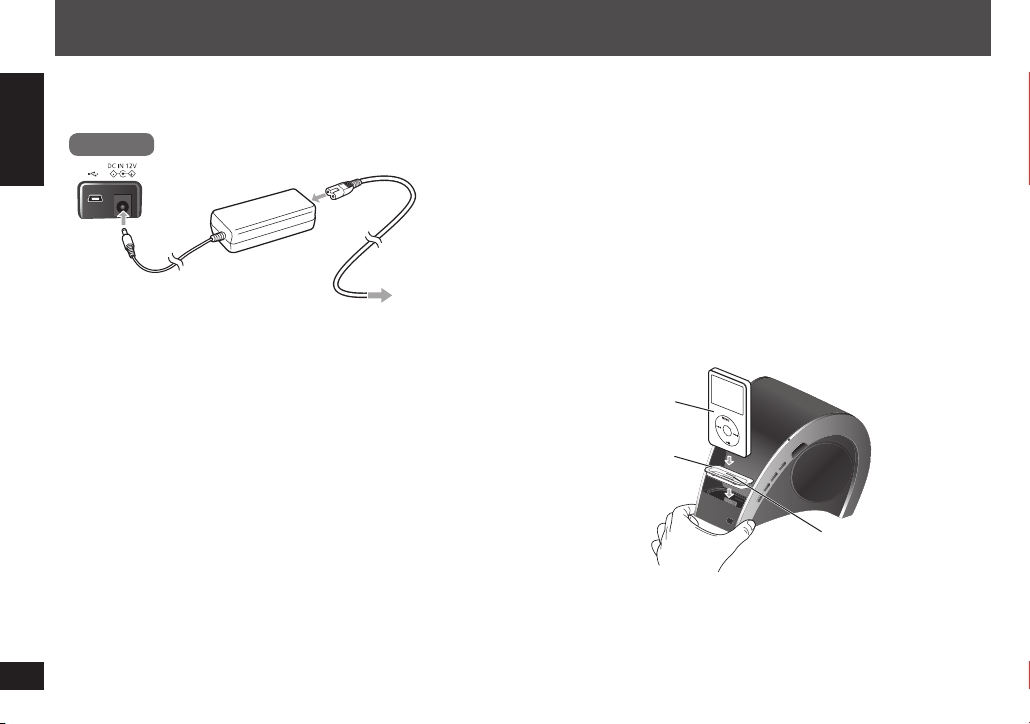
Connecting the iPod or iPhone
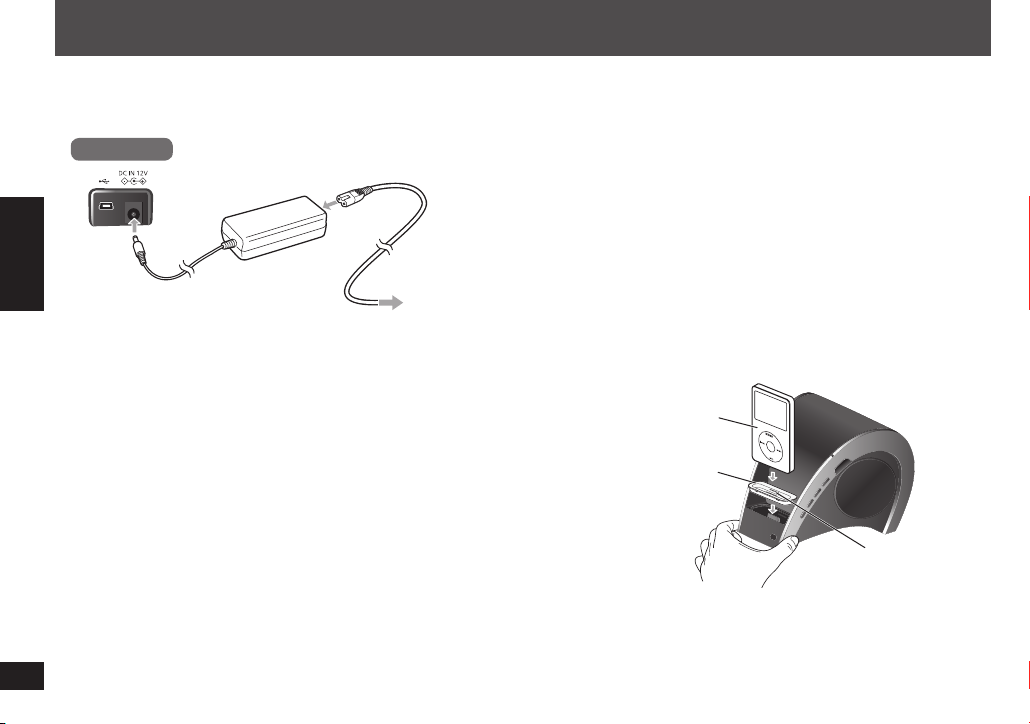
1 Connect the AC power.
Rear view
ENGLISHESPAÑOLENGLISH
AC adaptor
(switching power
supply) (included)
The AC adaptor (switching power supply) is in the standby condition
when the mains plug is connected. The primary circuit is always “live”
as long as the mains plug is connec ted to an electrical outlet.
Note:
• The included AC mains lead is for use with this unit only. Do not use it
with other equipment.
• Do not use an AC mains lead from other equipment.
• Do not use any other AC adaptors (switching power supplies) except
the supplied one.
RQTX1009
8
8
AC mains lead
(included)
To household
mains socket
2 Insert the dock adaptor into the main unit.
iPod
Use the adaptor supplied with your iPod or refer to Apple Inc. for
the compatible dock adaptor (for details, refer to the instructions
supplied with the dock adaptors), which may need to be purchased
separately.
iPhone
Use an appropriate iPhone adaptor when playing an iPhone.
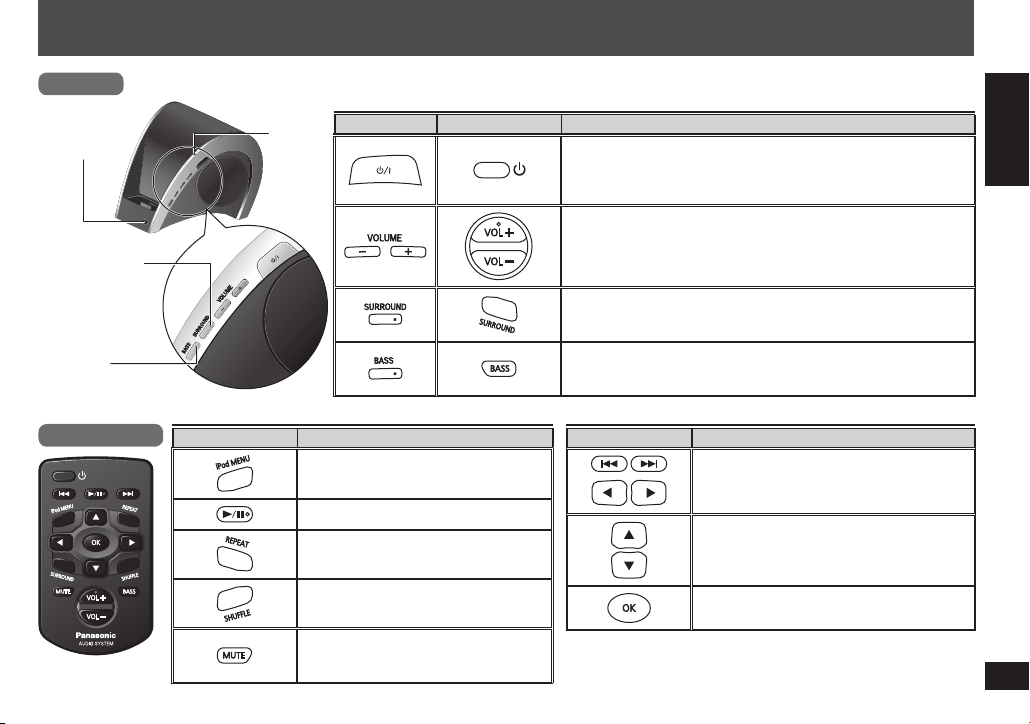
3 Connect the iPod or iPhone to the main unit.
Hold the main unit when connecting or disconnecting the iPod or
iPhone.
iPod
(not included)
iPod dock adaptor
(not included)
When removing, insert your
fi ngernail or a fl at object and
lift upwards.
Page 9
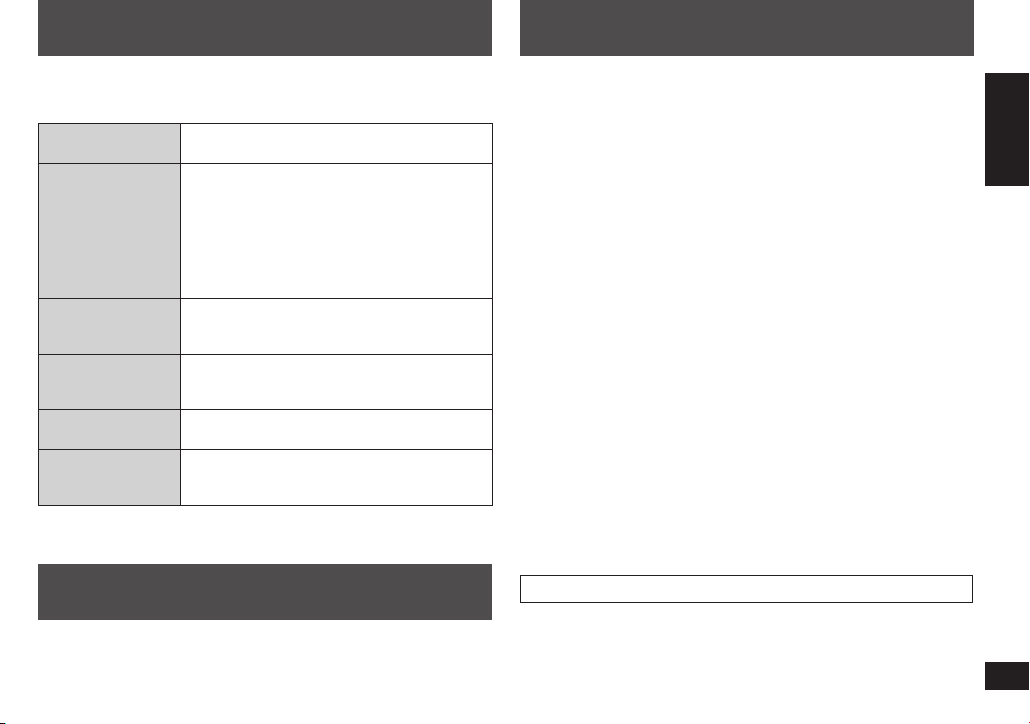
Listening to the iPod or iPhone
Main unit
Remote control
signal sensor
SURROUND
indicator
BASS
indicator
Remote control
You can navigate the iPod or iPhone using the buttons described.
The power indicator blinks each time a but ton on the remote c ontrol is pressed.
Power
indicator
Remote control Function
Main unit Remote control Function
Access the menu screens.
Playback or pause the iPod or iPhone.
Select the repeat mode of iPod or
iPhone.
Select the shuf fl e mode of iPod or
iPhone.
Mute the sound from the speakers.
To cancel: Press the button again or
adjust the volume.
Turn the main unit ’s power on or off.
• The power indicator lights up when the main unit is on.
• The operation switch does not separate entire unit from
mains even if in off position.
Adjust the speakers’ volume level.
Turn the surround effect on or off.
• The SURROUND indicator on the main unit button lights up
when the surround function is activate d.
Turn the bass ef fect on or off.
• The BASS indicator on the main unit button lights up when
the bass function is activated.
Remote control Function
Press to skip to the previous or next track.
Press and hold to backward or for ward
search for the desired track.
Select an item on the menu screen.
Press and hold: Scrolls through the list.
Confi rm the selected menu or playback.
Note:
For iPod or iPhone operation details, please refer to iPod or
iPhone User’s Manual.
ENGLISH
ESPAÑOLENGLISH
RQTX1009
9
9
Page 10

Connecting to the PC
Using other equipment
While the iPod or iPhone is connected to the main unit, you can
transfer data from the PC using the USB connectivity.
Rear view
ENGLISHESPAÑOLENGLISH
USB cable (not included)
1 Connect the USB cable to the USB port of the main unit
and PC.
Refer to iPod or iPhone User’s Manual on PC synchronisation.
2 Before disconnecting the USB cable, make sure the
procedure of safe eject of hardware from the PC is
performed.
Recording and operating problems may occur on some computer
systems.
Please note that Panasonic and Panasonic dealers cannot be held
liable for any lost data or other direct or indirec t damage except in
RQTX1009
cases of intentional or gross negligence.
10
10
Preparation
• Ensure that the iPod or iPhone is not connec ted to the main unit.
• Ensure that the other equipment is completely set up and its volume
reduced before connecting to the main unit.
Portable audio equipment
(not included)
Audio cable (included)
Connec t the other equipment such as a portable audio equipment, etc.
to the MUSIC PORT using the supplied audio cable.
Rear view
Avoid interfering with other Panasonic equipment
You can operate this unit using a different mode.
The main unit and remote control must be set to the same mode.
1 Press and hold [SURROUND] on the main unit and
[BASS] on the remote control for at least 3 seconds.
The power indicator fl ashes 3 times confi rming the change.
2 Press and hold [OK] and [BASS] on the remote control
for at least 2 seconds.
To return to the default mode, repeat the above steps. For step 2,
replace [BASS] with [ MUTE].
Page 11
Troubleshooting guide
Specifi cations
Before requesting ser vice, make the following checks. If you are in
doubt about some of the check points, or if the solutions indicated in
the table do not solve the problem, consult your dealer for instructions.
No power
No sound
Remote control is
not functioning
Distorted sound
iPod or iPhone
does not charge
Unable to use PC
synchronisation
• Ensure the AC mains lead is connected
properly.
• Adjust the volume.
• Check if mute function is enabled.
• Update your iPod or iPhone with the latest
software.
• The iPod or iPhone was incorrectly inserted
into the dock. Turn off the iPod or iPhone,
remove it from the dock connector. Reinsert
it and turn it on again.
• Replace the battery.
• Ensure the iPod or iPhone is seated properly
into the unit.
• Reduce the volume.
• Set the “EQ” setting of the iPod to “Of f” or
“Flat”.
• Check the connections. (\ page 8)
• Turn the main unit on.
• Check PC and iPod or iPhone connections.
(\ page 8, 10)
Maintenance
To clean this unit, wipe with a soft, dry cloth.
• Never use alcohol, paint thinner or benzine to clean this unit.
• Before using chemically treated cloth, read the instructions that came
with the cloth carefully.
AMPLIFIER SECTION
RMS output power stereo mode
Front Ch (both channels driven)
5 W per channel (6 Ω), 1 kHz, 10% THD
Subwoofer Ch 10 W per channel (6 Ω), 100 Hz, 10% THD
Total RMS stereo mode power 20 W
TERMINALS SECTION
Music port (rear)
Sensitivity 350 mV, 13.2 kΩ
Terminal Stereo, 3.5 mm jack
SPEAKER SECTION
Front speakers
Speaker unit(s) Impedance: 6 Ω
Full range 4 cm cone type
Input power (IEC) 5 W (Max)
Subwoofer
Speaker unit(s) Impedance: 6 Ω
Woofer 6.5 cm cone type
Passive radiator (x2) 6.5 cm
Input power (IEC) 10 W (Max)
GENERAL
Power supply DC 12 V (DC IN terminal)
Power consumption 15.6 W (unit only)
AC adaptor (switching power supply) AC 100 to 240 V, 50/60 Hz
Power consumption 36 W
Dimensions (WxHxD) 175 mm x 138.8 mm x 178.5 mm
Mass 0.85 kg
Operating temperature range 0°C to +40°C
Operating humidity range 20% to 80% RH (no condensation)
Power consumption in standby mode: 0.7 W (approximate)
Note:
1) Specifi cations are subject to change without notice.
Mass and dimensions are approximate.
2) Total harmonic distortion is measured by the digital spectrum
analyser.
ENGLISH
ESPAÑOLENGLISH
RQTX1009
11
11
Page 12
Estimado Cliente
Muchísimas gracias por haber adquirido este aparato. Lea con atención estas instruc ciones para obtener las máximas prestaciones y seguridad.
Antes de conectar, operar o ajustar este producto, sírvase leer estas instrucciones completamente. Guarde este manual para su
consulta en el futuro.
ENGLISHENGLISH ESPAÑOL
RQTX1009
2
12
Page 13

Precauciones de seguridad
UbicaciónUbicación
Coloque el aparato en una superfi cie plana lejos de la luz directa
del sol, temperatura y humedad altas, y vibración excesiva. Esta s
condiciones pueden dañar a la c aja y otros componentes, y por lo
tanto ac ortar la vida útil del aparato.
No ponga objetos pesados sobre el aparato.
VoltajeVoltaje
No use fuentes de alimentación de alto voltaje. Esto puede sobrecargar el
aparato y causar un incendio.
No use una fuente de alimentación de CC. Verifi que cuidadosamente la
fuente cuando coloque el aparato en una embarcación u otro lugar donde
se utilice CC.
Protección del cable de alimentación de CAProtección del cable de alimentación de CA
Asegúrese de que el cordón de alimentación de CA esté conectado
correctamente y no dañado. Una mala conexión y daño en el cordón
pueden causar un incendio o un choque eléctrico. No tire, doble el cordón
ni coloque objetos pesados sobre él.
Sujete el enchufe fi rmemente cuando desenchufe el cordón. El tirar el
cordón puede c ausar choque eléctrico.
No manipule el enchufe con manos mojadas. Esto puede causar choque
eléctrico.
Objetos extrañosObjetos extraños
No permita que objetos de metal c aigan dentro del aparato. Esto
puede causar choque eléctrico o fallos.
No permita que líquidos penetren en el aparato. Esto puede causar
choque eléctrico o fallos. Si esto ocurre, desconecte inmediatemente
el aparato de su alimentación y póngase en contacto con su
distribuidor.
No rocíe insecticidas sobre o dentro del aparato. Contienen gases
infl amables que pueden encenderse si son rociados dentro de la unidad.
ServicioServicio
No intente reparar este aparato p or usted mismo. Si el sonido se
interrumpe, los indicadores no se iluminan, sale humo o sucede
cualquier problema que no esté tratado en estas instrucciones,
desconecte el cordón de alimentación de CA y póngase en contacto
con su distribuidor o con un centro de ser vicio autorizado. Puede
ocurrir un choque eléctrico o daño al aparato si este aparato es
reparado, desarmado o reconstruido por personas no califi cadas.
Alargue la vida útil del aparato desconectándolo de la fuente de
alimentación si no va a ser usado por largo tiempo.
Índice
Precauciones de seguridad ................................ 3
Accesorios suministrados .................................. 4
Preparación del mando a distancia ................... 5
iPod e iPhone compatibles ................................. 5
Cargar el iPod o iPhone ...................................... 5
Conectar el iPod o iPhone .................................. 6
Escuchar el iPod o iPhone..................................7
Conectar al PC ..................................................... 8
Utilización de otro equipo ................................... 8
Evite interferir con otros equipos Panasonic ... 8
Guía para la solución de problemas .................. 9
Mantenimiento ..................................................... 9
Especifi caciones ................................................. 9
ENGLISH
ENGLISH ESPAÑOL
RQTX1009
3
13
Page 14
ENGLISHENGLISH ESPAÑOL
RQTX1009
4
14
Accesorios suministrados
Por favor, verifi que e identifi que los accesorios
suministrados.
1 Cordón de alimentación
de CA
1 Adaptador de CA
(alternancia de
suministro eléctrico)
1 Cable de audio
1 Mando a distancia
(RAKX1002)
2 Adaptadores de base
M12
(para iPhone)
M15
(para iPhone 3G)
1 Batería de litio de
tipo botón
(La batería ya está instalada en
el mando a distancia.)
Advertencia
Mantenga la pila tipo botón
fuera del alcance de los
niños. No la ponga nunca en
la boca. Si alguien la traga,
llame a un médico.
Page 15
Preparación del mando a distancia
CR2025
iPod e iPhone compatibles
Antes de usar el mando a distancia por primera vez, retire la hoja de
aislamiento.
Sustituya la batería del mando a distancia cuando deje de funcionar, o
cuando se reduzca su distancia de funcionamiento.
Vista trasera
Batería de
litio de
tipo botón
(CR2025)
Tirar
1 Introduzca un objeto y pulse hacia
abajo para desbloquear el cierre.
Diríjalo al sensor del mando a distancia (\ página 7), evitando
los obstáculos, desde una distancia máxima de 7 m directamente
frente al aparato.
• No caliente o exponga a las llamas.
• No deje la (s) pila(s) en un automóvil expuesto a luz solar directa
durante un largo período de tiempo con las puertas y ventanas
cerradas.
• Retire la batería si el mando a distancia no va a ser utilizado durante
mucho tiempo. Guárdelas en un lugar oscuro y fresco.
CUIDADO
Hay peligro de explosión por si se sustituye incorrectamente la
batería. Sólo sustituya con el mismo tipo recomendado por el
fabricante o que sea equivalente. Deseche las baterías usadas
según instruye el fabricante.
Advertencia
Riesgo de incendio, explosión o quemaduras. No c argue,
desarme, caliente a más de 60°C ni incinere.
• iPhone 3G (8GB, 16GB)
• iPhone (4GB, 8GB, 16GB)
• iPod touch 2
• iPod nano 4
• iPod classic (120GB)
• iPod touch 1
• iPod nano 3
• iPod classic (80GB, 160GB)
• iPod nano 2
• iPod 5
• iPod 5
• iPod nano 1
• iPod 4
• iPod 4
• iPod 4
• iPod 4
a
generación (8GB, 16GB, 32GB)
a
generación (vídeo) (8GB, 16GB)
a
generación (8GB, 16GB, 32GB)
a
generación (vídeo) (4GB, 8GB)
a
generación (aluminio) (2GB, 4GB, 8GB)
a
generación (vídeo) (60GB, 80GB)
a
generación (vídeo) (30GB)
a
generación (1GB, 2GB, 4GB)
a
generación (pantalla de color) (40GB, 60GB)
a
generación (pantalla de color) (20GB, 30GB)
a
generación (40GB)
a
generación (20GB)
• iPod mini (4GB, 6GB)
La compatibilidad depende de la versión del software de su iPod o
iPhone.
Cargar el iPod o iPhone
• El iPod o iPhone se carga automáticamente cuando se suministra
alimentación a la unidad principal.
• Compruebe que el iPod o iPhone tenga la batería totalmente
cargada.
• Si no utiliza el iPod o iPhone durante un periodo largo de tiempo
después de terminar la carga, desconéctelo de la unidad principal, ya
que la batería se agotaría de mo do natural. (Cuando esté totalmente
cargada, no podrá efectuar cargas adicionales.)
ENGLISH
ENGLISH ESPAÑOL
RQTX1009
5
15
Page 16
Conectar el iPod o iPhone
1 Conecte la alimentación de CA.
Vista trasera
ENGLISHENGLISH ESPAÑOL
Adaptador de CA
(alternancia de
suministro eléctrico)
(suministrado)
El adaptador de CA (alternancia de suministro eléctric o) se encuentra
en modo de espera cuando conecta el enchufe de alimentación
principal. El circuito primario está siempre “activo” mientras el enchufe
de alimentación principal esté conectado a una toma eléctrica.
Nota:
• El cable de alimentación de CA incluido es para ser usado con este
aparato solamente. No lo utilice con otro equipo.
• No utilic e el cable de alimentación CA de otro equipo.
• No utilic e ningún otro adaptador de CA (alternancia de suministro
eléctrico) que no sea el proporcionado.
RQTX1009
6
16
Cordón de
alimentación de CA
(suministrada)
A la toma de
corriente
2 Introduzca un adaptador de base a la unidad principal.
iPod
Utilice el adaptador proporcionado con su iPod o póngase en
contacto con Apple Inc. para conseguir el adaptador de base
compatible (para más detalles, consulte las instrucciones
proporcionadas con los adaptadores de base), que deberá adquirir
por separado.
iPhone
Utilice un adaptador de iPhone adecuado cuando use un iPhone.
3 Conecte el iPod o iPhone a la unidad principal.
Sostenga el aparato cuando conecte o desconecte el iPod o
iPhone.
iPod
(no suministrado)
Adaptador de base de iPod
(no suministrado)
Cuando lo retire,
introduzca su uña
o un objeto plano y
levántelo hacia arriba.
Page 17

Escuchar el iPod o iPhone
Unidad principal
Sensor de
señal del
mando a
distancia
Indicador
SURROUND
(sonido ambiente)
Indicador
BASS
(graves)
Mando a
distancia
Puede desplazarse por el iPod o iPhone usando los botones descritos.
El indicador de energía parpadea cada vez que se pulsa un botón del mando a distancia.
Indicador
de
energía
Mando a distancia Función
Unidad
principal
Accede a las pantallas del menú.
Reproduce o pausa el iPod o iPhone.
Seleccione el modo de repetición del
iPod o iPhone.
Seleccione el modo de reproducción
aleatoria.
Silencia el sonido de los altavoces.
Para cancelar: Pulse el botón de
nuevo o ajuste el volumen.
Mando a distancia Función
Enciende o apaga la unidad principal.
• El indicador de energía se ilumina cuando la unidad
principal está encendida.
• El interruptor de funcionamiento no separa la unidad de la
alimentación eléctrica incluso en posición de apagado.
Ajusta el nivel de volumen de los altavoces.
Enciende o apaga el efecto de sonido ambiente.
• El indicador SURROUND (sonido ambiente) del botón de la
unidad principal se ilumina cuando se ac tiva la función de
sonido ambiente.
Activa o desactiva el efecto de graves.
• El indicador BASS (graves) del botón de la unidad principal
se ilumina cuando se activa la función de graves.
Mando a distancia Función
Nota:
Para detalles sobre el uso del iPod o iPhone, consulte el
Manual del Usuario del iPod o iPhone.
ENGLISH
ENGLISH ESPAÑOL
Pulse para saltar a la pista anterior o
siguiente.
Mantenga pulsado para buscar la pista
deseada hacia atrás o hacia adelante.
Seleccione un elemento de la pantalla
del menú.
Mantenga pulsado: Se desplaza por la
lista.
Confi rma la reproduc ción o el menú
seleccionado.
RQTX1009
7
17
Page 18

Conectar al PC
Utilización de otro equipo
Mientras el iPod o iPhone esté c onectado a la unidad principal, puede
transferir datos desde el PC usando la conectividad USB.
Vista trasera
ENGLISHENGLISH ESPAÑOL
Cable USB (no suministrado)
1 Conecte el cable USB al puerto USB de la unidad
principal y PC.
Consulte el Manual del Usuario del iPod o iPhone sobre
sincronización con el PC.
2 Antes de desconectar el cable USB, asegúrese de
efectuar el procedimiento de expulsión segura del
hardware del PC.
Podrían producirse problemas de funcionamiento y grabación en
algunos sistemas informáticos.
Tenga en cuenta que Panasonic y los proveedores de Panasonic
RQTX1009
no se resp onsabilizan de ninguna pérdida de datos u cualquier
otro daño directo o indirecto exc epto en los casos de negligencia
8
intencional o grave.
18
Preparación
• Asegúrese de que el iPod o iPhone no esté conectado a la unidad
principal.
• Asegúrese de que el otro equipo esté completamente confi gurado y
que su volumen esté bajo antes de efec tuar la c onexión a la unidad
principal.
Equipo de audio portátil
(no suministrado)
Cable de audio (suministrado)
Conecte el otro equipo como equipos de audio portátil, etc. al
MUSIC PORT (puerto de música) usando el cable de audio proporcionado.
Vista trasera
Evite interferir con otros equipos Panasonic
Puede operar esta unidad usando un modo diferente.
La unidad principal y el mando a distancia deberán funcionar en
el mismo modo.
1 Mantenga pulsado [SURROUND] en la unidad principal
y [BASS] en el mando a distancia durante por lo menos
3 segundos.
El indicador de energía se enciende 3 veces confi rmando el cambio.
2 Mantenga pulsado [OK] y [BASS] en el mando a
distancia durante por lo menos 2 segundos.
Para volver al modo por defecto, repita los pasos de arriba. Para el
paso 2, sustituya [ BASS] por [MUTE].
Page 19

Guía para la solución de problemas
Especifi caciones
Antes de solicitar el servicio de reparaciones haga las comprobaciones
indicadas en la tabla de abajo. Si tiene alguna duda acerc a de algunos
de los puntos de comprobación o si los remedios indicados en la tabla
no resuelven el problema, c onsulte a su conc esionario para obtener
instrucciones.
Sin alimentación
Sin sonido
El mando a
distancia no
funciona
Sonido
distorsionado
El iPod o iPhone
no se carga
Imposible usar
la sincronización
con el PC
• Asegúrese de que el cable de alimentación
de CA se encuentre conectado
correctamente.
• Ajuste el volumen.
• Compruebe que la función de silencio esté
activada.
• Actualice su iPod o iPhone con el sof tware
más reciente.
• El iPod o iPhone se introdujo
incorrectamente en la base. Apague el iPod
o iPhone, y retírelo del conector de la base.
Introdúzcalo de nuevo y enciéndalo otra vez.
• Sustituya la batería.
• Asegúrese de que el iPod o iPhone esté
fi jado correctamente en la unidad.
• Reduzca el volumen.
• Establezca la propiedad “EQ” del iPod en
“Off” o “Flat”.
• Compruebe las conexiones. (\ página 6)
• Encienda la unidad principal.
• Compruebe el PC y las conexiones del iPod
o iPhone. (\ página 6, 8)
Mantenimiento
Utilice un paño suave y seco para limpiar este aparato.
• No utilic e nunca alcohol, diluyente de pintura ni gasolina para limpiar
este aparato.
• Antes de utilizar un paño impregnado químic amente, lea con
atención las instrucciones, suministradas con él.
SECCIÓN DEL AMPLIFICADOR
Modo estéreo de potencia de salida RMS
Canal frontal (ambos canales controlados)
5 W por canal (6 Ω), 1 kHz, 10% THD
Canal del Subwoofer 10 W por canal (6 Ω), 100 Hz, 10%THD
Potencia total del modo estéreo RMS 20 W
SECCIÓN DE LOS TERMINALES
Puerto de música (trasero)
Sensibilidad 350 mV, 13,2 kΩ
Terminal Estéreo, toma de 3,5 mm
SECCIÓN DE ALTAVOCES
Altavoces frontales
Altavoce(s) Impedancia: 6 Ω
Gama completa Tipo cónico de 4 cm
Potencia de entrada (IEC) 5 W (Máx.)
Subwoofer
Altavoce(s) Impedancia: 6 Ω
Woofer Tipo cónico de 6,5 cm
Radiador pasivo (x2) 6,5 cm
Potencia de entrada (IEC) 10 W (Máx.)
GENERALIDADES
Alimentación DC de 12 V (terminal DC IN)
Consumo energético 15,6 W (sólo la unidad)
Adaptador de CA (alternancia de suministro eléctrico)
100 a 240 V CA, 50/60 Hz
Consumo energético 36 W
Dimensiones (AnxAlxPrf) 175 mm x 138,8 mm x 178,5 mm
Peso 0,85 kg
Gama de temperaturas de funcionamiento 0°C a +40°C
Gama de humedades de funcionamiento
20% a 80% humedad relativa (sin condensación)
Consumo en el modo de espera: 0,7 W (aproximados)
Nota:
1) Las especifi caciones están sujetas a cambios sin previo aviso.
Los pesos y las dimensiones son aproximados.
2) La distorsión armónica total se mide con el analizador de espectro
digital.
ENGLISH
ENGLISH ESPAÑOL
RQTX1009
9
19
Page 20

Drogi Kliencie
Dziękujemy Ci za zakupienie tego produktu. Proszę dokładnie zapoznać się z tą instrukcją obsługi, aby jak najlepiej wykorzystać to urządzenie i
zapewnić jego bezpieczne użytkowanie.
Przed podłączeniem, obsługą lub regulacją sprzętu prosimy o dokładne zapoznanie się z treścią niniejszej instrukcji. Prosimy o
zachowanie niniejszej instrukcji obsługi.
Niniejsza instrukcja została opracowana na podstawie oryginalnej publikacji firmy Panasonic Corporation.
ENGLISHPOLSKI ESPAÑOL
RQTX1009
2
20
Page 21

Środki ostrożności
Ustawienie urządzeniaUstawienie urządzenia
Ustaw urządzenie na równej powierzchni, z dala od bezpośredniego
oświetlenia słonecznego, wysokiej temperatury, dużej wilgoci
i nadmiernych wibracji. Takie warunki mogą doprowadzić do
uszkodzenia obudowy i innych części i przez to skrócić czas
prawidłowego działania urządzenia.
Nie umieszczaj ciężkich przedmiotów na urządzeniu.
NapięcieNapięcie
Nie używaj jako źródła zasilania wysokiego napięcia. Może to
przeciążyć urządzenie i spowodować pożar.
Nie używaj jako źródła zasilania prądu stałego. Starannie upewnij
się, jakie parametry ma napięcie sieciowe, zwłaszcza na statku lub w
innym miejscu, gdzie bywa stosowana sieć prądu stałego.
Obchodzenie się z przewodem sieciowymObchodzenie się z przewodem sieciowym
Przewód sieciowy musi być dokładnie podłączony i nie może być
uszkodzony. Złe kontaktowanie i uszkodzenie przewodu sieciowego
może być przyczyną pożaru lub porażenia prądem. Nie rozciągaj,
zginaj i nie umieszczaj ciężkich przedmiotów na przewodzie.
Przy wyłączaniu przewodu z sieci ciągnij za wtyczkę. Ciągnięcie za
przewód sieciowy może doprowadzić do porażenia prądem.
Nigdy nie dotykaj wtyczki mokrymi rękami. Może to doprowadzić do
porażenia prądem.
Ciała obceCiała obce
Nie dopuszczaj do tego, aby metalowe przedmioty przypadkowo
wpadły do urządzenia. Może to spowodować porażenie prądem lub
uszkodzenie urządzenia.
Nie dopuszczaj do dostania się płynów do wnętrza. Może to
spowodować porażenie prądem lub uszkodzenie urządzenia. Jeśli do
tego dojdzie, natychmiast wyłącz urządzenie z sieci i skontaktuj się z
punktem sprzedaży.
Unikaj rozpylania środków owadobójczych w aerozolu w pobliżu
urządzenia. Zawierają one łatwopalne gazy, które mogą się zapalić
jeżeli dostaną się do wnętrza.
SerwisSerwis
Nigdy nie próbuj naprawiać urządzenia samodzielnie. Jeśli dźwięk jest
przerywany, wskaźniki nie świecą, pojawia się dym lub inny problem
nieopisany w tej instrukcji, wyłącz urządzenie z sieci i skontaktuj się
z punktem sprzedaży lub z autoryzowanym punktem serwisowym.
Może dojść do porażenia prądem lub uszkodzenia urządzenia, jeśli
urządzenie będzie naprawiane, rozbierane lub przerabiane przez
niewykwalifikowane osoby.
Jeśli urządzenie nie będzie używane przez dłuższy czas, wyłącz je z
sieci, co wydłuży jego czas poprawnej pracy.
Spis treści
Środki ostrożności ..............................................3
Dostarczone wyposażenie..................................4
Przygotowanie pilota zdalnego sterowania ...... 5
Kompatybilny iPod i iPhone................................ 5
Ładowanie iPod’a lub iPhone’a .......................... 5
Podłączanie iPod’a lub iPhone’a ........................ 6
Odsłuchiwanie zawartości iPod’a lub
iPhone’a ............................................................ 7
Podłączanie do komputera ................................. 8
Używanie innego sprzętu.................................... 8
Unikać zakłóceń z innymi urządzeniami
Panasonic ......................................................... 8
Rozwiązywanie problemów ................................ 9
Konserwacja ........................................................ 9
Dane techniczne .................................................. 9
ENGLISH
ESPAÑOL
POLSKI
RQTX1009
3
21
Page 22

ENGLISHPOLSKI ESPAÑOL
RQTX1009
4
22
Dostarczone wyposażenie
Zidenty fikuj poszczególne elementy wyposazenia
standardowego.
1 Przewód sieciowy
1 Adapter AC
(zmiana źródła
zasilania)
1 Przewód audio
1 Pilot zdalnego
sterowania
(RAKX1002)
2 Adaptery dokujące
M12
(dla iPhone’a)
M15
(dla iPhone’a 3G)
1 Litowa bateria
guzikowa
(Bateria znajduje się już w
pilocie.)
Ostrzeżenie
Należy trzymać baterię
guzikową z dala od dzieci.
Nigdy nie wkładać baterii
guzikowej do buzi. W
razie połknięcia należy
skontaktować się z
lekarzem.
Page 23

Przygotowanie pilota zdalnego sterowania
CR2025
Kompatybilny iPod i iPhone
Przed rozpoczęciem korzystania z pilota należy zdjąć powłokę
izolacyjną.
W przypadku, gdy pilot przestanie działać lub zakres działania wydaje
się ograniczony, należy wymienić baterię.
Widok od tyłu
Litowa
bateria
guzikowa
(CR2025)
1 Włożyć przedmiot i wcisnąć w
celu odblokowania zatrzasku.
Skierować sensor sygnału pilota zdalnego sterowania (\ strona 7),
unikając przeszkód, przy maksymalnym zasięgu 7 m, licząc
bezpośrednio od przodu urządzenia.
• Nie zbliżać baterii do źródeł ciepła lub ognia.
• Nie zostawiać baterii (jednej lub więcej) przez dłuższy czas
w pojeździe narażonym na bezpośrednie działanie promieni
słonecznych, z zamkniętymi drzwiami i oknami.
• Należy wyjąć baterię jeśli pilot nie będzie używany przez dłuższy
okres. Przechowywać w chłodnym, ciemnym miejscu.
UWAGA
Istnieje niebezpieczeństwo wybuchu w przypadku, gdy baterie
zostaną nieprawidłowo założone. Baterie należy wymieniać na
takie same lub na baterie równorzędnego typu, zalecane przez
producenta. Zużytych baterii należy pozbywać się zgodnie z
instrukcjami producenta.
Ostrzeżenie
Ryzyko pożaru, wybuchu oraz poparzeń. Nie ładować, rozbierać
na części, podgrzewać do temperatury przekraczającej 60°C lub
doprowadzić do spalenia.
Pociągnąć
• iPhone 3G ( 8GB, 16GB)
• iPhone (4GB, 8GB, 16GB)
• iPod touch 2. generacji (8GB, 16GB, 32GB)
• iPod nano 4. generacji (wideo) (8GB, 16GB)
• iPod classic (120GB)
• iPod touch 1. generacji (8GB, 16GB, 32GB)
• iPod nano 3. generacji (wideo) (4GB, 8GB)
• iPod classic (80GB, 160GB)
• iPod nano 2. generacji (aluminiowy) ( 2GB, 4GB, 8GB)
• iPod 5. generacji (wideo) (60GB, 80GB )
• iPod 5. generacji (wideo) (30GB)
• iPod nano 1. generacji (1GB, 2GB, 4GB)
• iPod 4. generacji (kolorowy wyświetlacz) (40GB, 60GB)
• iPod 4. generacji (kolorowy wyświetlacz) (20GB, 30GB)
• iPod 4. generacji (40GB)
• iPod 4. generacji ( 20GB)
• iPod mini (4GB, 6GB)
Kompatybilność jest uzależniona od wersji oprogramowania
zainstalowanego na iPod’zie lub iPhone’ie.
Ładowanie iPod’a lub iPhone’a
• iPod lub iPhone będą ładowane automatycznie w momencie
podłączenia głównego urządzenia do zasilania.
• Należy sprawdzić iPod lub iPhone pod kątem pełnego naładowania
akumulatora.
• W razie niekorzystania z iPod’a lub iPhone’a przez dłuższy okres
czasu po zakończeniu ładowania, należy odłączyć go od głównego
urządzenia, ponieważ bateria ulega wyczerpaniu w naturalny
sposób. (Po pełnym naładowaniu nie nastąpi dodatkowe ładowanie.)
ENGLISH
ESPAÑOL
POLSKI
RQTX1009
5
23
Page 24

Podłączanie iPod’a lub iPhone’a
1 Podłączyć zasilanie AC.
Widok od tyłu
ENGLISHPOLSKI ESPAÑOL
Adapter AC (zmiana
źródła zasilania)
(należy do wyposażenia)
Po podłączeniu wtyczki głównego przewodu zasilacz prądu
przemiennego (zmiana źródła zasilania) przejdzie w tryb czuwania.
Obwód pierwotny będzie zawsze „żywy”, dopóki wtyczka głównego
przewodu będzie podłączona do gniazdka elektrycznego.
Uwaga:
• Załączony przewód zasilania może być używany tylko z tym
urządzeniem. Nie wolno używać go z innymi urządzeniami.
• Nie stosować przewodów zasilających, pochodzących z innych
urządzeń.
• Nie używać innych zasilaczy (zmiana źródeł zasilania) prądu
przemiennego za wyjątkiem dołączonego.
RQTX1009
6
24
Przewód sieciowy
(należy do wyposażenia)
Do domowego
gniazdka
zasilającego
2 Zamocować adapter dokujący w głównym urządzeniu.
iPod
Należy użyć adaptera dołączonego do iPod’a lub sprawdzić listę
adapterów kompatybilnych z Apple Inc. (odnośnie szczegółów,
patrz instrukcje dołączone do adapterów dokujących), który być
może będzie musiał być zakupiony osobno.
iPhone
W trakcie odtwarzania zawartości iPhone’a należy użyć
właściwego adaptera iPhone.
3 Podłączyć iPod lub iPhone do głównego urządzenia.
Przytrzymaj główne urządzenie podczas podłączania lub
rozłączania iPod’a lub iPhone’a.
iPod
(nie należy do
wyposażenia)
Adapter dokujący
iPod’a
(nie należy do
wyposażenia)
Podczas usuwania użyć
paznokcia lub płaskiego
przedmiotu i podnieść.
Page 25

Odsłuchiwanie zawartości iPod’a lub iPhone’a
Urządzenie główne
Czujnik sygnału
Wskaźnik
SURROUND
(dżwíęk
przestrzenny)
Wskaźnik
BASS
(bas)
Pilot zdalnego
sterowania
Pilot zdalnego
sterowania
Można przeglądać zawartość iPod’a lub iPhone’a przy użyciu opisanych przycisków.
Wskaźnik zasilania migocze każdorazowo po wciśnięciu przycisku na pilocie.
Wskaźnik
zasilania
Urządzenie
główne
Funkcja
Dostęp do ekranów menu.
Odtwarzanie lub wstrzymanie
odtwarzania zawartości iPod’a lub
iPhone’a.
Wybór trybu powtarzania odtwarzania
iPod’a lub iPhone’a.
Wybór trybu losowego odtwarzania
iPod’a lub iPhone’a.
Ściszenie dźwięku z głośników.
Aby wyłączyć: Wcisnąć ponownie przycisk
lub wyregulować poziom głośności.
Pilot zdalnego
sterowania
Funkcja
Włączanie lub wyłączanie zasilania głównego urządzenia.
• Wskaźnik zasilania zapali się, gdy urządzenie będzie włączone.
• Przycisk działania nie powoduje oddzielenia całego
urządzenia od głównego nawet w pozycji wyłączenia.
Regulacja poziomu głośności głośników.
Włączenie lub wyłączenie efektu dźwiękowego.
• Wskaźnik SURROUND głównego urządzenia zapala się po
włączeniu funkcji surround (przestrzennej).
Włączenie lub wyłączenie efektu basu.
• Wskaźnik BASS głównego urządzenia zapala się po
włączeniu funkcji bass (basu).
Pilot zdalnego
sterowania
Uwaga:
Odnośnie szczegółów działania iPod’a lub iPhone’a, patrz
instrukcja obsługi użytkownika iPod’a lub iPhone’a.
Funkcja
Wcisnąć w celu przejścia do poprzedniego
lub następnego utworu.
Wcisnąć i przytrzymać w celu
wyszukiwania wstecz lub w przód do
pożądanego utworu.
Wybór elementu na ekranie menu.
Wcisnąć i przytrzymać: Przewijanie listy.
Zatwierdzenie wybranego menu lub
odtwarzania.
ENGLISH
ESPAÑOL
POLSKI
RQTX1009
7
25
Page 26

Podłączanie do komputera
Używanie innego sprzętu
Gdy iPod lub iPhone są podłączone do głównego urządzenia, można
przenosić dane z komputera przy użyciu połączenia USB.
Widok od tyłu
ENGLISHPOLSKI ESPAÑOL
Przewód USB (nie należy do wyposażenia)
1 Podłączyć przewód USB do portu USB głównego
urządzenia i komputera.
Patrz instrukcja obsługi użytkowników iPod’a lub iPhone’a
odnośnie synchronizacji komputera.
2 Odłączanie przewodu USB winno odbywać się z
zachowaniem procedury bezpiecznego usuwania
sprzętu.
Na niektórych systemach komputerowych mogą wystąpić problemy
z nagrywaniem i obsługą.
Panasonic oraz sprzedawcy Panasonic nie ponoszą
RQTX1009
odpowiedzialności za utracone dane lub inne bezpośrednie lub
pośrednie szkody, za wyjątkiem przypadków zamierzonego lub
8
poważnego zaniedbania.
26
Przygotowanie
• Upewnić się, iż iPod lub iPhone nie są podłączone do głównego
urządzenia.
• Upewnić się, że inny sprzęt jest ustawiony, a jego poziom głośności
ściszony przed podłączeniem do głównego urządzenia.
Przenośny sprzęt audio
(nie należy do wyposażenia)
Przewód audio (należy do wyposażenia)
Inny sprzęt, jak przenośny sprzęt audio, itd., należy podłączyć do
MUSIC PORT (gniazda audio) przy użyciu załączonego przewodu.
Widok od tyłu
Unikać zakłóceń z innymi urządzeniami Panasonic
Można obsługiwać niniejsze urządzenie przy użyciu innego trybu.
Panel sterowania głównego urządzenia i pilot zdalnego
sterowania muszą być ustawione do tego samego trybu.
1 Wcisnąć i przytrzymać [SURROUND] na głównym
urządzeniu oraz [BASS] na pilocie przez co najmniej 3
sekundy.
Wskaźnik zasilania zamigocze 3 razy, potwierdzając zmianę.
2 Wcisnąć i przytrzymać [OK] oraz [BASS] na pilocie
przez co najmniej 2 sekundy.
W celu powrotu do trybu domyślnego, należy powtórzyć powyższe
kroki. W kroku 2, zamienić [BASS] na [MUTE].
Page 27

Rozwiązywanie problemów
Dane techniczne
Przed oddaniem urządzenia do naprawy należy przeprowadzić
następujące kontrole. W razie wątpliwości odnośnie niektórych
punktów kontrolnych, lub jeśli rozwiązania podane w tabeli
nie powodują usunięcia problemu, należy skonsultować się ze
sprzedawcą w celu uzyskania dalszych instrukcji postępowania.
Brak zasilania
Brak dźwięku
Pilot nie działa
Zniekształcony
dźwięk
iPod lub iPhone
nie ładuje się
Nie można użyć
synchronizacji
komputera
• Upewnić się, że przewód głównego
zasilania AC jest połączony w prawidłowy
sposób.
• Wyregulować dźwięk.
• Sprawdzić, czy funkcja ściszenia głosu jest
włączona.
• Aktualizować iPod lub iPhone przy użyciu
najnowszego oprogramowania.
• iPod lub iPhone został nieprawidłowo
umieszczony w porcie. Wyłączyć iPod lub
iPhone, usunąć ze złącza dokującego.
Włożyć go ponownie i włączyć.
• Wymienić baterię.
• Upewnić się, że iPod lub iPhone są
prawidłowo umieszczone w urządzeniu.
• Zmniejszyć poziom głośności.
• Ustawić „EQ” iPod’a na „Off” lub „Flat”.
• Sprawdzić połączenia. (\ strona 6)
• Włączyć główne urządzenie.
• Sprawdzić połączenia komputera i iPod’a
lub iPhone’a. (\ strona 6, 8)
Konserwacja
W celu oczyszczenia urządzenia należy przetrzeć go miękką,
suchą szmatką.
• Do czyszczenia urządzenia nie należy stosować alkoholu,
rozcieńczalnika ani benzyny.
• Przed użyciem chusteczki nasączonej środkiem chemicznym należy
zapoznać się z dołączoną do niej instrukcją.
SEKCJA WZMACNIACZA
Obwód zasilania wyjściowego trybu stereo RMS
Kanał przedni (przy użyciu obu kanałów)
5 W na kanał (6 Ω), 1 kHz, 10% THD
Kanał niskotonowy 10 W na kanał (6 Ω), 100 Hz, 10% THD
Całkowite zasilanie trybu stereo RMS 20 W
SEKCJA ZŁĄCZY
Gniazda audio (tył)
Czułość 350 mV, 13,2 kΩ
Złącze Stereo, złącze 3,5 mm
SEKCJA ZESTAWÓW GŁOŚNIKOWYCH
Przednie reproduktory
Głośnik(i) Impedancja: 6 Ω
Pełen zakres Stożkowy 4 cm
Moc wejściowa (IEC) 5 W (Maks.)
Głośnik niskotonowy
Głośnik(i) Impedancja: 6 Ω
Wbudowany głośnik niskotonowy Stożkowy 6,5 cm
Pasywny radiator (x2) 6,5 cm
Moc wejściowa (IEC) 10 W (Maks.)
DANE OGÓLNE
Zasilanie
Pobór mocy 15,6 W (tylko jednostki)
Adapter AC (zmiana źródła zasilania)
Prąd zmienny 100 do 240 V, 50/60 Hz
Pobór mocy 36 W
Wymiary (szer. x wys. x głęb.) 175 mm x 138,8 mm x 178,5 mm
Masa 0,85 kg
Zakres temperatur roboczych 0°C do +40°C
Zakres wilgotności roboczych od 20% do 80% RH (bez kondensacji)
Zużycie mocy w stanie gotowości: 0,7 W (około)
Uwaga:
1) Producent zastrzega sobie możliwość wprowadzenia zmian bez
uprzedzenia.
Masa i wymiary podane są w przybliżeniu.
2) Całkowite zniekształcenie harmoniczne było zmierzone za pomocą
cyfrowego analizatora widma.
Prąd stały 12 V (złącze wejściowe zasilania prądem stałym)
ENGLISH
ESPAÑOL
POLSKI
RQTX1009
9
27
Page 28

Vážený Zákazníku
Děkujeme za zakoupení tohoto výrobku. Pro dosažení optimálního výkonu a z bezpečnostních důvodu si pečlivě přečtěte tyto pokyny.
Dříve než začnete jakékoli zapojování, provoz nebo nastavování tohoto výrobku, prostudujte si prosím celý tento návod. Uschovejte si
prosím tento návod k obsluze.
ČESKYPOLSKI ESPAÑOL
RQTX1009
2
28
Page 29

Bezpečnostní upozornění
UmístěníUmístění
Umístěte přístroj na vodorovný povrch mimo dosah přímého
slunečního záření, vysokých teplot, vlhkosti a přílišných vibrací.
Takové prostředí by mohlo poškodit skříňku přístroje nebo jiné
komponenty a zkrátit tak životnost přístroje.
Neumísujte na přístroj těžké předměty
NapětíNapětí
Nepoužívejte pro napájení zásuvky s vysokým napětím. To může vést
k přetížení přístroje a způsobit požár.
K napájení nepoužívejte stejnosměrný zdroj. Zkontrolujte pečlivě zdroj,
zapojujete-li přístroj na lodi nebo podobném místě, kde se používá
stejnosměrný proud.
Ochrana přívodu střídavého prouduOchrana přívodu střídavého proudu
Přesvědčte se, že je síový kabel řádně zapojen, a že není poškozen.
Špatné připojení nebo poškození kabelu může zapříčinit požár nebo
úraz elektrickým proudem. Za kabel netahejte, neohýbejte ho a
neumísujte na něj těžké předměty.
Při odpojování kabelu vždy uchopte pevně zástrčku. Tahání za kabel
může způsobit úraz elektrickým proudem.
Nezacházejte s kabelem mokrýma rukama. To může zapříčinit úraz
elektrickým proudem.
Cizí předmětyCizí předměty
Zabraňte vniknutí kovových předmětů do přístroje. To může zapříčinit
úraz elektrickým proudem nebo poruchu.
Zabraňte vniknutí kapaliny do přístroje. To může zapříčinit úraz
elektrickým proudem nebo poruchu. Pokud se tak stane, okamžitě
odpojte přístroj ze sítě a kontaktujte vašeho prodejce.
Nerozprašujte žádné insekticidy na přístroj ani do něj. Obsahují
hořlavý plyn, který by mohl ve styku s přístrojem vzplanout.
ServisServis
Nepokoušejte se přístroj opravit sami. Pokud přístroj přestane hrát,
displej přestane svítit, objeví se kouř nebo dojde k jinému problému,
který není popsán v těchto instrukcích, odpojte přístroj ze sítě a
kontaktujte vašeho prodejce nebo autorizovaný servis. Pokud se
nekvalifikovaná osoba snaží rozebrat nebo opravit přístroj, může dojít
k úrazu elektrickým proudem nebo k poškození přístroje.
Pokud přístroj delší dobu nepoužíváte, odpojte ho ze sítě, prodloužíte
tak jeho životnost.
Obsah
Bezpečnostní upozornění ................................... 3
Dodávané příslušenství ....................................... 4
Příprava dálkového ovladače ............................. 5
Kompatibilita s iPod a iPhone ............................ 5
Nabíjení iPodu nebo iPhone ............................... 5
Připojení zařízení iPod nebo iPhone .................. 6
Poslouchání hudby z iPodu nebo iPhone .......... 7
Připojení k počítači.............................................. 8
Používání jiného zařízení ....................................8
Zabraňte rušení s jiným zařízením
Panasonic ......................................................... 8
Odstraňování závad ............................................ 9
Údržba .................................................................. 9
Specifikace ........................................................... 9
ČESKY
ESPAÑOL
POLSKI
RQTX1009
3
29
Page 30

Dodávané příslušenství
ČESKYPOLSKI ESPAÑOL
RQTX1009
4
30
Zkontrolujte si prosím a identifikujte dodávané
příslušenství.
1 Kabel přívodu
střídavého proudu
1 Síový adaptér
(přepínací zdroj)
1 Audio kabel
1 Dálkové ovládání
(RAKX1002)
2 Dokovací adaptér
(pro iPhone 3G )
1 Knoflíková Li baterie
(Baterie je v dálkovém ovladači
již vložena.)
Varování
Knoflíkovou baterii udržujte
mimo dosah dětí. Nikdy
nedávejte knoflíkovou baterii
do úst. Při jejím spolknutí
okamžitě zavolejte lékaře.
(pro iPhone)
M12
M15
Page 31

Příprava dálkového ovladače
CR2025
Kompatibilita s iPod a iPhone
Před prvním použitím dálkového ovladače vyjměte izolační proužek.
Baterii v dálkovém ovladači vyměňte, když přestane fungovat nebo
když se zdá, že je zhoršen jeho dosah.
Pohled zezadu
Knoflíková
Li baterie
(CR2025)
Vytáhněte
1 Zasuňte vhodný předmět a
stlačením dolů odjistěte pojistku.
Zamiřte na čidlo signálu dálkového ovládání (\ str. 7) tak, aby v cestě
nebyly překážky, z maximální vzdálenosti 7 m přímo před přístrojem.
• Baterie nezahřívejte a nevhazujte do ohně.
• Nenechávejte baterie v automobilu vystavené přímému slunečnímu
světlu po delší dobu, když jsou zavřené dveře a okna.
• Jestliže dálkový ovládač nehodláte delší dobu používat, baterii
vyjměte. Skladujte na chladném a tmavém místě.
POZOR
V případě nesprávné výměny baterie hrozí nebezpečí výbuchu.
Vyměňujte pouze za stejný nebo rovnocenný typ, který
doporučuje výrobce. Použité baterie likvidujte podle pokynů
výrobce.
Varování
Nebezpečí požáru, výbuchu a popálení. Nedobijete, nerozebírejte,
nevystavujte teplotám nad 60°C a nevhazujte do ohně.
• iPhone 3G ( 8GB, 16GB)
• iPhone (4GB, 8GB, 16GB)
• iPod touch 2. generace (8GB, 16GB, 32GB)
• iPod nano 4. generace (video) (8GB, 16GB)
• iPod classic (120GB)
• iPod touch 1. generace (8GB, 16GB, 32GB)
• iPod nano 3. generace (video) (4GB, 8GB)
• iPod classic (80GB, 160GB)
• iPod nano 2. generace (hliníkový) (2GB, 4GB, 8GB)
• iPod 5. generace (video) (60GB, 80GB)
• iPod 5. generace (video) (30GB)
• iPod nano 1. generace (1GB, 2GB, 4GB)
• iPod 4. generace (barevný displej) (40GB, 60GB)
• iPod 4. generace (barevný displej) (20GB, 30GB)
• iPod 4. generace (40GB)
• iPod 4. generace (20GB)
• iPod mini (4GB, 6GB)
Kompatibilita závisí rovněž na verzi softwaru iPod nebo iPhone.
Nabíjení iPodu nebo iPhone
• iPod nebo iPhone se dobijí automaticky, pokud je hlavní jednotka
připojena k napájení.
• Zkontrolujte iPod nebo iPhone, chcete-li ověřit, zda je baterie plně
dobita.
• Pokud nebudete po dokončení nabíjení iPod nebo iPhone po delší
dobu používat, odpojte jej od hlavní jednotky, jinak dochází ke
zhoršování baterie. (Po úplném dobití k dalšímu dobíjení nedochází.)
ČESKY
ESPAÑOL
POLSKI
RQTX1009
5
31
Page 32

Připojení zařízení iPod nebo iPhone
1 Připojte kabel napájení.
Pohled zezadu
ČESKYPOLSKI ESPAÑOL
Síový adaptér
(přepínací zdroj)
(je v příslušenství)
Síový adaptér (přepínací zdroj) je v pohotovostním stavu, když
je připojen do elektrické sítě. Dokud je síový adaptér zapojen do
zásuvky, je primární obvod pod napětím.
Poznámka :
• Dodávaný elektrický kabel je pouze pro tento přístroj.
Nepoužívejte ho s jiným zařízením.
• Nepoužívejte napájecí kabely jiného zařízení.
• Nepoužívejte žádné jiné síové adaptéry (přepínací zdroje) s
výjimkou dodaných.
RQTX1009
6
32
Kabel přívodu
střídavého proudu
(je v příslušenství)
Pro domácí
síovou
zásuvku
2 Vložte dokovací adaptér do hlavní jednotky.
iPod
Použijte adaptér dodaný s iPodem nebo se použijte adaptér
doporučený společností Apple Inc. (podrobnosti naleznete v
návodu dodávaném s dokovacími adaptéry), který může být nutné
zakoupit samostatně.
iPhone
Při přehrávání z iPhonu použijte vhodný iPhone adaptér.
3 Připojte iPod nebo iPhone k hlavní jednotce.
Při připojování nebo odpojování zařízení iPod nebo iPhone hlavní
jednotku přidržte.
iPod
(není v příslušenství)
Dokovací adaptér
pro iPod
(není v příslušenství)
Při odstraňování vložte
svůj nehet nebo plochý
předmět na zdvihněte.
Page 33

Poslouchání hudby z iPodu nebo iPhone
Hlavní jednotka
Snímač signálu
dálkového
ovládání
Kontrolka
SURROUND
Kontrolka
BASS
(basy)
Dálkové ovládání
Dálkové
ovládání
Můžete procházet hudbu uloženou v iPodu nebo iPhone pomocí popsaných tlačítek.
Kontrolka napájení bliká pokaždé, když stisknete tlačítko na dálkovém ovladači.
Indikátor
napájení
Hlavní
jednotka
Funkce
Přístup k obrazovkám menu.
Přehrávání nebo pozastavení přehrávání z
iPodu nebo iPhone.
Výběr režimu opakovaného přehrávání na
zařízení iPod nebo iPhone.
Výběr režimu shuffle na zařízení iPod nebo
iPhone.
Vypnutí zvuku z reproduktorů.
Pro zrušení: Znovu stiskněte tlačítko nebo
upravte hlasitost.
Dálkové
ovládání
Funkce
Zapnutí nebo vypnutí hlavní jednotky.
• Když je hlavní jednotka zapnutá, rozsvítí se kontrolka napájení.
• Tento spínač neodpojí celou jednotku od zdroje napájení ani v
poloze vypnuto.
Nastavení hlasitosti reproduktorů.
Zapnutí nebo vypnutí efektu surround.
• Kontrolka SURROUND na hlavní jednotce se po zapnutí funkce
surround rozsvítí.
Zapnutí nebo vypnutí efektu basů.
• Kontrolka BASS (basy) na hlavní jednotce se po zapnutí této
funkce rozsvítí.
Dálkové
ovládání
Poznámka :
Podrobné informace o ovládání iPodu nebo iPhone najdete
v jejich uživatelském návodu.
Funkce
Po stisknutí přeskočení na předchozí nebo
další skladbu.
Po stisknutí a přidržení posun vzad nebo
vpřed na požadovanou skladbu.
Výběr položky na obrazovce menu.
Stisknutí a přidržení: Procházení
seznamem.
Potvrzení vybrané položky menu nebo
přehrávání.
ČESKY
ESPAÑOL
POLSKI
RQTX1009
7
33
Page 34

Připojení k počítači
Používání jiného zařízení
Když je k hlavní jednotce připojen iPod nebo iPhone, můžete přenášet
data z počítače přes rozhraní USB.
Pohled zezadu
ČESKYPOLSKI ESPAÑOL
USB kabel (není v příslušenství)
1 Připojte USB kabel k USB portu hlavní jednotky a
počítače.
Podrobnosti o synchronizaci naleznete v uživatelském návodu k
iPodu nebo iPhone.
2 Před odpojením USB kabelu nezapomeňte na počítači
bezpečně odebrat USB zařízení.
U některých počítačových systémů mohou nastat problémy s
nahráváním a funkcí.
Vezměte na vědomí, že Panasonic ani prodejci Panasonic
neodpovídají za ztrátu dat nebo jiné přímé či nepřímé škody s
RQTX1009
výjimkou případů záměrné nebo hrubé nedbalosti.
8
34
Příprava
• Zkontrolujte, že iPod nebo iPhone není připojen k hlavní jednotce.
• Zkontrolujte, že je druhé zařízení plně nastaveno a jeho hlasitost
snížena před připojením k hlavní jednotce.
Přenosné audiozařízení
(není v příslušenství)
Audio kabel (je v příslušenství)
Připojte další zařízení, například přenosné audio zařízení apod.,
k MUSIC PORT (hudební port) pomocí dodaného audio kabelu.
Pohled zezadu
Zabraňte rušení s jiným zařízením Panasonic
Tuto jednotku můžete ovládat pomocí jiného režimu.
Hlavní jednotka a dálkový ovladač musí být nastaveny na stejný
režim.
1 Stiskněte a přidržte [SURROUND] na hlavní jednotce a
[BASS] na dálkovém ovladači nejméně na 3 sekundy.
Kontrolka napájení 3krát blikne pro potvrzení změny.
2 Stiskněte a přidržte [OK] a [BASS] na dálkovém
ovladači nejméně na 2 sekundy.
Pro návrat do výchozího režimu zopakujte výše uvedené kroky. V
kroku 2 nahrate [BASS] ze [MUTE]
Page 35

Odstraňování závad
Specifikace
Před žádostí o servis prove te následující kontroly. Jestliže máte
pochybnosti o některých bodech kontroly nebo jestliže návrhy na
vyřešení problému uvedené v tabulce problém nevyřeší, vyžádejte si
pokyny od svého prodejce.
Chybí napájení
Nehraje zvuk
Dálkový ovladač
nefunguje
Zkreslený zvuk
iPod nebo iPhone
se nenabijí
Nelze použít
synchronizaci s
počítačem
• Zkontrolujte, že je síový kabel správně
připojen.
• Nastavte hlasitost.
• Zkontrolujte, zda je funkce vypnutí zvuku
povolena.
• Aktualizujte svůj iPod nebo iPhone na
nejnovější software.
• iPod nebo iPhone nejsou správně zasunuty
do dokovací jednotky. Vypněte iPod
nebo iPhone a vyjměte je z dokovacího
konektoru. Zasuňte znovu a zapněte.
• Vyměňte baterii.
• Zkontrolujte, zda je iPod nebo iPhone
správně umístěn v jednotce.
• Snižte hlasitost.
• Nastavte „EQ“ iPodu na „Off“ nebo „Flat“.
• Zkontrolujte připojení. (\ str. 6)
• Zapněte hlavní jednotku.
• Zkontrolujte připojení počítače a iPodu
nebo iPhone. (\ str. 6, 8)
Údržba
K vyčištění přístroje použijte jemný a suchý hadřík.
• Nikdy nepoužívejte k čištění přístroje alkohol, ředidlo nebo technický
benzín.
• Před použitím chemicky impregnované látky si pročtěte instrukce
přiložené k látce.
SEKCE ZESILOVAČE
Výstupní výkon RMS ve stereo režimu
Přední kanál (oba kanály napájeny)
5 W na kanál (6 Ω), 1 kHz, 10% THD
Kanál subwooferu 10 W na kanál (6 Ω), 100 Hz, 10% THD
Celkový výstupní výkon RMS 20 W
SEKCE PŘIPOJENÍ
Hudební port (zadní)
Citlivost 350 mV, 13,2 kΩ
Konektor Stereo, konektor 3,5 mm
SEKCE REPRODUKTORŮ
Přední reproduktory
Reproduktor(y) Impedance: 6 Ω
Plný rozsah 4 cm kónický
Příkon (IEC) 5 W (Max)
Subwoofer
Reproduktor(y) Impedance: 6 Ω
Woofer 6,5 cm kónický
Pasivní chladič (x2) 6,5 cm
Příkon (IEC) 10 W (Max)
VŠEOBECNĚ
Napájení DC 12 V (zdířka DC IN)
Spotřeba 15,6 W (pouze jednotka)
Síový adaptér (přepínací zdroj) AC 100 až 240 V, 50/60 Hz
Spotřeba 36 W
Rozměry (ŠxVxH) 175 mm x 138,8 mm x 178,5 mm
Hmotnost 0,85 kg
Rozsah provozních teplot 0°C až +40°C
Rozsah provozní vlhkosti 20% až 80% RH (bez kondenzace)
Spotřeba v pohotovostním režimu (standby): 0,7 W (přibližně)
Poznámka :
1) Technické údaje podléhají změnám bez předchozího upozornění.
Hmotnost a rozměry jsou přibližné.
2) Celkové harmonické zkreslení je měřeno digitálním spektrálním
analyzátorem.
ČESKY
ESPAÑOL
POLSKI
RQTX1009
9
35
Page 36

Уважаемый Покупатель
Благодаpим Вас за покупку данного изделия. Чтобы получить оптимальное качество pаботы с истемы и обес печить безопасно сть работы, пожалуйста,
внимательно пpочтите данную инстpукцию.
Перед подключением, работой или регулировкой данного устройства, пожалуйста, прочтите данную инструкцию полностью. Сохраните,
пожалуйста, данную инструкцию для того, чтобы иметь возможность сверяться с ней в будущем.
ENGLISHENGLISH
РУССКИЙ ЯЗЫК
RQTX1009
2
36
Page 37

Меpы предосторожности
РасположениеРасположение
Установите устройство на ровной поверхности пода льше от воздействия
прямого солнечного света, высоких темпеpатуp, высокой вла жнос ти и
чрезмерных вибpаций. Вышеперечисленные факторы могут повpедить
коpпус устройства, а также дpугие компоненты, и сократить тем самым
сpок его службы.
Не ставьте на устройство тяжелые предметы.
НапpяжениеНапpяжение
Не используйте источники электропитания высокого напряжения. Это
может привести к перегрузке устройства и возникновению пожаpа.
Не используйте источники питания постоянного тока. Перед установкой
устройства на судах или в дpугом месте, где используется постоянный
ток, обязательно пpовеpьте источник электропитания.
Защита кабеля электропитанияЗащита кабеля электропитания
Убедитесь в том, что сетевой кабель переменного тока подключен
правильно, и не поврежден. Плохое подключение, а также повреждение
кабеля могу т привести к пожару, или пора жению электрическим током.
Не тяните за кабель, не сги байте его, а также не кладите на него
тяжелые предметы.
При отк лючении кабеля, крепко держите его за штепсельную вилку.
Если тянуть за сетевой кабель переменного тока, это может привести к
поражению электрическим током.
Не прикасайтесь к вилке мокрыми руками. Это может привести к
поражению электрическим током.
Постоpонние пpедметыПостоpонние пpедметы
Не допускайте попадания металлических предметов внутрь устройства.
Это может привести к пора жению электр ическим током или
возникновению неисправности.
Не допускайте попадания в аппарат жидкостей. Это может привести
к поражению электрическ им током или неисправности. Если это
произойдет, немед ленно отключите устройс тво от источника
электропитания, и обратитесь к мес тному дилеру.
Не pаспыляйте на устройство, а так же внутрь него инсектициды. Они
содержат горючие газы, которые могy т воспламениться при распылении
внутри устройства.
РемонтРемонт
Не пытайтесь отремонтировать данное устройство самостоятельно.
Если прерывается звук, не светятся индикаторы, появился дым, или
возникла любая другая неполадка, которая не описана в данной
инструкции, отключите кабель электропитания переменного тока и
обратитесь к местному торговому представителю или в уполномоченный
центр сервис ного обслу живания. Eсли ремонт устройства, его разборка
или реконструкция выполняется неквалифицированным персоналом,
возможно пора жение электрическим током или повреждение
устройства.
Срок службы ус тройства можно увеличить, отключив его от источника
электропитания, если он не будет использоваться в течение
продолжительного периода времени.
Содеpжание
Меpы предосторожности .......................................... 3
Пpилагаемые пpинадлeжности ............................... 4
Подготовка пульта ДУ ............................................... 5
Совместимые iPod и iPhone .....................................5
Зарядка iPod или iPhone ........................................... 5
Подсоединение iPod или iPhone .............................. 6
Прослушивание iPod или iPhone ............................. 7
Подключение к ПК ..................................................... 8
Использование другого оборудования .................. 8
Избегайте влияния на работу другого
оборудования Panasonic ...................................... 8
Руководство по поиску и устранению
неисправностей ...................................................... 9
Обслуживание ............................................................ 9
Технические характеристики ................................... 9
ENGLISH
РУССКИЙ ЯЗЫК
ENGLISH
RQTX1009
3
37
Page 38

Пpилагаемые пpинадлeжности
ENGLISHENGLISH
РУССКИЙ ЯЗЫК
RQTX1009
4
38
Проверьте наличие дополнительных
принадлежностей в комплекте.
1 Ceтeвoй кабель
пеpеменного тока
1 Сетевой адаптер
(импульсный источник
электропитания)
1 Аудио кабель
1 Пульт ДУ
(RAKX1002)
2 Док-адаптеры
M12
(для iPhone)
M15
(для iPhone 3G)
1 Литиевая батарейка-
таблетка
(Батарейка уже вставлена в
пульт ДУ.)
Предупреждение
Держите кнопочную
батарейку в недоступном
для детей месте. Никогда
не кладите кнопочную
батарейку в рот. В случае
проглатывания обратитесь
к врачу.
Page 39

Подготовка пульта ДУ
CR2025
Совместимые iPod и iPhone
Перед первым использованием пульта ДУ снимите с него защитную
пленку.
Замените батарейку пульта ДУ, когда она прекратит свою работ у или
когда диапазон срабатывания пульта ДУ заметно сократится.
Вид сзади
Литиевая
батарейкатаблетка
(CR2025)
1
Вставьте предмет и толкните
вниз, чтобы открыть фиксатор.
Находясь непосредственно перед аппаратом, направьте на датчик
сигна ла дистанционного управления (\ стp. 7), избегая препятствий,
с максимального расстояния 7 метров.
•
Нельзя допускать нагрев или контакт с пламенем.
•
Нельзя оставлять батарейку(и) в автомобилях, не защищенных от
воздействия прямых солнечных лучей в течение д лительного времени
с закрытыми дверями и окнами.
•
Вынимайте батарейку, если пульт ДУ не будет использоваться в
течение длительного времени. Храните их в прохладном темном месте.
ПРЕДУПРЕЖДЕНИЕ
При неправильной замене аккумулятора возникает опас ность
взрыва. Производить замену, исполь зуя только тот же
тип акк умулятора, или равноценный ему, рекомендуемый
производителем. Размещение в отходы исполь зованных
аккумуляторов производить согласно инструкциям производителя.
Предупреждение
Опасность пожара, взрыва и пламени. Не перезаряжайте, не
разбирайте, не нагревайте выше 60°C и не сжигайте.
Потяните
•
iPhone 3G (8 Гбайт, 16 Гбайт)
•
iPhone (4 Гбайт, 8 Гбайт, 16 Гбайт)
•
iPod touch 2-го поколения (8 Гбайт, 16 Гбайт, 32 Гбайт)
•
iPod nano 4-го поколения (видео) (8 Гбайт, 16 Гбайт)
•
iPod classic (120 Гбайт)
•
iPod touch 1-го поколения (8 Гбайт, 16 Гбайт, 32 Гбайт)
•
iPod nano 3-го поколения (видео) (4 Гбайт, 8 Гбайт)
•
iPod classic (80 Гбайт, 160 Гбайт)
•
iPod nano 2-го поколения (алюминиевый) ( 2 Гбайт, 4 Гбайт, 8 Гбайт)
•
iPod 5-го поколения (видео) (60 Гбайт, 80 Гбайт)
•
iPod 5-го поколения (видео) (30 Гбайт)
•
iPod nano 1-го поколения (1 Гбайт, 2 Гбайт, 4 Гбайт)
•
iPod 4-го поколения (цветной дисплей ) (40 Гбайт, 60 Гбайт)
•
iPod 4-го поколения (цветной дисплей ) (20 Гбайт, 30 Гбайт)
•
iPod 4-го поколения (40 Гбайт)
•
iPod 4-го поколения (20 Гбайт)
•
iPod mini (4 Гбайт, 6 Гбайт)
Совместимость зависит от версии программного обеспечения,
установленного на iPod или iPhone.
Зарядка iPod или iPhone
•
Устройства iPod или iPhone заряжаются автоматически, когда питание
поступает к основному устройству.
•
Проверьте, распознает ли iPod или iPhone полную зарядк у батарейки.
•
Если iPod или iPhone не будут использоваться в течение длительного
периода времени после выполнения полной зарядки, отсоедините
его от основного устройства, так как батарейка будет разряжаться
естественным образом. (После выполнения полной зарядки
дополнительная подзарядка не осуществляется.)
ENGLISH
РУССКИЙ ЯЗЫК
ENGLISH
RQTX1009
5
39
Page 40

Подсоединение iPod или iPhone
1
Подключите к сетевому адаптеру.
Вид сзади
ENGLISHENGLISH
Сетевой адаптер
(импульсный источник
РУССКИЙ ЯЗЫК
Когда штепсель вставлен в розетк у сети питания, сетевой адаптер
(импульсный источник электро питания) на ходится в состоянии
ожидания. Пока штепсель связан с электрическим выходом, первичная
цепь всегда “работает”.
Примечание:
•
Входящий в комплек т сетевой кабель переменного тока предназначен
для использования исключительно с данным изделием. Не
используйте его с другим оборудованием.
•
Не используйте сетевой шнур от другого оборудования.
•
Использование других сетевых адаптер ов (импульсный источник
электропитания), кроме предоставленных, запрещено.
электропитания)
(входит в комплект)
Ceтeвoй кабель
пеpеменного тока
(входит в комплект)
К электрической
розетке
2
Вставьте док-адаптер в основное устройство.
iPod
Используйте адаптер, входящий в комплект iPod или совместимый
док-адаптер Apple Inc. (подробнее см. в инструкциях к докадаптерам, вход ящим в комплект), которые, возможно, пр идется
приобрести отдельно.
iPhone
При использовании iPhone используйте соответствующий адаптер
iPhone.
3
Подключите iPod или iPhone к основному устройству.
При подключении и отключении iPod или iPhone придерживайте
аппарат.
iPod
(не входит в комплект)
Док-адаптер iPod
(не входит в комплект)
При снятии необходимо
вставить ноготь или
плоский предмет и поднять.
RQTX1009
6
40
Page 41

Прослушивание iPod или iPhone
Основной устройство
Датчик
сигнала
пульта ДУ
Индикатор
SURROUND
(объемное
звучание)
Индикатор
BASS (бас)
Пульт ДУ
Перемещаться по рубрикам iPod или iPhone можно с помощью описанных кнопок.
Индикатор питания мигает каж дый раз, когда нажимается кнопка на пульте ДУ.
Индикатор
питания
Пульт ДУ Функция
Доступ к экранам меню.
Воспроизведение или пауза в
воспроизведении iPod или iPhone.
Выбор режим повтора для iPod или iPhone.
Выбор режима воспроизведения в
случайном порядке д ля iPod или iPhone.
Приглушение звука, идущего из
громкоговорителей.
Для отмены: Нажмите кнопку снова и
отрег улируйте уровень громкости.
Основной
устройство
Пульт ДУ Функция
Включение или выключение питания устройства.
•
Когда аппарат вк лючается, загорается индикатор питания.
•
Выключатель операции не отключает устройство полностью от сети
даже в вык люченном положении.
Регулирование уровня громкости громкоговорителей.
Включение или выключение эффекта объемного зву чания.
•
Индикатор SURROUND (объемное звучание) на основном
устройстве загорается при включении функции объемного звучания.
Включение или вык лючение эффекта звучания басов.
•
Индикатор BASS (бас) на основном устройстве загорается при
включении функции звучания басов.
Пульт ДУ Функция
Нажмите, чтобы перейти к предыдущей или
следующей дорожке.
Нажмите и удерживайте на выполнения
поиска нужной дорожки в обратном и
прямом направлении.
Выберите пункт на экране меню.
Нажмите и удерживайте: Прокрутка вну три
списка.
Подтверж дение выбранного меню или
воспроизведения.
Примечание:
Подробнее о работе iPod или iPhone см. в руководстве по
эксплуатации iPod или iPhone.
ENGLISH
РУССКИЙ ЯЗЫК
ENGLISH
RQTX1009
7
41
Page 42

Подключение к ПК
Использование другого оборудования
Когда iPod или iPhone подключены к основному устройству, передачу
данных с ПК можно осущес твить с помощью устройств и портов USB.
Вид сзади
ENGLISHENGLISH
РУССКИЙ ЯЗЫК
Кабель USB (не входит в комплект)
1
Подсоедините кабель USB к порту USB основного
устройства и ПК.
Подробнее о синхронизации ПК см.в руководстве по эксплуатации
iPod или iPhone.
2
Перед отсоединением кабеля USB необходимо
убедиться в выполнении процедуры безопасного
извлечения устройства из ПК.
НА некоторых компьютерных системах возможны проблемы записи и
функционирования.
Panasonic и дилеры Panasonic не несут ответственности за любые
RQTX1009
потерянные данные или другое прямое или косвенное повреждение,
за исключением случаев намеренной порчи или халатного отношения
8
к оборудованию.
42
Подготовка
•
Убедитесь, что iPod или iPhone не подключен к основному устройству.
•
Перед подключением к основному устройству необходимо убедиться,
что другое оборудование полностью настроено и его уровень
громкости убавлен.
Переносное аудио оборудование
(не входит в комплект)
Аудио кабель (входит в комплект)
Подключите другое оборудование, такое как переносное аудио
оборудование и т.п. к MUSIC PORT (музыкальный порт) с помощью аудио
кабеля, входящего в комплект по ставк и.
Вид сзади
Избегайте влияния на работу другого оборудования Panasonic
Управление данным аппаратом можно осуществлять с помощью
различных режимов.
Основной аппарат и пульт ДУ должны быть установлены в один и
тот же режим.
1
Нажмите и удерживайте кнопку [SURROUND] на
основном аппарате и кнопку [BASS] на пульте ДУ, по
меньшей мере, в течение 3 секунд.
Индикатор питания мигает 3 раза, подтверждая изменение.
2
Нажмите и удерживайте кнопку [OK] и кнопку [BASS] на
пульте ДУ, по меньшей мере, в течение 2 секунд.
Для возврата к режиму по умолчанию повторите действия, указанные
выше. Для действия 2 замените кнопк у [BASS] кнопкой [ MUTE].
Page 43

Руководство по поиску и устранению неисправностей
Технические характеристики
Перед тем, как обратиться к специалисту по техническому
обслуживанию, выполните следующие действия. В случае
возникновения сомнений относительно некоторых пунктов проверки,
или если указанные в таблице методы не решают проблему,
проконсультируйтесь с дилером относительно дальнейших действий.
•
Нет питания
Нет звука
Пульт ДУ не
работает
Искаженный звук
Не происходит
зарядка iPod или
iPhone
Невозможно
использовать
синхронизацию ПК
Убедитесь, что провод питания переменного
тока правильно подсоединен.
•
Отрегулируйте уровень громкости.
•
Убедитесь, что функция приглушения
включена.
•
Установите на iPod или iPhone последнюю
версию программного обеспечения.
•
iPod или iPhone были неправильно вс тавлены
в док. Вык лючите iPod или iPhone, извлеките
его из док-коннектора. Снова вставьте его и
включите.
•
Замените батарейку.
•
Убедитесь, что iPod или iPhone надежно
вставлены в устройство.
•
Уменьшите ур овень громко сти.
•
Установите настройку “EQ” iPod на “Off” или
“Flat”.
•
Проверьте соединения. (\ стp. 6)
•
Включите основное устройство.
•
Проверьте соединения ПК и iPod или iPhone.
(\ стp. 6, 8 )
Обслуживание
Для очистки данного аппарата используйте мягкую сухую ткань.
•
Ни в коем случае не используйте для очис тки аппарата спирт,
растворители или бензин.
•
Перед использованием химически обработанной ткани внимательно
ознакомьтесь с инс трукц ией по эксплуатации данной ткани.
РАЗДЕЛ УСИЛИТЕЛЯ
Стереофонический режим выходной среднеквадратической мощности
Передний канал (управление двумя фронтальными каналами)
5 Вт на канал (6 Ом), 1 кГц, 10% THD
Канал сабвуфера 10 Вт на канал (6 Ом), 100 Гц, 10% THD
Стереофонический режим полной среднеквадратической
мощности 20 Вт
РАЗДЕЛ РАЗЪЕМОВ
Музыкальный порт (задний)
Чувствительность 350 мВ, 13,2 кОм
Разъем Стерео, гнездо 3,5 мм
РАЗДЕЛ ДИНАМИКОВ
Передние динамики
Динамик(-и) Сопротивление: 6 Ом
Полный диапазон 4 см кoничecкoгo типa
Входная мощность (МЭК) 5 Вт (Макс.)
Сабвуфер
Динамик(-и) Сопротивление: 6 Ом
Вуфер 6,5 см кoничecкoгo типa
Пассивный излучатель (
Входная мощность (МЭК) 10 Вт (Макс.)
ОБЩИЕ ПАРАМЕТРЫ
Питание 12 В постоянного тока (разъем для подключения)
Потребляемая мощность 15,6 Вт (только основное устройство)
Сетевой адаптер (импульсный источник электропитания)
Переменный ток от 100 до 240 В, 50/60 Гц
Потребляемая мощность 36 Вт
Размеры (ШxВxГ) 175 мм x 138,8 мм x 178,5 мм
Масса 0,85 кг
Диапазон температуры зксплуатации от 0°C до +40°C
Диапазон влажности зксплуатации
от 20% до 80% относительной влажности (без конденсации)
Потребляемая мощность в режиме ожидания :
Примечание:
1
) Технические характеристики мог ут быть изменены без уведомления.
Вес и размеры даны при близительно.
2
) Полный коэфф ициент гармонических искажений измерялся с
помощью цифрового анализатора спектра.
x2
) 6,5 см
0,7 Bт (приблизительно)
ENGLISH
РУССКИЙ ЯЗЫК
ENGLISH
RQTX1009
9
43
Page 44

Шановний Покупцю
Дякуємо Вам за придбання цього пристрою. Щоб забезпечити найбільш оптимальну та безпечну роботу, будь ласка, уважно ознайомтеся з цими
інструкціями.
Перед тим, як підключати, використовувати або налаштовувати цей пристрій, будь ласка, до кінця прочитайте ці інструкції. Збережіть цей
документ для використання в майбутньому.
ENGLISH
УКНРАЇНСЬКА УКНРАЇНСЬКА
RQTX1009
2
44
Page 45

Застережні заходи
Розташування пристроюРозташування пристрою
Розташовуйте пристрій на рівній поверхні, подалі від прямих сонячних
променів, джерел вис окої температ ури, вологості та надмірної вібраці ї.
Ці фактори можуть пошкодити корпус та інші компоненти пристрою і
скоротити строк його служби.
Не кладіть ва жкі предмети на прис трій.
ЖивленняЖивлення
Не використовуйте джерела живлення високої напруги. Це може
призвести до перенапруги пристрою та викликати пожежу.
Не використовуйте джерела живлення постійного струму. Уважно
перевірте джерело живлення перед тим, як встановлювати пристрій
на борт у судна або в будь-якому іншому місц і, де використовується
постійний струм.
Захист кабелю живлення змінного струмуЗахист кабелю живлення змінного струму
Перевірте, чи кабель живлення змінного струму не пошкоджено та
правильно під’єднано. Поганий контакт або пошкод ження кабелю може
призвести до пожежі або ура ження електричним струмом. Не смикайте,
не згинайте кабель та не ставте на нь ого ва жкі предмети.
Щоб витягнути кабель з розетки, візьміться міцно за штепсельну вилк у
та потягніть ї ї. Смикання кабелю живлення змінного струму може
призвести до ураження електричним струмом.
Не доторкайтесь до штепсельної вилки вологими руками. Це може
призвести до ураження електричним струмом.
Сторонні предметиСторонні предмети
Не допускайте потрапляння металевих предметів всередину пристрою.
Це може призвести до ураження електричним струмом або несправної
роботи пристрою.
Не допускайте проникнення рідини всередину пристрою. Це може
призвести до ураження елек тричним струмом або несправностей у
роботі пристрою. Якщо це трапилось, негайно від’єднайте пристрій від
мережі живлення та зверніться до магазину, в якому Ви його придба ли.
Не розпилюйте засоби від комах або тарганів на пристрій або всередину.
Такі засоби містять легкозаймисті гази, що можу ть спа лахнути в разі
потрапляння у пристрій.
ОбслуговуванняОбслуговування
Не намагайтеся відремонтувати пристрій власноруч. Якщо звук стає
переривчастим, не спрацьовують світлові індикатори, з’являється
дим або виникає будь-яка інша проблема, яка не зга дуєть ся в
цих інструкц іях, від’єднайте кабель жив лення змінного струму від
настінної розетки та зверніться до магазину, в якому Ви пр идбали цей
пристрій, або до авторизованого центру обслуговування. Наслідками
ремонту, розбирання та переладнання пристрою некваліфікованими
спеціалістами може стати ура ження електричним струмом або
пошкодження пристрою.
Щоб подовжити строк служби пристрою, від’єднуйте його від мережі
живлення, коли він не використовуєть ся протягом трива лого часу.
Зміст
Застережні заходи ...................................................... 3
Додаткові пристрої .................................................... 4
Підготовка пульта дистанційного керування ....... 5
Сумісні пристрої iPod та iPhone ............................... 5
Заряджання iPod чи iPhone ...................................... 5
Під’єднання iPod чи iPhone ....................................... 6
Прослуховування з iPod чи iPhone ......................... 7
Під’єднання до комп’ютера ...................................... 8
Використання іншого обладнання .......................... 8
Уникайте інтерференцій з іншим обладнанням
Panasonic ................................................................. 8
Вказівки з усунення несправностей ....................... 9
Обслуговування ......................................................... 9
Технічні характеристики ............................................ 9
ENGLISH
УКНРАЇНСЬКА УКНРАЇНСЬКА
RQTX1009
3
45
Page 46

Додаткові пристрої
ENGLISH
УКНРАЇНСЬКА УКНРАЇНСЬКА
RQTX1009
4
46
Звертаючись за замінними частинами, використовуйте
цифри, зазначені в дужках.
1 Кабель живлення
змінного струму (ЗС)
1 Адаптер змінного струму
(перемикання живлення)
1 Аудіокабель
1 Пульт дистанційного
керування (ДК)
(RAKX1002)
2 Адаптери доку
(для iPhone)
(для iPhone 3G)
1 Літієва батарея
таблеткового типу
(Батарею уже встановлено в
пульт дистанційного керування
[ДК].)
Попередження
Зберігайте батарею у місці,
недоступному для дітей. Не
кладіть батарею в рот. Якщо
Ви чи дитина ненароком
проковтнули батарею,
зверніться до лікаря.
M12
M15
Page 47

Підготовка пульта дистанційного керування
CR2025
Сумісні пристрої iPod та iPhone
Перш ніж користуватись пультом дистанційного керування вперше,
зніміть ізоляційну стрічку.
Замініть батарею пульта ДК, коли він перестає працювати або коли
зменшується діапазон його ді ї.
Вигляд ззаду
Літієва батарея
таблеткового типу
(CR2025)
1
Вставте предмет і натисніть,
щоб розблокувати фіксатор.
Направте на приймач сигналу пульта ДК (\ сторінка 7), уникаючи
перешкоди, максимум із відда лі 7 метрів від передньої панелі пристрою.
•
Не допускайте нагрівання чи контакту батарей з полум’ям.
•
Не залишайте батарею(-ї) в машині під прямим сонячним промінням на
трива лий термін із закритими вікнами та дверима.
•
Виймайте батареї, якщо пульт ДК не використовується впродовж
трива лого часу. Зберігайте їх у прохолодному і темному місці.
УВАГА
Якщо батарейка встановлена неправильно, існує небезпека
вибуху. Замінюйте її тільки на аналогічну батарейку або батарейку
подібного типу, відповідно до рекомендацій виробника обладнання.
Використані батарейки утилізуйте згідно з інструкціями
компанії-виробника.
Попередження
Ризик пожежі, вибух у чи опіків. Не перезаряджайте, не розбирайте,
не нагрівайте виріб до температури понад 60°C та не спалюйте його.
Потягніть
•
iPhone 3G (8 Гб, 16 Гб)
•
iPhone (4 Гб, 8 Гб, 16 Гб)
•
iPod touch 2-го покоління (8 Гб, 16 Гб, 32 Гб)
•
iPod nano 4-го покоління (video) (8 Гб, 16 Гб)
•
iPod classic (120 Гб)
•
iPod touch 1-го покоління (8 Гб, 16 Гб, 32 Гб)
•
iPod nano 3-го покоління (відео) (4 Гб, 8 Гб)
•
iPod classic (80 Гб, 160 Гб)
•
iPod nano 2-го покоління (алюмінієвий корпус) (2 Гб, 4 Гб, 8 Гб)
•
iPod 5-го покоління (відео) (60 Гб, 80 Гб)
•
iPod 5-го покоління (відео) (30 Гб)
•
iPod nano 1-го покоління (1 Гб, 2 Гб, 4 Гб)
•
iPod 4-го покоління (з кольо ровим дисплеєм) (40 Гб, 60 Гб)
•
iPod 4-го покоління (з кольо ровим дисплеєм) (20 Гб, 30 Гб)
•
iPod 4-го покоління (40 Гб)
•
iPod 4-го покоління (20 Гб)
•
iPod mini (4 Гб, 6 Гб)
Сумісність залежить від версії програмного забезпечення пристрою iPod
чи iPhone.
Заряджання iPod чи iPhone
•
iPod чи iPhone заряджаються автоматично, коли до головного блока
постачається живлення.
•
Упевніться, що батарея пристроїв iPod чи iPhone заряджена повніс тю.
•
Якщо пристрої iPod чи iPhone не використовуватимуться впродовж
трива лого часу після завершення заряд жання, від’єднайте їх
від головного блока, оскільки батарея розрядиться природнім
шляхом. (У разі повного заряд жання додаткове заряд жання не
відбуватиметься).
ENGLISH
УКНРАЇНСЬКА УКНРАЇНСЬКА
RQTX1009
5
47
Page 48

Під’єднання iPod чи iPhone
1
Під’єднайте живлення змінного струму.
Вигляд ззаду
ENGLISH
Кабель живлення
змінного струму (ЗС)
(постачається)
2
Вставте адаптер доку в головний блок.
iPod
Використовуйте адаптер, який надається з iPod, або зверніться
до Apple Inc. щодо сумісного адаптера доку (детальніше читайте
в інструкціях, які додаються до адаптера доку), який, можливо,
доведеться придбати окремо.
iPhone
Виконуючи відтворення з iPhone, використовуйте відповідний
адаптер iPhone.
Адаптер змінного струму
(перемикання живлення)
(постачається)
Адаптер змінного струму (перемикання ж ивлення) перебуває у режимі
очікування, доки під’єднано штекер. Первинний конт ур завж ди
“під напругою”, доки штекер під’єднано до розетки.
УКНРАЇНСЬКА УКНРАЇНСЬКА
Примітка.
•
Кабель живлення змінного струму, що додається до комплекту,
призначений для використання лише з цим пристроєм. Не
використовуйте його з іншим обладнанням.
•
Не використовуйте кабель живлення змінного струму від іншого
обладнання.
•
Не використовуйте інші адаптери змінного струму (перемикання
живлення), окрім того, що додається.
RQTX1009
До побутової
розетки змінного
струму
6
48
3
Під’єднайте iPod чи iPhone до головного блока.
Притримуйте апарат під час підключення чи відключення iPod чи
iPhone.
iPod
(не постачається)
Адаптер доку iPod
(не постачається)
Виймаючи, вставте
ніготь чи плаский
предмет, щоб підняти.
Page 49

Прослуховування з iPod чи iPhone
Гол овний блок
Сенсор
сигналу
пульта ДК
Індикатор
SURROUND
(об’ємний звук)
Індикатор BASS
(низькі частоти)
Пульт
дистанційного
керування (ДК)
Індикатор
живлення
Пульт
дистанційного
керування (ДК)
Навігацію на iPod чи iPhone можна виконувати за допомогою кнопок, описаних далі.
Індикатор живлення миготить щоразу, коли Ви натискаєте кнопку на пульті ДК.
Головни й
блок
Функція
Доступ до меню.
Відтворення чи призупинення відтворення
на пристрої iPod чи iPhone.
Вибір режиму повторення для iPod чи
iPhone.
Вибір режиму довільного відтворення для
iPod чи iPhone.
Вимкнення звуку гучномовців.
Щоб вимкнути: Натисніть кнопк у ще раз або
налаштуйте гучність.
Пульт
дистанційного
керування (ДК)
Функція
Увімкнення чи вимкнення живлення головного блока.
• Індикатор живлення засвічується після увімкнення головного блока.
• Перемикач режиму роботи не від’єднує весь блок від мережі, навіть
якщо перебуває у положенні “вимкнено”.
Налаштування рівня гучності гучномовців.
Увімкнення чи вимкнення режиму об’ємного звуку.
•
Індикатор SURROUND (об’ємний звук) на головному блоці
засвічується, коли вмикається режим об’ємного звуку.
Увімкнення чи вимкнення режиму низьких частот.
•
Індикатор BASS ( низькі частоти) на головному блоц і засвічується,
коли вмикається режим низьких частот.
Пульт
дистанційного
керування (ДК)
Примітка.
Детальну інформацію щодо роботи iPod чи iPhone читайте у
посібнику користувача iPod чи iPhone.
Функція
Дозволяють пропустити попередню чи
наступну доріжку.
Якщо натиснути і утримувати ці кнопки,
можна виконати швидке пропускання назад
і вперед д ля пошуку потрібної доріжки.
Дозволяють ви брати пункт меню.
Натиснути і утримувати: Дозволяють
прокрутити крізь список.
Дозволяє підтвердити вибраний пункт
меню чи відтворення.
ENGLISH
УКНРАЇНСЬКА УКНРАЇНСЬКА
RQTX1009
7
49
Page 50

Під’єднання до комп’ютера
Використання іншого обладнання
Поки iPod чи iPhone під’єднано до головного блока, можна передавати
дані з комп’ютера за допомогою кабелю USB.
Вигляд ззаду
ENGLISH
Кабель USB (не постачається)
УКНРАЇНСЬКА УКНРАЇНСЬКА
1
Під’єднайте кабель USB до входу USB головного блока і
комп’ютера.
Див. посібник користувача iPod чи iPhone щодо інформації про
синхр онізацію з комп’ютером.
2
Перед тим як від’єднати кабель USB, виконайте
процедуру безпечного виймання обладнання з
комп’ютера.
На деяких комп’ютерних система х можу ть ставатися проблеми з
записом чи роботою.
Зауважте, що компанія Panasonic і торгові представники Panasonic
RQTX1009
не несу ть відповіда льності за втрачені дані чи інше пряме чи непряме
пошкодження, крім випадків навмисної чи значної недбалості.
8
50
Підготовка
•
Упевніться, що iPod чи iPhone не під’єднано до головного блока.
•
Упевніться, що інше обладнання повністю налаштовано і його гучність
зменшено, перш ніж під’єднувати до головного блока.
Портативне аудіообладнання
(не постачається)
Аудіокабель (постачається)
Під’єднайте інше обладнання, наприклад портативне аудіообладнання
тощо до входу MUSIC PORT (музичний вхід) за допомогою аудіокабелю,
який додається.
Вигляд ззаду
Уникайте інтерференцій з іншим обладнанням Panasonic
Цим пристроєм можна керувати з використанням іншого режиму.
Головний блок і пульт дистанційного керування слід налаштувати
на однаковий режим.
1
Натисніть і утримуйте кнопку [SURROUND] на головному
блоці і кнопку [BASS] на пульті дистанційного керування
впродовж принаймні 3 секунд.
Індикатор живлення миготить 3 рази на підтвердження зміни.
2
Натисніть і утримуйте кнопку [OK] і [BASS] на пульті
дистанційного керування впродовж принаймні 2 секунд.
Щоб повернутись до режиму за замовчуванням, повторіть наведені вище
кроки. Для кроку 2, замініть [BASS] на [ MUTE].
Page 51

Вказівки з усунення несправностей
Технічні характеристики
Перш ніж звертатись до ремонтної служби, прочитайте надані нижче
порад и. Якщо Ви маєте якісь сумніви стосовно порад у цьому списку
або запропоновані в таблиці дії не вирішують проблеми, зверніться до
магазину, в якому Ви придбали виріб.
•
Живлення
відсутнє
Звуку немає
Пульт
дистанційного
керування не
працює
Спотворений звук
iPod чи iPhone не
заряджаються
Неможливо
виконати
синхронізацію з
комп’ютером
Упевніться, що кабель змінного струму
під’єднано належним чином.
•
Налаштуйте гучність.
•
Перевірте, чи не увімкнено функцію
вимкнення звуку.
•
Оновіть програмне забезпечення iPod чи
iPhone до найновішої версії.
•
iPod чи iPhone було неправильно встановлено
у док. Вимкніть iPod чи iPhone, вийміть із
роз’єму док у. Ще раз вставте і увімкніть.
•
Замініть батарею.
•
Упевніться, що iPod чи iPhone належним
чином встановлено у пристрій.
•
Зменшіть гучність.
•
Встановіть для пункт у “EQ” iPod значення
“Off” чи “Flat”.
•
Перевірте під’єднання. (\ сторінка 6)
•
Увімкніть головний блок.
•
Перевірте під’єднання комп’ютера і iPod чи
iPhone. (\ сторінка 6, 8)
Обслуговування
Для очистки даного пристрою використовуйте м’яку суху тканину.
•
Ніколи не використовуйте для очистки пристрою спирт, розчинники
або бензин.
•
Перед використанням хімічно обробленої тканини зверніться до
інструкції щодо поводження з нею.
СЕКЦІЯ ПІДСИЛЮВАЧА
Середньоквадратичне значення вихідної потужності у режимі стерео
Передній канал (по обох каналах)
5 Вт на канал (6 Ом), 1 кГц, 10% THD
Канал сабвуфера 10 Вт на канал (6 Ом), 100 Гц, 10% THD
Загальне середньоквадратичне значення потужності у режимі стерео
20 Вт
СЕКЦІЯ КОНТАКТІВ
Музичний вхід (задній)
Чутливість 350 мВ, 13,2 кОм
Контакт Стерео, гніздо 3,5 мм
СЕКЦІЯ ДИНАМІКІВ
Передні динаміки
Динамік(и) Імпеданс: 6
Повний діапазон 4 см, конічний
Вхідна потужність (МЕК) 5 Вт (макс.)
Динамік наднизьких частот
Динамік(и) Імпеданс: 6
Динамік низьких частот 6,5 см, конічний
Пасивний випромінювач (
Вхідна потужність (МЕК) 10 Вт (макс.)
ЗАГАЛЬНІ ПАРАМЕТРИ
Живлення 12 В постійного струму (роз’єм DC IN)
Споживана потужність 15,6 Вт (лише пристрій)
Адаптер змінного струму (перемикання живлення)
від 100 до 240 В змінного струму, 50/60 Гц
Споживана потужність 36 Вт
Розміри (ШxВxГ) 175 мм x 138,8 мм x 178,5 мм
Вага 0,85 кг
Робочий діапазон температури від 0°C до +40°C
Робочий діапазон вологості
від 20% до 80% відносної вологості (без конденсації)
Споживання енергії в режимі очікування 0,7 Bт (приблизно)
Примітка.
1
) Технічні характеристики можуть змінюватись без сповіщення.
Вага та розміри вказані приблизно.
2) Сумарне значення коефіцієнта нелінійних викривлень вимірюється
цифровим аналізатором спектру.
x2
) 6,5 см
ENGLISH
Ω
Ω
УКНРАЇНСЬКА УКНРАЇНСЬКА
RQTX1009
9
51
Page 52

EU
Panasonic Corporation
Web Site: http://panasonic.net
Pursuant to at the directive 2004/108/EC, article 9(2)
Panasonic Testing Centre
Panasonic Marketing Europe GmbH
Winsbergring 15, 22525 Hamburg, Germany
PoSpEn
RQTX1009-1R
L0609CH1079
UrRuCz
 Loading...