

Panasonic Screen Transfer Operating Manual
Windows
Operating Instructions
Screen Transfer 2.0
Thank you for purchasing this Panasonic product.
■ Before using this software, please read the instructions carefully.
DPQP1365ZA/X1(E)

Contents
Precautions and Disclaimers ................................................................................................ 3
Using the Software ................................................................................................................. 4
Displaying your computer screen on one device ............................................................................................................ 4
Displaying your computer screen on multiple devices .................................................................................................. 4
Registering rooms and devices and displaying by selecting a connection destination room ................................... 5
Checking Your Computer ...................................................................................................... 6
Necessary environment for computers to be connected ............................................................................................... 6
System requirements ......................................................................................................................................................... 6
Computer network settings ............................................................................................................................................... 7
Installing/Uninstalling the Software ..................................................................................... 8
Installing the software ........................................................................................................................................................ 8
Uninstalling the software ................................................................................................................................................... 8
Preparation ............................................................................................................................. 9
Checking the device ........................................................................................................................................................... 9
Registering rooms and devices ...................................................................................................................................... 10
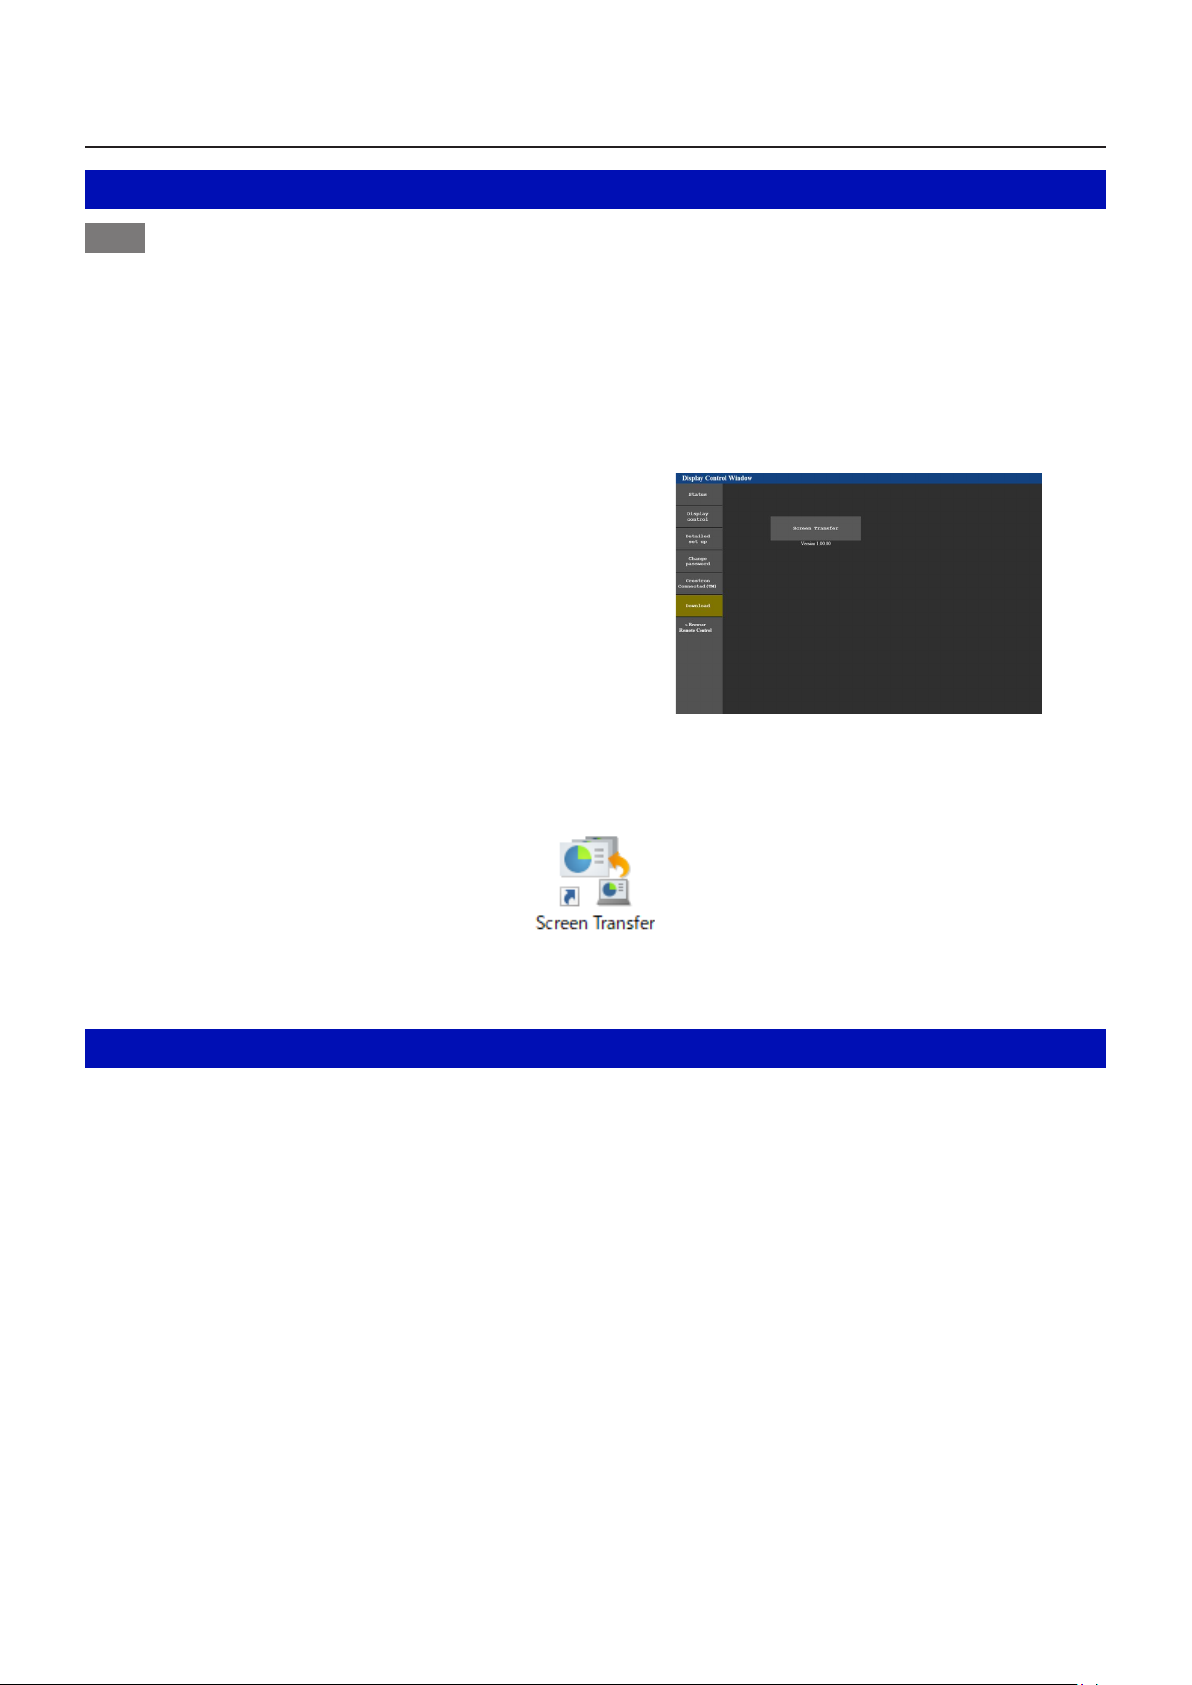
Starting the Application ....................................................................................................... 13
Selecting the Devices .......................................................................................................... 14
Displaying on one device ................................................................................................................................................. 14
Displaying on multiple devices ....................................................................................................................................... 16
Selecting the devices of a registered room ................................................................................................................... 19
Operating the Launcher ....................................................................................................... 24
Launcher ............................................................................................................................................................................ 24
Adjusting the volume ....................................................................................................................................................... 25
Checking the delivery status of devices ........................................................................................................................ 26
Exiting the application ..................................................................................................................................................... 26
Configuring Advanced Settings .......................................................................................... 27
<Settings> screen ............................................................................................................................................................. 27
Specifying the Area to Display ............................................................................................ 28
Ending selective area transmission ................................................................................................................................ 29
Version information ............................................................................................................. 30
Displayed Messages ............................................................................................................ 31
Frequently Asked Questions ............................................................................................... 32
2

Precautions and Disclaimers
z
Request Regarding Security
When using this software, security breaches of the type described below are conceivable.
y Leakage of your private information via the software
y Illegal operation of the software by a malicious third-party
y Harm to or cessation of operation of the software by a malicious third-party
Take steps to ensure that the devices and computer used are secured and protected.
y Make sure the password is as hard to guess as possible.
y Change the password periodically.
y Panasonic Corporation and its affiliated companies never directly ask customers for their password. Do
not give out your password even if directly asked by a third-party representing themselves as Panasonic
Corporation.
y Always use on a network that has safety protection such as a firewall implemented.
y Set the password for the computer you are using in order to set limits on user accessibility.
z
The illustrations and display examples used in this manual may differ from the actual product.
z
In this document and software, “device” refers to a Panasonic LCD display.
z
Please note that Panasonic cannot be held liable for damages arising from data corruption or loss as a result of
using a device.
Supported models
For the models supported by this software (Screen Transfer), refer to the software explanation on the Panasonic
website (https://panasonic.net/cns/prodisplays/download/software/).
This software does not support projectors.
Notes
z Operation is not guaranteed when connected with an unsupported model.
z To use this software, you need to enable the Screen Transfer function on the supported model. For details,
refer to the operating instructions of your device.
3
Using the Software
Using the software allows you to display your computer screen on one or multiple devices connected via a wired
LAN connection. You can also register multiple rooms, such as conference rooms and classrooms, and devices to
display your screen.
This software has the following features.
z
A device and computer can be connected by simply specifying an IP address.
z
High-resolution images can be displayed.
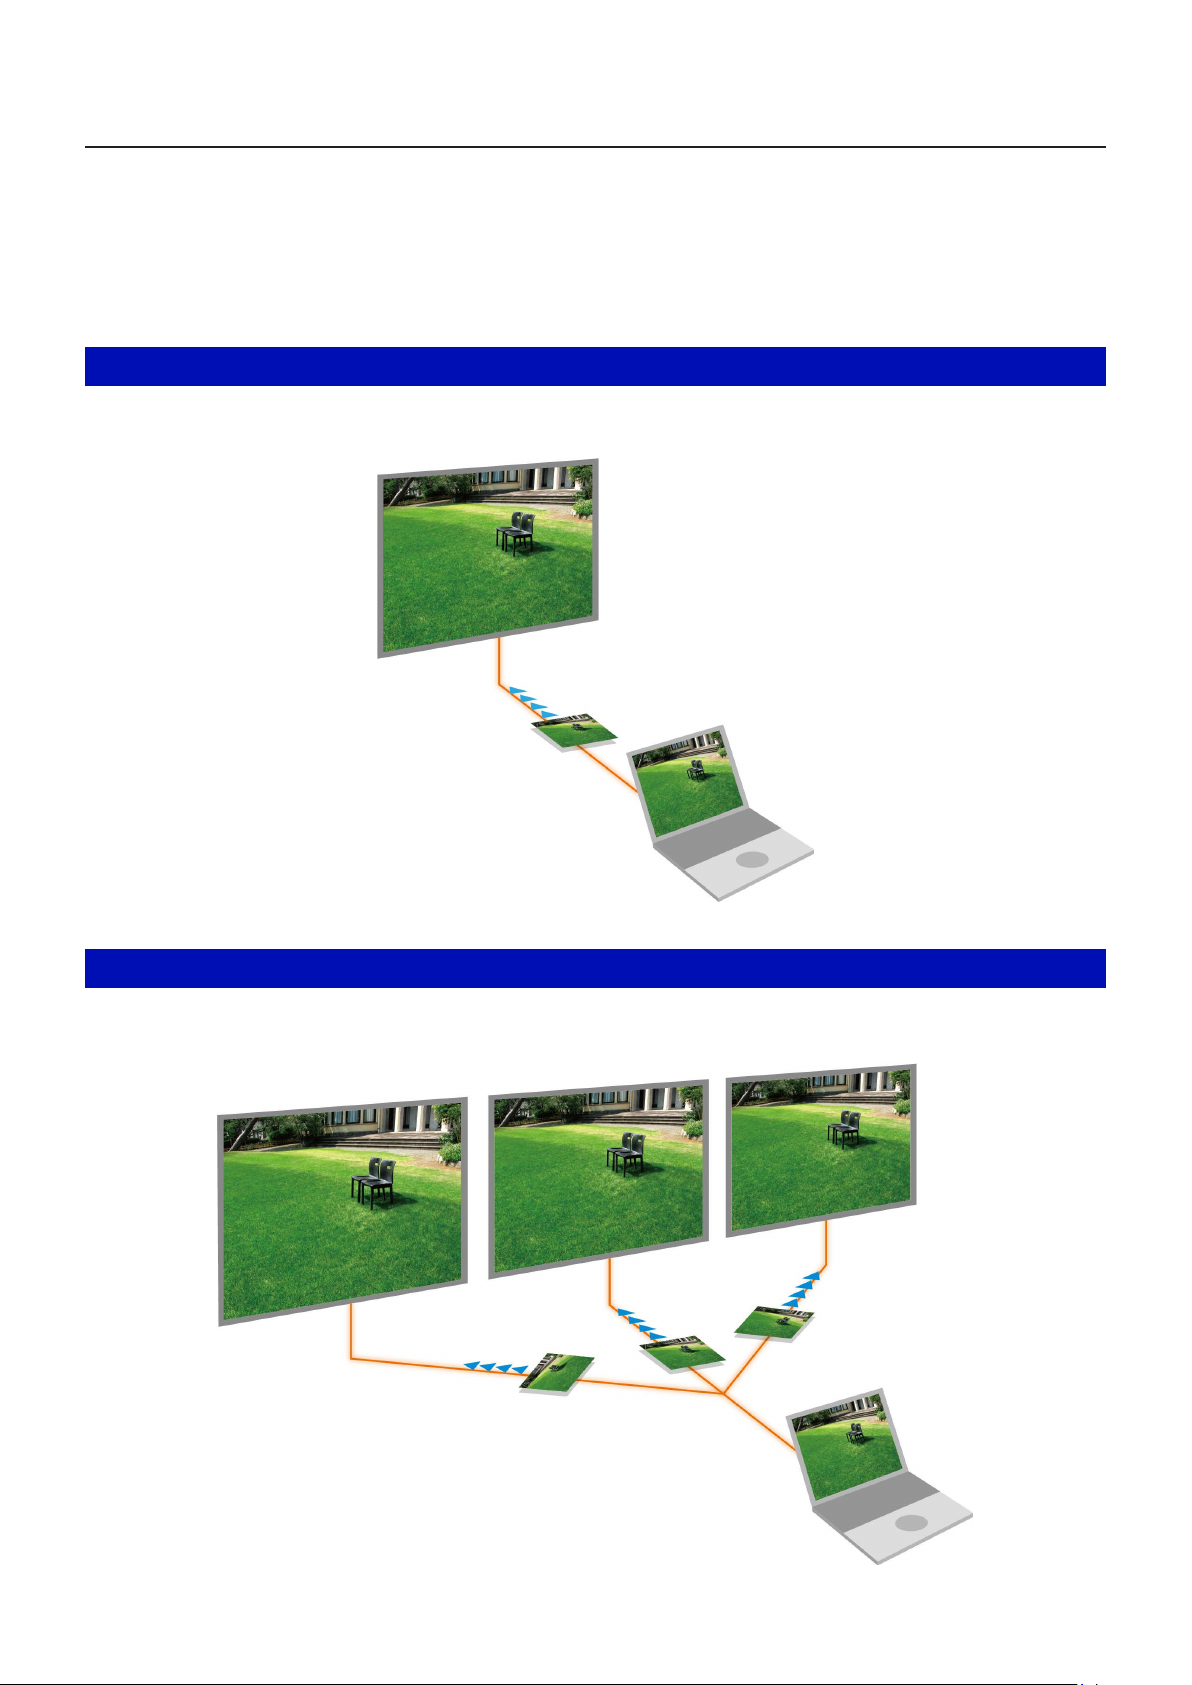
Displaying your computer screen on one device
page 14
Specify one device with its IP address and then display your computer screen on it.
Device 1
Computer
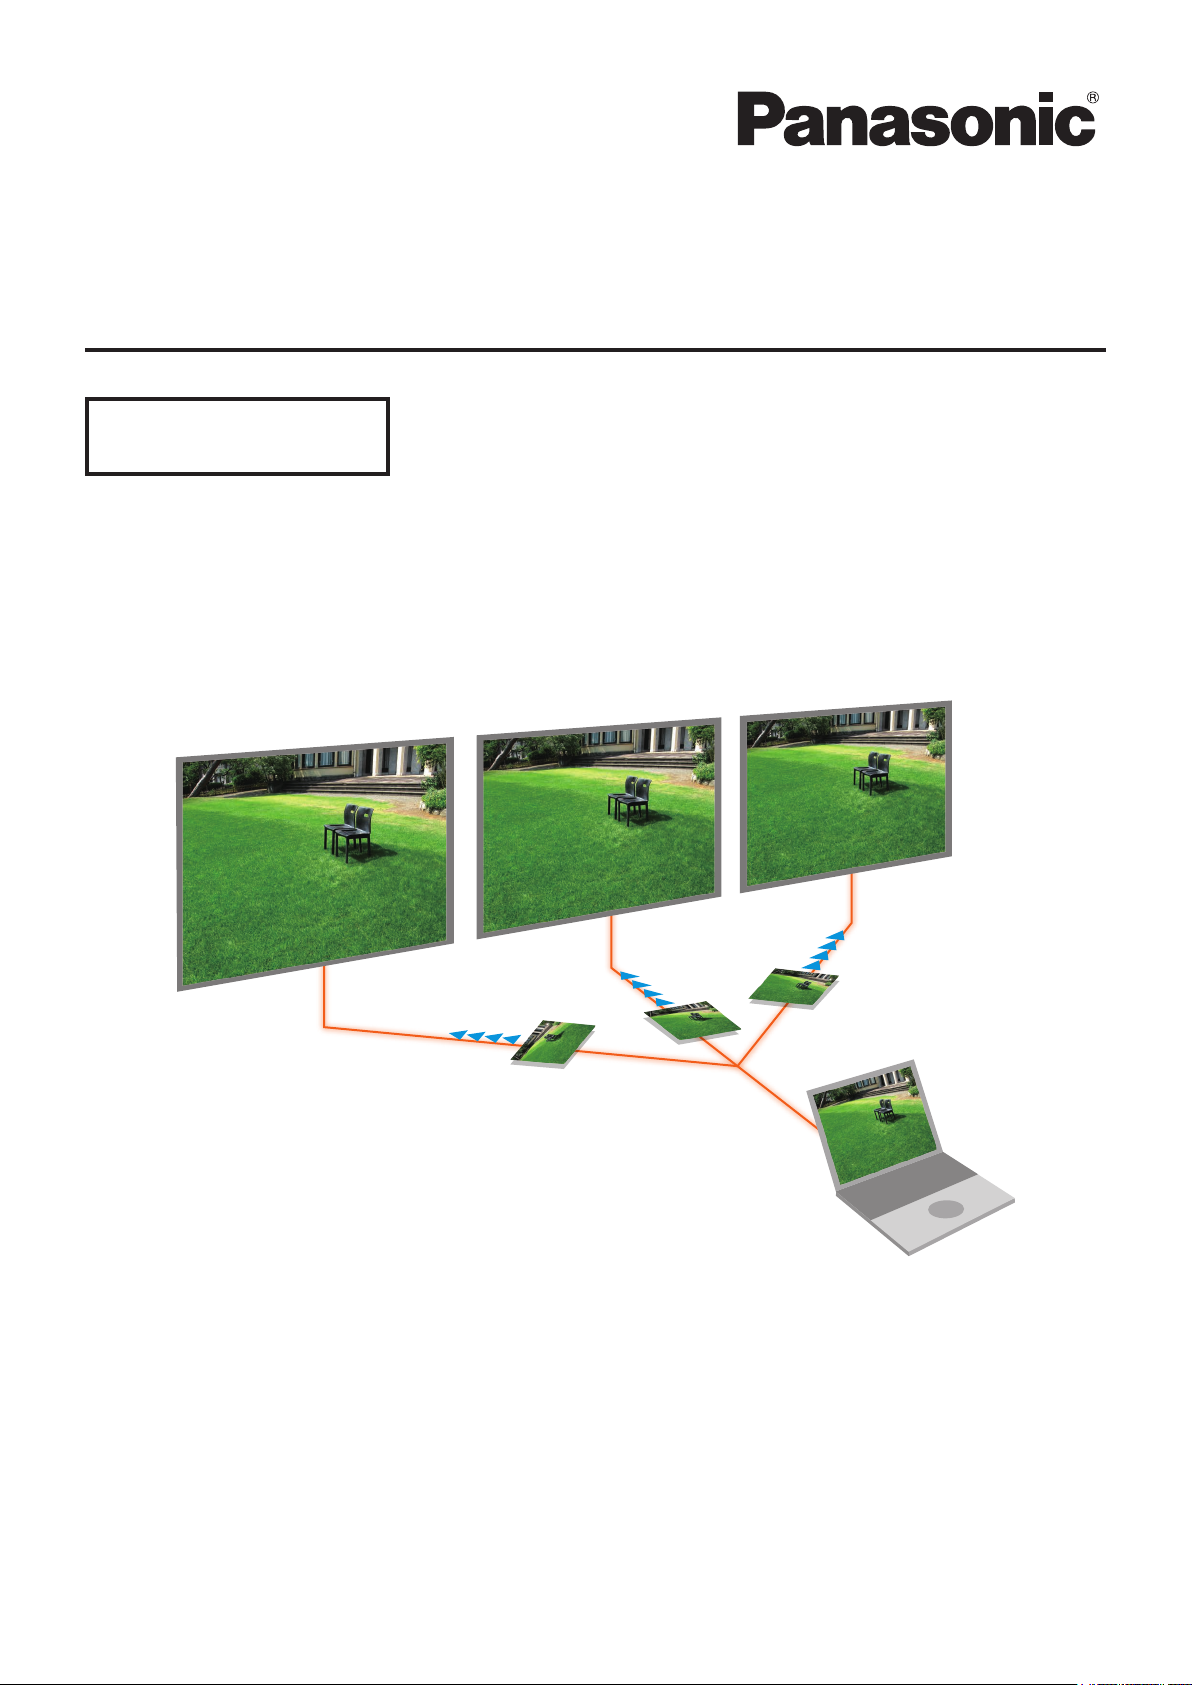
Displaying your computer screen on multiple devices
page 16
Specify multiple devices with their IP addresses and then display your computer screen on them.
Device 1
Device 2
Device 3
Computer
4
Using the Software
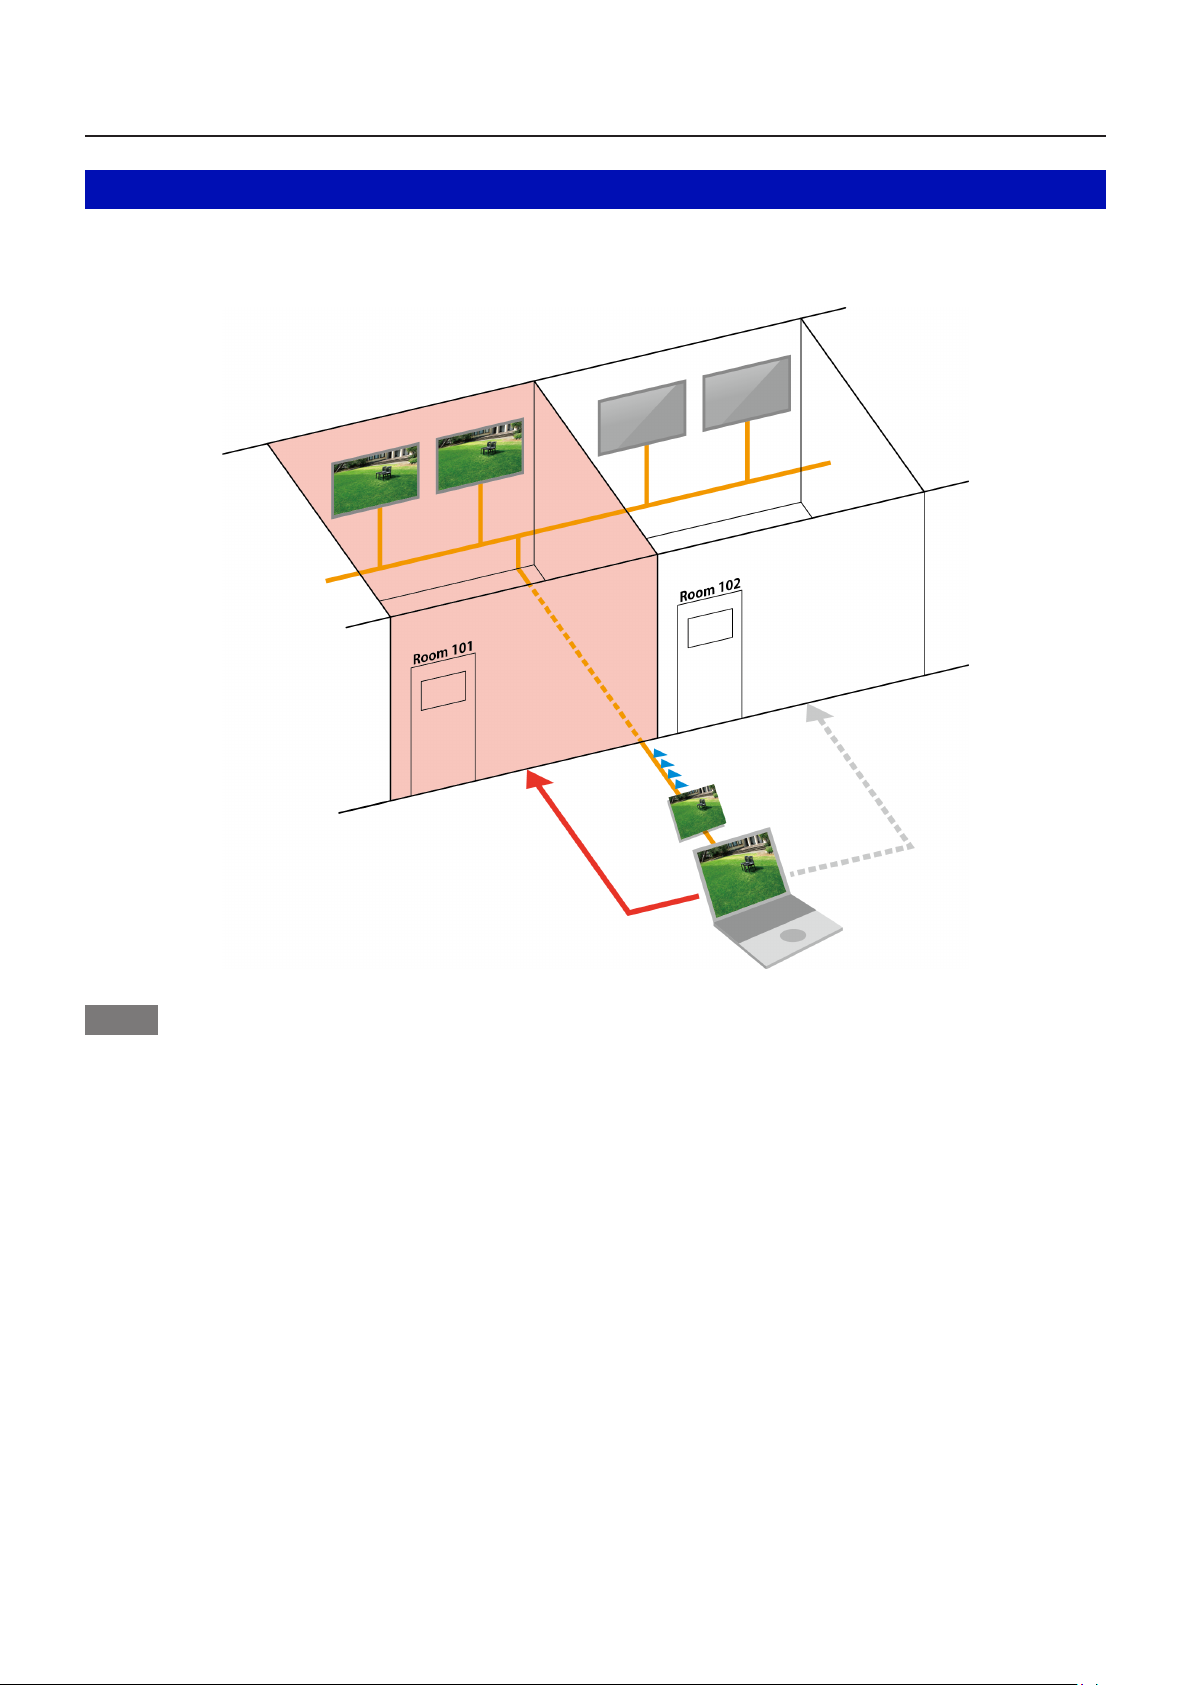
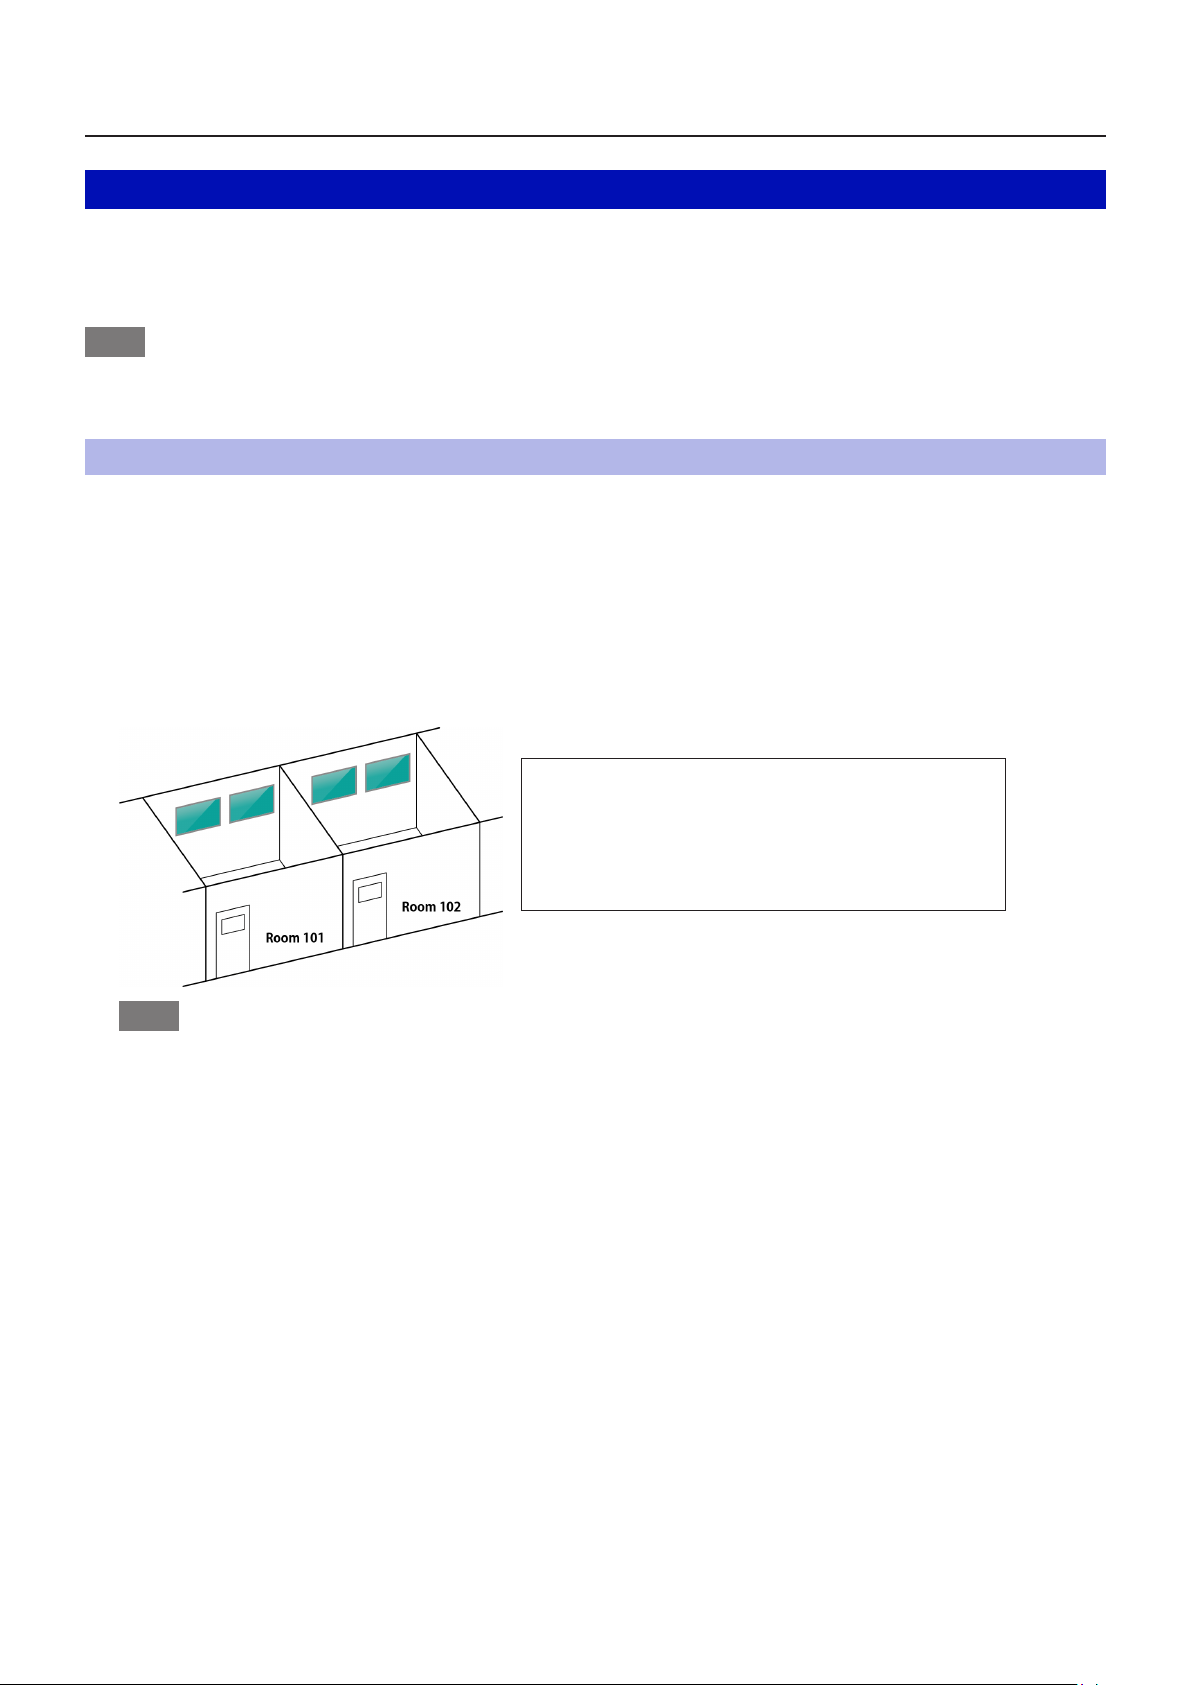
Registering rooms and devices and displaying by selecting a connection destination room
page 19
Preregister devices installed in multiple rooms and then display your computer screen by selecting the room to
which you wish to connect.
Device 4
Device 3
Device 2
Device 1
Notes
z
To use this method, register rooms and devices in advance (page 10).
Select room 101
5

Checking Your Computer
Necessary environment for computers to be connected
z
First, check your computer to see whether or not it has a wired LAN function.
z
Before connecting the device to the computer, be sure to check the following settings.
Check 1
Check 2
Check 3
For wired LAN
z
Is the cable properly connected?
z
The specifications for cables vary depending on the system configurations. Confirm the device
settings and the cable specifications.
Wired LAN adapter settings
z
Is your wired LAN adapter properly recognized?
z
Is your wired LAN adapter switched on?
z
Install the wired LAN adapter driver beforehand.
For details on how to install the driver, refer to the instructions accompanying the wired LAN
adapter.
Computer settings
z
When using a laptop computer, be sure to connect the AC adapter. There is a risk of the
performance deteriorating depending on the power settings of the computer.
z
Check the settings of security (firewall) software. When such software is installed, it may prevent
connecting with a device.
z
Check that a network bridge is not set. If set, it may prevent a connection.
“Frequently Asked Questions” (page 32)
z
Check that blocking by the firewall function has been disabled or stopped. A connection may not
be possible if this software is not registered to the firewall.
“Frequently Asked Questions” (page 32)
System requirements
To use this software, the computer must satisfy the following requirements.
OS: Windows 10 Home 64 bit (version 1803 or later)
Windows 10 Pro 64 bit (version 1803 or later)
The Japanese and English versions of the above operating systems are supported.
Operation is not guaranteed if Windows 10 is not pre-installed.
CPU: 3rd Generation Intel
Memory: 1024 MB or more
Hard disk: At least 100 MB free space
(Extra free space is required to save the device information.)
LAN environment: LAN connector (100BASE-TX/1000BASE-T) required
Desktop area: 1024 pixels × 768 pixels or more
2048 pixels × 1536 pixels or less
Note
z
Note that operation is not guaranteed when used with system environments other than the above or on
homemade computers.
z
Use the latest computer video driver (graphics driver) provided by the computer manufacturer or Intel
Corporation.
z
If your device is a flat panel display that supports 4K images, up to 1920x1080 is supported for the resolution of
projected images.
®
Core™ i7/i5/i3 (Ivy Bridge) or later processor with integrated graphics
Operation is not guaranteed for all computers that meet the above conditions.
6
Checking Your Computer
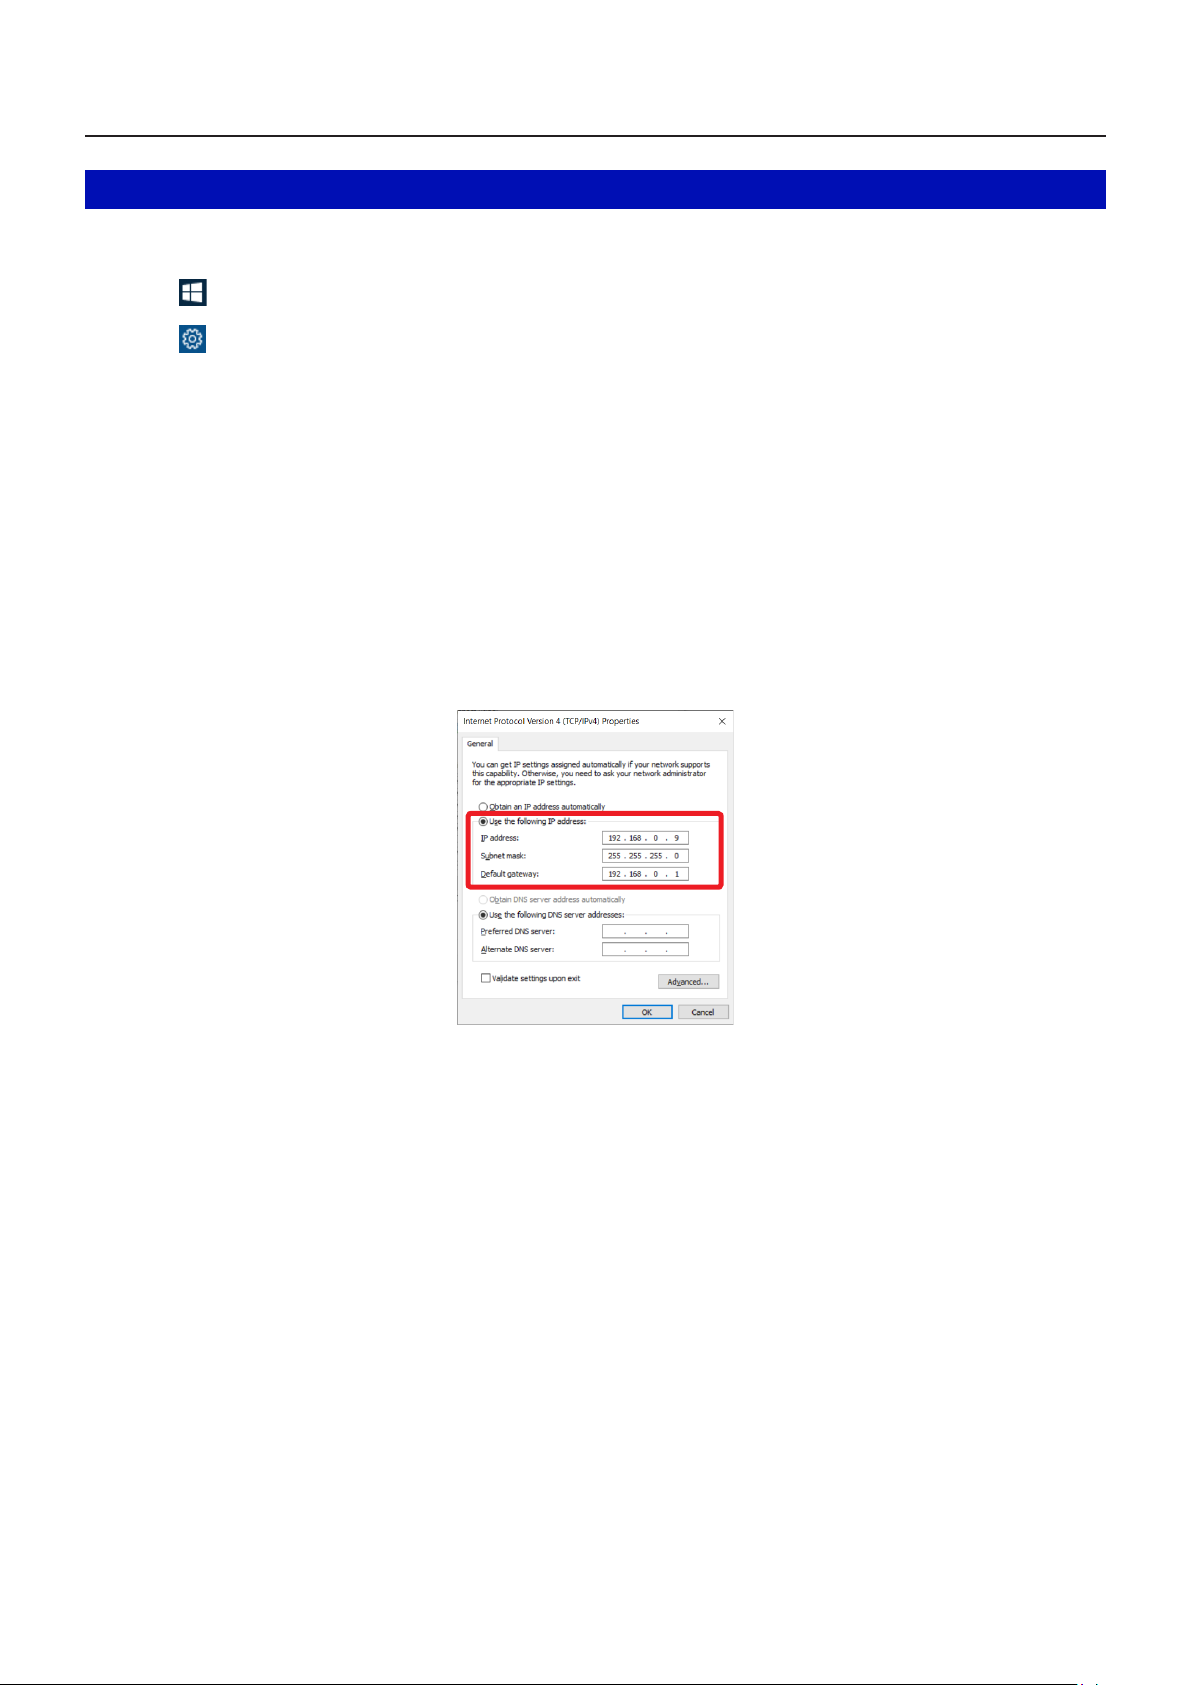
Computer network settings
The IP address, subnet mask, and other network settings can be specified with the following procedure. Confirm
the settings with the network administrator beforehand.
Click [ ] (Start) or press the Windows key to display the Start menu.
1
Click [ ] (Settings) to display the <Windows Settings> screen.
2
Select [Network & Internet] [Ethernet] [Change adapter options] of Related settings to display the
3
<Network Connections> screen.
Right-click [Ethernet] and then select [Properties].
4
Click the [Networking] tab.
5
Select [Internet Protocol Version 4 (TCP/IPv4] of [This connection uses the following items] and click
6
[Properties].
Set the network of the computer to match the settings of the device.
7
Click [Use the following IP address], and enter the values in the [IP address], [Subnet mask], and [Default
gateway] boxes.
Match each of the values to your network environment. For details, check with the network administrator.
7
Installing/Uninstalling the Software
Installing the software
Note
z
Install the software using an account with administrator privileges.
z
The illustrations and screens used in this document may differ from actual appearances.
z
For the models supported by this software, refer to the software explanation on the Panasonic website
(https://panasonic.net/cns/prodisplays/download/software/).
z
If you install this software on a computer using an old version, the <Settings> screen (page 27) and other
settings will be carried over.
Download the installer of this software from the Web browser control screen of the device.
1
For details on the Web browser control function, refer to
the operating instructions of your device.
Start the installer and perform the installation according to the on-screen instructions.
2
When installation is completed, a shortcut icon is created on the desktop.
When the completion screen appears after installation is completed, click the [Finish] button.
3
Uninstalling the software
Enter “Apps & features” in the search box on the taskbar and the select the displayed [Apps & features]. Select
[Screen Transfer] displayed in the list and then click [Uninstall].
8

Preparation
Checking the device
Device power
Turn on the device.
Notes
z
Check that the Screen Transfer function is enabled on the device. For details, refer to the operating instructions
of your device.
Checking the network status
Display the network status of the device and check the IP address.
For how to check the IP address, refer to the operating instructions of your device.
9
Preparation
Registering rooms and devices
When devices are installed in multiple rooms, registering rooms and devices in advance enables a connection with
your computer without entering an IP address (page 19).
If you wish to use this software without registering rooms and devices, the settings in this explanation are not
necessary. Start the software (page 13).
Note
z
Carry out registration before starting the software.
z
Use a file in CSV format for registration. Use a text editor or other application to create and edit the CSV file.
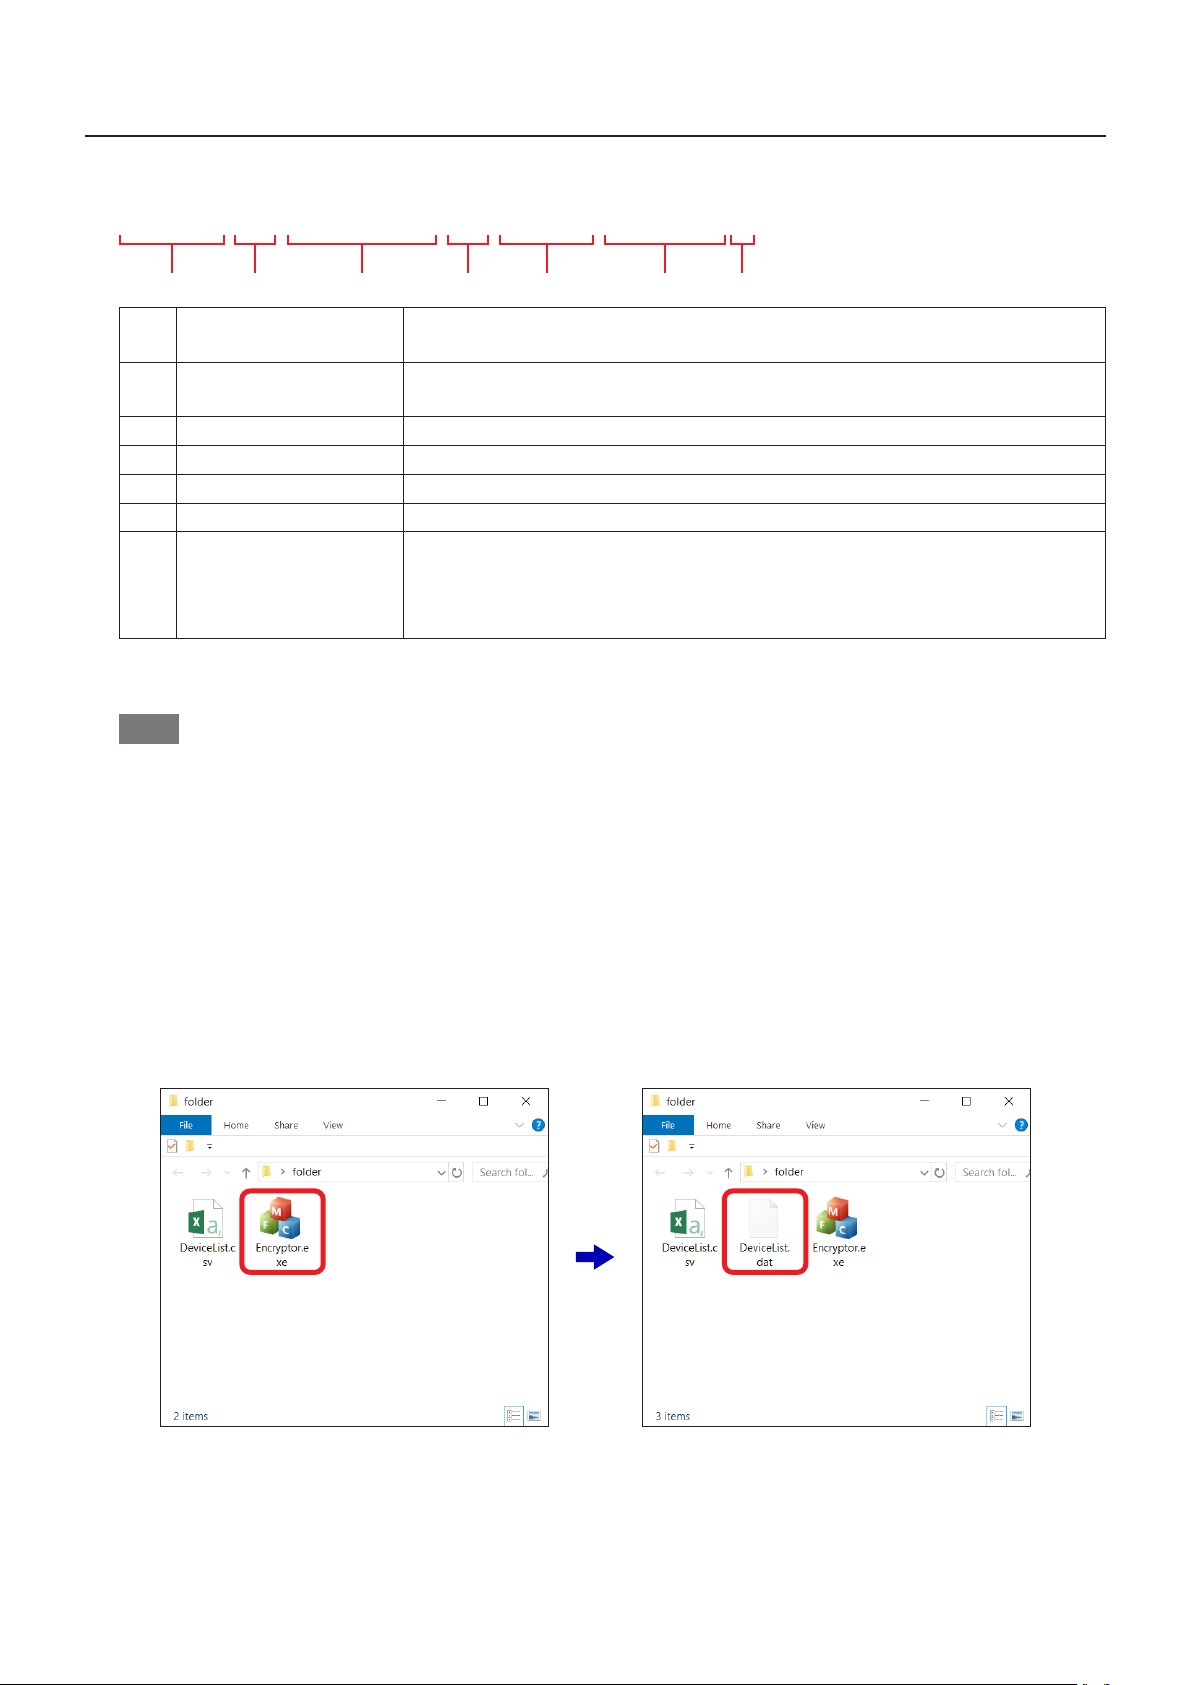
Creating a new device management data file
Create a file in CSV format.
1
Create a new CSV file with the “DeviceList.csv” file name. A template “DeviceList.csv” CSV file is installed in
the following location. Copy the file to any folder and then edit it.
C:¥Program Files (x86)¥Panasonic¥ScreenTransfer
For example, if there are a total of four devices in two rooms, create a CSV file containing the following
information.
Setting example
z
CSV file information
START,1.1
Device 1
Device 2
Device 3
Device 4
Room101,No1,192.168.1.101,user,xxxxxxxx,TH-xxSQ1x,0
Room101,No2,192.168.1.102,user,xxxxxxxx,TH-xxSQ1x,0
Room102,No3,192.168.1.103,user,xxxxxxxx,TH-xxSQ1x,1
Room102,No4,192.168.1.104,user,xxxxxxxx,TH-xxSQ1x,1
END
Note
z Separate each item with a comma (,).
z Enter “START,1.1” on the first line and “END” on the last line.
z Devices set in the same room are grouped.
10
Preparation
Room101,No1,192.168.1.101,user,xxxxxxxx,TH-xxSQ1x,ID
A B C D GE F
Input item list
Room number or name Enter a number or name for the room you wish to register. The room will be
A
indicated by the number or name set here in this software.
Device name Enter the name of the device. The device will indicated by the name set here
B
in this software.
IP address Enter the IP address of the device.
C
User name Enter the user name to use for Web browser control of the device.
D
Password Enter the password to use for Web browser control of the device.
E
Model name Enter the model name of the device.
F
Group ID
G
Match each of items C to G to the network settings of the devices to be used. For details, refer to the operating
instructions of the devices.
Number assigned to each room (A) to be registered. Enter a numerical value
from 0 to 127.
Enter the same numerical value for devices of the same room. Do not set the
same numerical value for devices for which the room differs.
Note
z Alphanumeric characters other than commas (,) and slashes (/) can be entered for a room number (name).
z If the names of rooms and devices are too long, the indications displayed when selecting a room may be
truncated. We recommend that each one is within about 10 characters.
z If the user ID or password of a device is wrong, [High Priority] (page 20) will become no longer possible.
z Up to 64 devices can be registered for one room. If a number of devices that will exceed the limit is
registered, the 65th and subsequent devices are not displayed in the software.
Convert the CSV file.
2
Convert the CSV file to a device management data file (.dat format). Copy “Encryptor.exe” to the same folder
as the one in which the CSV file was created.
C:¥Program Files (x86)¥Panasonic¥ScreenTransfer¥ST¥Encryptor.exe
Run “Encryptor.exe” to create a DeviceList.dat file in the same folder.
11
 Loading...