

Page 1

Panasonic
CD System Stereo
SC-CH7
Operating Instructions
1551IGN
Before operating this unit,
pietely.
DIGriAL AUDIO
please read these instructions com-
Page 2

CUb
We want to thank you tor selecting this product and to
welcome you to the growing family of satisfied
Panasonic product owners around the world.
We feel certain you wilt get maximum enjoyment
These operating instructions are applicable to the foilowing systems.
System
CD player
SC-CH7 SL-CH7
Contents
Suggestions for Safety ....................................... 3
Before Use.......................................................... 3
Placement Notes
Accessories ......................................................
Remote-Control Transmitter
How to Install the System ................................... 6
Connections
Front Panel Controls and Functions
Standard Operations
Setting the Time ................................................. 22
Easy Play
Listening to Compact Discs
Listening to Tapes ............................................. 28
Memory Presettings .......................................... 31
................................................
...............................
.......................................................
..................
.........................................
..........................................................
...............................
4
4
5
7
12
20
23
24
Tuner
ST-CH7L
from this new addition to your home.
Please read these operating instructions carefully,
and be sure to keep them handy for convenient
reference.
Amplifier
SU-CH7
Cassette deck
RS-CH7
Listening to Radio Broadcasts
Listening to Other Sources
Changing the Tone Quality
..............................
..............................
.........................
Speakers
SB-CH7
33
34
35
Producing a “Live” Performance Sound .... 38
Recording ........................................................ 40
Edit-Recording Compact Discs
........................
42
Tape to Tape Recording.................................... 46
Using the Timer
..............................................
47
Remote-Control Operation ............................... 53
About Cassette Tapes....................................... 55
About Compact Discs
.....................................
56
Maintenance..................................................... 57
Troubteshooting Guide..................................... 58
Technical Specifications
..................................
60
CAUTION!
THIS PRODUCT UTILIZES A LASER.
USE OF CONTROLS OR ADJUSTMENTS OR PER
FORMANCE OF PROCEDURES OTHER THAN THOSE
SPECIFIED HEREIN MAY RESULT IN HAZARDOUS
RADIATION EXPOSURE.
DO NOT OPEN COVERS AND DO NOT REPAIR YOUR
SELF. REFER SERVICING TO QUALIRED PERSONNEL.
AVERTISSEMENT!
CET APPAREIL UTILISE UN LASER.
L’UTILISATION DE COMMANDES OU DE RÉGLAGES
OU L'EXÉCUTION DE PROCÉDURES AUTRES QUE
CEUES SPÉCIFIÉES ICI PEUVENT PROVOQUER UNE
EXPOSITION A DES RADIATIONS DANGEREUSES.
NE PAS OUVRIR LES COUVERCLES NI ESSAYER DE
RÉPARER SOI-MÊME. CONFIER TOUT TRAVAIL
D’ENTRETIEN A UN PERSONNEL QUALIFIÉ.
¡ADVERTENCIA!
ESTE APARATO UTILIZA UN LASER.
EL USAR LOS CONTROLES, HACER LOS REGLAJES O
LOS PASOS REQUERIDOS EN FORMA DIVERSA DE LA
aquí EXPUESTA PUEDE REDUNDAR EN EXPOSiaÓN
PEUGROSA A LA RADIACIÓN.
NO ABRA LAS TAPAS NI HAGA REPARACIONES
USTED MISMO. EN CASO DE PRODUCIRSE ANO
MALÍAS SCUCITE AYUDA DE PERSONAL CUAUFICADO.
DANGffijnM
||мг whn
Sñio DIRECT EXPOSURETQBEAM.
(Irwidtol product)
-2-
Page 3

Suggestions for Safety
■ Use a standard AC wait outlet
1. Use from an AC power source of high voltage, such as for
an air conditioner, is very dangerous.
There is the possibility that a fire might be caused by making
such a connection,
2. A DC power source cannot be used.
Be sure to check the power source carefully, especially on a
ship or other place where DC is used.
■ Grasp the plug when disconnecting the power
suppiy cord
1. Wet hands are dangerous.
A dangerous electric shock may result if the plug is touched by
wet hands.
2. Never place heavy Items on top of the power supply cord,
and never force It to bend sharply.
■ Place the unit where It will be well ventilated
Place this unit at least 10 cm (4") away from wall surfaces, etc.
■ Avoid places such as the following:
In direct sunlight or In other places where the temperature Is
high.
In places where there Is excessive vibration or humidity.
Such conditions might damage the cabinet and/or other component
parts and thereby shorten the unit’s service life.
■ Be sure to place the unit on a flat, level surface
If the surface is inclined, a malfunction may result.
■ Never attempt to repair or reconstruct this unit
A serious electric shock might occur if this unit is repaired,
disassembled or reconstructed by unauthorized persons, or if the
internal parts are accidentally touched.
■ Take particular care If children are present
Never permit children to put anything, especially metal. Inside this
unit. A serious electric shock or malfunction could occur if articles
such as coins, needles, screwdrivers, etc. are Inserted through the
ventilation holes, etc. of this unit.
■ If water is spilled on the unit
Be extrerrrely careful if water is spilled on the unit, because a Hre or
serious electric shock might occur. Immediately disconnect the
power cord plug, and consult with your dealer.
■ Avoid spray-type insecticides
Insecticides might cause cracks or "cloudiness” in the cabinet and
plastic parts of this unit. The gas used in such sprays might,
moreover, be ignited suddenly.
■ Never use alcohol or paint thinner
These and similar chemicals should never be used, because they
might cause flaking or cloudiness of the cabiriet finish.
■ Disconnect the power supply cord If the unit
will not be used for a long time
If the unit is left for a long time with the power ON, this will not only
shorten its useful operation life, but may also cause other troubles.
■ If trouble occurs
If, during operation, the sound is interrupted or indicators no longer
illuminate, or if abnormal odor or smoke is detected, immediately
disconnect the power cord plug, and contact your dealer or an
Authorized Service Center.
Before Use
Be sure to disconnect the mains cord before adjusting the voltage
selector.
Use a minus (-) screwdriver to set the voltage selector (on the rear
panel) to the voltage setting for the area in which toe unit will be
used.
THIS TUNER/RECEIVER IS CAPABLE OF RECEIVING THE NEW AM STEREO BROADCASTS FROM THE AM BAND
RADIO STATIONS. HOWEVER LIKE MANY TUNERS AND RECEIVERS CURRENTLY AVAILABLE ON THE MARKET
IT WILL REPRODUCE THIS AM STEREO SIGNAL ONLY IN AM MONO. WHICH, IN EFFECT, IS OF NO LESSER
QUALITY THAN YOUR EXISTING AM MONO TUNER/RECEIVER.
(If the power supply in your area is 117 V or 120 V, set to the
"110-127 V" position.)
Note that this unit will be seriously damaged if this setting is not
made correctly. (There is no voltage selector tor some countries;
the correct voltage is already set.)
-3-
Page 4
Plaœment Notes
■ This unit Is a precision Instrument. Be sure to place It on a
flat surface.
■ Avoid places such as the following:
•Near any equipment or device that generates strong magnetism.
•On any heat-generating equipment or device, or in any place
where the temperature is high (35‘’C 95°For higher).
•Extremely cold places (5“C 41 "For below).
•For tong periods of time in direct sunlight.
•In dusty or smoky locations.
•In locations prone to vibrations.
•In locations where the rear panel is less than 10 cm (about 4")
away from the wall or back of an audio rack.
•Within reach of children.
■ When carrying or storing the unit, handle It with care so It Is
not subjected to any strong bumps.
Always remove the disc before storing the unit for any period of
time.
■ To avoid problems due to vibration.
•Do not place a book or similar object under this unit.
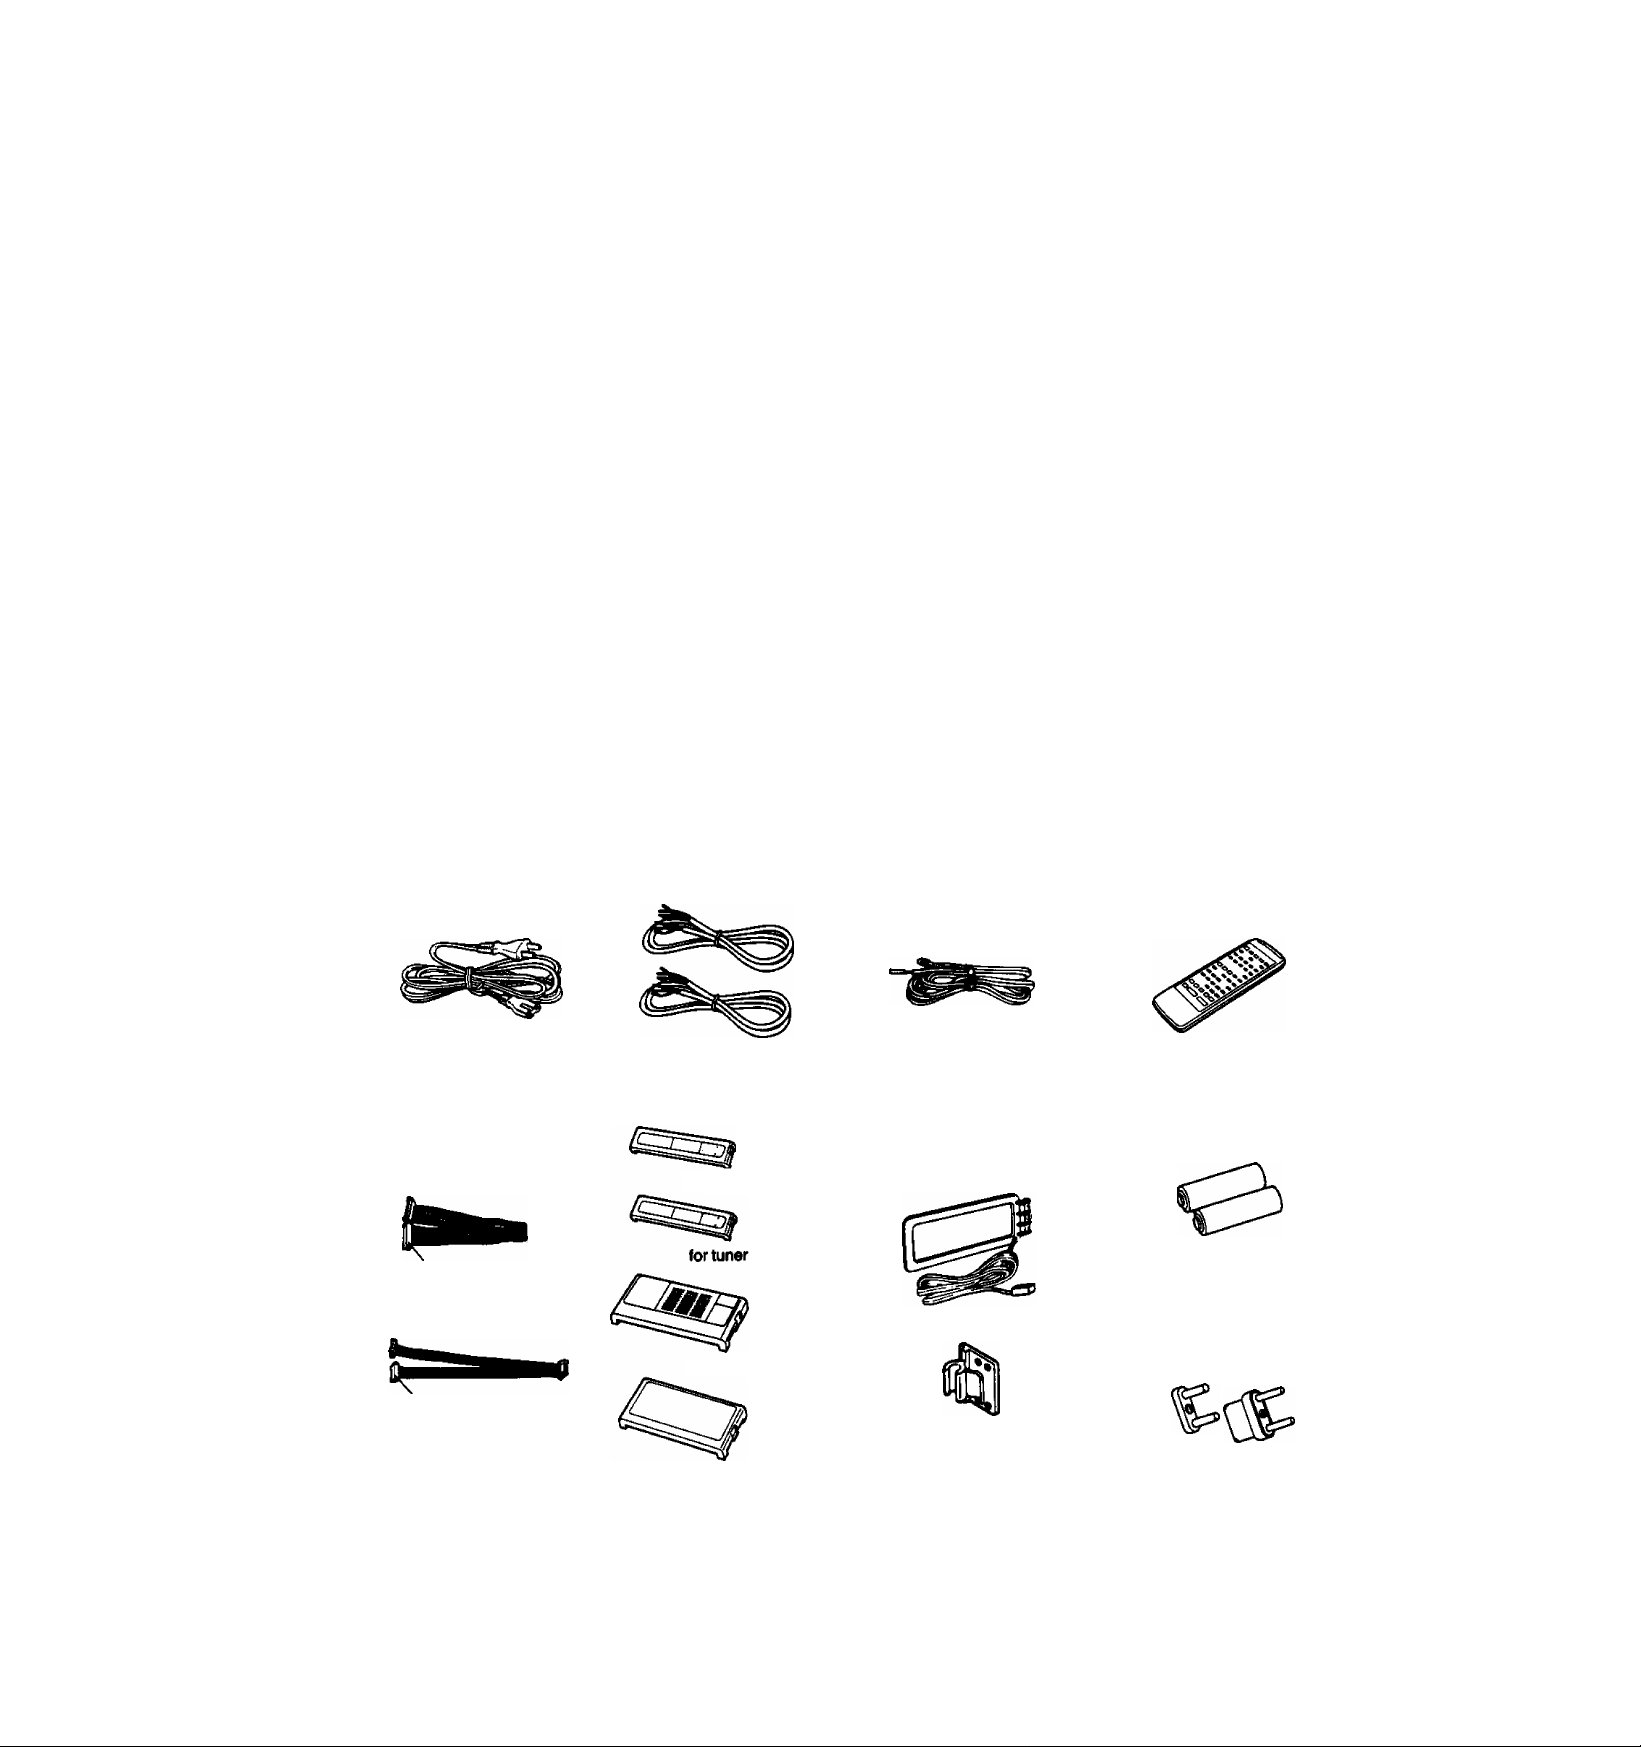
Accessories
•AC power supply cords (1) eSpeaker cords (2)
•Flat cables (2)
Blue
•Bade cover (4)
for CD Flayer
for amplifier
•FM indoor antenna (1 )
•LWMW loop antenna (1)
Emd Antenna holder
(1) and mounting
screws (2)
•Remote control
transmitter (1 )
(RAK-SC511W)
•Remote control batteries (2)
•Power plug adaptor
(For areas except Australia)
...............
i
Black
for cassette deck
Note: The configuration of AC power supply cord differs according to area.
- 4 -
0»*
0P»
Page 5
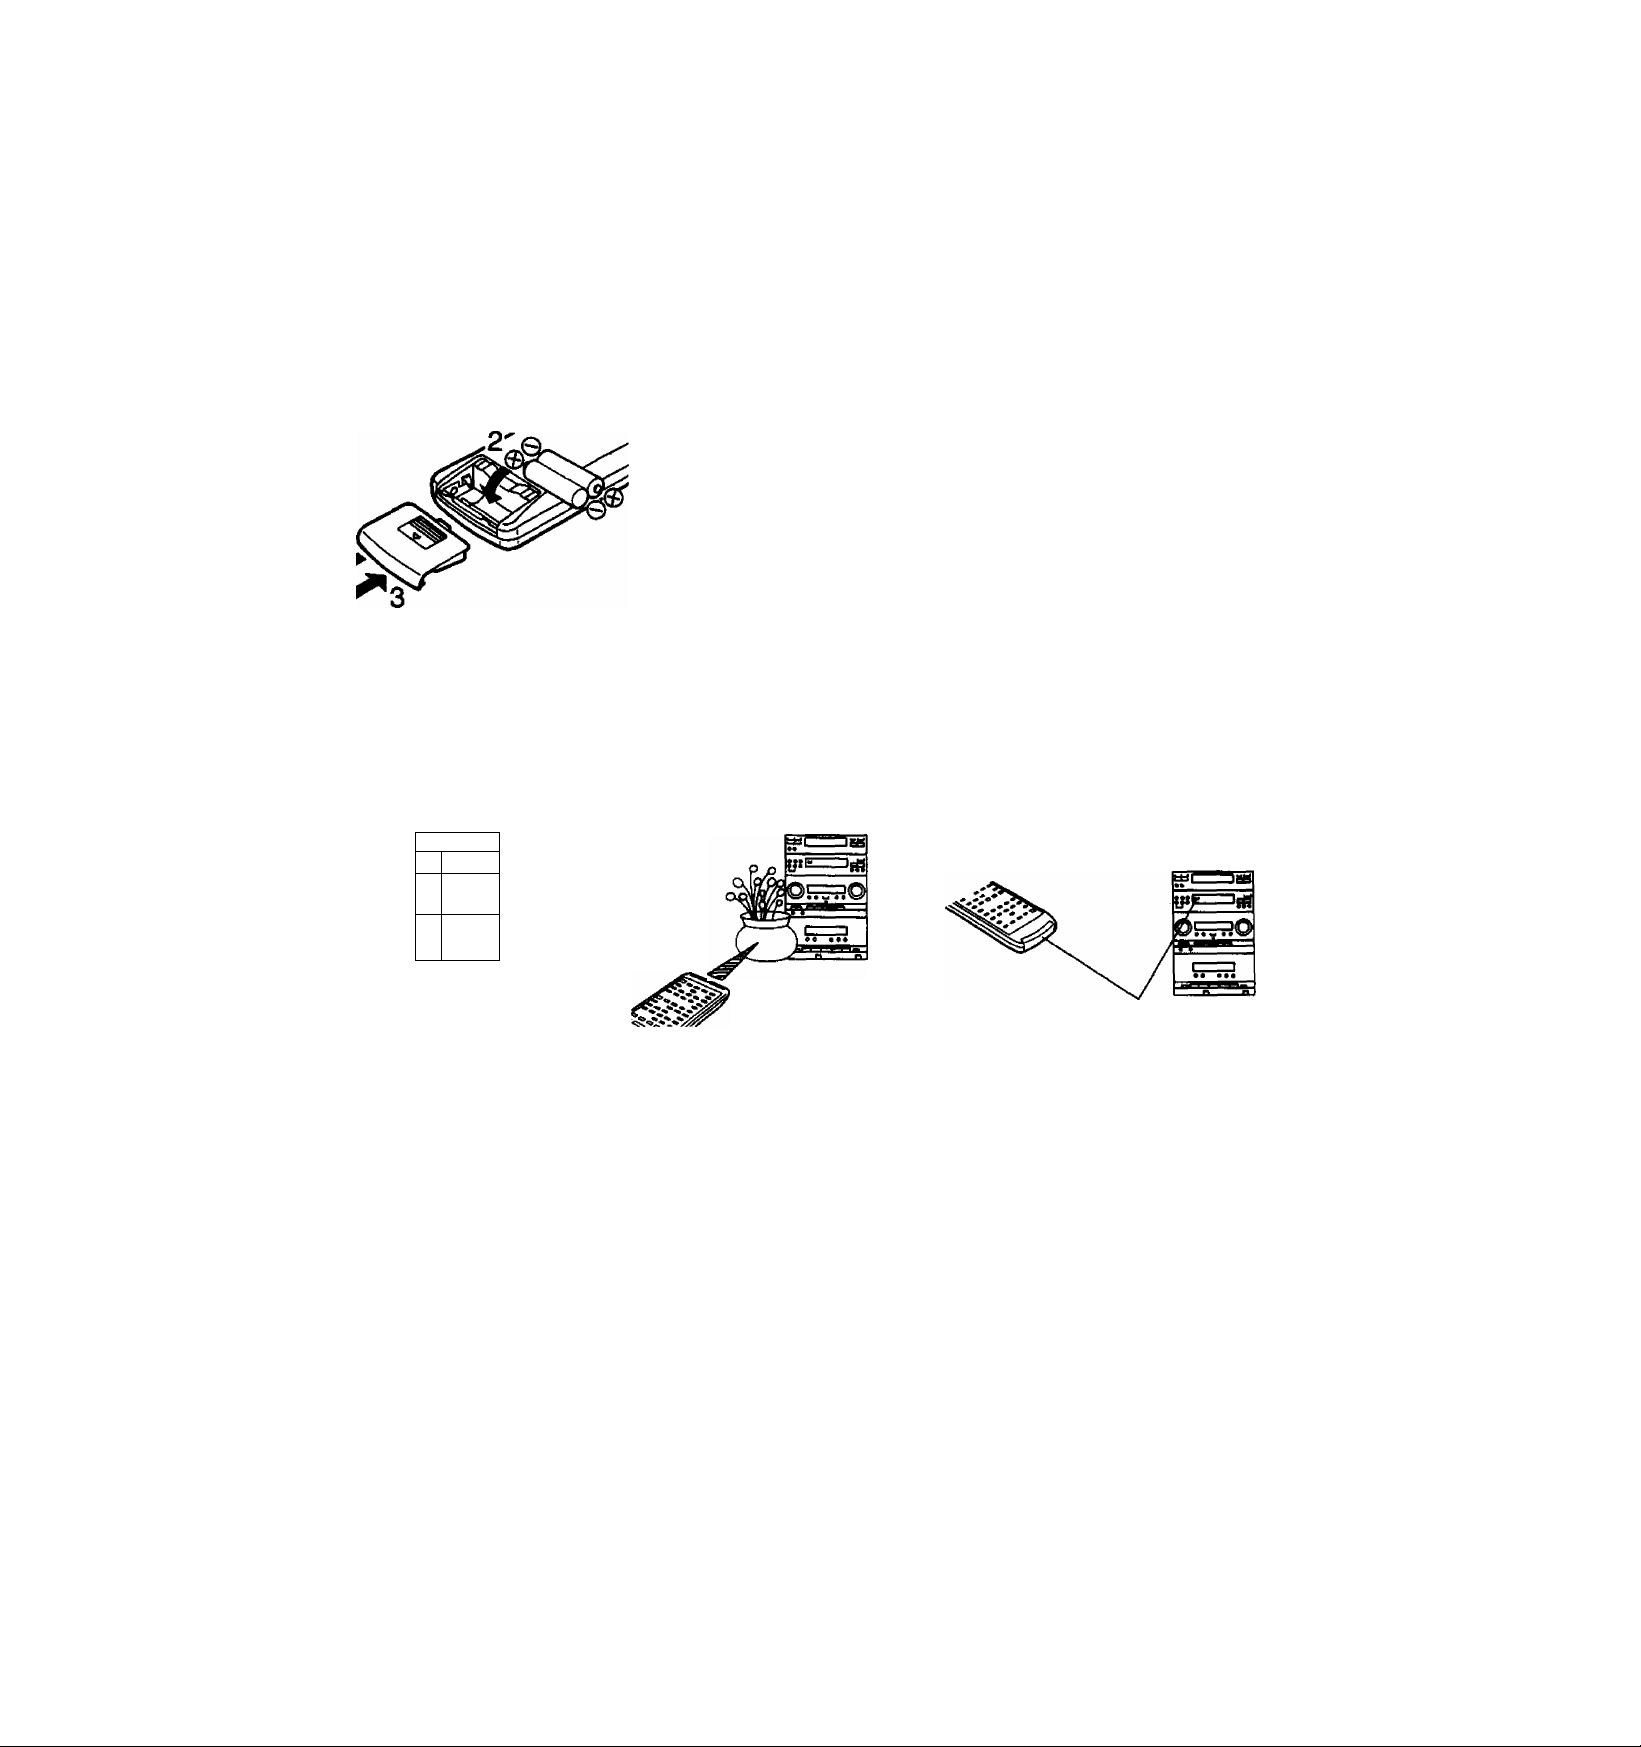
Remote-Control Transmitter
I Insertion of remote-control transmitter batteries
■ Battery IHe
1. Open the cover.
2. fnMrt the batteries.
•Be sure to insert according to the
(+) and (-) indications in the
battery compartment.
•Use two UM-4 "AAA" (R03 1.5 V)
size batteries.
3. Close the cover.
Battery life is about one year. (Battery life may
vary depending upon the frequency of use and
other conditions of use.)
The batteries should be replaced if the unit
cannot be operated even when the remotecontrol transmitter is brought close to the unit.
■ Battery notes
•Be sure that batteries are inserted so that
ttiey are placed correctly with respect to the
(+) and (-) indications in the battery com
partment. If the batteries are not inserted
correctly, they may leak and damage the
remote-control transmitter.
•Do not use rechargeable (nickel-cadmium)
type batteries.
Remote-control transmitter operation notes
Use the remote-control transmitter
within 6 meters (20 ft.).
ee 1—
Face ft toward the remote-control
elgnel receptor of this unit
•Do not mix old and new batteries, or batter
ies of different types (carbon and alkaline,
etc.).
•if the remote-control transmitter is not to be
used for a long period of time, take out the
batteries and store them in a cool, dark
place.
•ReiTKJve and dispose of vrom-out batteries.
•Never attempt to recharge or short-circuit the
batteries, and do not disassemble them or
expose them to excessive heat or throw
them into a fire.
•If a battery leaks, remove both batteries and
dispose of them, and then thoroughly clean
the battery compartment before inserting
new batteries.
Be sure the transmitter part of the remote-control
ttensmHter and the receptor part of this imN are
free from dust
Excessive dust might prevent reception.
♦ ee^
î=|f|l 6 meters (20 ft.)
60“
i— Other notes---------------------------------------------
1. Do not expose the receptor (on this unit)
to direct sunlight or other strong light,
because to do so might result in incorrect
operation.
(Obstacles should be
avoided.)
2. Do not use a remote-control transmitter
for a TV set, a VCR or other wdeo
component at the same time as this
remote-control transmitter is being used,
because to do so might result in incorrect
operation.
Avoid dust.
3. If this unit is installed in a rack with glass
doors, the glass doors' thickness or color
might make it necessary to use the
remote-control transmitter a shorter dis
tance from tfie unit.
-5-
Page 6
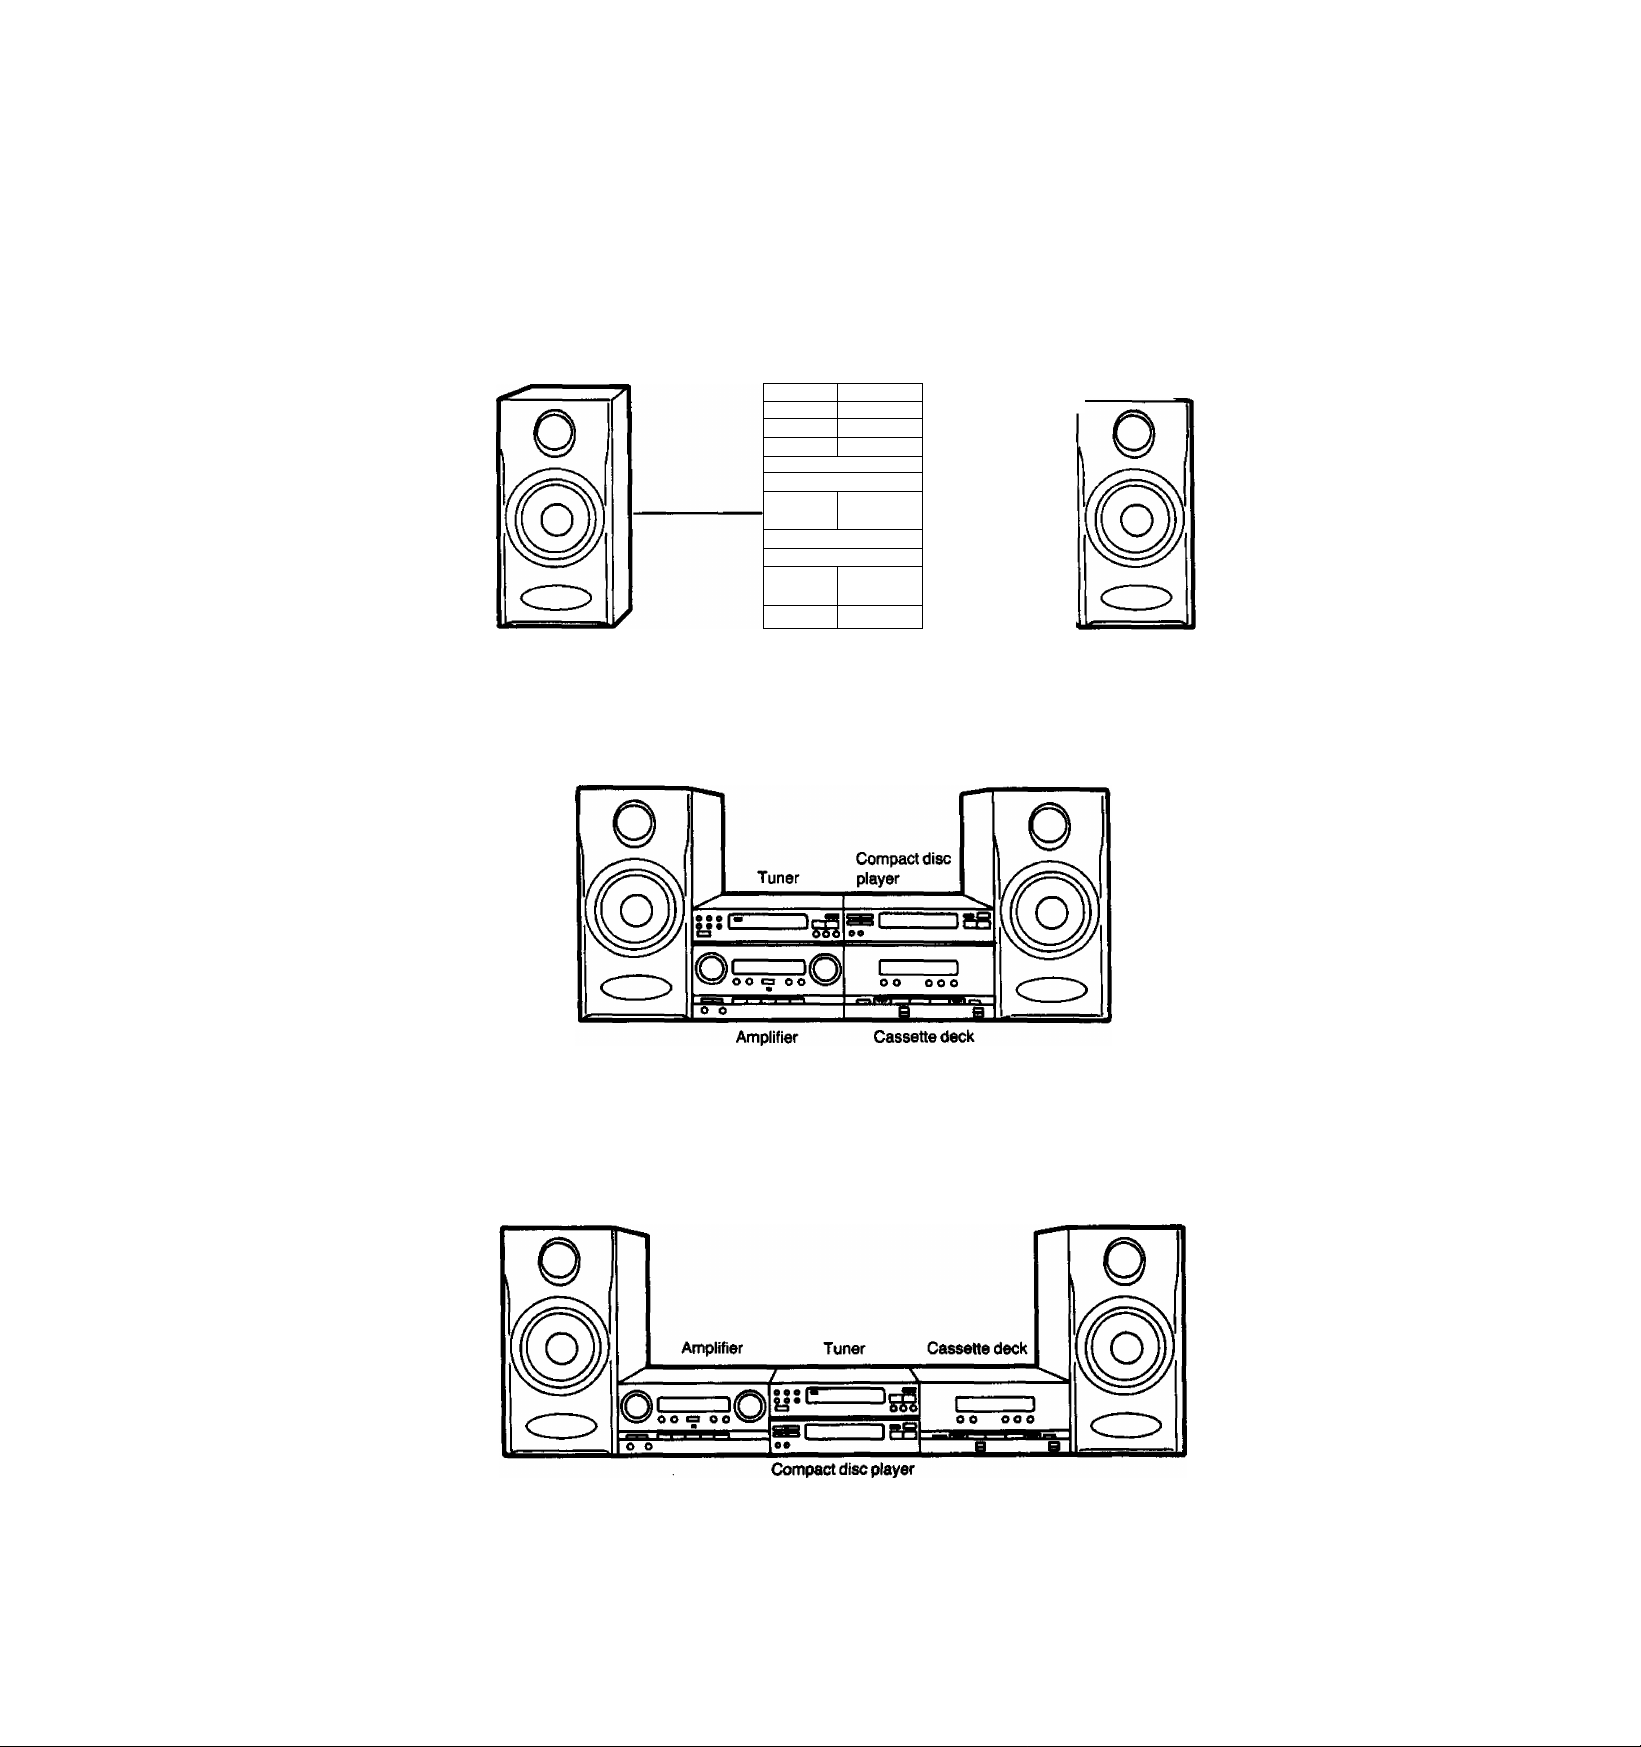
How to Install the System
Install the various components as shown in the figure.
Installing the components vertically
Left speaker
Installing the components horizontally
«0
eee f?
a 060
0 0
0 0
______
a
_____
000
ii-a
' 'a
Compact disc
\FH
player
Tuner
Cassette deck
Right speaker
Amplifier
Installing the components on a line
-6-
Page 7
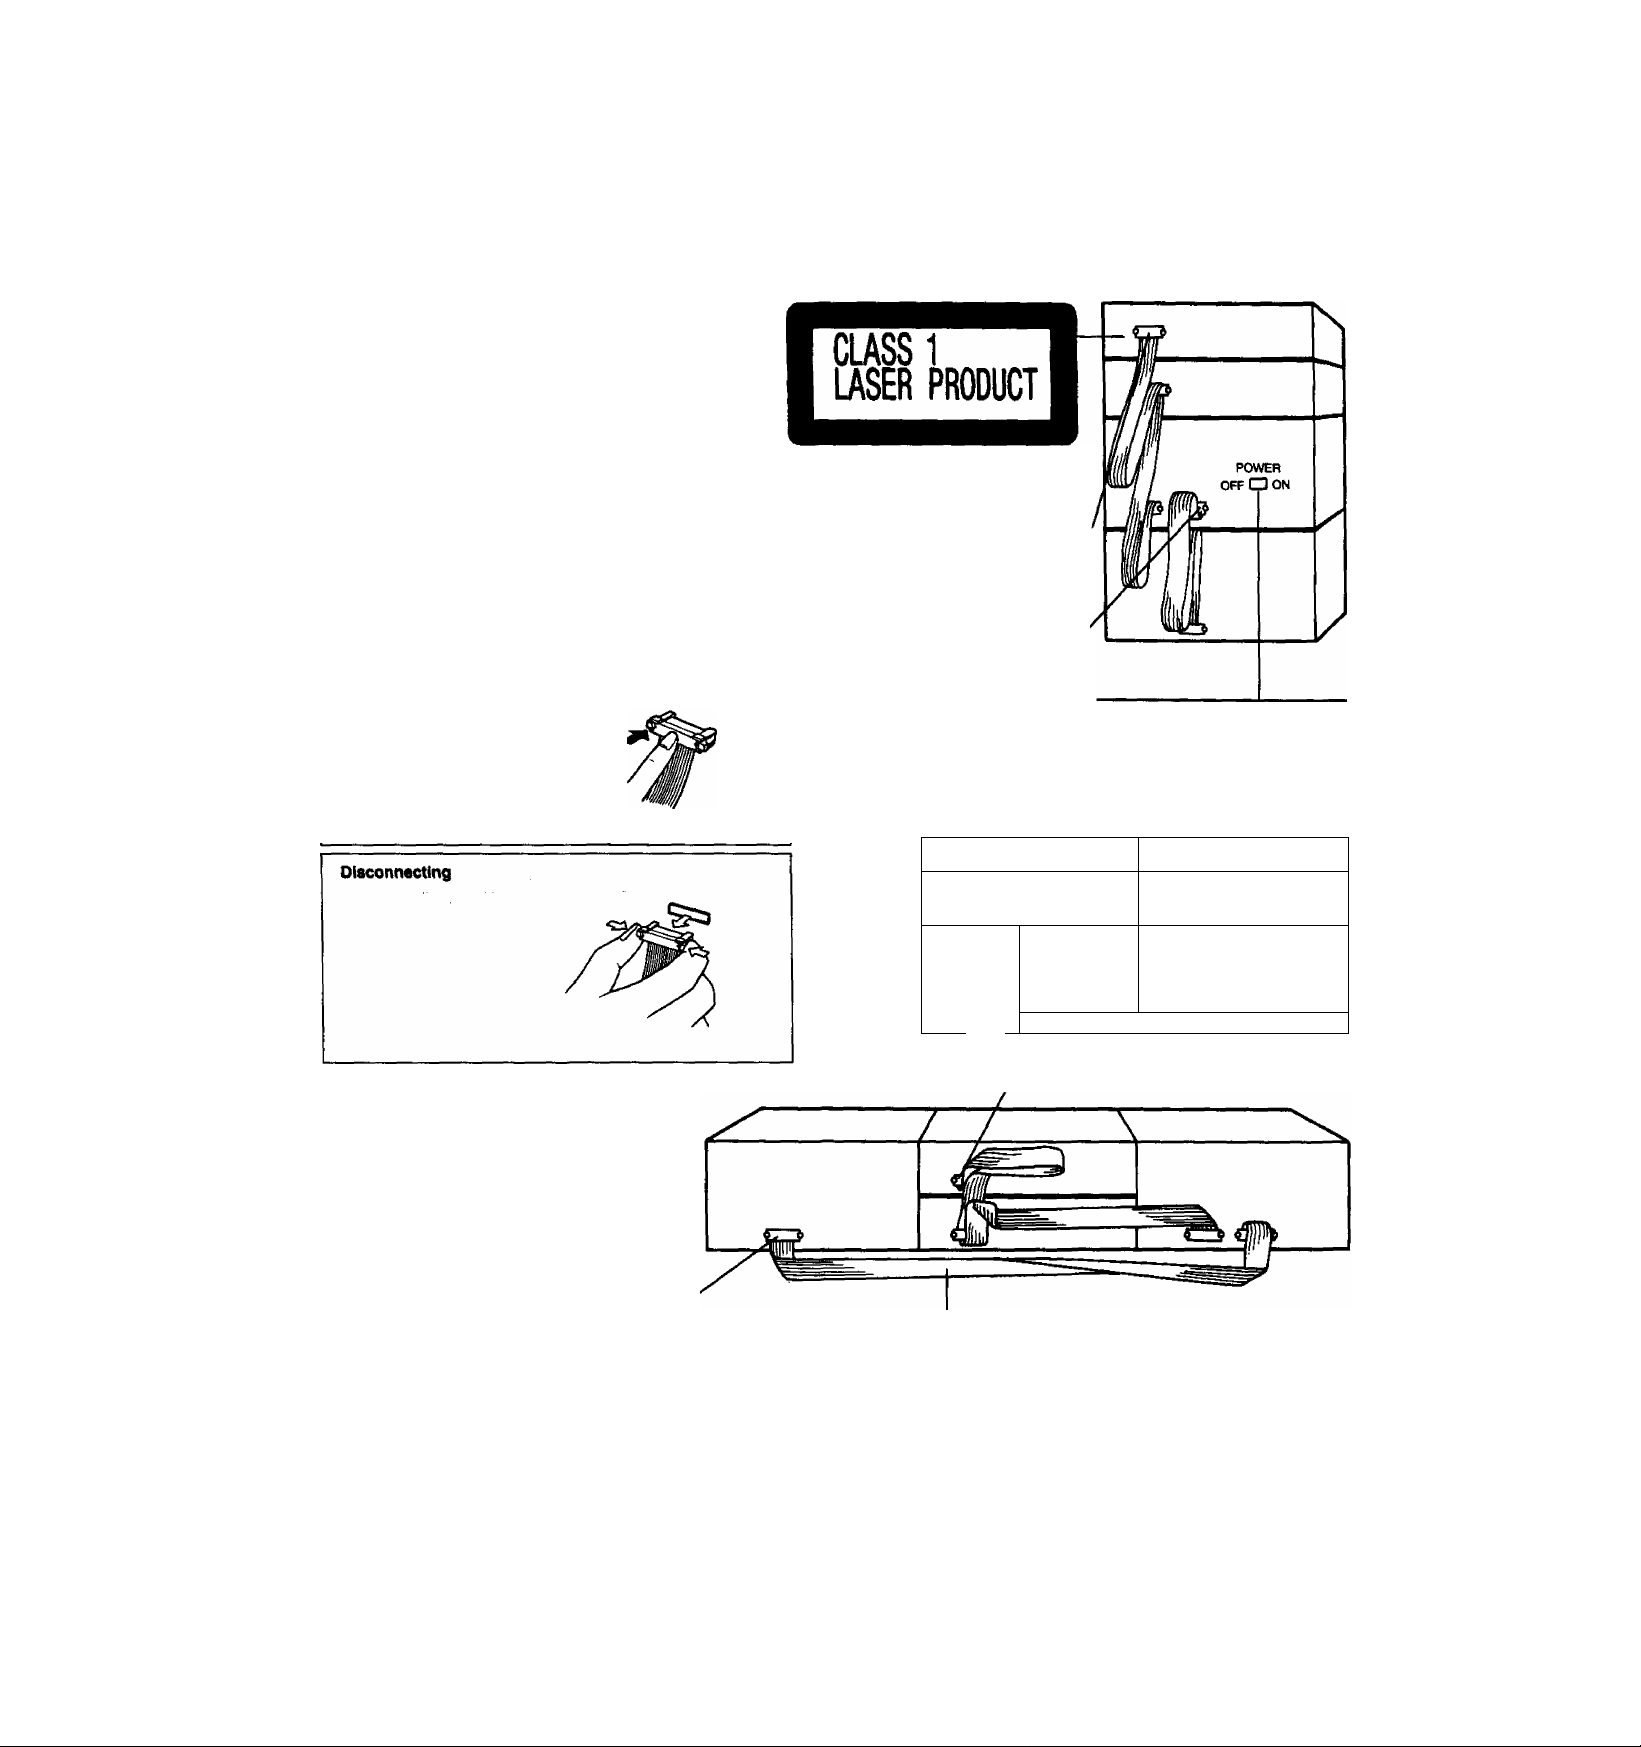
Connections
Flat cables
After connection, please fold and press the cable as flat to the back
of the unit as possible.
From the amplifier to the cassette deck
(Blue)
From the compact disc player via the tuner to the amplifier
(Black)
Connecting
Hold the connector with the
recessed part up and press
in at the center until you hear
a click.
The white line should be on
the right side.
(Blue)
(Black)
LUOKAN1 LASERLAITE
KLASS1 LASER APPARAI
Black
Blue
—For Australia'
Power switch is (ocated on the rear panel.
Make sure that the power switch on the back of the
amplifier is switched ON.
—N
Black'
Blue
I «
____
? miP
Blue
Black
When installing the back cover, put this fiat cables out of the back cover.
-7-
Page 8
Connections (continued)
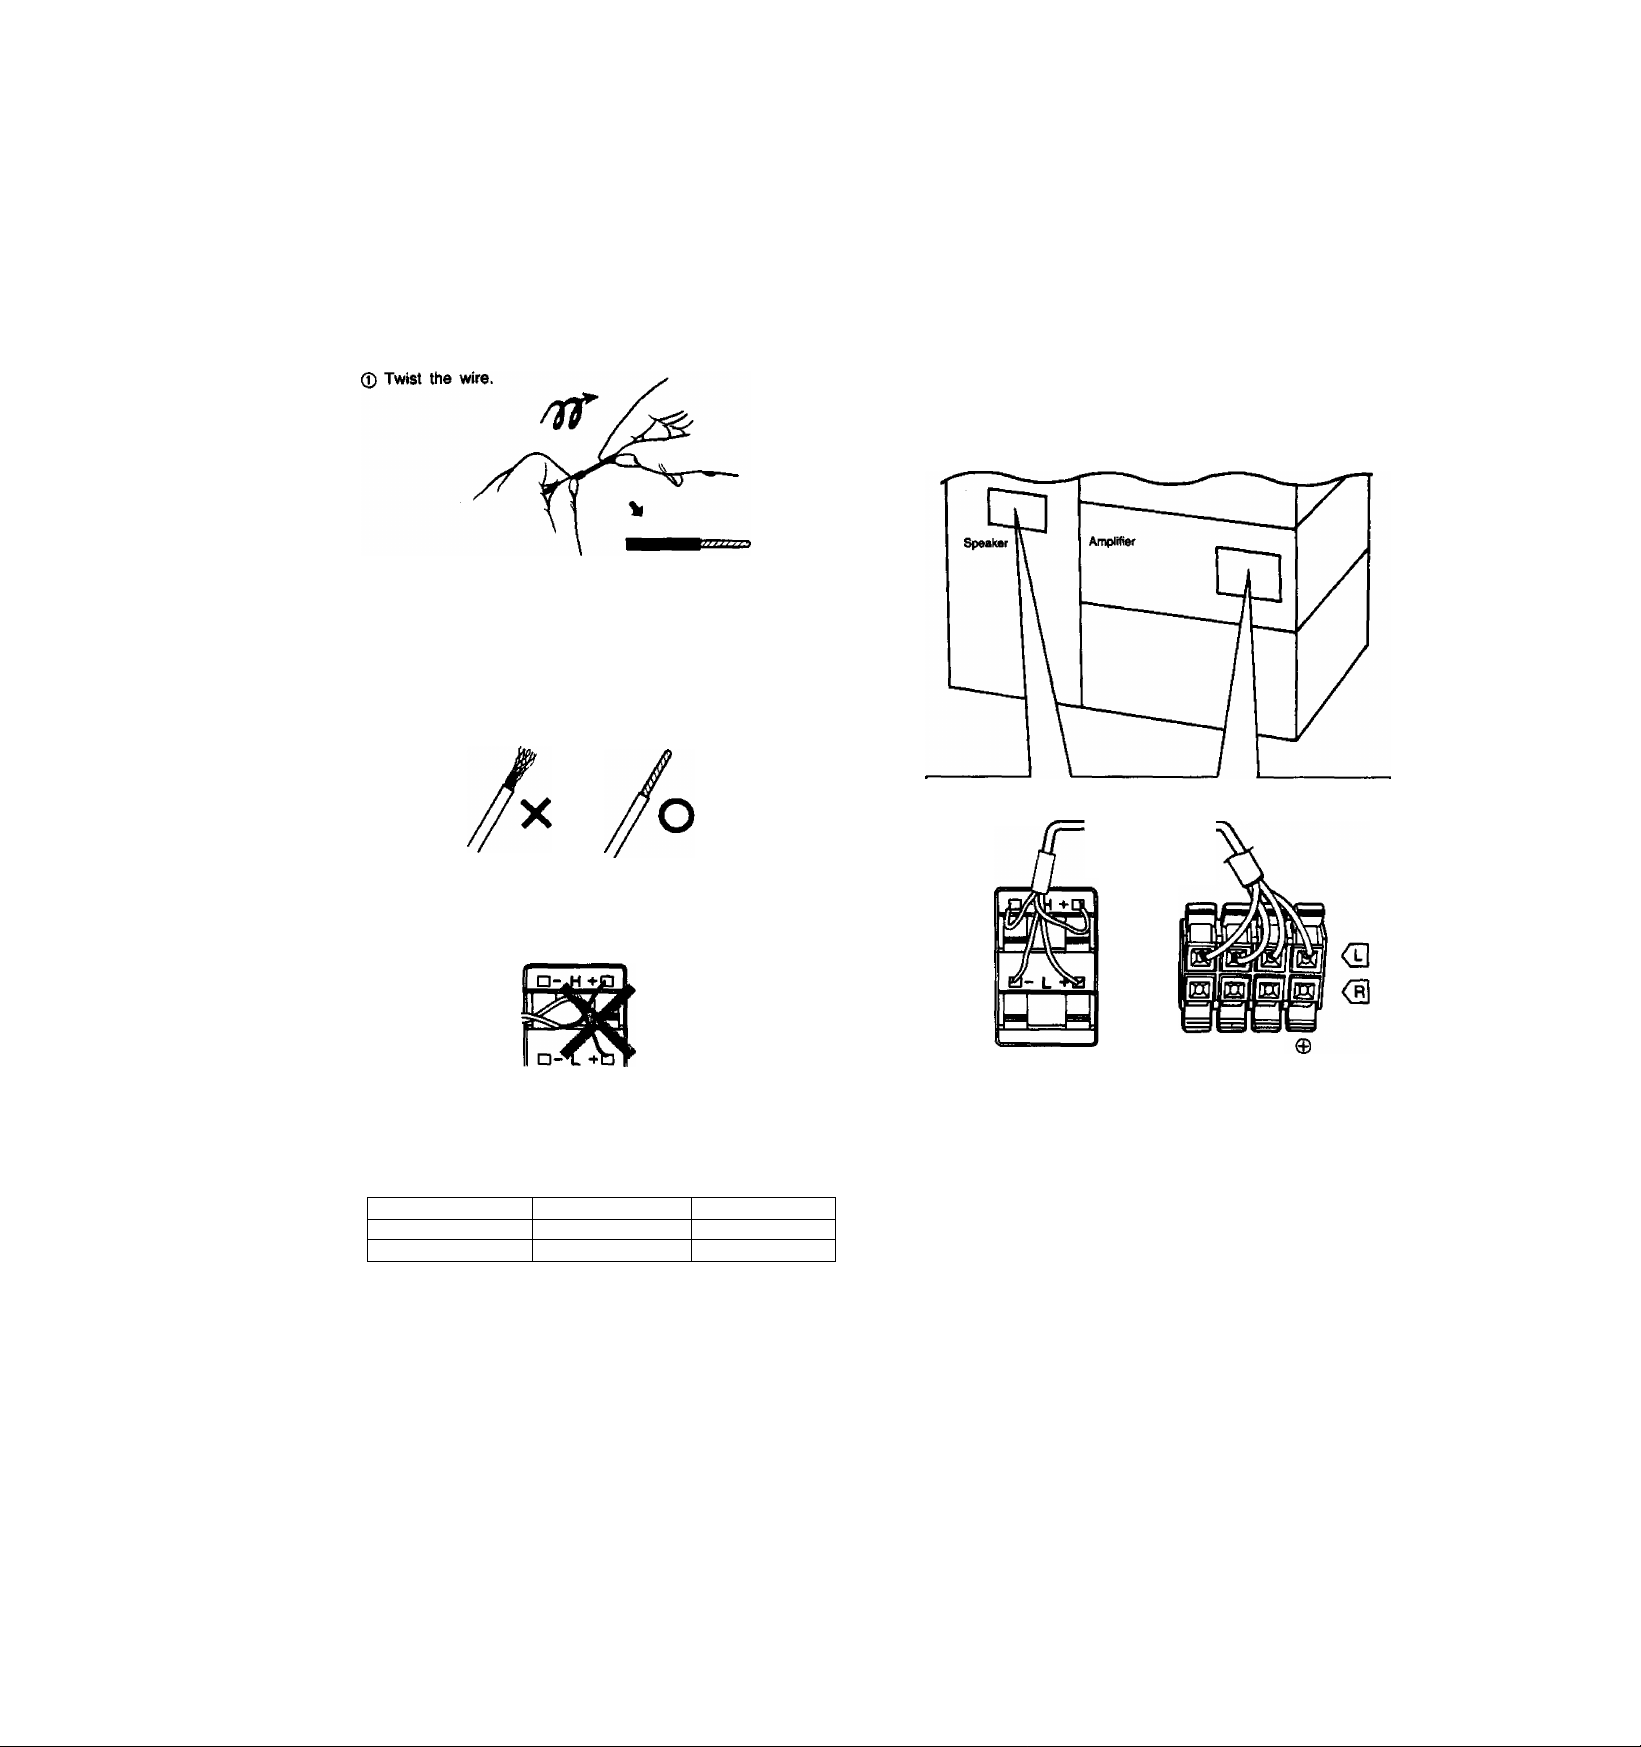
Speaker cables
other types of speaker cannot be connected to this unit.
Match the four wires from the left and right speaker cables with the
same colored levers of the speaker terminales, then insert the
wires into the respective terminals.
(g) Push down on the lever, insert the bare ends of the wires, and
push up the lever. (Refer to the right)
Note;
•Make sure the bare ends of the wires are not unraveled. (If they
are, twist them tight again.)
•Take care not to short the wires. (The main unit could be
damaged if they are shorted.)
Notice for speaker connectioris:
Connect each color coded wire of the speaker cat^e to the
corresponding color coded terminal according to the following
chart.
Polarity
High tone
Low tone
-
Blue
Black
+
Gray
Red
First connect the cables to the speakers, then to the
amplifier.
Speaker cable
(included)
(Blue)
(Black)
(Gray)
(Red)
® 0 e
Speaker
Amplifier
-8-
Page 9
FM antenna
The indication AM used here In
cludes both MW and LW.
■ FM indoor antenna (included)
Install this antenna on a wall at a height and in a direction which
result in the best reception.
For best reception sound quality:
An FM outdoor antenna is recommended.
Notes:
•The tack used to fix the internal antenna wire should not come
into contact with №e bare wire.
•Disconnect the antenna if an FM outdoor antenna is installed.
FM outdoor antenna
■Fix with
tack or tape
^ Remove insulation
I and twist the
conductor.
Tuner
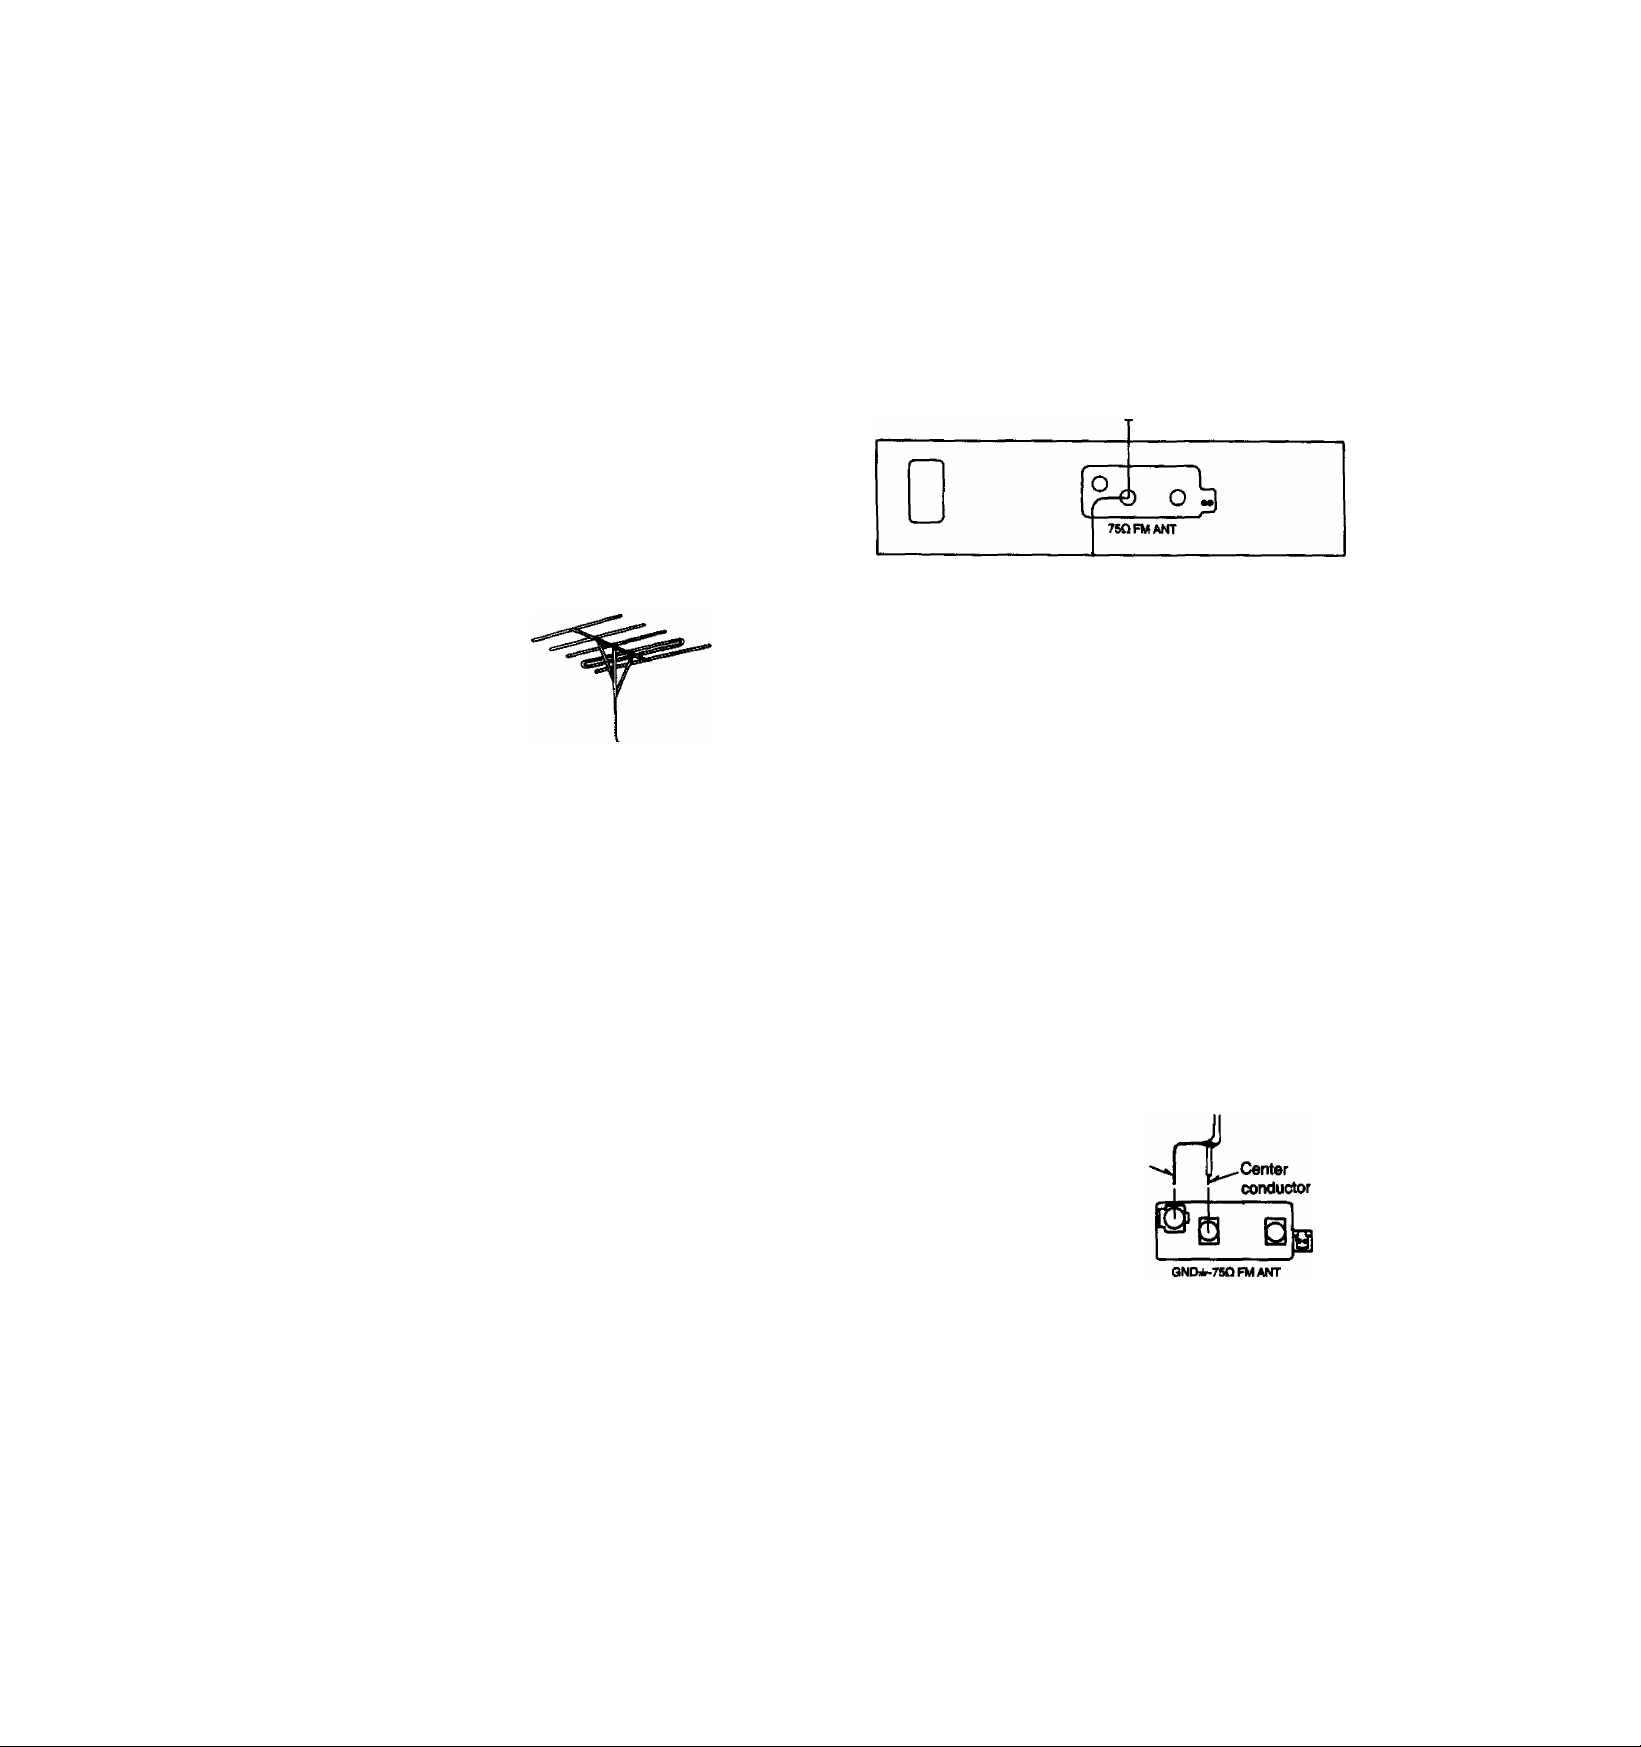
■ FM outdoor antenna (not included)
If the FM indoor antenna does not provide satisfactory reception,
an outdoor antenna should be used.
The outdoor antenna may be required in a mountainous region, or
if this unit is iocated inside a reinforced-concrete building, etc.
How to connect a TS^hm coaxial cable
O Remove a piece of the
outer vinyl sheath from
the end.
20mm(2%2")
d) Bundle the shield braid,
and remove a piece of
the inner vinyl sheath
covering the core wire.
10mm(%'l
@ Connect the core wire
and the shield braid.
Shield braid
Page 10

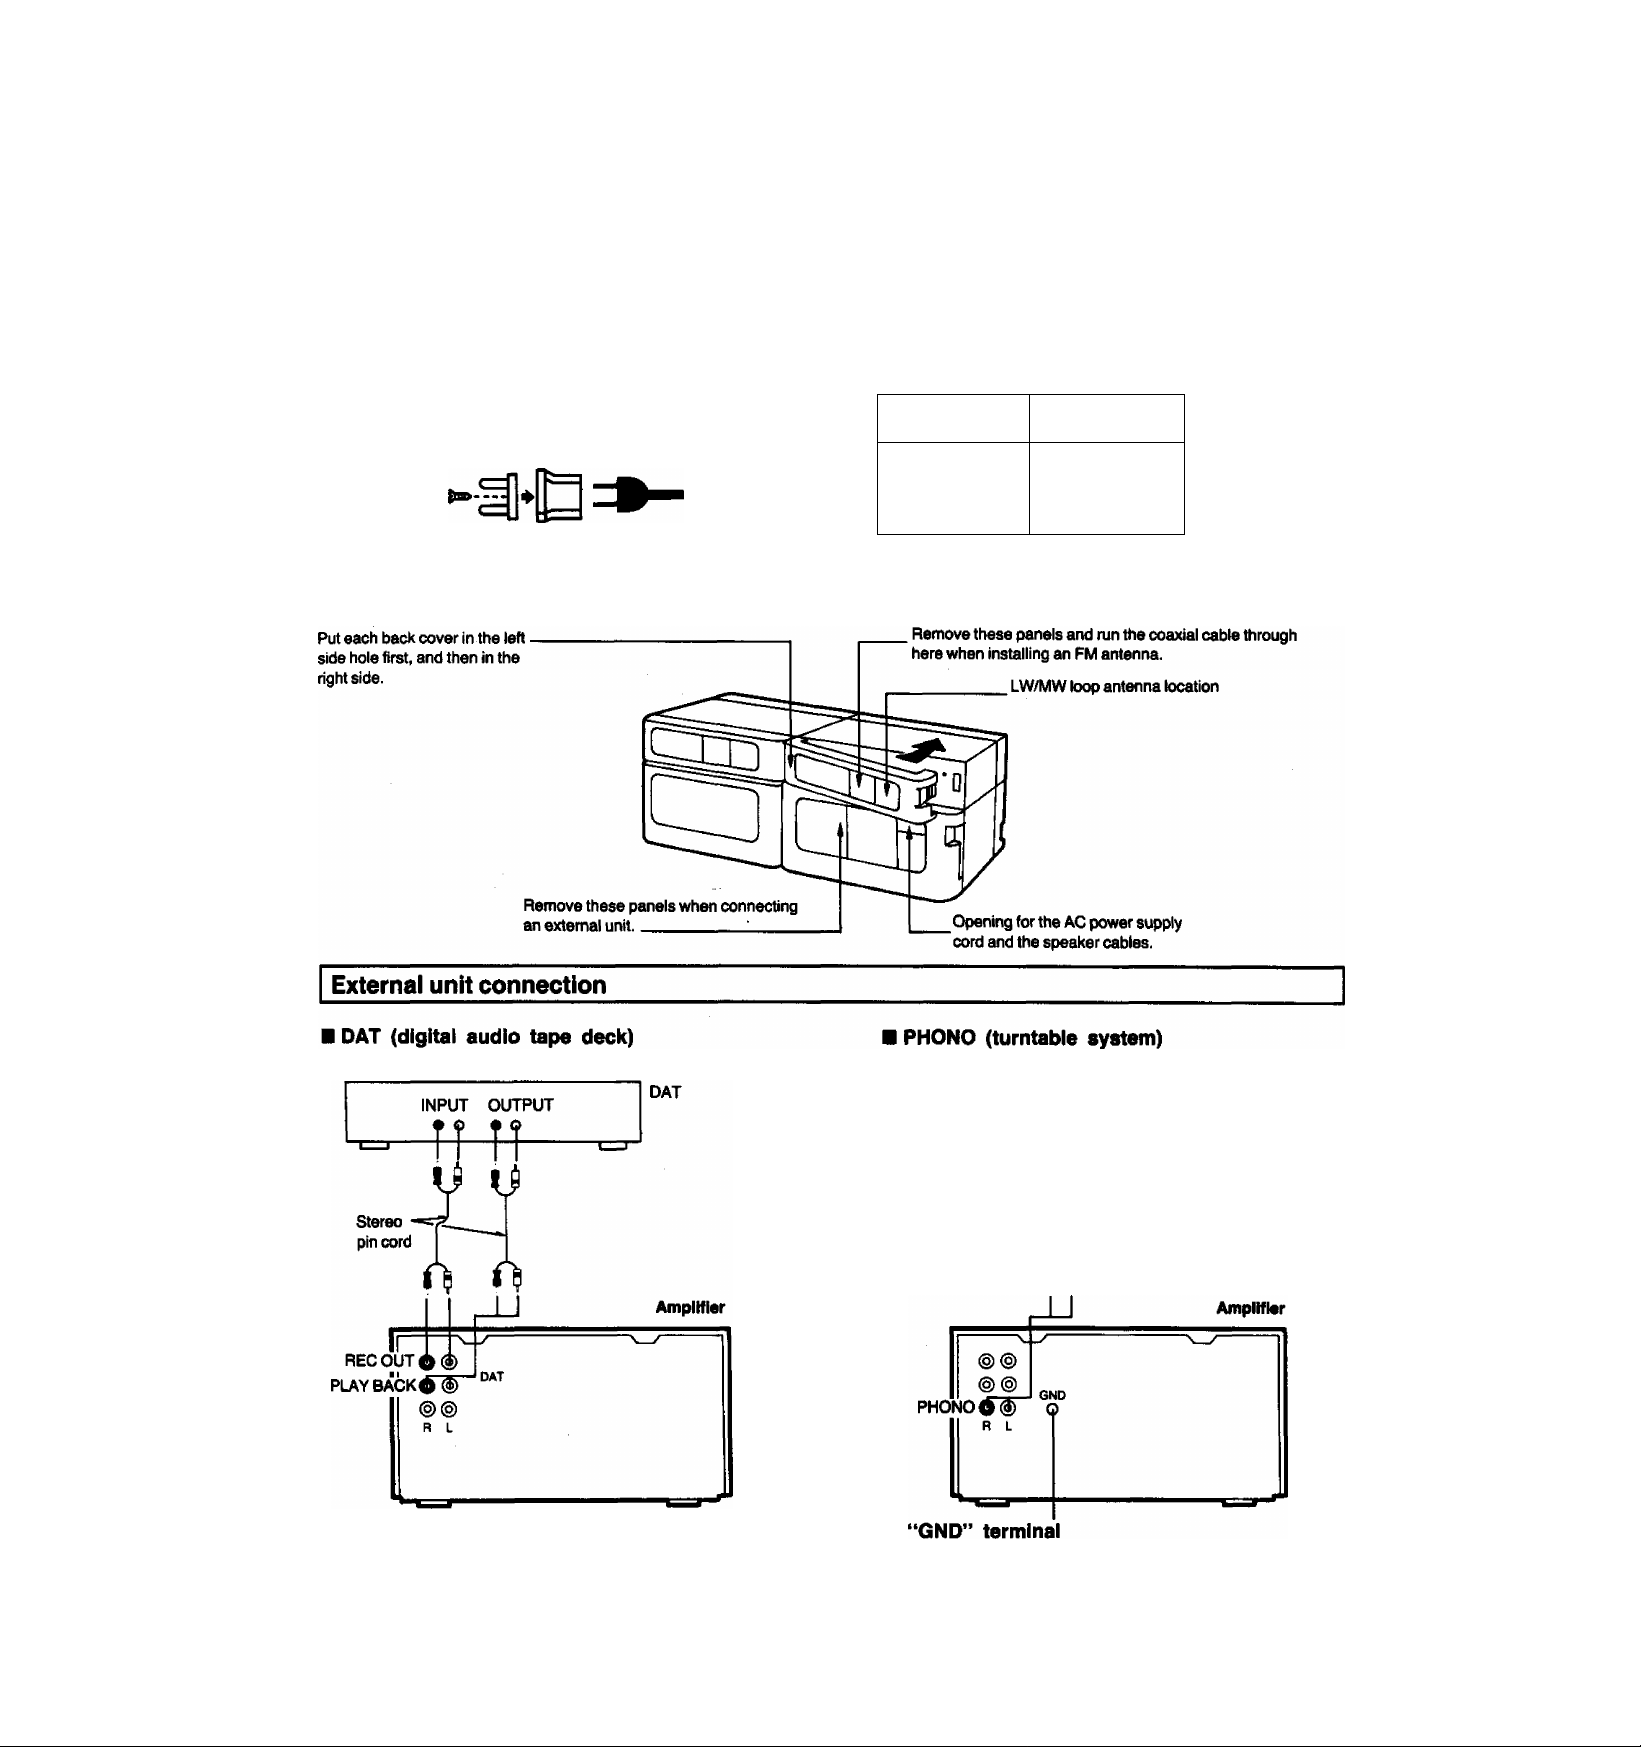
Connection
(continued)
LW/MW antenna
■ LW/MW loop antenna (included)
Mount the antenna on a wall or at the tuner at a height and the
direction which results in the best reception.
Notes:
•If this antenna is not connected, LW/MW broadcasts can't be
received.
•Be sure to connect the LW/MW loop antenna even when an
outdoor antenna is used.
LW/MW loop antenna
C
Install the LW/MW loop antenna holder at the back
of the unit without backcover.
•How to Install the LW/MW loop antenna
After installing the back cover, install the antenna.
In case not to use the back cover, install the antenna at the back of
the tuner. (See above.)
To minimize noise pickup, keep the loop antenna away from the
speaker cable, power cord and metal surfaces.
Back cover (Refer to page 11.)
LW/MW loop antenna holder
(included)
Screws (2, included)
■ LW/MW outdoor antenna (not included)
An outdoor antenna may be required in a mountainous region, or if
this system is located inside a reinforced-concrete building, etc.
Run 5 to 12 m of vinyl-covered wire
horizontally along a window or other
convenient location.
C
— -&-12m— —
(16-40 ft.)
Tuner
-10-
Page 11
AC power supply cord
Connect the AC power supply cord after all other cables have bem
connected and the back covers are installed.
^ For areas exc^ Australia
' If the power plug will not fit your socket, use the power plug
adaptor (included).
----------------------------------------------------
Install the back covers
G)
Household AC outlet
AC power supply cord
(induded)
--------
^
B
-11-
OUTPUT
TURNTABLE
-4^
0
Stereo
pin cord
0
This terminal Is for use with turntables which have a ground wire.
Page 12
I
Front Panel Controls and Functions
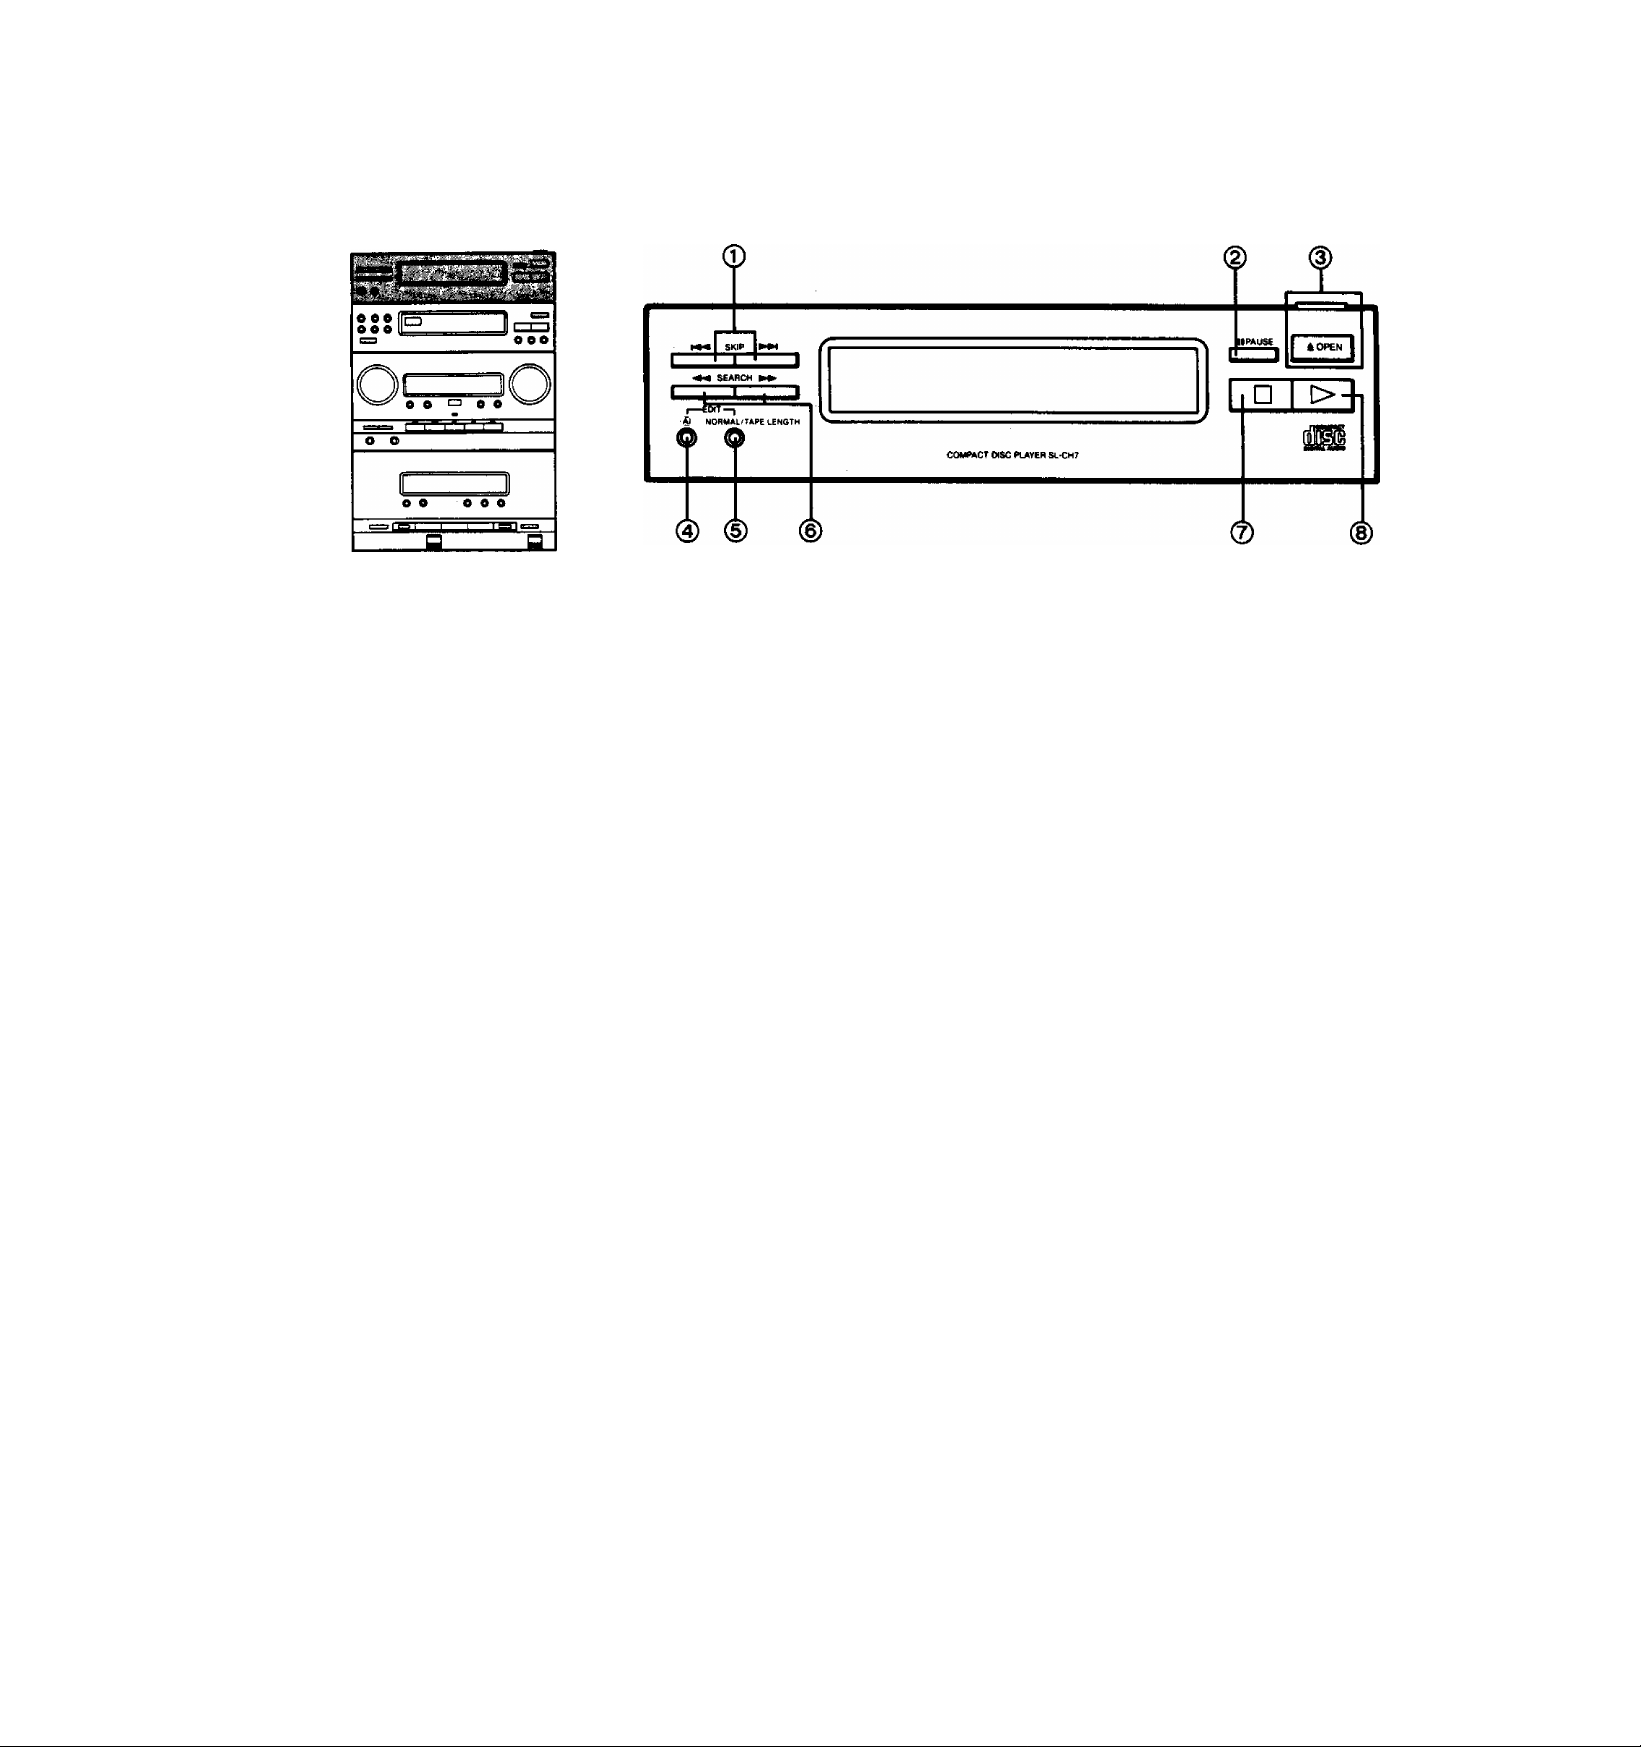
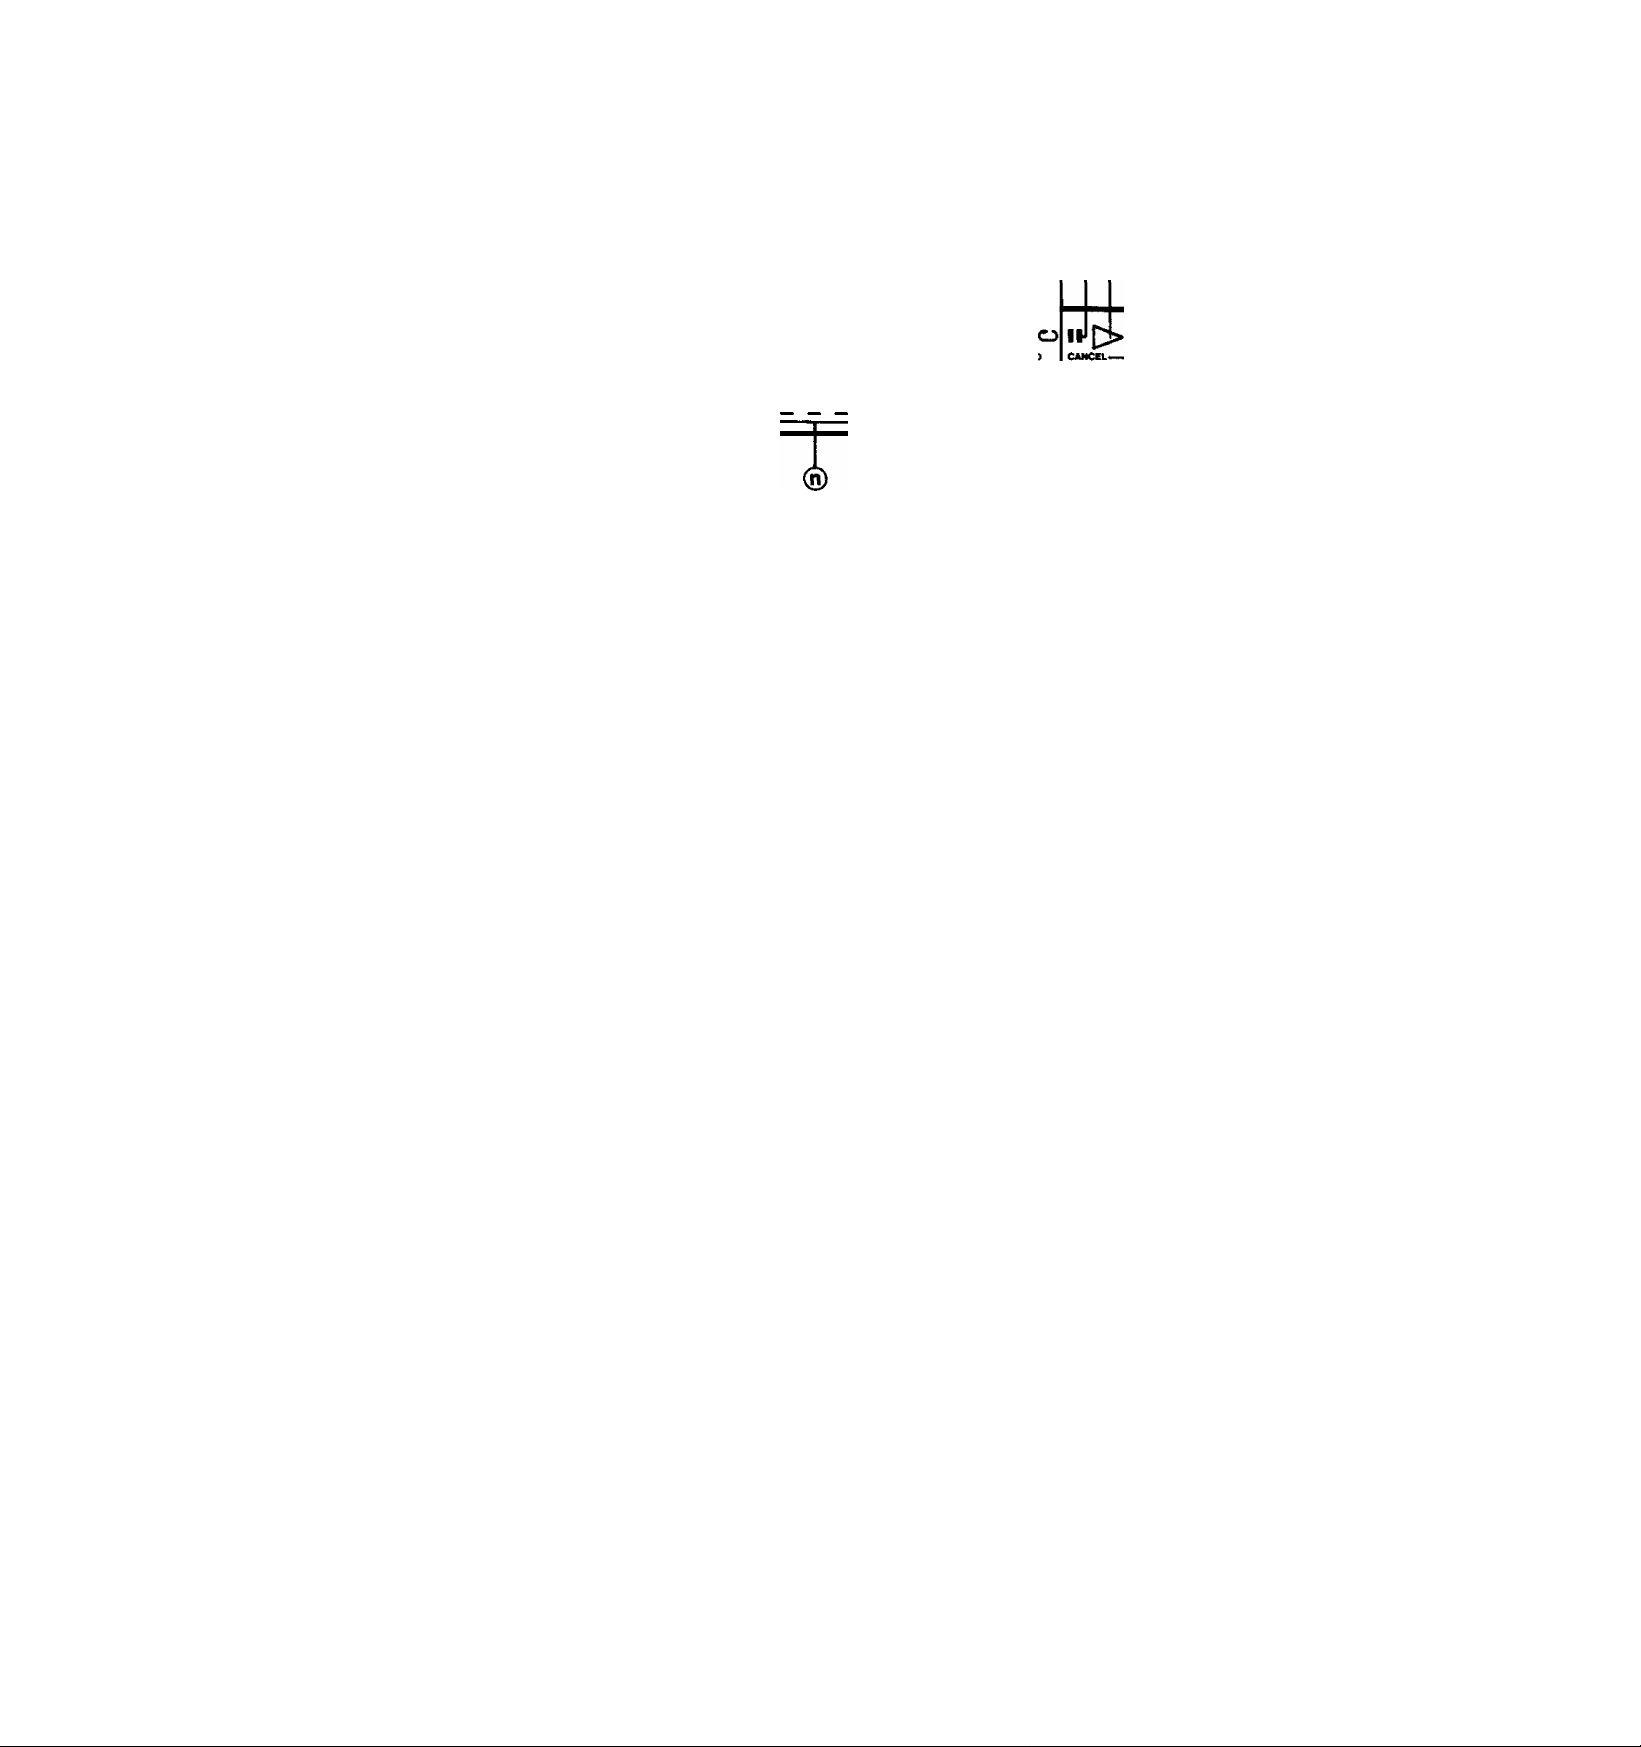
Compact disc player: control section
© Skip buttons (SKIP ►►()
Press one of these buttons briefly to move the pickup
(backward and forward) to the beginning of a specific track.
@ Pause button (II PAUSE)
@ Disc tray open/close button
(A OPEN, ▲ OPEN/CLOSE)
Used for opening and closing the disc tray.
0 Al edit-recordIng button ([aO)
This button is used to make an Al edit-recording.
© Edit mode button (NORMAL/TAPE LENGTH)
This button can be used to choose one of the edit modes or to
specify the tape length to be used.
@ Search buttons {« SEARCH ►►)
Use these buttons to move the pickup forward and backward.
© Stop button (□)
® Play button (>)
-12-
Page 13
® ® ©®(
®® ®®(T)(P®
^IDE
№IT I
»—LINK
■ DISC
Al
TKACK HIM
B|1 £ 1 1 £ ® Z £ 9 10 11 12 13 14 15 16 17 18 19 20. g
o® ® (g)
Compact disc player: display section
® Link indicator (LINK)
Illuminates when the unit is In a condition the disc link is
(g) Edit indicator (EDIT)
Illuminates when edit-recording a CD.
® Disc Indicator (DISC)
Illuminates when a disc has been loaded.
(3) Multi-display
This display shows the track number and elapsed play time of
the current track, or the remaining time of the tape while the
unit is in the CD-edit mode. ("SIDE A” or "SIDE B"
illuminates.)
1
SEC AUTO SMCE-i PfMOMM
• c la 1« If lo IV
0 Play indicator (>)
Illuminates when the play mode is activated.
0 Program cancel Indicator (CANCEL)
Illuminates when ttie programmed track can be cancelled.
® Program play indicator (PROGRAM)
Illuminates during program play.
0 Al edit-recording Indicator (Al)
Illuminates when Al edit-reoording mode is activated.
@ Tape side indicator (^ A, ^ B)
Shows the tape side (A or B) to be recorded on when
performing the edit-recording of compact disc.
@ Fade end Indicator (FADE END)
Illuminates when the unit is normal edit mode, and illuminates
to show fading at the end of the tape.
0 Repeat indicator (o)
Illuminates when the repeat mode is activated.
(§) Auto space indicator (AUTO SPACE)
Illuminates during edit-recording of compact discs, and shows
that the auto space function is activated.
(H) Pause indicator (II)
Illuminates when the pause mode is activated.
(n) Track number indicator (1-^)
Shows the number of tracks.
® "Over” mark (^)
This indicator Illuminates if the total number of tracks on the
disc is 21 or more.
® Peak search indicator (PEAK SEARCH)
Illuminates while the CD player automaticatly scans for the
peak level on the CD. (See page 45.)
When peak search ends. “PEAK” flashes to indicate the peak
level.
-13-
Page 14
I
Front Panel Controls and Functions
(continued)
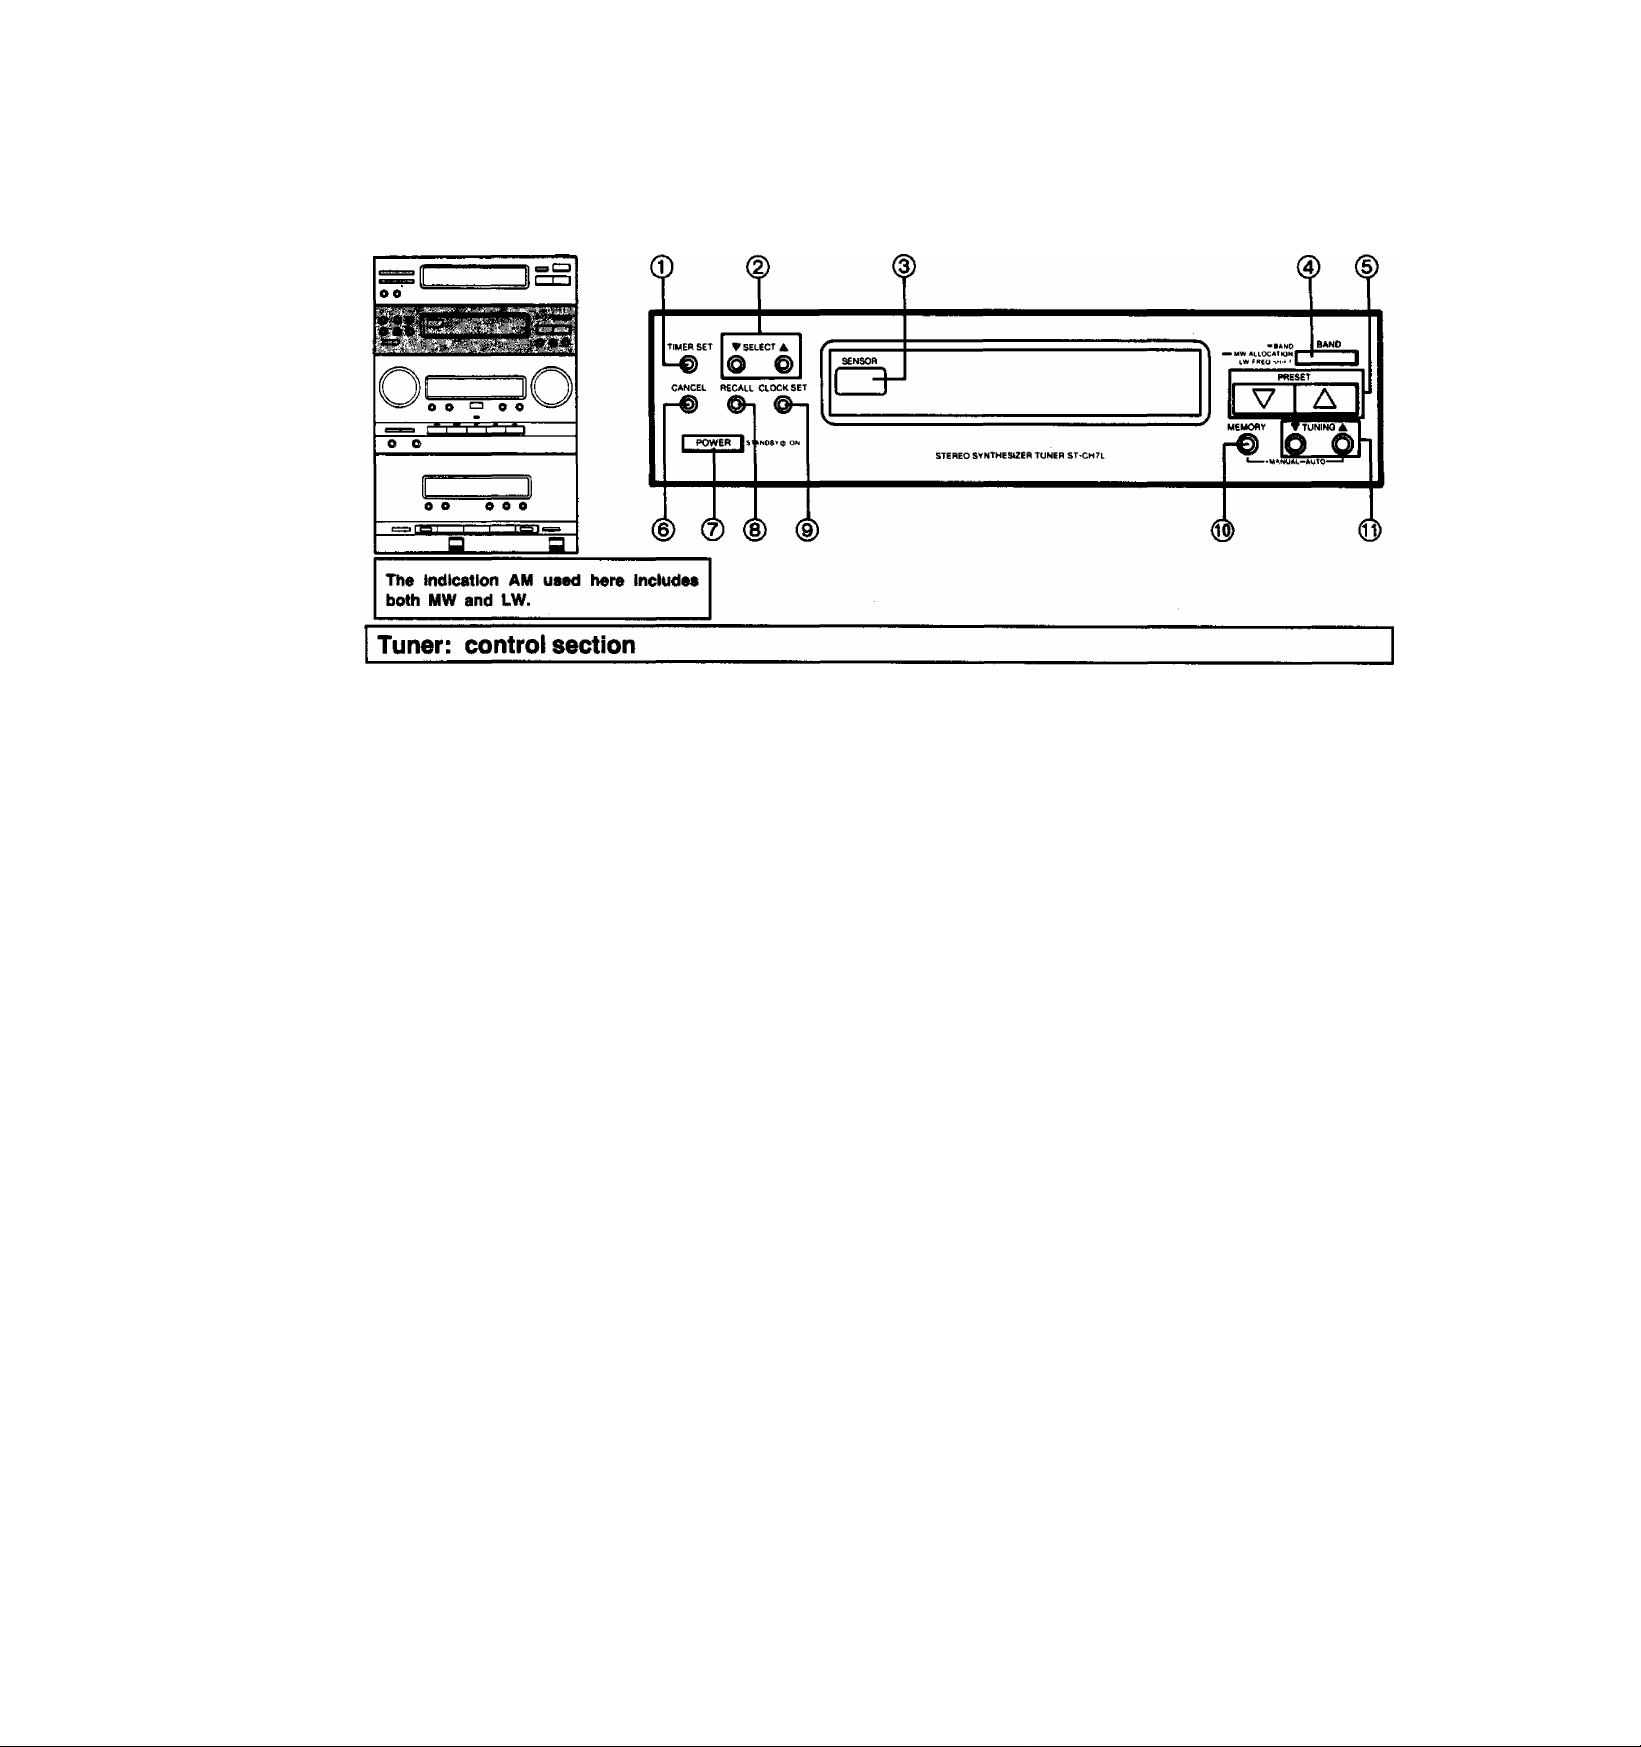
0 Timer set button (TIMER SET)
This button is used when making the timer setting.
(2) Timer select buttons (T SELECT A)
These buttons are used when setting the time. And when
making the timer setting, to select the type of timer operation,
the day, the time, etc.
0 Remote signal sensor (SENSOR)
0 Band select button (BAND)
This button is used to select either the MW, LW or FM band.
0 Preset-tuning'buttons (V PRESET A)
These buttons are used to select channel numbers for a
broadcasting station which has been stored in the tuner’s
memory.
0 Timer cancel button (CANCEL)
This button is used to cancel the timer setting.
© Power “STANDBY (!)/ON” switch
(POWER STANDBY (!)/ON)
This switch switches ON and OFF the secondary circuit power
only. The unit is in the “standby” condition when this switch is
set to the STANDBY position. Regardless of the switch
setting, the primary circuit is always “live" as long as the
power cord is connected to an electrical outlet.
0 Timer setting confirmation button (RECALL)
This button is used to confirm the timer setting.
0 Clock set button (CLOCK SET)
This button is used to set the present time.
0 Memory button (MEMORY)
TTiis button is used when presetting broadcast station
frequencies into memory.
® Tuning buttons (▼ TUNING A)
These buttons are used for tuning the desired broadcast
station.
-14-
Page 15
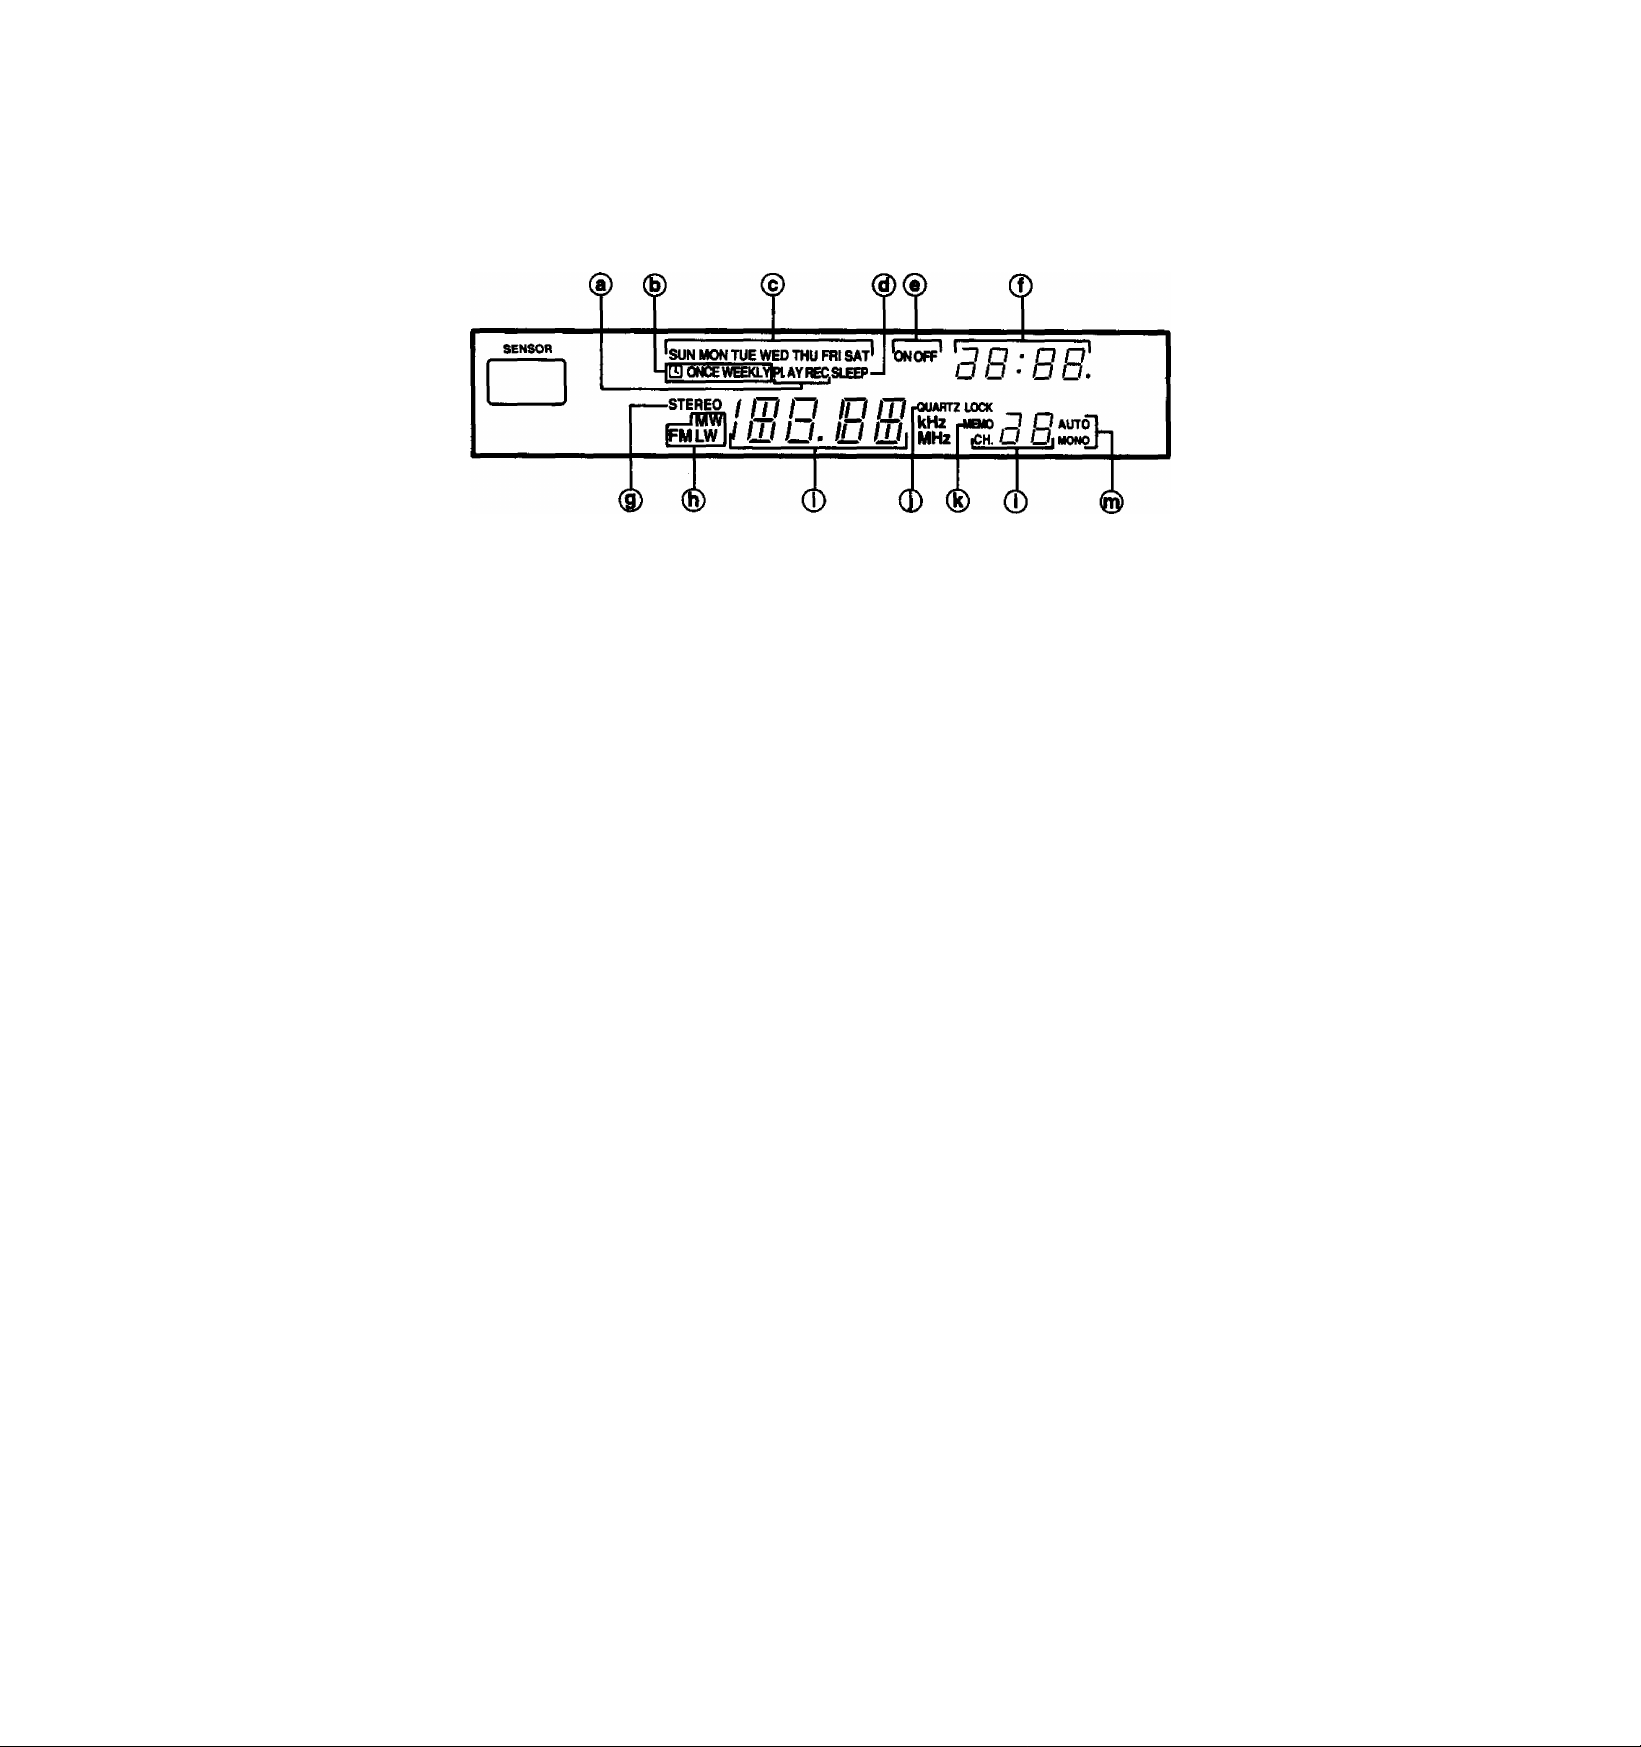
Tuner: display section
I
® Timer play/recording indicator (PLAY, REC)
This indicator shows that timer play mode or timer recording
mode is activated.
(g) Timer mode-indicator (Q ONCE, WEEKLY)
This indicator shows the timer operation mode (ONCE or
WEEKLY).
® Day dispiay (SUN-SAT)
This display shows the present day, or the day the timer has
been set for, if used.
(g) Sieep indicator (SLEEP)
Illuminates when the sleep timer is activated. (See page 52.)
(e) Timer ON/OFF indicator (ON, OFF)
This indicator shows whether the times for timer switch-ON
and switch-OFF have been set.
0 Time display
This display shows the present time, or the day the timer has
been set for.
d) FM Stereo indicator (STEREO)
This indicator automatically illuminates when an FM stereo
broadcast is being received. It wilt not illuminate if the FM
mode button Is used to select monaural mode.
® Band indicator (FM, MW, LW)
Illuminates to show which band is seized.
0 Digital frequency display
Displays the broadcast frequencies.
0 Quartz lock indicator (QUARTZ LOCK)
This indicator illuminates when the unit is precisely tuned to a
broadcast station.
0 Memory Indicator (MEMO)
This indicator illuminates when the memory button is pressed.
0 Preset channel display
This display shows the channel number selected the preset-
tuning buttons.
@ FM mode indicator (AUTO, MONO)
When FM broadcasts are being received, usually the “AUTO"
indication is illuminated. When the FM mode is set to
monaural, “MONO" illuminates.
-15-
Page 16
Front Panel Controls and Functions
(continued)
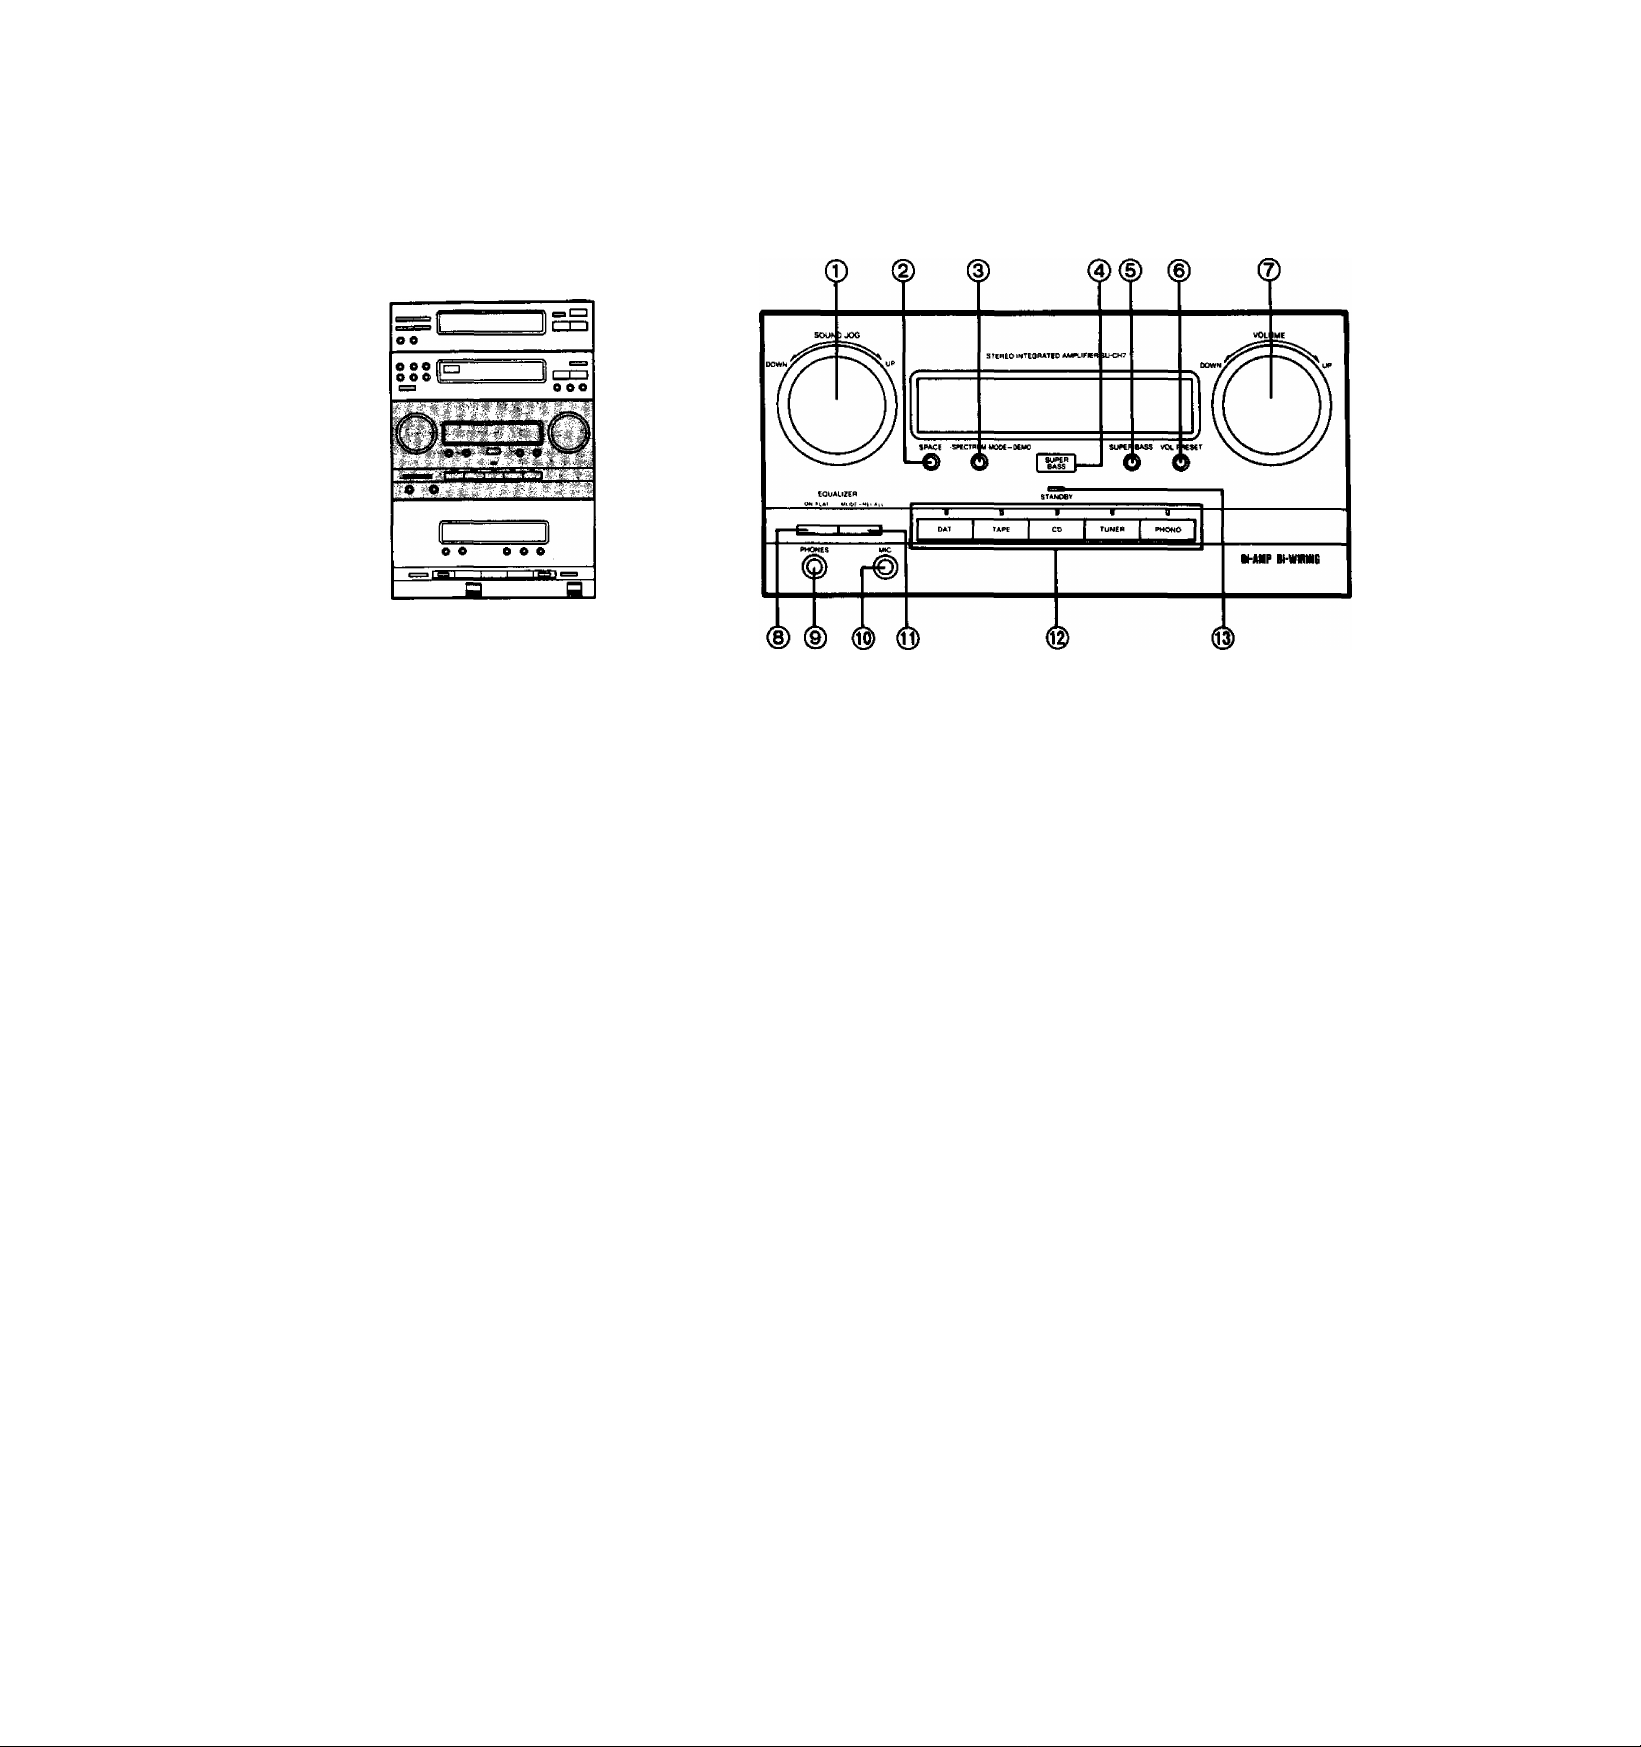
Amplifier : control section
0 Sound effect level control (SOUND JOG)
This control is used for adjusting the level of the ambience
enhancement effect and the equalization level.
@ Ambience enhancement button (SPACE)
This button is used to activate ambience enhancement mode.
@ Spectrum mode-eelect/demonetratlon button
(-SPECTRUM MODE—DEMO)
This button is used to select one of the six spectrum curves. If
you press and hold this button, six types of sound effects
(spectrum curve in combination with ambience enhancement)
wiil be sequentiaiiy changed (Demonstration mode).
0 Super bass indicator
Illuminates when the super bass mode is activated.
0 Super bass button (SUPER BASS)
\№ien this button is press^, the dynamic low frequency
ranges are boosted.
0 Volume preset button (VOL. PRESET)
This button is used to make a volume presetting.
0 Volume level control (VOLUME)
This control is used to adjust the volume level (~82 dB~
0 dB). Note that -82 dB is the lowest volume setting and 0 dB
is the highest levei setting.
0 Headphones Jack (PHONES) 0 Microphone Jack (MIC) 0 Equalization mode-select/recall button
(-MODE—RECALL)
This button is used to retrieve a pre-programmed equalization
curve from the memory. If you press and hold this button, a
curve you programmed can be retrieved.
® Input selectors and indicators
These selectors are used to select the sound source to be
heard. When the sound source is selected, the indicator
above the selector will illuminate.
® Standby Indicator (STANDBY)
This indicator illuminates when tiie power “STANDBY c!)/ON"
switch of the unit or that of the remote control is switched
“OFF". Its purpose is to alert the user of the constant supply
voltage to the internal circuitry even with the power switch
OFF.
For this unit, even if this switch is switched to the “STANDBY'
position, there is still a slight power consumption of about
17 watts; this is in order to retain of the “most recent” memory
and the preset-memory functions.
0 Equalization function button (ON/FLAT)
This button is used to switch the equalization correction
function. If no equalization correction is desired, press this
button ageun to cancel the function.
-16-
Page 17

(§) (^ (p
I
8MCE I *
»TSOUNDJOOt •
EQ USER I*
»HEAW »CLEAR
► 80fT »VOCAL
»HPST »CARSI
® ® Ó
IIIIIIIN
aOHi 3SOH1 TKHl 4kHl 13.ShHl
Amplifier: display section
® Ambience enhancement mode indicator
(SPACE)
Illuminates when the ambience enhancement mode is acti
vated.
(g) Spectrum analysis dispiay
This display shows the spectrum analysis level.
® Level meter
Display the volume level as it is being adjusted by the volume
control. When adjusting the level of the ambience enheuicement effect with the sound effect level control, the display
shows the level of the ambience enhancement effect.
(3) Ambience enhancement adjustment indicator
(SPACE)
Illuminates when adjusting the level of the ambience en
hancement effect.
® CD edit indicator (EDIT)
Illuminates when making an edit-recording of a compact disc.
I
u»«. SMCE EDIT
MAX
I
-IBB
I
MiH VOL. MUTiMO
(b ®
® Sound effect indicator (▼ SOUND JOG A)
When illuminates, it shows the equalization curves can
be adjusted, and when “A" illuminates, it shows that the
ambience enhancmient effect can be adjusted.
(R) Equalization mode Indicators
(HEAVY-CAR ST)
These indicators show which of the six equalization curves is
currently used.
0 “USER” indicator (USER)
This indicator illuminate to show that the desired equalization
curves can be programmed into memory or retrieved from the
memory.
0 Volume indicator (VOL.)
Illuminates when adjusting the volume level.
® Muting indicator (MUTING)
Illuminates when the muting mode is activated.
0 Volume level display
Displays the volume level.
-17-
Page 18
Front Panel Controls and Functions
(continued)
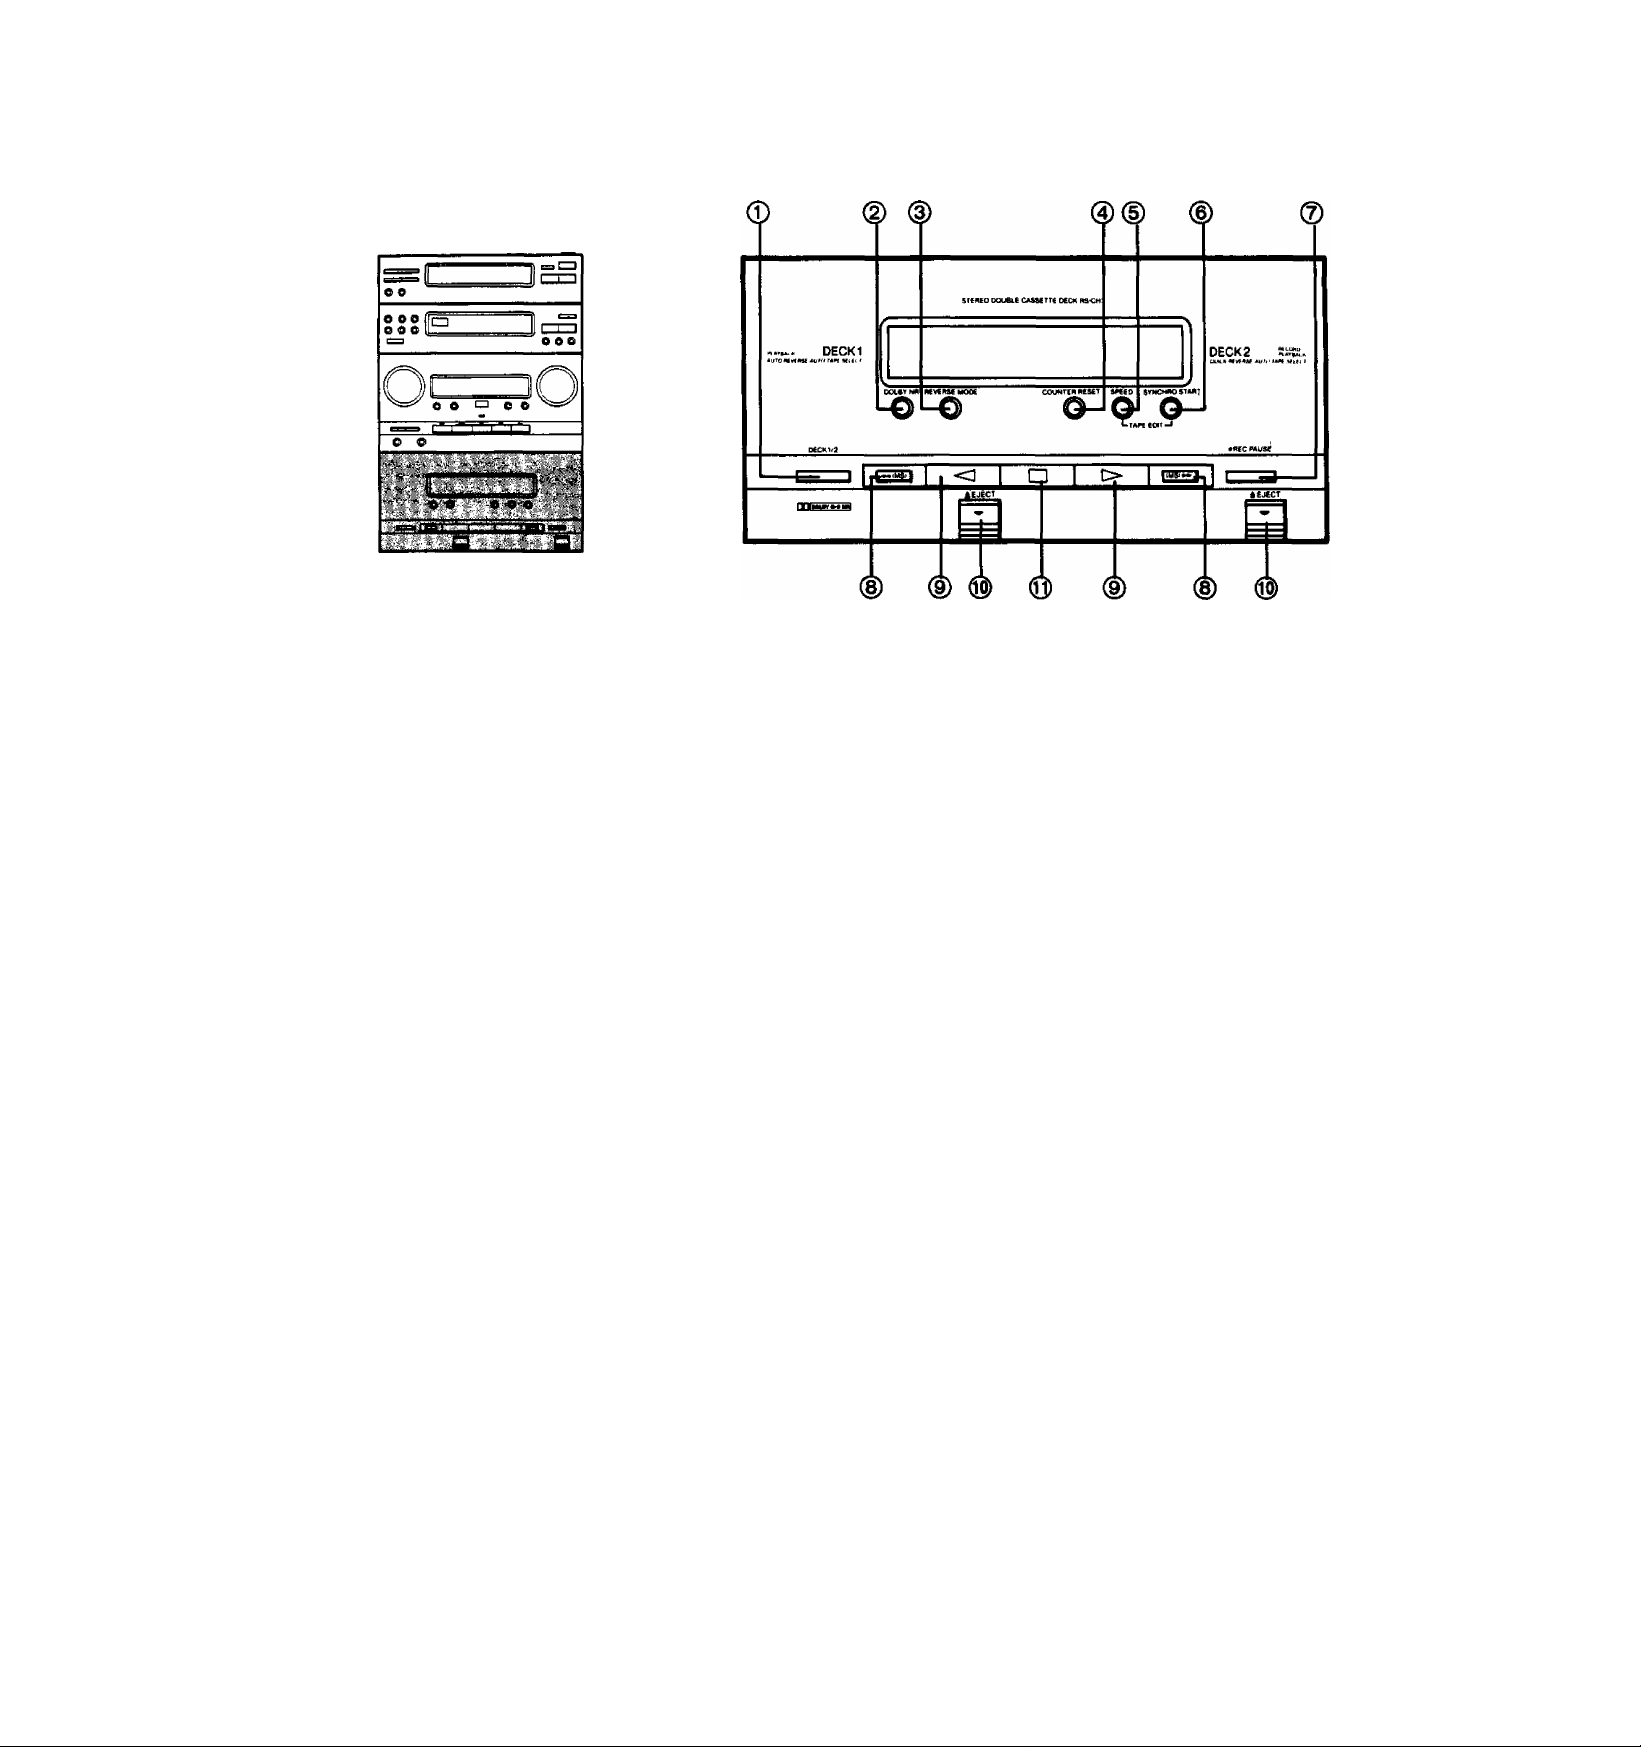
Cassette deck: control section
0 Deck1/deck2 selector (DECK 1/2)
This button is used to select the deck to be operated.
(2) Dolby noise reduction button (DOLBY NR)
This button is used to reduce the hissing noise heard from the
tape. This unit is prbvided with both the Dolby B-type and
Dolby C-type noise reduction systems.
@ Reverse mode button (REVERSE MODE)
This button is used to select the reverse mode (for playback or
recording).
® Tape counter reset button
(COUNTER RESET)
This button is used to reset the tape counter indicator to
“000”.
® Edit speed button (SPEED)
This button is used to select the recording speed when
edit-recording tapes.
(g) Synchro-start button (SYNCHRO START)
This button is used to start a tape-to-tape recording, simul
taneously starting deck 1 (the playback deck) and the deck 2
(the recording deck).
0 Record/record standby button
(• REC PAUSE)
This buttcHi is used to put deck 2 into №e record standby
mode.
(g) Fast-forward/rewind/music select buttons
{« (MS). (MS) ►►)
These buttons are used to advanced or rewind the tape, or to
quickly search for the beginning of a tune while the tape is
being played.
@ Playback buttons (O. >)
These buttons are used to start the playback or reconting
(Deck 2 only).
® Elect button (^ EJECT)
This button is us^ to open the cassette holder.
Q Stop button (□)
This button is used to stop the tape movement.
-18-
Page 19
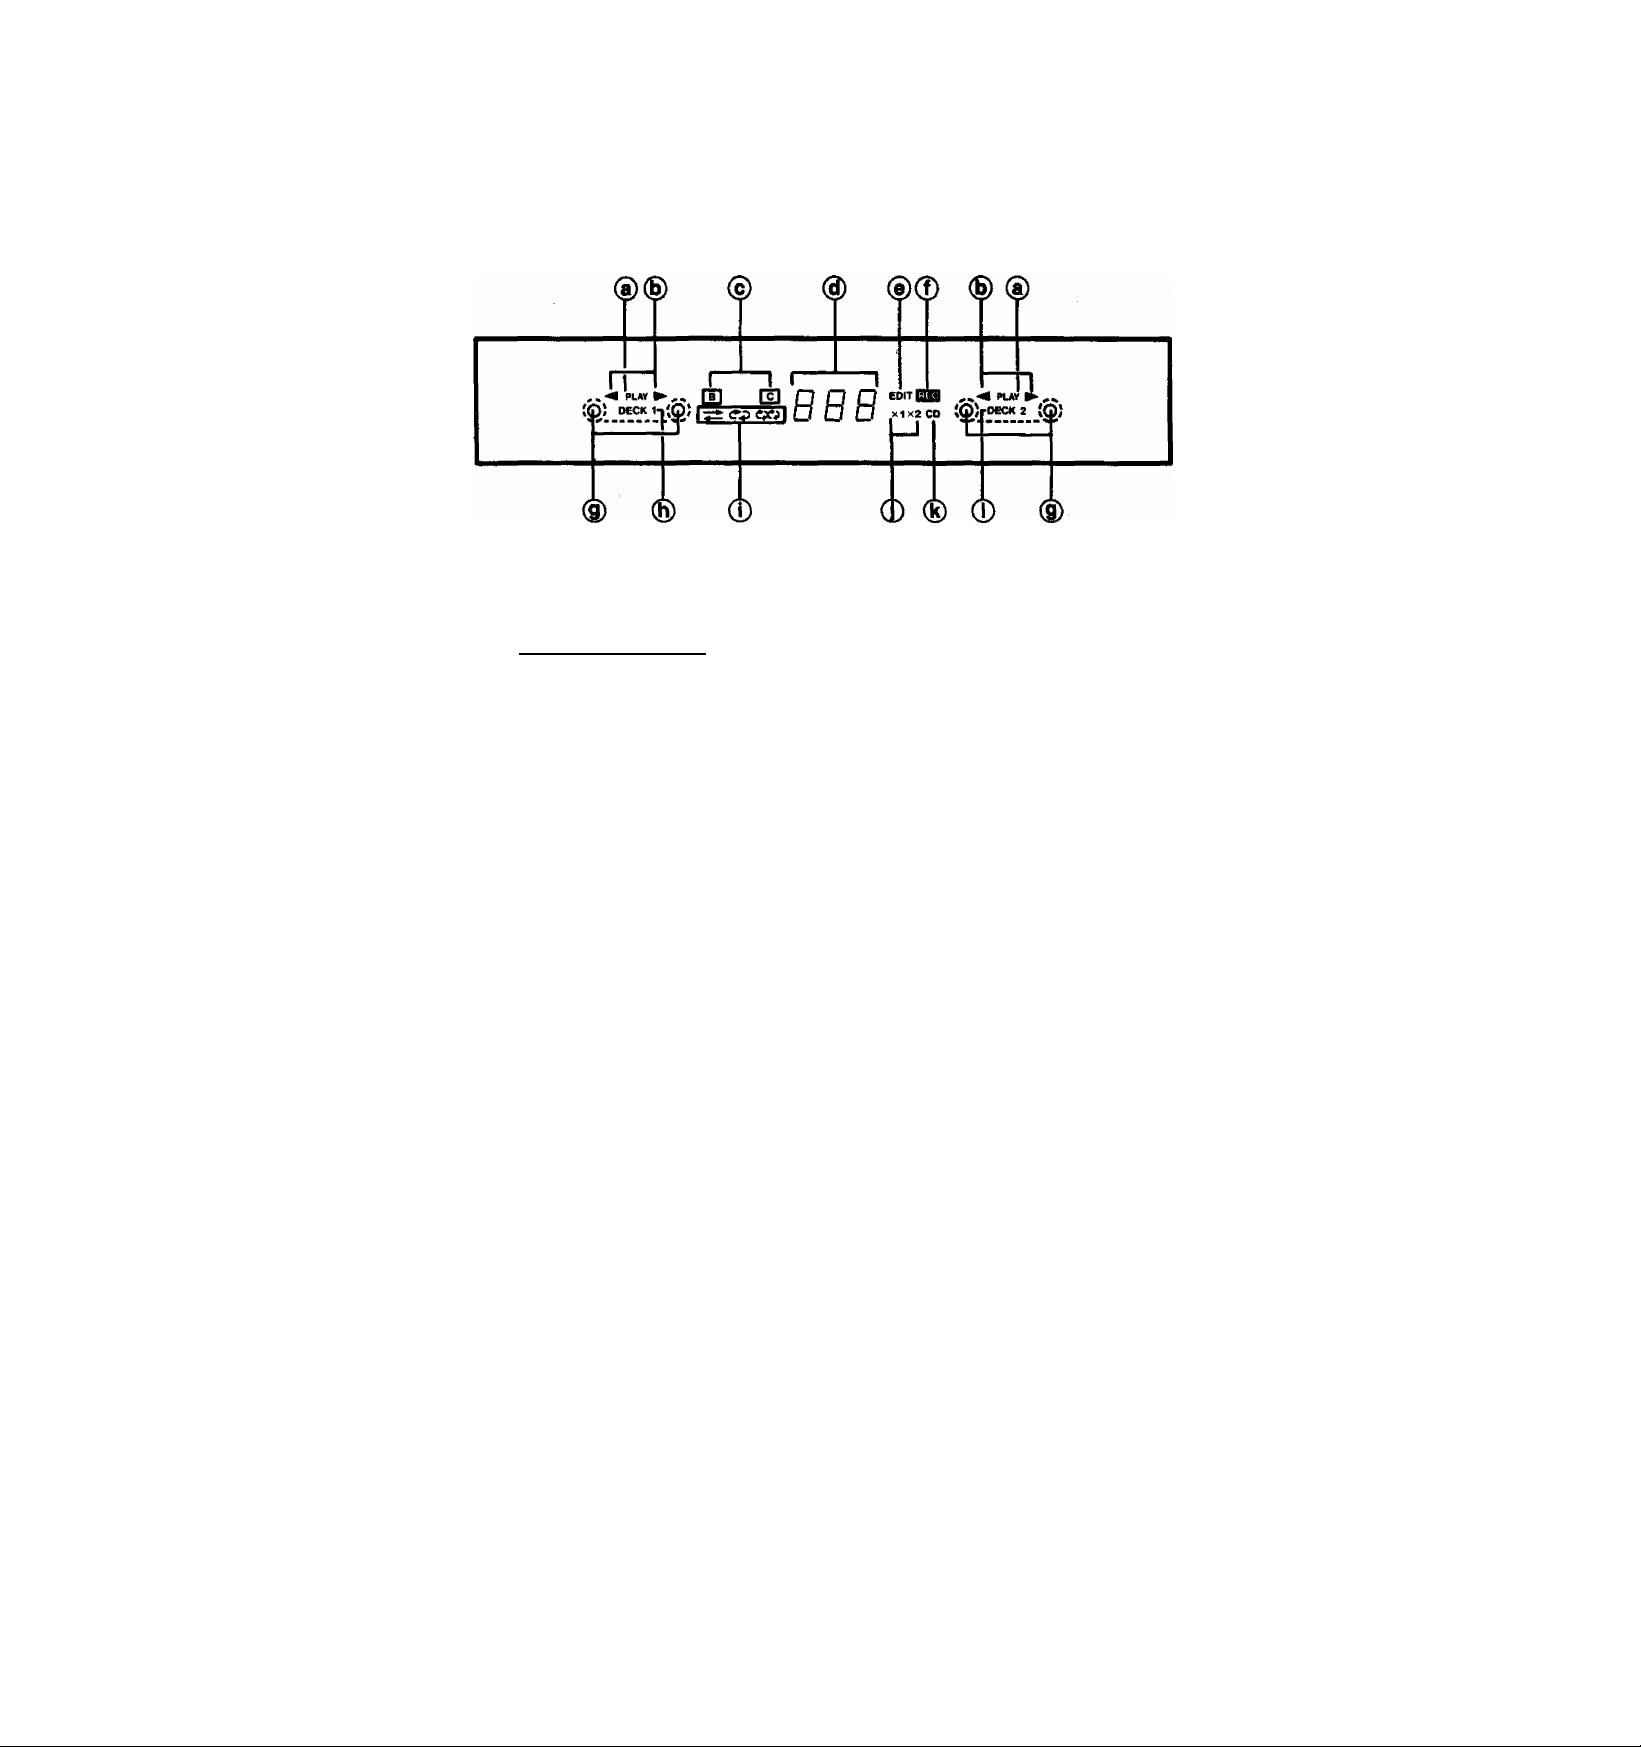
Cassette deck: display section
I
® Playback indicator (PLAY)
Illuminates to show that deck 1 or 2 is in the playback mode or
recording mode (deck 2 only).
(B) Tape travel direction indicators
One of these indicators illuminates to show the direction of
tape travel.
® Dolby noise reduction indicators (d),
Each indicator illuminates to show the type of Dolby noise
reduction system selected by pressing the Dolby noise
reduction button.
(§) Tape counter
Indicates the amount of tape movement separately for deck 1
or deck 2.
® Edit indicator (EDIT)
Illuminates when edit-recording tapes or CD.
0 Recording indicator ([rH)
Illuminates to indicate that deck 2 is in the recording standby
or recording mode.
® Tape indicator
Illuminates to show that there is a tape in the cassette holder
of deck 1 or deck 2.
(R) Deck 1 operating indicator (DECK 1)
Illuminates to show that deck 1 can be operated.
0 Reverse mode indicators (^,crp,CjO)
Each irKlicator illuminates to show whic^ of the reverse
modes was selected by the reverse mode button.
0 Edit speed indicators (x1, x2)
One of these Indicators will illuminates to show which of the
tape-to-tape recording speeds was selected by pressing the
edit speed button.
® CD Indicator (CD)
Illuminates when edit-recording a CD.
0 Deck 2 operating indicator (DECK 2)
Illuminates to show that deck 2 can be operated.
-19-
Page 20

standard Operations
Switch ON the power.
1
Select the desired audio source.
2
DAT; Press this button to listen to the playback sound
TAPE: Press this button to listen to tapes.
CD; Press this button to listen to compact discs.
TUNER: Press this button to listen to radio broadcasts.
PHONO: Press this button to listen to phono discs.
If the tuner source is selected, the CD players power will be
cut off.
The CD or tape will automatically stop when a different input
mode is selected during its operation.
Start the sound source.
3
Adjust the voiume level.
4
from the DAT,
For Australia:
Has the power switch on the rear pane) been
switched ON? (See page 7.)
After listening is finished
Be sure to reduce the volume level, and switch this unit to standby
mode using its "STANDBY(i)/ON" switch or an “ON/OFF” switch
on the remote-control transmitter.
Note:
The input selection and equalizer settings wilt be retained (as they
were at the time when the power is switched to standby mode) by
the memory back-up funchon.
To listen through headphones
PHONES
Connect headphones (not included) to the head
phones Jack.
-20-
Notes:
•Reduce the volume level before connecting headphones.
•Sound from the speakers will not be heard when headphones are
connected to this jack.
•Avoid listening for a long time at a volume level so high that it
irritates the ears.
•Plug type: Stereo mini.
To use a microphone
Connect the microphone (not Included) to the microphone Jack after reducing the volume level.
If strange noises (squealing or howling) are emitted during mixing
either change the direction of the microphone or turn down the
volume.
It is possible to record a singing voice accompanying the tuner or
CD.
•Plug type; Monaural mini.
Page 21

Spectrum display
spectrum mode-demo
This shows the level of each sound range (frequency range).
The foHowtng 6 types of display modes are possible.
Each time the spectrum mode-setect demonstration button is
pressed, the display mode changes.
1. Peak-hold display
The peak sound value of each sound
range is held on the display for about
one second after it occurs.
2. Dot display
Only the upper two parts of the bar
display are shown, thus maidng the
strength of the sound for each sound
range even easier to see.
3. Hustler mode
The peak sound value of each sound
range is displayed in augmented
form.
5. Afterimage display
After indicating the peak sound value
of each sound range, it will fall down
giving an afterimage.
6. Repeat mode
Indicates each of 1 to 5 sequentially
for about five seconds at a time.
To temporarily reduce the volume level
I MUTING I
Press №e muting button on the remote control transmitter. The
volume level is attenuated by 20 dB (approx. 1/10).
If the audio output has been muted by the muting button on the
remote control transmitter (the muting indicator is tit), the muted
state can be cancelled by pressing the muting button once again or
by setting the volume level to the "— dB" position.
4. Aurora mode
The peak sound value of each sound
range is displayed in inverted form.
-21-
Page 22

Setting the Time
For example:
To set the time to Wednesday at 16:45.
1 Press the clock set button.
-Flashing will begin.
r
n n
u u.
u •
n • n n
'sun-
u • uu.
2 Select the day using the select button.
(to select "WED")
...
s ✓
-WED- n -
3 Press the clock set button.
WED _ nl- n n
.u:uu.
4 Select the hour using the select button.
(to select "16")
5 Press the clock set button.
WED
/ 1 ^
6 Select the minute using the select button.
(to select "45")
WED
'' 1 ^
7 Press the clock set button to finish setting the
time.
Dot indicator
WED
1 o • n n
- ib ~u u.
/ 1 'V
-22-
Page 23

Easy Play
You can start the play by simply pressing the easy
play button on the remote oontrol transmitter even
when the power is switched to standby mode.
Listening to compact discs
Press the easy play button marked “CD*\
The play will start automatically from the first track.
Listening to tapes
fXA^
Press the easy play button marked “TAPE".
The playback will automatically start under the same conditions
(tape direction and reverse mode) last set when the power was
switdied OFF.
In case a tape has been loaded in both decks, deck 1 has priority.
Listening to radio broadcasts
I TUNER I
Press the easy play button marked “TUNER".
The station last tuned to when the power was switched to standby
mode will be automatically received when power is switched ON.
” IE:H5.
in I on ,
FM t L J /. O L./ MHz CH. I f
About the voiume levei
If the volume level last set is less than -60 dB, it will automatically
increase up to -60 dB gradually (fade in) during play. If the volume
level last set is more than -58 dB, it will increase automaticatly up
to level last set gradually (fade in) during play.
wr:
-23-
Page 24

Listening to Compact Discs
Sequencial play
Carry out the steps 1 and 2 of “Standard Operations" on page
20.
1 Press the open/close button to open the disc
holder and Insert a disc.
Label
must face
upward.
2 Press the open/close button again to close
the disc holder.
The total number of tracks on the disc and the total playing
time are displayed.
Do not stick your finger through the hole In the
middle of the disc holder. (It could get caught when
the holder closes.)
Total number of tracks Total playing time
3 Press the play button.
Oise play begins from the first track on the disc.
Elapsed time
Track in play
The bars above and below the number of the track in
play flash. They go out when play finishes.
•The unit stops automatically when the last track on the disc
finishes playing. (The display returns to the total number of tracks
and total playing time indications.}
Play indicator
■ To stop disc play
I □ I
Press the stop button.
The unit switches to the stop mode and the total number of tracks
and total playing time are displayed.
■ To temporarily stop disc play
IpauseI
Press the pause button.
Pause indicator
-24-
Press the play button to play again.
•Attempting to change discs while the disc holder is in the process
of opening can scratch or damage your discs.
•The total playing time displayed includes the silent sections
between tracks. For this reason, it may differ by a few secemds
from the playing time printed in the disc's liner notes.
Page 25

Program play
This function allows you to program up to 20 tracks on the disc in
any order you choose.
1 Press the function selector button marked
“CD 10 KEY”.
2 Press the program button.
Program indicator
n
n
TfMCS
1 2 S 4 s e
me LJ
u
7 a ft 10 11 12 12 14 IB IS
3 Press the numeric buttons in the desired
track sequence.
To program more than one track from the disc such as 3, 5
and 7 in that order:
Press theQ.Q , and q buttons.
Program sequence
Program track number ! Playing time
Programmed track numbers
To select a specific track
Tracks 1-9: Press the appropriate numeric button 1-9
directly.
Tracks 10 and up (For example, to select the track number
such as 25):^ First press A , then to select the “tens"
digit, and ^ to select №e “units" digit.
•If the total playing time exceeds 99 minutes or the track number
21 (or higher) has been specified, the display reads “—:—But
the program play can be performed.
•When the 21st program has been performed, “-F" (full) appears
on die display, indicating that no more tracks can be added to the
programmed sequence.
4 Press the play button.
The programmed sequence is played beginning from the first
track you entered.
BTo cancel program play
I PROGRAM I
Press the program button while a disc is being played, and normal
play will resume.
M To enter additional program
h-o.>iol
Press the numeric button corresponding to the track to be added.
■ To cancel an entire program
Press the stop button when a disc is r>ot being played (or twice
when a disc is being played). The entire program will be canceled.
■ To cancel the selected tracks one by one
[CANCEL I
0 Preu the cancel button.
The cancel indicator will illuminate.
(g) Presa the numeric button of the track to be cancelled.
(D Press the cancel button.
The cancel indicator will go out.
-25-
Page 26

Listening to Compact Discs
(continued)
1 Press the function seiector button marked
“CD 10 KEY”.
2 Press the numeric button corresponding to
the desired track number.
For example: 3
To select the 3rd track, press the button.
To select a specific track
Tracks 1-9: Press the appropriate numeric button 1-9 directly.
Tracks 10 and up^^For example, to select a track number such as
25): First press , then q to select ttie “tens” digit, and q
to select the “ur№" digit.
•The disc will be played from the designated track to the end and
then automatically stop.
REPEAT
Press the repeat button.
Repeat indicator
Pressing this button once again wilt cancel repeat play.
•While program play is taking place, only the programmed tracks
will be played repeatedly.
•You can enjoy the same track repeatedly if one track only is
programmed.
■ To canoei repeat piay
Press this button once again.
-26-
Page 27

Skip play
Search play
iski^
This function allows you to skip to the beginnings of tracks
preceding or following the track in play and begins play immediate
ly. It is a good idea to keep an eye on the track number display
when using this function.
Track number display
•To skip forward, press the skip button ).
The unit skip ahead one track each time the button is pressed.
For example, to skip from track 3 to track 5:
— . ► W—
(press 2 times)
o
u
•To skip backward, press the skip button ( H^).
The first time the button is pressed, the unit skips back to the
beginning of the track in play. Then it skips back one track for each
additional press.
For example, to skip from back 5 to treui^k 3 during play:
I SEARCH I
This function allows you to search rapidly fonvard or backward on
the disc for specific sections.
•To search forward, press the search button
(►►).
The unit begins searching in a forward direction.
•To search backward, press the search button
{◄^).
The unit begins searching in a reverse direction.
•Sound from the disc can be heard as the pickup moves. The
output level at this time is decreased by 12 dB {Va) compared with
the normal level.
•The search speed is slow when the button is pressed at first and
becomes faster if you keep it pressed down. Reiease the button
when you reach the desired point on the disc.
•During program play, a search wilt take place only within the track
being played.
(press 3 tirrtes)
r................
o
Ji
•If these buttons are pressed during program play, the pickup will
skip from one track to another in the programmed sequence.
c
_/
-27-
Page 28

Listening to Tapes
Either tape deck 1 or tape deck 2 can be used
for tape playback by following the same steps.
Carry out the steps 1 and 2 of "Standard Operations” on page
20.
1 Press the eject button, and then insert the
cassette to be used for playback.
(The part of the cassette where the tape is
expo^ should face down-ward.)
c. Press the Dolby noise reduction button to set
the Dolby NR mode B or C in which the tape
was recorded.
The Dolby noise reduction indicator (B or C) mil illuminate.
•If the tape was not recorded in a Dolby NR mode, press the
Dolby noise reduction button again to go off the Dolby noise
reduction indicator.
3 Select the reverse mode.
Each time the reverse mode button is pressed, one of the
three reverse mode indicators (> CXP) will be
alternately di^layed.
7^ One side only will be played, and then the tape will
automatically stop.
4 start playing the tape.
D>- I The forward side (front side) will be played.
The reverse side will be played.
•When the tapes are loaded in both decks, press the deck
1/deck 2 selector to select the deck to be used.
•To reset the tape counter (000), first press bie deck 1 /dedt 2
selector to select the deck and press the counter reset
button.
■ To stop tape playback
Press the stop button.
■ Auto tape selector function
This function automatically identifies the kind of tape loaded
(rwrrnal, chrome, or metal), and sets the bias (for recording) and
equalization accordingly.
•Types of tapes that can be played : normal, chrome, metal.
Both sides will be played 8 times, then the tape will
automatically stop.
(When a cassette is loaded in only one ceck.)
Both sides will be played, then the tape will automati
cally stop.
(forward side-» reverse side)
-28-
Page 29

1 Press the eject buttons, and then Insert the
cassettes in decks 1 and 2.
Be sure that the side that you wish to start to listen to is facing
you, and ioad it in deck 1.
2 Press the reverse mode button to set the
” cxj ” mode.
3 Press the Deck 1/Deck 2 selector to seiect
deck 1.
4 start playing the tape in deck 1.
Two tapes wilt be played back aa follmvs:
Forward \
side of tape j
in deck 1 j
•After repeating aixwe operation 8 times, the cassette deck will
automatically stop.
Reverse \
side of tape ]
Forward \
side of tape :
in deck 2 j
Reverse
side of tape
in deck 2
■ To Stop the tape mid-way
I □ I
Press the stop button of the deck in which the tape is currentiy
playing.
Notea:
•You can also start playback from a position other than the forward
side of the tape in deck 1.
•If playback is started from deck 2, the tape in deck 1 will play only
seven times.
-29-
Page 30

Listening to Tapes
(continued)
M (MS) I 1(MS>»»
STCMtO OOUM.E CAS EtTEKCKRS-CN7
OOkJBVW ftEVfR$EUOOE
o ©
<3 I □ I
AEJECT
*
To select beginning of a tune (MS: music select)
Press the music seiect button.
When the forward side (the "PLAY Indicator Is lit) Is being
played:
...The tape will be played from the beginning of the next
tune.
.. .The tape will be rewound to the beginning of the present
tune, then the tune will be played agan.
•White a music select operation is taking place, the play indicator
will flash.
When the reverse side (the PLAY” indicator is lit:) is being
played, the reverse operation to the above will take place.
■ To fast forward or rewind the tape
If this button is pressed when the tape is stationary, the tape will
start moving at high speed in the direction of the arrow, regardless
of which side is being played back.
oooMTtm ni«CT snco syp^chao stmt
O O O
tunJ
tCJECT
-
The music select function may sometimes fail to operate correctly
in the following cases.
•When the interval between tunes (the non-recorded part) is less
than three seconds.
•When playing a tape that was recorded using fade-in or fade-out.
•When there is a particularly low level passage or silent passage in
the middle of a tune.
-30-
Page 31

The indication AM used here includes
Memory Presettings
When broadcast frequencies have been preset to the menwry, any of those broadcast frequencies can thereafter be easily selected by simply
pressing one of the preset-tuning buttons. There are two methods for presetting broadcast frequencies in the memory: the automatic ntethod {see
below) and the manual method (refer to page 32); select whichever method you prefer.
If a new broadcast station is preset into a channel, the broadcast station which was previously entered in that channel will be automatically erased.
both MW and LW.
Automatic memory presetting
When this method is used, the frequencies of the selected
broadcast stations are automatically preset (in sequence to higher
frequencies) into the memory; “channels” 1 to 28 are available for
the presetting of FM stations, “channels" 21 to 28 are available for
MW stations, and “channels" 27 to 28 are available for LW
stations. When a presetting is made to a channel that has already
been preset, the prior presetting will be erased.
Carry out the steps 1 and 2 of “Standard Operations” on page
20.
1 Select the desired band (“FM”, “MW” or
“LW").
in I on
FM I LJ I, LJ LJ MHz CH.
Set to the frequency from which you want to start automatic memory presetting.
(Refer to “Frequency tuning" at the right.)
Press and hoid the memory button; release it when the display frequency begins to change.
(The memory indicator will flash, and the automatic memory
presetting is activated.)
Notes:
•For automatic presetting in areas where there are fewer than 28
FM stations, the remaining channels (through channel 28) will be
left unoccupied. The unoccupied channels can be filled by using
manual memory presettings.
•For AM broadcasts with extremely strong signal transmissions,
the frequency memorized may be slightly different than ttie
correct frequency, if this occurs, make a manual presetting.
■ Frequency tuning (“TUNING” buttons)
1 ▼ TUNINGI Press to changa the frequency downward.
IA TUNING I Press to changa the frequency upwanJ.
1. Press and hold one of the tuning buttwis, then release the
button when the displayed frequency begins to change.
2. When the displayed frequency approaches the desired frequen
cy, press one of the tuning buttons momentarily. (The displayed
frequency will stop changing.)
Note:
The changing of tiie displayed frequency will be automatically
stopped (by the automatic tuning functicm) if a broadcast station
frequency is located during the tuning process, if the frequency
at which it stops is not the desired frequency, repeat step 1
above.
3. After stopping at step 2, tap one of the tuning buttons a few
times until the desired frequency is reached.
FM
LJ MHz CH.:
■ To confirm the stations which are preset to
each channel
Press one of the preset-tuning buttons.
The frequency preset Preset number
■ MW allocation
When the band select button is pressed for about 3 seconds, the
MW frequency step will change to 10 kHz per step. (This unit Is set
to 9 kHz before shipment.) In order to return to the original
frequency indication, press this button for about 3 seconds again.
■ LW freq shift
When the bwid select button is pressed for about 3 seconds during
reception of an LW broadcast, the LW frequency will decrease by 2
kHz. In order to return to the original frequency indication, press
this button for about 3 seconds again.
-31-
Page 32

Memory Presettings
(continued)
3*5 4 1
Stations can be freely preset to any desired channel.
A maximum of 28 broadcast stations can be memorized.
Carry out the steps 1 and 2 of "Standard Operations” on page
20.
1 Press the band select button to select the
desired band *‘MW” or “LW’’).
2 Press the appropriate tuning button to tune to
the desired broadcast.
(Refer to "Frequency tuning" on page 31.)
3 Press the memory button momentarily.
(The memory indicator will illuminate.)
CH.
Note:
If the memory button is pressed continuously, the automatic
memory presetting is activated. To stop the automatic
memory presetting, press the tuning button.
Then t^in again from step 2.
/auto
Select the desired “channel”
(Refer to "To confirm the stations which are preset to each
channel" on page 31.)
■ FM mode (FM AUTO, MONO) memory
With this unit, it is possible to enter into the memory FM broadcast
stations in the nfronaural mode. This is convenient when entering
into the memory an FM broadcast station that Is broadcasting FM
stereo signals in whi^ there is much noise.
(T) Follow above steps 1 through 2.
(g) Press the FM mode button to select “MONO". (The “MONO"
FM mode indicator will illuminate.)
@ Follow steps 3 through 5 above.
ooooo
òóóòt^
tìàùss
P_OQ--
sSt5
V.»
5 Press the memory button momentarily.
(The memory indicator will go out.)
6 Repeat the above procedures to make mem
ory presettings.
-32-
Page 33

Listening to Radio Broadcasts
(x:=y\
ooooo
06609I
btilCloS:
H 5 o
Memory tuner operation
Have you completed the steps of “Automatic memory presetting"
on page 31 or “Manual memory presetting" on page 32?
Carry out the steps 1 and 2 of “Standard Operations” on page
20.
Press one of the preset-tuning buttons to select
the desired channei.
I I Press this button to select low-order presets.
[ j Press this button to select high-order presets.
M if noise is excessive in FM broadcasts
iFMMODEi
Press the FM mode button.
The sound wilt then be heard as monaural sound and the FM
stereo indicator will not illuminate; the "MONO" FM mode indicator
will then illuminate instead of the "AUTO" indicator. If the
broadcast signal is weak, sounds can be heard more clearly (than
in the stereo mode) by pressing the FM mode selector.
■ Back-up memory
The Back-up function maintains the fKeset memory and the
most-recent memory, if the power cord is disconnected. The
memory will be maintained for as long as approximately 2 weeks.
Most-recent moemory:
The most-recent memory system "remembers" №e broadcast
station last tuned to when the unit was switched to standby mode.
That station will be automatically tuned to when the power is
switched ON.
If frequency presettings are accidentally erased:
1. Switch ON the power.
2. Make the frequency presettings (on page 31 or 32) once again.
-33-
Page 34

Listening to Other Sources
DAT
Carry out the step 1 of “Standard Operations" on page 20.
1 Press the Input selector button marked
PHONO
Carry out the step 1 of “Standard Operations" on page 20,
U
Press the Input selector button marked
‘DAT”. “PHONO”.
2 operate the DAT.
See the instruction manual of the DAT.
■ To record on a DAT tape.
After selecting the desired source, follow the 8^x>ve procedures,
then start recording.
For details, refer to the DAT instruction manual.
•To prevent a low-pitched noise (“hum”), install a turntable at the
right side of the system, or separate from the system.
Microphone mixing
7 Turn down the volume.
2 Connect a microphone. 3 Play the desired source and adjust the
If a strange noise (squealing or howling noise) Is emitted during
mixing, either change the direction of the microphone or turn down
the volume.
To perform mlxlng*recordlng
Put the amplifier in the mic mixing mode, then perform the
operation of “Recording". (See page 40.)
Note:
Mixing-recording from deck 1 to deck 2 cannot be performed.
Operate the turn table system.
See the instruction mwiuai of the turn table system.
volume level.
-34-
Page 35

Changing the Tone Quality
Carry out the steps 1, 2 and 3 ait "Standard Operation’' on
page 20.
1 Press the equalization function button to ON.
^ TSOUNDJOO /
EQ
CLEM
»HEAVY
VOCAL
•OFT
CM ST
MMT
/
\
( The preset equalization curves
1 HEAVY
This curve can be used to add
“punch” to rock and other
music.
2 CLEAR
This curve can be used to clarify
the treble range of jazz, etc.
3 SOR
This curve can be used to listen
to background music, etc. at a
low volume level.
“ - _
____
" " _
---------------
______
2 Press the equalization mode-select/recall but
ton to select desired tone quality.
Each time you press this button, the equalization curve will
change as follows.
HEAVY-^CLEAR->SOrr-»VOCAL-»H.P.ST~»CAR ST
t
____________________________________
I
■ When the equalizer effect is not necessary
Press the equalizatim function button.
4 VOCAL
This curve can be used to clarify
vocal music.
_ - " _ - " - _
5 H.P.ST
This curve can be used to record
a tape for playbadt using the
stereo cassette player (Head
phones Stereo).
---------
6 CAR ST
This curve can be used to record
atape for playback using the car
audio system (Car Stereo).
-35-
Page 36

Changing the Tone Quality
(continued)
To store a desired equalization curves
You can easily create the desired tone quality by using №e sound
effect level control. The tone qualities you created are automaticaiiy stored (up to 6) in the unit's memory.
1 Press the equalization function button to ON.
2 Press the equalization mode-select/recall but
ton momentarily to select the desired tone
quality.
Each time you press this button, the equaiization curve wili
change as follows.
HEAVY-.-CLEAR-»SOFT-» VOCAL^H.P.ST-^CAR ST
t
____________________________________
I
3 Adjust the equalization effect to create the
desired tone quality with the sound effect
level control.
TSOUNDJOQ
"USER" indicator
wiil illuminate.
To gain this effect, turn clodcwise.
Onoe adjustment has been done, the equaiization curves wilt
be automatically stored as the "USER" curve in the unit's
memory.
ИСМП.
OEM
•on »WCM.
KP
KT CM
«T
To retrieve equalization curves from
the memory
___________
H Press the equalizer mode seiect/recall button
momentarily to select the mode in which you
have programmed previously.
^ Press and hold the equalizer mode select/
recall button to Illuminate the user Indicator
and to change to your desired tone.
Note:
•To confirm the equalization curve, press the equalization
function button twice.
-36-
Page 37

•SPECrnUM MODE-DEMO SUPER BASS
o o
SOUND JOO
sTtsco wTiafWTco Aupunm tuot?
y SMCE -«crii
\^ o
tOUAUZER
111 IMT 1 TAn 1 CO 1 TUMin 1 HOMO 1
aHONCS MIC
uMOM-oiMe suPE
b EM] i
To listen with augmented bass
(SUPER BASS)
I SUPER BASSI
Press the super bass button.
The super bass indicator will illuminate.
To cartce) the super bass mode, press the super bass tHJtton once
again.
___ __ __ __
II r SUPER I"
BASS ¡ —
WmsE
saw voLPSiMT y
fl(Cl)
1> O
StANOar
To Change the equalization curve and
ambience enhancement continuously
[PEi^
Press and hold the spectrum mode select/
demonstration button.
The programmed setting for the tone qucdity and the ambience
enhancement effect wili be canceied and return to their originai
settings.
To cancel, press this button again.
-37-
Page 38

Producing a “Live” Performance
Sound
Adjust the effect while listenir>g to the sound.
1 Press the ambience enhancement button
(SPACE) to ON.
^ 1^—
__ I SPACE 1
^ SOUNDJOGi
2 Adjust the ambience enhancement effect with
the sound effect ievei control.
To gain this effect, turn clodcvise.
(Max. position of
ambience
enhancement effect)
( The ambience enhancement effect
This is effective even at low sound levels.
Adjusting the ambience enhancement effect using tiie sound effect
level control makes you feel as if you were in a different space. You
can enjoy this effect at any voiume level and enjoy listening as if
you were in a large room.
SOUND JOG
Page 39

To enjoy ambience enhancement with equalization effect
You can combine your desired tone quaiity with ambience
enhancement to get more comfortable sound quality.
1 Press the equalization function button to ON.
T8OUW0JOQ
EQ
CLEM
»HCIIW
VOCAL
•OFT
CM ST
KFJT
Press the equalization mode-select/recall but
ton momentarily to select the desired tone
quality.
TSOUHDJOQ
EQ
Hbwv CLEM
•OFT »VOCAL
KP ST CM ST
Adjust the equalization effect with the sound
effect level control.
5 Adjust the ambience enhancement effect with
the sound effect level control.
The flashing curve (In the example below, an ambience
enhancement curve) is adjustable.
illuminates
flashes
■ To change the tone quality after setting as
shown above
Press the equalization function button to set ‘‘FLAT’ and then
press again to set "ON". The equalizer curve will flash and the
changing of №e equalizer level will be possible using the sound
effect level control.
4 Press the ambience enhancement button to
ON.
— SPACE
aouHPjoGt
EG
USER
HEAVY
CUM
•on
»VOCAL
HF.ST
CM ST
3»-
Page 40

Recording (Tape deck 2 only)
You can make a record mth your desired tone
quality and ambience enhancement effect.
Though you can record a CD by the following procedure, it is
recommended that you use the handy CD edit-recording procedure
to record a CD. (See F»ages 42-45.)
When recording from tape to tape, follow the procedure for tape to
tape recording (on page 46).
Carry out die step 1 of "Standard Operation” on page 20.
1 Press the eject button, and then insert the
cassette to be used for recording into tape
deck 2.
(The part of Uie cassette where the tape
is exposed should face downward)
rioa^i
2 When making a Dolby NR recording, press
the Dolby noise reduction button to select
“B” or “C”.
3 Select the reverse mode.
One side will be recorded, then the tape will
'automatically stop.
sides will be recorded (forward side reverse
side), then the tape will automatically stop.
4 Press the Input selector corresponding to the
sound source (compact-disc player, phono
disc, etc.) from which you want to make the
recording.
5 Press the record/record standby button.
6 Press the playback button (The recording will
begin.), then begin the sound source to be
recorded.
When recording on either the forward side or
both sides.
When recording only on the reverse side.
Synchro Start function
When you make a recording from a CD, №e recording wi
automatically take place if you press the play button on the CD
player. After recording has b^ done, the cassette deck will create
a non-recorded passage of about four seconds, then go into the
recording standby state.
M To briefly Interrupt recording
IrecpauseI
Press the record/record standby button.
To resume recording, press the play button corresponding to the
direction in which recording is taking place.
■ To stoD recordino
r~5~1
Press the stop button.
Notes:
•Only tape deck 2 can used for recording. Tape ded( 1 has no
recording capability.
•You cannot record on the leader tape, so take up the leader tape
in advance.
•The optimum recording level wilt be set automatically.
•Types of tapes that can be played: nornial, chrome, metal.
Recording indicator will illuminate
ipj iSi
Deck 2 operating indicator will flash.
-40-
Page 41

Synchro start function
To erase a recorded tape (Peck 2)
When you make a recording from compact discs, the recording will
automatically start when you press the play button on the compact
disc player. After recording has been completed the cassette deck
will create a non-recorded passage of about four seconds, and
then go into the recording standby state.
Quick-reverse function (Peck 2)
This is a function by which the unit detects the leader tape {the
transparent tape at both ends of the magnetic tape) and then
automatically reverses (in about one second) the direction of the
tape movement during playback (or recording).
=5
Magnetic tape (where recordings are made)
- Leader tapes (no recordings can be made)
•In order to avoid an operational error at the beginning of the page,
this function is not effective until about 15 seconds after playback
(or recording) first starts.
•This function does not operate for tapes that do not have leader
tapes.
•This function may not function <x»rrectly.
If the leader tapes are colored.
If there is dirt or dust on the tape,
if the magnetic part of the tape is thin.
If a strong light (direct sunlight, a spotlight, etc.) is shining into the
cassette hcMer.
•When the unit is subjected to a strong impact.
•When the quick-reverse function is not activated, the tape's
direction of movement will reverse when the tape reaches its end.
--------
^
1 Pres« the Input selector button on the ampli
fier marked *TAPE'\
2 Insert the recorded tape Into the deck 2. 3 Press the Dolby noise reduction button to go
off the Dolby noise reduction Indicator.
4 Select the desired reverse mode. 5 Press the record/record standby button.
6 Press the playback button corresponding to
the side to be erased.
When a new recording is made on a pre recorded tape, the
previous recording will be automaticalty erased.
Dolby NR system
This is a system intended to reduce hiss noise in the high
frequency range. It raises the level of the high frequency
components during recording, emd lowers it by the same amount
during pla^ck.
B type: Noise is reduced to about 1/3. Use this type when
C type: Noise is reduced to about 1/10. Use this type when
Dolby noise reduction manufactured under license from Dolby
Laboratories Licensing Corporation.
“DOLBY" and the double-D symbol OD are trademarks of Dolby
Laboratories Licensing Coiporation.
playing a tape in the Dolby NR mode.
recording and playing back a high quality, high dynamic
range source such as a CD or FM broadcast
-41-
Page 42

Edit-Recording Compact Discs
You can not edit more than 21 tracks.
You can make a record with your desired tone quality and
ambience enhancement effect.
Sequencial editing (NORMAL)
During recording, silent gaps of approximately 4 seconds are
inserted between tracks automatically (auto space function).
The unit makes a tape with no blank at the end of side A.
A tape such as follows will be made:
Faded out at the end of side A
(side A) I 1 St track I 1 2nd track | [ 3«1 track 1 i
(side B) I *th track I P 5th track | | 61h track |
t
The track that has been faded Faded out if the tape ends
out at the end of side A in the middle of the track
1 Carry out the steps 1 and 2 of “Recording” on
page 40.
Recording will take place automatically from the forward side
to the reverse side of the tape, so insert the tape with the side
from which you intend to record first facing toward you, then
enter the reverse mode
2 Press the input selector button on the ampli
fier marked “CD”.
3 Load a disc. 4 Press the edit mode button once to indicate
“C-AUTO”.
Cassette deck wilt take up the leader tape automatically and
the edit indicator wilt illuminate.
Edit indicator
During edit-recording, the Edit mode has priority hence operations
tiiat can be performed are power switch-on/switch-off and level
control adjustments.
5 Press the play button.
The ATLS function (See page 45.) will operate to adjust the
recording level, and then recording will start.
riSin t
MM 1
maeii
3 4 s a 1
When edit-recording has finished, the cassette deck automati
cally creates a non-recorded passage of about four seconds
in length, and then enters the recording standby mode.
n
1 n I>
U ■
■M
nc iUTBIHKI
« Itt
■ When the edit indicator and CD indicator on the
cassette deck does not iliuminate
The cassette deck is not ready to record because the tape is not
loaded or the safety tab is broken, for example. Press the stop
button on the CD player and repeat the procedure from step 1.
■ To stop edit recording
Press the stop button on the cassette deck.
The CD player will automatically stop.
■ To record another disc on the tape left
When recording of the first disc has finished, the link indicator
illuminates and the CD player's time display indicates the amount
of blank tape left over on side “B”. The tracks from a second disc
can be recorded as indicated on page 45.
After finishing recording the first disc using the sequencial editing,
tracks to be recorded on the tape leftover will not be displayed, but
it is possible to record ^mother disc.
If another disc is not going to be recorded, press the stop button on
the CD player.
-42-
Page 43

Editing with consideration to the specified tape length (TAPE LENGTH)
3 5
Like the "Sequencial editing" function on the previous page, this
function aiiows for automatic recording of CD songs in sequence,
on a tape whic^ you spedfy its iength.
Hovraver, at the end of each side of the tape, instead of fading out
the song, the tape is left biank unless the next entire song in the
sequence wiil fit.
A tape such as foiiows wiii be made;
{side A) I iBttrack 1 I 2nd track | | Srdlrack [ [ 4lhtrack J
(side B) I 5th track~^ | 6th track | 7th track [ |
1 Carry out the steps 1 and 2 of “Re cording” on
page 40.
Recording witi take place automatically from the forward side
to the reverse side of the tape, so insert the tape with the side
from which you intend to record first facing toward you, then
enter the reverse mode
2 Press the input seiector button on the ampii-
fier marked “CD”.
3 Load a disc. 4 Press the edit mode button to seiect the tape
iength.
Each time the button is pressed the tape length indicator
changes as follows.
•Cassette deck will take up the leader tape automatically and the
edit indicator wilt illuminate.
■ To specify a tape iength other than C-46 60,90
Press the edit mode button 5 times to select "C- Then press tiie
numeric button on the remote control transmitter to specify the total
recording time of the tape. From the main unit, keep pressing one
of the skip buttons until the display shows the desired tape length.
For example:
If a 52 minute tape is to be used, from the remote control
transmitter, after pressing the CD 10 KEY, first press 5, and then 2.
From the main unit, keep pressing (or press or hold) one of the skip
buttons (P-N, M^) until the display shows "C-52''.
5 Press the piay button.
The ATLS function (See page 45) will operate to adjust the
recording level and then recording will start.
Whoi edit-recording has finished, the cassette deck automatically
creates a non-recwded passage of about four seconds in length,
and then enters the recording standby mode.
•When you want to record programmed tracks, first program
tracks in memory using the progrwn play procedure. Then press
the edit mode button.
■ To record another disc on the tape left
(See page 45.)
I—»[c^6]-»ic-60|
IC-AUTOi i
*
------
lC-90l
Remaining time on side A Remaining time on side B
^ m MM Mc wMe
""i a 3 4 s 6|^T
Tracks edited on side A Tracks edited on side B
—Edit indicator
-43-
Page 44

I
Edit-Recording Compact Discs
Al edit recording (Al)
The Al (Artificial Intelligence) function will rearrange the CD song
order to minimize leftover tape at the end of side “A" of your
cassette.
The tape is advanced and then rewound in order to measure its
length. ITiis is done so that the CD player can estimate which song
order best fits on side “A”. After recording has been completed on
side “A”, the CD player accurately determines the amount of
leftover blank tsqw. If die amount of blank tape is great, the tape
deck rewinds the tape and the CD player selects a different song
order that best fits on side “A”.
A tape such as follows will be made:
•First arranged
(side A)
•Re-arranged
(side A)
1st track 1 1 Sthtrack 1 1
2nd track
1 1 Sth track 1 1
Tthtraclk 1
♦
Sth track 1 ) Tthtrack 1 1
1 Sth track { 1
Blank
•The maximum allowable playing time for editing is 99 minutes.
When a track number of 21 (or higher) is specified, the edit
function does not work.
■ To record another disc on the tape left
(See page 45.)
(continued)
(sideB) 1
1st track
1 1 Srdtrack 1 1
4th track
1 1 Sthtrack I 1
Carry out the step 1 and 2 of “Recording” on page 40.
Recording will take place automatically from the forward side
to the reverse side of the tape, so insert the tape with the side
from which you intend to record first facing toward you, then
enter the reverse mode
Press the Input selector button on the ampli
fier marked “CD”.
Load a disc.
3
Press the Al edit button.
4
Just pressing this button makes Al edit-recording.
The cassette deck automatically fast-forwards and rewinds
the tape to measure the length, then stops at the beginning of
the tape.
The ATLS function (see page 45.) will operate to adjust the
Sound level, and then recording will stal.
-44-
Page 45

To record another disc on the tape left
(Auto link)
ATLS (Automatic Tape Level Setting)
When recording of the first disc has finished, the iink indicator
iiluminates and tracks of another disc can be recorded.
1 Switch the disc to another when recording of
the first disc has finished.
Tracks to be recorded on the tape ieft will be automatically
calculated and displayed.
2 Press the piay button to start recording.
After the recording level has been automatically adjusted, the
recording will start.
Notes:
•If there is not enough space at the end of the tape, it may not be
able to record on the tape left.
•In case you record more than third discs, follow the above
procedures.
•After finishing recording the first disc using the sequencial editing,
tracks to be recorded on the tape will not be displayed, but it is
posable to record another disc.
or the programmed tracks.
When the peak point is found, the peak signal will be sent for about
6 seconds, and the recording level will be set automatically at the
cassette deck. (During this interval, the peak sound will not be
OUt^HJt.)
-45-
Page 46

Tape to Tape Recording
I
2 1 34
StEAEO DOUBLE C iSSETTE 0Е» RS-CH7
0ECK1
ОСХЛУМЯ REV(№
О Ф
To record from deck 1 to deck 2
The recording level of the original (playback) tape, and №e
noise-reduction effect on the original tape, will be recorded to the
new tape just as they were in the original recording.
Carry out the steps 1 and 2 of “Recording” on page 40.
1 Insert the blank tape Into deck 2 and the
pre-recorded tape into deck 1.
Be sure to load the tape in decks 1 and 2 with the fonward side
uppermost (so that the “PLAY ►" indicator light),
COUWTEB мест
I Ш I
DECK 2
:0 SYNCH* > START
EDiT-pJ
To stop edit-recordlng
Press the stop button.
If the ded( 1 operating indicator is tit, press the deck 1/ dedt 2
selector to select deck 2 before stop recording.
If you press the stop button while the deck 1 indicator is lit, the
cassette deck automatically creates a non-recorded passage of
about four seconds in length, and then enters the recording
standby state. Pressing the synchro-start button can resunre
edit-recording.
2 Select the desired reverse mode.
; Single sided recording (forward side only)
: Two-sided recording
(forward side reverse side)
In case the length of a tape set in the deck 2 is longer
than a tape in the deck 1 tne deck 1 repeats the
playback until the deck 2 complete the two-sided
recording, (up to eight times)
<rX?- Two sided recording
(forward side reverse side)
3 Press the edit speed button to select the
recording speed “xl” or *‘x2”.
xl: Normal speed
x2: High speed
4 Press the synchro-start button to start edit-
recording.
The tape edit indicator on the cassette deck will illuminate.
When edit-reoording is completed, the cassette deck automatically
creates a non-recorded passage of about four second in length,
and then enters the recording standby mode.
Note:
Be sure to press the edit speed button to go out of the edit speed
indicator after finishing recording.
■ To change the direction of tape travel
1) Press the one of the desired play button.
2) Press the stop button.
■ While edit-recording Is taking place
You can press one of the input selector buttons on the amplifier
and enjoy listening to another music source, such as a CD.
You can cheunge the settings of the volume and tone controls of the
amplifier without affectirvg the recording.
Note:
Switch off your television set or video equipment when performing
edit-recording at high speed (x2). The reason for this is that noise
is sometimes picked up and recorded.
-46-
Page 47

Using the Timer
Types of timer operations
■ One-time timer function (ONCE)
This timer function can be used to switch the power ON and to the
stand-by condition at a desired day and time (one day only).
This is convenient for recording broadcasts while you are away.
(Programmed settings are canceled when this timer function is
used.)
■ Weekly timer function (WEEKLY)
•Every week on the same day. (one day from Sunday to Saturday)
•Every day (from Sunday to Saturday)
•Every day except Sunday (from Monday to Saturday)
•Every day except Saturday and Sunday (from Monday to Friday)
The power will be switched ON and to the stand-by condition at the
desired times (among those choices described E^ve). This
feature is convenient for listening to and/or recording the same
program at regular intervals,
(The programming remains in effect until canceled.)
Timer sequence of priority
If programmed times overlap, timer operation priority is as follows:
"SLEEP". “ONCE" and "WEEKLY" settings.
: Timer Is functioning.
1 I: Timer is not functioning.
[T] In the following example, the “WEEKLY” setting will be stopped
mid-way.
■ Sleep timer function (SLEEP)
This timer function can be used to switch the power to the stand-by
condition at the desired time (within a range of 120 to 1 minutes
from ^e pres«it time). Use this timer to switch the power to the
stand-by condition automatically even if you fall asleep while
listening.
(Programmed settings are canceled when this timer function is
used.)
After approximately one minute after the sleep timer is activated,
the tuner display will return to showing the present time.
If the button is pressed in this condition, the time remaining on the
sleep timer wilt be displayed for approximately 10 seconds, and if
the button is pressed once more while the time remaining on the
sleep timer is being displayed, the sleep timer will be cancelled.
[2] In the following example, the “WEEKLY” setting will not be
activated.
O ONCE
X
WEEKLY
© ON
9 10 11 12 ^13 14 15 16
ON
@ OFF
~ [off
SLEEP ® Set time
0
ONCE ® ON
0
X
16 17 18/ 19 20 21 22 20
Not activated because the “ONCE" switch-ON time has priority.
/ I OFF
Id) OFF
OFF
Timer functions
•Timer setting for compact discs
The play starts from the first track.
•Timer setting for the cassette deck
8o№ deck 1 and 2 can be operated. (When cassette tapes are set
both in deck 1 and 2, deck 1 will be (grated.)
•Ttmar playing for the radio broadcasts
(Refer to the next page.)
•Timer recording for the radio broadcaate
While timer recording is taking place, the volume level will be
automatically muted (-- dB).
The fade-in recording automatically activates with the timer
recording.
Not activated because the "ONCE" switch-OFF time has priority.
When the timer programming is set by "ONCE" as shown above,
recording or tape playback will not start.
-47-
Page 48

I
Using the Timer (continued)
Set the volume level for timer play In advance (See page 51.)
TIM ER SET T SELECT A
Tuner timer setting (ONCE)
Have you completed "Setting the Time” on page 22 and
“Automatic menv>ry presetting" or “Manual memory presetting” on
pages 31-32?
If not, please complete №ese sections before continuing.
The following example will show how to set the "ONCE” timer
function for listening to FM channel 3 from 6:30 to until 7:15 on
Saturday.
Carry out the step 1 of “Standard Operation“ on page 20.
1 Press the timer set button to enter the timer
set mode.
(Flashing will begin.)
2 Set the timer function.
0 Press the timer select buttons to select
"ONCE”.
3 Set the day.
0 Press the timer select buttcms to select
“SAT'.
V I >
-SAT- ON
u
r
r
Í»
^ I ^
n
u
UT ON
n
u
QONCE PUT
d) Press the timer set button.
4 Set the ON time.
0 Press the timer select buttons to select
"6".
mata. PUY
0 Press the timer set button.
0 Press the timer select buttons to
select “30”.
D:DD
:B-:DD
0 Press the timer set button.
® Press the timer set buttcm.
-46-
Page 49

5 Select the tuner source.
0 Press the timer select buttons to select tuner source.
Each time you press one of the timer select button, “CD"
“TAPE” and tuner source is alternately displayed.
SAT ON
[DONCE
MW gg g
PlAY U
kHz
© Press the timer select buttons to select "15".
El ONCE
PUT
SAT
!^I~I
FM
® Press the timer set button.
SE.
OU
MHz CH.
I r / ^
/ I ^
@ Press the timer set button.
6 Select the desired preset channel.
0 Press the timer select buttons to select channel “3".
SAT OH £T * 3 n
QONCE
O O cn
FM
0 Press the timer set button.
J tD LJ MHz , D~
PIAV O • Du
7 Select “PLAY” or “REC”.
© Press the timer select buttons to select “PLAY".
Each time you press one of the timer select button, "PLAY" and
“REC” is alternately displayed.
EONCE
-)uy-
SAT ON
/ \
cn
FM 3 ^ C3 Li MHz
© Press the timer set button.
CH
E
*
Du
—1
3
8 Set the OFF time.
© Press the timer select buttons to select “7".
9 Switch the power to standby mode.
Tuner timer setting (WEEKLY)
For the weekly timer function, select "WEEKLY" on step 2, then
select from among one of the choices. (Refer to page 47.)
You can make "ONCE" and “ WEEKLY’ timer setting respectively.
EONCE
FM
© Press the timer set button.
PUT
Q O cn
^ L* C J LJ MHz
SAT OFF
. D
CH. U
n
U
-49-
Page 50

I
Using the Timer
(continued)
To cancel a timer setting
1 Press the timer set button.
2 Select the **ONCE” or “WEEKLY" timer.
3 Press the cancel button.
The display will return to the clock mode.
To confirm the timer setting
RECALL
Press the timer setting confirmation button.
Each time you press the timer setting oorrfirmatjon button, the
display will chfuige as follows:
® “ONCE"power-
ON time
ШОНСЕ
PLAY
SAT ON
5:30
QO on
FM
"ONCE" powerOFF time
Шоке
^ O’ O U MHz CH. 3
SAT OFF
PUY
/ * lO
noon
“WEEKLY"
power-ON time
FM
HONTUEWEDTHUFHSAT ON
Q WESaYFLAY
. о LJ MHz CH 3
0:00
ТП PE
@ "WEEKLY'
power-OFF time
HON TUE WED THU m SAT OFF
m WEBCLYPUY
0:30
-50-
TP PE
Present time
Notes:
•Though the power is switched to standby mode, you can confirm
the timer setting.
•If you confirm the timer setting while the power is ON, the volume
iewl display on the amplifier will flashes to indicate tiie volume
preset level. (The volume level from the speakers wilt not
change.)
Page 51

To preset the volume level for timer play
1 Press the volume preset button to start
setting.
/ (J □
/ ~ W D*
Smm VOL
1 /
Flashing
/ 1 ^
2 Adjust the volume level using the volume
level control.
3 Press the volume preset button to finish
setting.
•The volume level memorized will activate at timer play, even if the
volume setting is changed after the atxive procedures have been
followed.
-51-
Page 52

Using the Timer
(continued)
ISLEEPI
Press the sleep button (on the remote control
transmitter) while the source Is being played.
Sleep indicator
The power will be switched OFF after 120 minutes.
•You can change the sleep time in 1-minute steps by pressing the
timer select buttons (within a range of 120 to 1 minute from the
present time).
•To cancel the sleep timer setting, press the sleep button once
again or press the timer cancel button.
■ To use the sleep timer in conjunction with the
timer-play operation
You can go to sleep listening to the radio broadcasts, and wake up
the next morning listening to a CD.
1. Make the timer setting for a CD.
2. Set the time with the sleep button.
3. Tune to your favorite station and set the desired volume.
(Refer to page 51. “To preset the volume level for timer play.")
-52-
Page 53

Remote-Control Operation
Common operation controls
© Power switch (Ioff/on[|
(2) Function seiector buttons
(D Equailzation function button (EQ ON/FLAT)
Press this button to switch the unit ON or to the standby
condition. Note that there is no need to press this biftton if the
unit’s power is ON. (If it is pressed, the unit will be switched to
the standby n>ode.)
(CD 10 KEY, TUNER 10 KEY, DAT, PHONO)
These buttons are used to change the functions of this remote
control transmitter as well as the main unit.
Press to select the equalizer effect on or flat.
2 3 ■* 5
ooooo
6 7 8 0 0
ta
opppy
S5;
DDDoo
«MAT wo»w awca
□ a a o
' oecKV!
S
a
a o o g □
For detailed information concerning operation steps, etc., please
refer to the appropriate page lor each unit and №e respective
operation instructions. For this system, you can iisten to tapes or
compact discs, etc., by operating the remote control transmitter
without using the input seiectors.
® Equaiization mode-seiect button (EQ MODE)
(D Muting button (MUTING -20 dB)
This button is used to temporarily attenuate ("mute") the
volume level. After pressing the button the volume level will be
reduced by 20 dB.
® Easy piay buttons (EASY PLAY)
(See page 23.)
® Super bass button (SUPER BASS)
(g) Sound effect ievei buttons
(▼ SOUND EFFECT A)
(g) Ambience enhancement button (SPACE)
(Q) Voiume ievei controi buttons (T VOLUME A)
For adjustment of the volume level.
A: To increase the volume level.
▼: To decrease the volume level.
Tuner controls
[T] steep button (SLEEP)
Press this button to use the sleep timer function.
[2] FM mode button (FM MODE)
This button is used to change bad stereo reception to
improved monaural sound when listening to an FM broadcast
station.
Preset-tuning buttons (1-0)
These buttons are used to tune to broadcast stations that
have been preset in the unit's memory.
When these buttqns are used, be sure to first press the
TUNER 10 KEY: from the function selector buttons on the
remote control b^nsmitter.
-53-
Page 54

Remote-Control Operation
Compact disc player controls
0 Numeric buttons (1-0, CD >10)
These buttons are used to select the track to be played. When
these buttons are used, be sure to first press the CD 10 KEY
from the function selector buttons of the remote control
transmitter.
@ Play button (►)
Press this button to start disc play.
(3) Pause button (II)
To temporarily stop compact disc play.
0 Disc tray open/close button (OPEN/CLOSE)
Press this button to open or close the disc tray.
© Repeat button (REPEAT)
Press this button to perform repeat play. Press once again to
cancel this mode.
© Skip buttons ()
Press one of these buttons to select the desired track,
0 Stop button (■)
Press this button to stop disc play.
(I>
E^
H
eje;
r:
____
TUHEH
-------
o o lo
TAP E TUNE R
2?---------3T
D OOOO lÒÓCDOO
№
CO
>10 I
1^
O cp rnio o
(continued)
for a prior track
: for a track ahead
fuua ▼ wkwmb A
© Cancel button (CANCEL)
Press this button to cancel the track selected for program
play.
© Program button (PROGRAM)
Press ttiis button to perform program play.
© Al edit buttons (Al EDIT)
These buttons are used to perform Al edit recording. (See
page 44.)
Cassette Deck controls
[T| Record/record standby button (REC PAUSE)
Press this buttcm to change to the recording stand-by mode.
[2] Deck 1/Deck 2 selector (DECK 1/2)
Press to select the deck ("DECK 1" or “DECK 2") to be used.
[3] Stop button (■)
Press this button to stop the tape.
[4] Fast-forward/rewind music select button
(◄◄, ►►)
Press one of these buttons to advance or rewind the tape
whiie the unit is in the stop mode.
Press one of these buttons to select the desired tune whiie the
unit is in the piay mode.
-54-
[5] Playback buttons {<, P>)
Press this button to start the tape.
>■: “A” side (side facing outward)
“B" side
(There wilt be an autcmiatic change of the input selector.)
Page 55

About Cassette Tapes
Selection of cassette tapes
Do not use the following types of tapes in this unît.
•120^inute (or longer) tape»
Because the tape is very thin, it might stretch during use causing
unstable tape movement which may result In the tape becoming
tangled in the rotating parts of this unit, ^
•Fe-Cr tapes (TYPE III)
The high frequency range will be emphasized and it viiil) not be
possible to obtain a fiat frequency response.
•Metal tape wHtiout detection holes In the cassette
Recordings will be very distorted. (There is no playback problem
however.)
Tape slack
Tape stack may cause the tape to break.
To prevent erasure of recorded sounds
Remove the erase-prevention tat» (thus preventing recording).
Use a screwdriver
Tab for side “A'
Tab for side "8"
or similar object to
break out the tab.
■ To re-record on a protected cassette
Cover the slot with adhesive tape.
Avoid tape storage in the following places
Tape can be damaged if it is stored in places such as described
below.
•Where the temperature is high (ЭбТ/ЗбХ or higher) or where the
humidity is high (80% or higher).
•Where there is a strong magnetic field (near a speaker, on fop of
a TV, etc.). Recording may become erased.
•In direct sunlight.
-55-
Page 56

About Compact Discs
I
Handling precautions
Only compact discs having this mark
can be used with this unit.
_n COMPACT
DIGITAL AUDIO
Observe the following precautions to enjoy the same
outstanding sonic performance from your Compact Discs for
many years.
•Hold compact discs by the edges so the surface is not soiled with
fingerprints.
•Be careful not to scratch the surface with fingernails or other
sharp objects, particularly when inserting and removing discs
from their cases.
•Do not bend the disc.
•Do not use record cleaning sprays or static electricity prevention
liquids.
•Do not wipe with benzine, thinner or any other solvent. If the
surface is soiled, wipe gently with a soft, damp (water only) cloth.
•When wiping discs, always move the cloth directly outward from
the center of the disc, not in a circular motion as with standard
phonograph records.
(In compact discs, circular scratches along a tine of pits are more
likely to cause errors than straight scratches across many lines of
pits.)
• If the disc is brought from a cold environment into a warm room,
moisture may form on the disc. Wipe this off with a soft, dry,
lint-free cloth before using the disc.
•Do not dry discs with a hair dryer.
•Do not write on the label side with a ball-pCMnt pen, hard pencil or
other writing utensil.
•Handle compact discs with care. Fingerprints, dirt and scratches
can cause skipping and distortion.
Storage precautions
•Be sure to store discs in their cases to protect them from dust,
scratches and warping.
•Do not place or store discs in the following places;
1) Locations exposed to direct sunlight.
2) Humid or dusty locations.
3) Locations directly exposed to a heat outlet or heating
appliance.
4) In the glove compartment or rear ledge of an automobile.
-56-
Page 57

Maintenance
care
Head
To assure good sound quaiity for recording and playback, be sure
to clean the heads after approximately every 10 hours of use.
1. Switch the power of this unit to standby mode.
2. Press the eject button to open the cassette holder.
3. Clean the heads, pinch roller and the capstan shaft of each
deck with a cotton swab (or with a soft, lint-free cloth) slightly
moistened with alcohol.
Do not use any solution other than alcohol for head cleaning.
Head demagnetization
In order to maintain good sound quality during recording and
playback, it is recommended that the heads should be demagne
tized If distortion or poor sound quality persist after cleaning the
heads.
If the heads become magnetized, they could create noise in
recordings, loss of high-frequency response, or erasure of valuable
recordings. Several types of head demagnetizers are available and
may be purchased at local electronics supply stores. Follow the
instructions that are supplied with the device.
•Do not bring any type of metal objects or toots such as magnetic
screwdrivers in contact with the head assembly.
Maintenance of external surfaces
To clean this unit, use a soft, dry cloth.
For very dirty surfaces, dip a soft cloth in a weak soap-and-water
solution and wring well. After cleaning, wipe with a soft, dry cloth.
Never use alcohol, paint thinner, benzine, or a chemically treated
cloth to clean this unit.
Such chemicals may damage the unit's finish.
-57-
Page 58

Troubleshcx)ting Guide
Before requestir>g service for this unit, check the chart below for a possible cause of the problem you are experiencing. Some simple checks or a
minor adjustment on your part may eliminate the problem and restore proper operation.
If you are in doubt about some of the check points, or if the remedies indicated in the chart do not solve the problem, refer to the directory of
Authorized Service Centers (enclosed with this unit) to locate a convenient service center, or consult your dealer for instructions.
Problem
Problems common to all units
The ampiffler is not turned
on when the power
“STANDBY c!)/ON” switch Is
pressed.
No sound Is emitted when
the power fs switched ON.
The iocatlon of the various
musical instruments Is not
well defined.
The left and right sounds are
reversed.
A low frequency hum is
heard when a source is
being played.
Sound Is emitted from only
one speaker.
No sound is emitted when a
source Is being played.
The power switch on the back of the amplifier is
switched OFF.
appears on the volume level display.
Reverse the © and © connections to one of the
speakers.
Reverse the left and right connections to the
speaker.
The power cord or a fluorescent light is located near
a connecting cord.
One of the wires of the speaker cord is
disconnected.
The © and © wires of the speaker cable are
shorted.
While listening to FM broadcasts
A “rushing” noise which Is
not heard during a monaural
broadcast la heard during a
stereo broadcast.
Much noise la heard during
a stereo broadcast, and
occasionally the sound from
the program disappears.
The stereo Indicator of the
tuner flickers and does not
light completely.
The sound during a stereo
broadcast la highly
distorted.
Noise is more likely to appear on a stereo signal
than on a monaural signal.
•The installation location and orientation of the
antenna are unsuitable.
•The transmitting station Is a long distance away.
There is a building or mountain nearby. [Distortion
is caused by interference between the signal from
the transmitting station (direct wave) and the signed
reflected of the building or mountain (reflected
wave).]
Probable cau8e(8)
Suggested remedy
•Press the power switch on the back of the amplifier.
•Adjust the volume level with the VOLUME control on
the amplifier.
•Connect the speaker cable correctly.
•Connect the speaker cable correctly.
•Keep electricat appliances well away from the
<xinnecting cords.
•Connect the speaker cable correctly.
•Switch off the system, re-connect the speaker cable
so that it is not shorted, then switch the power ON
again.
etf an indoor antenna is being used, change to an
outdoor antenna.
•If a spedai outdoor antenna is being used, try
changing the installation location, height, and
orientation.
•Try switching off the television, video deck.
•Press the FM mode button on the remote control
transmitter to change the reception from stereo to
monaural mode.
While listening to LW/MW broadcasts
An unusual beat sound is
heard.
A low frequency hum Is
heard.
The system is being used at the same time as a
television set.
The antenna wire is near the power oord.
When there is a television set nearby
The picture disappears or
sbrlpes can be seen.
The location and orientation of the antenna are
incorrect.
The wiring at the back of hie system is unsuitathe.
S^ch OFF the televiskm set, or use the system
farther away from it.
Separate the antenna wire from the power cord.
•If an indoor antenna is being used, change to an
outdoor antenna.
• Separate the television set from the system.
•Separate the antenna wire of the television set from
the system.
-58-
Page 59

p Problem
Probable cause(8) | Suggested remedy |
While using the tape
Sound Is low. Intermittent, of
poor quality, noisy,
scratchy, Of unsteady.
The deck does not enter the
recording mode.
While listening to a c
The tray does not close
when a disc Is loaded and
the OPEN/CLOSE button
pressed.
The total number of tracks
and total time are not
displayed when a disc is
loaded.
The disc doss not start
being played when the PLAY
button is pressed.
A certain part of the disc
cannot be played.
decks
Heads are dirty.
The Dolby NR switch is set in the wrong position.
The erase-prevention tabs have been removed. Attach t^ to cover the space left by removal of the
compact disc
The disc is not sitting correctly in the disc tray. Re-insert the tray.
The disc is loaded upside down.
The disc is dirty.
The disc is scratched.
The disc is badly warped.
The disc used is a non-standard one.
There is condensation inside the CD player. Switch ON the power, then wait for 20 to 30 minutes
The disc is dirty. Clean the disc with a soft cloth.
The disc is scratched.
While using the remote controller
The system cannot be
operated with the remote
controller.
The batteries are inserted in the reverse polarity. Re-insert the batteries in the correct polarity.
The dry batteries are worn.
Clean the heads.
Set it to match the recording condition.
erase-prevention tabs.
Re-load the disc.
Wipe the disc with a soft cloth.
Replace the disc with a new one.
Replace the disc with a different one.
before using it.
Skip the scratched part of die disc (skip play).
Replace the batteries with new ones.
About moisture (for SL-CH7)
cases...
•Immediatety after a heater has been turned on.
•In a steamy or very humid room.
•When the unit is suddenly moved from a cold environment to a
warm one.
If moisture forms inside this unit, it may not operate properly. To
correct this problem, turn on the power and waK about one hour for
the moisture to evaporate.
About cooling fan on the amplifier rear
panel
The cooling fan attemately rotates and stops in order to remove
heat from the amplifier. (Do not block off the outlet of the cooling
fan.)
Cooling fan
Amplifier
Page 60

Technical Specifications
(EMN 45 500)
LW/MW/FM Stereo Tuner
■ FM TUNER SECTION
Frequency range
SeneKIvtty 1.5 pV (IHP, usable)
S/N30dB
S/N26dB
S/N20dB
IHF 46 dB sterao quieting I
Total harmonic diatortlon
MONO
STEREO
S/N
MONO
STEREO
Frequency response
Attamata channel aalactivity ±400 kHz
Stereo aaparsUon 1 kHz 40 dB
Channel balance (250 Hz~
Limiting point
Bandwidth
IF amplH Isr
FM demodulator
Antenna terminal 750 (unbalanced)
■ LW/MW TUNER SECTION
Frequency range
MW(ForAuatralla) 522-'1611 kHz (9 kHz step)
LW (For Australia) 144-288 kHz (9 kHz step)
Sensitivity (S/N 20 dB)
MW
LW
Selectivity (±9 kHz)
MW
LW
■ TIMER SECTION
Clock
Functions 24-houf programmable;
■ GENERAL
Power consumption
Dimensiona (WxHxD)
87.50'-108.00 MHz (0.05 MHz step)
1.5 pV(75n)
1.3mV{75Q)
1.2 mV (750)
■naltivlty
20H2-15kHz,+0.5dB-
10 kHz
6,300 Hz)
530-1620 kHz (10 kHz step)
(For Saudi Arabia and othera)
531 -1602 kHz (9 kHz step)
530-1600 kHz (10 kHz step)
146-290 kHz (+2 kHz shift)
(For Saudi Arabia and others)
155-281 kHz (+2 kHz shift)
sleep (1-120 min., 1 -min. Intervals)
Setting Intervals 1 minute-23 hours, 59 minutes
28 mV (750)
60dB{74dB, IHF)
58dB{70dB,IHF)
—1.5 dB PHONO
1000 kHz
153-279 kHz (9kHzst^)
20MV,330MV/m
(at 999 kHz) 50 dB
(at 216kHz) 50 dB
Quartz-lock type
244iour indication
weekly (1 time)
once only (1 time)
(at 1 min. Intervals)
215x55x295 mm
(8'%а"х2%г"х11%*)
1.4 kg (3.0 lb.)
0.2%
0.3%
50 dB
30 dB
±1.5 dB
1.2 mV
180 kHz
50 mV
Stereo Integrated Amplifier Compact Disk Player
■ MAIN AMP. SECTION
Power output DIN 1 kHzTHD1%602x25W
both channel driven at 127/240 V
Total harmonic diatortlon
half power at 1 kHz: Low Amp 0.09% (6D)
Hoedplwnes output teval/Impedanoe
10ldHzTHD1%8O2x5W
300mV/3300
■ PREAMP. SECTION
Input aaneKlvlty/impadanca
PHONO
MIC
DAT
S/N (rated power, 60): Low Amp
DAT, CD, TAPE 84dB(IHF.A85dB)
Graphic equalizer control
80 Hz, 250 Hz, 1 kHz, 4 kHz, 12.5 kHz
Muting
Super beta
Output voKags/Impedanca
DATRECOUT 150 mV
3mV/47kO
0.7mV/10kO
250mV/27kO
70dB(IHF.A75dB)
55 Hz. +4dB
■ GENERAL
Power consumption
Power supply
For Australia
For othera
Dimensions (WxHxD)
Weight
AC50«0Hz. 230-240 V
AC5(W60Hz.110~127V,
220-240 V
215x110x303 mm
(8’%г''х4’’Л2"х1Г¥«-)
4.3 kg (9.5 lb.)
-20 dB
250W
■ AUDIO
Frequency response
Wow and flutter
■ PICKUP
Wavelength
■ GENERAL
Power eonsumptton
Dimensions (WxHxD)
Weight
Speaker System
Type
Speakers Woofer
Impedance HIGH
Input level Music HIGH
Output sound pressure levsl 67 dB/W (1.0 m)
Frequency range 42 htz-22 kHz (-16 dB)
Dimensions (WxHxD) 165x329x302 mm
Weight 5.1 kg(11.2lb.)
Stereo Double Cassette Deck
Track system
Tape speed
Bias frequency
(DECK2)REC4>LAY
Erasing
(DECK 1) PLAY
Motors
(DECK 2)
(DECK1)
Wow and flutter
Fast Forward and Rewind Tints
Approx. 110 secorvds with C-60 cassette tape
Frequency response (w/o Dolby N.R.)
METAL 30 Hz-17 kHz
CrO) 30 Hz-16 kHz
NORMAL 30 Hz-16 kHz
8W
Corr^»act cassette stereo
4.8cm/sec.(1^yktps)
60 kHz
Permalloy head
Double-gap ferrite head
Permalloy head
DC servo motor
DC servo motor
0.1%(WRMS)
SfH
DOLBY B NR on
DOLBY CNR on
DOLBY Off
■ GENERAL
Power consumption
Dhntnalona (Wx Hx D)
Weight
Below measurable limit
LOW
LOW
(61/4"x12’Vi8"x11%')
(signal level max recording level,
(8<%2"x4'Vüí''x11*y«“)
2 Hz-20 kHz
(±1dB)
780 nm
215x55x295 mm
(8'%г''х2%г"х11%0
2 way 2 sp bass-reflex
14cm (5’A") cone type
6 cm (2%”) cone type
CrOs type tape)
215x110 x 297 mm
17W
2.0 kg (4.4 lb.)
80
60
low
SOW
66 dB (CCIR)
74dB(CCIR)
56dB(AWTD)
16W
2.6 kg (5.7 lb.)
-eo-
1. Specifications are subject to change without
notioe.
Weight and diirteneions are approximate.
2. Total harmonic distortion is measured by the
digital spectrum «lalyzar.
Page 61

-1.9-
01Л1Э1Л1
 Loading...