

Page 1

Panasonic*
CD Stereo System
SC-CH64M
Operating Instructions
Note:
The “EB” indication shown on the outside packing case indicates
United Kingdom.
Before connecting, operating or adjusting this product, please read
these instructions completely. Please save this manual.
[EbI ìgm
COMPACT
DIGITAL AUDIO
RQT3449-B
)[§
UDIO
Page 2

Dear customer
Thank you for purchasing this product.
For optimum performance and safety, please read these instructions
carefully.
Table of contents
Before use
These operating instructions are applicable to the following systems.
System SC-CH64M
Main unit
Speakers
SA-CH64M
SB-CH64
CAUTION!
THIS PRODUCT UTILIZES A LASER.
USE OF CONTROLS OR ADJUSTMENTS OR
PERFORMANCE OF PROCEDURES OTHER THAN
THOSE SPECIFIED HEREIN MAY RESULT IN
HAZARDOUS RADIATION EXPOSURE.
DO NOT OPEN COVERS AND DO NOT REPAIR
YOURSELF. REFER SERVICING TO QUALIFIED
PERSONNEL.
CAUTION!
DO NOT INSTALL OR PLACE THIS UNIT IN A
BOOKCASE, BUILT IN CABINET OR IN ANOTHER CON
FINED SPACE IN ORDER TO KEEP WELL VENTILATED
CONDITION. ENSURE THAT CURTAINS AND ANY
OTHER MATERIALS DO NOT OBSTRUCT THE VEN
TILATION CONDITION TO PREVENT RISK OF ELECTRIC
SHOCK OR FIRE HAZARD DUE TO OVERHEATING.
Suggestions for safety
Caution for AC mains lead
Supplied accessories
..........................................
....................................
............................................
3
4
5
Concerning the remote control............................. 5
Connections ......................................................... 6
Basic connections (for supplied accessories)
Placement of speakers............................................................... 7
External unit connection............................................................. 7
Optional antenna connections
Front panel controls
..................................................
............................................
............................
8
Preparations
Setting the time
Memory presetting
Automatic memory presetting
Manual memory presetting........................................................10
......................................................
..............................................
....................................................
10
Radio operations
Listening to radio broadcasts ............................11
Preset tuning.............................................................................11
Manual tuning...........................................................................11
6
7
9
10
INVISIBLE LASER RADIATION WHEN OPEN.
DANGER
AVOID DIBECT EXPOSURE TO KAM
USWGL№B1№EHGVEDMia.HMS№№t№Neit'roEF£
ADVAfiSEL
EBUOEAfFimN. UtmiAUDSirmSEFORSIHilWG.
AVmTAESSA lASuaiAtUKITOsaillETTAESSA CIET ALT7IINA
VARO]
NMiTMAtWlASEfiSATEHLlE AIÄKAISOSÄTEESEEN
OSVNLIG LASERSIRAINING NitR OEHNADEL Ай ÜPPMAD OCH
VARNING
EPAfIflENABUliKOPPLAD. B£yftAKIAÜSIRAl£tJ,
tlSMIGtAEERSIiUUHDNinDEKStl APNESOB SIKKtllHEDSLAS
ADVAHSEL
вида. mAEXSPOHEMHOFOftSMliN.
UNSiCHTeAll LASfUSIBAHLUNfi, WENNAfiDECKUKG BEÖFFNEI,
VORSICHT
NICHT DEMStRAHLAUSSEIZEN.
THIS MUSIC SYSTEM IS CAPABLE OF RECEIVING
THE NEW AM STEREO BROADCASTS FROM THE
AM BAND RADIO STATIONS. HOWEVER LIKE
MANY MUSIC SYSTEM CURRENTLY AVAILABLE
ON THE MARKET IT WILL REPRODUCE THIS AM
STEREO SIGNAL ONLY IN AM MONO. WHICH, IN
EFFECT, IS OF NO LESSER QUALITY THAN YOUR
EXISTING AM MONO MUSIC SYSTEM.
{Inside of product)
(Indersiden at apparatet)
(Tuottoen sisällä)
(Ar^aratens in sida)
(Produktets innsido)
(Im Inneren des Gerätes)
Compact disc operations
Listening to compact discs ................................
Setting/Removing discs .............................................................12
CDs playback modes
Sequential play..........................................................................13
Single disc play
Disc grouping play .....................................................................15
Program play .............................................................................18
Direct programming .................................................................. 19
Random play.............................................................................20
1-disc function
Repeat function.........................................................................22
Search function.........................................................................22
Skip functions............................................................................23
................................................................
.........................................................................
..........................................................................
Tape deck operations
Listening to tapes
To fast-forward or rewind the tape
................
Other functions
Changing sound quality and field
Selecting sound quality and field
Adding bass ...............................................................................25
Convenient functions ...
Easy play ...................................................................................25
To mute the volume ...................................................................26
Demo function...........................................................................26
..............................................
.......................................
.......................
12
12
14
21
24
. 24
25
25
25
Page 3

Recording operations
Before recording.................................................. 26
Type of tape which can be recorded correctly.............................26
How to advance the leader tape
Concerning the volume level while recording
Concerning the sound quality and field while recording
To erase a recorded sound .......................................................26
Recording from radio broadcasts
To reduce the noise while MW/LW (AM) recording
(Beat proof function)...............................................................27
Recording from compact discs
Normal recording........................................................................29
One-touch editing.......................................................................30
...............................................
............................
............
.......................
............................
.27
28
26
26
26
n Placement
Avoid placing the unit in areas of;
•direct sunlight
• high temperature
•high humidity
•excessive vibration
•uneven surfaces (Place the unit on a fiat level surface.)
Such conditions might damage the cabinet and/or other component parts and
thereby shorten the unit’s service life.
To protect the unit against sound distortion and acoustical effects, please place
the unit at least 15 cm away from wall surfaces etc.
H Ventilation
• Place the unit in a well-ventilated position at least 10 cm away from wall
surfaces etc.
• Ensure that curtains and similar materials do not obstruct the ventilation holes.
Timer operations
Using the play timer
Using the record timer
Using the sleep timer
To use two timers together
...............................................
..........................................
.............................................
.........................................................
Reference
Using an external unit
Quick reference of remote control
operations ..........................................................36
Concerning compact discs
Concerning cassette tapes
Maintenance.......................................................... 41
Troubleshooting guide
Technical specifications
..........................................
..................................
...................................
..........................................
........................
Back cover
.35
31
33
35
40
40
42
35
B stacking
Never place heavy items on top of the unit or the power cord.
B Voltage
• It is very dangerous to use an AC power source of high voltage such as for an
air conditioner.
A fire might be caused by such a connection.
•A DC power source can not be used.
Be sure to check the power source carefully, especially if on a ship or other
place where DC is used.
B Power cord protection
•Avoid cuts, scratches or poor connection of the AC main cord, as this may
result in fire or electric shock.
Excessive bending, pulling or slicing of the cord should also be avoided,
•Do not pull on the cord when you are disconnecting the power, as this could
cause an electric shock. Grasp the plug firmly when you disconnect the power
supply.
•Never touch the plug with wet hands or a serious electric shock could result.
B Foreign materials
• Ensure that no foreign objects, such as needles, coins, screwdrivers etc,,
accidentally fail into the unit or through the ventilation holes.
Otherwise, a serious electric shock or malfunction could occur.
• Be extremely careful about spilling water or liquid on/into the unit, as a fire or
electric shock could occur.
(Disconnect the power plug and contact your dealer immediately if this
occurs.)
•Avoid spraying insecticides onto the unit as they contain flammable gases
which can be ignited.
•Insecticides, alcohol, paint thinner and similar chemicals should never be
used to dean the unit as they can cause flaking or cloudiness to the cabinet
finish.
B Service
• Never attempt to repair, disassemble or reconstruct the unit if there seems to
be a problem.
A serious electric shock could result if you ignore this precautionary measure.
•If a problem occurs during operation (the sound is interrupted, indicators fail to
light up. smoke is detected, etc.) contact your dealer or Authorized Service
Center immediately.
•Disconnect the power supply if the unit will not be used for a long time.
Otherwise the operation life could be shortened.
Cautions on moving your stereo:
Before moving your stereo to another location, be sure to remove alt
discs from the rack and turn off the stereo.
The changer mechanism automatically locks when the system is turned
off, to protect it against damage in transport. Therefore, always press
POWER and make sure “GOOD BYE" appears on the display before
you unplug the stereo.
Failure to do so will expose the compact discs and the stereo to the risk
of severe damage.
Page 4

Caution Jhr AC mains lead
(For United Kingdom)
(“EB” area code model only)
For your safety, please read the following text carefully.
This appliance is supplied with a moulded three pin
mains plug for your safety and convenience.
A 5-ampere fuse is fitted in this plug.
Should the fuse need to be replaced please ensure that
the replacement fuse has a rating of 5-ampere and that
it Is approved by ASIA or BSI to BS1362.
Check for the ASIA mark ^ or the BSI mark ^ on the
body of the fuse.
If the plug contains a removable fuse cover you must
ensure that it is refitted when the fuse is replaced.
If you lose the fuse cover the plug must not be used
until a replacement cover is obtained.
A replacement fuse cover can be purchased from your
local dealer.
CAUTION!
IF THE FITTED MOULDED PLUG IS
UNSUITABLE FOR THE SOCKET OUTLET IN
YOUR HOME THEN THE FUSE SHOULD BE
REMOVED AND THE PLUG CUT OFF AND
DISPOSED OF SAFELY.
THERE IS A DANGER OF SEVERE ELECTRI
CAL SHOCK IF THE CUT OFF PLUG IS IN
SERTED INTO ANY 13-AMPERE SOCKET.
The wire which is coloured BROWN must be con
nected to the terminal in the plug which is marked with
the letter L or coloured RED.
Under no circumstances should either of these wires be
connected to the earth terminal of the three pin plug,
marked with the letter E or the Earth Symbol -i.
Before use
Remove the connector cover as follows.
How to replace the fuse
1. Remove the fuse cover with a screwdriver.
If a new plug is to be fitted please observe the wiring
code as shown below.
If in any doubt please consult a qualified electrician.
IMPORTANT
The wires in this mains lead are coloured in accordance
with the following code:
Blue: Neutral
Brown: Live
As the colours of the wires in the mains lead of this
appliance may not correspond with the coloured mark
ings identifying the terminals in your plug, proceed as
follows:
The wire which is coloured BLUE must be connected to
the terminal in the plug which is marked with the letter
N or coloured BLACK.
2. Replace the fuse and attach the fuse cover.
Page 5

accessories
Concerning the remote
Please check and identify the supplied ac
cessories.
B
AC mains lead .........................................................1 pc.
□
(For United Kingdom: (For Australia and
VJA0733) New Zealand: RJA0036-K)
I I FM indoor antenna ..
(For United Kingdom:
RSA0007)
AM loop antenna set (RSA0010)
□
•AM loop antenna.....................................................1 pc.
•AM antenna holder
•Screw......................................................................1 pc.
i 1 Remote control transmitter
(EUR644340)
....................................
(For Australia and
New Zealand: RSA0006)
................................................
1 pc.
1 pc.
.. 1 pc.
control
Battery installation
Insert the batteries with this unit as shown below.
Use two UM-3 “AA", lEC R6 (1.5 V) or equivalent batteries.
• Do not mix old and new batteries, or batteries of different types
(manganese and alkaline, etc.).
•Never subject batteries to excessive heat or flame; do not attempt
to disassemble them; and be sure they are not short-circuited.
• If the remote control is not to be used for a long period of time,
remove the batteries and store them in a cool, dark place.
•Do not attempt to recharge alkaline or manganese batteries.
•Do not use rechargeable type batteries.
Battery life
2 pcs.
□ Notebook-like binder ...
[Liner notes organizer]
(RFA0622-K1)
I 1 Adhesive number
(RQLA0321)
[ j Antenna plug adaptor.............................................
(Supplied for United Kingdom only: SJP9009)
Use numbers indicated in parentheses when asking for replacement
parts.
. 1 pc.
1 pc.
1 pc.
The battery life is about one year.
The batteries should be replaced if commands from the remote
control transmitter do not operate the unit even when the transmitter
is held close to the front panel.
Correct method of use
Remote control
sensor
About 7 meters in front of
the signal sensor (The
Transmission
window
Operations notes
•Aim the remote control’s transmission window toward the unit’s
sensor. Avoid any obstacles.
• Be sure the transmission window and the unit’s sensor are free
from dust. Excessive dust might affect its performance.
•The operation may not be correct it direct sunlight or other strong
light source strikes the receiving sensor of this unit. If there is a
problem, place the unit away from the light source.
• If this system is installed in a rack with glass doors, the glass doors'
thickness or color might make it necessary to use the remote
control a shorter distance from the system,
•Never place heavy items,
•Do not disassemble or reconstruct.
• Do not spill water or other liquids.
actual range will depend
on the angle at which the
remote control is used.)
Page 6

Connections
Basic connections (for supplied accessories)
Speaker cords
(?) strip off the outer covering, and twist the center con
ductor.
:=t— O
X
! Match the cords to the terminals by color and con
nect.
AM (MW) Poop antenna
1. Attach the antenna holder to 2. Clamp the antenna to the anthe rear panel. Press the an- tenna holder,
tenna holder hard enough to
get it fixed firmly in place,
with a click.
3. Connect the antenna termi
nal to the rear panel of the
unit.
4. While listening to an MW
(AM) broadcast, position the
loop antenna for the best re
ception.
Page 7

Placement of speakers
Speakers are symmetrically the same on the inside, so you don't
have to orient them in a certain one or another.
For your reference
For your listening pleasure, keep your speakers from touching the
stereo.
Caution
Use the speaker(s) only with the recommended system,
Failure to do so may lead to damage to the amplifier
and/or the speaker, and may result in the risk of fire.
Consult a qualified service person if damage has oc
curred or if you experience a sudden change in perfor
mance.
FM outdoor antenna (not included)
UM
An outdoor antenna should be installed by a competent technician
only.
For United Kingdom
For Australia and New Zealand
FM outdoor antenna
(not included)
750 coaxial cable
(not Included)
(T) Remove a piece of the outer vinyl
insulator.
FM outdoor antenna
External unit connection
• For details, refer to the instruction manual of the units which are to
be connected.
•When units other than those described below are to be connected,
please consult with your audio dealer.
Analog player
Only an analog player with a built-in phono equalizer can be con
nected.
This example shows how to connect the analog player with the
PHONO OUT/LINE OUT switch.
Set the switch to the "LINE OUT’ position at the back of the analog
player.
"LINE OUT" position
Rear panel of
this system
Analog player
{not included)
30 mm
Twist the shield braid to expose
the core wire.
Shield braid
Connect the shield braid and the
core wire as shown at the left.
15 mm
. . Core
wire
AM outdoor antenna (not included)
Connect the outdoor antenna without removing the AM loop antenna.
Run 5 to 12 m of vinyl-covered wire horizontally along a window or
other convenient location.
For United Kingdom
5-12 m
I------------^
For Australia and New Zealand
S -12 m
Optional antenna connections
You may need an outdoor antenna if you use this system in
mountainous region or inside a reinforced-concrete building, etc.
When the system is not in use, disconnect the outdoor antenna to
prevent possible damage that may be caused by lightning. Never use
an outdoor antenna during an electrical storm.
Page 8

Front panMeontrols^^
No. Name Ref^page
© Remote control sensor
@ Power “STANDBY c!)/ON” switch
(POWER, STANDBY ci)/ON) 9
Press to switch the unit from on to standby mode or vice versa. In
standby mode, the unit is still consuming a small amount of
power.
@ Reverse mode select button (REV MODE) 24
0 Recording start/stop button
(REC START/STOP)
(5) Basic operating buttons
Buttons change according to the source. 9, tO, 11,
© CD edit button (CD EDIT)
©Single play button (SINGLE PLAY) 14
© Display
©V. BASS/DEMO button (-V.BASS/-DEMO) 25
© Headphones jack (PHONES)
©Volume control (VOLUME)
@ Cassette holder open button (A OPEN)
13,24
27
30
35
11
24
No. Name
5
©Tuner, band select button
(TUNER, BAND)
© CD button (CD)
©Tape button (TAPE)
@ Record timer/play timer button
(© REC/© PLAY)
© Clock/timer button (CLOCK/TIMER)
©Window
© Group file select buttons (GROUP FILE)
© EQ space select button (EQ SPACE)
@AUX button (AUX)
©Cassette holder
© Rack panel
© Group name enter button (NAME ENTER) /5
© Group disc enter button (DISC ENTER)
@ Group mode select button (MODE)
Ref. page
10
13
24
32, 34
9, 31, 33
15
25
35
24
12
16
13
@ Disc skip/group name select button
(DISC SKIP/GROUP NAME)
8
13, IS
Page 9

•The builtnn demo function will run automatically shortly after
you plug in the system (see page 26).
•The demo function in the power standby mode will be can
celled automatically by setting the time.
This is a 24-hour display clock.
This example in the figure shows how to set the time for 18:25
(6:25 p.m.).
VTUMING/TIME ADJUST^
4
-V.BASS
-DEMO
CD
34
0 Press V or A to select the
minutes.
POWER
STANDBY
CLOCK/
TIMER
\/TUNtNG/TIME ADJUST/N hOUr
Switch on the power.
0 Press CLOCK/TIMER once
Within 7 seconds:
C2) Press MEWlORY/SET.
0 Press V or A to select the
b
©Press MEMORY/SET.
to show “CLOCK”.
o.Go:-
0
CLOCh
JJ ^
"-Í M D
r L 0 C f;
b
When “0:00” flashes or the demo function is run
ning:
This happens when you connect the AC mains lead for the first time
or if there has been a power failure.
In this case, reset the time.
If the minutes setting has gone wrong:
1. Press CLOCKATIMER.
2. Press MEMORY/SET twice.
3. Press V or A to set the minutes, and then press MEMORY/SET.
To display the clock again;
Press CLOCKn'lMER.
The display will return to the previous display after about 7 seconds.
For your reference
The hour indication will not change when the minutes pass from “59”
to “00".
CL DC ¡-!
© Press MEMORY/SET to fin
ish setting the time.
The clock now starts.
The display will return to the previous
display after about 5 seconds.
C {. D C f;
Í £io g;
Demo function while the power is on;
When the input source is set to “CD" or ‘TAPE", the demo
function wilt run automatically after about 2 minutes or more
in the stop mode.
You can cancel the demo function by pressing and holding
-V.BASS/-DEMO for about 2 seconds or more.
Page 10

Memory presetting
•If broadcast frequencies are preset in the memory, you can easily
tune in any of these frequencies from the system or remote control
unit.
Automatic memory presetting
This example in the figure shows how to preset stations in the FM
band.
BAND
%
Press TUNER BAND to select
“FM”, “MW” or “LW”.
For Australia and Nev/Zealand;
Note that for Australia and New Zea
land, there are two bands of *'FM” and
“AM" instead of “FM", “MW” and
“LW".
The power will come on automatically,
even if the stereo is on standby.
• Up to 12 stations can each be set in the FM, MW and LW (For
Australia and New Zealand: FM and AM) bands with the automatic
or manual memory presetting.
The moment the frequency is memorized:
The station and channel will be displayed for about 1 second.
Channel
m
-'uBUo"-
When auto memorization is compiete:
The last station to be memorized will be left on the display.
fj i Ditar*'^
Station
To confirm the preset stations:
1. Press TUNING MODE to select “PRESET".
2. Press V or A,
Press TUNING MODE to select
“MANUAL”.
Each time you press the button,
“MANUAL” and “PRESET’ will appear al
ternately,
Press V or A until the display
'✓ TUNiHG/iiME ADJUST ^ sHows the frequency from
which you want to begin auto
matic memory presetting.
Holding the button down will scroll the
frequency. Repeatedly tapping on it will
change the frequency one step with
every touch.
While scrolling, if the radio picks up a
station, it will automatically tune it in (auto
tuning).
Press and hold MEMORY/SET.
Release the button when the frequency
display begins to change.
The system will automatically memorize
the received broadcast frequencies in se
quence.
1209
Auto memory presetting does not work when radio waves from the
broadcasting station are too strong or too weak.
In such case, carry out presetting manually. (See below.)
Manual memory presetting
(After step 1-2 on the left of this page)
1. Press V or A to select the desired frequency, and press
MEMORY/SET. (“MEMO" flashes.)
2. Press V or A to select the preset channel, and then press
MEMORY/SET during “MEMO" flashes.
"MEMO” indicator goes off.
Memory retention:
The contents of the memory will continue to be stored for approxi
mately 2 weeks, even if the power supply cord is disconnected.
10
Page 11

Listening to radio broadcasts
Be sure you’ve completed the steps In “Memory presetting" on page
10.
This example in the figure shows how to listen to FM preset channel
1.
BAND
Press TUNER BAND to select “FM”, “MW” or “LW”.
For Australia and New Zealand
Note that for Australia and New Zea
land, there are two bands of “FM” and
“AM" Instead of “FM", “MW” and
“LW”.
The power will come on automatically,
even if the stereo is on standby.
Press TUNING MODE to select “PRESET”.
Each time you press the button,
“MANUAL" and "PRESET" will appear al
ternately.
Press V or A to select the pre-
' TuwNG/nME ADJUST/N s6t Channel.
“STEREO" lights when an FM stereo
broadcast is being received. “QUARTZ
LOCK" lights when you precisely tune in
a broadcast station.
Preset channel
If the frequency is not known, use v or a for searching,
1. Press TUNER BAND to select a band.
2. Press TUNING MODE to select “MANUAL".
Each time you press the button, "MANUAL" and '‘PRESET' will
appear alternately.
3. Press V or A to tune in the desired broadcast.
Repeatedly tapping on the button will change the frequency one
step with every touch. Holding it down will scroll the frequency.
While scrolling, if the radio picks up a station, it wilt automatically
tune it in (auto tuning).
Tuning may stop automatically if any jamming is encountered.
4. Turn VOLUME to adjust the volume as you like.
Switching the mode from stereo to monaural
while listening to an FM station:
Press FM MODE/BP.
The sound reception mode switches to “MONO" (monaural)
and "MONO" lights.
When “MONO” indicator lights up:
Use this setting when listening to or recording in monaural. All
sound reception including stereo sound, is in monaural.
When “MONO” indicator goes off:
Use this setting for normal listening. Both stereo and monau
ral sounds can be heard as they are.
For your reference
If too much noise is produced in the FM stereo mode, press
FM MODE/BP and check “MONO” lights up.
The sound will then be heard in monaural, if the broadcast
signal is weak, or if there is a large amount of interference,
you will get a clearer sound in "MONO” mode.
4
VOLUME
^ tflCK
M3 F fi 0 a XnsfBEo
Turn VOLUME to adjust the volume as you like.
F N 0 R 'l n
-- HO,
You cannot memorize the stations in the “MONO” mode.
11
Page 12

Ustening to compact discs
Setting/Removing discs
Special notes
• You can set discs in the rack and remove them too, while playing
discs.
• Never set a disc in the slot of the disc being played.
•Sometimes the rack panel cannot be opened while a disc is playing,
It is a question of time, in such case, wait until you can open it.
• Do not open the rack panel while the changer is changing discs.
How to set discs
1. Open the rack panel.
changer while open. You could injure yourself if somehow entangled
in the internal mechanism.
2. Slide the loader carriage to the slot you want.
You can read the numbers between the prongs
4. Close gently the rack panel.
You will hear a catching sound when the rack panel closes.
How to remove discs
1. Open the rack panel.
2. Slide the loader carriage to the slot you want.
3. Press the eject button gently on the loader car
riage.
usa
When removing CDs while the power is on, make sure the source is
set to “CD" before removing CDs.
If you cannot remove the disc:
1. Press CD.
2. Open the rack panel.
3. Slide the loader carriage to the slot of the disc you want to
remove.
4. Press the eject button.
3. Set the disc on the loader and flip the loader
upwards.
Label side
• Do not use 8 cm discs fitted with expander rings. Use the 8 cm
discs as they are, to prevent damage to the slots from rings.
• Do not use cleaning discs, discs with stickers on the label side or
warped discs. Alt of these could damage your changer.
• Do not put anything other than discs in the changer.
•Do not set a disc in the slot of the disc being played (slot flashes).
The disc in play is returned to its slot when finished. If the two discs
somehow jam the slot, one or both could be damaged. When this
happens, the message “TAKE OUT’ will appear on the display.
Remove the disc that doesn’t belong in the slot and close the rack
panel.
How to know what disc in what slot
Your changer comes with a notebook-tike binder (liner notes orga
nizer) in which you can keep your CD liners. There are also adhesive
numbers for indicating slot numbers in the binder. This is a conve
nient way to keep track of what disc is in what slot.
Put two liners back-to-back inside each pocket, as shown above.
Do not put CD cases in the binder.
CDs playback modes
With this CD changer, you can playback CDs in the following
2 modes.
• Block mode...Normal sequential playback (page 13).
• Group mode...Only CDs registered in the selected group are
played back (page 15),
• Set discs with the label facing to the right.
• Never load more than one disc in any given slot.
12
Page 13

Sequential play
The changer plays all the tracks on all the discs in order and stops
automatically when the last track on the last disc finishes playing.
Press CD.
The power will come on automatically,
even if the stereo is on standby.
While the changer checks which slots
have CDs and which don’t, you will hear
the internal mechanism working. In the
meantime, “SEARCH" will flash on the
display.
Press MODE to select
2
DISC SKIP/
GROUP NAME
“BLOCK”.
Each time you press the button, “BLOCK"
and “GROUP” will appear alternately.
Press DISC SKIP/GROUP
NAME (V or a) until you reach
the desired disc.
a: Skips forward to next disc,
v: Skips backwards to the preceding
disc.
VOLUME
Turn VOLUME to adjust the volume as you like.
To temporarily stop play:
Press 11.
Press ► to resume play.
To stop play:
Press ■.
The display will show the total number of
tracks and the total playing time of the
current disc.
Total number of
tracks Current disc
The total playing time displayed includes the silent sections between
tracks. For this reason, it may be a few seconds longer than the
playing time indicated on the disc.
When you open the rack panel, the total number of tracks and the
total playing time go out.
Press ► to re-start play.
mm
Outside light or noise may sometimes cause the changer to detect a
disc when there isn’t one. However, the changer always correctly
detects the disc when in the play mode no matter what.
When “ ^ ” appears on the display;
It indicates there are 16 or more tracks on the disc at the playing
position.
When “NO DISC” appears on the display:
It indicates there is no disc set in the slot.
Press ►.
Play will begin.
Disc number of
Indicates another
disc(s) will follow.
Track number
Disc number of next
disc Elapsed playing time
(Current disc number)
The changer will play all CDs up through the one before the CD you
started with, and it will stop automatically after playing the last track
on it.
For your reference
If you leave the front panel open while a disc is in play, wtien the disc
is over, the changer will stop.
Convenient way to use GROUP FILE buttons (A-F):
The changer automatically divides the CD rack up into 6 blocks as
shown below.
DISC SLOT
BLOCK
One way to organize yourself would be to arrange the blocks by band
or solo artist. Within each block, you could then set the discs in
chronological order from the earliest you have until the band’s
(artist's) most recent. In sequential play, discs will be played in the
set order.
1-10
11-20 21 -30 31-40 41-50 51-60
A B c D E F
13
Page 14

Listening to compact discs
Sequential play
Listening to a particular track on a particular
disc first
by remote control only
Sr
----
J
2-3
ba|
OQ
OciiOo
nci>6e>
CJciD
Press DISC.
Single disc play
Single disc play is for that special disc of yours, perhaps one you just
bought. You see, the changer has a slot for one special disc which
you can use even when the rack is full (max. 60 discs).
Open the rack panel, and set the disc in the
slot No. 0.
Slot number
21 Sr
-- '■il Bit
While is flashing (approx. 10 seconds)
Press the numeric button(s) to
djCiC)
Selecting double-digit discs and tracks numbers:
First press >10, and then press the numbers for the two digits.
For example: number 20
Press >10, then 2, and then 0,
select the desired disc.
If you want to start listening from the first
track, you do not need to perform step 3.
Press the numeric button(s) to select the track.
The changer will play all CDs up through
the one before the CD you started with,
and it will stop automatically after playing
the last track on it.
SINGLE PLAY
To cancel single disc play mode:
• Select another disc by pressing DISC and the numeric buttons on
the remote control.
•Skip to another disc with DISC SKIP/GROUP NAME. (See
page 23.)
•Select a group. (See page 17.)
• In the block mode, press a GROUP FILE button (A-F).
Close the rack panel and press SINGLE PLAY.
The disc will start playing from the first
track.
1?D /
■■ ''■f B.»
The changer plays all the tracks in order
and stops automatically when the last
track finishes playing.
14
For your reference
While “SINGLE" appears on the display, you can start play from the
button as well as SINGLE PLAY.
Page 15

Disc grouping play
Sometimes, you want to block off your CDs into groups. For example,
by the type of music, or your favorite CDs, etc. Well, this changer lets
you make up to six groups, A through F. Basically, it’s like dropping a
disc into a box, then playing just discs from that box. What’s more,
you can name the groups with any of the preset names.
NAME JAZZ
GROUP
DISC
SLOT
You can register up to 60 CDs including the same disc more than
once.
A
1,3,5...
To name groups
This example shows how to name group A “JAZZ”.
ROCK FAVORITE
B F
2, 10, 30... 1,2, 11...
DISC SKIP/
GROUP NAM£
Press DISC SKiP/GROUP
NAME (v or a) to select the
name you want (JAZZ).
Names change in rotation as shown
below, every time you press v.
POP<
--------
—
I
ROMANTIC
i
PARTY
NEW AGE
I
HIP HOP
I
FAVORITE
I
DANCE
------
To change the names in the reverse
order, press a .
-----------
BALLADS
t
CLASSIC
T
JAZZ
T
OLDIES
t
ROCK
t
BLUES
i
.COUNTRY
Press NAME ENTER.
Press NAME ENTER.
SELECT
-GRP - NR HE
4
G3mCDG3iXICD
h'U ll-M )M| 4|.)l 11«
5
'G P P - F I L E
Press the GROUP FILE button
(A-F) for the group you want
to name.
“»ul fì z z
For example; To name group A
Press ®.
This will officially name group A “JAZZ”.
Repeat steps 1-4 to name
other groups.
15
Page 16

Ustening to compact discs
Disc grouping play
Registering CDs under named groups
• Any single group can hold up to 60 CDs.
•You can enter the same CD into any single group as many times as
you want.
•You cannot register the disc in slot No, 0. in your groups.
1-4
This example shows how to put disc 3 into the group “JAZZ” (group
A).
Press DISC ENTER.
1 sfffcr
~>GRP- r ILE
Press DISC ENTER.
ST IZ „
m s 3» 3
7 7
“MEMO” will go out when the changer
finishes processing your selection.
Repeat steps 1-4 until you
have completed all items.
To check what discs are in what groups:
1. Press MODE to select “GROUP".
2. Press the GROUP FILE button (A-F) you want and then press ■.
3. Press DISC SKIP/GROUP NAME (v or a).
Every time you press the button, the next disc number in order is
displayed.
A; Numbers progress in regular order,
v: Numbers progress in reverse order.
To cancel discs from groups:
1, Press DISC ENTER.
2, Press CANCEL on the remote control.
“CANCEL” appears on the display.
3, Press the GROUP FILE button (A-F) for the group you want to
cancel.
4, Press DISC SKIP/GROUP NAME (v or a ) to select the disc you
want to cancel.
“MEMO” lights,
5, Press DISC ENTER.
“MEMO" will go out when the changer cancels the disc from the
group.
aifiu
16
Press the GROUP FILE button
(A) for the group you want to
gdczdgdczkdczi
Mi Cv u-t* M-M «14» 11«
b
register.
Mi fisc 'm
Press DISC SKIP/GROUP
NAME (v or a) to select the
disc you want.
mrs
If you remove group-registered CDs from the rack, the changer
automatically cancels their entries from the group.
Lights up
Page 17

To start play
Clearing groups names and discs
The changer will play only CDs in the selected group.
Press MODE to select
“GROUP”.
Each time you press the button, “BLOCK"
and “GROUP” will appear alternately.
GP DU P
Hi due
Press the GROUP FILE button
(A-F) for the group you want
to start play.
Before actually starting play, the changer
will scroll disc numbers of the selected
CDQCpCpGDCB
”*'b" ’’
group from the smallest to the highest.
Play will begin from the disc with the
smallest number.
• If no discs have been registered,
“
----
>—" will appear on the display.
•Unnamed groups will be displayed as
“GROUP A, B, C” and so forth.
You can clear both the group name and all registered discs at the
same time.
Press NAME ENTER.
DISC SKIP/
GROUP NAME
Press DISC SKIP/GROUP
NAME (v or a) to select
“RESET”.
POP^
i
ROMANTIC
I
PARTY
i
NEW AGE
i
HIP HOP
i
FAVORITE
i
dance
iRESETN -BALLADS
--------
i
CLASSIC
T
JAZZ
T
OLDIES
t
ROCK
T
BLUES
t
-COUNTRY
Press NAME ENTER.
To cancel group play mode:
(In the stop mode)
Press MODE to select “BLOCK”.
QGDCDE)GDCZ3
lia au* ikH 4141 IU4
b
b
Press the GROUP FILE button
(A-F) of the group you want to
clear.
(The name of the group (A-F) will appear
on the display.]
m iPESET E~
“"G PGUP E
Press the same GROUP FILE
button again.
This will clear the group name and regis
tered discs.
17
Page 18

Usteningtoc^
Program play
by remote control only
Everyone has his/her favorite tracks. You can program the changer
to play them in a specific order. With this changer, you can make one
program and fill it with up to 24 selections from any of the discs in the
rack.
4
ciSOcii
ÓÓ(±)
While is flashing (approx. 10 seconds)
Select the disc(s) you want with the numeric buttons.
For example:
To select disc 2, press 2.
Specified disc number
This example shows how to program track 8 of disc 2.
CD
Press CD.
1
2
PROGRAM
(In the stop mode)
Press PROGRAM.
J J J ^ «y
Í
úP. D ISC
gSora
7 Fhn] NoO
Press DISC.
PP
HI SC
r f?“ 0 N o G
JJJ^ ^ ^
HI SC ¿
No
You can select slot No. 0.
“SINGLE" appears on the display.
Press the numeric button(s) to
cí5c!jKÍ3
cbcí:tcb
6
7
Selecting double-digit discs and tracks numbers:
First press >10. and then press the numbers for the two digits.
For example: number 20
Press yo, then 2, and than 0.
To cancel program play mode:
(In the stop mode)
Press PROGRAM.
The changer will return to the sequential play mode.
specify the track.
Program order
TÍ?'“G No
Specified track number
Repeat steps 3 to 5 until you have completed all entries.
Press ^/11 to start play.
Play will start and tracks will be played in
the programmed order. When all tracks
have been played, play will stop automat
ically.
MCU
D 'W
18
The programmed contents will remain stored in memory until they
are cleared, even after the program mode is canceled.
Therefore, after programming, it is possible to cancel the program
mode and use another play mode and then hear the same program
again at a later time.
In addition, if discs are changed, the program will be played using the
new discs. If non-existing entries are found at this time, the changer
will cancel them.
For your reference
The program will remain stored in memory for approximately 2 weeks
even after the system is switched oft.
Page 19

Direct programming
When “FULL” appears:
This indicates that an attempt has been made to program more than
24 tracks. No more than 24 tracks can be programmed.
To check programmed contents:
(In the stop mode)
Press or
The track and its place in the program will appear on the display.
Specified track number
1333 SIS
J f?” i
J. . Ijb
1 N 1
Program order
To add an entry:
(In the stop mode)
Repeat steps 3-5.
To clear a programmed track one by one:
1. (In the stop mode)
Press CANCEL.
“CANCEL" appears on the display.
2. Press DISC.
3. Select the disc you want to clear with the numeric buttons.
4. Press the numeric button(s) to specify the track.
(The track you specified will be canceled.)
5. Press CANCEL.
“CANCEL" goes out.
To clear all tracks:
Press ■ once in the stop mode or twice in the play mode.
“CLEAR” appears on the display for approximately 1 second.
•When you press MODE on the changer, the changer automatically
cancels the program mode.
• If you enter non-existing track(s), the corresponding indicator illumi
nates and the entry is included in the count. In the play mode, the
changer will cancel the non-existing entry.
•When including the slot No. 0 disc in the program, after program
ming, press ► on the changer or ►/!! on the remote control to
stary play.
by remote control only
You can add the track in play to your program.
In fact, a good way to build up your program is to listen to tracks and
add those you like while they are stilt being piayed. It sure makes
programming easier if you iisien-and-program.
rtnWH
DIRECT
PROGRAM
o
DIRECT
PROGRAM
ooL
(In the play mode)
Press DIRECT PROGRAM.
The current track will be added to the tail
end of the program.
Example Programmed order of the
newly added track
D 0
■ "Pf?0 5 r.fo
The display will return to the original indication after about 3 seconds.
When you make a program as explained under “Program play” on the
opposite page, and then perform the above procedure without clear
ing the program first, the selected track is added to the end of the
program.
To check programmed contents:
(In the stop mode)
1. Press PROGRAM.
2. Press or ►►/►►I.
•You cannot add to the program if already full, that is, if already
24 selections have been programmed. If you press DIRECT PRO
GRAM in such case, the message “FULL" will be displayed. There
fore, direct programming is possible only when 23 or less tracks
have been programmed.
• During program play, the DIRECT PROGRAM button does not
respond to touch.
19
Page 20

Listening to
Random play
One disc random play
The changer will play all tracks on the current disc in random order.
oooo
oooo
OOOOJ^
ooogJTI *
oooo
oooo
oooo
ooo
oooo
acD
3
4
V_J
1
GROUP NAME
Press DISC SKIP/GROUP
NAME (v or a) to select the
desired disc.
Multiple disc random play
Full random play
1
Press MODE
‘‘BLOCK”.
oooo
oooo
oooo
oooo
oooo
oooo
ooo
oooo
oo
w
ooo
to select
Press > and check play starts
y^^^TAand which disc is being
/ TUNm?MODE \ \ playCd.
Then, press ■ and stop play.
‘ Press 1-DISC.
sajiik TO& a«
Ü9!ï3 t r
fiiBiaS r Q
RANDOM
In the single disc play mode:
Only tracks from the disc in slot No. 0 are played, though played in
random order.
In the disc grouping play mode:
The changer randomly selects one disc from the group and plays the
tracks in random order.
Press RANDOM.
Play will begin.
The changer will stop automatically when
alt the tracks have been played once.
Tà3D
HOttXH
" H 8-
2
RANDOM
%
Program random play
The changer plays the programmed tracks in random order.
1
2
RANDOM
Press RANDOM.
Play will begin.
•Once the changer has played the maxi
mum 72 tracks, it stops automatically.
•The disc in slot No. 0 will not be played.
• If more than 25 tracks have been
played, the same track may be played
twice.
Program tracks you want to
listen to.
(Follow steps 1-6 on page 18.)
Press RANDOM.
Play will begin.
Your program can hold a maximum of
24 tracks. When all tracks have been
played, play will slop automatically.
To cancel random play mode:
Press RANDOM.
“RANDOM” goes out.
20
Page 21

Group random play
1-disc function
by remote control only
This function is convenient for ending play after the disc in play or the
specified disc for which play is about to start has finished.
1~01SC
cbcbOi
OQ’O'^
CxiiOcfi
Sq<5o
CS'tÍD
o
The changer randomly plays the tracks in the group in random order.
Press MODE to select “GROUP”.
Press the GROUP FILE button
2
------
- -OBOUPHLE .
-----
>». Then, press ■ and stop play.
(A-F) for the group you want
.
b
RANDOM
•Once the changer has played the maximum 72 tracks, it stops
automatically.
• If more than 25 tracks have been registered in the group, the same
track may be played twice.
Press RANDOM.
Play will begin.
(Before or during play)
Press 1-DISC.
3Su
Press the button again to cancel.
“I-DISC" goes out.
The changer reverts back to the stale it
was in before this function was turned
ON.
ic?0
■■
For your reference
The changer automatically cancels this function in the following
cases.
•When the system is switched to the standby mode or the power is
turned on.
•When SINGLE PLAY is pressed
Single disc ptay functions the same as 1 -disc play.
21
Page 22

Listening to compacldiscs
Repeat function
by remote control only
Play will continue endlessly in accordance with the specific play
mode selected.
OGSU
REPEAT
ooqQ
Oc!>Oo
n“ocbo
(Before or during play)
Press REPEAT.
REPEAT
o
Search function
You can search rapidly forward or backward on the disc for specific
sections.
V' TUNING/TIME ADJUST /s
(In the play or pause mode)
Press and hold or
lii /G
Piir wc youw*
£? e ) S'
Press the button again to cancel.
“ ” goes out.
In the sequential play mode:
All tracks of all discs will be played repeatedly.
In the single disc play mode:
The changer will repeatedly play the disc in slot No. 0.
In the one disc random play mode:
The changer will play all the tracks on the current disc in random
order. When finished one round, it wiii start another and play contin
uously, The sequence differs each time.
In the full random play mode:
Once the changer has played the maximum 72 tracks, it will select a
new random sequence and will continue playing.
In the group random play mode:
The changer will play all tracks in the group in random order. When
finished one round, it will start another and continue endlessly in this
manner.
In the program play mode:
The changer plays only the programmed selections in the pro
grammed sequence repeatedly.
►►/►W: You can search forward.
You can search backward.
Release the button when you reach the
desired point.
The changer will return to the previous
mode (play or pause).
In the program/random play mode:
You can search forward or backward only within the current track.
In other play modes;
You can search forward and backward within the current disc.
For your reference
The search function will begin slowly, and then, if the button is held
down for longer than 3 seconds, it will change to high-speed search.
To repeat the same track over and over:/
To repeat programmed tracks;
1. Select the desired track using the program play procedure on
page 18.
2. Press REPEAT to display “ "•
3. Press ►'/II.
22
Page 23

Skip functions
To skip discs
Use this function to skip discs when selecting a disc which you wish
to iisten to.
DISC SKIP/
GROUP NAME
For your reference
If you press DISC SKIP/GROUP NAME (v or a) intermittently, the
slot Nos. change slowly. If you hold the buttons down, the changer
fast skips through numbers.
Press DISC SKIP/GROUP NAME (v or a) until you reach the desired disc.
A: Skips forward to next disc,
v: Skips backwards to the preceding
disc.
The changer skips over empty slots.
When you select a disc and press ►, the
changer will skip to the selected disc and
will start play there.
This function is not available during one
disc random or program play.
To skip tracks
Use this function to skip tracks when selecting a track which you wish
to listen to.
V TUKIHGffIME ADJUST
v**!-*-*
In the sequential/single dlsc/disc grouping/program play mode:
You can skip only within the current disc.
In the program play mode, you can skip from one track to another in
the programmed sequence.
You can skip to the beginning of the track being played. If
you press this button again quickly, you can skip to the
beginning of the previous track.
Remember that in a backward skip, the current track is
included in the count.
►►/►►i: You can skip as many tracks as the number of times you
press the button.
In the random play mode:
You can skip to the beginning of the current track,
►►/►►i: You can skip to the beginning of a next track in the
random order the changer has selected.
Press either or
►►/►►I until you reach the
desired track.
\«/^: You can skip backward.
You can skip forward.
When you select a track and press
the changer will skip to the selected track
and will start play there.
You can also skip tracks when the changer is in the stop mode
(except during random play) or pause mode.
23
Page 24

Listening to tapes
Lz^Jl
^OPEN
REV MODE
Press TAPE.
The power will come on automatically,
even if the stereo is on standby.
TFIPE
SO.
Press A OPEN, and then in
sert the tape.
Insert the tape with the exposed tape fac
ing down.
Close the holder.
Front side
Press REV MODE to select the reverse mode.
Each time you press REV MODE, one of
the indicators will light up.
The deck plays one side only, and
then stops automatically.
The deck plays both sides, and
then stops automatically.
The deck plays both sides 8 times,
and then stops automatically.
VOLUME
To stop tape playback:
For your reference
The tape will automatically stop when a different source mode is
selected during its operation.
Type of tape which can be played correctly:
The system automatically identifies the type of tape.
NORMAL POSmON/TYPE 1
HIGH POSmONn'YPE II
METAL POSmONm'PE IV
Playing may not turn out as you want it to when using HIGH position
and METAL position tapes.
Turn VOLUME to adjust the volume as you like.
ii
7RPE’“ ,
t' GL - y
Press
o
X
X
24
4
b
Press or ^ to start play
back.
►; The forward side (front side) will play.
◄ ; The reverse side will play.
r Ft PE
P L R y -■ H S.
To fast-forward or rewind the tape
Press or
If the forward side (►) of the tape is selected;
►►/►w: The tape will be fast forwarded.
The tape will be rewound.
If the reverse side (◄) of the tape is selected;
The reverse operation will take place.
Page 25

for playback only
Convenient
Selecting sound quality and field
Base your selection on the type of music and how you want to listen
to it.
EQ SPACE
Each time the button is pressed, the indication will change as follows.
DISCO~> LI VE^ H ALL-> HE AVY
FLAT^SOFT^CLEAR^
DISCO: Use to reproduce a long reverberating sound like that
heard in discotheques.
LIVE: Use primarily for vocal pieces to add gloss to the vocals.
HALL: Use to impart a deep bass and spread which will make you
feel as if you were in a large concert hall,
HEAVY: Use to add “punch" to rock and other music.
CLEAR: Use to clarify the treble range of jazz, etc.
SOFT: Use to listen to background music, etc.
To cancel the mode:
Press to select "FLAT”.
Press EQ SPACE to select the desired mode.
T££E
t
Adding bass
Easy play
When you load a CD or cassette in advance, you can start play
directly from standby by pressing the appropriate selector button.
Listening to tapes
Press TAPE.
The reverse mode stores the previously
selected mode in memory.
Listening to compact discs
Press CD.
• Play will begin from the disc that you
last heard.
• When the tracks has been pro
grammed, the play will start in the pro
grammed sequence.
Listening to radio broadcasts
BAND
%
Listening to external units
AUX
Press TUNER BAND.
You can receive the station last tuned in.
Press AUX.
The stereo will turn on and the unit con
nected to the "AUX” terminals will be se
lected as the input source.
-V.8ASS
-DEMO
Press -V. BASS/-DEMO.
TRpfr
P L R y " ^rO-
Press the button again to cancel.
“V. BASS" goes out.
For your reference
You can not record with the sound quality or field. The sound quality
and field are effective only to the pla^ack sound.
25
Page 26

WHveriientfmctìù
Your attention is drawn to the fact that recording pre-recorded
tapes or discs or other published or broadcast materia! may
infringe copyright laws.
Type of tape which can be recorded
correctly
The unit automatically identifies the type of tape.
To mute the volume
bv remotG control only
This feature is convenient when you have a telephone call, etc.
MUTING Pt6ss MUTING-
M JRPe"" _
Vi UT I NGS ““
Press the button again to cancel.
“MUTING” goes out.
Muting can also be canceled by lowering
the volume alt the way (— dB).
When the system is turned off, the muting
operation will be automatically canceled.
Demo function
NORMAL POSITION/TYPE I
HIGH POSITION/TYPE II
METAL POSITION/TYPE IV X
Recording may not turn out as you want it to when using HIGH
position and METAL position tapes.
O
X
How to advance the leader tape
Wind the leader tape forward so that recording can start as soon as
you press the button. But, this is not necessary if edit-recording from
CDs.
The leader tape is the first few revolutions that you cannot record on.
Magnetic section
(on which sound can be recorded)
Leader tape
(on which sound cannot be recorded)
Concerning the volume level while
recording
The deck automatically sets the recording level. If you change the
volume level while recording, it does not affect the recording volume
level.
This stereo comes with a “demo” function. The default setting is for
the demo function to be ON.
Switching the demo function on or off:
Press and hold -V.BASS/-DEMO for
-V.BAS8 about 2 seconds or more.
-DEMO
& c? 5
HE MO OFF
When the demo function is set to on:
•When the power is ON;
When the input source is set to “CD" or “TAPE", the demo function
wiil run automatically after about 2 minutes or more pass in the stop
mode.
You can turn the demo function OFF any time by pressing ► or ■.
•When the system is in the power standby mode:
When you do not set the time, the demo function runs automa
tically.
26
Concerning the sound quality and field
while recording
While recording, none of the changes you make to sound quality or
field will affect recording.
While recording, “FLAT' is temporarily selected no matter what
sound quality and field settings you selected. When finished record
ing, the stereo will revert back to your settings.
I'ggna
You cannot open the cassette holder while recording.
To erase a recorded sound
1. Press TAPE,
2. Insert the recorded tape into deck.
3. Press REV MODE to select reverse mode,
4. Press REC START/STOP.
Page 27

Recording from ràdio
Press TUNING MODE to select
“PRESET”.
Fit-aj5D
:p f? E 5 E T
You can also select the desired broad
cast station by tuning manually.
(See page 11.)
'✓ TUHiNfi/riME ADJUST/\ Prcss V or A to sclect thc pre-
set channel.
Advance the leader tape a few revolutions.
1
2
3
4
^OPEN
REV MODE
Press ^ OPEN, and then in
sert the tape.
Close the holder.
Press REV MODE to select the
reverse mode.
One Side will record, and then the
tape will stop automatically at the
tape end.
Both sides will record (forward
side~>reverse side), and then the
tape wiii stop automatically at the
tape end.
cZ-y. Same as above. (When you press
REC START/STOP, “CZ^" will be
automaticaiiy switched over to
“^y.)
Press TAPE.
Press ◄ or ►, immediately fol
lowed by ■.
This selects which direction the tape runs
Jjjj
»iw nn>
rSPE
► : Recording from forward side
■4: Recording onto reverse side
■■ R S-
Press REC START/STOP to
start recording.
ffl
E N SB. t Oa.""”
9EC - ^re.
startTi
SEC
G
8
To stop recording:
Press REC START/STOP again.
Recording can also be stopped by pressing ■.
To cut an unnecessary part while recording:
1. Press REC START/STOP when hearing a unnecessary part.
The cassette deck will go into the stop mode,
2, Press REC START/STOP when wanting resume recording again.
Recording will continue in the same direction as before.
To reduce the noise while MW/LW (AM)
recording (Beat prooffunction )
Press FM MODE/BP while re
cording.
Each time you press the button, BP 1, BP 2 and BP 3 will be
displayed alternately. (For Australia and New Zealand: BP 1 and
BP 2 will be displayed alternately and “AM" display appears instead
of “MW” and “LW’.)
Select the position where there is less noise.
1- 1 W
WO-
BAND
(jrUNEl
Press TUNER BAND to select
“FM”, “MW” or “LW”.
For Australia and New Zealand
Note that for Australia and New Zea
land, there are two bands of “FM” and
“AM” instead of “FM", “MW” and
“LW”.
27
Page 28

There are 2 ways to record from compact discs, normal recording
and one-touch editing.
Normal recording
•Tracks are recorded in the order in which they are found on the CD.
•Tracks are cut in the middle when the end of the tape is reached.
•You can record from any point on the tape.
When recording from one CD;
Breaks
Side A II Track1
Side B
Remaining part of track 5
iil'
O
One-touch editing
•Tracks are recorded in the order in which they are found on the CD.
•Tracks are cut in the middle when the end of the tape is reached,
but recording is resumed on side B.
• Recording always starts from the beginning of the tape. (Tapes are
automatically rewound.)
When recording from one CD:
Breaks
Side A 11 Track 1
Side B
I
Recording resumes here.
HI
IDl
)
When recording from more than one CD: When recording from more than one CD:
CDO
j Tracki
Side B
For your reference
•You can specify the tracks to be recorded in the desired sequence
using the program play procedure.
•The recorded tape should be long enough to record the desired
tracks.
. II - ■ -
^— CD
CDO
2
Tracki
3
2
■CD(
4
Tracki
5
D
Side ACDTracki
------
2
Tracki
CD
5
D
Side B 1:2^ Tracki
^— CD ^^ ^
The link function automatically turns on between CDs to keep on
recording.
28
Page 29

Normal recording
1
2
A.OPEH
REV MODE
3
5
Press Sl open, and then in
sert the tape.
Close the holder.
Press REV MODE to select the
reverse mode.
One side will record, and then the
tape will stop automatically at the
tape end,
-^y. Both sides will record {forward
side—>reverse side), and then the
tape will stop automatically at the
tape end.
Same as above. (When you press
REC START/STOP. will be
automatically switched over to
DISC SKlPf
GROUP NAME
REC
STAHTj
To stop recording:
To stop recording after a 4 second silent interval:
Press ■.
To stop recording without a silent interval:
Press REC START/STOP.
The CD will stop automatically too.
To record programmed tracks:
® Perform steps 1-5, and then press PROGRAM on the remote
control.
@ Press DISC on the remote control.
® Select the disc from the remote control with the numeric buttons.
@ Select the track number from the remote control with the numeric
buttons.
(D Repeat steps @-(g) until programming all tracks (max. 24 tracks).
(6) Press REC START/STOP to start recording.
Press DISC SKIP/GROUP
NAME (v or a) to select the
disc you want to record.
Press REC START/STOP to
start recording.
00 i
” B«
8:
3
4
f / • V
%
Press TAPE.
Press ^ or immediately fol
lowed by ■.
This selects which direction the tape runs
in.
rnPC
- a..
► ’. Recording from forward side
◄ ; Recording onto reverse side
Press CD.
SELGCT ^
HI EC - H B..
29
Page 30

Recording frottiWr^
One-touch editing
> You don’t have to advance the leader tape,
of the reverse mode will be automatically selected.
One-touch editing operation:
1. The cassette deck section will rewind the tape, and then advance
the tape beyond the leader tape while making the non-recorded
passage of about 10 seconds.
2. The recording on side A starts.
3. If the last track on side A has not yet finished recording, that track
will automatically be recorded again from the beginning of side B.
4. Depending on the length of the tape, the last track on side B may
be cut off in the middle.
When one-touch editing finishes:
«The disc and track Nos. last recorded will remain on the display.
• If there is another CD to record, '‘LINK" will flash on the display and
the stereo will automatically start recording the next CD.
• If there isn’t another CD to record, “LINK" will stilt flash on the
display, but the stereo will go on standby. To continue recording,
select a disc and press ►.
To quit linking, press B.
1
2
GROUP N/\ME
/ ■ \
/ TUNWQMQQg \
AOPBH
^
Disc SKIP/
CD EDIT
b
Press ^ OPEN, and then in
sert the tape.
Close the holder.
Press CD,
Press DISC SKIP/GROUP
NAME (v or a) to select the
disc you want to record.
Press > and check play starts
and which disc is being re
corded.
After checking, press ■ and stop play.
Press CD EDIT to start re
cording.
The deck starts rewinding the tape.
To record programmed tracks:
(i) Perform steps 1-2 on the left of this page, and then press
PROGRAM on the remote control.
(g) Press DISC on the remote control.
<2) Select the disc from the remote control with the numeric buttons.
(4) Select the track number from the remote control with the numeric
buttons.
(D Repeat steps until programming all tracks (max. 24 tracks),
(D Perform steps 4-5 on the left of this page.
To stop editing:
Press B.
The CD changer also stops.
30
It takes a little while after the button is
pressed for the recording to actually start.
Page 31

Using the play timer
•Make sure that you have completed “Setting the time” on page 9.
• Select this timer when you want to use the timer as an alarm clock.
You can wake up with listening to music (CD, tuner, tape or aux) at
a desired volume level and time.
I Preparation [ Switch on the power.
The following example in the figure shows how to set the play timer
for playing a CD at -40 dB from 6:30 a.m. to 7:40 a.m.
CLOCK/
TtMEO
0 Press CLOCK/TIMER three
times to show “© PLAY”.
OOG
Within 7 seconds:
® Press MEWlORY/SET.
e p L n y
‘ON” time setting
□
0 Press V or A to select the
N/ 7UNING/TIME ADJUST /s stsrttnQ hour.
D
0 P L R y
Press MEMORY/SET.
I ftG 0^
! GPL Ry !
vTUNlNG/TIHE ADJUST^
0 Press V or A to select the
ispuT
\
@ Press MEMORY/SET.
“OFF” time setting
TUKiuemME adjust ^ ending hour.
5?
v/TUNING/TIME ADJUST^
0 Press V or A to select the
0 Press MEMORY/SET.
114
tiEUDnv/i;
! 0 P L R y
starting minutes.
6^r
0 P L R y
-55 0
0 P L R y
0 Press V or A to select the
0 PL R y
Press MEMORY/SET.
0 P L R y
ending minutes.
BP i FT lI
0
(Continued on next page)
3J
Page 32

Using the play timer
4
0REC/
®PUY
Select the desired source and
then prepare the stereo for
play.
When you play CD(s):
Press CD and insert CD(s).
Stop the CD(s) after playing.
When you play a tape:
Press TAPE and insert a tape.
Stop the tape deck after you select the
direction of the tape.
When you play the radio:
Press TUNER BAND and tune in the de
sired station.
When you play a unit connected to the
“AUX" terminals:
Press AUX.
Set the playback volume.
Press © REC/0 PLAY.
Your selections and setting will be stored
in the timer’s memory,
To check settings (only while power is ON);
Press CLOCK/TIMER 3 times and check "© PLAY" is displayed.
Two seconds later, the display will change in the following order.
© Play start time
(2) Play over time
@ Play source and playback volume
To change settings (only while power is ON);
© Press © REC/® PLAY and check “© PLAY" goes out.
© Reprogram from step 1.
Using the timer at the same time setting continu
ously;
(You can accomplish this even if your stereo is on standby.)
Press © REC/© PLAY and check “® PLAY" is displayed.
As long as “® PLAY" is displayed, the timer will work every morning
at the same time.
To enjoy the desired source after the timer setting
is completed:
1. After finishing step 6, start playing the desired source.
Even if you change the volume level or music source, the timer
play will start with the preset condition.
^503
When you set the CD changer for timer playback, playback will
start with the last disc played and in the last playback mode used.
2. Press POWER to standby mode after enjoying the play, and
confirm CD(s) or a tape has (have) been inserted.
Confirm "© PLAY" lights on the display.
Press POWER to put your ste
POWER
STAHDBV
reo on standby.
The timer play will start at the preset time
with volume increasing gradually up to
the volume level you preset.
To switch the timer OFF:
Press © REG/® PLAY and check “0 PLAY" goes out.
The settings made with the preceding procedure will however be kept
in memory.
• If the power is on, the timer will not function. The system must be in
the standby mode.
•The ON time and OFF time cannot be the same setting.
• If you switch the power to the standby mode while the play timer is
functioning, the OFF time setting will not be activated.
• Play timer cannot be used in combination with the record timer.
•The lowest possible volume with the timer is -60 dB. If you set it
lower than this, it will automatically be played back at -60 dB just
the same.
For your reference
External sources must be connected to the “AUX” terminal. However,
time settings apply only to this stereo. For more information, see the
instruction manual of the connected unit.
32
Page 33

Using the mcoMt^
• Make sure that you have completed “Setting the time” on page 9.
• Select this timer when you want to use the timer to record a
midnight program or while you are out.
1
7
2-3
I Prej3^tiorn Switch on the power.
The following example in the figure shows how to set the record timer
for recording FM broadcasts from 18:30 (6:30p.m.) to 20:00
(8;00p.m.).
CLOCK/
TIMER
^ “ON” time setting
N/ TUNING/TIME ADJUST /s starting hour.
©Press CLOCIVTIMER two
times to show “© REC”.
0--D0
Within 7 seconds:
©Press MEMORY/SET.
-'O-Jj 0
QPBC
© Press V or A to select the
-j ej3 0
SPEC
Press MEMORY/SET.
V TUKING/TIME ADJUST ^
^ I “OFF” time setting
vTUNIHG/riME ADJUST^
9
vTUNIHG/TIME ADJUST^
►►/►►I
9
I Press V or A to select the
starting minutes.
/ Gj
SPEC
©Press MEMORY/SET.
it G>3 0
SPEE
© Press V or A to select the
ending hour.
C>3 0
SPEC
© Press MEMORY/SET.
SPEC
©Press V or A to select the
ending minutes.
SPEC
! iiO Di-
PEC
© Press MEMORY/SET.
EGOS
SPEC
(Continued on next page)
33
Page 34

Using the record timer
Prepare for recording.
1. Insert a tape into the deck with the
forward side facing you.
2. Select the reverse mode.
3. Select which direction the tape runs
in.
4. Press EQ SPACE to select “FLAT’.
Select the desired source.
When you record from the radio;
Press TUNER BAND to select a band
and tune in the desired station.
When you record from a unit con
nected to the “AUX” terminais:
Press AUX.
©REC/
©PLAY
POWER
STANDBY
Press © REC/® PLAY.
Your selections and setting will be stored
in the timer’s memory.
Please confirm “© REC lights on the
display.
Press POWER to put your ste>
reo on standby.
Recording will start 30 seconds before
the set time.
Sound is automatically muted while the
record timer is working.
To check settings (only while power is ON):
Press CLOCK/TIMER 2 times and check “© REC" is displayed.
Two seconds later, the display will change in the following order,
© Recording start time
® Recording over time
(5) Recording source
To change settings (only while power is ON):
© Press ©REC/© PLAY and check “© REC" goes out.
© Reprogram from step 1.
Using the timer at the same time setting continu
ously;
(You can accomplish this even if your stereo is on standby.)
Press © REC/® PLAY and check “© REC” is displayed.
To enjoy the desired source after the timer setting is completed;
1, After finishing step 6, start playing the desired source.
Even if you change the music source, the timer recording will start
with the preset condition.
2. Press POWER to set the stereo on standby after enjoying play,
and confirm a tape is inserted in the deck.
•if the power is on, the timer will not function.
•The ON time and OFF time cannot be the same setting.
•If you switch the power to the standby mode white the record timer
is functioning, the OFF time setting will not be activated.
•Play timer cannot be used in combination with a record timer.
For your reference
•Set recording to start roughly two minutes ahead of time,
• External sources must be connected to the “AUX" terminal. How
ever, time settings apply only to this stereo. For more information,
see the instruction manual of the connected unit.
To switch the timer OFF:
Press ® REG/© PLAY and check “© REC” goes out.
The settings made with the preceding procedure wilt however be kept
in memory.
34
Page 35

timer
by remote control only
The stereo has a sleep timer so that you can fall asleep with the
music on and have the system stop by itself. When the set time
elapses, the stereo goes into the power standby mode. You have up
to 2 hours time available for listening and you can set the timer in
30 minute increments.
SLEEP
o
escbciis
6 OS'S
►11 jL 53? waw*
ooOq
■(fbc^n
The following exampie in the figure shows how to set the system to
standby mode after 30 minutes.
While enioying the desired source:
SLEEP
Press SLEEP to select the de
sired time.
0:30-» 1:00-»T.30-»2;00~»OFF
C
(The display changes each time the but
ton is pressed.) Time setting
------
Record timer and sleep timer:
To go to sleep listening to a compact disc, and then to make a timer
recording from a radio broadcast,
® Program the record timer.
Follow steps 1-6 on pages 33-34,
(5) Start CD playback.
(3) Set the sleep timer.
rrm
Be sure to set the sleep timer to off before the timer recording
begins.
Timer priority:
The sleep timer always has priority. Be sure not to overlap timer
settings.
For your reference
The play timer cannot be used in combination with the record timer.
Using an external
unit
,
Check “SLEEP” is displayed.
The system is turned off after the set time has elapsed.
To cancel the sleep timer:
Press SLEEP to select “OFF”.
To confirm the remaining time:
(only while power is ON)
Press SLEEP.
To change the time remaining during operation:
Press SLEEP to show the remaining time then press SLEEP to select
the desired time.
igBra
The sleep timer turns OFF automatically the moment you attempt to
edit-record a CD,
To use two timers together
The sleep timer can be used in conjunction with the play timer or
record timer.
Play timer and sleep timer:
To go to sleep listening to an FM broadcast, and wake up the next
morning listening to a compact disc,
® Program a CD for play timer.
Follow steps 1 -6 on pages 31 -32.
(2) Tune in the desired band and station, and adjust the volume.
See page 11.
@ Set the sleep timer.
The volume of the play timer does not change if the volume of the
sleep timer is changed.
Listening to an external source
(See page 7 for external unit connection)
1. Press AUX,
The power will come on automatically, even if the stereo is on
standby.
2. Start playback from the external source. (For details, refer to the
owner’s manual of the equipment.)
Recording from an external source
1. Follow steps 1 -4 on page 27.
2. Press AUX.
3. Press REG START/STOP (recording starts).
4. Start playback from the external source, (For details, refer to the
owner’s manual of the equipment.)
To stop recording;
1. Press REC START/STOP.
2. Stop the source.
Listening with headphones
rWBI
Connect the headphones to the headphones jack.
•Before connecting, reduce the volume.
•Avoid listening for prolonged periods of time to prevent hearing
damage.
35
Page 36

Reference pages are indicated in black circles.
Compmn pperation
Starting play directly from the power
standby condition
POWER SlEEPTUN^AAHD AUX
OQOO
Switching the system on and to the
power standby mode
(ЬсЬсЬСЗ
0 >10 «MttEl fHOfiRMi
оЛоо
CD ГМШ1Ш1
oooo
ooOo
^'4 ►► HfiPEAT
ooo
ttUTiNQ < m >•
oooo
VOLUME +
Selecting the input source
Adjusting the volume
ocz:»
SINGLE
TUMEB/BAND ►/!! ^/11 -4 ► AUX
0.0.0.00.0
POWER
o
TUNEB/BAND CD AUX
0.0,0
- VOLUME +
Ф
©
ФФФ
ФФФ
Tuner/tini er ope ration
POWER SLEEP TUkEfWXD AUX
OOOO
1 ft 8 a 3c mse
OOOO
(±)(±»(±)if3
0 »in CANta PROGRAM
cboon
►«' fiANBOM
OOOO
XIL» « ►► REPEAT
Q Q
MUTUJQ ^ m >
OOOO
VOLUME
___
+
CDC
Muting the volume temporarily
Listening to radio broadcasts
(Preset tuning)
Operating/releasing the sleep timer
^ cbibib
MUTING
o
SLEEP
Ф
Ф
oO
О
Ф
36
Page 37

Compact disc section
POWEB SLEEPTUttKMND AUX
QQOO
CidCiCi
C)CiC)°S
C)CiC>'G
0 >lj> CANCEL PROGRAM
CO •■*■ •/■ ** »■►>*1 pRocaiM
<±>c5oo
oooO
►>» _I_ jSl MNDOM
o oo o
<■4 PP REPEAT
TAPE
ooo
MUTtNG ^
oooo
VOLUME +
oa
Starting play
Temporarily stopping play
Listening to the disc in slot No. 0
Pausing the disc in slot No. 0
Stopping play
c3
(During playback)
o
SINGLE
>ni
o
(During playback)
SINGLE
►ni
o
■
o
Tap on the buttons repeatedly.
<E>
(D
<D
POWER SLEEP TUNER/QAHD AUX
oooo
C>C,C>C)
¿)(±>(±)Q
0 ¿10 CAHCiL PROGRAM
OCiQQ
CO PMUSM
oooO
a W n*MDDM
Q
0(±»0
ooCi
MUTWQ -4 ■
oooo
" VCH.UME +
GZ)CZ)
Skipping forwardAjackward
Searching forward/backward
Repeating play
Starting play from a particular track
o o
Press and hold during playback
o o
(Before or during playback)
REPEAT
o
0
1
(bCiCi ¿>c!Dci:>
c±»a
0
(D
Random play
RANDOM
o
0 0
37
Page 38
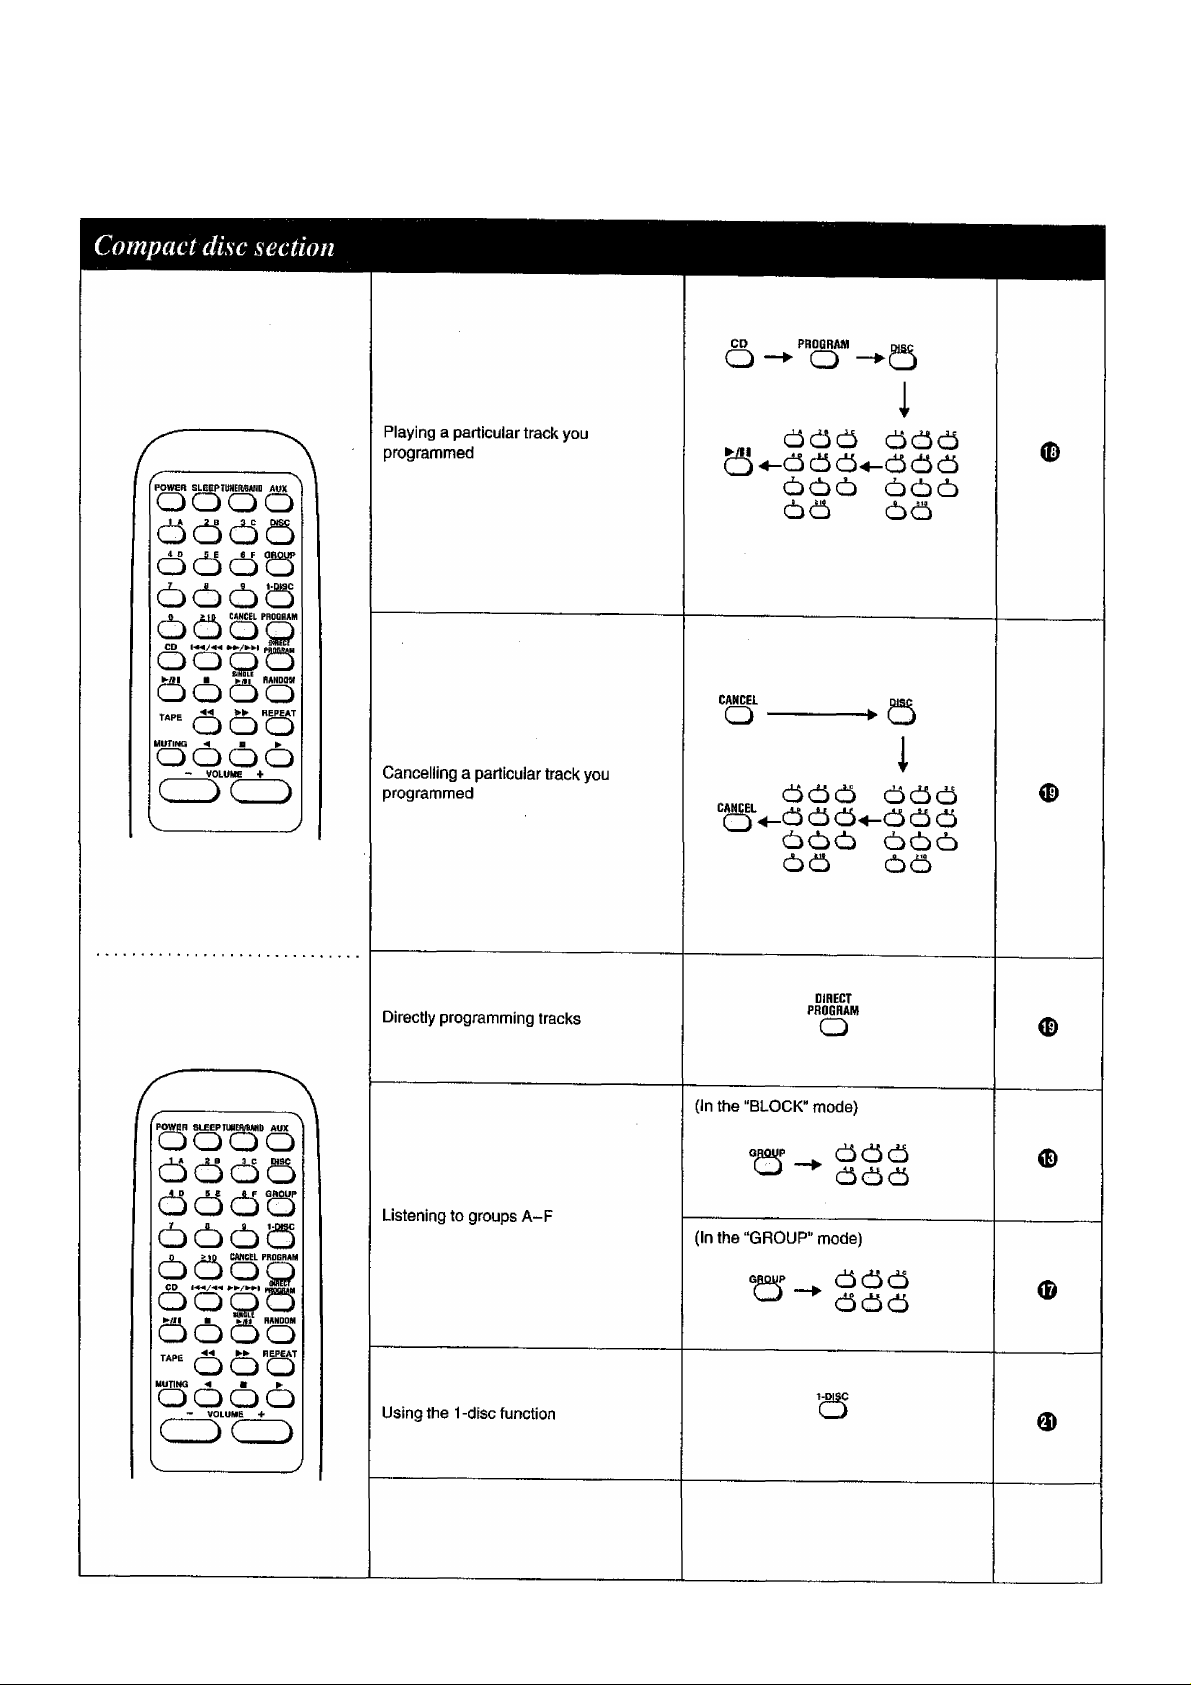
38
Page 39

mm
POWER SUEEPTUHEiimyuiD AUX
oooo
0 ¿10 MHCa PrtOQHMt
CiCiCx^
CP ‘‘***/-*^ pantimii
ooqC
TAPE REPEAl
MUTJNQ << ■ »■
CZ3CZ)
(±)cbcbG
oOo
CD O O
OOGDQ
- VOLUME +
Starting playback
Fast-forwarding or rewinding the tape
Stopping playback and recording
►
QO
►►
CD CD
m
o
©
©
0 0
39
Page 40

Concerning compact discs
With this changer, you can only play compact
discs having this mark.
ÉS®
DIGITAL AUDIO
Handling precautions
To open the compact disc case, gently press the sides of the top and
pull up.
To remove the disc from the case, press the center holder and lift the
disc, holding by the edges.
Concerning cassette tapes
Selection of cassette tapes
Cassette tapes exceeding 100 minutes:
These tapes are handy for their long playback and recording time but
be careful about repeatedly stopping and starting, rewinding and fast
forwarding these tapes in short intervals as they are thin, tend to
stretch and may become entangled in the deck mechanism.
Endless-tapes:
Failure to operate these tapes correctly may cause the tape to wind
around the revolving parts.
For this unit, it is recommended to use the tape which is appropriate
to the auto reverse mechanism.
Tape slack
To return the disc to the case, insert the disc with the label facing up
and press downward at the center.
Hold compact discs by the edges so as not to soil the surface with
fingerprints. Fingerprints, dirt and scratches can cause skipping and
distortion.
Do not use record cleaning sprays, benzine, thinner, static electricity
prevention liquids or any other solvent on a disc.
If the surface is soiled, wipe gently with a soft, damp (water only)
cloth.
Always move the cloth directly outward from the center of the disc,
not in a circular motion as with standard phonograph records.
If you are taking the disc from a cold to a warm environment,
moisture may form on the disc. Wipe this off with a soft, dry, tint-free
cloth before using the disc.
Tape slack may cause the tape to break.
Erasure prevention
Remove the tab(s).
To re-record on a protected cassette
Cover the slot with adhesive tape.
Do not write on the label side with a bail-point pen or other writing
instrument.
Storage precautions
Be sure to store discs in their cases to protect them from dust,
scratches, and warping.
Do not place or store discs in the following places;
1 ) Locations exposed to direct sunlight
2) Humid or dusty iocations
3) Locations directly exposed to a heat vent or heating appliance
4) in the glove compartment or on the rear deck of an automobile
40
Do not cover the detection holes on high position and metal position
tapes.
Tape storage
Tapes can be damaged if stored in places such as those described
below.
•Where the temperature is high (35“C or higher) or where the humid
ity is high (80% or higher)
•Where there is a strong magnetic field (near a speaker, on top of a
TV, etc.). Recording may become erased.
• In direct sunlight
* •
Page 41

Maintenance
Maintenance of external surfaces
To dean this unit, use a soft, dry cloth.
If the surfaces are extremely dirty, use a soft cloth dipped in a
soap-and-water solution or a weak detergent solution.
Wring the cloth well before wiping the system.
Wipe once again with a soft, dry cloth.
Never use alcohol, paint thinner, benzine, or chemically treated
cloths to clean this system. Such chemicals may damage the finish of
your system.
Tape head care
To assure sound quality for recording and playback, be sure to clean
the tape heads after approximately every 10 hours of use.
1. Press ^ OPEN to open the cassette holder.
2. Press POWER to put your stereo on standby.
3. Clean the heads, pinch roller and the capstan shaft with a cotton
swab (or with a soft, lint-free cloth) slightly moistened with isopro
pyl alcohol.
Do not use any solution other than alcohol for head cleaning.
41
Page 42
Troublèshoo0tg guidé
Before requesting service for this unit, check the chart below for a possible cause of the problem you are experiencing. Some simple checks or a
minor adjustment on your part may eliminate the problem and restore proper operation.
If you are in doubt about some of the check points, or if the remedies indicated in the chart do not solve the problem, refer to the directory of
Authorized Service Centers (enclosed with this unit) to locate a convenient senrtce center, or consult your dealer for instructions.
Problem
Probable cause(s)
Problems common to all systems
There no sound when the
power Is ON.
The location of the various
musical instruments is not
well defined.
The left and right sounds
are reversed.
When listening to the
external unit, the left and
right sounds are reversed.
Only one speaker is
emitting sound.
There is no sound when a
source is being played.
“ERROR” message appears
on the display.
Volume is set too low.
The (+) and {-) connections to one of the
speakers are reversed.
The left and right connections to the
speaker are reversed.
The left and right connections to the
external unit are reversed.
One of the wires of the speaker cord is
disconnected.
The (+) and (-) wire of the speaker cords
are shorted.
Wrong operation has been done. Operate the unit correctly by following the
While listening to FM broadcasts
There is a “rushing noise”
during a stereo broadcast
which is not audible during
a monaural broadcast.
You hear excessive noise
during a stereo broadcast,
and occasionally the sound
disappears.
The stereo indicator
flickers and does not light
completely.
The sound during a stereo
broadcast is highly
distorted.
The transmitting station is a long distance
away.
The installation location and orientation of
the antenna are unsuitable.
The transmitting station is a long distance
away.
The power of the TV set or VCR is ON.
There is a building or mountain nearby.
[Distortion is caused by interference
between the signal from the transmitting
station (direct wave) and the signal
reflected from the building or mountain
(reflected wave).]
Suggested remedy
Adjust the volume level with the volume
control.
Connect the speaker cord correctly.
Connect the speaker cords correctly.
Connect the external unit’s cord correctly.
Connect the speaker cord correctly.
Switch the system to the standby mode,
and reconnect the speaker cords so that
they are not shorted. Then switch on the
power.
operating instructions.
If you are using an indoor antenna, change
to an outdoor antenna.
Try switching off the TV set or VCR.
Use a high-grade outdoor antenna, and
install it in a good location, height, and
orientation for reception.
Reference
page(s)
11.13,24
6
6
7
6
6
7
7
42
While listening to MW/LW (AM) broadcasts
You hear an unusual beat
sound.
You hear a low-frequency
hum.
You are using the system at the same time
you are playing a TV set.
The antenna wire is near the power cord.
Switch off the TV set, or use the system
further away from it.
Separate the antenna wire from the power
cord.
Page 43

Problem
Probable cause(s)
When there is a television set nearby
The picture on the TV
disappears or stripes
appear on the screen.
The location and orientation of the antenna
are incorrect.
The wiling at the back of the system is
unsuitable.
Suggested remedy
If you are using an indoor antenna, change
to an outdoor antenna,
Separate the antenna wire of the TV set
from the system.
Reference
page(s)
7
While listening to ta
Sound is low, intermittent,
poor quality, noisy,
scratchy, or unsteady.
The deck does not enter the
recording mode.
pes
Heads are dirty.
The erase-prevention tabs are removed
from the cassette.
While listening to compact discs
The display does not show
the correct indication. Disc
play does not start when
you press the play button.
The error message “F61"
appears on the display and
the changer stops
operating.
The error message “TAKE
OUT” appears on the
display and the changer
stops operating.
The disc label is facing left. Set the disc with the label facing right.
The disc is dirty.
The disc is scratched.
The disc is badly warped.
The disc is a nonstandard one.
There is condensation inside the CD
changer.
The protection circuitry has functioned
because the positive and negative speaker
connection wires are “shorted".
A disc has been put in the slot of the disc in
play.
Clean the heads.
Attach tape to cover the space left by
removal of the erase-prevention tabs.
Wipe the disc with a soft cloth.
Replace the disc with a new one.
Replace the disc with a different one.
Switch the power ON, and then wait for
60 minutes before using the CD changer.
Turn off the system, and, after determining
and correcting the cause, switch ON the
power once again,
Remove the disc whose number is
displayed and close the rack panel.
41
40
12
40
40
/
/
/
y
y'
/
/
While using the remote control
The system cannot be
operated with the remote
control.
When a CD does not return to its slot (“TAKE OUT‘
flashes on the display):
Check whether another disc is in the slot or not. If not, hold down the
■ (stop) button for 4 seconds. The changer will then eject the disc. If
this proves to be ineffective, contact the place of purchase.
The batteries are installed in the reverse
polarity.
The batteries are run-down.
Re-insert the batteries in the correct
polarity.
Replace the batteries with new batteries.
5
5
43
Page 44

AMPUFIER SECTION
1 kHz continuous power output, both
channels driven
DIN 2X20 W {THD 1 %, 6Q)
RMS 2X25 W (THD 10%, 6Q)
Total harmonic distortion
Half power at 1 kHz 0.07% (6Q)
Frequency response
AUX 60 Hz^20 kHz (-3 dB)
Input sensitivity and impedance
AUX 250 mV, 22 kQ
Tone controls
6-EQ SPACE modes
V.BASS (volume at -30 dB) 63 Hz, 7 dB
Load impedance 6Q
HEAVY, CLEAR, SOFT,
DISCO, LIVE, HALL
FM TUNER SECTION
Freq uency range 87,5-108 MHz
Sensitivity 23.3 dBf (4.0 pV, IHF ’58)
Total harmonic distortion
MONO 0.3%
STEREO 0.5%
S/N
MONO 60 dB (66 dB, IHF)
Antenna terminai(s) 750 (unbalanced)
AM TUNER SECTION
Frequency range
(For United Kingdom)
MW
LW
(For Others)
AM
Sensitivity (for 500 mW)
(For United Kingdom)
MW (at 999 kHz)
LW (at 252 kHz)
(For others)
AM (at 999 kHz)
522-1611 kHz
144-288 kHz
522-1611 kHz
250 tiV/m
500 nV/m
250 MV/m
CD SECTION
Sampling frequency 44.1 kHz
Decoding 16 bit linear
Beam source/wave length
Semiconductor laser/780 nm
Number of channels
Frequency response
S/N
SP OUT
Wow and flutter
Digital filter
D/A converter
Below measurable limit
MASH (1 bit DAC)
Stereo
20 Hz-20 kHz
(+1 dB, -2dB)
85 dB (JIS.A)
8fs
SPEAKER SECTION
Type
Speaker(s)
Woofer
Tweeter
Impedance
Input power
(For United Kingdom)
(For others)
Output sound pressure level
Cross over frequency 8 kHz
Frequency range
Dimensions (WXHXD)
Weight 2 9 kg
2 way 1 speaker, bass-ref
12 cm cone type
6 cm cone type
6Q
40 W (music)
20 W (DIN)
80 W (music)
40 W (DiN)
85 dBAW(1.0 m)
47 Hz-22 kHz (-16dB)
54 Hz-20 kHz (-lOdB)
200x345x207 mm
GENERAL
Power supply AC 50 Hz, 230-240 V
Power consumption 100 W
Dimensions (WxHxD)
270X347X424 mm
Weight 9.7 kg
Notes:
1. Specifications are subject to change
without notice.
Weight and dimensions are approximate.
2. Total harmonic distortion is measured
by the digital spectrum analyzer.
MASH is a trademark of NTT.
CASSETTE DECK SECTION
Track system 4 tracks, 2 channels
Heads
Record/ptayback Solid pemrialloy head
(Rotary head)
Erasure Double gap ferrite head
Motor DC servo motor
Recording system AC bias 100 kHz
Erasing system AC erase 100 kHz
Tape speed 4.8 cm/s
Frequency response
[(+3 dB, —6 dB) at deck out]
NORMAL 35 HZ-14 kHz
S/N 50 dB (A weighted)
Wow and flutter 0.18% (WRMS)
Fast forward and rewind times
Approx. 120 seconds
with C-60 cassette tape
Matsushita Electric Industrial Co., Ltd.
Central P.O. Box 288, Osaka 530-91, Japan
Printed in Singapore
RQT3449-B
F0396U0 (D)
 Loading...