

Page 1
Operating
Instructions
N o s e / E a r H a i r T r i m m e r
E R 1 1 2
Matsushita Electric Works,(Thailand) Ltd.
Pathumthani 12120, Thailand
No. 2 EN. OR. FR. NE. TT. SR. <R«1j
Panasonic
Please read these instructions completely before use.
Printed in Thailartd
Page 2
INDEX
ENGLISH
DEUTSCH
FRANÇAIS
NEDERLANDS
m
Page 3
Seite 5
Page 7
Pagina 9
ITALIANO
ESPAÑOL
Pagina 11
Página 13
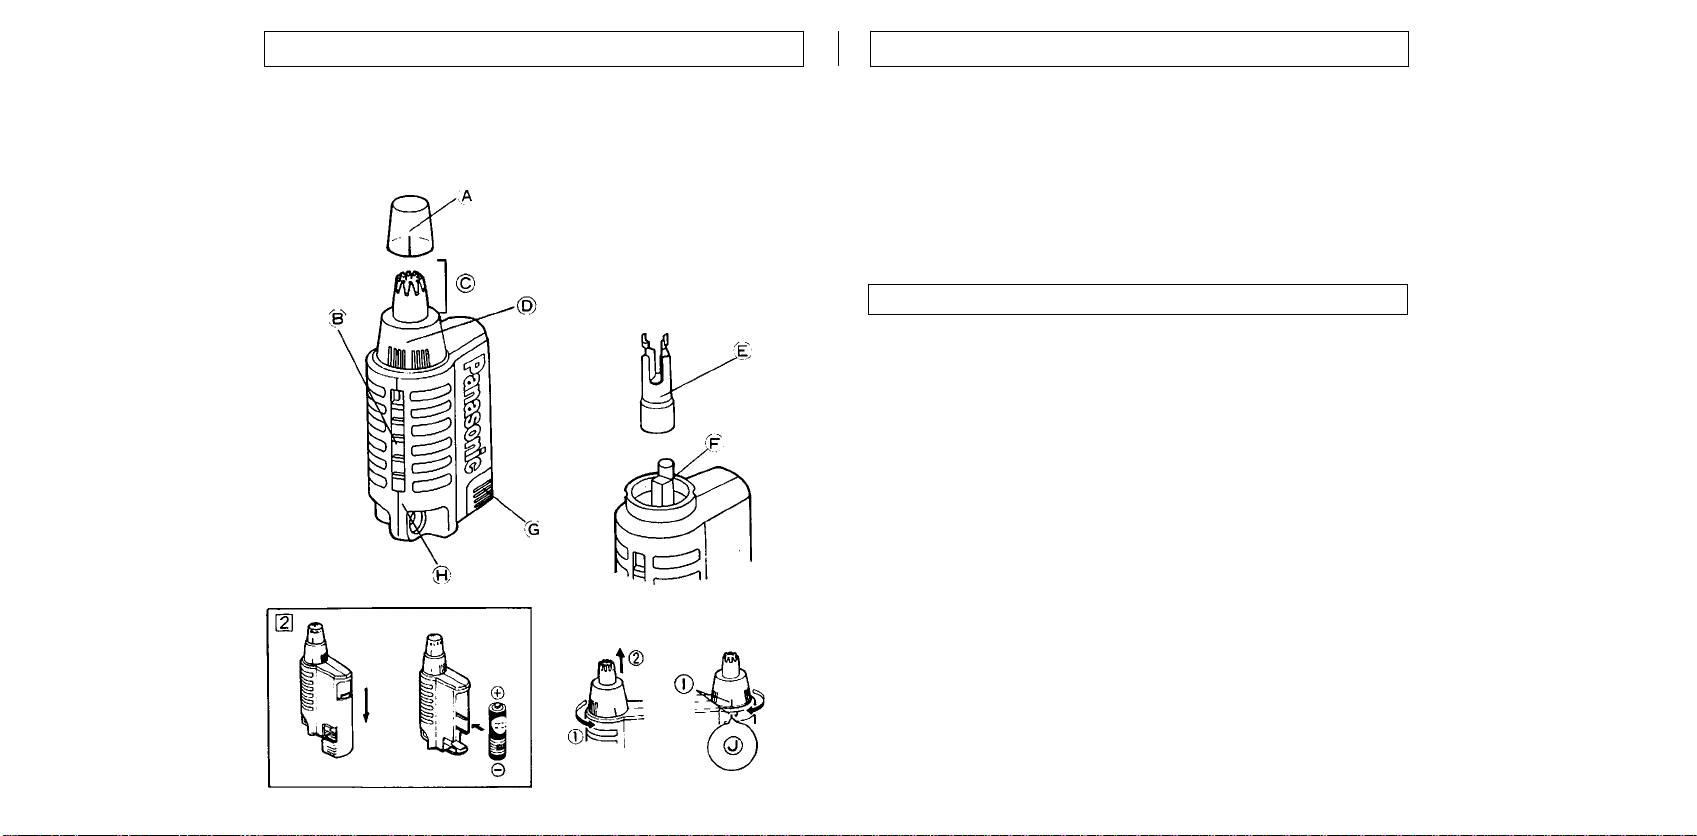
Parts identification (Fig 1)
® Cap
(B) Switch (On/Off)
@ Outer Blade 0 Trimmer Body
(§) Outer Blade Frame
Inner Blade
0 Joint
0 Battery Cover
(T) Align Marks
(0 Align The Alignment Marks
Specifications
Power supply:
1.5V DC (one "AA", UM-3 size battery, not included)
How to replace the battery (Fig.2)
1. As shown in the figure, remove the battery cover and insert the battery, and
attach the battery cover to the main unit.
Instructions for use
1. Turn on the switch and carefully insert the tip of the outer blade into your nostril
to cut the nose hairs.
2. Some cut nose hairs may remain inside the nostril after cutting; these can be re
moved by blowing your nose.
Page 3

Cleaning the trimmer (Fig.3)
Bezeichnungen der Teile (Abb.1)
• Be sure that the switch is turned off before removing, mounting, or cleaning the
blades.
1. As shown in the figure, remove the outer biade frame by turning and raising it up
ward. Detach the inner blade from the outer blade. Wipe the blades with a tissue
to remove any cut hairs, dust, etc.
The inner biade and the outer blade can be washed in water after they have been
removed from the trimmer body, but be sure to wipe off any excess water and
aliow the biades to dry completeiy before mounting them back onto the trimmer
body. (* The trimmer body cannot be washed in water.)
2. Mount the inner biade back onto the outer blade.
3. Replace the outer blade back on to the body by pushing down gently and twisting
ciockwise.
Caution
1. Do not insert the device further into your nostril than the narrow tip of the outer
blade. Also, do not press the trimmer forcefully into your nostril.
2. Do not attempt to use the device if the outer blade frame or blades are deformed
or damaged, doing so could cause injury to your nostrii.
3. This trimmer is designed oniy for cutting nose or ear hairs; do not attempt to use
it for any other purpose.
4. The blades have been precision manufactured; do not subject them to excessive
force, impact, etc.
5. The trimmer body cannot be washed in water.
6. Be sure that the switch is turned off before attempting to clean the blades.
7. The blades do not require replacement.
If used once a week for approximately one minute at a time, the life of the blades
is approximateiy two years.
© Verbindung
@ Schalter (An/Aus)
© Scherblatt
@ Scherblatthalter
© Innere Klinge
© Batteriefachdeckei
(H) Nasenhaar Schneider
(J) Ausrichtmarkierungen
Die Ausrichmarkierungen in Übereinstimmung
^ bringen.
Technische Daten
Spannungsversorgung: 1,5 V Gleichstrom (eine Batterie der Größe UM-3, AA, R6)
Auswechseln Der Batterie (Abb.2)
1. Wie in der Abbildung gezeigt, den Batteriefachdeckel abnehmen und die Batterie
einsetzen, dann den Batteriefachdeckel wieder anbringen.
Bedienungsauleitung
1. Den Schalter einschalten und die Spitze des Scherblatts vorsichtig in das Nasen-
■ t loch einführen, um die Nasenhaare zu schnieden. Nur die Nasenhaare
schneiden, die aus dem Nasenloch hervorstehen.
I
2. Nach dem Schneiden ist es möglich, daß einige abgeschnittene Nasenhaare im
i Nasenioch verbleiben. Diese können durch Schneuzen der Nase entfernt werden.
Reinigung und Pflege der Mascheine (Abb.3)
Das Gerät muß vor Entnehmen, Einsetzen und Reinigung des Scherblatts und der
inneren Klinge unbedingt ausgeschaltet sein.
Page 4

1. Wie in der Abbildung gezeigt, den Scherblatthalter durch Drehen und Hochziehen
entfernen.
Die innere Klinge vom Scherblatt abnehmen. Die Teile mit einem Tuch abwis
chen, um abgeschnittene Haare, Staub, usw. zu entfermen. Die innere Klinge und
das Scherblatt können unter Wasser gereinigt werden, nachdem sie vom Gerät
abgenommen wurden Anschließend müssen Wassertropfen abgewischt und die
Teile vollständig getrocknet werden, bevor sie wieder an das Gerät angebracht
werden. (‘Der Nasenhaar-Schneider selbst darf nicht mit Wasser gereinigt
werden.)
2. Die innere Klinge wieder in das Scherblatt einsetzen.
3. Die innere Klinge mit der Verbindung am Gerät ausrichten und die Ausrichtmarkierung am Scherblatthalter und am Gerät in Übereinstimmung bringen . Dann
den Scherblatthalter auf das Gerät drücken, bis es hörbar einrastet.
Nomenclature (Fig.l)
(Â) Capuchon
(B) Interrupteur (Marche/Arrêt)
(£) Lame extérieure
(p) Porte-lame extérieure
Lame intérieure
Caractéristiques
(0 Accouplement
(g) Couvercle du logement de la pile
(Q) Corps
(T) Repères
(2) Alignez les repères
Vorsicht
1. Der Nasenhaar-Schneider darf nicht weiter als bis zur schmaleh Spitze des
Scherblatts in das Nasenloch eingeführt werden. Der Nasenhaar Schneider darf
nicht mit Kraft in das Nasenloch gedrückt werden.
2. Der Nasenhaar-Schneider darf nicht venvendet werden, wenn der Scherblatthal
ter, das Scherblatt oder die innere Klinge verformt oder beschädigt sind, weil
dadurch Verletzungen in der Nase verursacht werden können.
3. Dieses Gerät dient nur zum Schneiden der Nasen- oder Ohrenhaare; benützen Sie
das Gerät deshalb nicht für andere Zwecke.
4. Das Scherblatt und die innere Klinge sind präzisionsgefertigt, sie dürfen keiner
starken Belastung sowie Stößen o ä ausgezetzt werden.
5. Das Gerät selbbst darf nicht unter Wasser gereinigt werden.
6. Vor Reinigung von Scherblatt und innerer Klinge muß sichergestellt werden, daß
das Gerät ausgeschaltet Ist.
7. Das Scherblatt und die innere Klinge brauchen nicht ausgewechselt zu werden.
(Die Lebensdauer von Scherblatt und innerer Klinge beträgt etwa zwei Jahre,
wenn das Gerät einmal wöchentlich für etwa eine Minute verwendet wird.)
Alimentation:
1,5 V CC (une pile “AA”, UM-3, non fournie)
Remplacement de la pile (Fig.2)
1. Procédez comme le montre l'illustration. Retirez le couvercle du logement de la
pile, posez la pilé, replacez le couvercle.
Instructions d’emploi
1. Mettez la tondeuse en fonctionnement puis introduisez l’extrémité de la lame ex
térieure dans une narine.
2. Expirez par la narine pour chasser les poils coupés.
Page 5

Nettoyage de la tondeuse (Fig.3)
Namen van onderdelen (Fig.1)
* Veillez à ce que la tondeuse ne soit pas en fonctionnement avant de procéder au
démontage et au nettoyage des lames.
1. Comme le montre rillustration, retirez le porte-lame extérieure en le tournant.
Séparez la lame intérieure de la lame extérieure. Essuyez les lames avec un chif
fon ou une petite brosse.
Les deux lames peuvent être rincées à l’eau lorsqu'elles sont séparées de la ton
deuse mais veillez à ce qu’elles soient parfaitement sèches avant de les remettre
en place. (‘ La tondeuse ne doit pas être nettoyée à l’eau.)
2. Placez la lame intérieure dans la lame extérieure.
3. Posez la lame extérieure sur la tondeuse et appuyez sans forcer tout en tournant
dans le sens des aiguilles d'une montre.
Précautions
1. N’introduisez dans une narine que la partie étroite de la lame extérieure et n’ap
puyez pas la tondeuse sur la surface de la muqueuse nasale.
2. N'employez pas la tondeuse si une quelconque des lames est déformée, car
vous pourriez vous blesser.
3. Cette tondeuse est conçue seulement pour couper les poils du nez et des oreilles;
ne pas essayer de l’utiliser pour autre chose.
4. Les lames sont des pièces de précision; prenez-en soin.
5. Le corps de la tondeuse ne doit pas être rincé à l’eau.
6. Veillez à ce que la tondeuse ne soit pas en fonctionnement avant de procéder au
nettoyage des lames.
7. Il n'y a pas lieu de remplacer les lames.
Employée une fois par semaine, à raison d’une minute chaque fois, la durée de
vie des lames est d'environ deux années.
@Dop
@! Schakelaar (Aan/Uit)
© Buitenste blad
© Buitenste bladhouder (T) Breng de tekens op een lijn
© Binnenste blad
© Bevestiging
©) Batterijdeksel
(0) Scheermachine.
@ Zet de tekens tegen over elkaar
Technische gegevens
Stroomvoorziening:
1,5V gelijkstroom
(1 batterij maat “AA”, UM-3, niet bijgeleverd)
Vervangen van de batterijen (Fig.2)
1. Verwijder zoals in de afbeelding te zien is het batterijdeksel en steek de batterij
in. Bevestig daarna het batterijdeksel weer aan het apparaat.
Gebruiksaanwijzingen
1. Schäkel de schakelaar in en steek het uiteinde van het buitenste blad voorzichtig
in uw neusgat om de neusharen te scheren.
2. Enkele neusharen kunnen in uw neusgat blijven nadat ze geschoren zijn; door uw
neus te snuiten kunt u deze verwijderen.
Page 6

Reinigen van het neushaarscheerapparaat (Fig.3) identificazione delie varie parti (Fig.i)
* Zorg ervoor dat de schakelaar uitgeschakeld is alvorens de bladen le verwijderen,
te monieren of te reinigen.
1. Verwijder het buitenste blad door deze te draaien en omhoog te tillen zoals
aangegeven in de afbeelding. Maak het binnenste blad los van het buitenste blad.
Veeg de bladen met een papieren zakdoekje af om haartjes, stof, enz. te verwi
jderen.
Het binnenste en buitenste blad kunnen in water worden gewassen nadat ze van
het scheerapparaat losgemaakt zijn, maar de bladen mögen niet aan het
scheerapparaat worden gemonteerd alvorens ze volledig droog zijn.
(• Het scheerapparaat zeit mag niet in water worden gewassen.)
2. Monteer het binnenste blad aan het buitenste blad.
3. Plaats het buitenste blad opnieuw aan het scheerapparaat door het zachtjes naar
beneden te drukken en naar links te draaien.
Waarschuwing
1. Steek het scheerapparaat niet verder in uw neusgat dan het smalle uiteinde van
het buitenste blad. Druk het apparaat niet met kracht in uw neusgat.
2. Probeer het apparaat niet te gebruiken als de buitenste bladhouder of de bladen
vervormd of beschadigd zijn; dit kan nl. letsel veroorzaken aan uw neusgat.
3. Deze trimmer is gemaakt voor oor- en neusgaten. Gebruik deze nooit voor andere
doeleinden.
4. De bladen zijn heel precies gemaakt; stel ze niet bloot aan harde stoten, enz.
5. Het scheerapparaat zeit mag niet in water worden gewassen.
6. Zorg ervoor dat de schakelaar uitstaat alvorens de bladen te reinigen.
@ Cappuccio
(B) Interruttore di alimentazione (On/Off)
(5) Lama esterna
(D) Innesto lama esterna
Lama interna
(0 Giunto
(G) Coperchio batteria
(H) Corpo rasoio
(T) Allineare i segni.
(3) Allineare i segni sul rasoio.
Dati tecnici
Alimentazione:
1,5 V di c.c.
(una batteria di formato “AA”, UM-3, non in dotazione)
Sostituzione della batteria (Fig.2)
1. Togliete il coperchio della batteria come mostrato in figura, estraete la batteria ed
applicate il coperchio della batteria all'unità principale.
istruzioni per l’uso
1. Accendete l'apparecchio ed inserite lentamente nella narice il rasoio per i peli del
naso.
2. Dopo il taglio, nella narice potrebbero rimanere alcuni peli recisi. Essi possono
essere eliminati soffiandosi il naso.
7. De bladen hoeven niet te worden vervangen.
De bladen gaan ca. twee jaar mee als ze per week voor ca. een minuut per keer
worden gebruikt.
Page 7

Pulizia del rasoio (Fig.3)
Identificación de'las partesÌFig.l)
* Prima di togliere, montare o pulire le lame, controllate che l’apparecchio sia
spento.
1. Togliete l'innesto della lama esterna come mostrato in figura ruotandolo e con
temporaneamente sollevandolo. Staccate la lama interna da quella esterna. Pulite
le lame con un fazzoletto di carta in modo da togliere peli, polvere e sporco.
La lama interna e quella esterna possono essere lavate in acqua dopo essere
state tolte dal rasoio, ma devono essere sgocciolate e lasciate asciugare del tutto
prima di essere reinstallate. C II corpo del rasoio invece non deve entrare in con
tatto con l'acqua.)
2. Installate la lama interna in quella esterna.
3. Rimettete la lama esterna nel suo innesto spingendola lentamente verso il basso
e ruotandola in senso orario.
Precauzioni
1. Non inserite nel vostro naso che l'estremità della lama del rasoio. Inoltre, non
premete sul rasoio durante il taglio.
2. Se le lame sono deformate o danneggiate, non tentate l'uso dell'apparecchio o
potreste ferirvi.
3. Questo apparecchio è stato progettato per tagliare esclusivamente i peli del naso
e delle orecchie; non utilizzatelo per altri scopi.
4. Le lame sono state fabbricate con grande precisione. Esse devono per questo
essere trattate con cautela.
5. Non lavate il corpo del rasoio.
6. Prima di pulire le lame, controllate che l'interruttore di alimentazione sia sulla
posizione di spegnimento.
7. Non è necessario sostituire le lame.
Se usate una volta la settimana un minuto per volta, la durata delle lame è di cir
ca 2 anni.
(Á) Tapa
(B)' Interruptor (Encendido/Apagado)
(C) Cuchilla exterior
@ Bastidor de la cuchilla exterior
Cuchilla interior
(0 Unión
(§) Tapa de la pila
(H) Cuerpo del recortador
(T) Marcas de alineamiento
(Q) Alinee las marcas de alineamiento
Especificaciones
Alimentación:
1,5 V CC (una pila tamaño "AA" UM-3, no incluida)
Cómo cambiar la pila (Fig.2)
1. Como se indica en la ilustración, extraiga la tapa de la pila, introduzca la pila y
coloque otra vez la tapa.
Instrucciones de utilización
1. Conecte el interruptor e introduzca cuidadosamente la punta de la cuchilla ex
terior en su nariz para cortar los pelos.
2. Algunos pelos cortados pueden quedar dentro de la nariz; sople la nariz para ex
traerlos.
Page 8

Limpieza del recortador (Fig.3)
* Asegúrese de que el interruptor esté desconectado antes de extraer, montar o
limpiar las cuchillas.
1. Como se muestra en la ilustración, extraiga el bastidor de la cuchilla exterior
girándolo y levantándolo. Separe la cuchilla interior de la exterior. Limpie las
cuchillas con un tisú para eliminar los pelos cortados, el polvo, etc.
La cuchilla interior y la exterior pueden lavarse con agua una vez extraídas del
cuerpo del recortador. Elimine el exceso de agua de las cuchillas y deje que se
sequen por completo antes de montarlas de nuevo en el cuerpo del recortador.
(• El cuerpo del recorlador no puede lavarse con agua.)
2. Monte la cuchilla interior en la exterior.
3. Vuelva a poner la cuchilla exterior en el cuerpo empujándola suavemente y girán
dola hacia la derecha.a/Marcas de alineamientob/Alinee las marcas de
alineamiento.
Precaución
1. No introduzca el aparato más alia de la punta estrecha de la cuchilla exterior. No
meta tampoco a la fuerza el recortador en su nariz.
2. No trate de utilizar el aparato si el bastidor de la cuchilla exterior o las cuchillas
están deformados o estropeados porque podría herirse.
3. Esta recortadora ha sido exclusivamente diseñada para cortar los pelos de la nariz
y de las orejas; no intente usarla para ningún otro fin.
4. Las cuchillas han sido fabricadas con la máxima precisión; no las someta a
esfuerzos excesivos, no las golpee tampoco, etc.
5. El cuerpo del recortador no puede lavarse con agua.
6. Asegúrese de que el interruptor esté desconectado antes de limpiar las cuchillas.
7. Las cuchillas no necesitan recambios.
La duración de las cuchillas es de dos años aproximadamente, utilizándolas una
vez a la semana durante un minuto aproximadamente.
14
 Loading...