

Page 1
Operating Instructions
Software
(For Setting Up PCL 6 Emulation Printer Driver)
Model No. DA-PC800
Installation Overview
Installation
Setting Up
Before using this software, please read these instructions completely and keep these operating instructions in a safe place for future
reference.
English
Page 2

The following trademarks and registered trademarks are used throughout this manual:
Microsoft, MS-DOS, Windows, Windows NT and Windows Server are either registered
trademarks or trademarks of Microsoft Corporation in the USA and other countries.
Microsoft product screen shot(s) reprinted with permission from Microsoft Corporation.
i386, i486, Celeron, Intel Centrino and Pentium are trademarks of Intel Corporation and its
subsidiaries.
The USB-IF Logos are trademarks of Universal Serial Bus Implementers Forum, Inc.
TrueType is a registered trademark of Apple Computer, Inc.
Novell, NetWare, IntranetWare, NDS are registered trademarks of Novell, Inc. in the USA and
other countries.
PEERLESSPage™ is a trademark of the PEERLESS Systems Corporation; and,
PEERLESSPrint and Memory Reduction Technology® are registered trademarks PEERLESS
Systems Corporation; and, COPYRIGHT © 2005 PEERLESS Systems Corporation.
COPYRIGHT © 2005 Adobe Systems Incorporated. All Rights Reserved; and Adobe
PostScript® 3™
Universal Font Scaling Technology (UFST) and all typefaces have been licensed from Monotype
Imaging Inc.
Agfa® and the Agfa rhombus are registered trademarks of Agfa-Gevaert N.V. registered in the
U.S. Patent and Trademark Office and may be registered in other jurisdictions. Monotype® is a
registered trademark of Monotype Imaging Inc. registered in the U.S. Patent and Trademark
Office and may be registered in other jurisdictions.
ColorSet™, Profile Tool Kit™, Profile Studio™ and Profile Optimizer™ are trademarks of
Monotype Imaging Inc. and may be registered in certain jurisdictions.
COPYRIGHT © 2005 Monotype Imaging Inc. All Rights Reserved.
PCL is a trademark of Hewlett-Packard Company.
Adobe, Acrobat, Adobe Reader, Adobe Type Manager, PostScript, PostScript 3 and Reader are
either registered trademarks or trademarks of Adobe Systems Incorporated in the United States
and/or other countries.
All other product/brand names, trademarks or registered trademarks identified herein are the
property of their respective owners.
®
2
© 2006 Panasonic Communications Co., Ltd. All Rights Reserved.
Unauthorized copying and distribution is a violation of law.
Published in Japan.
The contents of these Operating Instructions are subject to change without notice.
Page 3

Table of Contents
Installation Overview
General Installation Overview ........................................................................................................................4
Installation
■ Installing the Printer Driver, and Utility Software
● System Requirements............................................................................................................................6
● Software Setup Procedures ...................................................................................................................6
● Installing the Printer Driver (Network Port Connection), and
the Job Status Utility (Completion Notice) ............................................................................................. 7
■ Printer for Parallel Port Connection
● Installing the Printer Driver for Parallel Port Connection......................................................................10
● Configure the Optional Devices ...........................................................................................................12
■ Printer for USB Port Connection
● Installing the Printer Driver for USB Port Connection ..........................................................................14
● Configure the Optional Devices ...........................................................................................................20
Setting up
■ Printer for Network Port Connection
● Configure the Shared Setting on the Network Print Server ................................................................. 22
Windows NT Server ...........................................................................................................................22
Windows 2000 Server ........................................................................................................................24
Windows Server 2003 ........................................................................................................................26
● Setting up your Client PC.....................................................................................................................28
■ Job Status Utility Function
● Setting up the Job Status Utility ...........................................................................................................29
3
Page 4

General Installation Overview
Installation Overview
Follow the guidelines in this booklet when installing, and setting up the printer driver. Please read all procedures
completely before attempting to setup the PCL 6 Emulation Printer Driver.
1
Turning the Power Switches ON.
1
Connect all Cables, and the Power Cord
to the machine.
● DP-8060/8045/8035
Parallel
Cable
2
Turn ON ( ) the Main Power Switch first,
and then turn ON (
• DP-8060/8045/8035
Main Power Switch: Rear of the machine.
Power Switch : Left side of the
• DP-8020P/8020E/8016P
Power Switch : Right side of the
● DP-8060/8045/8035
) the Power Switch.
machine.
machine.
●
Parallel Cable is used for Local Printer
connection.
● DP-8020E/8020P/8016P
LAN
Cable
LAN
Cable
USB
Cable
Power Switch
Main Power Switch
● DP-8020E/8020P/8016P
Power Switch
4
●
USB Cable is used for Local Printer
connection.
Page 5

2
3
Installation
■ Installing the Printer and Utility
Software
Installing the Printer Driver for the Network
Port Connection. (See pages 6-9)
■
Printer for Parallel Port Connection
Installing the Printer Driver for Parallel Port.
(See pages 10-13)
■ Printer for USB Port Connection
Installing the Printer Driver for USB Port
(See page 14-21)
Setting up
■ Configure the Shared Setting on
the Network Print Server.
Windows NT Server
Windows 2000 Server
Windows Server 2003
(See pages 22-27)
■
Setting up your Client PC.
Connecting a Client PC on the Network
Print Server. (See page 28)
■ Setting up the Job Status Utility.
A Job Completion Notice will be displayed
on the PC screen when the Copy/Print Job
is completed. (See page 29)
NOTE
● When using the Printer on the Netware network
environment, install the IPX/SPX setup wizard.
Refer to the Operating Instruction (For IPX-SPX
setup wizard) on the provided CD-ROM.
IPX/SPX Setup Wizard is not available for DP8020E/8020P/8016P.
● When there are two printer drivers (for Network
Port Connection and Parallel / USB Port
Connection) for the same model, each printer
driver can be used normally.
The printer driver can be selected from the Printer
List of the Print Screen within the application software.
Network Print Server Connection Printer
●
The Print Server name will be automatically added.
On Peer to Peer Connection (Direct Connection)
the Print Server name is not added. Change the
Printer Name using the Windows Printer Settings
for convenience.
Installation Overview
DP-8020P is not available for the USA, and Canada.
5
Page 6
Installation
Installation
Installing the Printer Driver, and Utility Software
Installation
■ System Requirements
• Personal Computer : IBM PC/AT, and compatibles
(CPU Pentium II or greater is
required, Pentium 4 or greater is
recommended)
• Display : 800x600 Pixel or greater
(recommended), and 16-bit High
Color (True Color) video adapter,
or greater
1
• Operating System : Windows 98*
Windows NT 4.0*
Pack 3 or later is required),
Windows 2000*4, Windows XP*5,
Windows Server 2003*
• System Memory : The minimum recommended
Memory for each OS is as
follows:
Windows 98, Windows Me :
128 MB or greater
Windows 2000, Windows XP,
Windows NT 4.0,
Windows Server 2003 :
256 MB or greater
, Windows Me *2,
3
(With Service
6
■ Software Setup Procedures
1.Select the software.
• Printer Driver
When using Print function.
• Job Status Utility
A Job Completion Notice pops-up on your PC's
Desktop when the Copy/Print Job is completed.
(See page 7)
2.Install the software.
The selected software will be automatically
installed.
(See pages 7-9)
• Free Disk Space : 40 MB or greater
• CD-ROM Drive : Used for installing the software,
and utilities from the CD-ROM
• Interface : 10Base-T/100Base-TX Ethernet
port, Parallel / USB Port (For
Printer)
USB Port is available for
DP-8020E/8020P/8016P.
(See Page 4)
Application Software
•
1
Microsoft® Windows® 98 operating system (hereafter
*
Windows 98)
*2Microsoft® Windows® Millennium Edition operating
system (hereafter Windows Me)
*3Microsoft® Windows NT® operating system Version
4.0 (hereafter Windows NT 4.0)
*4Microsoft® Windows® 2000 operating system
(hereafter Windows 2000)
*5Microsoft® Windows® XP operating system (hereafter
Windows XP)
6
Microsoft® Windows Server® 2003 operating system
*
(hereafter Windows Server 2003)
: Microsoft Internet Explorer 5.0 or
later
3.Restart the PC.
(See page 9)
6
Page 7
■ Installing the Printer Driver (Network Port Connection), and the Job Status Utility
(Completion Notice)
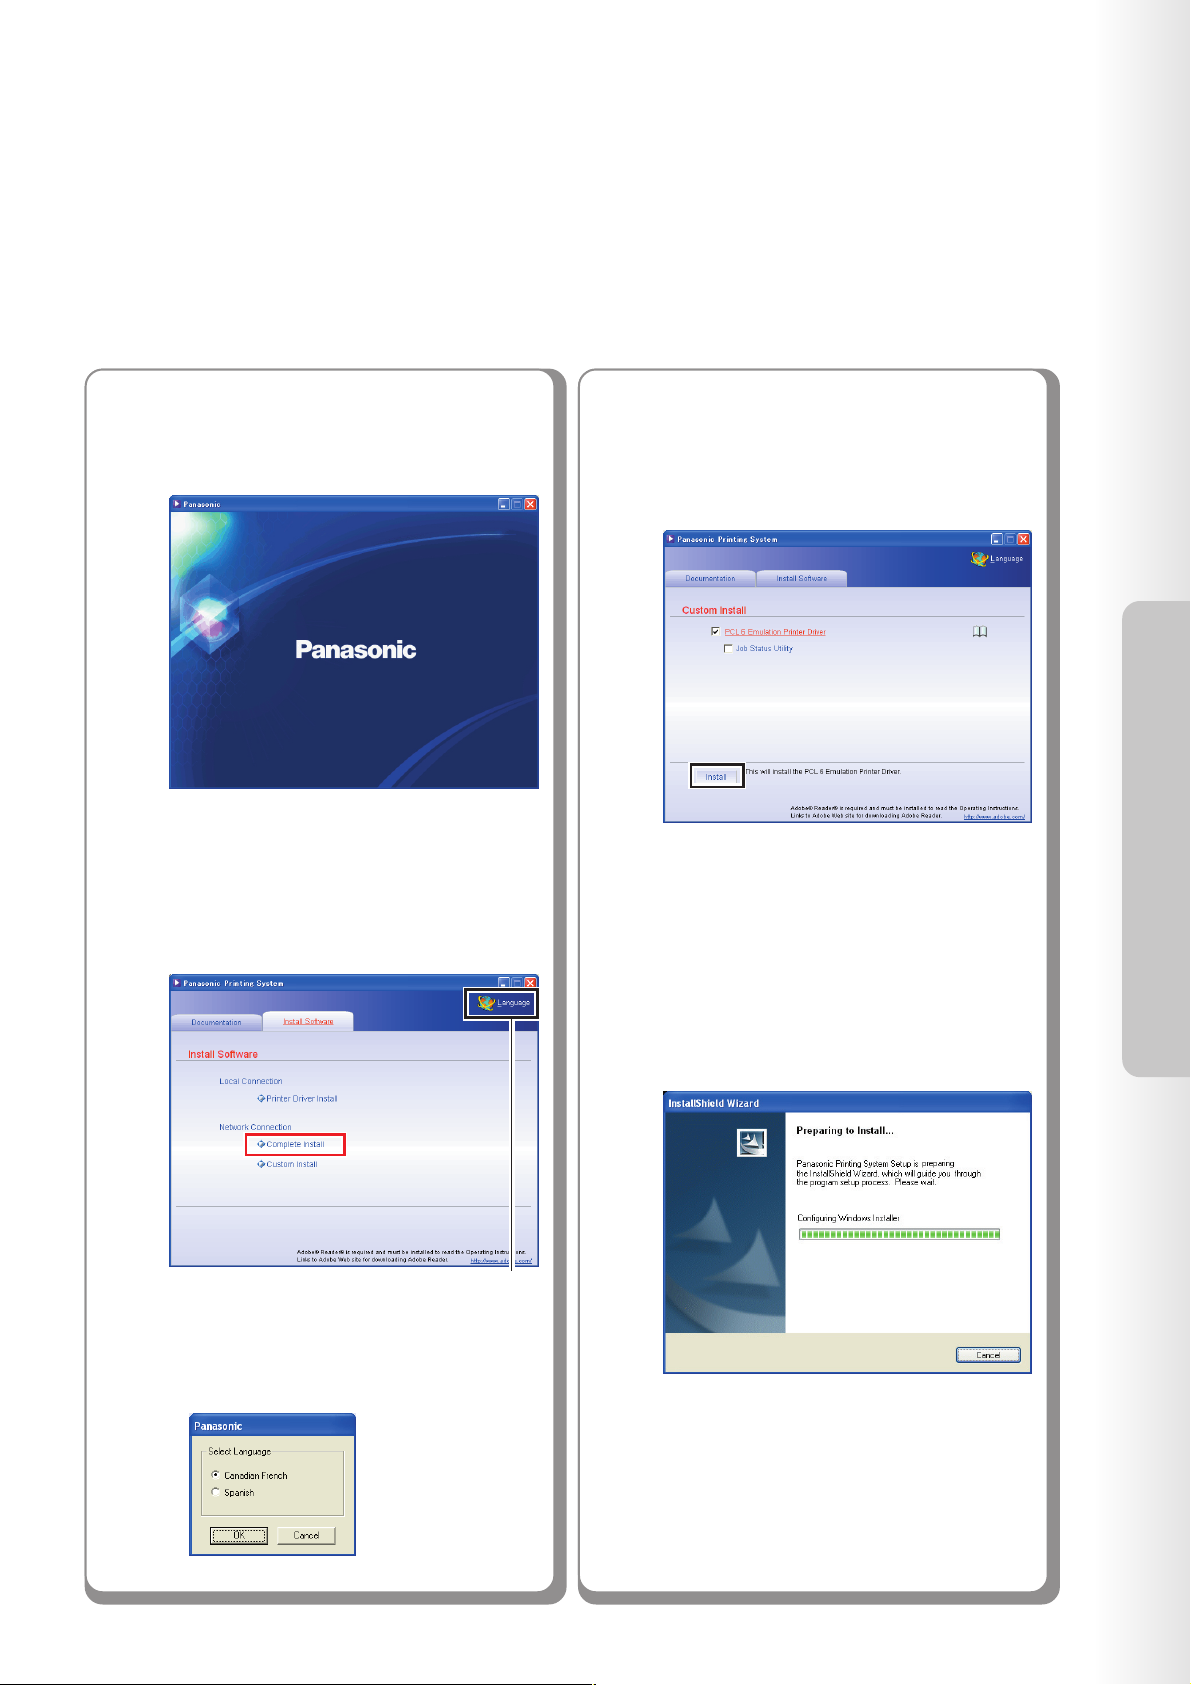
1
2
Insert the "Panasonic Printing
System" CD-ROM.
The opening screen is displayed.
● If the CD-ROM does not launch
automatically, double click "My Computer"
on the Desktop or on the Start menu, and
then double click the CD-ROM icon.
Select "Complete Install".
If you choose "Custom Install", you
can select the desired Software.
Click "Install", and selected
software will be installed.
● You can install the applications you wish to
install by checking the box next to the
software names.
Also, unmark the check box if you do not want
to install any of the displayed software.
Installation
Language Selection
● Screen Language will be automatically
selected using with your PC language.
If you want to change the language, click
"Language", and then choose the desired
language and click "OK".
3
The InstallShield Wizard screen is
displayed.
<Continue to the Next Page>
7
Page 8
Installation
Installing the Printer Driver and Utility Software
■ Installing the Printer Driver (Network Port Connection), and the Job Status Utility
(Completion Notice)
Installation
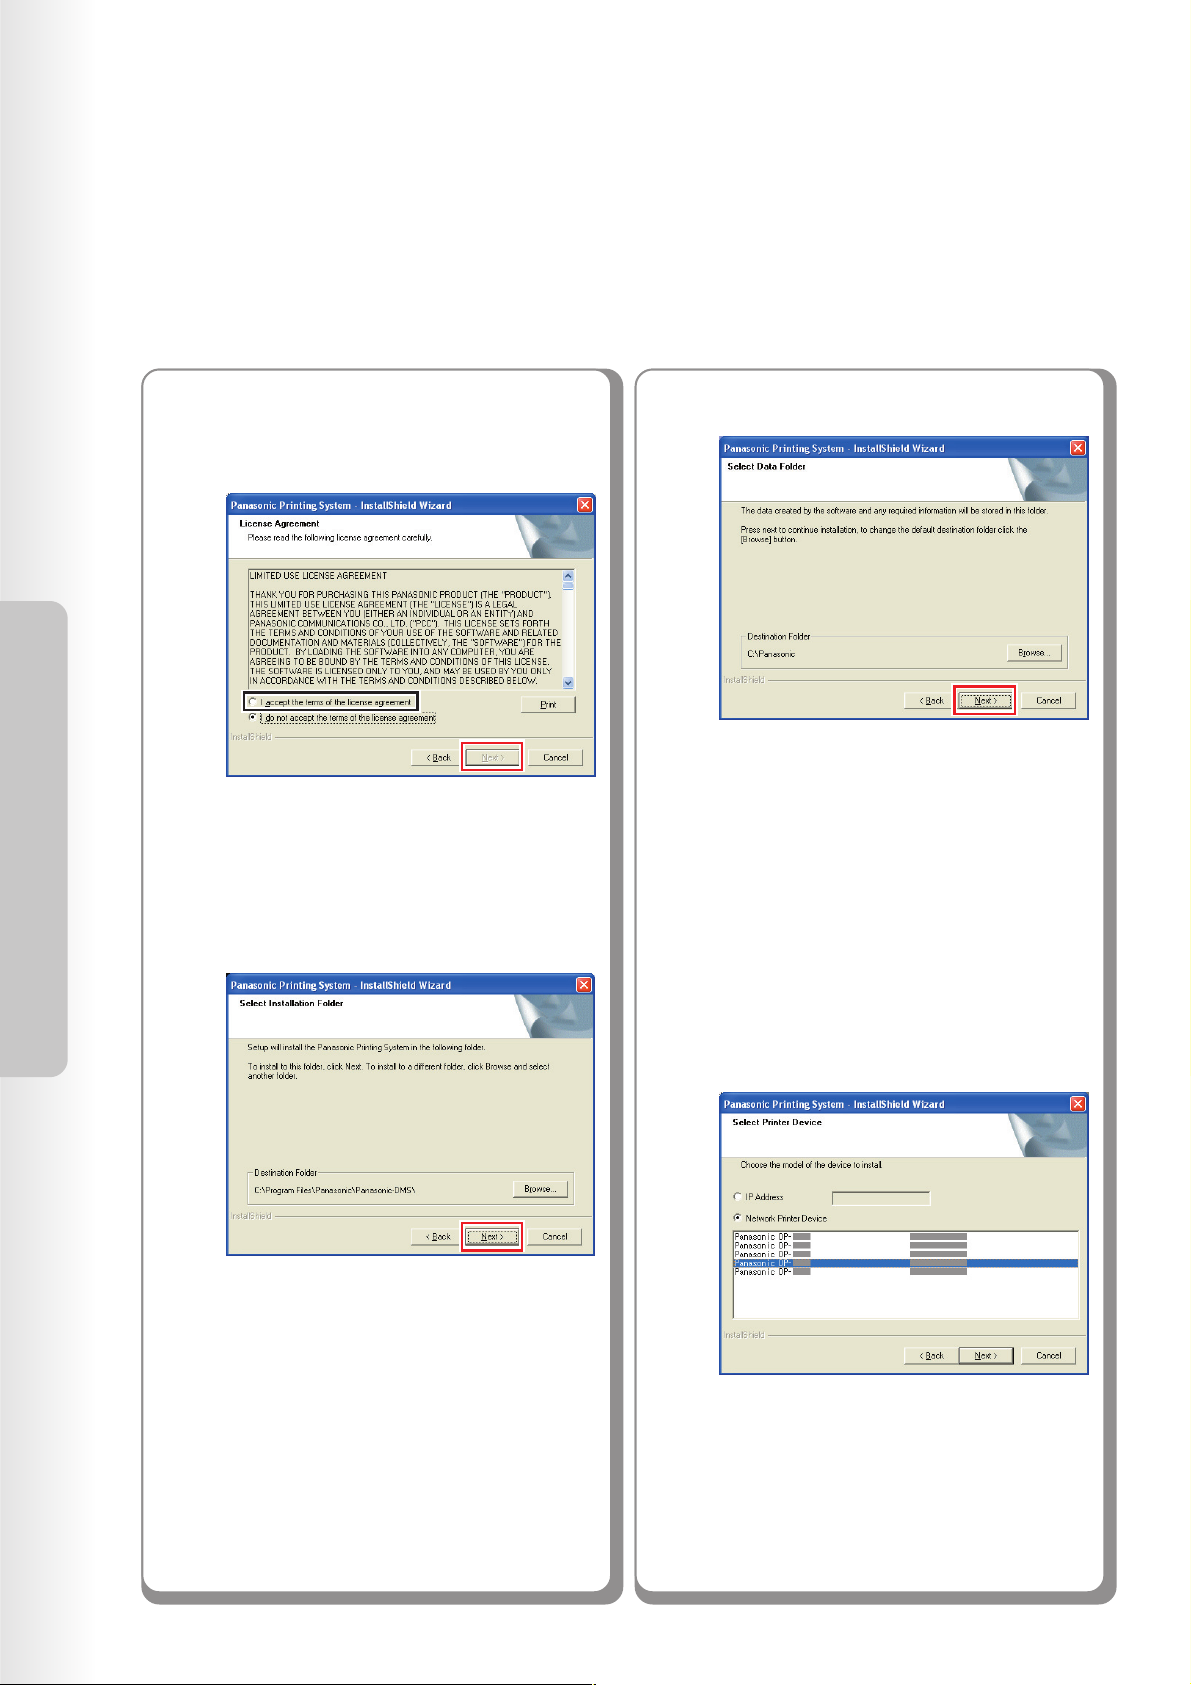
4
5
Check "I accept the terms of the
license agreement", and then click
"Next".
● Make sure that your machine is connected
to the network properly, and/or the Power
Switch is ON before clicking "Next".
Click "Next".
6
7
Click "Next".
● The above Screen will not be shown if
there is another model's Panasonic
Document Management System installed.
The Wizard automatically searches
for machines connected to your
network, and displays the found
units in the Network Printer
Device window.
8
● Above Screen will not be shown when
another model's Panasonic Document
Management System has been installed.
● Only the machines connected to your
subnet can to be used as a network printer.
● If your machine has not been connected to
the network yet, enter its allocated IP
Address, and then click "Next" to proceed
with the installation.
Page 9
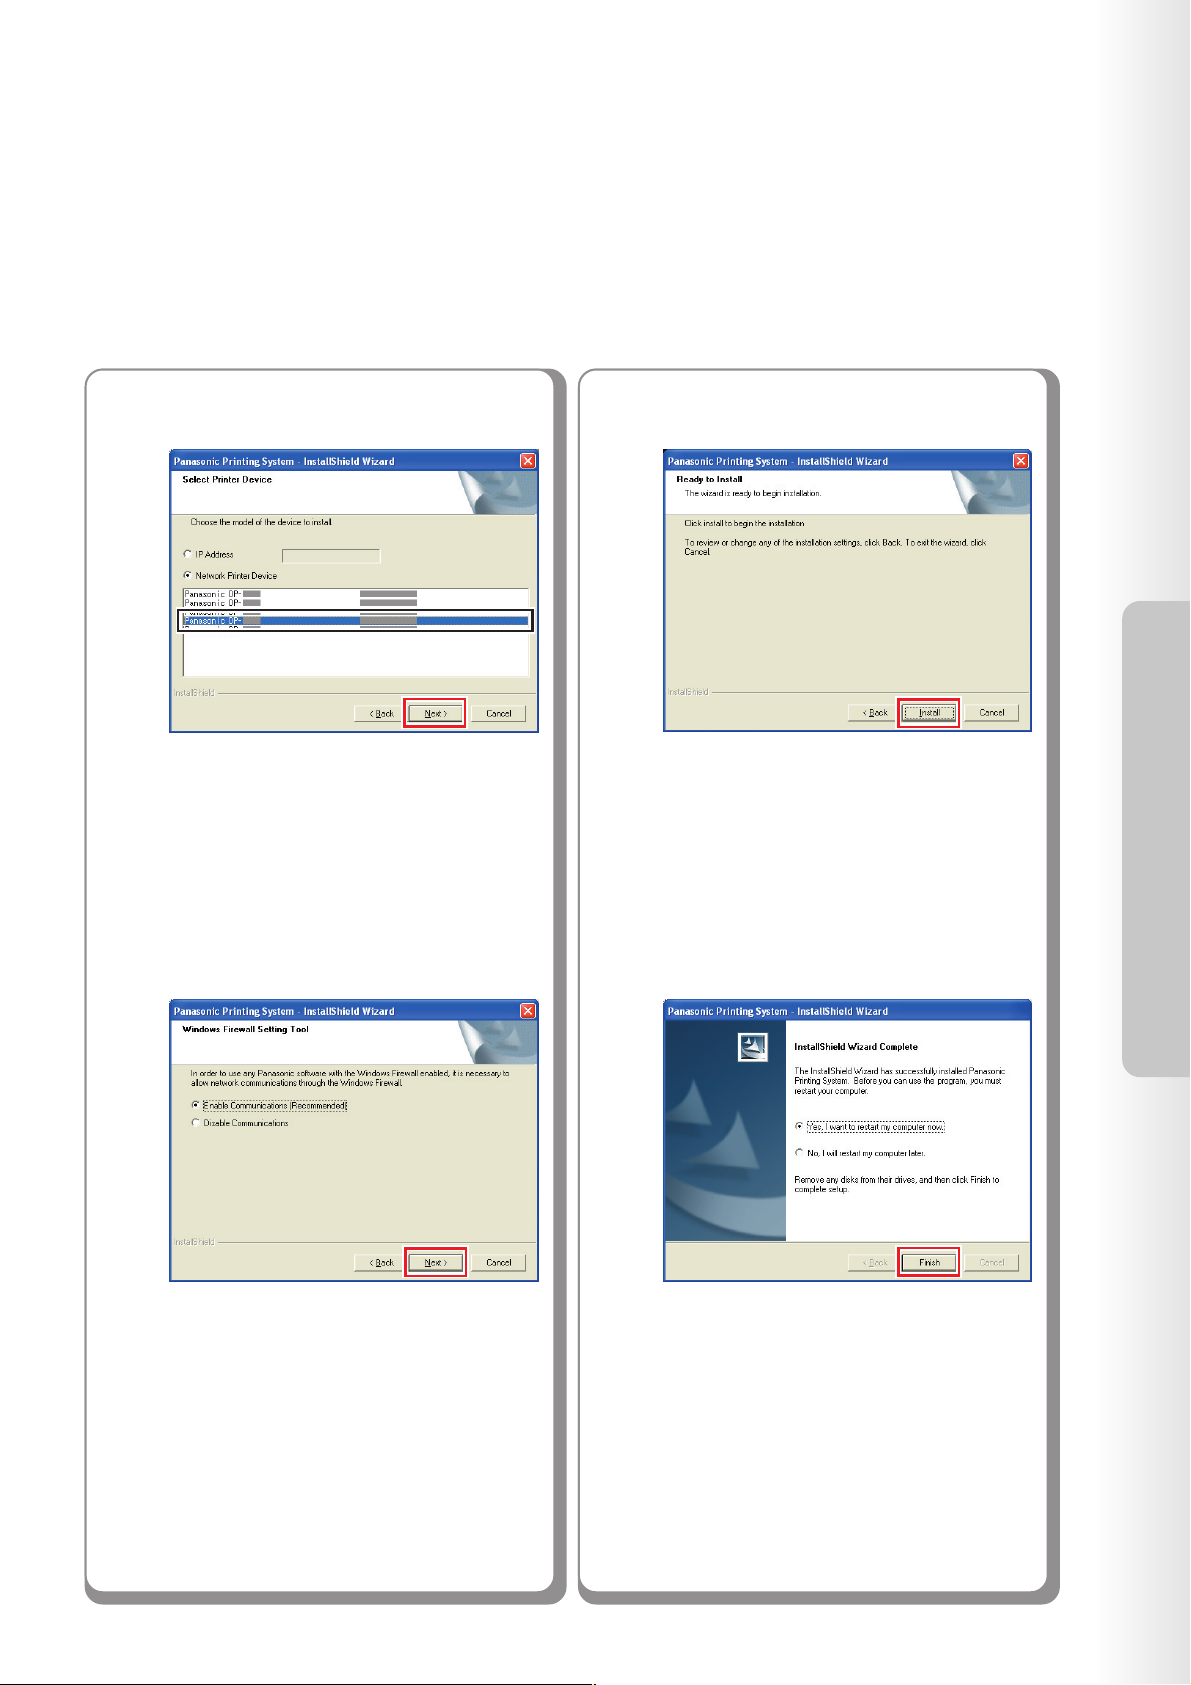
8
Select a printer, and then click "Next".
Click "Install".
10
Installation
9
Select "Enable Communications
(Recommended)", and then click "Next".
● Above screen only displays when you are
installing the Job Status Utility on Windows
XP (Service Pack 2 or later).
11
Click "Finish".
●
If you cannot shut down the computer
immediately, choose "No. I will restart my
computer later.". However, the new setting
is only applied after rebooting your computer.
9
Page 10

Installation
Printer for Parallel Port Connection
■ Installing the Printer Driver for Parallel Port Connection
● Parallel Port Connection is only available for DP-8060/8045/8035
Installation
1.Select the Printer Driver.
(See pages 10-11)
2.Install the Printer Driver.
Selected software will be automatically installed.
(See pages 10-11)
3.Restart the PC.
1
2
Insert the "Panasonic Printing
System" CD-ROM.
The opening screen is displayed.
● If the CD-ROM does not launch
automatically, double-click "My Computer"
on the Desktop or on the Start menu, and
then double-click the CD-ROM icon.
Select "Printer Driver Install".
10
(See page 11)
Page 11

3
4
The InstallShield Wizard screen is
displayed.
Check "I accept the terms of the
license agreement", and then click "Next".
6
7
Select the Printer Driver that you
want to install, and then click "Next".
Click "Install".
Installation
5
Click "Next".
● Above Screen will not be shown when
another model's Panasonic Document
Management System has been installed.
8
Check "Yes, I want to restart my
computer now.", and then click
"Finish".
11
Page 12

Installation
Printer for Parallel Port Connection
■ Configure the Optional Devices
Installation
1.Open the printer dialog box.
(See page 12)
2.Select a Printer and open the
Property screen.
(See pages 12-13)
3.Select a Device tab and configure
1
Open the Printer Dialog Box using
the following procedures.
Windows XP/Server 2003:
Select "Start" → "Printers and
Faxes"
Other Windows OS:
Select "Start" → "Settings" →
"Printers"
Right-click the printer icon that you
2
want to configure.
the Optional Devices.
(See page 13)
12
Page 13

3
Click "Properties".
Memo:
4
Click on the "Device" tab, and
configure the optional devices,
and then click "OK".
Installation
13
Page 14

Installation
Printer for USB Port Connection
■ Installing the Printer Driver for USB Port Connection
● USB Port Connection is only available for DP-8020E/8020P/8016P
Installation
1.Select the "Printer Driver Install".
(See pages 14-19)
2.Install the Printer Driver for USB
Connection.
(See pages 14-19)
ATTENTION :
Do not turn the Power Switch ON (on the right side of
the machine) until you reach the step 8 (A, B, C).
Do not connect the USB Cable until notified to do so.
Insert the "Panasonic Printing
1
System" CD-ROM.
The Panasonic opening screen is
displayed.
3.Restart the PC.
(See page 19)
● If the CD-ROM does not launch
automatically, double-click "My Computer"
on the Desktop or on the Start menu, and
then double-click the CD-ROM icon.
Select "Printer Driver Install".
2
● USB connection "Printer Driver Install" is
not selectable with Windows NT 4.0
14
Page 15

3
The Install Shield Wizard screen is
displayed.
Click "Next".
5
● The above Screen will not be shown if there
is other model's Panasonic Document
Management System installed.
● If you wish to change the folder, click
"Browse", and then the desired folder to
install.
Installation
4
Check "I accept the terms of the
license agreement", and then
click "Next".
● Make sure that your machine is connected
to the network properly, and/or the Power
Switch is ON before clicking “NEXT”.
6
Select the Printer Driver that you
want to install, and then click "Next".
<Continue to the Next Page>
15
Page 16

Installation
Printer for USB Port Connection
■ Installing the Printer Driver for USB Port Connection
● USB Port Connection is only available for DP-8020E/8020P/8016P
Installation
7
Click "Install".
Windows 98 / Windows Me
go to steps 8A and 9
Windows 2000
go to steps 8B and 9
8A
<Windows 98 / Windows Me>
Connect the USB cable to your
machine, and then turn the Power
Switch ON, and click "Next".
Windows XP / Windows Server 2003
go to steps 8C and 9
16
Page 17

8B
<Windows 2000>
Click "Yes".
Connect the USB cable to your
8C
<
Windows XP / Windows Server 2003
Click "Continue Anyway".
>
machine, and then turn the Power
Switch ON, and click "Next".
Click "Yes".
Connect the USB cable to your
machine, and then turn the Power
Switch ON, and click "Next".
Installation
<Continue to the Next Page>
17
Page 18

Installation
Printer for USB Port Connection
■ Installing the Printer Driver for USB Port Connection
● USB Port Connection is only available for DP-8020E/8020P/8016P
Installation
Select "No, not this time", and
then click "Next".
1 2
● Above screen will be displayed when you
have installed the Windows XP Service
Pack 2.
Select "Install the software
automatically (Recommended)",
For Windows Server 2003
If you have a previous version of
the Printer Driver installed, select
the latest version of the “.inf” file,
and then click “Next”.
and then click "Next".
For Windows XP
1 2
● Above screen will not be displayed when
installing the Printer Driver for the first time.
18
Page 19

Click "Continue Anyway".
Click "Finish".
9
Check "Yes, I want to restart my
computer now.", and then click
"Finish".
Installation
19
Page 20

Installation
Printer for USB Port Connection
■ Configure the Optional Devices
Installation
1.Open the printer dialog box.
(See page 20)
2.Select a Printer, and open the
Property screen.
(See pages 20-21)
3.Select a Device tab, and configure
1
Select "Start" → "Printers and
Faxes" to open the Printer Dialog
Box.
Right-click the printer that you want
2
to configure.
the Optional Devices.
(See page 21)
20
Page 21

3
Click "Properties".
Memo:
4
Select "Device" tab, and configure
the optional devices, and then
click "OK".
Installation
21
Page 22

Setting Up
Setting Up
Printer for Network Port Connection
■ Configure the Shared Setting on the
Network Print Server
1.Configure the Shared Setting on
the Network Print Server.
• Windows NT Server
• Windows 2000 Server
• Windows Server 2003
(See pages 22-27)
2.Setting up your Client PC.
(See page 28)
■ Configure the Shared Setting on the
Network Print Server
(Windows NT Server)
Click "Start".
1
Select "Settings".
2
Setting Up
3. Add the Printer Driver if your client
OS is different from the Network
Print Server.
• Using the PrnCopy.exe before installing the
Printer Driver.
On the Panasonic Printing System CD-ROM,
there is a tool to create the Printer Driver for
various Windows OS.
Open the CD-ROM with the Explorer, Go "Tools"
→"PrnCopy" folder.
In the "PrnCopy" folder, double click the
PrnCopy.exe file, a folder will be created on your
Desktop.
Please select an appropriate printer driver in
the folder when you add the Printer Driver for a
client OS.
(See pages 22-27)
3
Click "Printers".
22
Page 23

4
Right-Click the printer that you
want to share.
6
Click on the "Sharing" tab.
5
Click "Properties".
7
Check "Shared", and then enter
the Share Name.
Ex: Panasoni
NOTE
If you need to install an alternative printer
driver for your client OS, select the type of
OS from the alternative driver list, and click
[OK]. You can manually add the Printer Driver
by following the instructions on the screen.
To easily create the Printer Drivers for various
OS, use the PrnCopy.exe before the
installation. (See page 22)
Setting Up
8
Click "OK" to close the screen.
23
Page 24

Setting Up
Printer for Network Port Connection
■ Configure the Shared Setting on the Network Print Server (Windows 2000 Server)
1
2
Click "Start".
Select "Settings".
4
Right-Click the printer that you
want to share.
Click "Properties".
5
Setting Up
24
3
Click "Printers".
Page 25

6
Click on the "Sharing" tab.
Memo:
7
Check "Shared as", and then
enter the Share Name.
Ex: Panasoni
NOTE
If you need to install an alternative printer
driver for your client OS, click [Additional
Drivers...], you can manually add the Printer
Driver by following the instructions on the
screen. To easily create the Printer Drivers
for various OS, use the PrnCopy.exe before
the installation. (See page 22)
Setting Up
8
Click "OK" to close the screen.
25
Page 26

Setting Up
Printer for Network Port Connection
■ Configure the Shared Setting on the Network Print Server (Windows Server 2003)
1
Click "Start".
(Category View Mode)
(Classic View Mode) (Classic View Mode)
3
Click "Printers & Faxes".
(Category View Mode)
Setting Up
26
2
Select "Settings".
(Classic View Mode)
4
Right-Click the printer that you
want to share.
Page 27

5
Click "Properties".
7
Check "Share this printer", and
then enter the Share Name.
Ex: Panasoni
6
Click on the "Sharing" tab.
NOTE
If you need to install an alternative printer
driver for your client OS, click [Additional
Drivers...], you can manually add the Printer
Driver by following the instructions on the
screen. To easily create the Printer Drivers
for various OS, use the PrnCopy.exe before
the installation. (See page 22)
Click "OK" to close the screen.
8
Setting Up
27
Page 28

Setting Up
Printer for Network Port Connection
■ Setting up your Client PC
1
2
Open the Printers and Faxes
window.
Click "Start", right-click "My
Computer", and then select
"Explore".
4
Drag-and-drop the printer icon onto
the Printer and Faxes window.
Verify that the Printer icon is
5
copied onto the Printer and Faxes
window.
Setting Up
28
3
Select the Printer shared on your
Printer Server.
● The illustrations shown for the previous steps are
for Windows XP.
The procedures for other Windows Operating
Systems are basically the same, even though
some of the details may differ.
Page 29

Job Status Utility Function
■ Setting up the Job Status Utility
Ex: Copy Job
Basic Procedures:
Install the Job Status Utility, located
1
on the Panasonic Printing System
CD-ROM.
(See pages 6-11)
Confirm that the Job Status Utility
2
icon is shown on the task bar.
The Job Status Utility software will display the pop-up Completion Notice
on your Windows Desktop when the Print, PC Fax, Copy, or a Fax job is
completed.
The information displayed in the Completion Notice vary according to the
type of job being performed.
• Completion Notice for Fax job is not available for DP-8016P.
Setting up for PC Fax and PC Print:
Right-click the Job Status Utility
1
icon on the task bar, and select
"Setup" from the menu.
3
Panasonic Job Status Utility Icon
● If the Job Status Utility icon is not
shown on the task bar, click "Start", select
"All Programs"
Status Utility"
activate the Job Status Utility icon.
For PC Fax and PC Print only
Setup the Job Status Utility as
described above.
For Copy, Fax and Internet Fax only
Refer to the Operating Instructions ( For
Communications Utility ) on the provided CDROM.
→→
→ "Panasonic"
→→
→→
→ "Job Status Utility" to
→→
→→
→ "Job
→→
Panasonic Job Status Utility Icon
Choose the display condition for the
2
Setup window, and then select
"OK".
Setting Up
All : Always displays after each
transmission or print job.
Error only : Displays only when an error
occurs.
None : Does not display.
29
Page 30

USA Only
WARRANTY
PANASONIC DIGITAL DOCUMENT COMPANY MAKES NO WARRANTIES, GUARANTEES OR
REPRESENTATIONS, EXPRESSED OR IMPLIED, TO CUSTOMER WITH RESPECT TO THIS
PANASONIC MACHINE, INCLUDING BUT NOT LIMITED TO, ANY IMPLIED WARRANTY OF
MERCHANTABILITY OR FITNESS FOR A PARTICULAR PURPOSE.
PANASONIC DIGITAL DOCUMENT COMPANY ASSUMES NO RISK AND SHALL NOT BE SUBJECT
TO LIABILITY FOR ANY DAMAGE, INCLUDING, BUT NOT LIMITED TO DIRECT, INDIRECT, SPECIAL,
INCIDENTAL OR CONSEQUENTIAL DAMAGES OR LOSS OF PROFITS SUSTAINED BY THE
CUSTOMER IN CONNECTION WITH THE USE OR APPLICATION OF THIS PANASONIC MACHINE.
SEE YOUR DEALER FOR DETAILS OF DEALER’S WARRANTY.
© 2006 Panasonic Communications Co., Ltd. All Rights Reserved.
Unauthorized copying and distribution is a violation of law.
The contents of these Operating Instructions are subject to change without notice.
For Service, Call:
Panasonic Digital Document Company,
Unit of Panasonic Corporation of North America
One Panasonic Way
Secaucus, New Jersey 07094
http://panasonic.co.jp/pcc/en/
Panasonic Canada Inc.
5770 Ambler Drive
Mississauga, Ontario L4W 2T3
http://www.panasonic.ca
K0806-0(12)
PJQMC0667ZA
August 2006
Published in Japan
 Loading...