

Page 1
Operating Instructions
Your Mach i n e
Getting To Know
(For Facsimile and Internet Fax/Email Functions)
Digital Imaging Systems
Model No.
DP-8020E / 8020P
Features
Facsimile
Features
Internet Fax
Advanced
Facsimile Features
Before operating this equipment, please carefully read this manual, and keep this documentation in a safe
place for future reference.
(Illustration shows optional accessories that may not be installed on your machine.)
Fax Features
Advanced Internet
Setting
Your Machine
and Lists
Printing Journals
Problem Solving
English
Appendix
Page 2
Getting To Know Your Machine
Useful Office Functions/Operating Instructions
Copy
• Copy up to Legal size originals.
• Capable of copying text/photos/
halftone originals.
Scan/File
• Monochrome scanner capability
(for DP-8020P*/8020E only).
• Scanning resolution up to 600 dpi
Fax/Email
• Plain Paper High-speed Super G3
compatible Fax with JBIG
compression. The Facsimile function
is available when optional Fax
Communication Board (DA-FG180) is
installed (for DP-8020P*/8020E only).
•Quick-Scan
• Quick Memory Transmission
• Email Function capability
Print
• Digital printer controller standard,
printer resolution 300 or 600 dpi.
Application Software
• Quick Image Navigator
• Network Scanner
• Utilities (Network Status Monitor, Address Book Editor, Network Configuration Editor)
• Pan a fax Desktop when optional Fax Communication Board is installed.
*DP-8020P is not available for USA, and Canada.
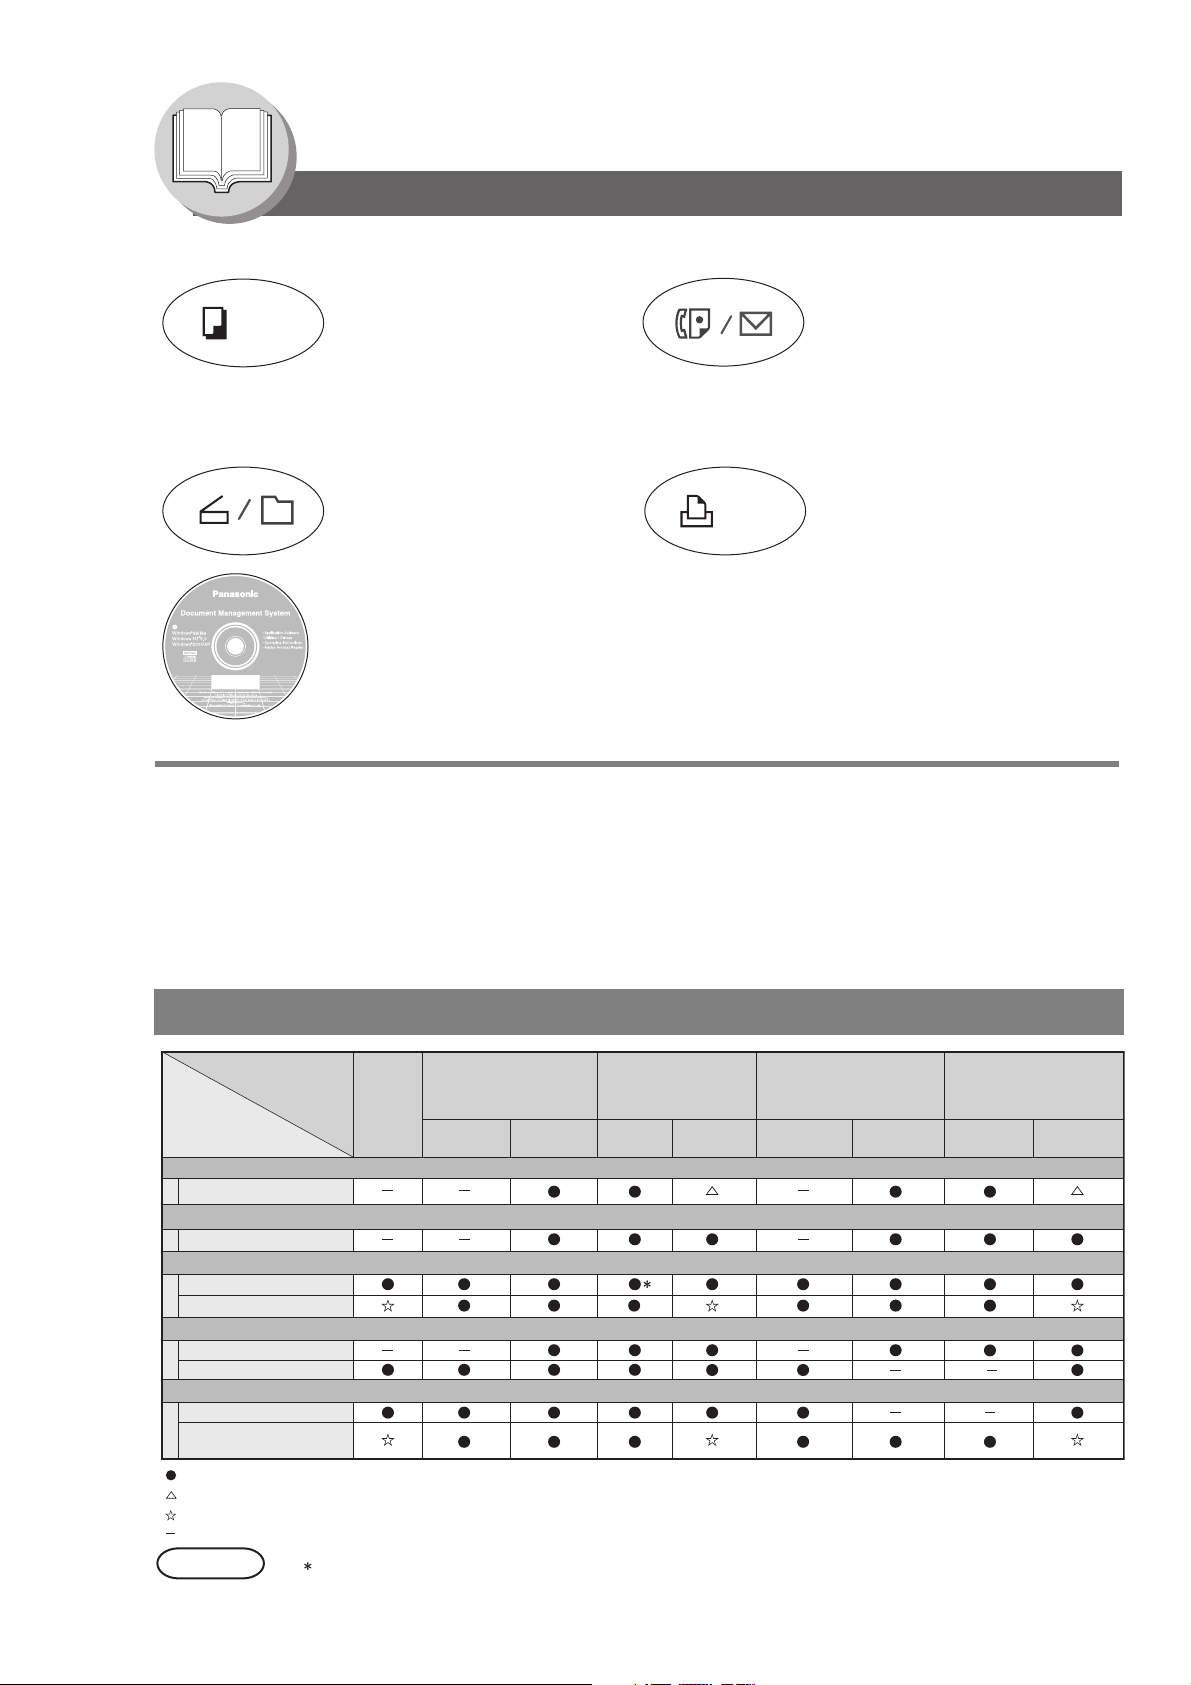
The following operating instruction manuals are included on the CD for this machine, please use the correct manual
when an operator intervention is necessary.
<Facsimile &
Internet Fax/Email>
<Copy & Network
Scan>
<Print &
Other Advanced
Functions>
Use the information provided on the enclosed CD whenever a Fax/Internet Fax function requires intervention.
For example: How to send/receive a Fax/Email, or when a trouble message appears, etc.
Use the information provided on the enclosed CD whenever a Copy & Network Scan function requires
intervention.
For example: How to make copies, add paper, replace the toner bottle, etc.
Use the information provided on the enclosed CD for an explanation of how to use as a Network Printer,
Network Scanner, Edit Directory Dialing Feature, Device Settings, Network Status Monitor, and/or Document
Management System.
Multi-Tasking Job Table
Current
Job
2nd Job
Copy
Copy
Network Scanning, Internet Fax
Storing Document
GDI/PCL/PS Printing
Receiving Data
Printing Receive Document
Facsimile (Sending)
Storing Document
Memory Transmission
Facsimile (Receiving)
Memory Receiving
Printing Received
Memory Data
: Accepts and executes the 2nd Job.
: Accepts and executes the 2nd Job (Copy) only if the Current Job is interrupted.
: Accepts the 2nd Job and executes the 2nd Job after the Current Job is completed.
: Not applicable.
NOTE
Copy
: HDD (DA-HD18) and additional 16MB (minimum) Image memory are required.
Network Scanning,
Internet Fax
Storing
Document
Transmission
GDI/PCL/PS
Printing
Receiving
Data
Printing
Received Data
Facsimile
(Sending)
Storing
Document
Memory
Transmission
Facsimile
(Receiving)
Memory
Receiving
Printing Received
Memory Data
2
Page 3
Operating Instructions Outline
Your Mach i n e
Getting To Know
Getting To Know
Your Machine
Facsimile Features
Internet Fax
Features
Advanced Facsimile
Features
Quick Operation Chart
(See pages 2-21)
Instructions for Sending/Receiving Documents and Creative
Features
(See pages 22-45)
General Descriptions for Internet Fax, Sending/Receiving
Documents via LAN and Creative Features
(See pages 46-75)
Advanced Facsimile Features
(See pages 76-113)
Advanced Internet
Fax Features
Setting Your
Machine
Printing Journals
and Lists
Problem Solving
Advanced Internet Facsimile Features
(See pages 114 -135)
Setting/Adjusting or Customizing Your Machine
• Adjusting the Volume, etc.
• User Parameters
• One-Touch/Abbreviated Dialing Numbers
• Fax Parameters
• Access Code (See pages 136-155)
Printing Journals, Fax Parameter, Program
and Phone Book (One-Touch/ABBR.) List
(See pages 156-165)
Troubleshooting
• Information Codes, etc.
(See pages 166-177)
Appendix
Specifications, Glossary, Index, etc.
(See pages 178-193)
3
Page 4
Getting To Know Your Machine
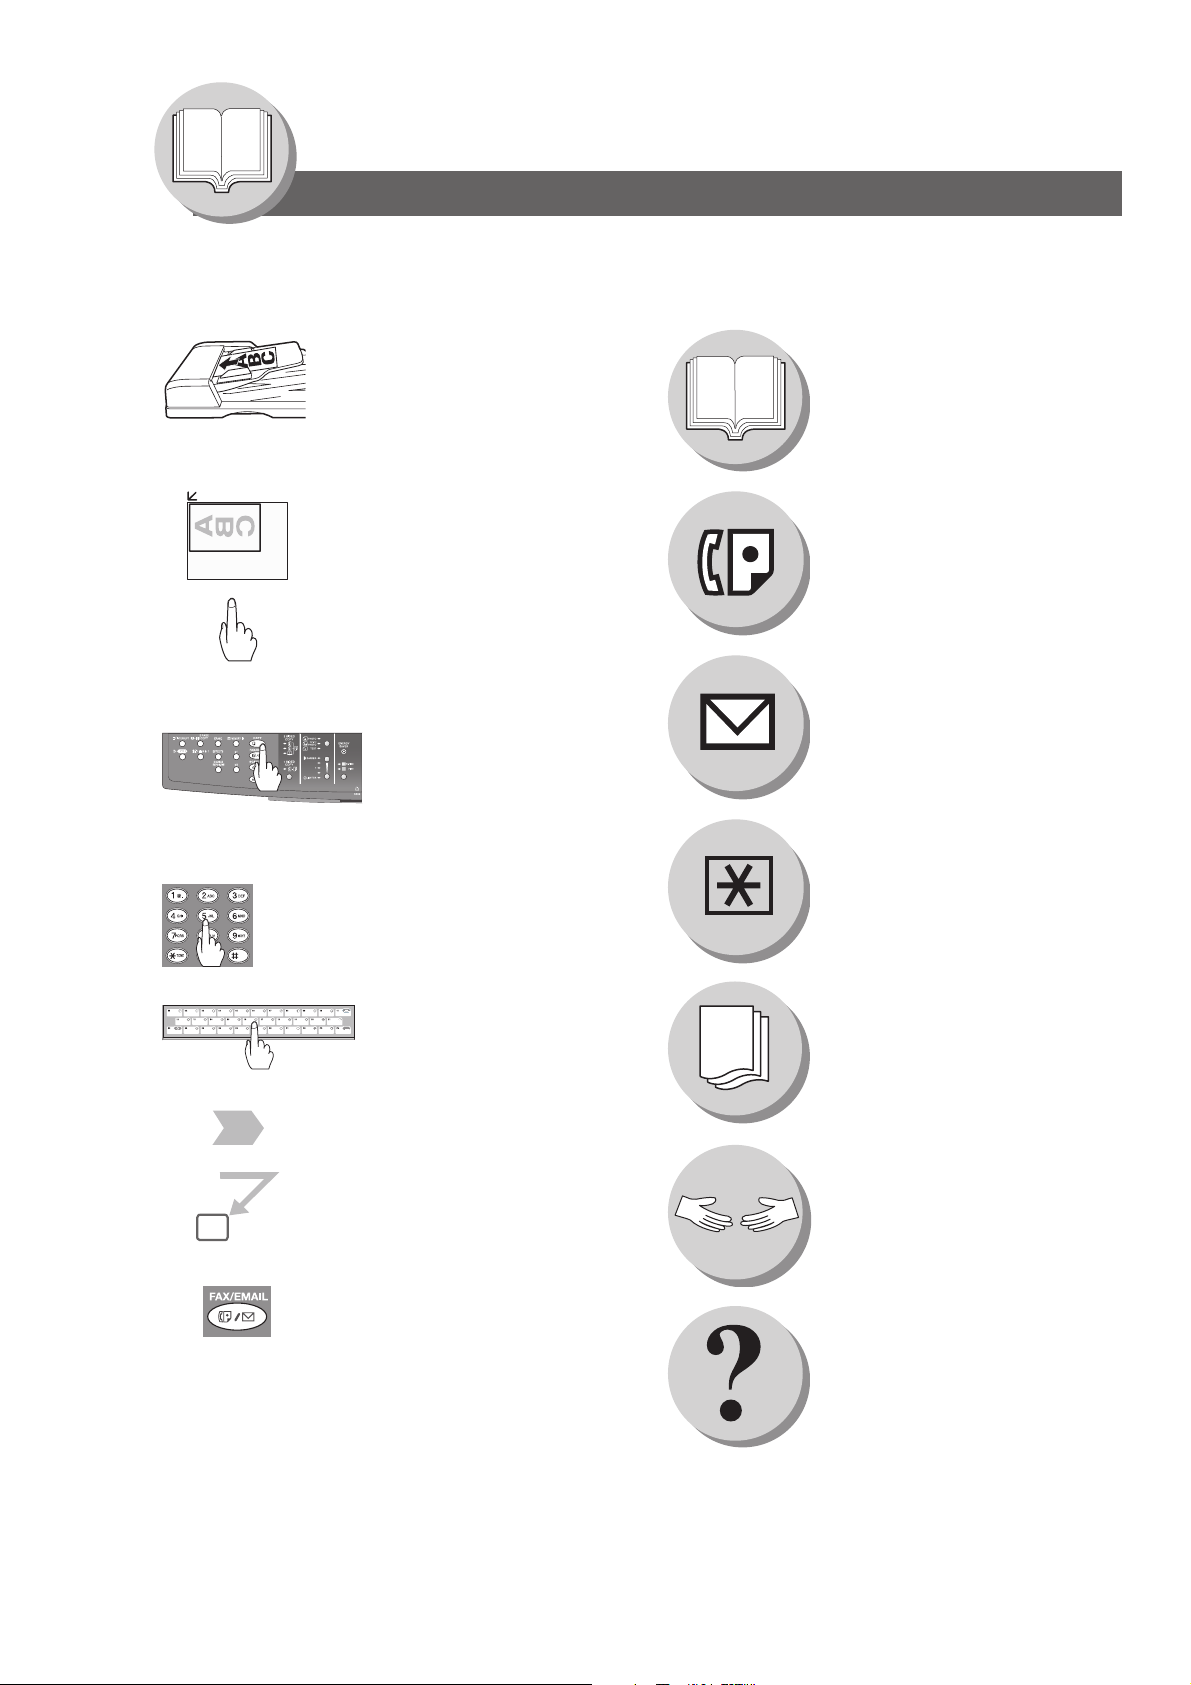
Symbols/Icons
The following Symbols/Icons are used throughout this operating instructions manual.
Place original(s) on the ADF/i-ADF
Place original on the Platen
(Sheet)
Press any Hard Key on the Control
Panel
Press Hard Key
Input numbers with keypad
• Telephone Number
• Email Address, etc.
Getting to know your machine
before starting
Facsimile Features
Internet Fax Features
When setting the machine
modes
Input text with a Keyboard (Option)
Go to next step
Go to next step (below)
5
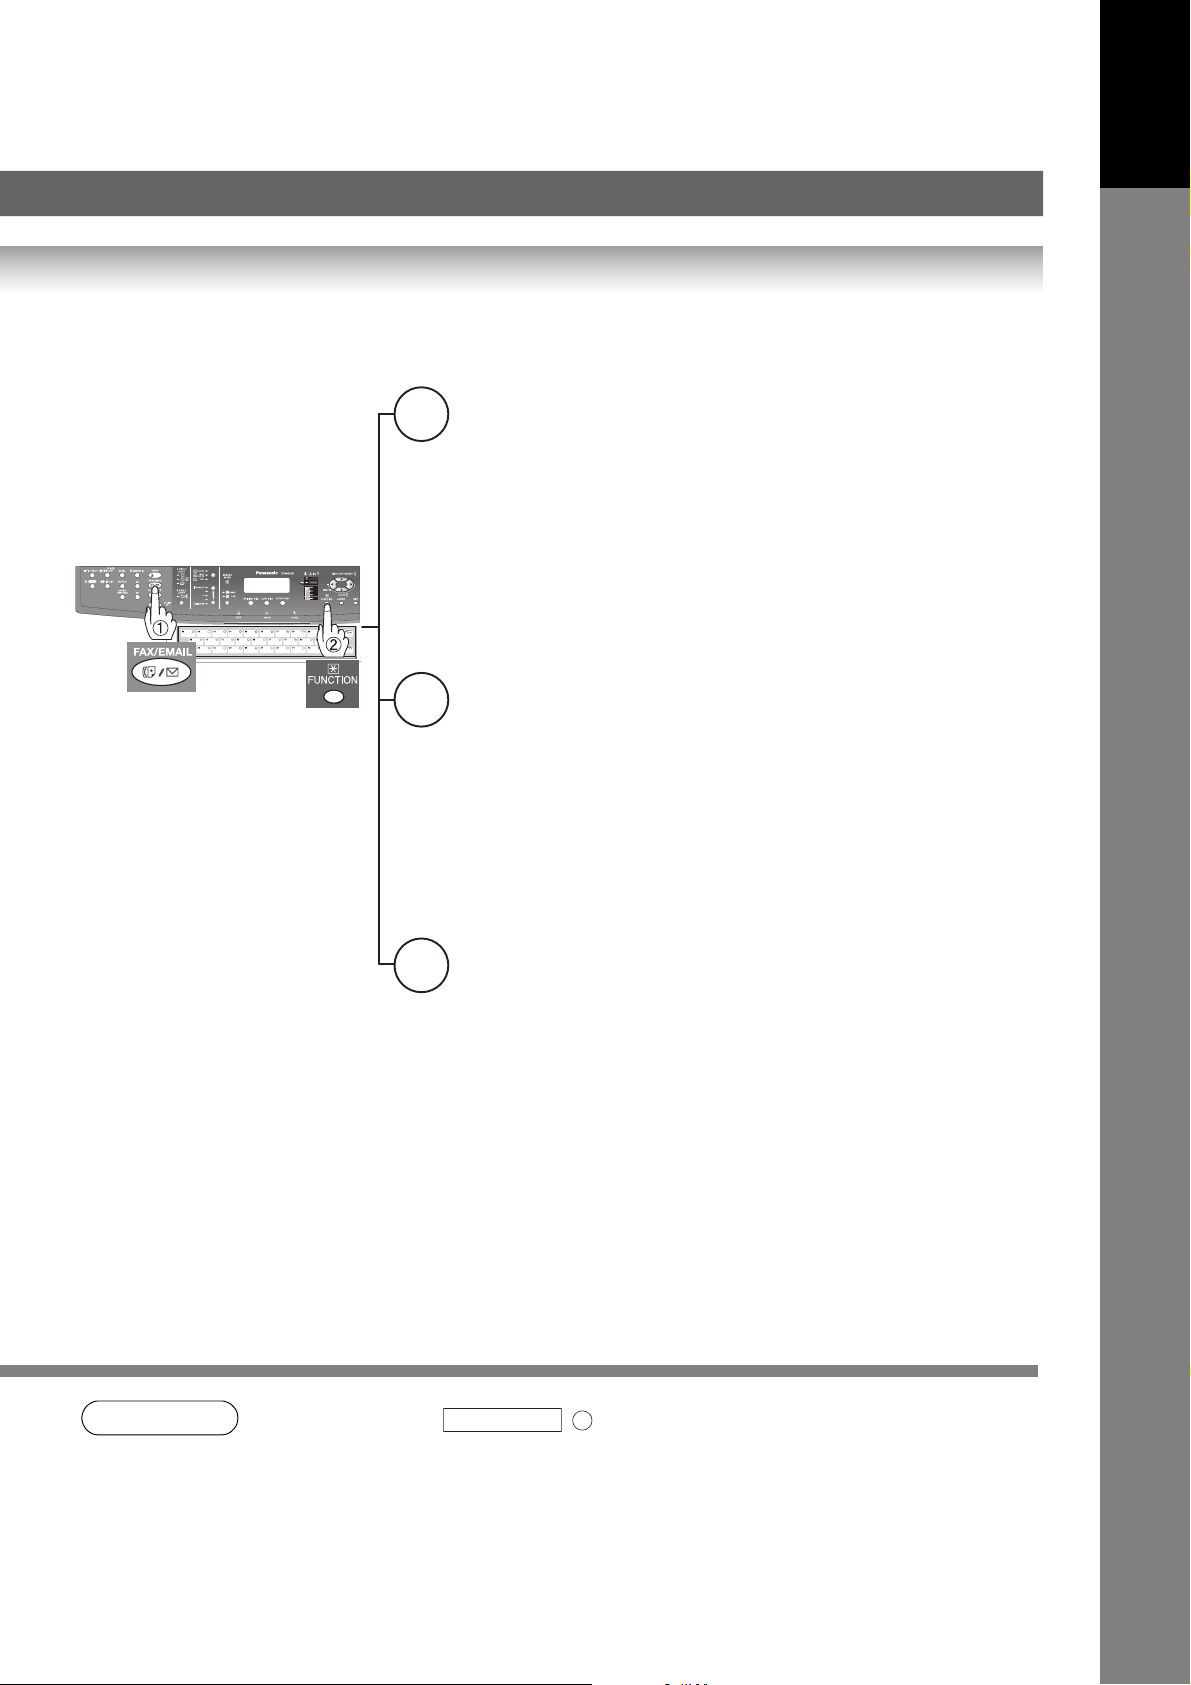
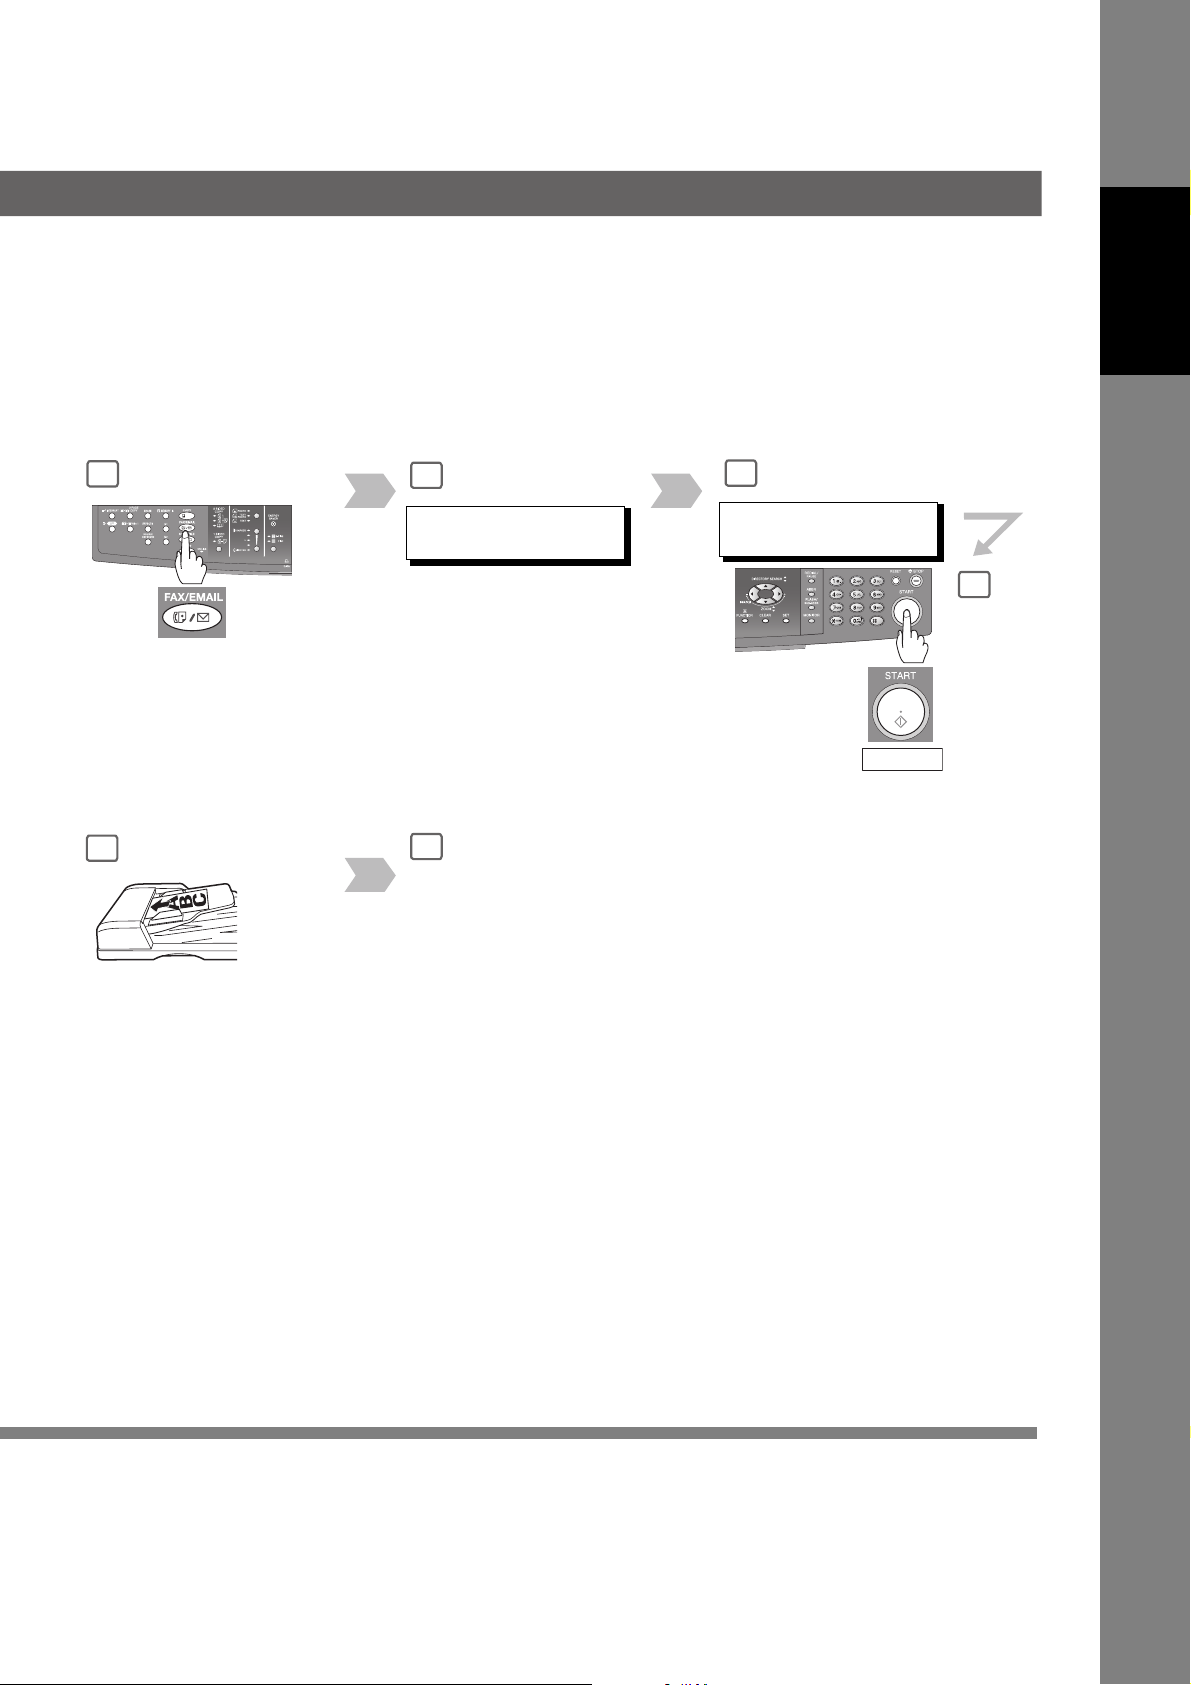
Ensure that the indicator lamp of the
FAX/EMAIL button is ON. If not, press
the FAX/EMAIL mode button.
To change the input mode to
Telephone Number or Email Address
when the indicator lamp of FAX/
EMAIL mode button is ON.
When printing the Journals
and Lists
Problem solving
Others
4
Page 5

Getting To Know Your Machine
Table of Contents
Getting To Know Your Machine
Useful Office Functions/Operating Instructions .............................. 2
Operating Instructions Outline .......................................................... 3
Symbols/Icons..................................................................................... 4
Basic Operation Chart ........................................................................ 10
Basic Operation ............................................................................ 10
To Stop the Transmission .............................................................. 12
Rotated Transmission .................................................................... 12
2-Sided Transmission (Scan) (DP-8020E only) ............................. 12
Mode Setting ....................................................................................... 14
Changing the Modes...................................................................... 14
Connecting the Cables ....................................................................... 16
Safety Information .............................................................................. 17
Control Panel....................................................................................... 18
How To Enter Characters .............................................................. 20
Your Mach i n e
Getting To Know
Facsimile Features
Sending Documents ........................................................................... 22
Memory Transmissions.................................................................. 22
Direct Transmission Reservation
(Priority Transmission Reservation)............................................... 24
On-Hook Dialing............................................................................. 26
Off-Hook Dialing (Voice Mode Transmission) ................................ 26
To Stop the Transmission .............................................................. 26
To Cancel the Direct Transmission Reservation............................ 26
Job Build ........................................................................................ 28
Receiving Documents ........................................................................ 30
Automatic Reception...................................................................... 30
Manual Reception .......................................................................... 30
Print Reduction Setting .................................................................. 30
Substitute Memory Reception........................................................ 30
Duplex (2-Sided) Receiving (DP-8020E only)................................ 31
Timer Controlled Communications ................................................... 32
General Description ....................................................................... 32
Deferred Transmission................................................................... 32
Deferred Polling ............................................................................. 32
Batch Transmission............................................................................ 34
General Description ....................................................................... 34
Real-Time Batch Transmission...................................................... 34
Polling .................................................................................................. 36
General Description ....................................................................... 36
Preparing to be Polled ................................................................... 36
Poll Documents from Another Station............................................ 38
5
Page 6

Getting To Know Your Machine
Table of Contents
Facsimile Features
Program Keys (Option)...................................................................... 40
General Description ....................................................................... 40
Setting for Group Dialing ............................................................... 40
Setting for Deferred Transmission ................................................. 42
Setting for One-Touch Key ............................................................ 44
Changing the Program Key Setting ............................................... 44
Internet Fax Features
Pre-Installation Information/Features .............................................. 46
Setup (SMTP Mail Server/POP3 Client) ............................................ 48
Internet Communication Features.................................................... 52
Transmission/Reception ................................................................ 52
Internet Fax Delivery Notice (MDN)............................................... 52
Direct SMTP .................................................................................. 53
Internet Mail Reception.................................................................. 53
Important Information........................................................................ 54
General Description ....................................................................... 54
Differences Between Internet Fax and Regular Fax...................... 54
Transmitted Document Confirmation ............................................. 54
Your Machine Cannot Make a Phone Call via LAN ....................... 54
Dual Port Communication.............................................................. 54
Transmission Resolution ............................................................... 54
Internet Mail Reception.................................................................. 55
Sending a Document to a PC via LAN........................................... 55
Internet Relayed Transmission ...................................................... 55
Setting the Internet Parameters........................................................ 56
Basic Parameters .......................................................................... 56
User Parameters (Internet Parameters) ........................................ 56
Sending Documents .......................................................................... 58
Manual Mail Addressing ................................................................ 58
One-Touch/Abbreviated and Search Mail Addressing................... 60
Entering the Mail Header............................................................... 62
Ledger Size Document Transmission............................................ 64
Returned Mail ................................................................................ 66
Receiving Documents........................................................................ 68
General Description ....................................................................... 68
Internet Fax Received on a PC...................................................... 68
Receiving Mail from a POP Server................................................ 70
Setting the POP Parameters ......................................................... 70
Unattended Email Reception from the POP Server....................... 72
Manual Email Retrieval from the POP Server ............................... 72
Program Keys (Option)...................................................................... 74
Setting the POP Access Key ......................................................... 74
Using POP Access Key ................................................................. 74
6
Page 7

Advanced Facsimile Features
Confidential Mailbox........................................................................... 76
Sending a Confidential Document ................................................. 76
Polling a Confidential Document.................................................... 78
Receiving a Confidential Document to Your Machine's
Mailbox........................................................................................... 78
Storing a Confidential Document ................................................... 80
Printing a Confidential Document ................................................. 80
Deleting a Confidential Document ................................................. 82
Sub-Addressing .................................................................................. 84
Sending a Fax with Sub-Address................................................... 84
Setting the Sub-Address into an Phone Book................................ 84
Fax Cover Sheet.................................................................................. 86
Using the Fax Cover Sheet............................................................ 86
Password Communications............................................................... 88
Setting Password Transmission..................................................... 88
Setting Password Reception.......................................................... 88
Using Password Transmission....................................................... 90
Using Password Reception............................................................ 90
Receive To Memory ............................................................................ 92
Setting RCV To Memory Password ............................................... 92
Setting the RCV To Memory .......................................................... 92
Printing Documents........................................................................ 92
PIN Code Access ................................................................................ 94
Selecting the Access Method (Prefix or Suffix).............................. 94
Dialing with a PIN Code ................................................................. 94
Selective Reception ............................................................................ 96
General Description ....................................................................... 96
Setting the Selective Reception ..................................................... 96
Department Code ................................................................................ 98
General Description ....................................................................... 98
Setting the Department Code ........................................................ 98
Changing or Erasing the Department Code................................... 100
Sending Document with Department Code.................................... 100
Printing a Department Code Journal.............................................. 102
Edit File Mode...................................................................................... 104
General Description ....................................................................... 104
Printing or Viewing a List ............................................................... 104
Changing the Start Time or the Station of a File............................ 106
Deleting a File ................................................................................ 106
Printing Out a File .......................................................................... 108
Adding Documents into a File ........................................................ 108
Retry an Incomplete File ................................................................ 110
Completion Notice .............................................................................. 112
Enabling Completion Notice .......................................................... 112
Disabling the Completion Notice ................................................... 112
Your Mach i n e
Getting To Know
7
Page 8

Getting To Know Your Machine
Table of Contents
Advanced Internet Fax Features
Internet Communication Features.................................................... 114
Inbound Routing ............................................................................ 114
Dynamic Host Configuration Protocol (DHCP) .............................. 115
SMTP Authentication..................................................................... 115
Lightweight Directory Access Protocol (LDAP).............................. 115
Relayed Transmission ................................................................... 116
Sender Selection ................................................................................ 118
Setting the Sender Selection ......................................................... 118
Sending Documents with Sender Selection................................... 118
Inbound Routing ................................................................................ 120
Setting the Routing Parameters..................................................... 120
One-Touch/ABBR Dialing for Inbound Routing ............................. 120
Fax Forward........................................................................................ 122
Setting Fax Forward ...................................................................... 122
Relayed Transmission ....................................................................... 124
General Description ....................................................................... 124
Relay Network ............................................................................... 125
Setting Up Your Machine as an Internet Relay Station ................. 127
Programming the End Receiving Station into your
Auto Dialer..................................................................................... 128
Sending via an Internet Relay........................................................ 130
Sending Document(s) from a PC to a G3 Fax Machine ................ 132
Printouts and Reports .................................................................... 134
Setting Your Machine
Adjusting the Volume and Dialing Method (Tone or Pulse)........... 136
Setting the Dialing Method (Tone or Pulse)................................... 136
Setting the Monitor Volume ........................................................... 136
Setting the Ringer Volume............................................................. 136
User Parameters................................................................................. 138
General Description ....................................................................... 138
Setting the User Parameters ......................................................... 138
One-Touch (Option)/Abbreviated Dialing Numbers........................ 140
Entering One-Touch (Option)/Abbreviated Dialing Numbers......... 140
Entering One-Touch (Option)/Abbreviated Email Address............ 140
Printing Out Directory Sheet (Option) ............................................ 142
Changing or Erasing the Settings of the One-Touch/
Abbreviated Dialing Numbers ........................................................ 144
Fax Parameters .................................................................................. 146
General Description ....................................................................... 146
Setting the Fax Parameters........................................................... 146
Access Code....................................................................................... 154
General Description ....................................................................... 154
Setting the Access Code ............................................................... 154
Operating FAX/EMAIL with the Access Code................................ 154
8
Page 9

Printing Journals and Lists
Transaction Journal............................................................................ 156
Communication Journal (COMM. JOURNAL)................................... 158
One-Touch/Abbreviated and Directory Search List......................... 160
Program List (Option)......................................................................... 162
Fax Parameter List.............................................................................. 164
Problem Solving
Troubleshooting.................................................................................. 166
Information Code ................................................................................ 168
Email ABBR Programming Errors..................................................... 172
Error Messages Sent to the Sender............................................... 172
Internet Fax Return Receipt Error Messages ................................ 173
Verification Stamp and Flash Memory Card..................................... 174
Verification Stamp.......................................................................... 174
Installing the Flash Memory Card .................................................. 176
Your Mach i n e
Getting To Know
Appendix
Specifications...................................................................................... 178
FCC Notice for Users in USA ............................................................. 180
Notice to Users in Canada ................................................................. 182
Glossary............................................................................................... 184
ITU-T Image No. 1................................................................................ 191
Index..................................................................................................... 192
9
Page 10
Getting To Know Your Machine
Basic Operation Chart
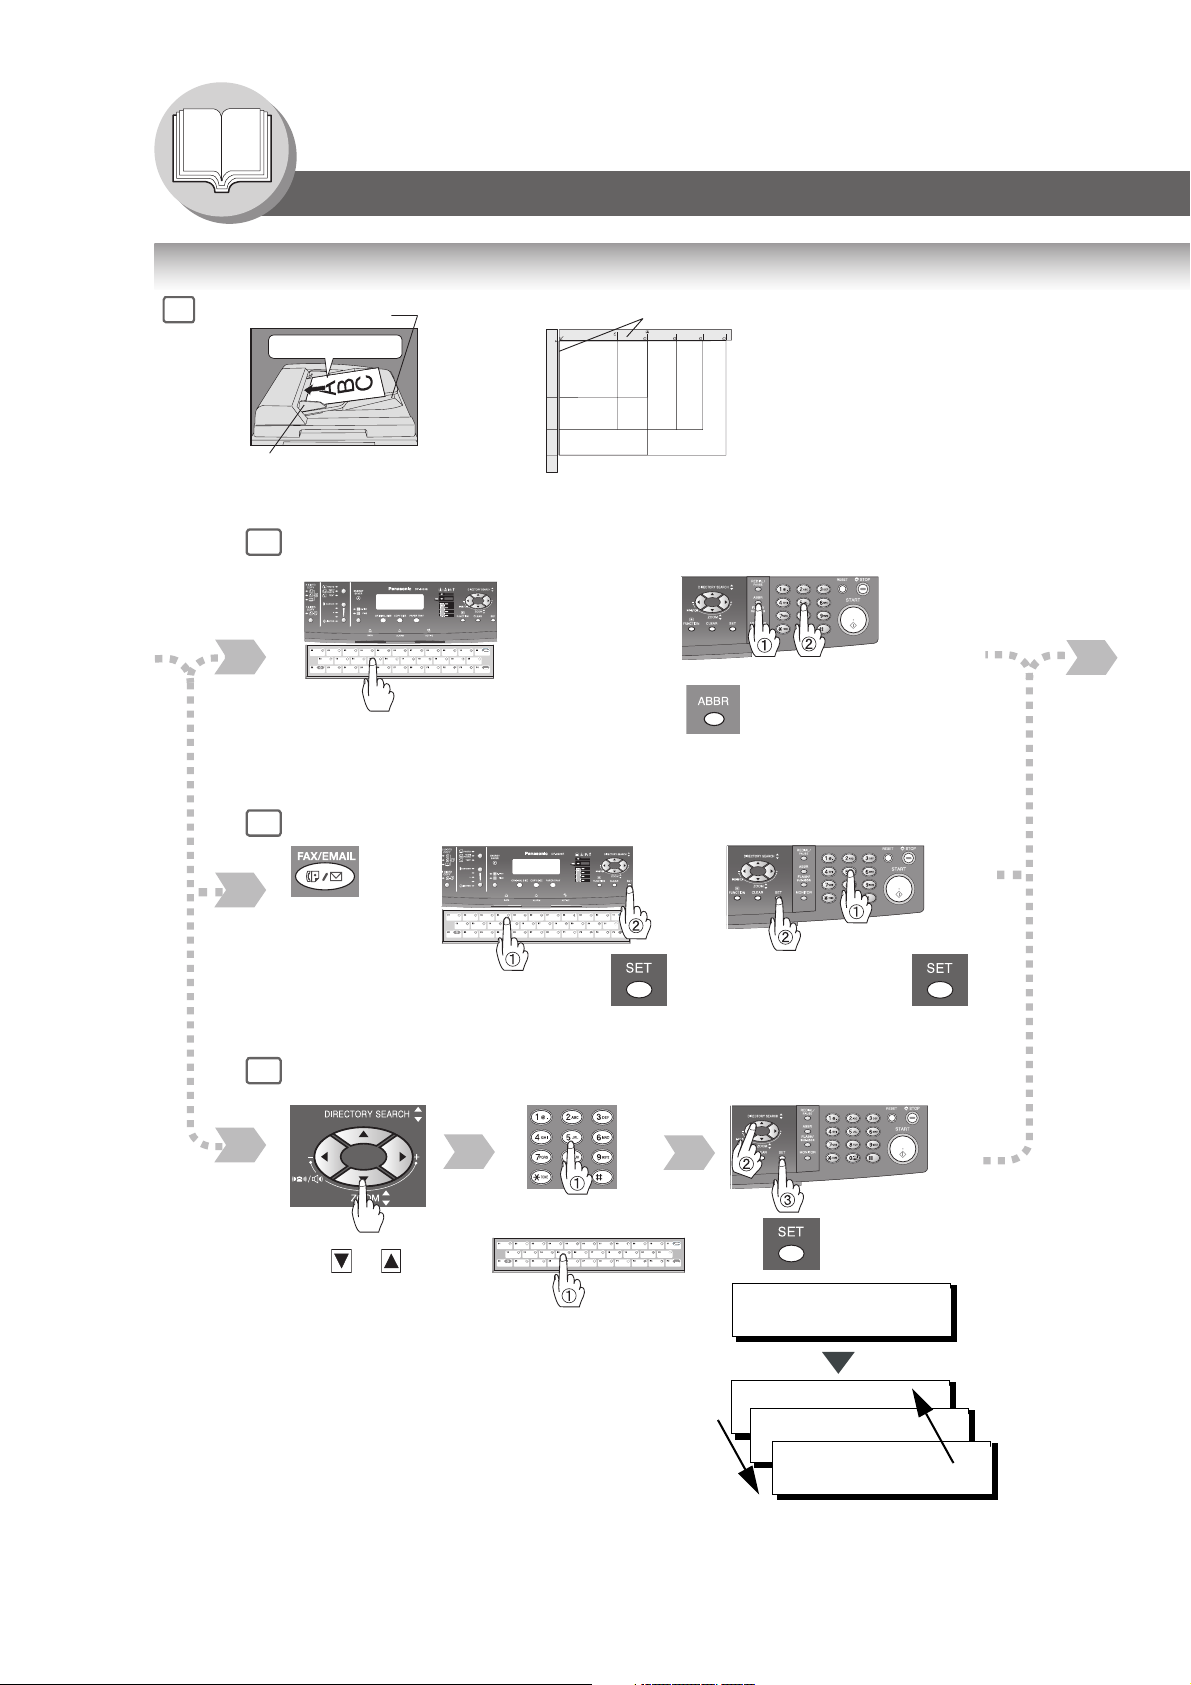
Basic Operation
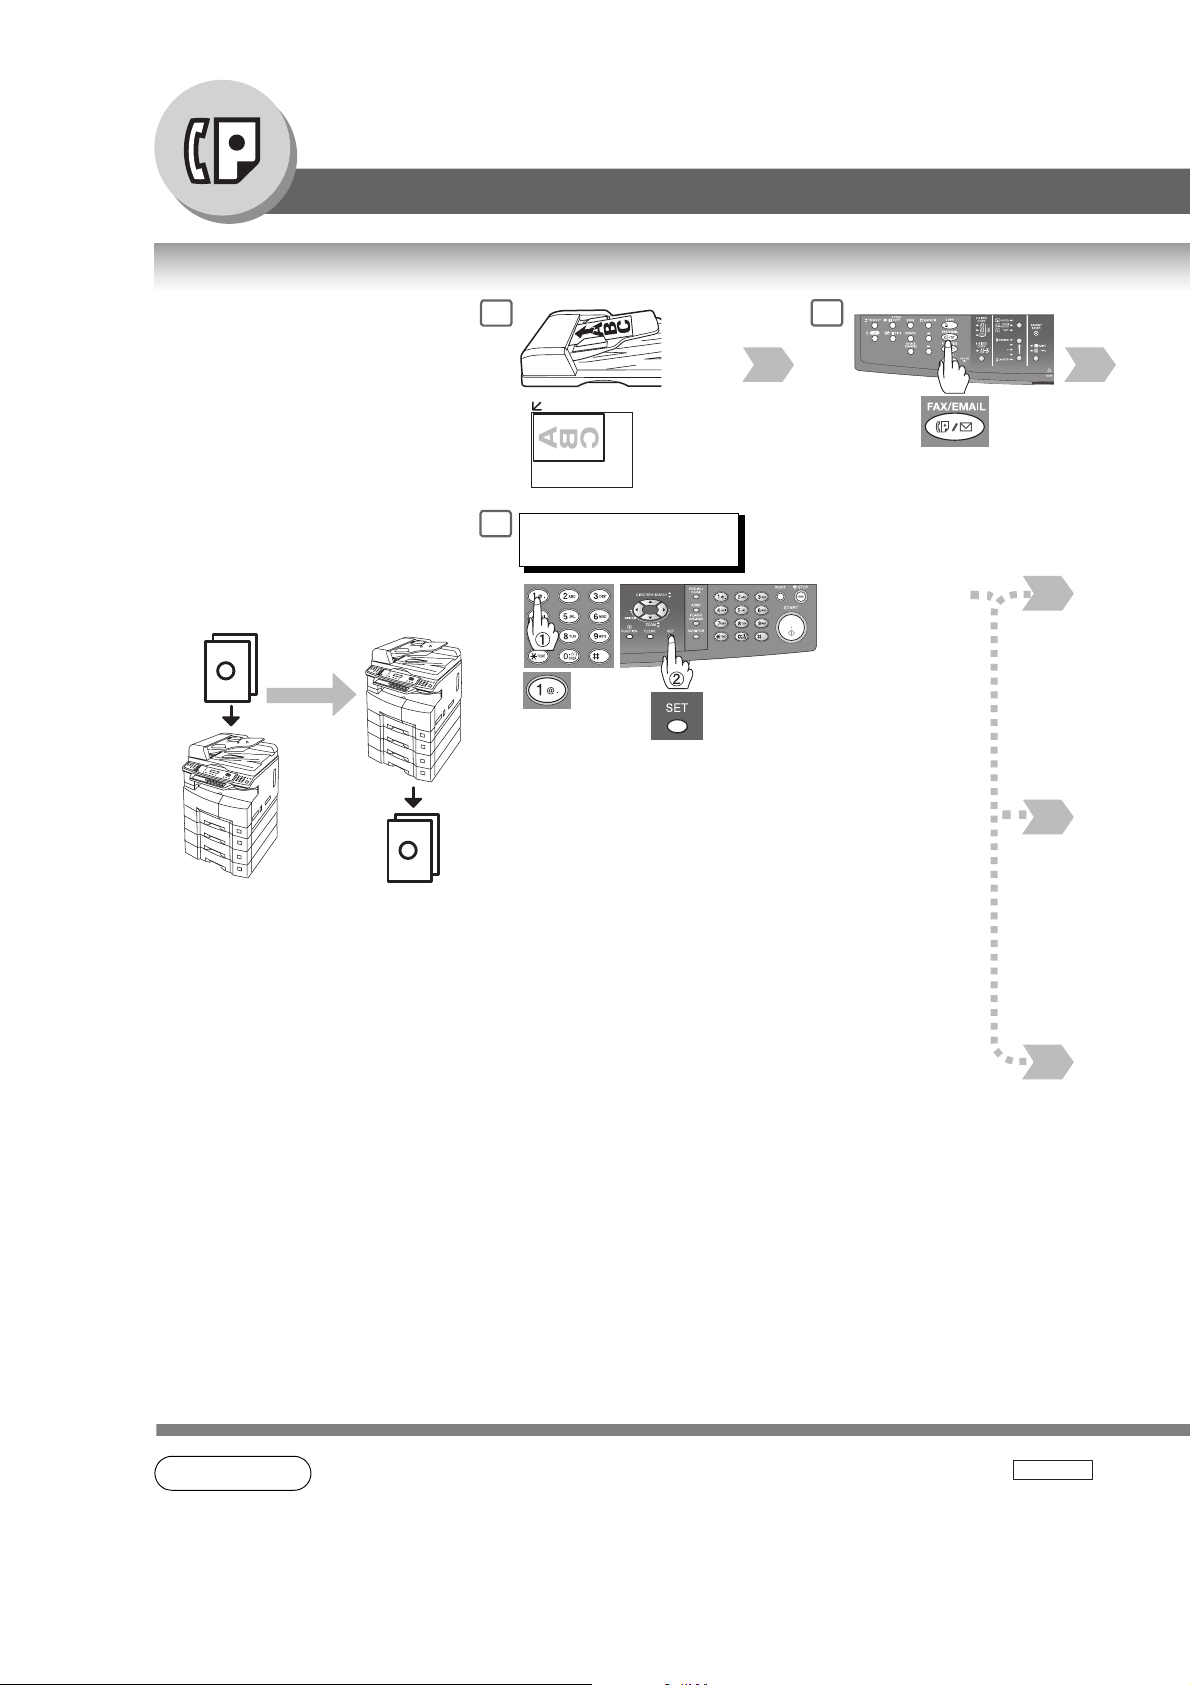
1
From
ADF/
i-ADF
(Option)
Original Guides
Adjust to the original’s width.
ADF Tray
Face up
One-Touch/ABBR Dialing (see Note 3)
4a
(One-Touch is available when a Keyboard option is installed.)
or
From
Platen
Original Guides
INV
INV
INV
INV
INV
LTR
LGV
LTR
LDR
INV-R
LTR
LTR
LTR-R
LGL
LGL
LDR
LDR
INV: Invoice, LTR: Letter
LGL: Legal, LDR: Ledger
or
• Place originals face down on the
Platen or face up on the ADF/i-ADF.
• For originals smaller than Invoice
size, position the original within the
Invoice area and select Invoice.
• Select original size when placing the
document on the Platen.
(Option)
When the Telephone Number(s) or Email
Address(es) are registered in the
One-Touch/Abbreviated Dialing.
or
Manual Number Dialing (Up to 50 Stations)
4b
Change to Email
Address or
Telephone No.
input mode.
or
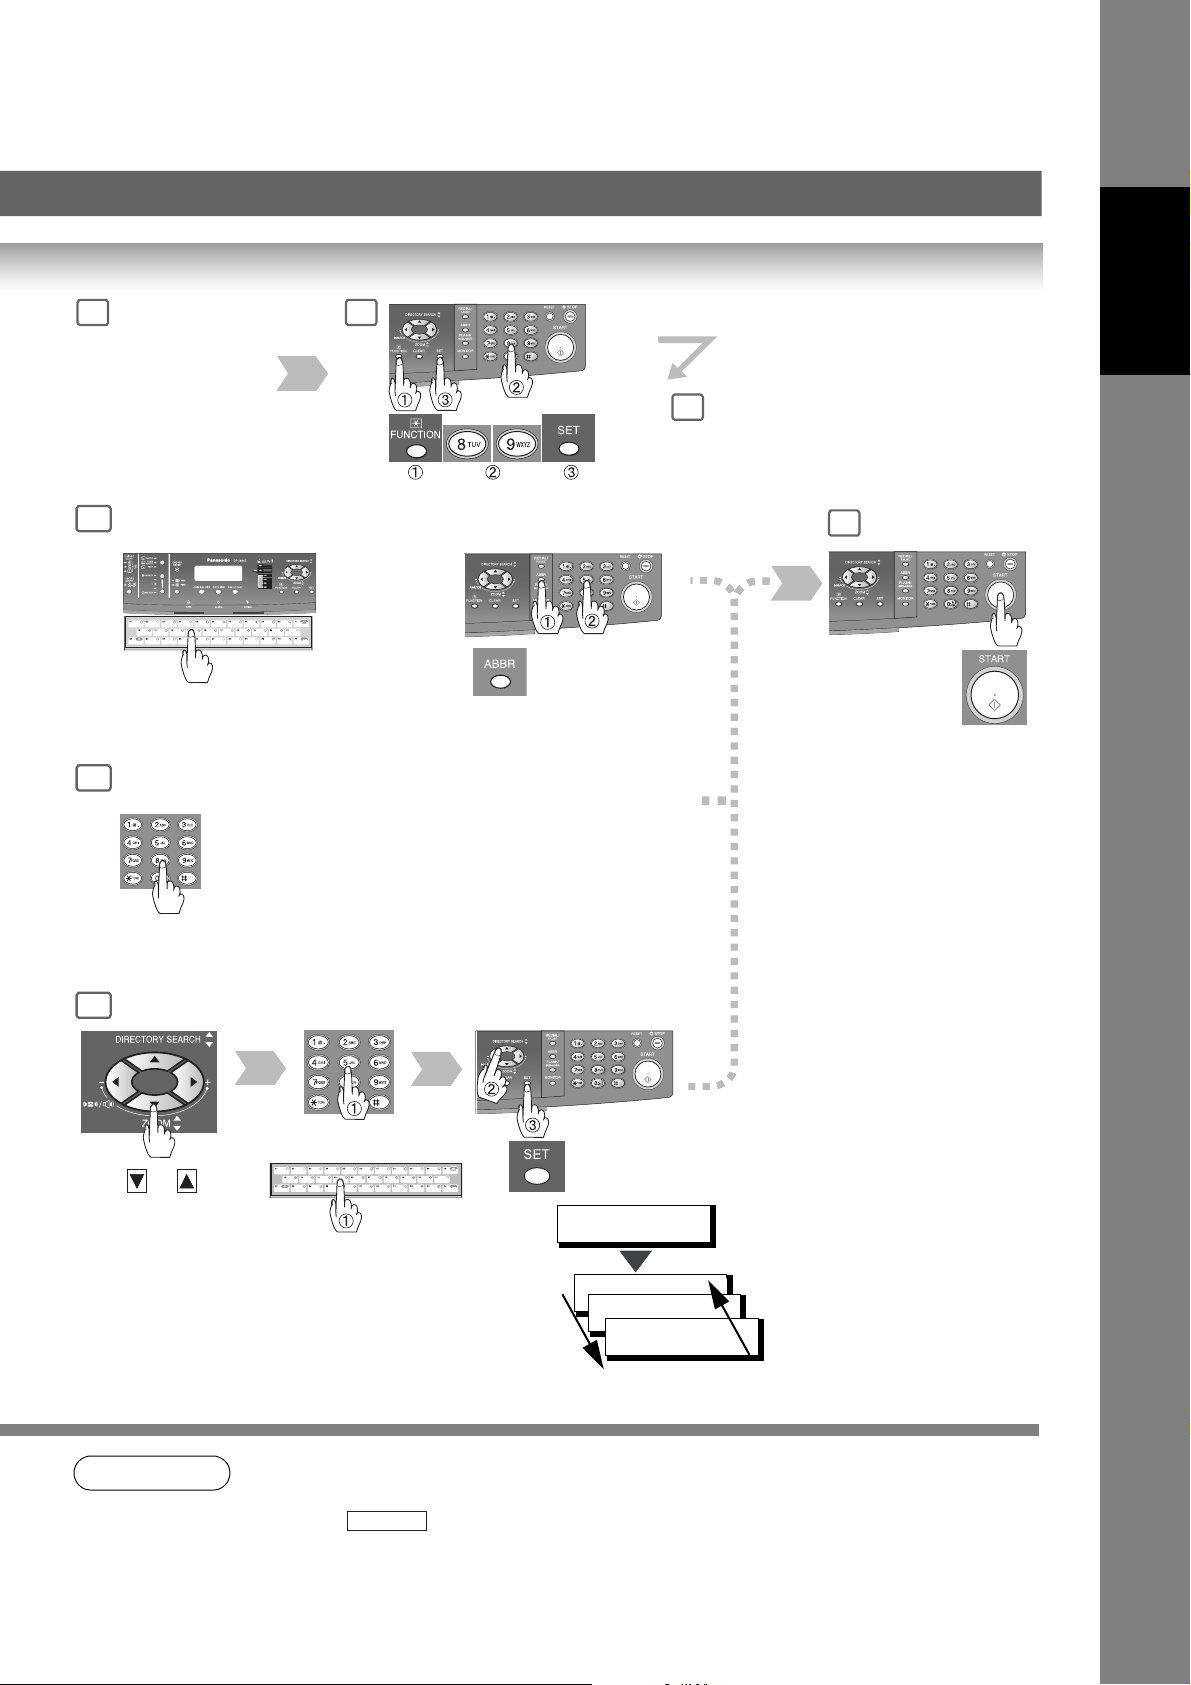
Directory Search Dialing (see Note 3)
4c
Email Address(es) +
(When a Keyboard option is installed)
or
Enter the first letter(s) of the
name you wish to search.
Ex: "SA"
or
(Option)
+ ABBR No.
or
Email Address or
Telephone Number +
ENTER LETTER(S)
SA
[100]SALES 3
5551234
[005]SALES 2
(3-digit)
5551234
[001]SALES
5551234
10
Page 11
Your Mach i n e
Getting To Know
2
If set on other
function mode.
5 6
The document(s) is stored into
memory with a file number.
Then starts sending the
document(s).
3
Select the desired
Transmission setting.
(See the right column)
4a
4b
4c
When an original is scanned from
the Platen Glass, the message
"ANOTHER ORIGINAL?" is
shown.
Place another original,
then press .
Machine starts
sending.
START
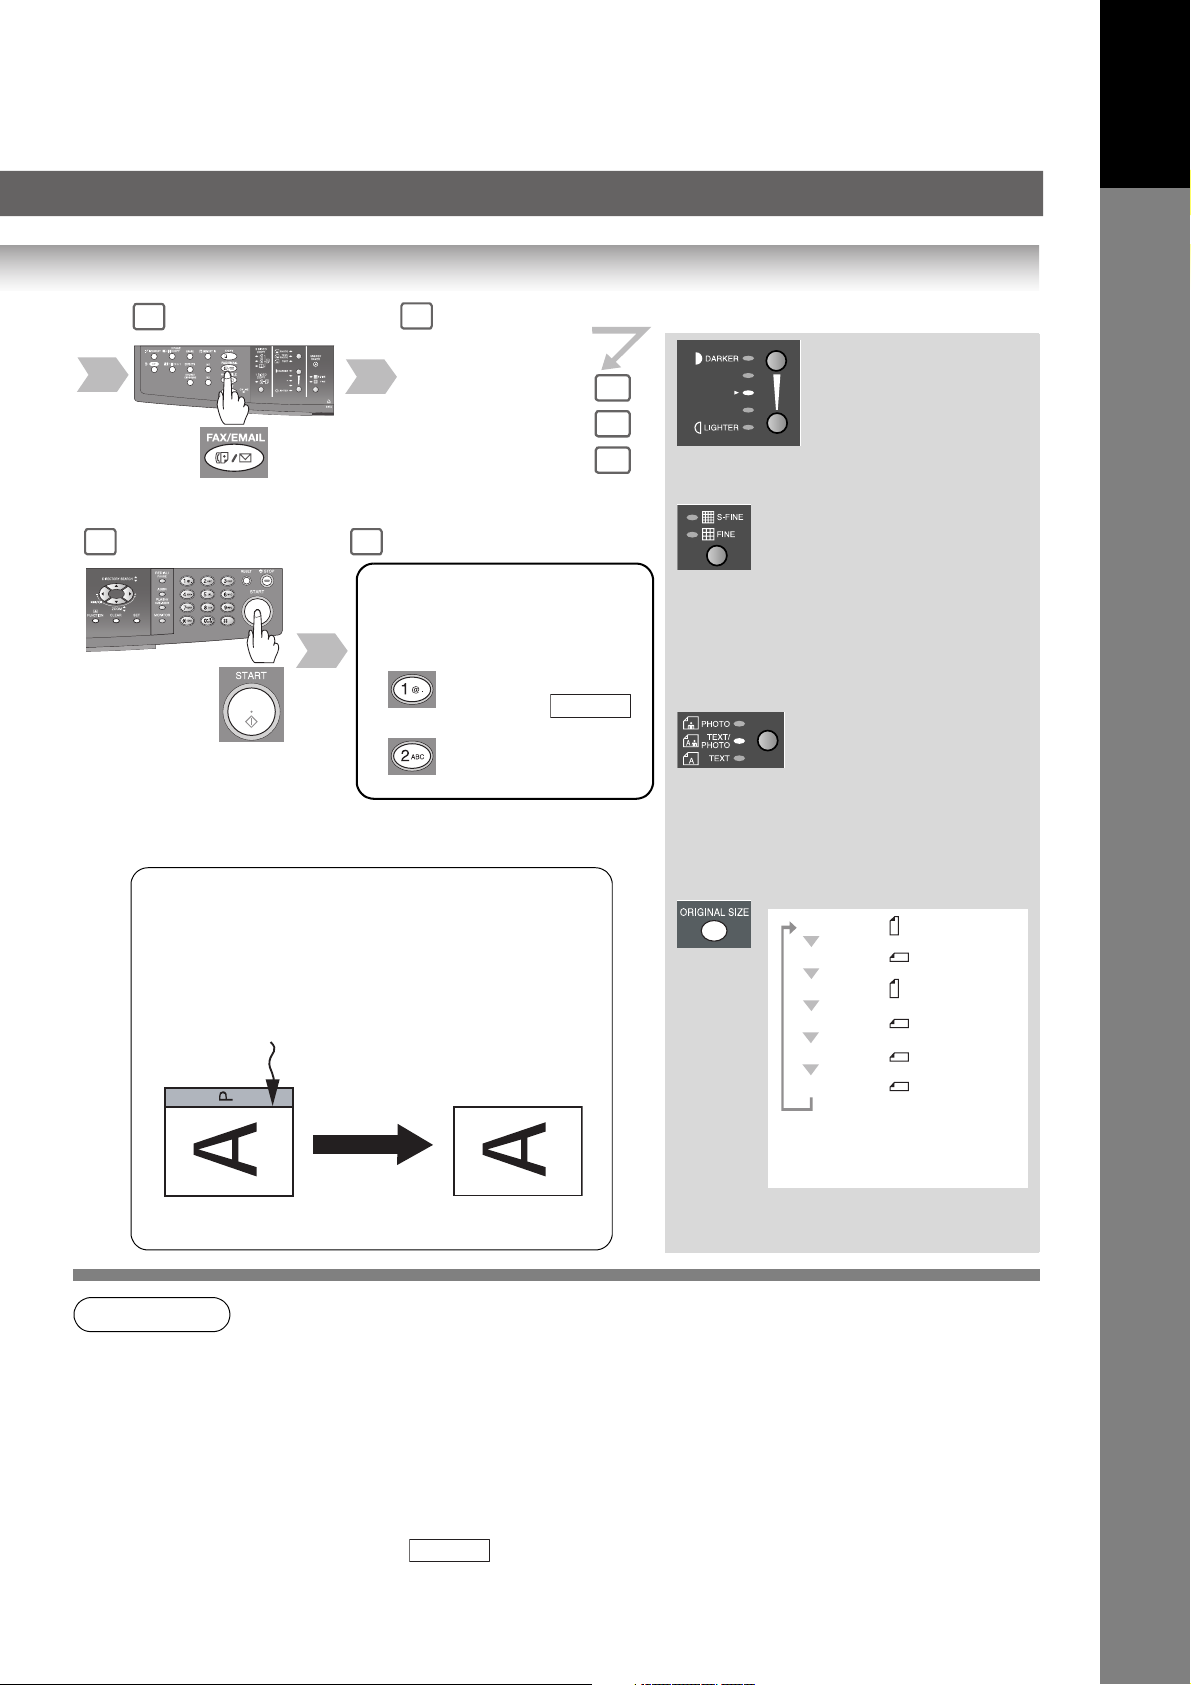
Transmission Settings
S-FINE for finer detailed originals
(400 or 600 dpi, see page 148)
FINE for detailed originals
STANDARD for standard originals
(both LED lights go out)
PHOTO for photo or illustration
TEXT/
PHOTO
TEXT for text only originals
originals
for text and photo originals
Sending Non-Standard Size Documents
When transmitting non-standard size document(s), the
machine will not send the portion of the document that
exceeds the standard size ("P" portion).
NOTE
1. If your machine sounds an alarm (pi-pi-pi) in Step 4 above, this indicates that the Dialer is Full
(more than 50 full Email Addresses are entered or 50 transmission reservations including G3
communication have been already reserved).
2. To utilize the Email functions, your machine needs to be set up properly on your network.
Please contact your network administrator for actual network setup.
3. Auto Dialer (One-Touch/ABBR.) is only available when stations are registered.
(See page 140)
4. When transmitting in Photo or S-Fine mode, there is a possibility that printing quality may
deteriorate at the remote station due to its reception capability. If this occurs, re-send with
Direct Transmission or use "Fine" Resolution.
5. You can send the same document(s) to multiple stations by repeating Steps 4a, 4b or 4c, and
then pressing .
6. To stop the transmission, see page 12.
START
LETTER : Letter
LETTER : Letter-R
INVOICE : Invoice
INVOICE : Invoice-R
LEDGER : Ledger
LEGAL : Legal
ORIGINAL SIZE key is
*
used for Platen Glass.
Legal size with ADF only.
*
11
Page 12

Getting To Know Your Machine
Basic Operation Chart
To Stop the Transmission
1
2
COMMUNICATION STOP ?
1:YES 2:NO
SAVE AS INCOMP.FILE?
3
1:YES 2:NO
: Saves the file.
1
: Deletes the file.
2
• If Fax Parameter No. 31 (INC.
FILE SAVE) is "Valid".
(See page 149)
• To retry an Incomplete File, see
page 110.
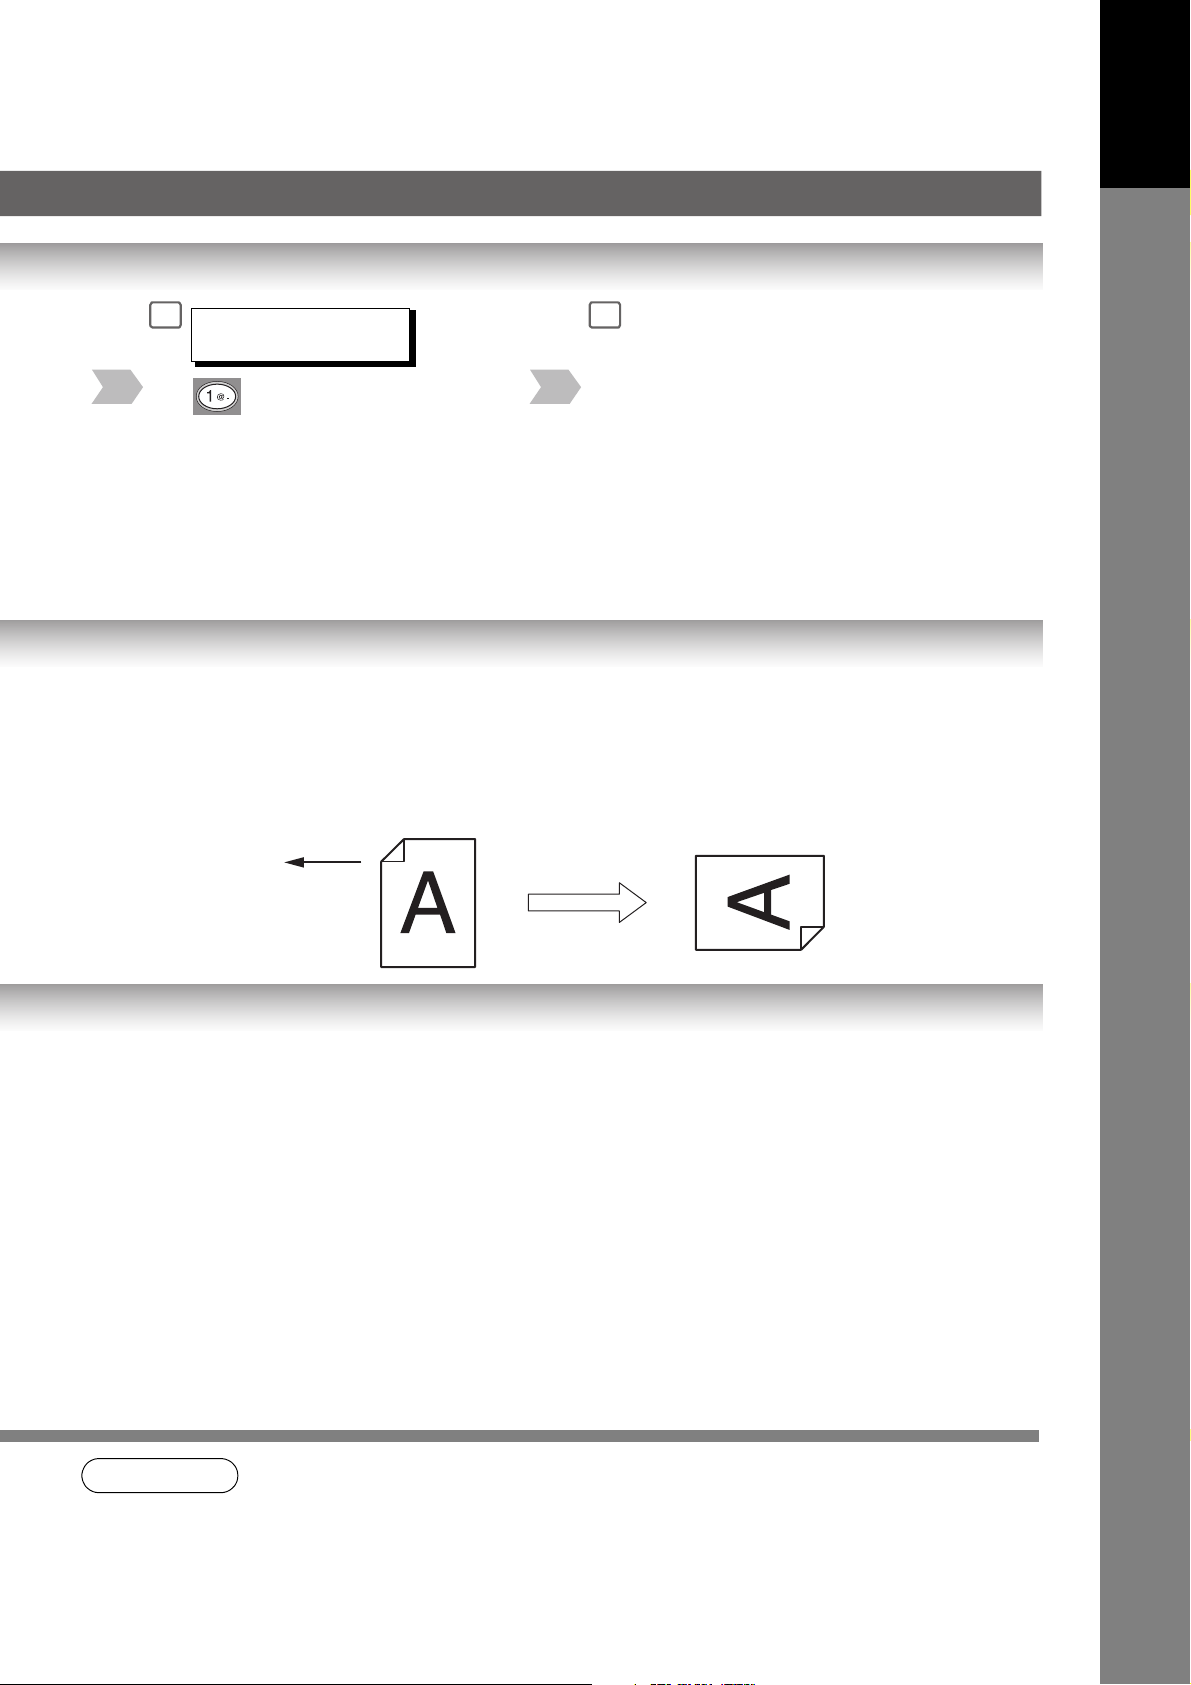
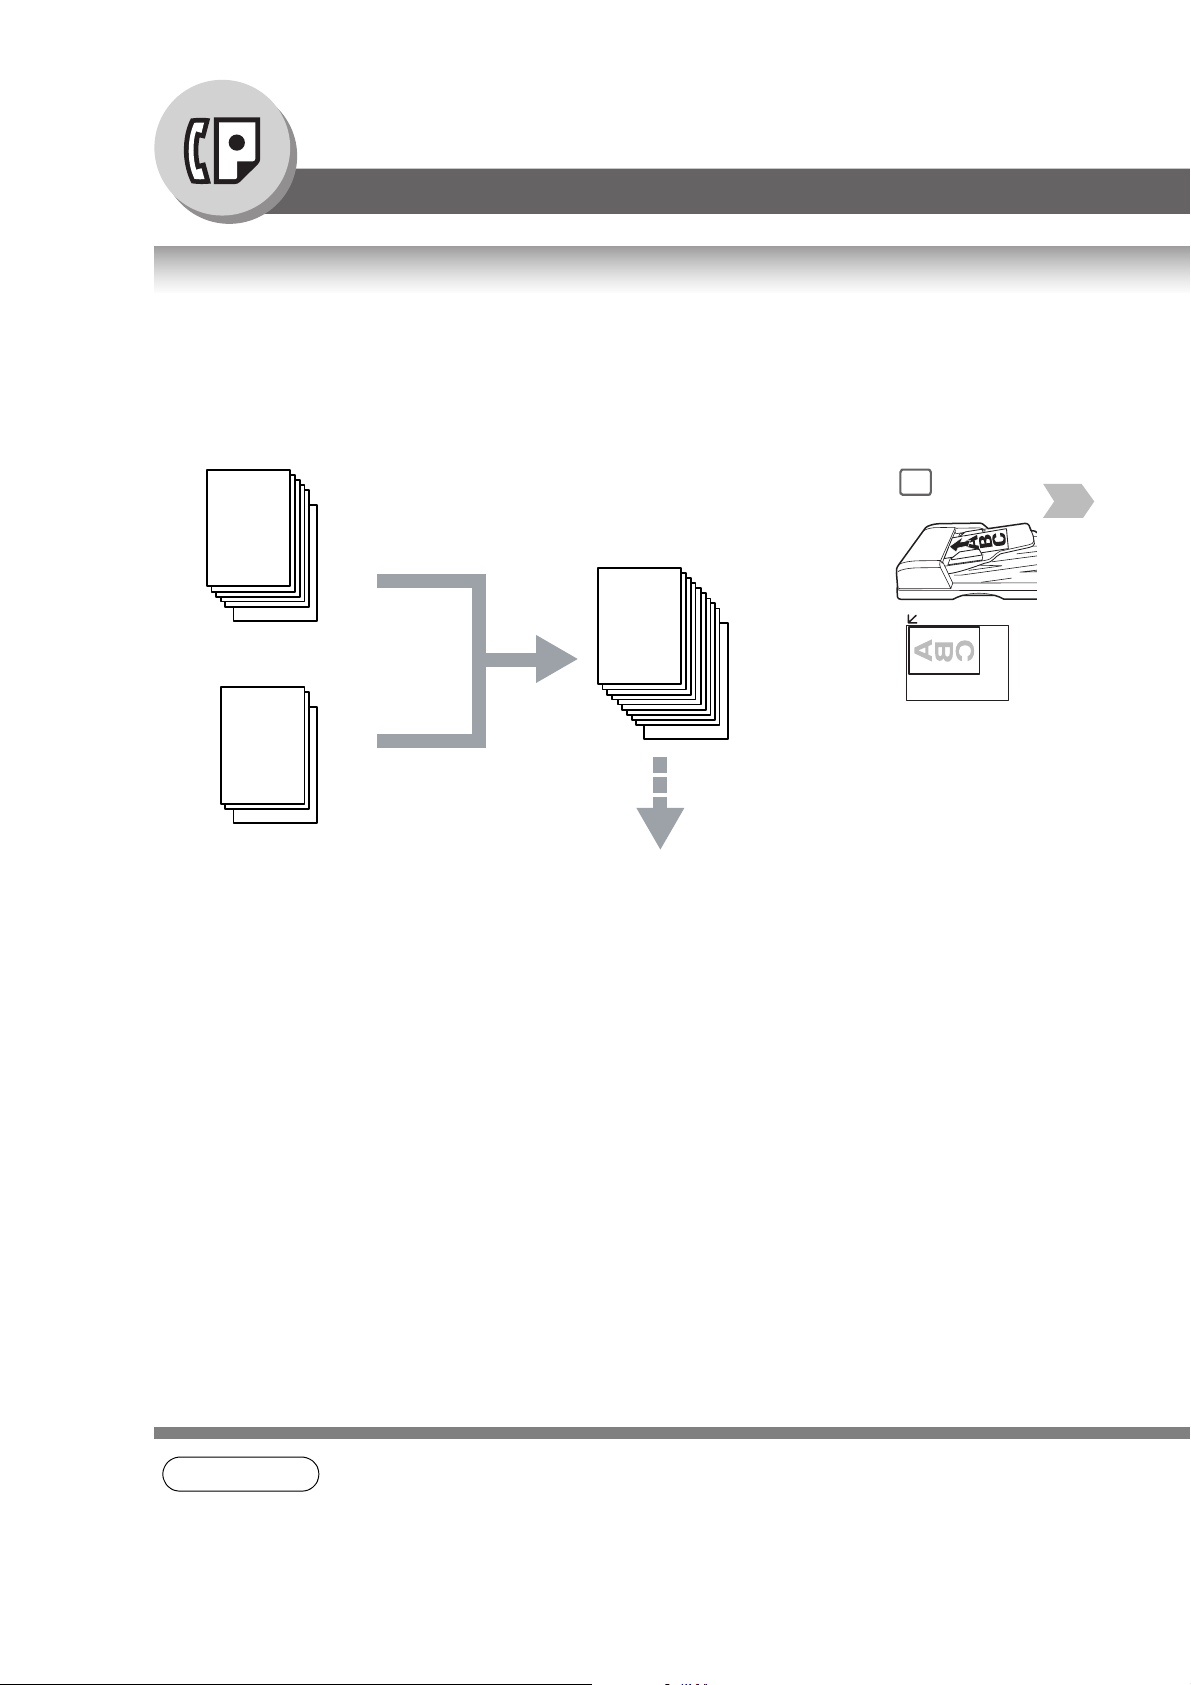
Rotated Transmission
Letter or A4 size Original(s) are placed in a Portrait ( ) direction, the document(s) will be rotated by 90º and then
transmitted in a Landscape ( ) direction. The document(s) will be printed the same size as the transmitted
originals at the Receiving Station.
Fax Parameter No. 78 (ROTATION XMT) set to:
• Invalid
Letter or A4 Original
Sends with 70%
Reduction
Receiving Station:
Letter or A4 paper
2-Sided Transmission (Scan) (DP-8020E only)
This machine has duplex SCAN capabilities. (It is available when the i-ADF (DA-AR202) option is installed.)
Scanning 2-Sided Original(s) using the Basic Menu:
• 2-Sided Original = ON ( lights)
Duplex Scan Receiving Station
NOTE
1 SIDED COPY
1. To select the Comm. Journal printout condition, change the setting of Fax Parameter No. 12.
(See page 148)
2. If the Email transmission cannot be completed for any reason, the Email may be returned
undelivered; otherwise no reply will be printed.
12
Page 13
Your Mach i n e
Getting To Know
4
PRINT COMM. JOURNAL?
1:YES 2:NO
Print Communication Journal
(COMM. JOURNAL).
• Valid (Default Position)
Letter or A4 Original
5
Stop the transmission.
Receiving Station:
Letter or A4 paper
Sends with
Rotated Transmission
NOTE
3. Rotation XMT requires the use of Memory Transmission.
4. Verification Stamp is disabled during 2-Sided Scanning.
13
Page 14
Getting To Know Your Machine
Mode Setting
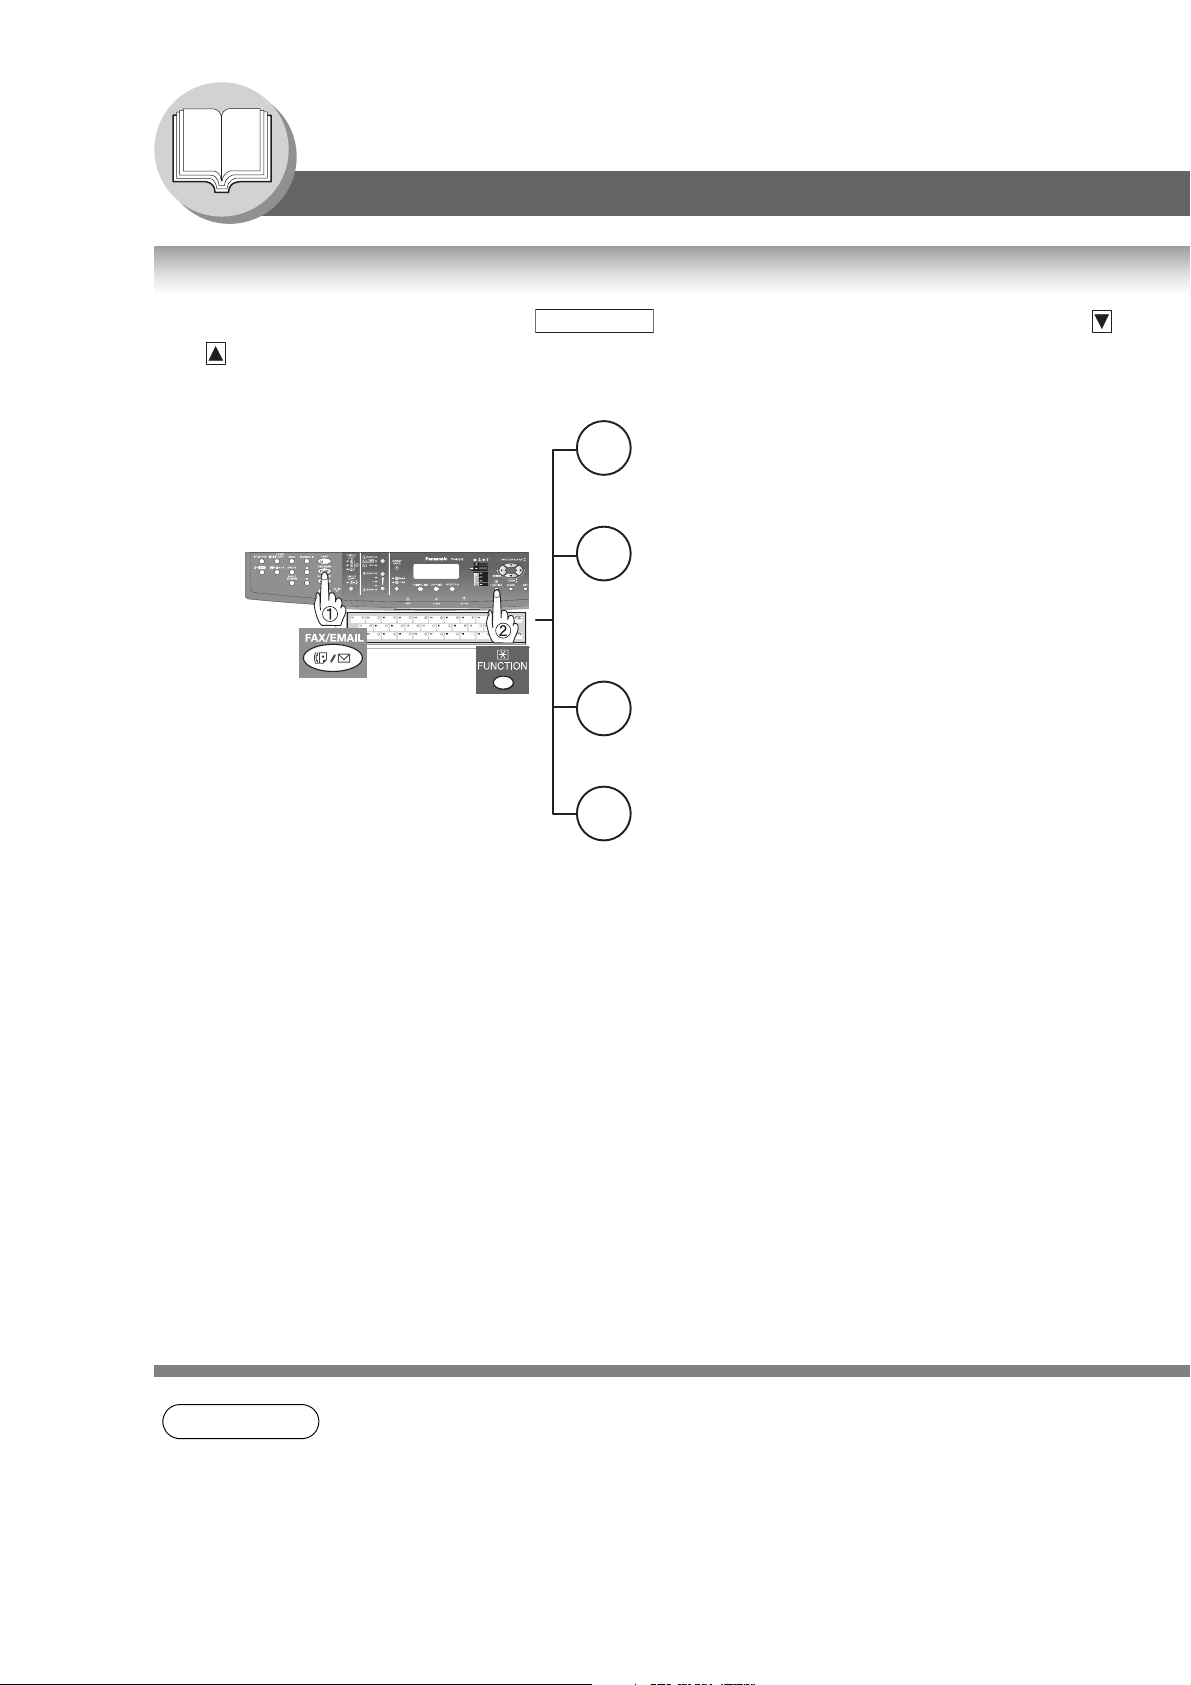
Changing the Modes
Any function can be started by first pressing and then entering the function number, or by pressing
or scroll key repeatedly until the desired function appears on the display.
If set on other
function mode.
FUNCTION
1
2
3
6
Deferred Communication
1 = Deferred XMT (see page 32)
2 = Deferred Polling (see page 32)
3 = Advanced Communication
Advanced Communication
2 = Confidential Communication (see page 76)
4 = Sub-Address XMT (see page 84)
5 = LAN Relay XMT (see Note 1) (see page 130)
Polling
1 = Polling (see page 38)
2 = Polled (see page 36)
Print Out
1 = Journal (Print/View) (see page 156)
2 = One-Touch (see Note 2)/Abbreviated/
Directory Search List (see page 160)
3 = Program List (see Note 2) (see page 162)
4 = Fax Parameter List (see page 164)
6 = Individual XMT Journal
7 = Directory Sheet (see Note 2) (see page 142)
14
NOTE
1. If Fax Parameter No. 140 is not preset to "Valid " position, which enables you to use its
function, the display will not show the function. (See page 150)
2. These functions are available when the optional Keyboard (DA-KB180) is installed.
Page 15
If set on other
function mode.
Set Mode
7
1 = User Parameters (see page 138)
• Date & Time
• Logo
• Character ID
• ID Number (Fax Telephone Number)
• Time Zone
(Internet Parameters)
2 = One-Touch (see Note 2)/
Abbreviated Numbers (see page 140)
3 = Program Keys (see Note 2) (see page 40)
4 = Fax Parameters (see page 146)
Select Mode (see Note 3)
8
1 = Communication Journal = OFF/ON/INC (see page 158)
2 = Delivery Notice = OFF/ON (see pages 52 and 152)
3 = Cover Sheet = OFF/ON (see page 86)
4 = Password-XMT = OFF/ON (see Note 4) (see pages 88 and 90)
5 = RCV to Memory = OFF/ON/PRINT (see page 92)
6 = File Type / Name = TIFF/PDF (see pages 59 and 61)
7 = Stamp = OFF/ON
8 = LAN Ledger XMT = OFF/ON (see page 64)
9 = Memory XMT = OFF/ON (see page 22)
Your M achine
Getting To Know
NOTE
Edit File Mode
9
1 = File List (Print/View) (see page 104)
2 = Change Time/Station (see page 106)
3 = Delete File (see page 106)
4 = Print File (see page 108)
5 = Add Document (see page 108)
6 = Retry Incomplete File (see page 110)
3. The Select Mode ( ) settings can be temporarily changed for the current
communication. Upon its completion, however, these parameters are returned to their preset
default values (Home position). You can change the Home position of these settings in the
Fax Parameters mode. (See page 146)
4. If Fax Parameter No. 43 is not preset to the "ON" position, which enables you to use its
function, the display will not reveal this function. (See page 149)
FUNCTION
8
15
Page 16
Getting To Know Your Machine
Connecting the Cables
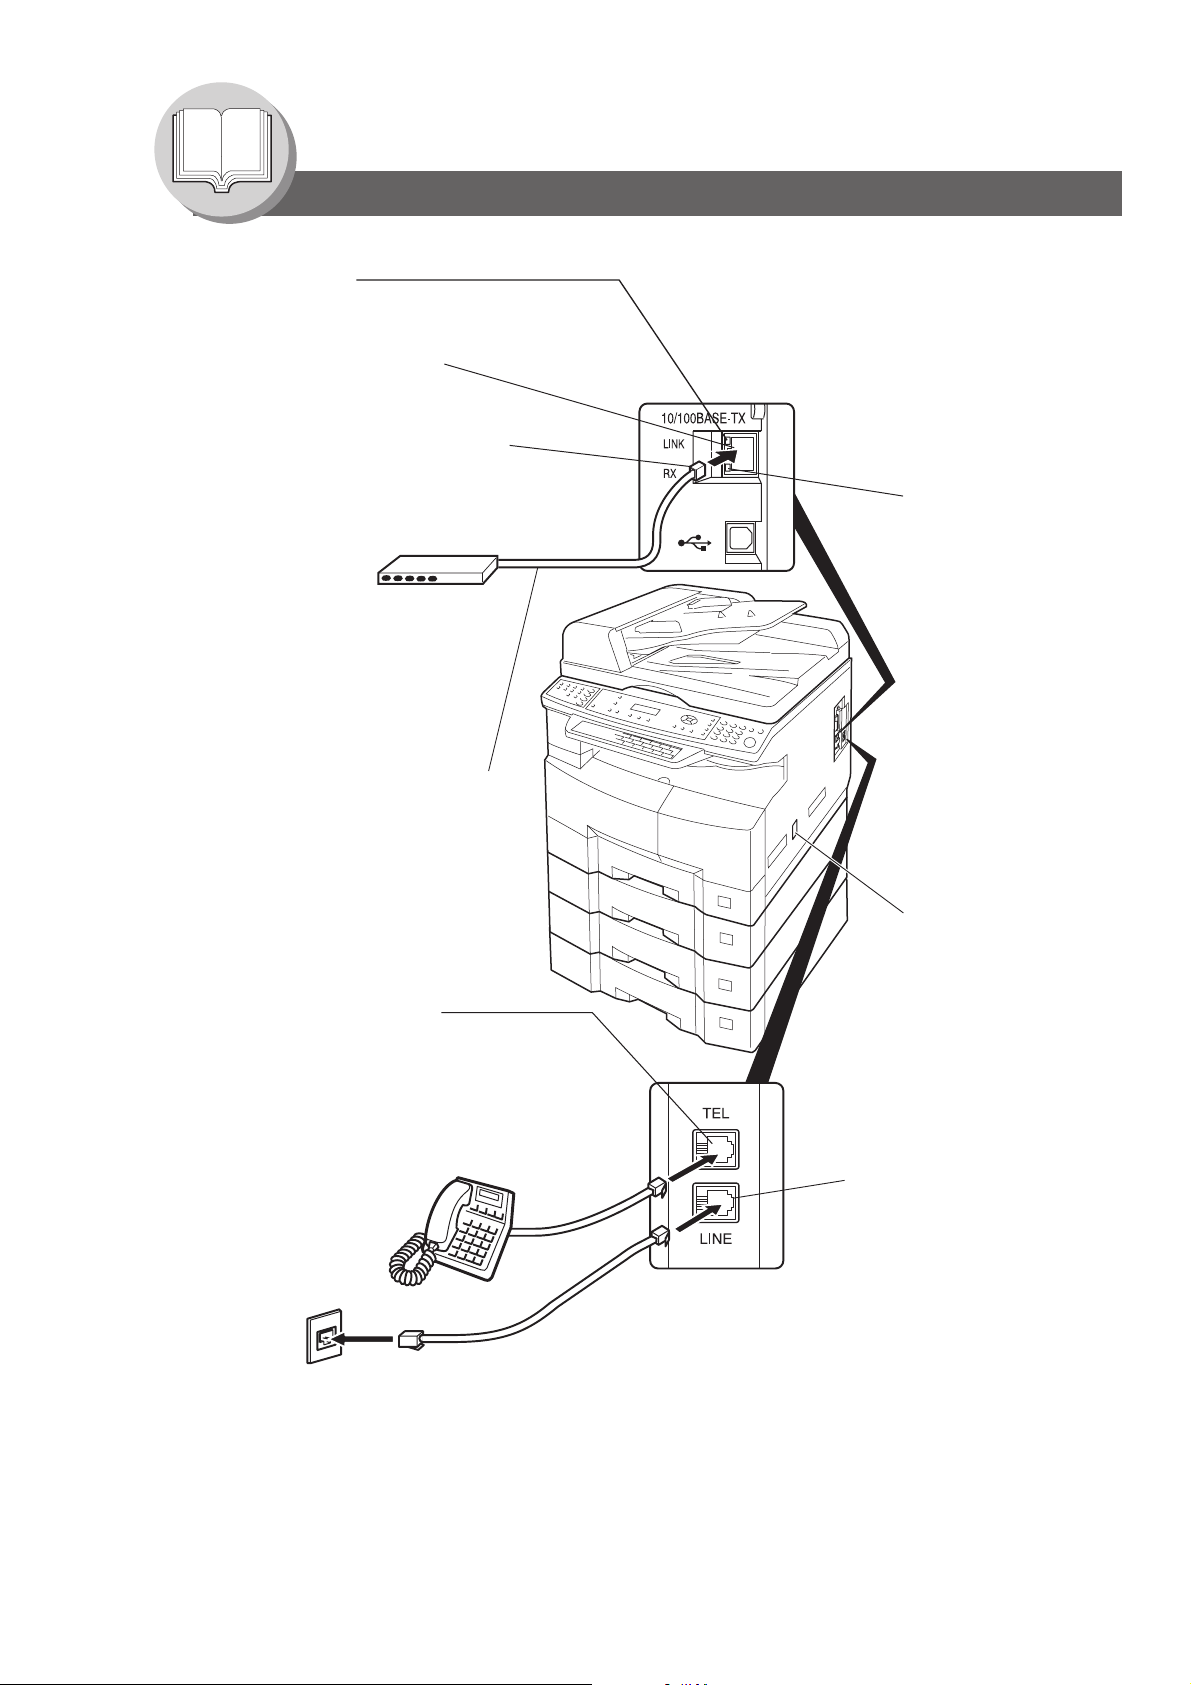
LINK Lamp
Illuminates when connected to the LAN.
Lamp will not turn ON if LAN cable is defective
(contains breaks).
LAN Connection Jack
(10Base-T/100Base-TX)
LAN Cable
(10Base-T/100Base-TX Cable)
Insert the plug until a click is heard.
(LAN cable is not included with the product.)
Purchase a Category 5 Cable, compliant with
EIA/TIA 568-A-5 standard.
10Base-T/100Base-TX Ethernet Hub
ACTIVITY Lamp
Blinks when there
is data traffic
on the LAN.
Ethernet LAN Cable
(10Base-T/100Base-TX)
(Not included)
External Telephone Jack
You can connect an additional standard
single line telephone to the machine.
To connect the telephone, remove the
protective tab on the TEL jack.
Power Switch
After connecting all
cables and Power Cord,
turn the Power Switch on
the Right Side of the
machine to the ON
position.
Telephone Line Jack
Plug one end of the telephone
line cable into the "RJ-11C"
telephone jack supplied by the
telephone company and the
other end into the LINE jack on
the Right Side of the machine.
(Refer to the Dialing Method.
See page 136.)
16
RJ-11C
Telephone Jack
Page 17
Safety Information
CAUTION
Denotes hazards that could result in minor injury or damage to the machine.
• TO REDUCE THE RISK OF SHOCK OR FIRE, USE ONLY NO. 26 AWG OR LARGER TELEPHONE LINE CABLE.
• DISCONNECT ALL POWER TO THE MACHINE BEFORE COVER(S) ARE REMOVED. REPLACE THE COVER(S)
BEFORE THE UNIT IS RE-ENERGIZED.
IMPORTANT SAFETY INSTRUCTIONS
When using your telephone equipment, basic safety precautions should always be followed to reduce the risk of fire,
electric shock and injury to persons, including the following:
• DO NOT USE THIS PRODUCT NEAR WATER, FOR EXAMPLE, NEAR A BATH TUB, WASH BOWL, KITCHEN
SINK OR LAUNDRY TUB, IN A WET BASEMENT OR NEAR A SWIMMING POOL.
Your Mach i n e
Getting To Know
• AVOID USING A TELEPHONE (OTHER THAN A CORDLESS TYPE) DURING AN ELECTRICAL STORM. THERE
MAY BE A REMOTE RISK OF ELECTRIC SHOCK FROM LIGHTNING.
• DO NOT USE THE TELEPHONE TO REPORT A GAS LEAK IN THE VICINITY OF THE LEAK.
SAVE THESE INSTRUCTIONS.
17
Page 18
Getting To Know Your Machine
Control Panel
13
3192
26
No. Icon Contents No. Icon Contents
1
24
25
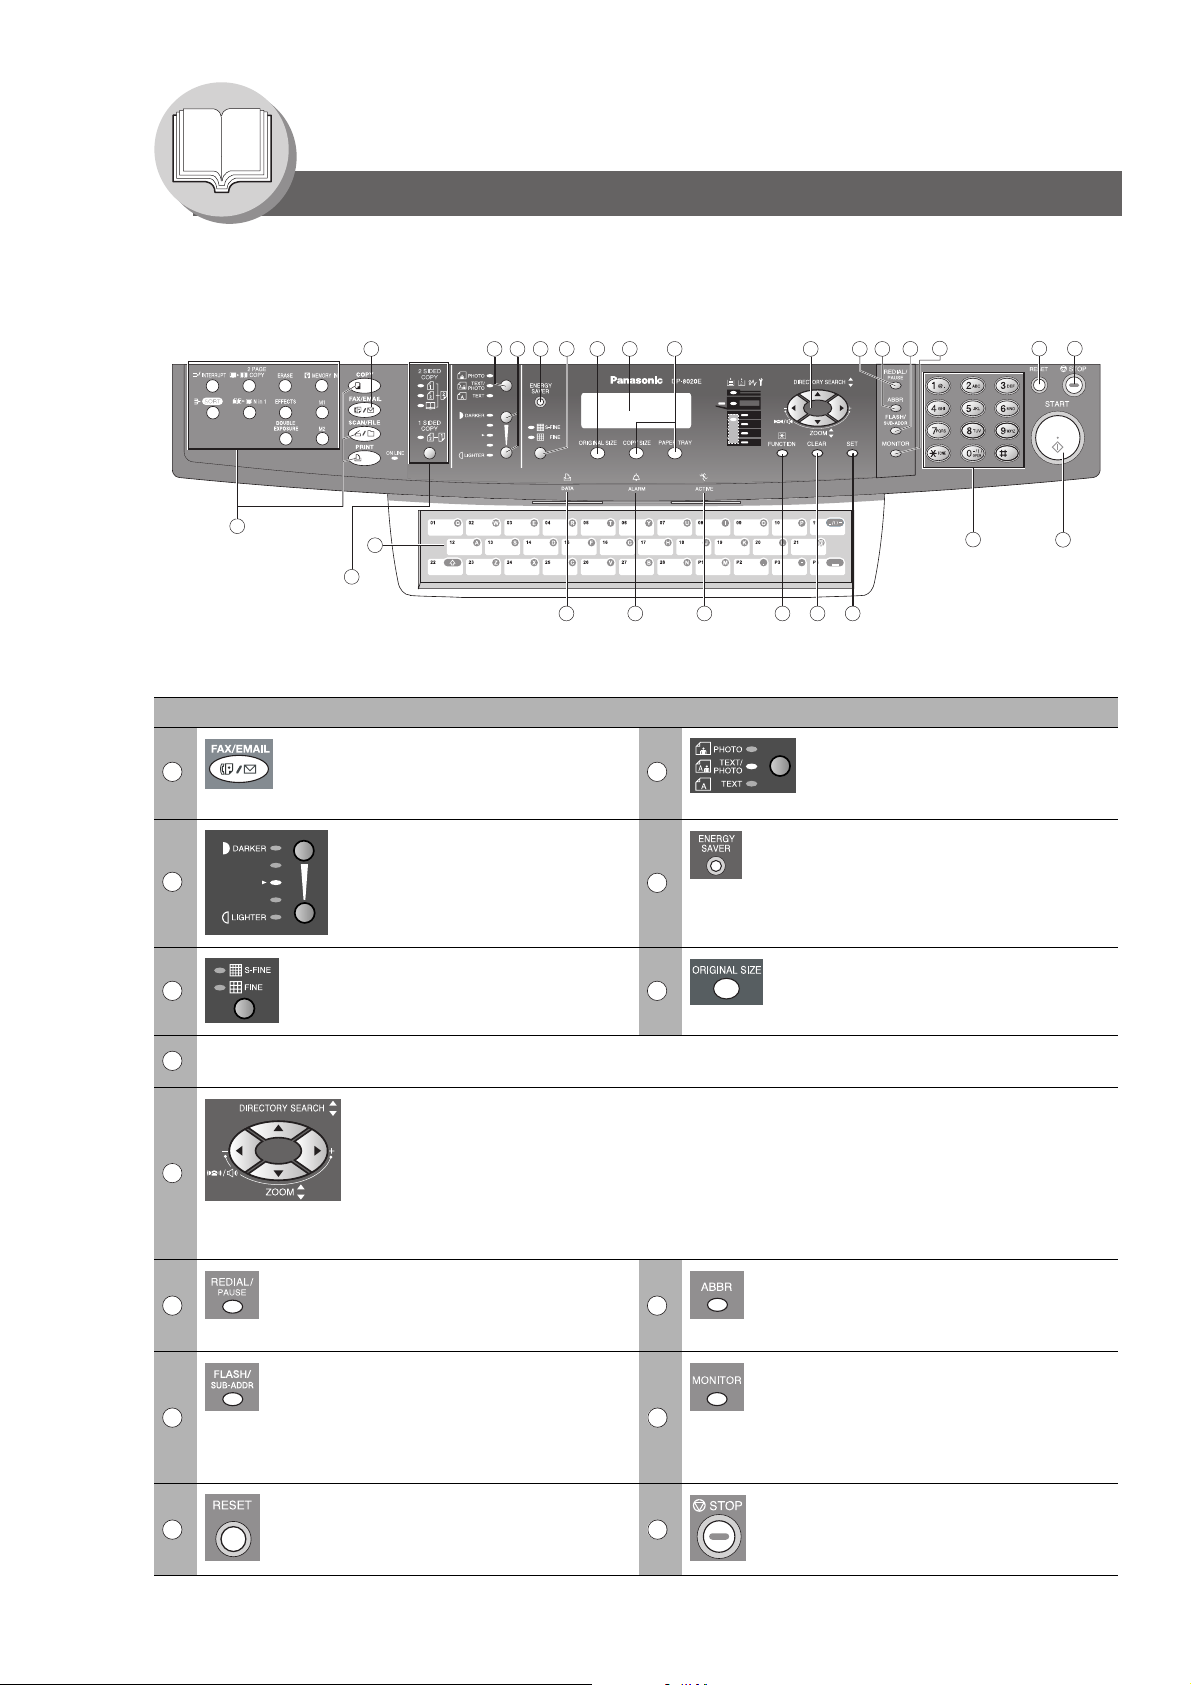
FAX/EMAIL Key
Used to select the FAX/EMAIL mode.
To change the input mode between
Email Address and Telephone Number.
CONTRAST (Lighter/Darker) Key
Used to adjust the Manual Exposure.
3
876541
212223
2
4
9
ORIGINAL Key
Used to select type of Original.
(See page 11)
ENERGY SAVER Key
Used to switch the machine into Energy
Saver Mode.
12
1110
17
1820
14
15
16
RESOLUTION Key
5 6
7
9
10 11
12 13
14 15
Used to set Standard, Fine, Super-Fine
(400 or 600 dpi). (See page
LCD Display
Indicates Number of Copies / Original(s) / Machine / User Error Code.
Cursor Keys
• Adjust the Monitor and Ringer Volume.
• Move the cursor while entering numbers and characters.
• Search the Station Name for Directory Search Dialing.
• Confirm the entered station for multi-station communication.
• Select functions.
• Confirm the current communication modes (e.g. Page Number, ID, Dialed Telephone
Number or Email Address, File Number) when the unit is ON LINE.
REDIAL/PAUSE Key
Used to enter a pause when recording
or dialing a Telephone Number, or to
redial the last dialed number.
FLASH/SUB-ADDR Key
Used to separate the Sub-Address from
the Telephone Number when dialing, or
to access some features of your PBX.
RESET Key
Resets all features to the initial poweron state.
11)
ORIGINAL SIZE Key
Used to select the Original Size
manually. (See page
ABBR Key
Used to start Abbreviated Dialing.
(See pages 10, 22 and 60)
MONITOR Key
Used to start On-Hook Dialing or to
input a space between numerical
entries (such as, while entering
telephone numbers).
(See pages 26 and 136)
STOP Key
Press this button when you want to Stop
a telecommunication, registration
operation or audible tone.
11)
18
Page 19

No. Icon Contents No. Icon Contents
START Key
Press this button to Start transmitting or
16 17
18 19
20 21
22 23
24
receiving a fax.
SET Key
Used to Set operations.
FUNCTION Key
Used to start or select functions and
subfunctions. These functions are
explained in detail on page 14.
ALARM LED (red)
Lights/Flashes when trouble occurs.
Lights:
Machine detected a trouble status.
• No paper in the selected tray or toner
has run out.
• Machine detected trouble, such as
paper misfeed or jammed.
Flashes:
Machine detected an alarm status.
• No paper in the Tray. (Tray not
selected)
• Toner is getting low, etc.
Keyboard (Option)
• Used to input the Characters. (To switch between Upper/Lower
characters, press Shift key (
• Used for One-Touch Keys, Program Keys.
• Used to enter a symbol for the LOGO, Character ID, Station Name
and for the Email Address. Use
symbol(s).
2-Sided Key
Used for 2-Sided transmission. (Available when the i-ADF (DA-AR202) option is installed.)
Keypad
Used for manual number dialing,
recording phone numbers and
numerical entries.
Used to input Characters when a
Keyboard option is not installed.
CLEAR Key
Use this button when correcting entered
numbers or characters.
ACTIVE LED (green)
Flashes:
When machine is active.
Lights:
When the received fax message is in
memory.
PRINT DATA LED (green)
Flashes:
When receiving printing data.
Lights:
While printing.
))
or to select the desired
(For DP-8020E only)
Your Mach i n e
Getting To Know
25
Used for Copier, Network Scanner and Printer Functions.
8
26
19
Page 20
Getting To Know Your Machine
Control Panel
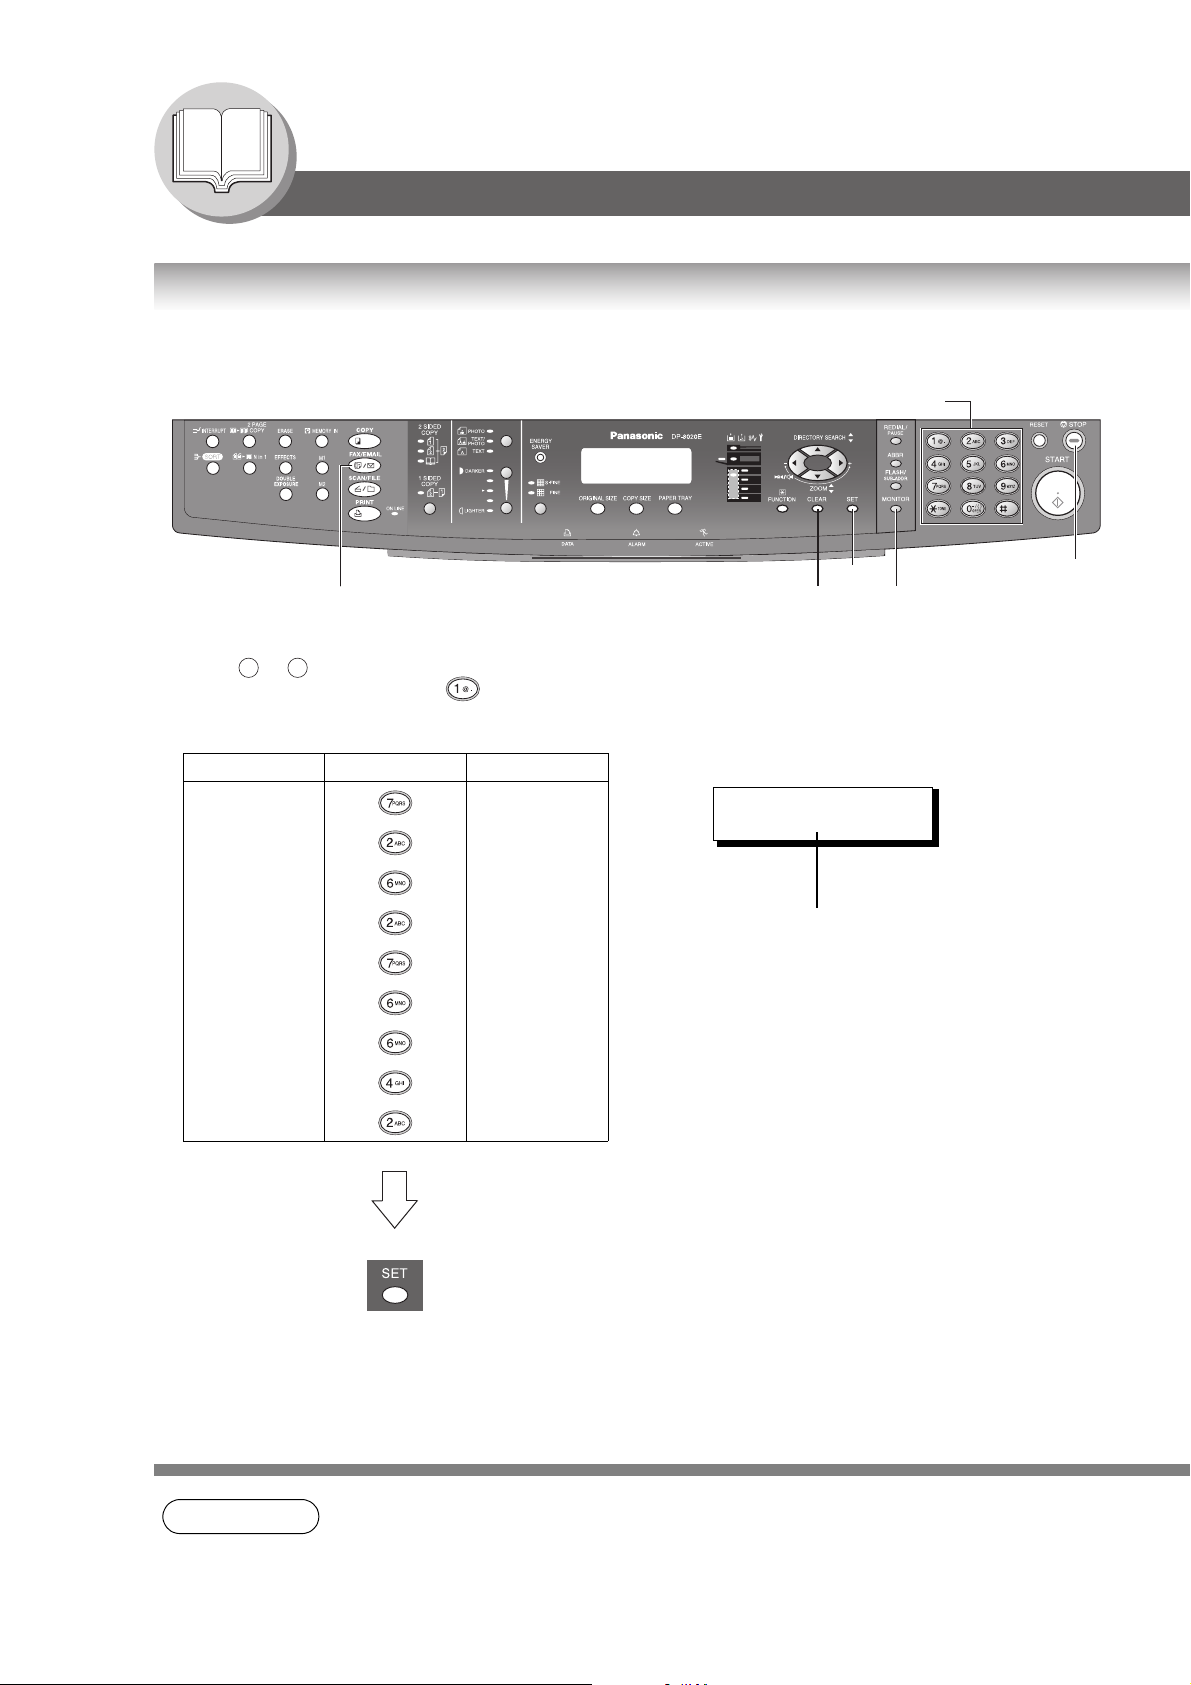
How To Enter Characters
To enter characters or symbols follow the steps below.
Keypad
SET
FAX/EMAIL
• Use to on the keypad to enter characters and symbols. The keypad assignment for the characters and
Ex: To enter "Panasonic"
0 9
symbols is shown below. The " " key is also used to enter a period "." during Email or IP Address input.
Character Keypad Key Strokes
P 6
a 2
n 3
a 2
s 5
o 4
n 3
i 4
c 4
Ex: LOGO
CLEAR
LOGO
Panasonic
Cursor
MONITOR
STOP
20
NOTE
1. When the Keyboard Option (DA-KB180) is installed, the keypad reverts to Numerical entries
only.
Page 21
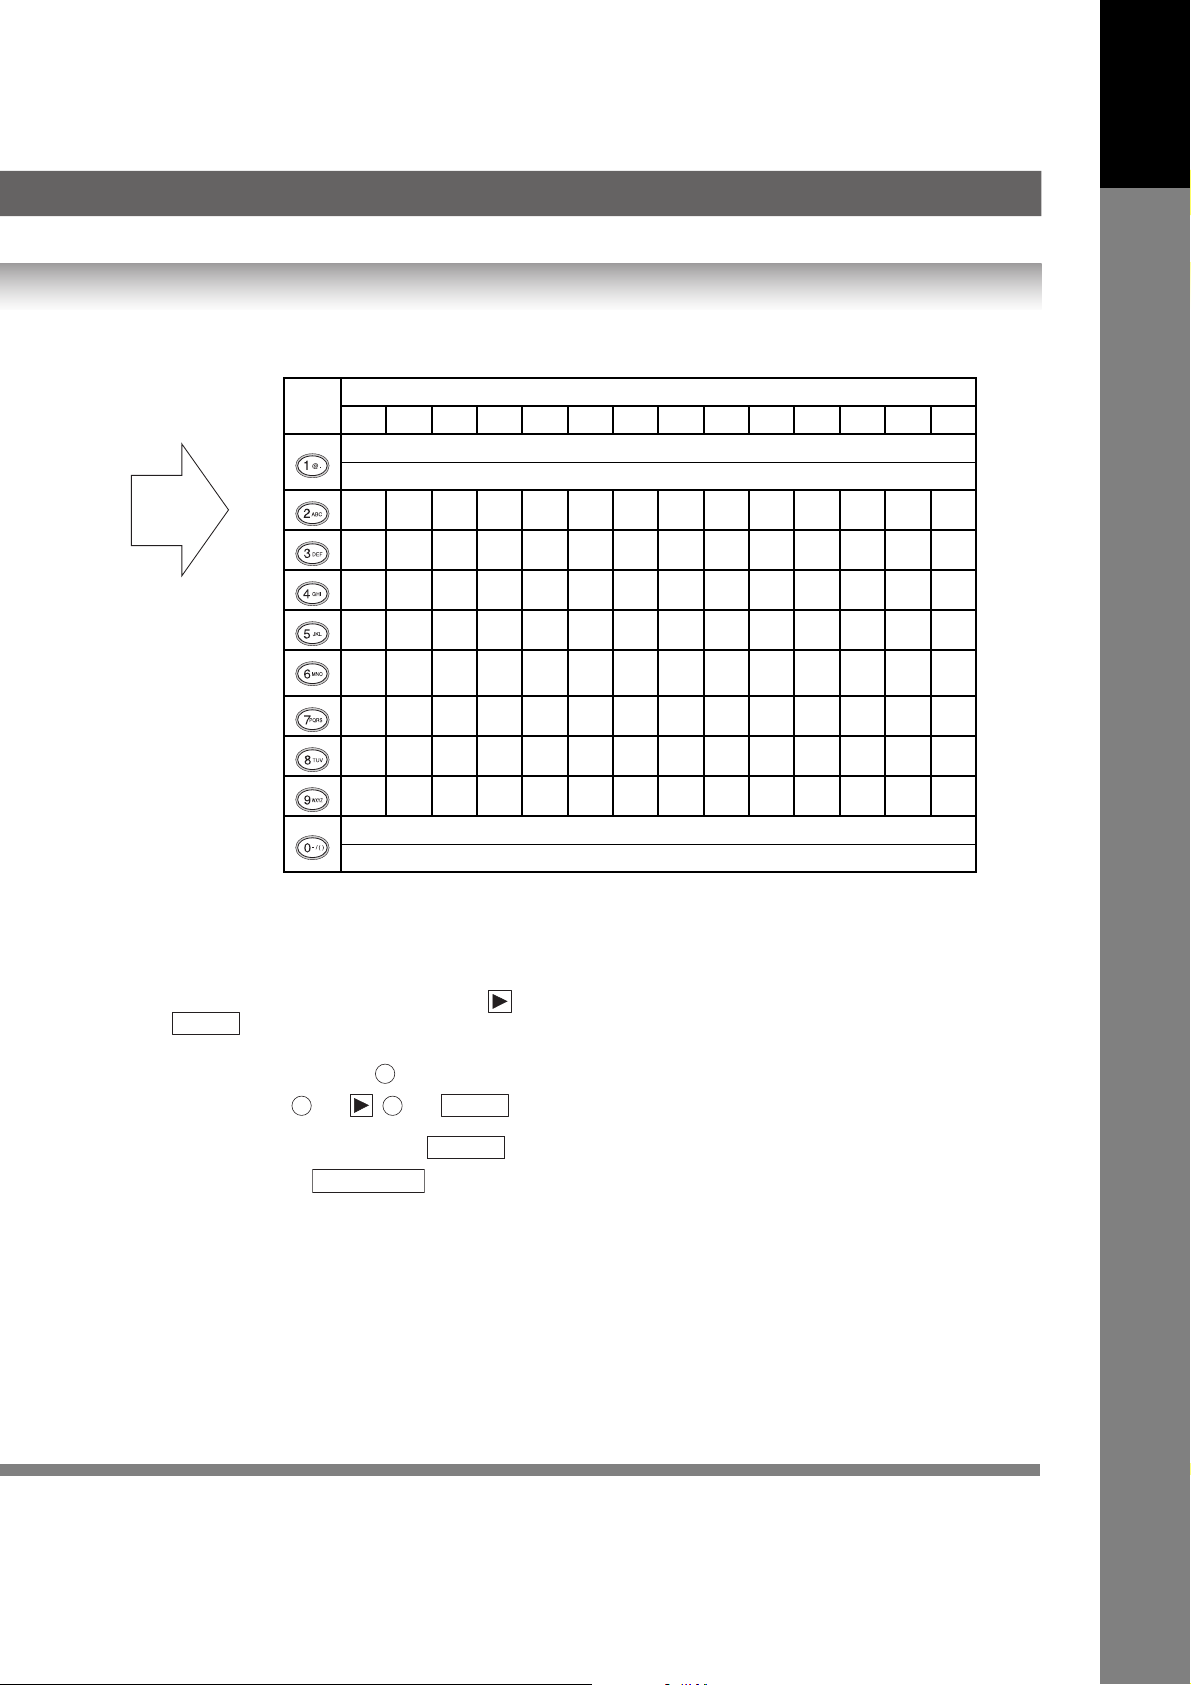
Character Table and Required Number of Key Strokes
1234567891011121314
1 @ . Å å Ä ä Ö ö Ü ü È è É é Æ æ Ñ
1 @ .
2abcABC
3de fDEF
4gh iGHI
5jklJKL
6mn oMNO
7pqr sPQRS
Your Mach i n e
Getting To Know
8tuvTUV
9wxyzWXYZ
0 - / ( ) _ , ’ : % & + =
0 - / ( ) _ ’ : & + = ! " $ < > % ? [ ] ^ ` { | }
• Select and continue pressing the appropriate key on the keypad until the desired Character / Symbol is displayed,
then select another key on the keypad to enter the next Characters / Symbols. If the next Character / Symbol that
you wish to enter falls on the same key, press
Press to complete the registration.
Ex: To input an "o" and "n", the key is used for both Characters.
• To delete a Character / Symbol, press .
• To enter a space, press .
• Upper case characters are typically used to enter Station Name, etc. Lower case characters are typically used to
enter E-mail Addresses.
SET
6
Enter as follows: x 4 x 3
6 6
MONITOR
CLEAR
, to set the first Character / Symbol before continuing.
SET
21
Page 22
Facsimile Features
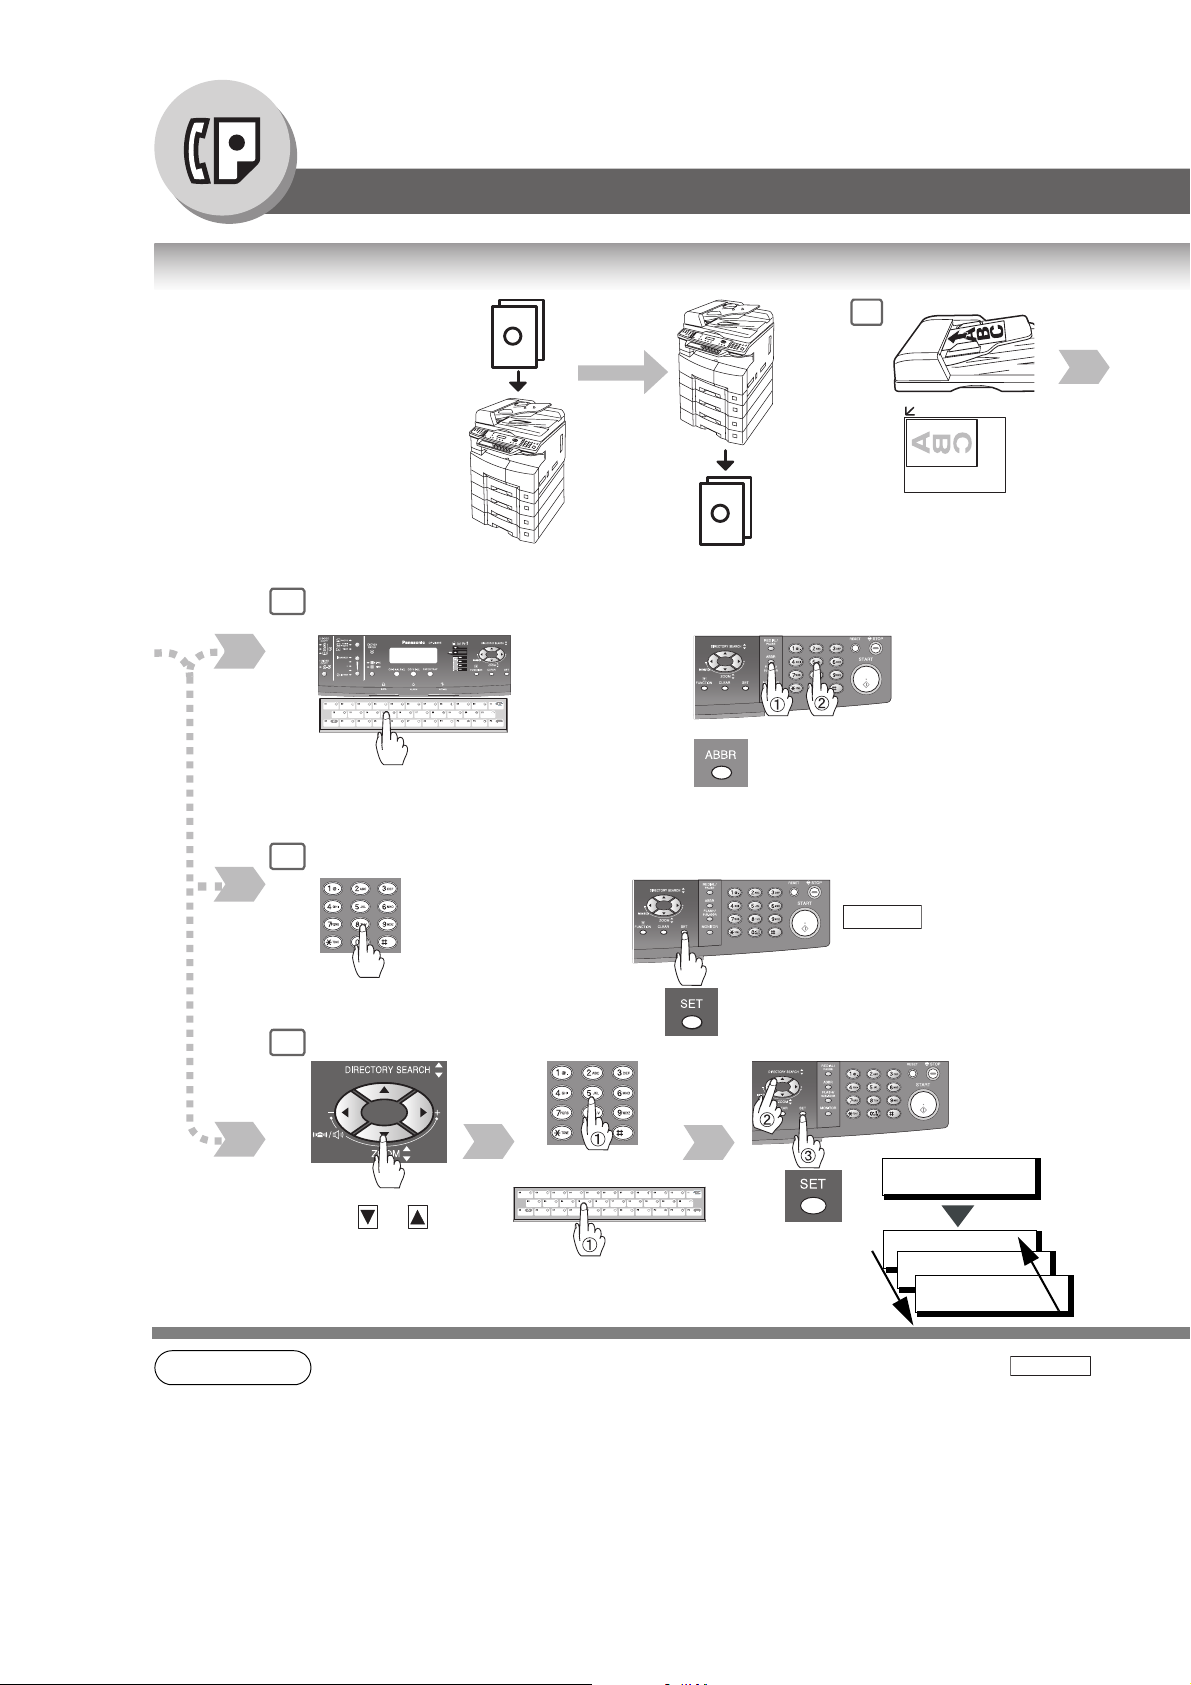
Sending Documents
Memory Transmissions
Your machine quickly stores the
document(s) into the machine's
memory. Then, starts to dial the
Telephone Number. If the
transmission fails, your machine
will retransmit the remaining
unsuccessful page(s)
automatically.
A
Transmit
or
1
A
Store
One-Touch/ABBR Dialing (see Note 2)
4a
(One-Touch is available when a Keyboard option is installed.)
or
(Option)
When the Telephone Number(s) or Email
Address(es) are registered in the
One-Touch/Abbreviated Dialing.
or
Manual Number Dialing (Up to 50 Stations)
4b
Telephone
Number
(Up to 36 digits)
or
Directory Search Dialing (see Note 2)
4c
+
Receive
+ ABBR No.
(3-digit)
If you make a mistake, press
CLEAR
then reenter the correct number.
(See page 10)
to erase the number
22
NOTE
or
or
(Option)
Enter the first letter(s) of the
name you wish to search.
Ex: "SA"
1. If you need a special access number to get an outside line, dial it first then press to
enter a pause (represented by a "-") before dialing the full number.
Ex: 9 PAUSE 5551234
2. Auto Dialer (One-Touch/ABBR.) is only available when stations are registered.
(See page 140)
3. To stop the transmission, see page 26.
ENTER LETTER(S)
SA
[100]SALES 3
5551234
[005]SALES 2
5551234
[001]SALES
5551234
PAUSE
Page 23
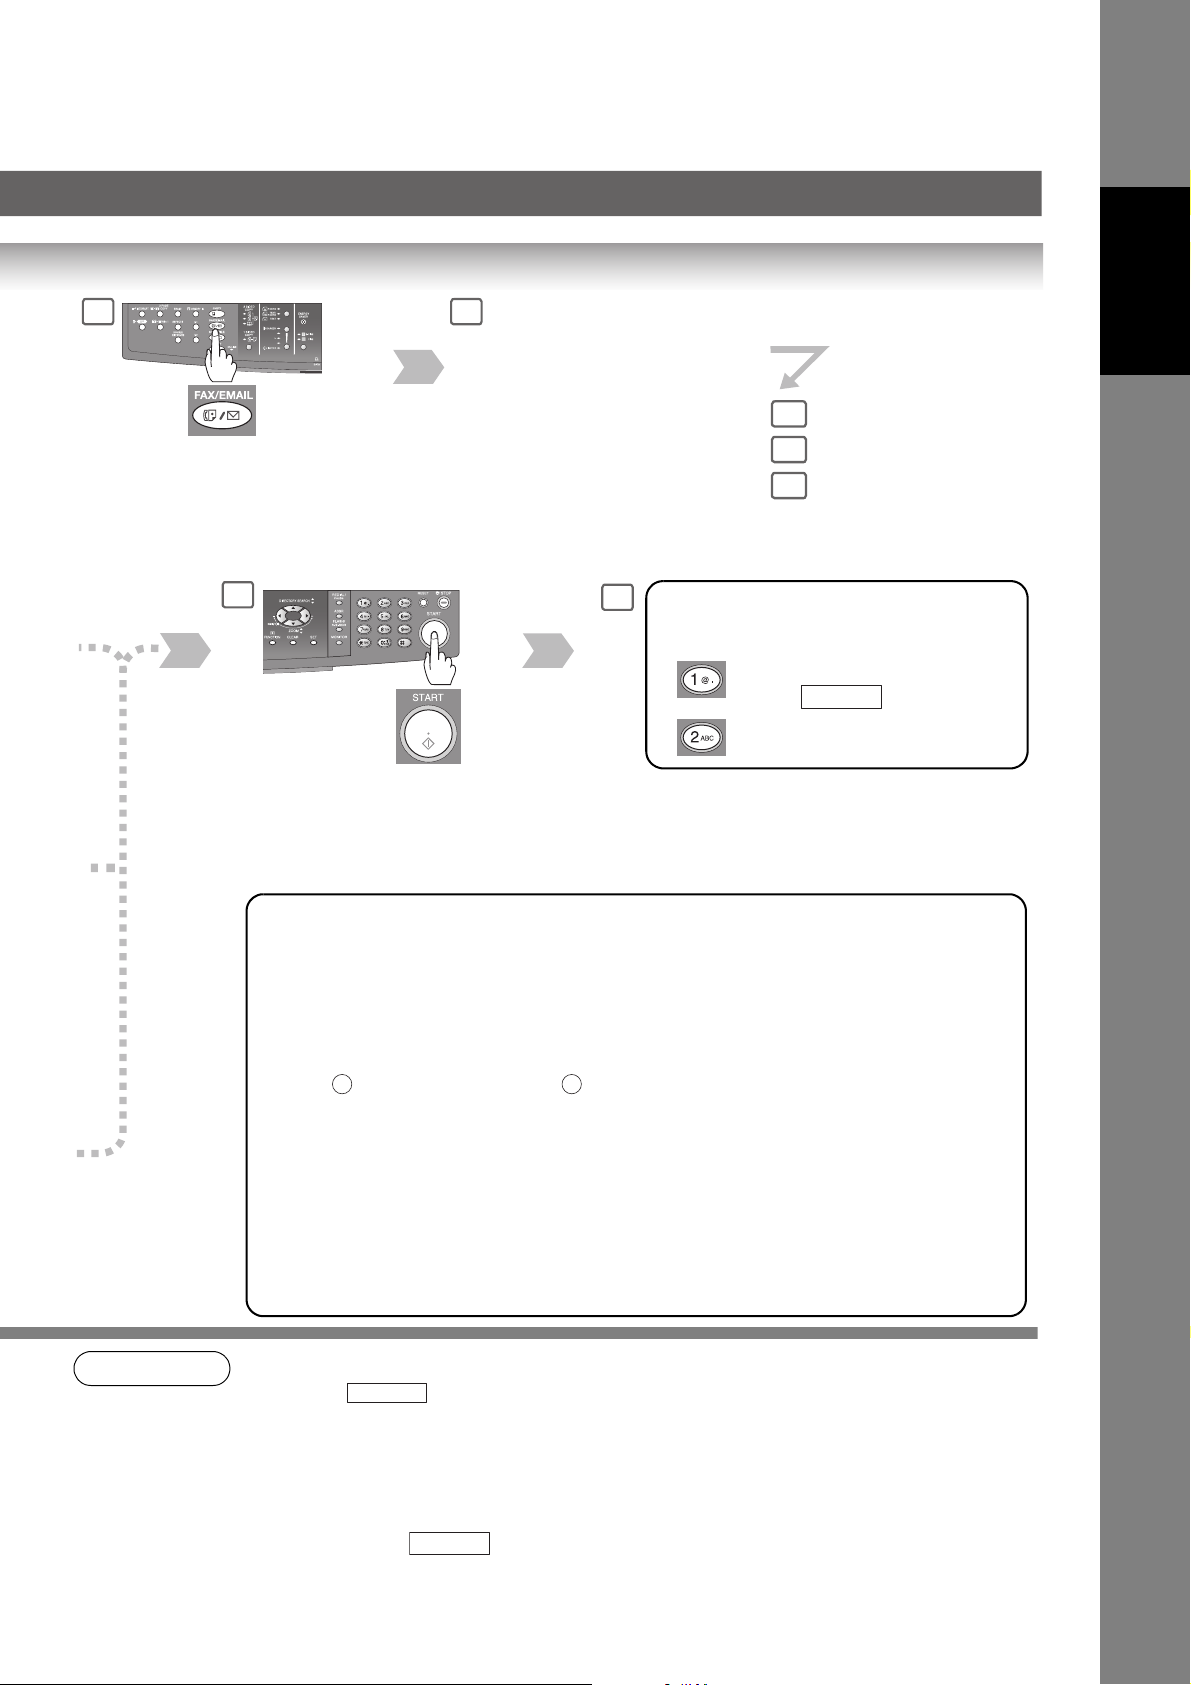
Select the desired
2
3
Transmission setting.
(See page 11)
Facsimile
Features
4a
If set on other
function mode.
5
The document(s) will be stored into memory with a file number
when sending from the ADF (Automatic Document Feeder).
Then starts dialing the Telephone Number or connecting to the
LAN immediately after storing the first page. (See Note 5)
The remaining page(s) continue to store into memory.
• If memory overflow occurs while storing documents, the machine will show "MEMORY FULL"
on the display. In the factory default setting (Fax Parameter No. 82 (QUICK MEMORY XMT)
is set to "Valid"), the machine will transmit the stored documents automatically when
transmitting to one station. If Fax Parameter No. 82 is set to "Invalid" and transmitting to one
station, the machine will change the transmission mode from Memory to Direct XMT
automatically when it detects that memory overflow will occur.
In the "Val id" setting, the machine will show "MEMORY FULL" and prompts you whether to
transmit the successfully stored documents or to cancel the transmission.
Press "YES" to cancel or press "NO" to transmit. If no action is taken within 10
seconds, the machine will start transmitting the stored documents.
If memory overflows while storing the 1st page, use Direct Transmission.
• An Information Code will be displayed if the transmission has failed or there was no answer at
the receiving side after the last automatic redial.
The document stored for the transmission will be erased from the memory automatically and
the information code is printed for the transmission on the Communication Journal (COMM.
JOURNAL).
If you need to retain the incomplete documents even after the last redial, change the Fax
Parameter No. 31 (INC. FILE SAVE) to "Valid" in advance. (See page 149)
To retry the incomplete documents, refer to page 110.
1 2
4b
4c
When an original is scanned from the Platen
6
Glass, the message "ANOTHER
ORIGINAL?" is shown.
Place another original, then
press .
Machine starts sending.
START
NOTE
4. If you are using Pulse dialing and you wish to change to Tone dialing in the middle of dialing,
press
The dialing mode will be changed from Pulse to Tone after dialing the digit "/".
Ex: 9 PAUSE TONE 5551234
5. This feature is called "Quick Memory Transmission". If you wish to store all the document(s)
into memory first before transmitting, change the Fax Parameter No. 82 (QUICK MEMORY
XMT) to "Invalid".
6. You can send the same document(s) to multiple stations by repeating Steps 4a, 4b or 4c, and
then pressing
7. The "QUICK MEMORY TRANSMISSION" feature is disabled if multiple stations are set.
TONE
(represented by a "/").
START
.
23
Page 24
Facsimile Features
Sending Documents
Direct Transmission Reservation (Priority Transmission Reservation)
If you are in a rush to send an
urgent document, however there
are many files in the memory, use
Direct Transmission Reservation to
send. The urgent document will be
sent immediately after the
current communication is finished.
If your machine's memory is full, use
Direct Transmission.
Note: You cannot send document(s)
to multiple stations.
Transmit
A
A
1
or
(Only 1 page can be
sent from the Platen in
this mode)
5
MEMORY XMT=ON
1:OFF 2:ON
(If you need to change the preset
Memory position, change the setting of
Fax Parameter No. 5. (See page 148))
2
If set on other
function mode.
Does not store
original(s) in
memory.
NOTE
Receive
1. If you need a special access number to get an outside line, dial it first then press to
enter a pause (represented by a "-") before dialing the full number.
Ex: 9 PAUSE 5551234
2. Auto Dialer (One-Touch/ABBR.) is only available when stations are registered.
(See page 140)
PAUSE
24
Page 25
Set the desired
3 4
Transmission
setting, if
necessary.
(See page 11)
One-Touch/ABBR Dialing (see Note 2)
6a
(One-Touch is available when a Keyboard option is installed.)
or
Features
Facsimile
5
7
(Option)
When the Telephone Number(s) or Email
Address(es) are registered in the
One-Touch/Abbreviated Dialing.
or
Manual Number Dialing
6b
Telephone
Number
(Up to 36 digits)
or
Directory Search Dialing (see Note 2)
6c
or
or
Enter the first letter(s) of the
name you wish to search.
Ex: "SA"
(Option)
+ ABBR No.
(3-digit)
ENTER LETTER(S)
SA
[100]SALES 3
5551234
[005]SALES 2
5551234
[001]SALES
5551234
You can reserve to
send an urgent
document to a single
station only.
NOTE
3. To stop the transmission, see page 26.
4. If you are using Pulse dialing and you wish to change to Tone dialing in the middle of dialing,
press
The dialing mode will be changed from Pulse to Tone after dialing the digit "/".
Ex: 9 PAUSE TONE 5551234
TONE
(represented by a "/").
25
Page 26
Facsimile Features
Sending Documents
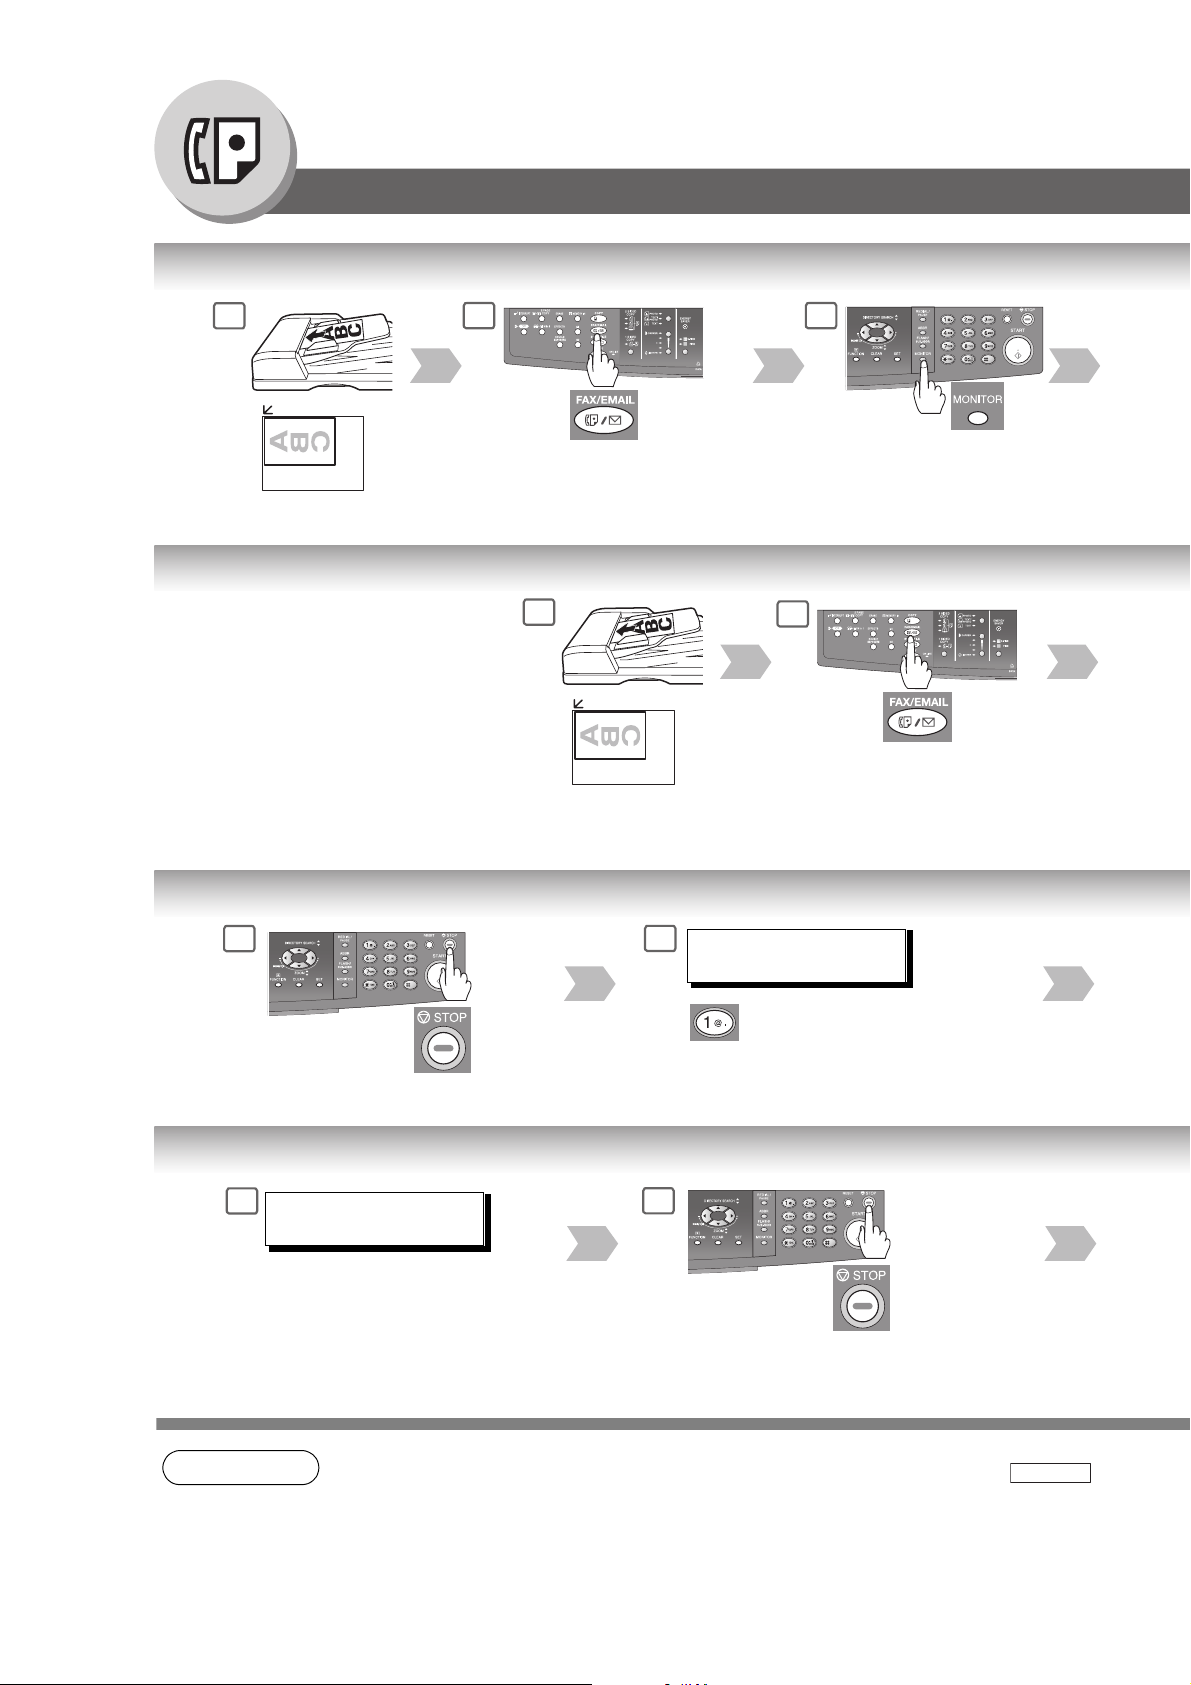
On-Hook Dialing
1
or
(Only 1 page can be sent from
the Platen in this mode)
2
If set on other
function mode.
Select the original size when
placing the document on the
Platen.
Off-Hook Dialing (Voice Mode Transmission)
If you wish to send the document
after talking with the other party first,
use Voice Mode Transmission. Your
machine requires an external
telephone.
1
or
(Only 1 page can be
sent from the Platen in
this mode)
3
You will hear a dial tone
through the monitor speaker.
2
If set on other
function mode.
Select the original size when
placing the document on the
Platen.
To Stop the Transmission
1
2
COMMUNICATION STOP ?
1:YES 2:NO
To Cancel the Direct Transmission Reservation
1
NOTE
DIRECT XMT RESERVED
(Station Name)
Make sure the document(s) are
still on the ADF/i-ADF.
1. If you need a special access number to get an outside line, dial it first then press to
enter a pause (represented by a "-") before dialing the full number.
Ex: 9 PAUSE 5551234
2
PAUSE
26
Page 27
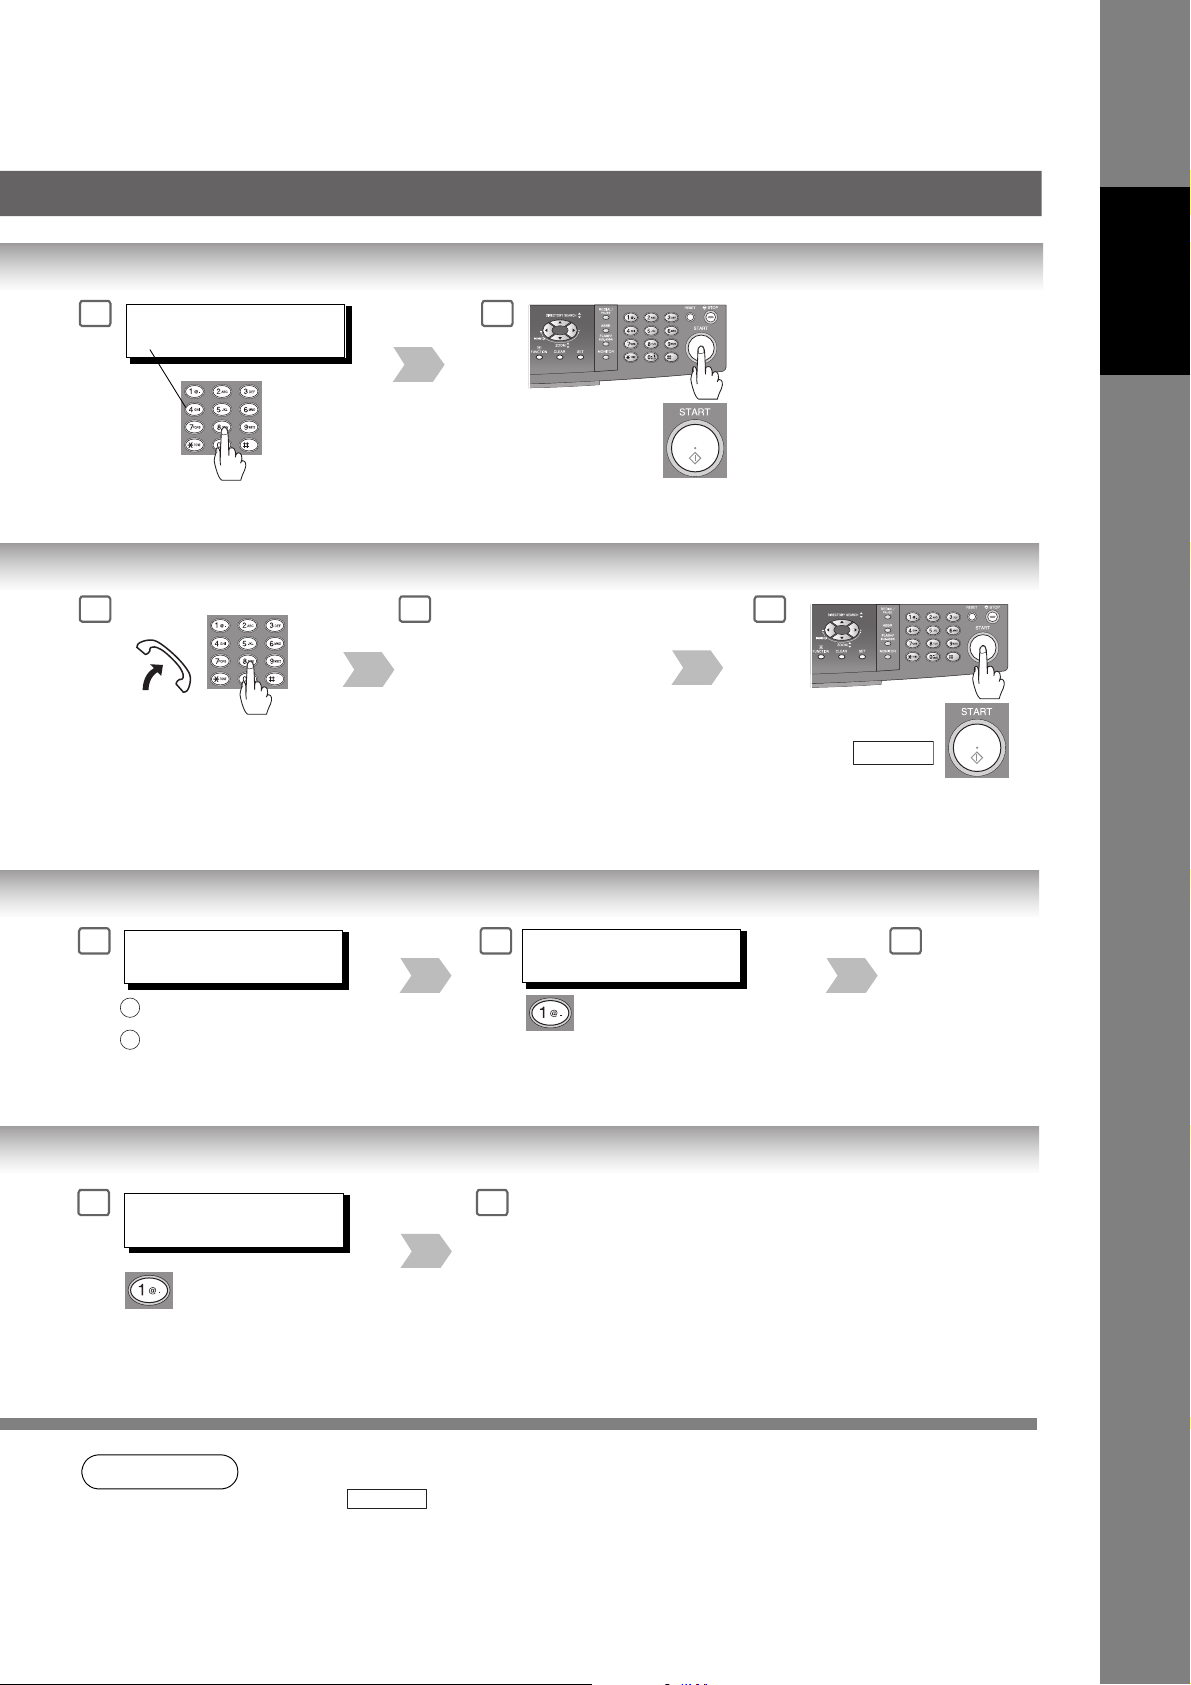
4
* DIALING *
5551234
5
Facsimile
Features
3
Telephone
Number
3
SAVE AS INCOMP.FILE?
1:YES 2:NO
: Saves the file.
1
: Deletes the file.
2
If Fax Parameter No. 31 (INC. FILE SAVE) is
"Valid ". (See page 149)
When you hear the voice
of the other party, tell the
other party to prepare to
receive a document.
PRINT COMM. JOURNAL?
4 5
1:YES 2:NO
Print Communication Journal
(COMM. JOURNAL).
54
Then when you hear a
beep, press
and hang up the
handset.
START
Stop the
transmission.
CANCEL XMT RESERVE ?
1:YES 2:NO
NOTE
2. If you are using Pulse dialing and you wish to change to Tone dialing in the middle of dialing,
press
The dialing mode will be changed from Pulse to Tone after dialing the digit "/".
Ex: 9 PAUSE TONE 5551234
TONE
43
After the transmission stops,
remove the document(s) from
the ADF/i-ADF.
(represented by a "/").
27
Page 28
Facsimile Features
Sending Documents
Job Build
If the total document number of the job that you wish to send exceeds the maximum capacity of the ADF of 50 sheets
(20 lb; 80 g/m2), change the setting of the Fax Parameter No. 133 (Job Build) to "On" in advance. (See page 150; the
Example below, and Notes 1 and 2.)
You can also scan the documents manually one at a time.
Ex: (one 70-sheet job is split into 2 scan jobs)
1
1
50
Documents: 50 sheets <1st scan>
1
or
1st and 2nd Scanning Data is
combined into one job
51
70
Documents: Remaining 20 sheets <2nd scan>
70
70-sheet is sent at one
time (Max: 255-sheet)
28
NOTE
1. Quick Memory Transmission features are not available when using the Job Build.
2. Job Build features are not available if the Duplex sending is selected.
3. If you do not place the next documents within 5 minutes in step 5, your machine will send the
already scanned documents automatically.
Page 29
Facsimile
Features
2
If set on other
function mode.
5
5 seconds after the 1st scan, the
machine will display "ANOTHER
ORIGINAL?". You can place the
remaining 20 documents on the ADF
and select "1:YES". (If you place the
documents within 5 seconds after the
1st Scan, the next scan will start
immediately without displaying any
notice.)
3
ENTER STATION(S)
THEN PRESS START 00%
Enter the stations :
• One-Touch / ABBR. Dialing
• Manual Number Dialing
• Directory Search Dialing
(For details, see page 22)
6
After the remaining documents are
scanned, "ANOTHER ORIGINAL?"
will display, select "2:NO" to start
sending.
4
<01> (Station name)
5551234
Press .
START
5
29
Page 30

Facsimile Features
Receiving Documents
Automatic Reception
Transmit
Manual Reception
You may wish to receive
documents manually if you use the
telephone line in your office
primarily as a personal telephone
and occasionally for your facsimile
machine.
Print Reduction Setting
Transmitted Document Received Document
Receive
Transmit
Documents are received automatically.
A
To receive documents
manually, change the Fax
Parameter No. 17
(RECEIVE MODE) to
"Manual".
(See page 148)
A
Receive
Oversized Document
Substitute Memory Reception
If the recording paper runs out, jams or if the
toner runs out during reception, the machine
automatically starts receiving documents into
its image data memory. Stored documents are
printed automatically after replenishing the
recording paper / toner or after clearing the
paper jam. (See Notes 2 and 3)
NOTE
1. If the received document is extremely long
(over 39% longer than the recording paper),
the document is divided into separate pages.
(When printing on separate pages, the bottom
0.5 in (13 mm) of the 1st page's data will overlap
on top of the next page.)
Reduced to fit
the loaded paper size
(See Note 1)
1
MESSAGE IN MEMORY
03%
When the machine
completes the memory
reception and there is no
recording paper or toner,
this error message appears
on the display when set on
FAX/EMAIL mode.
Overlap print.
0.5 in (13 mm)
30
Page 31

Duplex (2-Sided) Receiving (DP-8020E only)
Duplex Print Fax Parameter No. 95 (DUPLEX PRINT) set to:
• Duplex Print = Valid (Default Position is "Invalid") (See page 150)
(See Note 5)
1
Rings
Automatic Reduction
Based on the document length, your machine will automatically calculate the
suitable reduction ratio (70% to 100%).
Set Fax Parameter No. 24 (PRINT REDUCTION) to "Auto". (See page 149)
Fixed Reduction
Predetermine the reduction ratio from 70% to 100% in 1% steps.
a) Set Fax Parameter No. 24 (PRINT REDUCTION) to "Fixed".
b) Set Fax Parameter No. 25 (REDUCTION RATIO). (See page 149)
2 43
Lift the handset
Remove any documents
from the ADF/i-ADF.
Press
then hang up the
telephone.
Start receiving the
document(s).
Ex: A4 to A4 96%
A4 to Letter 90%
Letter to Letter 96%
Legal to Letter 75%
START
Facsimile
Features
2
NOTE
Replenish the recording paper or toner.
The document(s) stored in memory are
automatically printed.
2. If the memory overflows, the machine will stop receiving and release the communication line.
The document(s) stored in the memory up to that moment will be printed out.
3. If you wish to turn off the substitute reception function, change the setting of Fax Parameter
No. 22 to "Invalid". (See page 148)
4. The machine cannot print the received documents from the Sheet Bypass.
5. If the machine detects memory overflow while receiving in the Duplex Print setting, it will
switch from Duplex to Single side printing.
31
Page 32

Facsimile Features
Timer Controlled Communications
General Description
You can send document(s) to one or multiple stations at any preset time within the next 24 hours.
Up to 50 built-in timers can be set for deferred communication.
Deferred Transmission
A
Store document(s) in
memory.
Calling at
1
predetermined
time
Transmit
12
Deferred Polling
Calling at
A
1
predetermined
time
Receive
13
1
or
4
DEFERRED XMT
A
START TIME :
1
2
If set on other
function mode.
Enter the start time from
the keypad, then press .
(Use a 4-digit, 24-hour clock)
Ex: and
2 3 3 0
2
SET
SET
32
Transmit
12
Store document(s) in
memory.
(See page 36)
NOTE
If set on other
function mode.
A
Receive
13
1. To change or cancel the Deferred Communication settings, see page 106.
4
DEFERRED POLLING
PASSWORD=
• If you have set the polling password in Fax parameter No. 26,
the password will appear on the display. You can still change
the password temporarily by writing it with new one.
Enter a 4-digit polling
Password, then press
.
SET
Page 33

Features
Facsimile
3
4
ENTER STATION(S)
THEN PRESS START
DEFERRED POLLING
3
START TIME
5
ENTER STATION(S)
THEN PRESS START
or
:
Dial by any combination of the
following methods:
• One-Touch (Option)
• ABBR Dialing
• Manual Number Dialing
• Directory Search Dialing
(See page 22)
Ex:
ABBR
Enter the start time from the
keypad, then press .
(Use a 4-digit, 24-hour clock)
Ex: and
2 3 3 0
0 0 1
SET
SET
65
[001](Station name)
5551234
To store document(s)
into the memory.
4
6
[001](Station name)
5551234
NOTE
Dial by any combination of the
or
2. If you enter a wrong number, press then reenter the correct number.
following methods:
• One-Touch (Option)
• ABBR Dialing
• Manual Number Dialing
• Directory Search Dialing
(See page 22)
Ex:
ABBR
0 0 1
CLEAR
33
Page 34

Facsimile Features
Batch Transmission
General Description
To reduce transmission time and cost, this feature allows your machine to group (Batch) different documents for the
same destination(s) to be transmitted in a single phone call.
Real-Time Batch Transmission
to NY
to LA
to London
Transmit
to NY
Transmit
to LA
to London
to LA
Time
Transmit
to LONDON
34
NOTE
1. The machine cannot Batch to a file(s) that is/are Waiting to Redial or is currently being sent,
but it will Batch to files that are pending to dial.
Page 35

During memory transmission, this machine searches its memory for reserved files (up to 5 files) to transmit to the same
destination, automatically batching and transmitting them in a single phone call.
Facsimile
Features
35
Page 36

Facsimile Features
Polling
General Description
Polling means calling other station(s) to retrieve document(s). The other station must know in advance that
you will call and must have document(s) set on the ADF or stored in the memory. You may need to set a
polling Password, shared by the other station, to ensure security.
Preparing to be Polled
To allow other stations to poll your machine, you must prepare your machine by storing a document in memory.
Be sure to set the polling Password before storing the document into memory. After being polled, the documents
stored in the memory will be erased automatically. To retain the documents in memory so that they can be polled
repeatedly change the Fax Parameter No. 27 (POLLED FILE SAVE) to "Valid".
1
A
1
or
Store document(s)
12
in memory.
6
POLLED
PASSWORD=4321
To store document(s)
into the memory.
2
If set on other
function mode.
36
NOTE
1. You can still send or receive documents even when the machine is set to be polled.
2. Only 1 polled file can be stored in memory. If you need to add document(s) into the same
polled file, see page
3. To delete a polled file, see page 106.
4. If you have set the polling Password in Fax Parameter No. 26, the Password will appear on
the display.
You can still change the Password temporarily by overwriting it with a new one.
108.
Page 37

Facsimile
Features
POLLING NO.=
1:POLLING 2:POLLED
POLLED
543
PASSWORD=
Enter a 4-digit polling
Password.
Ex:
4 3 2 1
6
NOTE
5. If a Password is not set in the polled station, you may poll the other station even though your
machine has a Password.
37
Page 38

Facsimile Features
Polling
Poll Documents from Another Station
Store document(s)
in memory.
(See page 36)
For Deferred Polling,
see page 32.
Polling
1
Transmit
12
A
Receive
13
1
If set on other
function mode.
6
ENTER STATION(S)
THEN PRESS START
Enter the stations by any combination of the following
methods:
• One-Touch (Option)
• ABBR Dialing
• Manual Number Dialing
• Directory Search Dialing
(For details, see page 22)
Ex:
ABBR
0 0 1
2
or
SET
38
NOTE
1. You can still send or receive documents even when the machine is set to be polled.
2. If you have set the polling Password in Fax Parameter No. 26, the Password will appear on
the display.
You can still change the Password temporarily by overwriting it with a new one.
Page 39

3 54
POLLING NO.=
1:POLLING 2:POLLED
7
[001](Station name)
5551234
POLLING
PASSWORD=
Enter a 4-digit polling
Password.
Ex:
4 3 2 1
POLLING
PASSWORD=4321
Features
Facsimile
6
NOTE
3. If a Password is not set in the polled station, you may poll the other station even though your
machine has a Password.
39
Page 40

Facsimile Features
Program Keys (Option)
General Description
This function is available when optional Keyboard (DA-KB180) is installed.
Your machine has special Program Keys for your convenience, where each key can be programmed with a frequently
used function. For instance, these keys are useful if you regularly send or poll the same group of stations. You can use
these keys to store a One-Touch Group Dialing key, a sequence of stations to be polled, a deferred transmission
sequence or an additional One-Touch key. (To set for manual Email retrieval from the POP Server, see page
Setting for Group Dialing
74.)
The Program Keys are useful if
you frequently need to send or
poll the same group of stations.
5
1
If set on other
function mode.
PROGRAM[P1] NAME
ENTER NAME
Enter the Group Name
(up to 15 characters) by
using the Character keys,
then press .
Ex: GROUP.A
SET
2
6
ENTER STATION(S)
THEN PRESS START
or
Enter the Stations by any
combination of the following
methods:
• One-Touch
• ABBR Dialing
(For details, see page 22)
40
NOTE
1. Press (If set on other function mode), then press
FAX/EMAIL
to delete a Group Dial or Program Dial.
SET
4
FUNCTION
7 3
Page 41

3
PROGRAM (1-5)
ENTER NO. OR ∨ ∧
PROGRAM[P ]
4
PRESS PROGRAM KEY
Ex:
P1 M
Features
Facsimile
5
7
<01> (Station name)
5551234
You can now set other Program
8
Keys by repeating the procedures
from Step 4, or return to standby
mode by pressing .
STOP
NOTE
2. The Group Dialing and Program Key cannot be changed or erased until the communication
has finished. To change or erase the settings, cancel the communication first by using the Edit
File Mode. (See page
3. To print a Program List, see page 162.
106)
41
Page 42

Facsimile Features
Program Keys (Option)
Setting for Deferred Transmission
Use Program Keys to store a
sequence of stations to be
polled, or when setting up a
deferred transmission sequence.
1
If set on other
function mode.
5
PROGRAM[P1] NAME
ENTER NAME
Enter the Program Name
(up to 15 characters) by
using the Character keys,
then press .
Ex: PROG.A
SET
2
6
PROGRAM[P1]
PRESS FUNCTION KEY
42
NOTE
1. Press (If set on other function mode), then press
2. The Group Dialing and Program Key cannot be changed or erased until the communication
has finished. To change or erase the settings, cancel the communication first by using the Edit
File Mode. (See page
FAX/EMAIL
to delete a Group Dialing or Program Dial.
SET
4
106)
FUNCTION
7 3
Page 43

3
PROGRAM (1-5)
ENTER NO. OR ∨ ∧
7 8
FUNCTION (1-3)
ENTER NO. OR ∨ ∧
Program each function.
• Deferred Communication (see page 32)
• Advanced Communication
(see pages 76, 84 and 130)
• Polling Communication (see page 36)
4
PROGRAM[P ]
PRESS PROGRAM KEY
Ex:
P1 M
You can now set other Program
Keys by repeating the
procedures from Step 4, or
return to standby mode by
pressing .
STOP
Features
Facsimile
5
NOTE
3. To print a Program List, see page 162.
43
Page 44

Facsimile Features
Program Keys (Option)
Setting for One-Touch Key
1
If set on other
function mode.
2
6
[P1] SALES
NTER EMAIL ADDRESS
E
Change to
Telephone No.
input mode, if
necessary.
3
PROGRAM (1-5)
ENTER NO. OR ∨ ∧
+
Enter a Telephone Number or
an Email Address.
Ex: 9 555 1234
or
44
Changing the Program Key Setting
To change the Program Key settings, follow the procedure on setting a program key on pages 40 to 45.
• Start time or station(s) for deferred transmission
• Station(s) for normal polling
• Start time or station(s) for deferred polling
• Station(s) for group dialing
• Telephone Number and station name for One-Touch key
NOTE
1. Press (If set on other function mode), then press
2. The Group Dialing and Program Key cannot be changed or erased until the communication
has finished. To change or erase the settings, cancel the communication first by using the Edit
File Mode. (See page 106)
FAX/EMAIL
to delete a Group Dialing or Program Dial.
SET
4
FUNCTION
7 3
Page 45

4
PROGRAM[P ]
PRESS PROGRAM KEY
Ex:
P1 M
7
[P1] SALES
9 555 1234
5
PROGRAM[P1] NAME
ENTER NAME
Enter the station name (up to 15 characters)
by using the Character keys, then press
.
SET
Ex: SALES
Features
Facsimile
6
You can now set other Program Keys
by repeating the procedures from
Step 4, or return to standby mode by
pressing .
NOTE
STOP
3. To print a Program List, see page 162.
45
Page 46

Internet Fax Features
Pre-Installation Information/Features
Before setting up your Panasonic machine on your network, please read this entire section to be familiar with its functions.
Your machine is able to perform the following when connected to a 10Base-T/100Base-TX Ethernet LAN (Local Area
Network):
• Send paper-based information as an Internet Email.
• Send Internet fax message (Direct Internet Fax XMT).
• Receive and print an Internet Email automatically.
• Forward received G3 Fax message(s) or Email automatically to the preprogrammed Email Address or regular G3 Fax
machine (see "Fax Forward" on page 122).
• Route received G3 Fax message(s) automatically to the sender-specified Email Address or G3 Fax machine using ITUT SUB-Address (see "Inbound Routing" on page 120).
• Route received G3 Fax message(s) automatically to the preprogrammed Email Address or G3 Fax machine using the
sender’s fax ID Code (see "Inbound Routing" on page
• Relay an Internet Email to a G3 Fax machine via regular fax transmission (see "Relayed Transmission" on page 124).
• Scan to Email.
To utilize the above functions, your machine needs to be set up properly on your network. Please contact your network
administrator for actual network setup.
Copy the Pre-installation Information form found at the end of this section on page 50, record the MAC Address on the
form, and ask your network administrator to complete the remaining information on the form. The MAC Address of your
machine can be found on the 3rd page of the Fax Parameter List printout.
120).
To print the Fax Parameter List, follow the steps below:
Press (If set on other function mode), then press .
FAX/EMAIL
FUNCTION
6 4
SET
46
Page 47

Your machine can be set up as either an SMTP Mail Server, or a POP3 Client. Depending on the type of setup, different
functions are available as follows.
Function SMTP Server Setup POP3 Client Setup
Sending paper-based information as an Internet Email Yes Yes
Sending and Receiving the Internet Fax message with Direct
SMTP protocol
Receive and print an Internet Email automatically Ye s Yes
Receive and print an Internet Email manually No Yes
Forward received G3 fax message(s) or Email automatically Yes Yes
Route received G3 fax message(s) automatically Yes Yes
Relay an Internet Email to G3 fax machine Yes No
Important Note!
The Default setting of Fax Parameter No. 177 (XMT FILE TYPE) for this machine is "PDF", as PDF has become the
industry standard for exchanging documents from computer to computer (Scan-to-Email feature).
However, this PDF format cannot be used for Internet Faxing (i.e. from an Internet Fax machine to an Internet Fax
machine) as current Internet Fax Specifications do not support PDF file format. Internet Faxing requires TIFF-F file format.
If your customer's requirements are mainly Internet Faxing, please change the Fax Parameter No. 177 (XMT FILE TYPE)
to "TIFF". (See page
153)
Yes No
Features
Internet Fax
If your customer uses both Internet Fax and Scan-to-Email and needs to switch file formats on the fly, please explain to
them how to use the Select Mode (F8-6) "FILE TYPE/NAME" for individual transmissions. After the transmission is
completed, the machine returns to its Default setting. (See pages
NOTE
1. To function as an SMTP Mail Server, your machine's email address must include its unique Host
Name within your company domain. This unique Host Name must be registered within your
network’s DNS (Domain Name System) Server.
Example: Internet_Fax@fax01.panasonic.com
2. Automatically refers to immediate SMTP transfer, or immediate POP3 retrieval. Manually
refers to manual retrieval of Email when configured as POP3 client.
3. If you are using DHCP to acquire the network parameters, contact your Network Administrator
to reserve the obtained IP Address printed on the Fax Parameter List.
4. Your machine will receive, print, forward or relay emails in text message format, and TIFF-F
image file attachment only.
58 to 61)
47
Page 48

Internet Fax Features
Setup (SMTP Mail Server/POP3 Client)
To install your machine as an SMTP Mail Server, the following network parameters need to be programmed on your
network, and on your machine.
• TCP/IP Address of your machine
• TCP/IP Subnet Mask of your machine
• TCP/IP Address of the Default Gateway
• Host Name/Domain Name
• TCP/IP Address of the DNS Server (if not available, see Note 2)
• Email Address of your machine (see Note 1)
• Name or IP Address of the Default SMTP Mail Server
• SMTP Authentication Name (when the authentication with the SMTP Server is required)
• SMTP Authentication Password (when the authentication with the SMTP Server is required)
Email (from your machine to a PC), and Direct Internet Fax XMT Transmission
ifaxuser@fax01.panasonic.com
SMTP01.panasonic.com
(SMTP Mail Server)
Direct Internet Fax XMT
Gateway (Router)
SMTP
POP3
popuser001@panasonic.com
ifaxuser@fax02.panasonic.com
Email (from a PC to your machine), and Direct Internet Fax XMT Reception
ifaxuser@fax01.panasonic.com
Direct Internet Fax XMT
Gateway (Router)
SMTP
popuser001@panasonic.com
ifaxuser@fax02.panasonic.com
NOTE
1. To function as an SMTP Mail Server, your machine's email address must include its unique
Host Name within your company domain. This unique Host Name must be registered within
your network’s DNS (Domain Name System) Server.
Example: Internet_Fax@fax01.panasonic.com
2. By default the machine requires the IP Address of the DNS Server and prompts you to enter
the SMTP Server Name. If the DNS Server is not available, change the General Settings; Key
Operator Mode; Parameter No. 23 (DNS Server Address) to "Invalid"
( , Input a 3-digit Key Operator's Password,
COPY
SET
Address of the SMTP Server.
FUNCTION
). Then the machine will prompt you to enter the IP
23 DNS SERVER ADDR.
SET
1
9
POP02.panasonic.com
(POP Server)
SMTP01.panasonic.com
(SMTP Mail Server)
48
Page 49

To install your machine as a POP3 Client, the following network parameters need to be programmed on your network.
• TCP/IP Address of your machine
• TCP/IP Subnet Mask of your machine
• TCP/IP Address of the Default Gateway
• TCP/IP Address of the DNS Server (if not available, see Note 2)
• Email Address of your machine (see Note 3)
• Name or IP Address of the Default SMTP Mail Server
• POP Server Name or IP Address
• POP User Account Name
• POP Password
Email Transmission (from your machine to a PC)
ifaxuser@fax01.panasonic.com
SMTP01.panasonic.com
(SMTP Mail Server)
Gateway (Router)
Features
Internet Fax
popuser001@panasonic.com
Email Reception (from a PC to your machine)
ifaxuser@fax01.panasonic.com
Gateway (Router)
popuser001@panasonic.com
NOTE
3. The email address format can be the same as your regular email address.
If your email address is popuser001@panasonic.com, your machine's email address can be
Internet_Fax@panasonic.com.
SMTP
POP3
SMTP
POP3
POP02.panasonic.com
(POP Server)
SMTP01.panasonic.com
(SMTP Mail Server)
POP02.panasonic.com
(POP Server)
49
Page 50

Internet Fax Features
Setup (SMTP Mail Server/POP3 Client)
For the total system to work properly via LAN, certain information and additional parameters must be set. Please contact
your network administrator for the required information and connection to the LAN.
Important: Make a copy of this page and ask the Network Administrator to complete the required information.
User Information
Company Name
Dept.
City State Zip Code
Address
Tel. No. Fax No.
Internet Parameters (See page 56)
(1) *IP Address:
(2) *Subnet Mask:
(3) *Default Gateway IP Address:
(4) *Primary DNS IP Address:
(5) *Secondary DNS IP Address:
(6) Email Address:
(7) *SMTP Server Name: or *SMTP Server IP Address:
(8) SMTP Auth Name:
(9) SMTP Auth Password:
(10) *POP Server Name: or *POP Server IP Address:
(11) POP User Name:
(12) POP Password:
(13) *LDAP Server Name: or *LDAP Server IP Address:
(14) LDAP Login Name:
(15) LDAP Password:
(16) *LDAP Search Base:
(17) Host Name/Domain Name:
(18) Default Subject:
(19) Default Domain:
(20) Selectable Domains:
1. 6.
2. 7.
3. 8.
4. 9.
5. 10.
(21) Remote Password:
(22) Relay XMT Password:
(23) Manager’s Email Address:
(24) Relay Domains (Domains Authorized for Relay Transmission):
1. 6.
2. 7.
3. 8.
4. 9.
5. 10.
50
NOTE
1. Items in Bold, depict information obtained from your Network Administrator.
2. By default the machine requires the IP Address of the DNS Server, and prompts you to enter
the SMTP Server Name. If the DNS Server is not available, change the General Settings; Key
Operator Mode; Parameter No. 23 (DNS Server Address) to "Invalid"
( , Input a 3-digit Key Operator's Password,
COPY
SET
FUNCTION
). Then the machine will prompt you to enter the IP
23 DNS SERVER ADDR.
SET
1
9
Address of the SMTP Server.
3. If required, the MAC Address of your machine can be obtained from the 3rd page of the Fax
Parameter List printout (press
FUNCTION
).
6 4
SET
FAX/EMAIL
(If set on other function mode), then press
Page 51

Explanation of Contents
MAC Address : MAC Address from the 3rd page of the Fax Parameter List printout (press
FAX/EMAIL
).
SET
4
*(1) IP Address : The Internet Protocol (IP) address assigned to your machine.
*(2) Subnet Mask : The Subnet Mask number.
*(3) Default Gateway IP Address : The Default Gateway's IP Address.
*(4) Primary DNS Server IP Address : The IP address of the Primary DNS Server.
*(5) Secondary DNS Server IP
Address
(6) Email Address : The Email Address assigned to your machine. (Up to 60 characters)
(7) SMTP Server Name or SMTP
Server IP Address
(8) SMTP Auth Name : The SMTP Authorized Name. (Up to 40 characters)
(9) SMTP Auth Password : The SMTP Authorized Password. (Up to 10 characters)
(10) POP Server Name or POP
Server IP Address
(11) POP User Name : The POP User Name. (Up to 40 characters)
(12) POP Password : The POP Password. (Up to 10 characters)
(13) LDAP Server Name or LDAP
Server IP Address
(14) LDAP Login Name : The LDAP Login Name. (Up to 40 characters, Ex: username)
(15) LDAP Password : The LDAP Password. (Up to 10 characters, Ex: password)
(16) LDAP Search Base : The LDAP Search Base. (Up to 60 characters, Ex: cn=users, dc=company,
*(17) Host Name/Domain Name : The name assigned to your machine. (Up to 50 characters)
(18) Default Subject : The information to be added to the Subject Line for all outgoing emails. (Up to
(19) Default Domain : Specify the Domain Name (up to 50 characters) to be added to frequently used
(20) Selectable Domains : Enter up to 10 Domain Names that can be selected during manual email
(21) Remote Password : Enter a security password (up to 10 characters) to allow Remote Programming
(22) Relay XMT Password : Enter a password to provide network security to your Relay Station (for G3
(23) Manager’s Email Address : Enter your Department Manager’s email address for notification of all Internet
(24) Relay Domain (01 to 10) : Enter up to 10 Domain Names that are authorized to access your Internet Fax
: The second IP address of the Primary DNS Server.
: The SMTP Server Name (up to 60 characters). The SMTP Server IP Address.
: The POP Server Name (up to 60 characters). The POP Server IP Address.
: The LDAP Server Name (up to 60 characters, Ex: ldap.company.com). The
LDAP Server IP Address.
(Available for some countries only.)
(Available for some countries only.)
(Available for some countries only.)
dc=com)
(Available for some countries only.)
40 characters)
or incomplete outgoing email addresses (i.e. @yourcompany.com).
addressing. (Up to 30 characters)
of the Internet Parameters and Auto Dialer or the retrieval of the Journal via
email.
relay purposes). (Up to 10 characters)
relayed transmissions for supervision and cost control purposes. (Up to 60
characters)
for Relayed Transmission Request. (Up to 30 characters)
Relay Domain, a.k.a. Domain Name in your machine.
(If set on other function mode), then press
FUNCTION
6
Features
Internet Fax
(*These parameters are in the General Settings. Refer to the Operating Instructions (For Copy & Network Scan
Functions).)
51
Page 52

Internet Fax Features
Internet Communication Features
Transmission/Reception
Your machine allows you to transmit documents over the Internet to another Internet Fax, or a PC. The document is
first scanned and converted into a TIFF-F, or PDF* file, and then transmitted to the remote location as an attachment
file to an email using MIME encoding.
The email system at the receiving end must support MIME. Otherwise, the attachment file will be detached, and lost.
When you send an email message to someone, your machine uses Simple Mail Transfer Protocol (SMTP) to transfer
your outgoing mail to your SMTP Mail Server, which in turn uses SMTP to send your mail to the Internet.
Note: PDF file is only available if sending the document(s) to a PC.
Internet Fax Delivery Notice (MDN)
If the sender (Internet Fax) desires a processing confirmation, it must request a Message Disposition Notification when
sending the message itself to a device supporting this notification function.
Several email applications such as Eudora and Outlook® Express support, and are able to respond to the delivery
confirmation notification sent from the Internet Fax. As well as send a request for notification to the Internet Fax by
email applications that support MDN (Message Disposition Notification) function.
For additional details on MDN, consult a suitable reference such as the Help file, and the Operating Instructions of
each respective email application.
MDN Request
Internet Fax
MDN Request
PC
Eudora, Outlook Express, etc.
Legend :
: MDN Request from the Originator
: MDN Response with Capability Notification from the Recipient
: MDN Response from the Recipient
Internet Fax Transmission
Message Delivery Notification (MDN)
Response Capability Notification
Capability Notification
Email Transmission
MDN Response
Internet Fax
MDN Response
PC
Eudora, Outlook Express, etc.
52
Page 53

Direct SMTP
LAN
Internet
Internet
LAN
LAN
Simple Mail Transfer Protocol (SMTP) is used to transfer mail reliably and efficiently. An important feature of SMTP is
its capability to transport mail across networks, usually referred to as SMTP mail relay by employing SMTP Server.
Direct SMTP allows you to transmit documents to another Internet Fax directly without using an SMTP Server. For this
feature to work reliably, the IP Address should remain unchanged (ask your Network Administrator to reserve the IP
Address). The Domain Name of the machines and other record information must be properly registered in the DNS
Server.
Furthermore, in common cases only email and web service from the Internet are permitted into the corporate intranet,
and corporate network administrators are extremely unwilling to open the firewall for other, incoming services, since
each opened path represents additional, potential security threats.
This makes Direct SMTP attractive because it can operate throughout the organization's Intranet.
Internet Fax Internet Fax
Direct SMTP
SMTP Server
Typical SMTP
Routing
Features
Internet Fax
LAN
Internet
Internet Mail Reception
Your machine allows you to receive, and print a PC transmitted email automatically or manually, depending on its
setup configuration. However, if the received email includes a file attachment in a format other than TIFF-F, such as
PDF, JPEG, Word, Excel, PowerPoint, your machine prints an error message instead.
Internet Fax Internet Fax
LAN
Internet Fax
Transmission
Internet
Internet Mail Reception
LAN
Email Transmission
PC
PC
53
Page 54

Internet Fax Features
Important Information
General Description
Your machine uses the same communication protocols as email: the Simple Mail Transfer Protocol (SMTP). The
differences from a standard G3 fax communication using the Public Telephone Network (PSTN) are as follows.
Differences Between Internet Fax and Regular Fax
A regular Fax machine goes off-hook, dials, and the phone network completes a circuit over phone lines to the
receiving fax. You pay for the circuit. The two faxes negotiate a connection, synchronize and exchange image data.
The Internet Fax works like an email, the image data is broken down into packets, and is transmitted through your
Local Area Network (LAN) to the Internet or Intranet instead of using a telephone company’s network, thus saving you
long distance costs.
Transmitted Document Confirmation
1. Your machine does not directly connect to the final destination (see Note below), but rather connects to a Mail
Server via LAN. Therefore, if a document cannot be correctly transmitted due to an error, the erroneous mail may
be returned from the Mail Server to your machine.
2. The erroneous mail may take a long time to return (20 to 30 minutes) depending on the destination location, traffic
on the network or LAN system configuration.
3. Depending on the Mail Server, it is also possible that erroneous mail is not returned at all. Therefore, when
transmitting important or time sensitive documents, it is recommended that you follow up with a telephone call to
confirm reception.
4. Documents cannot be transmitted correctly if the destination Mail Server does not conform to the MIME protocol.
Erroneous mail may not be returned depending on the Mail Server.
Note:
1) Fax Parameter No. 172 (Direct Internet Fax XMT), if set to "Valid", allows you to configure Phone Book so that
you can directly send to the destination without medium of SMTP.
2) Your machine supports the Delivery Notice feature. (See page 52, 152)
Your Machine Cannot Make a Phone Call via LAN
Your machine can only make a phone call using a regular telephone line (PSTN).
Dual Port Communication
Your machine's dual port capability, allows simultaneous G3 Fax Communication over regular telephone line (PSTN)
and LAN Communication.
Transmission Resolution
In view of PC transmission, the factory default setting for the resolution is set to FINE mode. If required, this setting can
be changed to Normal.
54
Page 55

Internet Mail Reception
1. Your machine can receive text email from a PC, and print ANSI characters. It will print a "❚" symbol if an
unrecognized character is received.
2. Received email font and character size are fixed, and cannot be changed.
3. Text email will be printed at about 72 lines per page. It is recommended that you use A4/Letter size recording
paper.
4. If the received text email includes a file attachment in a format other than TIFF-F, such as PDF, JPEG, Word, Excel,
PowerPoint, your machine prints an error message instead.
5. If the received email includes attached TIFF-F formatted image files, the text and TIFF-F formatted image file will
be printed on separate pages.
Sending a Document to a PC via LAN
When transmitting a document to an email address, the following instructions are sent as text message in addition to
the TIFF-F formatted image file.
An Image data in TIFF-F format has been attached to this email. You can download the TIFF-F Image Viewer from the
following URL address:
http://panasonic.co.jp/pcc/en/
Note: If the document(s) being sent are in the PDF format, the following message is shown instead.
An image data in PDF format has been attached to this email.
Features
Internet Fax
Internet Relayed Transmission
To prevent unauthorized stations from accessing your Relay Station for Internet Relayed Transmission, you must set
up your Network security. Enter a Relay Station Name, which is concealed from the final destinations, and a Manager’s
Email Address for notification of all Internet Relayed Transmissions.
55
Page 56

Internet Fax Features
Setting the Internet Parameters
Basic Parameters
The following Six (6) Basic Parameters
must be pre-programmed into the machine.
*• TCP/IP Address of your machine
*• TCP/IP Subnet Mask of your machine
*• TCP/IP Address of the Default Gateway
*• TCP/IP Address of the DNS Server
• Email Address of your machine
• Name or IP Address of the Default
SMTP Mail Server
(*These parameters are in the General
Settings. Refer to the Operating
Instructions (For Copy & Network Scan
Functions).)
1
If set on other
function mode.
2
User Parameters (Internet Parameters)
Depending on how your machine will be configured to communicate on the LAN, the appropriate parameters listed in the
table below must be set up first. (See page 50)
Parameter Comments
1 DATE & TIME Current Date and Time.
2 LOGO Up to 25 characters & digits.
3 CHARACTER ID Up to 16 characters & digits.
4 ID NO. Your Fax Telephone Number. (Up to 20 digits)
5 TIME ZONE The Time Zone is required as part of the Email header information when sending
Internet faxes.
6* EMAIL ADDRESS The Email Address assigned to your machine for sending and receiving.
(Up to 60 characters)
7* SMTP SERVER NAME The name of the SMTP Mail Server. (Up to 60 characters)
8* SMTP SERVER IP
ADDRESS
9* SMTP AUTH NAME The SMTP Authorized Name. (Up to 40 characters)
10* SMTP AUTH PASSWORD The SMTP Authorized Password. (Up to 10 characters)
11* POP SERVER NAME The name of the POP Mail Server. (Up to 60 characters)
12* POP SERVER IP
ADDRESS
13* POP USER NAME User Name assigned to your machine. (Up to 40 characters)
14* POP PASSWORD Password assigned to your machine. (Up to 10 characters)
15* LDAP SERVER NAME The name of the LDAP Server. (Up to 60 characters, Ex: ldap.company.com)
IP Address of the SMTP Mail Server. (Available when DNS Server address setting is
“INVALID”.)
(Available when Fax Parameter No. 170 "SMTP AUTHENTICATION" is "Valid ")
(Available when Fax Parameter No. 170 "SMTP AUTHENTICATION" is "Valid ")
IP Address of the POP Mail Server. (Available when DNS Server address setting is
“INVALID”)
(Available for some countries only.)
56
NOTE
1. These setting is required only when "23 DNS Server Address" in General setting is set to
"Valid". When the setting is "Invalid", set each IP address, refer to For Key Operator in the
Operating Instructions (For Copy and Function Parameters) on the provided CD-ROM.
Page 57

3
SET MODE (1-4)
ENTER NO. OR ∨
Parameter Comments
16* LDAP SERVER IP
ADDRESS
17* LDAP LOGIN NAME Login Name assigned to your machine. (Up to 40 characters, Ex: username)
18* LDAP PASSWORD Password assigned to your machine. (Up to 10 characters, Ex: password)
19* LDAP SEARCH BASE ID for starting the search in the directory on the LDAP server.
20 DEFAULT SUBJECT The default information to be added to the Subject Line for all outgoing Emails.
21 DEFAULT DOMAIN When the outgoing email address is incomplete by SMTP standards, the Frequently
22 SELECTABLE DOMAINS
(01) ~ (10)
23 REMOTE PASSWORD This is a security password that allows Remote Programming of the Internet
24 RELAY XMT PASSWORD A password that provides Network security for your Relay Station (used exclusively for
25 MANAGER’S EMAIL
ADDRESS
26 RELAY DOMAIN
(01) ~ (10)
* Contact your Network Administrator for this Information.
∧
IP Address of the LDAP Server. (Available when DNS Server address setting is
“INVALID”.)
(Available for some countries only.)
(Available for some countries only.)
(Available for some countries only.)
(Up to 60 characters, Ex: cn=users, dc=company, dc=com)
(Available for some countries only.)
(Up to 40 characters)
Sent Domain specified here will be automatically added to the email address. This
feature is also useful as a shortcut when manually entering email addresses to a
frequently used Domain. (Up to 50 characters)
Enter up to 10 Domain Names that can be selected using the "\/" or "/\" key during
Manual email addressing. (Up to 30 characters)
Parameters and Auto Dialer or the retrieval of the Journal via an Email. (Up to 10
characters)
G3 relay purposes). (Up to 10 characters)
Department Manager’s Email Address for notification of all Internet relayed
transmissions for supervision and cost control purposes. (Up to 60 characters)
Enter up to 10 Domain Names that have been authorized to access your Internet Fax
for Relayed Transmission Request. (Up to 30 characters)
Relay Domain, a.k.a. Domain Name in your machine.
4
DATE & TIME
01-01-2006 12:00
Press or to scroll the
display to the desired User (Internet)
Parameter and press .
Ex:
SMTP SERVER NAME
SET
5
SMTP SERVER NAME
or
(Option)
Enter SMTP Server Name and
press . To advance to the
next parameter, press
to return to Step 4 or press
STOP
SET
CLEAR
to return to standby.
Features
Internet Fax
57
Page 58

Internet Fax Features
Sending Documents
Manual Email Addressing
Enter the Email
Address using the
Keyboard.
Full Email Address
5a
Using Default Domain
5b
1
or
or
(Option)
2
or
If set on other
function mode.
Enter the full Email Address using the keypad
or the keyboard (option) (up to 60 characters).
If you make a mistake, press to
erase the character then reenter the correct
character.
Ex: abc@panasonic.com
Enter the User portion of the Email Address
and press . The machine will
complete the email address with the Default
Domain preprogrammed in the User (Internet)
Parameters (i.e. will add "@panasonic.com"
to the email address).
Ex: abc
SET
CLEAR
58
5c
NOTE
(Option)
Using the Domain List
If you want to send to a different Domain,
enter the first part of an Email Address (ex:
abc@), press or to display Domain
Names in the Selectable Domains List.
or
(Option)
1. If your machine sounds an alarm (pi-pi-pi) when pressing the KEYBOARD Button or any
Phone Book Entries that contain an email address, one or more of the required 6 Basic
Internet Parameters may have been omitted in the User (Internet) Parameter(s).
(See page 56)
2. The Unit will accept a combination of Email Address and PSTN Dialing numbers.
3. If the Email transmission cannot be completed for any reason, the Email may be returned
undelivered; otherwise no reply will be printed.
Choose the desired domain and press
from Domain List.
SET
Ex: abc@mgcs.com
Page 59

Select the desired Transmission setting.
3
(See page 11)
Your machine can temporarily change the File
Type and File Name by using
(FILE TYPE AND NAME).
6
You can select TIFF or PDF File Type and then
change the File Name. When sending to:
Internet Fax : select "TIFF".
PC : select "TIFF" or "PDF".
• The standard setting can be change by the Fax
Parameter No.177 (XMT FILE TYPE).
See page 153.
FUNCTION
4
8
5a
Change to Email
Address input mode.
5b
5c
Features
Internet Fax
6
The document(s) is stored into
memory with a file number.
Then starts sending the
document(s).
7
When an original is scanned on the Platen
Glass, the message "ANOTHER
ORIGINAL?" is shown.
Place another original, then
press .
Machine starts sending.
START
NOTE
4. For the machine to perform the email address completion the Fax Parameter No. 160
(DEFAULT DOMAIN) must be set to "Valid" and the Default Domain must be preprogrammed
in the User (Internet) Parameters. (See page 152)
5. You can send the same document(s) to multiple stations by repeating Steps 5a, 5b or 5c, and
then pressing
6. The "QUICK MEMORY TRANSMISSION" feature is disabled if multiple stations are set.
7. Direct Transmission is not available for LAN communication.
START
.
59
Page 60

Internet Fax Features
Sending Documents
One-Touch/Abbreviated and Search Email Addressing
When sending via LAN, the Directory
Search function allows you to enter a
full email address by searching for
the station name or email address
entered in the Auto Dialer and the
LDAP (Lightweight Directory Access
Protocol) Server.
One-Touch/ABBR Dialing (see Note 3)
4a
(One-Touch is available when a Keyboard option is installed.)
(Option)
When the Telephone Number(s) or Email
Address(es) are registered in the
One-Touch/Abbreviated Dialing.
or
Directory Search Dialing (see Note 3)
4b
or
or
1
or
or
or
(Option)
Enter the first letter(s) of the name
you wish to search.
Ex: "SA"
2
If set on other
function mode.
+ ABBR No.
(3-digit)
ENTER LETTER(S)
SA
[100]SALES 3
sales@panasonic.co
[005]SALES 2
sales@panasonic.co
[001]SALES
sales@panasonic.co
60
4c
NOTE
Email Address Search Dialing (see Note 3)
Change to
Email Address
input mode.
Enter the first letter(s) of the email
address you wish to search.
Ex: "sa"
1. If your machine sounds an alarm (pi-pi-pi) when pressing the KEYBOARD Button or any
Phone Book Entries that contain an email address, one or more of the required 6 Basic
Internet Parameters may have been omitted in the User (Internet) Parameter(s).
(See page 56)
2. The Unit will accept a combination of Email Address and PSTN Dialing numbers.
3. Auto Dialer (One-Touch/ABBR.) is only available when stations are registered.
(See page 140)
4. If the Email transmission cannot be completed for any reason, the Email may be returned
undelivered; otherwise no reply will be printed.
or
(Option)
sa
sa
sales@panasonic.com
sales@panasonic.com
sa
sales@panasonic.com
Page 61

Select the desired Transmission setting. (See page 11)
3
Your machine can temporarily change the File Type and File Name by using
(FILE TYPE AND NAME).
You can select TIFF or PDF File Type and then change the File Name. When sending to:
Internet Fax : select "TIFF".
PC : select "TIFF" or "PDF".
5
The document(s) is stored into
memory with a file number. Then
starts sending the document(s).
6
When an original is scanned from the Platen
Glass, the message "ANOTHER
ORIGINAL?" is shown.
FUNCTION
Place another original, then
press .
Machine starts sending.
START
8 6
4a
4b
4c
Features
Internet Fax
NOTE
5. For the machine to perform the email address completion the Fax Parameter No. 160
(DEFAULT DOMAIN) must be set to "Valid" and the Default Domain must be preprogrammed
in the User (Internet) Parameters. (See page
6. You can send the same document(s) to multiple stations by repeating Steps 4a, 4b or 4c, and
then pressing .
7. The "QUICK MEMORY TRANSMISSION" feature is disabled if multiple stations are set.
8. Direct Transmission is not available for LAN communication.
START
152)
61
Page 62

Internet Fax Features
Sending Documents
Entering the Email Header
Email Address
You can enter the Email Address for CC
(Carbon Copy) and BCC (Blind Carbon
Copy). If you would like to enter CC and/or
BCC, change Fax Parameter No. 168 (CC/
BCC STATION) to "Valid". (See page 152)
1
or
2
Subject
Your machine will automatically add the
Default Subject information that was entered
during the User Parameter setup, to the
Subject Line of all outgoing emails.
If you would like for the machine to prompt
you for the Subject before each email
transmission, change the Fax Parameter No.
159 (SUBJECT LINE ENTRY) to "Valid ".
(See page 152)
5a
ENTER CC STATION(S)
THEN PRESS START 00%
or
(Option)
Enter the CC station(s) and then
press .
SET
If set on other
function mode.
6
nn STN(S) ARE SET
ADD MORE OR START
62
Confirm the destinations,
5b
[001]TO1
to1@co.jp
then press to return to Step 4.
9
ENTER SUBJECT OR
PRESS START TO SEND
SUBJECT
FAX from Mr. Jones
[002]TO2
to2@co.jp
SET
Enter the Subject.
(Up to 40 characters & digits)
[003]TO3
to3@co.jp
10
Page 63

3
4
nn STN(S) ARE SET
ADD MORE OR START
or
(Option)
Enter Email station(s) by any combination of the
following methods and then press .
• One-Touch (Option)
• ABBR Dialing
• Manual Number Dialing
• Directory Search Dialing
(For details, see pages 58 to 60)
ENTER BCC STATION(S)
7a
THEN PRESS START 00%
Enter the BCC station(s) and then
press .
SET
or
(Option)
SET
5a
5b
Features
Internet Fax
8
9
Confirm the destinations,
7b
[004]CC1
cc1@co.jp
then press to return to Step 6.
[005]CC2
cc2@co.jp
SET
[006]CC3
cc3@co.jp
63
Page 64

Internet Fax Features
Sending Documents
Q Ledger Size Document Transmission
When transmitting via LAN, the transmitter is
incapable of identifying the receiver's recording
paper size capability, and thus it will not reduce
the document size during transmission.
Therefore, it is recommended that you send only
A4/Letter size documents for LAN transmission.
If a Ledger size document is transmitted and the
receiver is only able to print A4/Letter size
documents, the communication will fail when the
temporary setting "LEDGER EMAIL XMT" of the
Select Mode is set to its default position (ON).
1
or
2
If set on other
function mode.
5
or
(Option)
Enter Email station(s) by any combination of the
following methods and then press .
• One-Touch (Option)
• ABBR Dialing
• Manual Number Dialing
• Directory Search Dialing
(For details, see pages 58 to 60)
SET
To send with reduction, repeat Steps 1 to 6, except in Step 4, set the "LEDGER EMAIL XMT" setting to "OFF"
position.
When the Select Mode "LEDGER EMAIL XMT" setting is set to the "OFF" position, the transmission reduction is
according to the setting of Fax Parameter No. 141 (LAN XMT REDUCE).
LEDGER EMAIL XMT = ON
LEDGER EMAIL XMT = OFF
NOTE
1. Factory default setting for Fax Parameter No. 141 (LAN XMT REDUCE) is "Invalid".
(See page 151)
Transmits actual document size (without reduction).
:
Reduces Ledger size document to B4 size or to A4/Letter before transmission.
:
(According to the Fax Parameter No. 141 (LAN XMT REDUCE) setting, see
Table.)
64
Page 65

3 4
6
LEDGER EMAIL XMT=OFF
1:OFF 2:ON
5
Features
Internet Fax
Document Size Transmission
LEDGER EMAIL XMT = OFF
Document Size
LEDGER LEDGER B4 A4/Letter
B4 B4 B4 A4/Letter
A4/Letter A4/Letter A4/Letter A4/Letter
LEDGER EMAIL XMT = ON
Fax Parameter No. 141
(LAN XMT REDUCE)
set to "Invalid"
Fax Parameter No. 141
(LAN XMT REDUCE)
set to "Valid"
65
Page 66

Internet Fax Features
Sending Documents
Returned Email
When using the Internet communication mode, a failure report will print automatically for each transaction if the email
is returned undelivered by the mail server. The printout will consist of the undelivered message contents supplied by
the mail server, and a portion of the first page’s image for that particular transaction.
Failure Report Sample (User unknown)
Received: from localhost (localhost) by ifeifl.rdmg.mgcs.mei.co.jp (8.6.12/3.4W3) with
internal id OAA24381; THU, 15 AUG 2004 14:52:57 +0900
Date: THU, 12 AUG 2004 14:52:57 +0900
From: Mail Delivery Subsystem <MAILER-DAEMON@ifeifl.rdmg.mgcs.mei.co.jp>
Subject: Returned mail: User unknown
Message-Id: <200011120552.OAA243B1@ifeifl.rdmg.mgcs.mei.co.jp>
To: <fax@nwpc31.rdmg.mgcs.mei.co.jp>
The original message was received at THU, 15 AUG 2004 14:52:54 +0900
from nwpc31.rdmg.mgcs.mei.co.jp [172.21.22.51]
----- The following addresses had delivery problems ----<error@nwr39.rdmg.mgcs.mei.co.jp> (unrecoverable error)
----- Transcript of session follows -----
.... while talking to nwr39.rdmg.mgcs.mei.co.jp.:
>>> RCPT To:<error@nwr39.rdmg.mgcs.mei.co.jp>
<<< 550 <error@nwr39.rdmg.mgcs.mei.co.jp>... User unknown
550 <error@nwr39.rdmg.mgcs.mei.co.jp>... User unknown
----- Original message follows ----Return-Path: fax@nwpc31.rdmg.mgcs.mei.co.jp
Received: from nwpc31.rdmg.mgcs.mei.co.jp (Internet FAX) (nwpc31.rdmg.mgcs.mei.co.jp [172.21
.22.51]) by ifeifl.rdmg.mgcs.mei.co.jp (8.6.12/3.4W3) with SMTP id OAA24380 for <error@nwr39
.rdmg.mgcs.mei.co.jp>; THU, 15 AUG 2004 14:52:54 +0900
Message-ID: <200011120552.OAA24380@ifeifl.rdmg.mgcs.mei.co.jp>
Mime-Version: 1.0
Content-Type: image/tiff
Content-Transfer-Encoding: base64
Content-Disposition: attachment; filename="image.tif"
Content-Description: image.tif
X-Mailer: Internet FAX, MGCS
Date: THU, 15 AUG 2004 14:49:00 +0900
From: iFAX <fax@nwpc31.rdmg.mgcs.mei.co.jp>
Subject: IMAGE from Internet FAX
To: error@nwr39.rdmg.mgcs.mei.cp.jp
5
15-SPT-2006 14:49 iFAX
P.001/001
66
Page 67

memo
Features
Internet Fax
67
Page 68

Internet Fax Features
Receiving Documents
General Description
Your machine offers you a choice to receive Fax documents unattended (by default), or manually over regular
telephone lines.
Your machine also offers the same choice to receive, and print Internet email messages via LAN unattended, or
manually when subscribing to a POP Mail Server. However, when your machine is configured to receive email using
SMTP protocol, the email can only be received, and printed unattended.
Internet Fax Received on a PC
Figure 1: Outlook® Express Inbox Sample
mm/dd/yy 3:15 PM
mm/dd/yy 3:17 PM
mm/dd/yy 3:18 PM
mm/dd/yy 3:19 PM
mm/dd/yy 3:20 PM
mm/dd/yy 3:21 PM
mm/dd/yy 3:21 PM
68
• The "Subject" column in the above example shows samples of email messages received on a PC from your machine,
and Internet Fax.
• For your reference, the above example is from Outlook® Express Inbox running under Microsoft® Windows®. If you are
using a different email application software, please refer to your application’s User Manual.
Page 69

MM, DD, YYYY
http://panasonic.co.jp/pcc/en/
Figure 2: Internet Fax Received on a PC
Features
Internet Fax
• For your reference, the above example is from Windows Messaging running under Microsoft® Windows®.
• To run the Viewer, please refer to your application’s User Manual. The attached file is composed of TIFF-F (Tagged
Image File Format with Modified Hoffman coded image). TIFF Viewers come in many flavors, a majority of TIFF
Viewers will open and view this file, however, a handful of Viewers may not support this format.
• You can download the TIFF-F Image Viewer into your PC from the following URL address:
http://panasonic.co.jp/pcc/en/
• License agreement of Panasonic’s TIFF-F Image Viewer application.
You must carefully read the license agreement before installing the TIFF-F Image Viewer application on your PC. If you
do not agree to all the terms of this agreement, do not use the software and destroy all of the copies thereof.
You must assume full responsibility for selection of the software and its operation/non-operation and results obtained
therefrom.
• If you receive an email (Internet Fax) with a PDF file formatted attachment, the following text message is shown in the
Email body.
An image data in PDF format has been attached to this email.
69
Page 70

Internet Fax Features
Receiving Documents
Receiving Email from a POP Server
Your machine offers a choice to receive, and print Internet email messages via LAN unattended, or manually when
subscribing to a POP Mail Server.
Setting the POP Parameters
Set the parameters pertinent to the
POP Server (Fax Parameters No. 146
to 149). (See page 151)
No. 146 (POP TIMER):
Enter the interval to check, and retrieve
email from the POP Server
(0 to 60 minutes).
"0 min.": Will not query the POP Server
for Email.
No. 147 (AUTO POP RCV):
The machine will retrieve email from
the POP Server, and print the email
unattended.
"Invalid": Will not retrieve
automatically.
No. 148 (DEL POP RCV MAIL):
Select whether the email is deleted
from the POP Server after it is retrieved
by your machine.
No. 149 (DEL POP ERR MAIL):
Select whether to delete the email from
the POP Server when the file
attachment format is not supported.
1
If set on other
function mode.
5
147 AUTO POP RCV
2:VALID
Select desired Setting,
and press .
SET
2
6
148 DEL POP RCV MAIL
2:VALID
Select desired Setting,
and press .
SET
70
NOTE
1. If you program a User Name and Password in the Program Key, you can receive email from
the POP Server using a User Name other than the name set in the User Parameter.
Page 71

FAX PARAMETER(1-182)
3
NO.=
7
149 DEL POP ERR MAIL
1:INVALID
Select desired Setting and
press .
SET
146 POP TIMER
4
3 min. (0-60)
Features
Internet Fax
5
Enter the desired download interval (0-60)
and press .
SET
8
To return to standby.
NOTE
2. If the machine is in the Shutdown mode, it cannot wakeup when receiving Email.
71
Page 72

Internet Fax Features
Receiving Documents
Unattended Email Reception from the POP Server
When the Fax Parameter No. 146 (POP TIMER) is set
to a value between 1 and 60 minutes, and Fax
Parameter No. 147 (AUTO POP RCV) is set to "Valid",
the machine will query the POP Server at the specified
interval for new email. (See page 151)
Any email on the POP Server is retrieved and printed
unattended.
Manual Email Retrieval from the POP Server
Use the following procedure for
manual email retrieval from the POP
Server.
Confirm that there is no
1
document(s) on the ADF/
i-ADF.
1
If set on other
function mode.
2
NOTE
If set on other
function mode.
1. If you program a User Name and Password in the Program Key, you can receive email from
the POP Server using a User Name other than the name set in the User Parameter.
72
Page 73

2 3
1 NEW MAIL(S)
MMM-dd-yyyy 17:15
< NEW MAIL(S)>
When the Fax Parameter No. 146 (POP TIMER) is
set to "0", the machine will not query the POP
Server and the email is not retrieved automatically.
With this setting, email must be retrieved manually
from the POP Server.
3
MMM-dd-yyyy 17:15
00%
When the Fax Parameter No. 147 (AUTO POP
RCV) is set to "Invalid", the machine will query the
POP Server for new email at the interval specified
by Fax Parameter No. 146. If new email has
arrived at POP Server, the machine will not retrieve
it, but displays the number of emails on the POP
Server.
1 NEW MAIL(S)
If the POP Server received
4a-24a-1
new email, the machine will
display the number of
emails on the server, then
receive and print the email.
ON LINE * RCV *
ID:abc@panasonic.com
Features
Internet Fax
If the POP Server has not
4b
received any new email,
the following message is
displayed.
NO NEW MAIL
73
Page 74

Internet Fax Features
Program Keys (Option)
Setting the POP Access Key
This function allows others to
share your machine to retrieve
their emails from the POP
Server by preprogramming
their POP User Names, and
POP Passwords into the
Program Keys (P1 to P4).
Their emails can be retrieved
by simply pressing their
associated Program Key.
(See Note 1)
1
If set on other
function mode.
5
POP USER NAME
Ex: "kate" and press
SET
2
POP PASSWORD
6
Ex: "PANA123" and press
SET
Using POP Access Key
Use the following
procedure to retrieve your
Email from the POP Server
using the Program Key.
NOTE
1. If security is a concern, and to prevent unauthorized personnel from retrieving your email from
the POP Server, when programming the Program Key, leave the POP Password field "Blank".
By leaving it "Blank", the machine will prompt you to enter the POP Password when the
Program Key is pressed to retrieve email.
1
If set on other
function mode.
2
Ex:
P1 M
74
Page 75

PROGRAM (1-5)
3 4
ENTER NO. OR ∨ ∧
PROGRAM[P ]
PRESS PROGRAM KEY
Ex:
P1 M
5
Features
Internet Fax
7
DELETE EMAIL NO.=2
1:YES 2:NO
or
1 2
: deletes the messages from the
1
server
: leaves the messages on the
2
server
3
POP RCV USER NAME
kate
8
PROGRAM[P ]
PRESS PROGRAM KEY
To return to standby.
If the POP Password is not
4
entered in the program key,
enter the POP Password.
(Up to 10 characters and
press )
START
5
NOTE
If the POP Server has
5
not received any new
email, the following
message is displayed.
NO NEW MAIL
2. To erase the POP Access Key, see page 44.
If the POP Server received
new email, the machine will
display the number of emails
on the server, then retrieves
and prints the email.
nn NEW MAIL(S)
or
75
Page 76

AAA
AAA
BBB
BBB
BBB
AAA
Advanced Facsimile Features
Confidential Mailbox
Sending a Confidential Document
The confidential mailbox feature can be used as a
mailbox to communicate with other compatible models
using a 4-digit confidential code. The Confidential
Mailbox feature receives document(s) with a
confidential code into memory. These documents can
only be printed by the person who has the correct
confidential code.
Storing
with Confidential
BBB
Code (4-digit)
AAA
Sending
with Confidential
Code (4-digit)
Confidential
Mailbox
AAA
Confidential
Code (4-digit)
Polling
BBB
AAA
BBB
1
or
5
CONFIDENTIAL XMT
CONF. CODE=
Confidential Code
(4-digit)
Ex: 2233
2
If set on other
function mode.
76
These documents can only be printed by the person
who has the correct confidential code.
Compatibility with Other Panasonic Machines
DF-1100
DP-180 DP-190 DP-1810F DP-1820P DP-1820E
DP-2000 DP-2310 DP-2500 DP-3000 DP-3010
DP-3510 DP-3520 DP-4510 DP-4520 DP-6010
DP-6020 DP-8020E DP-8020P DP-8035 DP-8045
DP-8060
DX-600 DX-800
UF-280M UF-312 UF-322 UF-332
UF-333 UF-342 UF-344
UF-550 UF-560 UF-585 UF-590 UF-595
UF-733* UF-744 UF-745 UF-755 UF-755e UF-766
UF-770 UF-780 UF-788 UF-790
UF-880 UF-885 UF-890 UF-895 UF-990
UF-7000 UF-8000 UF-9000
(*: See page 78 Note 4)
Page 77

3 4
CONF. COMM. (1-5)
ENTER NO. OR ∨ ∧
5
6 7
CONFIDENTIAL XMT
CONF. CODE=2233
ENTER STATION
THEN PRESS START
Dial by any one of the
following methods:
• One-Touch (Option)
• ABBR Dialing
• Manual Number Dialing
• Directory Search Dialing
(For details, see page 22)
8
Advanced
Facsimile Features
If notify the receiving
person, and share the
Confidential Code with
them.
77
Page 78

Advanced Facsimile Features
Confidential Mailbox
Polling a Confidential Document
After you have been informed
that someone has transmitted a
confidential document to a
remote station's mailbox, use
the following procedure to poll
the confidential document from
the remote station.
1
If set on other
function mode.
5
ENTER STATION
THEN PRESS START
Dial by any one of the
following methods:
• One-Touch (Option)
• ABBR Dialing
• Manual Number Dialing
• Directory Search Dialing
(For details, see page 22)
2
6
Receiving a Confidential Document to Your Machine's Mailbox
No special setting is required, your machine comes with this feature ready to use. Your machine receives a confidential
fax the same way it receives a normal fax message. When receiving the confidential fax, the display shows the
following message and prints out the Confidential Receive Report (CONF. RCV REPORT).
MESSAGE IN MAIL BOX
NOTE
1. The confidential file will be erased automatically at the center station after being polled.
2. If your machine receives two confidential faxes with same confidential code, both documents
are stored together in the same confidential mailbox.
3. We recommend that optional flash memory card is installed when this function is used. See
page 178 on Image Memory Capacity.
4. If confidential faxes were received in the mailbox of UF-733, you cannot poll those documents.
The UF-733 is designed to print out the received confidential document locally only.
78
Page 79

CONF. COMM. (1-5)
ENTER NO. OR ∨ ∧
43
CONFIDENTIAL POLL
CONF. CODE=
5
Confidential Code (4-digit) and press .
Sample CONF. RCV Report
*************** -CONF. RCV REPORT- **************** DATE MMM-dd-yyyy ***** TIME 15:00 ********
** NOTICE OF CONFIDENTIAL DOCUMENT HELD **
(1) (2) (3) (4)
FILE NO. RECEIVED FROM PAGES TIME RECEIVED
040 PANAFAX 001 MMM-dd 15:00
SET
Advanced
Facsimile Features
-PANASONIC -
*****DP-xxxxx*********************** -HEAD OFFICE - ***** - 201 555 1212- *********
Explanation of Contents
(1) File number : 001 to 999
(2) Received remote station's ID : Character ID or Numeric ID
(3) Number of pages received
(4) Received date and time
NOTE
5. Up to 26 Mailbox files can be stored in memory. So, you can receive confidential faxes using
up to 26 different confidential codes.
6. If the memory overflows, the machine will stop receiving and release the line.
7. You can verify whether the unit has received a confidential fax by printing out the File List.
79
Page 80

Advanced Facsimile Features
Confidential Mailbox
Storing a Confidential Document
Once the confidential
document is stored in
your machine, it can
be polled by another
machine.
1
or
CONFIDENTIAL POLLED
5
CONF. CODE=
2
If set on other
function mode.
Confidential Code (4-digit) and press .
Printing a Confidential Document
After you have been
notified that someone
has transmitted a
confidential document to
your machine's mailbox,
use the following
procedure to print the
confidential document.
1
If set on other
function mode.
* PRINTING *
5
PAGE=001/001
The machine will print the
confidential documents.
SET
2
80
NOTE
1. The confidential file will be erased automatically after being polled. If you wish to retain the
confidential file even after being polled, change the setting of Fax Parameter No. 42 (CONF.
POLLED FILE SAVE) to "Valid ". (See page
149)
Page 81

3 4
6
* STORE * NO.002
PAGES=001 01%
The document(s) will be stored into memory.
If required, inform the receiving party of the
confidential document and tell them the
confidential code needed to poll the
document.
CONF. COMM. (1-5)
ENTER NO. OR ∨ ∧
5
Advanced
Facsimile Features
3 4
CONF. COMM. (1-5)
ENTER NO. OR ∨ ∧
PRINT CONF. FILE
CONF. CODE=
5
Confidential Code (4-digit) and press .
SET
81
Page 82

Advanced Facsimile Features
Confidential Mailbox
Deleting a Confidential Document
If your memory becomes
full, or you just want to
clean out your confidential
documents, you may
delete one or more
confidential faxes stored
in your machine by using
the following procedure.
There are two types of
confidential file deletions,
one is to delete the file
individually by its
Confidential Code, and
the other is to delete all
confidential files in
memory.
To delete a file using Confidential Code
1
If set on other
function mode.
* DELETING *
5
CONF. CODE=2233
2
To delete all confidential files from memory
1
If set on other
function mode.
5
DELETE ALL CONF.
FILES? 1:YES 2:NO
2
6
* DELETING *
ALL CONF. FILES
82
Page 83

3 4
CONF. COMM. (1-5)
ENTER NO. OR
∨ ∧
DELETE CONF. FILE
CONF. CODE=
5
3
CONF. COMM. (1-5)
ENTER NO. OR ∨ ∧
Confidential Code (4-digit) and press .
Ex: 2233
4
DELETE CONF. FILE
CONF. CODE=
SET
Advanced
Facsimile Features
5
83
Page 84

Advanced Facsimile Features
Sub-Addressing
Example of a Network
Document with SUB
e.g.
Dial : 2013331234
SUB=2222
aaa
PBX
Tel No. Ext. No.
-
-
201-333-1234
Document with SUB
Telephone Line
PSTN
Network
Extension Network
2222
3333
1111
e.g.
Dial : 2013331234
SUB=0001
bbb
aaa
Sending a Fax with Sub-Address
1
or
2
If set on other
function mode.
Setting the Sub-Address into an Phone Book
1
2
G3/Internet
Fax
Automatic Routing Table of Panasonic
Internet Fax capable models
Address Tel. No. Sub-Address
Book Email Addr.
G3 Fax
No.001
G3 Fax
No.002
Mail Bob
Bob Dave John
bbb
Compatibility with Other Machines
• Sub-Addressing Transmission:D350F/DF-1100/DP-135FP/150FP/150FX/180/190/1810F/1820E/1820P/2000/2310/
• Sub-Addressing Reception: DX-600/800 and DP-180/190/1810F/1820E/1820P/2000/2310/2500/3000/3010/3510/
G3 Fax G3 Fax
2222
3333
Bob@
pana.com
2222
3333
0001
LAN Network
2500/3000/3010/3510/3520/4510/4520/6010/6020/8020E/8035/8045/8060/DX-600/800/
1000/2000/FP-D250F/UF-332/333/342/344/490/550/590/560/585/595/770/780/790/880/
885/890/895/990/7000/8000/9000 (see Note 4)
3520/4510/4520/6010/6020/8020E/8035/8045/8060/UF-7000/8000/9000 with Internet
Fax.
If set on other
function mode.
[001]
5
ENTER TEL. NO.
Enter the Telephone Number,
press then
SUB-ADDR
enter the Sub-Address.
(Up to 20 digits)
(Up to 36 digits including Telephone
Number, pauses, spaces, FLASH
and Sub-Address)
Ex:
2013331234 2222
SUB-ADDR
6
[001]
2013331234s2222
84
NOTE
1. separates the Sub-Address from the Telephone Number and is indicated by
SUB-ADDR
an "s" in the display.
2. Manual Off-Hook or On-Hook Dialing cannot be used with the Sub-Addressing Transmission.
3. The Sub-Address is not transmitted during Manual Redial Mode.
Page 85

3
Tel. No. Sub-Addr.
4
TEL. NO.
2013331234s2222
Enter the Telephone Number, press ,
then enter the Sub-Address. (Up to 20 digits)
(Up to 36 digits including Telephone Number, pauses,
spaces, FLASH and Sub-Address)
Ex: 2013331234 2222
1:ONE-TOUCH
3 4
2:ABBR NO.
One-Touch is available when a
optional Keyboard is installed. When
it is not installed, go to Step 4.
7
[001]ENTER NAME
2013331234s2222
SUB-ADDR
Ex:
2
SUB-ADDR
ABBR[ ]
ENTER ABBR NO.
Ex:
0 0 1
8
[001]SALES DEPT
2013331234s2222
Send the
document(s) with
Sub-Addressing
information.
(See Note 5)
Advanced
Facsimile Features
5
You can send the
document using a
One-Touch/ABBR
Dialing with a preset
Sub-Address.
NOTE
or
(Option)
Enter Station Name.
4. UF-788 with PC Interface Option or Option ROM installed.
5. The Sub-Address Password will be sent when Fax Parameter No. 53 (SUB-ADDRESS PSW)
is set. (See page 150)
6. You can change a Sub-Address Password temporarily by using (If set on other
function mode), then press .
FUNCTION
2 4
FAX/EMAIL
SET
85
Page 86

Advanced Facsimile Features
Fax Cover Sheet
Using the Fax Cover Sheet
Sending
Page
1
2
Receiving
Cover
+
Page
1
1
or
2
5
ENTER STATION(S)
THEN PRESS START 00%
Dial by any one of the following methods:
• One-Touch (Option)
• ABBR Dialing
• Manual Number Dialing
• Directory Search Dialing
(For details, see pages 22, 58)
2
If set on other
function mode.
Sample Fax Cover Sheet
***** FACSIMILE COVER SHEET *****
(1)
MMM-dd-yyyy 15:00
(2)
Message To:
SALES DEPT.
(3)
Message From:
PANASONIC
201 555 1212
(4)
02
Page(s)
Following This Cover Page
86
NOTE
1. The Fax Cover Sheet is not counted in the number of pages column of the Journal.
2. To change the preset Fax Cover Sheet setting, change the setting of Fax Parameter No. 56,
see page
150. Fax Parameter No.56 needs G3FAX Option (FG180).
Page 87

3
4
COVER SHEET=OFF
1:OFF 2:ON
: Cover Sheet is not attached
1
: Cover Sheet is attached
2
6
Explanation of Contents
(1) Starting time of communication. (Time Stamp)
(2) Recorded name in the Phone Book.
(3) Your LOGO (up to 25 characters) and ID Number (up to 20 digits).
(4) The number of pages to follow.
5
Advanced
Facsimile Features
NOTE
3. When the Fax Cover Sheet setting is set to On, the Quick Memory Transmission feature is
disabled.
87
Page 88

Advanced Facsimile Features
Password Communications
Setting Password Transmission
AAA
BBB
Password
1234
Compatibility with Other Machines
Matching Password
No Password
Password
1234
1
If set on other
function mode.
5
43 PASSWORD-XMT
1:OFF 1234
: OFF (password is not checked)
1
: ON (password is checked)
2
2
Setting Password Reception
1
2
• DF-1100 • DP-180 • DP-190
• DP-1810F • DP-1820E • DP-1820P
• DP-2000 • DP-2310 • DP-2500
• DP-3000 • DP-3010 • DP-3510
• DP-3520 • DP-4510 • DP-4520
• DP-6010 • DP-6020
• DP-8020E • DP-8020P • DP-8035 • DP-8045
• DP-8060
• DX-600 • DX-800
• FP-D250F • FP-D350F
• UF-160 • UF-160M • UF-170
• UF-260 • UF-270 • UF-270M • UF-280M
• UF-300 • UF-312 • UF-322
• UF-550 • UF-560 • UF-585
• UF-590 • UF-595 • UF-650
• UF-733 • UF-745 • UF-750
• UF-750D • UF-755 • UF-755e
• UF-766 • UF-770 • UF-780 • UF-788
• UF-790 • UF-880 • UF-885 • UF-890
• UF-895 • UF-990 • UF-7000 • UF-8000
• UF-9000 • UF-M500
NOTE
1. You can change the setting temporarily by using (If set on other function
mode), then press for each transmission.
5
44 PASSWORD-RCV
1:OFF 1234
1
2
FUNCTION
If set on other
function mode.
: OFF (password is not checked)
: ON (password is checked)
FAX/EMAIL
8 4
SET
88
Page 89

3 4
FAX PARAMETER(1-182)
NO.=
6
43 PASSWORD-XMT
4-digit Transmission Password and
press .
Ex: 1234
SET
5
Advanced
Facsimile Features
3
FAX PARAMETER(1-182)
NO.=
6
4
44 PASSWORD-RCV
4-digit Reception Password and
press .
Ex: 1234
SET
5
NOTE
2. To change the password, press in Step 4, then reenter a new one.
CLEAR
89
Page 90

Advanced Facsimile Features
Password Communications
Using Password Transmission
Use the following
procedure to select
whether the password is
checked.
(PASSWORD-XMT
"OFF" or "ON" for each
Transmission)
1
or
5
ENTER STATION(S)
THEN PRESS START 00%
Dial by any one of the following methods:
• One-Touch (Option)
• ABBR Dialing
• Manual Number Dialing
• Directory Search Dialing
(For details, see page 22)
2
If set on other
function mode.
90
Using Password Reception
There is no additional operation required once you set the parameter by following the procedure on page 88. The
parameter cannot be set to either "OFF" or "ON", for each individual reception. It is always set to "OFF" or "ON" until
you change the setting.
Page 91

3
ENTER STATION(S)
THEN PRESS START 00%
6
4
PASSWD-XMT=OFF
1:OFF 2:ON
: OFF (password is not checked)
1
: ON (password is checked)
2
5
Advanced
Facsimile Features
91
Page 92

Advanced Facsimile Features
Receive To Memory
This feature is used to secure all
received documents by storing
them into memory. To print the
document(s) received in memory,
the authorized operator must
enter the correct password.
aaa bbb ccc
Memory
aaa
bbb
ccc
Setting RCV To Memory Password
1
37 RCV TO MEMORY
5
1234
If set on other
function mode.
2
Setting the RCV To Memory
1
2
NOTE
If set on other
function mode.
Printing Documents
After receiving documents with the Receive To Memory feature, the following
message will appear on the display.
1
If set on other
function mode.
MESSAGE IN MEMORY
< RCV TO MEMORY >
1. When the memory overflows, the machine will stop receiving, and release the line. The
machine will not answer the next incoming call until there is space available in memory.
2. We recommend that optional flash memory card is installed when this function is used. See
page 178 on Image Memory Capacity.
3. If the password has not been set, your machine will not prompt you to enter the password. The
document(s) will be printed immediately after pressing
2
in Step 4.
SET
92
Page 93

3
FAX PARAMETER(1-182)
NO.=
(See Note 4)
4
37 RCV TO MEMORY
5
4-digit RCV to Memory Password
Ex: 1234
Advanced
Facsimile Features
3 4
RCV TO MEMORY=OFF
1:OFF 2:ON 3:PRINT
RCV TO MEMORY=ON
3 4
1:OFF 2:ON 3:PRINT
RCV TO MEMORY=ON
1:OFF 2:ON 3:PRINT
RCV TO MEMORY=PRINT
1:OFF 2:ON 3:PRINT
(See Note 3)
5
MMM-dd-yyyy 15:00
< RCV TO MEMORY >
5
INPUT PASSWORD
4-digit RCV to
Memory Password
and press .
Ex: 1234
SET
NOTE
4. Once the RCV TO MEMORY feature is set to "ON", the password cannot be changed (Fax
Parameter No. 37 will not be selectable on the LCD display). If you wish to change the
password, set the RCV TO MEMORY feature to "OFF" first, then change the password.
(See page 149)
93
Page 94

Advanced Facsimile Features
PIN Code Access
If your PBX requires a PIN (Personal Identification Number) Code to get an outside line, your machine can be set to
prompt the user to enter a PIN Code before any dialing.
Selecting the Access Method (Prefix or Suffix)
1
aaa
PBX
PIN* Code Transmit
*PIN
(Personal Identification Number)
Dialing with a PIN Code
1
or
If set on other
function mode.
4
39 PIN CODE ACCESS
1:NONE
2
: Suffix Code
2
: Prefix Code
3
Ex:
2
If set on other
function mode.
94
5
ENTER PIN CODE
PIN Code (Up to 36 digits)
Ex: 9876
NOTE
6
ENTER PIN CODE
9876
1. The PIN Code is shown as " " on the display when dialing the number.
Page 95

2
3
FAX PARAMETER(1-182)
NO.=
4
5
39 PIN CODE ACCESS
2:SUFFIX
3 4
ENTER STATION(S)
THEN PRESS START 00%
Dial by any one of the following methods:
• One-Touch (Option)
• ABBR Dialing
• Manual Number Dialing
• Directory Search Dialing
(For details, see page 22)
Ex:
ABBR
0 0 1
SET
6
7
[001](Station name)
5551234
Advanced
Facsimile Features
5
Starts dialing with a PIN Code.
NOTE
2. This feature is not available when dialing a number in the Off-Hook or On-Hook Direct Dialing
mode.
95
Page 96

Advanced Facsimile Features
Selective Reception
General Description
Before receiving the document, the last 4-digit of the ID Number received from the sending machine will be compared
with the last 4-digit of the Telephone Number programmed in each One-Touch or Abbreviated station. When a match is
found, your machine will start receiving the document. If a match is not found, your machine will cancel the reception
and an Information Code 406 will be recorded on the Journal.
aaa
Received with
ID Number
Check
ID A:xxxxx1234
B:xxxxx9876
aaa
bbb
ID Number
(4-digit)
Programmed
Telephone No.
xxxxx1234
Setting the Selective Reception
1
If set on other
function mode.
5
bbb
2
96
NOTE
1. When the Selective Reception is set, your machine can receive only from those stations which
are programmed in the built-in auto-dialer.
Page 97

Advanced
Facsimile Features
3 4
FAX PARAMETER(1-182)
NO.=
46 SELECT RCV
1:INVALID
5
NOTE
2. If your ID Number has not been set, your machine might not be able to receive from some
models. To set your ID Number, see page 138.
97
Page 98

Advanced Facsimile Features
Department Code
General Description
This operation requires the user to input a preset Department Code (8-digit maximum) before transmission. The
Department Name of the selected Department Code is printed on the Header of each page sent, COMM. Journal and
Individual Transmission Journal.
When the Department Code is set, the Transaction Journal will be sorted by the Department Code number (1 - 300)
when it is printed. For details on how to setup the Department Codes, refer to Operating Instructions (For Copy &
Network Scan Functions).
If you wish to use the Department Code function, please ask your authorized Panasonic dealer to activate this feature.
Setting the Department Code
Requires the input
of a preset
Department Code
(8-digit maximum)
1
If set on other
function mode.
Department Code
is printed
aaa
Reception
4
77 DEPARTMENT CODE
1:INVALID
6
INPUT DEPT. NAME
012
or
(Option)
98
NOTE
Department Name and press .
Ex: PANASONIC
1. The Department Code List can be printed out with the Fax Parameter List. To enable the
printing of the Department Code List, change the setting of Fax Parameter No. 77
(DEPARTMENT CODE) to "Valid" in advance. (See pages
150 and 164)
SET
Page 99

2
5
DEPT. CODE (1-300)
ENTER NO. OR ∨ ∧
Enter the Department Code number
(1 to 300) and press .
Ex: 12
SET
3
FAX PARAMETER(1-182)
NO.=
6
4
Advanced
Facsimile Features
7
INPUT DEPT. CODE
012
Department Code (up to 8-digit) and
press .
Ex: 12345678
SET
8
INPUT DEPT. NAME
013
To record another Department Code,
repeat Steps 6 and 7.
To return to standby, press .
STOP
99
Page 100

Advanced Facsimile Features
Department Code
Q Changing or Erasing the Department Code
Requires the input
of a preset
Department Code
(8-digit maximum)
1
If set on other
function mode.
4
77 DEPARTMENT CODE
2:VALID
INPUT DEPT. CODE
7
012 (Previous Code)
2
5
DEPT. CODE (1-300)
ENTER NO. OR
Enter the Department Code
number you wish to change or
erase (1 to 300).
Ex: 12
∨ ∧
Q Sending Document with Department Code
1
Requires the input
of a preset
Department Code
(8-digit maximum)
5
or
INPUT DEPT. CODE
]
Department Code
(Up to 8-digit)
Ex: 12345678
CLEAR
Department Code and press
SET
Ex: 12345678
then enter a new
.
2
If set on other
function mode.
100
 Loading...