

Panasonic DP-6020 User Manual

Digital Imaging Systems
Operating Instructions
(For Facsimile and Internet Fax)
Your Machine
Getting to Know
Before Starting
Model No.
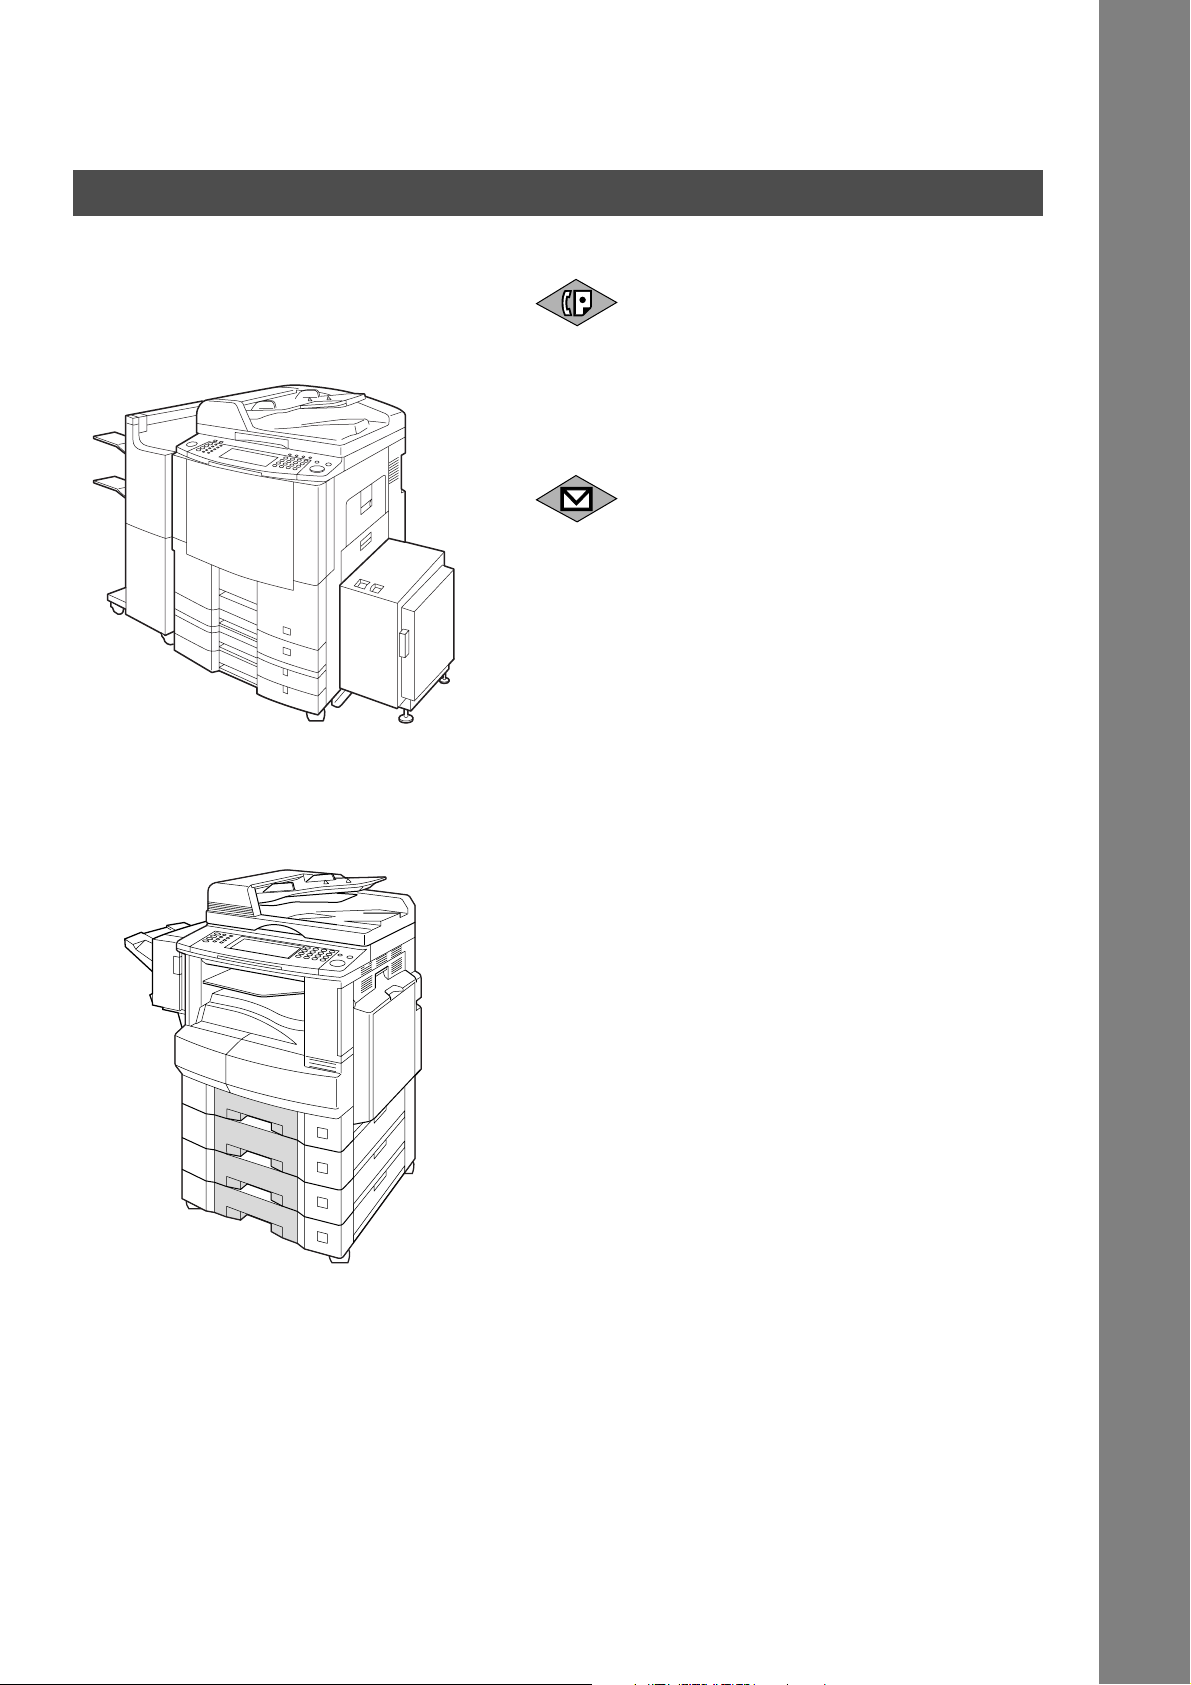
DP-2310/3010/3510/3520/4510/4520/6010/6020
Features
Facsimile
Features
Internet Fax
Machine
Setting Your
Before operating this equipment, please read these instructions completely and keep these operating instructions for future reference.
English
and Lists
Printing Journals
Problem Solving
Appendix

IMPORTANT INFORMATION
When requesting information, supplies or service, always refer to the model and serial number of your
machine. The model and serial number plate (Main Name Plate) is located on the machine as shown on
page 10. For your convenience, space is provided below to record information you may need in the future
for reference or troubleshooting.
Model No.: Serial:
Date of Purchase:
Dealer:
Address:
Telephone Number:
Supplies Telephone Number:
Service Telephone Number:
For the total system to work properly via LAN, certain information and additional parameters must be set. Please
contact your network administrator for the required information and connection to the LAN.
(Please confirm other required Internet parameter in General Settings. This setting list is printed by following the
steps below: , Input ID Code,
00/31* Print General Setting
* Certain Parameter Numbers may differ between the DP-2310/3010, DP-3510/3520/4510/4520/6010/6020 series. If you encounter two Parameter Numbers separated by a "/" and an asterisk ("*"), the first number corresponds to (DP-2310/3010) and the second number corresponds to (DP-3510/3520/4510/4520/6010/6020).
FUNCTION GENERAL SETTINGS 09/04* Key Operator Mode
.)
Start
OK
OK
User Information
Company Name:
Address:
Dept.:
City: State: Zip Code:
Tel. No.: Fax No.:
Internet Parameters (See page 122)
EMAIL Address:
SMTP Server Name: or SMTP Server IP:
SMTP AUTH Name: SMTP AUTH Password:
** TCP/IP Default Gateway:
** DNS Server Address:
** 2nd DNS Server Address:
POP Server Name: or POP Server IP:
POP User Name:
POP Password: (for security, do not write it in - but keep it in a safe place)
LDAP Server Name: or LDAP Server IP:
LDAP User Name:
LDAP Password:
LDAP Search Base:
"**" These parameters are located in the Copier mode.
The following trademarks and registered trademarks are used throughout this manual:
®
Microsoft
Microsoft Corporation in the USA and other countries.
Adobe
Systems Incorporated.
All other trademarks identified herein are the property of their respective owners.
Copyright
All rights reserved. Unauthorized copying and distribution is a violation of law.
The contents of these Operating Instructions are subject to change without notice.
, Windows®, Outlook® & Windows logo are either registered trademarks or trademarks of
®
, Acrobat Reader® & Adobe logo are either registered trademarks or trademarks of Adobe
© 2003 by Panasonic Communications Co., Ltd.
Useful Office Functions
1. Facsimile
2. Internet Fax
• Plain Paper High-speed Super G3 compatible
Fax with JBIG compression when optional Fax
Communication Board (DA-FG300 for DP2310/3010) (DA-FG600 for DP-3510/3520/
4510/4520/6010/6020) is installed.
• Quick-Scan
• Quick Memory Transmission
• Email (Internet Fax) Function capability when
Internet Fax kit (DA-NF 600) is installed.
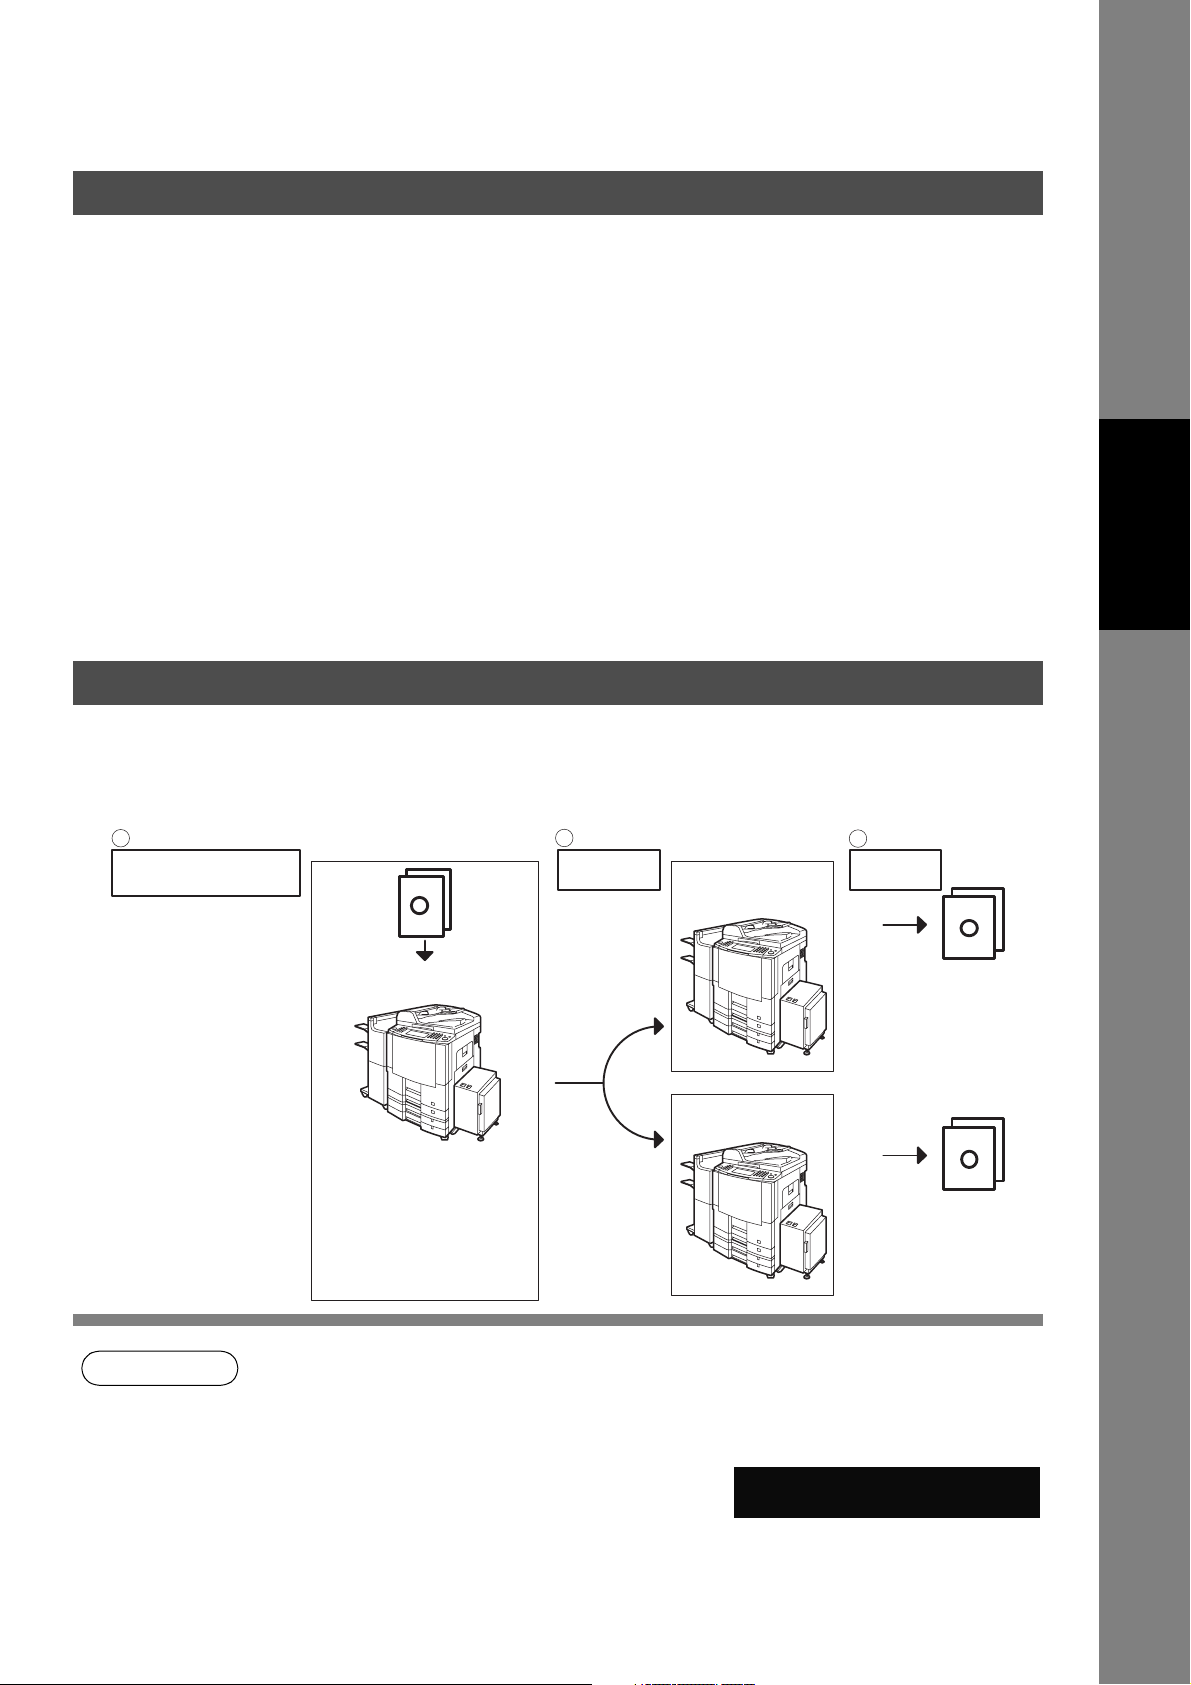
Document Distribution System
• When DP-3520/4520/6020 is installed with the
Fax Communication Board (DA-FG600) and
the Internet Fax Kit (DA-NF600) options, your
machine will allow Fax Forwarding to the
Document Distribution System (DA-WR10).
• The Document Distribution System
automatically distributes received data
(scanner data, data received via FAX, and data
received via I-FAX) to specified recipients via a
predefined delivery mechanism. The system
administrator uses the system to specify the
delivery mechanisms and the recipients.
3

Table of Contents
Getting to Know Your Machine
Safety Information.......................................................................................................... 9
■ Connecting the Cables ................................................................................... 12
Control Panel .................................................................................................................. 14
Before Starting
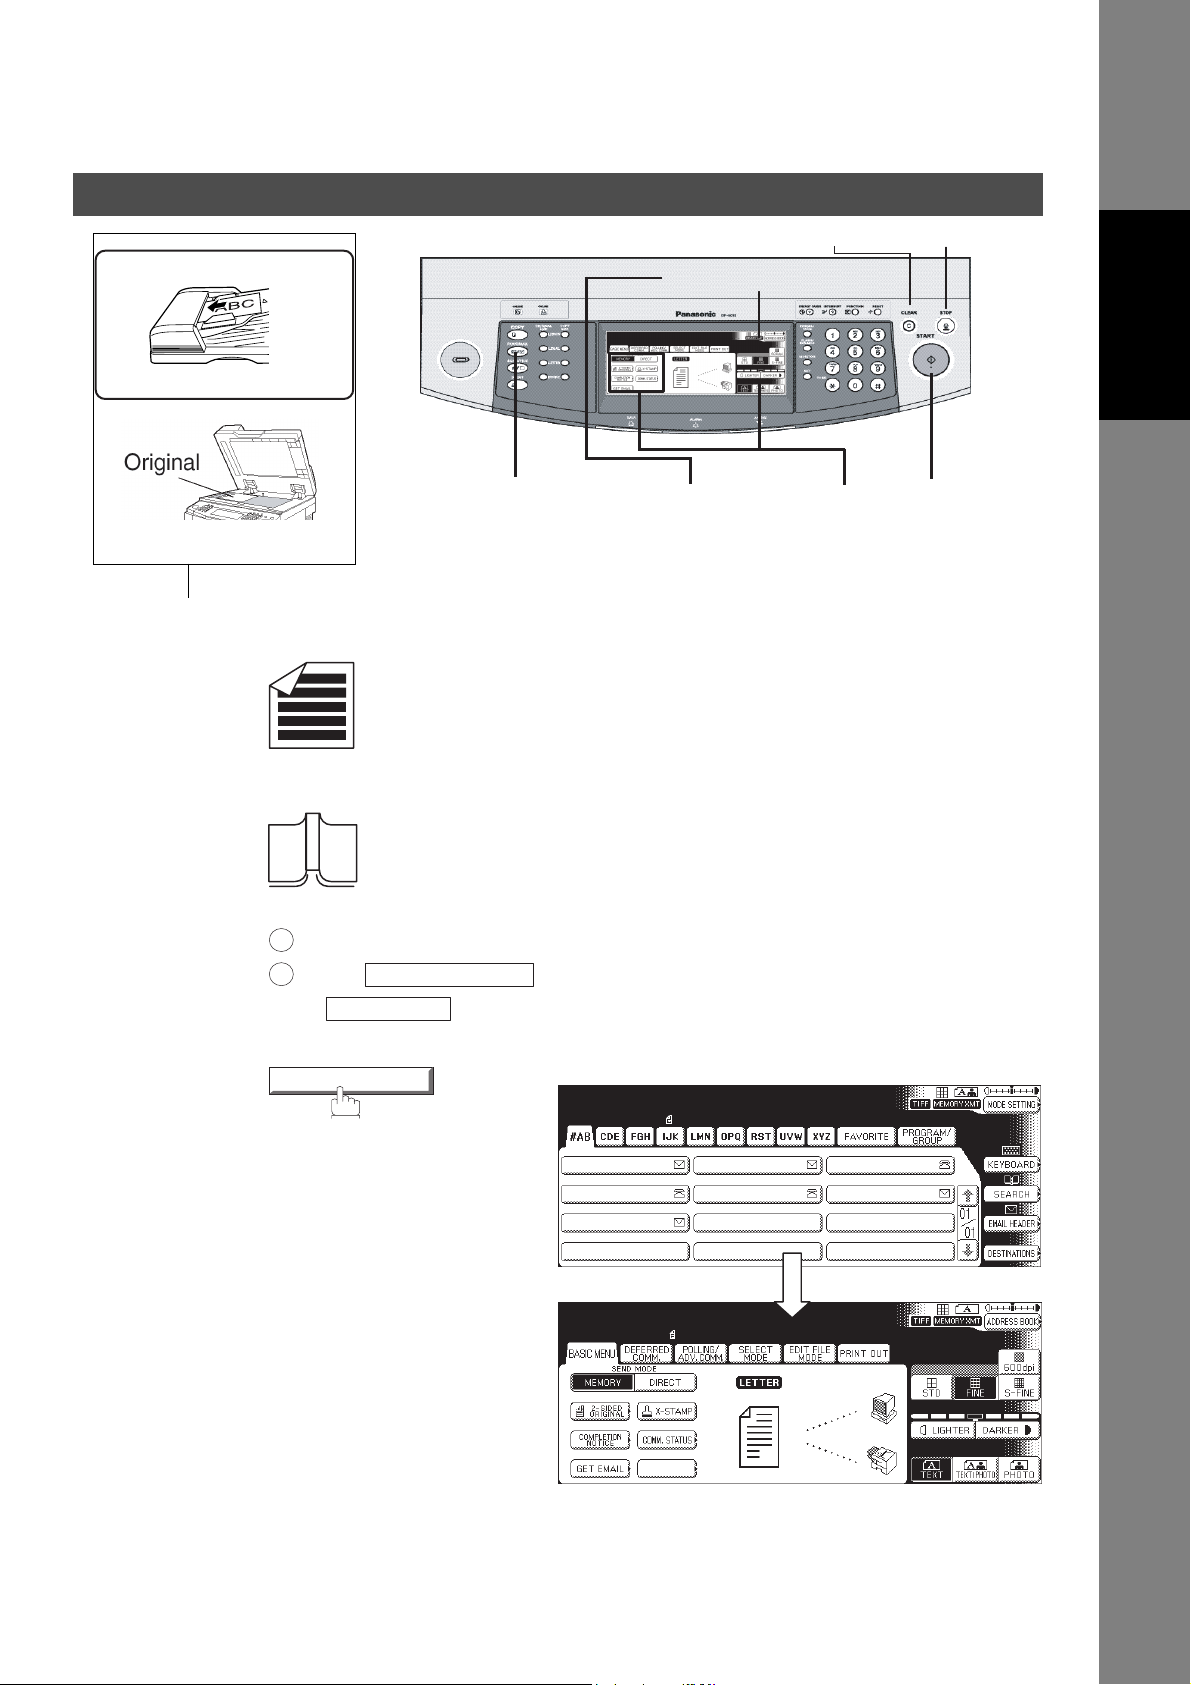
Loading Documents....................................................................................................... 17
■ How to Load Documents................................................................................ 17
■ Sending Non-Standard Size Documents........................................................ 17
Basic Transmission Settings ........................................................................................ 18
■ General Description........................................................................................ 18
■ Contrast.......................................................................................................... 18
■ Resolution ...................................................................................................... 19
■ Original (Text/Photo) ...................................................................................... 20
■ Others............................................................................................................. 20
Sending Documents....................................................................................................... 21
■ Flatbed Scanning ........................................................................................... 23
■ Searching and Editing the Address Book....................................................... 23
Facsimile Features
Sending Documents....................................................................................................... 25
■ General Description........................................................................................ 25
■ Memory Transmission .................................................................................... 25
■ Rotated Transmission .................................................................................... 27
■ 2-Sided Transmission (Receiving) ................................................................. 27
■ On-Hook Dialing ............................................................................................. 28
■ Transmission Reservation.............................................................................. 29
■ Redialing ........................................................................................................ 31
Receiving Documents.................................................................................................... 32
■ General Description........................................................................................ 32
■ Automatic Reception ...................................................................................... 32
■ Manual Reception .......................................................................................... 32
■ Print Reduction............................................................................................... 34
■ Receiving Oversize Documents ..................................................................... 35
■ Substitute Memory Reception ........................................................................ 36
Mode Setting................................................................................................................... 37
■ Setting the Mode Setting ................................................................................ 37
Batch Transmission ....................................................................................................... 41
■ General Description........................................................................................ 41
Timer Controlled Communications .............................................................................. 42
■ General Description........................................................................................ 42
■ Deferred Transmission ................................................................................... 42
■ Deferred Polling.............................................................................................. 44
Polling ............................................................................................................................. 46
■ General Description........................................................................................ 46
■ Preparing to be Polled.................................................................................... 46
■ Poll Documents from Another Station ............................................................ 48
4

Table of Contents
Facsimile Features
Program Keys ................................................................................................................. 50
■ General Description........................................................................................ 50
■ Setting for Group Dialing ................................................................................ 50
■ Setting for Program Dial ................................................................................. 52
■ Editing for Group Dialing ................................................................................ 54
■ Erasing the Program Key Settings ................................................................. 56
Confidential Mailbox ...................................................................................................... 57
■ General Description........................................................................................ 57
■ Confidential Mailbox ....................................................................................... 57
■ Sending a Confidential Document to a Remote Station's Mailbox ................. 58
■ Polling a Confidential Document from a Remote Station's Mailbox ............... 60
■ Receiving a Confidential Document to Your Machine's Mailbox .................... 61
■ Storing a Confidential Document in Your Machine's Mailbox......................... 62
■ Printing Out a Confidential Document from Your Machine's Mailbox............. 63
■ Deleting a Confidential Document Stored in Your Machine's Mailbox ........... 64
Sub-Addressing.............................................................................................................. 66
■ General Description........................................................................................ 66
■ Setting the Sub-Address into a Address Book Number ................................. 67
■ Sending a Fax with Sub-Address ................................................................... 69
■ Using Manual Number Dialing........................................................................ 70
■ Using Sub-Address Temporarily .................................................................... 71
Fax Cover Sheet ............................................................................................................. 73
■ General Description........................................................................................ 73
■ Using the Fax Cover Sheet ............................................................................ 73
Password Communications .......................................................................................... 76
■ General Description........................................................................................ 76
■ Setting Password Transmission .................................................................... 77
■ Setting Password Reception .......................................................................... 79
■ Using Password Transmission ....................................................................... 81
Receive To Memory........................................................................................................ 83
■ Setting the RCV To Memory Password.......................................................... 83
■ Setting RCV To Memory ................................................................................ 85
■ Printing Documents ........................................................................................ 86
PIN Code Access............................................................................................................ 88
■ Selecting the Access Method (Prefix or Suffix) .............................................. 88
■ Dialing with a PIN Code ................................................................................. 90
Selective Reception ....................................................................................................... 92
■ General Description........................................................................................ 92
■ Setting the Selective Reception ..................................................................... 92
Department Code ........................................................................................................... 94
■ General Description........................................................................................ 94
■ Activating the Department Code Feature ....................................................... 94
■ Sending Document with Department Code .................................................... 96
■ Printing a Department Code Journal .............................................................. 97
5

Table of Contents
Facsimile Features
Edit File Mode ................................................................................................................. 99
■ General Description ....................................................................................... 99
■ Printing or Viewing a File List......................................................................... 99
■ Changing the Start Time or the Station of a File ............................................ 101
■ Deleting a File ................................................................................................ 103
■ Printing Out a File .......................................................................................... 104
■ Adding Documents into a File ........................................................................ 105
■ Retry an Incomplete File ................................................................................ 106
Internet Fax Features
Pre Installation Information........................................................................................... 107
■ Internet Fax Features..................................................................................... 107
■ Setup as SMTP Mail Server........................................................................... 108
■ Setup as POP3 Client .................................................................................... 109
Internet Communication Features................................................................................ 112
■ Internet Fax Transmission ............................................................................. 112
■ Direct SMTP (Direct IFAX XMT) .................................................................... 113
■ Internet Mail Reception .................................................................................. 114
■ Inbound Routing............................................................................................. 115
■ Fax Forward................................................................................................... 116
■ Dynamic Host Configuration Protocol (DHCP)............................................... 116
■ SMTP Authentication ..................................................................................... 116
■ Lightweight Directory Access Protocol (LDAP).............................................. 117
■ Relayed Transmission ................................................................................... 117
Important Information.................................................................................................... 118
User Parameters............................................................................................................. 120
■ Setting the User (Internet) Parameters .......................................................... 120
Setting the Internet Parameters.................................................................................... 122
■ Setting the User Parameters for the LAN Interface ....................................... 122
Sending Documents via LAN ........................................................................................ 124
■ Manual Email Addressing .............................................................................. 124
■ Address Book Email Addressing.................................................................... 126
■ Multi Email Station Addressing (Broadcasting) .............................................. 128
■ Internet Fax Ledger Size Document Transmission........................................ 129
■ Change the File Format and File Name ......................................................... 131
■ Returned Email .............................................................................................. 133
■ Using a Mailing List ........................................................................................ 134
Receiving Documents via LAN ..................................................................................... 135
■ General Description ....................................................................................... 135
■ Receiving Email from a POP Server .............................................................. 137
Program Keys ................................................................................................................. 141
■ Setting the POP Email Retrieval Key ............................................................. 141
■ Using the POP Email Retrieval Key ............................................................... 143
Sender Selection ............................................................................................................ 145
■ General Description ....................................................................................... 145
■ Setting the Sender Selection ......................................................................... 145
■ Sending Document with Sender Selection..................................................... 148
■ Printing the Sender Selection List .................................................................. 149
6

Table of Contents
Internet Fax Features
Inbound Routing............................................................................................................. 151
■ Setting the Routing Parameters ..................................................................... 151
■ Entering Address Book Dialing Numbers for Inbound Routing ...................... 152
Fax Forward ....................................................................................................................155
■ Setting Fax Forward ....................................................................................... 155
■ Fax Forward (Using Document Distribution System) ..................................... 157
Ifax Return Receipt......................................................................................................... 158
■ General Description........................................................................................ 158
Relayed Transmission ................................................................................................... 160
■ General Description........................................................................................ 160
■ Relay Network................................................................................................ 161
■ Setting Up Your Machine as an Internet Relay Station .................................. 163
■ Setting Up Your Machine for Relayed Transmission...................................... 164
■ Sending Documents via Internet Relay .......................................................... 167
■ Sending Document(s) from a PC to a G3 Fax Machine ................................. 171
■ Printouts and Reports..................................................................................... 173
Setting Your Machine
Setting the Dialing Method (Tone or Pulse)................................................................. 175
■ General Description........................................................................................ 175
Adjusting the Volume .................................................................................................... 176
■ General Description........................................................................................ 176
■ Setting the Monitor Volume ............................................................................ 176
User Parameters............................................................................................................. 177
■ General Description........................................................................................ 177
■ Setting the User Parameter............................................................................ 177
Address Book ................................................................................................................. 180
■ Adding Address Book Dialing Numbers ......................................................... 180
■ Editing the Address Book ............................................................................... 183
Customizing Your Machine ........................................................................................... 188
■ General Description........................................................................................ 188
■ Setting the Fax Parameters............................................................................ 188
■ Fax Parameter Table...................................................................................... 190
Printing Journals and Lists
Journals and Lists.......................................................................................................... 197
■ General Description........................................................................................ 197
■ Transaction Journal........................................................................................ 197
■ Communication Journal (COMM. JOURNAL) ............................................... 201
■ Address Book List .......................................................................................... 203
■ Group and Program List ................................................................................. 205
■ Fax Parameter List ......................................................................................... 206
7

Table of Contents
Problem Solving
Troubleshooting ............................................................................................................. 207
■ Information Codes.......................................................................................... 209
■ Verification Stamp.......................................................................................... 212
■ Checking the Telephone Line ........................................................................ 215
Appendix
Specifications................................................................................................................. 217
FCC Notice for User in USA .......................................................................................... 219
Notice to User in Canada............................................................................................... 221
Glossary.......................................................................................................................... 223
ITU-T Image No. 1........................................................................................................... 230
Index ................................................................................................................................ 231
8
Getting to Know Your Machine
Safety Information
Your Machine
Getting to Know
!
WARNING
• TO PREVENT FIRE OR SHOCK, DO NOT EXPOSE THIS PRODUCT TO RAIN OR ANY TYPE OF
MOISTURE.
• TO MINIMIZE THE POSSIBILITY OF SHOCK OR DAMAGE TO THE MACHINE, IT MUST BE PROPERLY
GROUNDED.
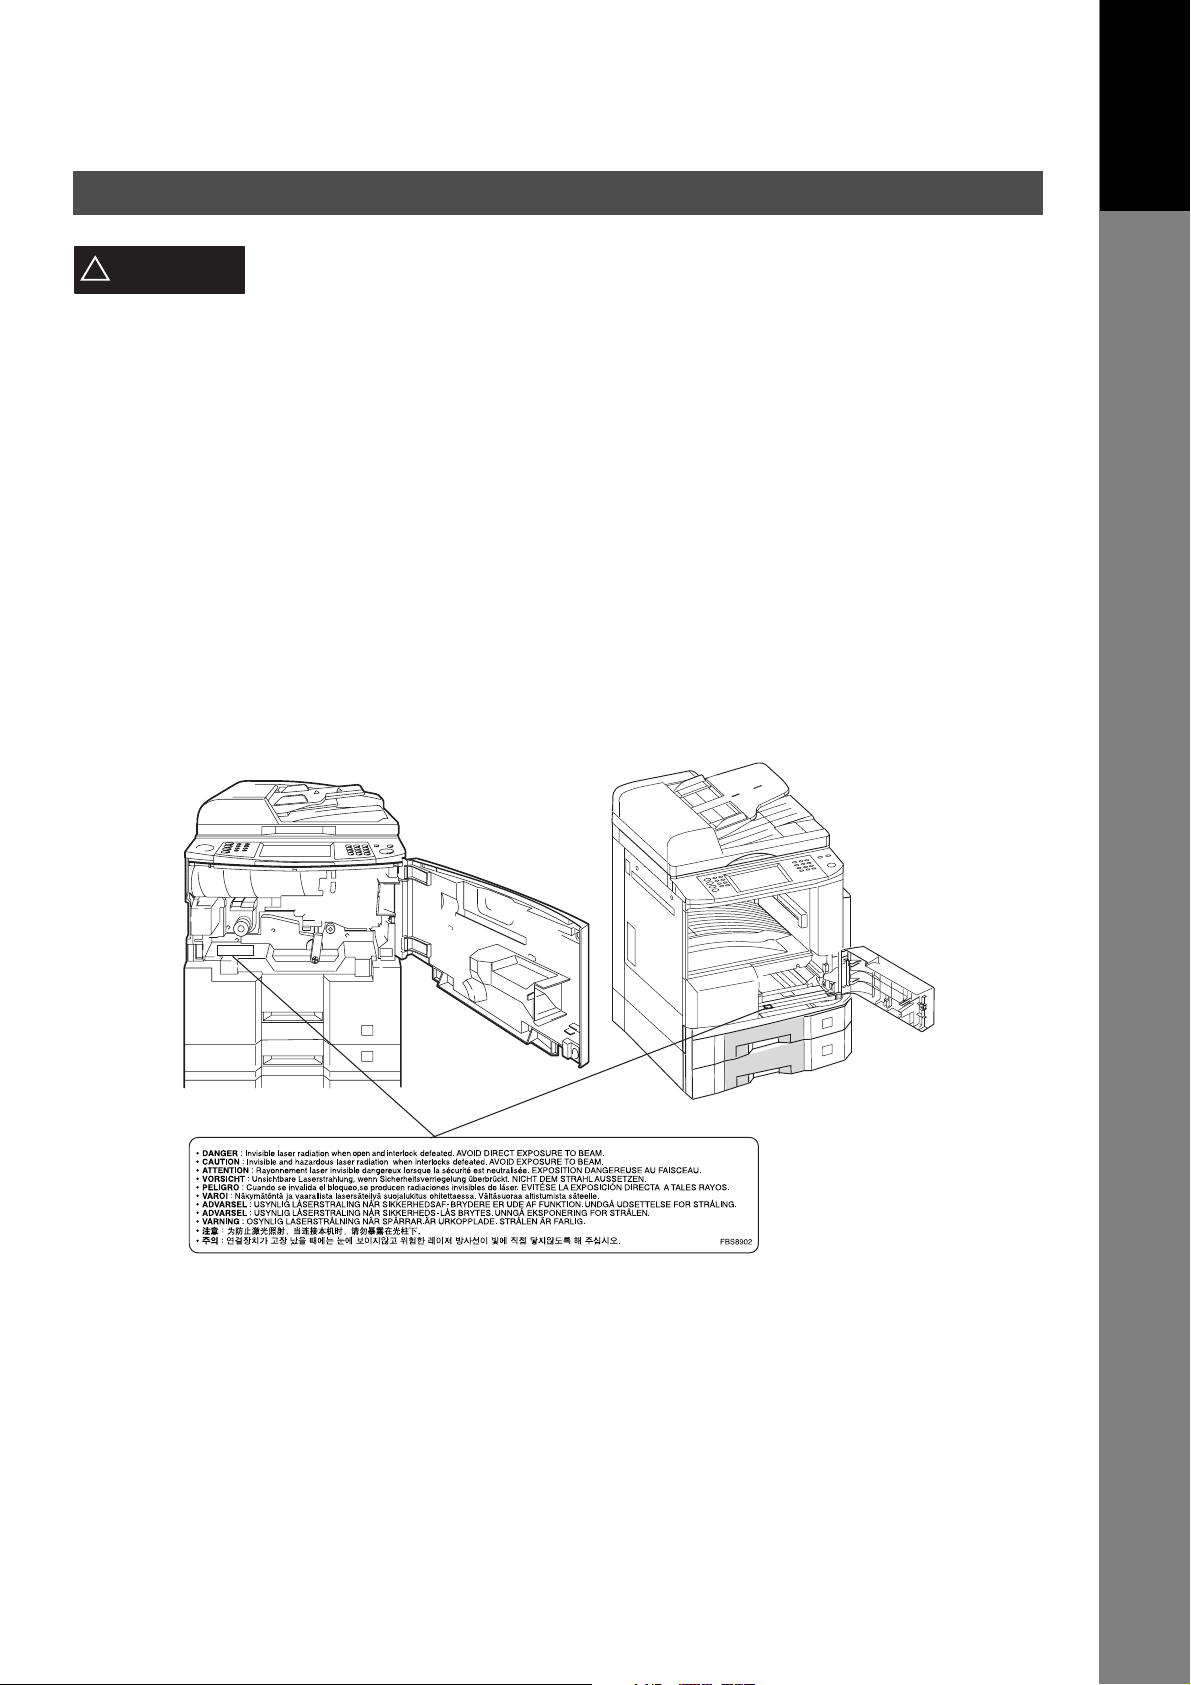
• THIS PRODUCT UTILIZES A LASER. ONLY QUALIFIED SERVICE PERSONNEL SHOULD ATTEMPT TO
SERVICE THIS DEVICE DUE TO POSSIBLE EYE INJURY.
CAUTION -
• THE POWER CORD ON THIS EQUIPMENT MUST BE USED TO DISCONNECT THE MAIN POWER.
PLEASE ENSURE THAT THE SOCKET OUTLET IS NEAR THE EQUIPMENT AND IS EASILY
ACCESSIBLE.
• MAKE SURE THAT THE MACHINE IS INSTALLED IN A SPACIOUS OR WELL VENTILATED ROOM SO
AS NOT TO INCREASE THE AMOUNT OF OZONE IN THE AIR. SINCE OZONE IS HEAVIER THAN AIR,
IT IS RECOMMENDED THAT AIR AT FLOOR LEVEL BE VENTILATED.
denotes a potential hazard that could result in serious injury or death.
USE OF CONTROLS OR ADJUSTMENTS OR PERFORMANCE OF PROCEDURES OTHER
THAN THOSE SPECIFIED HEREIN MAY RESULT IN HAZARDOUS RADIATION EXPOSURE.
[DP-2310/3010][DP-3510/4510/6010]
[DP-3520/4520/6020]
9
Safety Information
[DP-3510/4510/6010]
[DP-3520/4520/6020]
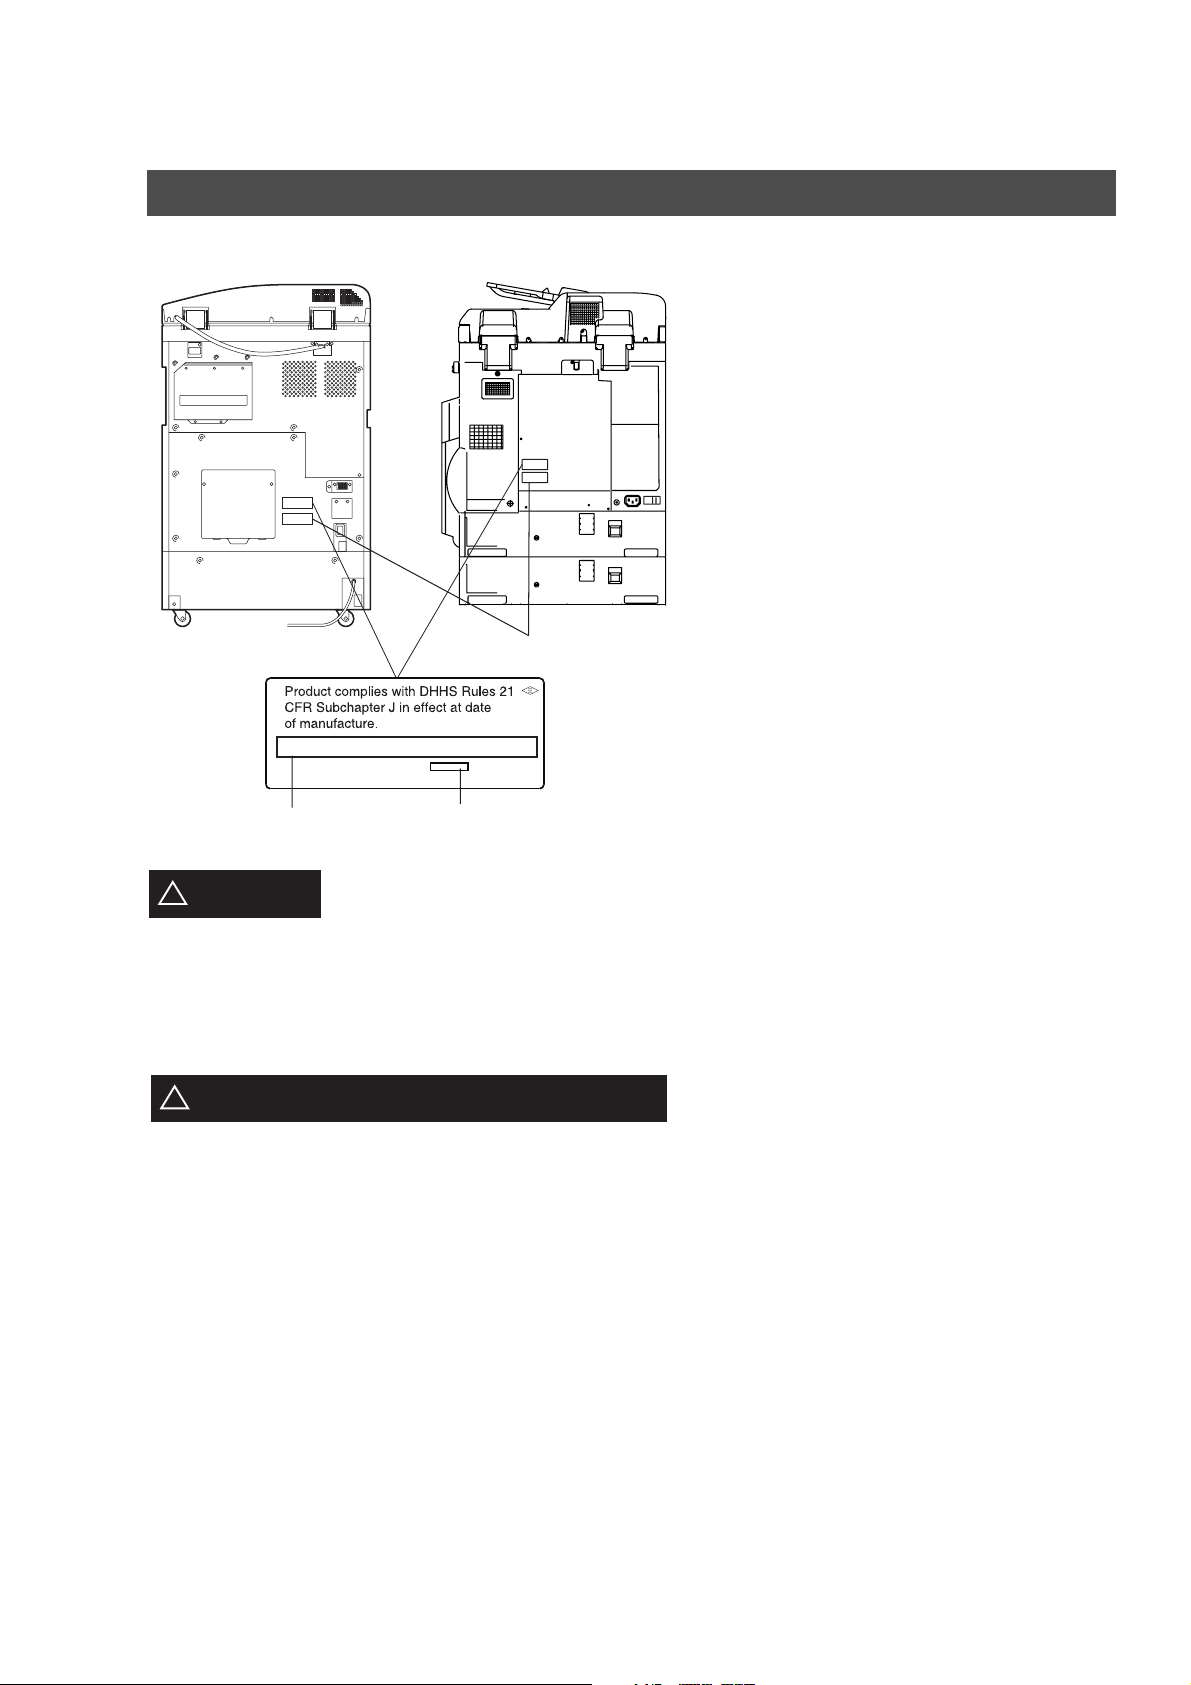
Manufacturer’s Name and Address
[DP-2310/3010]
Model and Serial Number
Factory ID
CAUTION
!
• TO REDUCE THE RISK OF SHOCK OR FIRE, USE ONLY NO. 26 AWG OR LARGER TELEPHONE LINE
CABLE.
• DISCONNECT ALL POWER TO THE MACHINE BEFORE COVER(S) ARE REMOVED. REPLACE THE
COVER(S) BEFORE THE UNIT IS RE-ENERGIZED.
IMPORTANT SAFETY INSTRUCTIONS
!
When using your telephone equipment, basic safety precautions should always be followed to reduce the risk
of fire, electric shock and injury to persons, including the following:
• DO NOT USE THIS PRODUCT NEAR WATER, FOR EXAMPLE, NEAR A BATH TUB, WASH BOWL,
KITCHEN SINK OR LAUNDRY TUB, IN A WET BASEMENT OR NEAR A SWIMMING POOL.
• AVOID USING A TELEPHONE (OTHER THAN A CORDLESS TYPE) DURING AN ELECTRICAL STORM.
THERE MAY BE A REMOTE RISK OF ELECTRIC SHOCK FROM LIGHTNING.
• DO NOT USE THE TELEPHONE TO REPORT A GAS LEAK IN THE VICINITY OF THE LEAK.
• USE ONLY THE POWER CORD AND BATTERIES INDICATED IN THIS MANUAL. DO NOT DISPOSE OF
BATTERIES IN A FIRE. THEY MAY EXPLODE. CHECK WITH LOCAL CODES FOR POSSIBLE SPECIAL
DISPOSAL INSTRUCTIONS.
denotes hazards that could result in minor injury or damage to the machine.
10
Safety Information
Your Machine
Getting to Know
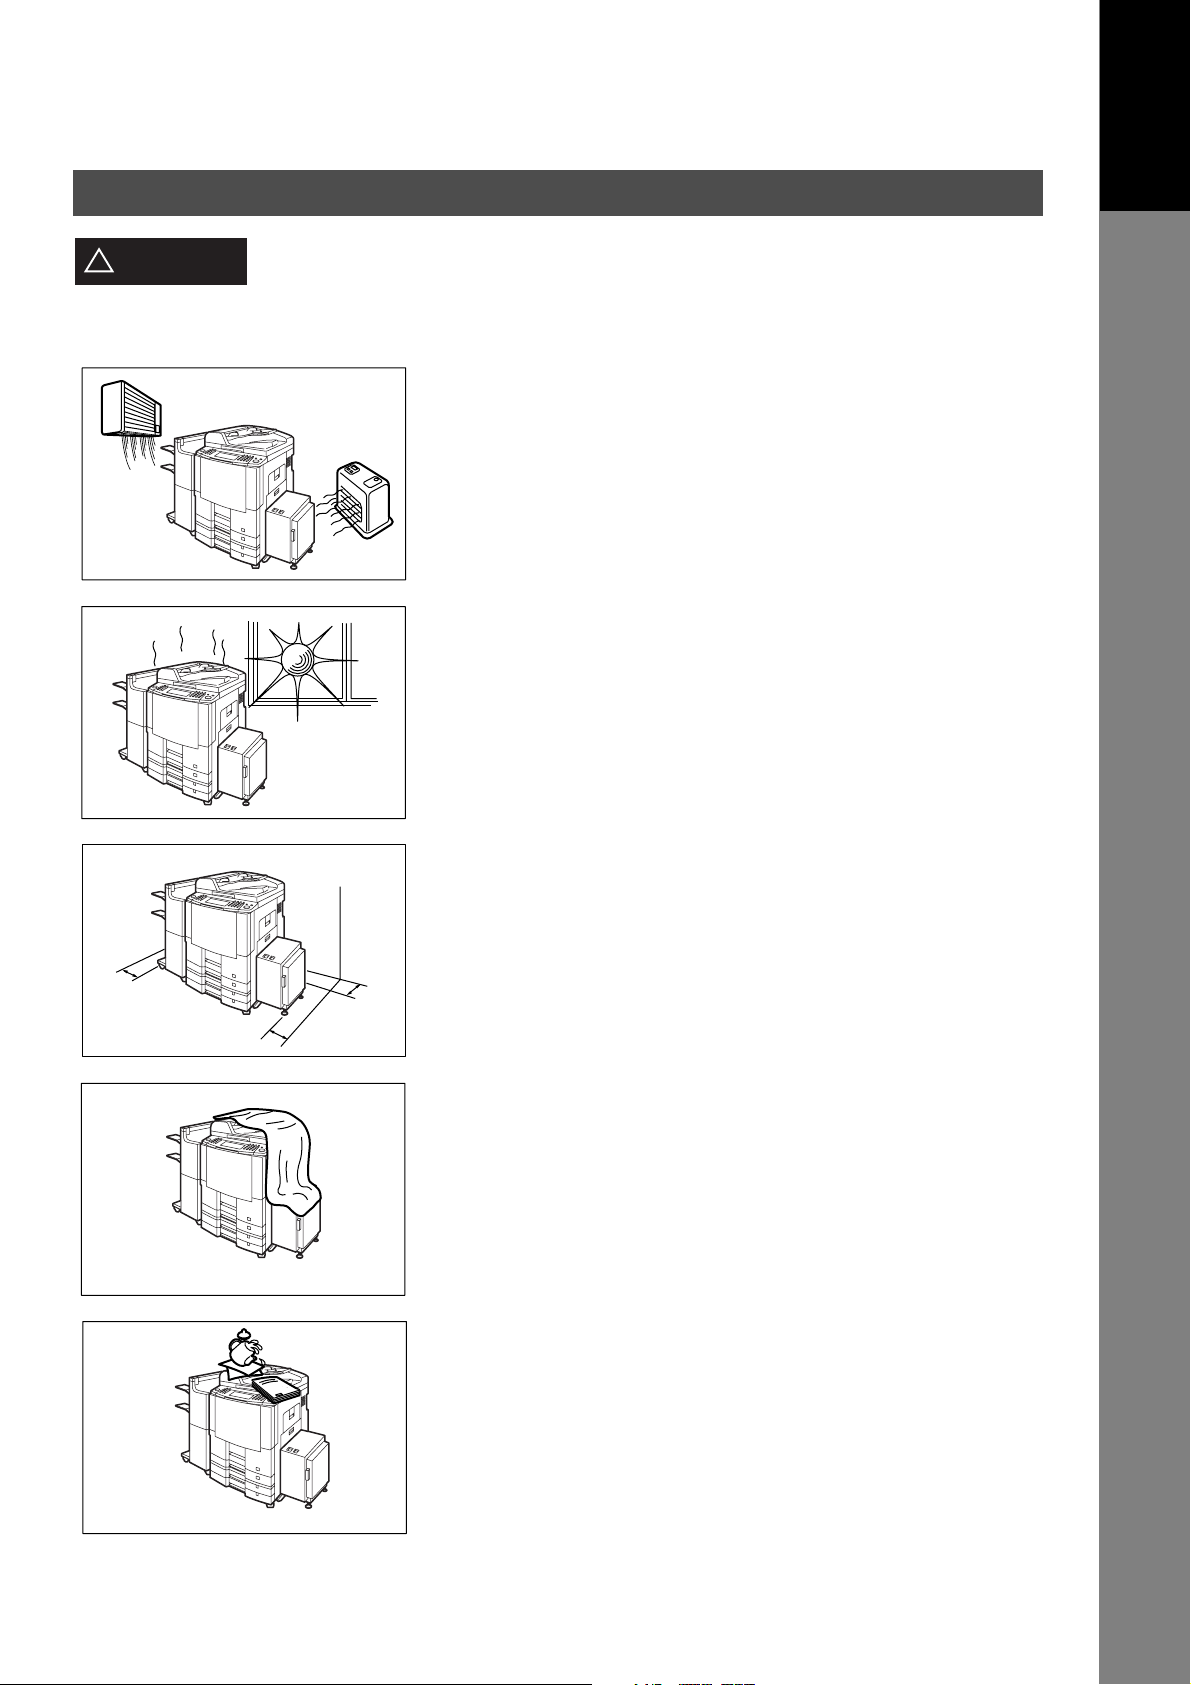
CAUTION
!
denotes hazards that could result in minor injury or damage to the machine.
Do not install the machine near heating or an air conditioning unit.
Avoid exposure to direct sunlight.
Install the machine on a flat surface, leave at least 4 inches (10 cm) of space
between the machine and other objects.
Do not block the ventilation openings.
Do not place heavy objects or spill liquids on the machine.
11
Safety Information
Connecting the Cables
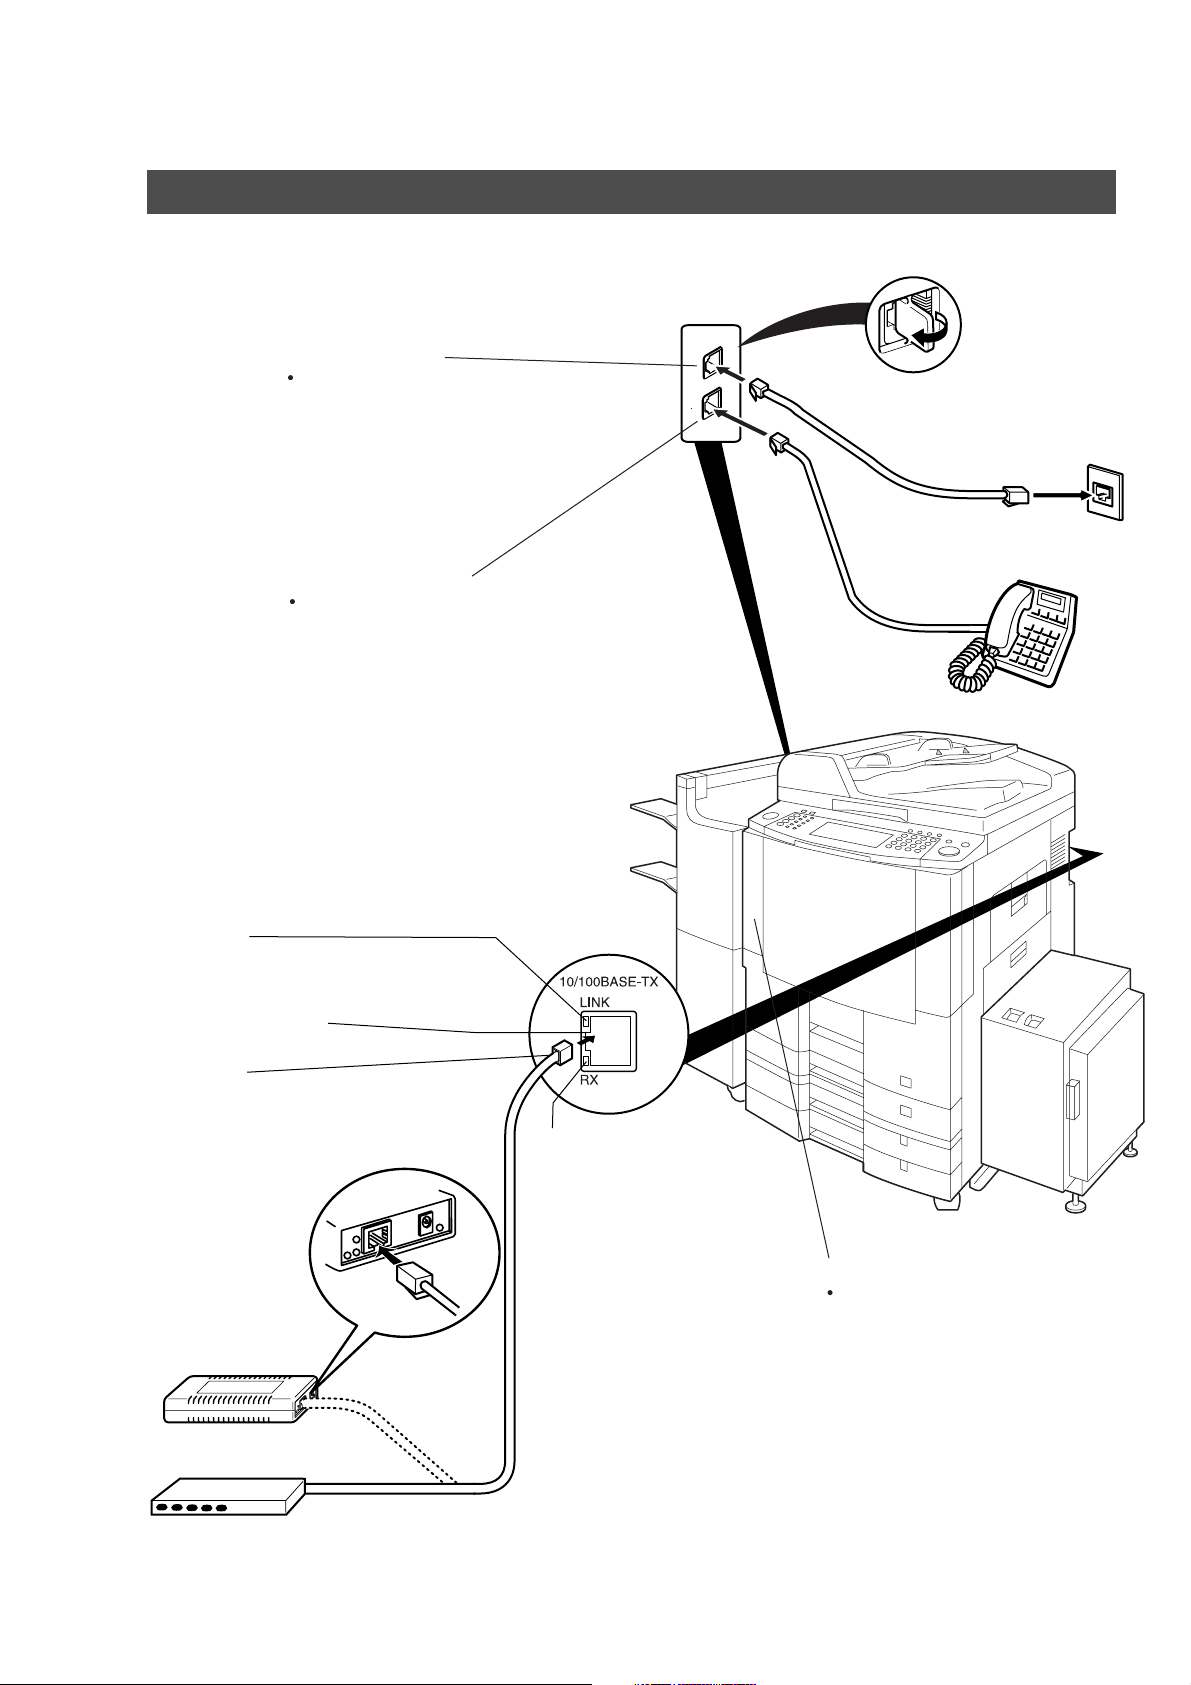
[For DP-3510/3520/4510/4520/6010/6020]
Telephone Line Jack
Plug one end of the
telephone line cable into
the "RJ-11C" telephone
jack supplied by the
telephone company and
the other end into the LINE
jack on the left side of the
machine. (For setting the
Dialing Method,
see pages 175 and 190)
External Telephone Jack
You can connect an
additional standard single
line telephone to the
machine. To connect the
telephone, remove the
protective tab on the TEL
jack.
RJ-11C
Telephone Jack
LINK Lamp
Illuminates when connected to the LAN.
Lamp will not turn ON if LAN cable is defective
(contains breaks).
LAN Connection Jack
(10Base-T/100Base-TX)
LAN Cable
(10Base-T/100Base-TX Cable)
Insert the plug until a click is heard.
(LAN cable is not included with the product.)
Purchase a Category 5 Cable, compliant with
EIA/TIA 568-A-5 standard.
Ethernet-Token-Ring
Bridge
(Optional Order
No. UE-204006)
10Base-T/100Base-TX Ethernet Hub
ACTIVITY Lamp
Blinks when there is data traffic
on the LAN.
Ethernet LAN
(10Base-T/100Base-TX)
Cable (Not included)
Power Switch
After connecting all cables
and the Power Cord, turn the
Main Power Switch on the Back
and the Power Switch on the Left
Side of the machine to the ON
position.
12
Connecting the Cables
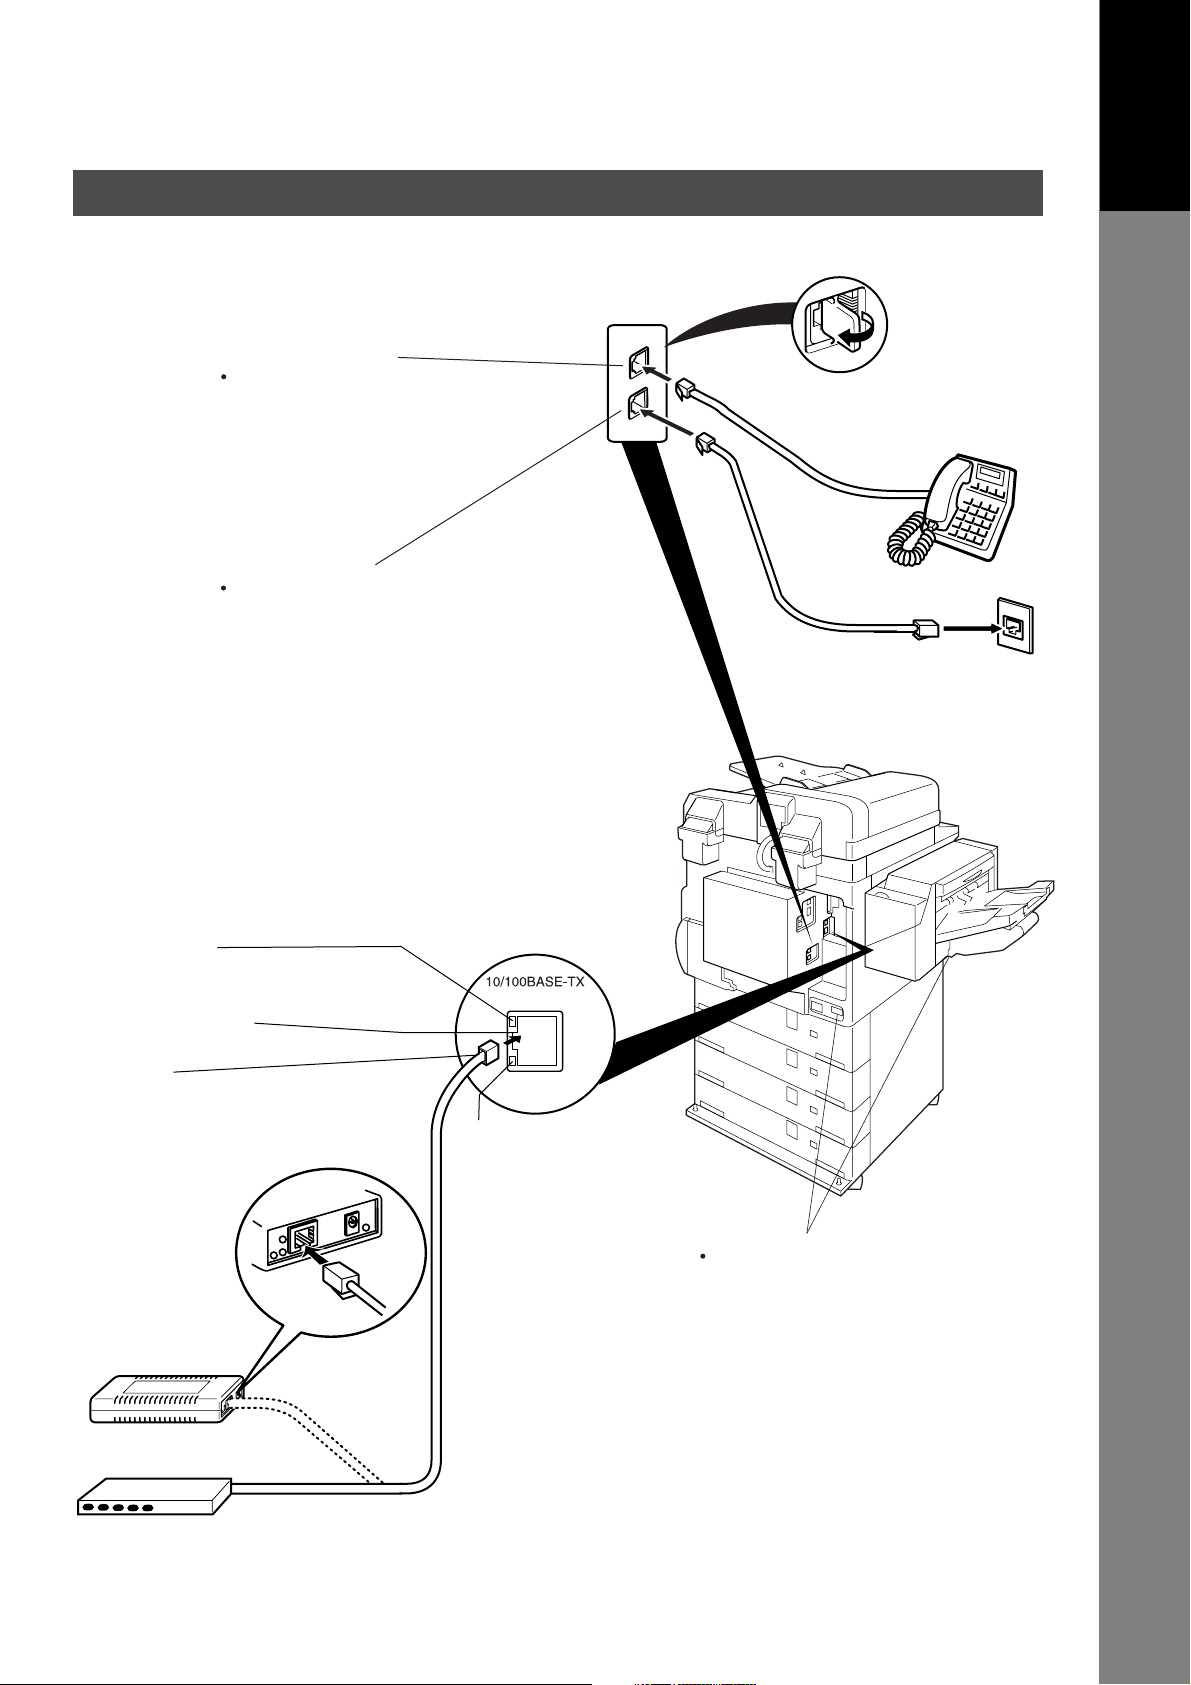
[For DP-2310/3010]
External Telephone Jack
You can connect an
additional standard single
line telephone to the
machine. To connect the
telephone, remove the
protective tab on the TEL
jack.
Telephone Line Jack
Plug one end of the
telephone line cable into
the "RJ-11C" telephone
jack supplied by the
telephone company and
the other end into the LINE
jack on the left side of the
machine. (For setting
the Dialing Method,
see pages 175 and 190)
Safety Information
RJ-11C
Telephone Jack
Your Machine
Getting to Know
ACTIVITY Lamp
Blinks when there is data traffic
on the LAN.
LAN Connection Jack
(10Base-T/100Base-TX)
LAN Cable
(10Base-T/100Base-TX Cable)
Insert the plug until a click is heard.
(LAN cable is not included with the product.)
Purchase a Category 5 Cable, compliant with
EIA/TIA 568-A-5 standard.
Ethernet-Token-Ring
Bridge
(Optional Order
No. UE-204006)
10Base-T/100Base-TX Ethernet Hub
RX
LINK
LINK Lamp
Illuminates when connected to the LAN.
Lamp will not turn ON if LAN cable
is defective
(contains breaks).
Ethernet LAN
(10Base-T/100Base-TX)
Cable (Not included)
Power Switch
After connecting all cables
and the Power Cord, turn the
Main Power Switch on the Back
and the Power Switch on the Left Side
of the machine to the ON position.
13

Control Panel
ON LINE Indicator
Blinks : When sending or
receiving FAX/Email
communication.
Used to select the
FAX/EMAIL mode.
Used to select the
original size manually.
[Ex.: DP-6010]
14
Touch Panel Display
PRINT DATA LED (Green)
Lights when receiving print data.
ALARM LED (Red)
Lights when trouble occurs.
ACTIVE LED (Green)
Blinks when machine is active.
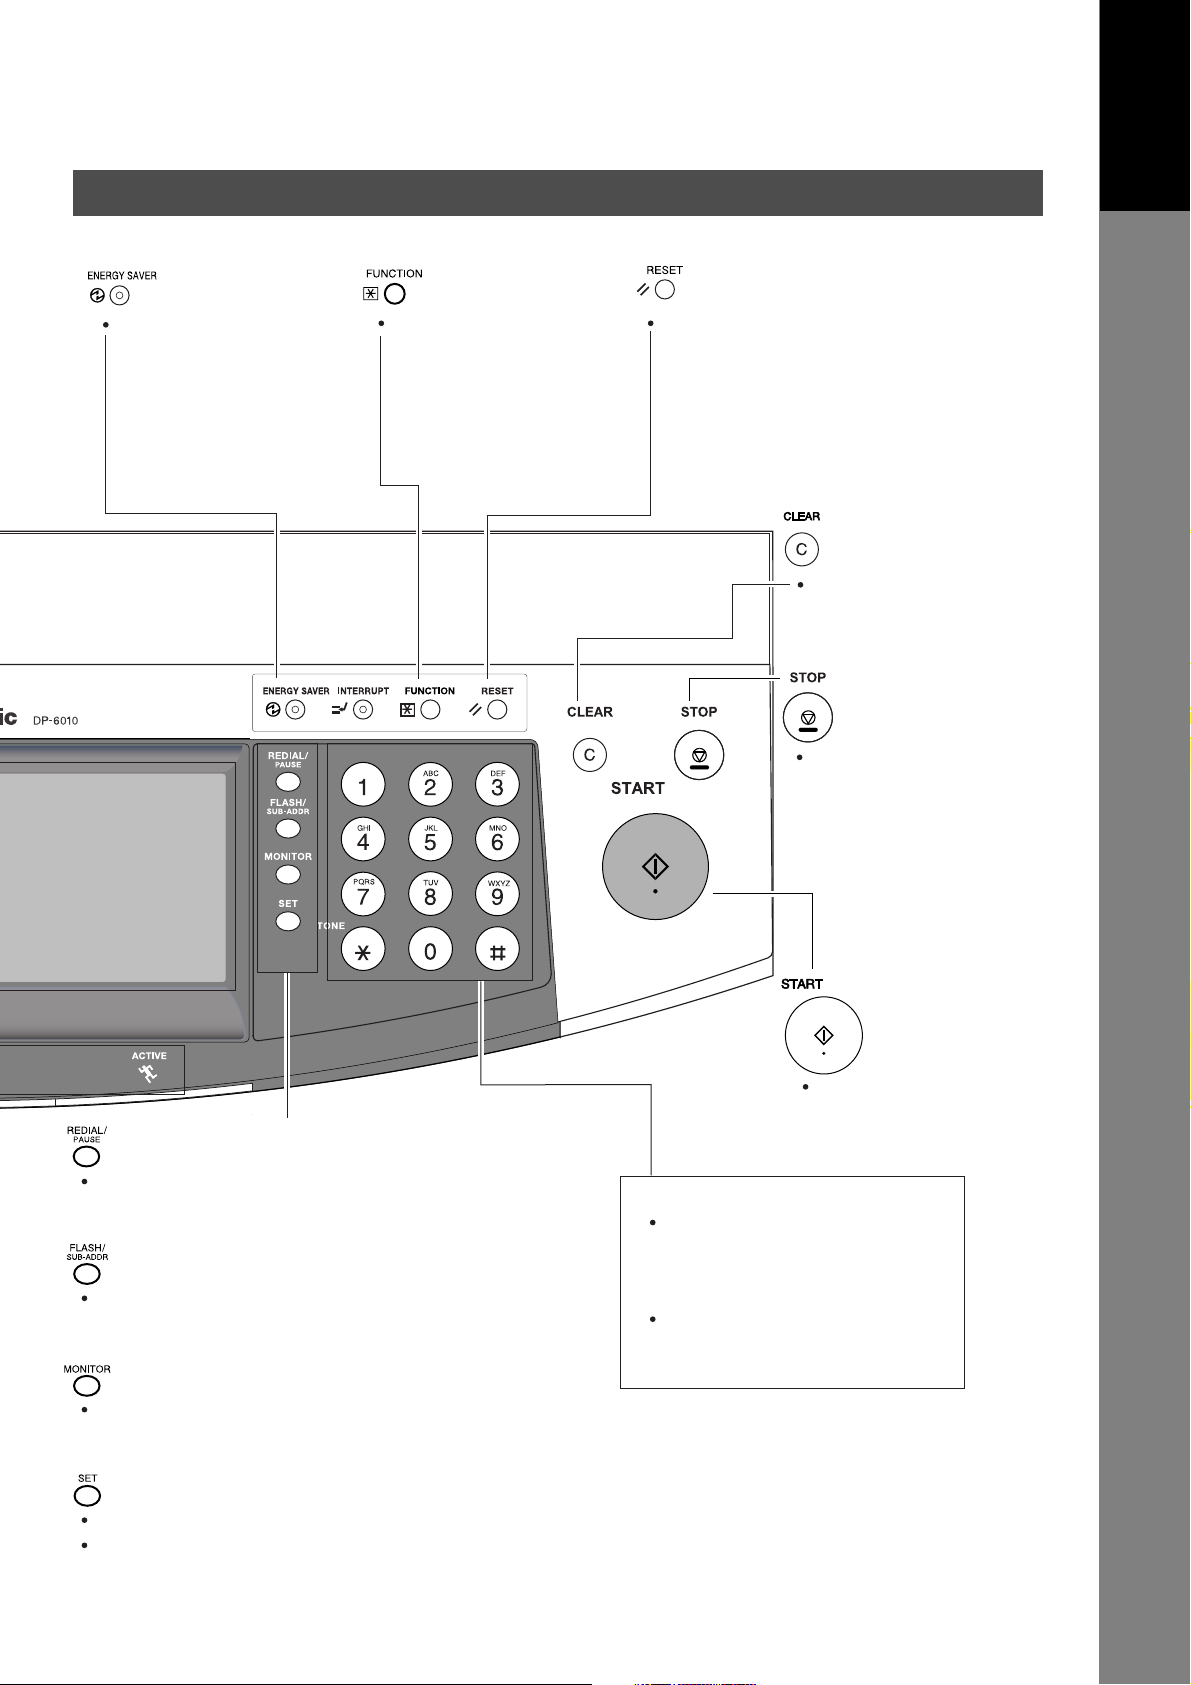
Control Panel
Your Machine
Getting to Know
Used to switch the
machine into energy
saving mode.
For more details, see
Energy Saver page
of the Operating
Instructions (For Copier.)
Used to start or
select the function
and sub-functions.
Used to reset
all the previously
set functions.
Use this button when
correcting entered
numbers or characters.
Press this button when
you want to stop the
communication,
registration operation,
or audible tone.
Used to enter a pause when recording or dialing
a telephone number, or to redial the last dialed
number/email address.
Used to separate the Sub-Address from the telephone
number when dialing, or to access some features of
your PBX.
Used to start On-Hook Dialing or to input a space
between numerical entries
(such as, while entering telephone numbers).
Used to set operations.
Used for adjusting the monitor volume while in the
FAX/EMAIL mode. (See page 176).
Press this button to
start transmission, email
communication or a
manual fax reception.
Keypad
Used for manual number dialing,
recording phone numbers, and
numerical entries.
Tone Key
Used to temporarily change the
dialing mode to Tone when Pulse
mode is set.
15

memo
16

Before Starting
Loading Documents
How to Load Documents
1. On the ADF / Inverting ADF 2. On the Platen Glass
Face Up
Original Size
Guide
• Insert the original(s) Face Up into the ADF until
the leading edge placed into the machine
stops.
• Place a book or an original Face Down on the
Platen Glass, aligning it with the arrow mark on
the original size guides.
Sending Non-Standard Size Documents
When transmitting non-standard size
document(s), the machine may perform Rotate
Transmission automatically and not transmit
the portion of the document that exceeds the
standard size ("P" portion). (See note 1)
P
Direction
Rotation XMT
The portion labeled
"P" that exceeds the
standard document
size is not sent.
Face Down
Before Starting
Original Size
Guide
NOTE
1. When an oversized original is sent to another machine, sometimes, it is reduced in accordance
with the other party's recording paper size.
Ex:
A3 size Letter size
17

Basic Transmission Settings
General Description
MMM-dd-yyyy 15:00 0%
Ready To Fax
Original Set
FILE TYPE
AND NAME
You can temporarily change the transmission settings either before or after you place the document on the
ADF. These settings are as follows:
• Contrast
• Resolution
• Original (Text/Photo)
•Stamp
• Duplex Scan
• File Format
DP-3520/4520/6020 : File Type and Name
DP-2310/3010 : File Type only
After your document(s) have been sent, your machine will automatically return to the preset settings.
Contrast
Your machine is preset to Normal contrast. If you wish to send a document with lighter contrast, change the
setting to Lighter. If you wish to send a document with darker contrast, change the setting to Darker.
DarkerNormalLighter
LIGHTER DARKER
18

Basic Transmission Settings
s
Resolution
Your machine is preset to Standard resolution, which is suitable for most documents.
Use Fine or Super Fine for detailed documents.
for standard originals
STD
FINE
S-FINE
600 dpi
Before Starting
for detailed originals
for finer detailed originals
for 600 dpi detailed original
NOTE
1. To change the preset Contrast position, change the setting of Fax Parameter No. 01.
(See page 190)
2. To change the preset Resolution position, change the setting of Fax Parameter No. 02.
(See page 190)
3. If you send a photographic original with gray tones, set the Resolution to Fine or S-Fine (406 x
391 dpi) and the Original setting to Text/Photo or Photo. The reproduction of the received
document will be determined by the capability of the remote station.
19
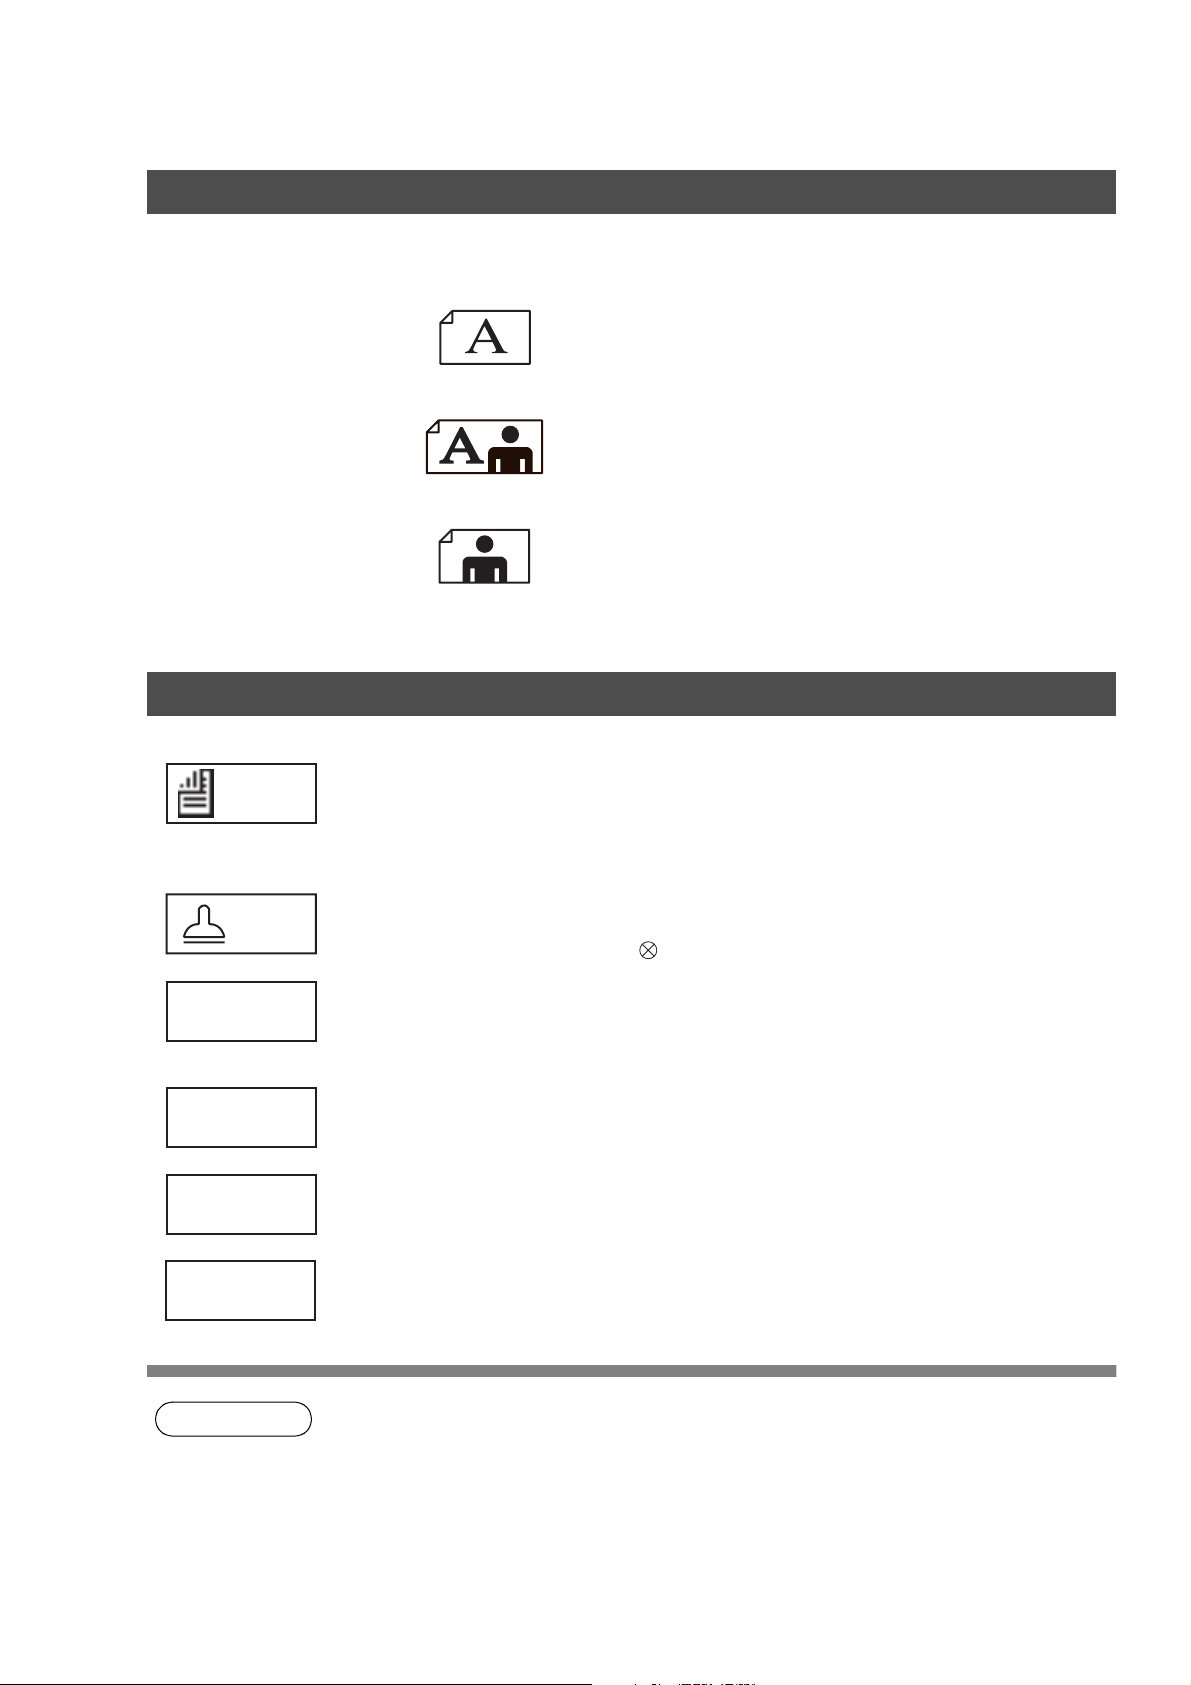
Basic Transmission Settings
Original (Text/Photo)
The Original setting is useful when sending photographs or illustrations with gray tones. Your machine is
preset to "TEXT". You can select either "TEXT/PHOTO" or "PHOTO" mode.
for text only originals
TEXT
for text and photo originals
TEXT/PHOTO
for photo or illustration originals
PHOTO
Others
2-SIDED
ORIGINAL
X-STAMP
COMPLETION
NOTICE
COMM. STATUS
GET EMAIL
FILE TYPE
AND NAME
Sending 2-Sided Original(s)
2-Sided scanning selection control is available for the user depending on the original
layout. The following selections are available for the 2-Sided scanning option:
• Long Edge : 2-Sided scanning aligned to the long edge of the original.
• Short Edge: 2-Sided scanning aligned to the short edge of the original.
Verification Stamp
• Confirms successful transmissions by stamping the bottom of each successfully
transmitted page with a small mark.
You or a selected party can be notified with a Job Completion Notice via a pop up
screen on your/their PC when the Copy Job or the Print Job is completed. You must
setup the Job Completion Notice feature prior to starting the job and properly setup the
Status Monitor.
Confirms the commication status.
Retrieving the Email temporarily.
The File Format can be changed temporarily when sending an Internet Fax.
DP-3520/4520/6020 : File Type and Name
DP-2310/3010 : File Type only
20
NOTE
1. When you select TEXT/PHOTO, or PHOTO, your machine will automatically select Fine Resolution.
2. When you store a document in memory, the Verification Stamp will stamp on the document if it
is successfully stored in memory. In this case the Verification Stamp is not a confirmation that
the document was successfully transmitted. If you wish to disable the use of the Verification
Stamp when storing document in memory, change the setting of Fax Parameter No. 28. (See
page 191)
3. To change the preset Verification or File Format position, change the setting of Fax Parameter
No. 04 or 177. (See page190,195)
Sending Documents
i-ADF
Face-Up
Face-Down
1
Place original(s)
1a
2
Press the
FAX/EMAIL Key
Place original(s) face up on the ADF.
or
Mode Setting Button
3
Press the
SETTING
MODE
Button
Clear Key
4
Select the
SEND MODE
or adjust the
desired Parameter(s)
Stop Key
5
Press
Before Starting
START
1b
2
3
1
Place a book or an original face down on the Platen Glass.
Press to select the original size.
2
Press Key.
MODE SETTING
Select the Mode(s)
Set the SEND MODE or
desired Parameter(s), if necessary.
(See page 18)
• Resolution
• Send Mode
• 2-SIDED ORIGINAL
•X-STAMP
• File Format
DP-3520/4520/6020 :
File Type and Name
DP-2310/3010 :
File Type only
ORIGINAL SIZE
FAX/EMAIL
MMM-dd-yyyy 15:00 0%
Ready To Fax
ORG.SIZE = LTR
AFRICA
APOLLO
BRAZIL
MMM-dd-yyyy 15:00 0%
Ready To Fax
ORG.SIZE = LTR
AMERICA
ASIA
ANTARTICA
BERLIN
Continued on the next page...
FILE TYPE
AND NAME
21
Sending Documents
Select either ADDRESS BOOK DIALING or MANUAL NUMBER
4
DIALING.
1. ADDRESS BOOK DIALING
Telephone numbers or Email
addresses should be registered in
advance. (See page 180)
2. MANUAL NUMBER DIALING
Facsimile: Enter the telephone
number.
Memory Transmit STN(s):001
TO:PANASONIC
5551234
PANASONIC
QUALITY DEPT
5
Ex:
5 5 1 2
5
4
3
Email: Enter the Email address using
the QWERTY KEYBOARD.
Ex: abc@panasonic.com
MMM-dd-yyyy 15:00 0%
Ready To Fax
Original Set
AFRICA
APOLLO
BRAZIL
Enter Addr(TO) STN(s):000
Enter Station(s)
abc@panasonic.com
@panasonic.com
@mgcs.co.jp
@abc-net.wxy.com
@host.pana.com
AMERICA
ASIA
ANTARTICA
BERLIN
22
NOTE
The document(s) will be stored into memory with a file number.
Then starts dialing the telephone number or connecting to the LAN
immediately after storing the first page.
(See note 3)
The remaining page(s) continue to store into memory.
1. To utilize the above functions, your machine needs to be setup properly on your network.
Please contact your network administrator for actual network setup.
2. You can register the entered dialing number into the Address Book by pressing the
ADD TO LOCAL DIR.
3. This feature is called "Quick Memory Transmission". If you wish to store All the documents into
memory first before transmitting, change the Fax Parameter No. 082 (QUICK MEMORY XMT)
to "Invalid". (See page 192)
in Step 4.
EDIT
Sending Documents
Flatbed Scanning
When a book or an original is placed on the Platen Glass, the message "ANOTHER ORIGINAL?" is shown
on the LCD display when is pressed and the scanning is completed.
• If you wish to store another page, press and place another original, then press .
• If is pressed, the machine starts to dial the telephone number.
NO
START
YES
START
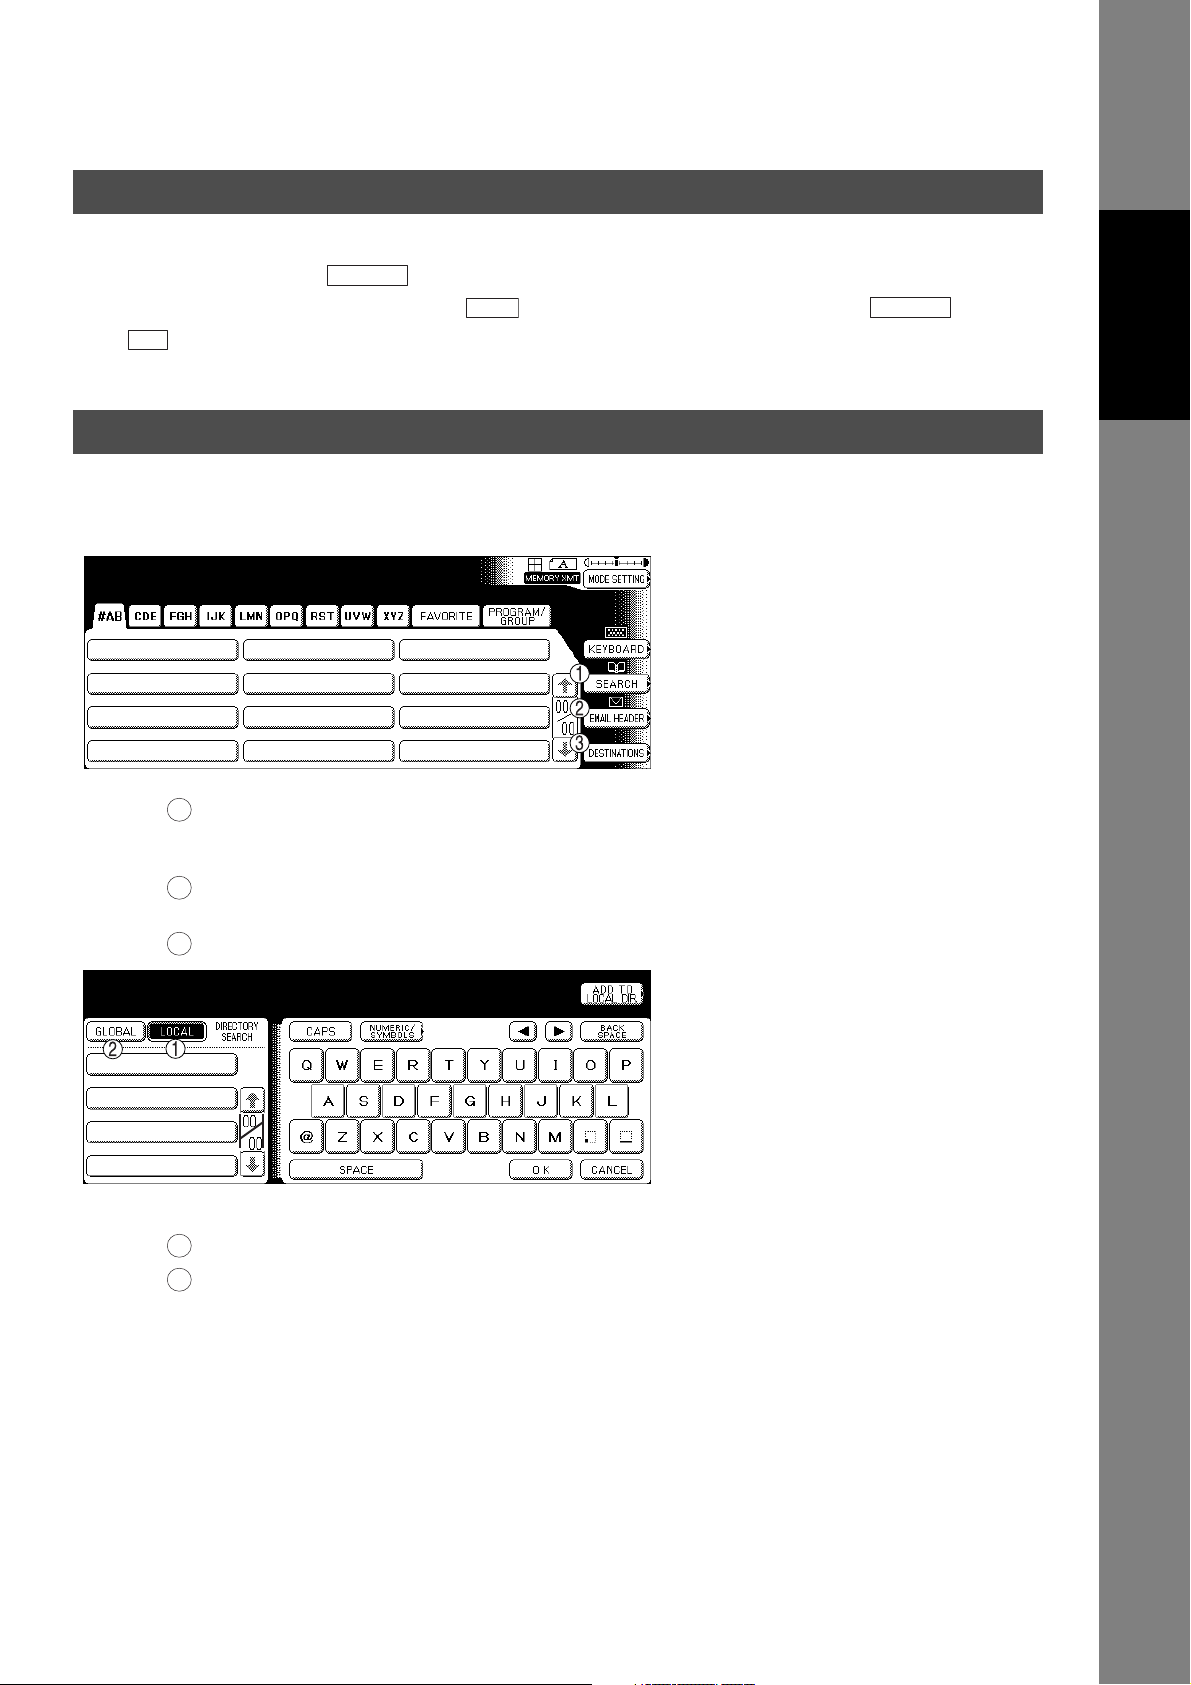
Searching and Editing the Address Book
You can search and edit an Address Book entry as follows.
MMM-dd-yyyy 15:00 0%
Ready To Fax
Before Starting
1
Search the directory using the Local address book or the Global
directory services LDAP
(Lightweight Directory Access Protocol).
Input the Email address, CC (Carbon Copy), BCC (Blind Carbon
2
Copy), FROM and SUBJECT.
Confirm the destinations.
3
Enter Letter(s)
_
■ SEARCH
1
Search the Local address book.
Search the Global directory services (LDAP).
2
23
Sending Documents
Searching and Editing the Address Book
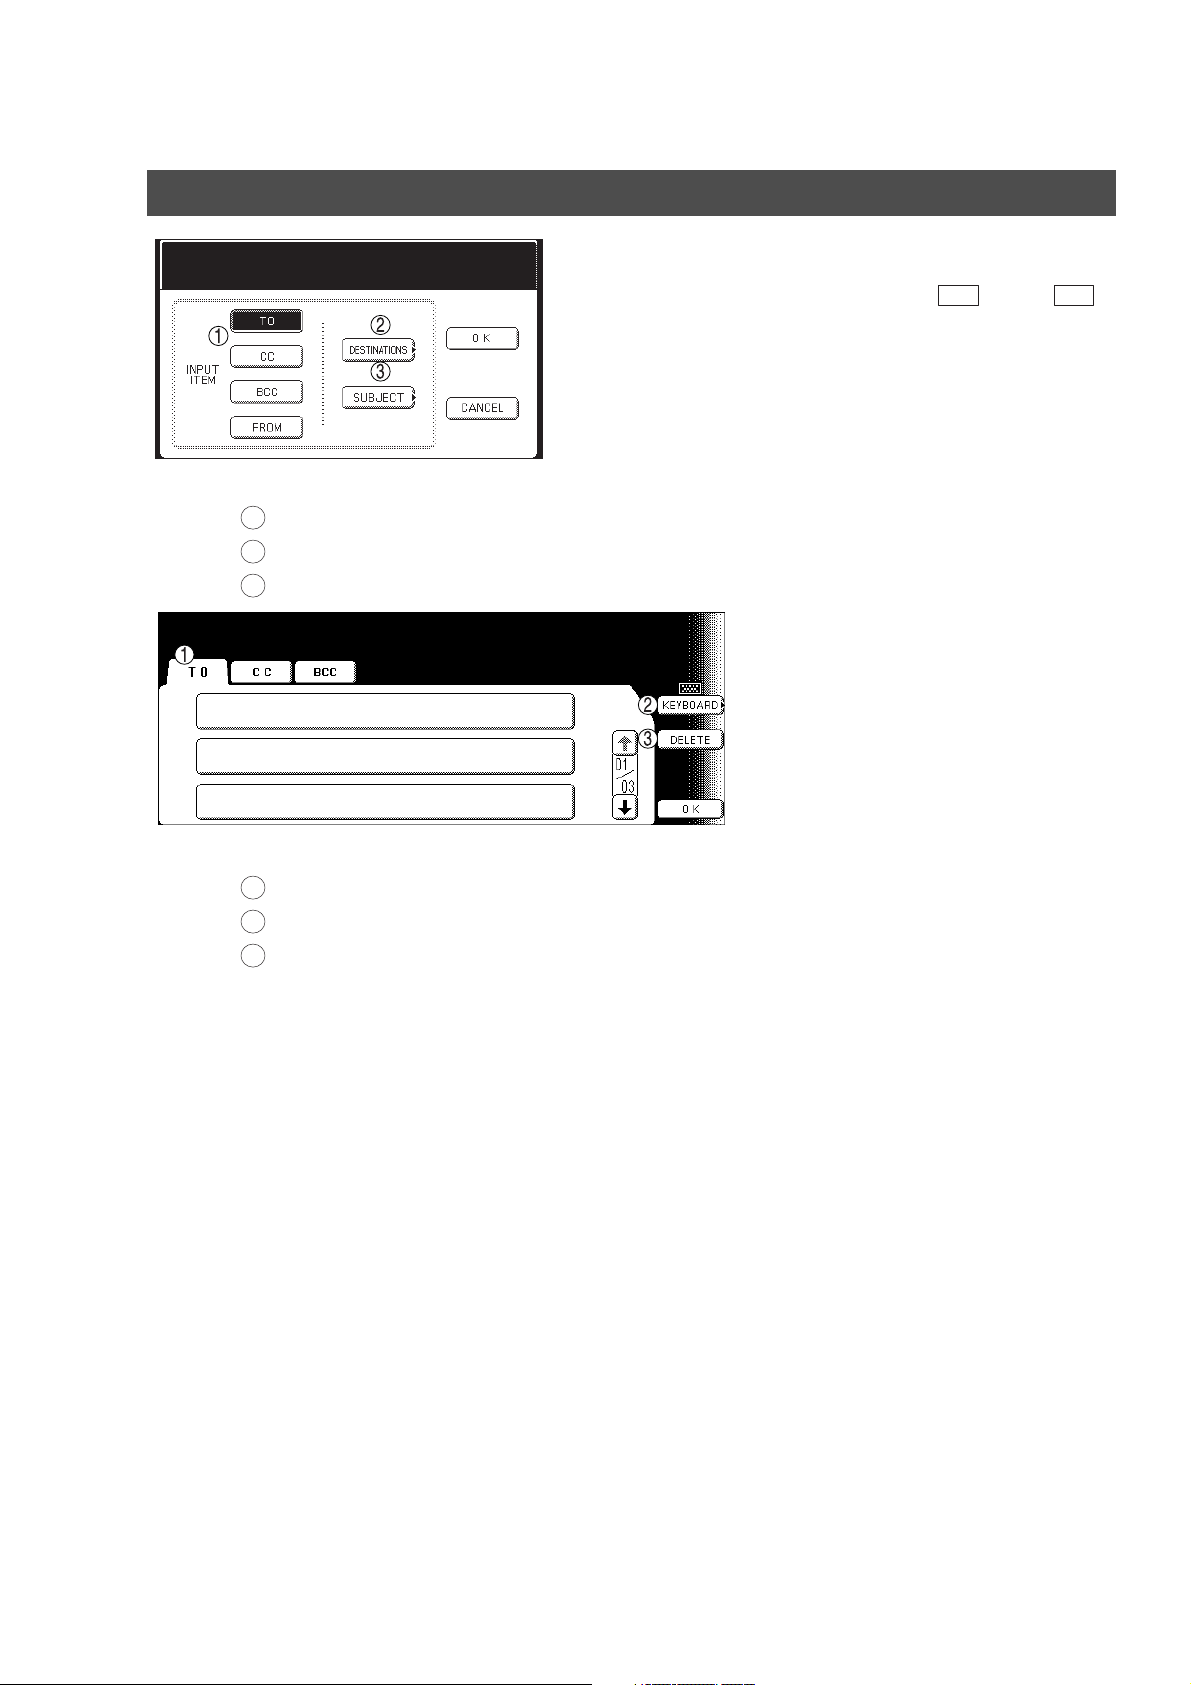
EMAIL HEADER
Select A Function
■ EMAIL HEADER
1
Select the input item and press OK.
Confirm the destinations.
2
Enter the subject.
3
Confirm Destinations
Check And Press OK
SALES DEPT
panasonic@panasonic.com
PANASONIC SALES
5551234
PANAFAX
panasonic@jp.panasonic.com
Ex: Entering the Email address
into the TO: field
1. Press and the
2. Confirm the destinations.
TO OK
buttons, then enter the
Email address.
■ DESTINATIONS
1
Select the address tab.
Edit the email address when using manual number dialing.
2
Delete the selected address.
3
24
Facsimile Features
Sending Documents
General Description
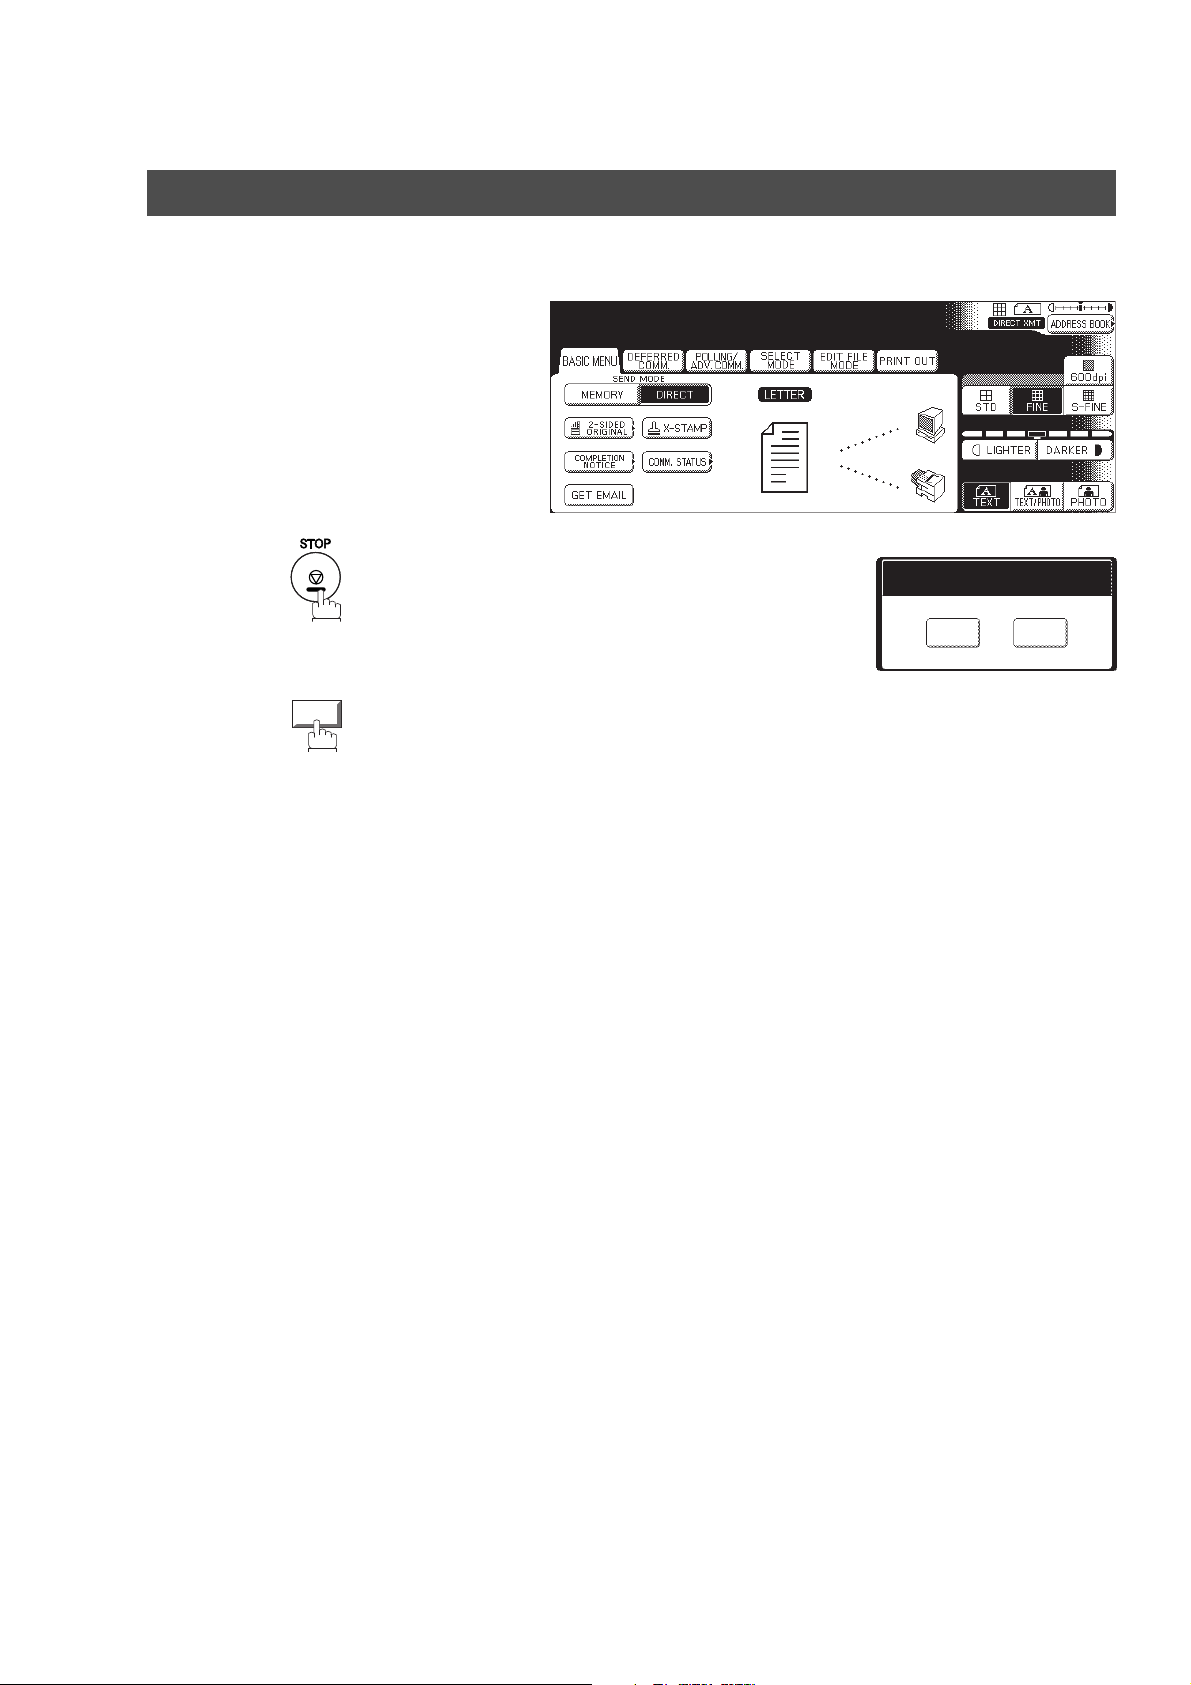
You can choose either Memory or Direct Transmission.
Use Memory Transmission if:
• You want to send the document(s) to multiple stations.
• You have to retrieve the document immediately.
• You want to take advantage of Multi-access design.
• You want to take advantage of Batch Transmission.
Use Direct Transmission if:
• The memory is full.
• You want to send the document(s) immediately.
Use Voice Mode Transmission if:
• You want to send the document(s) after listening to a voice prompt.
• You want to send the document after talking with the other party. (Requires an External Telephone)
Features
Facsimile
Memory Transmission
Your machine quickly stores the document(s) into the machine's memory.
Then, starts to dial the telephone number.
If the transmission fails, your machine will re-transmit the remaining unsuccessful page(s) automatically.
1
Store document(s)
into memory
A
2
Transmit Receive
Destination A
Destination B
3
A
A
NOTE
Continued on the next page...
1. While storing, the File Number of the document being stored is shown at the upper right corner
of the display. It is also printed on the Communication Journal (COMM. JOURNAL),
Transaction Journal and the File List. The percentage of memory used is shown on the lower
right corner of the display after each page is stored.
Memory Transmit No.026
Page 01 0%
5551234
25

Sending Documents
Memory Transmission
2. If memory overflow occurs while storing the document(s), the page will be ejected. The
machine will show "MEMORY FULL" on the display. You will need to reload the last page that
was ejected back on the ADF and send the remaining document(s) again when the memory
becomes available.
If Fax Parameter No. 082 (Quick Memory XMT) is set to "Invalid", the machine stores all the
documents into memory first before transmitting.
After storing each document, the machine checks the available memory to prevent memory
overflow and stops storing additional document(s) if the stored data approaches a certain
percentage* (around 80%).
Then the machine dials and sends the memory stored documents first and continues the
transmission of the remaining document(s) from the ADF during the same phone call.
If transmitting to multiple stations or if memory overflows while storing a document, the
machine prompts you whether to transmit the successfully stored documents or to cancel the
transmission. Press to terminate the transmission or press to transmit.
For image memory capacity, see the Specifications page. (See page 217)
If no action is taken within 10 seconds, the machine will start transmitting the stored
documents.
* The percentage varies and is dependent on the type of documents you are storing, machine
settings or whether an optional memory card is installed.
3. An Information Code will be displayed if the transmission has failed or there was no answer at
the receiving side after the last automatic redial.
The document stored for this transmission will be erased from the memory automatically and
the information code is printed for the transmission on the Communication Journal (COMM.
JOURNAL).
If you need to retain the incomplete documents even after the last redial, change Fax
Parameter No. 031 (INC. FILE SAVE) to "Valid" in advance (See page 191). To retry the
incomplete documents, refer to page 106.
4. To stop the transmission, press .
The display shows:
NO
Memory Transmit No.010
Memory Full * 100%
PANASONIC
YES
STOP
Communication Stop?
YES
Press to stop the transmission. The document you stored will be erased automatically.
If you do not want to erase the documents, change the setting of Fax Parameter No. 031 (INC.
FILE SAVE) to "Valid" in advance. (See page 191)
Then the following display will appear and you can select whether to save the file as an
incomplete file for editing and retry, or delete the file manually.
5. If you would like to print a Communication Journal (COMM. JOURNAL) after stopping a
transmission, press when the display shows:
YES
Save AS Incomp. File?
YES
YES
Print Comm. Journal?
YES
N O
N O
N O
26
Sending Documents
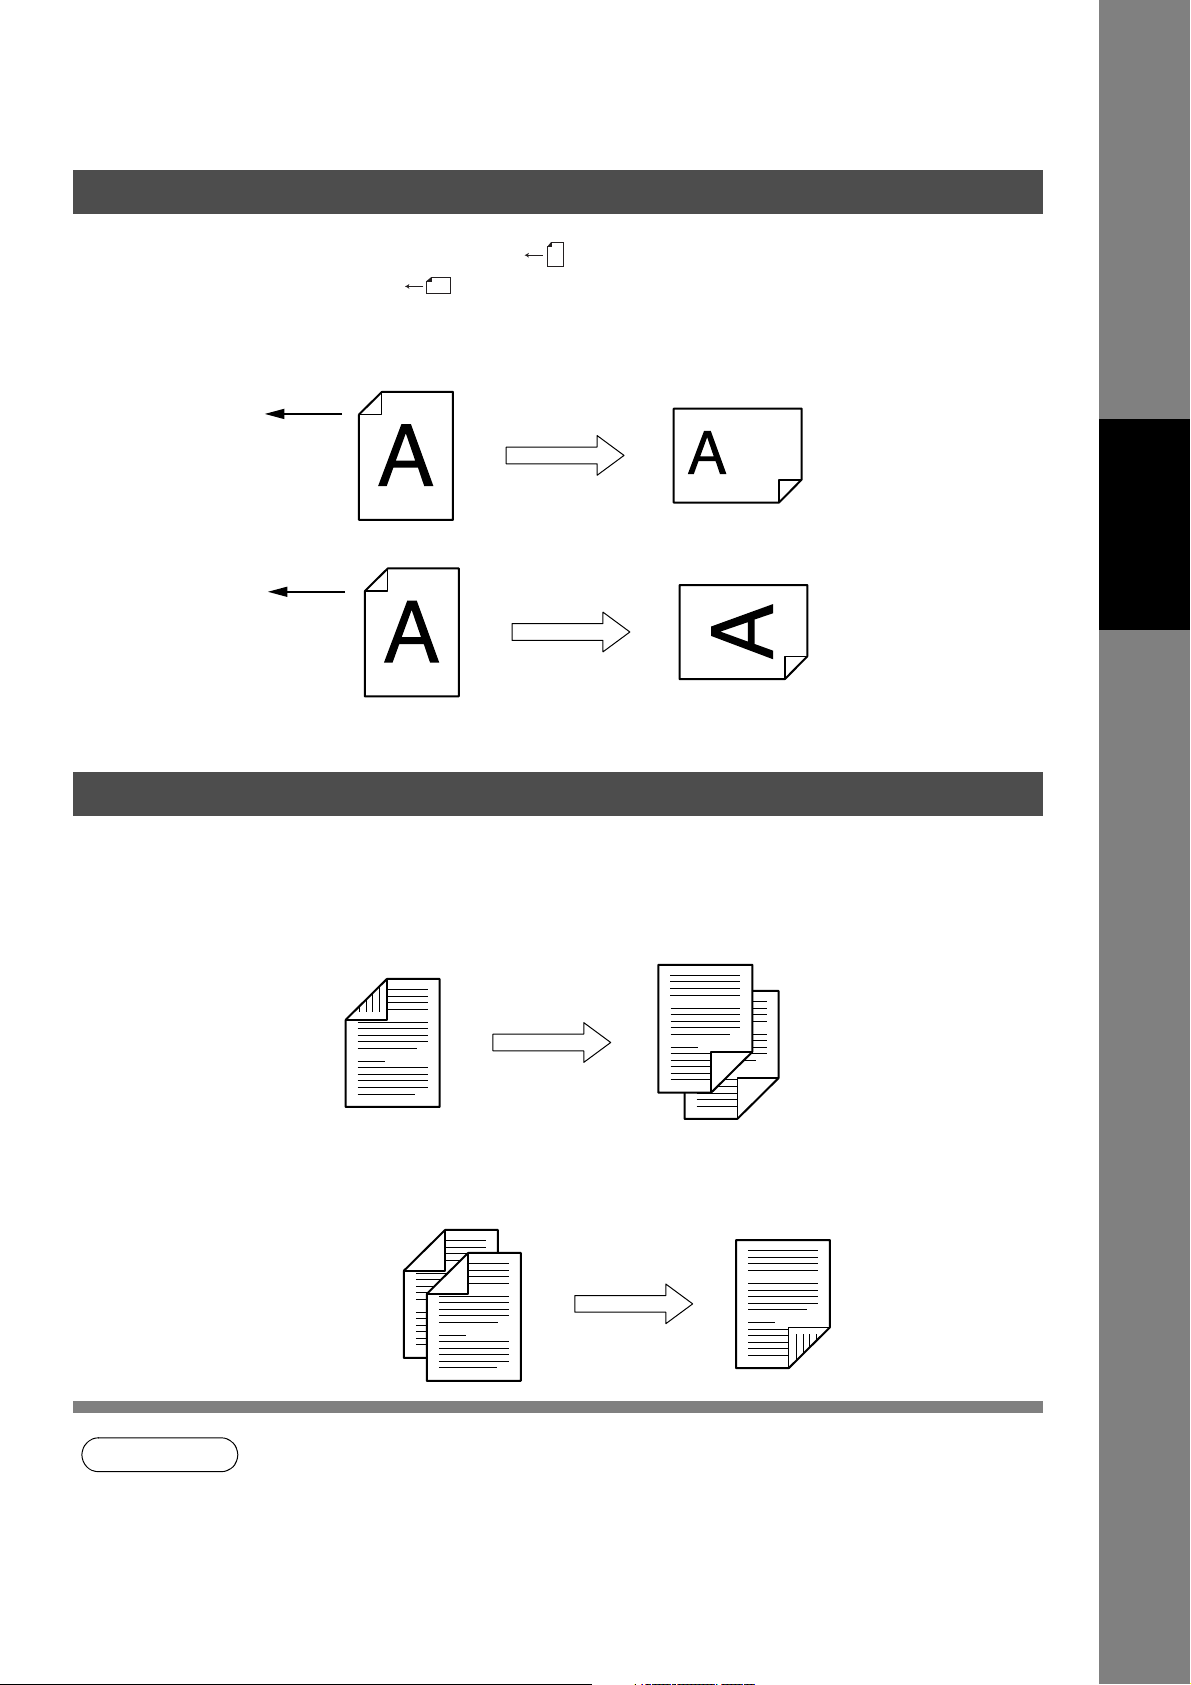
Rotated Transmission
Letter or A4 Original(s) are placed in a Portrait ( ) direction, the document(s) will be rotated by 90º and
then transmitted in a Landscape ( ) direction. The document(s) will be printed the same size as the
transmitted originals at the Receiving Station.
Rotation XMT Fax Parameter No. 078 (ROTATION XMT) set to:
• Invalid
Letter or A4 Original
Sends with
70% Reduction
• Valid (Default Position)
Letter or A4 Original
Sends with
Rotated Transmission
2-Sided Transmission (Receiving)
This machine has duplex SCAN & PRINT capabilities.
Duplex Scan 2-Sided Original on the Basic Menu:
• 2-Sided Original = ON
Receiving Station:
Letter or A4 Paper
Receiving Station:
Letter or A4 Paper
Features
Facsimile
Duplex Scan
Duplex Print Fax Parameter No. 095 (DUPLEX PRINT) set to:
• Duplex Print = Valid (Default Position is "Invalid")
Sending Station
(Letter or A4 Originals)
NOTE
1. Rotation XMT requires the use of Memory Transmission.
2. Verification Stamp is disabled during Duplex Scan.
Receiving Station
Duplex Print
27
Sending Documents
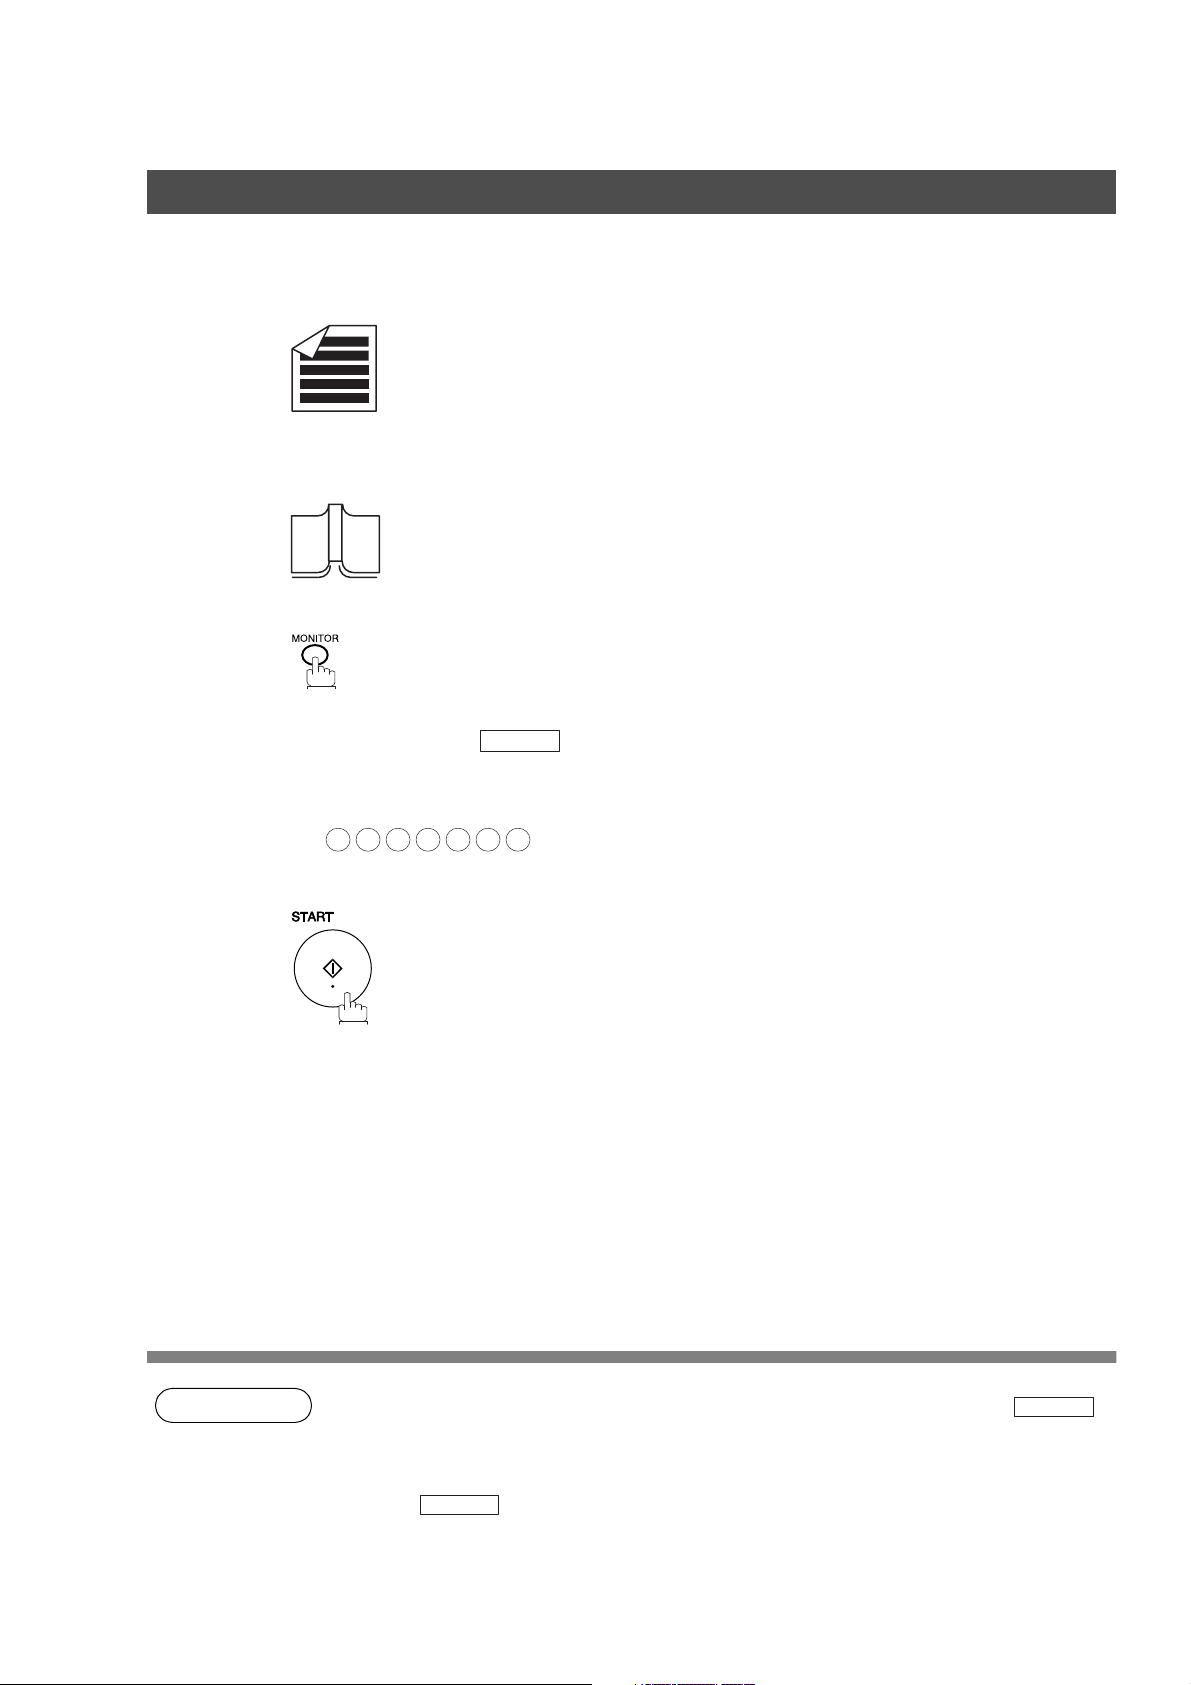
On-Hook Dialing
On-Hook Dialing
For On-Hook Dialing, follow the steps below.
1a
Place original(s) face up on the ADF.
or
1b
Place a book or an original face down on the Platen Glass.
2
3
4
You will hear dial tone through the monitor speaker.
If required, press the key, and adjust the Monitor volume.
(See page 176)
Dial the telephone number using the keypad.
Ex:
5 5 5 1 2
When you hear a beep,
3
SET
4
28
NOTE
1. If you need a special access number to get an outside line, dial it first then press to
enter a pause (represented by a "-") before dialing the full number.
Ex: 9 PAUSE 5551234
2. If you are using Pulse dialing and you wish to change to Tone dialing in the middle of dialing,
press (represented by a "/").
The dialing mode will be changed from Pulse to Tone after dialing the digit "/".
Ex: 9 PAUSE TONE 5551234
TONE
PAUSE
Sending Documents
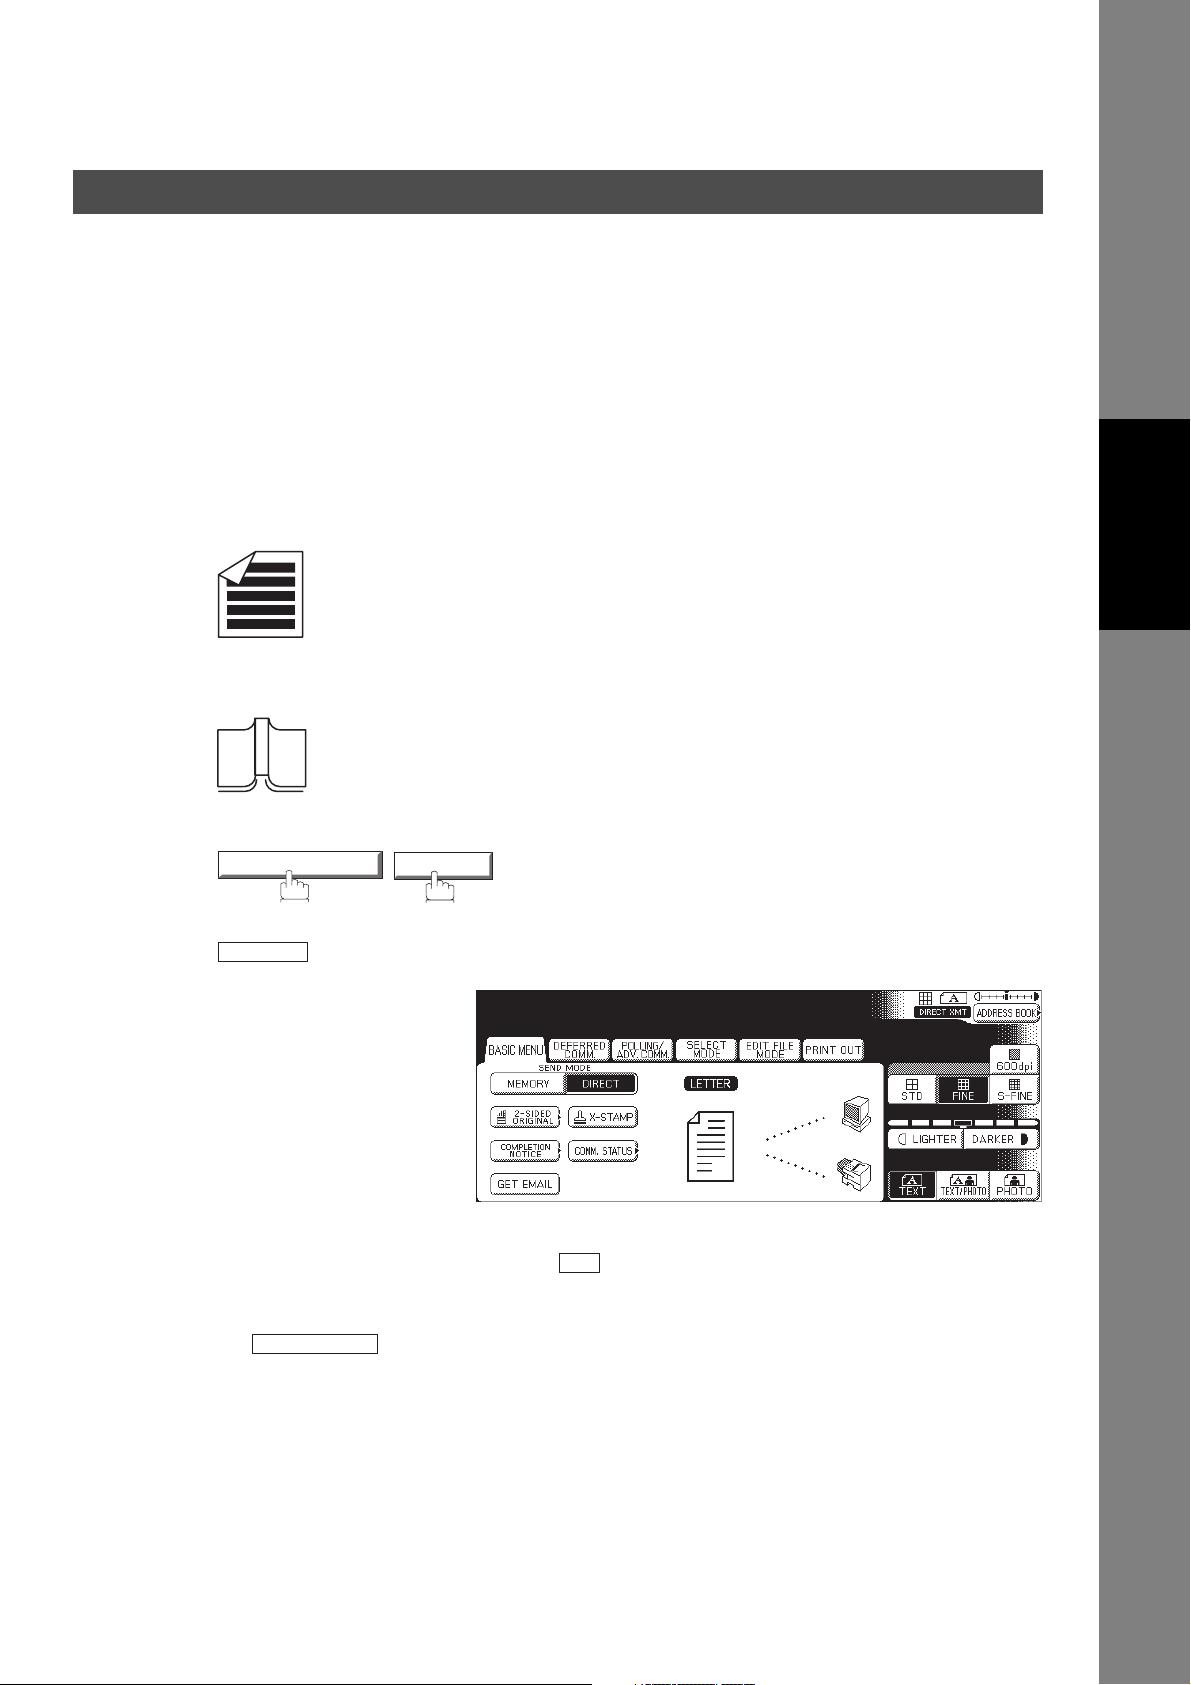
Transmission Reservation
Direct Transmission Reservation (Priority Transmission Reservation)
If you are in a rush to send an urgent document, however there are many files in the memory, use Direct
Transmission Reservation to send the urgent document. The urgent document will be sent immediately after
the current communication is finished.
Note that you cannot send document(s) to multiple stations.
To reserve your machine for sending the urgent documents
Your machine is On-Line, the ON LINE lamp is blinking or printing received
1
documents.
2a
Place original(s) face up on the ADF.
or
Features
Facsimile
2b
3
4
Place a book or an original face down on the Platen Glass.
MODE SETTING
Make sure that "DIRECT" is displayed, if "MEMORY" appears, press
DIRECT
Dial by using any one of the following methods:
• Manual Number Dialing and press
• Address Book Dialing
(For details, see page 22.)
Ex:
You can make reservation to send an urgent document to a single station
only. A message “Direct XMT Reserved” will be shown on the display.
to change to Direct Transmission.
PANASONIC
DIRECT
MMM-dd-yyyy 15:00 0%
Ready To Fax
Original Set
OK
29
Sending Documents
Transmission Reservation
To cancel the direct transmission reservation
Make sure the document is on the ADF.
1
Direct Comm. No.013
* Dialing *
SALES DEPT
2
3
YES
and then remove the document from the ADF.
Communication Stop?
YES
N O
30
 Loading...