

Page 1
Digital Imaging Systems
Operating Instructions
(For Copy & Network Scan Functions)
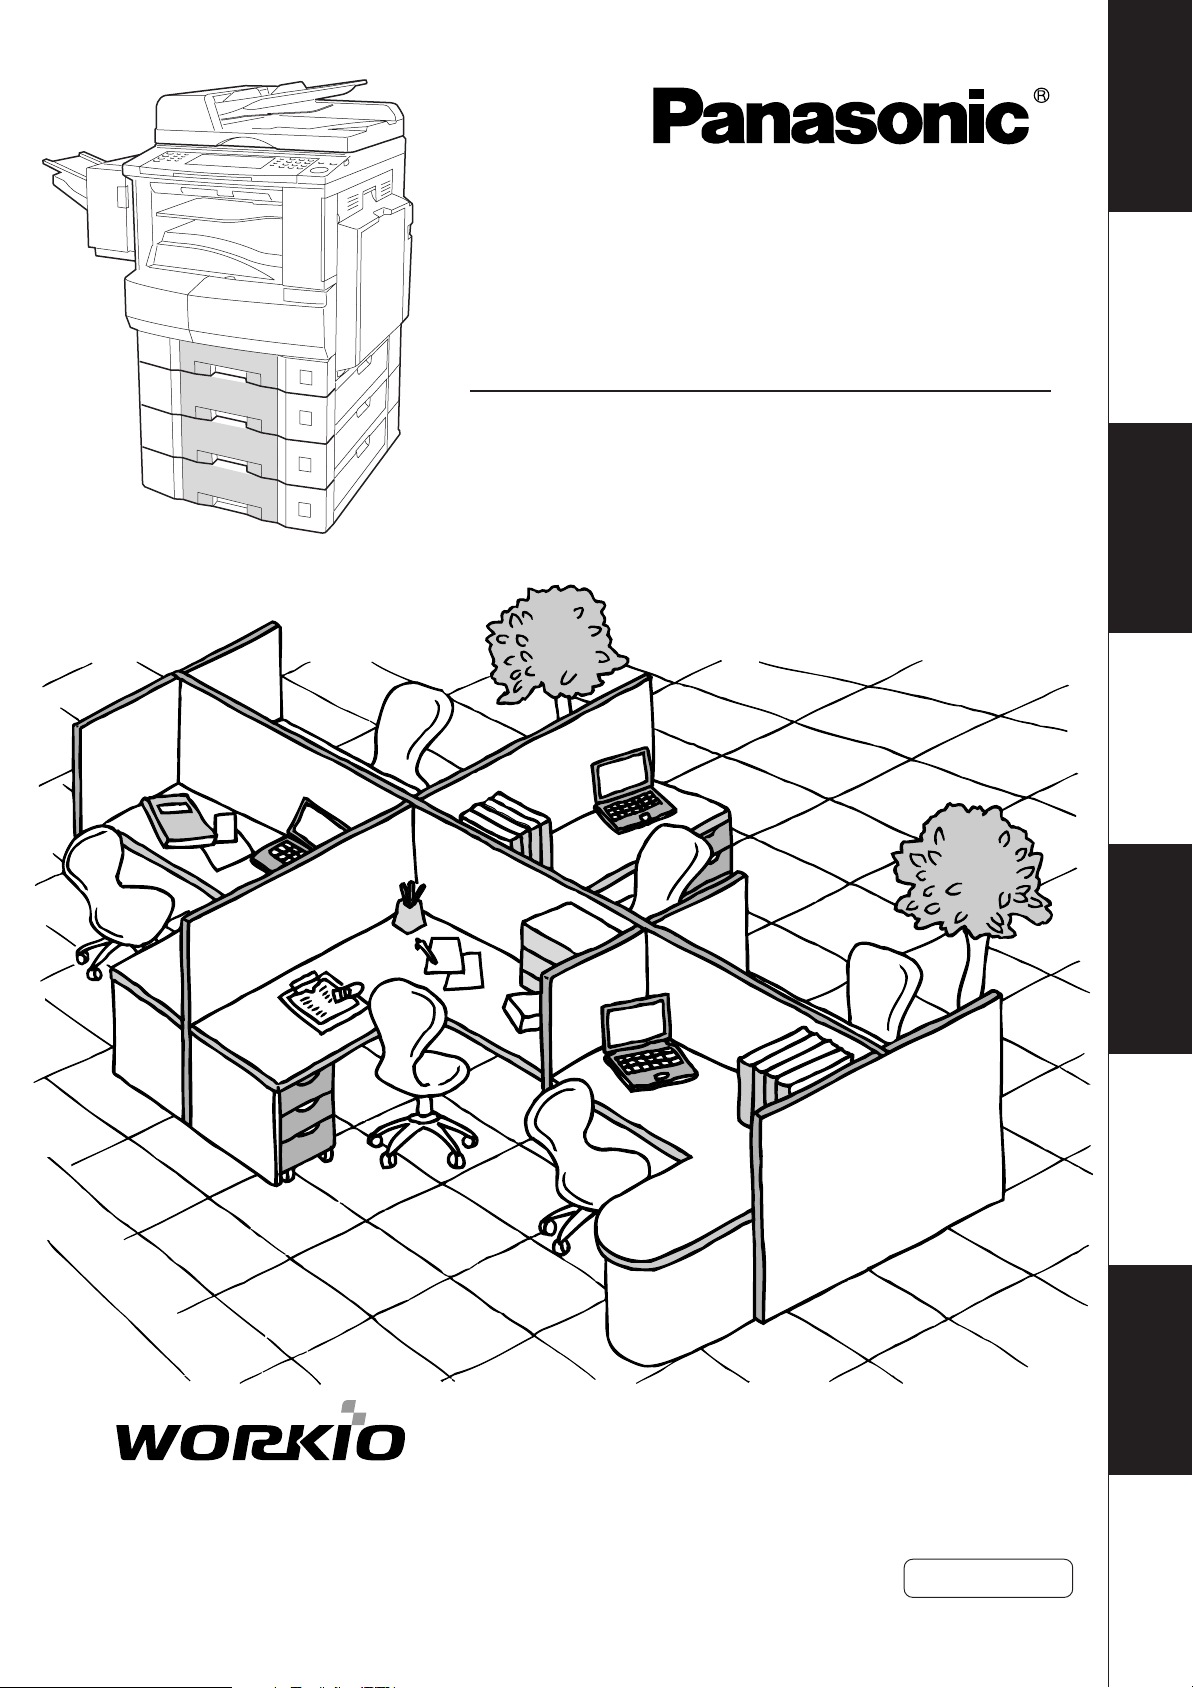
Model No. DP-2310/3010
with Options
Your Machine
Getting To Know
Before Starting
Making Copies
Function
Accessories
(Option)
Network Scanner
Before operating this equipment, please read these instructions completely
and keep these operating instructions for future reference.
Problem Solving
English
Others
Page 2
Getting To Know Your Machine
Useful Office Functions
Copy
• Copy up to Ledger size.
Capable of copying text/photos/halftone originals.
Fax/Email
• Plain Paper High-speed Super G3 compatible Fax with JBIG
compression when optional Fax Communication Board (DAFG300) is installed.
• Quick-Scan
• Quick Memory Transmission
• Email Function capability when optional Internet Fax/
E-Mail Module (DA-NF600) is installed.
Print
• Digital printer controller standard, printer resolution 300 or 600
dpi.
Scan/File
• Monochrome scanner capability when optional Network Scanner
Module (DA-NS600) is installed.
Scanning resolution up to 600 dpi.
•A document can be saved to, or retrieved from the
Network Server with this Digital Imaging System.
Application Software
• Document Manager
• Document Viewer
• Document Network Scanner*
• Utilities (Network Status Monitor, Phone Book Editor, Device
Configuration Editor)
∗ Document Network Scanner is only available when the optional
Network Scanner Module (DA-NS600) is installed.
DP-2310/3010 Operating Instructions
This copier includes operating instruction manuals, please use the correct manual when an operator intervention
is necessary.
<Copy & Network Scan>
Use the information provided in this manual whenever a copier function requires
intervention. For example: how to make copies, add paper, replace the toner bottle,
etc.
<Fax/Internet Fax (Email)>
<Print &
Other Advanced Functions>
2
Use the information provided in the DP-2310/3010 Fax & Internet Fax Operating
Instructions manual whenever a Fax/Internet Fax function requires intervention.
For example: how to send/receive a Fax/Email, or when a trouble message appears,
etc.
Use the information provided on the enclosed CD for an explanation of how to
use as a Network Printer, Network Scanner, Edit Directory Dialing Feature,
Device Settings, Network Status Monitor, and/or Document Management System.
Page 3
Operating Instructions Outline
Getting To Know
Your Machine
Before Starting
Making Copies
Your Machine
Getting To Know
● Quick Operation Chart
(See pages 10, 11)
● Adding Paper, Replacing the Toner Bottle,
Removing a Misfed Paper and Error Codes
(See pages 10-17)
● Safety Precautions (See pages 7-9)
● Control Panel Key/Button/Indicator Names
(See pages 19-21)
Operating Instructions for making copies according
to Function Categories on the LCD Touch Panel
Display
(See pages 22-49)
Function
Options
Problem Solving
Changing the Initial Machine Modes
● Copy, Printer, Scanner (Option)
and Fax/Internet Fax (Option)
(See pages 50-63)
● Accessories Components (See page 65)
● 1-Bin Finisher (DA-FS300) (See page 37, 38)
● Network Scanner (DA-NS600) (See pages 66-69)
● Troubleshooting (See pages 70, 71)
● Replacing the Battery (See pages 72, 73)
Others
Specifications, Options and Supplies and Index
(See pages 74-78)
3
Page 4
Getting To Know Your Machine
COPY
A3
B4
A4
A5
FLS
Symbols/Icons
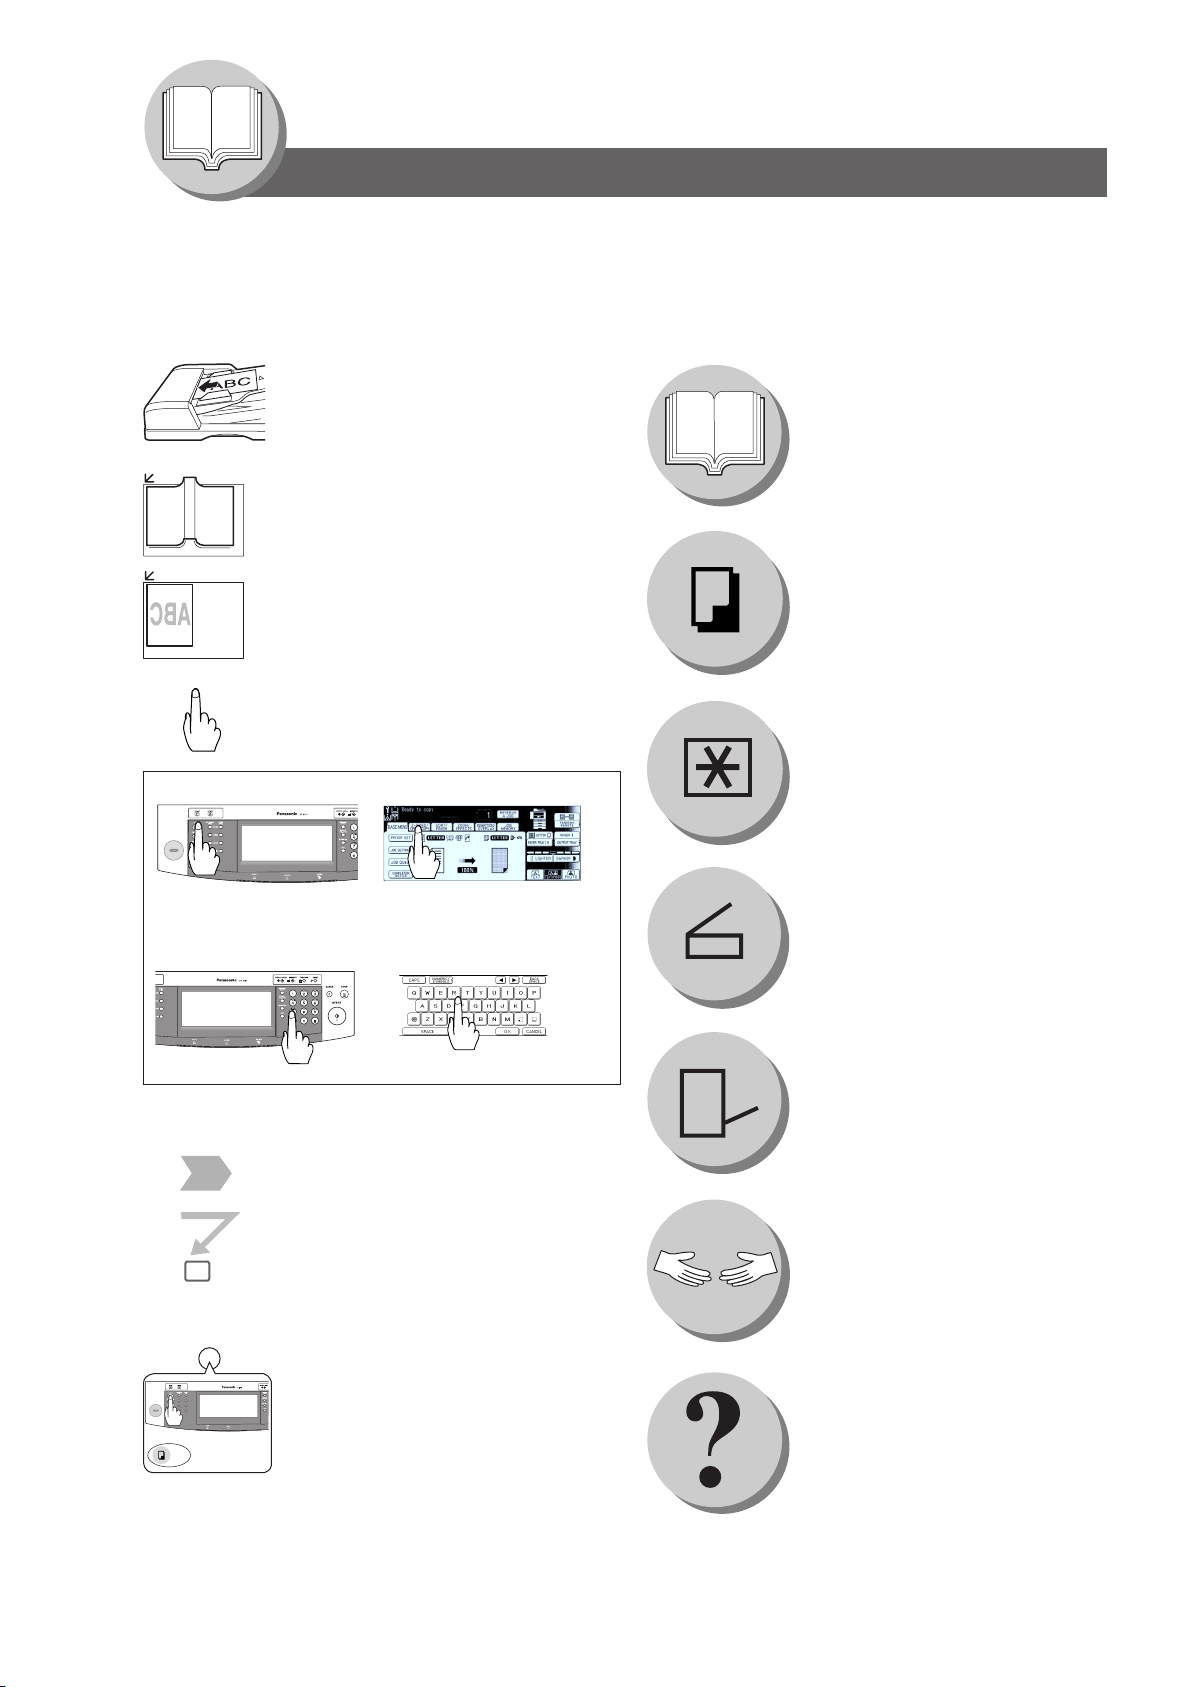
The following Symbols/Icons are used throughout this operating instructions manual.
Place original(s) on the ADF
Place original(s) on the Platen
(Book)
Place original on the Platen
(Sheet)
Press any Hard Key on the
control panel or touch any Button
on the touch panel display
Press Hard Key
Input numbers
● Number of Copies, etc.
Getting to know your machine
Before starting
When making copies
When setting the machine
modes
Touch any Button
Options
(ex.: Network Scanner)
When scanning document(s)
Input text with a keyboard
Options
(ex.: 1-Bin Finisher)
Go to next step
Problem solving
Go to next step (below)
5
Setting any function(s) if required
Others
(Specifications, Index)
4
Page 5
Getting To Know Your Machine
Table of Contents
Useful Office Functions .................................................................................................................. 2
DP-2310/3010 Operating Instructions ........................................................................................... 2
Operating Instructions Outline ...................................................................................................... 3
Symbols/Icons ................................................................................................................................. 4
Precautions...................................................................................................................................... 7
Operation Chart ............................................................................................................................. 10
■ Quick Operation Chart ................................................................................... 10
■ Problem Solving ..............................................................................................11
Before Starting
Energy Star .................................................................................................................................... 18
Control Panel ................................................................................................................................. 19
Touch Panel Display ..................................................................................................................... 20
Making Copies
Basic Menu .................................................................................................................................... 22
■ Copying the Same Size Originals (1:1) .......................................................... 22
■ Using the ADF ................................................................................................ 22
■ Copying on Heavy Paper (Post Cards, etc.) (35 lb max.) .............................. 22
■ Position of the original .................................................................................... 23
■ Copying with Preset Ratios ............................................................................ 24
■ Proof Copying ................................................................................................ 24
■ Tandem/Remote Copying ............................................................................... 24
■ Tandem/Remote Copy Settings (Registration 1) ............................................ 26
■ Tandem/Remote Copy Settings (Registration 2) ............................................ 26
■ Tandem/Remote Copy Settings (Editing) ....................................................... 26
■ Tandem/Remote Copy Settings (Deleting) ..................................................... 26
■ Job Queue ...................................................................................................... 28
■ Completion Notice .......................................................................................... 28
2-Sided/Original
Sort/Finish ..................................................................................................................................... 36
Zoom/Effects ................................................................................................................................. 38
Insertion/Overlay ........................................................................................................................... 44
Copy .............................................................................................................. 30
■ 1-Sided
■ Book
■ 2 Page Copy .................................................................................................. 32
■ N in 1 Copy .................................................................................................... 32
■ Booklet Copy .................................................................................................. 32
■ Multi-Size Feeding ......................................................................................... 34
■ Job Build and SADF Mode ............................................................................. 34
■ When using Sort Mode ................................................................................... 36
■ Zoom .............................................................................................................. 38
■ Auto Zoom ...................................................................................................... 38
■ Edge ............................................................................................................... 38
■ Book ............................................................................................................... 38
■ Margin ............................................................................................................ 40
■ Centering ........................................................................................................ 40
■ Image Repeat ................................................................................................. 40
■ Inverse ........................................................................................................... 40
■ Stamping (Page Numbering) .......................................................................... 42
■ Stamping (Date Stamp) .................................................................................. 42
■ Stamping (Issue Number Stamping) .............................................................. 42
■ Cover .............................................................................................................. 44
■ Page Insertion ................................................................................................ 44
■ OHP Interleaving ............................................................................................ 44
■ Presentation ................................................................................................... 44
2-Sided, 2-Sided 1-Sided, 2-Sided 2-Sided Copy .............. 30
2-Sided Copy ................................................................................... 30
Your Machine
Getting To Know
5
Page 6

Getting To Know Your Machine
Table of Contents
Insertion/Overlay/Job Memory..................................................................................................... 46
■ Overlay ........................................................................................................... 46
■ File Edit .......................................................................................................... 46
■ Form Overlay ................................................................................................. 46
■ Job Memory ................................................................................................... 46
Other Features............................................................................................................................... 48
■ Concurrent Copying ....................................................................................... 48
■ Energy Saver (Energy Saver Mode, Sleep/Shutdown Mode) ........................ 48
■ Skyshot Mode ................................................................................................ 48
■ Interrupt Mode ................................................................................................ 49
Function
■ Using Function Modes to Change the Initial Copy Modes ............................. 50
■ Procedure ....................................................................................................... 50
■ General Settings ............................................................................................ 52
■ Copier Settings ............................................................................................... 52
■ Scanner Settings ............................................................................................ 53
■ Printer Settings ............................................................................................... 54
For Key Operator........................................................................................................................... 55
■ General Settings ............................................................................................ 55
■ Copier Settings ............................................................................................... 57
■ Printer Settings ............................................................................................... 58
For Example................................................................................................................................... 60
■ Changing the Auto Contrast Setting ............................................................... 60
■ Changing the Paper Size ............................................................................... 60
■ Weekly Timer ................................................................................................. 60
■ Department Counter ....................................................................................... 62
■ Network Settings ............................................................................................ 62
Combined Function Table ............................................................................................................ 64
Accessories
Components .................................................................................................................................. 65
■ Options ........................................................................................................... 65
■ Supplies ......................................................................................................... 65
Network Scanner (Option)
■ Document Scanning ....................................................................................... 66
■ Adding your PC or DD Server IP Address ...................................................... 66
■ Editing your PC or DD Server IP Address ...................................................... 68
■ Erasing the Address ....................................................................................... 68
Problem Solving
Troubleshooting ............................................................................................................................ 70
Replacing the Battery ................................................................................................................... 72
Others
Specifications ................................................................................................................................ 74
Index ............................................................................................................................................... 76
6
Page 7
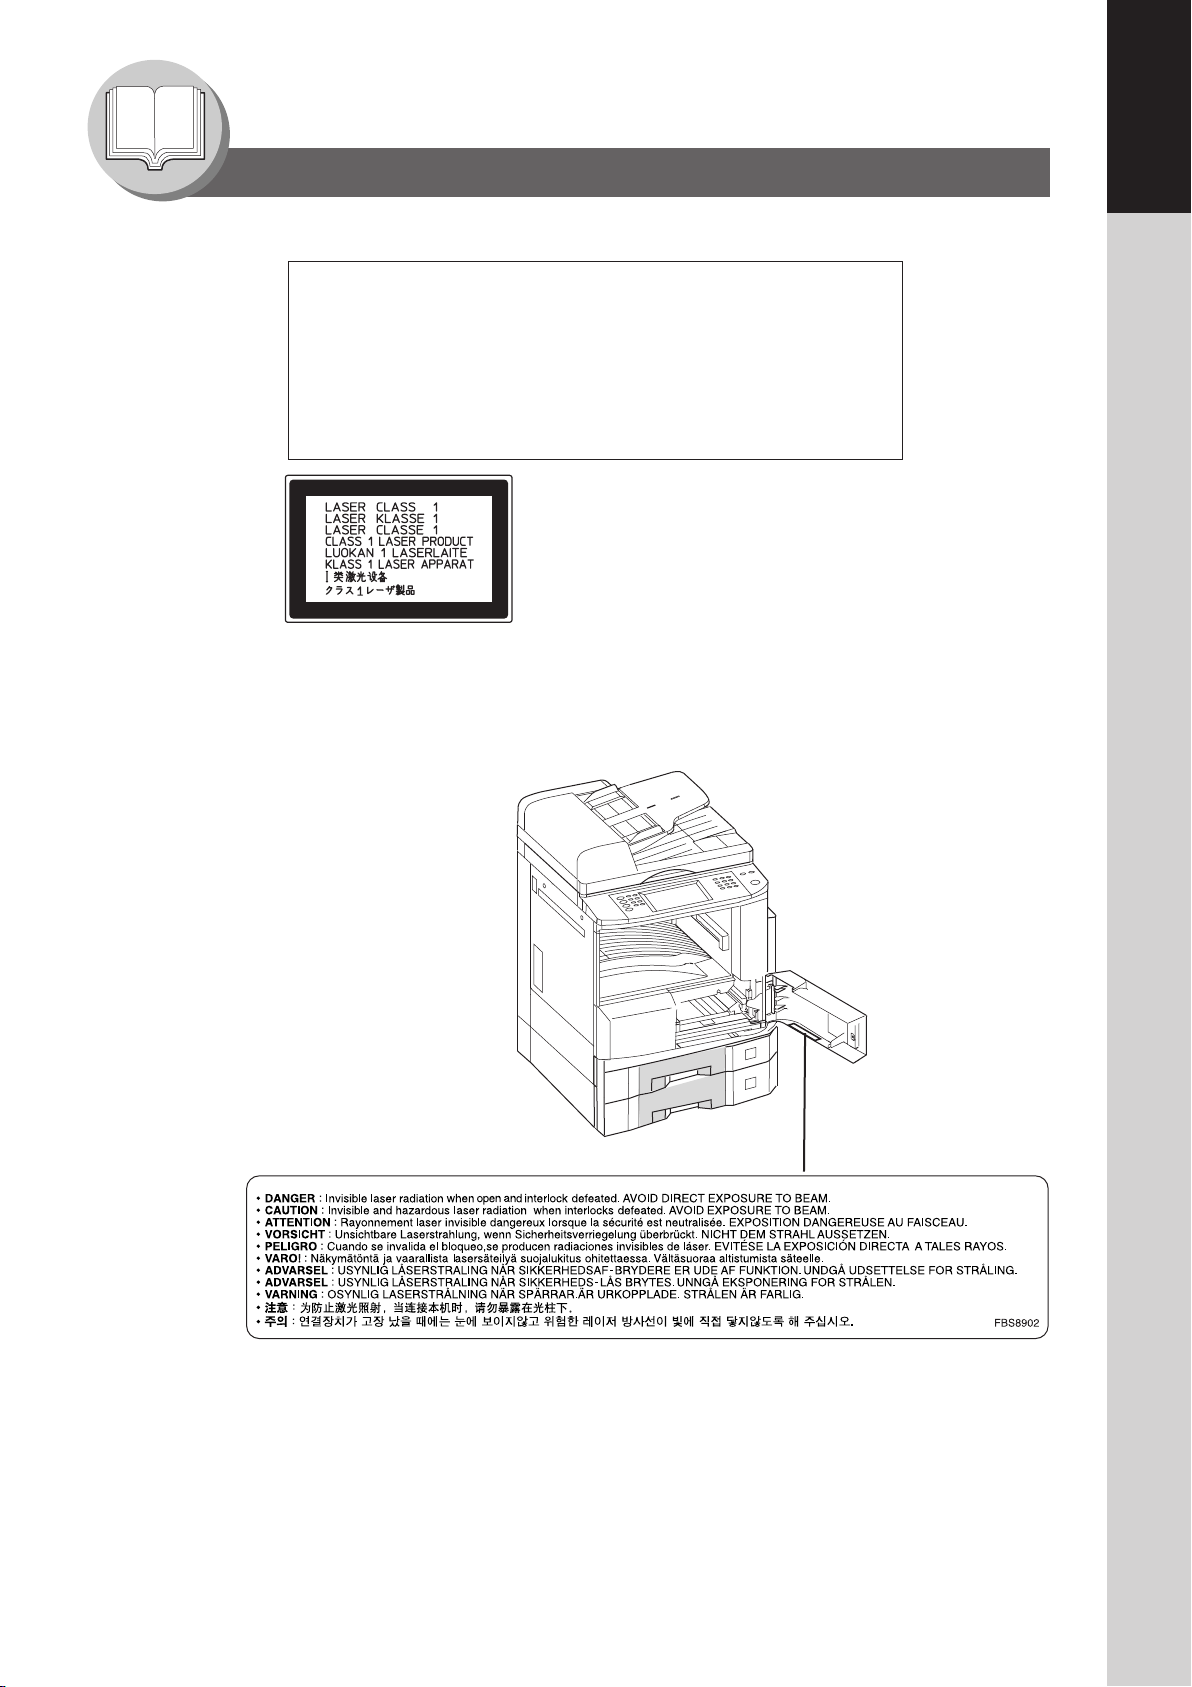
Getting To Know Your Machine
LASER SAFETY
This unit employs a laser. Only qualified service personnel
should attempt to service this device due to possible eye injury.
CAUTION:
USE OF CONTROLS, ADJUSTMENTS OR PERFORMANCE
PROCEDURES OTHER THAN THOSE SPECIFIED HEREIN MAY
RESULT IN HAZARDOUS RADIATION EXPOSURE.
Precautions
■ Laser Safety
■ Caution Label
Your Machine
Getting To Know
7
Page 8

Getting To Know Your Machine
Precautions
Handling
■ Do not look directly at the exposure lamp when copying.
■ Do not turn the power switches Off or open the front cover/right cover during copying.
● Do not drop paper clips or other metal objects into the copier.
■ If you are not going to use the copier for long periods of time, turn OFF
the Power Switch on the Left Side of the machine and wait 10 seconds
then, turn OFF the Main Power Switch on the Back Side of the machine.
■ Energy Save Mode Notice
● If the energy save mode is set to Shutdown mode, the following
functions will not work while the unit is in this mode.
When using the following functions, we recommend that you leave
the energy save mode in the initial factory default setting (Sleep).
(See page 55)
1) Data Reception Function while Tandem/Remote Copying is being used
2) Printer Function (USB Local and Network Connections)
■ Inner Tray Notice
● Under normal operation, it is not necessary to remove this Inner
Tray. If this tray is removed, lift up the Paper Holder while
reinstalling the tray to prevent damaging it.
Inner Tray Paper Holder
Toner and Paper
■ Store toner, drum and paper in cool areas with low humidity.
● Use high quality 16 - 24 lb (Sheet Bypass: 15 - 35 lb) paper.
● For optimum performance, it is recommended that only Panasonic Brand supplies are used
in the copier.
● Do not unseal the toner bottle unless you are ready to use it.
● Certain types of transparency film may not be compatible and may damage your machine.
Consult with an authorized Panasonic dealer for advice regarding non-standard paper types.
(Panasonic has tested “3M PP2500” transparency film and found it to be compatible.)
Installation
■ The copier should not be installed in areas with the following conditions:
● Extremely high or low temperature and humidity.
Ambient conditions
Temperature: 50 – 86°F
Relative humidity: 30 – 80 %
● Where temperature and humidity can change rapidly, causing condensation.
● Direct exposure to sunlight.
● Directly in the air conditioning flow.
● In areas of high dust concentration.
● In areas of poor ventilation.
● In areas with chemical fume concentration.
● In areas with extreme vibration.
● With unstable or uneven conditions (floors, etc.).
8
Page 9
CAUTION
FCC WARNING:
This equipment has been tested and found to comply with the limits for a Class A digital device, pursuant to
part 15 of the FCC Rules. These limits are designed to provide reasonable protection against harmful
interference when the equipment is operated in a commercial environment. This equipment generates, uses,
and can radiate radio frequency energy and, if not installed and used in accordance with the instruction
manual, may cause harmful interference to radio communications. Operation of this equipment in a residential area is likely to cause harmful interference in which case the user will be required to correct
the interference at his/her own expense.
The user could lose the authority to operate this equipment if any unauthorized changes or modifications are
made to this equipment.
Ventilation
■ The copier should be installed in a well-ventilated area to minimize the ozone density in the air.
For Your Safety
■ The maximum power consumption is 1.45 kW.
A properly wired (grounded), dedicated, 15A, 120V AC outlet is required. Do not use an
extension cord. Please ensure the wall outlet is installed near the equipment and is easily accessible.
Caution Note: Unplug the power cord from the wall outlet before removing covers.
● THIS PRODUCT CONTAINS A LITHIUM BATTERY. DANGER OF EXPLOSION IF BATTERY IS
INCORRECTLY REPLACED.
REPLACE ONLY WITH THE SAME OR EQUIVALENT TYPE. DISPOSE OF USED BATTERIES
ACCORDING TO THE INSTRUCTIONS OF YOUR LOCAL SOLID WASTE OFFICIALS.
WARNING For USA
Your Machine
Getting To Know
This product has a fluorescent lamp that contains a small amount of mercury. It also contains lead in some
components. Disposal of these materials may be regulated in your community due to environmental considerations.
For disposal or recycling information please contact your local authorities, or the Electronics Industries Alliance:
<http://www.eiae.org >.
9
Page 10
Getting To Know Your Machine
Face Up
INV
INV
LTR
LGL
LDR
LTR
LDR
INV
LTR
LGL
INV
INVOICE
INVOICE-R
LETTER-R
LEGAL
LEDGER
LETTER
COPY
Max Level Indicator
Sheet Bypass
Until it Stops
Face Down
Side Guides
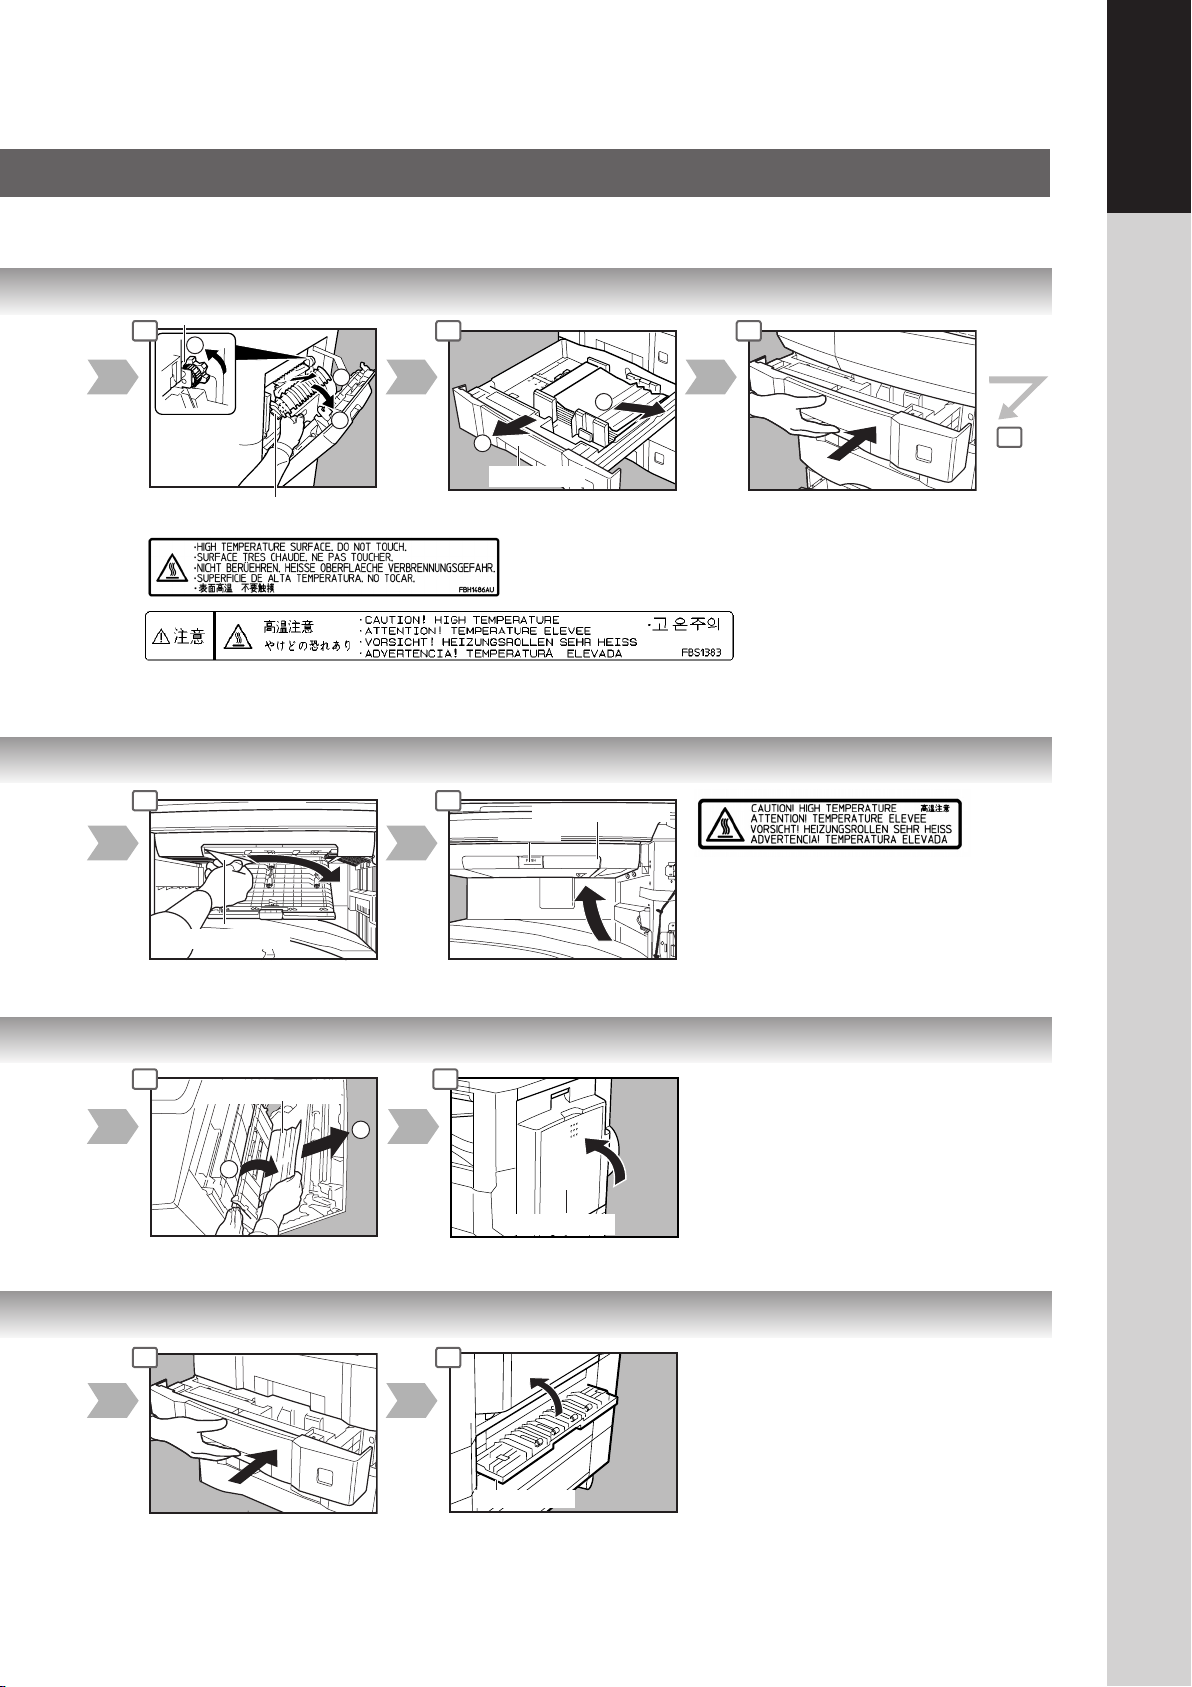
Operation Chart
■ Quick Operation Chart
Turn the Main
Power Switch
On
(Back side of
the Copier)
(See page 8)
Turn the Power
Switch On
(Left side of the Copier)
Load Paper
From
ADF
or
From
Platen
1 2
Tray
Max. 50 originals*
Original Guides
Adjust to the original’s width
Original Guides
Face Down
● If the original is not positioned
properly, a portion of the original
may not be copied.
● For originals smaller than Invoice
size, position the original within
the Invoice area and select
Invoice.
If set in other
function mode
*30 originals (Legal/Ledger)
● Adding Paper (Paper Tray)
1 2 3
4
Paper Weight: 16-24 lb Paper Capacity: 550 Sheets (20 lb)
NOTE:
When changing the paper size, refer to page 60.
● Adding Paper (Sheet Bypass)
Copying on Special Paper, etc.
1 2 3
4
10
4
4
Adjust the side guides.
Incorrect adjustment may cause the
paper to wrinkle, misfeed or skew.
NOTE:
If the paper size is not detected,
remove paper and press Reset Key.
Then, load the paper again.
Load Paper
(Do not exceed limit mark)
Approximately up to 50
Letter size sheets/20 lb
Paper Weight: 15-35 lb
To add paper to the Sheet Bypass,
remove the paper left on the tray, and
align it with the added paper and load
them together onto the tray.
Page 11
3 4 5
Your Machine
Getting To Know
Select desired settings
Copy Jobs
COPY
SIZE
Reduction/ Enlargement only
(See page 24)
Adjust the Manual Exposure
or
Select type of Original(s)
Mainly Text
Select the Exit Destination
Receiving Tray (Lower) Receiving Tray (Upper)
Tray/1-Bin Finisher (External)
• INNER 2 and OUTER are only available when the optional Inner Tray
or Exit Tray/1-Bin Finisher is installed.
Text and Photo
combined
Number of Copies
(Max. 999)
Mainly Photo
(See pages 22-29) (See pages 30-35) (See pages 36 and 37)
(See pages 38-43) (See pages 44-47) (See pages 46 and 47)
■ Problem Solving
Removing a Misfed Paper
(See pages 14-17)
Adding Paper
(See page 10)
Replacing Toner Bottle
(See page 12)
Replacing Toner Waste
Container
(See page 12)
UXX
EXX
User Error Code
(See page 12)
Machine Error Code
(Call your Service provider)
Replacing Staple
Cartridge
(See page 12)
● When the optional
1-Bin Finisher (DAF300) is installed.
11
Page 12
Getting To Know Your Machine
Toner Waste Container
Shake the new Toner
Bottle well to loosen the contents.
Seal
Toner Bottle
(New)
U1
U4
U6
U7
U13
U14
U15
U16
U25
U12
U11
U20/U21/U22
U0
U90
U8
Operation Chart
■ Problem Solving
● Replacing Toner Bottle/Replacing Toner Waste Container
1 2
Replace Toner Bottle
6
Replace Toner Waste
Container
7
● Replacing the Staple Cartridge (When optional 1-Bin Finisher is installed.)
1 2
Add Staples
or
Check the
6 7
operation
8
● User Error Codes (U Code)
12
Code Check Points
U0 Contact your Key Operator.
• Key Counter is not installed.
• Department ID Code is not entered.
U1 Front Cover is open.
U4 1-Bin Finisher is separated from the machine.
U6 Right Cover is open.
U7 Feeder Cover 1/2/3 is open.
U8 Transport Cover is open.
Page 13
Your Machine
Bottle's Green Knob
New Toner Bottle
Toner Bottle
Bottle's Green Knob
Toner Bottle
(Empty)
(New)
Staple Case
New
1
2
Empty
1
2
3
Jammed
Staple
Toner Waste Container
Cap
Getting To Know
3
4 5
8 9 10
New Toner Waste Container
Replace the Toner Waste Container
along with the New Toner Bottle.
3 4 5
6
6
Staple Cartridge
FQ-SS32
When the Staple is jammed
● The following message will
be displayed on the Touch
Panel Display:
"Can Not Complete
Confirm Staple Unit"
Code Check Points
U11 Paper remains in the Finisher Bin.
U12 Finisher Staple Cover/Top Cover is open.
U13 Low Toner.
U14 Toner Waste Container is full.
U15 Toner Waste Container is not installed.
U16 Call your Service provider.
U18 Total Copy Count reached the limit, consult your
Key Operator.
Code Check Points
U20 ADF Cover is open.
U21 ADF is opened while scanning from ADF.
U22 ADF Exit Unit is open.
U25 Shake Toner Bottle well.
U90 Battery requires replacement.
(See page 72)
13
Page 14
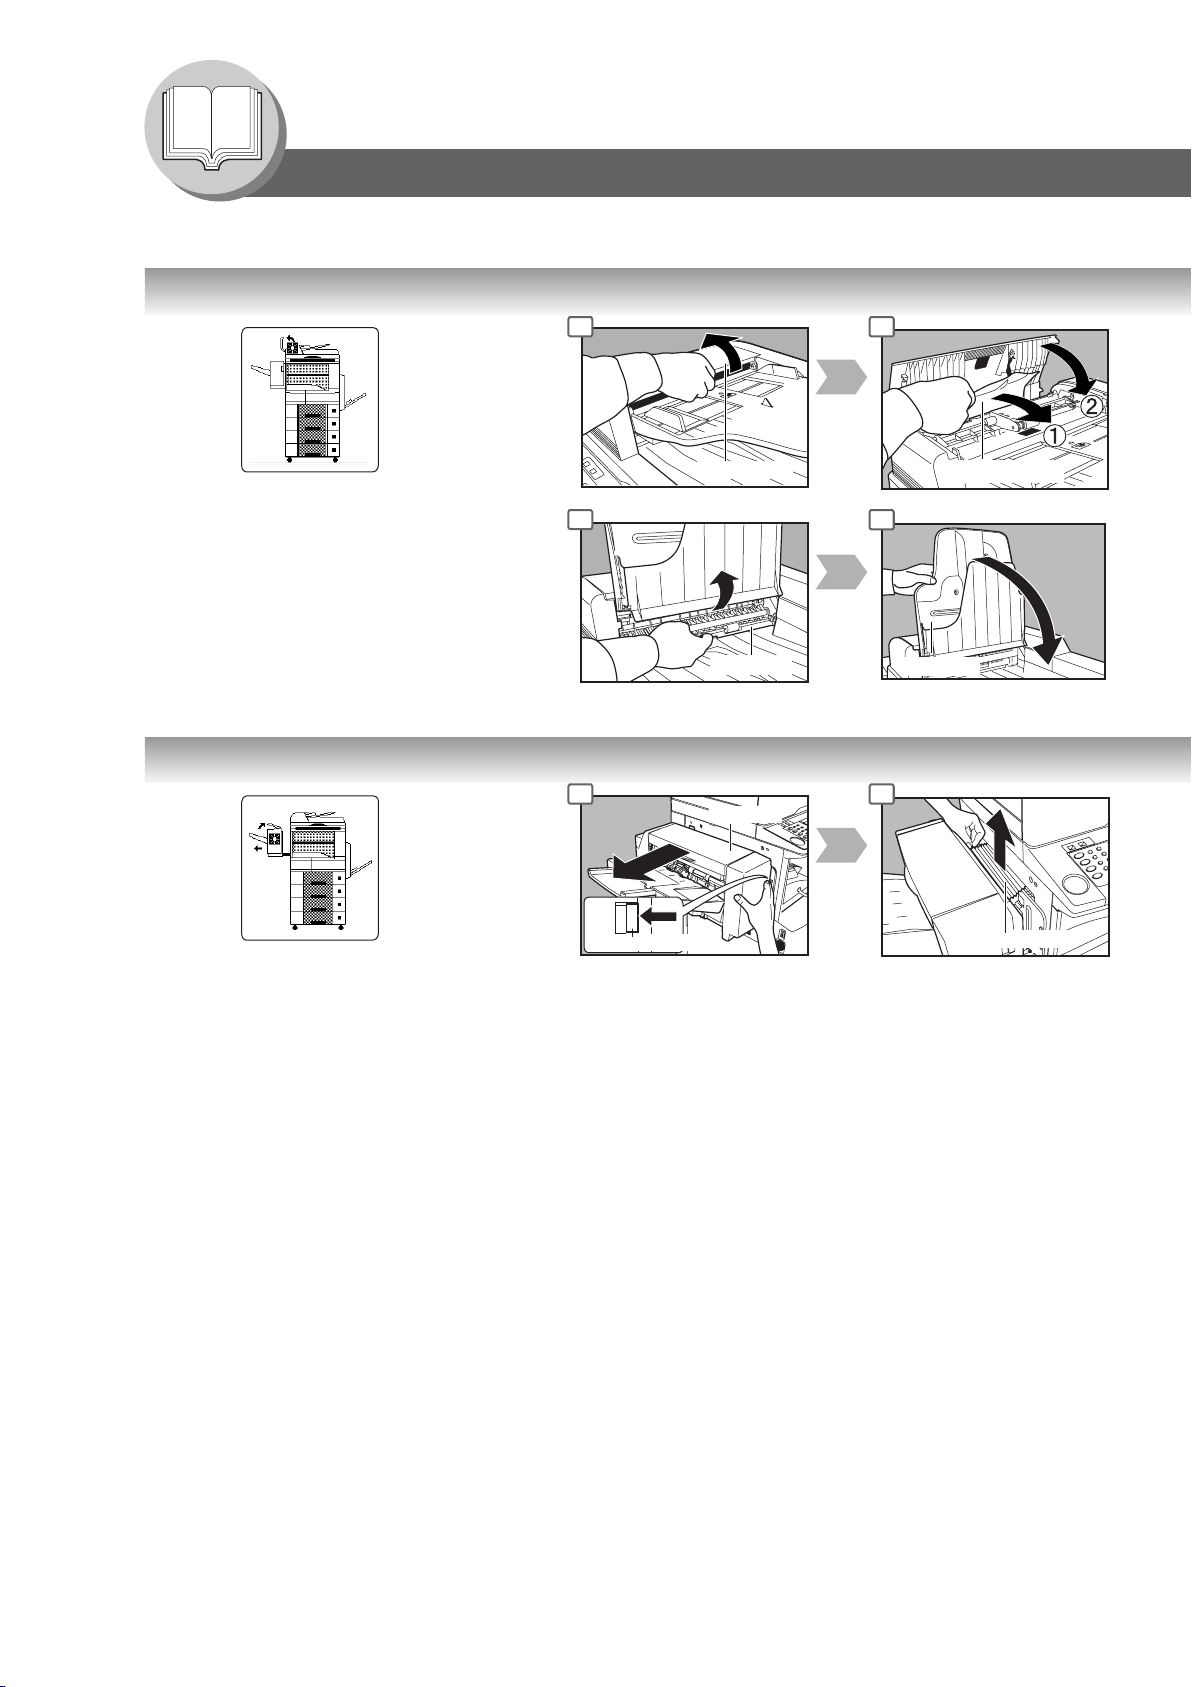
Getting To Know Your Machine
Right Cover
Misfed Paper
Right Cover
1
2
Push
Latch
Misfed Paper
Right Cover
Paper Feed Guide
1
2
Feed Cover
1
2
Paper Tray
Operation Chart
■ Problem Solving (Continued)
● Removing a Misfed Paper (Paper Entry Area/1st Paper Tray)
1 2
6
● Removing a Misfed Paper (Paper Transport Area)
1 2
When the optional Tray/1-Bin
Finisher is installed.
● Removing a Misfed Paper (Automatic Duplex Unit)
1 2
● Removing a Misfed Paper (2nd/3rd/4th Paper Tray)
1 2
14
Options
3rd Paper Tray (DA-DS303)
4th Paper Tray (DA-DS304)
Page 15
Misfed Paper
1
2
Heat Roller Cover
Right Paper Clearing Knob
1
3
2
1
2
Paper Tray
Misfed Paper
Latch
∗
Transport Cover
Feed Cover
3 4 5
Right Cover
Your Machine
Getting To Know
6
3 4
3
3 4
Confirm that the latch is securely fastened.
∗
4
15
Page 16
Getting To Know Your Machine
ADF Cover
Misfed Paper
ADF Tray
Finisher
Release Button
Misfed Paper
Operation Chart
■ Problem Solving (Continued)
● Removing a Misfed Paper (ADF)
1 2
6 7
Exit Unit
● Removing a Misfed Paper (1-Bin Finisher)
Option (DA-FS300)
1 2
16
Page 17
Exit Unit
1
2
Misfed Paper
Remaining
Copies
Upper Cover
1
Misfed Paper
3
2
Finisher
3 4 5
ADF Tray
Your Machine
Getting To Know
Misfed Paper
6
8
3
9
NOTE:
If the misfeed indicator(s) do not clear,
open the upper cover and remove all
misfed paper.
When using the Staple Sort, Shift-Sort
or Shift-Group mode, remove the
remaining copies on the staple tray.
Then the copy job will restart.
17
Page 18

Before Starting
Energy Star
As an ENERGY STAR® Partner, Panasonic has determined that this product meets
the ENERGY STAR® guidelines for energy efficiency.
This voluntary program specifies certain energy consumption and usage standards.
This product will automatically “power down” after a specified period of non-use. The
use of this ENERGY STAR® compliant product will reduce energy consumption and
ultimately benefit the environment.
The default functions can be adjusted depending on your office requirements.
Please ask your authorized Panasonic dealer for more details.
18
Page 19
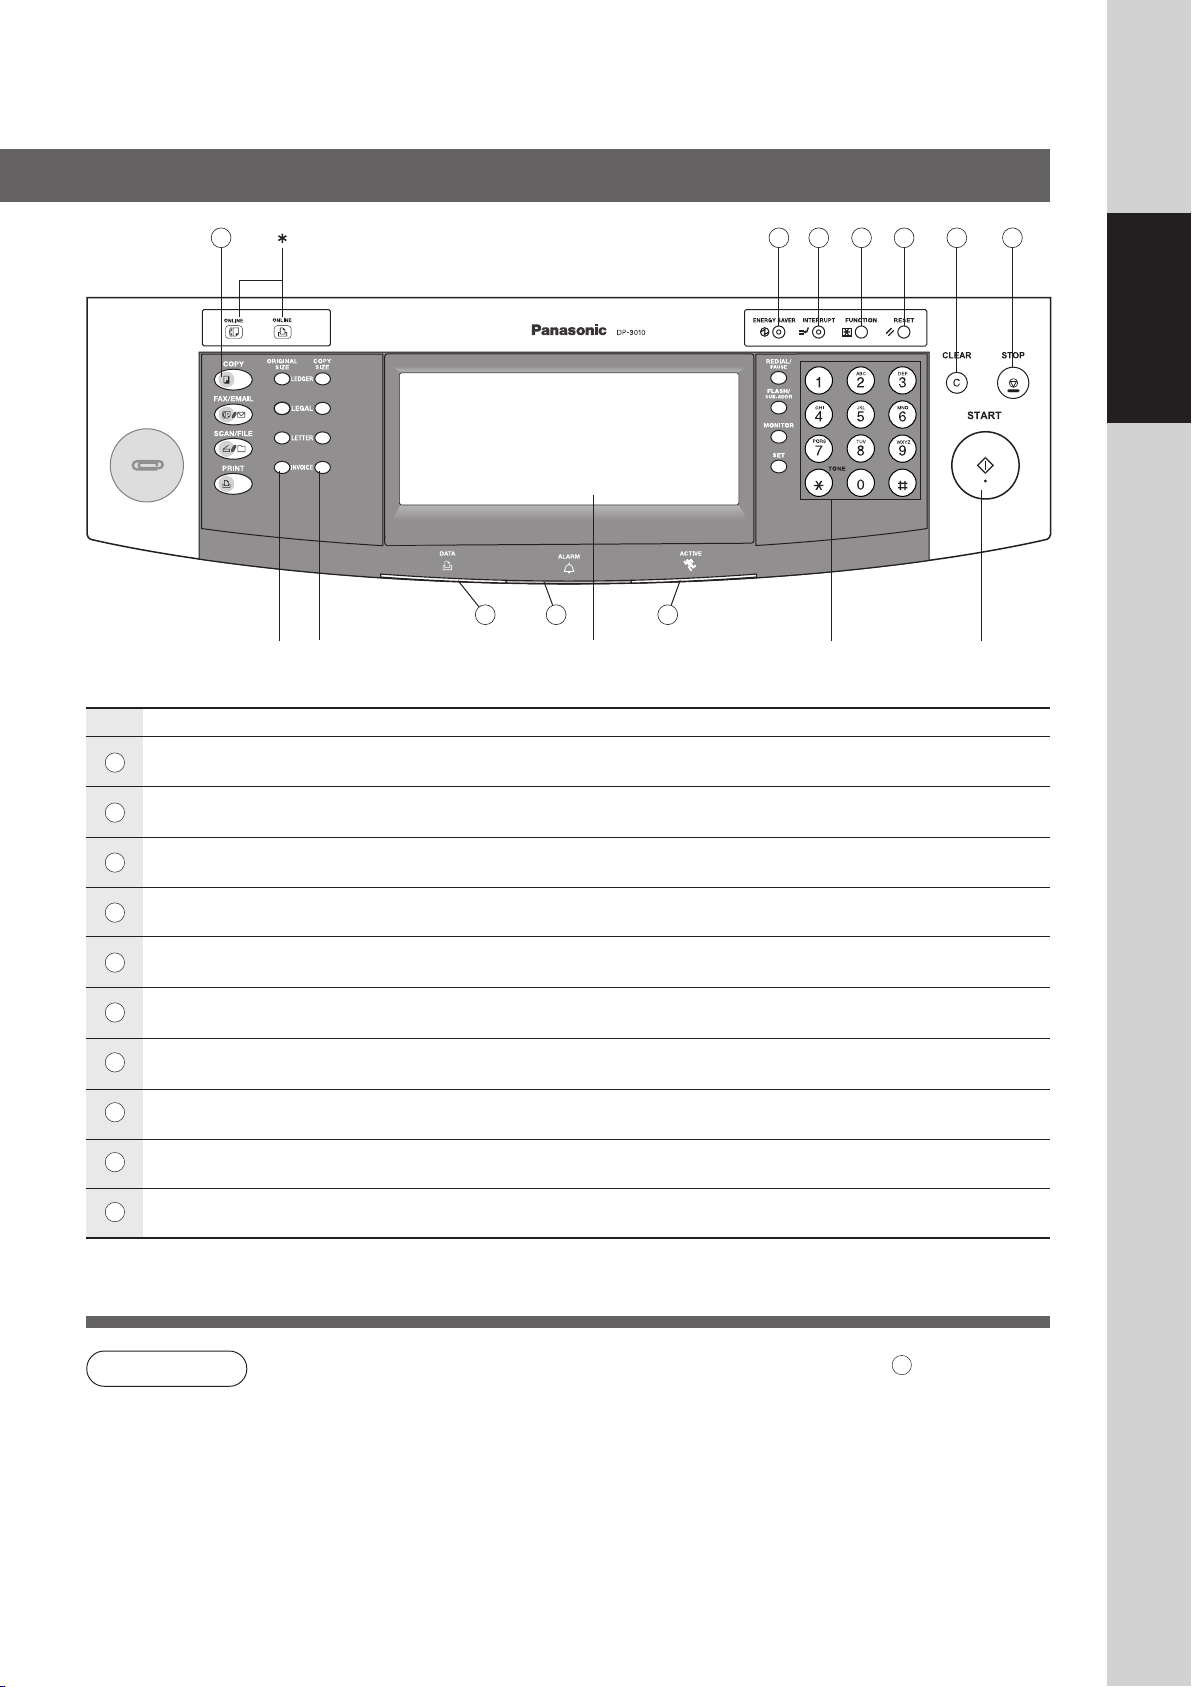
1 2 3 4 5 6 7
10
8 9
Control Panel
Before Starting
ORIGINAL
SIZE Keys
No.
COPY Key
1
● To use the unit as a photocopier.
ENERGY SAVER Key
2
● Saves power while the copier is not in use.
INTERRUPT Key
3
● Interrupts other copy or print jobs while making copies.
FUNCTION Key
4
● Use when changing the paper size, initial function values (default values) and key operator settings.
RESET Key
5
● Resets all features to the initial power-on state.
CLEAR Key
6
● Clears the copy count in the display.
STOP Key
7
● Stops the copy run.
ALARM LED (RED)
8
● Lights when trouble occurs.
ACTIVE LED (GREEN)
9
● Lights when machine is active.
PRINT DATA LED (GREEN)
10
● Lights when receiving print data.
COPY SIZE
Keys
∗∗
Touch Panel
Display
Contents
Keypad START
Key
Fax/Email "ON LINE" LED for optional Fax/Internet Fax functions
∗
Print "ON LINE" LED for Printer function
When the machine detects a problem or an alarm status is activated, the 8 Alarm LED lights
NOTE
∗∗
or begins to flash.
LED Lights: Machine detected a trouble status
• No paper in the selected tray or toner has run out.
• Machine detected trouble, such as paper misfed or jammed.
LED Flashes: Machine detected an alarm status
• No paper in the Tray. (Tray not selected)
• Toner is getting low, etc.
● The Control Panel displayed above shows only copier functions. Please refer to the appropriate operating instructions for other control panel functions.
19
Page 20
Before Starting
1 2 3 4 5 9
10
2224 23
12
15
16
20
21
17
18
28
27
26
25
29
13
14
11
8
6 7
19
Touch Panel Display
NOTE
● Use only soft finger pressure to activate the Touch Panel Display. DO NOT USE SHARP
OBJECTS such as pens, fingernails etc., as this may damage the panel.
● Touch Panel Display Brightness Adjustment:
To adjust the brightness of the Touch Panel display, press and while holding down the "C"
(CLEAR) key, keep pressing the "ORIGINAL SIZE/LEDGER" or the "COPY SIZE/LEDGER"
keys until the desired brightness is achieved.
ORIGINAL SIZE/LEDGER : Dimmer
COPY SIZE/LEDGER : Brighter
20
Job Status Indicator
Ex.: Copying 3 sets.
The Indicator displays the progress of a job task as follows:
0/3 → 1/3 → 2/3 → 3/3
Page 21
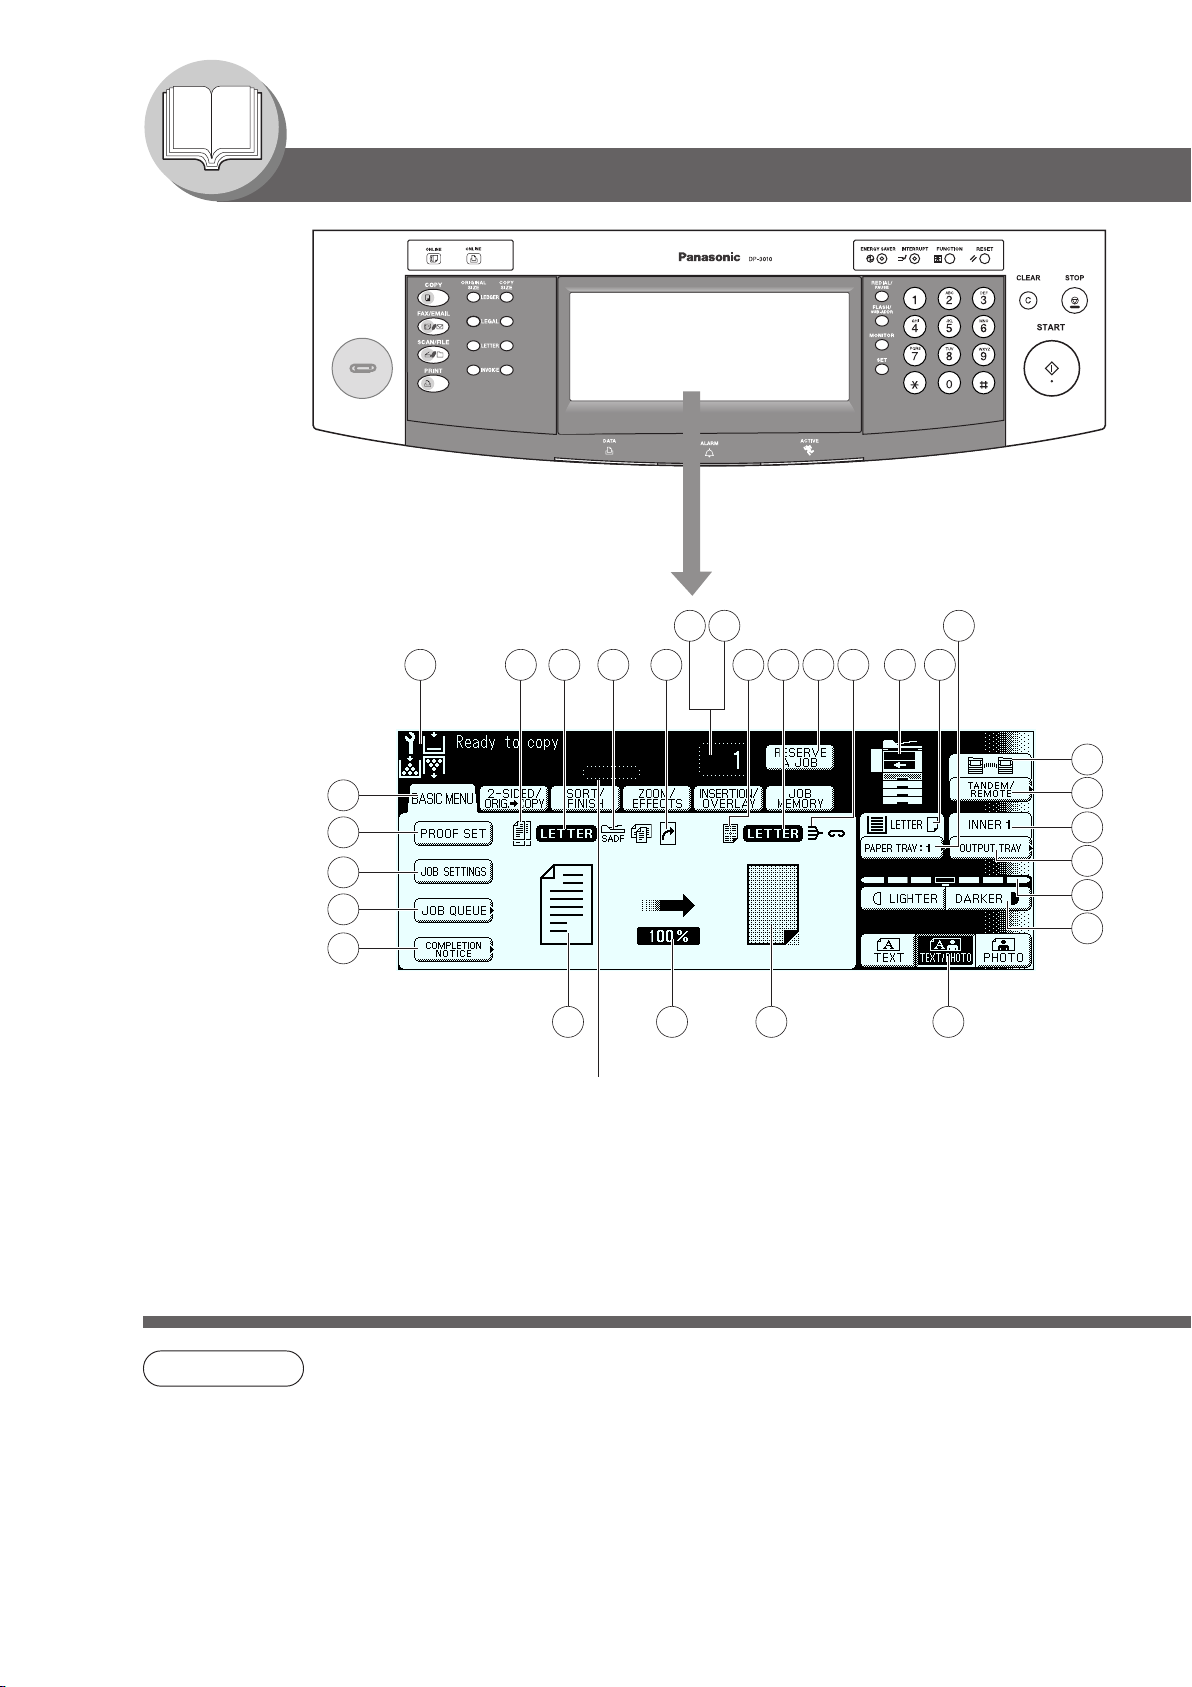
■ Touch Panel Display Indications
No.
Warning Indications 10 - 13
1
: Add Toner : Add Paper : Call Service (Call your Service Provider) :
Original Icon —
2
Original Size Indication —
3
Job Build and SADF/Multi-Size Feed Mode Indication 34, 35
4
Rotate Mode Indication —
5
Number of Copies / Original(s) —
6
Machine / User Error Code Indication (E1-01, U13, etc.) 12, 13
7
Copy Icon —
8
Copy Size Indication —
9
Reserve a Job Button 49
10
Finisher Functions Indication 37
11
Machine Outline with Tray Selection (Paper Tray and Output Tray) —
12
Paper Level and Size Indication —
13
Paper Tray Selection Button —
14
Ta ndem/Remote Button Indication 25
15
Tandem/Remote Button 25
16
Output Tray Indication 11
17
Output Tray Button 11
18
Density Indicator (7 steps) 11, 23
19
Manual Exposure Select Buttons (Lighter and Darker) 11, 23
20
Original Mode Select Button (Text; Text / Photo; Photo) 11, 23
21
Copy Image and Paper Image Indication —
22
Copy Ratio Indication —
23
Original Image Indication —
24
Completion Notice Button 29
25
Job Queue Button 28
26
Job Settings Button —
• Selected copy jobs will be indicated on the right side of the touch panel display.
27
(2-Sided/Original → Copy, Sort/Finish, Zoom/Effects, Insertion/Overlay modes)
Proof Set Button 25
28
Function Categories —
29
Contents See Page
Waste Toner
Before Starting
21
Page 22
Making Copies
100%
Inappropriate Originals
● Paper with a smooth surface such as glossy
and coated papers
● Transparencies
● Originals with a Lead Edge that is “creased”,
“folded”, “punched” or “glued”
● Paste-ups
● Pressure sensitive or carbon backed papers
● Paper with excessive curl
● Stapled originals
● Freshly printed copies from a laser printer
Upper Limit
Indicator
345
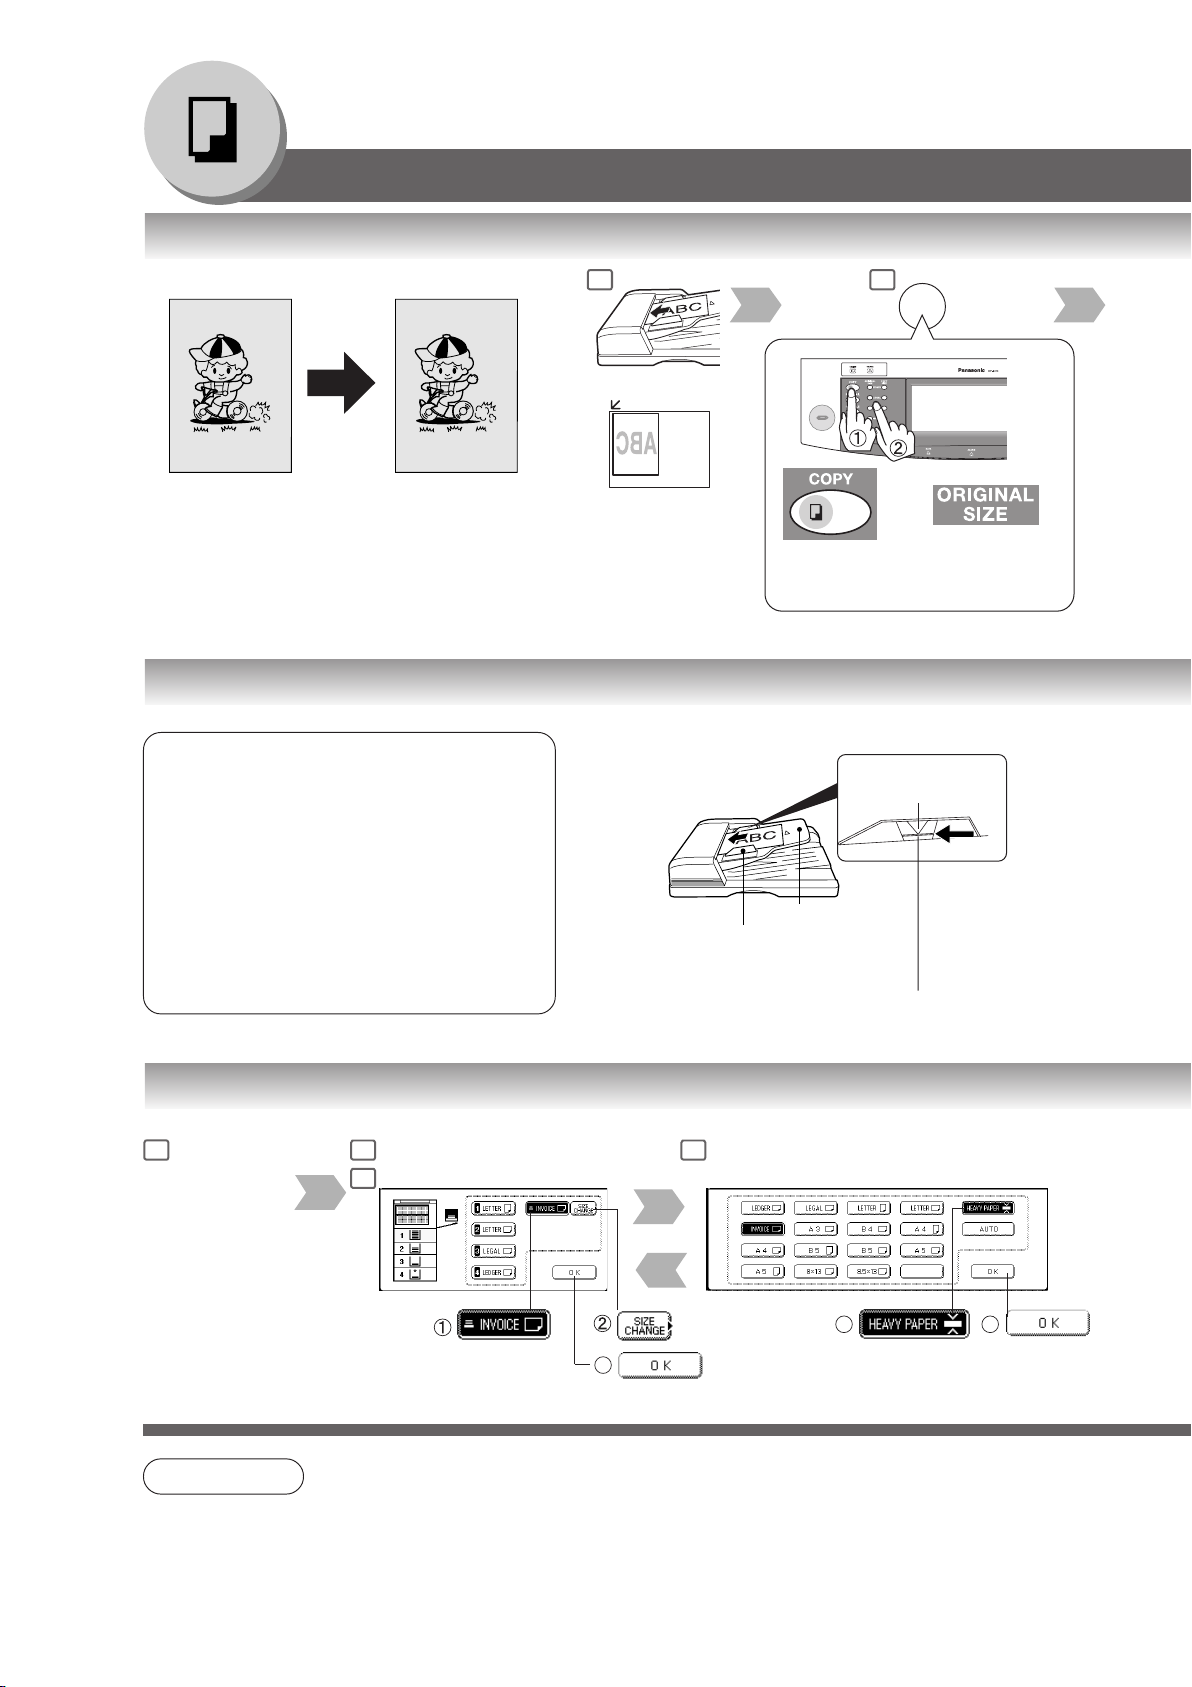
Basic Menu
■ Copying the Same Size Originals (1:1)
Copy size is automatically selected.
1 2
or
■ Using the ADF
ADF
ADF Tray
Original Guides
Adjust to the original’s width
Set the originals up to the upper limit indicator
■ Copying on Heavy Paper (Post Cards, etc.) (35 lb max.)
If set in other
function mode
If original size
is not detected
1 2 3
Load paper
on the Sheet
Bypass
22
NOTE
● During the copy operation and after making copies, the fan motor may start spinning. This is a
normal operation and is used to cool down the copier.
Select Sheet Bypass and
touch the Size Change button
4
Select Heavy Paper
Page 23
3 4
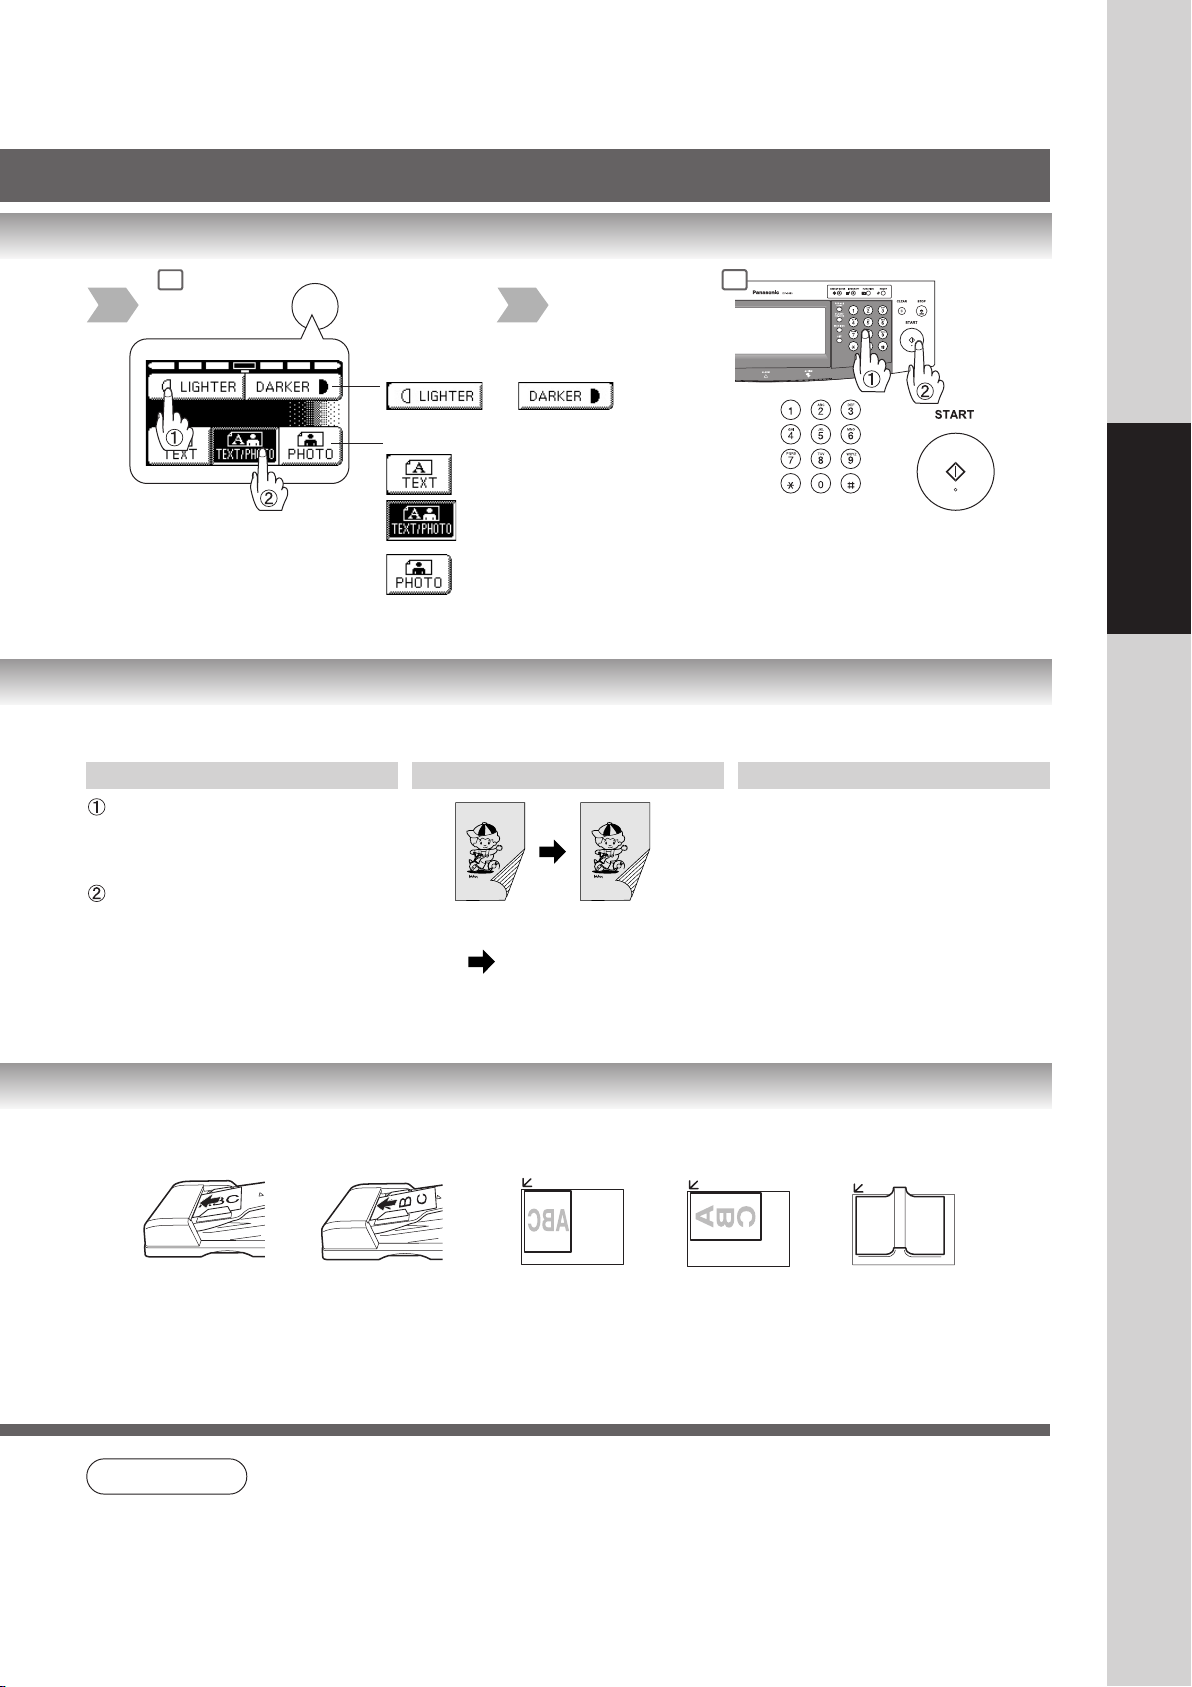
Adjust the Manual Exposure
or
Select type of Original(s)
Mainly Text
Text and Photo
combined
Mainly Photo
Number of Copies
(Max. 999)
Features
Automatic Original Feeding Duplex Copying Insertion/Overlay
Feeds originals automatically
Up to 50 Letter size (20 lb)
(up to 30 Legal or Ledger size)
Automatic original size detection
Invoice to Ledger
2-Sided originals
2 or 1-Sided copy
automatically
(See pages 30 and 31)
• Cover
• Page Insertion
• OHP Interleaving
• Presentation
• Overlay
(See pages 44-47)
Making Copies
■ Position of the original(s)
From ADF/i-ADF From Platen
NOTE
● Memory Capacity:
If the memory becomes full during original scanning, the message “Cannot Complete / Job
Exceeds Memory Capacity” will be displayed on the LCD. If this occurs, follow the instructions
on the LCD.
When additional memory is required, consult with an authorized service provider.
23
Page 24

Making Copies
100
copies
50
copies
50
copies
+
100 copies
2
1
100
Basic Menu
■ Copying with Preset Ratios
1 2
Letter
or
Ledger Letter
Ledger
■ Proof Copying
Allows you to make one proof set, before
proceeding to copy a large multi-set with
various settings.
Proof copy
Multi copy
or
If original size
is not detected
1 2
or
Select Copy Job settings
■ Tandem/Remote Copying
Requires installation of optional Hard Disk Drive (DAHD30) and additional Image Memory (DA-SM16B/
SM64B/SM28B), Network setup (See pages 56 and
62) and Parameter registration. (See page 26)
Remote Copying
Tandem Copying
This copier
24
NOTE
● If the desired copy size is different from the paper size loaded in the Paper Tray, use Sheet
Bypass. (See page 10)
The selected Remote printing copier, must be either DP-2310 or DP-3010.
For the copier to function as a Remote/Tandem Copier it has to be setup in advance.
1 2
or
Other copier
Select Copy Job settings
5
Other copier
or
Station
Page 25

For Tandem
For Remote
3 4
The Correct ratio is automatically selected.
Reduction and enlargement ratios (%)
ORIGINAL
SIZE Ledger Legal Letter-R
Ledger 100 77 65 50
Legal 121 100 79 61
Letter-R 129 100 100 65
Invoice-R
200 155 129 100
COPY SIZE
Invoice-R
3 4 5
Number of Copies
(Max. 999)
Number of Copies
(Max. 999)
Making Copies
If the Proof copy is OK,
the remaining number
of sets will be printed.
or
If the Proof Copy is NG,
again, place the originals
back on the ADF (or
Platen) and try again.
3 4
Number of Copies
(Max. 999)
6 7
● Press the PROOF SET button again if the Proof Copying mode was reset.
NOTE
5
25
Page 26

Making Copies
Basic Menu
■ Tandem/Remote Copy Settings (Registration 1)
Input the Key Operator ID Code if required.
1
4
Input ID Code
(4-digit)
7
By default, the key name will
∗
be up to 15 characters of the
station’s name.
Enter the key name
(up to 15 characters).
∗
■ Tandem/Remote Copy Settings (Registration 2)
If either DP-2310 or DP-3010 is installed
on a Network with a different subnet mask,
the DP-2310 or DP-3010 must be registered first, before being able to use the
Tandem/Remote Copying function.
5 6
1 2
Scroll to
04/04
■ Tandem/Remote Copy Settings (Editing)
To edit the registered machine’s settings
(IP Address, machine name or key name).
1 2
Open the screen
04/04 same as
the Registration
procedures above.
IP Address
Ex: 123.123.12.1
When entering a 1 or 2-digit number
segment, add “00” or “0” in front of the
number, to scroll to the next segment of
numbers or press the “
period after the number.
“ key to enter a
■ Tandem/Remote Copy Settings (Deleting)
To delete the registered machine.
1 2
Open the screen
04/04, same as
the Registration
procedures above.
26
Page 27

2 3
5 6
Scroll to 07/08
Button Names on the Keyboard
To input upper case letter(s).
To input numbers and/or symbols.
3 4
Scroll to
02/02
4
7
Machine name
(up to 15 characters)
To move the cursor (_) to the left or right side.
To erase the character before the cursor.
Making Copies
Scroll to
04/04
7
Input ID Code
(4-digit)
8
Enter the machine and key
name, same as the Registration
procedures above.
3 4 5
Enter the new IP Address,
same as the Registration
procedures above.
Select the registered
machine name
3 4
5
Enter the machine and key
name, same as the
Registration procedures
above.
Select the registered
machine name
27
Page 28

Making Copies
Job
1
Job
2
Job
3
Job 3
Job 1
Job 2
Deleted
Basic Menu
■ Job Queue
Refers to a list of jobs waiting to print, delete
or change of priority (only for print job).
1
4
∗∗
Select the job(s)
■ Completion Notice
A Job Completion Notice via a pop up screen on the
Desktop of your PC when the Copy Job is completed.
Before using the Completion Notice, install the
Panasonic-DMS included with the machine.
Copy is completed.
Pop up screen
Select the job(s)
you wish to delete
You can select to delete multiple/all jobs.
∗
Priority can be selected for print jobs only
∗∗
when the optional HDD is installed.
1 2
Select Pop up
Display
∗
Right click the
Status Monitor icon
or
28
NOTE
● The PRINT JOB QUEUE requires the Key Operator’s Password, however, the COPY JOB
QUEUE does not require a password.
The Job Queue selection function is only available when the optional HDD is installed.
Page 29

2 3
Input password
(4-digit)
5 6
3 4 5
4
Making Copies
2 times
NOTE
Select the desired
PC Address
● This Completion Notice is available only when connected to the Network.
To reset the Completion Notice, press the CANCEL button.
Number
of Copies
29
Page 30

Making Copies
Bottom right
position
Upper right
position
or
2-Sided/Original Copy
■ 1-Sided 2-Sided, 2-Sided 1-Sided, 2-Sided 2-Sided Copy
1-Sided 2-Sided
Copy
1 2
2-Sided
Copy
2-Sided
● Duplex Notice Function
“2-SIDED PRINT” is printed on 1-Sided copy.
1-Sided
2-Sided Copy
or
Reduction/
Enlargement
only
(1 2 Copy only)
■ Book 2-Sided Copy
Book 2-Sided Copy
(1st Page BLANK)
(1st Page IMAGED)
● Duplex Notice Function
“2-SIDED PRINT” is printed on 1-Sided copy.
Blank Page
1 2
Platen
Ex : Ledger size original
Book Mark
Letter
Ledger
∗∗
∗ Center book by length and
∗∗
width according to center
marks only for Ledger size.
∗
Ledger
Reduction/
Enlargement
only
30
Page 31

3
4
2-SIDED PRINT
2-SIDED PRINT
3
4
3 4 5
or
or
Bind position
or
4
Number
of Copies
When clearing the
2-Sided Copy:
If required
or
Original format Copy format
or
3 4 5
6
From Platen:
When "Last Original?"
message is displayed.
Ex: 2 originals
Touch "NO" button.
Place next original on
the platen.
Press Start Key.
Touch "YES" button.
When DUPLEX NOTICE
is selected.
Making Copies
Number
of Copies
or
If required
or
or
6
When "Last Original?"
message is displayed.
When DUPLEX NOTICE
is selected.
Ex: 2 originals
To uch "NO" button.
Place next original on
the platen.
Press Start Key.
Touch "YES" button.
31
Page 32

Making Copies
123
564
6
4
5
3
1
2
3
4
12
43
1
2
3
4
14
23
1
2
2-Sided/Original Copy
■ 2 Page Copy
Copying two facing pages or a Ledger size original
on two separate Letter size sheets.
■ N in 1 Copy
From two/four/six 1-Sided originals, side by side,
to 1-Sided pages.
1
Platen
Example: Ledger size original
Ledger
Letter
Ledger
1 2
2
● 2 in 1 Copy
● 4 in 1 Copy
● 6 in 1 Copy
● 2-Sided Copy
From 4/8/12 1-Sided originals, side by side, to
2-Sided copies.
■ Booklet Copy
Formats the output in a manner so that
documents can be folded like a book.
or
6
∗∗
Number
of Copies
From Platen:
Same Procedures as for 2 Page Copy
1 2 3
Letter or Invoice originals only
Default copy size is Re-
32
Reduction/
Enlargement
only
∗
duced, copy size can be
selected as 100 % or
Reduced.
Page 33

3
4
3 4 5
2-SIDED PRINT
Copy Format
or
Number
of Copies
When "Last Original?" message is displayed.
Ex: 2 originals
To uch "NO" button.
Place next original on the
platen.
Press Start Key.
Touch "YES" button.
3 5
∗
Original
N in 1 mode
or
or
● Copy is automatically reduced.
2 in 1: 65 %, 4 in 1: 50 %, 6 in 1: 38 %
(ex. Letter to Letter- size)
direction
ex. 2 in 1
or
Copy
layout
or
4
∗
Binding position
or
When N in 1 Copying a 2-Sided copy.
∗
"2-SIDED PRINT" will be printed on the copy
when "DUPLEX NOTICE" is selected.
Making Copies
6
Reduction/
Enlargement
only
When 2 in 1 copying with different
original size, select desired copy
size with COPY SIZE Key
(not PAPER TRAY button on the
LCD Touch Panel).
4 5
Number
Binding
position
Cover mode and
Paper Tray
or
of Copies
33
Page 34

Making Copies
50
80
1
51
80
1
Originals: 50 sheets <1st scan>
Originals: Remaining 30 sheets <2nd scan>
1
st
and 2nd Scanned Data
are combined into one job.
5 sets of 80 sheets sorted
copies are printed
2-Sided/Original Copy
■ Multi-Size Feeding
Use this function when copying mixed Ledger/Letter
size originals using the ADF. Original size can be
detected automatically then can be copied full size
(1:1) or same size.
Combination of Multi-Size Feeding
Originals
Legal Legal Letter-R/Invoice Ledger
Letter-R Letter-R Letter-R/Invoice Ledger
Ledger Ledger Letter/Letter-R
Letter Letter Letter/Letter-R
Full Size Reduction
Copies
Enlargement
1
2
—
Reduction/
Enlargement
only
■ Job Build and SADF Mode
Special originals (like thin paper, etc.) can be fed
from the ADF Tray and copied continuously using
the Job Build and SADF Mode.
Example: To make 5 sets of sorted copies of
80 sheets of originals. (Letter size)
1
Place one Original
at a Time or up to 50
sheets (20 lb)
30 sheets/Legal,
∗
Ledger
∗
1
Place the first 50 sheets
of originals on the ADF
Tray.
2
Reduction/
Enlargement
only
2
34
NOTE
● Multi-Size Feeding Function cannot be combined with another 2-sided/original copy function.
● Job Build and SADF function cannot be combined with 2
1 and 2 2.
● Optional Image Memory or Hard Disk Drive (DA-HD30) may be required.
Page 35

4
3
Number
of Copies
Making Copies
4 5 6
3
Select Sorting/Finishing settings
or
or
etc.
4 5 63
Number
of Copies
Number of
Copies
(ex. 5)
Place the next original
within 5 sec. of last
ejected copy.
If “Another Original? YES or
NO” message is displayed,
touch the “NO” button.
Place the next original within
5 sec. of last ejected copy.
(30 sheets)
If “Another Original? YES or
NO” message is displayed,
touch the “NO” button.
35
Page 36

Making Copies
1
1
1
Sort
Staple Sort
Non-Sort
Rotate-Sort
1
1
1
Rotate-Group
3
1
2
Shift-Sort
Shift-Group
1
1
1
3
1
2
P
P
ADF
Platen
Staple Position
Sort/Finish
■ When using Sort Mode
Multiple copy sets are sorted
automatically.
1
or
Multiple copy sets are sorted
automatically and stacked in
alternate direction (rotate).
(Letter size only)
Multiple copies of individual
pages are stacked in alternate
direction (rotate).
(Letter size only)
When optional 1-Bin Finisher
(DA-FS300) is installed.
Offset using electronic sorting
(Letter, Letter-R, Legal, Ledger)
36
When optional 1-Bin Finisher
(DA-FS300) is installed.
Offset using electronic sorting
(Letter, Letter-R, Legal, Ledger)
When optional 1-Bin Finisher
(DA-FS300) is installed.
Sort by stapling sets.
Up to 30 sheets.
(Letter, Letter-R, Legal, Ledger)
Copy is stored on the Tray.
Page 37

2 43
Reduction/
Enlargement
only
1-Bin Finisher (DA-FS300)
Sort mode
or
or
or
When the optional 1-Bin Finisher is installed,
this screen will change as follows:
For DA-FS300
Number
of Copies
Making Copies
Bin
● Electronic Shift-Sort
● When copying with Legal/Ledger
size, pull out the bin until it stops.
● Paper Capcity (20 lb Paper)
Paper Size Non-Sort/Rotate Shift Staple
Letter 500 500 10 to 30 Sheets: 45 to 16 Sets
(Max. 30 Sheets/Shift) 2 to 9 Sheets: 70 to 50 Sets
Legal, Ledger 250 250 10 to 20 Sheets: 25 to 12 Sets
(Max. 20 Sheets/Shift) 2 to 9 Sheets: 70 to 28 Sets
● Overflow
oF
When overflow indicator appears on the display,
remove excess copies from the bin, then press any
mode key on the control panel to reset.
oF
or or
Ex: Letter Size
∗
10 Sheets: 45 Sets
30 Sheets: 16 Sets
∗
37
Page 38

Making Copies
25%
400%
Zoom/Effects
■ Zoom
Copies with variable zoom ratios from 25 %
to 400 % in 1 % increments.
■ Auto Zoom
The copy Zoom Ratio adjusts automatically to the
selected paper size.
1 2
or
1 2
Fit to paper length or width
Fit to paper length and width
■ Edge
Creates a blank edge.
■ Book
Eliminates dark inner binding shadows.
Opening the ADF
1 2
or
1 2
ATTENTION
NOTE
38
Platen
Letter
Ledger
●
If using the keypad to set the zoom ratio, press the CLEAR key first to reset the current zoom ratio.
When changing the paper size after setting the zoom ratio, use the PAPER TRAY button.
● For Auto Zoom
An incorrect exposure may occur when there is a black line at the edge of the original or an
image which the copier interprets as a black pattern in the skyshot mode.
An incorrect position detection of the original may occur when a strong light shines onto the
glass during skyshot mode.
Ledger
Page 39

Same vertical and horizon-
3
tal ratio
25% - 400%
or Keypad
or
or
Different vertical and
horizontal ratio
or
25% - 400%
or Keypad
4
Number
of Copies
or
3 4 5
Paper Size
Fit to paper length or
width
Fit to paper length
and width
Same vertical and horizon-
3
tal void value
5 - 99 mm
or Keypad
or
or
(Paper Tray)
Different vertical and
horizontal void value
or
5 - 99 mm
or Keypad
or
Making Copies
Number
of Copies
4
Number
of Copies
3 4
5 - 99 mm
or
or Keypad
NOTE
● Zoom Ratio
If using the keypad to set the zoom ratio, press the CLEAR key first to reset the current zoom
ratio.
Number
of Copies
39
Page 40

Making Copies
Zoom/Effects
■ Margin
Shifts image to right, left, up or down.
■ Centering
Copy image can be centered automatically on
selected paper.
1 2
or
1 2
■ Image Repeat
Creates continuous copy image on one sheet.
Minimum original size: 20 x 20 mm
■ Inverse
Negative/Positive image can be created for
special effects.
Opening the ADF
1 2
Opening the ADF
The dotted line can be set to
“None” or “Print” by Function mode
(See page 53).
1 2
or
40
NOTE
● In Centering and Image Repeat mode, make copies with the ADF open.
● Remove the originals from the ADF before selecting the Centering and Image Repeat mode.
An incorrect position detection of the original may occur when a strong light shines onto the
glass during the Centering and Image Repeat mode.
Also an image which the copier interprets as a black pattern in the Centering and Image
Repeat modes.
Page 41

3 4
5 - 99 mm
Margin area
or
or Keypad
3 4
If a part of the copied image
is missing when using the
Margin mode, change the
Margin Reduction setting to
Yes. (See page 52)
Number
of Copies
Making Copies
Paper Size
(Paper Tray)
3 4
Paper Size
(Paper Tray)
3
Number
of Copies
Number
of Copies
Number
of Copies
41
Page 42

Making Copies
1/8
-1-
01/05/2003
001
Zoom/Effects
■ Stamping (Page Numbering)
Page numbers can be automatically stamped
on each page.
1 2
The page numbering
format can be changed in
function mode.
Default format is "-n-".
(See page 53)
■ Stamping (Date Stamp)
The date can be automatically stamped on each
page.
ADF only
1 2
ADF only
∗
∗
■ Stamping (Issue Number Stamping)
An issue number can be automatically stamped
on each page.
When copying with the Stamping mode combined with N in 1 mode, the Stamping mode can be
NOTE
∗
used from the platen.
42
1 2
ADF only
∗
Page 43

3 4
ORIENTATION
Stamping start page
or
Stamping position
From 1, 2 or 3
From 3rd page
From 2nd page
From 1st page
3 4
ORIENTATION
Stamping position
or
Changing the stamp date
Number of Copies
(Max. 999)
● Multiple copy sets will be
sorted automatically.
Making Copies
Number of Copies
(Max. 999)
● Multiple copy sets will be
sorted automatically.
3 4
ORIENTATION
or
Stamping position Stamping the Issue Number
or
Keypad
Number of Copies
(Max. 999)
● Multiple copy sets will be
sorted automatically.
43
Page 44

Making Copies
OHP2
2
1
+
(2)
(1)
+
OHP(2)
OHP2
OHP(1)
(2)
(1)
2
1
+
(2)
(1)
+
OHP1
OHP1
OHP2
2
1
+
OHP(2)
OHP2
OHP(1)
(2)
(1)
2
1
+
OHP1
OHP1
+
+
Insertion
Insertion
2
2
1
1
+
3
2
4
3
+
4
1
2
1
Insertion/Overlay
■ Cover
Adds Cover Page(s) to copies.
1 2
Original Blank
page
Blank page
Original Copied
page
Copied page
■ Page Insertion
Inserts Blank/Copied pages between copies.
Original Blank
Blank page
Original Copied
Copied page
page
page
Copied
page
ADF only
1 2
ADF only
■ OHP Interleaving
Inserts Blank/Copied pages between OHP film.
Original Blank
page
Blank page
Original Copied
page
Copied page
1 2
ADF only
■ Presentation
Inserts Blank/Copied pages between OHP film
and make copied sets for handouts.
Original Blank
page
Handouts
Blank page
Original
Copied
page
Copied page
44
NOTE
● Certain types of transparency film may not be compatible and may damage your machine.
Consult with an authorized Panasonic dealer for advice regarding non-standard paper types.
(Panasonic has tested "3M PP2500" transparency film and found it to be compatible.)
1 2
ADF only
Handouts
Page 45

3 4
Cover Page mode
Cover (Front) Cover (Front+Back)
Blank
Copy
Paper Size
Paper Tray
∗
Number of Copies
(Max. 999)
3 4 5
Page Insertion mode
Blank
Copy
Paper Size
Paper Tray
3 5
Load OHP film onto
the Sheet Bypass
∗
Set the insert page position with
Keypad
If selecting other position, move
the sheet with
set the insert page position with Keypad
∗∗
/ button, then
4
Making Copies
Number of Copies
(Max. 999)
OHP Interleaving mode
Blank
Copy
3 5
Load OHP film onto
the Sheet Bypass
NOTE
4
Presentation mode
Blank
Copy
The size and orientation of the printed copy and recording paper should match.
∗
Blank page to be inserted before the indicated selected page number.
∗∗
Paper Size
Paper Tray
Paper Size
Paper Tray
∗
∗
Number of Copies
(Max. 999)
Number of Copies
for handouts
(Max. 999)
45
Page 46

Making Copies
Insertion/Overlay/Job Memory
■ Overlay
Overlays a second image onto the first by using
a second original.
1st-page
■ File Edit
Up to three∗ editing functions
available in the Form Overlay
feature.
1 2 3
1 2
or
∗
:To Add a new file
(HDD = Max. 5 files)
∗
:To Erase a
registered file
∗
:To Change the
title of a file
∗
or
(Register only)
■ Form Overlay
Overlay an image stored in memory onto the copy.
File
∗∗
Select a file
One image file can be registered.
∗
With the optional Hard Disk Drive (DA-HD30)
installed, up to 5 image files can be registered.
If the selected File Key already contains a
registered file image, the new image will overwrite
the current image.
Without the optional Hard Disk Drive (HDD) installed: After
∗∗
pressing the FILE EDIT button, the machine skips Step 3
and proceeds to Step 4 (Erase Mode).
1 2
or
■ Job Memory
Five Copy Jobs can be stored in Memory
(M1 to M5) for recall at a later time.
Set up the copy job
to be stored.
NOTE
46
● The File Edit function for selecting a file is only available when the optional Hard Disk Drive and
Image Memory (See page 65) is installed.
When the optional Hard Disk Drive is not installed, only one file can be selected.
● When an overlay image is not stored in memory, Form Overlay function is not selectable.
To store a job in memory
1 2
M1, M2, M3, M4, M5
Page 47

3
4
3 4 5
Density for second image
or
4 5
REGISTER
Density for
second image
or
ERASE
FILE NAME EDIT
4
3 4
Select a file
Number of Copies
(Max. 999)
To cancel the registration,
touch "CANCEL" button.
4 5
Enter the file name
Number of Copies
(Max. 999)
From Platen:
Same procedures
as for Form Overlay
6 7
From Platen:
If “Another Original? message is
displayed, touch the “NO” button.
Ex: 2 originals
Select the overlay image to store
into memory for later use.
or
Making Copies
File Name
Touch "NO" button.
Place the next original on the
Platen.
Press Start Key.
Touch "YES" button.
To recall a job stored in memory
1 2 3
or
Number of Copies
M1, M2, M3, M4, M5
NOTE
● JOB MEMORY mode will not be deleted even if the power switches are turned Off.
● When storing a new job into a programmed memory location, the previously stored job will be
overwritten and erased.
● M1, M2 can use as manual skyshot mode by setting the user function mode.
(Max. 999)
47
Page 48

Making Copies
1st job
1st job
2nd job
Reserve
Copy
2nd job
Other Features
■ Concurrent Copying
The next copy job can be reserved even if the
current copy job is not completed.
(Requires the optional Hard Disk Drive and Image
Memory (See page 65) to be installed)
1st job
1
or
■ Energy Saver (Power Save Mode, Sleep/Shutdown Mode)
These modes save power while the copier is not in use.
1 2
Power Save Mode
Enter
Indicator
Flash: Power Save Mode
Light: Sleep/Shutdown Mode
Sleep/Shutdown Mode
Automatically enters the Sleep/
or
Shutdown Mode after 15 minutes
from the last copy job.
Modes Power Consumption Warm Up Time
Normal Operation Approx. 140 Wh N/A
Power Save Approx. 28 Wh Approx. 30 sec.
Sleep Approx. 18 Wh 35 sec.
Shutdown Approx. 3 Wh 35 sec.
The machine will not go into Sleep/Shutdown Mode when the Weekly
Timer is selected.
∗∗
∗
∗∗
To clear
2
Select Function
■ Skyshot Mode
Skyshot allows copying a manuscript without generating dark borders even if the platen cover or ADF is opened.
Two types of Skyshot modes can be selected;
Digital Skyshot Mode : The scanning area (size) is not pre-determined.
Manual Skyshot Mode: The scanning area (size) is pre-registered into memory (M1 and M2) in advance.
Digital Skyshot Mode
NORMAL
Default setting (usually select this mode).
QUALITY
For better definition, select the Quality mode.
The default setting of Digital Skyshot Mode is
“NORMAL”. In this setting, the unit scans once.
If there are black areas around the borders in
the copies, set the Digital Skyshot Mode to
“QUALITY” to soften the dark borders. In this
setting, the unit scans twice.
(See page 52)
NOTE
48
∗∗∗∗
∗∗
∗∗∗∗
21
Opening the ADF
Number of Copies
(Max. 999)
Sleep Mode/Shutdown Mode and entering timer can be selected by the key operator.
∗
(See page 55)
When copying the Quality mode combined with 1 2, BOOK 2, 2PAGE, N in 1, “Quality”
∗∗
mode will be changed to “Normal” mode.
● An incorrect exposure may occur when there is a black line at the edge of the original or an
image which the copier interprets as a black pattern in the skyshot mode.
Page 49

3 4 5 6
Select
Function
or
Job Waiting List can be
confirmed with Job Queue.
(See page 28)
Scanning is completed
■ Interrupt Mode
This mode can interrupt other copy jobs while making copies.
Other Job set
1 2 3 4 5
Other Job is
completed
or
Manual Skyshot Mode
● Set 09 Manual Skyshot Mode in Copier Settings first. (See page 52)
1 2 3
Platen
UpperLeft
Corner
Making Copies
NOTE
Custom size
Default M1/M2 size can be changed
∗
by Function mode. (See page 57)
● If using ADF, place originals in the center position of ADF Tray. The ADF can feed only 14 - 28
lb plain paper.
● When using the manual skyshot mode, the M1 and M2 are turned On and other job requiring
memory cannot be used.
● An incorrect position detection of the original may occur when a strong light shines onto the
glass during skyshot mode.
∗
Number of Copies
(Max. 999)
49
Page 50

Function
General Settings: Changing the Initial Machine Modes
● Power On Default mode, Manually add toner, etc.
(See page 52)
For Key Operator:
Paper size, Finisher bin/Staple mode, Department
Counter, Network TCP/IP settings, etc.
(See pages 55 and 56)
■ Using Function Modes to Change the Initial Copy Modes
Options
General
Settings
General
Settings for
Key Operator
Copier
Settings
Input Identification (Key Operator ID) Code
Copier
Settings for
Key Operator
Printer
Settings
Printer
Settings for
Key Operator
Fax/Email
Settings
Fax/Email
Settings for
Key Operator
Scanner
Settings
■ Procedure
1 2 3
Select the desired Function Mode Select the desired Function
NOTE
50
● Please refer to the appropriate operating instructions manual for function settings on options.
Page 51

Copier Settings: Changing the Initial Copy Modes
● Default function of each copy mode
(See pages 52 and 53)
For Key Operator:
Paper size priority, Original mode, Contrast, Job Build
and SADF mode, Original size of Manual Skyshot
mode, etc.
(See page 57)
Printer Settings: Changing the Initial Printer Modes
● Default function of each print mode
(See page 54)
For Key Operator:
Job completion time, Page protection, Error page print,
Spool function, PS configuration, Font list print, Mailbox
data holding, etc.
(See page 58)
<When Optional accessories are installed>
Scanner Settings: Changing the Initial Scanner Modes
● Original mode, Compression mode, Resolution, Job
Build and SADF mode, Address book, etc.
(See page 53)
● The Completion Notice will work for other modes (i.e.
Copy, etc.) even if the Scanner Option not installed.
Fax/Email Settings: Changing the Initial Fax/Email (i-FAX) Modes
Refer to Operating Instructions (For Fax/Internet Fax
function).
When the Key Operator Mode:
Setting the Function Parameter
4 5 6
Identification Code
(4-digit)
Set the desired Function
Parameter(s).
Function
51
Page 52

Function
■ General Settings
Screen
No.
00 Power On Default Mode Selects mode. Copy
01 Manual Copy Quality Adj Sets to activate the manual density control. Off
01/02
02/02
02 Manual Add Toner Adds toner manually. Off
03 Sort Memory Status Indicates the sorting memory status. Off
04 Departmental Counter Indicates the department counter.
09 Key Operator Mode Input the Key Operator ID Code.
■ Copier Settings
Screen
No.
00 Margin Value Default Selects the margin shift value. 10 mm
Modes Function
● Copy, Printer, Scanner∗, Fax∗/Email
● Off, On
● Off, On
● Off, On
When the optional Network Scaner Module/Fax
∗
Communication Board is installed.
Modes Function
● 5 mm, 10 mm, 15 mm, 20 mm
Initial
Setting
∗
Consult with an
authorized service
provider
Initial
Setting
01/04
02/04
01 Edge Value Default Selects the edge width. 5 mm
● 5 mm, 10 mm, 15 mm, 20 mm
02 Book Value Default Selects the book void width. 20 mm
● 15 mm, 20 mm, 25 mm, 30 mm
03 Margin Reduction Def. Selects the reduction ratio in margin mode. No
● No, Yes
04 2-Sided Mode Default Function sets the duplex priority mode. No
● No, 1 to 2, 2 to 2, Book to 2
05 N in 1 Default Mode Selects the N in 1 default mode 2 in 1
● 2 in 1, 4 in 1, 6 in 1
06 Reduce N in 1 For Space Selects whether to disable edge deletion No
● No, Yes
07 Booklet Default Mag. Selects the booklet magnification Reduce
● 100%, Reduce
08 Digital Skyshot Mode Enables or disables the use of Skyshot mode. Normal
● No, Normal, Quality
09 Manual Skyshot Mode Enables or disables the use of Manual Skyshot. Off
● Off, M1 On, M2 On, M1&M2 On
52
Page 53

■ Copier Settings
Screen
No.
10 Auto Contrast Adjust. Automatically adjusts the copy density for text, Yes
11 Sort Priority ADF Selects the sort mode. Sort
03/04
04/04
12 Sort Priority Glass Selects the sort mode. None
13 Stamping Default Mode Selects the stamping mode. Page
14 Page Numbering Style Selects the page numbering style. -n-
15 Imag. Repeat Dotted Line Selects the dotted line. Print
19 Key Operator Mode Input Key Operator ID Code.
■ Scanner Settings
Modes Function
T/P.
● No, Yes
●
None (Non-Sort), Sort, Shift∗, Staple∗, Group
●
None (Non-Sort), Sort, Shift∗, Staple∗, Group
● Page, Date, Issue
● -n-, n/m
● None, Print
Shift, Staple and Group modes are available when
∗
the optional 1-Bin Finisher is installed and the
"Outer" is selected with the touch panel display.
Initial
Setting
∗
∗
Function
Screen
No.
01/02
02/02
Modes Function
00 Scanner Settings Print To print scanner settings. Start
● Stop, Start
01 Original Mode Default Sets the original setting. T/P
● Text, T/P (Text/Photo), Photo
02 Compression Mode Def. Sets the compression mode setting. JBIG
● MH, MR, MMR, JBIG
03 Resolution Default Sets the resolution setting. 600 dpi
● 150 dpi, 300 dpi, 600 dpi
04 Job Build and SADF Mode Sets the Job Build and SADF mode initial No
setting.
● No, Yes
05 Bind Edge 2-Side Orig. Sets the bind position, 2-sided original initial Long
setting.
● Long, Short
06 Add New Address To add new address. 0,0,0,0
● PC, DD, FTP
07 Edit Address Book To edit address book. (See page 68)
08 Delete Address To delete address.
Initial
Setting
53
Page 54

Function
■ Printer Settings
Screen
No.
01/04
02/04
Modes Function
00 Number of Prints Sets the initial number of prints. 1
● 1 ~ 999
01 Paper Size Sets the paper size setting. LETTER
● A3, B4, A4, B5, A5, LEDGER, LEGAL,
LETTER, INVOICE, 8 x 13, 8.5 x 13
02 Paper Tray Sets the Paper Tray setting. Auto
● Auto, Bypass, Tray 1, Tray 2, Tray 3, Tray 4
03 Print Direction Sets the print direction setting. Portrait
● Portrait, Landscape
04 Auto Tray Selection Sets the auto tray setting. On
● Off, On
05 2-Sided Print Sets the 2-sided print setting. Off
● Off, On
06 Bind Edge Sets the bind position. Long
● Long, Short
07 Resolution Sets the resolution setting. 600 x 600
● 1200 x 600, 600 x 600, 300 x 300
08 Font (PCL) Sets the PCL font. 0
● 0 ~ 99
09 Symbol Table (PCL) Sets PCL symbol table. 11
● 0 ~ 35
Initial
Setting
03/04
04/04
10 Pitch (PCL) Sets the PCL pitch. 10.00
● 0.44 - 99.99
11 Point Size (PCL) Sets PCL point size. 012.00
● 4.00 - 999.75
12 Lines/Page (PCL) Sets PCL lines/page. 60
● 5 - 123
13 Return Character (PCL) Sets PCL return character. CR
● CR, CR + LF
14 Mutual A4/LTR Converts A4 to Letter automatically. Off
● Off, On
15 Mailbox Memory Status Indicates the mailbox memory status.
● Memory, Box
16 Print Data Sets print data. Start
● Stop, Start
19 Key Operator Mode Input the Key Operator ID Code.
54
Page 55

For Key Operator
■ General Settings
Screen
No.
01/08
02/08
03/08
04/08
Modes Function
00 Print General Settings Prints the initial user settings of the common menu. Start
● Stop, Start
01 Paper Size Sets the paper size of each Paper Tray. Consult with an
● Ledger, Legal, Letter, Letter-R, Invoice, authorized service
A3, B4, A4, A4R, B5, B5R, A5, A5R, 8 x 13, provider
8.5 x 13
02 A4R/A5 Size Selection Sets the Sheet Bypass initial paper size. A4R
● A4R, A5
03 B5R/A5R Selection Sets the Sheet Bypass initial paper size. B5R
● B5R, A5R
04 Special Paper Tray 1 Sets the Paper Tray for special paper None
(ex: colored).
None, Paper Tray 1, Paper Tray 2, Paper Tray
●
3, Paper Tray 4, Sheet Bypass
05 Special Paper Tray 2 Sets the Paper Tray for special paper None
(ex: colored).
●
None, Paper Tray 1, Paper Tray 2, Paper Tray
3, Paper Tray 4, Sheet Bypass
06 Auto Paper Out Rotate Copier will automatically rotate image and print Off
when the selected Paper Tray is empty.
● Off, On
07 Copy Output Tray Sets the output Copy Tray. Inner 1
● Inner 1, Inner 2, Outer
08 Printer Output Tray Sets the output Printer Tray. Inner 1
● Inner 1, Inner 2, Outer
09 Fax/Email Output Tray Sets the output Fax/Internet Fax Tray. Inner 1
● Inner 1, Inner 2, Outer
10 Auto Reset Time Sets the Control Panel reset time. 1 min.
● None, 30 sec., 1 min., 2 min., 3 min., 4 min.
11 Power Save Mode Timer Sets the Power Save timer. 15
● 1 - 240 minutes
12 Sleep/Shutdown Select Sets the Sleep/Shutdown mode. Sleep
● Sleep, Shutdown
13 Sleep/Shutdown Timer Sets the Sleep/Shutdown timer. 15
● None, 1 - 240 minutes
14 Language Sel. Priority Selects the display message language. Off
● Off, On
15 Language Default Selects the display message language. English
● English, C. French, Spanish
16 TCH Panel Beep Sound Beep sound when the panel is touched. Soft
● Off, Soft, Loud
17 Original Set Beep Sound Beep sound when original is set on the platen. No
● No, Yes
18 Orig. Set In ADF Sound Beep sound when original is set in the ADF. Yes
● No, Yes
19 Dept. Counter Mode Monitors copy usage of each department Consult with an
(1) Printer usage of each document authorized service
(2) Print limit of each department provider
(3) ID code of each department
Initial
Setting
Function
NOTE
● The Key Operator ID Code is required before any changes can be made to items on this page.
55
Page 56

Function
For Key Operator
■ General Settings
Screen
No.
05/08
06/08
Modes Function
20 Date Time Setting Sets the registered date and time.
● Month, Day, Year, Time
21 Weekly Timer Sets the weekly On/Off timer. Off
● Off, On (Set)
22 Daylight Time Sets the daylight time. Yes
● No, Yes
23 DHCP Default Sets the DHCP. Yes
● No, Yes
∗∗
∗∗
∗∗
∗∗
0. 0. 0. 0
0. 0. 0. 0
0. 0. 0. 0
Yes
24 TCP/IP Address Sets user IP address.
● 3 digits x 4
25 TCP/IP Subnet Mask Sets the subnet mask.
● 3 digits x 4
26 TCP/IP Default Gateway Sets the gateway address.
● 3 digits x 4
27 DNS Server Address Sets the DNS server.
● No, Yes
28 MAC Address Indicates the MAC address.
29 Hard Disk Format
Selects the HDD format Stop
∗
● Stop, Start
Initial
Setting
07/08
08/08
30 Hard Disk Error Check Selects the HDD error check Stop
● Stop, Start
31 Address Book Group ID Inputs address book group ID. 0
● 0 ~ 99
32 Tandem User Parameter Inputs the Tandem User Parameter.
33 Community Name (1) Selects to change the SNMP of Community public
Name (1).
● Enables read only.
34 Community Name (2) Selects to change the SNMP of Community public
Name (2).
● Enables read/write.
35 Device Name Input the device name when required.
(For Status Monitor/EtherTalk Machine Name)
36 Device Location Input the device location when required.
(For Status Monitor)
∗∗
∗∗
∗∗
Panasonic
DP-2310 or DP-3010
∗∗
56
NOTE
● The Key Operator ID Code is required before any changes can be made to items on this
page.
Not required in copying mode, but needed when installing options with advanced functions
∗
(See page 65).
When functions No. 24 to 27 and No. 33 to 36 are set, cycle the power by turning the Power
∗∗
Switch on the Left Side of the machine OFF and ON.
Page 57

■ Copier Settings
Screen
No.
01/04
02/04
Modes Function
00 Copier Settings Print Prints the copier settings. Start
● Stop, Start
01 Paper Size Priority Selects paper size priority LETTER
● LEDGER, LEGAL, LETTER, LETTER-R,
INVOICE, A3, B4, A4, A4-R, B5, B5-R, A5,
A5-R, 8 x 13, 8.5 x 13
02 Original Mode Default Selects original setting T/P
● Text, T/P (Text/Photo), Photo
03 Text Contrast Selects contrast for Text mode 4
● 1 ~ 7
04 T/P Contrast Selects contrast for Text/Photo mode 4
● 1 ~ 7
05 Photo Contrast Selects contrast for Photo mode 4
● 1 ~ 7
06 Overlay Contrast Sets the density (transparency) of the page 4
being produced in overlay mode.
● 1 ~ 7
07 Interleaving Default Selects OHP interleaving paper Blank
● Blank, Copy
08 Page Insertion Default Selects page insertion Blank
● Blank, Copy
Initial
Setting
Function
03/04
04/04
09 Cover Mode Default Selects cover paper F, Blank
● F, Blank, F, Copy
FB, Blank, FB, Copy
(F: Front, FB: Front + Back)
10 Job Build And SADF Mode Enables or disables the SADF function. Yes
● No, Yes
11 Maximum Copy Setting Determines whether to limit number of copies 0
(0-99). (No limit)
12 M1, Size Inputs the frequently used size in job memory 1. 70 x 160 mm
● X: 5~432/Y: 5~297 mm (X) (Y)
(See page 46)
13 M2, Size Inputs the frequently used size in job memory 2. 95 x 220 mm
● X: 5~432/Y: 5~297 mm (X) (Y)
(See page 46)
14 Memory Overflow Warning Selects performed task when the memory Print
overflow occurs
● Print, Cancel
15 Add New Tandem Desti. Inputs a new destination to split the copy job
16 Edit Tandem Destination Edits a copy destination
17 Delete Tandem Desti. Deletes a copy destination
NOTE
● The Key Operator ID Code is required before any changes can be made to items on
this page.
57
Page 58

Function
For Key Operator
■ Printer Settings
Screen
No.
01/03
02/03
Modes Function
00 Printer Settings Print Sets the printer status printout. Start
● Stop, Start
01 Job Completion Time Sets the job completion time setting. 180
● 1~ 999 sec.
02 Page Protection Compress automatically then printout. Off
● Off, On
03 Error Page Print Sets the error page printout. On
● Off, On
04 Spool Function Sets the spool function. On
● Off, On
05 Text Print Prints text page only. On
● Off, On
06 PS Configuration Print Sets the status page print of PS. Start
● Stop, Start
07 Font List Print (PCL) Sets the font list print of PCL. Start
● Stop, Start
08 Font List Print (PS) Sets the font list of PS. Start
● Stop, Start
09 Mailbox Data Holding Sets the automatic holding function of mailbox 7 days
10 Delete Mailbox Data Sets delete the mailbox data.
∗
data.
● Infinity, 1 day, 2 days, 3 days, 4 days, 6 days,
7 days
∗
● All, Before
Before
Initial
Setting
03/03
NOTE
11 Print Queue Delete Sets authorization to delete the print queue. Key op.
● Free, Key op. (operator)
12 AppleTalk Zone Name Inputs an AppleTalk Zone name.
● Maximum 32 characters
● The Key Operator ID Code is required before any changes can be made to items on this
page.
Functions 09 and 10 are available when optional Hard Disk Drive (DA-HD30) is installed.
∗
When function No. 12 is set, cycle the power by turning the Power Switch on the Left Side of
∗∗
the machine OFF and ON.
∗∗
58
Page 59

MEMO
Function
59
Page 60

Function
For Example
■ Changing the Auto Contrast Setting
You can select whether to automatically adjust the copying density for Text and Photo originals.
1 2 3
■ Changing the Paper Size
The Paper Trays are designed to accommodate Invoice, Letter, Letter-R, Legal and Ledger Size paper.
1 2 3
Scroll to
03/04
6 7 8
Paper Tray
Paper Size
■ Weekly Timer
Key Operator can administer the Weekly Timer. On/Off weekly timers.
1 2 3
Scroll to
02/02
9
Scroll to
02/02
6 7 8
End time
Input time
Ex.: 0800
60
Start time
Page 61

a
b
4 5
or
4 5
6
ID Code
(4-digit)
10 11 12
Pull out the Paper Tray Adjust the Paper Guides ( a / b ) Change the Paper Size Indicator
Note: It is recommended that the paper guide ( b ) is fixed in place with screws.
Consult an authorized service provider for details on how to fasten the guide.
4 5
ID Code
(4-digit)
Scroll to
05/08
9 10 11
Function
6
Input time
Ex.: 1700
61
Page 62

Function
6
For Example
■ Department Counter
The Department Counter feature can limit the number of copies, administer counters and Identification Code numbers for
each department. (Maximum Number of Departments: 300)
Contact your authorized service provider to enable the Department Counter feature.
1 2 3
Scroll to
02/02
For Total Counter
6
Displays the sum of all the
active department counters.
To clear the total counter, touch the
INPUT button, enter 0 and touch the
OK button.
Prints all the active
department counters.
For Identification Code
or
ID Code
(8-digit)
Select Page
Select Department
7
Input a Department Name (up to 25
characters) using the Keyboard and
touch the OK button. (See page 27,
How to use the Keyboard)
■ Network Settings
When the Parameter “23 DHCP Default” is set to “No”, the Key Operator must administer the Network settings manually.
1 2 3
or
Scroll to
02/02
5 6
Scroll to 05/08
or
Scroll to 06/08
Input an IP Address
Ex.: 192.168.1.100
When entering a 1 or 2-digit number segment, add “00” or “0” in
front of the number, to scroll to the next segment of numbers or
press the “
” key to enter a period after the number.
62
Page 63

4 5
ID Code
(4-digit)
6
Scroll to
04/08
For Department Counter
Select Page
Select Department
4
Clear the
counter (8-digit)
to “0”
For Maximum Prints
or
Select Page
Select Department
Maximum number
of Copies (8-digit)
Function
ID Code
(4-digit)
7 8
5
Turn the Power Switch on the Left Side
of the machine OFF and ON.
63
Page 64

Function
Next
Selections
2-SIDED/ORIG.
COPY
SORT/
FINISH
ZOOM/
EFFECTS
INSERTION/
OVERLAY
Others
1 1
1 2
2 1
2 2
Book 2
2 Page
N in 1
Booklet
Multi-Size Feeding
Job Build and SADF
Sort
Shift-Sort
Rotate-Sort
Staple-Sort
Shift-Group
Rotate-Group
Non-Sort
Zoom
Auto Zoom
Edge
Book
Margin
Stamping
Image Repeat
Centering
Inverse
Cover
Insertion
OHP Interleaving
Presentation
Overlay
Form Overlay
File Edit
Interrupt
Proof Copy
Tandem Copy
Concurrent Copying
Manual Skyshot
Digital Skyshot
2-SIDED/ORIG.
COPY
First
Selections
SORT/
FINISH
INSERTION/
OVERLAY
ZOOM/
EFFECTS
1 1
1 2
2 1
2 2
Book 2
2 Page
N in 1
Booklet
Multi-Size Feeding
Job Build and SADF
Sort
Shift-Sort
Rotate-Sort
Staple-Sort
Shift-Group
Rotate-Group
Non-Sort
Zoom
Auto Zoom
Edge
Book
Margin
Stamping
Image Repeat
Centering
Inverse
Cover
Insertion
OHP Interleaving
Presentation
Overlay
Form Overlay
File Edit
Interrupt
Proof Copy
Tandem Copy
Concurrent Copying
Manual Skyshot
Digital Skyshot
: Possible Combined Functions.
: Possible Combined Functions without full size copy ratio.
: Unavailable Combined Functions.
: Next Selection is Carried Out.
: When the same function is selected twice, the second selection is ignored.
: Functional combination that cannot be performed.
A
R
Others
Combined Function Table
64
Page 65

Accessories
Components
■ The DP-2310/3010 is a digital photocopier which can produce images with great clarity.
Furthermore, its copying functionality can also be greatly enhanced by the addition of the following options and
supplies.
We hope you find that the wide ranging capabilities will make your office-place more productive and efficient.
■ Options
Image Memory
(DA-SM16B/64B/28B)
● 16/64/128 MB
● To increase the memory capacity for electronic
sorting.
Inner Tray
(DA-XN200)
1-Bin Finisher
(DA-FS300)
or
Exit Tray
(DA-XT200)
3rd Paper Tray
(DA-DS303)
4th Paper Tray
(DA-DS304)
Fax Communication Board
(DA-FG300)
Internet Fax/E-Mail Module
(DA-NF600)
Hard Disk Drive (HDD) Unit
(DA-HD30)
● This option also requires at least 16 MB of
optional Sorting Image Memory (DA-SM16B)
● For PS Printing (for Fonts)
Security Print/Mailbox
Tandem copy/Concurrent copy
I-FAX without mail server
1,000 Station Address Book
Print Job Spooling
OneRIP
Account Management
Expansion Board
(DA-EM600)
● Expansion F-ROM (8 MB)
Network Scanner Module
(DA-NS600)
Printer Controller Module
(DA-PC300)
● Printer Controller for PCL6
Multi Page Description Language
Controller Module
(DA-MC300)
● Printer Controller for PS∗/PCL6
∗
Accessories
■ Supplies
Part Name Part No. Remarks
Staple Cartridge FQ-SS32 Staple Cartridge Refills (3) for DA-FS300
Toner DQ-TU15E Toner
PCL6 is a Page Description Language of the Hewlett-Packard Company.
NOTE
∗
PS is a Page Description Language of the Adobe Cooperation.
● Contact your authorized service provider for details on combinations of options.
65
Page 66

Network Scanner (Option)
Document Scanning/Address Book
■ Document Scanning
When Panasonic Document Management
System (PDMS) is installed and configured
on your PC, document(s) can be scanned from
the DP-2310/3010 to PC.
1 2
or
5
Original Size
if original size is not shown
■ Adding your PC or DD Server IP Address
If the PC or DD Server IP Addresses were not entered with the PDMS software,
input the IP Addresses from the copier's Touch Panel.
1 2 3
6 7 8
Key Name
(Max. 15 characters)
Ex.: PC Name
Document Save
Docu. Retrieve
12 13 14
Add the IP Address to Favorites
or
(DD Server only)
Scroll to 02/02
For PC
For DD Server
(DD Server only)
66
Port number
For saving
For retrieving
Creating a shortcut
button
Do not create
Create
Page 67

3 4
5
Select a destination (PC)
A destination will be indicated
∗
PC Screen
6 7
∗
4 5
Select a Mode if required
Resolution
Exposure
Original mode
∗
150dpi: Text mode only.
∗
2 Sided Original
Thin Original
Refer to PDMS Operating
Instructions on the
CD-ROM.
6
IP Address
Ex.: 192.168.1.10
(DD Server only)
∗∗
(DD Server only)
9 10 11
Account name
(Max. 60 characters)
Ex.: Jack
Password
(Max. 60 characters)
Ex.: Jack
∗∗
When entering a 1 or 2-digit number segment, add
“00” or “0” in front of the number, to scroll to the next
segment of numbers or press the “
period after the number.
Button Names on the Keyboard
To input upper case letter(s).
To input numbers and/or symbols.
To move the cursor (_) to the left or
right side.
To erase the character before the
cursor.
Server name
(Max. 15 characters)
Ex.: SALES DEPT
(DD Server only)
Directory name
(Max. 60 characters)
Ex.: \ddserver\sub01
“\dserver” is required
” key to enter a
12
(Option)
Network Scanner
67
Page 68

Network Scanner (Option)
Document Scanning/Address Book
■ Editing your PC or DD Server IP Address
If you have to change or erase any of the Address Book stations, follow the steps below.
1 2 3
Scroll to 02/02
6 8
New name
(Max. 15 characters)
Ex.: SALES DEPT 01
(DD Server only)
12
Directory name
(Max. 60 characters)
Ex.: \ddserver\sub01
“\dserver” is required
7
New key name
(Max. 15 characters)
Ex.: PC Name
Document Save
Docu. Retrieve
13 14
Port number
■ Erasing the Address
If you have to delete any of the Address Book entries.
Add the IP Address to Favorites
or
(DD Server only)
For saving
For retrieving
1 2 3
68
Scroll to 02/02
Page 69

4 5
6
Select the entry you wish to change
9
For PC
For DD Server
(DD Server only)
15
Creating a shortcut
button
Do not create
Create
New IP Address
Ex.: 192.168. 1. 11
(DD Server only)
∗
10 11
Account name
(Max. 60 characters)
Ex.: Jack
When entering a 1 or 2-digit number
∗
segment, add “00” or “0” in front of the
number, to scroll to the next segment of
numbers or press the “
period after the number.
(DD Server only)
12
Password
(Max. 60 characters)
Ex.: Jack
” key to enter a
4 5
Select the entry you wish to delete
(Option)
Network Scanner
69
Page 70

Problem Solving
Unit Does Not Operate
Light Copies
Troubleshooting
Check Action
Does the display light?
Does the Energy Saver key flash (or light)
and displays are turned OFF?
(See page 48)
Check if the Power Switches (Main Power
Switch on the back and Power Switch on the
Left Side of the machine) are turned ON and if
the power cord is plugged into the AC outlet.
Press Energy Saver key on the control panel.
Does any of the U## codes and messages
appear on the display?
(U1, U4, U6, U7, U11....etc.)
Does the Add Staples indicator and message
appear on the display?
Does the Add Paper indicator and message
appear on the display? (
Does the paper misfeed indicator and
message appear on the display? (
Does E#-## indicator and message appear
on the display?
The machine would not accept the next job
during operation, instructed job would not be
accepted for a long time period or job would
not be completed.
)
)
Perform actions in accordance with each
message.
Add Staples (See page 12)
Remove all jammed staples. (See page 13)
Add paper. (See page 10)
Remove the misfed paper. (See pages 14 - 17)
Turn the Power Switch on the Left Side and
the Main Power Switch on the Back of the
machine to the OFF and ON. If the error code
does not clear, call your Service provider.
Turn the Power Switch on the Left Side and
the Main Power Switch on the Back of the
machine to the OFF and ON.
Does the Add Toner indicator and message
appear on the display? (
70
Touch the “DARKER” button.Does the exposure indicator say “LIGHTER”?
Replace the Toner Bottle.
)
(See pages 12 and 13)
Page 71

Check Action
Marked Copies
Is the copier Platen Glass or Platen Sheet
dirty?
Is the original an OHP film or a dark original?
■ If the measures outlined above do not solve the problem, call your Service provider.
Clean the Platen Glass or Sheet.
Cover the original with a sheet of white paper
before copying or lighten the exposure setting.
Copier Care
■ As a rule, clean weekly.
Platen Sheet
Platen Glass/Platen Sheet
Wipe marks off with a cloth and a neutral detergent.
Wipe again with a dry cloth.
Platen (glass)
Problem Solving
71
Page 72

Problem Solving
Replacing the Battery
The copier has an internal battery (Product No.:
CR2032) which maintains the date and time.
In the event the battery requires replacement,
the following message will be displayed.
1 2
Turn the Power Switch on the
Left Side of the machine to the
OFF position.
Set the date and time
6 7
10
NOTE
Scroll to 05/08
● The service life of the battery is approximately 1 year under normal use.
72
Page 73

CAUTION
3 4
Used
New
5
Turn the Power Switch
on the Left Side of the
machine to the ON
position.
8 9
ID Code
(Department Code)
11 12
6
10
Month, Day, Year,
Time
Month/Day/Year/Time
denotes hazards that could result in minor injury or damage to the machine.
● THIS PRODUCT CONTAINS A LITHIUM BATTERY. DANGER OF EXPLOSION IF BATTERY IS INCORRECTLY
REPLACED.
REPLACE ONLY WITH THE SAME OR EQUIVALENT TYPE. DISPOSE OF USED BATTERIES ACCORDING TO
THE INSTRUCTIONS OF YOUR LOCAL SOLID WASTE OFFICIALS.
Time
Problem Solving
73
Page 74

Others
Specifications
■ DP-2310/3010 (Copier)
Type: Desk Top
Platen Type: Fixed
Acceptable Originals: Sheets, Books (max. Ledger)
Copying Method: Laser Electrophotography
Fixing Method: Heat Roller Fixing
Imaging Method: Dry-Type Dual components imaging
Resolution: Max. 600 dpi
Operation Panel: Touch Panel Display
Maximum Copy Size: Ledger - Invoice via Paper Tray
Void Area: Max. 0.2″ (5 mm)
Warm Up Time: Approx. 35 seconds (68°F/20°C)
First Copy Time: Less than 4.5 seconds (Letter , from 1st Tray to Inner Tray)
Multi-Copy Speed: DP-2310 : 23 cpm (Letter size)
DP-3010 : 30 cpm (Letter size)
Enlargement Ratios: Preset: 121%, 129%, 155%, 200%
Variable: from 101% to 400% in 1% increments
Reduction Ratios: Preset: 79%, 77%, 65%, 61%, 50%
Variable: from 99% to 25% in 1% increments
Paper Feed: Paper Tray (550 sheets × 2) + Sheet Bypass (50 sheets)
Paper Weight: Paper Tray: 16 - 24 lb (Bypass: 15 - 35 lb)
Quantity Selector: Max. 999 sheets (Output Tray capacity is 250 sheets)
Electrical Consumption: AC 120V, 60Hz, 12A
Energy Consumption: Max. 1.45 kW, 18 Wh in Sleep Mode
Dimensions (W)(D)(H): 23.6″ (W) × 27.8″ (D) × 27.4″ (H) (599 × 707 × 697 mm)
Mass (Weight): 158 lb (72 kg)
Operating Environment: Temperature: 50°F (10°C ) - 86°F (30°C) Relative Humidity: 30% - 80%
(However, the humidity should be 70% or less at a temperature of 86°F (30°C),
and the temperature should be 80°F (27°C) or less at a humidity level of 80%.)
● Specifications are subject to change without notice.
74
Page 75

■ ADF (Standard)
ADF
Tray Capacity: Letter, Invoice: 50 sheets (20 lb)
Ledger, Legal: 30 sheets (20 lb)
Paper Size: Invoice/Letter/Legal/Ledger
Paper Weight: 14 – 28 lb
Electrical Requirements: Supplied from the copier
Dimensions (W)(D)(H): 21.7″ (W) × 20.5″ (D) × 5.3″ (H) (552 × 520 × 135 mm) (without Tray)
Mass (Weight): 20.5 lb (9.3 kg)
■ 1-Bin Finisher (DA-FS300)
Paper Size: Letter/Legal/Ledger
Paper Weight: 16 – 24 lb
Stacking Capacity: Letter: 500 sheets, Legal: 250 sheets, Ledger: 250 sheets
Staple Sort : Letter: 30 sheets, Legal: 20 sheets, Ledger: 20 sheets
Electrical Requirements: Supplied from the copier
Dimensions (W)(D)(H): 7.1″ (W) × 19.7″ (D) × 10.1″ (H) (182 × 498 × 257 mm)
Mass (Weight): 22.0 lb (10 kg)
■ 3rd/4th Paper Feed Module (DA-DS303/DA-DS304)
DA-DS303 DA-DS304
Paper Size: Invoice/Letter/Legal/Ledger
Paper Weight: 16 – 24 lb
Electrical Requirements: Supplied from the copier
Dimensions (W)(D)(H): 21.7″ (W) × 23.5″ (D) × 5.8″ (H) 21.7″ (W) × 23.5″ (D) × 6.8″ (H)
(550 × 596 × 147 mm) (550 × 596 × 173 mm)
Mass (Weight): 18.7 lb (8.5 kg) 19.8 lb (9.0 kg)
● Specifications are subject to change without notice.
75
Others
Page 76

Others
INDEX
1-Bin Finisher
Components ····························································· 65
Function ··································································· 55
Functions Indication ················································· 20
Making Copies ························································· 36
Replacing Staple Cartridge ····································· 12
Removing a Misfed Paper ········································ 16
Specifications ··························································· 75
User Error Codes (U##) ··········································· 12
1-Sided
2 Page Copy ······························································· 32
2-Sided
2-Sided
2-Sided/Original
2-Sided Copy ············································ 30
1-Sided Copy ············································ 30
2-Sided Copy ············································ 30
Copy ······································· 30-35
A
Accessories (Components) ········································· 65
ACTIVE LED (GREEN) ··············································· 19
Adjust the Manual Exposure ································· 11, 23
ALARM LED (RED) ····················································· 19
Auto Zoom··································································· 38
B
Basic Menu ···························································· 22-29
Book ············································································ 38
Book
Booklet Copy ······························································· 32
Button Names on the Keyboard ···························· 27, 67
2-Sided Copy ················································ 30
C
Centering····································································· 40
Changing the Paper Size ············································ 60
CLEAR Key ································································· 19
Combined Function Table ··········································· 64
Completion Notice ······················································· 28
Completion Notice Button ····································· 20, 29
Concurrent Copying ···················································· 48
Control Panel ······························································ 19
Copier Care ································································· 71
Copy Image and Paper Image Indication ···················· 20
COPY Key ····························································· 10, 19
Copy Ratio Indication ·················································· 20
Copy Size Indication ··················································· 20
Copy Size Key······················································· 19, 24
Copying the Same Size Originals (1:1) ······················· 22
Copying with Preset Ratios ········································· 24
Cover··········································································· 44
D
Density Indicator (7 steps) ···································· 11, 20
Digital Skyshot Mode ·················································· 48
DP-2310/3010 Operating Instructions ··························· 2
Duplex Notice Function ··············································· 30
E
Edge ············································································ 38
Energy Saver ······························································ 48
ENERGY SAVER Key ··········································· 19, 48
Energy Star ································································· 18
Exit Destination ··························································· 11
F
File Edit ······································································· 46
Form Overlay ······························································ 46
Function ······································································ 50
Function (Copier Settings for Key Operator) ··············· 57
Function (Copier Settings) ····································· 52-53
Function (For Example:
Changing the Auto Contrast Setting) ······················· 60
Function (For Example: Changing the Paper Size) ··· 60
Function (For Example: Department Counter) ··········· 62
Function (For Example: Network Settings) ················· 62
Function (For Example: Weekly Timer) ······················· 60
Function
(General Settings for Key Operator) ···················· 55-56
Function (General Settings) ········································ 52
Function (Printer Settings for Key Operator) ··············· 58
Function (Printer Settings) ·········································· 54
Function (Procedure) ·················································· 50
Function (Scanner Settings)········································ 53
FUNCTION Key ···················································· 19, 50
I
Image Repeat······························································ 40
Insertion/Overlay ···················································· 44-47
INTERRUPT Key ·················································· 19, 49
Inverse ········································································ 40
J
Job Build and SADF Mode ········································· 34
Job Build and SADF/
Multi-Size Feed Mode Indication ························· 20, 34
Job Memory ································································ 46
Job Queue··································································· 28
Job Queue Button ················································· 20, 28
Job Settings Button ····················································· 20
K
Keypad ········································································ 19
L
Light Copies ································································ 70
Load Paper (Paper Tray)············································· 10
Load Paper (Sheet Bypass) ········································ 10
M
Machine Outline with Tray Selection ··························· 20
Machine/User Error Code Indication
(U13, E1-01, etc.) ·········································· 12, 20, 70
76
Page 77

Manual Exposure Select Buttons
(Lighter and Darker) ······································ 11, 20, 23
Manual Skyshot Mode················································· 49
Margin ········································································· 40
Marked Copies ···························································· 71
Multi-Size Feeding ······················································ 34
N
N in 1 Copy ································································· 32
Network Scanner (Option)······································ 66-69
Network Scanner (Option)
(Adding your PC or DD Server IP Address) ·············· 66
Network Scanner (Option) (Document Scanning) ······· 66
Network Scanner (Option)
(Editing your PC or DD Server IP Address) ·············· 68
Network Scanner (Option) (Erasing the Address) ······· 68
Non-Sort ······································································ 36
O
OHP Interleaving ························································· 44
Operation Chart (Load Paper)····································· 10
Operation Chart (Problem Solving) ····························· 11
Operation Chart (Quick Operation Chart) ··················· 10
Operating Instructions Outline······································· 3
Original Image Indication ············································ 20
Original Mode Select Button
(Text; Text / Photo; Photo) ····························· 11, 20, 23
Original Size Indication ··············································· 20
ORIGINAL SIZE Key ··················································· 19
Output Tray Button ················································ 11, 20
Output Tray Indication ··········································· 11, 20
Overlay ········································································ 46
P
Page Insertion ····························································· 44
Paper Level and Size Indication ································· 20
Paper Tray Selection Button ······································· 20
Position of the Original(s) ············································ 23
Precautions
(Handling, Toner and Paper, Ventilation, Installation) ····
Precautions (For Your Safety) ······································· 7
Presentation ································································ 44
PRINT DATA LED (GREEN) ······································· 19
Problem Solving (Replacing the Battery) ···················· 72
Problem Solving (Troubleshooting) ····························· 70
Proof Copying ····························································· 24
Proof Set Button ···················································· 20, 25
R
Removing a Misfed Paper
(2nd/3rd/4th Paper Tray) ··········································· 14
Removing a Misfed Paper (1-Bin Finisher) ················· 16
Removing a Misfed Paper (ADF) ································ 16
Removing a Misfed Paper (Automatic Duplex Unit) ···· 14
Removing a Misfed Paper
(Paper Entry Area/1st Paper Tray) ···························· 14
Removing a Misfed Paper (Paper Transport Area) ····· 14
Replacing the Staple Cartridge ··································· 12
Replacing Toner Bottle/
Replacing Toner Waste Container ···························· 12
Reserve a Job Button ··········································· 20, 49
RESET Key ································································· 19
Rotate Mode Indication ··············································· 20
Rotate-Group ······························································ 36
Rotate-Sort ·································································· 36
S
Select type of Original(s) ············································· 23
Shift-Group ·································································· 36
Shift-Sort ····································································· 36
Skyshot Mode ····························································· 48
Sort·············································································· 36
Sort/Finish ····························································· 36, 37
Specifications ······························································ 74
Stamping (Date Stamp)··············································· 42
Stamping (Issue Number Stamping) ··························· 42
Stamping (Page Numbering)······································· 42
Staple Sort ·································································· 36
START Key·································································· 19
STOP Key ··································································· 19
Symbols/Icons ······························································· 4
T
Table of Contents ·························································· 5
Tandem/Remote Copy Settings (Deleting) ·················· 26
Tandem/Remote Copying············································ 24
Tandem/Remote Button ········································ 20, 25
Tandem/Remote Button Indication ························ 20, 25
Ta ndem/Remote Copy Settings (Editing) ···················· 26
Tandem/Remote Copy Settings (Registration) ············ 26
Touch Panel Display···················································· 20
U
Unit Does Not Operate ················································ 70
Useful Office Functions ················································· 2
8
User Error Codes (U Code)········································· 12
Using the ADF ····························································· 22
W
Warning Indications·········································· 11-13, 20
Z
Zoom ··········································································· 38
Zoom/Effects ·························································· 38-43
77
Others
Page 78

Others
PEERLESSPAGE™ is a trademark of the PEERLESS Systems Corporation; and,
PEERLESSPrint
®
and Memory Reduction Technology® are registered trademarks PEERLESS
Systems Corporation; and, COPYRIGHT © 2000 PEERLESS Systems Corporation
Universal Font Scaling Technology (UFST) and all typefaces have been licensed from Agfa Monotype
IMPORTANT INFORMATION
When requesting information, supplies or service always refer to the model and serial number of your
machine. The model and serial number plate (Main Name Plate) is located on the rear side of machine.
For your convenience, space is provided below to record information you may need in the future.
Model No.
Serial No.
Date of Purchase
Dealer
Address
Telephone Number
( )
Supplies Telephone Number
( )
Service Telephone Number
( )
Model and Serial Number
Copyright © 2003 Panasonic Communications Co., Ltd.
All rights reserved. Unauthorized copying and distribution is a violation of law.
The contents of these Operating Instructions are subject to change without notice.
Factory ID
Manufacturer’s Name and Address
78
Page 79

Page 80

USA Only
WARRANTY
PANASONIC DIGITAL DOCUMENT COMPANY MAKES NO WARRANTIES, GUARANTEES OR
REPRESENTATIONS, EXPRESSED OR IMPLIED, TO CUSTOMER WITH RESPECT TO THIS
PANASONIC MACHINE, INCLUDING BUT NOT LIMITED TO, ANY IMPLIED WARRANTY OF
MERCHANTABILITY OR FITNESS FOR A PARTICULAR PURPOSE.
PANASONIC DIGITAL DOCUMENT COMPANY ASSUMES NO RISK AND SHALL NOT BE SUBJECT
TO LIABILITY FOR ANY DAMAGE, INCLUDING, BUT NOT LIMITED TO DIRECT, INDIRECT, SPECIAL,
INCIDENTAL OR CONSEQUENTIAL DAMAGES OR LOSS OF PROFITS SUSTAINED BY THE
CUSTOMER IN CONNECTION WITH THE USE OR APPLICATION OF THIS PANASONIC MACHINE.
SEE YOUR DEALER FOR DETAILS OF DEALER’S WARRANTY.
For Service, Call:
Panasonic Digital Document Company
Unit of Matsushita Electric Corporation of America
Two Panasonic Way
Secaucus, New Jersey 07094
http://panasonic.co.jp/pcc/en/
Panasonic Canada Inc.
5770 Ambler Drive
Mississauga, Ontario L4W 2T3
Ko0603-1063
DZSD001957-1
June 2003
Printed in Japan
 Loading...