


|
URC-7562 |
|
701922 |
UK |
Universal remote |
D |
|
F |
|

Table of Contents |
|
UK |
PICTURE OF ONE FOR ALL 6 REMOTE |
3 |
|
INSTALLING THE BATTERIES |
4 |
|
THE KEYPAD |
4 |
|
INSTALLATION |
|
|
Setting up your devices |
6 |
|
The Search Method |
7 |
|
CHANGING A DEVICE KEY |
8 |
|
QUICK CODE REFERENCE |
8 |
|
ADVANCED FEATURES |
|
|
Colour and Brightness |
9 |
|
Volume Punch-Through |
9 |
|
Auto Scan |
9 |
|
Favourite Programme Scan |
10 |
|
Device Sleeptimer |
11 |
|
ONE FOR ALL Sleeptimer |
11 |
|
Macros |
12 |
|
The Learning Feature |
13 |
|
Home Theater |
15 |
|
Key Magic |
17 |
|
Telephone Upgradable Technology / Internet Download |
18 |
|
TROUBLE-SHOOTING |
|
|
Helpful Hints |
19 |
|
Customer Service |
20 |
|
About Your ONE FOR ALL 6
Your ONE FOR ALL 6 Package contains:
• Your ONE FOR ALL 6 Remote
• Your ONE FOR ALL 6 Manual
• Your ONE FOR ALL 6 Codelist
You may need this guide again in the future, so please be sure to keep it.
Your ONE FOR ALL 6 needs 2 new “AA/LR6” batteries.
Your ONE FOR ALL 6 is designed to let you use one remote to operate your Video and Audio equipment; any device designed to be operated by an infrared signal. This also includes those devices, which operate over 100 kHz. You can choose any combination of six devices you would like to operate. Also, what makes the ONE FOR ALL 6 even more unique is the "Learning" feature, which allows you to customise any of the special functions of your original remote control onto the keypad of your new ONE FOR ALL 6.
The following pages explain in simple steps how to customise the ONE FOR ALL 6 to your home entertainment needs.
2 |
WWW.ONEFORALL.COM |

1
4
5
6
10
11
12/13
14
2
3
7
8
9
WWW.ONEFORALL.COM |
3 |

Installing the Batteries
Your ONE FOR ALL 6 needs 2 new “AA/LR6” alkaline batteries.
1Remove the battery cover from the back of your ONE FOR ALL 6 by pressing down on the tab.
2Match the batteries to the + and - marks inside the battery case, then insert the batteries.
3Press the battery cover back into place.
Important notes:
-On the inside of the battery compartment door you will find a label on which to write your Set-Up codes after your ONE FOR ALL 6 is set up for your device. Please write down your codes for easy, future reference.
-Do not use rechargable batteries.
-Upon changing the batteries, your set-up codes and advanced programming will be retained.
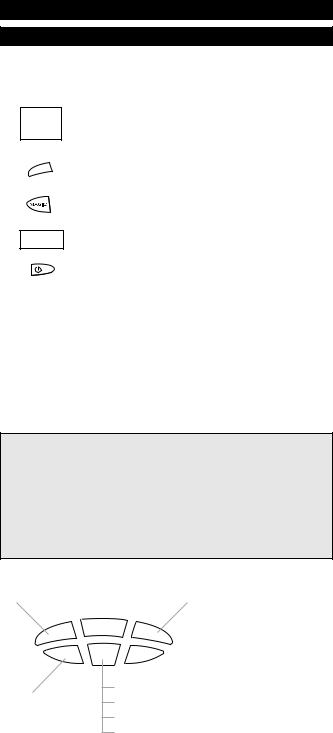
The Keypad
See picture of ONE FOR ALL 6 remote on page 3.
1MAGIC Key
The MAGIC key is used to set up your ONE FOR ALL 6 and to access special functions.
2MENU Key
The MENU key controls the same function as it did on your original remote. If available on your original remote control, this key will also allow you to access the Surround mode of your device.
3POWER Key
The POWER key controls the same function as it did on your original remote.
4HOME THEATER Key
This key is used to select the Home Theater mode of the ONE FOR ALL remote control. See page 15 for more information.
5Backlit Device Keys
The TV, VCR, SAT, CD, AUD and DVD keys select the home entertainment device to be controlled. For example pressing the TV key allows the remote to control the functions of your Television, after pressing VCR you can operate your Video Cassette Recorder, etc. For more detailed information, please refer to the chart on page 6. During operation of the ONE FOR ALL the device key will light up to indicate the mode you are using.
6Number Keys
The Number keys (0-9, 10, 20 (AV)) provide functions just like your original remote. If your original remote uses one/two digit input switching (-/-- symbol), this function can be obtained by pressing the -/-- key, which is the same as the 10 key. If your original remote has a 20 key this function can be found under the AV key.
7AV
The AV key operates the same function it did on your original remote control. Also, if your original remote control required that you press an “EXIT” key during Menu operation, the AV key can be used for this function. In VCR mode it obtains the TV/VCR function.
8Directional Keys
If available on your original remote, these keys will allow you to navigate through the menu and the Surround Sound mode of your device.
WWW.ONEFORALL.COM |
4 |

9Programme (Channel) +/- Keys
These keys operate in the same way as the keys on your original remote.
10Mute Key (OK/Enter in Menu operation)
The Mute key operates the same function it did on your orginal remote control. It is also used to activate the Auto Scan feature (see page 9). Also, if your original remote control required that you press an “OK” or “ENTER” key during Menu operation, the Mute key can be used for this function.
11Volume +/- Keys
These keys operate in the same way as the keys on your original remote.
12Video Recorder Keys
After pressing the VCR key, the Video Recorder keys operate the functions of your Video Recorder. To prevent accidental recordings, the Record key must be pressed twice to start recording.
The SP/LP key controls the tape speed function, the AUTO key controls the auto tracking function, just like on your original remote.
13Teletext and Fastext Keys
After pressing the TV key, the top row of the VCR keys is used to operate the main Teletext functions. The symbols below the keys are for Teletext. The text keys are used to access the Teletext functions of your television. Of course, your television must have Teletext capability.
TEXT ON: Puts the television in the Teletext mode.
TEXT OFF: Switches the television back to regular viewing mode. On some televisions, this may be done by pressing the TEXT ON key several times.
HOLD/STOP: Stops changing pages.
EXPAND: Shows the top half of the Teletext page in larger letters. By pressing again, you can see the bottom half of the Teletext page enlarged. To return to regular Teletext viewing, press the EXPAND key again, or press the TEXT ON key, depending on your television.
After pressing the TV key and accessing the text mode, the bottom row of the Video Recorder keys marked red, green, yellow and blue, allow you to access the Fastext functions of your television. If on your original remote control these keys are used for Menu navigation, the ONE FOR ALL Fastext keys may operate in the same way.
Important note: For a more detailed explanation of Teletext and Fastext, please refer to the manual of your television. Remember, different televisions control Teletext and Fastext features in different ways. Not all of the Teletext functions may be available for your particular model.
14Custom keys
The Custom Keys are spare keys which give you the possibility to customise the ONE FOR ALL remote using the learning and Key Magic® features (page 13 and 17). These keys can also be used to program Macros (see page 12).
For your convenience, the ONE FOR ALL 6 comes with an adhesive overlay to label the “custom keys”.
WWW.ONEFORALL.COM |
5 |
Installation
Before you start, please read these instructions carefully
Setting Up Your Devices
Example: To set up the ONE FOR ALL 6 for your television:
1
cura
Admiral Adyson Agazi AGB Agef Aiko
ONE |
FO |
|
|
|
|
|
|
|
|
|
|
3,041 |
|
|
0000897,0093,036 |
|
|
||
00217,0216 |
|
|
|
|
0264 |
|
|
|
|
0516 |
|
7, |
0 |
|
0087 |
9,003 |
|
||
|
6,000 |
|
|
|
020137,0274 |
0371 |
|
||
|
00361,0208, |
|
|
|
Find the code for your device in the Code list. Codes are listed by device type and brand name.
The most popular code is listed first. Make sure your device is switched on (not on standby).
2
3
4
TV
_ _ _ _
Press the TV key on the ONE FOR ALL 6 for the device you wish to Set-Up.
Press and hold down MAGIC until the device key blinks twice. (The device key will blink once and then twice.)
Enter your four-digit device code using the number keys. The device key will blink twice.
5Now, aim the ONE FOR ALL 6 at your device and
press POWER. If your device switches off, the ONE FOR ALL 6 is ready to operate your device.
6Turn your device back on and try all the remote’s functions to ensure they are working properly. If the functions do not work properly, repeat steps 1-5 using another code listed under your brand.
7If your device does not respond, follow steps 1 to 5 with each code listed for your brand. If none of the codes listed for your brand operate your device, or if your brand is not listed at all, try the search method described on page 7.
8Write your code in the four boxes provided in the battery compartment and on page 8 for easy future reference.
Important notes:
-Some codes are quite similar. If your device does not respond or is not functioning properly with one of the codes, try another code listed under your brand.
-If your device’s original remote control does not have a POWER key, press PLAY instead of POWER when setting up your device.
-Remember to press the correct device key before operating your device. Only one device (CD, amplifier, cassette, etc.) can be assigned to a device key. If your original remote operates more than one device (for example, a receiver, CD player and cassette player in one remote), you need to set up each device separately.
Devices can be found under the following keys:
Television |
Video Recorder |
Satellite Receiver / |
|
|
|
|
Cable Converter |
|
|
|
|
TV
CD
CD Player /
Mini Disk Player
VCR
AUD
SAT |
|
Digital Versatile Disc (DVD) / |
|
|
|||
DVD |
|
|
Laser Disc Player / |
|
|
||
|
|
Audio Cassette Player / |
|
|
|
||
|
|
|
|
|
|
|
Digital Audio Tape |
|
|
|
|
Audio Amplifier /
Tuner /
Miscellaneous Audio /
Phonographs
To set up a second TV, VCR, SAT, CD, AUD or DVD see page 8.
6 |
WWW.ONEFORALL.COM |
The Search Method
If your device does not respond to the ONE FOR ALL 6 after you have tried all the codes listed for your brand, try searching for your code. The Search Method allows you to find the code for your device by scanning through all the codes contained in the memory of the ONE FOR ALL 6. The Search Method may also work if your brand is not listed at all.
Example: To search for your TV code:
1Switch your television on (not on standby) and aim your ONE FOR ALL at your TV.
2
3
TV
Press the TV key on your ONE FOR ALL 6.
Press and hold down MAGIC until the ONE FOR ALL 6’s TV key blinks twice (The TV key will blink once and then twice).
4
5
6
TV
Press 9 9 1. The TV key will blink twice.
Now slowly, alternate between TV and POWER, over and over, until your television turns off. You may have to press these keys many times (up to 200!), so please be patient. Remember to keep pointing the ONE FOR ALL 6 at your television when you press these keys.
As soon as your television turns off, press MAGIC to store the code.
The ONE FOR ALL remote should now be ready to operate your device. Turn your device back on and try all the remote’s functions to ensure they are working properly. If some of the ONE FOR ALL’s commands are not operating correctly, try the search method again. You may be using the wrong code.
Important notes:
-To search for the code for another device follow the instructions above only press the appropriate device key instead of TV during steps 2 and 5.
-If the original remote control of your device does not have a POWER key, press PLAY instead of POWER during step 5.
Once you have Set-Up your ONE FOR ALL 6, you can blink back your SET-UP CODE for future reference.
Example: To blink out your Television code:
1
2
TV
Press TV once.
Press and hold MAGIC until the ONE FOR ALL 6’s TV key blinks twice (The TV key will blink once and then twice).
3 |
Press 9 9 0. The TV key will blink twice. |
4 |
For the first digit of your four-digit code, press 1 and |
|
count all the red blinks. If there are no blinks, the digit is |
|
"0". |
5 |
For the second digit, press 2 and count all the red blinks. |
|
If there are no blinks, the digit is "0". |
6 |
For the third digit, press 3 and count all the red blinks. |
|
If there are no blinks, the digit is "0". |
7 |
For the fourth digit, press 4 and count all the red blinks. |
|
If there are no blinks, the digit is "0". Now you have your |
|
four-digit code. |
Make sure you write your Television code in the boxes provided in the battery compartment and on page 8 for easy future reference.
Important note: To blink back the code for your other devices press the appropriate device key during step 1.
WWW.ONEFORALL.COM |
7 |
Changing a Device Key
It is possible to change any device key.
Example 1:
To program a second Television on the DVD key (for example), you need to change the DVD key into a TV key, so press:
1
2
(*) |
TV |
DVD |
(**) |
The DVD key has now become a second TV key.
Now enter the SET-UP code for your second TV by pressing:
DVD |
(*) |
|
|
_ _ _ _ |
(4-digit TV SET-UP code) (**) |
|
|
|
|
|
|
|
|
Example 2:
To program a second Video recorder on the CD key (for example), you need to change the CD key into a VCR key, so press:
1
2
(*) |
VCR |
CD |
(**) |
The CD key has now become a second VCR key.
Now enter the SET-UP code for your second VCR by pressing:
CD |
(*) |
|
|
_ _ _ _ |
(4-digit VCR SET-UP code)(**) |
|
|
|
|
|
|
|
|
(*)Hold down the MAGIC key until the device key blinks twice (the device key will blink once then twice).
(**)The device key blinks twice.
Resetting a Device Key
Example: To reset the DVD key press:
(*) |
DVD |
DVD |
(**)
(*)Hold down the MAGIC key until the device key blinks twice (the device key will blink once then twice).
(**)The device key blinks twice.
Quick Code Reference
Write down the codes for your devices in the boxes below and in the battery compartment for quick and easy reference.
Device Type |
Code |
1._________________________ |
■ ■ ■ ■ |
2._________________________ |
■ ■ ■ ■ |
3._________________________ |
■ ■ ■ ■ |
4._________________________ |
■ ■ ■ ■ |
5._________________________ |
■ ■ ■ ■ |
6._________________________ |
■ ■ ■ ■ |
8 |
WWW.ONEFORALL.COM |

Advanced Features
Colour and Brightness
Depending on the functions of your original remote control, the ONE FOR ALL may operate the colour and brightness settings of your television.
Colour (+) |
= Press and release MAGIC |
then hold Volume (+) |
Colour (-) |
= Press and release MAGIC |
then hold Volume (-) |
Brightness (+) = Press and release MAGIC |
then hold Channel (+) |
|
Brightness (-) |
= Press and release MAGIC |
then hold Channel (-) |
Note: You have 5 seconds to press the Volume or Channel keys for colour or brightness adjustment after pressing MAGIC.
Volume Punch-Through
You may be able to use some features of your Television, Video Recorder and Satellite Receiver at the same time. If you're watching a programme on your Video, you can adjust the volume (a TV function) without first pressing the TV key. The chart below lists some of the possibilities:
Last Key Pressed: |
You Can Control: |
|
|
VCR |
TV volume up and down, mute |
SAT |
TV volume up and down, mute |
|
|
To punch through to TV Volume while in VCR, SAT or DVD mode press:
MAGIC* 9 9 3 TV key.
To punch through to AMP/TUN Volume while in CD mode press:
MAGIC* 9 9 3 AUD key.
To cancel the ”Volume Punch Through” press:
MAGIC* 9 9 3 Volume(+) (a device key will blink four times).
*Here you must hold down MAGIC until the device key blinks twice.
Auto Scan
Your ONE FOR ALL 6 comes with a special Auto Scan function which lets you “scan” through every programme available on your device.
For example, to scan the programmes on your TV:
1Aim the ONE FOR ALL 6 at your TV. Press the TV key. Press and release MAGIC then press the MUTE key.
The ONE FOR ALL 6 will send the command to advance through all the programmes available on your Television stopping at each programme for about three seconds. Remember, you must aim the ONE FOR ALL at your device the entire time you are using Auto scan.
2When you find a programme you would like to watch, simply press any key on the ONE FOR ALL key pad to stop the Auto Scan feature.
Important note: Auto Scan may not work with devices that did not have programme +/- keys on the original remote control.
WWW.ONEFORALL.COM |
9 |

Favourite Programme Scan
Instead of Auto Scan, you can set your ONE FOR ALL 6 to scan through up to 10 of your favourite programmes. To set up your favourite programmes for your TV:
1Press and release the ONE FOR ALL 6’s TV key.
2Hold down the MAGIC key until the TV key blinks twice (the TV key will blink once then twice).
3Press 9 9 6.
4Enter the number for the first programme you wish to be included as a “favourite programme”. Then press and release MAGIC. (You must enter the programme number exactly as you would on your original remote. Example: If to get programme 5 you had to press 05 or if you used the 10, 20 or -/-- keys, you will need to do the same on the ONE FOR ALL 6.)
5Enter the next programme number you wish to be included as a “favourite programme”. Then press and release MAGIC.
6Continue entering each programme you wish to be included as your “favourite programmes”. After you have entered the last programme number, press and hold down MAGIC until the TV key blinks twice. Remember, the ONE FOR ALL 6 can hold a maximum of 10 of your favourite programmes. After you have entered the 10 favourite programmes it will automaticallly exit the Favourite Programme Scan.
7When you want to scan through your “favourite programmes”, aim the ONE FOR ALL 6 at your TV and press TV, MAGIC and then the MUTE key. You will automatically move through your favourite programmes, stopping at each for about three seconds. Remember the ONE FOR ALL 6 must be aimed at your TV the entire time you are using Scan.
8When you find a programme you would like to watch, simply press any key on the ONE FOR ALL key pad to stop the scan feature. To continue the favourite programme scan, press MAGIC, then the MUTE key again. The ONE FOR ALL 6 will stop automatically at the last favourite programme.
Notes:
-To set up your “favourite programmes” for another device, follow steps 1 through 8, only substitute the appropriate device key (VCR, SAT, CD, AUD, DVD) during step 1.
-Favourite Programme Scan can only be set up for one device at a time. Once you have set up your “favourite programmes” for one device, you will not be able to use the Scan feature with any other device.
To clear the favourite programmes you have set up:
1Press the device key.
2Press and hold down the MAGIC key until the device key blinks twice (the device key will blink once then twice).
3Press 9 9 6.
4Press the MAGIC key until the device key blinks twice (the device key will blink once then twice). The ONE FOR ALL 6 will now perform the Auto Scan function whenever the MAGIC and MUTE keys are pressed.
10 |
WWW.ONEFORALL.COM |
Device Sleeptimer
If your TV or Satellite has a “Sleeptimer” function built in, you can access this function with your ONE FOR ALL remote. To do so:
1Make sure your TV (or Satellite) is switched on.
2Press the device key (TV or SAT).
3Point the ONE FOR ALL at your TV (or Satellite) and press and release MAGIC then press POWER. You should see the Sleeptimer activate on your TV screen.
To increase the timer, simply press POWER again (within 5 seconds) until the timer gets to the desired time.
To deactivate the Sleeptimer, repeat steps 1-3 above. During step 3, continue pressing POWER (within 5 seconds) until the timer indicates zero minutes.
Important note: Depending on how you used sleeptimer on the original remote, you might need to access sleeptimer in a different way (through menu for example).
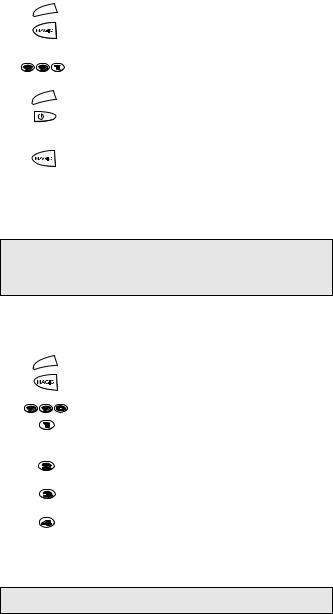
ONE FOR ALL Sleeptimer
If your device does not have a sleeptimer function built in, you can install the ONE FOR ALL sleeptimer function. To do so:
1Press the device key (TV, SAT, CD or AUD).
2Then, press and hold MAGIC until the device key blinks twice.
3Press 970. The device key will blink twice again. It is only necessary to perform steps 1, 2 and 3 once. Now to set the timer, continue with the steps below.
Setting the ONE FOR ALL Sleeptimer:
It is possible to set the timer for 15, 30, 45 or 60 minutes. To do this, first make sure your device is switched on.
Press the device key (TV, SAT, CD or AUD).
(:15)
(:30)
(:45)
(:60)
Now, press and release MAGIC, then press POWER.
The device key will blink once which indicates the timer is set for 15 minutes. To increase the timer, simply press POWER again (this must be done within 5 seconds). The device key will blink twice indicating the timer is set for 30 minutes (2x 15). You can press POWER to a maximum of four times which will set the timer to 60 minutes.
Once you have set the timer to the desired time, set your ONE FOR ALL remote down, pointing it at your device. When the programmed amount of time has elapsed, the ONE FOR ALL will send the command for POWER, hence turning off your device.
Important notes:
-The device key on the ONE FOR ALL will blink every 15 seconds indicating that the remote is in Sleeptimer mode.
-To deactivate the Sleeptimer, simply press any key on the ONE FOR ALL remote.
-Also, it is only necessary to follow steps 1,2 and 3 above once. For subsequent use of the Sleeptimer, simply begin with “Setting the Sleeptimer”.
-To switch the ONE FOR ALL back to Device Sleeptimer, repeat steps 1,2 and 3 above. The device key will blink 4 times.
-Remember, when using the ONE FOR ALL Sleeptimer, you must set the remote so it is pointing to your device.
-The ONE FOR ALL Sleeptimer can be set up for only one device at a time.
WWW.ONEFORALL.COM |
11 |

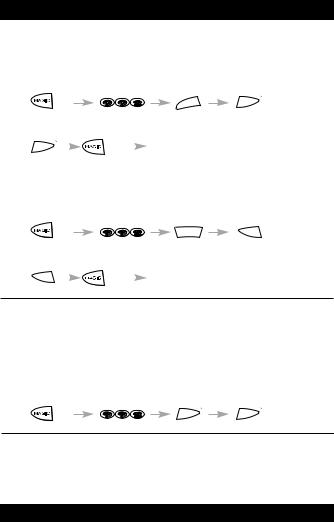
Macros
You can program your ONE FOR ALL 6 to issue a sequence of commands at the press of one button. For example, you may want to turn off your TV, VCR and Satellite at the same time. Any sequence of commands you regularly use can be reduced to one key stroke for your convenience. A Macro should only be set on the Custom keys.
Example: To set up the Macro mentioned above on the key labeled A on your ONE FOR ALL 6:
1Press and hold MAGIC until a device key blinks twice (the device key will blink once then twice).
2Press 9 9 5.
3Then press the A key to which the Macro will be assigned.
4Next press TV, POWER, VCR, POWER, SAT, POWER.
5To store the Macro, press and hold MAGIC until the device key blinks twice (the device key will blink once then twice).
6Whenever you press the A key, the ONE FOR ALL 6 will turn off your TV, VCR and Satellite.
•To erase the Macro from the A key, press: MAGIC* 9 9 5 A key MAGIC*
*Here you must hold down MAGIC until the device key blinks twice.
Note: Each MACRO can consist of a maximum of 15 key strokes.
Shifted Macros
You can install a Shifted Macro on any key, except for the device keys (TV, VCR, SAT, CD, AUD and DVD), the MAGIC key, the Home theater key and the NUMBER keys.
If for example, you want to program a shifted Macro on the POWER key, simply press MAGIC once then the POWER key during step 3.
Now everytime you press MAGIC, then the POWER key, the ONE FOR ALL will turn off your TV, VCR or Satellite.
• To erase the Shifted Macro from the POWER key press:
MAGIC* 9 9 5 MAGIC POWER key MAGIC*
*Here you must hold down MAGIC until the device key blinks twice.
Notes:
-Make sure that you program a Macro on a spare key that you don’t use in any mode.
-Once you program a Macro on a specific key, the sequence will work regardless of the mode (TV, VCR, SAT, CD, AUD or DVD) you are using.
-To avoid accidental recordings with the ONE FOR ALL 6, you must press the Record key twice to begin recording. Because of this, you cannot assign a Macro or Shifted Macro to the Record key.
-If you had to hold down a key for a few seconds on the original remote control to get a function, this function may not work in a macro on your ONE FOR ALL remote.
-If a Shifted Macro is placed on the Mute, Channel and Volume keys then Scan and Colour/Brightness will be sacrificed.
12 |
WWW.ONEFORALL.COM |
 Loading...